manual - company.vendio.comcompany.vendio.com/docs/andale_manual_gallery.doc · web view6....
TRANSCRIPT

Andale Gallery Getting Started Manual
CHAPTER 1 : GETTING STARTED 3
1. Log Into Your Andale Account 3
1

2. Design Your Gallery 42.1 Choose your Gallery Design 42.2 Select your Default Image 52.3 Select the Information Displayed 52.4 Choose your Gallery Location 6
3. Business Information (Optional) 63.1 Enter your Business Name 73.2 Enter a Promotion Line 7
4. About Us Information (Optional) 74.1 Upload Your Logo 84.2 Enter About Us Welcome Message 84.3 Enter About Us Image 9
5. Classic Gallery Options (Optional) 95.1 Choose a Design Layout 95.2 Choose a Design Style 105.3 Choose a Font 10
6. Traffic Booster Options (Optional) 106.1 Listing Order 116.2 Category Display 11
2

Chapter 1 : Getting Started
Welcome to Andale Gallery!!
This manual is a step-by-step Guide to Andale Gallery. As you read through this manual, you will notice tips that will assist you in determining your options, but these are not required.
1. Log Into Your Andale Account
Once you have registered for Andale Research, you will need to log into your Andale account to begin researching items. From the http://app.vendio.com website, sign in with your user name and password.
FIGURE I. Log into Your Andale Account
Tip: Your Andale User ID will appear at the top of the page if you are correctly signed in.
3

2. Design Your Gallery
Once you have logged in, select the Auction Tools Tab. This is the Start Page for all the Andale Auction Tools. Select the Gallery navigation link to view your Gallery Options.
FIGURE II. Select Gallery Builder
2.1 Choose your Gallery Design
Choose the type of Gallery is your most important Gallery Decision. Andale sets the defaults, so that even if you make no selection, your gallery will be functional and inserted into your auctions.
Andale offers three different Gallery types for you to choose from:
The Classic Andale Gallery provides many different design layouts. This is designed for sellers who wish to customize the “skin” of the gallery to match their type of items.
The Traffic Booster Gallery works with traffic booster. This is designed for sellers who sell items that work well together, such as cameras and batteries.
The Slide Show Gallery is a scrolling gallery designed for seller who have many one of a kind items to bring attention to their unique items.
4

In addition, Andale offers two additional options. Choose Gallery Link if you only want a link to your Gallery inserted in your auction. This option will not display any images or gallery in your Auction ad, but will display a link to your Gallery.
If you want to market your Gallery yourself by entering the HTML code, choose None, and copy and paste the code provided onto your Web Page or Emails.
FIGURE III. Choose your Gallery Design
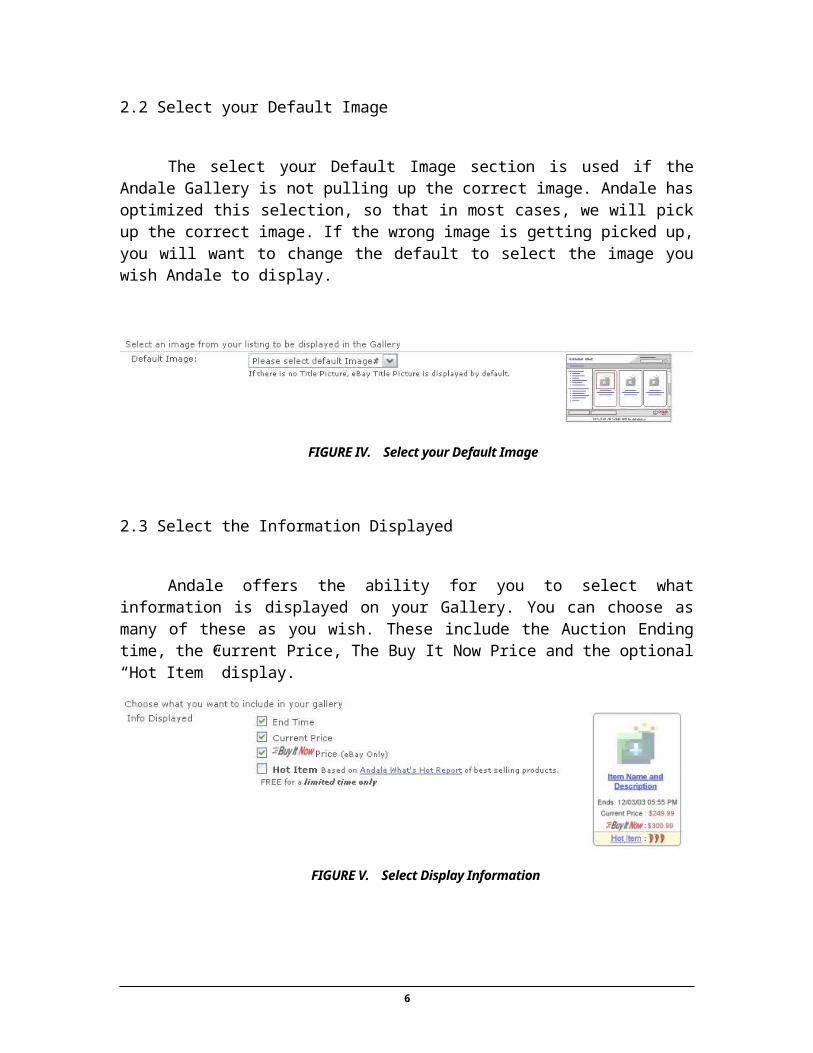
2.2 Select your Default Image
The select your Default Image section is used if the Andale Gallery is not pulling up the correct image. Andale has optimized this selection, so that in most cases, we will pick up the correct image. If the wrong image is getting picked up, you will want to change the default to select the image you wish Andale to display.
FIGURE IV. Select your Default Image
5
2.3 Select the Information Displayed
Andale offers the ability for you to select what information is displayed on your Gallery. You can choose as many of these as you wish. These include the Auction Ending time, the Current Price, The Buy It Now Price and the optional “Hot Item” display.
FIGURE V. Select Display Information
2.4 Choose your Gallery Location
Select where you wish your Andale Gallery to display. These options are top, middle and side.
FIGURE VI. Choose Your Gallery Location
3. Business Information (Optional)
The Business Information area of your Gallery is where you can enter your Business name as well as any promotional messages. These items will appear on the Gallery in your Ad.
6

FIGURE VII. Select the Business Information Link
3.1 Enter your Business Name
Choose a Business Name that you wish to display at the top of your Gallery. In many cases, this would be your eBay User Id or Store name.
FIGURE VIII. Enter Your Business Name
3.2 Enter a Promotion Line
Enter a promotional line, such as any discounts for multiple purchases. This line is placed at the bottom of your gallery and could include any message that you wish to convey to y our perspective buyers.
FIGURE IX. Enter a Promotional Message
4. About Us Information (Optional)
When a buyer selects to view more within your Andale Gallery he is taken to a static page where all of your items are displayed. From this page, an About Us Page is available for your buyers to read about you and your business.
7
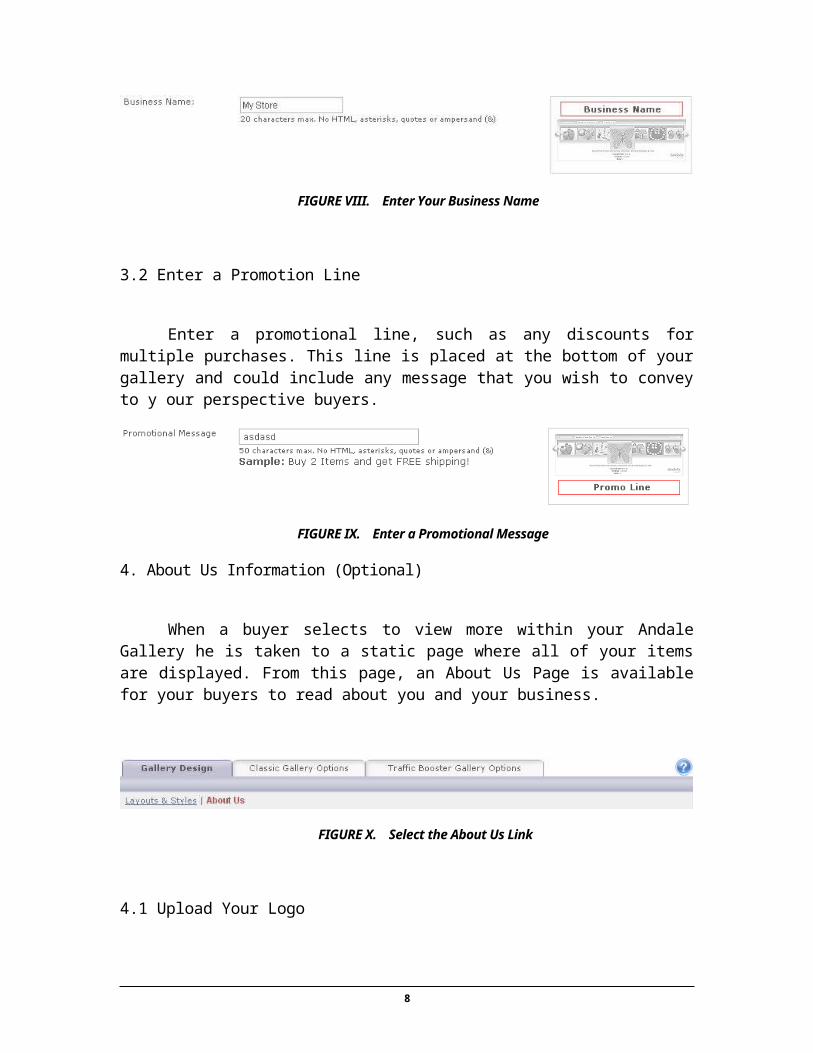
FIGURE X. Select the About Us Link
4.1 Upload Your Logo
When a buyer selects to view more within your Andale Gallery he is taken to a static page your logo can be displayed. Upload your Business Logo if you would like this to be displayed to your buyers.
FIGURE XI. Upload Your Logo
4.2 Enter About Us Welcome Message
When a buyer selects to view more within your Andale Gallery he is taken to a static page where a Welcome Message can be entered. Use this area to enter any welcome message that you would like to display to your perspective buyers.
FIGURE XII. Enter About Us Welcome Message
8

4.3 Enter About Us Image
When a buyer selects to view more within your Andale Gallery he is taken to a static page where all of your items are displayed. From this page, an About Us Page is available for your buyers to read about you and your business. If you would like to add an image to this page, upload the image here.
FIGURE XIII. Upload About Us Image
5. Classic Gallery Options (Optional)
The Classic Andale Gallery provides many different design layouts. This is designed for sellers who wish to customize the “skin” of the gallery to match their type of items.
FIGURE XIV. Select Class Gallery Options
5.1 Choose a Design Layout
The Andale Classic Gallery offers many options for display of your Gallery. Choose your Design Layout from the drop down menu.
9
FIGURE XV. Choose a Design Layout
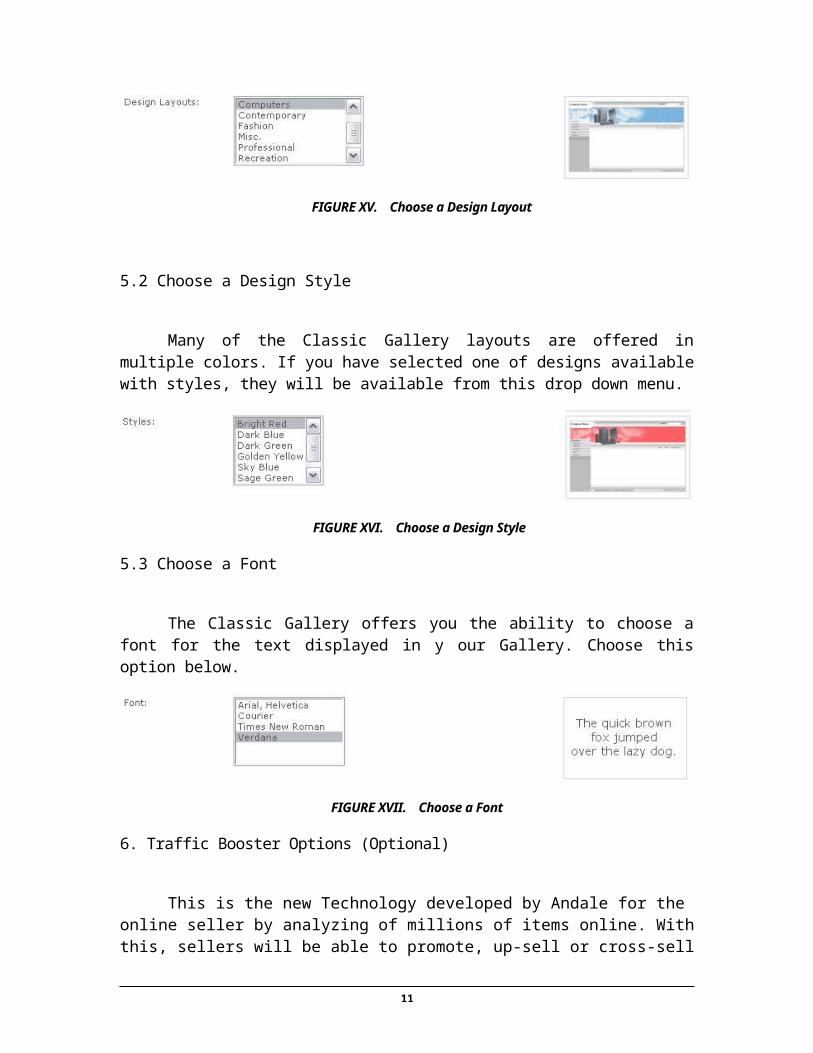
5.2 Choose a Design Style
Many of the Classic Gallery layouts are offered in multiple colors. If you have selected one of designs available with styles, they will be available from this drop down menu.
FIGURE XVI. Choose a Design Style
5.3 Choose a Font
The Classic Gallery offers you the ability to choose a font for the text displayed in y our Gallery. Choose this option below.
FIGURE XVII. Choose a Font
6. Traffic Booster Options (Optional)
This is the new Technology developed by Andale for the online seller by analyzing of millions of items online. With this, sellers will be able to promote, up-sell or cross-sell the most relevant items to the buyers. Galleries powered by this technology will show the most sellable items on top thereby maximizing your sales.
10
Example: If you sell cameras and accessories like Lenses, Cases and Tripods. Andale Traffic Booster determines that Accessories sell more with Camera than other Cameras. With the New Andale gallery and Traffic Booster, the most relevant items are displayed.
FIGURE XVIII. Select the Traffic Booster Link
6.1 Listing Order
The listing order in traffic booster will display the most relevant items in your gallery first. Choose to feature up to 8 which will be featured at the top of your New Andale Gallery which include newest listings, listings in the same category, highest-price listings or lowest-priced listings.
FIGURE XIX. Set Featured and Listing Order
6.2 Category Display
Andale provides a method for you to display categories of items on your Gallery. Categories for Gallery in Listings: This option will allow you to choose what categories you display on your Gallery. The categories will allow potential bidders to quickly find like items you are selling.
No Categories - Choose this option if you do not want any categories displayed.
11

eBay Categories - Choose this option to display the categories using Ebay category tree. If you turn off this option, more items are displayed in place of the category tree.
Custom Categories - Choose this option to create custom categories. This option requires that you set up categories based on words included in your title.
Custom Categories allows you to create and choose up to 8 specialized categories. You can use these to promote specific/ unique categories of items that you sell. EXAMPLE: Category #1: Lionel Word(s) from Item Title: Lionel, trainmaster Exclude Word(s): steamship, catalog Category #2: marklin Word (s) from Item Title: marklin Exclude Word (s):
Step One: Choose your Category Name To create custom categories, choose the name of your category. This will be displayed on your Gallery. In the above example, Lionel and Marklin are the category titles chosen.
Step Two: Choose the Include Words Choose the words from your item titles that will ensure your item is picked up when you bidder views the category. In the above example: For Lionel: Items will be place in the category that has the words Lionel or Trainmaster in the item title. For Marklin: Items will be placed in the category that has the word Marklin in the item title.
Step Three: Choose the Exclude Words Choose the words from you titles that you to not want picked up by the category. In the above example: For Lionel Trains: Items will be placed in the Lionel Category. It will pick up items with the words Lionel or Trainmaster, but will not pick up items that have steamship or catalog.
FIGURE XX. Set Category Display Options
12

13