manual trucolorii 6.0
TRANSCRIPT

User’s Guide
Information Display Technology
Electronic Moving Message Sign
Rev. D

WELCOME......to the world of electronic moving message systems! We are pleased that youhave chosen the Pro-Lite TruColorII electronic message sign.
The Tru-ColorII utilizes state-of-the-art electronic technology along with a proveneasy-to-learn programming sequence to seamlessly display both informativeand fun messages to your viewing audience!
We trust that you will enjoy the benefits from using the Pro-Lite sign. Should youhave any questions or suggestions about the Pro-Lite product, please feel freeto write or email the president of Pro-Lite, Inc. to the following contact informa-tion below:
Pro-Lite, Inc.3505 Cadillac Ave., Bldg. D
Costa Mesa, California 92626Attn: President
Fax: 714-668-9980E-mail: [email protected]
Web Link: http://www.pro-lite.com/feedback
Pro-Lite, Inc. has made every effort to ensure the accuracy of this manual.However, the information in this manual is subject to change without notice.Pro-Lite, Inc. assumes no responsibility for any errors that may appear in thismanual.
REMEMBER TO...Mail your warranty registration card today to receive the following benefits:
1 YEAR MANUFACTURERS WARRANTYFREE TRIVIA SOFTWARE UPDATESDISCOUNTSNEW PRODUCT ANNOUNCEMENTSAND MORE...
**Warranty card must be mailed within 30-days of product purchase to be valid.
TRADEMARKSTru-ColorII and TRIVIA MOTION are trademarks of Pro-Lite, Inc.Microsoft Windows is a registered trademark of Microsoft Corporation.
Copyright © 2006 Pro-Lite, Inc. All Rights Reserved
I

KEY FEATURESTRIVIA QUESTIONSYour electronic sign is equipped with built-in TRIVIA to maximize the impact ofyour message. Whether it is a promotional message or just information foremployees. TRIVIA questions entice people to read. The messages you pro-gram will automatically be inserted between the questions and answers. Thiswill give the reader the opportunity to read your message while anticipating theanswer to the question.
COLORS AND FONT SIZESBy combining colors and different font sizes, the TRU-COLOR II will allow youto advertise and capture your customers attention like never before.
VISUAL TEXT EFFECTS AND GRAPHICSWith such functions as cycling, scroll-up, scroll down, and overlap, advertisinghas never been so much fun! Use the pre-stored graphics or create your own tomake your messages stand out!
DEPENDABILITY AND DURABILITYAll of our signs are manufactured under strict quality controls for years of prob-lem free operation. The aluminum casing minimizes interference and assuresreliability wherever it is installed.
JUMBO MEMORY AND MESSAGE STORAGEThe TruColorII is equipped with 32K of memory with the capability to retain yourprogrammed information for up to 30 days when not used.* Internal back-up battery must be charged. See Page 17, question #2.
THE TARGET FUNCTIONWant to promote safety within your work environment? Use the TARGET func-tion to count injury free days or hours.
30-DAY TRIAL SOFTWAREIncluded with your TruColorII sign is a 30-day trial software that can be installedon most any PC Computer to send messages directly to the Pro-Lite sign!
OPTIONAL PACKAGES1. TruColorII Software (Full Registered Version)
Easily send messages directly to your Pro-Lite sign from your computer!*software not compatible with Macintosh systems.
2. Mini-Web DeviceAllows for seamless integration with your LAN network!*TruColorII Software package required
3. Trivia packagesUpload NEW TRIVIA such as General Trivia 002, 003, . . . 010, Sports, andSafety!
See the Accessories Brochure that came with your sign packagefor additional accessories and information. Or call 714-668-9988, and ask to
speak with one of our Sales Representatives.
II

UNPACKINGThe complete package consists of the following items:1. Electronic message sign2. Wireless Infrared Remote Keyboard3. Power adapter4. User's manual5. Warranty Registration Card6. Two mounting brackets
* Wall mounting screws not included 7. 30-day TRIAL Software and PC cable.8. Accessories Brochure/Order FormIf you notice a missing item(s), please contact Pro-Lite, Inc. within 7 days ofpurchase at 714-668-9988.
INSTALLATION AND SET UP1. Mount the brackets onto the chosen wall location. Use the mounting screws
included with the display to fasten the brackets onto the sign.2. There are two wires from the power adapter. First connect the two-prong
end to any 110V/120V AC wall outlet. Second, connect the single prong end to the display via the location on the end cap.
3. As soon as you connect the single prong end to the sign, the sign should automatically light up and start displaying the "demo" message that is a preprogrammed message showing all the features of the display. Note: If your sign does not turn "ON", please turn to the Help Section on page 18.
4. Surge protectors are recommended if you are in an area where power out-ages are frequent.
WARNING! U.S. PATENT NOTICEPro-Lite displays are protected by one or more U.S. Patents. Companies or indi-viduals that copy or infringe Pro-Lite products in part or in whole will be prose-cuted to the full extent possible under the law of the United States.
MOVING SIGN PANEL
TO MAINS
POWER ADAPTOR
SENSOR
IR REMOTEKEYBOARD
LOW VOLTAGE AC/DCPOWER INPUT(FROM ADAPTOR)
RS 232 SERIALINTERFACE
III

Command KeysKeys located in the yellow area
Character KeysKeys outside the yellow area• Upper Case Keys (26) A-Z• Lower Case Keys (26) a-z• Numeric (10) 0-9• Symbols (29) !; ...• European (64) Â æPlease refer to pages 3-4 forinstructions on displayingEuropean characters
NOTE:• IR keyboard must be pointed
at the built-in infra-red sensor located on the top left hand corner of the sign.
• Optimum operating distance should be around 5' to 30'.
• DO NOT subject the remote keyboard to impact, water orexcessive humidity.
• The remote keyboard operateson two “AA” 1.5-volt batteries. * Batteries not included
Inserting Batteries
Battery Cover
KEYBOARD LAYOUT
INFRA-RED REMOTE KEYBOARD LAYOUT
IV

V
USER’S GUIDE SECTIONSPROGRAMMING Section .................................................. 1 - 11
Programming your new Pro-Lite sign using the includedIR Remote Keyboard
QUICK REFERENCE Section .......................................... 12 - 15Corresponding Codes for IR Remote Keyboard
HELP - PROGRAMMING Section .................................... 16 - 18Most commonly asked questions, troubleshooting
SOFTWARE Section ......................................................... 19 - 31Programming your new Pro-Lite sign using the included30-Day Trial Software
HELP - SOFTWARE Section ............................................ 32 - 33Most commonly asked questions, troubleshooting
?
!
?

VI
TABLE OF CONTENTSGetting started . . . . . . . . . . . . . . . . . . . . . . . . . . . . . . . . . . . . . .1 - 2Programming basics.
Programming alternate characters . . . . . . . . . . . . . . . . . . . . . . . .3 - 4Displaying letters, numbers, symbols, graphics, and alternate characters.
Colors and Effects . . . . . . . . . . . . . . . . . . . . . . . . . . . . . . . . . . . .5 - 6Text colors, font sizes, effects, displaying the DATE & TIME.
Advanced features . . . . . . . . . . . . . . . . . . . . . . . . . . . . . . . . . . . .7 - 9Running combined pages, setting the current DATE/TIME, turning theBEEP OFF, editing your own graphics, and DELETING a page.
New and improved features . . . . . . . . . . . . . . . . . . . . . . . . . . . . . . . .9Turning OFF the TRIVIA, and setting the SPEED.
The TARGET function . . . . . . . . . . . . . . . . . . . . . . . . . . . . . . . .10 - 11
Corresponding Codes . . . . . . . . . . . . . . . . . . . . . . . . . . . . . . . .12 - 15Colors, fonts, euro characters, graphics, effects, and target variables
About the TruColorII software . . . . . . . . . . . . . . . . . . . . . . . . . . . 19
The Tru-ColorII software screen . . . . . . . . . . . . . . . . . . . . . . . . . . . 20
The menu bar . . . . . . . . . . . . . . . . . . . . . . . . . . . . . . . . . . . . . . 21 - 22
Set-up . . . . . . . . . . . . . . . . . . . . . . . . . . . . . . . . . . . . . . . . . . . . 23 - 24Configuring the sign and software for computer communication.
Sending a message . . . . . . . . . . . . . . . . . . . . . . . . . . . . . . . . . . . . . 24Sending a message to the sign after SET-UP.
The graphic editor. . . . . . . . . . . . . . . . . . . . . . . . . . . . . . . . . . . 25 - 26
Set TARGET . . . . . . . . . . . . . . . . . . . . . . . . . . . . . . . . . . . . . . . 26 - 27Setting up a counter and displaying Current Count Variables.
Send by schedule . . . . . . . . . . . . . . . . . . . . . . . . . . . . . . . . . . . . . . 28Scheduling messages to be displayed on the sign from the computer.
LAN communication . . . . . . . . . . . . . . . . . . . . . . . . . . . . . . . . . 29 - 31Setting up the RSC and TMC to send messages via the LAN.
Technical Support and RMA Procedure . . . . . . . . . . . . . . . . . . . 34
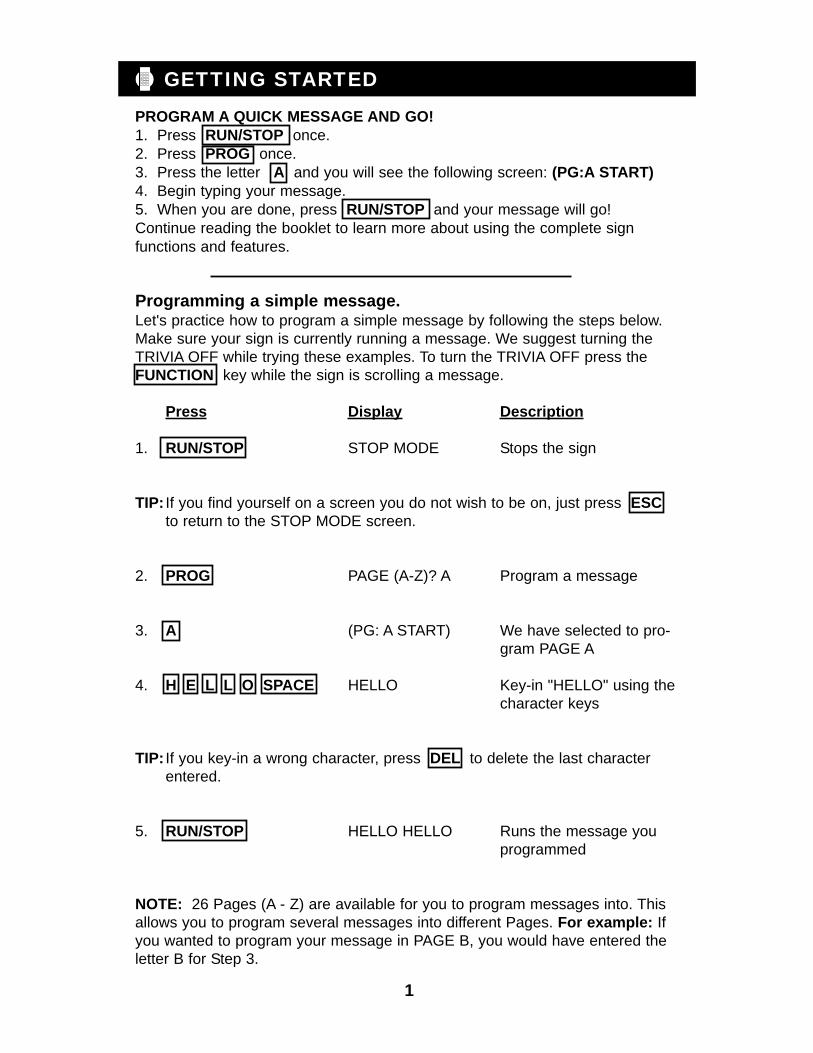
GETTING STARTED
PROGRAM A QUICK MESSAGE AND GO!1. Press RUN/STOP once.2. Press PROG once.3. Press the letter A and you will see the following screen: (PG:A START)4. Begin typing your message.5. When you are done, press RUN/STOP and your message will go!Continue reading the booklet to learn more about using the complete signfunctions and features.
Programming a simple message.Let's practice how to program a simple message by following the steps below.Make sure your sign is currently running a message. We suggest turning theTRIVIA OFF while trying these examples. To turn the TRIVIA OFF press theFUNCTION key while the sign is scrolling a message.
Press Display Description
1. RUN/STOP STOP MODE Stops the sign
TIP: If you find yourself on a screen you do not wish to be on, just press ESCto return to the STOP MODE screen.
2. PROG PAGE (A-Z)? A Program a message
3. A (PG: A START) We have selected to pro-gram PAGE A
4. H E L L O SPACE HELLO Key-in "HELLO" using thecharacter keys
TIP: If you key-in a wrong character, press DEL to delete the last character entered.
5. RUN/STOP HELLO HELLO Runs the message youprogrammed
NOTE: 26 Pages (A - Z) are available for you to program messages into. This allows you to program several messages into different Pages. For example: Ifyou wanted to program your message in PAGE B, you would have entered theletter B for Step 3.
1

Editing Your MessageNow that you have programmed a simple message, let's change that messagefrom "HELLO" to "HELLO MY NAME IS JOE".
Press Display Description
1 RUN/STOP STOP MODE Stops the sign
2. PROG PAGE (A-Z)? A Program a message
3. A (PG: A START) Program PAGE A
4. HELLO View previously pro-grammed message from right to left until "O" "is thelast character on the right
TIP: Use the right arrow key or the left arrow key to view and edit yourprogrammed message.
5. SPACE M Y SPACE HELLO MY NAME Key in "MY NAME IS N A M E SPACE IS JOE JOE” using the character I S SPACE J O E keys
6. RUN/STOP HELLO MY NAME Runs the message you IS JOE programmed
Deleting characters using the DEL key.You can easily delete characters from your message by using the DEL key.Let's change "HELLO MY NAME IS JOE" to "HELLO JOE".
1. Press RUN/STOP to stop the sign.2. Press PROG to program a message.3. Press A to program PAGE A. The sign will read: (PG: A START)4. Press the key until the letter "S" from the word "IS" is the last character
on the right. Remember, you can use the key if you scroll too far.5. Now press the DEL key until the word "HELLO" is the only word seen on
the sign.6. Press RUN/STOP to run the message.7. "HELLO JOE" should now be seen on the sign.
2

PROGRAMMING ALTERNATE CHARACTERS
Display lower-case Letters, numbers, and symbols using theSHIFT key.
Please take notice of the COLORED BLOCK, which appears on the left handcorner of the sign whenever the SHIFT key is pressed in the following steps.
1. Press RUN/STOP to stop the sign.2. Press PROG to program a message.3. Press B to program PAGE B. The sign will read: (PG: B START)4. Press A to display the letter" A".5. Press the SHIFT key once. Now press any one of the orange letter
character keys on the IR Remote. ORANGE COLORED BLOCK = orangecharacter keys active (lower-case mode).
6. Press SHIFT again. Now press any one of the white number character keys on the IR Remote. RED COLORED BLOCK = white character keysactive (numerical mode).
7. Press the SHIFT key again. Now press any one of the green symbols character keys on the IR Remote. GREEN COLORED BLOCK = greencharacter keys active (symbols mode).
8. Press SHIFT again to return you to the upper-case mode. Press any letterkey to verify that you are back in the upper-case mode.
NOTE: Upper-Case mode is the default selection when beginning to program.Once you press the SHIFT key, you are no longer in the upper-case mode.Follow steps 5 - 8 to toggle between modes.
9. Press RUN/STOP to run your message.
Displaying European characters using the ALT-CHAR key.1. Press RUN/STOP to stop the sign.2. Press PROG to program a message.3. Press C to program PAGE C. The sign will read: (PG: C START)4. Press A to display the letter "A".5. Now press the ALT-CHAR key. As you will notice, the letter "A" has now
changed its shape to the European letter "À". Continue to press theALT-CHAR key until you reach the European style "A" of your choice.
TIP: To revert back to the normal character, continue to press ALT-CHAR .Also, you can press any letter at any time to continue to type normal characters.
6. Following previous steps 4 and 5, try to display the European character for the letter "U".
7. Press RUN/STOP to run your message.3

Displaying European characters in lower-case using the SHIFTand ALT-CHAR key.
1. Press RUN/STOP to stop the sign. Press PROG to program a message.2. Press D to program PAGE D. The sign will read: (PG: D START)3. Press the SHIFT key once to go into the lower-case mode. Remember,
the SHIFT key toggles you from 4 different modes. Upper case, lower-case, numerical, and symbols mode.
4. Now press C to display the letter" C "in lower-case.5. Now press the ALT-CHAR key. As you will notice, the letter" c "has now
changed its shape to the European "ç".6. While staying in the lower-case mode, try to display the European character
for the letter "o".7. Press RUN/STOP to run your message.
NOTE: There are 64 European characters that you can select from. Please referto the Quick Reference Section, page 13, for the European Characters Tableand corresponding letters.
TIP: Use the letter "G" with ALT-CHAR to display some Greek characters.
Displaying graphics.Let's say we wanted to display the following message and graphic:"BIKE SALE"
Press Display Description
1. RUN/STOP STOP MODE Stops the sign2. PROG PAGE (A-Z) ?A Program a message3. E (PG: E START) Program PAGE E4. B I K E SPACE BIKE Key-in the word "BIKE"5. GRAPHIC Gfx (A-Z) ?: A Select a graphic to
display6. P Insert graphic "P"(bicycle)7. SPACE S A L E SALE Key-in the word "SALE"
SPACE8. RUN/STOP BIKE SALE Runs your message
NOTE: There are 26 pre-stored graphics that you can select from. Please referto the Quick Reference Section, page 14, for the Graphics Images Table andcorresponding letters..
4

COLORS AND EFFECTSUsing the COLOR key to select a text color.
1. Press RUN/STOP to stop the sign.2. Press PROG to program a message.3. Press F to program PAGE F. The sign will read: (PG: F START)4. Press the COLOR key. The sign will read: COLOR: A5. Now press the right or left arrow keys to view the different text
colors. Once you see the color you wish to use, press the ENTER key. Your color has now been selected. The color you select will stay active untilanother color is chosen or the RUN/STOP key is pressed to run your message.
6. Key-in the word “SUCCESS” and press SPACE .7. Press RUN/STOP to run your message.
NOTE: There are 26 text colors that you can select from. Please refer to theQuick Reference Section, page 12, for the Color Table and correspondingletters.
Using the FONT key to select font sizes.
1. Press RUN/STOP to stop the sign.2. Press PROG to program a message.3. Press G to program PAGE G. The sign will read: (PG: G START)4. Press the FONT key. The sign will read: FONT: A5. Now press the right or left arrow key to view the different font
sizes. Once you see the font size you which to use, press the ENTER key.Your font size has now been selected. The font you select will stay active until another font is chosen or the RUN/STOP key is pressed to run your message.
6. Key-in the word “SALE” and press SPACE .7. Press RUN/STOP to run your message.
NOTE: There are 8 font sizes that you can select from. Please refer to theQuick Reference Section, page 12, for the Font Size Table and correspondingletters.
TIP: When programming a message, you can combine features without having to exit the page you are programming. For example: you can first select a text color, then select a font size, then key-in the word you want. You can then select another text color, another font size, and then key-in another word.
5

Adding special effects to your message using the FUNCTION key.
Now the real fun begins! Let's program a message using the effect"CYCLING" and the animated graphic "COMIC 1".
1. Press RUN/STOP to stop the sign.2. Press PROG to program a message.3. Press H to program PAGE H. The sign will read: (PG: H START)4. Press the FUNCTION key. The sign will read: (AUTO): A5. Now press the right or left arrow key to scroll through the vari-
ous effects. Once you locate the effect "CYCLING", press the ENTERkey. The sign will read: (CYCLING)
6. Key-in the word "COOL".7. Press the FUNCTION key. The sign will read: (AUTO): A8. Now press the right or left arrow keys to scroll through the various
effects. Once you locate the effect "COMIC 1", press the ENTER key.The sign will read: (COMIC 1)
9. Key-in the word "EFFECTS".10. Press RUN/STOP to run your message.
NOTE: There are 25 effects that you can select from. Please refer to the QuickReference Section, page 15, for the Effects Table and corresponding letters.
Displaying the TIME and DATE using the FUNCTION key.1. Press RUN/STOP to stop the sign.2. Press PROG to program a message.3. Press I to program PAGE I. The sign will read: (PG: I START)4. Press the FUNCTION key. The sign will read: (AUTO): A5. Now press the right or left arrow keys to scroll through the vari
ous effects. Once you locate the effect "TIME", press the ENTER key.The sign will read: (TIME)
6. Press the FUNCTION key again. The sign will read: ( AUTO ): A7. Now press the right or left arrow key to scroll through the various
effects. When you locate the effect "DATE", press the ENTER key. The sign WILL read: ( DATE )
8. Press RUN/ST0P to run your message.
NOTE: Please see page 10 for setting the current DATE and TIME.
TIP: You can use the Quick Reference Section, pages 12-15, to choose anyfeature directly. For example: let's say you wanted to use text color green.If you look at the Color Code Table, you will see the letter "M" correspondsto the color green. Just press COLOR and the letter M to use this color.This shortcut also applies to font sizes, graphics, and effects.
6

ADVANCED FEATURESRunning combined Pages using the F1 key.This feature allows you to run up to 32 pages together as one long message.Remember to have your messages programmed before setting this feature.1. Press RUN/STOP to stop the sign.2. Press the F1 key. The sign will read: Page: 1)_3. The "1)" represents the sequence number in which the Pages will run.
For example: let's say you have Pages "A", "B", and "C" programmed and you want to run them together as one long message.
4. Key-in the letter A . The sign will read: Page: 1) A 2)_.Now key-in the letters B and C . The sign will read: Page: 2) B 3) C
TIP: If you make an incorrect entry, use the left arrow key to move onecursor back, and then press the DEL key.
5. Press RUN/STOP to run your messages together.
NOTE: If you press the DEL key when there are other entries ahead of theone you deleted, the entries ahead will shift to the left once. If you key-in a letterwhere there is an existing entry, the letter will be inserted and the previous entrywill shift to the right once.
Setting the Password, current DATE/TIME, turning the BEEP OFF.1. Press RUN/STOP to stop the sign.2. Press ESC to configure the Advanced Settings of the sign. The sign will
read: Gfx Rst Set3. Press S for Set. The sign will read: PASSWORD? N
Press N to NOT enter a PASSWORD. Press ENTER to continue.The PASSWORD prevents others from making changes to the sign.Press Y for YES to enter a PASSWORD.
1) The sign will read: PASSWORD? Y2) Press ENTER . Key-in a four letter PASSWORD. Press ENTER .3) PASSWORD will now be requested before changes are made.
4. The sign will read: CENTURY: 19. Key-in the current CENTURY.Press ENTER .
5. The sign will read: YEAR: 98. Key-in the current YEAR. Press ENTER .6. The sign will read: MONTH: 01. Key-in the current MONTH. Press ENTER
MONTH format: 01 =Jan, O2=Feb, 03=Mar, . . . 7. The sign will read: DAY: 01. Key-in the current DAY. Press ENTER .8. The sign will read: WEEKDAY: 01. Key-in the current WEEKDAY.
Press ENTER . WEEKDAY format: 00=Sunday, 01=Monday, 02=Tuesday,9. The sign will read: HOUR: 01. Key-in the current HOUR. Press ENTER .
HOUR must be entered as Military Hour (i.e. 1p.m. =13)
7

Setting the Password, current DATE/TIME, turning the BEEP OFF. (cont.)10. The sign will read: MINUTE: 01. Key-in the current MINUTE(s).
Press ENTER .11. The sign will read: 24 HOUR Y/N ?. Press Y to display the time as
MILITARY TIME (i.e. 01:00 p.m. = 13:00). Press N to display the time as NORMAL TIME.
12. The sign will read: ID = 01. This setting is for software use only.Press ENTER .
13. The sign will read: 9600 BAUD. This setting is for software use only.Press ENTER .
14. The sign will read: BEEP ON. Press the right arrow key to turn the"BEEP OFF". Press ENTER . The Advanced Settings are now set!
Editing your own graphics.To edit your own graphic you must select an existing graphic and modify it.1. Press RUN/STOP to stop the sign.2. Press ESC to configure the Advanced Settings of the sign. The sign will
read: Gfx Rst Set3. Press G for Editing Graphics. The sign will read: Gfx(A-Z)?A4. Press A to edit existing GRAPHIC "A". The sign will read:
RGYBPI I I IThe concept is to use the arrow keys to move the "dot" to thelocation where you want to draw. The following letters correspond to the colorsyou can use: R = RED, G = GREEN, Y = YELLOW, B = BLACK, as well as P = PLACE the "dot". Example: Press B to select the color black. Looking atthe sign, press the right arrow key a few times. As you will notice the reddots have now been replaced with black dots. Now press G to select the colorgreen. Looking at the sign, press the left arrow key a few times. As you willnotice the black dots have now been replaced with green dots.5. Press ESC to accept changes.
(See below to reset the graphics to their original state).6. To display the edited GRAPHIC "A", please see page 4 on how to display
graphics.
Deleting a Page(s) or Graphic(s) you edited.1. Press RUN/STOP to stop the sign.2. Press DEL to delete a Page(s) or Graphic you edited. The sign will read:
Page Gfx3. Press P to delete a Page(s) or press G to delete a Graphic(s).4. In this example we want to delete a Page, so we will press the letter P .
The sign will read: Page (A-Z, Del)
8

Deleting a Page(s) or Graphic(s) you edited. (cont.)5. At this time you can Key-in any "PAGE LETTER" to delete or you can
press the DEL key to delete all the Pages.6. Press A to delete PAGE "A".7. The screen will read: Del: A (Y/N)?. Press Y for YES or N for NO.
Your selection has now been accepted. To delete a Graphic(s), select "G" for Graphics in Step 3.
NOTE: Deleting a graphic will restore the graphic to its original state.
NEW AND IMPROVED FEATURESTurning OFF the TRIVIA using the FUNCTION key.1. While your message is running, press the FUNCTION key.2. The TRIVIA is now OFF.3. To turn the TRIVIA ON press the FUNCTION key again.
NOTE: This setting will be retained in memory whenever power is removed.Please see page 16 on instructions to permanently remove the TRIVIA.
SLOWING the SPEED of the sign using the arrow keys.1. While your message is running, press the down arrow key to reduce
the speed.2. To increase the speed press the up arrow key.
NOTE: If power is removed from the sign, the SPEED will default to fast.
DIRECT RUN Page feature!Let's say you have Pages "A", "B", and "C" programmed. If Page "A" is currentlyrunning and you wanted to run Page "C", just press C . The same applies toany other Page programmed.
Turning OFF the sign without removing the power cord.1. While your message is running, press the ON/OFF key.2. Your display should now be OFF.3. To turn ON the sign just press the ON/OFF key again.
RESETTING the system.This is an excellent feature when you just want to start from the beginning.CAUTION: This will delete all your previously stored information.
1. Press RUN/STOP to stop the sign.2. Press ESC to configure the Advanced Settings of the sign.
The sign will read: Gfx Rst Set.3. Press R for Reset. The sign will read: SURE (Y/N)?.4. Press Y for YES or N for NO.5. Your selection has now been accepted.
9

The TARGET FunctionWhat you should know about the TARGET function.You should be familiar with Pages 1-9 before beginning.
NOTE: Due to varying outlet frequencies, power outages and/or incorrect entryof information, Pro-Lite, Inc. will not be responsible for counter inaccuracies.
There are 2 types of' TARGET options:1) Count Up to TARGET. 2) Count Down to TARGET.• If you select to "Count Up to TARGET" and you set the TARGET to be
reached 30 days from now, you can have your message read "2 Days havepassed", "3 Days have passed", "4 Days have passed". . . , See "Count Up" to TARGET.
• If you select to "Count Down to TARGET" and you set the TARGET to be reached 30 days from now, you can have your message read "29 Days to reach our target", "28 Days to reach our target", "27 Days to . . .”, See "Count Down" to TARGET.
NOTE: Please be aware that any interruption of power will cause the TARGETFunction to reset.
"Count Up" to TARGET setup1. Begin by setting the current DATE and TIME.2. Press RUN/ST0P to stop the sign.3. Press the TARGET key. The sign will read: Count Up/Dn.4. Press U to count UP to the specified TARGET.5. If you want your TARGET to be reached in days, press D . If you want
your TARGET to be reached in hours, press H .6. The sign will read: TARGET: 0000. Key-in the number of days or hours to
specify a TARGET. For example: If you wanted the TARGET to be reachedin 125 days, press 1 2 5 . The sign will display: TARGET: 0125
TlP: If an incorrect entry is made, key-in 0 four times to clear the entry.
7. Press ENTER . The sign will read: START: 0000. Key-in the number of days or hours to specify a start point. For example: If you wanted to start the counter at day 10, press 1 0 . The sign will display: START: 0010
NOTE: If you selected “D" for Days in step 5, your start point in step 7 will auto-matically be in days. If you selected “H” for Hours, your start point willautomatically be in hours.
8. Press ENTER . The sign will read: PAGE (A-Z)? A. Key-in the PAGELETTER you want to run when the TARGET is reached. For example: If you wanted to run PAGE "D" when the TARGET is reached, press D .
9. Press ENTER to confirm your entry and to start the counter.10. The sign will read: STOP MODE11. Press RUN/STOP to run the sign.
10

"Count Down" to TARGET setup1. Begin by pressing RUN/STOP to stop the sign. Press the TARGET key.2. The sign will read: Count Up/Dn. Press D to count DOWN to a TARGET.3. The sign will read: DAY: 0000. Key-in the number of days to start counting
down from. For example: If you wanted to count down from 125 days, press 1 2 5 . The sign will display: DAY: 0125
4. Press ENTER . The sign will read: HOUR 00. Key-in the current hour.For example: If the hour is currently 10, press 1 0 .The sign will display: HOUR: 10
5. Press ENTER . The sign will read: MINUTE: 00. Key-in the current min-utes. For example: If the minutes are currently 23, press 2 3 .The sign will display: MINUTES: 23
6. Press ENTER . The sign will read: PAGE (A-Z)? A. Key-in the PAGELETTER you want to run when the TARGET is reached. For example: If your TARGET message is in Page "D", press D .
7. Press ENTER to confirm your entry and to start the counter.8. The sign will read: STOP MODE. Press RUN/STOP to run your message.
Displaying a "Count Up" to TARGET variable in your messageGo to the part of your message where you want to display the variable. In thisexample we want to display the "Current Count" variable.1. Press the FUNCTION key. The sign will read: (AUTO): A2. Now press the key until the sign reads:( COUNT): 2
TIP: Use the key to go back if you scroll too far.
3. Press ENTER . The sign will read: (COUNT)4. Press SPACE . Press RUN/STOP to run your message.
Displaying a "Count Down" to TARGET variable in your messageGo to the part of your message where you want to display the variable. In thisexample we want to display the current "DAYS LEFT" variable.1. Press the FUNCTION key. The sign will read: (AUTO): A2. Now press the key until the sign reads:(DAYS LEFT): 33. Press ENTER . The sign will read: (DAYS LEFT)4. Press SPACE . Press RUN/STOP to run your message.
NOTE: There are a 2 "Count Up" to TARGET variables and 4 "Count Down" toTARGET variables that can be selected to display in your message. Pleaserefer to the Quick Reference Section, page 15.
NOTE: Please note that when selecting to display a Count Up or Count DownTARGET variable(s), only the number(s) will be shown. The user will berequired to input the required text, if any, to define the variable being displayed.
11

12
QUICK REFERENCE SECTION
Color Code TableTo select a COLOR, press COLOR once, then press the Corresponding Letter.
ABCDEFGHIJKLMNOPQRSTUVWXYZ
Letter ForegroundColor
BackgroundColor
OFFOFFOFFOFFOFFOFFOFFOFFOFFOFFOFFOFFOFFOFFONOFFONONONONOFFOFFONONONON
DIM REDREDBRIGHT REDORANGEBRIGHT ORANGELT-YELLOWYELLOWBRIGHT YELLOWLIMEDIM LIMEBRIGHT LIMEBRIGHT GREENGREENLT-GREENLT-YELLOWRAINBOWREDREDGREENGREENGREENREDORANGEDIM LIMEGREENRED
BLACKBLACKBLACKBLACKBLACKBLACKBLACKBLACKBLACKBLACKBLACKBLACKBLACKBLACKGREENBLACKBLACKBLACKBLACKBLACKREDGREENGREENREDREDGREEN
ShadowColor--------------RED-GREENLT YELLOWREDLT YELLOW--BLACKBLACKBLACKBLACK
ShadowSwitch
!
Font Size TableTo select a FONT SIZE, press FONT once, then press the CorrespondingLetter.
ABCDEFGH
Letter Character Font Size
NORMALBOLDITALICBOLD ITALICFLASH NORMALFLASH BOLDFLASH ITALICFLASH BOLD ITALIC
13
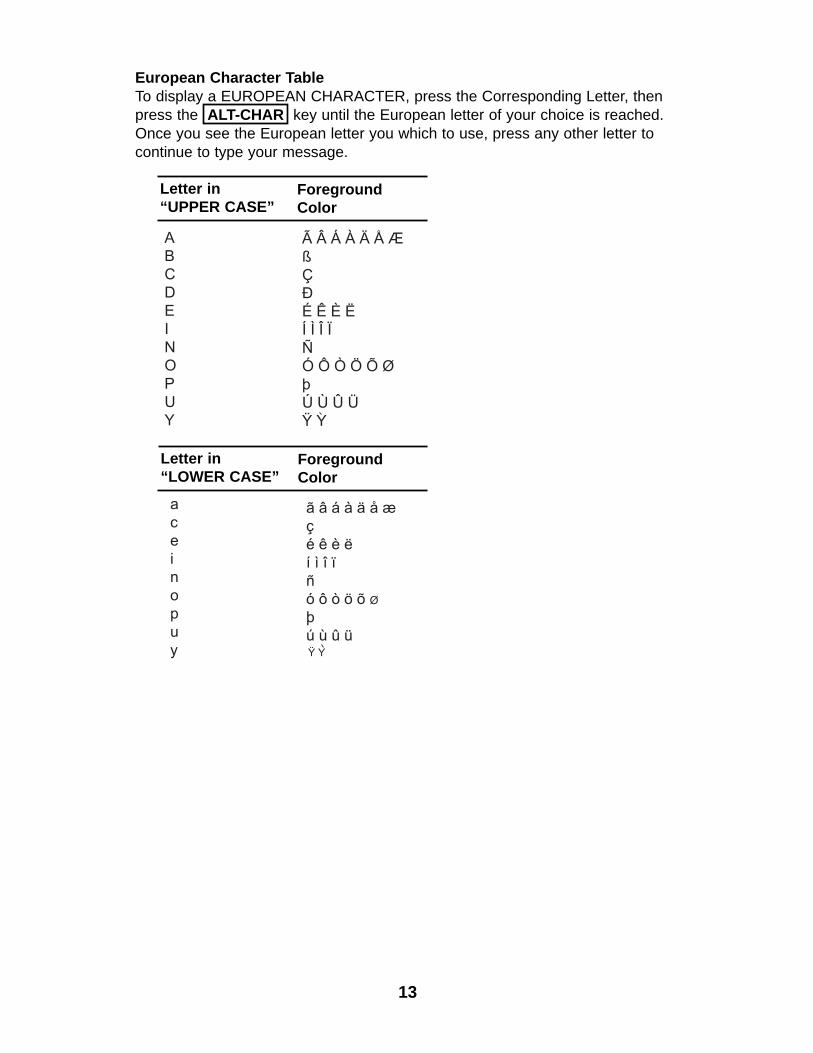
European Character TableTo display a EUROPEAN CHARACTER, press the Corresponding Letter, thenpress the ALT-CHAR key until the European letter of your choice is reached.Once you see the European letter you which to use, press any other letter tocontinue to type your message.
Letter in“UPPER CASE”
ForegroundColor
Letter in“LOWER CASE”
ForegroundColor

14
Graphic Images TableTo select a GRAPHIC, press GRAPHIC once, then press the CorrespondingLetter.
ABCDEFGHIJKLM
Letter GraphicPatternTELEPHONEGLASSESFAUCETROCKETSPACE MONSTERKEYSHIRTHELICOPTERCAR TANKHOUSETEA POTKNIFE & FORK
Letter GraphicPattern
NOPQRSTUVWXYZ
DUCKMOTORCYCLEBICYCLECROWNTWIN HEARTSARROW 1ARROW 2ARROW 3ARROW 4GLASS OF BEERCHAIRHIGH-HEEL SHOEWINE GLASS
Graphic Patterns A-ZA
D
G
J
M
P
S
V
Y
B
E
H
K
N
Q
T
W
Z
C
F
I
L
O
R
U
X
15
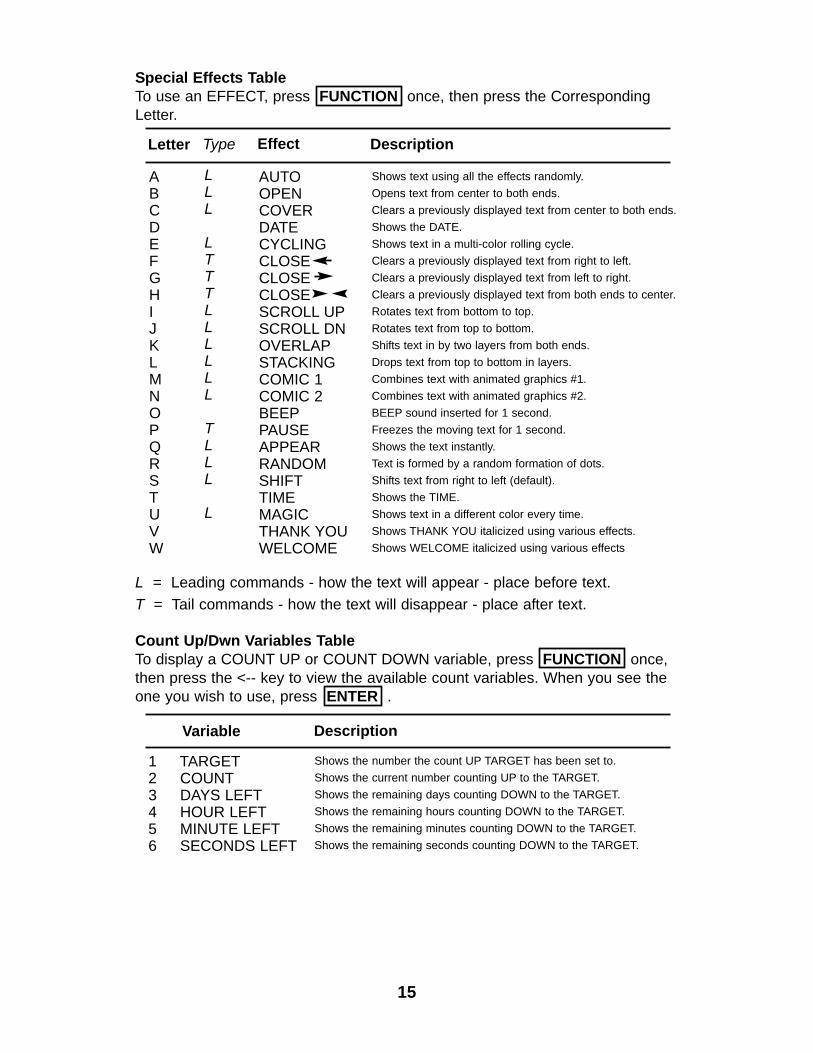
Special Effects TableTo use an EFFECT, press FUNCTION once, then press the CorrespondingLetter.
Letter
AUTOOPEN COVER DATECYCLINGCLOSECLOSECLOSE SCROLL UPSCROLL DNOVERLAPSTACKINGCOMIC 1COMIC 2BEEPPAUSEAPPEARRANDOMSHIFTTIMEMAGICTHANK YOUWELCOME
Shows text using all the effects randomly.Opens text from center to both ends.Clears a previously displayed text from center to both ends.Shows the DATE.Shows text in a multi-color rolling cycle.Clears a previously displayed text from right to left.Clears a previously displayed text from left to right.Clears a previously displayed text from both ends to center.Rotates text from bottom to top.Rotates text from top to bottom.Shifts text in by two layers from both ends.Drops text from top to bottom in layers.Combines text with animated graphics #1.Combines text with animated graphics #2.BEEP sound inserted for 1 second.Freezes the moving text for 1 second.Shows the text instantly.Text is formed by a random formation of dots.Shifts text from right to left (default).Shows the TIME.Shows text in a different color every time.Shows THANK YOU italicized using various effects.Shows WELCOME italicized using various effects
ABCDEFGHIJKLMNOPQRSTUVW
LLL
LTTTLLLLLL
TLLL
L
Type Description
L = Leading commands - how the text will appear - place before text.T = Tail commands - how the text will disappear - place after text.
Count Up/Dwn Variables TableTo display a COUNT UP or COUNT DOWN variable, press FUNCTION once,then press the <-- key to view the available count variables. When you see theone you wish to use, press ENTER .
Variable
1 TARGET2 COUNT3 DAYS LEFT4 HOUR LEFT5 MINUTE LEFT6 SECONDS LEFT
Shows the number the count UP TARGET has been set to.Shows the current number counting UP to the TARGET.Shows the remaining days counting DOWN to the TARGET.Shows the remaining hours counting DOWN to the TARGET.Shows the remaining minutes counting DOWN to the TARGET.Shows the remaining seconds counting DOWN to the TARGET.
Description
Effect

16
HELP SECTION - PROGRAMMINGI programmed Pages A, B, and C. But when I press RUN/STOP only PageA will show. How do I get all of my Pages to run together?Please refer to page 7 for running combined pages.
What does it mean when the sign says "MEMORY FULL"?This message means you have entered the maximum amount of charactersonto the sign. To correct this you must down-size your messages in order toenter more information.
How do I permanently remove the TRIVIA?Install the included 30-day TruColorII Software and use the "Remove TRIVIA" command. The software will also restore the TRIVIA onto the sign.Please keep in mind that the software is fully operational for a trial period of30-days. After the trial period, the software will lock the user out and an unlockkey will be required to be entered for continued unlimted usage. To purchase anunlock key, please call 714-668-9988.
How do I display the animated graphics?There are a total of 8 animated graphics. "COMIC 1" displays two animatedgraphics and "COMIC2" displays 6 different animated graphics randomly. Sincethe animations are displayed randomly, a single animation is not user selec-table. Please see page 4 on how to display these effects.
What is the F2 key used for?The F2 key has no function at this time.
My audience really enjoys the TRIVIA questions, but some of them haveread the same questions twice. Do you have different TRIVIA questions?Yes, please see the enclosed Accessories Brochure for more information orcontact Pro-Lite at 714-668-9988.
I want to show my own TRIVIA questions and answers, how can I do this?You can use a basic text editor to open, edit and change the TRIVIA questionsthat come with the Pro-Lite 30-day trial software. Use the software to upload thenew TRIVIA file to your sign.
Can I run multiple pages when the TARGET is reached?No, you are only allowed to run 1 page.
How can I control more than one sign from a central location?The Pro-Lite 30-day trial software will allow you to control up to 255 signs.How do I remove the message pre-programmed on the sign?The demo message is permanently programmed onto the sign and is designedto run automatically when there are no messages programmed by the user.When you program a message onto a page, the demo message will no longershow.
How much text can I program onto each PAGE?You can program up to 820 characters per page. Total user memory available isabout 10,000 bytes. Each character occupies 1 byte and each function occupies2 bytes.
?

17
I program and run my message, but it shows characters I don't want.This is usually a programming error. Edit your message and use the arrow keys(left and right arrows) to locate the unwanted characters. When you locatethem, press DEL to delete the unwanted characters. Please refer to page 1.
Will I lose my messages if I remove the power to the sign?No, there is a built-in rechargeable battery in the sign. When you first purchasethe sign, you must program a short message and let the sign run for a minimumof 72 hours in order for the battery to be fully charged.
After I unplug my sign, I lose the current TIME and DATE setting. Why?The clock is dependent on the CPU clock, therefore when power is removed itwill reset the clock to 12:00. Please keep the sign powered at all times to keepTIME and DATE accurate.
I forgot my PASSWORD. How do I get back in to erase it?Stand 4' from the display. Using the wireless programmer, point to the top lefthand corner of the display and press and hold the ESC key. At the same timeremove the power from the left hand side of the display. Now press and holdthe ESC key again, and at the same time power up the display.**You may need to repeat these steps several times. Remember to go back tothe SET mode to delete or set a new password.
Can I change the color of the TIME and DATE?No, these colors are fixed.
Can I change the color of the TARGET variables?No, these colors are fixed.
How do I make a word or sentence flash?Please refer to page 5 on how to select a flashing font. Remember, the font youselect and begin to use will be saved in memory. If you decide you do not likethe font you used, you will have to select another font and re-type your mes-sage.
How do I display lower-case letters?Please refer to page 3.
How do I slow the speed of the display? In most cases, you are standing too close to the display. The display isdesigned to attract attention from 15' to 100' away. Stand back at least 20 feetto view the speed of your message. If the speed is still too fast, simply use the"DOWN" arrow key to set the speed slower. To increase the speed, press the"UP" arrow key.

18
HELP SECTION - TROUBLESHOOTINGI press RUN/STOP and the sign doesn't respond?• Try using a fresh new set of batteries.• Make sure the battery polarities are inserted in the correct direction.• Stand 10’ from the sign and point to the top left hand corner of the sign.
My sign does not show the trivia questions.• Make sure the TRIVIA is enabled by pressing the FUNCTION key while
your message is running.• You can use the enclosed 30-Day TRIAL software to upload the TRIVIA to
the sign.
The sign keeps flashing, "CHECKING".• Check the label on the power supply and see if the output is rated at
9VAC - 2.5 AMPS or higher.
I plugged the sign in but nothing comes ON?• Unplug the power to the sign and plug it in again.• Make sure the 9VAC plug is plugged into the sign firmly.• Try using another wall outlet.
The sign does not keep memory.• Program a short message and leave it running for at least 72 hours for the
built-in battery to fully charge.• Power outages will cause the sign to dump its information. We suggest
using a Power Surge Protector to prevent your sign from losing its stored information.
I forgot my PASSWORD. How do I get back in to erase it?• Stand 4' from the display. Using the wireless programmer, point to the
top left hand corner of the display and press and hold the ESC key.At the same time remove the power from the left hand side of the display.
• Now press and hold the ESC key again, and at the same time power upthe display.
*You may need to repeat these steps several times. Remember to go back to the SETmode to delete or set a new password.
?

The TruColorII Software for Windows®The TruColorII Software turns your computer into an Instant Messaging Updatemachine. Features such as scheduling, editing your own graphics, time syn-chronization, and more, are just a click away!
Complete Package Consists of the following Items1. Communication Cable with 9 pin female connector
(communication cable not a phone cable)2. 1 - PC Software CD
System Requirements1. PC Operating System running Windows 95 or higher
(software not compatible with Macintosh operating systems)2. Hardware - available Com Port (COM1 or COM2)3. E-mail - user provided internet connection (optional)
Software InstallationIf you are upgrading from an earlier version of the TruColorII Software, youmust uninstall your previous version.1. Close all programs.2. Insert the provided Software CD into your CD-ROM drive.3. Please wait a moment for the CD to initialize.4. The Software Installation screen will appear.
If the installation screen does not appear, please click on “START”, “RUN”,and “BROWSE”. Next select “MY COMPUTER” and click on your CD-ROMdrive. Double-click on “SET-UP.EXE” to start the installation program.
5. Follow the instructions on the screen.
Running the Software• Click on "START", "PROGRAMS", "PROLITE", and "TRUCOLORII
SOFTWARE".
19

20
Sends a message by Schedule.
The TruColorII Software Screen
Opens a new Message Window.
MESSAGE WINDOW:Area where you can typeand see the message thatwill be transmitted to thesign.
CHARACTER COUNT:Displays the number ofcharacters typed by theuser.
TOOL BAR:Buttons that serve asshortcuts to executecommands.
MENU BARSee pages 21 and22 for descriptions.
Opens an existing File.
Saves the current message in the Message Window.
Cut the highlighted selection and put it on the clipboard.
Copy the highlighted selection and put it on the clipboard.
Paste the contents of the clipboard.
Print the contents in the Message Window.
Sends the message in the Message Window to the sign.
Sends a message through the LAN.
21
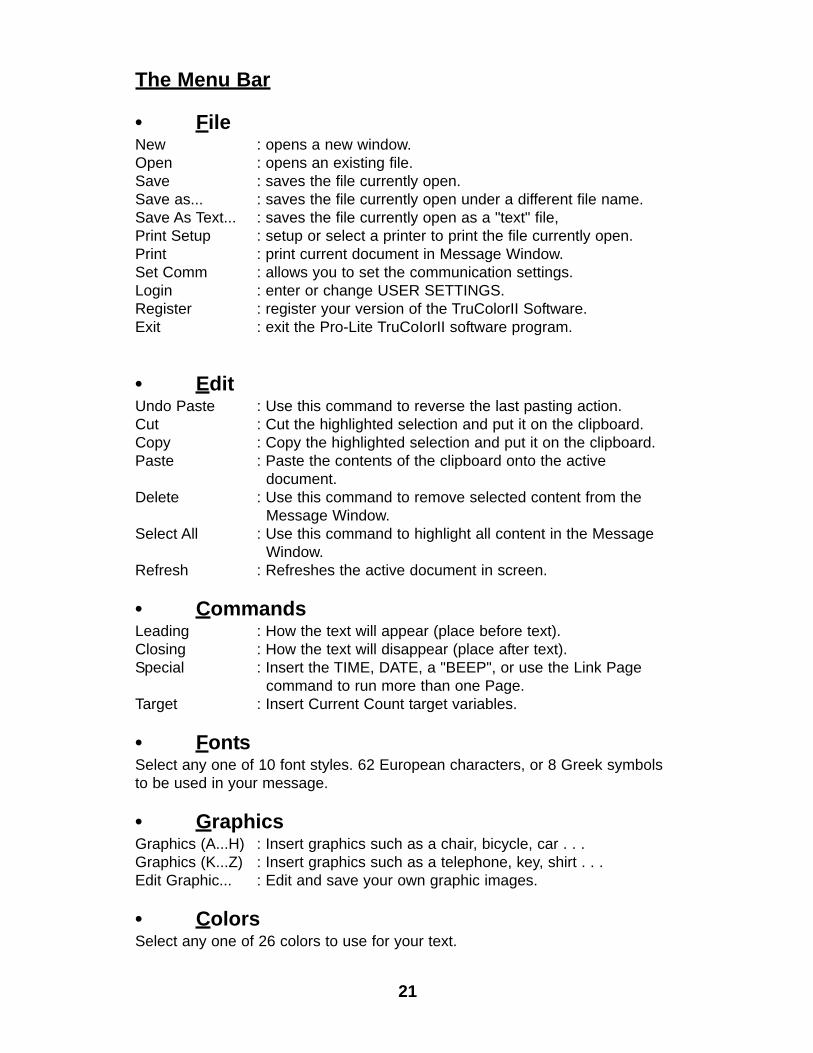
The Menu Bar
• FileNew : opens a new window.Open : opens an existing file.Save : saves the file currently open.Save as... : saves the file currently open under a different file name.Save As Text... : saves the file currently open as a "text" file,Print Setup : setup or select a printer to print the file currently open.Print : print current document in Message Window.Set Comm : allows you to set the communication settings.Login : enter or change USER SETTINGS.Register : register your version of the TruColorII Software.Exit : exit the Pro-Lite TruCoIorII software program.
• EditUndo Paste : Use this command to reverse the last pasting action.Cut : Cut the highlighted selection and put it on the clipboard.Copy : Copy the highlighted selection and put it on the clipboard.Paste : Paste the contents of the clipboard onto the active
document.Delete : Use this command to remove selected content from the
Message Window.Select All : Use this command to highlight all content in the Message
Window.Refresh : Refreshes the active document in screen.
• CommandsLeading : How the text will appear (place before text).Closing : How the text will disappear (place after text).Special : Insert the TIME, DATE, a "BEEP", or use the Link Page
command to run more than one Page.Target : Insert Current Count target variables.
• FontsSelect any one of 10 font styles. 62 European characters, or 8 Greek symbolsto be used in your message.
• GraphicsGraphics (A...H) : Insert graphics such as a chair, bicycle, car . . . Graphics (K...Z) : Insert graphics such as a telephone, key, shirt . . . Edit Graphic... : Edit and save your own graphic images.
• ColorsSelect any one of 26 colors to use for your text.
22
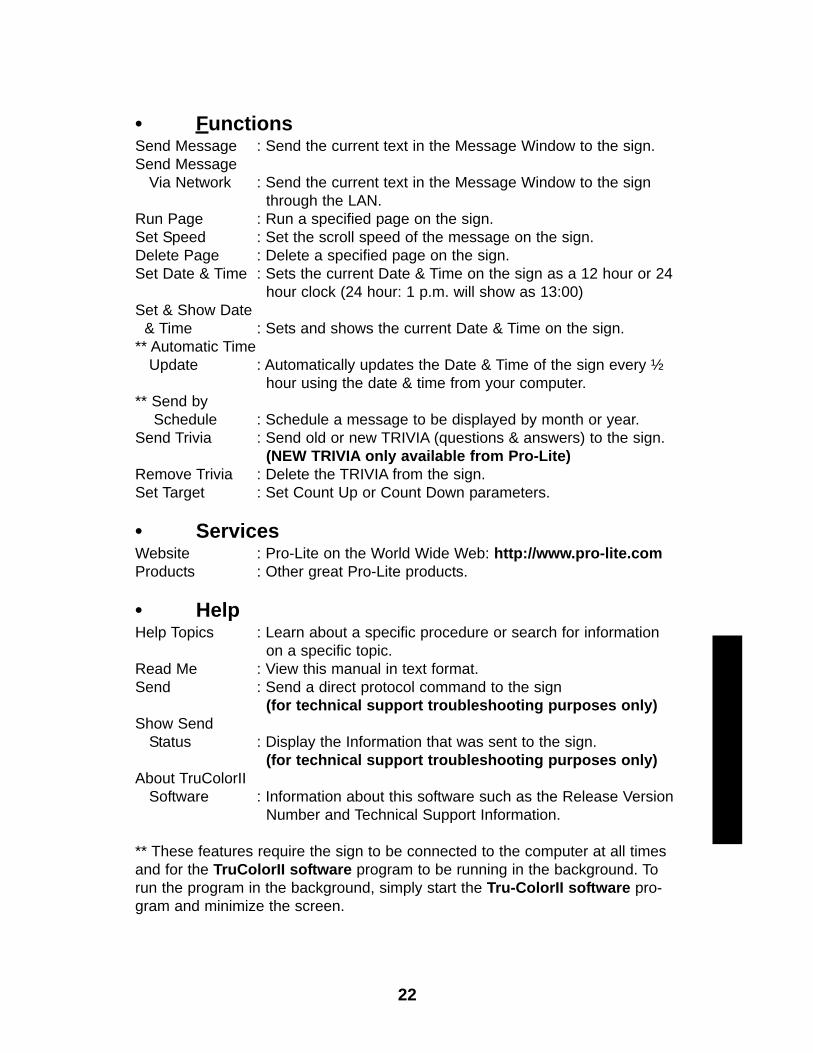
• FunctionsSend Message : Send the current text in the Message Window to the sign.Send Message
Via Network : Send the current text in the Message Window to the sign through the LAN.
Run Page : Run a specified page on the sign.Set Speed : Set the scroll speed of the message on the sign.Delete Page : Delete a specified page on the sign.Set Date & Time : Sets the current Date & Time on the sign as a 12 hour or 24
hour clock (24 hour: 1 p.m. will show as 13:00)Set & Show Date
& Time : Sets and shows the current Date & Time on the sign.** Automatic Time
Update : Automatically updates the Date & Time of the sign every ½ hour using the date & time from your computer.
** Send by Schedule : Schedule a message to be displayed by month or year.
Send Trivia : Send old or new TRIVIA (questions & answers) to the sign.(NEW TRIVIA only available from Pro-Lite)
Remove Trivia : Delete the TRIVIA from the sign.Set Target : Set Count Up or Count Down parameters.
• ServicesWebsite : Pro-Lite on the World Wide Web: http://www.pro-lite.comProducts : Other great Pro-Lite products.
• HelpHelp Topics : Learn about a specific procedure or search for information
on a specific topic.Read Me : View this manual in text format.Send : Send a direct protocol command to the sign
(for technical support troubleshooting purposes only)Show Send
Status : Display the Information that was sent to the sign.(for technical support troubleshooting purposes only)
About TruColorIISoftware : Information about this software such as the Release Version
Number and Technical Support Information.
** These features require the sign to be connected to the computer at all timesand for the TruColorII software program to be running in the background. Torun the program in the background, simply start the Tru-ColorII software pro-gram and minimize the screen.

23
Set-UpConnecting the Communication Cable1. Connect the Phone Clip end of the Phone Type Cable to the sign.2. On the back of your computer, identify a COM PORT. If you have trouble
locating a COM PORT on your computer, please reference your computer user manual or contact the manufacturer of your computer.
3. Write the COM PORT number you will be using (for example: COM1, COM2):
COM PORT Number = _____________
4. Connect the 9-Pin connector end to the COM PORT you will be using. If the 9-pin connector is not connected to the correct COM PORT, computer communication to your sign will not work.
PLEASE NOTE: The Communication Cable supplied by Pro-Lite is NOT aphone cable. Should you need a longer length cable, please contact Pro-Lite at714-668-9988.
Configure Sign1. Using the hand-held remote, press the "RUN/STOP" key, The sign will
show: STOP MODE.2. Press the "ESC" key.3. Press "S" for Set,4. Now press "ENTER" and continue to press "ENTER" one step at a
time until you see "ID =" on the sign. Write down the ID Number below:
ID Number = ____________________________
5. Again press "ENTER" until you see "Baud Rate =". Write the Baud Rate setting below. NOTE: If "Baud Rate =" never comes up, your sign Baud Rate is 300.
Baud Rate Setting = _______________________
6. Now, continue to press "ENTER" until the sign reads "STOP MODE".7. Your sign MUST be in the "running mode" to receive a transmission
from the computer. To put your sign in the running mode, simply press the "RUN/STOP" key on the remote. Your sign should be showing a message.
L.E.D. SIGN

24
Sending a Message
The Send Message icon is used to transmit the message to the sign.
1. In the Message Window, type in a test message such as 'Welcome to my message".
2. Click on the icon on the Toolbar or press "F5" to bring up the Send Message window.
3. Click on "OK" to send your message to the sign. If your sign did not receive your message, try sending the message again.
Configure Software1. Go to "File" and "Set Communication"
2. Click on "OK" when your settings are complete.
Select the Com Portfrom PAGE 23.
Select the BaudRate from PAGE 23.
Data Bits = 8Stop Bits = 1Parity = NoneDo Not ChangeThese Settings.
Enter the Sign ID Numberfrom PAGE 23.
** Select a page to sendyour message to.
** You have pages A-Z available. Each page can be used to store a different message.
25
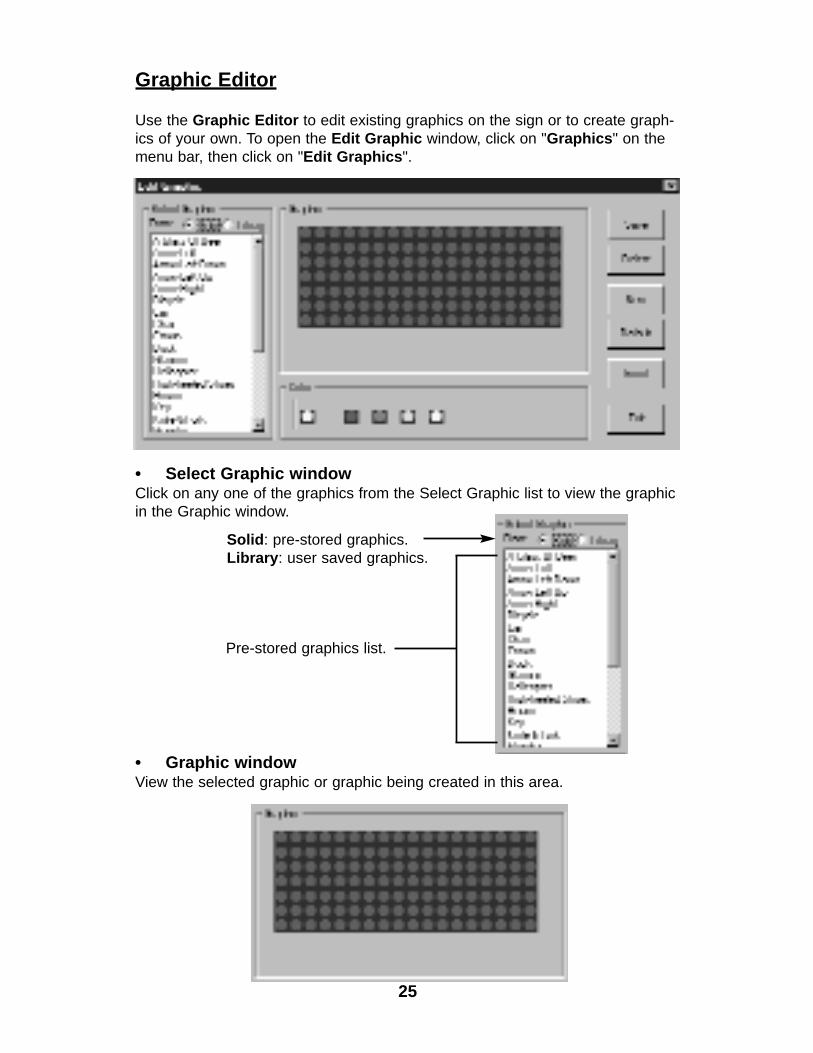
Graphic Editor
Use the Graphic Editor to edit existing graphics on the sign or to create graph-ics of your own. To open the Edit Graphic window, click on "Graphics" on themenu bar, then click on "Edit Graphics".
• Select Graphic windowClick on any one of the graphics from the Select Graphic list to view the graphicin the Graphic window.
Solid: pre-stored graphics.Library: user saved graphics.
Pre-stored graphics list.
• Graphic windowView the selected graphic or graphic being created in this area.

26
Set TargetUse the Set Target feature to set-up a counter that will count down to a speci-fied "target". At the same time, display a message that will show the currentcount as the specified "target" approaches closer and closer.To open the Set Target window, click on Functions on the menu bar, then clickon Set Target.NOTE: Due to varying outlet frequencies, power outages and/or incorrect entry of information. Pro-Lite,Inc. will not be responsible for counter inaccuracies.
There are three Set Target options:1) Count Up 2) Count Down 3) Count Down by date• If you select to Count Up and you set the TARGET to be reached 30
days from now, you can have your message read: "2 Days have passed", "3 Days have passed", "4 Days have passed", . . . See Count Up window.
• If you select to Count Down or Count Down by Date, and you set the TARGET to be reached 30 days from now, you can have your mes-sage read: "29 Days to reach our target", "28 Days to reach our tar-get", "27 Days to reach our target",. .See Count Down window and Count Down by Date window.
• Color WindowSelect any one of four colors to edit an existing graphic or to create a graphic.
Current selected color.Colors to select from:black, red, green, yellow
• Edit Graphic ButtonsFunctions of buttons are described below.
SAVE the current graphic displayed in the "Graphic" window.Graphic name can be up to 25 characters. Graphic will be saved in the "Library".
DELETE a graphic from the "Library"."Solid" graphics cannot be deleted.
Open a NEW "Graphic Window" for editing.
Revert a changed graphic back to its original state.Will revert graphic from last saved state.
INSERT the current graphic in the "Graphic" window into yourmessage.
EXIT the "Edit Graphic" window.

27
1. Count Up window• Day/Hour: select to "count up" in Days or Hours,• Start: specify a "start point”. For example: If you wanted to
start the counter in 10 days, enter 0010.If you selected Day, your "start point” will automatically be in days. If you select-ed Hour, your "start point" will automatically be in hours.
• Target: specify a "target" day or hour, For example: If you wanted the "target" to be reached in 125 days, enter 0125.• Page: select the Page you want to run when the "target" Is reached. For example: If you wanted to run Page D when the "target" is reached, select the letter D.
2. Count Down window• Days: specify how many days to start counting from, For
example: If you wanted to "count down" from 125 days, enter 0125.
If you enter any number other than 0000 for Days, your selections for Hoursand Minutes below should be based on the current time.
• Hours: select the hour you wish to "count down" from. For example: If you wanted to "count down" from 12 hours, select 12.
• Minutes: select the minutes you wish to "count down" from, For example: If you wanted to "count down" from 25 minutes, select 25.
• Page: select the Page you want to run when the "target" is reached. For example: If you wanted to run Page D when the "target" is reached, select the letter D.
3. Count Down by Date window
4. Displaying the Current Count Variables in your message1) Go to the part of your message where you want the Current
Count Variable to be displayed.2) Click on Commands on the menu bar, then click on Target.3) Click on the Current Count Variable you wish to use.
Please Note: (Count Down) variables = apply to count down only;(Count Up) variables= apply to count up only.
Enter the "target"month, date, and year.
Enter the "target" hour,minutes and seconds.
Select the Page letter torun when the "target" isreached.
Sets the counter on thesign for the specifiedentries.

28
Send by Schedule
The Send by Schedule icon is used to schedule a message to be sentfrom the computer to sign on the specified date and time. In order for this
feature to work, the sign MUST always be connected to the computer. In addi-tion, the Pro-Lite Software program must be running in the background mode.To run the software in the background mode, simply start the TruColorlISoftware program and minimize the screen.
1. Click on the Send by Schedule icon on the toolbar.
• To set-up a new schedule, click on "Add". Go to Step 2• To modify an existing schedule, click on the schedule you wish to
modify then click on "Modify".• To delete an existing schedule, click on the schedule you wish to
delete, then click on "Delete".
2. Setting a new schedule.
• Click on "Browse" to select an existing message file to schedule.• Enter the "Date" & "Time" you want the message to be sent to the
sign. NOTE: Hour must be entered as military time (1 p.m.=13).• Enter the "Sign ID Number" from page 23.• Select the "Page Number" you want the message to be sent to.
Use to repeat the messageHOURLY, DAILY, or MONTHLY.If HOURLY, is selected, the entriesentered in the Date window will beignored.If DAILY is selected. the date entered inthe Date window will be ignored.If MONTHLY, is selected, the monthentered in the Date window will beignored.Schedules are based using the clockfrom the computer.

LAN Communication
HOW IT WORKSThe display is first connected to the Serial Communication Port of a
computer in the LAN environment which we refer to as the Receiving SlaveComputer (RSC). The computer that will actually be transmitting messages tothe display is referred to as the Transmitting Master Computer (TMC). The TMCwill have the display control software installed. It is not necessary to install thesoftware on the RSC. The next step is to set-up a Generic/ Text Only printerdriver on the RSC and share it with the TMC. Once the set-up is done and amessage created, a simple click on the button for "Send via Network" will bringup the "PRINT" dialog window. You then select the Generic/Text Only printercreated and click on "OK" and your message is on its way.
• RSC Printer Driver Set -Up1. Begin by clicking on "Start", "Settings", and "Printers". The "Printer" dia-
log window will appear.2. Double-click on the "Add Printer" icon. The "Add Printer Wizard" window
will appear.3. Click on "Next". Select "Local printer" and click on "Next" again.4. Under "Manufacturers", search for "Generic". Select "Generic" and click
on "Next". If prompted: "A driver is already installed for this printer", then select to "Keep existing driver" and click on "Next".
5. Select the Communications Port on the RSC the display will be connected to and click on "Next". For Example: If the display is connected to COM1, select "COM1".
L.E.D. SIGN
LAN(Local Area Network) RSCTMC
29

6. Under "Printer name", type in the name you want for the Display Printer Driver. This name must be 12 characters in length. Write the "Printer name" below.
Printer name: ______________________________
In the example below we used the initials "F.D." to represent "Front Desk". Select "No" to select the printer as the default printer and click on "Next".
7. Click on "Finish" to complete the set-up. If prompted for the Windows 95 CD or disk, insert CD or disk into the proper drive and click "OK".
8. Now select the printer you created. Go to "File" and click on "Properties".9. Click on the "Details" tab then click on "Port Settings".10. Make sure the settings below are set accordingly. Click on "OK" when
done.
11. Click on the "Sharing" tab and click on "Shared As". In the "Share Name"box, type in the 12 character "Printer name" you used in step 6. If you want to "password protect" the use of the Display Printer Driver, type in a password in the "Password" box. Only the user with the password can access the "Printer Driver" to send a message to the display.
12. RSC Printer Driver set -up complete.
Set to the "BAUD RATE"setting on PAGE 23.
Settings should beas shown.
30

• TMC Printer Driver Set -Up1. Click on "Start", "Settings", and "Printers". The "Printer" dialog window
will appear.2. Double-click on the "Add Printer" icon. The "Add Printer Wizard" window
will appear.3. Click on "Next". Select "Network printer" and click on "Next" again.4. Select "No" to print from "MS-DOS-based programs". Click on "Browse".5. Double-click on the name of the RSC on the network and select the Display
Printer Driver created.
6. Click on "OK". Now click on "Next".7. Under "Printer name", type in the 12 character "Printer name" used in
Step 6 of the RSC Printer driver set-up.8. Select "No" to select the printer as the default printer and click on "Next".9. Click on "Finish" to complete the set-up. If prompted for the Windows 95
CD or disk, insert CD or disk into the proper drive and click "OK".10. TMC Printer Driver set -up complete.
• SENDING A MESSAGE through the LAN1. Start the TruColorII Software program. Create your message.2. Click on “S*” for "Send via Network". Input the "Sign ID Number" and
"Page Number", Now click on "OK".3. Select the Display Printer Driver from the Printer Name box and click on
"OK". Message sent successfully!
31

32
HELP SECTION - SOFTWARECan I assign an IP address to the Pro-Lite sign?This can only be done with a partnering device such as a LAN serial server. Youcan purchase one directly from Pro-Lite. Ask for the Mini-Web!
How do I display the current Count Variables in my message1. Go to the part of your message where you want the Current Count
Variable to be displayed.2. Click on Commands on the menu bar, then click on Target.3. Click on the Current Count Variable you wish to use.
If you used the Set Target to "count up" to a target, you can only select to usethe variables labeled with (Count Up).If you used the Set Target to "count down" to a target. you can only select touse the variables labeled with (Count Down).
How do I run multiple Pages using the "Link Page" command.PLEASE NOTE: If your Pages have already been sent to the sign, you cannotautomatically run multiple pages. Use the example format given below to runmultiple pages. Example: we want Pages A, B, and C to run as one message,
1. Open an existing file or begin to type your message for Page A.2. Place the cursor at the end of the message.3. Insert the "Link Page" command. To insert the "Link Page" command
in your message, click on "Commands" on the menu bar, then click on"Special", and "Link Page".
4. Now enter the letter of the Page you wish to run after Page A is done.The Page letter must be in upper-case.
5. Using our example, your message should look similar to the following:
THIS IS YOUR MESSAGE FOR PAGE A. <Link Page>B
6. Now send your message to Page A.7. Following steps 1 -5, do the same for Page B.
THIS IS YOUR MESSAGE FOR PAGE B.<Link Page>C
8. Now send your message to Page B.9. Following steps 1 -5, do the same for Page C.
THIS IS YOUR MESSAGE FOR PAGE C.<Link Page>A
10. Send your message to Page C.11. Now run Page A. To run Page A, go to “Functions” and “Run Page”.
Enter your Sign ID Number and select “Page Number = A”. Now clickon “OK”
As you can see from our example, each Page is linked to another Page usingthe “Link Page” command.
?

33
How do I turn my sign OFF and ON automatically everyday.In order for this feature to work, the sign MUST always be connected to thecomputer and the TruColorII softtware minimized in the background.
1. Program an ON message. Save the message to the computer.2. Use the "Set By Schedule" feature and set your ON message to
come ON "daily" at a specified time. See Page 28.3. Click on "OK" to confirm your entries.4. Program an OFF message (edit a page with only a "space")5. Save the message to the computer.6. Set another schedule to have the OFF message come ON "daily" at
a specified time. See Page 28 for more information.7. Click on "OK" to confirm your entries.
Your messages will automatically be sent to the sign at the specified times.When the Off message is sent to the sign, it will only run the "space" you pro-grammed and will appear as if the sign is OFF.
The software is not communicating with the sign?Use the checklist below to verify your settings.
I have found the Baud Rate and ID settings of the sign and entered them into the software. Page 23-24.I am using the cable supplied by Pro-Lite. Page 23.
NOTE: Do not substitute the provided communication cable in any way.
I have connected the 9-Pin connector end of the Pro-Lite cable to a Com Port on my computer that is free. Page 23.Start the Tru-ColorIl software program. Click on "Help" and "Send".
Type in the following text (uppercase letters only): <ID01><RST> Now click on"OK". The Sign should quickly show "CHECKING", then revert to the factorydemo message. Now try to send your message.
"SEND MESSAGE FAIL".If the error message is "SEND MESSAGE FAIL", this means the Com Port youhave selected is not available for your use or is being used by an internaldevice in your computer. A computer normally has 4 COM PORTS. Two externalports which are available to connect external devices to the computer and twointernal ports which are available, in most cases, for computer use only. Pleasecheck the back of your computer to see if it is labeled COM1 or COM2. If not,please refer to your computer user's manual or contact the computer manufac-turer for more information.
My laptop does not have any Com Ports and only has support for USBdevices.Some newer laptops do not have Com Ports and only support USB devices(please reference your Laptop User’s Manual to verify this). For this situationyou will need to purchase a USB Serial Adapter directly from Pro-Lite (seeAccessories Brochure) or from your local computer store. This device will con-vert one of your available USB ports to a working Com Port. Pro-Lite does notguarantee that this device will work with all laptops due to other devicesinstalled by user and varying manufacturers equipment.

34
ARE YOU STILL HAVING PROBLEMS?• Review this manual• World Wide Web: http://www.pro-lite.com/support• E-mail: [email protected]
CONTACTING TECHNICAL SUPPORTBefore contacting Technical Support, please have the following informationready:1. MODEL NUMBER (found on the back panel of the display)2. DATE OF PURCHASE3. SIGN VERSION (Press RUN/STOP , then press the letter V )
Phone: (714) 668-9988 x106
Fax: (714) 668-9980
Email: [email protected]
Online: http://www.pro-lite.com/support
RETURN FOR REPAIR PROCEDUREPLEASE NOTE: Out of warranty units or units returned for which a Warranty RegistrationCard has not been returned will be repaired or replaced at Pro-Lite, Inc.'s option and thecustomer will be charged for parts, labor, and shipping.
PLEASE FOLLOW THE PROCEDURES LISTED BELOW:• Contact Pro-Lite, Inc. to obtain a Return Materials Authorization (RMA) number at
(714)668-9988. Units will be refused if no RMA number is found on the package.• Ship the unit in its original container postage paid. If the original container is not
available, pack the unit in a strong box made of corrugated cardboard with plenty of packing material.
• Include the following information when returning the unit:
Pro-Lite, Inc.Technical Support Department3505 Cadillac Ave. Bldg. DCosta Mesa, CA 92626RMA #
• Include a letter with a brief description of the problem.• All units returned to Pro-Lite, Inc. for repair must be shipped postage paid with track-
ing capability. Units shipped COD will not be accepted. Pro-Lite accepts no responsi-bility for lost or damaged packages sent via mail or parcel company.
?

ONE YEAR LIMITED WARRANTYPRO-LITE, INC. warrants to the original consumer that each of its PRO-LITE products and all components thereincontained will be free from defects in materials and/or workmanship for one year from the date of purchase. Any war-ranty hereunder is extended only to the original consumer purchaser and is not assignable.
In the event of malfunction or other indication of failure attributable directly to faulty workmanship and/or material,PRO-LTTE, INC will at its option, repair or replace said products or components to whatever extent it shall deemnecessary to restore said product to proper operating condition, provided the consumer purchaser has previouslyreturned the enclosed Warrants Registration Card to PROLITE, INC. Before returning a product for repair, the cus-tomer must call PRO-LITE, INC. Customer Service at (714) 668-9988 for a Return Materials Number. This numbershould be included with the customer's mailing address and telephone number when the product is returned.Products should be returned to: PRO-LITE, INC., Attention: Warranty/Repair, 3505 Cadillac Ave. Bldg. D, CostaMesa, CA 92626 (postage prepaid). During the first year after the date of purchase, all labor and materials will beprovided without charge. There shall be no warranty for either parts or labor after the expiration of one year from thedate of purchase. PRO-LITE, INC does not warranty bulbs in combivision or fluorescent board products.
Units must be returned postage prepaid. It is recommended that the unit be insured when shipped. Units returned forwhich a Warranty Registration Card has not been submitted or out-of-warranty units returned will be repaired orreplaced (at the option of PRO-LITE, INC) and the customer will be charged for parts and labor
Products will be returned to customer after repair or replacement has been completed by carrier and method chosenby PRO-LITE, INC. to any destination within the United States of America. Should the customer desire some otherspecific form of conveyance, or be located outside the border of the U. S. then the customer must bear the cost ofreturn shipment.
The customer shall be solely responsible for failure of any PRO-LITE, INC. product or component thereof, resultingfrom accident, abuse or misapplication of the product, and PRO-LITE, INC. assumes no liability as a consequence ofsuch events under the terms of the Warranty.
This Warranty gives you specific legal rights and you also have other rights that vary from state to state.
This Warranty is in lieu of all other express warranties, which now or hereafter might otherwise arise with respect tothis product. ANY AND ALL IMPLIED WARRANTIES OF MERCHANTABILITY AND FITNESS FOR PARTICULARUSE SHALL HAVE NO GREATER DURATION THAN THE PERIOD FOR THE EXPRESS WRITTEN WARRANTYAPPLICABLE TO THIS PRODUCT AS SHOWN ABOVE AND SHALL TERMINATE AUTOMATICALLY AT THE EXPI-RATION OF SUCH PERIOD. No action shall be brought for breach of any implied or express warranty after one yearsubsequent to the expiration of the period of the express written warranty. (Some states do not allow limitations orhow long an implied warranty lasts, so this limitation may not apply to you.)
Incidental and consequential damages caused by malfunctions, defect, or otherwise and with respect to breach ofany express or implied warranty, are not the responsibility of PRO-LITE, INC. and to the extent permitted by law arehereby excluded both for property and, to the extent of unconscionable, for personal injury damage. (Some states donot allow the exclusion or limitations of incidental or consequential damages, so the above may not apply to you.)
OTHER PRO-LITE PRODUCTS• OUTDOOR LED DISPLAYS • INDOOR/ OUTDOOR LED CLOCKS• MULTI-LINE LED DISPLAYS • RATE EXCHANGE LED BOARDS
• CUSTOM LED DISPLAYS • ELECTRONIC DIRECTORY BOARDS• FLIGHT INFORMATION SYSTEMS • QUEUEING SYSTEMS
• POINT-OF-PURCHASE LED ELECTRONICS • LED OPEN SIGNS
Please call (714) 668-9988 to receive more information on the abovePro-Lite products. Pro-Lite is a design, engineering, and manufacturer of a widearray of electronic LED products for indoor and outdoor use. View our complete
product line on the World Wide Web at
www.pro-lite.com