manual projetores
DESCRIPTION
manualTRANSCRIPT

PowerLite® 520/525W/530/535WUser's Guide


ContentsPowerLite 520/525W/530/535W User's Guide............................................................................................ 9Introduction to Your Projector ................................................................................................................. 10
Projector Features.............................................................................................................................. 10Product Box Contents.................................................................................................................... 11Additional Components ................................................................................................................ 13Optional Equipment and Replacement Parts................................................................................. 13Warranty and Registration Information .......................................................................................... 15
Notations Used in the Documentation ................................................................................................ 15Where to Go for Additional Information .............................................................................................. 15Projector Part Locations ..................................................................................................................... 16
Projector Parts - Front/Top ............................................................................................................ 17Projector Parts - Rear .................................................................................................................... 18Projector Parts - Base.................................................................................................................... 20Projector Parts - Control Panel ...................................................................................................... 21Projector Parts - Remote Control................................................................................................... 22
Setting Up the Projector ........................................................................................................................... 24Projector Placement........................................................................................................................... 24
Projector Setup and Installation Options ....................................................................................... 24Projection Distance........................................................................................................................ 26
Projector Connections........................................................................................................................ 32Connecting to Computer Sources.................................................................................................. 33
Connecting to a Computer for USB Video and Audio................................................................ 33Connecting to a Computer for VGA Video................................................................................. 34Connecting to a Computer for HDMI Video and Audio .............................................................. 35Connecting to a Computer for USB Mouse Control................................................................... 35Connecting to a Computer for Sound........................................................................................ 36
Connecting to Video Sources ........................................................................................................ 36Connecting to an HDMI Video Source ...................................................................................... 37Connecting to a Component-to-VGA Video Source .................................................................. 37Connecting to a Composite Video Source ................................................................................ 38
3
Connecting to an S-Video Video Source................................................................................... 38Connecting to a Video Source for Sound .................................................................................. 39
Connecting to an External Computer Monitor................................................................................ 40Connecting to External Speakers .................................................................................................. 41Connecting a Microphone.............................................................................................................. 41Connecting to External USB Devices ............................................................................................ 42
USB Device Projection.............................................................................................................. 42Connecting a USB Device or Camera to the Projector.............................................................. 43Selecting the Connected USB Source ...................................................................................... 44Disconnecting a USB Device or Camera From the Projector .................................................... 44
Connecting to a Document Camera .............................................................................................. 44Installing Batteries in the Remote Control .......................................................................................... 45
Using the Projector on a Network ............................................................................................................ 47Wired Network Projection................................................................................................................... 47
Connecting to a Wired Network ..................................................................................................... 48Selecting Wired Network Settings ................................................................................................. 48
Wireless Network Projection .............................................................................................................. 51Installing the Wireless LAN Module ............................................................................................... 52Using Quick Wireless Connection (Windows Only) ....................................................................... 54Selecting Wireless Network Settings Manually.............................................................................. 55
Wireless LAN Menu Settings .................................................................................................... 57Selecting Wireless Network Settings in Windows.......................................................................... 58Selecting Wireless Network Settings in OS X................................................................................ 59Setting Up Wireless Network Security ........................................................................................... 59
Wireless Security Menu Settings .............................................................................................. 60Setting Up Projector Network E-Mail Alerts ........................................................................................ 61
Network Projector E-mail Alert Messages ..................................................................................... 62Setting Up Monitoring Using SNMP ................................................................................................... 62Controlling a Networked Projector Using a Web Browser .................................................................. 64Crestron RoomView Support.............................................................................................................. 66
Setting Up Crestron RoomView Support ....................................................................................... 66Controlling a Networked Projector Using Crestron RoomView...................................................... 67
4
Using Basic Projector Features ............................................................................................................... 69Turning On the Projector .................................................................................................................... 69Turning Off the Projector .................................................................................................................... 70Selecting the Language for the Projector Menus................................................................................ 72Adjusting the Image Height ................................................................................................................ 72Image Shape...................................................................................................................................... 74
Correcting Image Shape with Quick Corner .................................................................................. 74Correcting Image Shape with the Keystone Buttons...................................................................... 76
Resizing the Image with the Wide and Tele Buttons .......................................................................... 78Focusing the Image Using the Focus Ring......................................................................................... 78Remote Control Operation ................................................................................................................. 79
Using the Remote Control as a Wireless Mouse ........................................................................... 80Using the Remote Control as a Pointer.......................................................................................... 81
Selecting an Image Source ................................................................................................................ 82Projection Modes ............................................................................................................................... 84
Changing the Projection Mode Using the Remote Control ............................................................ 84Changing the Projection Mode Using the Menus........................................................................... 85
Image Aspect Ratio ............................................................................................................................ 85Changing the Image Aspect Ratio ................................................................................................. 86Available Image Aspect Ratios ...................................................................................................... 86
Color Mode......................................................................................................................................... 87Changing the Color Mode.............................................................................................................. 88Available Color Modes................................................................................................................... 88Turning On Auto Iris....................................................................................................................... 89
Controlling the Volume with the Volume Buttons................................................................................ 90Projecting a PC Free Presentation ..................................................................................................... 90
Slideshow Features....................................................................................................................... 91Supported PC Free File Types ...................................................................................................... 91Starting a Slide Show .................................................................................................................... 92
Display Options......................................................................................................................... 94Adjusting Projector Features ................................................................................................................... 96
Shutting Off the Picture and Sound Temporarily ................................................................................ 96Stopping Video Action Temporarily .................................................................................................... 96
5
Zooming Into and Out of Images ........................................................................................................ 97Projector Security Features................................................................................................................ 98
Password Security Types .............................................................................................................. 98Setting a Password ................................................................................................................... 98Selecting Password Security Types........................................................................................ 100Entering a Password to Use the Projector............................................................................... 101Saving a User's Logo Image to Display................................................................................... 102
Locking the Projector's Buttons ................................................................................................... 104Unlocking the Projector's Buttons ........................................................................................... 105
Installing a Security Cable ........................................................................................................... 105Creating a User Pattern to Display ................................................................................................... 105
Adjusting the Menu Settings .................................................................................................................. 107Using the Projector's Menus............................................................................................................. 107Image Quality Settings - Image Menu .............................................................................................. 109Input Signal Settings - Signal Menu.................................................................................................. 111Projector Feature Settings - Settings Menu...................................................................................... 114Projector Setup Settings - Extended Menu....................................................................................... 116Projector Network Settings - Network Menu..................................................................................... 120Projector Setup Settings - ECO Menu.............................................................................................. 122Projector Information Display - Info Menu ........................................................................................ 124
Event ID Code List....................................................................................................................... 125Projector Reset Options - Reset Menu............................................................................................. 126
Maintaining and Transporting the Projector ......................................................................................... 128Projector Maintenance ..................................................................................................................... 128
Cleaning the Lens........................................................................................................................ 128Cleaning the Projector Case........................................................................................................ 129Air Filter and Vent Maintenance .................................................................................................. 129
Cleaning the Air Filter and Vents............................................................................................. 130Replacing the Air Filter............................................................................................................ 132
Projector Lamp Maintenance....................................................................................................... 134Replacing the Lamp ................................................................................................................ 135Resetting the Lamp Timer....................................................................................................... 140
Replacing the Remote Control Batteries ..................................................................................... 141
6

Transporting the Projector................................................................................................................ 142Solving Problems .................................................................................................................................... 144
Projection Problem Tips ................................................................................................................... 144Projector Light Status ....................................................................................................................... 145Using the Projector Help Displays .................................................................................................... 147Solving Image or Sound Problems ................................................................................................... 148
Solutions When No Image Appears............................................................................................. 148Solutions When Image is Incorrect Using the USB Display Function .......................................... 149Solutions When "No Signal" Message Appears........................................................................... 150
Displaying From a PC Laptop ................................................................................................. 150Displaying From a Mac Laptop ............................................................................................... 150
Solutions When "Not Supported" Message Appears ................................................................... 151Solutions When Only a Partial Image Appears ............................................................................ 151Solutions When the Image is Not Rectangular ............................................................................ 151Solutions When the Image Contains Noise or Static ................................................................... 152Solutions When the Image is Fuzzy or Blurry .............................................................................. 153Solutions When the Image Brightness or Colors are Incorrect .................................................... 153Solutions to Sound Problems ...................................................................................................... 154Solutions to Microphone Problems .............................................................................................. 154
Solving Projector or Remote Control Operation Problems ............................................................... 155Solutions to Projector Power or Shut-Off Problems..................................................................... 155Solutions to Problems with the Remote Control........................................................................... 156Solutions to Password Problems................................................................................................. 156
Solving Network Problems ............................................................................................................... 157Solutions When Network Alert E-Mails are Not Received............................................................ 157Solutions When You Cannot Access the Projector Through the Web ......................................... 158
Where to Get Help............................................................................................................................ 158Technical Specifications ........................................................................................................................ 160
General Projector Specifications ...................................................................................................... 160Projector Lamp Specifications.......................................................................................................... 163Remote Control Specifications ......................................................................................................... 164Projector Dimension Specifications.................................................................................................. 164Projector Electrical Specifications .................................................................................................... 164
7
Projector Environmental Specifications............................................................................................ 166Projector Safety and Approvals Specifications................................................................................. 166Supported Video Display Formats.................................................................................................... 166USB Display System Requirements ................................................................................................. 169
Notices ..................................................................................................................................................... 170Recycling.......................................................................................................................................... 170Important Safety Information ............................................................................................................ 170Important Safety Instructions............................................................................................................ 171
Restriction of Use ........................................................................................................................ 173FCC Compliance Statement............................................................................................................. 174Trademarks...................................................................................................................................... 175Open Source Software License........................................................................................................ 175Copyright Notice............................................................................................................................... 220
A Note Concerning Responsible Use of Copyrighted Materials................................................... 221Copyright Attribution.................................................................................................................... 221
8
PowerLite 520/525W/530/535W User's GuideWelcome to the PowerLite 520/525W/530/535W User's Guide.
9

Introduction to Your ProjectorRefer to these sections to learn more about your projector and this manual.Projector FeaturesNotations Used in the DocumentationWhere to Go for Additional InformationProjector Part Locations
Projector FeaturesThe PowerLite 520/525W/530/535W projectors include these special features:Short-throw projection system• Project an 87-inch (221 cm) image (16:10) from just 35.7 inches (90 cm) away with WXGA models• Easily mounted to the wall for fast, low-cost installations• Ideal for use with interactive whiteboards• Reduced shadow interference and glareBright, high-resolution projection system• PowerLite 520: Up to 2700 lumens of color brightness (color light output) and 2700 lumens of white
brightness (white light output)PowerLite 525W: Up to 2800 lumens of color brightness (color light output) and 2800 lumens of whitebrightness (white light output)PowerLite 530: Up to 3200 lumens of color brightness (color light output) and 3200 lumens of whitebrightness (white light output)PowerLite 535W: Up to 3400 lumens of color brightness (color light output) and 3400 lumens of whitebrightness (white light output)
Note: Color brightness (color light output) and white brightness (white light output) will vary dependingon usage conditions. Color light output measured in accordance with IDMS 15.4; white light outputmeasured in accordance with ISO 21118.
• PowerLite 520/530: Native resolution of 1024 × 768 pixels (XGA)PowerLite 525W/535W: Native resolution of 1280 × 800 pixels (WXGA)
10
Flexible connectivity• Plug-and-play 3-in-1 USB projection, audio, and mouse control for instant setup• HDMI port for computer or video device connection• Wired network support for projection, monitoring, and control via remote network computer• Optional wireless network support, including video and audio transfer• PC Free photo slide shows via connected USB memory devices or Epson document camera• Dual VGA ports for connections by multiple presenters• Port for connecting an external monitor or second projector• Port for connecting a microphoneInnovative display and operation features• Low total cost of ownership with long-life projector lamp and high-efficiency air filter• High zoom ratio for larger images in shorter projection distances• 16000:1 contrast ratio and Auto Iris control for crisply detailed images• Built-in closed captioning decoder• Powerful 16 W speaker system with audio out port for connecting external speakers• Epson's Instant Off and Direct Power On features for quick setup and shut down• Support for Crestron RoomView network monitoring systems• Network message broadcast system to project timely messages to all networked projectorsProduct Box ContentsAdditional ComponentsOptional Equipment and Replacement PartsWarranty and Registration InformationParent topic: Introduction to Your ProjectorRelated conceptsProjector Part Locations
Product Box ContentsSave all the packaging in case you need to ship the projector. Always use the original packaging (orequivalent) when shipping.
11
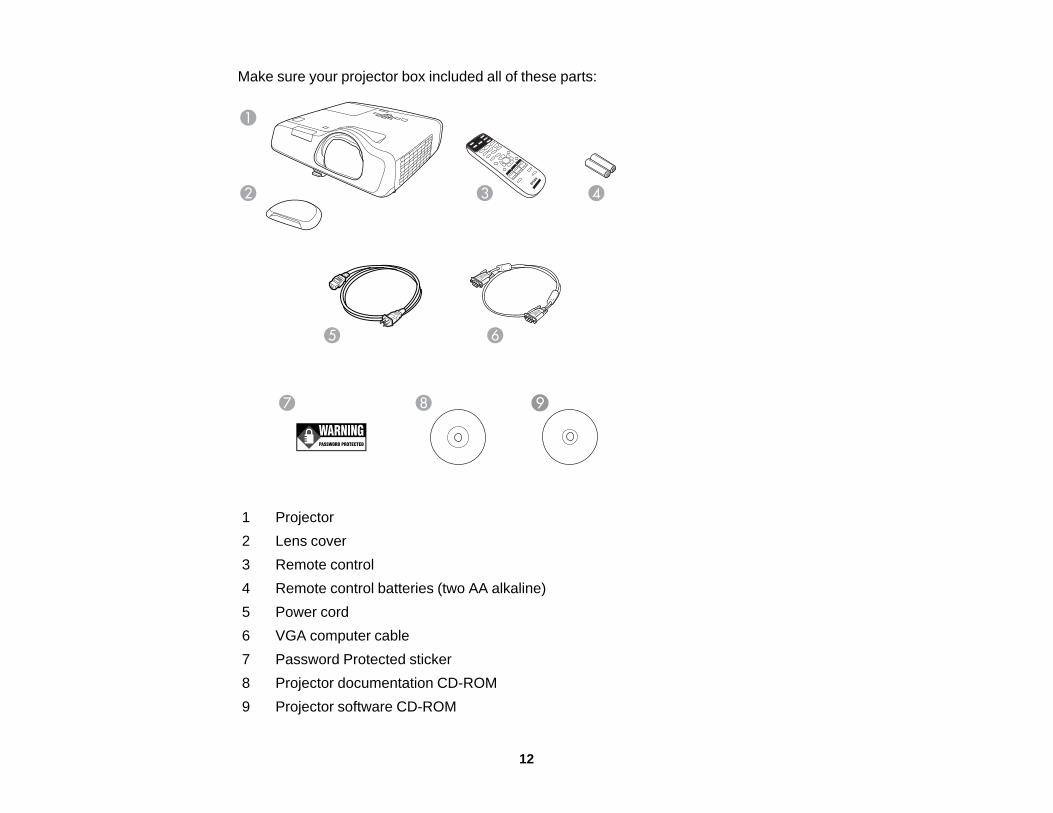
Make sure your projector box included all of these parts:
1 Projector2 Lens cover3 Remote control4 Remote control batteries (two AA alkaline)5 Power cord6 VGA computer cable7 Password Protected sticker8 Projector documentation CD-ROM9 Projector software CD-ROM
12
Parent topic: Projector FeaturesRelated conceptsProjector Connections
Additional ComponentsDepending on how you plan to use the projector, you may need to obtain the following additionalcomponents:• To receive an S-Video signal, you need an S-Video cable compatible with your device. See your local
computer or electronics dealer for purchase information.• To receive a component video signal, you need a D-sub, 15-pin, component-to-VGA video cable. You
can purchase one from Epson or an authorized Epson reseller.• To receive an HDMI signal, you need a compatible HDMI cable. You can purchase one from Epson or
an authorized Epson reseller.
Note: To connect a Mac that includes only a Mini DisplayPort, Thunderbolt port, or Mini-DVI port forvideo output, you need to obtain an adapter that allows you to connect to the projector's HDMI port.Contact Apple for compatible adapter options. Older Mac computers (2009 and earlier) may notsupport audio through the HDMI port.
• To project with audio from certain ports, you may need a commercially available audio cablecompatible with your device. See your local computer or electronics dealer for purchase information.
• To connect a Mac that includes only a Mini DisplayPort, Thunderbolt port, or Mini-DVI port for videooutput to the projector's VGA video port, you need to obtain an adapter. Contact Apple for compatibleadapter options.
Parent topic: Projector Features
Optional Equipment and Replacement PartsYou can purchase screens, other optional accessories, and replacement parts from an Epson authorizedreseller. To find the nearest reseller, call 800-GO-EPSON (800-463-7766). Or you can purchase onlineat epsonstore.com (U.S. sales) or epson.ca (Canadian sales).Epson offers the following optional accessories and replacement parts for your projector:
Option or part Part numberGenuine Epson replacement lamp (ELPLP87) V13H010L87
13

Option or part Part numberAir filter replacement (ELPAF47) V13H134A47Wireless LAN module (ELPAP07) V12H418P12Quick Wireless Connection USB key (ELPAP09) V12H005M09Epson DC-06 document camera (ELPDC06) V12H321005Epson DC-11 document camera (ELPDC11) V12H377020Epson DC-12 document camera (ELPDC12) V12H594020Epson DC-20 document camera (ELPDC20) V12H500020PowerLite Pilot 2 (ELPCB02) V12H614020Active speakers (ELPSP02) V12H467020Short Throw Wall Mount (ELPMB45) V12H706020Universal projector ceiling mount ELPMBPJFAdjustable suspended ceiling channel kit ELPMBP01False ceiling plate kit ELPMBP02Structural round ceiling plate ELPMBP03Adjustable extension column (pipe) 8" - 11" (20 to 28 cm) ELPMBC01Kensington security lock ELPSL01Accolade Duet portable projector screen ELPSC80ES-3000 Ultra portable projector screen (ELPSC26H) V12H002S3YES-1000 portable screen V12H002S4YComponent-to-VGA video cable (ELPKC19) V12H005C191-Year Extended Depot Repair Service Plan EPPFTPA11-Year Extended Exchange Warranty EPPEXPA12-Year Extended Depot Repair Service Plan EPPFTPA22-Year Extended Exchange Warranty EPPEXPA2
Parent topic: Projector Features
14

Warranty and Registration InformationYour projector comes with a basic warranty that lets you project with confidence. For details, see thewarranty that came with your projector.In addition, Epson offers free Extra Care Road Service. In the unlikely event of an equipment failure, youwon’t have to wait for your unit to be repaired. Instead, Epson will ship you a replacement unit anywherein the United States, Canada, or Puerto Rico. See the Extra Care Road Service brochure for details.Register your product online using the projector CD or at this site: epson.com/webreg.Registering also lets you receive special updates on new accessories, products, and services.Parent topic: Projector Features
Notations Used in the DocumentationFollow the guidelines in these notations as you read your documentation:• Warnings must be followed carefully to avoid bodily injury.• Cautions must be observed to avoid damage to your equipment.• Notes contain important information about your projector.• Tips contain additional projection information.Parent topic: Introduction to Your Projector
Where to Go for Additional InformationNeed quick help on using your projector? Here's where to look for help:• Built-in help system
Press the Help button on the remote control or projector to get quick solutions to common problems.• epson.com/support (U.S) or epson.ca/support (Canada)
View FAQs (frequently asked questions) and e-mail your questions to Epson technical support 24hours a day.
• For detailed instructions on using your projector in a network environment, see the EasyMP NetworkProjection Operation Guide.
• For detailed instructions on monitoring your projector in a network environment (Windows only), seethe EasyMP Monitor Operation Guide.
• For detailed instructions on using your projector to hold interactive meetings in a network environment,see the EasyMP Multi PC Projection Operation Guide.
15

• If you still need help after checking this manual and the sources listed above, you can use the EpsonPrivateLine Support service to get help fast. For details, see "Where to Get Help".
Parent topic: Introduction to Your ProjectorRelated referencesWhere to Get Help
Projector Part LocationsCheck the projector part illustrations to learn about the parts on your projector.Projector Parts - Front/TopProjector Parts - RearProjector Parts - BaseProjector Parts - Control PanelProjector Parts - Remote ControlParent topic: Introduction to Your Projector
16

Projector Parts - Front/Top
1 Remote control receiver2 Foot release lever3 Front adjustable foot4 Projector lens5 Air intake vent (air filter)6 Focus ring7 Control panel8 Lamp cover
17

9 Exhaust vent10 A/V Mute button11 Lens cover
Parent topic: Projector Part Locations
Projector Parts - Rear
1 Power inlet2 S-Video port3 RS-232C port4 Video port5 L-Audio-R ports6 Mic (microphone) port7 Monitor Out port8 Audio1 port9 Audio Out port
18

10 Audio2 port11 Speaker12 HDMI port13 Computer2 port14 Computer1 port15 Remote receiver16 Network (LAN) port17 USB-B port18 USB-A port19 Wireless LAN unit cover screw
Parent topic: Projector Part Locations
19

Projector Parts - Base
1 Ceiling mount holes (3)2 Wall mount holes (5)3 Security cable attachment point4 Rear feet5 Front adjustable foot
20

Parent topic: Projector Part Locations
Projector Parts - Control Panel
1 Status lights2 Source Search button (searches for connected video sources)3 Enter button (selects options)4 Vertical keystone adjustment buttons (adjust screen shape) and arrow buttons5 Help button (accesses projector help information)6 Esc button (cancels/exits functions)7 Wide/Tele buttons (adjust projected image size), horizontal keystone adjustment buttons (adjust
screen shape), and arrow buttons8 Menu button (accesses projector menu system)9 Power button and light
Parent topic: Projector Part LocationsRelated referencesProjector Light Status
21

Projector Parts - Remote Control
1 Power button
22

2 Computer button (cycles through connected computer sources)3 Video button (cycles through connected video sources)4 Numeric buttons (enter numbers)5 Auto button (automatically adjusts position, tracking, and sync settings)6 Aspect button (selects the image aspect ratio)7 Num button (when held down, switches numeric buttons to number function)8 Menu button (accesses projector menu system)9 Arrow buttons (move through on-screen options and control wireless mouse functions)10 Enter button (selects options and controls wireless mouse functions)11 User button (customizable for different functions)12 Page up/down buttons (control presentation slides)13 E-Zoom +/– buttons (zoom into and out of the image)14 A/V Mute button (turns off picture and sound)15 Help button (accesses projector help information)16 Freeze button (stops video action)17 Volume up/down buttons (adjust speaker volume)18 Pointer button (activates on-screen pointer)19 Esc button (cancels/exits functions and controls wireless mouse functions)20 Pen Mode button (not active)21 Color Mode button (selects display modes)22 MHL Menu button (not active)23 LAN button (cycles between network and optional Quick Wireless Connection USB Key sources)24 USB button (cycles through connected USB sources)25 Source Search button (searches for connected sources)
Parent topic: Projector Part LocationsRelated referencesRemote Control Operation
23

Setting Up the ProjectorFollow the instructions in these sections to set up your projector for use.Projector PlacementProjector ConnectionsInstalling Batteries in the Remote Control
Projector PlacementYou can place the projector on almost any flat surface to project an image.You can also install the projector in a ceiling or wall mount if you want to use it in a fixed location.Keep these considerations in mind as you select a projector location:• Place the projector on a sturdy, level surface or install it using a compatible mount.• Leave plenty of space around and under the projector for ventilation, and do not place it on top of or
next to anything that could block the vents.• Position the projector within reach of a grounded electrical outlet or extension cord.Projector Setup and Installation OptionsProjection DistanceParent topic: Setting Up the Projector
Projector Setup and Installation OptionsYou can set up or install your projector in the following ways:Front
24
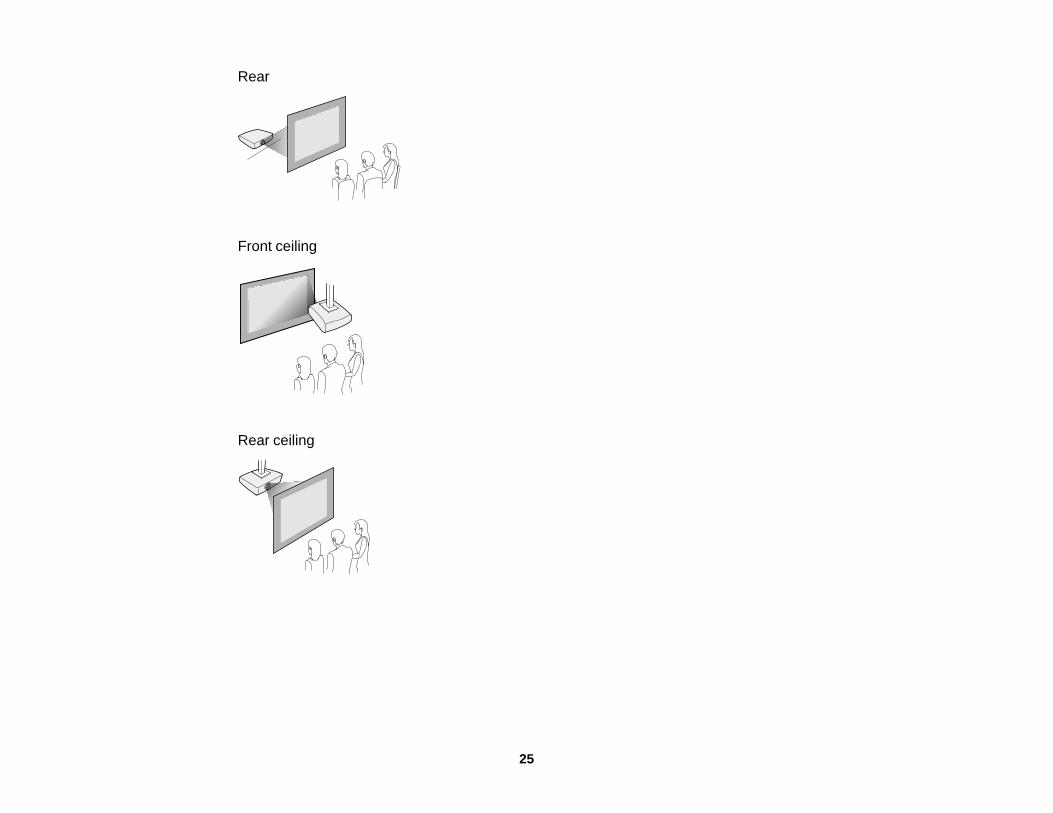
Rear
Front ceiling
Rear ceiling
25

Wall-mounted
Wherever you set up the projector, make sure to position it squarely in front of the screen, not at anangle.If you project from the ceiling or wall, or from the rear, be sure to select the correct Projection option inthe projector's menu system.Parent topic: Projector PlacementRelated referencesProjector Setup Settings - Extended Menu
Projection DistanceThe distance at which you place the projector from the screen determines the approximate size of theimage. The image size increases the farther the projector is from the screen, but can vary depending onthe zoom factor, aspect ratio, and other settings.Use the tables here to determine approximately how far to place the projector from the screen based onthe size of the projected image. (Conversion figures may have been rounded up or down.) You can alsouse the projector Throw Distance Calculator at epson.com/support (U.S.) or epson.ca/support (Canada).
26

PowerLite 520/530
4:3 Aspect RatioScreen or image Projection distance (1) Offset from lens center (2)size Wide to Tele50 inches 21 to 29 inches (55 to 75 cm) 2.5 inches (6 cm)60 inches 26 to 36 inches (66 to 90 cm) 3.1 inches (8 cm)
27
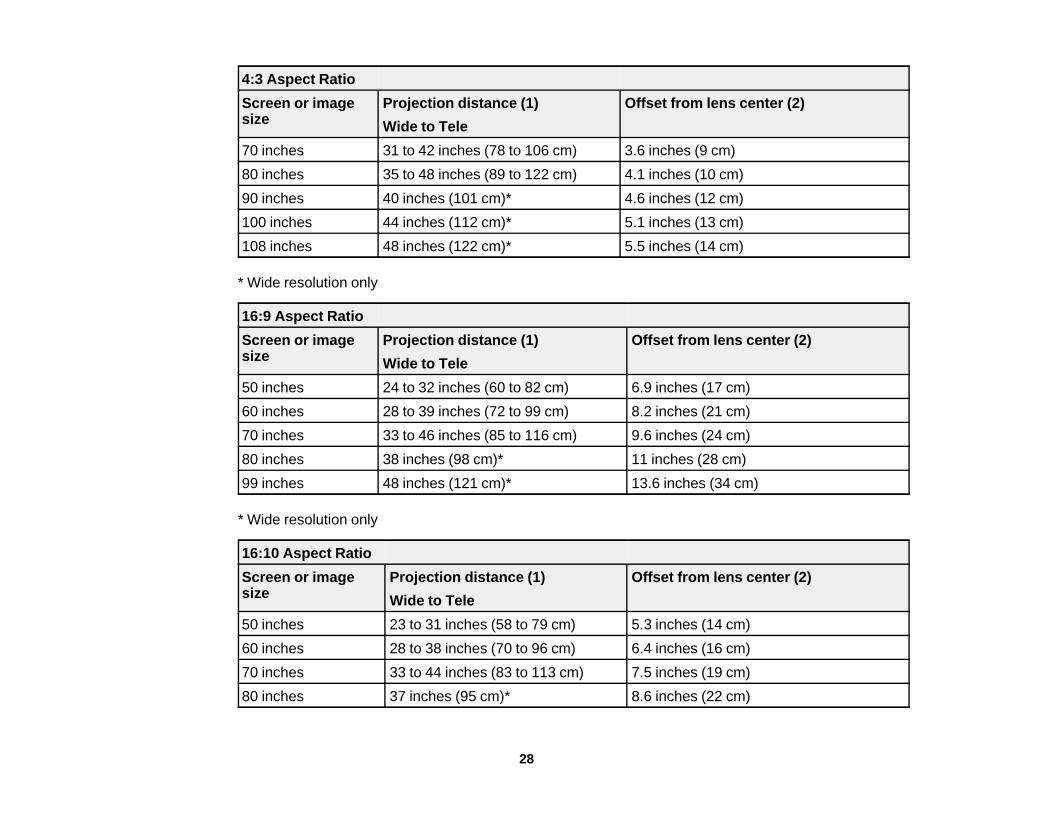
4:3 Aspect RatioScreen or image Projection distance (1) Offset from lens center (2)size Wide to Tele70 inches 31 to 42 inches (78 to 106 cm) 3.6 inches (9 cm)80 inches 35 to 48 inches (89 to 122 cm) 4.1 inches (10 cm)90 inches 40 inches (101 cm)* 4.6 inches (12 cm)100 inches 44 inches (112 cm)* 5.1 inches (13 cm)108 inches 48 inches (122 cm)* 5.5 inches (14 cm)
* Wide resolution only
16:9 Aspect RatioScreen or image Projection distance (1) Offset from lens center (2)size Wide to Tele50 inches 24 to 32 inches (60 to 82 cm) 6.9 inches (17 cm)60 inches 28 to 39 inches (72 to 99 cm) 8.2 inches (21 cm)70 inches 33 to 46 inches (85 to 116 cm) 9.6 inches (24 cm)80 inches 38 inches (98 cm)* 11 inches (28 cm)99 inches 48 inches (121 cm)* 13.6 inches (34 cm)
* Wide resolution only
16:10 Aspect RatioScreen or image Projection distance (1) Offset from lens center (2)size Wide to Tele50 inches 23 to 31 inches (58 to 79 cm) 5.3 inches (14 cm)60 inches 28 to 38 inches (70 to 96 cm) 6.4 inches (16 cm)70 inches 33 to 44 inches (83 to 113 cm) 7.5 inches (19 cm)80 inches 37 inches (95 cm)* 8.6 inches (22 cm)
28

16:10 Aspect RatioScreen or image Projection distance (1) Offset from lens center (2)size Wide to Tele90 inches 42 inches (107 cm)* 9.6 inches (24 cm)100 inches 47 inches (119 cm)* 10.7 inches (27 cm)102 inches 48 inches (122 cm)* 10.9 inches (28 cm)
* Wide resolution only
29

PowerLite 525W/535W
16:10 Aspect RatioScreen or image Projection distance (1) Offset from lens center (2)size Wide to Tele55 inches 22 to 30 inches (56 to 77 cm) 3.4 inches (9 cm)60 inches 24 to 33 inches (61 to 84 cm) 3.7 inches (9 cm)
30
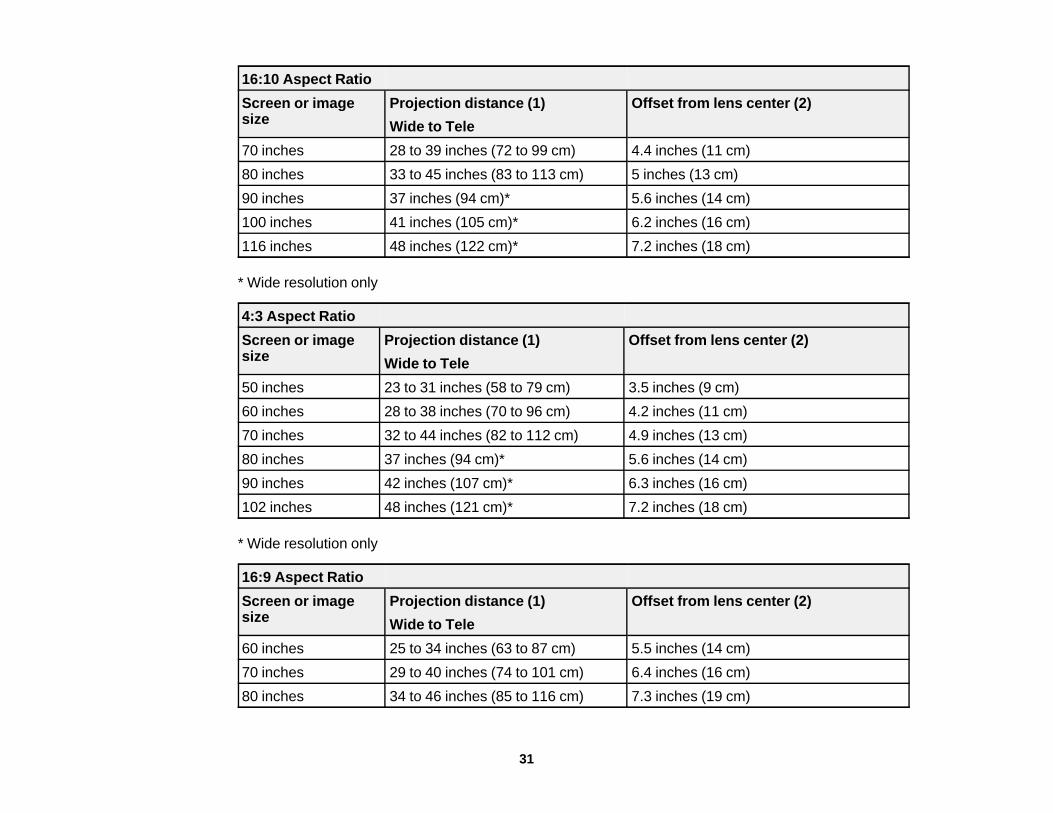
16:10 Aspect RatioScreen or image Projection distance (1) Offset from lens center (2)size Wide to Tele70 inches 28 to 39 inches (72 to 99 cm) 4.4 inches (11 cm)80 inches 33 to 45 inches (83 to 113 cm) 5 inches (13 cm)90 inches 37 inches (94 cm)* 5.6 inches (14 cm)100 inches 41 inches (105 cm)* 6.2 inches (16 cm)116 inches 48 inches (122 cm)* 7.2 inches (18 cm)
* Wide resolution only
4:3 Aspect RatioScreen or image Projection distance (1) Offset from lens center (2)size Wide to Tele50 inches 23 to 31 inches (58 to 79 cm) 3.5 inches (9 cm)60 inches 28 to 38 inches (70 to 96 cm) 4.2 inches (11 cm)70 inches 32 to 44 inches (82 to 112 cm) 4.9 inches (13 cm)80 inches 37 inches (94 cm)* 5.6 inches (14 cm)90 inches 42 inches (107 cm)* 6.3 inches (16 cm)102 inches 48 inches (121 cm)* 7.2 inches (18 cm)
* Wide resolution only
16:9 Aspect RatioScreen or image Projection distance (1) Offset from lens center (2)size Wide to Tele60 inches 25 to 34 inches (63 to 87 cm) 5.5 inches (14 cm)70 inches 29 to 40 inches (74 to 101 cm) 6.4 inches (16 cm)80 inches 34 to 46 inches (85 to 116 cm) 7.3 inches (19 cm)
31

16:9 Aspect RatioScreen or image Projection distance (1) Offset from lens center (2)size Wide to Tele90 inches 38 inches (97 cm)* 8.2 inches (21 cm)100 inches 42 inches (108 cm)* 9.1 inches (23 cm)113 inches 48 inches (122 cm)* 10.3 inches (26 cm)
* Wide resolution onlyParent topic: Projector Placement
Projector ConnectionsYou can connect the projector to a variety of computer, video, and audio sources to displaypresentations, movies, or other images, with or without sound.• Connect any type of computer that has a USB port, standard video output (monitor) port, or HDMI port.• For video projection, connect devices such as DVD players, gaming consoles, digital cameras, and
smartphones with compatible video output ports.• If your presentation or video includes sound, you can connect audio input cables, if necessary.• For slide shows without a computer, you can connect USB devices (such as a flash drive or camera)
or an optional Epson document camera.
Caution: If you will use the projector at altitudes above 4921 feet (1500 m), turn on High Altitude Modeto ensure the projector's internal temperature is regulated properly.
Connecting to Computer SourcesConnecting to Video SourcesConnecting to an External Computer MonitorConnecting to External SpeakersConnecting a MicrophoneConnecting to External USB DevicesConnecting to a Document CameraParent topic: Setting Up the Projector
32
Related referencesProduct Box ContentsProjector Setup Settings - Extended Menu
Connecting to Computer SourcesFollow the instructions in these sections to connect a computer to the projector.Connecting to a Computer for USB Video and AudioConnecting to a Computer for VGA VideoConnecting to a Computer for HDMI Video and AudioConnecting to a Computer for USB Mouse ControlConnecting to a Computer for SoundParent topic: Projector Connections
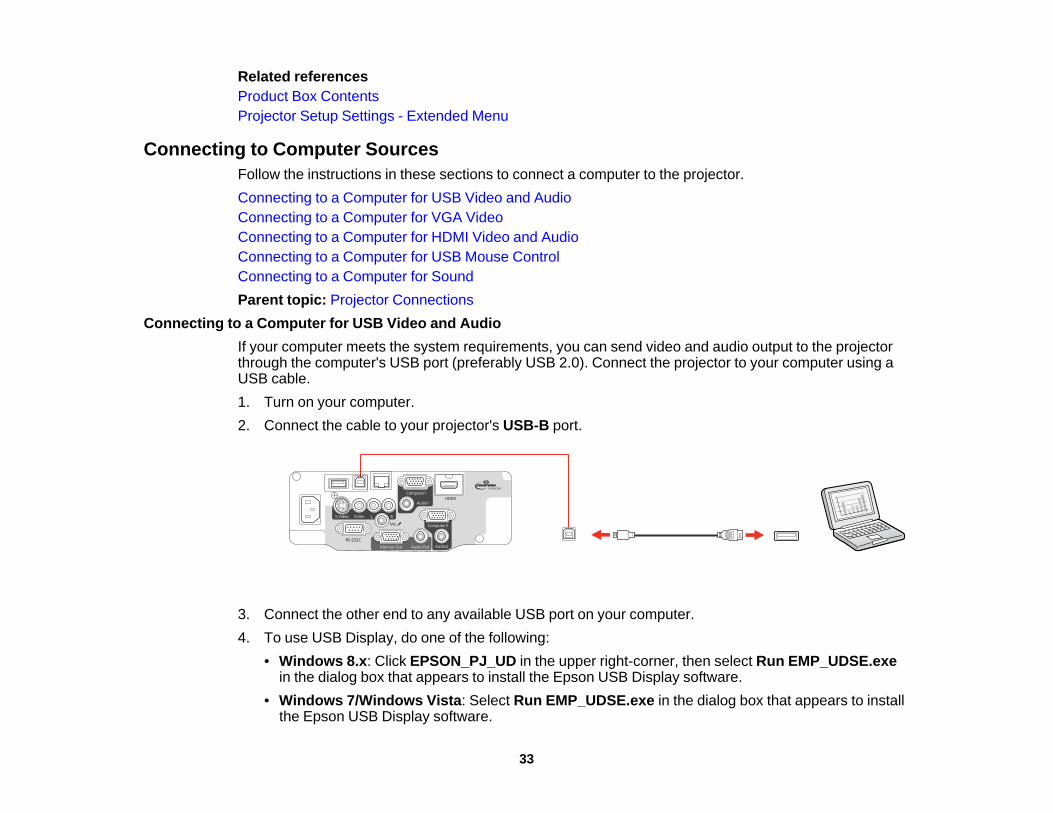
Connecting to a Computer for USB Video and AudioIf your computer meets the system requirements, you can send video and audio output to the projectorthrough the computer's USB port (preferably USB 2.0). Connect the projector to your computer using aUSB cable.1. Turn on your computer.2. Connect the cable to your projector's USB-B port.
3. Connect the other end to any available USB port on your computer.4. To use USB Display, do one of the following:
• Windows 8.x: Click EPSON_PJ_UD in the upper right-corner, then select Run EMP_UDSE.exein the dialog box that appears to install the Epson USB Display software.
• Windows 7/Windows Vista: Select Run EMP_UDSE.exe in the dialog box that appears to installthe Epson USB Display software.
33

• Windows XP: Wait as messages appear on your computer screen and the projector installs theEpson USB Display software on your computer.
• Windows 2000: Select Computer, EPSON_PJ_UD, and EMP_UDSE.EXE to install the EposnUSB Display software.
• OS X: The USB Display setup folder appears on your screen. Select USB Display Installer andfollow the on-screen instructions to install the Epson USB Display software.
Follow any on-screen instructions. You need to install this software only the first time you connectthe projector to the computer.
The projector displays the image from your computer's desktop and outputs sound, if your presentationcontains audio.Parent topic: Connecting to Computer Sources
Connecting to a Computer for VGA VideoYou can connect the projector to your computer using a VGA computer cable.
Note: To connect a Mac that includes only a Mini DisplayPort, Thunderbolt port, or Mini-DVI port forvideo output, you need to obtain an adapter that allows you to connect to the projector's VGA video port.Contact Apple for compatible adapter options.
1. If necessary, disconnect your computer's monitor cable.2. Connect the VGA computer cable to your computer's monitor port.3. Connect the other end to a Computer port on the projector.
4. Tighten the screws on the VGA connector.Parent topic: Connecting to Computer Sources
34

Connecting to a Computer for HDMI Video and AudioIf your computer has an HDMI port, you can connect it to the projector using an optional HDMI cable.
Note: To connect a Mac that includes only a Mini DisplayPort, Thunderbolt port, or Mini-DVI port forvideo output, you need to obtain an adapter that allows you to connect to the projector's HDMI port.Contact Apple for compatible adapter options. Older Mac computers (2009 and earlier) may not supportaudio through the HDMI port.
1. Connect the HDMI cable to your computer's HDMI output port.2. Connect the other end to the projector's HDMI port.
Parent topic: Connecting to Computer SourcesConnecting to a Computer for USB Mouse Control
If you connected your computer to a Computer, USB-B, or HDMI port on the projector, you can set upthe remote control to act as a wireless mouse. This lets you control projection at a distance from yourcomputer. To do this, connect the projector to your computer using a USB cable, if it is not connectedalready.1. Connect the USB cable to your projector's USB-B port.
35

2. Connect the other end to any available USB port on your computer.3. If necessary, configure your computer to work with an external USB mouse. See your computer
documentation for details.Parent topic: Connecting to Computer SourcesRelated referencesProjector Parts - Remote ControlRelated tasksUsing the Remote Control as a Wireless Mouse
Connecting to a Computer for SoundIf your computer presentation includes sound and you did not connect it to the projector's USB-B orHDMI port, you can still play sound through the projector's speaker system. Just connect an optional3.5 mm stereo mini-jack audio cable as described here.1. Connect the audio cable to your laptop's headphone or audio-out jack, or your desktop's speaker or
audio-out port.2. Connect the other end to the Audio port that corresponds to the Computer port you are using.
Parent topic: Connecting to Computer Sources
Connecting to Video SourcesFollow the instructions in these sections to connect video devices to the projector.Connecting to an HDMI Video SourceConnecting to a Component-to-VGA Video SourceConnecting to a Composite Video SourceConnecting to an S-Video Video SourceConnecting to a Video Source for Sound
36

Parent topic: Projector ConnectionsConnecting to an HDMI Video Source
If your video source has an HDMI port, you can connect it to the projector using an optional HDMI cable.The HDMI connection provides the best image quality.1. Connect the HDMI cable to your video source's HDMI output port.2. Connect the other end to the projector's HDMI port.
Parent topic: Connecting to Video SourcesConnecting to a Component-to-VGA Video Source
If your video source has component video ports, you can connect it to the projector using an optionalcomponent-to-VGA video cable. Depending on your component ports, you may need to use an adaptercable along with a component video cable.1. Connect the component connectors to your video source's color-coded component video output
ports, usually labeled Y, Pb, Pr or Y, Cb, Cr. If you are using an adapter, connect these connectorsto your component video cable.
2. Connect the VGA connector to a Computer port on the projector.
37
3. Tighten the screws on the VGA connector.If your image colors appear incorrect, you may need to change the Input Signal setting in the projector'sSignal menu.Parent topic: Connecting to Video SourcesRelated referencesInput Signal Settings - Signal Menu
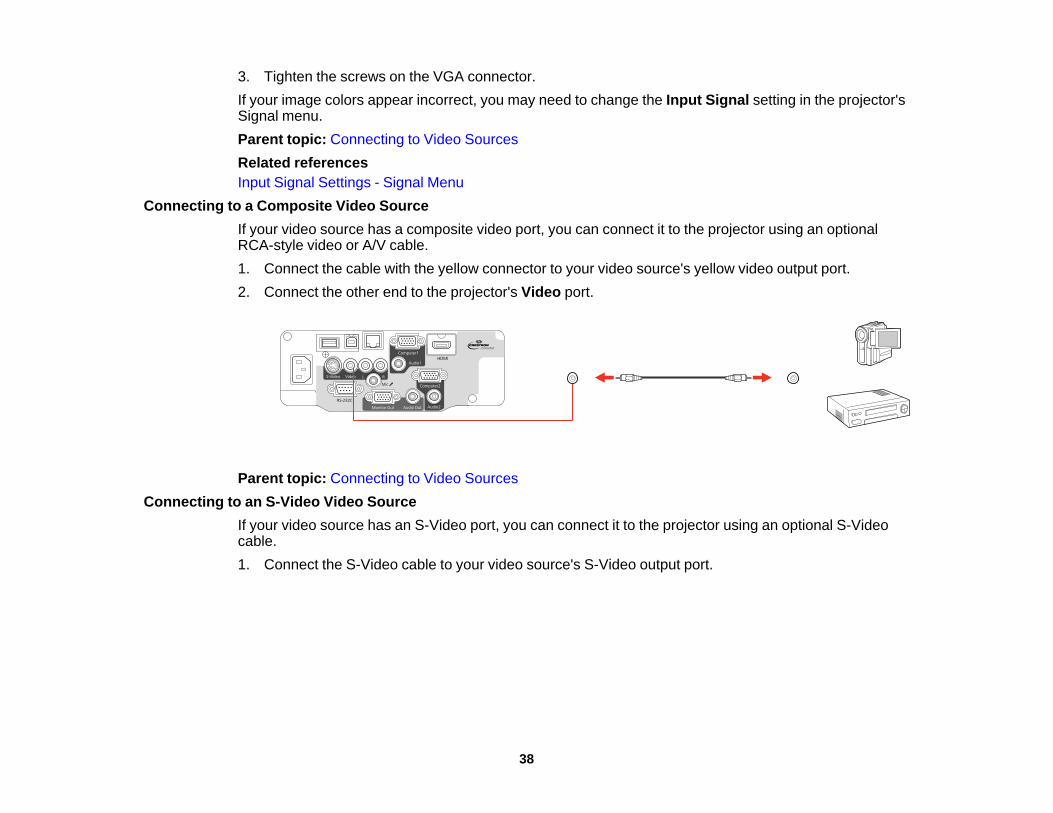
Connecting to a Composite Video SourceIf your video source has a composite video port, you can connect it to the projector using an optionalRCA-style video or A/V cable.1. Connect the cable with the yellow connector to your video source's yellow video output port.2. Connect the other end to the projector's Video port.
Parent topic: Connecting to Video SourcesConnecting to an S-Video Video Source
If your video source has an S-Video port, you can connect it to the projector using an optional S-Videocable.1. Connect the S-Video cable to your video source's S-Video output port.
38

2. Connect the other end to the projector's S-Video port.
Parent topic: Connecting to Video SourcesConnecting to a Video Source for Sound
You can play sound through the projector's speaker system if your video source has audio output ports.If you are projecting video using a Computer port, connect the projector to the video source using anoptional stereo mini-jack audio cable.If you are projecting video using the Video or S-Video port, connect the projector to the video sourceusing an RCA audio cable.
Note: If you connected your video source to the projector using an HDMI cable, the audio signal istransferred with the video signal; you do not need an additional cable for sound.
1. Connect the audio cable to your video source's audio-out ports.2. Do one of the following:
• Connect the other end of the cable to the projector's Audio port that corresponds to theComputer port you are using for video.
39
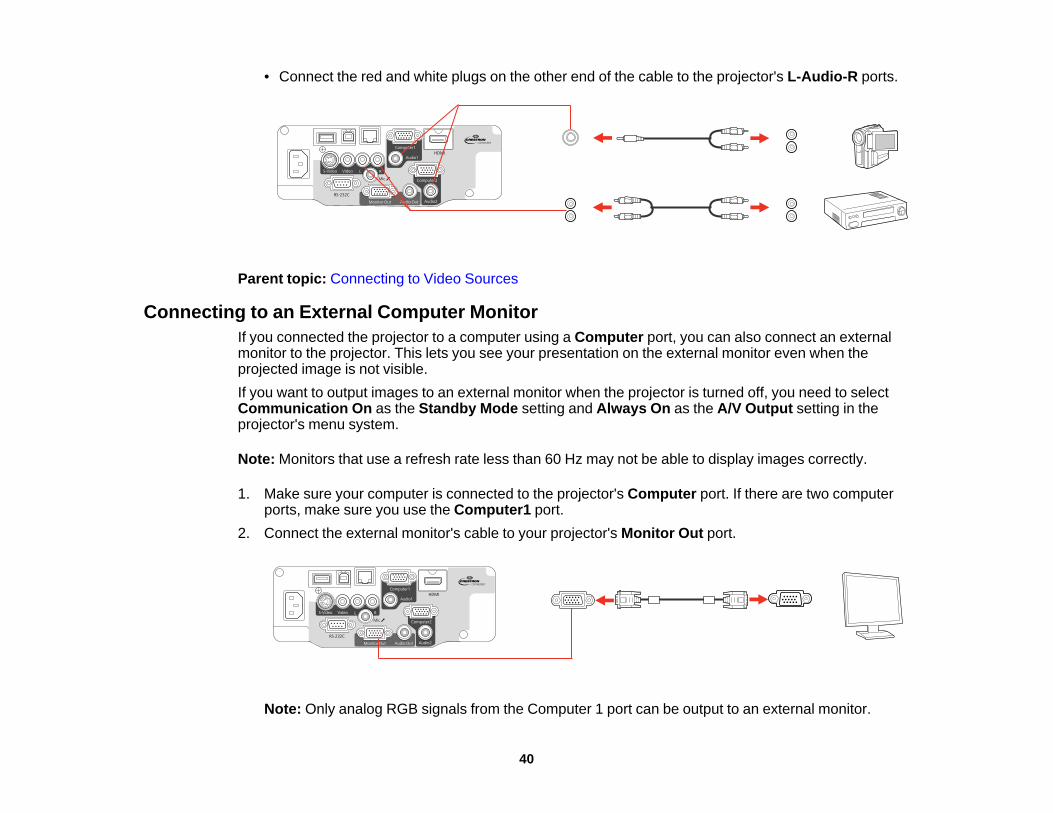
• Connect the red and white plugs on the other end of the cable to the projector's L-Audio-R ports.
Parent topic: Connecting to Video Sources
Connecting to an External Computer MonitorIf you connected the projector to a computer using a Computer port, you can also connect an externalmonitor to the projector. This lets you see your presentation on the external monitor even when theprojected image is not visible.If you want to output images to an external monitor when the projector is turned off, you need to selectCommunication On as the Standby Mode setting and Always On as the A/V Output setting in theprojector's menu system.
Note: Monitors that use a refresh rate less than 60 Hz may not be able to display images correctly.
1. Make sure your computer is connected to the projector's Computer port. If there are two computerports, make sure you use the Computer1 port.
2. Connect the external monitor's cable to your projector's Monitor Out port.
Note: Only analog RGB signals from the Computer 1 port can be output to an external monitor.
40

Parent topic: Projector Connections
Connecting to External SpeakersTo enhance the sound from your presentation, you can connect the projector to external self-poweredspeakers. You can control the volume using the projector's remote control.You can also connect the projector to an amplifier with speakers.If you want to output audio from the external speakers when the projector is turned off, you need toselect Communication On for the Standby Mode setting and Always On for the A/V Output setting inthe projector's menu system.
Note: The projector's built-in speaker system is disabled when you connect external speakers.
1. Make sure your computer or video source is connected to the projector with both audio and videocables as necessary.
2. Locate the appropriate cable to connect your external speakers, such as a stereo mini-jack-to-pin-jack cable, or another type of cable or adapter.
3. Connect one end of the cable to your external speakers as necessary.4. Connect the stereo mini-jack end of the cable to your projector's Audio Out port.
Parent topic: Projector ConnectionsRelated referencesProjector Setup Settings - Extended Menu
Connecting a MicrophoneYou can connect a microphone to the projector's Mic port to provide audio support during presentations.
41

1. Connect the microphone cable to the projector's Mic port.
2. Turn on the microphone, if necessary.Parent topic: Projector ConnectionsRelated referencesProjector Setup Settings - Extended Menu
Connecting to External USB DevicesFollow the instructions in these sections to connect external USB devices to the projector.USB Device ProjectionConnecting a USB Device or Camera to the ProjectorSelecting the Connected USB SourceDisconnecting a USB Device or Camera From the ProjectorParent topic: Projector Connections
USB Device ProjectionYou can project images and other content without using a computer or video device by connecting any ofthese devices to your projector:• USB flash drive• Digital camera or smartphone• USB hard drive• Multimedia storage viewer• USB memory card reader
Note: Digital cameras or smartphones must be USB-mounted devices, not TWAIN-compliant devices,and must be USB Mass Storage Class-compliant.
42

Note: USB hard drives must meet these requirements:• USB Mass Storage Class-compliant (not all USB Mass Storage Class devices are supported)• Formatted in FAT or FAT32• Self-powered by their own AC power supplies (bus-powered hard drives are not recommended)• Does not have multiple partitions
You can project slide shows from image files on a connected USB device or memory card reader.Parent topic: Connecting to External USB DevicesRelated topicsProjecting a PC Free Presentation
Connecting a USB Device or Camera to the ProjectorYou can connect your USB device or camera to the projector's USB-A port and use it to project imagesand other content.1. If your USB device came with a power adapter, plug the device into an electrical outlet.2. Connect the USB cable (or USB flash drive or USB memory card reader) to the projector's USB-A
port.
Note: Do not connect a USB hub or a USB cable longer than 10 feet (3 m), or the device may notoperate correctly.
3. Connect the other end of the cable (if applicable) to your device.Parent topic: Connecting to External USB Devices
43
Related topicsProjecting a PC Free Presentation
Selecting the Connected USB SourceYou can switch the projector's display to the source you connected to the USB-A port.1. Make sure the connected USB source is turned on, if necessary.2. Press the USB button on the remote control.3. Press the button again to cycle through other USB sources, if available.Parent topic: Connecting to External USB Devices
Disconnecting a USB Device or Camera From the ProjectorWhen you finish presenting with a connected USB device or camera, you must prepare to disconnect thedevice from the projector.1. If the device has a power button, turn off and unplug the device.2. Disconnect the USB device or camera from the projector.Parent topic: Connecting to External USB Devices
Connecting to a Document CameraYou can connect an Epson document camera to your projector to project images viewed by the camera.Depending on your document camera model, do one of the following to connect the document camera toyour projector:• For the Epson DC-06 document camera, locate the USB cable that came with the camera and
connect it to the to the projector's USB-A port and to the document camera's USB Type B port.• For the Epson DC-11 document camera, connect it to the projector's Computer or Video port and to
the corresponding port on the document camera. See the document camera manual for details.• For the Epson DC-12 document camera, connect it to the projector's HDMI, Computer, or Video port
and to the corresponding port on the document camera. See the document camera manual for details.• For the Epson DC-20 document camera, connect it to the projector's HDMI, Computer, or Video port
and to the corresponding port on the document camera. See the document camera manual for details.
Note: For additional features supported by software, connect your document camera to your computerinstead of the projector. See the document camera manual for details.
Parent topic: Projector Connections
44

Related referencesOptional Equipment and Replacement Parts
Installing Batteries in the Remote ControlThe remote control uses the two AA batteries that came with the projector.
Caution: Use only the type of batteries specified in this manual. Do not install batteries of different types,or mix new and old batteries.
1. Remove the battery cover.
2. Insert the batteries with the + and – ends facing as shown.
45

3. Replace the battery cover and press it down until it clicks into place.
Warning: Dispose of used batteries according to local regulations. Do not expose batteries to heator flame. Keep batteries out of the reach of children; they are choking hazards and are verydangerous if swallowed.
Parent topic: Setting Up the Projector
46

Using the Projector on a NetworkFollow the instructions in these sections to set up your projector for use on a network.Wired Network ProjectionWireless Network ProjectionSetting Up Projector Network E-Mail AlertsSetting Up Monitoring Using SNMPControlling a Networked Projector Using a Web BrowserCrestron RoomView Support
Wired Network ProjectionYou can send images to your projector through a wired network. To do this, you connect the projector toyour network, and then set up your projector and computer for network projection.After connecting and setting up the projector as described here, install the network software from theEpson Projector Software CD or download the software as necessary. Use the following software anddocumentation to set up, control, and monitor network projection:• EasyMP Network Projection software sets up your computer for network projection. See the EasyMP
Network Projection Operation Guide for instructions.• EasyMP Monitor software (Windows only) lets you monitor and control your projector through the
network. You can download the latest software and documentation from the Epson web site. Go toepson.com/support (U.S.) or epson.ca/support (Canada) and select your projector.
• EasyMP Multi PC Projection software allows you to hold interactive meetings by projecting thecomputer screens of users over a network. See the EasyMP Multi PC Projection Operation Guide forinstructions.
• EasyMP Network Updater software (Windows only) allows you to update firmware for a projector overa wired LAN. See the EasyMP Network Updater Operation Guide for instructions. You can downloadthe latest software and documentation from the Epson web site. Go to epson.com/support (U.S.) orepson.ca/support (Canada) and select your projector.
• Projection from iOS or Android devices using the free Epson iProjection app (if your projector isconnected to a network that includes a wireless access point); visit epson.com/projectorapp (U.S.) orepson.ca/projectorapp (Canada) for more information.
47

Note: If your projector is connected via a LAN cable to a network that includes a wireless access point,you can connect to the projector wirelessly through the access point using the EasyMP NetworkProjection software.
Connecting to a Wired NetworkSelecting Wired Network SettingsParent topic: Using the Projector on a NetworkRelated referencesProjector Network Settings - Network Menu
Connecting to a Wired NetworkTo connect the projector to a wired local area network (LAN), use a 100Base-TX or 10Base-T networkcable. To ensure proper data transmission, use a Category 5 shielded cable or better.1. Connect one end of the network cable to your network hub, switch, or router.2. Connect the other end of the cable to the projector's LAN port.
Parent topic: Wired Network Projection
Selecting Wired Network SettingsBefore you can project from computers on your network, you must select the network settings for theprojector using its menu system.
Note: Make sure you already connected the projector to your wired network using the LAN port.
1. Turn on the projector.2. Press the Menu button.
48
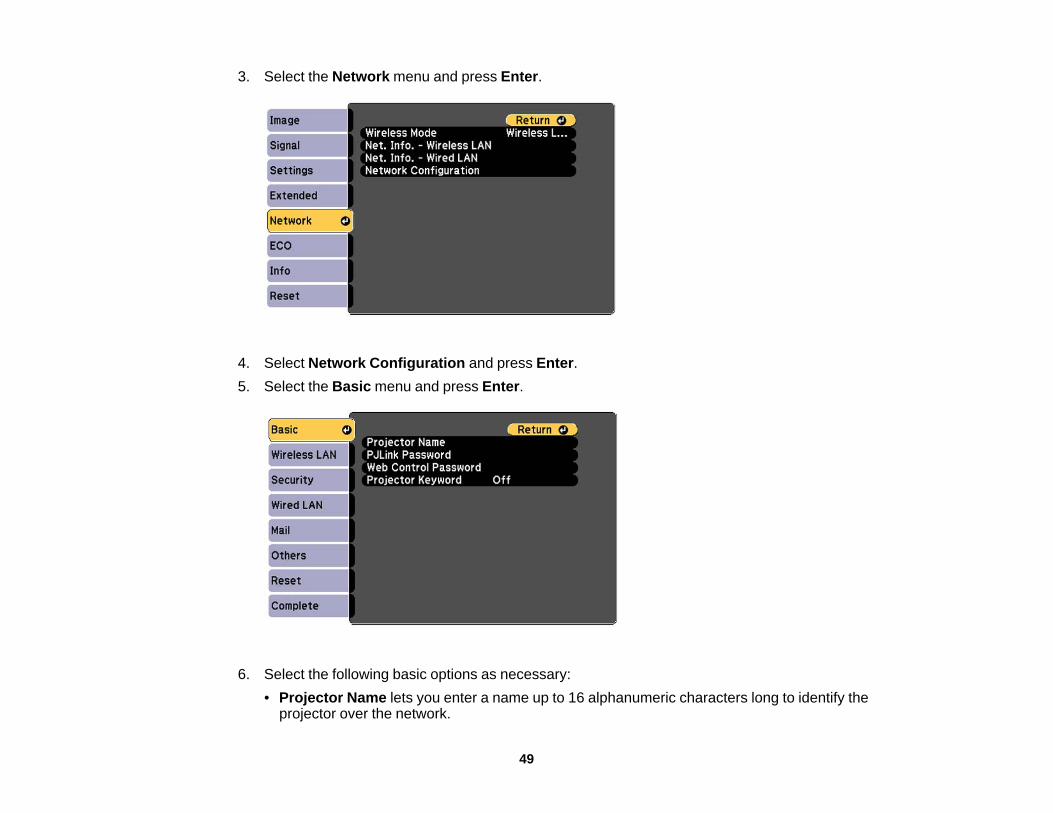
3. Select the Network menu and press Enter.
4. Select Network Configuration and press Enter.5. Select the Basic menu and press Enter.
6. Select the following basic options as necessary:• Projector Name lets you enter a name up to 16 alphanumeric characters long to identify the
projector over the network.
49
• PJLink Password lets you enter a password up to 32 alphanumeric characters long for using thePJLink protocol for projector control.
• Web Control Password lets you enter a password up to 8 alphanumeric characters long foraccessing the projector over the web. (Default user name is EPSONWEB; default password isadmin.)
• Projector Keyword lets you turn on a security password to prevent access to the projector byanyone not in the room with it. You must enter a displayed, randomized keyword from a computerusing the EasyMP Network Projection software to access the projector.
Note: Use the displayed keyboard to enter the name, passwords and keyword. Press the arrowbuttons on the remote control to highlight characters and press Enter to select them.
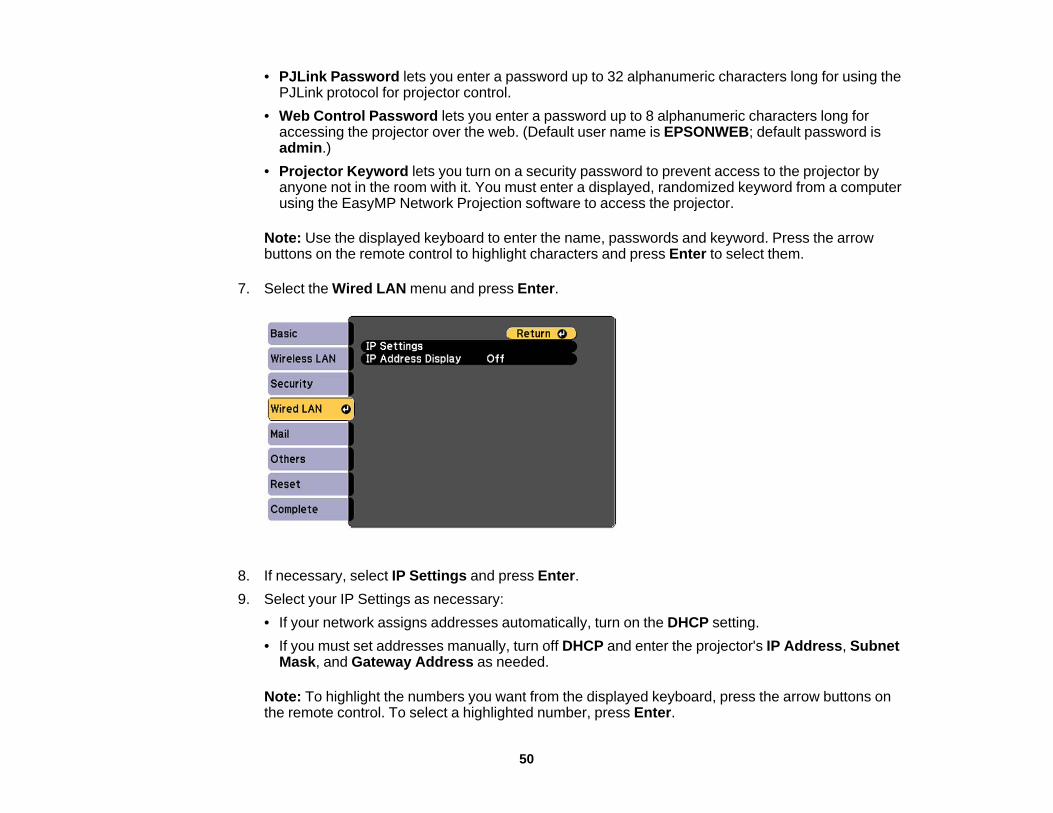
7. Select the Wired LAN menu and press Enter.
8. If necessary, select IP Settings and press Enter.9. Select your IP Settings as necessary:
• If your network assigns addresses automatically, turn on the DHCP setting.• If you must set addresses manually, turn off DHCP and enter the projector's IP Address, Subnet
Mask, and Gateway Address as needed.
Note: To highlight the numbers you want from the displayed keyboard, press the arrow buttons onthe remote control. To select a highlighted number, press Enter.
50
10. To prevent display of the IP address on the standby screen, turn off IP Address Display.11. When you finish selecting settings, select Complete and follow the on-screen instructions to save
your settings and exit the menus.Parent topic: Wired Network Projection
Wireless Network ProjectionYou can send images to your projector through a wireless network. To do this, you must install theEpson 802.11b/g/n wireless LAN module, and then set up your projector and computer for wirelessprojection.
Note: The wireless LAN module is not included with your projector.
Note: If your projector is connected via a LAN cable to a network that includes a wireless access point,you can connect to the projector wirelessly using the EasyMP Network Projection software.
There are two ways to connect the projector to your wireless network:• Using the optional Quick Wireless Connection USB Key (Windows only)• Configuring the connection manually using the projector's Network menusAfter installing the module and setting up the projector, install the network software from the EpsonProjector Software CD or download the software, as necessary. Use the following software anddocumentation to set up, control, and monitor wireless projection:• EasyMP Network Projection software sets up your computer for wireless network projection. See the
EasyMP Network Projection Operation Guide for instructions.• EasyMP Monitor software (Windows only) lets you monitor and control your projector through the
network. You can download the latest software and documentation from the Epson web site. Go toepson.com/support (U.S.) or epson.ca/support (Canada) and select your projector.
• EasyMP Multi PC Projection software allows you to hold interactive meetings by projecting thecomputer screens of users over a network. See the EasyMP Multi PC Projection Operation Guide forinstructions.
• EasyMP Network Updater software (Windows only) allows you to update firmware for a projector overa wired LAN. See the EasyMP Network Updater Operation Guide for instructions. You can downloadthe latest software and documentation from the Epson web site. Go to epson.com/support (U.S.) orepson.ca/support (Canada) and select your projector.
• Projection from iOS or Android devices with the wireless LAN module and free Epson iProjection app;visit epson.com/projectorapp (U.S.) or epson.ca/projectorapp (Canada) for more information.
51
Installing the Wireless LAN ModuleUsing Quick Wireless Connection (Windows Only)Selecting Wireless Network Settings ManuallySelecting Wireless Network Settings in WindowsSelecting Wireless Network Settings in OS XSetting Up Wireless Network SecurityParent topic: Using the Projector on a NetworkRelated referencesOptional Equipment and Replacement PartsProjector Network Settings - Network Menu
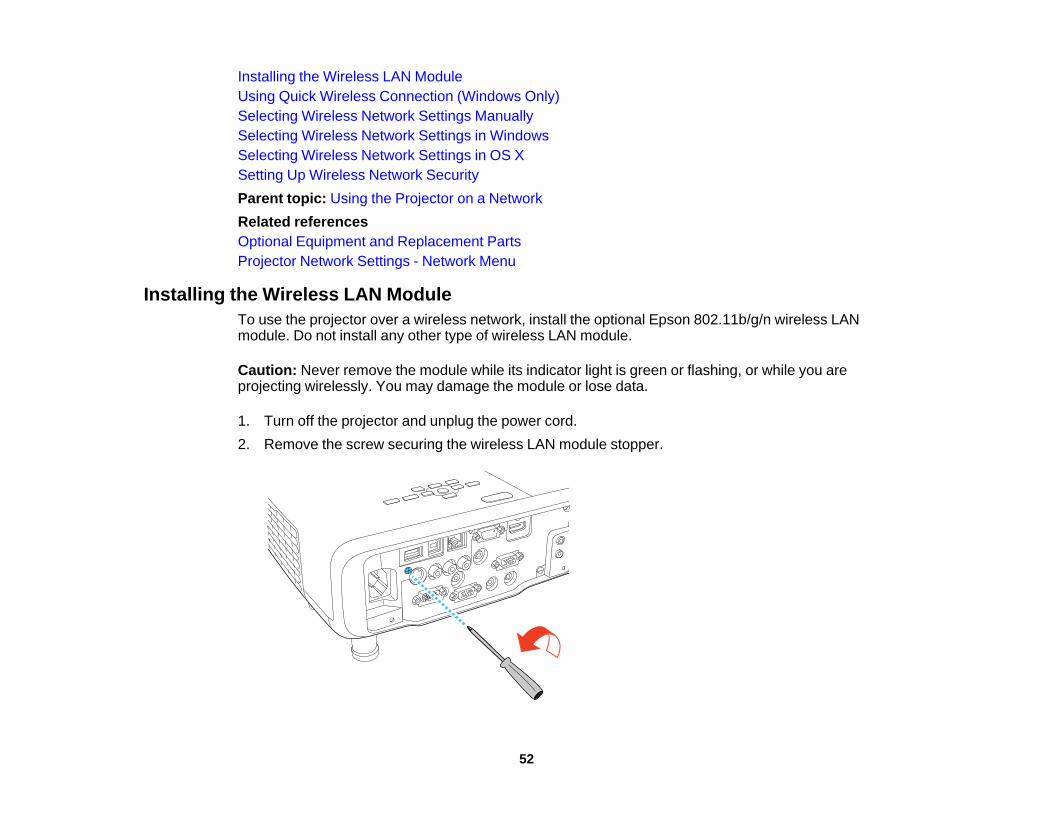
Installing the Wireless LAN ModuleTo use the projector over a wireless network, install the optional Epson 802.11b/g/n wireless LANmodule. Do not install any other type of wireless LAN module.
Caution: Never remove the module while its indicator light is green or flashing, or while you areprojecting wirelessly. You may damage the module or lose data.
1. Turn off the projector and unplug the power cord.2. Remove the screw securing the wireless LAN module stopper.
52

3. Insert the wireless LAN module into the port.
4. Attach the wireless LAN module stopper and secure it using the screw you removed.
5. Plug in and turn on the projector.Parent topic: Wireless Network Projection
53

Using Quick Wireless Connection (Windows Only)You can use the Quick Wireless Connection USB Key to quickly connect the projector to a Windowscomputer wirelessly. Then you can project your presentation and remove the key when you are done.
Note: The Quick Wireless Connection USB Key is not included with your projector.
1. Turn on the projector.2. Connect the USB key to the projector's USB-A port.
You see a projected message that the network information update is complete.3. Remove the USB key.4. Connect the USB key to a USB port on your computer or laptop.
Note: In Windows Vista, if you see the AutoPlay window, select Run LaunchU3.exe, then selectAllow on the next screen.
5. Follow the on-screen instructions to install the Quick Wireless Connection driver.
Note: If you see a Windows Firewall message, click Yes to disable the firewall.
After a few minutes, your computer image is displayed by the projector. If it does not appear, pressthe LAN button on your remote control or restart your computer.
54

6. Run your presentation as necessary.7. When you finish projecting wirelessly, select the Safely Remove Hardware option in the Windows
taskbar, then remove the USB key from your computer.
Note: You may need to restart your computer to reactivate your wireless LAN connection.
Parent topic: Wireless Network Projection
Selecting Wireless Network Settings ManuallyBefore you can project from your wireless network, you must select the network settings for the projectorusing its menu system.1. Turn on the projector.2. Press the Menu button.3. Select the Network menu and press Enter.
4. Set the Wireless Mode setting to Wireless LAN On and press Enter.5. Select Network Configuration and press Enter.
55

6. Select the Basic menu and press Enter.
7. Select the following basic options as necessary:• Projector Name lets you enter a name up to 16 alphanumeric characters long to identify the
projector over the network.• PJLink Password lets you enter a password up to 32 alphanumeric characters long for using the
PJLink protocol for projector control.• Web Control Password lets you enter a password up to 8 alphanumeric characters long for
accessing the projector over the web. (Default user name is EPSONWEB; default password isadmin.)
• Projector Keyword lets you turn on a security password to prevent access to the projector byanyone not in the room with it. You must enter a displayed, randomized keyword from a computerusing the EasyMP Network Projection software to access the projector.
Note: Use the displayed keyboard to enter the name, passwords and keyword. Press the arrowbuttons on the remote control to highlight characters and press Enter to select them.
56

8. Select the Wireless LAN menu and press Enter.
9. Select the settings on the Wireless LAN menu as necessary for your network.10. When you finish selecting settings, select Complete and follow the on-screen instructions to save
your settings and exit the menus.After you complete the wireless settings for your projector, you need to select the wireless network onyour computer.Wireless LAN Menu SettingsParent topic: Wireless Network Projection
Wireless LAN Menu Settings
Setting Options DescriptionConnection Mode Quick Selects the type of wireless
connection:AdvancedQuick: lets you quickly connectto one computer or use theoptional Quick WirelessConnection USB key to connectAdvanced: lets you connect tomultiple computers via a wirelessnetwork access point
57

Setting Options DescriptionChannel 1ch In Quick connection mode,
selects the frequency band6ch (channel) used by the wireless11ch LAN
SSID Auto Setting On Turns on automatic SSIDsearching in Quick connectionOff mode; set to Off whenconnecting to multiple projectorsat the same time
SSID Up 32 alphanumeric characters Sets the SSID (network name) ofthe wireless LAN system theprojector is connecting to
Search Access Point — Search for available wirelessnetwork access points inAdvanced connection mode
IP Settings DHCP In Advanced connection mode,select DHCP if your networkIP Address assigns addresses automatically,
Subnet Mask or manually enter the network'sIP Address, Subnet Mask, andGateway Address Gateway Address
SSID Display On Selects whether to display theSSID on the network standbyOff screen
IP Address Display On Selects whether to display the IPaddress on the network standbyOff screen
Parent topic: Selecting Wireless Network Settings Manually
Selecting Wireless Network Settings in WindowsBefore connecting to the projector, select the correct wireless network on your computer.1. To access your wireless utility software, access the Desktop and double-click the network icon on
the Windows taskbar.
58

2. Do one of the following:• If your projector is set up on an existing network (Advanced mode), select the network name
(SSID).• If your projector is configured for Quick mode, select the projector's SSID.
3. Click Connect.Parent topic: Wireless Network Projection
Selecting Wireless Network Settings in OS XBefore connecting to the projector, select the correct wireless network in OS X.1. Click the AirPort icon on the menu bar at the top of the screen.2. Make sure AirPort is turned on, then do one of the following:
• If your projector is set up on an existing network (Advanced mode), select the network name(SSID).
• If your projector is configured for Quick mode, select the projector's SSID.Parent topic: Wireless Network Projection
Setting Up Wireless Network SecurityYou can set up security for your projector to use on the wireless network. Set up one of the followingsecurity options to match the settings used on your network:• WPA/WPA2-PSK security (Advanced connection mode)• WPA2-PSK security (Advanced and Quick connection mode)Check with your network administrator for guidance on entering the correct information.1. Press the Menu button.2. Select the Network menu and press Enter.3. Select Network Configuration and press Enter.
59
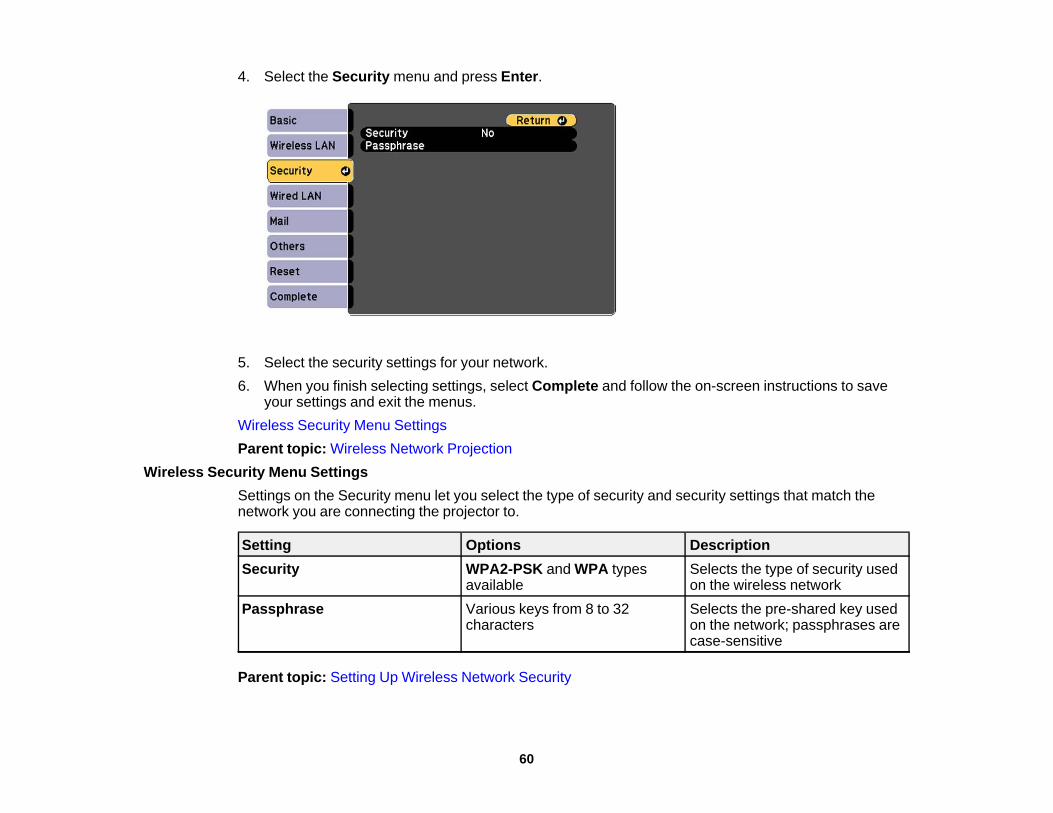
4. Select the Security menu and press Enter.
5. Select the security settings for your network.6. When you finish selecting settings, select Complete and follow the on-screen instructions to save
your settings and exit the menus.Wireless Security Menu SettingsParent topic: Wireless Network Projection
Wireless Security Menu SettingsSettings on the Security menu let you select the type of security and security settings that match thenetwork you are connecting the projector to.
Setting Options DescriptionSecurity WPA2-PSK and WPA types Selects the type of security used
available on the wireless networkPassphrase Various keys from 8 to 32 Selects the pre-shared key used
characters on the network; passphrases arecase-sensitive
Parent topic: Setting Up Wireless Network Security
60

Setting Up Projector Network E-Mail AlertsYou can set up the projector to send you an e-mail alert over the network if there is a problem with theprojector.1. Press the Menu button.2. Select the Network menu and press Enter.3. Select Network Configuration and press Enter.4. Select the Mail menu and press Enter.
5. Turn on Mail Notification.6. Enter the IP address for the SMTP Server option.
Note: Do not use these addresses: 127.x.x.x or 224.0.0.0 through 255.255.255.255 (where x is anumber from 0 to 255).
7. Select a number for the SMTP server Port Number, from 1 to 65535 (default is 25).8. Choose an Address field, enter the e-mail address, and select the alerts you want to receive there.
Repeat for up to three addresses.
Note: Your e-mail address can be up to 32 alphanumeric characters long.
61
9. When you finish selecting settings, select Complete and follow the on-screen instructions to saveyour settings and exit the menus.
Note: If a critical problem causes a projector to shut down, you may not receive an e-mail alert.
Network Projector E-mail Alert MessagesParent topic: Using the Projector on a Network
Network Projector E-mail Alert MessagesWhen a problem occurs with a networked projector, and you selected to receive e-mail alerts, youreceive an e-mail containing the following information:• Epson Projector on the subject line• The name of the projector experiencing a problem• The IP address of the affected projector• Detailed information about the problem
Note: If a critical problem causes a projector to shut down, you may not receive an e-mail alert.
Parent topic: Setting Up Projector Network E-Mail Alerts
Setting Up Monitoring Using SNMPNetwork administrators can install SNMP (Simple Network Management Protocol) software on networkcomputers so they can monitor projectors. If your network uses this software, you can set up theprojector for SNMP monitoring.1. Press the Menu button.2. Select the Network menu and press Enter.3. Select Network Configuration and press Enter.
62
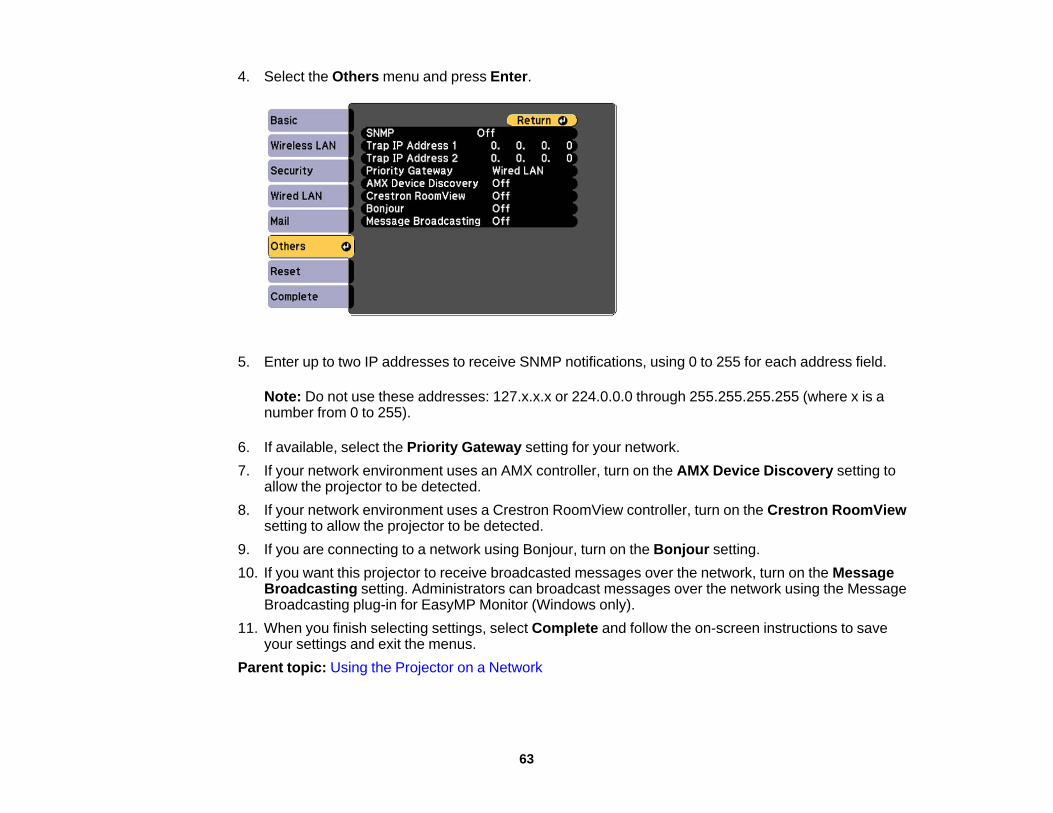
4. Select the Others menu and press Enter.
5. Enter up to two IP addresses to receive SNMP notifications, using 0 to 255 for each address field.
Note: Do not use these addresses: 127.x.x.x or 224.0.0.0 through 255.255.255.255 (where x is anumber from 0 to 255).
6. If available, select the Priority Gateway setting for your network.7. If your network environment uses an AMX controller, turn on the AMX Device Discovery setting to
allow the projector to be detected.8. If your network environment uses a Crestron RoomView controller, turn on the Crestron RoomView
setting to allow the projector to be detected.9. If you are connecting to a network using Bonjour, turn on the Bonjour setting.10. If you want this projector to receive broadcasted messages over the network, turn on the Message
Broadcasting setting. Administrators can broadcast messages over the network using the MessageBroadcasting plug-in for EasyMP Monitor (Windows only).
11. When you finish selecting settings, select Complete and follow the on-screen instructions to saveyour settings and exit the menus.
Parent topic: Using the Projector on a Network
63
Controlling a Networked Projector Using a Web BrowserOnce you have connected your projector to your network, you can select projector settings and controlprojection using a compatible web browser. This lets you access the projector remotely.
Note: The web setup and control features support Microsoft Internet Explorer or later, and Safari onnetworks that do not use a proxy server for connection. You cannot select all of the projector menusettings or control all projector functions using a web browser.
Note: If you set Standby Mode to Communication On, you can use a web browser to select settingsand control projection even if the projector is in standby mode.
1. Make sure the projector is turned on.2. Start your web browser on a computer connected to the network.3. Type the projector's IP address into the browser's address box and press the computer's Enter key.
You see the Web Control screen.
Note: You may need to log in before you see the Web Control screen. If you see a log in window,enter your user name and password. (The default user name is EPSONWEB and the defaultpassword is admin.)
4. To select projector menu settings, select the name of the menu and follow the on-screeninstructions.
5. To control projection remotely, select the Web Remote option.
64

You see a screen like this:
1 Power button control2 Selects Computer port source3 Selects Video, S-Video, and HDMI port sources4 Freeze button control5 A/V Mute button control6 Page Up and Page Down button controls7 Searches for sources8 Selects the network source9 Selects the USB Display or USB device source10 Volume button controls11 Closed Caption control
6. Select the icon corresponding to the projector function you want to control.Parent topic: Using the Projector on a Network
65
Related referencesProjector Setup Settings - Extended Menu
Crestron RoomView SupportIf you are using the Crestron RoomView network monitoring and control system, you can set up yourprojector for use on the system. Crestron RoomView lets you control and monitor your projector using aweb browser.
Note: You cannot use the Epson Web Control feature or the Message Broadcasting plug-in for EasyMPMonitor when you use Crestron RoomView.
For additional information on Crestron RoomView, contact Crestron.Setting Up Crestron RoomView SupportControlling a Networked Projector Using Crestron RoomViewParent topic: Using the Projector on a Network
Setting Up Crestron RoomView SupportTo set up your projector for monitoring and control using a Crestron RoomView system, make sure yourcomputer and projector are connected to the network. If you are connecting wirelessly, set up theprojector using the Advanced network connection mode.
Note: If you want to use the Crestron RoomView system when the projector is turned off, you need toadjust the Standby Mode settings in the ECO menu.
1. Press the Menu button.2. Select the Network menu and press Enter.3. Select Network Configuration and press Enter.
66

4. Select the Others menu and press Enter.
5. Set the setting to On to allow the projector to be detected.6. Turn off the projector, then turn it on again to enable the setting.Parent topic: Crestron RoomView SupportRelated referencesProjector Setup Settings - Extended Menu
Controlling a Networked Projector Using Crestron RoomViewOnce you have set up your projector to use Crestron RoomView, you can control and monitor projectionusing a compatible web browser.1. Start your web browser on a computer connected to the network.2. Type the projector's IP address into the browser's address box and press the computer's Enter key.
67
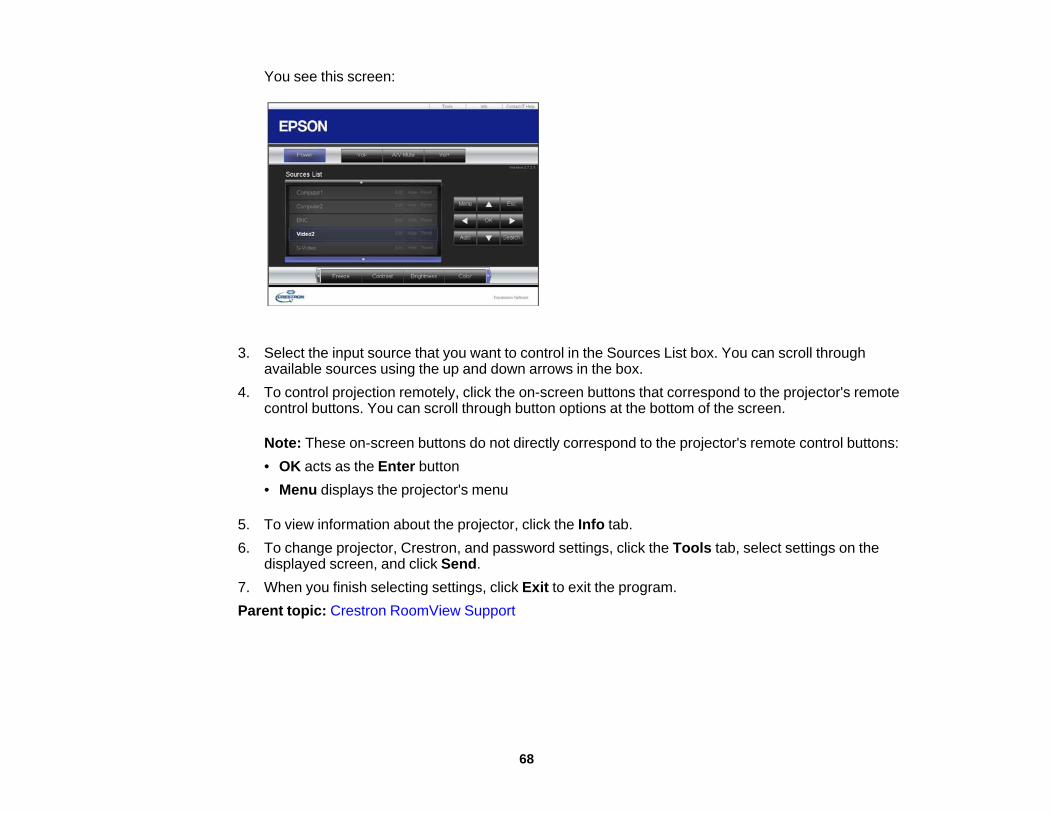
You see this screen:
3. Select the input source that you want to control in the Sources List box. You can scroll throughavailable sources using the up and down arrows in the box.
4. To control projection remotely, click the on-screen buttons that correspond to the projector's remotecontrol buttons. You can scroll through button options at the bottom of the screen.
Note: These on-screen buttons do not directly correspond to the projector's remote control buttons:• OK acts as the Enter button• Menu displays the projector's menu
5. To view information about the projector, click the Info tab.6. To change projector, Crestron, and password settings, click the Tools tab, select settings on the
displayed screen, and click Send.7. When you finish selecting settings, click Exit to exit the program.Parent topic: Crestron RoomView Support
68

Using Basic Projector FeaturesFollow the instructions in these sections to use your projector's basic features.Turning On the ProjectorTurning Off the ProjectorSelecting the Language for the Projector MenusAdjusting the Image HeightImage ShapeResizing the Image with the Wide and Tele ButtonsFocusing the Image Using the Focus RingRemote Control OperationSelecting an Image SourceProjection ModesImage Aspect RatioColor ModeControlling the Volume with the Volume ButtonsProjecting a PC Free Presentation
Turning On the ProjectorTurn on the computer or video equipment you want to use before you turn on the projector so it candisplay the image source.1. Connect the power cord to the projector's power inlet.
69
2. Plug the power cord into an electrical outlet.
Note: With Direct Power On turned on, the projector turns on as soon as you plug it in.
The projector's power light turns blue. This indicates that the projector is receiving power.3. Press the power button on the projector or the remote control to turn on the projector.
The projector beeps and the Status light flashes blue as the projector warms up. Once the projectoris warmed up, the Status light stops flashing and turns blue.
Warning: Never look into the projector lens when the lamp is on. This can damage your eyes and isespecially dangerous for children.
If you do not see a projected image right away, try the following:• Turn on the connected computer or video device.• Press the Source Search button on the projector or remote control to detect the video source.• Press the button for the video source on the remote control.Parent topic: Using Basic Projector Features
Turning Off the ProjectorBefore turning off the projector, shut down any computer connected to it so you can see the computerdisplay during shutdown.
Note: Turn off this product when not in use to prolong the life of the projector. Lamp life will varydepending upon mode selected, environmental conditions, and usage. Brightness decreases over time.
Note: When using the A/V Mute feature, the projector lamp is still on. To turn off the lamp, turn off theprojector.
1. Press the power button on the projector or the remote control.
70
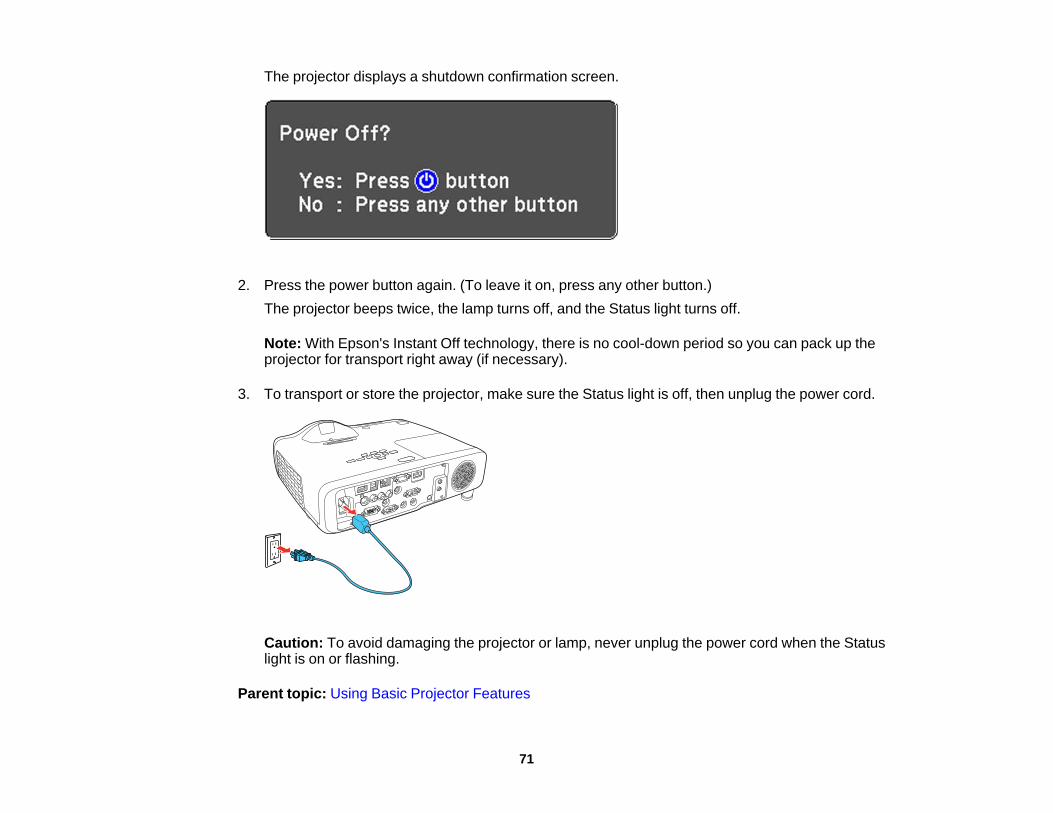
The projector displays a shutdown confirmation screen.
2. Press the power button again. (To leave it on, press any other button.)The projector beeps twice, the lamp turns off, and the Status light turns off.
Note: With Epson's Instant Off technology, there is no cool-down period so you can pack up theprojector for transport right away (if necessary).
3. To transport or store the projector, make sure the Status light is off, then unplug the power cord.
Caution: To avoid damaging the projector or lamp, never unplug the power cord when the Statuslight is on or flashing.
Parent topic: Using Basic Projector Features
71

Related referencesProjector Setup Settings - Extended Menu
Selecting the Language for the Projector MenusIf you want to view the projector's menus and messages in another language, you can change theLanguage setting.1. Turn on the projector.2. Press the Menu button.3. Select the Extended menu and press Enter.
4. Select the Language setting and press Enter.5. Select the language you want to use and press Enter.6. Press Menu or Esc to exit the menus.Parent topic: Using Basic Projector Features
Adjusting the Image HeightIf you are projecting from a table or other flat surface, and the image is too high or low, you can adjustthe image height using the projector's adjustable feet.1. Turn on the projector and display an image.
72

2. To adjust the front foot, pull up on the foot release lever and lift the front of the projector.
The foot extends from the projector.3. Release the lever to lock the foot.4. If the image is tilted, rotate the rear feet to adjust their height.
If the projected image is unevenly rectangular, you need to adjust the image shape.Parent topic: Using Basic Projector FeaturesRelated conceptsImage Shape
73

Related referencesProjector Feature Settings - Settings Menu
Image ShapeYou can project an evenly rectangular image by placing the projector directly in front of the center of thescreen and keeping it level. If you place the projector at an angle to the screen, or tilted up or down, or offto the side, you may need to correct the image shape for the best display quality.Correcting Image Shape with Quick CornerCorrecting Image Shape with the Keystone ButtonsParent topic: Using Basic Projector Features
Correcting Image Shape with Quick CornerYou can use the projector's Quick Corner setting to correct the shape and size of an image that isunevenly rectangular on all sides.1. Turn on the projector and display an image.
Note: You can display a pattern to aid in adjusting the projected image using the Settings menu.
Note: You can also display the pattern by pressing the User button on the remote control (if the testpattern is assigned to this button).
2. Press the Menu button.
74

3. Select the Settings menu and press Enter.
4. Select the Keystone setting and press Enter.5. Select the Quick Corner setting and press Enter. Then press Enter again.
You see the Quick Corner adjustment screen:
6. Use the arrow buttons on the projector or the remote control to select the corner of the image youwant to adjust. Then press Enter.
75

7. Press the arrow buttons to adjust the image shape as necessary.8. When you are finished, press Esc.Parent topic: Image Shape
Correcting Image Shape with the Keystone ButtonsYou can use the projector's keystone correction buttons to correct the shape of an image that isunevenly rectangular on the sides.1. Turn on the projector and display an image.
Note: You can also display the pattern by pressing the User button on the remote control (if the testpattern is assigned to this button).
2. Press one of these keystone buttons on the control panel to display the Keystone adjustmentscreen.
76
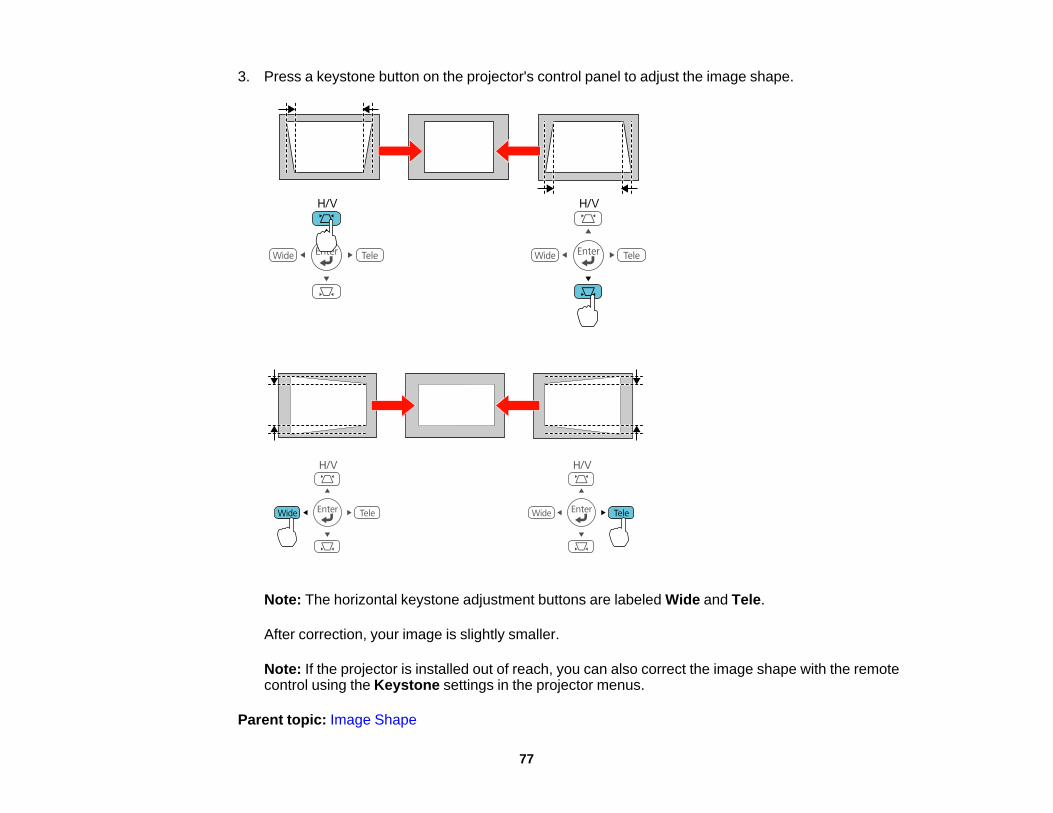
3. Press a keystone button on the projector's control panel to adjust the image shape.
Note: The horizontal keystone adjustment buttons are labeled Wide and Tele.
After correction, your image is slightly smaller.
Note: If the projector is installed out of reach, you can also correct the image shape with the remotecontrol using the Keystone settings in the projector menus.
Parent topic: Image Shape
77

Related referencesProjector Feature Settings - Settings Menu
Resizing the Image with the Wide and Tele Buttons1. Turn on the projector and display an image.2. To enlarge the image size, press the Wide button on the projector's control panel.3. To reduce the image size, press the Tele button.
Note: If the projector is installed out of reach, you can also adjust the image size with the remotecontrol using the Zoom setting in the projector menus.
Parent topic: Using Basic Projector FeaturesRelated referencesProjector Feature Settings - Settings Menu
Focusing the Image Using the Focus Ring1. Turn on the projector and display an image.
78

2. To sharpen the image focus, rotate the projector’s focus ring.
Parent topic: Using Basic Projector Features
Remote Control OperationThe remote control lets you control the projector from almost anywhere in the room. You can point it atthe screen, or the front or back of the projector.
79

Make sure that you aim the remote control at the projector's receivers within the distance and angleslisted here.
1 19.7 feet (6 m)2 ± 30°3 60°
Note: Avoid using the remote control in conditions with bright fluorescent lights or in direct sunlight, orthe projector may not respond to commands. If you will not use the remote control for a long time,remove the batteries.
Using the Remote Control as a Wireless MouseUsing the Remote Control as a PointerParent topic: Using Basic Projector Features
Using the Remote Control as a Wireless MouseYou can use the projector's remote control as a wireless mouse so you can control projection at adistance from the computer.
80

1. Connect the projector to a computer using the projector's USB-B, Computer, or HDMI port todisplay video.
2. If you connected your computer to a port other than the projector's USB-B port, also connect a USBcable to the projector's USB-B port and to a USB port on your computer (for wireless mousesupport).
3. Start your presentation.4. Use the following buttons on the remote control to control your presentation:
• To move through slides or pages, press the up or down Page buttons.
• To move the cursor on the screen, use the arrow buttons.• To left-click, press the button once (press it twice to double-click).• To right-click, press the Esc button.• To drag-and-drop, hold the button as you move the cursor with the arrow buttons, then release
at the destination.Parent topic: Remote Control OperationRelated tasksConnecting to a Computer for USB Mouse Control
Using the Remote Control as a PointerYou can use the projector's remote control as a pointer to help you call out important information on thescreen. The default pointer shape is an arrow, but you can select an alternative shape using the Settingsmenu.
81

1. Press the Pointer button on the remote control.
2. Use the arrow buttons on the remote control to move the pointer on the screen.
3. Press Esc to clear the pointer from the screen.Parent topic: Remote Control OperationRelated referencesProjector Feature Settings - Settings Menu
Selecting an Image SourceIf you connected multiple image sources to the projector, such as a computer and DVD player, you maywant to switch from one image source to the other.1. Make sure the connected image source you want to use is turned on.2. For video image sources, insert a DVD or other video media and press its play button, if necessary.
82

3. Do one of the following:• Press the Source Search button on the projector or remote control until you see the image from
the source you want.
• Press the button for the source you want on the remote control. If there is more than one port forthat source, press the button again to cycle through the sources.
1 Computer port sources2 Video and HDMI sources3 USB port sources (computer display and external devices)4 Network source (LAN)
83
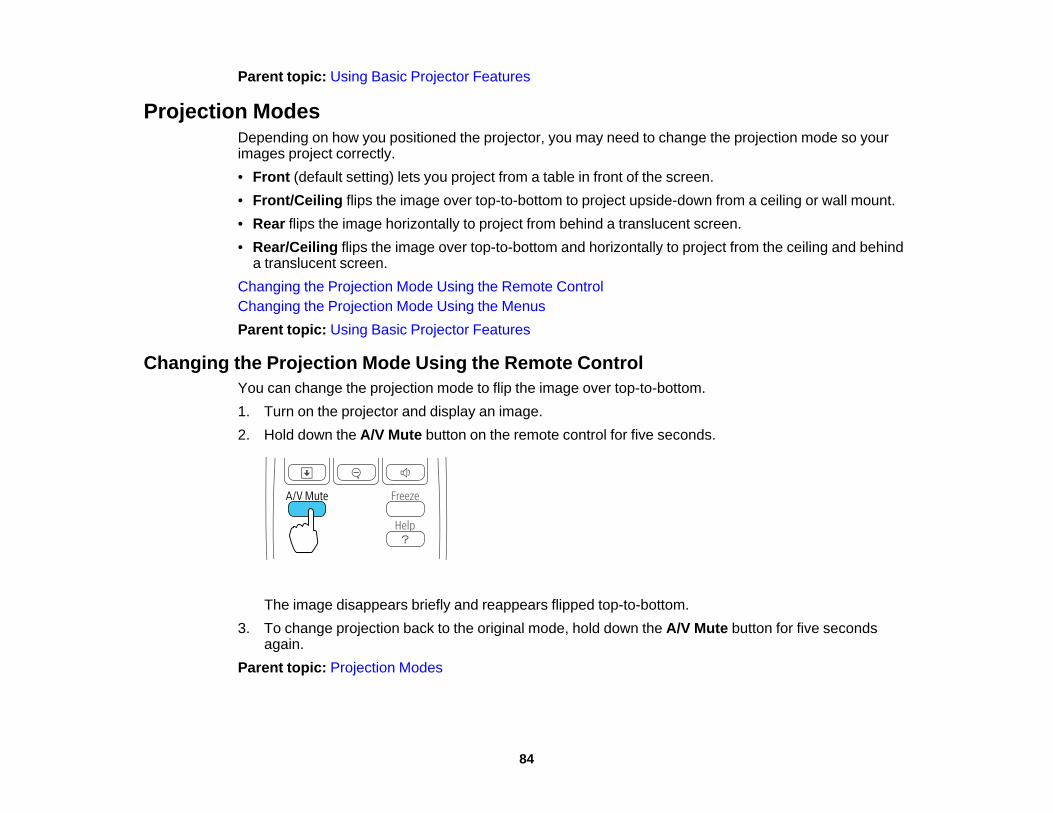
Parent topic: Using Basic Projector Features
Projection ModesDepending on how you positioned the projector, you may need to change the projection mode so yourimages project correctly.• Front (default setting) lets you project from a table in front of the screen.• Front/Ceiling flips the image over top-to-bottom to project upside-down from a ceiling or wall mount.• Rear flips the image horizontally to project from behind a translucent screen.• Rear/Ceiling flips the image over top-to-bottom and horizontally to project from the ceiling and behind
a translucent screen.Changing the Projection Mode Using the Remote ControlChanging the Projection Mode Using the MenusParent topic: Using Basic Projector Features
Changing the Projection Mode Using the Remote ControlYou can change the projection mode to flip the image over top-to-bottom.1. Turn on the projector and display an image.2. Hold down the A/V Mute button on the remote control for five seconds.
The image disappears briefly and reappears flipped top-to-bottom.3. To change projection back to the original mode, hold down the A/V Mute button for five seconds
again.Parent topic: Projection Modes
84

Changing the Projection Mode Using the MenusYou can change the projection mode to flip the image over top-to-bottom and/or left-to-right using theprojector menus.1. Turn on the projector and display an image.2. Press the Menu button.3. Select the Extended menu and press Enter.
4. Select the Projection setting and press Enter.5. Select a projection mode and press Enter.6. Press Menu or Esc to exit the menus.Parent topic: Projection Modes
Image Aspect RatioThe projector can display images in different width-to-height ratios called aspect ratios. Normally theinput signal from your video source determines the image's aspect ratio. However, for certain imagesyou can change the aspect ratio to fit your screen by pressing a button on the remote control.If you always want to use a particular aspect ratio for a certain video input source, you can select it usingthe projector's menus.Changing the Image Aspect RatioAvailable Image Aspect Ratios
85
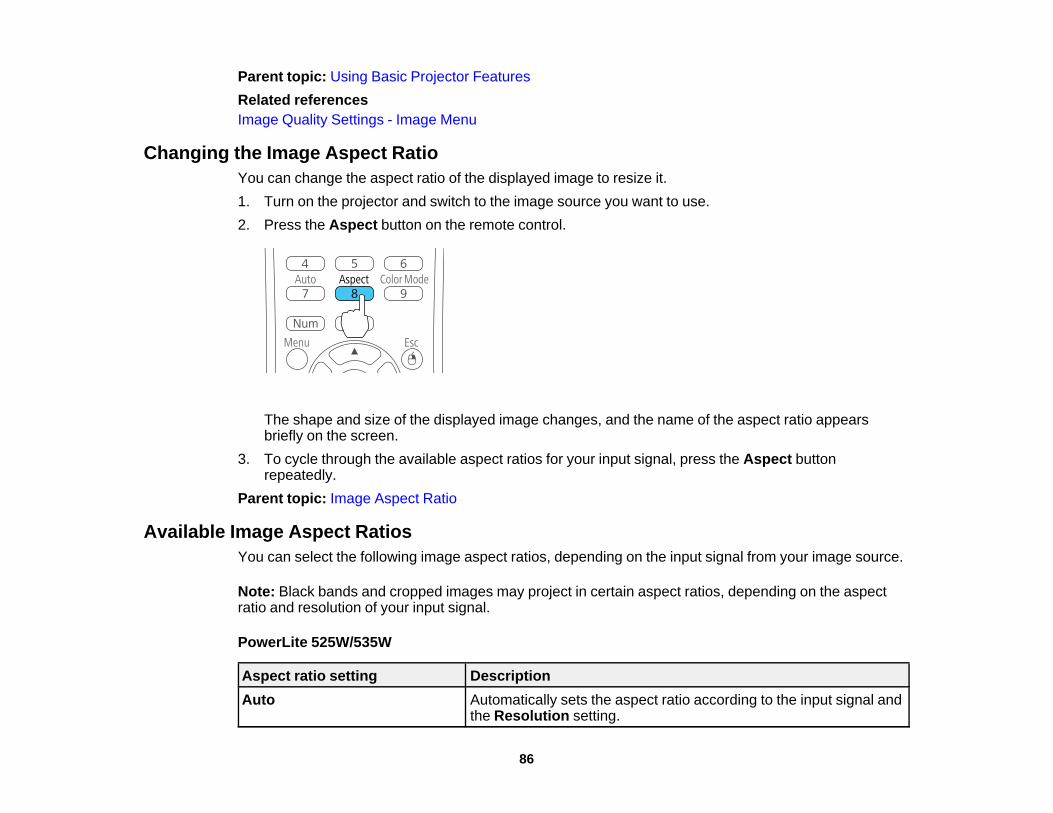
Parent topic: Using Basic Projector FeaturesRelated referencesImage Quality Settings - Image Menu
Changing the Image Aspect RatioYou can change the aspect ratio of the displayed image to resize it.1. Turn on the projector and switch to the image source you want to use.2. Press the Aspect button on the remote control.
The shape and size of the displayed image changes, and the name of the aspect ratio appearsbriefly on the screen.
3. To cycle through the available aspect ratios for your input signal, press the Aspect buttonrepeatedly.
Parent topic: Image Aspect Ratio
Available Image Aspect RatiosYou can select the following image aspect ratios, depending on the input signal from your image source.
Note: Black bands and cropped images may project in certain aspect ratios, depending on the aspectratio and resolution of your input signal.
PowerLite 525W/535W
Aspect ratio setting DescriptionAuto Automatically sets the aspect ratio according to the input signal and
the Resolution setting.
86

Aspect ratio setting DescriptionNormal Displays images using the full projection area and maintains the
aspect ratio of the image.16:9 Converts the aspect ratio of the image to 16:9.Full Displays images using the full width of the projection area, but does
not maintain the aspect ratio.Zoom Displays images using the full width of the projection area and
maintains the aspect ratio of the image.Native Displays images as is (aspect ratio and resolution are maintained).
Note: The Auto aspect ratio setting is available only for HDMI image sources.
PowerLite 520/530
Aspect ratio setting DescriptionAuto Automatically sets the aspect ratio according to the input signal and
the Resolution setting.Normal Displays images using the full projection area and maintains the
aspect ratio of the image.4:3 Displays images using the full projection area at 4:3 aspect ratio.16:9 Converts the aspect ratio of the image to 16:9.
Note: The Auto aspect ratio setting is available only for HDMI image sources.
Parent topic: Image Aspect Ratio
Color ModeThe projector offers different Color Modes to provide optimum brightness, contrast, and color for avariety of viewing environments and image types. You can select a mode designed to match your imageand environment, or experiment with the available modes.If you always want to use a particular color mode for a certain video input source, you can select it usingthe projector menus.Changing the Color Mode
87

Available Color ModesTurning On Auto IrisParent topic: Using Basic Projector FeaturesRelated referencesImage Quality Settings - Image Menu
Changing the Color ModeYou can change the projector's Color Mode using the remote control to optimize the image for yourviewing environment.1. Turn on the projector and switch to the image source you want to use.2. If you are projecting from a DVD player or other video source, insert a disc or other video media and
press the play button, if necessary.3. Press the Color Mode button on the remote control to change the Color Mode.
The image appearance changes and the name of the Color Mode appears briefly on the screen.4. To cycle through all the available Color Modes for your input signal, press the Color Mode button
repeatedly.Parent topic: Color Mode
Available Color ModesYou can set the projector to use these Color Modes, depending on the input source you are using:
Color Mode DescriptionDynamic Best for projecting in a bright roomPresentation Best for color presentations in a bright room
88

Color Mode DescriptionTheatre Best for movies projected in a dark roomsRGB Best for standard sRGB computer displaysBlackboard Best for presentations onto a green chalkboard (adjusts the colors
accordingly)
Parent topic: Color ModeRelated referencesImage Quality Settings - Image Menu
Turning On Auto IrisIn certain color modes, you can turn on the Auto Iris setting to automatically optimize the image based onthe brightness of the content you project.1. Turn on the projector and switch to the image source you want to use.2. Press the Menu button.3. Select the Image menu and press Enter.
4. Select the Auto Iris setting and choose one of the following:• High Speed to adjust brightness as soon as the scene changes.
89

• Normal for standard brightness adjustment.
Note: You can set Auto Iris for each Color Mode that supports the feature. You cannot change theAuto Iris setting when you are using a Closed Caption setting.
5. Press Menu or Esc to exit the menus.Parent topic: Color Mode
Controlling the Volume with the Volume ButtonsYou can use the Volume buttons on the remote control to adjust the volume as you project apresentation with audio. The volume buttons control the projector’s internal speaker system or anyexternal speakers you connected to the projector.You must adjust the volume separately for each connected input source.1. Turn on the projector and start a presentation that includes audio.2. To lower or raise the volume, press the Volume buttons on the remote control.
A volume gauge appears on the screen.3. To set the volume to a specific level for an input source, use the projector menus.Parent topic: Using Basic Projector Features
Projecting a PC Free PresentationYou can use your projector's PC Free feature whenever you connect a USB device that containscompatible image or movie files. This lets you quickly and easily display and control them using theprojector's remote control. You can also display a slide show of the images.Slideshow FeaturesSupported PC Free File Types
90

Starting a Slide ShowParent topic: Using Basic Projector FeaturesRelated conceptsUSB Device ProjectionRelated tasksConnecting a USB Device or Camera to the Projector
Slideshow FeaturesYour projector's Slideshow feature lets you do the following:• Display individual images• Present a slide show of all images in a folderParent topic: Projecting a PC Free Presentation
Supported PC Free File TypesYou can project these types of files using the projector's PC Free feature.
Note: For best results, place your files on media that is formatted in FAT16/32. If you have troubleprojecting from media formatted for non-Windows file systems, try formatting the media for Windowsinstead. You may not be able to use the security features on certain USB storage devices with PC Freefeatures.
91

File contents File type Details(extension)
Image .jpg Make sure the file is not:• CMYK format• Progressive format• Highly compressed• Above 8192 × 8192 resolution
.bmp Make sure the file resolution is not above 1280 × 800
.gif Make sure the file is not:• Above 1280 × 800 resolution• Animated
.png Make sure the file resolution is not above 1280 × 800Movie .avi Make sure the file is not:
• Saved with an audio codec other than linear PCM or ADPCM• Above 1280 × 720 resolution• Larger than 2GB
Parent topic: Projecting a PC Free Presentation
Starting a Slide ShowAfter connecting a USB device to the projector, you can switch to the USB input source and start yourslide show.
Note: You can change the Slideshow operation options or add special effects by highlighting Option atthe bottom of the screen and pressing Enter.
1. Press the USB button on the projector remote control.
92
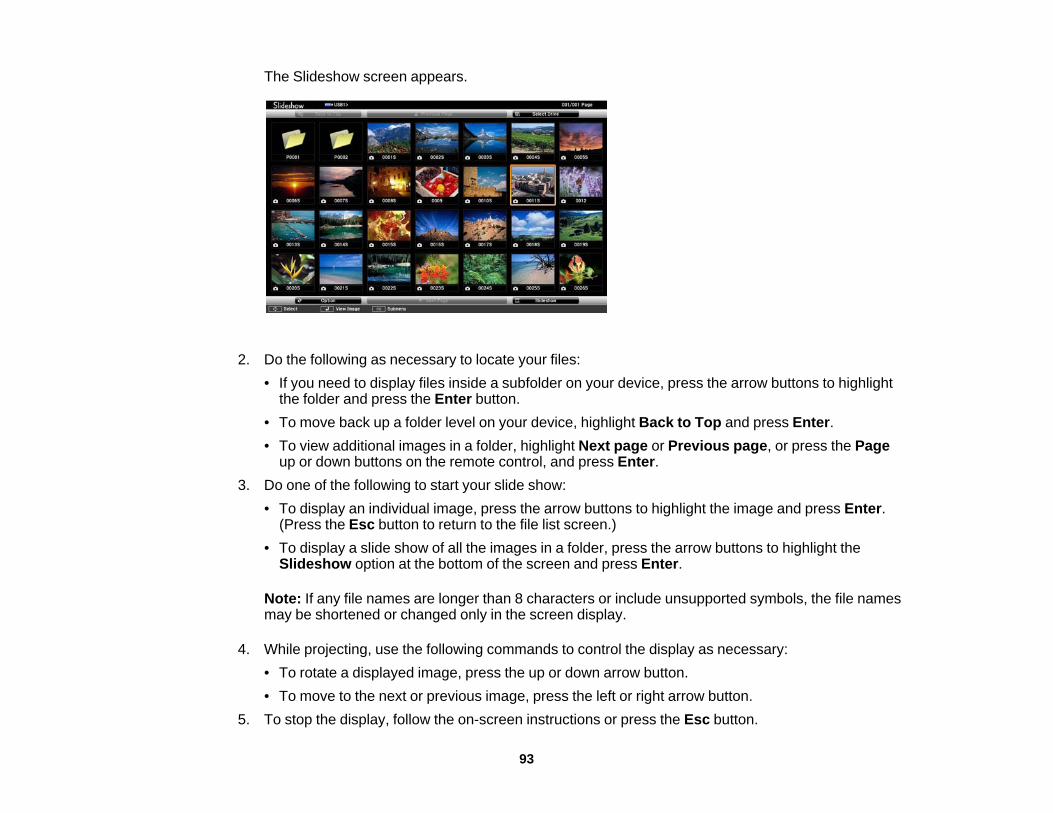
The Slideshow screen appears.
2. Do the following as necessary to locate your files:• If you need to display files inside a subfolder on your device, press the arrow buttons to highlight
the folder and press the Enter button.• To move back up a folder level on your device, highlight Back to Top and press Enter.• To view additional images in a folder, highlight Next page or Previous page, or press the Page
up or down buttons on the remote control, and press Enter.3. Do one of the following to start your slide show:
• To display an individual image, press the arrow buttons to highlight the image and press Enter.(Press the Esc button to return to the file list screen.)
• To display a slide show of all the images in a folder, press the arrow buttons to highlight theSlideshow option at the bottom of the screen and press Enter.
Note: If any file names are longer than 8 characters or include unsupported symbols, the file namesmay be shortened or changed only in the screen display.
4. While projecting, use the following commands to control the display as necessary:• To rotate a displayed image, press the up or down arrow button.• To move to the next or previous image, press the left or right arrow button.
5. To stop the display, follow the on-screen instructions or press the Esc button.
93
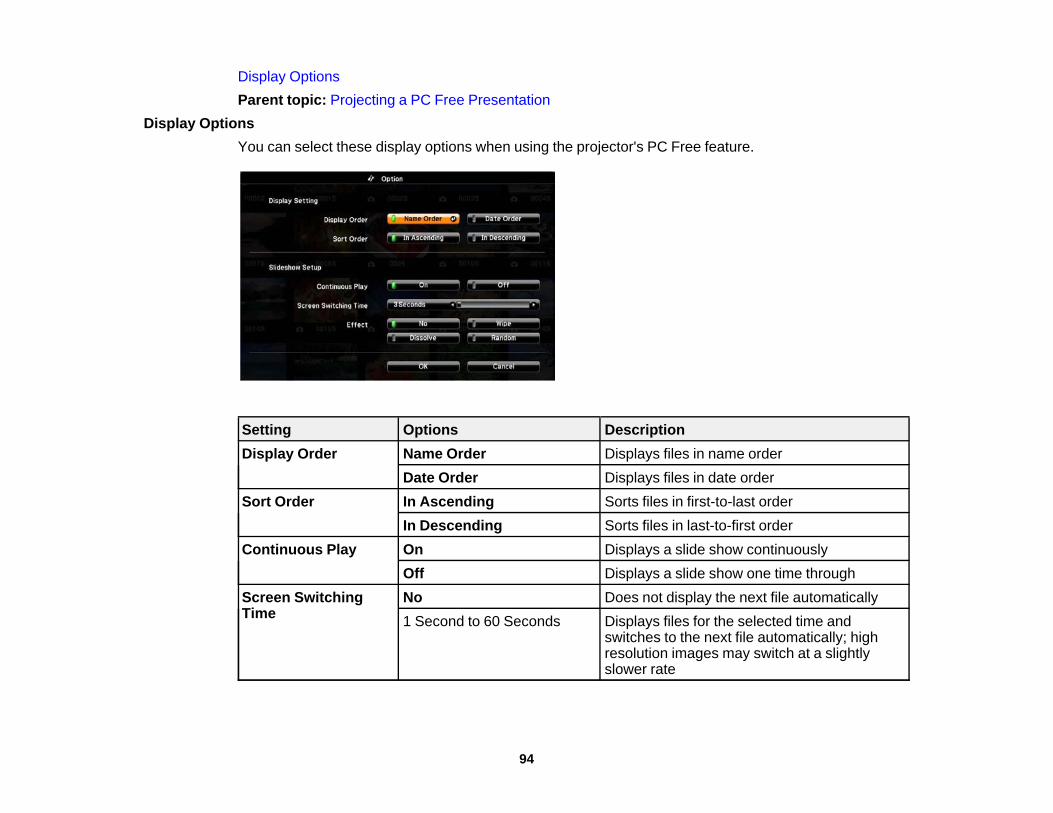
Display OptionsParent topic: Projecting a PC Free Presentation
Display OptionsYou can select these display options when using the projector's PC Free feature.
Setting Options DescriptionDisplay Order Name Order Displays files in name order
Date Order Displays files in date orderSort Order In Ascending Sorts files in first-to-last order
In Descending Sorts files in last-to-first orderContinuous Play On Displays a slide show continuously
Off Displays a slide show one time throughScreen Switching No Does not display the next file automaticallyTime 1 Second to 60 Seconds Displays files for the selected time and
switches to the next file automatically; highresolution images may switch at a slightlyslower rate
94

Setting Options DescriptionEffect Wipe Transitions between images with a wipe effect
Dissolve Transitions between images with a dissolveeffect
Random Transitions between images using a randomvariety of effects
Parent topic: Starting a Slide Show
95

Adjusting Projector FeaturesFollow the instructions in these sections to use your projector's feature adjustments.Shutting Off the Picture and Sound TemporarilyStopping Video Action TemporarilyZooming Into and Out of ImagesProjector Security FeaturesCreating a User Pattern to Display
Shutting Off the Picture and Sound TemporarilyYou can temporarily turn off the projected picture and sound if you want to redirect your audience'sattention during a presentation. Any sound or video action continues to run, however, so you cannotresume projection at the point that you stopped it.If you want to display an image such as a company logo or picture when the presentation is stopped, youcan set up this feature using the projector's menus.1. Press the A/V Mute button on the remote control to temporarily stop projection and mute any sound.
2. To turn the picture and sound back on, press A/V Mute again.Parent topic: Adjusting Projector Features
Stopping Video Action TemporarilyYou can temporarily stop the action in a video or computer presentation and keep the current image onthe screen. Any sound or video action continues to run, however, so you cannot resume projection at thepoint that you stopped it.
96

1. Press the Freeze button on the remote control to stop the video action.
2. To restart the video action in progress, press Freeze again.Parent topic: Adjusting Projector Features
Zooming Into and Out of ImagesYou can draw attention to parts of a presentation by zooming into a portion of the image and enlarging iton the screen.1. Press the E-Zoom + button on the remote control.
You see a crosshair on the screen indicating the center of the zoom area.2. Use the following buttons on the remote control to adjust the zoomed image:
• Use the arrow buttons to position the crosshair in the image area you want to zoom into.• Press the E-Zoom + button repeatedly to zoom into the image area, enlarging it as necessary.• To pan around the zoomed image area, use the arrow buttons.• To zoom out of the image, press the E-Zoom – button as necessary.• To return to the original image size, press Esc.
97

Parent topic: Adjusting Projector Features
Projector Security FeaturesYou can secure your projector to deter theft or prevent unintended use by setting up the followingsecurity features:• Password security to prevent the projector from being turned on, and prevent changes to the startup
screen and other settings.• Button lock security to block operation of the projector using the buttons on the control panel.• Security cabling to physically cable the projector in place.Password Security TypesLocking the Projector's ButtonsInstalling a Security CableParent topic: Adjusting Projector Features
Password Security TypesYou can set up these types of password security using one shared password:• Power On Protection password prevents anyone from using the projector without first entering a
password.• User's Logo Protection password prevents anyone from changing the custom screen the projector
can display when it turns on or when you use the A/V Mute feature. The presence of the customscreen discourages theft by identifying the projector’s owner.
• Network Protection password prevents anyone from changing the network settings in the projectormenus.
Setting a PasswordSelecting Password Security TypesEntering a Password to Use the ProjectorSaving a User's Logo Image to DisplayParent topic: Projector Security Features
Setting a PasswordTo use password security, you must set a password.
98

1. Hold down the Freeze button on the remote control for about ten seconds or until you see this menu.
2. Press the down arrow to select Password and press Enter.You see the prompt "Change the password?".
3. Select Yes and press Enter.4. Press and hold down the Num button on the remote control and use the numeric buttons to set a
four-digit password.
The password displays as **** as you enter it. Then you see the confirmation prompt.5. Enter the password again.
You see the message "Password accepted."6. Press Esc to return to the menu.7. Make a note of the password and keep it in a safe place in case you forget it.Parent topic: Password Security Types
99

Selecting Password Security TypesAfter setting a password, you see this menu, allowing you to select the password security types you wantto use.
If you do not see this menu, hold down the Freeze button on the remote control for about 10 seconds oruntil the menu appears.1. To prevent unauthorized use of the projector, select Power On Protection, press Enter, select On,
press Enter again, and press Esc.2. To prevent changes to the User's Logo screen or related display settings, select User's Logo
Protection, press Enter, select On, press Enter again, and press Esc.3. To prevent changes to network settings, select Network Protection, press Enter, select On, press
Enter again, and press Esc.You can attach the Password Protect sticker to the projector as an additional theft deterrent.
Note: Be sure to keep the remote control in a safe place; if you lose it, you will not be able to enter thepassword required to use the projector.
Parent topic: Password Security Types
100

Entering a Password to Use the ProjectorIf a password is set up and a Power On Protection password is enabled, you see a prompt to enter apassword whenever you turn on the projector.
You must enter the correct password to use the projector.1. Press and hold down the Num button on the remote control while you enter the password using the
numeric buttons.
The password screen closes.2. If the password is incorrect, the following may happen:
• You see a "wrong password" message and a prompt to try again. Enter the correct password toproceed.
101

• If you enter an incorrect password several times in succession, the projector displays a requestcode and a message to contact Epson Support. Do not attempt to enter the password again.When you contact Epson Support, provide the displayed request code and proof of ownership forassistance in unlocking the projector.
Parent topic: Password Security TypesRelated referencesProjector Setup Settings - Extended Menu
Saving a User's Logo Image to DisplayYou can transfer an image to the projector and then display it whenever the projector turns on. You canalso display the image when the projector is not receiving an input signal or when you temporarily stopprojection (using the A/V Mute feature). This transferred image is called the User's Logo screen.The image you select as the User's Logo can be a photo, graphic, or company logo, which is useful inidentifying the projector's owner to help deter theft. You can prevent changes to the User's Logo bysetting up password protection for it.1. Display the image you want to project as the User's Logo.2. Press the Menu button, select the Extended menu, and press Enter.
3. Select the User's Logo setting and press Enter.You see a prompt asking if you want to use the displayed image as a user's logo.
4. Select Yes and press Enter.
102

You see a selection box overlaying your image.5. Use the arrow buttons on the remote control to surround the image area you want to use as the
User's Logo and press Enter.You see a prompt asking if you want to select this image area.
6. Select Yes and press Enter. (If you want to change the selected area, select No, press Enter, andrepeat the last step.)You see the User's Logo zoom factor menu.
7. Select a zoom percentage and press Enter.You see a prompt asking if you want to save the image as the User's Logo.
8. Select Yes and press Enter.You see a completion message.
9. Press Esc to exit the message screen.10. Select the Extended menu and press Enter.11. Select Display and press Enter.12. Select when you want to display the User's Logo screen:
• To display it whenever there is no input signal, select Display Background and set it to Logo.• To display it whenever you turn the projector on, select Startup Screen and set it to On.• To display it whenever you press the A/V Mute button, select A/V Mute and set it to Logo.
To prevent anyone from changing the User's Logo settings without first entering a password, set apassword and enable User's Logo security.Parent topic: Password Security Types
103

Related referencesProjector Setup Settings - Extended Menu
Locking the Projector's ButtonsYou can lock the buttons on the projector's control panel to prevent anyone from using the projector. Youcan lock all the buttons or all the buttons except the power button.1. Press the Menu button.2. Select the Settings menu and press Enter.
3. Select the Control Panel Lock setting and press Enter.4. Select one of these lock types and press Enter:
• To lock all of the projector's buttons, select Full Lock.• To lock all buttons except the power button, select Partial Lock.You see a confirmation prompt.
5. Select Yes and press Enter.Unlocking the Projector's ButtonsParent topic: Projector Security FeaturesRelated referencesProjector Feature Settings - Settings Menu
104
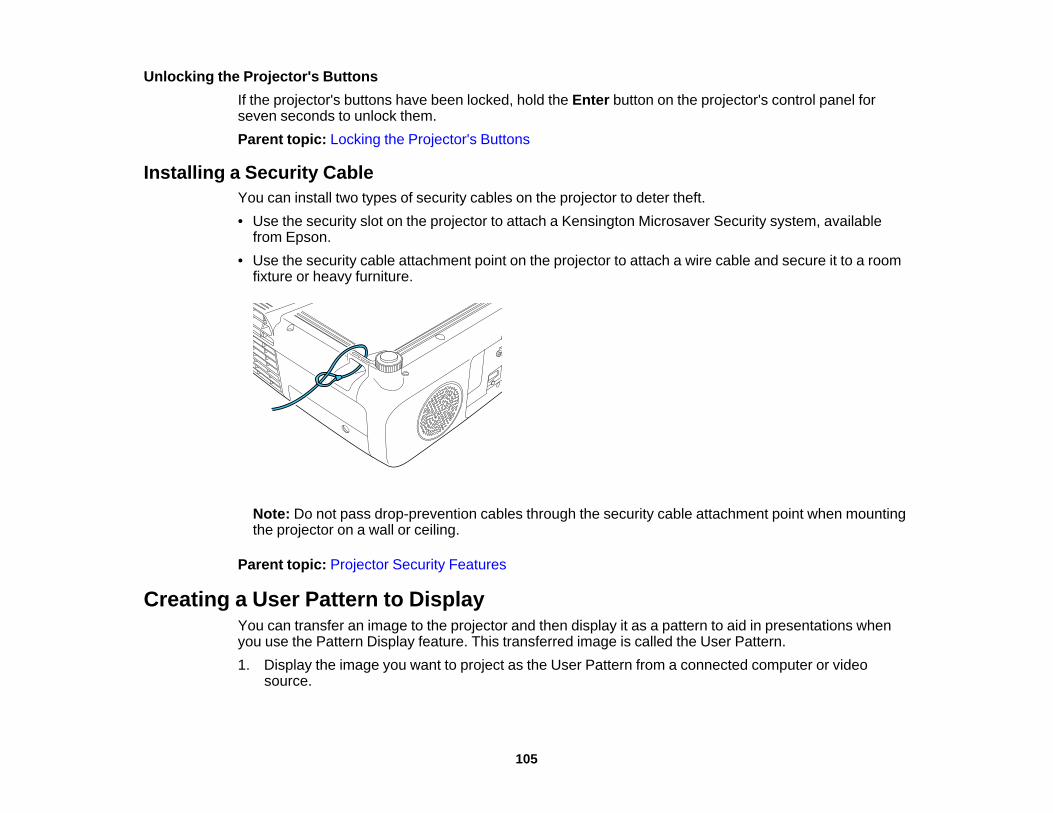
Unlocking the Projector's ButtonsIf the projector's buttons have been locked, hold the Enter button on the projector's control panel forseven seconds to unlock them.Parent topic: Locking the Projector's Buttons
Installing a Security CableYou can install two types of security cables on the projector to deter theft.• Use the security slot on the projector to attach a Kensington Microsaver Security system, available
from Epson.• Use the security cable attachment point on the projector to attach a wire cable and secure it to a room
fixture or heavy furniture.
Note: Do not pass drop-prevention cables through the security cable attachment point when mountingthe projector on a wall or ceiling.
Parent topic: Projector Security Features
Creating a User Pattern to DisplayYou can transfer an image to the projector and then display it as a pattern to aid in presentations whenyou use the Pattern Display feature. This transferred image is called the User Pattern.1. Display the image you want to project as the User Pattern from a connected computer or video
source.
105
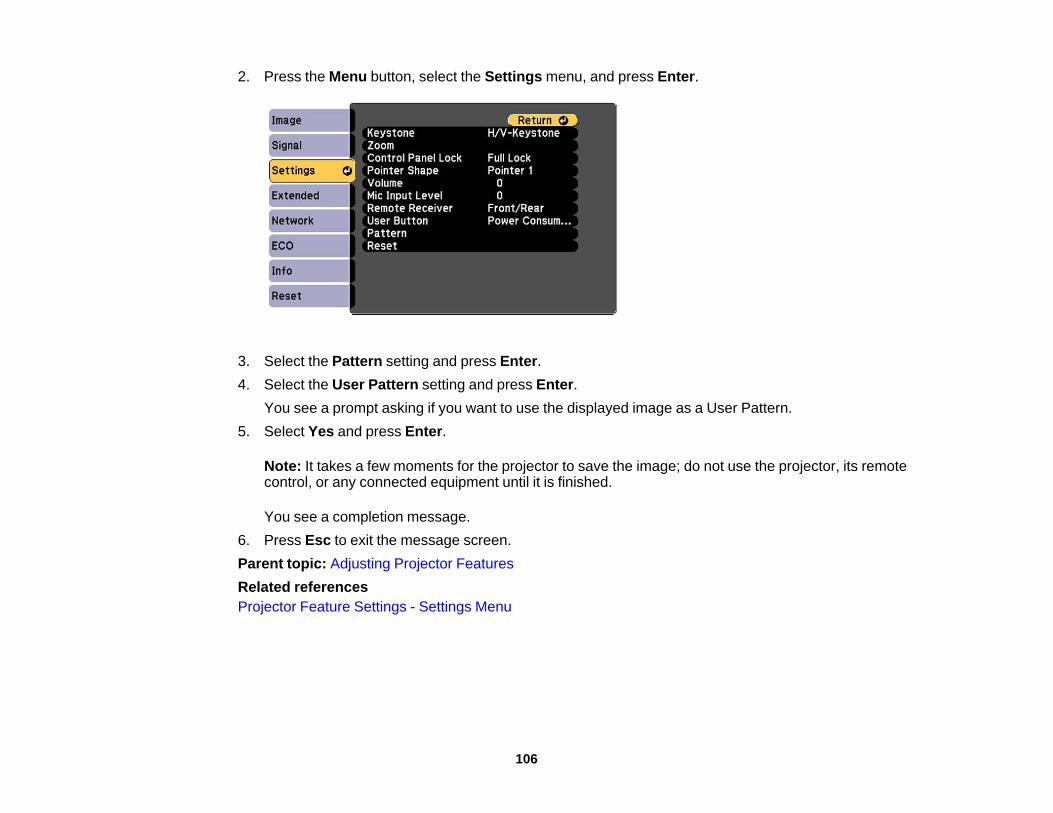
2. Press the Menu button, select the Settings menu, and press Enter.
3. Select the Pattern setting and press Enter.4. Select the User Pattern setting and press Enter.
You see a prompt asking if you want to use the displayed image as a User Pattern.5. Select Yes and press Enter.
Note: It takes a few moments for the projector to save the image; do not use the projector, its remotecontrol, or any connected equipment until it is finished.
You see a completion message.6. Press Esc to exit the message screen.Parent topic: Adjusting Projector FeaturesRelated referencesProjector Feature Settings - Settings Menu
106

Adjusting the Menu SettingsFollow the instructions in these sections to access the projector menu system and change projectorsettings.Using the Projector's MenusImage Quality Settings - Image MenuInput Signal Settings - Signal MenuProjector Feature Settings - Settings MenuProjector Setup Settings - Extended MenuProjector Network Settings - Network MenuProjector Setup Settings - ECO MenuProjector Information Display - Info MenuProjector Reset Options - Reset Menu
Using the Projector's MenusYou can use the projector's menus to adjust the settings that control how your projector works. Theprojector displays the menus on the screen.
107

1. Press the Menu button on the control panel or remote control.
You see the menu screen displaying the Image menu settings.
108
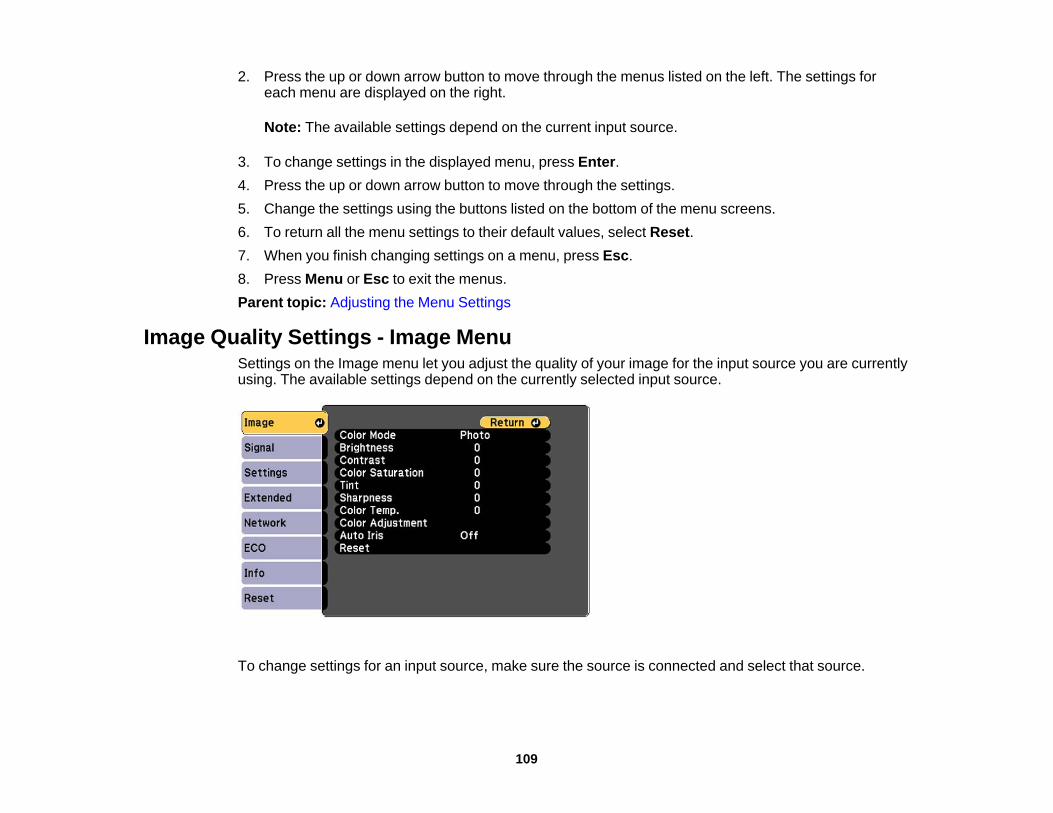
2. Press the up or down arrow button to move through the menus listed on the left. The settings foreach menu are displayed on the right.
Note: The available settings depend on the current input source.
3. To change settings in the displayed menu, press Enter.4. Press the up or down arrow button to move through the settings.5. Change the settings using the buttons listed on the bottom of the menu screens.6. To return all the menu settings to their default values, select Reset.7. When you finish changing settings on a menu, press Esc.8. Press Menu or Esc to exit the menus.Parent topic: Adjusting the Menu Settings
Image Quality Settings - Image MenuSettings on the Image menu let you adjust the quality of your image for the input source you are currentlyusing. The available settings depend on the currently selected input source.
To change settings for an input source, make sure the source is connected and select that source.
109

Setting Options DescriptionColor Mode See the list of available Color Adjusts the vividness of image
Modes colors for various image typesand environments
Brightness Varying levels available Lightens or darkens the overallimage
Contrast Varying levels available Adjusts the difference betweenlight and dark areas of the image
Color Saturation Varying levels available Adjusts the intensity of the imagecolors
Tint Varying levels available Adjusts the balance of green tomagenta tones in the image
Sharpness Varying levels available Adjusts the sharpness orsoftness of image details
Color Temp. (color temperature) Varying levels available Sets the overall color tone. Lowervalues tint the image red, andhigher values tint the image blue.
Color Adjustment Slider bars for each color Adjusts the intensity of individualhues in the image
Auto Iris Normal Adjusts the projected luminancebased on the image brightnessHigh Speed when certain Color Modes are
Off selected
Note: The Brightness setting does not affect lamp brightness. To change the lamp brightness mode,use the Power Consumption setting.
Parent topic: Adjusting the Menu SettingsRelated referencesAvailable Color Modes
110

Input Signal Settings - Signal MenuNormally the projector detects and optimizes the input signal settings automatically. If you need tocustomize the settings, you can use the Signal menu. The available settings depend on the currentlyselected input source.
Note: You can restore the default settings of the Position, Tracking, and Sync settings by pressing theAuto button on the remote control.
To change settings for an input source, make sure the source is connected and select that source.
Setting Options DescriptionAuto Setup On Automatically optimizes computer
image quality (when On)OffResolution Auto Sets the input signal resolution if
not detected automatically usingWide the Auto optionNormal
Tracking Varying levels available Adjusts signal to eliminate verticalstripes in computer images
111

Setting Options DescriptionSync. Varying levels available Adjusts signal to eliminate
fuzziness or flickering incomputer images
Position Up, down, left, right Adjusts the image location on thescreen
Progressive Off Sets whether to convertinterlaced-to-progressive signalsVideo for certain video image types
Film/Auto Off: for fast-moving video imagesVideo: for most video imagesFilm/Auto: for movies, computergraphics, and animation
Noise Reduction Off Reduces flickering in analogimages in two levelsNR1
NR2HDMI Video Range Auto Sets the video range to match the
setting of the device connected toNormal the HDMI input portExpanded Auto: detects the video range
automaticallyNormal: normally for images froma device other than a computer;can also be selected if the blackareas of the image are too brightExpanded: normally for imagesfrom a computer; can also beselected if the image is too dark
112
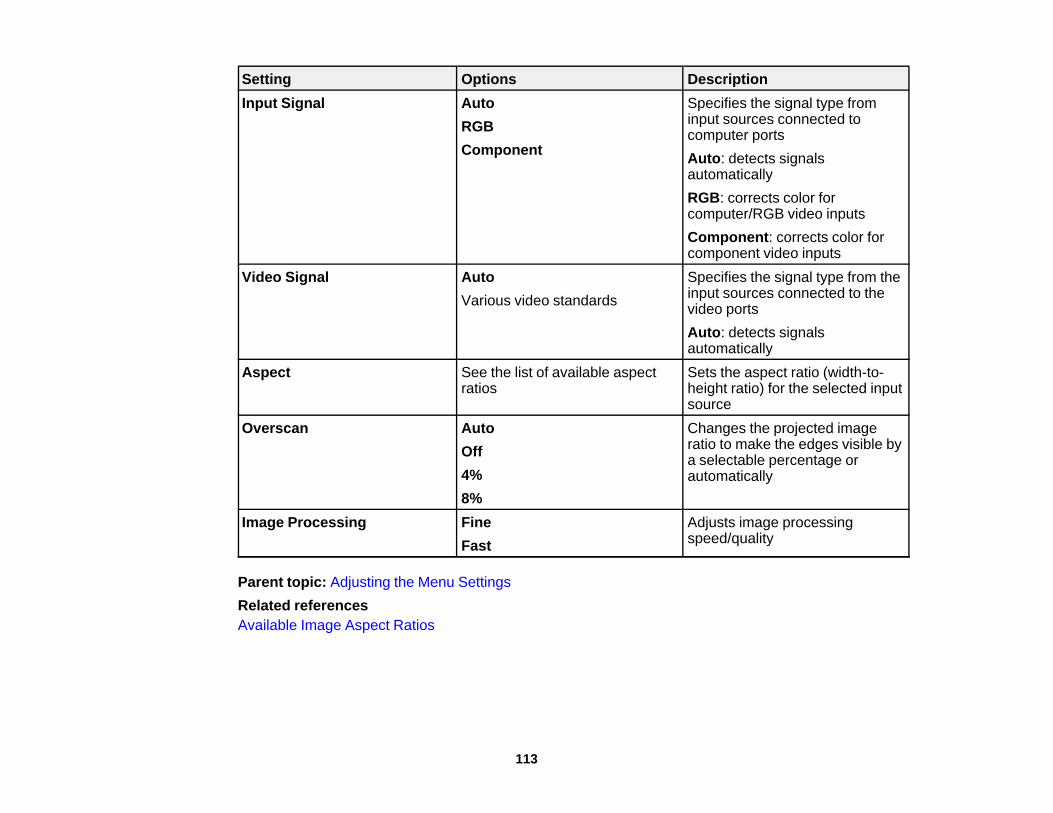
Setting Options DescriptionInput Signal Auto Specifies the signal type from
input sources connected toRGB computer portsComponent Auto: detects signals
automaticallyRGB: corrects color forcomputer/RGB video inputsComponent: corrects color forcomponent video inputs
Video Signal Auto Specifies the signal type from theinput sources connected to theVarious video standards video portsAuto: detects signalsautomatically
Aspect See the list of available aspect Sets the aspect ratio (width-to-ratios height ratio) for the selected input
sourceOverscan Auto Changes the projected image
ratio to make the edges visible byOff a selectable percentage or4% automatically8%
Image Processing Fine Adjusts image processingspeed/qualityFast
Parent topic: Adjusting the Menu SettingsRelated referencesAvailable Image Aspect Ratios
113

Projector Feature Settings - Settings MenuOptions on the Settings menu let you customize various projector features.
Setting Options DescriptionKeystone H/V Keystone Adjusts image shape to
rectangular (horizontally andQuick Corner vertically)H/V Keystone: lets you manuallycorrect horizontal and verticalsidesQuick Corner: select to correctimage shape and alignmentusing an on-screen display
Zoom Varying levels available Adjusts the size of the projectedimage
114

Setting Options DescriptionControl Panel Lock Full Lock Controls projector button locking
to secure the projectorPartial LockFull Lock: locks all buttonsOffPartial Lock: locks all buttonsexcept the power buttonOff: no buttons locked
Pointer Shape Three shapes available Changes the shape of the remotecontrol pointer feature
Volume Varying levels available Adjusts the volume of projector’sspeaker system or externalspeakers
Mic Input Level Varying levels available Adjusts the volume of theprojector's speaker system whenyou use a connected microphone
Remote Receiver Front/Rear Limits reception of remote controlsignals by the selected receiver;Front Off turns off all receivers
RearOff
User Button Power Consumption Assigns a menu option to theUser button on the remoteInfo control for one-touch access
ProgressiveClosed CaptionTest PatternResolutionMic Input LevelPattern DisplayFlip Horizontal
115

Setting Options DescriptionPattern Pattern Display Selects various pattern display
optionsPattern TypePattern Display: lets you displayUser Pattern the selected pattern type on the
Test Pattern screen to aid in presentationPattern Type: selects the type ofgrid or line pattern to displayUser Pattern: captures aprojected screen and saves it asa pattern for displayTest Pattern: displays a testpattern to assist in focusing andzooming the image andcorrecting image shape
Parent topic: Adjusting the Menu Settings
Projector Setup Settings - Extended MenuSettings on the Extended menu let you customize various projector setup features that control itsoperation.
116
Setting Options DescriptionDisplay Messages Selects various display options
Display Background Messages: controls whethermessages are displayed on theStartup Screen screen
A/V Mute Display Background: selectsthe screen color or logo todisplay when no signal isreceivedStartup Screen: controlswhether a special screenappears when the projector startsupA/V Mute: selects the screencolor or logo to display when A/VMute is turned on
Closed Caption Off Controls use of closed captionsand selects the closed captionCC1 type (closed captions are only
CC2 visible for NTSC signalsconnected through the S-Videoor Video ports)
User's Logo – Creates a screen that theprojector displays to identify itselfand enhance security
Projection Front Selects the way the projectorfaces the screen so the image isFront/Ceiling oriented correctly
RearRear/Ceiling
117
Setting Options DescriptionOperation Direct Power On Selects various operation options
High Altitude Mode Direct Power On: lets you turnon the projector without pressingStartup Source Search the power button
Auto Power On High Altitude Mode: regulatesthe projector’s operatingtemperature at altitudes above4921 feet (1500 m)Startup Source Search:automatically detects the imagesignal that is input when theprojector is turned onAuto Power On: lets you turn onthe projector by turning on acomputer connected to theComputer1 and Computer2ports
118

Setting Options DescriptionA/V Settings A/V Output Selects the following when the
projector is in standby modeAudio Output (turned off):HDMI Audio Output A/V Output: the Always On
setting indicates that theprojector outputs audio and videosignals even while it is in standbymode; available only whenStandby Mode is set toCommunication OnAudio Output: selects the audioinput port when projectingimages from the Computer1,Computer2, S-Video, Video,and USB-A portsHDMI Audio Output: selectswhich Audio port provides audiowhen viewing images from theHDMI port on the projector
Language Various languages available Selects the language forprojector menu and messagedisplays (not changed by Resetoption)
Parent topic: Adjusting the Menu Settings
119
Projector Network Settings - Network MenuSettings on the Network menu let you view network information and set up the projector for monitoringand control over a network.
Setting Options DescriptionWireless Mode Wireless LAN On Turns wireless LAN features on
and offOff
120

Setting Options DescriptionNet. Info - Wireless LAN Connection mode Displays wireless network status
and detailsWireless LAN Sys.Antenna LevelProjector NameSSIDDHCPIP AddressSubnet MaskGateway AddressMAC AddressRegion Code
Net. Info - Wired LAN Projector Name Displays wired network statusand detailsDHCP
IP AddressSubnet MaskGateway AddressMAC Address
Network Configuration Accesses additional network Configures your network settingsmenus
Parent topic: Adjusting the Menu SettingsRelated conceptsWired Network ProjectionWireless Network Projection
121

Projector Setup Settings - ECO MenuSettings on the ECO menu let you customize projector functions to save power. When you select apower-saving setting, a leaf icon appears next to the menu item.
Setting Options DescriptionPower Consumption Normal Selects the brightness mode of
the projector lampECONormal: sets maximum lampbrightnessECO: reduces lamp brightnessand fan noise, and saves powerand lamp life
Light Optimizer On When Power Consumption isset to Normal and Auto Iris isOff turned off, the lamp brightness isadjusted based on the projectedimage; you can set this option foreach color mode
Sleep Mode On Automatically places theprojector in standby mode afterOff an interval of inactivity
122

Setting Options DescriptionSleep Mode Timer 1 to 30 minutes Sets the interval for Sleep ModeA/V Mute Timer On Automatically turns off the
projector after 30 minutes ifOff A/V Mute is enabledStandby Mode Communication On Enable this setting to allow the
following operations to occurCommunication Off when the projector is in standbymode:• Monitor and control the
projector over a network• Output audio and video to an
external device (A/V Outputmust be set to Always On)
• Output audio from amicrophone (A/V Output mustbe set to Always On)
ECO Display On Displays a leaf icon in the bottomleft corner of the projected screenOff to indicate the power-savingstatus when the lamp brightnesschanges
Parent topic: Adjusting the Menu Settings
123

Projector Information Display - Info MenuYou can display information about the projector and input sources by viewing the Info menu. However,you cannot change any settings in the menu.
Select Version to display the projector's firmware version. Select Info to display the settings describedbelow.
Note: Available settings depend on the current input source. The lamp usage timer does not register anyhours until you have used the lamp for at least 10 hours.
Information item DescriptionLamp Hours Displays the number of hours (H) the lamp has been used in
Normal and ECO Power Consumption modes; if the information isdisplayed in yellow, obtain a genuine Epson replacement lampsoon
Source Displays the name of the port to which the current input source isconnected
Input Signal Displays the input signal setting of the current input sourceResolution Displays the resolution of the current input sourceVideo Signal Displays the video signal format of the current input source
124

Information item DescriptionRefresh Rate Displays the refresh rate of the current input sourceSync Info Displays information that may be needed by a service technicianStatus Displays information about projector problems that may be needed
by a service technicianSerial Number Displays the projector's serial numberEvent ID Displays the Event ID number corresponding to a specific projector
problem; see the list of Event ID codes
Event ID Code ListParent topic: Adjusting the Menu SettingsRelated referencesProjector Lamp SpecificationsOptional Equipment and Replacement Parts
Event ID Code ListIf the Event ID option on the Info menu displays a code number, check this list of Event ID codes for thesolution to the projector problem associated with the code.
Event ID code Cause and solution0432 The EasyMP Network Projection program did not start. Turn the projector off and
then on again.04350434 Unstable network communication. Check the network communication status, wait a
few moments, and try connecting to the network again.0482048404850433 Cannot display the transferred images. Restart the EasyMP Network Projection
program.0481 Communication with computer was disconnected. Restart the EasyMP Network
Projection program.
125
Event ID code Cause and solution0483 The EasyMP Network Projection program quit unexpectedly. Check the network
communication status, then turn the projector off and then on again.04FE0479 A projector system error has occurred. Turn the projector off and then on again.04FF0891 Cannot find an access point with the same SSID. Set your computer, access point,
and projector to the same SSID.0892 The WPA/WPA2 authentication type does not match. Make sure the wireless
network security settings are correct.0893 The WEP/TKIP/AES encryption type does not match. Make sure the wireless
network security settings are correct.0894 Communication with unauthorized access point was disconnected. Contact your
network administrator.0898 Failed to acquire DHCP address. Make sure the DHCP server is operating correctly.
If you are not using DHCP, turn off the DHCP setting in the Network menus.0899 A communication error has occurred. Try restarting the EasyMP Network Projection
program and restarting your projector. If that does not solve the problem, contactEpson for help.
Parent topic: Projector Information Display - Info Menu
Projector Reset Options - Reset MenuYou can reset most of the projector settings to their default values using the Reset All option on theReset menu.
126

You can also reset the projector's lamp usage timer to zero when you replace the lamp using the ResetLamp Hours option.
You cannot reset the following settings using the Reset All option:• Input Signal• User's Logo• Language• Network menu items• Lamp Hours• Password• Zoom• Image ShiftParent topic: Adjusting the Menu Settings
127

Maintaining and Transporting the ProjectorFollow the instructions in these sections to maintain your projector and transport it from place to place.Projector MaintenanceTransporting the Projector
Projector MaintenanceYour projector needs little maintenance to keep working at its best.You may need to clean the lens periodically, and clean the air filter and air vents to prevent the projectorfrom overheating due to blocked ventilation.The only parts you should replace are the lamp, air filter, and remote control batteries. If any other partneeds replacing, contact Epson or an authorized Epson servicer.
Warning: Before cleaning any part of the projector, turn it off and unplug the power cord. Never openany cover on the projector, except as specifically explained in this manual. Dangerous electrical voltagesin the projector can injure you severely.
Warning: Do not try to service this product yourself, except as specifically explained in this manual.Refer all other servicing to qualified servicers.
Cleaning the LensCleaning the Projector CaseAir Filter and Vent MaintenanceProjector Lamp MaintenanceReplacing the Remote Control BatteriesParent topic: Maintaining and Transporting the Projector
Cleaning the LensClean the projector's lens periodically, or whenever you notice dust or smudges on the surface.• To remove dust or smudges, gently wipe the lens with a soft, lint-free cloth.
128

• To remove stubborn smudges, moisten a soft, lint-free cloth with lens cleaner and gently wipe thelens. Do not spray any liquid directly on the lens.
Warning: Do not use a lens cleaner that contains flammable gas. The high heat generated by theprojector lamp may cause a fire.
Caution: Do not use glass cleaner or any harsh materials to clean the lens and do not subject the lensto any impacts; you may damage it. Do not use canned air, or the gases may leave a residue. Avoidtouching the lens with your bare hands to prevent fingerprints on or damage to the lens surface.
Parent topic: Projector Maintenance
Cleaning the Projector CaseBefore cleaning the projector case, turn off the projector and unplug the power cord.• To remove dust or dirt, use a soft, dry, lint-free cloth.• To remove stubborn dirt, use a soft cloth moistened with water and mild soap. Do not spray liquid
directly on the projector.
Caution: Do not use wax, alcohol, benzine, paint thinner, or other chemicals to clean the projectorcase. These can damage the case. Do not use canned air, or the gases may leave a residue.
Parent topic: Projector Maintenance
Air Filter and Vent MaintenanceRegular filter maintenance is important to maintaining your projector. Your Epson projector is designedwith an easily accessible, user-replaceable filter to protect your projector and make regular maintenancesimple. Filter maintenance intervals will depend on the environment.If regular maintenance is not performed, your Epson projector will notify you when the temperatureinside the projector has reached a high level. Do not wait until this warning appears to maintain yourprojector filter as prolonged exposure to high temperatures may reduce the life of your projector or lamp.Damage due to the failure to properly maintain the projector or its filter may not be covered by theprojector or lamp Limited Warranties.Cleaning the Air Filter and VentsReplacing the Air FilterParent topic: Projector Maintenance
129

Cleaning the Air Filter and VentsClean the projector's air filter or vents if they get dusty, or if you see a message telling you to clean them.1. Turn off the projector and unplug the power cord.2. Place your finger into the groove at the top of the air filter cover and pull to open the cover.
3. Pull the air filter out of the projector.
130

4. Vacuum the front of the air filter (the side with the tabs) to remove any remaining dust.
Note: If dust is difficult to remove or the air filter is damaged, replace the air filter.
5. Place the air filter back in the projector as shown.
131

6. Close the air filter cover.
Parent topic: Air Filter and Vent MaintenanceReplacing the Air Filter
You need to replace the air filter in the following situations:• After cleaning the air filter, you see a message telling you to clean or replace it• The air filter is torn or damagedYou can replace the air filter while the projector is mounted to the ceiling or placed on a table.1. Turn off the projector and unplug the power cord.
132

2. Place your finger into the groove at the top of the air filter cover and pull to open the cover.
3. Pull the air filter out of the projector.
Note: Air filters contain ABS resin and polyurethane foam. Dispose of used air filters according tolocal regulations.
133
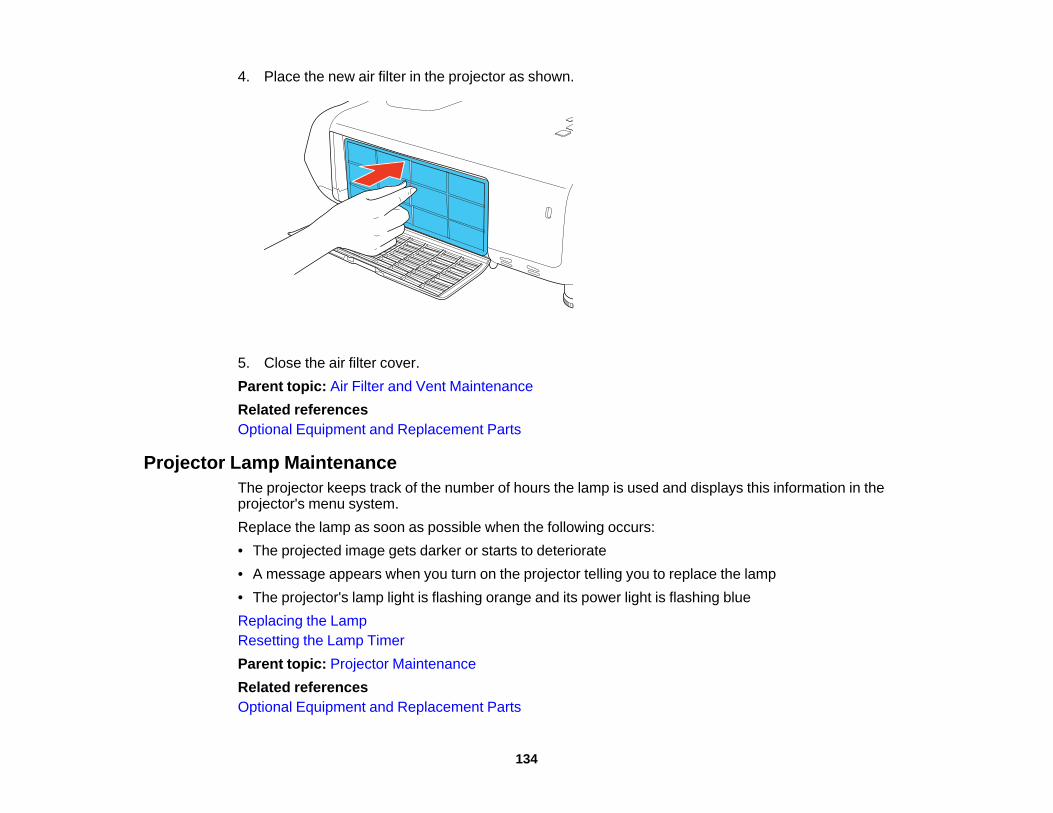
4. Place the new air filter in the projector as shown.
5. Close the air filter cover.Parent topic: Air Filter and Vent MaintenanceRelated referencesOptional Equipment and Replacement Parts
Projector Lamp MaintenanceThe projector keeps track of the number of hours the lamp is used and displays this information in theprojector's menu system.Replace the lamp as soon as possible when the following occurs:• The projected image gets darker or starts to deteriorate• A message appears when you turn on the projector telling you to replace the lamp• The projector's lamp light is flashing orange and its power light is flashing blueReplacing the LampResetting the Lamp TimerParent topic: Projector MaintenanceRelated referencesOptional Equipment and Replacement Parts
134

Projector Lamp SpecificationsProjector Information Display - Info Menu
Replacing the LampBefore you replace the lamp, let the projector cool down for at least one hour so the lamp will not be hot.
Warning: Let the lamp fully cool before replacing it to avoid injury.
You can replace the lamp while the projector is mounted to the ceiling, if necessary.1. Turn off the projector and unplug the power cord.2. Allow the projector lamp to cool down for at least one hour.3. Use the screwdriver included with the replacement lamp to loosen the screw securing the lamp
cover.
Warning: If the lamp is broken, glass fragments may be loose inside the lamp chamber. Be carefulremoving any broken glass to avoid injury. If the projector is installed on the ceiling, stand to the sideof the lamp cover and not underneath it; pieces of glass could fall into your eyes or mouth when youopen the lamp cover.
135
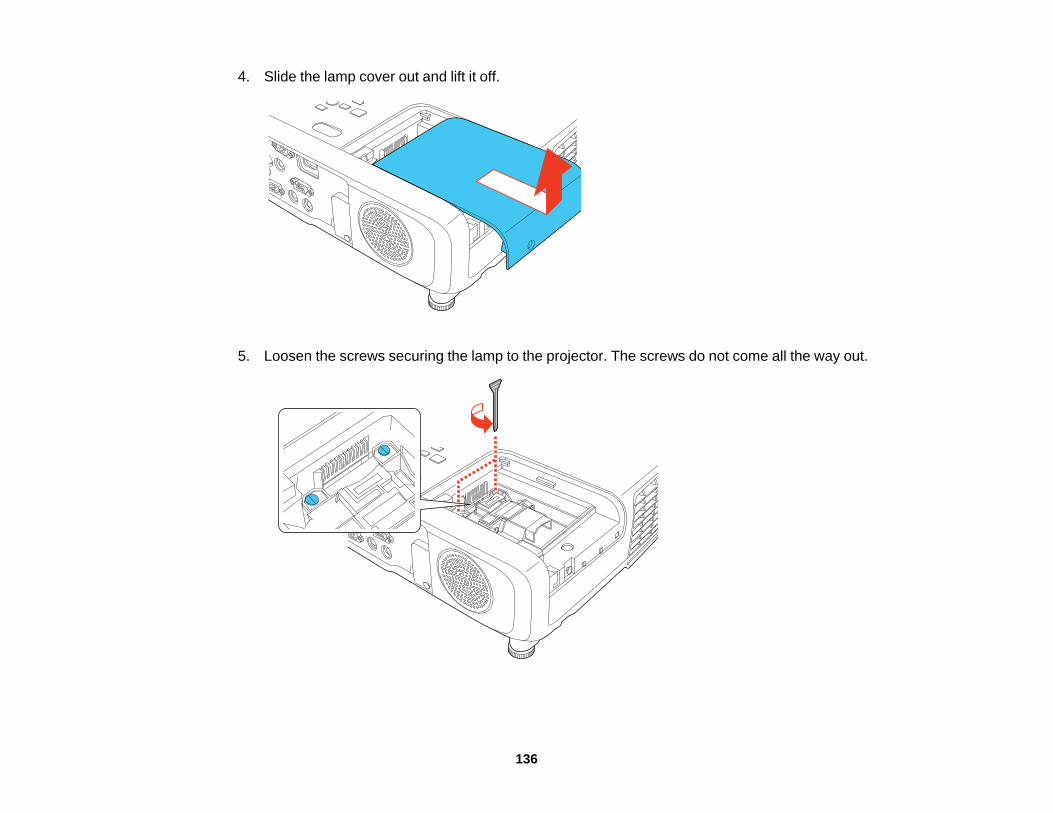
4. Slide the lamp cover out and lift it off.
5. Loosen the screws securing the lamp to the projector. The screws do not come all the way out.
136

6. Grasp the raised section of the lamp and gently pull the lamp out of the projector.
Note: The lamp(s) in this product contain mercury. Please consult your state and localregulations regarding disposal or recycling. Do not put in the trash.
137

7. Gently insert the new lamp into the projector. If it does not fit easily, make sure it is facing the rightway.
Caution: Do not touch any glass on the lamp assembly to avoid premature lamp failure.
138
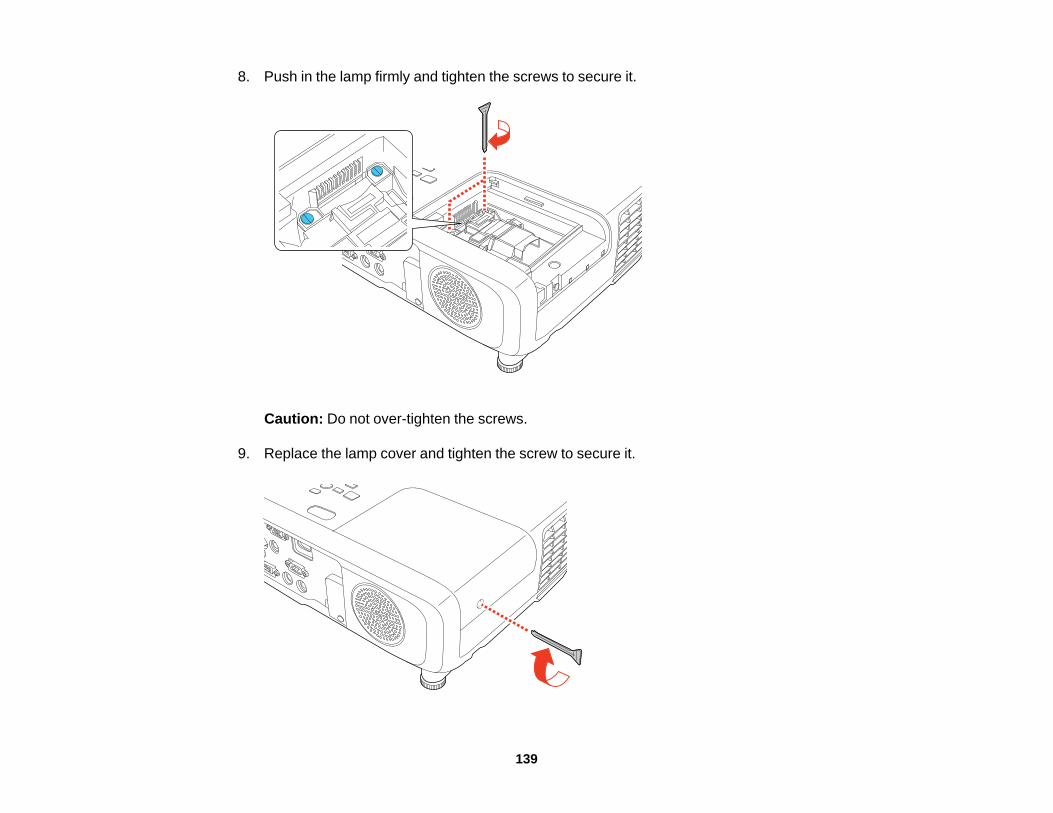
8. Push in the lamp firmly and tighten the screws to secure it.
Caution: Do not over-tighten the screws.
9. Replace the lamp cover and tighten the screw to secure it.
139

Note: Be sure the lamp cover is securely installed or the lamp will not come on.
Reset the lamp timer to zero to keep track of the new lamp’s usage.Parent topic: Projector Lamp MaintenanceRelated tasksResetting the Lamp Timer
Resetting the Lamp TimerYou must reset the lamp timer after replacing the projector's lamp to clear the lamp replacementmessage and to keep track of lamp usage correctly.
Note: Do not reset the lamp timer if you have not replaced the lamp to avoid inaccurate lamp usageinformation.
1. Turn on the projector.2. Press the Menu button.3. Select the Reset menu and press Enter.
4. Select Reset Lamp Hours and press Enter.You see a prompt asking if you want to reset the lamp hours.
5. Select Yes and press Enter.
140

6. Press Menu or Esc to exit the menus.Parent topic: Projector Lamp MaintenanceRelated referencesProjector Reset Options - Reset MenuRelated tasksReplacing the Lamp
Replacing the Remote Control BatteriesThe remote control uses two AA manganese or alkaline batteries. Replace the batteries as soon as theyrun out.
Caution: Use only the type of batteries specified in this manual. Do not install batteries of different types,or mix new and old batteries.
1. Remove the battery cover as shown.
2. Remove the old batteries.
Warning: If the battery fluid has leaked, wipe it away with a soft cloth and avoid getting the fluid onyour hands. If it gets on your hands, wash them immediately to avoid injury.
141

3. Insert the batteries with the + and – ends facing as shown.
4. Replace the battery cover and press it down until it clicks into place.
Warning: Dispose of used batteries according to local regulations. Do not expose batteries to heator flame. Keep batteries out of the reach of children; they are choking hazards and are verydangerous if swallowed.
Parent topic: Projector Maintenance
Transporting the ProjectorThe projector contains precision parts, some of which are glass. Follow these guidelines to transport,ship, or store the projector safely:• Remove any equipment connected to the projector.
142
• When transporting the projector a long distance or as checked luggage, pack it in a firm box withcushioning around it and mark the box "Fragile."
• When shipping the projector for repairs, place it in its original packing materials, if possible, or useequivalent materials with cushioning around the projector. Mark the box "Fragile."
Note: Epson shall not be liable for any damages incurred during transportation.
Parent topic: Maintaining and Transporting the Projector
143

Solving ProblemsCheck the solutions in these sections if you have any problems using the projector.Projection Problem TipsProjector Light StatusUsing the Projector Help DisplaysSolving Image or Sound ProblemsSolving Projector or Remote Control Operation ProblemsSolving Network ProblemsWhere to Get Help
Projection Problem TipsIf the projector is not working properly, try turning it off and unplugging it. Then plug it back in and turn iton.If this does not solve the problem, check the following:• The lights on the projector may indicate what the problem is.• The projector's Help system can display information about common problems, if the projector is
operating.• The solutions in this manual can help you solve many problems.If none of these solutions help, you can contact Epson for technical support.Parent topic: Solving Problems
144
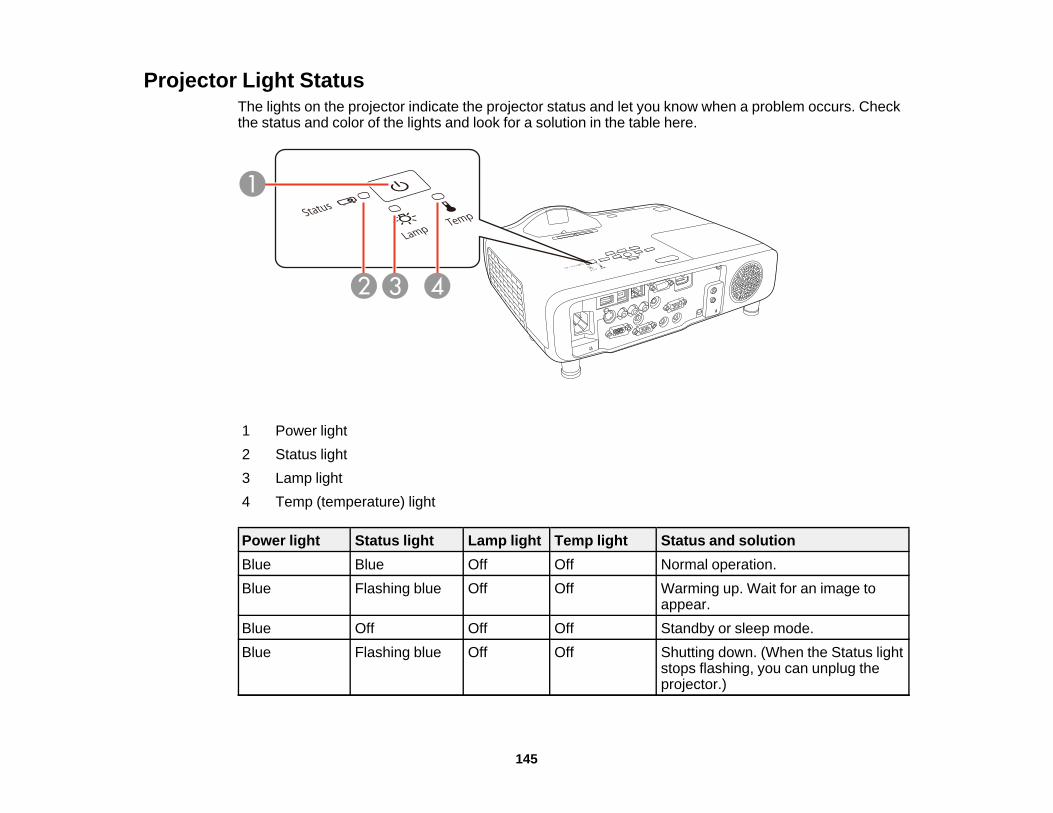
Projector Light StatusThe lights on the projector indicate the projector status and let you know when a problem occurs. Checkthe status and color of the lights and look for a solution in the table here.
1 Power light2 Status light3 Lamp light4 Temp (temperature) light
Power light Status light Lamp light Temp light Status and solutionBlue Blue Off Off Normal operation.Blue Flashing blue Off Off Warming up. Wait for an image to
appear.Blue Off Off Off Standby or sleep mode.Blue Flashing blue Off Off Shutting down. (When the Status light
stops flashing, you can unplug theprojector.)
145

Power light Status light Lamp light Temp light Status and solutionBlue Varies Off Flashing Projector is too hot.
orange • Make sure that the vents and airfilter are not clogged with dust orobstructed by nearby objects.
• Clean or replace the air filter.• Make sure the environmental
temperature is not too hot.Off Flashing blue Off Orange Projector has overheated and turned
off. Leave it turned off to cool down.After about five minutes, do thefollowing:• Make sure that the vents and air
filter are not clogged with dust orobstructed by nearby objects.
• Clean or replace the air filter.• If operating the projector at high
altitude, turn on High AltitudeMode.
• If the problem persists, unplug theprojector and contact Epson forhelp.
Off Flashing blue Orange Off Lamp has a problem.• Check to see if the lamp is burned
out, broken, or installed incorrectly.Reseat or replace the lamp asnecessary.
• Clean or replace the air filter.• If operating the projector at high
altitude, turn on High AltitudeMode.
• If the problem persists, unplug theprojector and contact Epson forhelp.
146

Power light Status light Lamp light Temp light Status and solutionFlashing blue Varies Flashing Varies Replace the lamp soon to avoid
orange damage. Do not continue using theprojector.
Off Flashing blue Off Flashing A fan or sensor has a problem. Turnorange the projector off, unplug it, and
contact Epson for help.Off Flashing blue Flashing Flashing Auto Iris error. Turn the projector off,
orange orange unplug it, and contact Epson for help.Off Flashing blue Orange Orange Power error. Turn the projector off,
unplug it, and contact Epson for help.Off Flashing blue Flashing Off Internal projector error. Turn the
orange projector off, unplug it, and contactEpson for help.
Note: If the lights display a pattern not listed in the table above, turn the projector off, unplug it, andcontact Epson for help.
Parent topic: Solving ProblemsRelated referencesWhere to Get HelpProjector Setup Settings - Extended MenuRelated tasksCleaning the Air Filter and VentsReplacing the Air Filter
Using the Projector Help DisplaysYou can display information to help you solve common problems using the projector's Help system.1. Turn on the projector.2. Press the Help button on the projector or the remote control.
You see the Help menu.3. Use the up and down arrow buttons to highlight the problem you want to solve.4. Press Enter to view the solutions.
147

5. When you are finished, do one of the following:• To select another problem to solve, press Esc.• To exit the help system, press Help.
Parent topic: Solving Problems
Solving Image or Sound ProblemsCheck the solutions in these sections if you have any problems with projected images or sound.Solutions When No Image AppearsSolutions When Image is Incorrect Using the USB Display FunctionSolutions When "No Signal" Message AppearsSolutions When "Not Supported" Message AppearsSolutions When Only a Partial Image AppearsSolutions When the Image is Not RectangularSolutions When the Image Contains Noise or StaticSolutions When the Image is Fuzzy or BlurrySolutions When the Image Brightness or Colors are IncorrectSolutions to Sound ProblemsSolutions to Microphone ProblemsParent topic: Solving Problems
Solutions When No Image AppearsIf no image appears, try the following solutions:• Make sure the lens cover is open all the way or off.• Press the A/V Mute button on the remote control to see if the image was temporarily turned off.• Make sure all necessary cables are securely connected and the power is on for the projector and
connected video sources.• Press the projector's power button to wake it from standby or sleep mode. Also see if your connected
computer is in sleep mode or displaying a blank screen saver.• Check the settings on the Signal menu to make sure they are correct for the current video source.• Adjust the Brightness setting or select the Normal Power Consumption setting.• Check the Display setting to make sure Messages is set to On.
148

• If the projector does not respond when you press the control panel buttons, the buttons may belocked. Unlock the buttons.
• If the projector does not respond when you press buttons on the remote control, make sure the remotereceivers are turned on.
• For images projected with Windows Media Center, reduce the screen size from full screen mode.• For images projected from applications using Windows DirectX, turn off DirectX functions.Parent topic: Solving Image or Sound ProblemsRelated referencesProjector Setup Settings - Extended MenuImage Quality Settings - Image MenuInput Signal Settings - Signal MenuProjector Feature Settings - Settings MenuRelated tasksUnlocking the Projector's Buttons
Solutions When Image is Incorrect Using the USB Display FunctionIf no image appears or if the image appears incorrectly using the USB Display function, try the followingsolutions:• Press the USB button on the remote control.• Make sure the USB Display software has installed correctly. Install it manually if necessary.• With OS X, select the USB Display icon in the Dock or from the Applications folder.• For images projected with Windows Media Center, reduce the screen size from full screen mode.• For images projected from applications using Windows DirectX, turn off DirectX functions.• If the mouse cursor flickers, select Make the movement of the mouse pointer smooth in the Epson
USB Display Settings program on your computer (feature not available with Windows 2000).• Turn off the Transfer layered window setting in the Epson USB Display Settings program on your
computer.• Make sure you are using the most recent version of the USB display software.Parent topic: Solving Image or Sound Problems
149

Solutions When "No Signal" Message AppearsIf the "No Signal" message appears, try the following solutions:• Press the Source Search button and wait a few seconds for an image to appear.• Turn on the connected computer or video source, and press its play button to begin your presentation,
if necessary.• Check the connection from the projector to your video sources.• If you are projecting from a laptop computer, make sure it is set up to display on an external monitor.• If necessary, turn the projector and the connected computer or video source off and then on again.Displaying From a PC LaptopDisplaying From a Mac LaptopParent topic: Solving Image or Sound Problems
Displaying From a PC LaptopIf you see the "No Signal" message when you display from a PC laptop, you need to set up the laptop todisplay on an external monitor.1. Hold down the laptop's Fn key and press the key labelled with a monitor icon or CRT/LCD. (See
your laptop manual for details.) Wait a few seconds for an image to appear.2. To display on both the laptop's monitor and the projector, try pressing the same keys again.3. If the same image is not displayed by the laptop and projector, check the Windows Display utility to
make sure the external monitor port is enabled and extended desktop mode is disabled. (See yourcomputer or Windows manual for instructions.)
4. If necessary, check your video card settings and set the multiple display option to Mirror orDuplicate.
Parent topic: Solutions When "No Signal" Message AppearsDisplaying From a Mac Laptop
If you see the "No Signal" message when you display from a Mac laptop, you need to set up the laptopfor mirrored display. (See your laptop manual for details.)1. Open the System Preferences utility and select Displays.2. Click the Arrangement tab.3. Select the Mirror Displays checkbox.Parent topic: Solutions When "No Signal" Message Appears
150

Solutions When "Not Supported" Message AppearsIf the "Not Supported" message appears, try the following solutions:• Make sure the correct input signal is selected on the Signal menu.• Make sure the computer's display resolution does not exceed the projector's resolution and frequency
limit. If necessary, select a different display resolution for your computer. (See your computer manualfor details.)
Parent topic: Solving Image or Sound Problems
Solutions When Only a Partial Image AppearsIf only a partial computer image appears, try the following solutions:• Press the Auto button on the remote control to optimize the image signal.• Try adjusting the image position using the Position menu setting.• Press the Aspect button on the remote control to select a different image aspect ratio.• If you zoomed into or out of the image using the E-Zoom buttons, press the Esc button until the
projector returns to a full display.• Check the cables connecting the computer or video source to the projector. Try connecting different
cables.• Check your computer display settings to disable dual display and set the resolution within the
projector's limits. (See your computer manual for details.)• Check the resolution assigned to your presentation files to see if they are created for a different
resolution than you are projecting in. (See your software help for details.)Parent topic: Solving Image or Sound ProblemsRelated referencesInput Signal Settings - Signal MenuSupported Video Display Formats
Solutions When the Image is Not RectangularIf the projected image is not evenly rectangular, try the following solutions:• If the projector is not mounted on the wall or ceiling, place it directly in front of the center of the screen,
facing it squarely, if possible.• If you adjusted the projector height using the projector feet, press the keystone buttons on the
projector to adjust the image shape.
151
• Adjust the Quick Corner or Keystone setting to correct the image shape.Parent topic: Solving Image or Sound Problems
Solutions When the Image Contains Noise or StaticIf the projected image seems to contain electronic interference (noise) or static, try the followingsolutions:• Check the cables connecting your computer or video source to the projector. They should be:
• Separated from the power cord to prevent interference• Securely connected at both ends• Not connected to an extension cable• No longer than 10 feet (3 m) for VGA/computer cables or 24 feet (7.3 m) for HDMI cables
• Check the settings on the projector's Signal menu to make sure they match the video source. Ifavailable for your video source, adjust the Progressive and Noise Reduction settings.
• Select a computer video resolution and refresh rate that are compatible with the projector.• If you are projecting from a computer, press the Auto button on the remote control to automatically
adjust the tracking and sync. If the problem remains, display a uniformly patterned image on thescreen and manually adjust the Tracking and Sync settings.
• If you adjusted the image shape using the projector controls, try decreasing the Sharpness setting toimprove image quality.
• If you connected an extension power cable, try projecting without it to see if it caused interference inthe signal.
• If you are using the USB Display function, turn off the Transfer layered window setting in the EpsonUSB Display Settings program on your computer.
Parent topic: Solving Image or Sound ProblemsRelated referencesInput Signal Settings - Signal MenuSupported Video Display FormatsRelated tasksDisplaying From a PC LaptopDisplaying From a Mac Laptop
152
Solutions When the Image is Fuzzy or BlurryIf the projected image is fuzzy or blurry, try the following solutions:• Adjust the image focus.• Clean the projector lens.• Position the projector close enough to the screen, and directly in front of it.• Position the projector so the keystone adjustment angle is not so wide that it distorts the image.• Adjust the Sharpness setting to improve image quality.• If you are projecting from a computer, press the Auto button on the remote control to automatically
adjust the tracking and sync. If any bands or overall blurriness remain, display a uniformly patternedimage on the screen and manually adjust the Tracking and Sync settings.
• If you are projecting from a computer, use a lower resolution.• Turn off any keystone correction and disable the Quick Corner setting.Parent topic: Solving Image or Sound Problems
Solutions When the Image Brightness or Colors are IncorrectIf the projected image is too dark or light, or the colors are incorrect, try the following solutions:• Press the Color Mode button on the remote control to try different color modes for the image and
environment.• Check your video source settings.• Adjust the available settings on the Image menu for the current input source, such as Brightness,
Contrast, Tint, Color Adjustment, and/or Color Saturation.• Make sure you selected the correct Input Signal or Video Signal setting on the Signal menu, if
available for your image source.• Make sure all the cables are securely connected to the projector and your video device. If you
connected long cables, try connecting shorter cables.• If you are using the ECO Power Consumption setting, try selecting Normal in the projector's menus.
Note: At high altitudes or locations subject to high temperatures, the image may become darker andyou may not be able to adjust the Power Consumption setting.
• Position the projector close enough to the screen.• If the image has been progressively darkening, you may need to replace the projector lamp soon.
153

Parent topic: Solving Image or Sound ProblemsRelated conceptsProjector Lamp MaintenanceRelated referencesInput Signal Settings - Signal MenuImage Quality Settings - Image MenuProjector Feature Settings - Settings Menu
Solutions to Sound ProblemsIf there is no sound when you expect it or the volume is too low or high, try the following solutions:• Adjust the projector's volume settings.• Press the A/V Mute button on the remote control to resume video and audio if they were temporarily
stopped.• Press the Source Search button to switch to the correct input source, if necessary.• Check your computer or video source to make sure the volume is turned up and the audio output is set
for the correct source.• Check the audio cable connections between the projector and your video source.• Make sure any connected audio cables are labeled "No Resistance".• If you are using the USB Display function, turn on the Output audio from the projector setting in the
Epson USB Display Settings program on your computer.• If you are using a Mac and you do not hear sound from an HDMI source, make sure your Mac
supports audio through the HDMI port. If not, you need to connect an audio cable.• If you want to use a connected audio source when the projector is off, set the Standby Mode option to
Communication On and the A/V Output option to Always On.• Make sure the Audio Output option is set to the correct audio port for your video device.• If you turn the projector on immediately after turning it off, the cooling fans may run at high speed
momentarily and cause an unexpected noise. This is normal.Parent topic: Solving Image or Sound Problems
Solutions to Microphone ProblemsIf there is no sound when you use a microphone connected to the projector, try the following solutions:• Make sure the microphone is securely connected to the projector.
154

• Make sure you are using a dynamic microphone, not a condenser microphone.• Adjust the Mic Input Level setting as necessary in the projector's menus.• If you want to use the microphone when the projector is off, set the Standby Mode option to
Communication On and the A/V Output option to Always On.Parent topic: Solving Image or Sound ProblemsRelated referencesProjector Feature Settings - Settings MenuProjector Setup Settings - Extended MenuRelated tasksConnecting a Microphone
Solving Projector or Remote Control Operation ProblemsCheck the solutions in these sections if you have problems operating the projector or remote control.Solutions to Projector Power or Shut-Off ProblemsSolutions to Problems with the Remote ControlSolutions to Password ProblemsParent topic: Solving Problems
Solutions to Projector Power or Shut-Off ProblemsIf the projector does not come on when you press the power button or it shuts off unexpectedly, try thefollowing solutions:• Make sure the power cord is securely connected to the projector and to a working electrical outlet.• The projector's buttons may be locked for security. Unlock the buttons or use the remote control to
turn on the projector.• The power cord may be defective. Disconnect the cord and contact Epson.• If the projector's lamp shuts off unexpectedly, it may have entered standby mode after a period of
inactivity. Press the power button to wake the projector.• If the projector's lamp shuts off and the power and Temp lights are red, the projector has overheated
and shut off. Check the solutions for this light status.• If the power button on the remote control does not turn on the projector, check its batteries and make
sure the Remote Receiver setting is turned on in the projector's menu, if available.Parent topic: Solving Projector or Remote Control Operation Problems
155

Related referencesProjector Feature Settings - Settings MenuProjector Light StatusRelated tasksUnlocking the Projector's Buttons
Solutions to Problems with the Remote ControlIf the projector does not respond to remote control commands, try the following solutions:• Check that the remote control batteries are installed correctly and have power. If necessary, replace
the batteries.• Make sure you are operating the remote control within the reception angle and range of the projector.• Make sure the projector is not warming up or shutting down.• Check to see if a button on the remote control is stuck down, causing it to enter sleep mode. Release
the button to wake the remote control up.• Strong fluorescent lighting, direct sunlight, or infrared device signals may be interfering with the
projector's remote receivers. Dim the lights or move the projector away from the sun or interferingequipment.
• If available, turn off one of the remote receivers in the projector's menu system, or check if all theremote receivers were turned off.
• If you assigned an ID number to the remote control to operate multiple projectors, you may need tocheck or change the ID setting (feature not available with all projectors).
• If you lose the remote control, you can order another one from Epson.Parent topic: Solving Projector or Remote Control Operation ProblemsRelated referencesProjector Feature Settings - Settings MenuOptional Equipment and Replacement PartsRemote Control Operation
Solutions to Password ProblemsIf you cannot enter or remember a password, try the following solutions:• You may have turned on password protection without first setting a password. Try entering 0000 using
the remote control.
156
• If you have entered an incorrect password too many times and see a message displaying a requestcode, write down the code and contact Epson. Do not attempt to enter the password again. Providethe request code and proof of ownership for assistance in unlocking the projector.
• If you set a Web Control password and forgot the user ID or password, try entering the following:• User ID: EPSONWEB• Default password: admin
• If you lose the remote control you cannot enter a password. Order a new one from Epson.Parent topic: Solving Projector or Remote Control Operation ProblemsRelated tasksControlling a Networked Projector Using a Web Browser
Solving Network ProblemsCheck the solutions in these sections if you have problems using the projector on a network.Solutions When Network Alert E-Mails are Not ReceivedSolutions When You Cannot Access the Projector Through the WebParent topic: Solving Problems
Solutions When Network Alert E-Mails are Not ReceivedIf you do not receive an e-mail alerting you to problems with a projector over the network, try thefollowing solutions:• Make sure the projector is turned on and connected to the network correctly. (If an error shut down the
projector, it cannot send an e-mail.)• Make sure you set up the projector e-mail alert settings correctly on the projector's network Mail menu
or in the network software.• Set the Standby Mode setting to Communication On so the network software can monitor the
projector in standby mode.Parent topic: Solving Network ProblemsRelated conceptsWired Network ProjectionWireless Network ProjectionRelated referencesProjector Setup Settings - Extended Menu
157
Projector Network Settings - Network Menu
Solutions When You Cannot Access the Projector Through the WebIf you are unable to access the projector through a web browser, make sure you are using the correct IDand password, which are case sensitive.• For the user ID, enter EPSONWEB. (You cannot change the user ID.)• For the password, enter the password set in the projector's Network menu. The default password is
admin.• Make sure you have access to the network the projector is on.
Note: The user ID and password are case sensitive.
Parent topic: Solving Network ProblemsRelated tasksControlling a Networked Projector Using a Web Browser
Where to Get HelpIf you need to contact Epson for technical support services, use the following support options.
Internet SupportVisit Epson's support website at epson.com/support (U.S.) or epson.ca/support (Canada) for solutions tocommon problems with your projector. You can download utilities and documentation, get FAQs andtroubleshooting advice, or e-mail Epson with your questions.
Speak to a Support RepresentativeTo use the Epson PrivateLine Support service, call (800) 637-7661. This service is available for theduration of your warranty period. You may also speak with a projector support specialist by dialing (562)276-4394 (U.S.) or (905) 709-3839 (Canada).Support hours are 6 AM to 8 PM, Pacific Time, Monday through Friday and 7 AM to 4 PM, Pacific Time,Saturday.Days and hours of support are subject to change without notice. Toll or long distance charges mayapply.Before you call, have the following information ready:• Product name
158

• Product serial number (located on the bottom or rear of the projector, or in the menu system)• Proof of purchase (such as a store receipt) and date of purchase• Computer or video configuration• Description of the problem
Purchase Supplies and AccessoriesYou can purchase screens, other optional accessories, and replacement parts from an Epson authorizedreseller. To find the nearest reseller, call 800-GO-EPSON (800-463-7766). Or you can purchase onlineat epsonstore.com (U.S. sales) or epson.ca (Canadian sales).To purchase a replacement remote control, call (562) 276-4394 (U.S.) or (905) 709-3839 (for dealerreferral in Canada).Parent topic: Solving Problems
159

Technical SpecificationsThese sections list the technical specifications of your projector.General Projector SpecificationsProjector Lamp SpecificationsRemote Control SpecificationsProjector Dimension SpecificationsProjector Electrical SpecificationsProjector Environmental SpecificationsProjector Safety and Approvals SpecificationsSupported Video Display FormatsUSB Display System Requirements
General Projector SpecificationsType of display Poly-silicon TFT active matrixResolution PowerLite 520/530:
1024 × 768 pixels (XGA)PowerLite 525W/535W:1280 × 800 pixels (WXGA)
Lens F=1.60Focal length: 6.4 mm
Color reproduction Full color, up to 1.07 billion colors
160

Brightness PowerLite 520:Normal Power Consumption mode:White light output 2700 lumens (ISO 21118 standard)Color light output 2700 lumensECO Power Consumption mode:White light output 1600 lumens (ISO 21118 standard)
Note: Color brightness (color light output) and white brightness(white light output) will vary depending on usage conditions. Colorlight output measured in accordance with IDMS 15.4; white lightoutput measured in accordance with ISO 21118.PowerLite 525W:Normal Power Consumption mode:White light output 2800 lumens (ISO 21118 standard)Color light output 2800 lumensECO Power Consumption mode:White light output 1700 lumens (ISO 21118 standard)
Note: Color brightness (color light output) and white brightness(white light output) will vary depending on usage conditions. Colorlight output measured in accordance with IDMS 15.4; white lightoutput measured in accordance with ISO 21118.
161

PowerLite 530:Normal Power Consumption mode:White light output 3200 lumens (ISO 21118 standard)Color light output 3200 lumensECO Power Consumption mode:White light output 1800 lumens (ISO 21118 standard)
Note: Color brightness (color light output) and white brightness(white light output) will vary depending on usage conditions. Colorlight output measured in accordance with IDMS 15.4; white lightoutput measured in accordance with ISO 21118.PowerLite 535W:Normal Power Consumption mode:White light output 3400 lumens (ISO 21118 standard)Color light output 3400 lumensECO Power Consumption mode:White light output 1900 lumens (ISO 21118 standard)
Note: Color brightness (color light output) and white brightness(white light output) will vary depending on usage conditions. Colorlight output measured in accordance with IDMS 15.4; white lightoutput measured in accordance with ISO 21118.
Contrast ratio 16000:1 with Dynamic Color Mode, Normal Power Consumptionmode, Wide Zoom setting, and Auto Iris on
Image size PowerLite 520/530:(in native aspect ratio) 37 inches (0.94 m) to 108 inches (2.74 m)
PowerLite 525W/535W:39 inches (0.99 m) to 116 inches (2.95 m)
Projection distance 21.3 inches (0.54 m) to 48 inches (1.22 m)(in native aspect ratio)Projection methods Front, rear, ceiling-mounted
162

Optical aspect ratio PowerLite 520/530:(width-to-height) 4:3
PowerLite 525W/535W:16:10
Focus adjustment ManualZoom adjustment DigitalZoom ratio 1.0 to 1.35(Tele-to-Wide)Internal sound system 16 W monauralNoise level PowerLite 520/525W:
35 dB (Normal Power Consumption mode)28 dB (ECO Power Consumption mode)PowerLite 530/535W:37 dB (Normal Power Consumption mode)29 dB (ECO Power Consumption mode)
Keystone correction angle ± 15º vertical or horizontal keystoneUSB Type B port compatibility USB 1.1 and 2.0 compliant for USB display, external mouse control,
firmware update, or copying menu settingsUSB Type A port compatibility One USB 1.1 and 2.0 compliant port for USB device input, Epson
document camera display, wireless LAN, firmware update, orcopying menu settings
Parent topic: Technical Specifications
Projector Lamp SpecificationsType UHE (Ultra High Efficiency)
163
Power consumption PowerLite 520/525W:200 WPowerLite 530/535W:215 W
Lamp life Normal Power Consumption mode:Up to about 5000 hoursECO Power Consumption mode:Up to about 10000 hours
Note: Turn off this product when not in use to prolong the life of the projector. Lamp life will varydepending upon mode selected, environmental conditions, and usage. Brightness decreases over time.
Parent topic: Technical Specifications
Remote Control SpecificationsReception range 19.7 feet (6 m)Batteries Two alkaline or manganese AA
Parent topic: Technical Specifications
Projector Dimension SpecificationsHeight (excluding feet) 3.7 inches (94 mm)Width 13.5 inches (344 mm)Depth 12.4 inches (314.5 mm)Weight 8.2 lb (3.7 kg)
Parent topic: Technical Specifications
Projector Electrical SpecificationsRated frequency 50/60 Hz
164

Power supply 100 to 240 VAC ±10%PowerLite 520/525W:3.0 to 1.3 APowerLite 530/535W:3.2 to 1.4 A
Power consumption Operating:(100 to 120 V) PowerLite 520/525W:
Normal Power Consumption mode: 293 WECO Power Consumption mode: 229 WStandby:1.90 W (Networked Standby), 0.22 W (Energy Saving)PowerLite 530/535W:Normal Power Consumption mode: 315 WECO Power Consumption mode: 230 WStandby:1.90 W (Networked Standby), 0.22 W (Energy Saving)
Power consumption Operating:(220 to 240 V) PowerLite 520/525W:
Normal Power Consumption mode: 278 WECO Power Consumption mode: 219 WStandby:2.10 W (Networked Standby), 0.28 W (Energy Saving)PowerLite 530/535W:Normal Power Consumption mode: 298 WECO Power Consumption mode: 221 WStandby:2.10 W (Networked Standby), 0.28 W (Energy Saving)
165

Parent topic: Technical Specifications
Projector Environmental SpecificationsTemperature Operating:
Up to 7500 ft (2286 m): 41 to 95 °F (5 to 35 °C)7500 ft (2286 m) to 9843 ft (3000 m): 41 to 86 °F (5 to 30 °C)Storage: 14 to 140 °F (–10 to 60 °C)
Humidity (relative, non- Operating: 20 to 80%condensing) Storage: 10 to 90%Operating altitude Up to 4921 feet (1500 m)
4921 feet (1500 m) to 9843 feet (3000 m) with High Altitude Modeenabled
Parent topic: Technical Specifications
Projector Safety and Approvals SpecificationsUnited States FCC Part 15 Class B (DoC)
UL60950-1 2nd edition (cTUVus Mark)Canada ICES-003 Class B
CSA C22.2 No. 60950-1-07
[FOR PRODUCTS RELEASING IN LATIN AMERICA WITH WIRELESS OR BLUETOOTHCAPABILITIES, INCLUDE THE SECTION BELOW FOR EACH NECESSARY MODULE AND INSERTTHE CORRECT INFORMATION. IF YOUR PRODUCT INCLUDES MULTIPLE CAPABILITIES,INCLUDE A LISTING FOR EACH ONE AND DELETE ANY YOUR PRODUCT DOES NOT SUPPORT:]Parent topic: Technical Specifications
Supported Video Display FormatsFor best results, your computer's monitor port or video card resolution should be set to display in theprojector's native resolution. However, your projector includes Epson's SizeWise chip that supports othercomputer display resolutions, so your image will be resized to fit automatically.
166

Your computer's monitor port or video card refresh rate (vertical frequency) must be compatible with theprojector. (See your computer or video card manual for details.)The table here lists the compatible refresh rate and resolution for each compatible video display format.
Display format Refresh rate (in Hz) Resolution (in pixels)Computer signals (analog RGB)VGA 60/72/75/85 640 × 480SVGA 56/60/72/75/85 800 × 600XGA 60/70/75/85 1024 × 768WXGA 60 1280 × 768
60 1366 × 76860/75/85 1280 × 800
WXGA+ 60/75/85 1440 × 900WXGA++ 60 1600 × 900SXGA 70/75/85 1152 × 864
60/75/85 1280 × 102460/75/85 1280 × 960
SXGA+ 60/75 1400 × 1050WSXGA+* 60 1680 × 1050UXGA 60 1600 × 1200MAC13" 67 640 × 480MAC16" 75 832 × 624MAC19" 75 1024 × 768
59 1024 × 768MAC21" 75 1152 × 870Composite videoTV (NTSC) 60 720 × 480TV (SECAM) 50 720 × 576
167

Display format Refresh rate (in Hz) Resolution (in pixels)TV (PAL) 50/60 720 × 576Component videoSDTV (480i) 60 720 × 480SDTV (576i) 50 720 × 576SDTV (480p) 60 720 × 480SDTV (576p) 50 720 × 576HDTV (720p) 50/60 1280 × 720HDTV (1080i) 50/60 1920 × 1080HDMI input signalsVGA 60 640 × 480SVGA 60 800 × 600XGA 60 1024 × 768WXGA 60 1280 × 800
60 1366 × 768WXGA+ 60 1440 × 900WXGA++ 60 1600 × 900WSXGA+** 60 1680 × 1050SXGA 60 1280 × 960
60 1280 × 1024SXGA+ 60 1400 × 1050UXGA 60 1600 × 1200SDTV (480i/480p) 60 720 × 480SDTV (576i/576p) 50 720 × 576HDTV (720p) 50/60 1280 × 720HDTV (1080i) 50/60 1920 × 1080HDTV (1080p) 24/30/50/60 1920 × 1080
168

* PowerLite 525W/535W only; Wide resolution only** PowerLite 525W/535W onlyParent topic: Technical Specifications
USB Display System RequirementsYour computer system must meet the system requirements here to use the projector's USB Displaysoftware.
Requirement Windows MacOperating system Windows 2000 (Service Pack 4 only) Mac OS X 10.5.x (32-bit), and
10.6.x, 10.7.x , 10.8.x, 10.9.x (32-Windows XP Professional, Home and 64-bit)Edition, and Tablet PC Edition (32-bit)Windows Vista Ultimate, Enterprise,Business, Home Premium, and HomeBasic (32-bit)Windows 7 Ultimate, Enterprise,Professional, and Home Premium (32-and 64-bit); Home Basic and Starter (32-bit)Windows 8.x, Pro, and Enterprise (32-and 64-bit)
USB version USB 1.1 and above (USB 2.0 recommended)CPU Mobile Pentium III 1.2 GHz or faster Power PC G4 1 GHz or faster (Core
(1.6 GHz or faster recommended) Duo 1.83 GHz or fasterrecommended)
Memory 256MB or more (512MB or more 512MB or morerecommended)
Hard disk space 20MB or moreDisplay Resolution between 640 × 480 and Resolution between 640 × 480 and
1920 × 1200, 16-bit color or greater 1680 × 1200, 16-bit color or greater
Parent topic: Technical Specifications
169

NoticesCheck these sections for important notices about your projector.RecyclingImportant Safety InformationImportant Safety InstructionsFCC Compliance StatementTrademarksOpen Source Software LicenseCopyright Notice
RecyclingEpson offers a recycling program for end of life products. Please go to this site for information on how toreturn your products for proper disposal.Parent topic: Notices
Important Safety InformationCaution: Never look into the projector lens when the lamp is turned on; the bright light can damage youreyes. Never let children look into the lens when it is on. Never open any cover on the projector, exceptthe lamp and filter covers. Dangerous electrical voltages inside the projector can severely injure you.Except as specifically explained in this User's Guide, do not attempt to service this product yourself.Refer all servicing to qualified service personnel.
Warning: The projector and its accessories come packaged in plastic bags. Keep plastic bags awayfrom small children to avoid any risk of suffocation.
Caution: When you replace the lamp, never touch the new lamp with your bare hands; the invisibleresidue left by the oil on your hands may shorten the lamp life. Use a cloth or glove to handle the newlamp.
Parent topic: Notices
170

Important Safety InstructionsFollow these safety instructions when setting up and using the projector:• Do not look into the lens when the projector is on. The bright light can damage your eyes. Avoid
standing in front of the projector so the bright light does not shine into your eyes.• Do not place the projector on an unstable cart, stand, or table.• Do not operate the projector on its side, or while tilted to one side. Do not tilt the projector more than 8°
forward or back.• If the projector is mounted on a ceiling or wall, it should be installed by qualified technicians using
mounting hardware designed for use with this projector.• When installing or adjusting a ceiling or wall mount, do not use adhesives to prevent the screws from
loosening and do not use oils or lubricants. This may cause the projector case to crack and theprojector to fall from its ceiling mount. This could cause serious injury to anyone under the mount andcould damage the projector.
• Do not use the projector near water, sources of heat, high-voltage electrical wires, or sources ofmagnetic fields.
• Use the type of power source indicated on the projector. Use of a different power source may result infire or electric shock. If you are not sure of the power available, consult your dealer or power company.
• Place the projector near a wall outlet where the plug can be easily unplugged.• Take the following precautions when handling the plug: Do not hold the plug with wet hands. Do not
insert the plug into a dusty outlet. Insert the plug firmly into the outlet. Do not pull the power cord whendisconnecting the plug; always be sure to hold the plug when disconnecting it. Do not overload walloutlets, extension cords, or power strips. Failure to comply with these precautions could result in fire orelectric shock.
• Do not place the projector where the cord can be walked on. This may result in fraying or damage tothe plug.
• Unplug the projector from the wall outlet before cleaning. Use a dry cloth (or, for stubborn dirt orstains, a moist cloth that has been wrung dry) for cleaning. Do not use liquid or aerosol cleaners, anysprays containing flammable gas, or solvents such as alcohol, paint thinner, or benzine.
• Do not block the slots and openings in the projector case. They provide ventilation and prevent theprojector from overheating. Do not operate the projector on a sofa, rug, or other soft surface, or set iton top of loose papers. Do not cover the projector with a blanket, curtain, or tablecloth. If you aresetting up the projector near a wall, leave at least 7.9 inches (20 cm) of space between the wall andthe air exhaust vent.
• Do not operate the projector in a closed-in cabinet unless proper ventilation is provided.
171

• Never allow objects of any kind to enter any openings in the projector. Do not leave objects, especiallyflammable objects, near the projector. Never spill liquid of any kind into the projector.
• If you are using two or more projectors side-by-side, leave at least 2 feet (60 cm) of space between theprojectors to allow for proper ventilation.
• You may need to clean the air filter and vent. A clogged air filter or vent can block ventilation neededto cool the projector. Do not use canned air, or the gases may leave a residue.
• Do not store the projector outdoors for an extended length of time.• Except as specifically explained in this manual, do not attempt to service this product yourself. Refer
all servicing to qualified personnel. Opening or removing covers may expose you to dangerousvoltages and other hazards.
• Never open any covers on the projector except as specifically explained in this manual. Never attemptto disassemble or modify the projector. Refer all repairs to qualified service personnel.
• Unplug the projector from the wall outlet and refer servicing to qualified service personnel under thefollowing conditions: if it does not operate normally when you follow the operating instructions, orexhibits a distinct change in performance; if smoke, strange odors, or strange noises come from theprojector; if the power cord or plug is damaged or frayed; if liquid or foreign objects get inside theprojector, or if it has been exposed to rain or water; if it has been dropped or the housing has beendamaged.
• Do not touch the plug during an electrical storm. Otherwise, you may receive an electric shock.• Unplug the projector when it will not be used for extended periods.• Do not use the projector where it may be exposed to rain, water, or excessive humidity.• Do not use or store the projector where it may be exposed to smoke, steam, corrosive gases,
excessive dust, vibration, or shock.• Do not use the projector where flammable or explosive gases may be present.• Do not use or store the projector or remote control in a hot location, such as near a heater, in direct
sunlight, or in a closed vehicle.• If you use the projector in a country other than where you purchased it, use the correct power cord for
that country.• Do not stand on the projector or place heavy objects on it.• Do not use the projector outside of the required temperature range of 41 to 95 °F (5 to 35 °C) at an
altitude of 7500 feet (2286 m) or less, or 41 to 86 °F (5 to 30 °C) at a higher altitude. Doing so maycause an unstable display and could lead to projector damage. Do not use or store the projector whereit may be exposed to sudden changes in temperature.
172
• Do not store the projector outside of the required temperature range of 14 to 140 °F (–10 to 60 °C) orin direct sunlight for long periods of time. Doing so may cause damage to the case.
• Do not place anything that can become warped or damaged by heat near the exhaust vents. Do notbring your hands or face close to the vents while projection is in progress. Do not bring your face closeto the projector while it is in use.
• Before you move the projector, make sure its power is turned off, the plug is disconnected from theoutlet, and all cables are disconnected.
• Never try to remove the lamp immediately after use because it will be extremely hot. Before removingthe lamp, turn off the power and wait at least an hour to allow the lamp to cool completely.
• Do not disassemble the lamp or subject it to impacts.• Do not place the source of an open flame, such as a lit candle, on or near the projector.• Do not modify the power cord. Do not place heavy objects on top of the power cord or bend, twist, or
pull it excessively. Keep the power cord away from hot electrical appliances.• If the lamp breaks, ventilate the room to prevent gases contained in the lamp from being inhaled or
coming in contact with your eyes or mouth. If you do inhale gases or gases come in contact with youreyes or mouth, seek medical advice immediately.
• If the projector is mounted overhead and the lamp breaks, be careful to prevent pieces of glass fromfalling into your eyes or mouth when you open the lamp cover. If pieces of glass do get into your eyesor mouth, seek medical advice immediately.
Note: The lamp(s) in this product contain mercury. Please consult your state and local regulationsregarding disposal or recycling. Do not put in the trash.
WARNING: The cords included with this product contain chemicals, including lead, known to the State ofCalifornia to cause birth defects or other reproductive harm. Wash hands after handling. (This notice isprovided in accordance with Proposition 65 in Cal. Health & Safety Code § 25249.5 and following.)Restriction of UseParent topic: Notices
Restriction of UseWhen this product is used for applications requiring high reliability/safety such as transportation devicesrelated to aviation, rail, marine, automotive; disaster prevention devices; various safety devices; orfunctional/precision devices, you should use this product only after giving consideration to including fail-safes and redundancies into your design to maintain safety and total system reliability.
173
Because this product was not intended for use in applications requiring extremely high reliability/safetysuch as aerospace equipment, main communication equipment, nuclear power control equipment, ormedical equipment related to direct medical care, please make your own judgment on this product'ssuitability after a full evaluation.Parent topic: Important Safety Instructions
FCC Compliance StatementFor United States UsersThis equipment has been tested and found to comply with the limits for a Class B digital device, pursuantto Part 15 of the FCC Rules. These limits are designed to provide reasonable protection against harmfulinterference in a residential installation. This equipment generates, uses, and can radiate radiofrequency energy and, if not installed and used in accordance with the instructions, may cause harmfulinterference to radio communications. However, there is no guarantee that interference will not occur ina particular installation. If this equipment does cause interference to radio and television reception, whichcan be determined by turning the equipment off and on, the user is encouraged to try to correct theinterference by one or more of the following measures:• Reorient or relocate the receiving antenna.• Increase the separation between the equipment and receiver.• Connect the equipment into an outlet on a circuit different from that to which the receiver is connected.• Consult the dealer or an experienced radio/TV technician for help.
WARNINGThe connection of a non-shielded equipment interface cable to this equipment will invalidate the FCCCertification or Declaration of this device and may cause interference levels which exceed the limitsestablished by the FCC for this equipment. It is the responsibility of the user to obtain and use a shieldedequipment interface cable with this device. If this equipment has more than one interface connector, donot leave cables connected to unused interfaces. Changes or modifications not expressly approved bythe manufacturer could void the user’s authority to operate the equipment.
For Canadian UsersCAN ICES-3(B)/NMB-3(B)Parent topic: Notices
174
TrademarksEPSON®, EasyMP®, Instant Off®, PowerLite®, and Quick Corner® are registered trademarks, and EPSONExceed Your Vision is a registered logomark of Seiko Epson Corporation.Accolade® and PrivateLine® are registered trademarks; and Epson StoreSM and Extra CareSM are servicemarks of Epson America, Inc.Mac and OS X are trademarks of Apple Inc., registered in the U.S. and other countries.HDMI and High-Definition Multimedia Interface are the trademarks or registered trademarks of HDMILicensing LLC.General Notice: Other product names used herein are for identification purposes only and may betrademarks of their respective owners. Epson disclaims any and all rights in those marks.
Parent topic: Notices
Open Source Software LicenseGNU GPLThis projector product includes the open source software programs which apply the GNU General PublicLicense Version 2 or later version ("GPL Programs").We provide the source code of the GPL Programs until five (5) years after the discontinuation of samemodel of this projector product.If you desire to receive the source code of the GPL Programs, contact Epson as described in the User'sGuide.These GPL Programs are WITHOUT ANY WARRANTY; without even the implied warranty ofMERCHANTABILITY AND FITNESS FOR A PARTICULAR PURPOSE. See the GNU General PublicLicense for more details.The list of GPL Programs is as follows and the names of author are described in the source code of theGPL ProgramsThe list of GPL Programsbusybox-1.13.4
175

iptables-1.4.4libgcc1(gcc-4.3.3)libstdc++-6.0.10linux-2.6.27patchesudhcp 0.9.8uvc rev.219wireless_tools 29EPSON original driversThe GNU General Public License Version 2 is as follows. You also can see the GNU General PublicLicense Version 2 at http://www.gnu.org/licenses/.GNU GENERAL PUBLIC LICENSEVersion 2, June 1991Copyright (c) 1989, 1991 Free Software Foundation, Inc., 51 Franklin Street, Fifth Floor, Boston, MA02110-1301 USA Everyone is permitted to copy and distribute verbatim copies of this license document,but changing it is not allowed.PreambleThe licenses for most software are designed to take away your freedom to share and change it. Bycontrast, the GNU General Public License is intended to guarantee your freedom to share and changefree software--to make sure the software is free for all its users. This General Public License applies tomost of the Free Software Foundation's software and to any other program whose authors commit tousing it. (Some other Free Software Foundation software is covered by the GNU Lesser General PublicLicense instead.) You can apply it to your programs, too.When we speak of free software, we are referring to freedom, not price. Our General Public Licenses aredesigned to make sure that you have the freedom to distribute copies of free software (and charge forthis service if you wish), that you receive source code or can get it if you want it, that you can change thesoftware or use pieces of it in new free programs; and that you know you can do these things.To protect your rights, we need to make restrictions that forbid anyone to deny you these rights or to askyou to surrender the rights. These restrictions translate to certain responsibilities for you if you distributecopies of the software, or if you modify it.For example, if you distribute copies of such a program, whether gratis or for a fee, you must give therecipients all the rights that you have. You must make sure that they, too, receive or can get the sourcecode. And you must show them these terms so they know their rights.
176

We protect your rights with two steps: (1) copyright the software, and (2) offer you this license whichgives you legal permission to copy, distribute and/or modify the software.Also, for each author's protection and ours, we want to make certain that everyone understands thatthere is no warranty for this free software. If the software is modified by someone else and passed on,we want its recipients to know that what they have is not the original, so that any problems introduced byothers will not reflect on the original authors' reputations.Finally, any free program is threatened constantly by software patents. We wish to avoid the danger thatredistributors of a free program will individually obtain patent licenses, in effect making the programproprietary. To prevent this, we have made it clear that any patent must be licensed for everyone's freeuse or not licensed at all.The precise terms and conditions for copying, distribution and modification follow.GNU GENERAL PUBLIC LICENSE TERMS AND CONDITIONS FOR COPYING, DISTRIBUTION ANDMODIFICATION0. This License applies to any program or other work which contains a notice placed by the copyrightholder saying it may be distributed under the terms of this General Public License. The "Program",below, refers to any such program or work, and a "work based on the Program" means either theProgram or any derivative work under copyright law: that is to say, a work containing the Program or aportion of it, either verbatim or with modifications and/or translated into another language. (Hereinafter,translation is included without limitation in the term "modification".) Each licensee is addressed as "you".Activities other than copying, distribution and modification are not covered by this License; they areoutside its scope. The act of running the Program is not restricted, and the output from the Program iscovered only if its contents constitute a work based on the Program (independent of having been madeby running the Program). Whether that is true depends on what the Program does.1. You may copy and distribute verbatim copies of the Program's source code as you receive it, in anymedium, provided that you conspicuously and appropriately publish on each copy an appropriatecopyright notice and disclaimer of warranty; keep intact all the notices that refer to this License and to theabsence of any warranty; and give any other recipients of the Program a copy of this License along withthe Program.You may charge a fee for the physical act of transferring a copy, and you may at your option offerwarranty protection in exchange for a fee.2. You may modify your copy or copies of the Program or any portion of it, thus forming a work based onthe Program, and copy and distribute such modifications or work under the terms of Section 1 above,provided that you also meet all of these conditions:a) You must cause the modified files to carry prominent notices stating that you changed the files and thedate of any change.
177

b) You must cause any work that you distribute or publish, that in whole or in part contains or is derivedfrom the Program or any part thereof, to be licensed as a whole at no charge to all third parties under theterms of this License.c) If the modified program normally reads commands interactively when run, you must cause it, whenstarted running for such interactive use in the most ordinary way, to print or display an announcementincluding an appropriate copyright notice and a notice that there is no warranty (or else, saying that youprovide a warranty) and that users may redistribute the program under these conditions, and telling theuser how to view a copy of this License. (Exception: if the Program itself is interactive but does notnormally print such an announcement, your work based on the Program is not required to print anannouncement.)These requirements apply to the modified work as a whole. If identifiable sections of that work are notderived from the Program, and can be reasonably considered independent and separate works inthemselves, then this License, and its terms, do not apply to those sections when you distribute them asseparate works. But when you distribute the same sections as part of a whole which is a work based onthe Program, the distribution of the whole must be on the terms of this License, whose permissions forother licensees extend to the entire whole, and thus to each and every part regardless of who wrote it.Thus, it is not the intent of this section to claim rights or contest your rights to work written entirely byyou; rather, the intent is to exercise the right to control the distribution of derivative or collective worksbased on the Program.In addition, mere aggregation of another work not based on the Program with the Program (or with awork based on the Program) on a volume of a storage or distribution medium does not bring the otherwork under the scope of this License.3. You may copy and distribute the Program (or a work based on it, under Section 2) in object code orexecutable form under the terms of Sections 1 and 2 above provided that you also do one of thefollowing:a) Accompany it with the complete corresponding machine-readable source code, which must bedistributed under the terms of Sections 1 and 2 above on a medium customarily used for softwareinterchange; or,b) Accompany it with a written offer, valid for at least three years, to give any third party, for a charge nomore than your cost of physically performing source distribution, a complete machine-readable copy ofthe corresponding source code, to be distributed under the terms of Sections 1 and 2 above on amedium customarily used for software interchange; or,c) Accompany it with the information you received as to the offer to distribute corresponding sourcecode. (This alternative is allowed only for noncommercial distribution and only if you received theprogram in object code or executable form with such an offer, in accord with Subsection b above.)The source code for a work means the preferred form of the work for making modifications to it. For anexecutable work, complete source code means all the source code for all modules it contains, plus any
178

associated interface definition files, plus the scripts used to control compilation and installation of theexecutable. However, as a special exception, the source code distributed need not include anything thatis normally distributed (in either source or binary form) with the major components (compiler, kernel, andso on) of the operating system on which the executable runs, unless that component itself accompaniesthe executable.If distribution of executable or object code is made by offering access to copy from a designated place,then offering equivalent access to copy the source code from the same place counts as distribution ofthe source code, even though third parties are not compelled to copy the source along with the objectcode.4. You may not copy, modify, sublicense, or distribute the Program except as expressly provided underthis License. Any attempt otherwise to copy, modify, sublicense or distribute the Program is void, and willautomatically terminate your rights under this License. However, parties who have received copies, orrights, from you under this License will not have their licenses terminated so long as such parties remainin full compliance.5. You are not required to accept this License, since you have not signed it. However, nothing elsegrants you permission to modify or distribute the Program or its derivative works. These actions areprohibited by law if you do not accept this License. Therefore, by modifying or distributing the Program(or any work based on the Program), you indicate your acceptance of this License to do so, and all itsterms and conditions for copying, distributing or modifying the Program or works based on it.6. Each time you redistribute the Program (or any work based on the Program), the recipientautomatically receives a license from the original licensor to copy, distribute or modify the Programsubject to these terms and conditions. You may not impose any further restrictions on the recipients'exercise of the rights granted herein. You are not responsible for enforcing compliance by third parties tothis License.7. If, as a consequence of a court judgment or allegation of patent infringement or for any other reason(not limited to patent issues), conditions are imposed on you (whether by court order, agreement orotherwise) that contradict the conditions of this License, they do not excuse you from the conditions ofthis License. If you cannot distribute so as to satisfy simultaneously your obligations under this Licenseand any other pertinent obligations, then as a consequence you may not distribute the Program at all.For example, if a patent license would not permit royalty-free redistribution of the Program by all thosewho receive copies directly or indirectly through you, then the only way you could satisfy both it and thisLicense would be to refrain entirely from distribution of the Program.If any portion of this section is held invalid or unenforceable under any particular circumstance, thebalance of the section is intended to apply and the section as a whole is intended to apply in othercircumstances.It is not the purpose of this section to induce you to infringe any patents or other property right claims orto contest validity of any such claims; this section has the sole purpose of protecting the integrity of thefree software distribution system, which is implemented by public license practices. Many people have
179

made generous contributions to the wide range of software distributed through that system in reliance onconsistent application of that system; it is up to the author/donor to decide if he or she is willing todistribute software through any other system and a licensee cannot impose that choice.This section is intended to make thoroughly clear what is believed to be a consequence of the rest of thisLicense.8. If the distribution and/or use of the Program is restricted in certain countries either by patents or bycopyrighted interfaces, the original copyright holder who places the Program under this License may addan explicit geographical distribution limitation excluding those countries, so that distribution is permittedonly in or among countries not thus excluded. In such case, this License incorporates the limitation as ifwritten in the body of this License.9. The Free Software Foundation may publish revised and/or new versions of the General PublicLicense from time to time. Such new versions will be similar in spirit to the present version, but may differin detail to address new problems or concerns.Each version is given a distinguishing version number. If the Program specifies a version number of thisLicense which applies to it and "any later version", you have the option of following the terms andconditions either of that version or of any later version published by the Free Software Foundation. If theProgram does not specify a version number of this License, you may choose any version ever publishedby the Free Software Foundation.10. If you wish to incorporate parts of the Program into other free programs whose distribution conditionsare different, write to the author to ask for permission. For software which is copyrighted by the FreeSoftware Foundation, write to the Free Software Foundation; we sometimes make exceptions for this.Our decision will be guided by the two goals of preserving the free status of all derivatives of our freesoftware and of promoting the sharing and reuse of software generally.NO WARRANTY11. BECAUSE THE PROGRAM IS LICENSED FREE OF CHARGE, THERE IS NO WARRANTY FORTHE PROGRAM, TO THE EXTENT PERMITTED BY APPLICABLE LAW. EXCEPT WHENOTHERWISE STATED IN WRITING THE COPYRIGHT HOLDERS AND/OR OTHER PARTIESPROVIDE THE PROGRAM "AS IS" WITHOUT WARRANTY OF ANY KIND, EITHER EXPRESSED ORIMPLIED, INCLUDING, BUT NOT LIMITED TO, THE IMPLIED WARRANTIES OF MERCHANTABILITYAND FITNESS FOR A PARTICULAR PURPOSE. THE ENTIRE RISK AS TO THE QUALITY ANDPERFORMANCE OF THE PROGRAM IS WITH YOU. SHOULD THE PROGRAM PROVE DEFECTIVE,YOU ASSUME THE COST OF ALL NECESSARY SERVICING, REPAIR OR CORRECTION.12. IN NO EVENT UNLESS REQUIRED BY APPLICABLE LAW OR AGREED TO IN WRITING WILLANY COPYRIGHT HOLDER, OR ANY OTHER PARTY WHO MAY MODIFY AND/OR REDISTRIBUTETHE PROGRAM AS PERMITTED ABOVE, BE LIABLE TO YOU FOR DAMAGES, INCLUDING ANYGENERAL, SPECIAL, INCIDENTAL OR CONSEQUENTIAL DAMAGES ARISING OUT OF THE USEOR INABILITY TO USE THE PROGRAM (INCLUDING BUT NOT LIMITED TO LOSS OF DATA OR
180

DATA BEING RENDERED INACCURATE OR LOSSES SUSTAINED BY YOU OR THIRD PARTIESOR A FAILURE OF THE PROGRAM TO OPERATE WITH ANY OTHER PROGRAMS), EVEN IF SUCHHOLDER OR OTHER PARTY HAS BEEN ADVISED OF THE POSSIBILITY OF SUCH DAMAGES.END OF TERMS AND CONDITIONSHow to Apply These Terms to Your New ProgramsIf you develop a new program, and you want it to be of the greatest possible use to the public, the bestway to achieve this is to make it free software which everyone can redistribute and change under theseterms.To do so, attach the following notices to the program. It is safest to attach them to the start of eachsource file to most effectively convey the exclusion of warranty; and each file should have at least the"copyright" line and a pointer to where the full notice is found.<one line to give the program's name and a brief idea of what it does.>Copyright (c) <year> <name of author>This program is free software; you can redistribute it and/or modify it under the terms of the GNUGeneral Public License as published by the Free Software Foundation; either version 2 of the License, or(at your option) any later version.This program is distributed in the hope that it will be useful, but WITHOUT ANY WARRANTY; withouteven the implied warranty of MERCHANTABILITY or FITNESS FOR A PARTICULAR PURPOSE. Seethe GNU General Public License for more details.You should have received a copy of the GNU General Public License along with this program; if not,write to the Free Software Foundation, Inc., 51 Franklin Street, Fifth Floor, Boston, MA 02110-1301USA.Also add information on how to contact you by electronic and paper mail.If the program is interactive, make it output a short notice like this when it starts in an interactive mode:Gnomovision version 69, Copyright (c) year name of author Gnomovision comes with ABSOLUTELY NOWARRANTY; for details type 'show w'. This is free software, and you are welcome to redistribute it undercertain conditions; type 'show c' for details.The hypothetical commands 'show w' and 'show c' should show the appropriate parts of the GeneralPublic License. Of course, the commands you use may be called something other than 'show w' and'show c'; they could even be mouse-clicks or menu items--whatever suits your program.You should also get your employer (if you work as a programmer) or your school, if any, to sign a"copyright disclaimer" for the program, if necessary. Here is a sample; alter the names:Yoyodyne, Inc., hereby disclaims all copyright interest in the program 'Gnomovision' (which makespasses at compilers) written by James Hacker.
181

<signature of Ty Coon>, 1 April 1989Ty Coon, President of ViceThis General Public License does not permit incorporating your program into proprietary programs. Ifyour program is a subroutine library, you may consider it more useful to permit linking proprietaryapplications with the library. If this is what you want to do, use the GNU Lesser General Public Licenseinstead of this License.GNU LGPLThis projector product includes the open source software programs which apply the GNU LesserGeneral Public License Version 2 or later version ("LGPL Programs").We provide the source code of the LGPL Programs until five (5) years after the discontinuation of samemodel of this projector product.If you desire to receive the source code of the LGPL Programs, please see the "EPSON ProjectorContact List" in the User's Guide, and contact the customer support of your region.These LGPL Programs are WITHOUT ANY WARRANTY; without even the implied warranty ofMERCHANTABILITY AND FITNESS FOR A PARTICULAR PURPOSE. See the GNU General PublicLicense for more details.The list of LGPL Programs is as follows and the names of author are described in the source code of theLGPL Programs.LGPL Programsglibc-2.8SDL-1.2.13SDL-ImageThe GNU Lesser General Public License Version 2 is as follows. You also can see the GNU LesserGeneral Public License Version 2 at http://www.gnu.org/licenses/.GNU LESSER GENERAL PUBLIC LICENSEVersion 2.1, February 1999Copyright ©) 1991, 1999 Free Software Foundation, Inc. 51 Franklin Street, Fifth Floor, Boston, MA02110-1301 USA Everyone is permitted to copy and distribute verbatim copies of this license document,but changing it is not allowed.[This is the first released version of the Lesser GPL. It also counts as the successor of the GNU LibraryPublic License, version 2, hence the version number 2.1.]Preamble
182

The licenses for most software are designed to take away your freedom to share and change it. Bycontrast, the GNU General Public Licenses are intended to guarantee your freedom to share andchange free software--to make sure the software is free for all its users.This license, the Lesser General Public License, applies to some specially designated softwarepackages--typically libraries--of the Free Software Foundation and other authors who decide to use it.You can use it too, but we suggest you first think carefully about whether this license or the ordinaryGeneral Public License is the better strategy to use in any particular case, based on the explanationsbelow.When we speak of free software, we are referring to freedom of use, not price. Our General PublicLicenses are designed to make sure that you have the freedom to distribute copies of free software (andcharge for this service if you wish); that you receive source code or can get it if you want it; that you canchange the software and use pieces of it in new free programs; and that you are informed that you cando these things.To protect your rights, we need to make restrictions that forbid distributors to deny you these rights or toask you to surrender these rights. These restrictions translate to certain responsibilities for you if youdistribute copies of the library or if you modify it.For example, if you distribute copies of the library, whether gratis or for a fee, you must give therecipients all the rights that we gave you. You must make sure that they, too, receive or can get thesource code. If you link other code with the library, you must provide complete object files to therecipients, so that they can relink them with the library after making changes to the library andrecompiling it. And you must show them these terms so they know their rights.We protect your rights with a two-step method: (1) we copyright the library, and (2) we offer you thislicense, which gives you legal permission to copy, distribute and/or modify the library.To protect each distributor, we want to make it very clear that there is no warranty for the free library.Also, if the library is modified by someone else and passed on, the recipients should know that what theyhave is not the original version, so that the original author's reputation will not be affected by problemsthat might be introduced by others.Finally, software patents pose a constant threat to the existence of any free program. We wish to makesure that a company cannot effectively restrict the users of a free program by obtaining a restrictivelicense from a patent holder. Therefore, we insist that any patent license obtained for a version of thelibrary must be consistent with the full freedom of use specified in this license.Most GNU software, including some libraries, is covered by the ordinary GNU General Public License.This license, the GNU Lesser General Public License, applies to certain designated libraries, and is quitedifferent from the ordinary General Public License. We use this license for certain libraries in order topermit linking those libraries into non-free programs.When a program is linked with a library, whether statically or using a shared library, the combination ofthe two is legally speaking a combined work, a derivative of the original library. The ordinary General
183
Public License therefore permits such linking only if the entire combination fits its criteria of freedom. TheLesser General Public License permits more lax criteria for linking other code with the library.We call this license the "Lesser" General Public License because it does Less to protect the user'sfreedom than the ordinary General Public License. It also provides other free software developers Lessof an advantage over competing non-free programs. These disadvantages are the reason we use theordinary General Public License for many libraries. However, the Lesser license provides advantages incertain special circumstances.For example, on rare occasions, there may be a special need to encourage the widest possible use of acertain library, so that it becomes a de-facto standard. To achieve this, non-free programs must beallowed to use the library. A more frequent case is that a free library does the same job as widely usednon-free libraries. In this case, there is little to gain by limiting the free library to free software only, so weuse the Lesser General Public License.In other cases, permission to use a particular library in non-free programs enables a greater number ofpeople to use a large body of free software. For example, permission to use the GNU C Library in non-free programs enables many more people to use the whole GNU operating system, as well as its variant,the GNU/Linux operating system.Although the Lesser General Public License is Less protective of the users' freedom, it does ensure thatthe user of a program that is linked with the Library has the freedom and the wherewithal to run thatprogram using a modified version of the Library.The precise terms and conditions for copying, distribution and modification follow. Pay close attention tothe difference between a "work based on the library" and a "work that uses the library". The formercontains code derived from the library, whereas the latter must be combined with the library in order torun.GNU LESSER GENERAL PUBLIC LICENSE TERMS AND CONDITIONS FOR COPYING,DISTRIBUTION AND MODIFICATION0. This License Agreement applies to any software library or other program which contains a noticeplaced by the copyright holder or other authorized party saying it may be distributed under the terms ofthis Lesser General Public License (also called "this License"). Each licensee is addressed as "you".A "library" means a collection of software functions and/or data prepared so as to be conveniently linkedwith application programs (which use some of those functions and data) to form executables.The "Library", below, refers to any such software library or work which has been distributed under theseterms. A "work based on the Library" means either the Library or any derivative work under copyrightlaw: that is to say, a work containing the Library or a portion of it, either verbatim or with modificationsand/or translated straightforwardly into another language. (Hereinafter, translation is included withoutlimitation in the term "modification".)
184

"Source code" for a work means the preferred form of the work for making modifications to it. For alibrary, complete source code means all the source code for all modules it contains, plus any associatedinterface definition files, plus the scripts used to control compilation and installation of the library.Activities other than copying, distribution and modification are not covered by this License; they areoutside its scope. The act of running a program using the Library is not restricted, and output from such aprogram is covered only if its contents constitute a work based on the Library (independent of the use ofthe Library in a tool for writing it). Whether that is true depends on what the Library does and what theprogram that uses the Library does.1. You may copy and distribute verbatim copies of the Library's complete source code as you receive it,in any medium, provided that you conspicuously and appropriately publish on each copy an appropriatecopyright notice and disclaimer of warranty; keep intact all the notices that refer to this License and to theabsence of any warranty; and distribute a copy of this License along with the Library.You may charge a fee for the physical act of transferring a copy, and you may at your option offerwarranty protection in exchange for a fee.2. You may modify your copy or copies of the Library or any portion of it, thus forming a work based onthe Library, and copy and distribute such modifications or work under the terms of Section 1 above,provided that you also meet all of these conditions:a) The modified work must itself be a software library.b) You must cause the files modified to carry prominent notices stating that you changed the files and thedate of any change.c) You must cause the whole of the work to be licensed at no charge to all third parties under the termsof this License.d) If a facility in the modified Library refers to a function or a table of data to be supplied by an applicationprogram that uses the facility, other than as an argument passed when the facility is invoked, then youmust make a good faith effort to ensure that, in the event an application does not supply such function ortable, the facility still operates, and performs whatever part of its purpose remains meaningful.(For example, a function in a library to compute square roots has a purpose that is entirely well-definedindependent of the application. Therefore, Subsection 2d requires that any application-supplied functionor table used by this function must be optional: if the application does not supply it, the square rootfunction must still compute square roots.)These requirements apply to the modified work as a whole. If identifiable sections of that work are notderived from the Library, and can be reasonably considered independent and separate works inthemselves, then this License, and its terms, do not apply to those sections when you distribute them asseparate works. But when you distribute the same sections as part of a whole which is a work based onthe Library, the distribution of the whole must be on the terms of this License, whose permissions forother licensees extend to the entire whole, and thus to each and every part regardless of who wrote it.
185

Thus, it is not the intent of this section to claim rights or contest your rights to work written entirely byyou; rather, the intent is to exercise the right to control the distribution of derivative or collective worksbased on the Library.In addition, mere aggregation of another work not based on the Library with the Library (or with a workbased on the Library) on a volume of a storage or distribution medium does not bring the other workunder the scope of this License.3. You may opt to apply the terms of the ordinary GNU General Public License instead of this License toa given copy of the Library. To do this, you must alter all the notices that refer to this License, so thatthey refer to the ordinary GNU General Public License, version 2, instead of to this License. (If a newerversion than version 2 of the ordinary GNU General Public License has appeared, then you can specifythat version instead if you wish.) Do not make any other change in these notices.Once this change is made in a given copy, it is irreversible for that copy, so the ordinary GNU GeneralPublic License applies to all subsequent copies and derivative works made from that copy.This option is useful when you wish to copy part of the code of the Library into a program that is not alibrary.4. You may copy and distribute the Library (or a portion or derivative of it, under Section 2) in object codeor executable form under the terms of Sections 1 and 2 above provided that you accompany it with thecomplete corresponding machine-readable source code, which must be distributed under the terms ofSections 1 and 2 above on a medium customarily used for software interchange.If distribution of object code is made by offering access to copy from a designated place, then offeringequivalent access to copy the source code from the same place satisfies the requirement to distributethe source code, even though third parties are not compelled to copy the source along with the objectcode.5. A program that contains no derivative of any portion of the Library, but is designed to work with theLibrary by being compiled or linked with it, is called a "work that uses the Library". Such a work, inisolation, is not a derivative work of the Library, and therefore falls outside the scope of this License.However, linking a "work that uses the Library" with the Library creates an executable that is a derivativeof the Library (because it contains portions of the Library), rather than a "work that uses the library". Theexecutable is therefore covered by this License. Section 6 states terms for distribution of suchexecutables.When a "work that uses the Library" uses material from a header file that is part of the Library, the objectcode for the work may be a derivative work of the Library even though the source code is not. Whetherthis is true is especially significant if the work can be linked without the Library, or if the work is itself alibrary. The threshold for this to be true is not precisely defined by law.If such an object file uses only numerical parameters, data structure layouts and accessors, and smallmacros and small inline functions (ten lines or less in length), then the use of the object file is
186

unrestricted, regardless of whether it is legally a derivative work. (Executables containing this objectcode plus portions of the Library will still fall under Section 6.)Otherwise, if the work is a derivative of the Library, you may distribute the object code for the work underthe terms of Section 6. Any executables containing that work also fall under Section 6, whether or notthey are linked directly with the Library itself.6. As an exception to the Sections above, you may also combine or link a "work that uses the Library"with the Library to produce a work containing portions of the Library, and distribute that work under termsof your choice, provided that the terms permit modification of the work for the customer's own use andreverse engineering for debugging such modifications.You must give prominent notice with each copy of the work that the Library is used in it and that theLibrary and its use are covered by this License. You must supply a copy of this License. If the workduring execution displays copyright notices, you must include the copyright notice for the Library amongthem, as well as a reference directing the user to the copy of this License. Also, you must do one ofthese things:a) Accompany the work with the complete corresponding machine-readable source code for the Libraryincluding whatever changes were used in the work (which must be distributed under Sections 1 and 2above); and, if the work is an executable linked with the Library, with the complete machine-readable"work that uses the Library", as object code and/or source code, so that the user can modify the Libraryand then relink to produce a modified executable containing the modified Library. (It is understood thatthe user who changes the contents of definitions files in the Library will not necessarily be able torecompile the application to use the modified definitions.)b) Use a suitable shared library mechanism for linking with the Library. A suitable mechanism is one that(1) uses at run time a copy of the library already present on the user's computer system, rather thancopying library functions into the executable, and (2) will operate properly with a modified version of thelibrary, if the user installs one, as long as the modified version is interface-compatible with the versionthat the work was made with.c) Accompany the work with a written offer, valid for at least three years, to give the same user thematerials specified in Subsection 6a, above, for a charge no more than the cost of performing thisdistribution.d) If distribution of the work is made by offering access to copy from a designated place, offer equivalentaccess to copy the above specified materials from the same place.e) Verify that the user has already received a copy of these materials or that you have already sent thisuser a copy.For an executable, the required form of the "work that uses the Library" must include any data and utilityprograms needed for reproducing the executable from it. However, as a special exception, the materialsto be distributed need not include anything that is normally distributed (in either source or binary form)
187
with the major components (compiler, kernel, and so on) of the operating system on which theexecutable runs, unless that component itself accompanies the executable.It may happen that this requirement contradicts the license restrictions of other proprietary libraries thatdo not normally accompany the operating system. Such a contradiction means you cannot use boththem and the Library together in an executable that you distribute.7. You may place library facilities that are a work based on the Library side-by-side in a single librarytogether with other library facilities not covered by this License, and distribute such a combined library,provided that the separate distribution of the work based on the Library and of the other library facilities isotherwise permitted, and provided that you do these two things:a) Accompany the combined library with a copy of the same work based on the Library, uncombined withany other library facilities. This must be distributed under the terms of the Sections above.b) Give prominent notice with the combined library of the fact that part of it is a work based on theLibrary, and explaining where to find the accompanying uncombined form of the same work.8. You may not copy, modify, sublicense, link with, or distribute the Library except as expressly providedunder this License. Any attempt otherwise to copy, modify, sublicense, link with, or distribute the Libraryis void, and will automatically terminate your rights under this License. However, parties who havereceived copies, or rights, from you under this License will not have their licenses terminated so long assuch parties remain in full compliance.9. You are not required to accept this License, since you have not signed it. However, nothing elsegrants you permission to modify or distribute the Library or its derivative works. These actions areprohibited by law if you do not accept this License. Therefore, by modifying or distributing the Library (orany work based on the Library), you indicate your acceptance of this License to do so, and all its termsand conditions for copying, distributing or modifying the Library or works based on it.10. Each time you redistribute the Library (or any work based on the Library), the recipient automaticallyreceives a license from the original licensor to copy, distribute, link with or modify the Library subject tothese terms and conditions. You may not impose any further restrictions on the recipients' exercise ofthe rights granted herein. You are not responsible for enforcing compliance by third parties with thisLicense.11. If, as a consequence of a court judgment or allegation of patent infringement or for any other reason(not limited to patent issues), conditions are imposed on you (whether by court order, agreement orotherwise) that contradict the conditions of this License, they do not excuse you from the conditions ofthis License. If you cannot distribute so as to satisfy simultaneously your obligations under this Licenseand any other pertinent obligations, then as a consequence you may not distribute the Library at all. Forexample, if a patent license would not permit royalty-free redistribution of the Library by all those whoreceive copies directly or indirectly through you, then the only way you could satisfy both it and thisLicense would be to refrain entirely from distribution of the Library.
188

If any portion of this section is held invalid or unenforceable under any particular circumstance, thebalance of the section is intended to apply, and the section as a whole is intended to apply in othercircumstances.It is not the purpose of this section to induce you to infringe any patents or other property right claims orto contest validity of any such claims; this section has the sole purpose of protecting the integrity of thefree software distribution system which is implemented by public license practices. Many people havemade generous contributions to the wide range of software distributed through that system in reliance onconsistent application of that system; it is up to the author/donor to decide if he or she is willing todistribute software through any other system and a licensee cannot impose that choice.This section is intended to make thoroughly clear what is believed to be a consequence of the rest of thisLicense.12. If the distribution and/or use of the Library is restricted in certain countries either by patents or bycopyrighted interfaces, the original copyright holder who places the Library under this License may addan explicit geographical distribution limitation excluding those countries, so that distribution is permittedonly in or among countries not thus excluded. In such case, this License incorporates the limitation as ifwritten in the body of this License.13. The Free Software Foundation may publish revised and/or new versions of the Lesser GeneralPublic License from time to time. Such new versions will be similar in spirit to the present version, butmay differ in detail to address new problems or concerns.Each version is given a distinguishing version number. If the Library specifies a version number of thisLicense which applies to it and "any later version", you have the option of following the terms andconditions either of that version or of any later version published by the Free Software Foundation. If theLibrary does not specify a license version number, you may choose any version ever published by theFree Software Foundation.14. If you wish to incorporate parts of the Library into other free programs whose distribution conditionsare incompatible with these, write to the author to ask for permission. For software which is copyrightedby the Free Software Foundation, write to the Free Software Foundation; we sometimes makeexceptions for this. Our decision will be guided by the two goals of preserving the free status of allderivatives of our free software and of promoting the sharing and reuse of software generally.NO WARRANTY15. BECAUSE THE LIBRARY IS LICENSED FREE OF CHARGE, THERE IS NO WARRANTY FORTHE LIBRARY, TO THE EXTENT PERMITTED BY APPLICABLE LAW. EXCEPT WHEN OTHERWISESTATED IN WRITING THE COPYRIGHT HOLDERS AND/OR OTHER PARTIES PROVIDE THELIBRARY "AS IS" WITHOUT WARRANTY OF ANY KIND, EITHER EXPRESSED OR IMPLIED,INCLUDING, BUT NOT LIMITED TO, THE IMPLIED WARRANTIES OF MERCHANTABILITY ANDFITNESS FOR A PARTICULAR PURPOSE. THE ENTIRE RISK AS TO THE QUALITY AND
189

PERFORMANCE OF THE LIBRARY IS WITH YOU. SHOULD THE LIBRARY PROVE DEFECTIVE,YOU ASSUME THE COST OF ALL NECESSARY SERVICING, REPAIR OR CORRECTION.16. IN NO EVENT UNLESS REQUIRED BY APPLICABLE LAW OR AGREED TO IN WRITING WILLANY COPYRIGHT HOLDER, OR ANY OTHER PARTY WHO MAY MODIFY AND/OR REDISTRIBUTETHE LIBRARY AS PERMITTED ABOVE, BE LIABLE TO YOU FOR DAMAGES, INCLUDING ANYGENERAL, SPECIAL, INCIDENTAL OR CONSEQUENTIAL DAMAGES ARISING OUT OF THE USEOR INABILITY TO USE THE LIBRARY (INCLUDING BUT NOT LIMITED TO LOSS OF DATA OR DATABEING RENDERED INACCURATE OR LOSSES SUSTAINED BY YOU OR THIRD PARTIES OR AFAILURE OF THE LIBRARY TO OPERATE WITH ANY OTHER SOFTWARE), EVEN IF SUCHHOLDER OR OTHER PARTY HAS BEEN ADVISED OF THE POSSIBILITY OF SUCH DAMAGES.END OF TERMS AND CONDITIONSHow to Apply These Terms to Your New LibrariesIf you develop a new library, and you want it to be of the greatest possible use to the public, werecommend making it free software that everyone can redistribute and change. You can do so bypermitting redistribution under these terms (or, alternatively, under the terms of the ordinary GeneralPublic License).To apply these terms, attach the following notices to the library. It is safest to attach them to the start ofeach source file to most effectively convey the exclusion of warranty; and each file should have at leastthe "copyright" line and a pointer to where the full notice is found.<one line to give the library's name and a brief idea of what it does.>Copyright (c) <year> <name of author>This library is free software; you can redistribute it and/or modify it under the terms of the GNU LesserGeneral Public License as published by the Free Software Foundation; either version 2.1 of the License,or (at your option) any later version.This library is distributed in the hope that it will be useful, but WITHOUT ANY WARRANTY; without eventhe implied warranty of MERCHANTABILITY or FITNESS FOR A PARTICULAR PURPOSE. See theGNU Lesser General Public License for more details.You should have received a copy of the GNU Lesser General Public License along with this library; ifnot, write to the Free Software Foundation, Inc., 51 Franklin Street, Fifth Floor, Boston, MA 02110-1301USAAlso add information on how to contact you by electronic and paper mail.You should also get your employer (if you work as a programmer) or your school, if any, to sign a"copyright disclaimer" for the library, if necessary. Here is a sample; alter the names:Yoyodyne, Inc., hereby disclaims all copyright interest in the library 'Frob' (a library for tweaking knobs)written by James Random Hacker.
190

<signature of Ty Coon>, 1 April 1990Ty Coon, President of ViceThat's all there is to it!BSD License (Berkeley Software Distribution License)This projector product includes the open source software program "University of California, BerkeleyLicense (Berkeley Software Distribution License)" which applies the terms and conditions provided byowner of the copyright to the "BSD License".The "BSD License" are WITHOUT ANY WARRANTY; without even the implied warranty ofMERCHANTABILITY AND FITNESS FOR A PARTICULAR PURPOSE.List of BSD License programsbusybox-1.13.4License terms of conditions of each program which are provided by owner of the copyright to the "BSDLicense" are as follows.Copyright (c) The Regents of the University of California. All rights reserved.This code is derived from software contributed to Berkeley by Kenneth Almquist.Redistribution and use in source and binary forms, with or without modification, are permitted providedthat the following conditions are met:1. Redistributions of source code must retain the above copyright notice, this list of conditions and thefollowing disclaimer.2. Redistributions in binary form must reproduce the above copyright notice, this list of conditions and thefollowing disclaimer in the documentation and/or other materials provided with the distribution.3. Neither the name of the University nor the names of its contributors may be used to endorse orpromote products derived from this software without specific prior written permission.THIS SOFTWARE IS PROVIDED BY THE REGENTS AND CONTRIBUTORS "AS IS" AND ANYEXPRESS OR IMPLIED WARRANTIES, INCLUDING, BUT NOT LIMITED TO, THE IMPLIEDWARRANTIES OF MERCHANTABILITY AND FITNESS FOR A PARTICULAR PURPOSE AREDISCLAIMED. IN NO EVENT SHALL THE REGENTS OR CONTRIBUTORS BE LIABLE FOR ANYDIRECT, INDIRECT, INCIDENTAL, SPECIAL, EXEMPLARY, OR CONSEQUENTIAL DAMAGES(INCLUDING, BUT NOT LIMITED TO, PROCUREMENT OF SUBSTITUTE GOODS OR SERVICES;LOSS OF USE, DATA, OR PROFITS; OR BUSINESS INTERRUPTION) HOWEVER CAUSED AND ONANY THEORY OF LIABILITY, WHETHER IN CONTRACT, STRICT LIABILITY, OR TORT (INCLUDINGNEGLIGENCE OR OTHERWISE) ARISING IN ANY WAY OUT OF THE USE OF THIS SOFTWARE,EVEN IF ADVISED OF THE POSSIBILITY OF SUCH DAMAGE.
191

libjpegThis projector product includes the open source software program "libjpeg" which applies the terms andconditions provided by owner of the copyright to the "libjpeg".The "libjpeg" are WITHOUT ANY WARRANTY; without even the implied warranty ofMERCHANTABILITY AND FITNESS FOR A PARTICULAR PURPOSE.List of libjpeg programslibjpeg-6bLicense terms of conditions of each program which are provided by owner of the copyright to the"libjpeg" are as follows.Copyright (c) 1994-1997, Thomas G. Lane. This file is part of the Independent JPEG Group's software.For conditions of distribution and use, see the accompanying README file.This distribution contains the sixth public release of the Independent JPEG Group's free JPEG software.You are welcome to redistribute this software and to use it for any purpose, subject to the conditionsunder LEGAL ISSUES, below.LEGAL ISSUES============In plain English:1. We don't promise that this software works. (But if you find any bugs, please let us know!)2. You can use this software for whatever you want. You don't have to pay us.3. You may not pretend that you wrote this software. If you use it in a program, you must acknowledgesomewhere in your documentation that you've used the IJG code.In legalese:The authors make NO WARRANTY or representation, either express or implied, with respect to thissoftware, its quality, accuracy, merchantability, or fitness for a particular purpose. This software isprovided "AS IS", and you, its user, assume the entire risk as to its quality and accuracy.This software is copyright (c) 1991-1998, Thomas G. Lane. All Rights Reserved except as specifiedbelow.Permission is hereby granted to use, copy, modify, and distribute this software (or portions thereof) forany purpose, without fee, subject to these conditions:(1) If any part of the source code for this software is distributed, then this README file must be included,with this copyright and no-warranty notice unaltered; and any additions, deletions, or changes to theoriginal files must be clearly indicated in accompanying documentation.
192
(2) If only executable code is distributed, then the accompanying documentation must state that "thissoftware is based in part on the work of the Independent JPEG Group".(3) Permission for use of this software is granted only if the user accepts full responsibility for anyundesirable consequences; the authors accept NO LIABILITY for damages of any kind.These conditions apply to any software derived from or based on the IJG code, not just to the unmodifiedlibrary. If you use our work, you ought to acknowledge us.Permission is NOT granted for the use of any IJG author's name or company name in advertising orpublicity relating to this software or products derived from it. This software may be referred to only as"the Independent JPEG Group's software".We specifically permit and encourage the use of this software as the basis of commercial products,provided that all warranty or liability claims are assumed by the product vendor.ansi2knr.c is included in this distribution by permission of L. Peter Deutsch, sole proprietor of itscopyright holder, Aladdin Enterprises of Menlo Park, CA. ansi2knr.c is NOT covered by the abovecopyright and conditions, but instead by the usual distribution terms of the Free Software Foundation;principally, that you must include source code if you redistribute it. (See the file ansi2knr.c for full details.)However, since ansi2knr.c is not needed as part of any program generated from the IJG code, this doesnot limit you more than the foregoing paragraphs do.The Unix configuration script "configure" was produced with GNU Autoconf. It is copyright by the FreeSoftware Foundation but is freely distributable. The same holds for its supporting scripts (config.guess,config.sub, ltconfig, ltmain.sh). Another support script, install-sh, is copyright by M.I.T. but is also freelydistributable.It appears that the arithmetic coding option of the JPEG spec is covered by patents owned by IBM,AT&T, and Mitsubishi. Hence arithmetic coding cannot legally be used without obtaining one or morelicenses. For this reason, support for arithmetic coding has been removed from the free JPEG software.(Since arithmetic coding provides only a marginal gain over the unpatented Huffman mode, it is unlikelythat very many implementations will support it.) So far as we are aware, there are no patent restrictionson the remaining code.The IJG distribution formerly included code to read and write GIF files. To avoid entanglement with theUnisys LZW patent, GIF reading support has been removed altogether, and the GIF writer has beensimplified to produce "uncompressed GIFs". This technique does not use the LZW algorithm; theresulting GIF files are larger than usual, but are readable by all standard GIF decoders.We are required to state that"The Graphics Interchange Format(c)) is the Copyright property of CompuServe Incorporated. GIF(sm)is a Service Mark property of CompuServe Incorporated."libpng
193

This projector product includes the open source software program "libpng" which applies the terms andconditions provided by owner of the copyright to the "libpng".The "libpng" are WITHOUT ANY WARRANTY; without even the implied warranty ofMERCHANTABILITY AND FITNESS FOR A PARTICULAR PURPOSE.List of libpng programslibpng-1.2.49License terms of conditions of each program which are provided by owner of the copyright to the "libpng"are as follows.This copy of the libpng notices is provided for your convenience. In case of any discrepancy betweenthis copy and the notices in the file png.h that is included in the libpng distribution, the latter shall prevail.COPYRIGHT NOTICE, DISCLAIMER, and LICENSE:If you modify libpng you may insert additional notices immediately following this sentence.This code is released under the libpng license.libpng version 1.2.6, August 15, 2004, through 1.2.49, March 29, 2012, are Copyright (c) 2004, 2006-2009 Glenn Randers-Pehrson, and are distributed according to the same disclaimer and license aslibpng-1.2.5 with the following individual added to the list of Contributing AuthorsCosmin Trutalibpng versions 1.0.7, July 1, 2000, through 1.2.5 - October 3, 2002, are Copyright (c) 2000-2002 GlennRanders-Pehrson, and are distributed according to the same disclaimer and license as libpng-1.0.6 withthe following individuals added to the list of Contributing AuthorsSimon-Pierre CadieuxEric S. RaymondGilles Vollantand with the following additions to the disclaimer:There is no warranty against interference with your enjoyment of the library or against infringement.There is no warranty that our efforts or the library will fulfill any of your particular purposes or needs. Thislibrary is provided with all faults, and the entire risk of satisfactory quality, performance, accuracy, andeffort is with the user.libpng versions 0.97, January 1998, through 1.0.6, March 20, 2000, are Copyright ©) 1998, 1999 GlennRanders-Pehrson, and are distributed according to the same disclaimer and license as libpng-0.96, withthe following individuals added to the list of Contributing Authors:Tom Lane
194

Glenn Randers-PehrsonWillem van Schaiklibpng versions 0.89, June 1996, through 0.96, May 1997, are Copyright (c) 1996, 1997 Andreas DilgerDistributed according to the same disclaimer and license as libpng-0.88, with the following individualsadded to the list of Contributing Authors:John BowlerKevin BraceySam BushellMagnus HolmgrenGreg RoelofsTom Tannerlibpng versions 0.5, May 1995, through 0.88, January 1996, are Copyright (c) 1995, 1996 Guy EricSchalnat, Group 42, Inc.For the purposes of this copyright and license, "Contributing Authors" is defined as the following set ofindividuals:Andreas DilgerDave MartindaleGuy Eric SchalnatPaul SchmidtTim WegnerThe PNG Reference Library is supplied "AS IS". The Contributing Authors and Group 42, Inc. disclaim allwarranties, expressed or implied, including, without limitation, the warranties of merchantability and offitness for any purpose. The Contributing Authors and Group 42, Inc. assume no liability for direct,indirect, incidental, special, exemplary, or consequential damages, which may result from the use of thePNG Reference Library, even if advised of the possibility of such damage.Permission is hereby granted to use, copy, modify, and distribute this source code, or portions hereof, forany purpose, without fee, subject to the following restrictions:1. The origin of this source code must not be misrepresented.2. Altered versions must be plainly marked as such and must not be misrepresented as being theoriginal source.3. This Copyright notice may not be removed or altered from any source or altered source distribution.
195

The Contributing Authors and Group 42, Inc. specifically permit, without fee, and encourage the use ofthis source code as a component to supporting the PNG file format in commercial products. If you usethis source code in a product, acknowledgment is not required but would be appreciated.A "png_get_copyright" function is available, for convenient use in "about" boxes and the like:printf("%s",png_get_copyright(NULL));Also, the PNG logo (in PNG format, of course) is supplied in the files "pngbar.png" and "pngbar.jpg"(88x31) and "pngnow.png" (98x31).Libpng is OSI Certified Open Source Software. OSI Certified Open Source is a certification mark of theOpen Source Initiative.Glenn [email protected] 29, 2012zlibThis projector product includes the open source software program "zlib" which applies the terms andconditions provided by owner of the copyright to the "zlib".The "zlib" are WITHOUT ANY WARRANTY; without even the implied warranty of MERCHANTABILITYAND FITNESS FOR A PARTICULAR PURPOSE.List of zlib programszlib-1.1.4License terms of conditions of each program which are provided by owner of the copyright to the "zlib"are as follows.Copyright notice:(c) 1995-1998 Jean-loup Gailly and Mark AdlerThis software is provided 'as-is', without any express or implied warranty. In no event will the authors beheld liable for any damages arising from the use of this software.Permission is granted to anyone to use this software for any purpose, including commercial applications,and to alter it and redistribute it freely, subject to the following restrictions:1. The origin of this software must not be misrepresented; you must not claim that you wrote the originalsoftware. If you use this software in a product, an acknowledgment in the product documentation wouldbe appreciated but is not required.2. Altered source versions must be plainly marked as such, and must not be misrepresented as beingthe original software.
196

3. This notice may not be removed or altered from any source distribution.Jean-loup [email protected] Mark [email protected] you use the zlib library in a product, we would appreciate *not* receiving lengthy legal documents tosign. The sources are provided for free but without warranty of any kind. The library has been entirelywritten by Jean-loup Gailly and Mark Adler; it does not include third-party code.If you redistribute modified sources, we would appreciate that you include in the file ChangeLog historyinformation documenting your changes.mDNSResponderThis projector product includes the open source software program "mDNSResponder" which applies thefollowing license terms "Apache License Version 2.0, January 2004".List of "mDNSResponder"mDNSResponder-107.6 (only mDNSResponderPosix is used)License terms "Apache License Version 2.0, January 2004" are as follows.Apache LicenseVersion 2.0, January 2004http://www.apache.org/licenses/TERMS AND CONDITIONS FOR USE, REPRODUCTION, AND DISTRIBUTION1. Definitions."License" shall mean the terms and conditions for use, reproduction, and distribution as defined bySections 1 through 9 of this document."Licensor" shall mean the copyright owner or entity authorized by the copyright owner that is granting theLicense."Legal Entity" shall mean the union of the acting entity and all other entities that control, are controlledby, or are under common control with that entity. For the purposes of this definition, "control" means (I)the power, direct or indirect, to cause the direction or management of such entity, whether by contract orotherwise, or (ii) ownership of fifty percent (50%) or more of the outstanding shares, or (iii) beneficialownership of such entity."You" (or "Your") shall mean an individual or Legal Entity exercising permissions granted by this License."Source" form shall mean the preferred form for making modifications, including but not limited tosoftware source code, documentation source, and configuration files.
197

"Object" form shall mean any form resulting from mechanical transformation or translation of a Sourceform, including but not limited to compiled object code, generated documentation, and conversions toother media types."Work" shall mean the work of authorship, whether in Source or Object form, made available under theLicense, as indicated by a copyright notice that is included in or attached to the work (an example isprovided in the Appendix below)."Derivative Works" shall mean any work, whether in Source or Object form, that is based on (or derivedfrom) the Work and for which the editorial revisions, annotations, elaborations, or other modificationsrepresent, as a whole, an original work of authorship. For the purposes of this License, Derivative Worksshall not include works that remain separable from, or merely link (or bind by name) to the interfaces of,the Work and Derivative Works thereof."Contribution" shall mean any work of authorship, including the original version of the Work and anymodifications or additions to that Work or Derivative Works thereof, that is intentionally submitted toLicensor for inclusion in the Work by the copyright owner or by an individual or Legal Entity authorized tosubmit on behalf of the copyright owner. For the purposes of this definition, "submitted" means any formof electronic, verbal, or written communication sent to the Licensor or its representatives, including butnot limited to communication on electronic mailing lists, source code control systems, and issue trackingsystems that are managed by, or on behalf of, the Licensor for the purpose of discussing and improvingthe Work, but excluding communication that is conspicuously marked or otherwise designated in writingby the copyright owner as "Not a Contribution.""Contributor" shall mean Licensor and any individual or Legal Entity on behalf of whom a Contributionhas been received by Licensor and subsequently incorporated within the Work.2. Grant of Copyright License. Subject to the terms and conditions of this License, each Contributorhereby grants to You a perpetual, worldwide, non-exclusive, no-charge, royalty-free, irrevocablecopyright license to reproduce, prepare Derivative Works of, publicly display, publicly perform,sublicense, and distribute the Work and such Derivative Works in Source or Object form.3. Grant of Patent License. Subject to the terms and conditions of this License, each Contributor herebygrants to You a perpetual, worldwide, non-exclusive, no-charge, royalty-free, irrevocable (except asstated in this section) patent license to make, have made, use, offer to sell, sell, import, and otherwisetransfer the Work, where such license applies only to those patent claims licensable by such Contributorthat are necessarily infringed by their Contribution(s) alone or by combination of their Contribution(s) withthe Work to which such Contribution(s) was submitted. If You institute patent litigation against any entity(including a cross-claim or counterclaim in a lawsuit) alleging that the Work or a Contributionincorporated within the Work constitutes direct or contributory patent infringement, then any patentlicenses granted to You under this License for that Work shall terminate as of the date such litigation isfiled.
198

4. Redistribution. You may reproduce and distribute copies of the Work or Derivative Works thereof inany medium, with or without modifications, and in Source or Object form, provided that You meet thefollowing conditions:(a) You must give any other recipients of the Work or Derivative Works a copy of this License; and(b) You must cause any modified files to carry prominent notices stating that You changed the files; and(c) You must retain, in the Source form of any Derivative Works that You distribute, all copyright, patent,trademark, and attribution notices from the Source form of the Work, excluding those notices that do notpertain to any part of the Derivative Works; and(d) If the Work includes a "NOTICE" text file as part of its distribution, then any Derivative Works that Youdistribute must include a readable copy of the attribution notices contained within such NOTICE file,excluding those notices that do not pertain to any part of the Derivative Works, in at least one of thefollowing places: within a NOTICE text file distributed as part of the Derivative Works; within the Sourceform or documentation, if provided along with the Derivative Works; or, within a display generated by theDerivative Works, if and wherever such third-party notices normally appear. The contents of the NOTICEfile are for informational purposes only and do not modify the License. You may add Your own attributionnotices within Derivative Works that You distribute, alongside or as an addendum to the NOTICE textfrom the Work, provided that such additional attribution notices cannot be construed as modifying theLicense.You may add Your own copyright statement to Your modifications and may provide additional or differentlicense terms and conditions for use, reproduction, or distribution of Your modifications, or for any suchDerivative Works as a whole, provided Your use, reproduction, and distribution of the Work otherwisecomplies with the conditions stated in this License.5. Submission of Contributions. Unless You explicitly state otherwise, any Contribution intentionallysubmitted for inclusion in the Work by You to the Licensor shall be under the terms and conditions of thisLicense, without any additional terms or conditions.Notwithstanding the above, nothing herein shall supersede or modify the terms of any separate licenseagreement you may have executed with Licensor regarding such Contributions.6. Trademarks. This License does not grant permission to use the trade names, trademarks, servicemarks, or product names of the Licensor, except as required for reasonable and customary use indescribing the origin of the Work and reproducing the content of the NOTICE file.7. Disclaimer of Warranty. Unless required by applicable law or agreed to in writing, Licensor providesthe Work (and each Contributor provides its Contributions) on an "AS IS" BASIS, WITHOUTWARRANTIES OR CONDITIONS OF ANY KIND, either express or implied, including, without limitation,any warranties or conditions of TITLE, NON-INFRINGEMENT, MERCHANTABILITY, or FITNESS FORA PARTICULAR PURPOSE. You are solely responsible for determining the appropriateness of using orredistributing the Work and assume any risks associated with Your exercise of permissions under thisLicense.
199

8. Limitation of Liability. In no event and under no legal theory, whether in tort (including negligence),contract, or otherwise, unless required by applicable law (such as deliberate and grossly negligent acts)or agreed to in writing, shall any Contributor be liable to You for damages, including any direct, indirect,special, incidental, or consequential damages of any character arising as a result of this License or out ofthe use or inability to use the Work (including but not limited to damages for loss of goodwill, workstoppage, computer failure or malfunction, or any and all other commercial damages or losses), even ifsuch Contributor has been advised of the possibility of such damages.9. Accepting Warranty or Additional Liability. While redistributing the Work or Derivative Works thereof,You may choose to offer, and charge a fee for, acceptance of support, warranty, indemnity, or otherliability obligations and/or rights consistent with this License. However, in accepting such obligations,You may act only on Your own behalf and on Your sole responsibility, not on behalf of any otherContributor, and only if You agree to indemnify, defend, and hold each Contributor harmless for anyliability incurred by, or claims asserted against, such Contributor by reason of your accepting any suchwarranty or additional liability.END OF TERMS AND CONDITIONSAPPENDIX: How to apply the Apache License to your work.To apply the Apache License to your work, attach the following boilerplate notice, with the fieldsenclosed by brackets "[]" replaced with your own identifying information. (Don't include the brackets!)The text should be enclosed in the appropriate comment syntax for the file format. We also recommendthat a file or class name and description of purpose be included on the same "printed page" as thecopyright notice for easier identification within third-party archives.Copyright [yyyy] [name of copyright owner]Licensed under the Apache License, Version 2.0 (the "License");you may not use this file except in compliance with the License.You may obtain a copy of the License athttp://www.apache.org/licenses/LICENSE-2.0Unless required by applicable law or agreed to in writing, software distributed under the License isdistributed on an "AS IS" BASIS, WITHOUT WARRANTIES OR CONDITIONS OF ANY KIND, eitherexpress or implied.See the License for the specific language governing permissions and limitations under the License.aes-src-29-04-09This projector product includes the open source software program "aes-src-29-04-09" which applies theterms and conditions provided by owner of the copyright to the "aes-src-29-04-09".
200

The "aes-src-29-04-09" are WITHOUT ANY WARRANTY; without even the implied warranty ofMERCHANTABILITY AND FITNESS FOR A PARTICULAR PURPOSE.List of es-src-29-04-09 programsnewlibThis projector product includes the open source software program "newlib" which applies the terms andconditions provided by owner of the copyright to the "newlib".The "newlib" are WITHOUT ANY WARRANTY; without even the implied warranty ofMERCHANTABILITY AND FITNESS FOR A PARTICULAR PURPOSE.List of newlib programsnewlib 1.17.0License terms of conditions of each program which are provided by owner of the copyright to the "newlib"are as follows.The newlib subdirectory is a collection of software from several sources.Each file may have its own copyright/license that is embedded in the source file. Unless otherwise notedin the body of the source file(s), the following copyright notices will apply to the contents of the newlibsubdirectory:(1) Red Hat IncorporatedCopyright (c) 1994-2007 Red Hat, Inc. All rights reserved.This copyrighted material is made available to anyone wishing to use, modify, copy, or redistribute itsubject to the terms and conditions of the BSD License. This program is distributed in the hope that it willbe useful, but WITHOUT ANY WARRANTY expressed or implied, including the implied warranties ofMERCHANTABILITY or FITNESS FOR A PARTICULAR PURPOSE. A copy of this license is availableat http://www.opensource.org/licenses. Any Red Hat trademarks that are incorporated in the sourcecode or documentation are not subject to the BSD License and may only be used or replicated with theexpress permission of Red Hat, Inc.(2) University of California, BerkeleyCopyright (c) 1981-2000 The Regents of the University of California.All rights reserved.Redistribution and use in source and binary forms, with or without modification, are permitted providedthat the following conditions are met:* Redistributions of source code must retain the above copyright notice, this list of conditions and thefollowing disclaimer.
201

* Redistributions in binary form must reproduce the above copyright notice, this list of conditions and thefollowing disclaimer in the documentation and/or other materials provided with the distribution.* Neither the name of the University nor the names of its contributors may be used to endorse orpromote products derived from this software without specific prior written permission.THIS SOFTWARE IS PROVIDED BY THE COPYRIGHT HOLDERS AND CONTRIBUTORS "AS IS"AND ANY EXPRESS OR IMPLIED WARRANTIES, INCLUDING, BUT NOT LIMITED TO, THE IMPLIEDWARRANTIES OF MERCHANTABILITY AND FITNESS FOR A PARTICULAR PURPOSE AREDISCLAIMED. IN NO EVENT SHALL THE COPYRIGHT OWNER OR CONTRIBUTORS BE LIABLEFOR ANY DIRECT, INDIRECT, INCIDENTAL, SPECIAL, EXEMPLARY, OR CONSEQUENTIALDAMAGES (INCLUDING, BUT NOT LIMITED TO, PROCUREMENT OF SUBSTITUTE GOODS ORSERVICES; LOSS OF USE, DATA, OR PROFITS; OR BUSINESS INTERRUPTION) HOWEVERCAUSED AND ON ANY THEORY OF LIABILITY, WHETHER IN CONTRACT, STRICT LIABILITY, ORTORT (INCLUDING NEGLIGENCE OR OTHERWISE) ARISING IN ANY WAY OUT OF THE USE OFTHIS SOFTWARE, EVEN IF ADVISED OF THE POSSIBILITY OF SUCH DAMAGE.(3) David M. Gay (AT&T 1991, Lucent 1998)The author of this software is David M. Gay.Copyright ©) 1991 by AT&T.Permission to use, copy, modify, and distribute this software for any purpose without fee is herebygranted, provided that this entire notice is included in all copies of any software which is or includes acopy or modification of this software and in all copies of the supporting documentation for such software.THIS SOFTWARE IS BEING PROVIDED "AS IS", WITHOUT ANY EXPRESS OR IMPLIEDWARRANTY. IN PARTICULAR, NEITHER THE AUTHOR NOR AT&T MAKES ANYREPRESENTATION OR WARRANTY OF ANY KIND CONCERNING THE MERCHANTABILITY OFTHIS SOFTWARE OR ITS FITNESS FOR ANY PARTICULAR PURPOSE.-----------The author of this software is David M. Gay.Copyright (c) 1998-2001 by Lucent TechnologiesAll Rights ReservedPermission to use, copy, modify, and distribute this software and its documentation for any purpose andwithout fee is hereby granted, provided that the above copyright notice appear in all copies and that boththat the copyright notice and this permission notice and warranty disclaimer appear in supportingdocumentation, and that the name of Lucent or any of its entities not be used in advertising or publicitypertaining to distribution of the software without specific, written prior permission.LUCENT DISCLAIMS ALL WARRANTIES WITH REGARD TO THIS SOFTWARE, INCLUDING ALLIMPLIED WARRANTIES OF MERCHANTABILITY AND FITNESS. IN NO EVENT SHALL LUCENT OR
202

ANY OF ITS ENTITIES BE LIABLE FOR ANY SPECIAL, INDIRECT OR CONSEQUENTIAL DAMAGESOR ANY DAMAGES WHATSOEVER RESULTING FROM LOSS OF USE, DATA OR PROFITS,WHETHER IN AN ACTION OF CONTRACT, NEGLIGENCE OR OTHER TORTIOUS ACTION,ARISING OUT OF OR IN CONNECTION WITH THE USE OR PERFORMANCE OF THIS SOFTWARE.(4) Advanced Micro DevicesCopyright 1989, 1990 Advanced Micro Devices, Inc.This software is the property of Advanced Micro Devices, Inc (AMD) which specifically grants the userthe right to modify, use and distribute this software provided this notice is not removed or altered. Allother rights are reserved by AMD.AMD MAKES NO WARRANTY OF ANY KIND, EXPRESS OR IMPLIED, WITH REGARD TO THISSOFTWARE. IN NO EVENT SHALL AMD BE LIABLE FOR INCIDENTAL OR CONSEQUENTIALDAMAGES IN CONNECTION WITH OR ARISING FROM THE FURNISHING, PERFORMANCE, ORUSE OF THIS SOFTWARE.So that all may benefit from your experience, please report any problems or suggestions about thissoftware to the 29K Technical Support Center at 800-29-29-AMD (800-292-9263) in the USA, or 0800-89-1131 in the UK, or 0031-11-1129 in Japan, toll free. The direct dial number is 512-462-4118.Advanced Micro Devices, Inc.29K Support ProductsMail Stop 5735900 E. Ben White Blvd.Austin, TX 78741800-292-9263(5) C.W. SandmannCopyright (C) 1993 C.W. SandmannThis file may be freely distributed as long as the author's name remains.(6) Eric Backus(C) Copyright 1992 Eric BackusThis software may be used freely so long as this copyright notice is left intact. There is no warrantee onthis software.(7) Sun MicrosystemsCopyright (C) 1993 by Sun Microsystems, Inc. All rights reserved.
203

Developed at SunPro, a Sun Microsystems, Inc. business. Permission to use, copy, modify, anddistribute this software is freely granted, provided that this notice is preserved.(8) Hewlett Packard(c) Copyright 1986 HEWLETT-PACKARD COMPANYTo anyone who acknowledges that this file is provided "AS IS" without any express or implied warranty:permission to use, copy, modify, and distribute this file for any purpose is hereby granted without fee,provided that the above copyright notice and this notice appears in all copies, and that the name ofHewlett-Packard Company not be used in advertising or publicity pertaining to distribution of thesoftware without specific, written prior permission. Hewlett-Packard Company makes no representationsabout the suitability of this software for any purpose.(9) Hans-Peter NilssonCopyright (C) 2001 Hans-Peter NilssonPermission to use, copy, modify, and distribute this software is freely granted, provided that the abovecopyright notice, this notice and the following disclaimer are preserved with no changes.THIS SOFTWARE IS PROVIDED "AS IS" AND WITHOUT ANY EXPRESS OR IMPLIEDWARRANTIES, INCLUDING, WITHOUT LIMITATION, THE IMPLIED WARRANTIES OFMERCHANTABILITY AND FITNESS FOR A PARTICULAR PURPOSE.(11) Christopher G. DemetriouCopyright (c) 2001 Christopher G. DemetriouAll rights reserved.Redistribution and use in source and binary forms, with or without modification, are permitted providedthat the following conditions are met:1. Redistributions of source code must retain the above copyright notice, this list of conditions and thefollowing disclaimer.2. Redistributions in binary form must reproduce the above copyright notice, this list of conditions and thefollowing disclaimer in the documentation and/or other materials provided with the distribution.3. The name of the author may not be used to endorse or promote products derived from this softwarewithout specific prior written permission.THIS SOFTWARE IS PROVIDED BY THE AUTHOR "AS IS" AND ANY EXPRESS OR IMPLIEDWARRANTIES, INCLUDING, BUT NOT LIMITED TO, THE IMPLIED WARRANTIES OFMERCHANTABILITY AND FITNESS FOR A PARTICULAR PURPOSE ARE DISCLAIMED. IN NOEVENT SHALL THE AUTHOR BE LIABLE FOR ANY DIRECT, INDIRECT, INCIDENTAL, SPECIAL,EXEMPLARY, OR CONSEQUENTIAL DAMAGES (INCLUDING, BUT NOT LIMITED TO,PROCUREMENT OF SUBSTITUTE GOODS OR SERVICES; LOSS OF USE, DATA, OR PROFITS;
204

OR BUSINESS INTERRUPTION) HOWEVER CAUSED AND ON ANY THEORY OF LIABILITY,WHETHER IN CONTRACT, STRICT LIABILITY, OR TORT (INCLUDING NEGLIGENCE OROTHERWISE) ARISING IN ANY WAY OUT OF THE USE OF THIS SOFTWARE, EVEN IF ADVISEDOF THE POSSIBILITY OF SUCH DAMAGE.(12) SuperH, Inc.Copyright 2002 SuperH, Inc. All rights reservedThis software is the property of SuperH, Inc (SuperH) which specifically grants the user the right tomodify, use and distribute this software provided this notice is not removed or altered. All other rights arereserved by SuperH.SUPERH MAKES NO WARRANTY OF ANY KIND, EXPRESS OR IMPLIED, WITH REGARD TO THISSOFTWARE. IN NO EVENT SHALL SUPERH BE LIABLE FOR INDIRECT, SPECIAL, INCIDENTAL ORCONSEQUENTIAL DAMAGES IN CONNECTION WITH OR ARISING FROM THE FURNISHING,PERFORMANCE, OR USE OF THIS SOFTWARE.So that all may benefit from your experience, please report any problems or suggestions about thissoftware to the SuperH Support Center via e-mail at [email protected], Inc.405 River Oaks ParkwaySan JoseCA 95134USA(13) Royal Institute of TechnologyCopyright (c) 1999 Kungliga Tekniska Hökolan (Royal Institute of Technology, Stockholm, Sweden).All rights reserved.Redistribution and use in source and binary forms, with or without modification, are permitted providedthat the following conditions are met:1. Redistributions of source code must retain the above copyright notice, this list of conditions and thefollowing disclaimer.2. Redistributions in binary form must reproduce the above copyright notice, this list of conditions and thefollowing disclaimer in the documentation and/or other materials provided with the distribution.3. Neither the name of KTH nor the names of its contributors may be used to endorse or promoteproducts derived from this software without specific prior written permission.
205
THIS SOFTWARE IS PROVIDED BY KTH AND ITS CONTRIBUTORS "AS IS" AND ANY EXPRESSOR IMPLIED WARRANTIES, INCLUDING, BUT NOT LIMITED TO, THE IMPLIED WARRANTIES OFMERCHANTABILITY AND FITNESS FOR A PARTICULAR PURPOSE ARE DISCLAIMED. IN NOEVENT SHALL KTH OR ITS CONTRIBUTORS BE LIABLE FOR ANY DIRECT, INDIRECT,INCIDENTAL, SPECIAL, EXEMPLARY, OR CONSEQUENTIAL DAMAGES (INCLUDING, BUT NOTLIMITED TO, PROCUREMENT OF SUBSTITUTE GOODS OR SERVICES; LOSS OF USE, DATA, ORPROFITS; OR BUSINESS INTERRUPTION) HOWEVER CAUSED AND ON ANY THEORY OFLIABILITY, WHETHER IN CONTRACT, STRICT LIABILITY, OR TORT (INCLUDING NEGLIGENCE OROTHERWISE) ARISING IN ANY WAY OUT OF THE USE OF THIS SOFTWARE, EVEN IF ADVISEDOF THE POSSIBILITY OF SUCH DAMAGE.(14) Alexey ZelkinCopyright (c) 2000, 2001 Alexey Zelkin <[email protected]>All rights reserved.Redistribution and use in source and binary forms, with or without modification, are permitted providedthat the following conditions are met:1. Redistributions of source code must retain the above copyright notice, this list of conditions and thefollowing disclaimer.2. Redistributions in binary form must reproduce the above copyright notice, this list of conditions and thefollowing disclaimer in the documentation and/or other materials provided with the distribution.THIS SOFTWARE IS PROVIDED BY THE AUTHOR AND CONTRIBUTORS "AS IS" AND ANYEXPRESS OR IMPLIED WARRANTIES, INCLUDING, BUT NOT LIMITED TO, THE IMPLIEDWARRANTIES OF MERCHANTABILITY AND FITNESS FOR A PARTICULAR PURPOSE AREDISCLAIMED. IN NO EVENT SHALL THE AUTHOR OR CONTRIBUTORS BE LIABLE FOR ANYDIRECT, INDIRECT, INCIDENTAL, SPECIAL, EXEMPLARY, OR CONSEQUENTIAL DAMAGES(INCLUDING, BUT NOT LIMITED TO, PROCUREMENT OF SUBSTITUTE GOODS OR SERVICES;LOSS OF USE, DATA, OR PROFITS; OR BUSINESS INTERRUPTION) HOWEVER CAUSED AND ONANY THEORY OF LIABILITY, WHETHER IN CONTRACT, STRICT LIABILITY, OR TORT (INCLUDINGNEGLIGENCE OR OTHERWISE) ARISING IN ANY WAY OUT OF THE USE OF THIS SOFTWARE,EVEN IF ADVISED OF THE POSSIBILITY OF SUCH DAMAGE.(15) Andrey A. ChernovCopyright (C) 1997 by Andrey A. Chernov, Moscow, Russia.All rights reserved.Redistribution and use in source and binary forms, with or without modification, are permitted providedthat the following conditions are met:
206

1. Redistributions of source code must retain the above copyright notice, this list of conditions and thefollowing disclaimer.2. Redistributions in binary form must reproduce the above copyright notice, this list of conditions and thefollowing disclaimer in the documentation and/or other materials provided with the distribution.THIS SOFTWARE IS PROVIDED BY THE AUTHOR "AS IS" AND ANY EXPRESS OR IMPLIEDWARRANTIES, INCLUDING, BUT NOT LIMITED TO, THE IMPLIED WARRANTIES OFMERCHANTABILITY AND FITNESS FOR A PARTICULAR PURPOSE ARE DISCLAIMED. IN NOEVENT SHALL THE REGENTS OR CONTRIBUTORS BE LIABLE FOR ANY DIRECT, INDIRECT,INCIDENTAL, SPECIAL, EXEMPLARY, OR CONSEQUENTIAL DAMAGES (INCLUDING, BUT NOTLIMITED TO, PROCUREMENT OF SUBSTITUTE GOODS OR SERVICES; LOSS OF USE, DATA, ORPROFITS; OR BUSINESS INTERRUPTION) HOWEVER CAUSED AND ON ANY THEORY OFLIABILITY, WHETHER IN CONTRACT, STRICT LIABILITY, OR TORT (INCLUDING NEGLIGENCE OROTHERWISE) ARISING IN ANY WAY OUT OF THE USE OF THIS SOFTWARE, EVEN IF ADVISEDOF THE POSSIBILITY OF SUCH DAMAGE.(16) FreeBSDCopyright (c) 1997-2002 FreeBSD Project.All rights reserved.Redistribution and use in source and binary forms, with or without modification, are permitted providedthat the following conditions are met:1. Redistributions of source code must retain the above copyright notice, this list of conditions and thefollowing disclaimer.2. Redistributions in binary form must reproduce the above copyright notice, this list of conditions and thefollowing disclaimer in the documentation and/or other materials provided with the distribution.THIS SOFTWARE IS PROVIDED BY THE AUTHOR AND CONTRIBUTORS "AS IS" AND ANYEXPRESS OR IMPLIED WARRANTIES, INCLUDING, BUT NOT LIMITED TO, THE IMPLIEDWARRANTIES OF MERCHANTABILITY AND FITNESS FOR A PARTICULAR PURPOSE AREDISCLAIMED. IN NO EVENT SHALL THE AUTHOR OR CONTRIBUTORS BE LIABLE FOR ANYDIRECT, INDIRECT, INCIDENTAL, SPECIAL, EXEMPLARY, OR CONSEQUENTIAL DAMAGES(INCLUDING, BUT NOT LIMITED TO, PROCUREMENT OF SUBSTITUTE GOODS OR SERVICES;LOSS OF USE, DATA, OR PROFITS; OR BUSINESS INTERRUPTION) HOWEVER CAUSED AND ONANY THEORY OF LIABILITY, WHETHER IN CONTRACT, STRICT LIABILITY, OR TORT (INCLUDINGNEGLIGENCE OR OTHERWISE) ARISING IN ANY WAY OUT OF THE USE OF THIS SOFTWARE,EVEN IF ADVISED OF THE POSSIBILITY OF SUCH DAMAGE.(17) S. L. MoshierAuthor: S. L. Moshier.
207

Copyright (c) 1984,2000 S.L. MoshierPermission to use, copy, modify, and distribute this software for any purpose without fee is herebygranted, provided that this entire notice is included in all copies of any software which is or includes acopy or modification of this software and in all copies of the supporting documentation for such software.THIS SOFTWARE IS BEING PROVIDED "AS IS", WITHOUT ANY EXPRESS OR IMPLIEDWARRANTY. IN PARTICULAR, THE AUTHOR MAKES NO REPRESENTATION OR WARRANTY OFANY KIND CONCERNING THE MERCHANTABILITY OF THIS SOFTWARE OR ITS FITNESS FORANY PARTICULAR PURPOSE.(18) Citrus ProjectCopyright (c)1999 Citrus Project,All rights reserved.Redistribution and use in source and binary forms, with or without modification, are permitted providedthat the following conditions are met:1. Redistributions of source code must retain the above copyright notice, this list of conditions and thefollowing disclaimer.2. Redistributions in binary form must reproduce the above copyright notice, this list of conditions and thefollowing disclaimer in the documentation and/or other materials provided with the distribution.THIS SOFTWARE IS PROVIDED BY THE AUTHOR AND CONTRIBUTORS "AS IS" AND ANYEXPRESS OR IMPLIED WARRANTIES, INCLUDING, BUT NOT LIMITED TO, THE IMPLIEDWARRANTIES OF MERCHANTABILITY AND FITNESS FOR A PARTICULAR PURPOSE AREDISCLAIMED. IN NO EVENT SHALL THE AUTHOR OR CONTRIBUTORS BE LIABLE FOR ANYDIRECT, INDIRECT, INCIDENTAL, SPECIAL, EXEMPLARY, OR CONSEQUENTIAL DAMAGES(INCLUDING, BUT NOT LIMITED TO, PROCUREMENT OF SUBSTITUTE GOODS OR SERVICES;LOSS OF USE, DATA, OR PROFITS; OR BUSINESS INTERRUPTION) HOWEVER CAUSED AND ONANY THEORY OF LIABILITY, WHETHER IN CONTRACT, STRICT LIABILITY, OR TORT (INCLUDINGNEGLIGENCE OR OTHERWISE) ARISING IN ANY WAY OUT OF THE USE OF THIS SOFTWARE,EVEN IF ADVISED OF THE POSSIBILITY OF SUCH DAMAGE.(19) Todd C. MillerCopyright (c) 1998 Todd C. Miller <[email protected]>All rights reserved.Redistribution and use in source and binary forms, with or without modification, are permitted providedthat the following conditions are met:1. Redistributions of source code must retain the above copyright notice, this list of conditions and thefollowing disclaimer.
208

2. Redistributions in binary form must reproduce the above copyright notice, this list of conditions and thefollowing disclaimer in the documentation and/or other materials provided with the distribution.3. The name of the author may not be used to endorse or promote products derived from this softwarewithout specific prior written permission.THIS SOFTWARE IS PROVIDED "AS IS" AND ANY EXPRESS OR IMPLIED WARRANTIES,INCLUDING, BUT NOT LIMITED TO, THE IMPLIED WARRANTIES OF MERCHANTABILITY ANDFITNESS FOR A PARTICULAR PURPOSE ARE DISCLAIMED. IN NO EVENT SHALL THE AUTHORBE LIABLE FOR ANY DIRECT, INDIRECT, INCIDENTAL, SPECIAL, EXEMPLARY, ORCONSEQUENTIAL DAMAGES (INCLUDING, BUT NOT LIMITED TO, PROCUREMENT OFSUBSTITUTE GOODS OR SERVICES; LOSS OF USE, DATA, OR PROFITS; OR BUSINESSINTERRUPTION) HOWEVER CAUSED AND ON ANY THEORY OF LIABILITY, WHETHER INCONTRACT, STRICT LIABILITY, OR TORT (INCLUDING NEGLIGENCE OR OTHERWISE) ARISINGIN ANY WAY OUT OF THE USE OF THIS SOFTWARE, EVEN IF ADVISED OF THE POSSIBILITY OFSUCH DAMAGE.(20) DJ Delorie (i386)Copyright (C) 1991 DJ DelorieAll rights reserved.Redistribution and use in source and binary forms is permitted provided that the above copyright noticeand following paragraph are duplicated in all such forms.This file is distributed WITHOUT ANY WARRANTY; without even the implied warranty ofMERCHANTABILITY or FITNESS FOR A PARTICULAR PURPOSE.(23) Intel (i960)Copyright (c) 1993 Intel CorporationIntel hereby grants you permission to copy, modify, and distribute this software and its documentation.Intel grants this permission provided that the above copyright notice appears in all copies and that boththe copyright notice and this permission notice appear in supporting documentation. In addition, Intelgrants this permission provided that you prominently mark as "not part of the original" any modificationsmade to this software or documentation, and that the name of Intel Corporation not be used inadvertising or publicity pertaining to distribution of the software or the documentation without specific,written prior permission.Intel Corporation provides this AS IS, WITHOUT ANY WARRANTY, EXPRESS OR IMPLIED,INCLUDING, WITHOUT LIMITATION, ANY WARRANTY OF MERCHANTABILITY OR FITNESS FOR APARTICULAR PURPOSE. Intel makes no guarantee or representations regarding the use of, or theresults of the use of, the software and documentation in terms of correctness, accuracy, reliability,currentness, or otherwise; and you rely on the software, documentation and results solely at your ownrisk.
209

IN NO EVENT SHALL INTEL BE LIABLE FOR ANY LOSS OF USE, LOSS OF BUSINESS, LOSS OFPROFITS, INDIRECT, INCIDENTAL, SPECIAL OR CONSEQUENTIAL DAMAGES OF ANY KIND. INNO EVENT SHALL INTEL'S TOTAL LIABILITY EXCEED THE SUM PAID TO INTEL FOR THEPRODUCT LICENSED HEREUNDER.(26) Mike BarcroftCopyright (c) 2001 Mike Barcroft <[email protected]>All rights reserved.Redistribution and use in source and binary forms, with or without modification, are permitted providedthat the following conditions are met:1. Redistributions of source code must retain the above copyright notice, this list of conditions and thefollowing disclaimer.2. Redistributions in binary form must reproduce the above copyright notice, this list of conditions and thefollowing disclaimer in the documentation and/or other materials provided with the distribution.THIS SOFTWARE IS PROVIDED BY THE AUTHOR AND CONTRIBUTORS "AS IS" AND ANYEXPRESS OR IMPLIED WARRANTIES, INCLUDING, BUT NOT LIMITED TO, THE IMPLIEDWARRANTIES OF MERCHANTABILITY AND FITNESS FOR A PARTICULAR PURPOSE AREDISCLAIMED. IN NO EVENT SHALL THE AUTHOR OR CONTRIBUTORS BE LIABLE FOR ANYDIRECT, INDIRECT, INCIDENTAL, SPECIAL, EXEMPLARY, OR CONSEQUENTIAL DAMAGES(INCLUDING, BUT NOT LIMITED TO, PROCUREMENT OF SUBSTITUTE GOODS OR SERVICES;LOSS OF USE, DATA, OR PROFITS; OR BUSINESS INTERRUPTION) HOWEVER CAUSED AND ONANY THEORY OF LIABILITY, WHETHER IN CONTRACT, STRICT LIABILITY, OR TORT (INCLUDINGNEGLIGENCE OR OTHERWISE) ARISING IN ANY WAY OUT OF THE USE OF THIS SOFTWARE,EVEN IF ADVISED OF THE POSSIBILITY OF SUCH DAMAGE.(27) Konstantin Chuguev (--enable-newlib-iconv)Copyright (c) 1999, 2000Konstantin Chuguev. All rights reserved.Redistribution and use in source and binary forms, with or without modification, are permitted providedthat the following conditions are met:1. Redistributions of source code must retain the above copyright notice, this list of conditions and thefollowing disclaimer.2. Redistributions in binary form must reproduce the above copyright notice, this list of conditions and thefollowing disclaimer in the documentation and/or other materials provided with the distribution.THIS SOFTWARE IS PROVIDED BY THE AUTHOR AND CONTRIBUTORS "AS IS" AND ANYEXPRESS OR IMPLIED WARRANTIES, INCLUDING, BUT NOT LIMITED TO, THE IMPLIED
210

WARRANTIES OF MERCHANTABILITY AND FITNESS FOR A PARTICULAR PURPOSE AREDISCLAIMED. IN NO EVENT SHALL THE AUTHOR OR CONTRIBUTORS BE LIABLE FOR ANYDIRECT, INDIRECT, INCIDENTAL, SPECIAL, EXEMPLARY, OR CONSEQUENTIAL DAMAGES(INCLUDING, BUT NOT LIMITED TO, PROCUREMENT OF SUBSTITUTE GOODS OR SERVICES;LOSS OF USE, DATA, OR PROFITS; OR BUSINESS INTERRUPTION) HOWEVER CAUSED AND ONANY THEORY OF LIABILITY, WHETHER IN CONTRACT, STRICT LIABILITY, OR TORT (INCLUDINGNEGLIGENCE OR OTHERWISE) ARISING IN ANY WAY OUT OF THE USE OF THIS SOFTWARE,EVEN IF ADVISED OF THE POSSIBILITY OF SUCH DAMAGE.iconv (Charset Conversion Library) v2.0(28) Artem Bityuckiy (--enable-newlib-iconv)Copyright (c) 2003, Artem B. Bityuckiy, SoftMine Corporation. Rights transferred to Franklin ElectronicPublishers.Redistribution and use in source and binary forms, with or without modification, are permitted providedthat the following conditions are met:1. Redistributions of source code must retain the above copyright notice, this list of conditions and thefollowing disclaimer.2. Redistributions in binary form must reproduce the above copyright notice, this list of conditions and thefollowing disclaimer in the documentation and/or other materials provided with the distribution.THIS SOFTWARE IS PROVIDED BY THE AUTHOR AND CONTRIBUTORS "AS IS" AND ANYEXPRESS OR IMPLIED WARRANTIES, INCLUDING, BUT NOT LIMITED TO, THE IMPLIEDWARRANTIES OF MERCHANTABILITY AND FITNESS FOR A PARTICULAR PURPOSE AREDISCLAIMED. IN NO EVENT SHALL THE AUTHOR OR CONTRIBUTORS BE LIABLE FOR ANYDIRECT, INDIRECT, INCIDENTAL, SPECIAL, EXEMPLARY, OR CONSEQUENTIAL DAMAGES(INCLUDING, BUT NOT LIMITED TO, PROCUREMENT OF SUBSTITUTE GOODS OR SERVICES;LOSS OF USE, DATA, OR PROFITS; OR BUSINESS INTERRUPTION) HOWEVER CAUSED AND ONANY THEORY OF LIABILITY, WHETHER IN CONTRACT, STRICT LIABILITY, OR TORT (INCLUDINGNEGLIGENCE OR OTHERWISE) ARISING IN ANY WAY OUT OF THE USE OF THIS SOFTWARE,EVEN IF ADVISED OF THE POSSIBILITY OF SUCH DAMAGE.(30) - Alex Tatmanjants (targets using libc/posix)Copyright (c) 1995 Alex Tatmanjants <[email protected]>at Electronni Visti IA, Kiev, Ukraine.All rights reserved.Redistribution and use in source and binary forms, with or without modification, are permitted providedthat the following conditions are met:
211
1. Redistributions of source code must retain the above copyright notice, this list of conditions and thefollowing disclaimer.2. Redistributions in binary form must reproduce the above copyright notice, this list of conditions and thefollowing disclaimer in the documentation and/or other materials provided with the distribution.THIS SOFTWARE IS PROVIDED BY THE AUTHOR "AS IS" AND ANY EXPRESS OR IMPLIEDWARRANTIES, INCLUDING, BUT NOT LIMITED TO, THE IMPLIED WARRANTIES OFMERCHANTABILITY AND FITNESS FOR A PARTICULAR PURPOSE ARE DISCLAIMED. IN NOEVENT SHALL THE AUTHOR BE LIABLE FOR ANY DIRECT, INDIRECT, INCIDENTAL, SPECIAL,EXEMPLARY, OR CONSEQUENTIAL DAMAGES (INCLUDING, BUT NOT LIMITED TO,PROCUREMENT OF SUBSTITUTE GOODS OR SERVICES; LOSS OF USE, DATA, OR PROFITS;OR BUSINESS INTERRUPTION) HOWEVER CAUSED AND ON ANY THEORY OF LIABILITY,WHETHER IN CONTRACT, STRICT LIABILITY, OR TORT (INCLUDING NEGLIGENCE OROTHERWISE) ARISING IN ANY WAY OUT OF THE USE OF THIS SOFTWARE, EVEN IF ADVISEDOF THE POSSIBILITY OF SUCH DAMAGE.(31) - M. Warner Losh (targets using libc/posix)Copyright (c) 1998, M. Warner Losh <[email protected]>All rights reserved.Redistribution and use in source and binary forms, with or without modification, are permitted providedthat the following conditions are met:1. Redistributions of source code must retain the above copyright notice, this list of conditions and thefollowing disclaimer.2. Redistributions in binary form must reproduce the above copyright notice, this list of conditions and thefollowing disclaimer in the documentation and/or other materials provided with the distribution.THIS SOFTWARE IS PROVIDED BY THE AUTHOR AND CONTRIBUTORS "AS IS" AND ANYEXPRESS OR IMPLIED WARRANTIES, INCLUDING, BUT NOT LIMITED TO, THE IMPLIEDWARRANTIES OF MERCHANTABILITY AND FITNESS FOR A PARTICULAR PURPOSE AREDISCLAIMED. IN NO EVENT SHALL THE AUTHOR OR CONTRIBUTORS BE LIABLE FOR ANYDIRECT, INDIRECT, INCIDENTAL, SPECIAL, EXEMPLARY, OR CONSEQUENTIAL DAMAGES(INCLUDING, BUT NOT LIMITED TO, PROCUREMENT OF SUBSTITUTE GOODS OR SERVICES;LOSS OF USE, DATA, OR PROFITS; OR BUSINESS INTERRUPTION) HOWEVER CAUSED AND ONANY THEORY OF LIABILITY, WHETHER IN CONTRACT, STRICT LIABILITY, OR TORT (INCLUDINGNEGLIGENCE OR OTHERWISE) ARISING IN ANY WAY OUT OF THE USE OF THIS SOFTWARE,EVEN IF ADVISED OF THE POSSIBILITY OF SUCH DAMAGE.(32) - Andrey A. Chernov (targets using libc/posix)Copyright (C) 1996 by Andrey A. Chernov, Moscow, Russia.
212
All rights reserved.Redistribution and use in source and binary forms, with or without modification, are permitted providedthat the following conditions are met:1. Redistributions of source code must retain the above copyright notice, this list of conditions and thefollowing disclaimer.2. Redistributions in binary form must reproduce the above copyright notice, this list of conditions and thefollowing disclaimer in the documentation and/or other materials provided with the distribution.THIS SOFTWARE IS PROVIDED BY THE AUTHOR "AS IS" AND ANY EXPRESS OR IMPLIEDWARRANTIES, INCLUDING, BUT NOT LIMITED TO, THE IMPLIED WARRANTIES OFMERCHANTABILITY AND FITNESS FOR A PARTICULAR PURPOSE ARE DISCLAIMED. IN NOEVENT SHALL THE REGENTS OR CONTRIBUTORS BE LIABLE FOR ANY DIRECT, INDIRECT,INCIDENTAL, SPECIAL, EXEMPLARY, OR CONSEQUENTIAL DAMAGES (INCLUDING, BUT NOTLIMITED TO, PROCUREMENT OF SUBSTITUTE GOODS OR SERVICES; LOSS OF USE, DATA, ORPROFITS; OR BUSINESS INTERRUPTION) HOWEVER CAUSED AND ON ANY THEORY OFLIABILITY, WHETHER IN CONTRACT, STRICT LIABILITY, OR TORT (INCLUDING NEGLIGENCE OROTHERWISE) ARISING IN ANY WAY OUT OF THE USE OF THIS SOFTWARE, EVEN IF ADVISEDOF THE POSSIBILITY OF SUCH DAMAGE.(33) - Daniel Eischen (targets using libc/posix)Copyright (c) 2001 Daniel Eischen <[email protected]>.All rights reserved.Redistribution and use in source and binary forms, with or without modification, are permitted providedthat the following conditions are met:1. Redistributions of source code must retain the above copyright notice, this list of conditions and thefollowing disclaimer.2. Redistributions in binary form must reproduce the above copyright notice, this list of conditions and thefollowing disclaimer in the documentation and/or other materials provided with the distribution.THIS SOFTWARE IS PROVIDED BY THE AUTHOR AND CONTRIBUTORS "AS IS" AND ANYEXPRESS OR IMPLIED WARRANTIES, INCLUDING, BUT NOT LIMITED TO, THE IMPLIEDWARRANTIES OF MERCHANTABILITY AND FITNESS FOR A PARTICULAR PURPOSE AREDISCLAIMED. IN NO EVENT SHALL THE REGENTS OR CONTRIBUTORS BE LIABLE FOR ANYDIRECT, INDIRECT, INCIDENTAL, SPECIAL, EXEMPLARY, OR CONSEQUENTIAL DAMAGES(INCLUDING, BUT NOT LIMITED TO, PROCUREMENT OF SUBSTITUTE GOODS OR SERVICES;LOSS OF USE, DATA, OR PROFITS; OR BUSINESS INTERRUPTION) HOWEVER CAUSED AND ONANY THEORY OF LIABILITY, WHETHER IN CONTRACT, STRICT LIABILITY, OR TORT (INCLUDINGNEGLIGENCE OR OTHERWISE) ARISING IN ANY WAY OUT OF THE USE OF THIS SOFTWARE,EVEN IF ADVISED OF THE POSSIBILITY OF SUCH DAMAGE.
213
(35) - ARM Ltd (arm and thumb variant targets only)Copyright (c) 2009 ARM LtdAll rights reserved.Redistribution and use in source and binary forms, with or without modification, are permitted providedthat the following conditions are met:1. Redistributions of source code must retain the above copyright notice, this list of conditions and thefollowing disclaimer.2. Redistributions in binary form must reproduce the above copyright notice, this list of conditions and thefollowing disclaimer in the documentation and/or other materials provided with the distribution.3. The name of the company may not be used to endorse or promote products derived from this softwarewithout specific prior written permission.THIS SOFTWARE IS PROVIDED BY ARM LTD "AS IS" AND ANY EXPRESS OR IMPLIEDWARRANTIES, INCLUDING, BUT NOT LIMITED TO, THE IMPLIED WARRANTIES OFMERCHANTABILITY AND FITNESS FOR A PARTICULAR PURPOSE ARE DISCLAIMED. IN NOEVENT SHALL ARM LTD BE LIABLE FOR ANY DIRECT, INDIRECT, INCIDENTAL, SPECIAL,EXEMPLARY, OR CONSEQUENTIAL DAMAGES (INCLUDING, BUT NOT LIMITED TO,PROCUREMENT OF SUBSTITUTE GOODS OR SERVICES; LOSS OF USE, DATA, OR PROFITS;OR BUSINESS INTERRUPTION) HOWEVER CAUSED AND ON ANY THEORY OF LIABILITY,WHETHER IN CONTRACT, STRICT LIABILITY, OR TORT (INCLUDING NEGLIGENCE OROTHERWISE) ARISING IN ANY WAY OUT OF THE USE OF THIS SOFTWARE, EVEN IF ADVISEDOF THE POSSIBILITY OF SUCH DAMAGE.(36) - CodeSourcery, Inc.Copyright (c) 2009 CodeSourcery, Inc.All rights reserved.Redistribution and use in source and binary forms, with or without modification, are permitted providedthat the following conditions are met:* Redistributions of source code must retain the above copyright notice, this list of conditions and thefollowing disclaimer.* Redistributions in binary form must reproduce the above copyright notice, this list of conditions and thefollowing disclaimer in the documentation and/or other materials provided with the distribution.* Neither the name of CodeSourcery nor the names of its contributors may be used to endorse orpromote products derived from this software without specific prior written permission.THIS SOFTWARE IS PROVIDED BY CODESOURCERY, INC. "AS IS" AND ANY EXPRESS ORIMPLIED WARRANTIES, INCLUDING, BUT NOT LIMITED TO, THE IMPLIED WARRANTIES OF
214
MERCHANTABILITY AND FITNESS FOR A PARTICULAR PURPOSE AREDISCLAIMED. IN NOEVENT SHALL CODESOURCERY BE LIABLE FOR ANY DIRECT, INDIRECT, INCIDENTAL,SPECIAL, EXEMPLARY, OR CONSEQUENTIAL DAMAGES (INCLUDING, BUT NOT LIMITED TO,PROCUREMENT OF SUBSTITUTE GOODS OR SERVICES; LOSS OF USE, DATA, OR PROFITS;OR BUSINESS INTERRUPTION) HOWEVER CAUSED AND ON ANY THEORY OF LIABILITY,WHETHER IN CONTRACT, STRICT LIABILITY, OR TORT (INCLUDING NEGLIGENCE OROTHERWISE) ARISING IN ANY WAY OUT OF THE USE OF THIS SOFTWARE, EVEN IF ADVISEDOF THE POSSIBILITY OF SUCH DAMAGE.(37) MIPS Technologies, Inc/** Copyright (c) 2009 MIPS Technologies, Inc.** All rights reserved.** Redistribution and use in source and binary forms, with or without modification, are permitted providedthat the following conditions are met:** * Redistributions of source code must retain the above copyright notice, this list of conditions and thefollowing disclaimer.* * Redistributions in binary form must reproduce the above copyright notice, this list of conditions andthe following disclaimer in the documentation and/or other materials provided with the distribution.* * Neither the name of MIPS Technologies Inc. nor the names of its contributors may be used toendorse or promote products derived from this software without specific prior written permission.* THIS SOFTWARE IS PROVIDED BY THE COPYRIGHT HOLDERS AND CONTRIBUTORS "AS IS"AND ANY EXPRESS OR IMPLIED WARRANTIES, INCLUDING, BUT NOT LIMITED TO, THE IMPLIEDWARRANTIES OF MERCHANTABILITY AND FITNESS FOR A PARTICULAR PURPOSE AREDISCLAIMED. IN NO EVENT SHALL THE COPYRIGHT OWNER OR CONTRIBUTORS BE LIABLEFOR ANY DIRECT, INDIRECT, INCIDENTAL, SPECIAL, EXEMPLARY, OR CONSEQUENTIALDAMAGES (INCLUDING, BUT NOT LIMITED TO, PROCUREMENT OF SUBSTITUTE GOODS ORSERVICES; LOSS OF USE, DATA, OR PROFITS; OR BUSINESS INTERRUPTION) HOWEVERCAUSED AND ON ANY THEORY OF LIABILITY, WHETHER IN CONTRACT, STRICT LIABILITY, ORTORT (INCLUDING NEGLIGENCE OR OTHERWISE) ARISING IN ANY WAY OUT OF THE USE OFTHIS SOFTWARE, EVEN IF ADVISED OF THE POSSIBILITY OF SUCH DAMAGE./*
215
MIT LicenseThis projector product includes the open source software program which applies the terms andconditions provided by owner of the copyright to the "MIT License".The "MIT License" are WITHOUT ANY WARRANTY; without even the implied warranty ofMERCHANTABILITY AND FITNESS FOR A PARTICULAR PURPOSE.List of MIT License programsjquery-1.7.2.min.jsjquery-ui-1.8.20.custom.zipjquery.ui.touch-punch.jsjquery.upload-1.0.2.min.jsLicense terms of conditions of each program which are provided by owner of the copyright to the "MITLicense" are as follows.Permission is hereby granted, free of charge, to any person obtaining a copy of this software andassociated documentation files (the "Software"), to deal in the Software without restriction, includingwithout limitation the rights to use, copy, modify, merge, publish, distribute, sublicense, and/or sell copiesof the Software, and to permit persons to whom the Software is furnished to do so, subject to thefollowing conditions:The above copyright notice and this permission notice shall be included in all copies or substantialportions of the Software.THE SOFTWARE IS PROVIDED "AS IS", WITHOUT WARRANTY OF ANY KIND, EXPRESS ORIMPLIED, INCLUDING BUT NOT LIMITED TO THE WARRANTIES OF MERCHANTABILITY, FITNESSFOR A PARTICULAR PURPOSE AND NONINFRINGEMENT. IN NO EVENT SHALL THE AUTHORSOR COPYRIGHT HOLDERS BE LIABLE FOR ANY CLAIM, DAMAGES OR OTHER LIABILITY,WHETHER IN AN ACTION OF CONTRACT, TORT OR OTHERWISE, ARISING FROM, OUT OF OR INCONNECTION WITH THE SOFTWARE OR THE USE OR OTHER DEALINGS IN THE SOFTWARE.TOPPERS/JSPThis projector product includes the open source software program "TOPPERS/JSP" which applies theterms and conditions provided by owner of the copyright to the "TOPPERS/JSP". The "TOPPERS/JSP"are WITHOUT ANY WARRANTY; without even the implied warranty of MERCHANTABILITY ANDFITNESS FOR A PARTICULAR PURPOSE.List of TOPPERS/JSP programsjsp-1.4.3
216

License terms of conditions of each program which are provided by owner of the copyright to the"TOPPERS/JSP" are as follows.TOPPERS/JSP KernelToyohashi Open Platform for Embedded Real-Time Systems/Just Standard Profile KernelCopyright (C) 2000-2003 by Embedded and Real-Time Systems Laboratory Toyohashi Univ. ofTechnology, JAPANCopyright (C) 2004 by Embedded and Real-Time Systems LaboratoryGraduate School of Information Science, Nagoya Univ., JAPAN.The above copyright holder, limited to cases in which one satisfies conditions (1) ~ (4) below, or theconditions described in Version 2 of the GNU Public License officially announced by the Free SoftwareFoundation, consents to the use, reproduction, alteration, and redistribution (hereafter called utilization)of this software (this software includes alterations, likewise below) without compensation.(1) When this software is utilized in the form of source code, the above copyright declaration, theseconditions of utilization, and the following stipulation of no guarantee shall be included in unchangedform inside the source code.(2) When this software is redistributed in a form in which it can be used in the development of othersoftware, library form, etc., the above copyright display, these terms of utilization, and the followingstipulation of no guarantee shall be inserted in documentation accompanying redistribution (user'smanual, etc.).(3) When this software is redistributed in a form in which it cannot be used in the development of othersoftware, embedded in devices, etc., one of the following conditions shall be satisfied.(a) The above copyright display, these terms of utilization, and the following stipulation of no guaranteeshall be inserted in documentation accompanying redistribution (user's manual, etc.).(b) The TOPPERS Project shall be notified owing to a method in which the form of distribution is decidedotherwise.(4) The above copyright holder and the TOPPERS Project shall be exempt from responsibility forwhatever damages occur either directly or indirectly through the utilization of this software.This software is something that is provided with no guarantee. The above copyright holder and theTOPPERS Project make no guarantee whatsoever in regard to this software, including the possibility ofits application. In addition, the above copyright holder and the TOPPERS Project shall also not bearresponsibility for whatever damages occur either directly or indirectly through the utilization of thissoftware.
217

Note: The TOPPERS License has been revised several times; what is shown above is the latest versionthat is to be applied to software made public hereafter.TINETThis projector product includes the open source software program "TINET" which applies the terms andconditions provided by owner of the copyright to the "TINET". The "TINET" are WITHOUT ANYWARRANTY; without even the implied warranty of MERCHANTABILITY AND FITNESS FOR APARTICULAR PURPOSE.List of TINET programstinet-1.4.4License terms of conditions of each program which are provided by owner of the copyright to the"TINET" are as follows.(1) FreeBSDCopyright (c) 1980, 1986, 1993The Regents of the University of California. All rights reserved.Redistribution and use in source and binary forms, with or without modification, are permitted providedthat the following conditions are met:1. Redistributions of source code must retain the above copyright notice, this list of conditions and thefollowing disclaimer.2. Redistributions in binary form must reproduce the above copyright notice, this list of conditions and thefollowing disclaimer in the documentation and/or other materials provided with the distribution.3. All advertising materials mentioning features or use of this software must display the followingacknowledgement:This product includes software developed by the University of California, Berkeley and its contributors.4. Neither the name of the University nor the names of its contributors may be used to endorse orpromote products derived from this software without specific prior written permission.THIS SOFTWARE IS PROVIDED BY THE REGENTS AND CONTRIBUTORS "AS IS" AND ANYEXPRESS OR IMPLIED WARRANTIES, INCLUDING, BUT NOT LIMITED TO, THE IMPLIEDWARRANTIES OF MERCHANTABILITY AND FITNESS FOR A PARTICULAR PURPOSE AREDISCLAIMED. IN NO EVENT SHALL THE REGENTS OR CONTRIBUTORS BE LIABLE FOR ANYDIRECT, INDIRECT, INCIDENTAL, SPECIAL, EXEMPLARY, OR CONSEQUENTIAL DAMAGES(INCLUDING, BUT NOT LIMITED TO, PROCUREMENT OF SUBSTITUTE GOODS OR SERVICES;LOSS OF USE, DATA, OR PROFITS; OR BUSINESS INTERRUPTION) HOWEVER CAUSED AND ONANY THEORY OF LIABILITY, WHETHER IN CONTRACT, STRICT LIABILITY, OR TORT (INCLUDING
218

NEGLIGENCE OR OTHERWISE) ARISING IN ANY WAY OUT OF THE USE OF THIS SOFTWARE,EVEN IF ADVISED OF THE POSSIBILITY OF SUCH DAMAGE.(6) TINET and TOPPERSTINET (TCP/IP Protocol Stack)Copyright (C) 2001-2006 by Dep. of Computer Science and Engineering Tomakomai National College ofTechnology, JAPANTINET (TCP/IP Protocol Stack)Copyright (C) 2001-2006 by Dep. of Computer Science and Engineering Tomakomai National College ofTechnology, JAPANThe above copyright holder, limited to cases in which one satisfies conditions (1) ~ (4) below, or theconditions described in Version 2 of the GNU Public License officially announced by the Free SoftwareFoundation, consents to the use, reproduction, alteration, and redistribution (hereafter called utilization)of this software (this software includes alterations, likewise below) without compensation.(1) When this software is utilized in the form of source code, the above copyright declaration, theseconditions of utilization, and the following stipulation of no guarantee shall be included in unchangedform inside the source code.(2) When this software is redistributed in a form in which it can be used in the development of othersoftware, library form, etc., the above copyright display, these terms of utilization, and the followingstipulation of no guarantee shall be inserted in documentation accompanying redistribution (user'smanual, etc.).(3) When this software is redistributed in a form in which it cannot be used in the development of othersoftware, embedded in devices, etc., following conditions shall be satisfied.(a) The above copyright display, these terms of utilization, and the following stipulation of no guaranteeshall be inserted in documentation accompanying redistribution (user's manual, etc.).(4) The above copyright holder and the TOPPERS Project shall be exempt from responsibility forwhatever damages occur either directly or indirectly through the utilization of this software.This software is something that is provided with no guarantee. The above copyright holder and theTOPPERS Project make no guarantee whatsoever in regard to this software, including the possibility ofits application. In addition, the above copyright holder and the TOPPERS Project shall also not bearresponsibility for whatever damages occur either directly or indirectly through the utilization of thissoftware.Tomakomai National College of Technology, JAPANThe above copyright holder, limited to cases in which one satisfies conditions (1) ~ (4) below, or theconditions described in Version 2 of the GNU Public License officially announced by the Free Software
219

Foundation, consents to the use, reproduction, alteration, and redistribution (hereafter called utilization)of this software (this software includes alterations, likewise below) without compensation.(1) When this software is utilized in the form of source code, the above copyright declaration, theseconditions of utilization, and the following stipulation of no guarantee shall be included in unchangedform inside the source code.(2) When this software is redistributed in a form in which it can be used in the development of othersoftware, library form, etc., the above copyright display, these terms of utilization, and the followingstipulation of no guarantee shall be inserted in documentation accompanying redistribution (user'smanual, etc.).(3) When this software is redistributed in a form in which it cannot be used in the development of othersoftware, embedded in devices, etc., following conditions shall be satisfied.(a) The above copyright display, these terms of utilization, and the following stipulation of no guaranteeshall be inserted in documentation accompanying redistribution (user's manual, etc.).(4) The above copyright holder and the TOPPERS Project shall be exempt from responsibility forwhatever damages occur either directly or indirectly through the utilization of this software.This software is something that is provided with no guarantee. The above copyright holder and theTOPPERS Project make no guarantee whatsoever in regard to this software, including the possibility ofits application. In addition, the above copyright holder and the TOPPERS Project shall also not bearresponsibility for whatever damages occur either directly or indirectly through the utilization of thissoftware.Parent topic: Notices
Copyright NoticeAll rights reserved. No part of this publication may be reproduced, stored in a retrieval system, ortransmitted in any form or by any means, electronic, mechanical, photocopying, recording, or otherwise,without the prior written permission of Seiko Epson Corporation. The information contained herein isdesigned only for use with this Epson product. Epson is not responsible for any use of this information asapplied to other products.Neither Seiko Epson Corporation nor its affiliates shall be liable to the purchaser of this product or thirdparties for damages, losses, costs, or expenses incurred by purchaser or third parties as a result of:accident, misuse, or abuse of this product or unauthorized modifications, repairs, or alterations to thisproduct, or (excluding the U.S.) failure to strictly comply with Seiko Epson Corporation's operating andmaintenance instructions.Seiko Epson Corporation shall not be liable for any damages or problems arising from the use of anyoptions or any consumable products other than those designated as Original Epson Products or EpsonApproved Products by Seiko Epson Corporation.
220

This information is subject to change without notice.A Note Concerning Responsible Use of Copyrighted MaterialsCopyright AttributionParent topic: Notices
A Note Concerning Responsible Use of Copyrighted MaterialsEpson encourages each user to be responsible and respectful of the copyright laws when using anyEpson product. While some countries' laws permit limited copying or reuse of copyrighted material incertain circumstances, those circumstances may not be as broad as some people assume. Contact yourlegal advisor for any questions regarding copyright law.Parent topic: Copyright Notice
Copyright Attribution© 2014 Epson America, Inc.12/14CPD-41704Parent topic: Copyright Notice
221