manual for the cadvent revit plug-in - lindab manauals... · 2019-09-26 · the cadvent revit...
TRANSCRIPT

lindab | we simplify construction
lindab | we simplify construction
lindab | we simplify construction
lindab | we simplify construction
lindab | we simplify construction
lindab | we simplify construction
lindab | we simplify construction
lindab | we simplify construction
lindab | we simplify construction
lindab | we simplify construction
lindab | we simplify construction
lindab | we simplify construction
lindab | we simplify construction
lindab | we simplify construction
lindab | we simplify construction
lindab | we simplify construction
lindab | we simplify construction
lindab | we simplify construction
lindab | we simplify construction
lindab | we simplify construction
lindab | we simplify construction
Manual for the CADvent Revit plug-in
1 General
This document describes the functionality and the needed prerequisites for the CADvent Revit plug-in. The CADvent Revit plug-in is intended to help users to work with Lindab products and functions known from CADvent and the CADvent MagiCAD plug-in, in their daily business and work more efficiently with Revit.
2 Installation and setup
The plug-in in the described version 1.19 supports Revit versions 2017 to 2019. You need to download the CADvent Revit plug-in installation file from:
http://itsolution.lindab.com/downloads/cadventplugin/latest/cadventplugin.exe
Double click on the EXE file to start the installation. Please note that you need to have local administrator rights to start the installation. If the User Account Control for Windows is activated on your computer, please click the “Yes” button to proceed with the installation if invoked.
The installation dialog will guide you through the installation process:
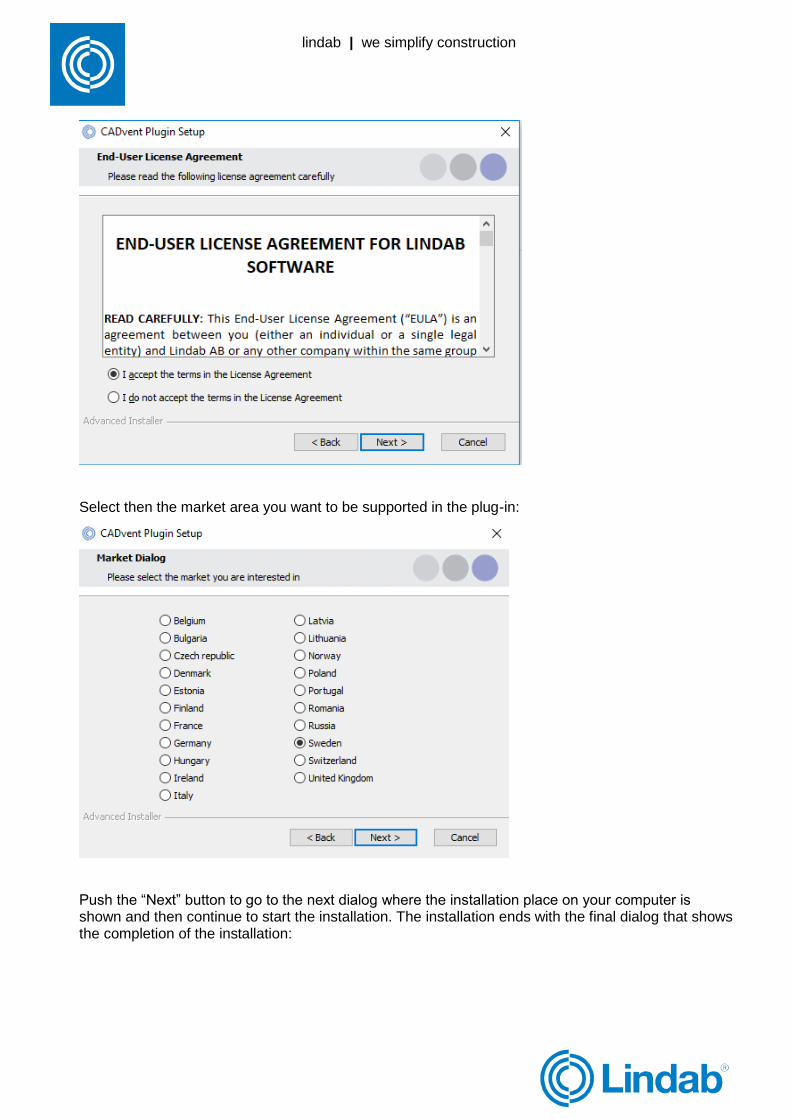
Please read the license agreement carefully. You must accept the agreement to continue with the installation:
lindab | we simplify construction
lindab | we simplify construction
lindab | we simplify construction
lindab | we simplify construction
lindab | we simplify construction
lindab | we simplify construction
lindab | we simplify construction
lindab | we simplify construction
lindab | we simplify construction
lindab | we simplify construction
lindab | we simplify construction
lindab | we simplify construction
lindab | we simplify construction
lindab | we simplify construction
lindab | we simplify construction
lindab | we simplify construction
lindab | we simplify construction
lindab | we simplify construction
lindab | we simplify construction
lindab | we simplify construction
lindab | we simplify construction
Select then the market area you want to be supported in the plug-in:
Push the “Next” button to go to the next dialog where the installation place on your computer is shown and then continue to start the installation. The installation ends with the final dialog that shows the completion of the installation:
lindab | we simplify construction
lindab | we simplify construction
lindab | we simplify construction
lindab | we simplify construction
lindab | we simplify construction
lindab | we simplify construction
lindab | we simplify construction
lindab | we simplify construction
lindab | we simplify construction
lindab | we simplify construction
lindab | we simplify construction
lindab | we simplify construction
lindab | we simplify construction
lindab | we simplify construction
lindab | we simplify construction
lindab | we simplify construction
lindab | we simplify construction
lindab | we simplify construction
lindab | we simplify construction
lindab | we simplify construction
lindab | we simplify construction
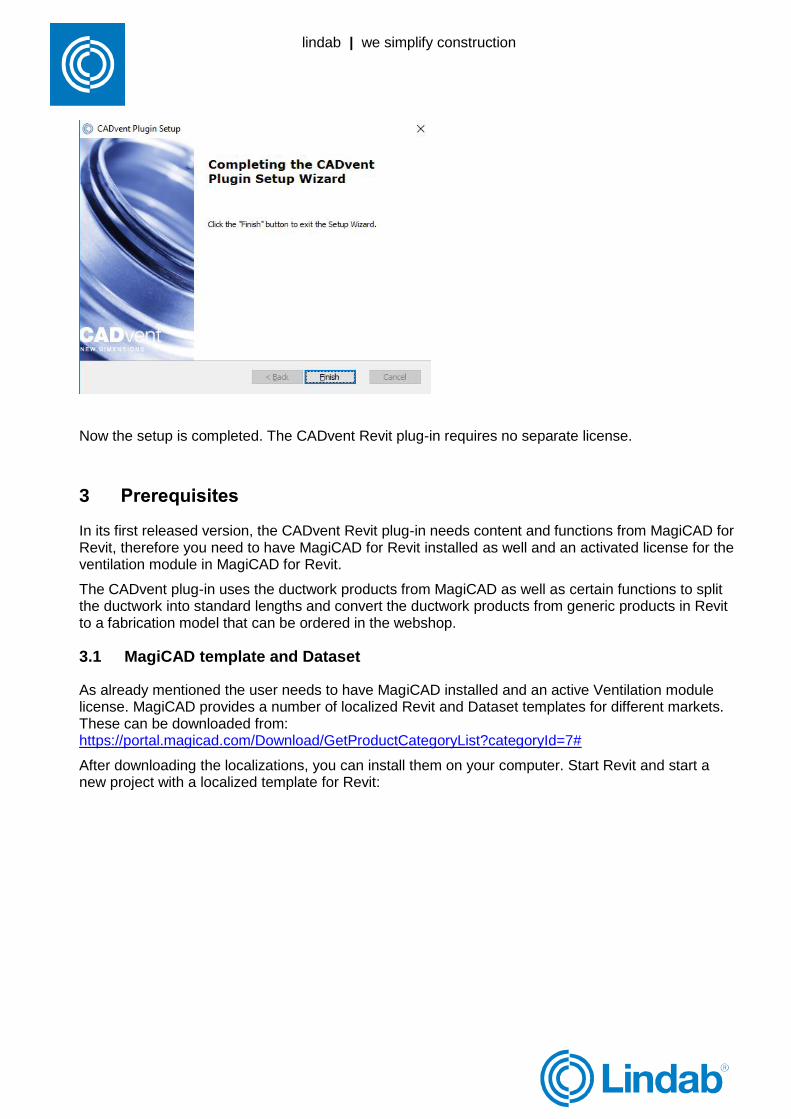
Now the setup is completed. The CADvent Revit plug-in requires no separate license.
3 Prerequisites
In its first released version, the CADvent Revit plug-in needs content and functions from MagiCAD for Revit, therefore you need to have MagiCAD for Revit installed as well and an activated license for the ventilation module in MagiCAD for Revit.
The CADvent plug-in uses the ductwork products from MagiCAD as well as certain functions to split the ductwork into standard lengths and convert the ductwork products from generic products in Revit to a fabrication model that can be ordered in the webshop.
3.1 MagiCAD template and Dataset
As already mentioned the user needs to have MagiCAD installed and an active Ventilation module license. MagiCAD provides a number of localized Revit and Dataset templates for different markets. These can be downloaded from: https://portal.magicad.com/Download/GetProductCategoryList?categoryId=7#
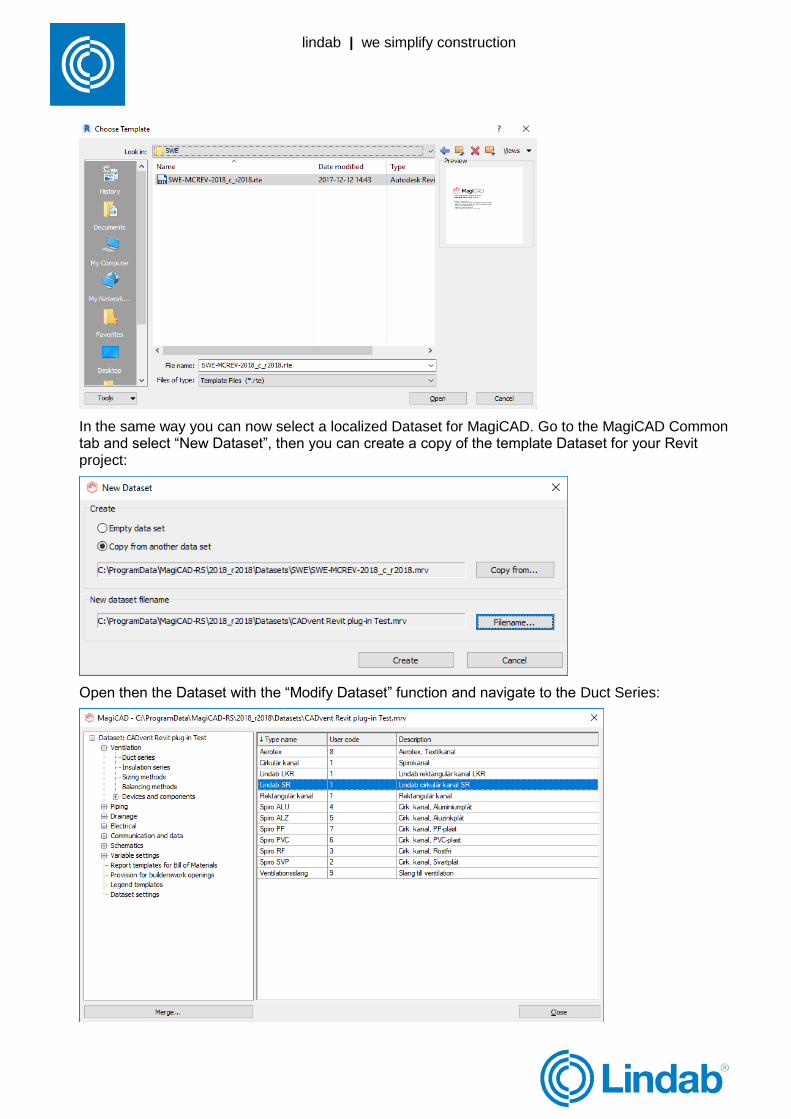
After downloading the localizations, you can install them on your computer. Start Revit and start a new project with a localized template for Revit:
lindab | we simplify construction
lindab | we simplify construction
lindab | we simplify construction
lindab | we simplify construction
lindab | we simplify construction
lindab | we simplify construction
lindab | we simplify construction
lindab | we simplify construction
lindab | we simplify construction
lindab | we simplify construction
lindab | we simplify construction
lindab | we simplify construction
lindab | we simplify construction
lindab | we simplify construction
lindab | we simplify construction
lindab | we simplify construction
lindab | we simplify construction
lindab | we simplify construction
lindab | we simplify construction
lindab | we simplify construction
lindab | we simplify construction
In the same way you can now select a localized Dataset for MagiCAD. Go to the MagiCAD Common tab and select “New Dataset”, then you can create a copy of the template Dataset for your Revit project:
Open then the Dataset with the “Modify Dataset” function and navigate to the Duct Series:
lindab | we simplify construction
lindab | we simplify construction
lindab | we simplify construction
lindab | we simplify construction
lindab | we simplify construction
lindab | we simplify construction
lindab | we simplify construction
lindab | we simplify construction
lindab | we simplify construction
lindab | we simplify construction
lindab | we simplify construction
lindab | we simplify construction
lindab | we simplify construction
lindab | we simplify construction
lindab | we simplify construction
lindab | we simplify construction
lindab | we simplify construction
lindab | we simplify construction
lindab | we simplify construction
lindab | we simplify construction
lindab | we simplify construction
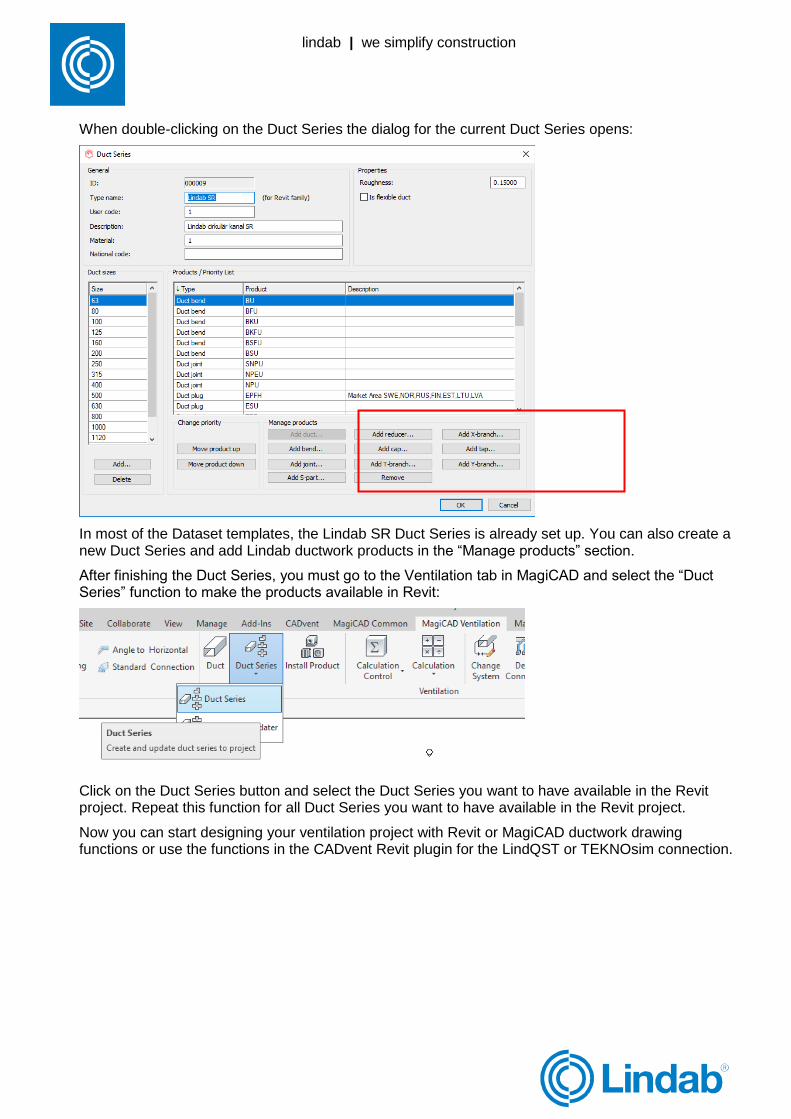
When double-clicking on the Duct Series the dialog for the current Duct Series opens:
In most of the Dataset templates, the Lindab SR Duct Series is already set up. You can also create a new Duct Series and add Lindab ductwork products in the “Manage products” section.
After finishing the Duct Series, you must go to the Ventilation tab in MagiCAD and select the “Duct Series” function to make the products available in Revit:
Click on the Duct Series button and select the Duct Series you want to have available in the Revit project. Repeat this function for all Duct Series you want to have available in the Revit project.
Now you can start designing your ventilation project with Revit or MagiCAD ductwork drawing functions or use the functions in the CADvent Revit plugin for the LindQST or TEKNOsim connection.

lindab | we simplify construction
lindab | we simplify construction
lindab | we simplify construction
lindab | we simplify construction
lindab | we simplify construction
lindab | we simplify construction
lindab | we simplify construction
lindab | we simplify construction
lindab | we simplify construction
lindab | we simplify construction
lindab | we simplify construction
lindab | we simplify construction
lindab | we simplify construction
lindab | we simplify construction
lindab | we simplify construction
lindab | we simplify construction
lindab | we simplify construction
lindab | we simplify construction
lindab | we simplify construction
lindab | we simplify construction
lindab | we simplify construction
4 CADvent Revit plugin functions
CADvent has its own tab in Revit where all the functions are available:
4.1 lindQST Terminal
This function opens LindQST and the user can select or calculate air diffusors and chilled beams and transfer the products into the Revit project. The function is similar as in the CADvent MagiCAD plugin for AutoCAD.
The product will then be added to the MagiCAD Dataset in Revit:
lindab | we simplify construction
lindab | we simplify construction
lindab | we simplify construction
lindab | we simplify construction
lindab | we simplify construction
lindab | we simplify construction
lindab | we simplify construction
lindab | we simplify construction
lindab | we simplify construction
lindab | we simplify construction
lindab | we simplify construction
lindab | we simplify construction
lindab | we simplify construction
lindab | we simplify construction
lindab | we simplify construction
lindab | we simplify construction
lindab | we simplify construction
lindab | we simplify construction
lindab | we simplify construction
lindab | we simplify construction
lindab | we simplify construction
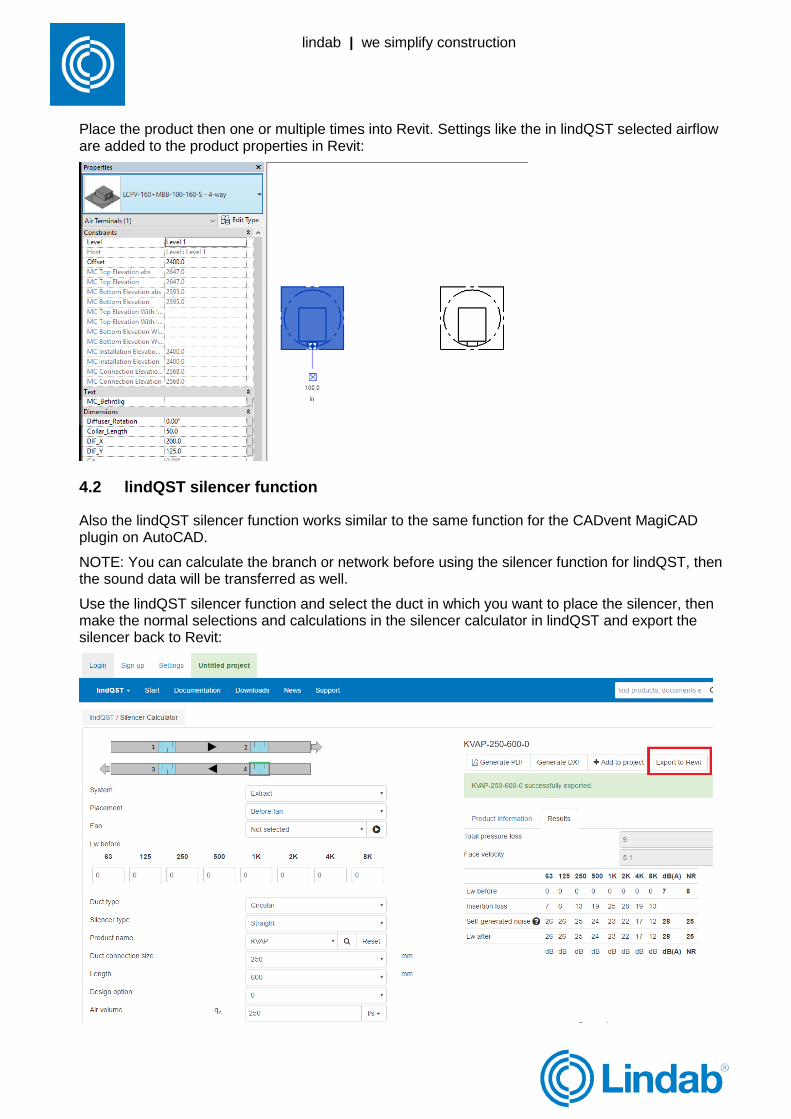
Place the product then one or multiple times into Revit. Settings like the in lindQST selected airflow are added to the product properties in Revit:
4.2 lindQST silencer function
Also the lindQST silencer function works similar to the same function for the CADvent MagiCAD plugin on AutoCAD.
NOTE: You can calculate the branch or network before using the silencer function for lindQST, then the sound data will be transferred as well.
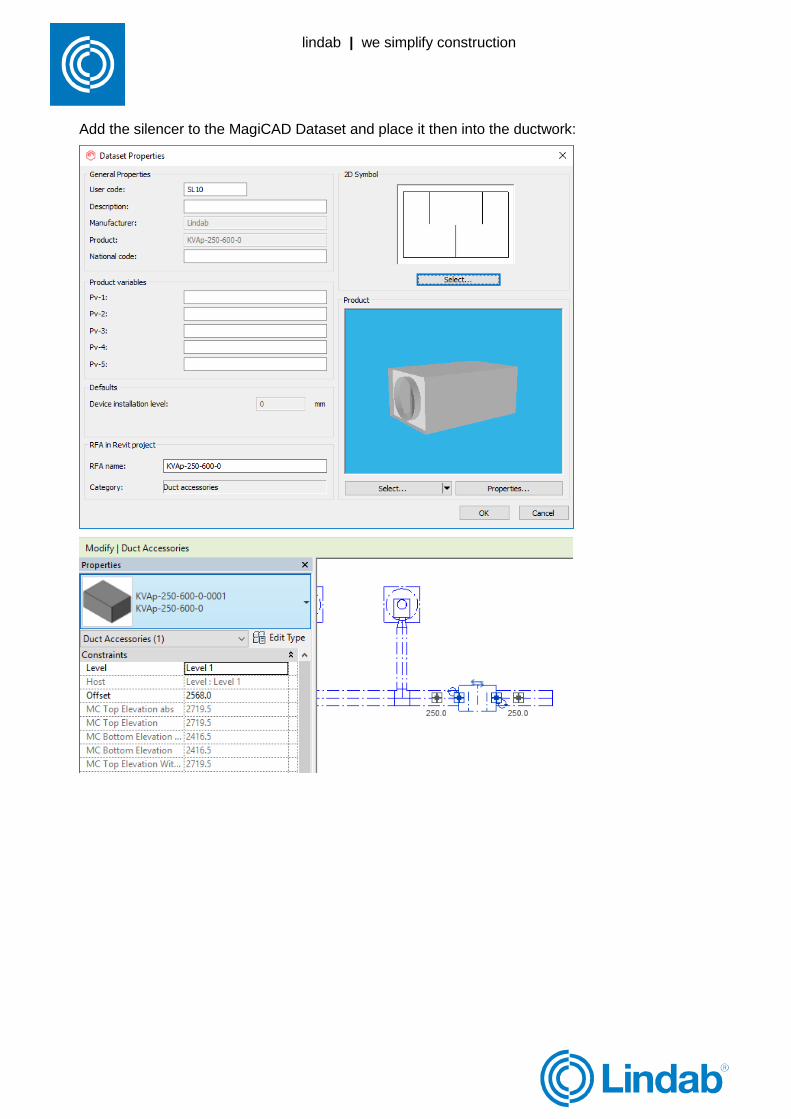
Use the lindQST silencer function and select the duct in which you want to place the silencer, then make the normal selections and calculations in the silencer calculator in lindQST and export the silencer back to Revit:
lindab | we simplify construction
lindab | we simplify construction
lindab | we simplify construction
lindab | we simplify construction
lindab | we simplify construction
lindab | we simplify construction
lindab | we simplify construction
lindab | we simplify construction
lindab | we simplify construction
lindab | we simplify construction
lindab | we simplify construction
lindab | we simplify construction
lindab | we simplify construction
lindab | we simplify construction
lindab | we simplify construction
lindab | we simplify construction
lindab | we simplify construction
lindab | we simplify construction
lindab | we simplify construction
lindab | we simplify construction
lindab | we simplify construction
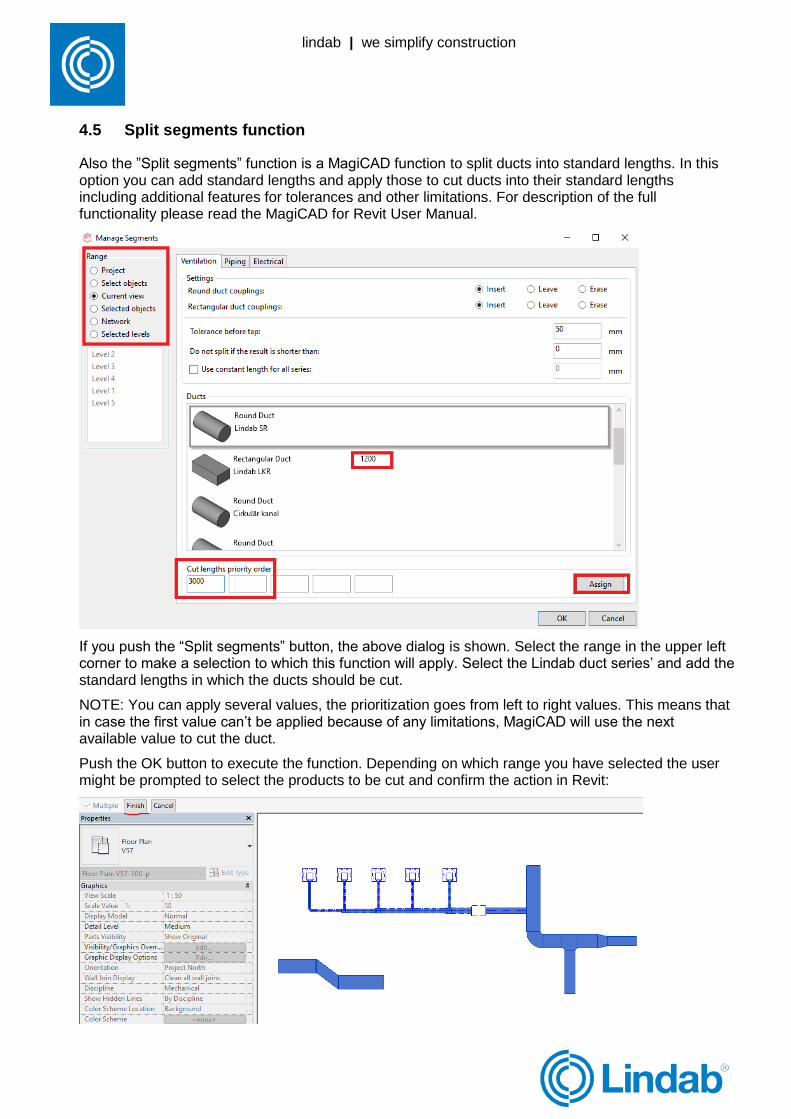
Add the silencer to the MagiCAD Dataset and place it then into the ductwork:

lindab | we simplify construction
lindab | we simplify construction
lindab | we simplify construction
lindab | we simplify construction
lindab | we simplify construction
lindab | we simplify construction
lindab | we simplify construction
lindab | we simplify construction
lindab | we simplify construction
lindab | we simplify construction
lindab | we simplify construction
lindab | we simplify construction
lindab | we simplify construction
lindab | we simplify construction
lindab | we simplify construction
lindab | we simplify construction
lindab | we simplify construction
lindab | we simplify construction
lindab | we simplify construction
lindab | we simplify construction
lindab | we simplify construction
4.3 Offset function
This function creates a rectangular Offset from two bends and a short piece of duct. Just select one the two bends and press the “Bends to Offset” button:
This will convert the 3 products into 1 Offset:
4.4 Production Model Updater
The Production Model Updater is a MagiCAD function that updates the generic Revit product models to “real” products”. In Revit, the products are not designed according to the Lindab Production Model as in CADvent. Therefore MagiCAD has a function to use the same product details on Revit as on MagiCAD for AutoCAD. This function makes that you can design the system as it can be built as well as prepare the ductwork products to be ordered in the Lindab Webshop. Examples are different types of products (pressed bends to segmented bends) or male/female connection types like a reducer with female coupling which directly connected to a T-piece.
Any product that is edited in Revit AFTER using the Production Model Updater will be reversed into the generic model, therefore this function should be last to use before making a bill of materials, use the CADvent Model Checker or the webshop upload.
When using this function you have to select a branch or a complete network. We recommend that you run the Production Model Updater function regularly to check smaller ready made parts of the ductwork. This to secure to not get a lot of errors so that Revit’s built in functions reverse the changes MagiCAD does with the project when exchanging products or update product measures.

lindab | we simplify construction
lindab | we simplify construction
lindab | we simplify construction
lindab | we simplify construction
lindab | we simplify construction
lindab | we simplify construction
lindab | we simplify construction
lindab | we simplify construction
lindab | we simplify construction
lindab | we simplify construction
lindab | we simplify construction
lindab | we simplify construction
lindab | we simplify construction
lindab | we simplify construction
lindab | we simplify construction
lindab | we simplify construction
lindab | we simplify construction
lindab | we simplify construction
lindab | we simplify construction
lindab | we simplify construction
lindab | we simplify construction
When using the function you can see in the “Product” column, which is the product that will be used or configured in the Revit project. If a product is not available or can’t be configured, the dialog will show warnings.
After pushing the “OK – Update to model” button, MagiCAD will adjust the products in the Revit project according to the Lindab Production Model.
lindab | we simplify construction
lindab | we simplify construction
lindab | we simplify construction
lindab | we simplify construction
lindab | we simplify construction
lindab | we simplify construction
lindab | we simplify construction
lindab | we simplify construction
lindab | we simplify construction
lindab | we simplify construction
lindab | we simplify construction
lindab | we simplify construction
lindab | we simplify construction
lindab | we simplify construction
lindab | we simplify construction
lindab | we simplify construction
lindab | we simplify construction
lindab | we simplify construction
lindab | we simplify construction
lindab | we simplify construction
lindab | we simplify construction
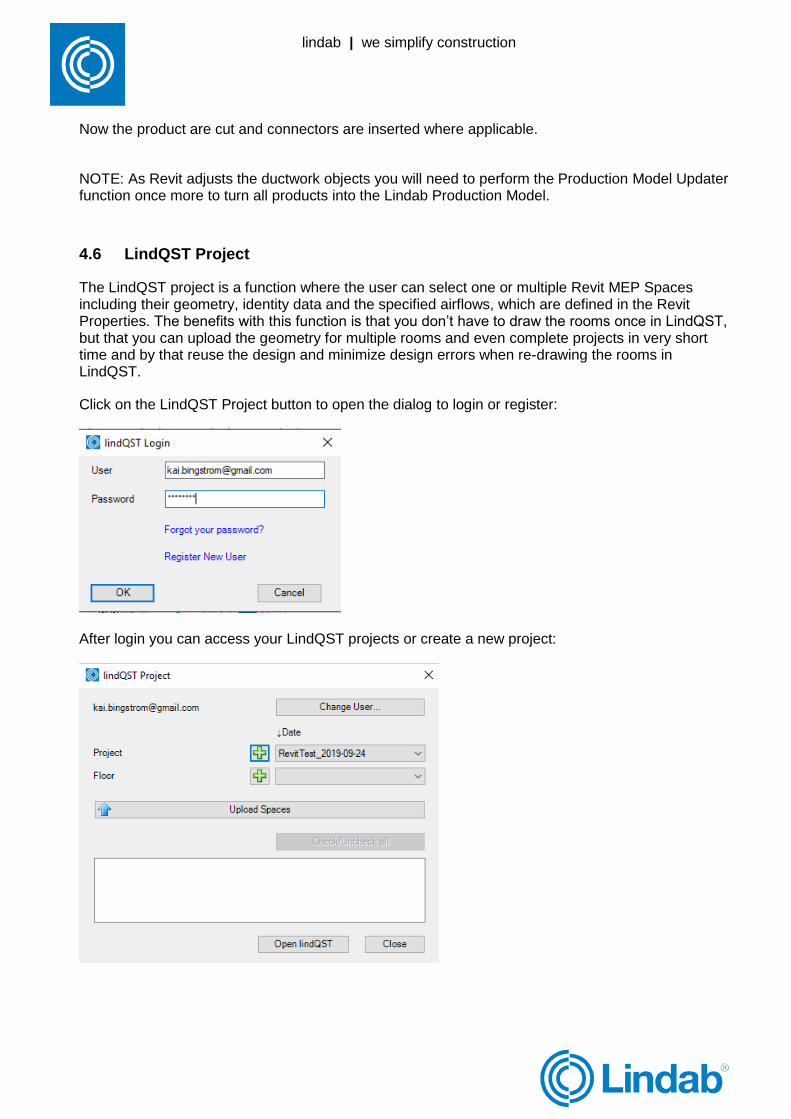
4.5 Split segments function
Also the ”Split segments” function is a MagiCAD function to split ducts into standard lengths. In this option you can add standard lengths and apply those to cut ducts into their standard lengths including additional features for tolerances and other limitations. For description of the full functionality please read the MagiCAD for Revit User Manual.
If you push the “Split segments” button, the above dialog is shown. Select the range in the upper left corner to make a selection to which this function will apply. Select the Lindab duct series’ and add the standard lengths in which the ducts should be cut.
NOTE: You can apply several values, the prioritization goes from left to right values. This means that in case the first value can’t be applied because of any limitations, MagiCAD will use the next available value to cut the duct.
Push the OK button to execute the function. Depending on which range you have selected the user might be prompted to select the products to be cut and confirm the action in Revit:
lindab | we simplify construction
lindab | we simplify construction
lindab | we simplify construction
lindab | we simplify construction
lindab | we simplify construction
lindab | we simplify construction
lindab | we simplify construction
lindab | we simplify construction
lindab | we simplify construction
lindab | we simplify construction
lindab | we simplify construction
lindab | we simplify construction
lindab | we simplify construction
lindab | we simplify construction
lindab | we simplify construction
lindab | we simplify construction
lindab | we simplify construction
lindab | we simplify construction
lindab | we simplify construction
lindab | we simplify construction
lindab | we simplify construction
Now the product are cut and connectors are inserted where applicable.
NOTE: As Revit adjusts the ductwork objects you will need to perform the Production Model Updater function once more to turn all products into the Lindab Production Model.
4.6 LindQST Project
The LindQST project is a function where the user can select one or multiple Revit MEP Spaces including their geometry, identity data and the specified airflows, which are defined in the Revit Properties. The benefits with this function is that you don’t have to draw the rooms once in LindQST, but that you can upload the geometry for multiple rooms and even complete projects in very short time and by that reuse the design and minimize design errors when re-drawing the rooms in LindQST.
Click on the LindQST Project button to open the dialog to login or register:
After login you can access your LindQST projects or create a new project:
lindab | we simplify construction
lindab | we simplify construction
lindab | we simplify construction
lindab | we simplify construction
lindab | we simplify construction
lindab | we simplify construction
lindab | we simplify construction
lindab | we simplify construction
lindab | we simplify construction
lindab | we simplify construction
lindab | we simplify construction
lindab | we simplify construction
lindab | we simplify construction
lindab | we simplify construction
lindab | we simplify construction
lindab | we simplify construction
lindab | we simplify construction
lindab | we simplify construction
lindab | we simplify construction
lindab | we simplify construction
lindab | we simplify construction
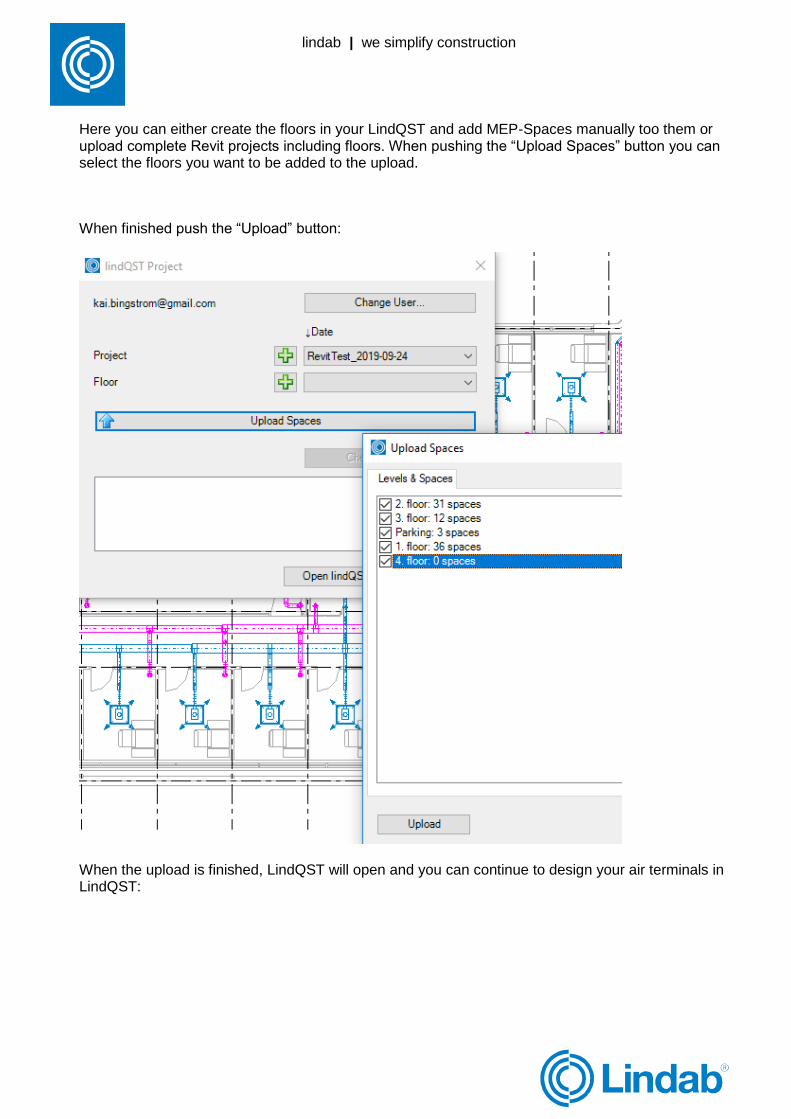
Here you can either create the floors in your LindQST and add MEP-Spaces manually too them or upload complete Revit projects including floors. When pushing the “Upload Spaces” button you can select the floors you want to be added to the upload.
When finished push the “Upload” button:
When the upload is finished, LindQST will open and you can continue to design your air terminals in LindQST:

lindab | we simplify construction
lindab | we simplify construction
lindab | we simplify construction
lindab | we simplify construction
lindab | we simplify construction
lindab | we simplify construction
lindab | we simplify construction
lindab | we simplify construction
lindab | we simplify construction
lindab | we simplify construction
lindab | we simplify construction
lindab | we simplify construction
lindab | we simplify construction
lindab | we simplify construction
lindab | we simplify construction
lindab | we simplify construction
lindab | we simplify construction
lindab | we simplify construction
lindab | we simplify construction
lindab | we simplify construction
lindab | we simplify construction
Alternatively you can select MEP-Spaces for the upload manually f. ex. if you have to design just a part of the building or if you have type rooms that needs to be defined:
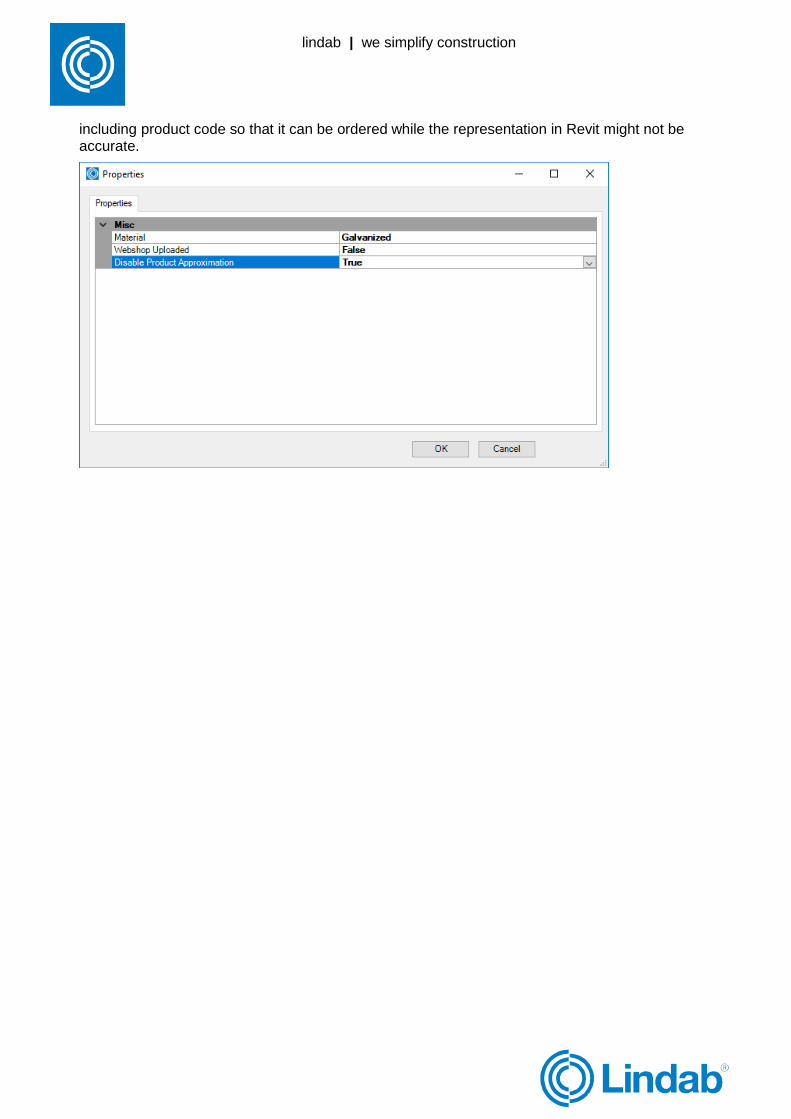
4.7 CADvent Properties
In the CADvent Properties the user can view and adjust settings for material, webshop upload and the Product Approximation. The approximation function interprets certain products if the Production Model can’t be applied. In that case the Revit object will be substituted by a real Lindab product,
lindab | we simplify construction
lindab | we simplify construction
lindab | we simplify construction
lindab | we simplify construction
lindab | we simplify construction
lindab | we simplify construction
lindab | we simplify construction
lindab | we simplify construction
lindab | we simplify construction
lindab | we simplify construction
lindab | we simplify construction
lindab | we simplify construction
lindab | we simplify construction
lindab | we simplify construction
lindab | we simplify construction
lindab | we simplify construction
lindab | we simplify construction
lindab | we simplify construction
lindab | we simplify construction
lindab | we simplify construction
lindab | we simplify construction
including product code so that it can be ordered while the representation in Revit might not be accurate.
lindab | we simplify construction
lindab | we simplify construction
lindab | we simplify construction
lindab | we simplify construction
lindab | we simplify construction
lindab | we simplify construction
lindab | we simplify construction
lindab | we simplify construction
lindab | we simplify construction
lindab | we simplify construction
lindab | we simplify construction
lindab | we simplify construction
lindab | we simplify construction
lindab | we simplify construction
lindab | we simplify construction
lindab | we simplify construction
lindab | we simplify construction
lindab | we simplify construction
lindab | we simplify construction
lindab | we simplify construction
lindab | we simplify construction
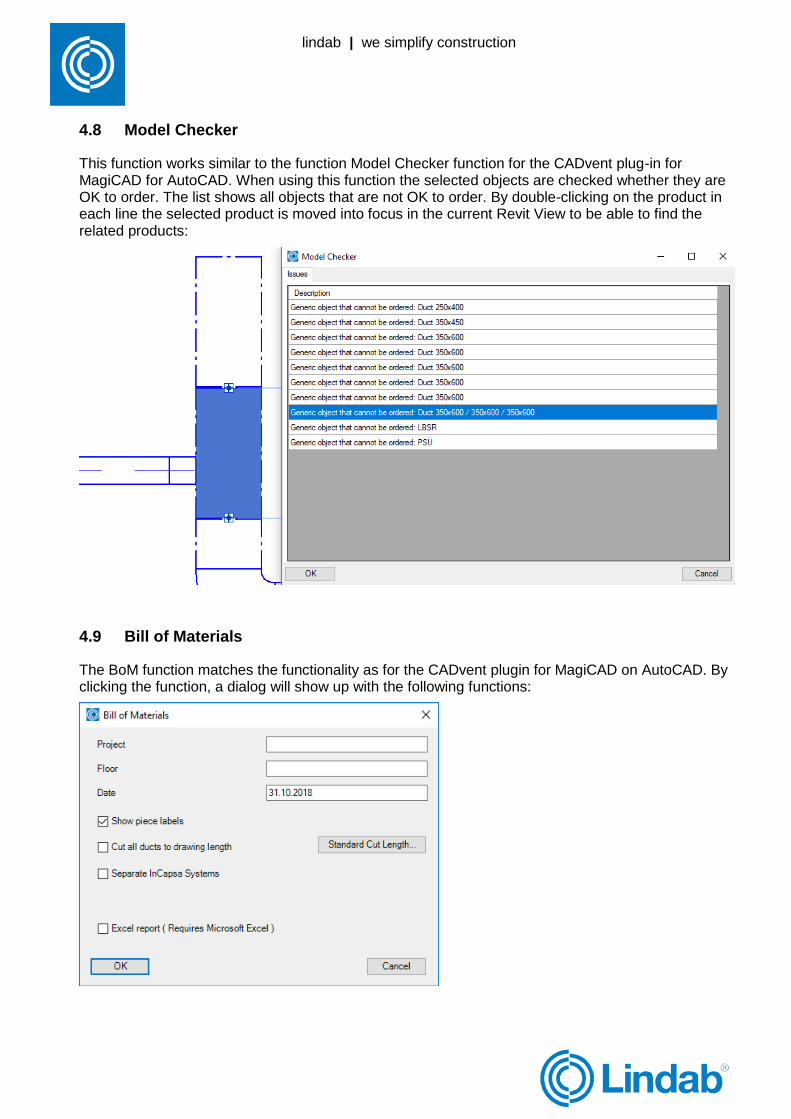
4.8 Model Checker
This function works similar to the function Model Checker function for the CADvent plug-in for MagiCAD for AutoCAD. When using this function the selected objects are checked whether they are OK to order. The list shows all objects that are not OK to order. By double-clicking on the product in each line the selected product is moved into focus in the current Revit View to be able to find the related products:
4.9 Bill of Materials
The BoM function matches the functionality as for the CADvent plugin for MagiCAD on AutoCAD. By clicking the function, a dialog will show up with the following functions:
lindab | we simplify construction
lindab | we simplify construction
lindab | we simplify construction
lindab | we simplify construction
lindab | we simplify construction
lindab | we simplify construction
lindab | we simplify construction
lindab | we simplify construction
lindab | we simplify construction
lindab | we simplify construction
lindab | we simplify construction
lindab | we simplify construction
lindab | we simplify construction
lindab | we simplify construction
lindab | we simplify construction
lindab | we simplify construction
lindab | we simplify construction
lindab | we simplify construction
lindab | we simplify construction
lindab | we simplify construction
lindab | we simplify construction
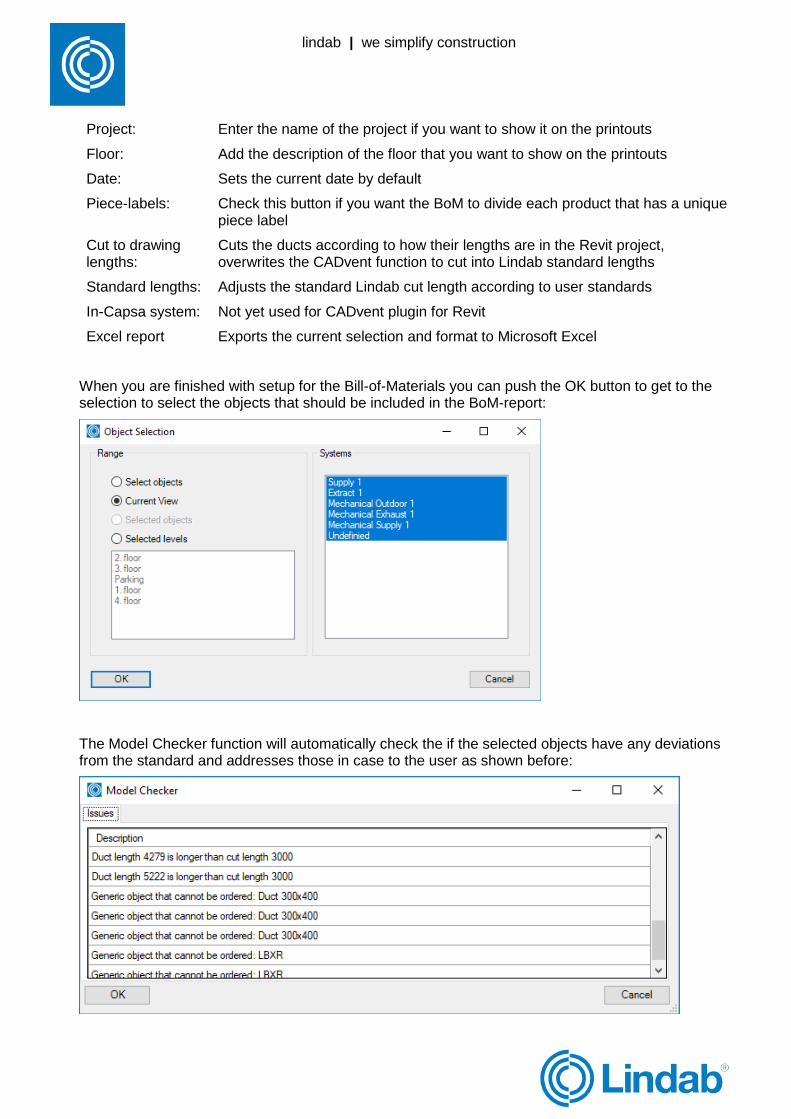
Project: Enter the name of the project if you want to show it on the printouts
Floor: Add the description of the floor that you want to show on the printouts
Date: Sets the current date by default
Piece-labels: Check this button if you want the BoM to divide each product that has a unique piece label
Cut to drawing lengths:
Cuts the ducts according to how their lengths are in the Revit project, overwrites the CADvent function to cut into Lindab standard lengths
Standard lengths: Adjusts the standard Lindab cut length according to user standards
In-Capsa system: Not yet used for CADvent plugin for Revit
Excel report Exports the current selection and format to Microsoft Excel
When you are finished with setup for the Bill-of-Materials you can push the OK button to get to the selection to select the objects that should be included in the BoM-report:
The Model Checker function will automatically check the if the selected objects have any deviations from the standard and addresses those in case to the user as shown before:
lindab | we simplify construction
lindab | we simplify construction
lindab | we simplify construction
lindab | we simplify construction
lindab | we simplify construction
lindab | we simplify construction
lindab | we simplify construction
lindab | we simplify construction
lindab | we simplify construction
lindab | we simplify construction
lindab | we simplify construction
lindab | we simplify construction
lindab | we simplify construction
lindab | we simplify construction
lindab | we simplify construction
lindab | we simplify construction
lindab | we simplify construction
lindab | we simplify construction
lindab | we simplify construction
lindab | we simplify construction
lindab | we simplify construction
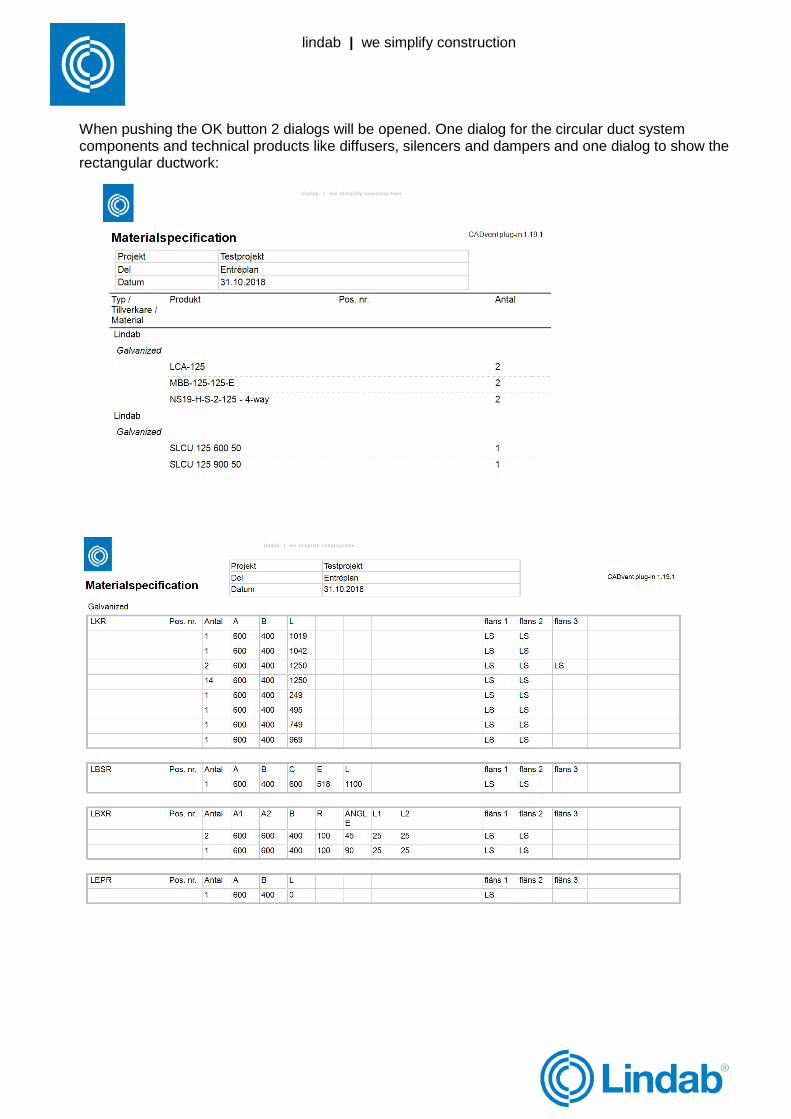
When pushing the OK button 2 dialogs will be opened. One dialog for the circular duct system components and technical products like diffusers, silencers and dampers and one dialog to show the rectangular ductwork:

lindab | we simplify construction
lindab | we simplify construction
lindab | we simplify construction
lindab | we simplify construction
lindab | we simplify construction
lindab | we simplify construction
lindab | we simplify construction
lindab | we simplify construction
lindab | we simplify construction
lindab | we simplify construction
lindab | we simplify construction
lindab | we simplify construction
lindab | we simplify construction
lindab | we simplify construction
lindab | we simplify construction
lindab | we simplify construction
lindab | we simplify construction
lindab | we simplify construction
lindab | we simplify construction
lindab | we simplify construction
lindab | we simplify construction
4.10 Webshop Upload
The webshop upload allows the user to collect and upload and order Lindab products to the Lindab webshop.
NOTE: The webshop is available in specific markets, for more information please contact your local representative.
When pushing the webshop button, the user is prompted to select the range of products to upload:
Just in the BoM function, the products to be uploaded will be checked for compatibility with the Model Checker:
In the next step the user will be shown whether there have already products been uploaded and will give alternatives as shown below to upload only the remaining products or to upload all products, including those that have already been uploaded once:

lindab | we simplify construction
lindab | we simplify construction
lindab | we simplify construction
lindab | we simplify construction
lindab | we simplify construction
lindab | we simplify construction
lindab | we simplify construction
lindab | we simplify construction
lindab | we simplify construction
lindab | we simplify construction
lindab | we simplify construction
lindab | we simplify construction
lindab | we simplify construction
lindab | we simplify construction
lindab | we simplify construction
lindab | we simplify construction
lindab | we simplify construction
lindab | we simplify construction
lindab | we simplify construction
lindab | we simplify construction
lindab | we simplify construction
After selecting which the upload function the actual connection to the webshop will be opened:
• Username: Enter your or your company’s user name for the Lindab webshop
• Password: Your or your company’s password for the Lindab webshop
• Connect: Connects to the Lindab webshop
• Customer: After connecting it shows the customer’s identity
• Project: Select a project in the webshop from the list or create a new project
• Sub project: Creates a new sub project in the webshop
After finishing the settings push the “Upload Products” button to execute the upload.
Push the open webshop button to open the Lindab webshop in your default web browser on your computer.
lindab | we simplify construction
lindab | we simplify construction
lindab | we simplify construction
lindab | we simplify construction
lindab | we simplify construction
lindab | we simplify construction
lindab | we simplify construction
lindab | we simplify construction
lindab | we simplify construction
lindab | we simplify construction
lindab | we simplify construction
lindab | we simplify construction
lindab | we simplify construction
lindab | we simplify construction
lindab | we simplify construction
lindab | we simplify construction
lindab | we simplify construction
lindab | we simplify construction
lindab | we simplify construction
lindab | we simplify construction
lindab | we simplify construction
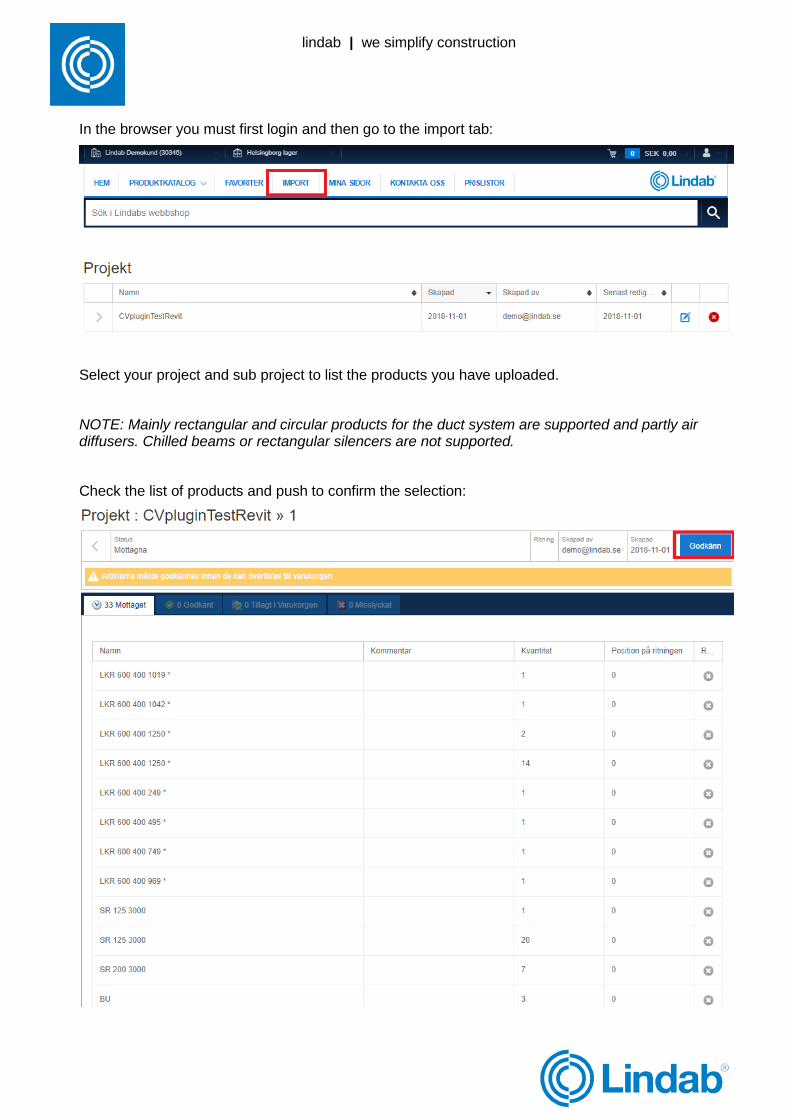
In the browser you must first login and then go to the import tab:
Select your project and sub project to list the products you have uploaded.
NOTE: Mainly rectangular and circular products for the duct system are supported and partly air diffusers. Chilled beams or rectangular silencers are not supported.
Check the list of products and push to confirm the selection:

lindab | we simplify construction
lindab | we simplify construction
lindab | we simplify construction
lindab | we simplify construction
lindab | we simplify construction
lindab | we simplify construction
lindab | we simplify construction
lindab | we simplify construction
lindab | we simplify construction
lindab | we simplify construction
lindab | we simplify construction
lindab | we simplify construction
lindab | we simplify construction
lindab | we simplify construction
lindab | we simplify construction
lindab | we simplify construction
lindab | we simplify construction
lindab | we simplify construction
lindab | we simplify construction
lindab | we simplify construction
lindab | we simplify construction
NOTE: The verification of the uploaded products might take a few minutes depending on number and type of products uploaded.
In the end you will get a report of the transactions:
Products which have not been accepted cam then be replaced or manually configured:
lindab | we simplify construction
lindab | we simplify construction
lindab | we simplify construction
lindab | we simplify construction
lindab | we simplify construction
lindab | we simplify construction
lindab | we simplify construction
lindab | we simplify construction
lindab | we simplify construction
lindab | we simplify construction
lindab | we simplify construction
lindab | we simplify construction
lindab | we simplify construction
lindab | we simplify construction
lindab | we simplify construction
lindab | we simplify construction
lindab | we simplify construction
lindab | we simplify construction
lindab | we simplify construction
lindab | we simplify construction
lindab | we simplify construction
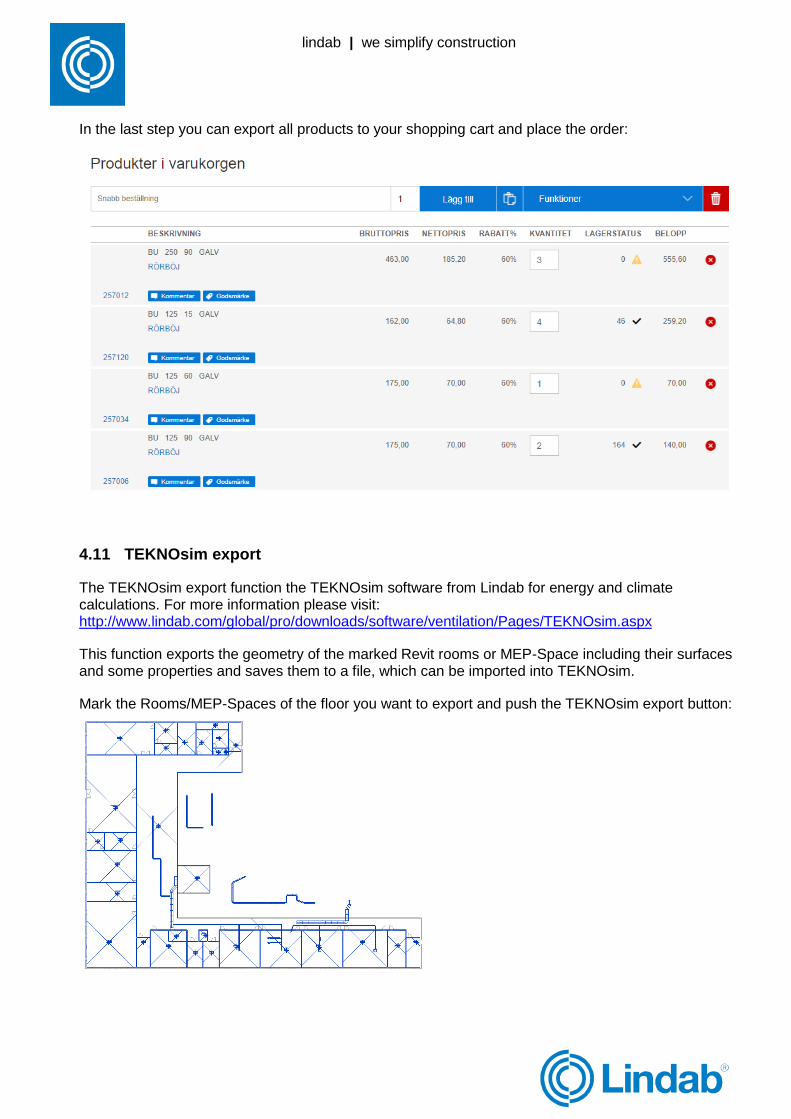
In the last step you can export all products to your shopping cart and place the order:
4.11 TEKNOsim export
The TEKNOsim export function the TEKNOsim software from Lindab for energy and climate calculations. For more information please visit: http://www.lindab.com/global/pro/downloads/software/ventilation/Pages/TEKNOsim.aspx
This function exports the geometry of the marked Revit rooms or MEP-Space including their surfaces and some properties and saves them to a file, which can be imported into TEKNOsim.
Mark the Rooms/MEP-Spaces of the floor you want to export and push the TEKNOsim export button:

lindab | we simplify construction
lindab | we simplify construction
lindab | we simplify construction
lindab | we simplify construction
lindab | we simplify construction
lindab | we simplify construction
lindab | we simplify construction
lindab | we simplify construction
lindab | we simplify construction
lindab | we simplify construction
lindab | we simplify construction
lindab | we simplify construction
lindab | we simplify construction
lindab | we simplify construction
lindab | we simplify construction
lindab | we simplify construction
lindab | we simplify construction
lindab | we simplify construction
lindab | we simplify construction
lindab | we simplify construction
lindab | we simplify construction
NOTE: you can just select any view with visual Rooms/Spaces and mark all objects in the View. The export function will filter all objects which are not Rooms or Spaces!
You can now save the file on your computer and open it in TEKNOsim: