manual for greenho use duo - dancovershop9-1п top door opening stand 2 9-2л top door opening stand...
TRANSCRIPT

20-03-2018
for Greenho use
DUO
Manual
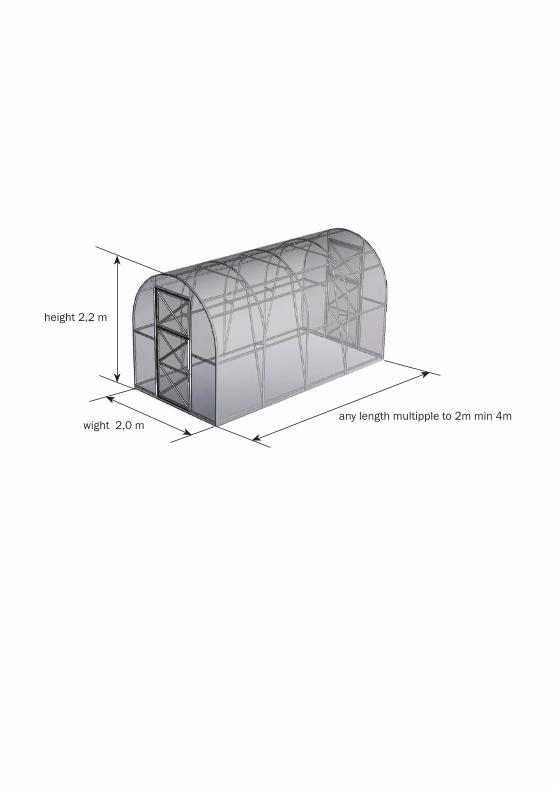
any length multipple to 2m min 4m
height 2,2 m
wight 2,0 m
2
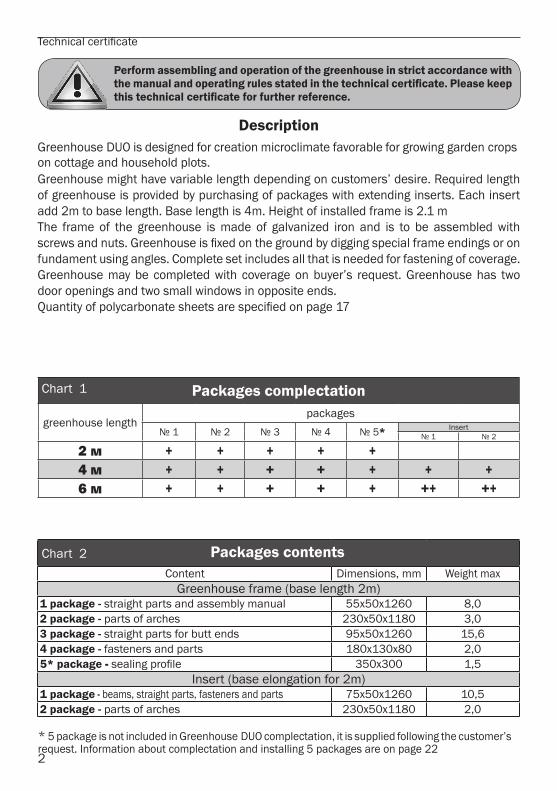
Content Dimensions, mm Weight maxGreenhouse frame (base length 2m)
1 package - straight parts and assembly manual 55х50х1260 8,02 package - parts of arches 230х50х1180 3,03 package - straight parts for butt ends 95х50х1260 15,64 package - fasteners and parts 180х130х80 2,05* package - 350х300 1,5
Insert (base elongation for 2m)1 package - beams, straight parts, fasteners and parts 75х50х1260 10,52 package - parts of arches 230х50х1180 2,0
Perform assembling and operation of the greenhouse in strict accordance with
Packages contents
Greenhouse DUO is designed for creation microclimate favorable for growing garden crops on cottage and household plots. Greenhouse might have variable length depending on customers’ desire. Required length of greenhouse is provided by purchasing of packages with extending inserts. Each insert add 2m to base length. Base length is 4m. Height of installed frame is 2.1 mThe frame of the greenhouse is made of galvanized iron and is to be assembled with
fundament using angles. Complete set includes all that is needed for fastening of coverage. Greenhouse may be completed with coverage on buyer’s request. Greenhouse has two door openings and two small windows in opposite ends.
Packages complectation
greenhouse lengthpackages
№ 1 № 2 № 3 № 4 № 5* Insert№ 1 № 2
2 м + + + + +4 м + + + + + + +6 м + + + + + ++ ++
Chart 1
Description
Chart 2
* 5 package is not included in Greenhouse DUO complectation, it is supplied following the customer’s request. Information about complectation and installing 5 packages are on page 22
3
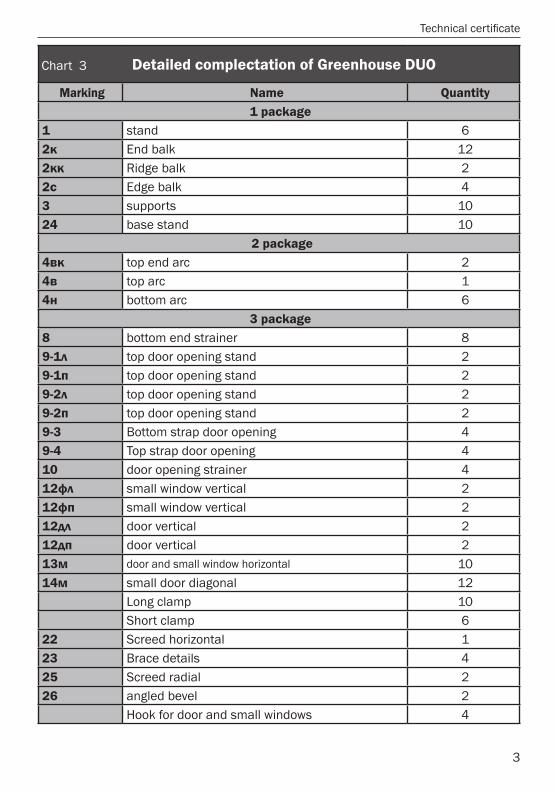
Detailed complectation of Greenhouse DUO
Marking Name Quantity1 package
1 stand 62к End balk 122кк Ridge balk 22с Edge balk 43 supports 10 24 base stand 10
2 package4вк top end arc 24в top arc 14н bottom arc 6
3 package8 bottom end strainer 89-1л top door opening stand 29-1п top door opening stand 29-2л top door opening stand 29-2п top door opening stand 29-3 Bottom strap door opening 49-4 Top strap door opening 410 door opening strainer 412фл small window vertical 212фп small window vertical 212дл door vertical 212дп door vertical 213м door and small window horizontal 1014м small door diagonal 12
Long clamp 10Short clamp 6
22 Screed horizontal 123 Brace details 425 Screed radial 226 angled bevel 2
Hook for door and small windows 4
Chart 3
4
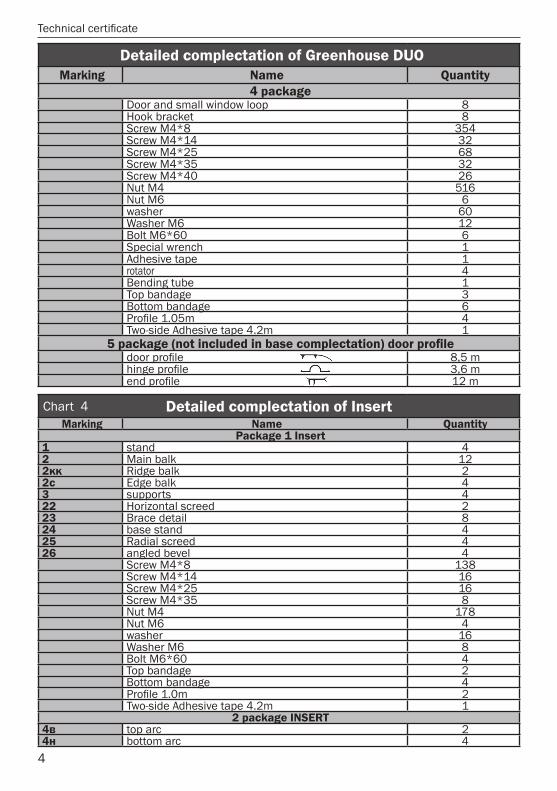
Detailed complectation of Greenhouse DUOMarking Name Quantity
4 packageDoor and small window loop 8Hook bracket 8Screw M4*8 354Screw M4*14 32Screw M4*25 68Screw M4*35 32Screw M4*40 26Nut M4 516Nut M6 6washer 60Washer M6 12Bolt M6*60 6Special wrench 1Adhesive tape 1rotator 4Bending tube 1Top bandage 3Bottom bandage 6
4Two-side Adhesive tape 4.2m 1
58,5 m3,6 m12 m
Detailed complectation of InsertMarking Name Quantity
Package 1 Insert1 stand 42 Main balk 122кк Ridge balk 22с Edge balk 43 supports 422 Horizontal screed 223 Brace detail 824 base stand 425 Radial screed 426 angled bevel 4
Screw M4*8 138Screw M4*14 16Screw M4*25 16Screw M4*35 8Nut M4 178Nut M6 4washer 16Washer M6 8Bolt M6*60 4Top bandage 2Bottom bandage 4
2Two-side Adhesive tape 4.2m 1
2 package INSERT4в top arc 24н bottom arc 4
Chart 4
5
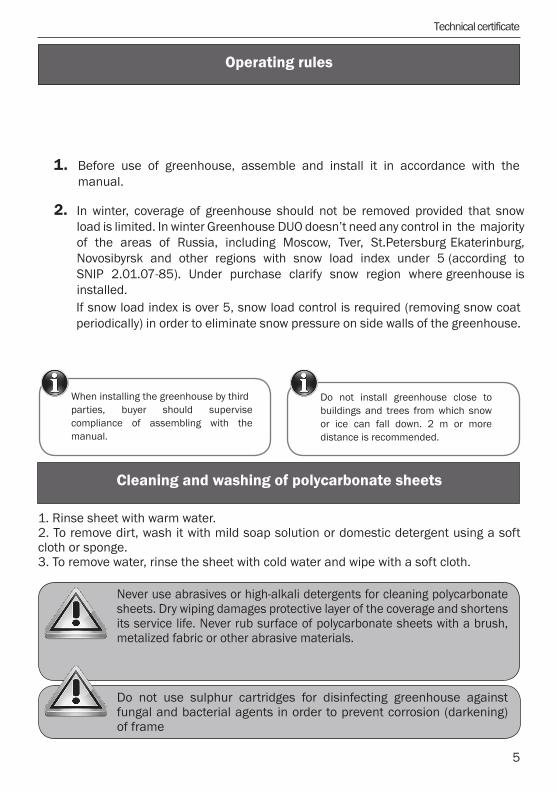
Before use of greenhouse, assemble and install it in accordance with the manual.
When installing the greenhouse by third parties, buyer should supervise compliance of assembling with the manual.
1.
2.
Operating rules
ot esolc esuohneerg llatsni ton oDbuildings and trees from which snow or ice can fall down. 2 m or more distance is recommended.
Cleaning and washing of polycarbonate sheets
1. Rinse sheet with warm water.2. To remove dirt, wash it with mild soap solution or domestic detergent using a soft cloth or sponge.3. To remove water, rinse the sheet with cold water and wipe with a soft cloth.
Do not use sulphur cartridges for disinfecting greenhouse against fungal and bacterial agents in order to prevent corrosion (darkening) of frame
Never use abrasives or high-alkali detergents for cleaning polycarbonate sheets. Dry wiping damages protective layer of the coverage and shortens its service life. Never rub surface of polycarbonate sheets with a brush, metalized fabric or other abrasive materials.
Technical certificate
If snow load index is over 5, snow load control is required (removing snow coat periodically) in order to eliminate snow pressure on side walls of the greenhouse.
In winter, coverage of greenhouse should not be removed provided that snow load is limited. In winter Greenhouse DUO doesn’t need any control in the majority of the areas of Russia, including Moscow, Tver, St.Petersburg Ekaterinburg, Novosibyrsk and other regions with snow load index under 5 (according to SNIP 2.01.07-85). Under purchase clarify snow region where greenhouse is installed.
6
Warranty
1. Manufacturer is responsible for full completing frame elements of greenhouse.
2. Manufacturer is responsible for assemblability of the greenhouse in accordance with the manual.
values of weather impact.
4. Warranty period – 12 months from date of purchase.
Warranty conditions
The warranty does not cover cases of:
1. Installation of greenhouse with violation of manual’s requirements.
2. Violation of operating rules.
3. Unintended use of greenhouse.
4. Floods, hurricanes, other natural disasters.
Manufacturer reserves right to change design of greenhouse
Warranty
7
Assembling manual
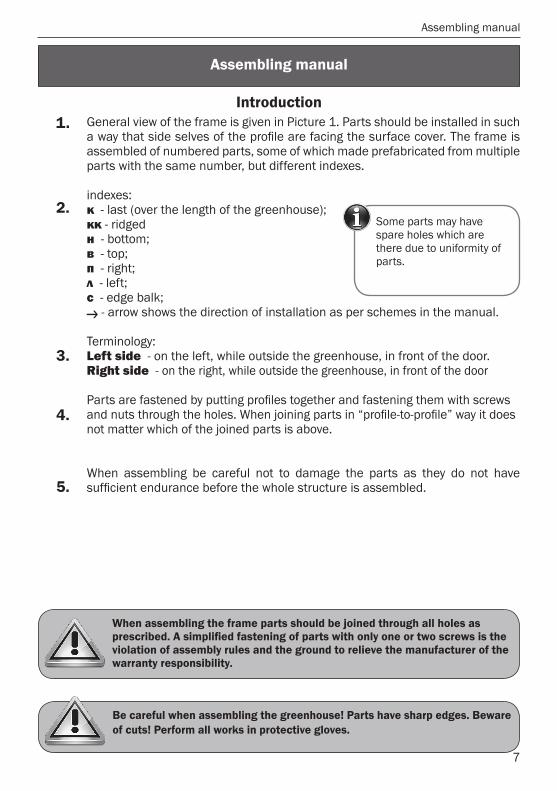
General view of the frame is given in Picture 1. Parts should be installed in such a way that side selves of the profile are facing the surface cover. The frame is assembled of numbered parts, some of which made prefabricated from multiple parts with the same number, but different indexes.
indexes: к - last (over the length of the greenhouse);кк - ridgedн - bottom; в - top; п - right; л - left;c - edge balk;
- arrow shows the direction of installation as per schemes in the manual.
Terminology:Left side - on the left, while outside the greenhouse, in front of the door.Right side - on the right, while outside the greenhouse, in front of the door
Parts are fastened by putting profiles together and fastening them with screws and nuts through the holes. When joining parts in “profile-to-profile” way it does not matter which of the joined parts is above.
When assembling be careful not to damage the parts as they do not have sufficient endurance before the whole structure is assembled.
1.
2.
3.
4.
5.
Some parts may have spare holes which are there due to uniformity of parts.
Assembling manual
Introduction
Be careful when assembling the greenhouse! Parts have sharp edges. Beware of cuts! Perform all works in protective gloves.
When assembling the frame parts should be joined through all holes as prescribed. A simplified fastening of parts with only one or two screws is the violation of assembly rules and the ground to relieve the manufacturer of the warranty responsibility.
8
Assembling manual
А (view from inside)
Б (view from outside)
В (view from outside)
2к25
1
4вк
9-2
2к
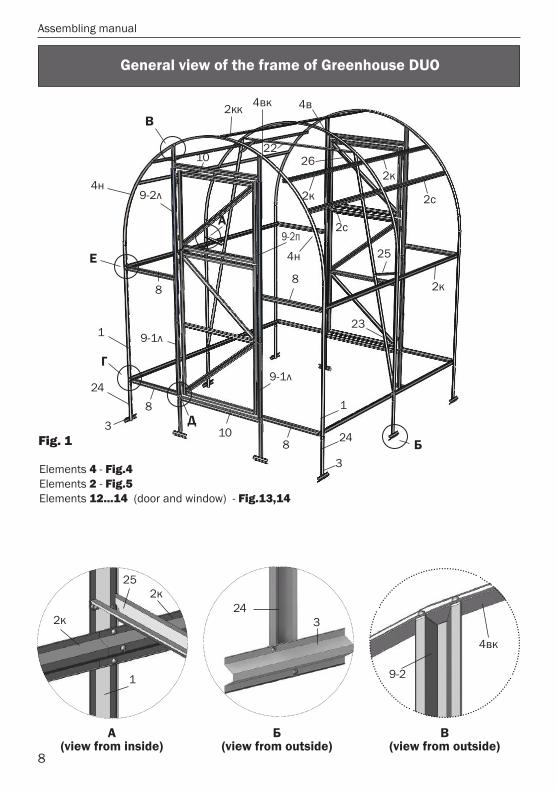
General view of the frame of Greenhouse DUO
Elements 4 - Fig.4Elements 2 - Fig.5Elements 12...14 (door and window) - Fig.13,14
А
Г
Д
Е
В
БFig. 1
4н
4н
1
1
2к
2к
2к
2с
2с
2622
25
2кк 4вк 4в
23
3
3
8
88
8
24
2410
9-1л
9-1л
9-2п
9-2л
10
324
9
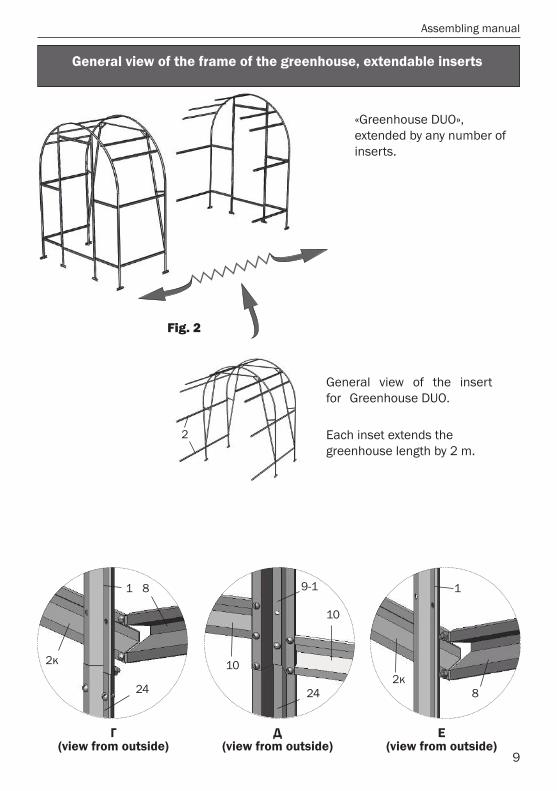
Г (view from outside)
Д (view from outside)
Е (view from outside)
Assembling manual
General view of the frame of the greenhouse, extendable inserts
2к
24 24
9-18
82к
1 1
Fig. 2
2
General view of the insert for Greenhouse DUO.
Each inset extends the greenhouse length by 2 m.
«Greenhouse DUO», extended by any number of inserts.

10
Level the frame by adding some soil into the holes or deepening the holes in order to make sure that the lateral parts are straight, horizontal and parallel to each other, and that the arches are straight when seen from aside. Tighten the screws again.
Perform the assembly next to the installation site of the greenhouse.
Perform the assembly in accordance with the pictures of assembly stages and the joints as shown in pic. 6…14.
On the site selected for installation of the greenhouse, dig holes as shown by the scheme in Pic. 3 to the spade length depth. Set the frame into the holes. Use the line to check that the diagonals of the frame are equal. General settlement of the greenhouse on the ground is made in such a way that the lower parts 10 of the door opening touch the ground, and parts 2 are some 5 cm above the ground. Use the line again to check the diagonals so that they are equal and adjust the corners of the frame if necessary.
Assembling manual
Installation steps
1.
2.
3.
4.
2060
+201
6 *
num
ber o
f ins
erts
2000
840 580
1008
1008
44
15Door
Door
11
Assembling manual
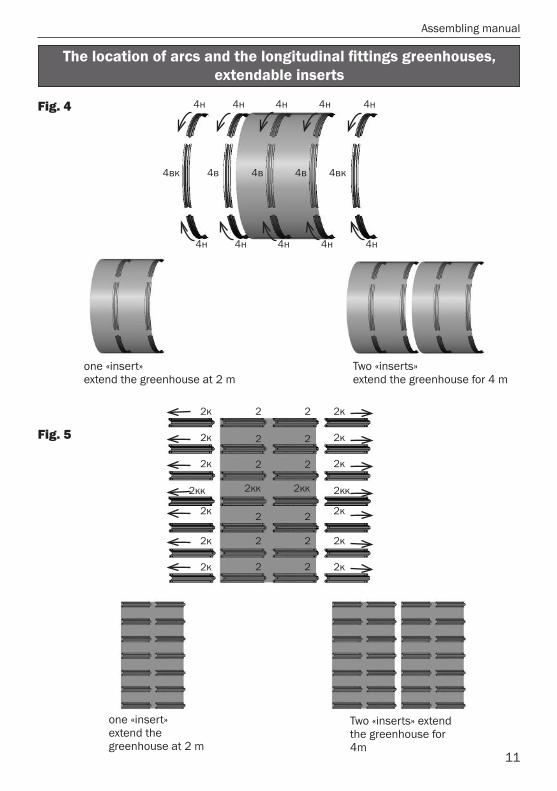
The location of arcs and the longitudinal fittings greenhouses, extendable inserts
one «insert»extend the greenhouse at 2 m
Two «inserts»extend the greenhouse for 4 m
4н
4н
4вк 4вк4в 4в 4в
4н
4н
2к
2к
2к
2к
2к
2к
2
2
2
2кк2кк
2
2
2
4н
4н
4н
4н
4н
4н
one «insert»extend the greenhouse at 2 m
Two «inserts» extend the greenhouse for 4m
Fig. 4
Fig. 5
2
2
2
2кк
2
2
2
2к
2к
2к
2к
2к
2к
2кк
Assembling manual
12
Installation steps
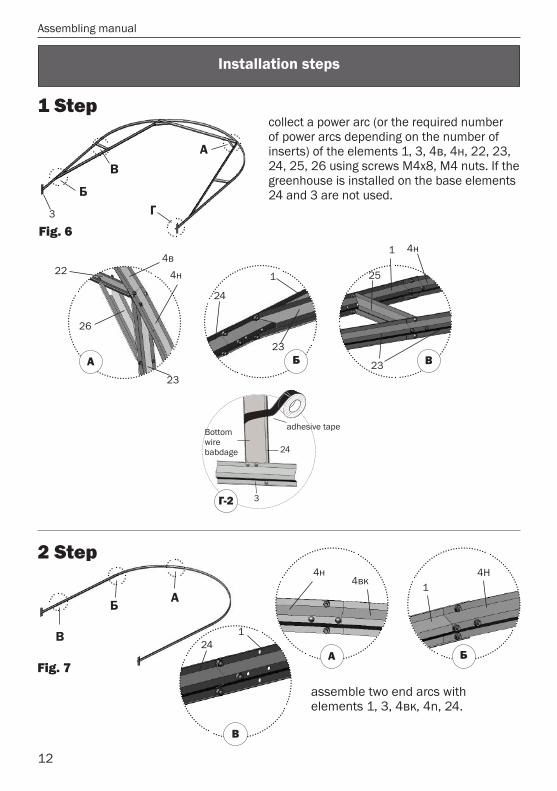
1 Step
2 Step
А
БГ
В
3
26
23
4в4н22
А23
24
1
Б
25
23
4н
В
1
collect a power arc (or the required number of power arcs depending on the number of inserts) of the elements 1, 3, 4в, 4н, 22, 23, 24, 25, 26 using screws М4х8, M4 nuts. If the greenhouse is installed on the base elements 24 and 3 are not used.
Fig. 6
АБ
ВА
4н4вк
Б
4Н1
В
241
assemble two end arcs with elements 1, 3, 4вк, 4n, 24.
Fig. 7
3
24
Bottom wire babdage
adhesive tape
Г-2

13
join the closest to the end arc elements 2K and 2 in accordance with Fig.5 and depending on the availability of inserts.
25
2
2
АА
3 Step
Manual
Installation steps
2
ВА
Вto part, assembled at step 3, connect the end of the arcFig. 9
join balks in accordance with pic.10 and pic.5
АД
ЕВ
ГБ
Fig. 10
4 Step
5 Step
4в 4н
2кк2с
Д ЕВ Г
4н 2к
24
1
А Б
2
2
4н
2к
2
223
25
2
2
А
Fig. 8
2к

14
Manual
Installation steps
А
Б
2ккА
2кк
2кк
4в
2ккБ2с
4н
to attach the second end of the arc. If the length of the greenhouse more than two meters, it’s necessary to attach the desired number of inserts consistently increasing runs and the power of the arc, then attach the end of the arc.
Fig. 11
7 Step
6 Step
А
Б
Д
Г
В
А Б
Г ДВ
2к
8
8
10
4вк
9-2л
9-2л
24
9-1
11
8 24
2к8
collect details of the ends.
Fig. 12
(inside view)
(outside view) (outside view)
(outside view) (outside view)
2с

15
Manual
Door and window assembly
Fig. 13 Window, outside view
Fig. 14 Door, outside view
А А
В
Д Д
К
К
З
ЗИ И
Ж Ж
Л
Л
В
Б Б
Г
Г
12фл
12дл
12дл
12фл14м
14м
14м
14м
14м
14м
14м
14м
13м
13м
13м
13м
13м
13м
13м13м
13м
13м
13м13м
13м
13м
13м
12фп
12дп
12дп
12дп
12дп
12дл
12дл
12дл
12дп
12фп
12фп 12фл
16
Manual
Left side of the end
Left side of the end
Door
Door
Window
Window
Ridged panel
Right side of the end
Right side of the end
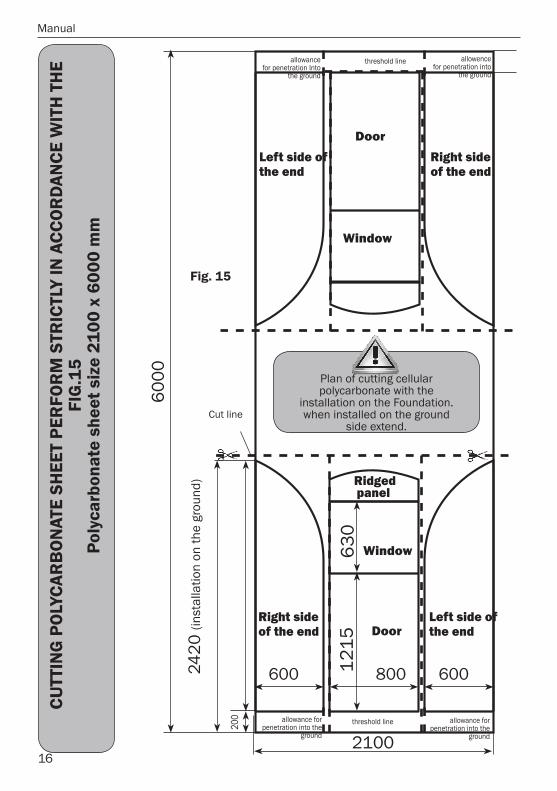
CUTT
ING
PO
LYCA
RB
ON
ATE
SHEE
T PE
RFO
RM
STR
ICTL
Y IN
ACC
OR
DAN
CE W
ITH
TH
E FI
G.1
5Po
lyca
rbon
ate
shee
t siz
e 21
00 x
600
0 m
m
2420
(ins
talla
tion
on th
e gr
ound
)
600 600
200
800
Cut line
allowancefor penetration Into
the ground
allowencefor penetration into
the ground
threshold line
Plan of cutting cellular polycarbonate with the
installation on the Foundation. when installed on the ground
side extend.
Fig. 15
allowance for penetration into the
ground
allowance for penetration into the
ground
threshold line
17
Manual
Fastening of coverage
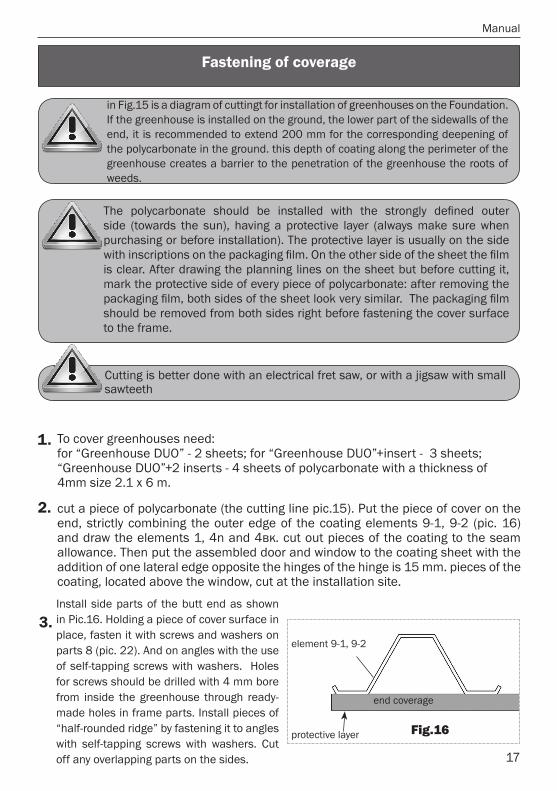
Install side parts of the butt end as shown in Pic.16. Holding a piece of cover surface in place, fasten it with screws and washers on parts 8 (pic. 22). And on angles with the use of self-tapping screws with washers. Holes for screws should be drilled with 4 mm bore from inside the greenhouse through ready-made holes in frame parts. Install pieces of “half-rounded ridge” by fastening it to angles with self-tapping screws with washers. Cut off any overlapping parts on the sides.
3.
Fig.16protective layer
element 9-1, 9-2
end coverage
Cutting is better done with an electrical fret saw, or with a jigsaw with small sawteeth
side (towards the sun), having a protective layer (always make sure when purchasing or before installation). The protective layer is usually on the side
is clear. After drawing the planning lines on the sheet but before cutting it, mark the protective side of every piece of polycarbonate: after removing the
should be removed from both sides right before fastening the cover surface to the frame.
in Fig.15 is a diagram of cuttingt for installation of greenhouses on the Foundation. If the greenhouse is installed on the ground, the lower part of the sidewalls of the end, it is recommended to extend 200 mm for the corresponding deepening of the polycarbonate in the ground. this depth of coating along the perimeter of the greenhouse creates a barrier to the penetration of the greenhouse the roots of weeds.
To cover greenhouses need:for “Greenhouse DUO” - 2 sheets; for “Greenhouse DUO”+insert - 3 sheets; “Greenhouse DUO”+2 inserts - 4 sheets of polycarbonate with a thickness of4mm size 2.1 x 6 m.
2. cut a piece of polycarbonate (the cutting line pic.15). Put the piece of cover on the end, strictly combining the outer edge of the coating elements 9-1, 9-2 (pic. 16) and draw the elements 1, 4n and 4вк. cut out pieces of the coating to the seam allowance. Then put the assembled door and window to the coating sheet with the addition of one lateral edge opposite the hinges of the hinge is 15 mm. pieces of the coating, located above the window, cut at the installation site.
1.
18
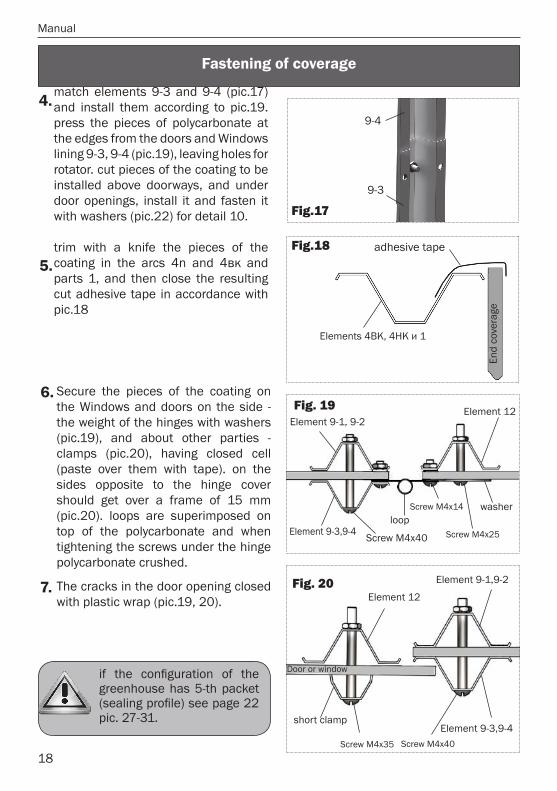
match elements 9-3 and 9-4 (pic.17) and install them according to pic.19. press the pieces of polycarbonate at the edges from the doors and Windows lining 9-3, 9-4 (pic.19), leaving holes for rotator. cut pieces of the coating to be installed above doorways, and under door openings, install it and fasten it with washers (pic.22) for detail 10.
trim with a knife the pieces of the coating in the arcs 4n and 4вк and parts 1, and then close the resulting cut adhesive tape in accordance with pic.18
4.9-4
9-3
Fig.17
Manual
Fastening of coverage
Secure the pieces of the coating on the Windows and doors on the side - the weight of the hinges with washers (pic.19), and about other parties - clamps (pic.20), having closed cell (paste over them with tape). on the sides opposite to the hinge cover should get over a frame of 15 mm (pic.20). loops are superimposed on top of the polycarbonate and when tightening the screws under the hinge polycarbonate crushed.
The cracks in the door opening closed with plastic wrap (pic.19, 20).
5.Fig.18
Elements 4ВК, 4НК и 1
adhesive tape
Door or window
short clamp
Element 12
Element 9-1,9-2
Element 9-3,9-4
Fig. 20
6.
7.
Fig. 19Element 9-1, 9-2
washerloop
Element 12
Screw М4х14
Screw М4х40Element 9-3,9-4 Screw М4х25
Screw М4х35 Screw М4х40
End
cove
rage
if the configuration of the greenhouse has 5-th packet (sealing profile) see page 22 pic. 27-31.
19
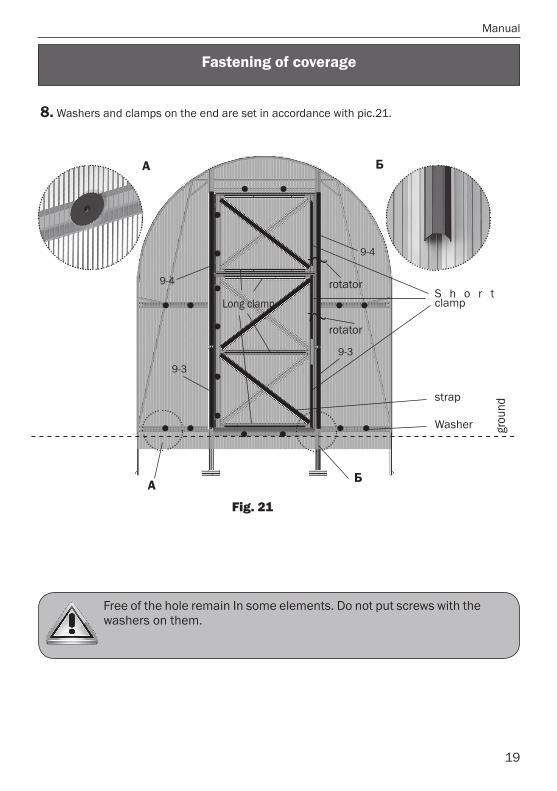
Washers and clamps on the end are set in accordance with pic.21.
Manual
Fastening of coverage
8.
Fig. 21gr
ound
А Б
А Б
Free of the hole remain In some elements. Do not put screws with the washers on them.
strap
S h o r t clampLong clamp
Washer
rotator
rotator
9-4
9-3
9-4
9-3
20
Manual
Fastening of coverage
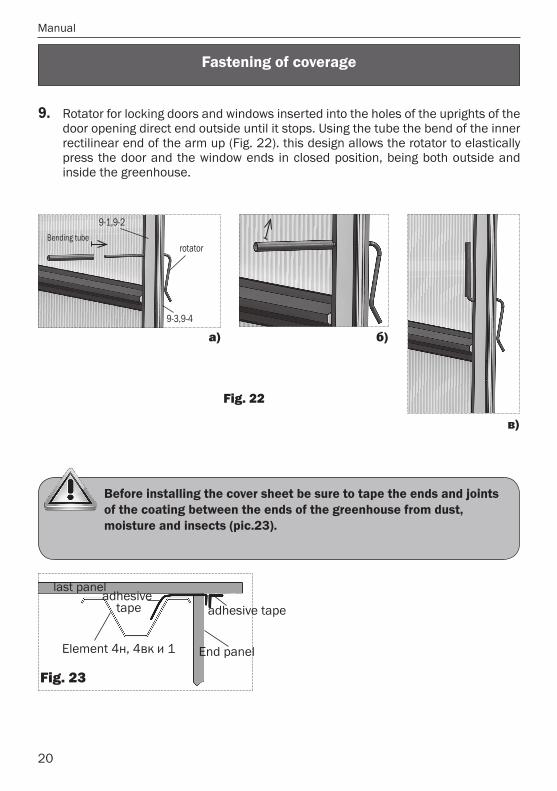
Before installing the cover sheet be sure to tape the ends and joints of the coating between the ends of the greenhouse from dust, moisture and insects (pic.23).
adhesive tapeadhesive
tape
Element 4н, 4вк и 1
last panel
End panel
Fig. 23
Rotator for locking doors and windows inserted into the holes of the uprights of the door opening direct end outside until it stops. Using the tube the bend of the inner rectilinear end of the arm up (Fig. 22). this design allows the rotator to elastically press the door and the window ends in closed position, being both outside and inside the greenhouse.
9.
Fig. 22
а) б)
в)
9-3,9-4
rotatorBending tube
9-1,9-2
21
Manual
Fastening of coverage
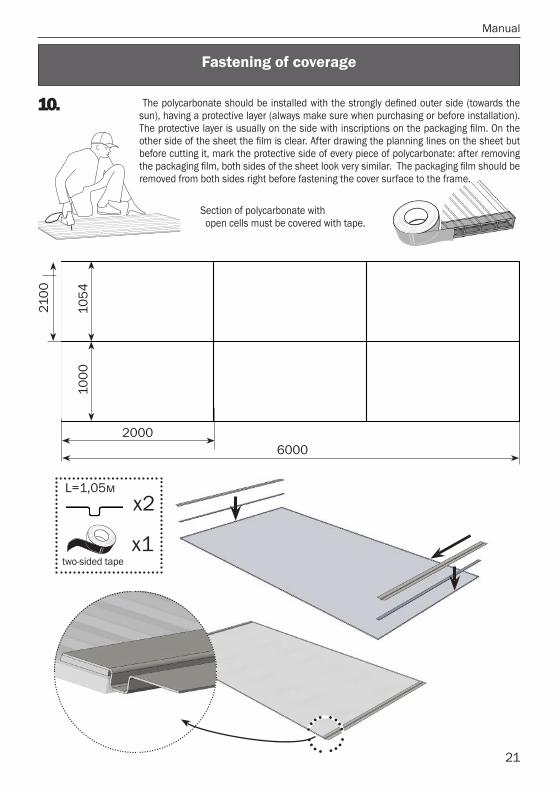
10. The polycarbonate should be installed with the strongly defined outer side (towards the sun), having a protective layer (always make sure when purchasing or before installation). The protective layer is usually on the side with inscriptions on the packaging film. On the other side of the sheet the film is clear. After drawing the planning lines on the sheet but before cutting it, mark the protective side of every piece of polycarbonate: after removing the packaging film, both sides of the sheet look very similar. The packaging film should be removed from both sides right before fastening the cover surface to the frame.
Section of polycarbonate with open cells must be covered with tape.
60002000
1054
1000
2100
х1
х2L=1,05м
two-sided tape

Assembling manual
22
Крепление покрытия
х3
M4x
25 х3
!Do not fully tighten!
х1
adhesive tape
11.
12.
Assembling manual
23
х2 х2
M4x
25 х2
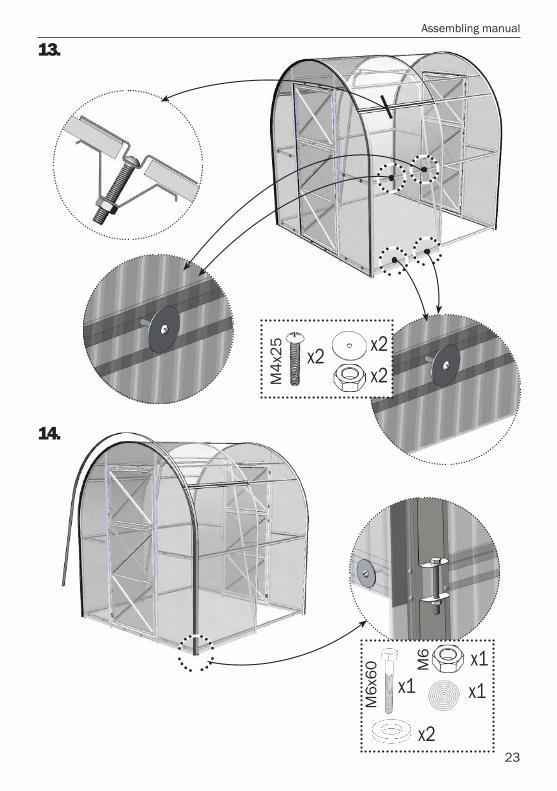
13.
M6x
60 M6
х1
х2
х1х1
14.

Assembling manual
24
15.
х1
х3
M4x
25 х3
L=1,05м
Assembling manual
25
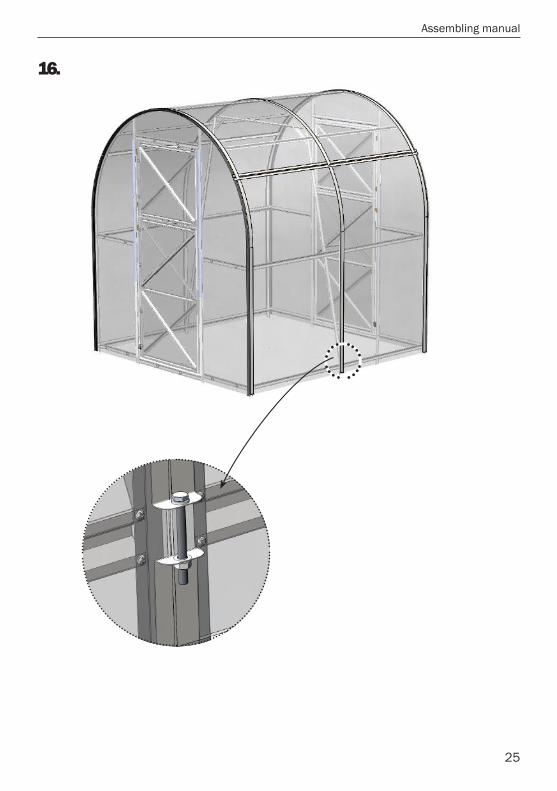
16.
Assembling manual
26
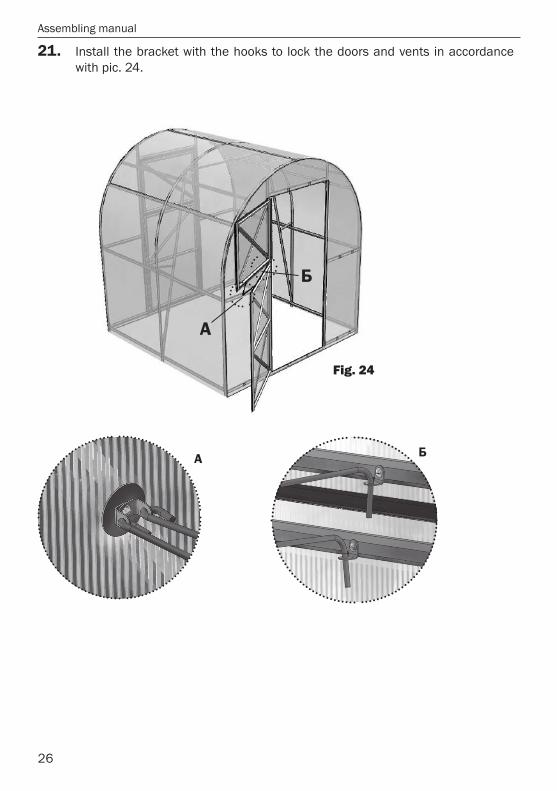
Install the bracket with the hooks to lock the doors and vents in accordance with pic. 24.
21.
А
А
Б
Б
Fig. 24
Assembling manual
27
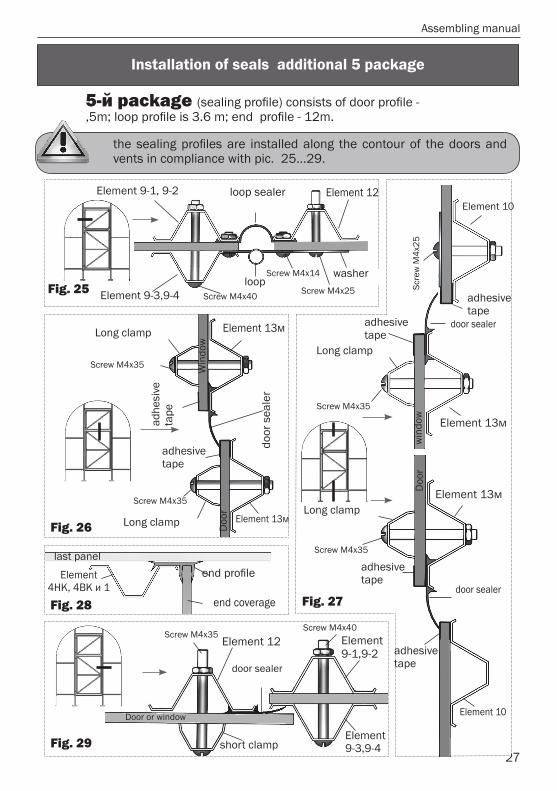
Installation of seals additional 5 package
Long clamp
Doo
r
Doo
r
Element 13м
Element 13м
Element 13м
Fig. 26
Win
dow
Fig. 29 short clamp
Element 10
Element 12
Element 13м
Element 9-1,9-2
Fig. 27
door
sea
ler
door sealer
door sealer
door sealer
Door or window
win
dow
Long clamp
adhesive tape
adhe
sive
ta
pe
adhesive tape
Long clampLong clamp
Element 9-3,9-4
loop sealerElement 9-1, 9-2
Element 9-3,9-4
washerloop
Element 12
Fig. 25Screw М4х14
Screw М4х25
Element 10
Screw М4х40
Screw М4х35
Screw М4х35
Screw М4х35
Screw М4х35
Screw М4х40Screw М4х35
5-й package (sealing profile) consists of door profile -,5m; loop profile is 3.6 m; end profile - 12m.
the sealing profiles are installed along the contour of the doors and vents in compliance with pic. 25...29.
last panel
Element 4НК, 4ВК и 1
end coverage
end profile
Fig. 28
Scre
w М
4х25
adhesive tape
adhesive tape
adhesive tape

Contact information
Head office:Dancover A/SNordre Strandvej 119 G3150 HellebækDenmark
For more informationplease visit:www.dancovershop.com
National contact
Denmark: 70 26 76 [email protected]
UK: 020 8099 [email protected]
Spain: 911 436 [email protected]
Italy: 02 479 21 [email protected]
Germany: 041 0266 [email protected]
Switzerland: 0840 [email protected]
France: 0975 181 [email protected]
Austria: 0662 [email protected]
Sweden: 040 233 [email protected]
Finland: 0 931 581 [email protected]
Nederland: 0 858 880 [email protected]
Poland: 22 300 [email protected]
Ireland: 0 151 33 [email protected]
Luxembourg: +49 041 0266 [email protected]
Portugal: 308 800 [email protected]
Belgium: 0 28 08 08 [email protected]
Norway: 231 00 [email protected]