manual for eprimer version 0 - brain innovation
TRANSCRIPT

manualfor
eprimer version 0.4
Hester Breman and Tobias Otto
November 23, 2010
1

Contents
1 Introduction and installation 31.1 Installation . . . . . . . . . . . . . . . . . . . . . . . . . . . . . . . . . . 31.2 Notes on the current version . . . . . . . . . . . . . . . . . . . . . . . . 31.3 Acknowledgements . . . . . . . . . . . . . . . . . . . . . . . . . . . . . 4
2 Usage 52.1 Start . . . . . . . . . . . . . . . . . . . . . . . . . . . . . . . . . . . . . . 52.2 Load the E-Prime Log file . . . . . . . . . . . . . . . . . . . . . . . . . 62.3 Configuring conditions . . . . . . . . . . . . . . . . . . . . . . . . . . . 7
2.3.1 Configuring conditions via a textfile . . . . . . . . . . . . . . . 72.3.2 Configuring conditions via manually via interactive dialog . . 9
2.4 Extract timing parameters . . . . . . . . . . . . . . . . . . . . . . . . . 122.5 Save BrainVoyager stimulation protocol . . . . . . . . . . . . . . . . . 122.6 Note . . . . . . . . . . . . . . . . . . . . . . . . . . . . . . . . . . . . . . 14
3 Design 15
A Logging the timing parameters in E-Prime 16A.1 Notes to take into account before starting the experiment . . . . . . . 16
B Reference time point 18B.1 Example: . . . . . . . . . . . . . . . . . . . . . . . . . . . . . . . . . . . 18B.2 Example: . . . . . . . . . . . . . . . . . . . . . . . . . . . . . . . . . . . 18
C Synchronizing your Experiment with the Scanner 19C.1 Creating a Scanner.pulse.start object . . . . . . . . . . . . . . . . . . . 19
D Eprimer FAQ 20D.1 I have to sort out the order of my conditions by hand, as I use iden-
tical objects for different conditions in my Eprime script. Is thereanything I can do to make this easier? . . . . . . . . . . . . . . . . . . 20
D.2 The BVQXLog tab shows empty lines when importing via eprimer . 20D.3 I do not see all of my conditions listed . . . . . . . . . . . . . . . . . . 21D.4 My stimulation protocol is NOT OK . . . . . . . . . . . . . . . . . . . 21
2

1 Introduction and installation
This is a manual for using eprimer, a BrainVoyager QX wizard (script project,*.qsa), to convert an E-Prime Log file (*.txt) to a BrainVoyager QX stimulation pro-tocol (*.prt). This will be available at the following BrainVoyager support page:http://support.brainvoyager.com/available-tools/50-available-scripts/.For more information on the BrainVoyager QX stimulation protocol, see step 3 ofthe Getting Started Guide that can be downloaded via the ‘Downloads’ section ofhttp://www.brainvoyager.com/.E-Prime is software to create and run an experiment for computer or MRI scanner.For more information, please consult the Psychology Software Tools website athttp://www.pstnet.com/products/e-prime/.
1.1 Installation
Installation can be performed by placing the file in/(My) Documents/BVQXExtensions/Scripts/. Make the script project ac-cessible by BrainVoyager in the following way:
1. Go to the BrainVoyager “Scripts...” menu option and select “Edit Scripts”.
2. In the Script Editor that opens, go to “File” 7→ “Load Script Project...”. Selectthis eprimer.qsa project.
3. Click on the floppydisk icon to save and close the Script Editor.
4. In BrainVoyager, go to the BrainVoyager “Scripts...” menu option and select“Generate stimulation protocol from EPrimeLog”.
After installation, the scripts of the script project will appear in separate tabs(see figure 1). The current version should have seven tabs, if not, please re-downloadeprimer from the support page or wiki.
Figure 1: After installation, the scripts of the script project will appear in separatetabs
1.2 Notes on the current version
v0.4: The configuration of the conditions is now automatically saved after config-uring the conditions via a dialog. This configuration can then be re-used for thenext subjects in the same experiment.v0.2: One can define conditions independent of the logged variables. Because
3

of this possibility, the end time of an interval should be defined with respect tothe start time of the first pulse, for example using the property “FinishTime”; thismeans that selecting “RT” as end of an interval will not deliver valid output (since“RT” has a timing parameter that is relative to the same variable).v0.1: The protocol is created with milliseconds resolution.
1.3 Acknowledgements
This tool was developed in collaboration with Tobias Otto (University of Maas-tricht, The Netherlands).
4

2 Usage
2.1 Start
Start eprimer via the BrainVoyager QX “Scripts” menu (see figure 2).
Figure 2: Start the conversion
5

2.2 Load the E-Prime Log file
At first, one can select the E-Prime Log file (*.txt, see figure 3) via the file selectiondialog that appears.
Figure 3: E-Prime log file
6

2.3 Configuring conditions
The names and properties in an E-Prime log file that will define a condition can beindicated via an interactive dialog, or fed to eprimer via a plain text file (*.txt).The preferred option can be selected via a dialog (see figure 4).
Figure 4: Dialog to select preferred configuration method
2.3.1 Configuring conditions via a textfile
When selecting the option to configure the conditions according to the parametertext file, a file dialog will appear asking for the parameter file (see figure 5).
Figure 5: File selection dialog for eprimer example parameter file
The text file starts with a header of exactly 5 lines. Then the names of the pa-rameters are printed, with on the next line(s) the values for the parameters. Allparameters should have the same number of values as number of conditions, ex-cept for the variables number of conditions which indicates the number ofconditions, experimentname which is a single name, and zero which is a singlenumber, indicating the start time of the experiment (see elsewhere in this docu-ment). All values are followed by <BR> for practical reasons.
The parameters are the following and should be printed in this order:
number of conditions:experimentname:variables:conditionnames:colors:zero:
7
condition begin variables:condition begin properties:condition end variables:condition end properties:
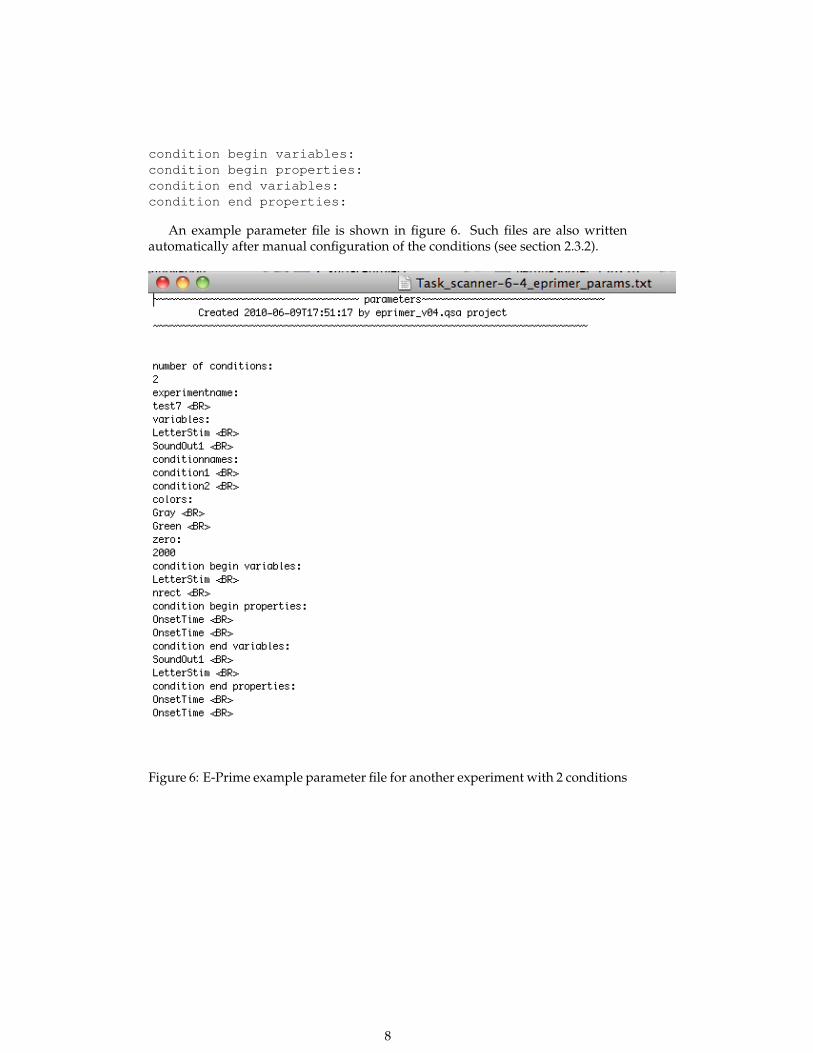
An example parameter file is shown in figure 6. Such files are also writtenautomatically after manual configuration of the conditions (see section 2.3.2).
Figure 6: E-Prime example parameter file for another experiment with 2 conditions
8

2.3.2 Configuring conditions via manually via interactive dialog
Select the conditions for the BrainVoyager stimulation protocolVia a dialog one can enter the number of conditions to be defined in the Brain-
Voyager stimulation protocol. In the example, we define 4 conditions (see figure7).
Figure 7: Enter number of conditions
Configure the conditions: naming and coloringVia the next dialog one can select the name and color for each condition (see top
of figure 8). Also the timing parameters can be specified: for each of the conditions,one selects the variable and property name that define the begin and end of aninterval. Also a name for the experiment can be entered. These parameters will beused in the BrainVoyager QX stimulation protocol (see figure 13).
Figure 8: Condition 1 with name “text”: the begin of an interval is defined by“LetterStim.OnsetTime” and the end of an interval by “SoundOut1.OnsetTime”.
The parameters are saved in a text file with the same name as the E-Prime logfile, and extension *_eprimer_params.txt. So the next time that a stimulationprotocol for another subject with an E-Prime log file of the same experiment needsto be created, one can just load this resulting text file.
9

Figure 9: Condition 2 with name “sound”: the begin of an interval is defined by“SoundOut1.OnsetTime” and the end of an interval by “nrect.OnsetTime”.
Figure 10: Condition 3 with name “rating”: the begin of an interval is de-fined by “FixationPreRSME.FinishTime” and the end of an interval by “Fixation-PostRSME.OnsetTime”.
10

Figure 11: Condition 4 with name “fixation”: the begin of an interval is de-fined by “FixationPostRSME.OnsetTime” and the end of an interval by “Fixation-PostRSME.FinishTime”.
11
2.4 Extract timing parameters
During this stage, eprimer will extract the start and end for the intervals of theselected conditions. No user input is required in this stage.
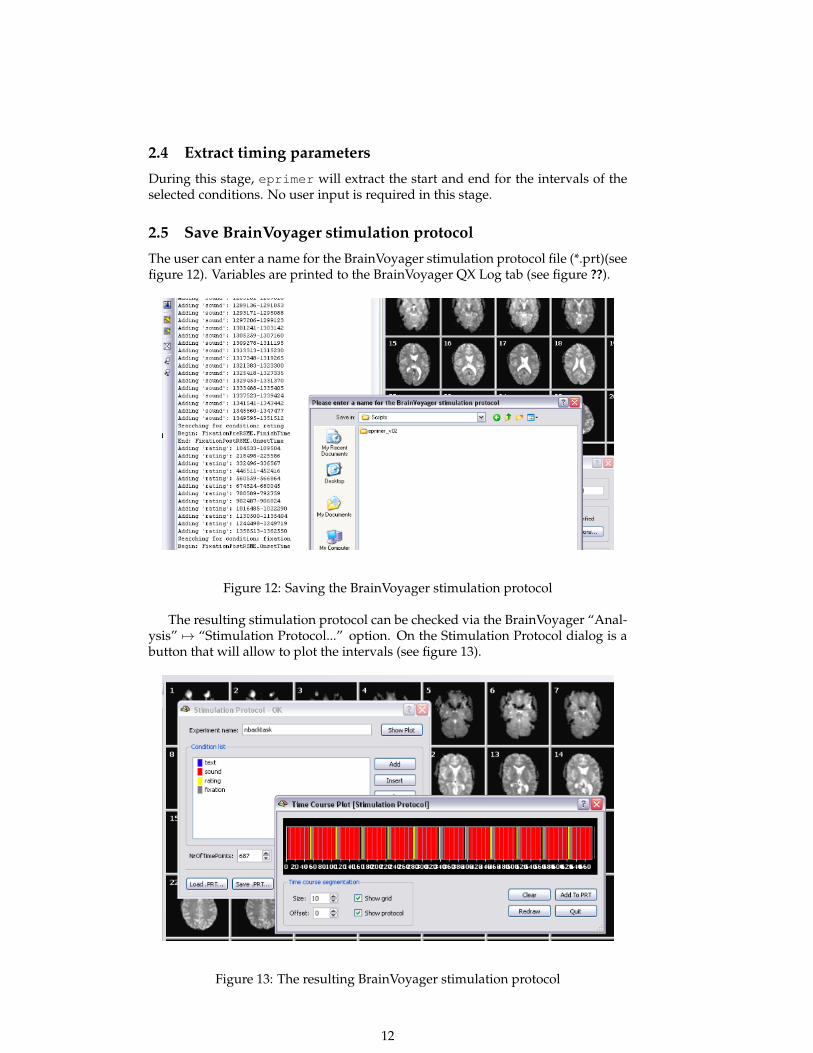
2.5 Save BrainVoyager stimulation protocol
The user can enter a name for the BrainVoyager stimulation protocol file (*.prt)(seefigure 12). Variables are printed to the BrainVoyager QX Log tab (see figure ??).
Figure 12: Saving the BrainVoyager stimulation protocol
The resulting stimulation protocol can be checked via the BrainVoyager “Anal-ysis” 7→ “Stimulation Protocol...” option. On the Stimulation Protocol dialog is abutton that will allow to plot the intervals (see figure 13).
Figure 13: The resulting BrainVoyager stimulation protocol
12

The stimulation protocol is a text file which can also be checked via for exampleWordpad on Windows, TextEdit on Mac or Kate on Linux (see figure 14).
Figure 14: The resulting BrainVoyager stimulation protocol file
13

2.6 Note
In case the BrainVoyager QX Log tab shows empty lines when importing via eprimer,please read the following. The cause is a text mark-up problem. The solution forimporting the *.txt log file from E-Prime is to copy-paste the logtext to a mark-upfree text/programming editor (like Code::Blocks, see http://www.codeblocks.org/),save in a different extension and import the ’mark-up free’ text with eprimer.
14

3 Design
The design of eprimer is shown in diagram 3 (read from top to bottom). (Pleasenote, the design flowchart needs to be updated).
15

A Logging the timing parameters in E-Prime
In the ‘Structure’ window of figure 15 one can see which variables are shown atwhich time point (where the time axis runs from top to bottom). One can select thelogging of the variables via right-clicking on the variable names and selecting oneor several of ‘OnsetDelay’, ‘OnsetTime’, ’DurationError’, ‘RTTime’, ‘ACC’, ‘RT’,‘RESP’ and ‘CRESP’. Please not that if ‘Logging’ is selected, but no properties inparticular, nothing will actually be saved to the Log file!
A.1 Notes to take into account before starting the experiment
• In particular, take care that a variable is created and enabled to log the firstscanner pulse (in this example ScannerPulsStart), to obtain a clear refer-ence point for the timing parameters like RTTime.
• If your stimulation program contains intervals between objects, that in turnare triggered by a scanner pulse, do not take intervals that are (multiplesof) TR times. The reason for this is that sometimes the program takes a fewmilliseconds more or less, which might uncontrollably shift your protocoldepending on if the program just catches the scanner pulse or has to wait forthe next one.
Figure 15: One can select the logging of the variables via right-clicking on thevariable names and selecting one of
It is also possible to export the logged stimuli timing to Excel format via E-DataAid (see figure 16). On Windows, this offers the possibility to access Excel (forexample using Matlab) via the Component Object Model (COM) and directly scriptthe BrainVoyager stimulation protocol (see the manual “Scripting BrainVoyagerfrom Matlab” on the BrainVoyager wiki).
16

Figure 16: The logged times can also be exported to Excel via E-Data Aid
17

B Reference time point
Eprime records the experiment time starting at the beginning of the script execu-tion, when you click “run”.This means that at the time of execution of the object logging the first scannerpulse, the time will be at a value representing this time.
B.1 Example:
After starting the experiment by clicking run, you enter the session numbers etcetera which takes around 5-10 seconds. It takes you another 5-10 seconds to startthe scanner. Hence, the timing value recorded in the Eprime log file for the time ofthe first scanner pulse is anywhere between 10 and 20 seconds! If you use instruc-tion screens or similar things, this time will be even higher.
Eprimer04 sets the timing to zero at the given reference point, which youindicate in the field “first scanner pulse w.r.t. logging”. To find the right value forthis field, you have to look up the correct time in your Eprime log file. It is usuallythe RTT of the object logging the first scanner pulse (See also Synchronizing yourexperiment with the scanner, section C).This value might change every time you run the experiment, so you want to lookit up in your Eprime log file to be sure. You will have to update it in the textfile which stores your parameter configuration as well, for every run. Using atext editor such as PSPad, search for “zero:”. The value following this is the onethat you have filled in the “first scanner pulse” field when you first created thisparameter file.Additionally, you need to take your skipped volumes into account as well. AsBrainVoyager starts counting from the first unskipped volume on, you need toadjust your experiment timing accordingly. Thus, if you e.g. skip 3 volumes of2000 ms each = 6000ms; you need to add this time to your reference point.
B.2 Example:
25000ms in the execution of your Eprime script, the scanner starts to collect thefirst volume (as logged by the first scanner pulse object). Your TR is 2000ms andyou discard the first three volumes. Thus, BrainVoyager starts counting with zeroat 25000ms + 6000ms = 31000ms Eprime script time. Therefore, 31000ms is the timeyou have to enter in the “first scanner pulse” field.
18

C Synchronizing your Experiment with the Scanner
C.1 Creating a Scanner.pulse.start object
Ideally you have an indicator object in your Eprime script that logs the first scannerpulse (see figure 17). This can be done in the following way:
Make sure your scanner has a trigger port, which delivers a pulse via a serialport at every TR start. Ask your MTA or manufacturer for details.
Create a trigger port device in Eprime. In the main screen of E-Studio go toEdit > Experiment > Devices. Add a “Port object”, click “Edit” and config-ure it with the values for your system (values shown here are just for demonstra-tion).
Then, create a Text.Object and add the trigger port object as input device andconfigure so that it is terminated as a reaction on the scanner pulse. Dont forget toturn on the appropriate logging values. This method can be used to ensure correctsynchronization.
Figure 17: Scanner pulse object
19

D Eprimer FAQ
D.1 I have to sort out the order of my conditions by hand, as Iuse identical objects for different conditions in my Eprimescript. Is there anything I can do to make this easier?
You want to keep your program lean by not including differently named copiesof identical objects for every condition. Instead, you can use identical objects thatyou “feed” with different contents from list files. In Eprimer04 however, thosevariables have identical names, thus making it impossible to separate them. Thiscan be remedied by using small indicator objects (see figure 18), lasting for example20ms. Just give them logical names. We have a stimulation procedure that weuse in 3 different conditions, employing the same objects. By placing the smallindicators before and after the actual procedure, we can use their timing valuesinstead.
Figure 18: Indicator objects
D.2 The BVQXLog tab shows empty lines when importing viaeprimer
The cause is a text mark-up problem. The solution for importing the *.txt logfile from E-Prime is to copy-paste the logtext to a mark-up free text editor (likeOpenOffice Writer), save in a different extension and import the ’mark-up free’
20
text with eprimer. Instead of copy-paste, import as generic Unicode can help aswell.
D.3 I do not see all of my conditions listed
Make sure that the objects defining your conditions do not have too similar names.In order to prevent double variables, Eprimer04 omits variables it deems identical.We found that the current version can handle numbered variables (xy1, xy2) butchokes on instances where a certain name is used with different prefixes. For ex-ample, one condition in our experiment was called difficulty1, and we called thefixation screen text object prior to it FixPreDifficulty1, which made Eprimer omitdifficulty1. If you have this problem, simply rename the variable name in a copyof your .txt log files with a text editor such as PSPad.
D.4 My stimulation protocol is NOT OK
In most cases, this is caused by overlapping conditions, either due to missed re-sponses or due to errors in defining the conditions. Eprime logs RTs and RTTs formissed responses as 0. Thus, if you use a reaction time as a defining parameter, incase of a missed response you will have a trial that lasts from the negative valueof your starting reference point (e.g. -31000ms) until the indicated end of that trial,naturally overlapping everything in between. Hint: If you suspect this, look forthe negative time of that protocols reference time point with the search function ofany text editor.If this is not the problem, there is probably an error in the definition of the condi-tions.Narrow done all possible errors by copying parts of your protocol file into anempty tryout .prt text file and inspecting them in BrainVoyager. Add the condi-tions/fixations piece by piece. As soon as BrainVoyager switches to NOT OK, youhave one part of the problem. Leave this part in, delete the rest of the conditionsfrom that tryout file and start adding the other conditions again. By this, you canidentify which conditions overlap.You then can proceed to see if there is an error in the parameters entered, or forexample a missed response by a subject.
21