manor primary school design technology year 1 : designing
TRANSCRIPT

Manor Primary School – Design Technology- Designing and Making a puppet – Textiles
Manor Primary School Design Technology Year 1: Designing and Making Puppets – textiles
Overview of the Learning: In this unit children will make a textile product by marking out, cutting and joining pieces of fabric. Children look at a selection of hand puppets and base their design on their investigations into how the puppets have been made and who they have been designed for.
Core Aims Design design purposeful, functional, appealing products for themselves and other users based on design criteria generate, develop, model and communicate their ideas through talking, drawing, templates, mock-ups and, where appropriate, information and communication technology Make select from and use a range of tools and equipment to perform practical tasks [for example, cutting, shaping, joining and finishing] select from and use a wide range of materials and components, including construction materials, textiles and ingredients, according to their characteristics Evaluate explore and evaluate a range of existing products evaluate their ideas and products against design criteria
Pupils should be taught to develop their design and making skills They will: Observe and explore and generate ideas, define problems and pose questions in order to develop investigations and products.
Take ownership of the whole design process: investigating existing products, designing, creating a prototype, making improvements, creating an end product and evaluating. To identify the needs of the end user by exploring existing products and asking questions about what people would like to see in a puppet. Apply practical skills to design, make and improve products safely, taking account of users and purposes.
Children will become familiar with how to create a design specification with the needs of the end user in mind taking into consideration the products they have examined. Communicate and model in order to explain and develop ideas, share findings and conclusions. To continually make evaluations when designing and making, to bring about improvements in processes and outcomes.
Pupils should be taught about making pencil cases, wallets and purses.
To identify the qualities of a range of materials thinking about the, suitability and aesthetic qualities
To create a prototype of a puppet identifying how the pattern fits together and understand the importance of this in the design process.
To use a range of techniques to line and join materials together in order to create a quality end product.

Manor Primary School – Design Technology- Designing and Making a puppet – Textiles
To use decorative finishes.
Expectations Examine a range of existing puppets and identify how they work, what their purpose is and how they have been made.
To test and identify the suitability of materials ensuring they are fit for purpose.
To investigate ways of joining materials and strengthening their product.
Create a design specification for a puppet thinking about the end user.
To create a pattern and prototype using the design specification.
To decorate the product.
To present and evaluate their product with the views of the end user in mind.
Manor Primary School – Design Technology- Designing and Making a puppet – Textiles
Learning Objectives Suggested Learning Opportunities
To explore and evaluate a range of existing puppets. To understand what they are used for and how they are made. To evaluate puppets against a design criteria.
http://www.enchantedlearning.com/crafts/puppets/index.shtml Explain to the children that they have received a very special letter from the toy shop The Entertainer, asking them to help them with a new upcoming project – designing and making a puppet.
Ask the children a series of questions. What are puppets? Who might use them? Why? What sort of puppets would you like to play with? Children to create an evaluation criteria to evaluate existing products against. A puppet should…. EG Be able to fit on a hand.
Give the children a range of puppets to investigate (finger puppets, hand puppets) How has the puppet been put together? What type of fabric has been used? What has been added? Who might the puppet have been made for? How well has it been made? Would you buy/play with this puppet? Why?
Children to draw a picture of the puppets and label thinking about the key features, colours, materials used etc. (children could create a table)
Children to explain what they like/dislike about the puppet.
Show a video of a range of puppet shows. Discuss with the children the types of puppets, the stories and how they make the characters come to life.
Ask each child to find an example of a puppet to bring to the group and talk about. talk about the different examples of puppets, describing how they have been made
make clear, labelled drawings of the puppets
To develop ideas through talking, drawing, Explain to the children that before they design their product they need to find out how to make one.

Manor Primary School – Design Technology- Designing and Making a puppet – Textiles
templates, and patterns. To identify ways of joining material together. To evaluate the techniques used.
Provide an opportunity for children to practise basic sewing techniques eg starting, ending, running stitch, using eg hessian, binca or plastic mesh.
Demonstrate how to use a template to cut out two identical pieces of fabric. Ask the children to explore simple ways to add features and bring characters to life.
Discuss how something can be made to look fierce, scary, funny, and so on. Children could practise making templates or patterns allowing for seam allowances. Children could investigate ways of joining two pieces of fabric eg running stitch, stapling
or gluing. Discuss when these techniques might be useful and the advantages and disadvantages of each of them
Children to discuss the skills they have developed and which technique would be best to hold their material/ puppet together.
To design a puppet thinking about what it will be used for. To think about how it will be made and why. To think about the material and appearance.
Designing a puppet Remind the children of the techniques they have learnt for making their puppets. Use examples of puppets to talk about ideas that the children might use in their own designs. Talk about what their puppet needs to do to work well Children to design their own puppet thinking about the appearance, material and what the puppet will be used for. Encourage children to think about the most appropriate materials. Which materials would be most suitable/unsuitable and why? Children to come up with their own design criteria to support their planning and ideas. (suggestions puppets linking to a story)
To create a template and a prototype of your puppet. To evaluate your design and suggest changes.
Creating a paper prototype Show the children how they can adapt a template for the basic shape of their puppet. Encourage them to try out their ideas by making a paper mock-up. This could be used as a paper pattern or they could make their own template from thin card. Encourage the children to be accurate when marking out, cutting, joining and finishing. Ask the children to evaluate against the design criteria.
Adapt a given template and model their ideas using paper use a template or paper pattern to cut out two pieces of fabric for their puppet join their fabric pieces effectively
Manor Primary School – Design Technology- Designing and Making a puppet – Textiles
add features to their puppets using appropriate materials and techniques talk about their finished puppet in relation to how well it works and how well it fulfils the design criteria.
To use the patterns and designs to create a puppet. To join material together making sure it is safe and secure. To add decoration to the puppet.
Making Children to use their prototype and patterns to make their finished product. Children to
cut out two pieces of fabric for their puppet and join effectively together ensuring it is secure and safe for other users.
Children to add features to their puppets using appropriate materials and techniques Eg adding finishes such as button eyes etc to their product for effect.
To evaluate their ideas and products against design criteria. To think about the views of the end user.
Evaluation Children to have a puppet ‘show’ to reveal their finished product to the entertainer store/target audience. Children to evaluate their product explaining what went well and what improvements could be made. Children to evaluate the work of their peers and give verbal feedback about what they like and what improvements could be made.

Manor Primary School – DT- Designing and making an electrical game: Focus Structures and electrical components
Manor Primary School
Science Year 2: Designing and making an electrical game: Focus Structures and electrical components
Overview of the Learning:
In this unit, children learn how to investigate, design and make an electronic game. They learn that designers must address a range of needs when designing the game e.g. appearance, safety, entertainment how it will work.
Children learn about circuits and switches and how they can be made/adapted. They learn to evaluate their products critically against design criteria and identify what to do to improve them.
Core Aims
Design
design purposeful, functional, appealing products for themselves and other users based on design criteria
generate, develop, model and communicate their ideas through talking, drawing, templates, mock-ups and, where
appropriate, information and communication technology
Make
select from and use a range of tools and equipment to perform practical tasks [for example, cutting, shaping,
joining and finishing]
select from and use a wide range of materials and components, including construction materials and circuits
according to their characteristics
Evaluate
explore and evaluate a range of existing products
evaluate their ideas and products against design criteria
Technical knowledge
build structures, exploring how they can be made stronger, stiffer and more stable
explore and use circuits in their products.
.
Pupils should be taught to…
Observe and explore and generate ideas, define problems and pose questions in order to develop
investigations and products.
Take ownership of the whole design process: carrying out market research, designing, creating a
prototype, making improvements, creating an end product and evaluating.
To identify the needs of the end user by exploring the existing market and asking questions about
what electronic games are popular and why and where there are gaps in the market which could
generate a profit.
Apply practical skills to design, make and improve products safely, taking account of users and
purposes.
Children will become familiar with how to create a design specification with the needs of the end
user in mind taking into consideration the results of their market research. Communicate and
model in order to explain and develop ideas, share findings and conclusions.
To continually make systematic evaluations when designing and making, to bring about
improvements in processes and outcomes.
Pupils should be taught about making an electronic game:
To understand how circuits work and the components that are needed,
To understand how circuits are used within an electronic board game.
To understand how to make and use a switch and understand the purpose.
Expectations
Children can:
Manor Primary School – DT- Designing and making an electrical game: Focus Structures and electrical components
Examine a range of existing electronic games and identify the purpose, suitability appearance and function and how the games have been assembled.
Carry out market research to find out about the products that are available to buy, gaps in the market and the needs of the end user.
Identify the suitability of materials ensuring they are fit for purpose.
Create a design specification for their own game using the market research.
To use a circuit including switches to make their game.
To evaluate the game against the design specification and the needs of the end user.
Suggest improvements during and after the design and making process.
Learning Objectives Suggested Learning Opportunities
To investigate a range of existing products. Introduce the new topic of learning to the children. Explain that they have had an important letter from the Toy

Manor Primary School – DT- Designing and making an electrical game: Focus Structures and electrical components
To understand how electronic games work. Store the Entertainer. Explain that they need help with designing and creating a new game to encourage children to
play electronic quiz games.
Ask the children to investigate a collection of simple games that use an electric circuit (operation, steady hand game
etc)
How does the switch work? How many batteries are used? What type are they? What materials have been used and
why? Are there any special surface textures? What shape is it and why? How heavy is it?
Explain to the children how the games works identifying the key features eg bulb, battery, switch, casing. If possible
take apart an old game to discover how it is made, especially the way a complete circuit is made using a switch.
Get children to draw annotated drawings of the games how it work
To understand how to make a circuit using a battery, bulb, wires and a switch.
To investigate how a switch can be made.
Show the children how to make a simple electrical circuit using a battery, bulb, switch and connecting wires.
Teach the children that a variety of metal components can be used as part of the circuit.
Ask the children to make a variety of hand-made switches by using simple classroom materials eg card, plastic,
aluminium foil, paper fasteners, paper clips.
Ask the children to make switches that work in different ways eg when you press them, when you slide them.
The children could investigate finishing techniques for a quiz game
Get children to record their learning in a variety of ways annotated drawings, taking photos of their switches/ circuits
and importing to word document and describing how their switches/ circuits work.
To investigate existing products, to carry out market research and to carry out a survey.
Ask children how they can find out about what games people might enjoy playing.
Give children the opportunity to investigate catalogues to find out what electronic quiz games are available in the
shops already.
Manor Primary School – DT- Designing and making an electrical game: Focus Structures and electrical components
Ask the children to design a survey to help them to find out about the themes people might enjoy.
Children to carry out the questionnaire.
To create a design a specification for an electronic game. To design and make an electronic game.
In pairs ask the children to use their knowledge of circuits and market research to design an electrical question board
on a learning theme of their choice
Children to use annotated diagrams in their books.
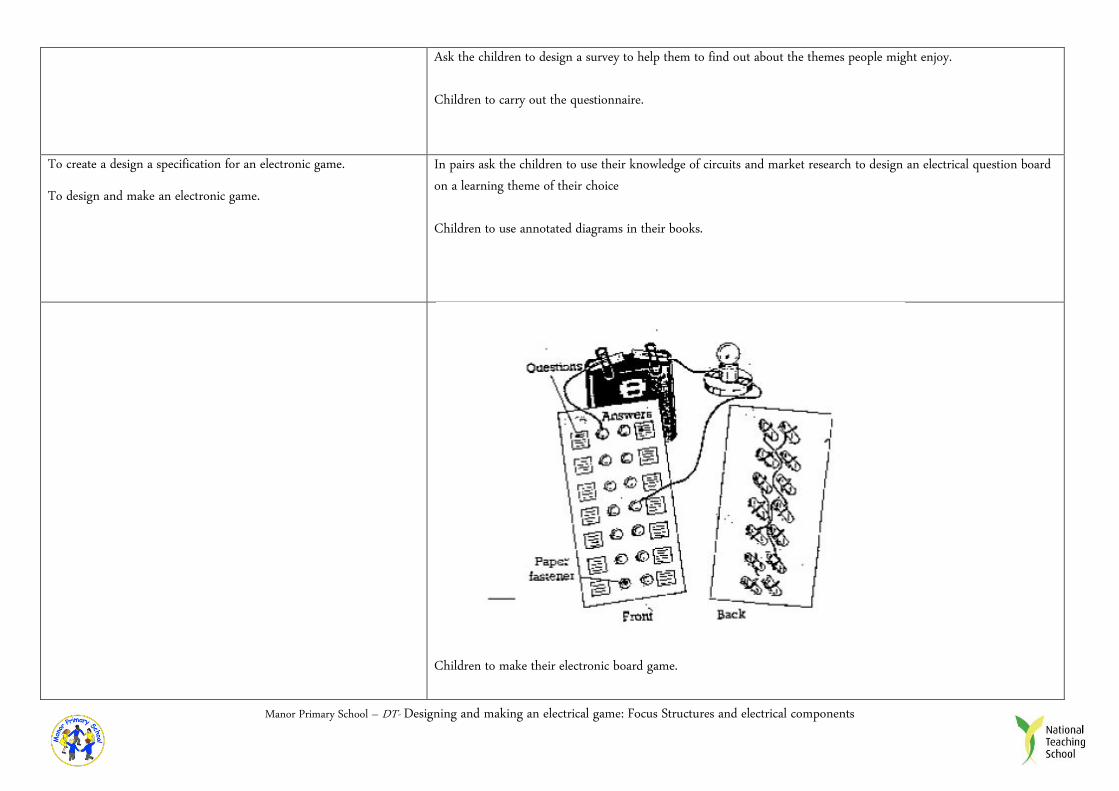
Children to make their electronic board game.

Manor Primary School – DT- Designing and making an electrical game: Focus Structures and electrical components
Model how to make the question board perhaps creating a large one for the children to investigate.
1. Write down some questions and answers on one side of the cardboard
Mix them up, so that questions are not next to the right answers.
2. Push a paper fastener through the board next to each question and
each answer.
3. On the other side of the board, use the wire to connect each question
with the right answer.
4. Make a circuit with the battery bulb and wire. Leave the bare ends of the
wires free.
5. Touch one wire to a paper fastener next to the question and the other
wire to a paper fastener next to the answer you think is the right one. If
you are right, you will complete a circuit and the bulb will light up.
Get children to record their work by describing their product drawing product/ photograph it and import into their
work.
To evaluate the end product against the original design.
To identify improvements.
To evaluate ideas by carrying out end user research.
Get children to evaluate their product comparing it with their design intentions and suggested ways of improving it.
Ask the children to evaluate their model by considering how well it works and meets the needs of the user that they
have identified. How well does this work? Will it do what you intend it to? How can you improve it? What do you
need to change? Why? How will this meet the needs of the user? What do the users say? Ask the children to play the
games with other children and take their feedback to help them to evaluate their product.
Children to identify some modifications to the light/ buzzer that they have made, including safety of the product

Manor Primary School – Design Technology- Designing and Making purses, wallets and pencil cases– Textiles
Manor Primary School Science Year 3: Designing and Making Wallets, Purses, Pencil Cases – textiles
Overview of the Learning: In this unit children learn how textiles containers eg purses, wallets and belt bags are designed for different purposes and different users. They design patterns/templates, and join and reinforce fabrics. Children develop their designing skills when evaluating products and use this information to generate their own ideas and identify design criteria. They communicate their early ideas through modelling with paper or inexpensive fabric, and use decorative techniques eg dyeing and embroidery.
Core Aims Design use research and develop design criteria to inform the design of innovative, functional, appealing products that are fit for purpose, aimed at particular individuals or groups generate, develop, model and communicate their ideas through discussion, annotated sketches, cross-sectional and exploded diagrams, prototypes, pattern pieces and computer-aided design Make select from and use a wider range of tools and equipment to perform
practical tasks [for example, cutting, shaping, joining and finishing], accurately select from and use a wider range of materials and components, including construction materials, textiles and ingredients, according to their functional properties and aesthetic qualities Evaluate investigate and analyse a range of existing products evaluate their ideas and products against their own design criteria and consider the views of others to improve their work understand how key events and individuals in design and technology have helped shape the world Technical knowledge apply their understanding of how to strengthen, stiffen and reinforce more complex structures
Pupils should be taught to develop their design and making skills They will: Observe and explore and generate ideas, define problems and pose questions in order to develop investigations and products.
Take ownership of the whole design process: carrying out market research, designing, creating a prototype, making improvements, creating an end product and evaluating. To identify the needs of the end user by exploring the existing market and asking questions about what containers and purses are popular and why and where there are gaps in the market which could generate a profit. Apply practical skills to design, make and improve products safely, taking account of users and purposes.
Children will become familiar with how to create a design specification with the needs of the end user in mind taking into consideration the results of their market research. Communicate and model in order to explain and develop ideas, share findings and conclusions. To continually make systematic evaluations when designing and making, to bring about improvements in processes and outcomes.
Pupils should be taught about making pencil cases, wallets and purses.
To identify the qualities of a range of materials thinking about the, suitability and aesthetic qualities
To create a prototype identifying how the pattern fits together and understand the importance of this in the design process.
To use a range of techniques to line and join materials together in order to create a quality end product.

Manor Primary School – Design Technology- Designing and Making purses, wallets and pencil cases– Textiles
To understand how fastenings such as buttons, zips and press studs are attached for functional purposes.
Expectations Examine a range of existing container products and identify the purpose, suitability appearance and function and how the containers have been
assembled.
Carry out market research including questionnaires to find out about the products that are available to buy, gaps in the market and the needs of
the end user.
To test and identify the suitability of materials ensuring they are fit for purpose.
To investigate ways of joining materials and strengthening their product.
Create a design specification for a pencil case/money container using the market research.
To create a pattern and prototype using the design specification.
To attach fastenings to the product.
To create and evaluate a purse/wallet, money belt/ pencil case container against the specification and the needs of the target audience.
Suggest improvements during and after the design and making process.
Learning Objectives Suggested Learning Opportunities

Manor Primary School – Design Technology- Designing and Making purses, wallets and pencil cases– Textiles
that products are designed for different purposes
and different users to evaluate products and identify criteria that can
be used for their own designs to make labelled drawings from different views showing specific features
Introduce the children to a letter that they have received from the House of Fraser. Explain that they have been asked to design a new and upcoming range of purses,
wallets, belt bags or pencil cases for the Spring catalogue. What are they used for? Who would use them? Provide opportunities for children to examine carefully a collection of money containers
eg purses, wallet, pencil cases and belt bags. Focus the children’s attention on the seams and seam allowance, fastenings and the names and number of parts used in construction and why they are used eg gusset, strap, hem.
Discuss the different fabrics used, how the material is reinforced and the properties needed in the fabric eg hard-wearing.
Ask the children questions eg Which purse is most suitable for a young
child/teenager/adult? Which would be safest to keep your money in? Why is it useful to have compartments in a wallet?
Make a list of features essential to all of these types of containers. Children to look at how the products have been lined. Discuss different fastenings eg buttons, press studs, hooks and eyes, Velcro, safety
pins, lace, buckles. What products are they used on? How do they work? Why is the fastening appropriate for the use? Is the fastening a feature of the product?
Ask the children to choose 2 different types of containers examined and make drawings and label the materials, fastenings, measurements and joining techniques used in a number of textiles containers. Draw products from different views, and label indicating the materials, fastenings, measurements and construction techniques used
Challenge: Ask children to investigate some of the different types of textiles in use.
Which textiles are known as “natural” and which are known as “synthetic”? Look at clothing labels to find out what materials they are made from.
To know how to sew using a range of different stitches.
To understand that fabrics have different properties that some joining techniques are stronger/weaker
than others
Explain that they are going to investigate techniques that are used to join material together.
Demonstrate and allow the children to practise techniques eg running stitch, back
stitch, starting/finishing, weaving and knitting.

Manor Primary School – Design Technology- Designing and Making purses, wallets and pencil cases– Textiles
that fabric can be joined in temporary and permanent ways
To understand how to line purses. how to model ideas with paper or inexpensive
fabric.
Ask the children to sew two small pieces of fabric together and test which joining method makes the strongest seam.
Show the children how to pieces of fabric can be joined together and turned inside out
in order to line the item and make it stronger and more aesthetically pleasing.
using textiles for a specific purpose to appreciate the aesthetic qualities of a design to draw up simple design specifications to make a plan and generate ideas for the product
Discuss with the children how fabrics are made and their different properties eg woven, bonded and knitted, fraying/non-fraying/stretchy/hard wearing. Choose tests to carry out in order to help decide on suitable fabric for a container; test out a small range of fabrics eg felt, calico, baize, denim, drill, needlecord. Over a series of lessons demonstrate and allow the children to try out suitable
decorative techniques and display examples of the results eg dyeing, embroidery, appliqué, fabric paints. Children can then apply this to their final design later on.
Children could try out methods of securing different fastenings and evaluate their
suitability. Children could practise stiffening fabric using vylene or thin card and putting in a
gusset to allow more space in the purse/bag.
using textiles for a specific purpose to appreciate the aesthetic qualities of a design to draw up simple design specifications to make a plan of how to make the product to evaluate their product at each stage identifying
strengths and areas for development against the original specifications
to carry out market research.
Discuss with the children the purpose and the user of the purse, wallet/ pencil case Ask the children to draw up a simple design specification and labelled diagram eg it
must be small, keep the money/ pencils safe, have compartments. Ask them to put the list of points in order with the most important ones coming first. Introduce children to market research and what is involved. Establish that this is
important when designing the product as these are the potential customers who you are aiming your product at and if they do not like it they won’t buy it. It also allows designers to identify where there is a need for a new product or where there are gaps in the market.
Children to create a questionnaire for their target market (adults/school children/
primary/secondary pupils) Children to complete a final design taking into consideration the needs of the end user.

Manor Primary School – Design Technology- Designing and Making purses, wallets and pencil cases– Textiles
how to make a paper pattern/template that uses a seam allowance
to measure, tape or pin, cut and join fabric with some accuracy
to evaluate the product at each stage. To write a simple action plan/set of instructions on
how to make the product.
Ask the children to model ideas (create a prototype) for money containers/ pencil cases using newspaper/paper/pins/staples/masking tape. Explain the importance of making a prototype out of cheaper materials. Take these apart carefully and use as a template to make a paper pattern. Show children how to add a seam allowance and discuss when it is needed. allowing for a seam (1-1.5cms), Encourage the children to draw or model their ideas using inexpensive fabric or paper, then choose the most appropriate material for the intended user.. Remind the children about a seam allowance when making their pattern/template and
to avoid fabric wastage when cutting. Children to evaluate their prototype in their books and explain what worked well and
what changes they need to make as a result of further research How well is this working? Is it what the user wants? What could we do to make it
better? How could we improve the way it looks? Feels? Opens? Closes? What do you need to change? What effect will this have?
Make a final drawing indicating fabric and fastenings to be used, simple
measurements and techniques. Ask the children to write a simple action plan.
Use textiles for a specific purpose to appreciate the aesthetic qualities of a design to use stitches to join fabric. to measure, tape or pin, cut and join fabric with
some accuracy to evaluate their product identifying strengths and
areas for development against the original
Children to create their final product and evaluate. Children to carry out another questionnaire with the end user to consider their needs. Children to present their final product to ‘The house of Frasier boardroom’ (rest of the class) answering questions and giving an explanation for their design choices.
Manor Primary School – Design Technology- Designing and Making purses, wallets and pencil cases– Textiles
specifications and the needs of the end user. To carry out market research to inform their own
evaluations and product designs.

Manor Primary School – Design Technology- Designing and Making Slippers – Textiles
Manor Primary School
Science Year 4: Designing and Making torches
Overview of the Learning:
Children will apply their knowledge about electric circuits that they acquire in science in a purposeful way by designing and making a simple torch. While all the designing and making skills will
be used, there will be a particular emphasis on defining a set of clear specifications for the torch by considering who will use it and the conditions under which it might be used. The children also
consider how the torch can be controlled by designing and making their own switch.
Core Aims
Design
use research and develop design criteria to inform the design of innovative, functional, appealing products that
are fit for purpose, aimed at particular individuals or groups
generate, develop, model and communicate their ideas through discussion, annotated sketches, cross-sectional
and exploded diagrams, prototypes, pattern pieces and computer-aided design
Make
select from and use a wider range of tools and equipment to perform practical tasks [for example, cutting,
shaping, joining and finishing], accurately
select from and use a wider range of materials and components, including construction materials, textiles and
ingredients, according to their functional properties and aesthetic qualities
Evaluate
investigate and analyse a range of existing products
evaluate their ideas and products against their own design criteria and consider the views of others to improve
their work
understand how key events and individuals in design and technology have helped shape the world
Technical knowledge
To apply understanding of circuits and electrical systems in their products [for example, series circuits
incorporating switches, bulbs, buzzers and motors]
apply their understanding of computing to program, monitor and control their products.
Pupils should be taught to develop their design and making skills They will:
Observe and explore and generate ideas, define problems and pose questions in order
to develop investigations and products.
Take ownership of the whole design process: carrying out market research,
designing, making improvements, creating an end product and evaluating.
To identify the needs of the end user by exploring the existing market and asking
questions about what bags are popular and why and where there are gaps in the
market which could generate a profit.
Apply practical skills to design, make and improve products safely, taking account of
users and purposes.
Children will become familiar with how to create a design specification with the
needs of the end user in mind taking into consideration the results of their market
research. Communicate and model in order to explain and develop ideas, share
findings and conclusions.
To continually make systematic evaluations when designing and making, to bring
about improvements in processes and outcomes.
What pupils will be taught about making torches. :
To identify the qualities of a range of materials thinking about the, suitability and
aesthetic qualities
To understand how a torch is made and how they work.

Manor Primary School – Design Technology- Designing and Making Slippers – Textiles
To understand how to make a circuit and use switches to control it.
To create a safe circuit which is suitable for a torch.
Expectations
Children can
Examine a range of existing products and identify the purpose, suitability appearance and function and how the torches have been assembled.
Carry out market research including questionnaires to find out about the products that are available to buy, gaps in the market and the needs of the end user.
Identify the suitability of materials ensuring they are fit for purpose.
Create a design specification for their own torch using the market research.
To use circuits and switches to control the torch.
To make the torch considering the materials used/ suitability and aesthetic qualities.
To evaluate the torch against the design specification and the needs of the end user.
Suggest improvements during and after the design and making process.
Learning Objectives Suggested Learning Opportunities

Manor Primary School – Design Technology- Designing and Making Slippers – Textiles
To understand that torches are designed with the particular needs of the user in mind and that these needs can vary widely
That commercially available torches contain a simple
circuit involving metal connectors which do not necessarily have to be wires
That torches are made of a variety of materials suited to
the purpose for which they are employed
Ask the children to investigate a collection of torches, cycle lamps and other battery-powered lights
eg pocket torches, ‘miners’’ head lamps, rear bicycle lamps, camping table lamps. How does the casing
stay together? How is the light reflected? How does the switch work? How many batteries are used?
What type are they? What materials have been used and why? Are there any special surface textures?
What shape is it and why? How heavy is it?
Discuss the circumstances in which each light is used and relate this to the particular features of its
design eg the milk deliverer, a caving enthusiast, a cyclist. How does a designer take account of
individual differences of a person’s anatomy (eg hand size) when designing a product to be used by the
general population? Where do they get information from about body sizes? Children could do a survey
of head/hand sizes to highlight the need for adjustment within the specification of a product.
Explain to the children how a torch works, identifying the key features eg bulb, reflector, battery,
switch, casing. If possible take apart an old torch to discover how it is made, especially the way a
complete circuit is made using a switch. Investigate how the torches are designed to be safe.
Discuss the advantages/disadvantages of disposable products eg torches.
Children to draw annotated drawings of a torch and how it work
to make a simple circuit incorporating a battery, light bulb, switch
and connecting wires in a safe manner
how to find a fault in a simple circuit and correct it
that a variety of metals in different forms will conduct electricity
Show the children how to make a simple electrical circuit using a battery, bulb, switch and connecting wires.
Teach the children that a variety of metal components can be used as part of the circuit.
Ask the children to make a variety of hand-made switches by using simple classroom materials eg card, plastic,
aluminium foil, paper fasteners, paper clips.
Ask the children to make switches that work in different ways eg when you press them, when you slide them.
Manor Primary School – Design Technology- Designing and Making Slippers – Textiles
The children could investigate the reflective qualities of some materials which might be used as a torch reflector.
The children could explore a variety of ‘casings’ for a torch and ways in which the batteries, switch and bulb might be
fixed inside. Include reclaimed card boxes, tubes, plastic bottles, 3D geometric shapes made from nets of card, etc.
The children could investigate finishing techniques for a torch case.
Get children to record their learning in a variety of ways annotated drawings, taking photos of their switches/ circuits
and importing to word document and describing how their switches/ circuits work
to create plans for a new product can be made using drawings with labels
To carry out market research to find out about the needs of the end
user.
Ask the children to:
think of a situation in which a battery-powered light might be of use.
Who are you going to design for? What activity is your light for? What must it do to be successful? How will you
meet your user’s needs?
list the needs of someone using the light eg:
the light should shine a beam onto the page of a book
the light should have a case which doesn’t fall over on uneven ground
the switch should only stay on when the light is being held by someone
discuss appearance, function, safety and reliability. How will the people use what you are designing? What could go
wrong? What must your product not do? How could you make it safer? Are there different ways of making this?
Which would give the best results?
prioritise the specification, listing first the essential elements and those that are important (but not essential)
Children to design their torch by labelling a drawing to show:
the materials to be used for different parts of the light
how the circuit will be arranged inside the casing
the kind of switch to be used.
Homework link/additional lesson-discuss the use of market research and the impact it has in the design process.
Children to design and carry out a questionnaire with family members to find out what they would look for in a
torch.
To use the design specification to make a torch.
To write a set of instructions to explain how the torch was made.
Children to make their torch and apply finishing touches using range of materials
Get children to record their work by giving step by step instructions of how the product was created using a
photograph and importing it into their work

Manor Primary School – Design Technology- Designing and Making Slippers – Textiles
to evaluate their work both during and at the end of the assignment
to check their product is safe
Children to evaluate their model by considering how well it works and meets the needs of the user that they have
identified.
How well does this work? Will it do what you intend it to? How can you improve it? What do you need to change?
Why? How will this meet the needs of the user? What do the users say?
Get children to evaluate their product comparing it with their design intentions and suggested ways of improving it.
Evaluate their light against the original design criteria and identify some modifications to the light that they have
made, including safety of the product.
What could be done to improve their design?
Manor Primary School – DT- Designing and Making a Designer Bag.
Manor Primary School
Science Year 5: Controllable Vehicles
Overview of the Learning:
In this unit, children develop their understanding of how products can be driven by electricity. They learn how to use motors within their models and how to control the speed and direction of movement. They develop their designing skills by
using their own ideas and experiences to produce clearly labelled drawings. They use construction kits and a range of materials and components to develop their skills, knowledge and understanding. The children will produce a framework structure
that will be controlled by an electrical circuit. The children will develop this structure with cladding and appropriate finishing techniques to create a quality product.
The vehicles made in this unit could be linked to the computer using appropriate equipment and software to enable children to experience writing procedures to control the movement and direction of their vehicles. This unit could be adapted by
focusing on a particular type of vehicle eg a circus vehicle, a carnival float, a moon buggy, a vehicle for transporting a particular load. Could be altered to create a speed boat)
Core Aims
To use research and develop design criteria to inform the design of functional moving vehicles that are fit for
purpose, aimed at particular individuals or groups
generate, develop, model and communicate their ideas through discussion, annotated sketches, cross-sectional
and exploded diagrams, prototypes, pattern pieces and computer-aided design
Make
select from and use a wider range of tools and equipment to perform practical tasks [for example, cutting,
shaping, joining and finishing], accurately
select from and use a wider range of materials and components, including construction materials, according to
their functional properties and aesthetic qualities
Evaluate
investigate and analyse a range of existing products
evaluate their ideas and products against their own design criteria and consider the views of others to improve
their work
Technical knowledge
apply their understanding of how to join materials permanently.
To apply their knowledge of circuits to creating a moving vehicle that is controlled by electricity.
Pupils should be taught to develop knowledge, skills and understanding by exploring and developing ideas …
Observe and explore and generate ideas, define problems and pose questions in order to develop
investigations and products.
Take ownership of the whole design process: carrying out market research, designing, creating a
prototype, making improvements, creating an end product and evaluating.
Apply practical skills to design, make and improve products safely, taking account of users and
purposes.
Children will become familiar with how to create a design specification with the needs of the end
user in mind taking into consideration the results of their market research. Communicate and
model in order to explain and develop ideas, share findings and conclusions.
To continually make systematic evaluations when designing and making, to bring about
improvements in processes and outcomes.
Pupils should be taught about making moving vehicles:
To understand how motors can be used to create moving vehicles.
To know how to use resources to make a chassis complete with axels and wheels that roll straight.
To use hacksaws and wood to create a chassis.
To understand how to use permanent joining techniques.
To understand how switches can be incorporated to control the vehicle.
Expectations
Children can:
Manor Primary School – DT- Designing and Making a Designer Bag.
Examine a range of moving/ controllable vehicles and identify the key features eg chassis, axles, motor and wheels.
Carry out market research including questionnaires to find out about the products that are available to buy, gaps in the market and the needs of the end user.
Identify the suitability of materials ensuring they are fit for purpose.
Create a design specification for their own controllable vehicle.
To use a hack saws and permanent joining techniques to create a chassis.
To use a circuit to control and power the vehicle.
To evaluate the vehicle against the design specification.
Suggest improvements during and after the design and making process.
Learning Objectives Suggested Learning Opportunities
how a vehicle moves using wheels and axles to investigate and disassemble products in order to learn how they work
and how they are made to communicate through labelled drawings that there are different sorts
of switches
Provide some examples of controllable toy vehicles for children to investigate eg models made from construction kits.
Ask questions about how the models work eg Where does the power come from? How are the wheels driven? What are their similarities and
differences? Discuss new vocabulary.
Ask the children to observe carefully how the model is constructed, how it works and how the components are joined together. Ask them to record
their findings through labelled drawings eg drawings from different views, exploded diagrams.
Challenge: The children could investigate examples of switches and how they work.
to assemble components to make working models
how to control the speed and direction of movement using pulleys and/or gears
how electrical circuits with switches can be used to achieve functional results
to use tools safely and accurately
Ask the children to use construction kits to make models of vehicles incorporating motors. How can the attached axle be made to turn faster or slower?
Give the children a series of practical activities related to circuits:
revise circuits, ensure children understand the need for a complete circuit
incorporate a motor into the circuit – Which way does it turn? How can the direction be changed?
add a small pulley to the motor spindle. Use an elastic band to make a belt drive. Place the belt around another pulley fixed to an axle secured in a box. Is the belt
turning quickly or slowly? What happens if you change the size of the pulley?
ask the children to add switches to control the circuit. Use the results of their investigations to make their own circuits and switches.
Demonstrate the use of tools, equipment and components that children might need to use eg wire strippers, connector strip, motor mounting clips. Remind
children how to make a wooden frame from square section wood joined with card triangles or diagonals and how to add wheels and axles. Show children how to
cut wood at an angle.
Challenge; The children could investigate axle speed using construction kits.
to generate and model ideas through discussion and drawing
to design and make as part of a team
to select appropriate tools, materials, components and techniques
to plan the main stages of making
Discuss with the children the possibilities for different sorts of toy vehicles, eg moon buggies, lorries, circus vehicles. Discuss how these might be
made from a basic chassis with cladding. What could you do? How could you do this? What does the vehicle need to do? What will it look like?
What need does the vehicle meet?
Discuss how the design should reflect the needs and/or style of the person who will use it. Who are you designing for? How will you make the

Manor Primary School – DT- Designing and Making a Designer Bag.
to evaluate their work according to their design criteria and to suggest improvements vehicle appear to say ‘I belong to...’? Ask the children to work in pairs to discuss their ideas, to set criteria and then to make labelled drawings to show how they would construct their
toy vehicle, including how the electrical components would be incorporated. Are there different ways of making this? Which could give the best
results? What could we use?
Ask the children to list the materials and components, and tools and equipment they would need and to identify their main stages of making. What
tools would be best for this? What do you need to do first? What else could you do if it doesn’t work?
Check the children’s design proposals before starting to make.
Encourage the children to test their models during development and to adapt where necessary. What do the users think about it? What could you
do to make it better?
Ask the children to evaluate their finished models against their design criteria and to suggest improvements. Make a factsheet, explaining how the vehicle was made, design features incorporated, how the vehicle works etc.

Manor Primary School – DT- Designing and Making a Designer Bag.
Manor Primary School
Science Year 5: Controllable Vehicles
Overview of the Learning:
In this unit, children develop their understanding of how products can be driven by electricity. They learn how to use motors within their models and how to control the speed and direction of movement. They develop their designing skills by
using their own ideas and experiences to produce clearly labelled drawings. They use construction kits and a range of materials and components to develop their skills, knowledge and understanding. The children will produce a framework structure
that will be controlled by an electrical circuit. The children will develop this structure with cladding and appropriate finishing techniques to create a quality product.
The vehicles made in this unit could be linked to the computer using appropriate equipment and software to enable children to experience writing procedures to control the movement and direction of their vehicles. This unit could be adapted by
focusing on a particular type of vehicle eg a circus vehicle, a carnival float, a moon buggy, a vehicle for transporting a particular load. Could be altered to create a speed boat)
Core Aims
To use research and develop design criteria to inform the design of functional moving vehicles that are fit for
purpose, aimed at particular individuals or groups
generate, develop, model and communicate their ideas through discussion, annotated sketches, cross-sectional
and exploded diagrams, prototypes, pattern pieces and computer-aided design
Make
select from and use a wider range of tools and equipment to perform practical tasks [for example, cutting,
shaping, joining and finishing], accurately
select from and use a wider range of materials and components, including construction materials, according to
their functional properties and aesthetic qualities
Evaluate
investigate and analyse a range of existing products
evaluate their ideas and products against their own design criteria and consider the views of others to improve
their work
Technical knowledge
apply their understanding of how to join materials permanently.
To apply their knowledge of circuits to creating a moving vehicle that is controlled by electricity.
Pupils should be taught to develop knowledge, skills and understanding by exploring and developing ideas …
Observe and explore and generate ideas, define problems and pose questions in order to develop
investigations and products.
Take ownership of the whole design process: carrying out market research, designing, creating a
prototype, making improvements, creating an end product and evaluating.
Apply practical skills to design, make and improve products safely, taking account of users and
purposes.
Children will become familiar with how to create a design specification with the needs of the end
user in mind taking into consideration the results of their market research. Communicate and
model in order to explain and develop ideas, share findings and conclusions.
To continually make systematic evaluations when designing and making, to bring about
improvements in processes and outcomes.
Pupils should be taught about making moving vehicles:
To understand how motors can be used to create moving vehicles.
To know how to use resources to make a chassis complete with axels and wheels that roll straight.
To use hacksaws and wood to create a chassis.
To understand how to use permanent joining techniques.
To understand how switches can be incorporated to control the vehicle.
Expectations
Children can:

Manor Primary School – DT- Designing and Making a Designer Bag.
Examine a range of moving/ controllable vehicles and identify the key features eg chassis, axles, motor and wheels.
Carry out market research including questionnaires to find out about the products that are available to buy, gaps in the market and the needs of the end user.
Identify the suitability of materials ensuring they are fit for purpose.
Create a design specification for their own controllable vehicle.
To use a hack saws and permanent joining techniques to create a chassis.
To use a circuit to control and power the vehicle.
To evaluate the vehicle against the design specification.
Suggest improvements during and after the design and making process.
Learning Objectives Suggested Learning Opportunities
how a vehicle moves using wheels and axles to investigate and disassemble products in order to learn how they work
and how they are made to communicate through labelled drawings that there are different sorts
of switches
Provide some examples of controllable toy vehicles for children to investigate eg models made from construction kits.
Ask questions about how the models work eg Where does the power come from? How are the wheels driven? What are their similarities and
differences? Discuss new vocabulary.
Ask the children to observe carefully how the model is constructed, how it works and how the components are joined together. Ask them to record
their findings through labelled drawings eg drawings from different views, exploded diagrams.
Challenge: The children could investigate examples of switches and how they work.
to assemble components to make working models
how to control the speed and direction of movement using pulleys and/or gears
how electrical circuits with switches can be used to achieve functional results
to use tools safely and accurately
Ask the children to use construction kits to make models of vehicles incorporating motors. How can the attached axle be made to turn faster or slower?
Give the children a series of practical activities related to circuits:
revise circuits, ensure children understand the need for a complete circuit
incorporate a motor into the circuit – Which way does it turn? How can the direction be changed?
add a small pulley to the motor spindle. Use an elastic band to make a belt drive. Place the belt around another pulley fixed to an axle secured in a box. Is the belt
turning quickly or slowly? What happens if you change the size of the pulley?
ask the children to add switches to control the circuit. Use the results of their investigations to make their own circuits and switches.
Demonstrate the use of tools, equipment and components that children might need to use eg wire strippers, connector strip, motor mounting clips. Remind
children how to make a wooden frame from square section wood joined with card triangles or diagonals and how to add wheels and axles. Show children how to
cut wood at an angle.
Challenge; The children could investigate axle speed using construction kits.
to generate and model ideas through discussion and drawing
to design and make as part of a team
to select appropriate tools, materials, components and techniques
to plan the main stages of making
Discuss with the children the possibilities for different sorts of toy vehicles, eg moon buggies, lorries, circus vehicles. Discuss how these might be
made from a basic chassis with cladding. What could you do? How could you do this? What does the vehicle need to do? What will it look like?
What need does the vehicle meet?
Discuss how the design should reflect the needs and/or style of the person who will use it. Who are you designing for? How will you make the
Manor Primary School – DT- Designing and Making a Designer Bag.
to evaluate their work according to their design criteria and to suggest improvements vehicle appear to say ‘I belong to...’? Ask the children to work in pairs to discuss their ideas, to set criteria and then to make labelled drawings to show how they would construct their
toy vehicle, including how the electrical components would be incorporated. Are there different ways of making this? Which could give the best
results? What could we use?
Ask the children to list the materials and components, and tools and equipment they would need and to identify their main stages of making. What
tools would be best for this? What do you need to do first? What else could you do if it doesn’t work?
Check the children’s design proposals before starting to make.
Encourage the children to test their models during development and to adapt where necessary. What do the users think about it? What could you
do to make it better?
Ask the children to evaluate their finished models against their design criteria and to suggest improvements. Make a factsheet, explaining how the vehicle was made, design features incorporated, how the vehicle works etc.

Manor Primary School – Design Technology- Designing and Making Slippers – Textiles
Manor Primary School Science Year 5: Designing and Making Slippers – textiles
Overview of the Learning: In this unit, children learn how products eg slippers are designed for different purposes and people. They learn that designers must address a range of needs when designing slippers eg appearance, safety, warmth and size. Pupils learn about making accurate patterns/templates and detailed working drawings. They develop making and finishing skills to enhance the quality of their slippers. They learn to evaluate their products critically against design criteria and identify what to do to improve them.
Core Aims To use research and develop design criteria to inform the design of innovative, functional, appealing slippers that are fit for purpose, aimed at particular individuals or groups generate, develop, model and communicate their ideas through discussion, annotated sketches, cross-sectional and exploded diagrams, prototypes, pattern pieces and computer-aided design Make select from and use a wider range of tools and equipment to perform practical tasks [for example, cutting, shaping, joining and finishing], accurately select from and use a wider range of materials and components, including construction materials, textiles according to their functional properties and aesthetic qualities Evaluate investigate and analyse a range of existing products evaluate their ideas and products against their own design criteria and consider the views of others to improve their work Technical knowledge apply their understanding of how to strengthen, stiffen and reinforce slippers.
Pupils should be taught to develop their design and making skills They will:
observe and explore to generate ideas, define problems and pose questions in order to develop investigations and create their own slippers
to identify the benefits and limitations of their own and existing designs.
apply practical skills to design, make and improve slipper designs safely, taking account of users and purposes
communicate and model in order to explain and develop ideas, share findings and conclusions
to continually make systematic evaluations when designing and making, to bring about improvements in processes and outcomes
to gather the opinions of the end user to support evaluations and improvements.
Pupils should be taught about making slippers:
How to design and create their own slippers.
To identify the qualities of a range of materials thinking about the warmth, safety, suitability and aesthetic qualities.

Manor Primary School – Design Technology- Designing and Making Slippers – Textiles
To create a pattern and understand the purpose of a pattern.
Identify how to join material by using a range of stitches.
Learn how to add high quality finishes to the slippers.
Expectations Children can:
Examine a range of existing slippers and identify the purpose, suitability appearance and function and how the bags have been assembled.
Carry out market research including questionnaires to find out about the products that are available to buy, gaps in the market and the needs of
the end user.
Create a design specification for their own slippers using the market research.
Investigate ways of strengthening their slippers to ensure durability.
To create a pattern and prototype using their design specification.
To use a stitching techniques to create a slippers of their own design joining the seams neatly to create a high quality finished product.
To evaluate the slippers against the design specification and the needs of the end user.

Manor Primary School – Design Technology- Designing and Making Slippers – Textiles
Learning Objectives Suggested Learning Opportunities
To use research to understand the design of innovative, functional, appealing slippers that are fit for purpose, aimed at particular individuals or groups generate, develop, model and communicate their ideas through discussion, annotated sketches, cross-sectional and exploded diagrams, prototypes, pattern pieces and computer-aided design
Introduce the children to the unit of work by collecting and displaying a range of
slippers. Share a range of designs such as mules, moccasin, open toe, closed toe, boot slippers etc.
Discuss with the children how they have been constructed; if possible, disassemble a
simple slipper. Ask the children to investigate the fabrics and materials used for the soles and the inner and outer layers. Children to investigate how the sole has been strengthened for durability. Ask them about the touch and appearance of fabrics and how the material suits the purpose. Children to draw comparisons between different slippers and materials used considering warmth, wear and strength. Discuss with the children the suitability of the slippers for different users and their
different purposes; including appearance, function, comfort, cost and safety. Ask the children to choose a one or two of the designs and sketch and label the key
features and evaluate thinking about the material, purpose, comfort, safety etc.

Manor Primary School – Design Technology- Designing and Making Slippers – Textiles
To select from and use a wider range of materials and components to decorate a product to ensure it is aesthetically pleasing.
Show the children different techniques for adding colour, pattern and texture to fabric which allows designers to create unique and interesting designs which are pleasing for the end user. eg embroidery, simple appliqué, use of sequins, use of fabric paints.
Children to practise techniques to inform their own designs at a later stage design.
To use research and develop design criteria to inform the design of innovative, functional, appealing slippers that are fit for purpose, aimed at particular individuals or groups generate, develop, model and communicate their ideas through discussion, annotated sketches, cross-sectional and exploded diagrams,.
Explain to the children that they have been sent a special letter from Next asking them to design and make a new designer slipper for their new catalogue.
Ask the children to generate for their design, children to create several designs and
choose the one the prefer- justifying their final choice. Will the slippers be functional, decorative, or both? Who will wear the slippers? What
size? Will they be suitable? Will they be warm? What is most important? Who is the target market?
Ask the children to sketch or model ideas using exploded diagrams Considering the
material and decorative finishes they will use, justifying their choices. Remind the children to think about touch, feel and insulating properties when they are choosing the fabric. What materials would work well? How will you decorate it? How much do you need? How will you make this?
Remind children to include measurements and fabric swatches. When the children have chosen their final design inform them that they must present
their ideas to the Next Board (rest of the class) to answer questions and explain and justify their ideas.
Discuss the importance of market research. Children to carry out market research in the form of questionnaires/investigating on shopping trips/ catalogues /internet as homework which can then be used to make any further alterations and improvements to their designs.
To create prototypes and pattern pieces and computer-aided design select from and use a wider range of tools and equipment to perform practical tasks [for example, cutting, shaping, joining and finishing], accurately To create an action plan, set of instructions for their end product.
Creating the pattern Explain that today the children are going to create a pattern for their design. What is a
pattern and why are they used? Model and demonstrate how to create a pattern allowing for seam allowances of 1–
1.5cm (plain paper or grid paper can be used). Try making a pattern for their own slipper (using their own feet as a guide) or for someone in their family.
Manor Primary School – Design Technology- Designing and Making Slippers – Textiles
Ask the children to write a step-by-step plan or draw a flow chart to demonstrate the order in which they will proceed. Remind children to think about the sole, the wadding and lining and the importance of the order in which things are done. Eg sewing on decorations before stitching the top of the slipper to the sole for ease.
Emphasise that the slippers need to have a good quality finish.
To select from and use a wider range of tools and equipment to perform practical tasks [for example, cutting, shaping, joining and finishing], accurately Select from and use a wider range of materials and components, including construction materials, textiles according to their functional properties and aesthetic qualities To strengthen the slippers to ensure durability. To add high quality decorative finishes. To evaluate throughout the making process.
Children to make their own slippers. Evaluating throughout and making necessary adjustments
Model and demonstrate how to pin the pattern onto the fabric allowing minimal
wastage. Remind the children about economical use of fabric. Try fitting a number of pattern pieces on the smallest amount of fabric eg by lay
planning. Demonstrate how to stitch right sides together, to snip curved edges, to tack wadding to
fabric (use of an eyelet punch should be shown if slippers are to be laced together).
To evaluate the end product against the needs of the end users making links to the original design specification. To give reasons for adjustments and improvements. To identify further areas for development.
Children to take part in the Next Spring Collection catwalk to show case their final designs. Ask the children to evaluate the slippers against the design specification (this may include asking the potential user to test them). What do the users think of the slippers? Do they meet their needs well? How could they be made better? What would you change? What are you pleased with? Children to carry out surveys/questionnaires with the end user to help with the evaluation process.
Manor Primary School – Design Technology- Designing and Making Slippers – Textiles

Manor Primary School – DT- Designing and Making a Designer Bag.
Manor Primary School
DT Year 6: Designing and making a designer bag
Overview of the Learning:
In this unit, children learn how products e.g. bags are designed for different purposes and people. They learn that designers must address a range of needs when designing bags e.g. appearance, safety, comfort, practicality and
size. Children learn about making accurate patterns/templates and detailed working drawings. They develop making and finishing skills to enhance the quality of their bags. They learn to evaluate their products critically against
design criteria and identify what to do to improve them.
Core Aims
Develop an understanding of how research can be used to create a design specification to ensure
products are functional, appealing and are fit for purpose, aimed at particular individuals or groups.
Develop an understanding of how to use a wide range of tools including sewing machines to join
pieces of material accurately.
Develop and understanding of how to select from and use a wider range of textile materials according
to their functional properties and aesthetic qualities
Develop an understanding of how to strengthen, stiffen and reinforce their products using their
knowledge of textiles and structures.
Develop an understanding of the skills of evaluation when investigating and analysing a range of
existing products as well as their own.
To evaluate their ideas and products against their own design criteria and consider the views of others
to improve their work.
Pupils should be taught to develop knowledge, skills and understanding by exploring and developing ideas …
Observe and explore and generate ideas, define problems and pose questions in order to develop
investigations and products.
Take ownership of the whole design process: carrying out market research, designing, creating a
prototype, making improvements, creating an end product and evaluating.
To identify the needs of the end user by exploring the existing market and asking questions about
what bags are popular and why and where there are gaps in the market which could generate a
profit.
Apply practical skills to design, make and improve products safely, taking account of users and
purposes.
Children will become familiar with how to create a design specification with the needs of the end
user in mind taking into consideration the results of their market research. Communicate and
model in order to explain and develop ideas, share findings and conclusions.
To continually make systematic evaluations when designing and making, to bring about
improvements in processes and outcomesError! Reference source not found.
Pupils should be taught about making bags:
To identify the qualities of a range of materials thinking about the, suitability and aesthetic
qualities
To create a prototype of a bag identifying how the pattern fits together and understand the
importance of this in the design process.
To use a sewing machine safely in order to create a high quality finished product.
To understand how fastenings such as buttons, zips and press studs are attached for functional

Manor Primary School – DT- Designing and Making a Designer Bag.
purposes.
Expectations
Children can:
Examine a range of existing bag products and identify the purpose, suitability appearance and function and how the bags have been assembled.
Carry out market research including questionnaires to find out about the products that are available to buy, gaps in the market and the needs of the end user.
Identify the suitability of materials ensuring they are fit for purpose.
Create a design specification for their own bag using the market research.
To create a pattern and prototype using their design specification.
To use a sewing machine to create a bag of their own design joining the seams neatly to create a high quality finished product.
To use attach fastenings to the bag.
To evaluate the bag against the design specification and the needs of the end user.
Suggest improvements during and after the design and making process.
Manor Primary School – DT- Designing and Making a Designer Bag.
Learning Objectives Suggested Learning Opportunities
To understand that products are designed for a particular purpose and
are suitable for different users;
To understand that a designer needs to consider appearance, function,
cost and safety when designing products;
To understand that many different materials can be used on a product
e.g. a bag, some to stiffen, some to provide comfort and some for
appearance.
To investigate a range of existing products.
Introduce this unit by collecting and displaying bags. Give children time to investigate a range of bags and find out how they have been
constructed, who may use them and for what purpose. If possible, disassemble a simple bag into its component parts e.g. simple
drawstring bag.
Focus the children’s attention on the fabrics and materials used for the different parts of the bags. Examine the fastenings used buttons,
zips, and press studs. Ask the children to investigate how they have been attached. Ask them about the touch and appearance of fabrics
and how the material suits the purpose.
Discuss with the children the suitability of the bags for different users and their different purposes; including appearance, function,
comfort, cost and safety. Distinguish between bags that are functional and those that are purely decorative.
PowerPoint 1: Exploring bags.
Ask the children to choose a bag and write down the five most important points in a specification that the designer might have worked
to.
Draw enlarged pictures of a bag from different viewpoints.
Ask the children to investigate different materials for, wear, strength and comfort.
To conduct market research
To design a questionnaire to collect information to create a design specification.
To investigate the needs of the end user.
Explain to the children that they have been asked to design a bag for the Next spring collection.
Explain that before this can be done market research must be carried out in order to identify gaps in the market and to find out what
will sell well.
Ask the children how this can be done. What could you do? What do you need to know? Who could you ask?
Discuss the use of questionnaires, visiting shops, looking through magazines to see what is available on the market, what is popular
and where there are gaps.
Children to create a questionnaire to take home to ask a range of potential end users. Children to carry out market research in the
style of the apprentice.
To understand that products are designed for a particular purpose and are suitable
for different users;
To understand that a designer needs to consider appearance, function, cost and
safety when designing products;
To investigate decorative designs that are aesthetically pleasing.
Over a series of lessons allow the children the opportunity to explore a range of decorative techniques such as applique, dyeing, fabric
paints. Children to evaluate which techniques they think give the best aesthetic quality.
To develop a design specification;
To communicate ideas through drawings and modelling;
Children to feedback their results from the market research. What are end users looking for? What do they want in a product? What
will sell well? Where are the gaps in the market?
Ask the children to draw up specifications. Will the bags be functional, decorative, or both? Who will use the bags? What size? Will

Manor Primary School – DT- Designing and Making a Designer Bag.
To plan the order of their work, choosing appropriate materials, tools and
techniques;
they be suitable? What is most important?
• Worksheet 2: My bag design.
Ask the children to sketch ideas considering the techniques they have explored. Children to create a prototype using paper and tape or
inexpensive material and pins/staples.
Ask the children to make a working drawing and pattern of the chosen idea, including measurements and fabric swatches. Remind the
children to think about touch, feel and colour when they are choosing the fabric and how suitable it will be for the purpose. What
materials would work well? How will you decorate it? How much do you need? How will you make this?
Ask the children to write a step-by-step plan or draw a flow chart to demonstrate the order in which they will proceed.
Emphasise that the bags need to have a good quality finish.
Check that the children’s final idea and construction is realistic before they begin.
Remind the children about economical use of fabric.
To understand that pattern/templates can be used many times and this
ensures consistency in size;
To learn how to pin, sew and stitch materials together to create a
product;
Understand that ideas for products can be developed by modelling with
paper;
to create a proto type of the chosen bag design.
To identify dimensions required.
Explain to the children that they are going to create a prototype of the bag thinking about the size and shape of the bag and the
dimensions needed.
Discuss why the dimensions are important at this stage. (emphasise the importance of size and how this many change if measurements
and cutting isn’t accurate) Model and demonstrate.
Show the children a pattern for a bag. how a pattern is made allowing for seam allowances of 1–1.5cm (plain paper or grid paper can
be used). Try making a pattern for a bag.
Show how to pin the pattern onto the fabric allowing minimal wastage. Try fitting a number of pattern pieces on the smallest amount
of fabric e.g. by nesting, lay planning.
Demonstrate how to stitch right sides together, to snip curved edges, to tack wadding to fabric (use of an eyelet punch should be
shown if bags are to be laced together).
Show the children different techniques for adding colour, pattern and texture to the fabric e.g. embroidery, simple appliqué, use of
sequins, use of fabric paints.
Show the children the way in which a variety of fastenings work e.g. zips, press studs, drawstrings, buckles, buttons etc.
Demonstrate how to use a sewing machine.
• PowerPoint 2: Sewing machines. Encourage the children to practise on simple shapes first.
Class management
A key aspect of this unit is for children to be able to design and use their own pattern/template.
Some children may experience difficulty in designing their own patterns/template and will therefore need support.
Have a prepared pattern of a bag for children who have difficulty making their own.
Grid paper can be very helpful when making paper patterns/templates.
Children could use inexpensive and easily worked material Cut fabric to manageable sizes for the children to use.

Manor Primary School – DT- Designing and Making a Designer Bag.
Children to make their paper prototype using paper.
Children to evaluate their prototype and discuss any potential changes that are required.
What went well? Is there anything that needs to be improved/changed? Why?
To construct products using permanent joining techniques;
To understand how to achieve a quality product;
To evaluate products identifying strengths and areas for development and
carrying out appropriate tests.
Re-model and demonstrate how to use a sewing machine to join materials, ensuring the seams are neat in order to produce a high quality
end product. Model and demonstrate how fastenings can be attached.
Children to create their bags by cutting the required pieces and assembling using a sewing machine.
Children to use hand stitching to add any additional decoration to their bags.
Remind children to evaluate their product as they are constructing it and make appropriate changes accordingly giving reasons.
Health and safety
When carrying out a risk assessment for this activity, teachers will need to consider the materials, tools and equipment being used.
In addition, the following points should be noted:
children using sewing machines should be supervised;
To evaluate the finished design against the specification.
To carry out a questionnaire to gather the opinions of potential end users.
To identify areas for development
Children to take part in a Next Spring Collection Launch catwalk to launch their designer bag onto the market.
Children to design a questionnaire to gather the opinions of the potential end users. What do they like about the bag? Would they buy
this bag? What would they change(if anything)
Children to take into consideration their original design specification and the end users opinions and evaluate their product explaining
what changes they have made along the way and why, what went well and what they could do to further develop the bag.