managing life skills -...
TRANSCRIPT

Managing
LIFE SKILLSSEWING LABS

Copyright © by The McGraw-Hill Companies, Inc. All rights reserved. Permission is granted to reproduce the material contained herein on the condition that such material be reproduced only for classroom use; be provided to students, teachers, and families without charge; and be used solely in conjunction with Managing Life Skills. Any other reproduction, for use or sale, is prohibited without prior written permission of the publisher, Glencoe/McGraw-Hill.
Printed in the United States of America.
Send all inquiries to:Glencoe McGraw-Hill4400 Easton CommonsColumbus, OH 43219
1 2 3 4 5 6 7 8 9 13 12 11 10 09

#1 Sewing Darts . . . . . . . . . . . . . . . . . . . . . . . . . . . . . . . . . . . . . . . . . . . . . . . . . . . . . .23
#2 Sewing Plain Seams . . . . . . . . . . . . . . . . . . . . . . . . . . . . . . . . . . . . . . . . . . . . . . . .25
#3 Sewing Seam Finishes. . . . . . . . . . . . . . . . . . . . . . . . . . . . . . . . . . . . . . . . . . . . . . .26
#4 Sewing Gathers . . . . . . . . . . . . . . . . . . . . . . . . . . . . . . . . . . . . . . . . . . . . . . . . . . . .27
#5 Sewing Facings . . . . . . . . . . . . . . . . . . . . . . . . . . . . . . . . . . . . . . . . . . . . . . . . . . . .29
#6 Hand Sewing . . . . . . . . . . . . . . . . . . . . . . . . . . . . . . . . . . . . . . . . . . . . . . . . . . . . . .31
#7 Sewing Patch Pockets . . . . . . . . . . . . . . . . . . . . . . . . . . . . . . . . . . . . . . . . . . . . . . .33
#8 Sewing Casings . . . . . . . . . . . . . . . . . . . . . . . . . . . . . . . . . . . . . . . . . . . . . . . . . . . .37
#9 Sewing Hems . . . . . . . . . . . . . . . . . . . . . . . . . . . . . . . . . . . . . . . . . . . . . . . . . . . . . .39
#10 Sewing Buttons . . . . . . . . . . . . . . . . . . . . . . . . . . . . . . . . . . . . . . . . . . . . . . . . . . . .41
#11 Sewing Lapped and Centered Zippers . . . . . . . . . . . . . . . . . . . . . . . . . . . . . . . . .42
#12 Repairing Seams . . . . . . . . . . . . . . . . . . . . . . . . . . . . . . . . . . . . . . . . . . . . . . . . . . .45
#13 Sewing a Patch . . . . . . . . . . . . . . . . . . . . . . . . . . . . . . . . . . . . . . . . . . . . . . . . . . . .46
#14 Making a Serger Thread Chain . . . . . . . . . . . . . . . . . . . . . . . . . . . . . . . . . . . . . . .48
Skill Sheet Pages
Copyright © by The McGraw-Hill Companies, Inc. All rights reserved. MANAGING LIFE SKILLS—Sewing Labs 3(Continued on next page)
#1 Sewing Safety . . . . . . . . . . . . . . . . . . . . . . . . . . . . . . . . . . . . . . . . . . . . . . . . . . . . . . 5
#2 Sewing Machine Parts—Pretest/Post-Test. . . . . . . . . . . . . . . . . . . . . . . . . . . . . . . 6
#3 Serger Parts—Pretest/Post-Test . . . . . . . . . . . . . . . . . . . . . . . . . . . . . . . . . . . . . . . 7
#4 Pattern Symbols—Pretest/Post-Test. . . . . . . . . . . . . . . . . . . . . . . . . . . . . . . . . . . . 8
#5 Daily Lab Evaluation . . . . . . . . . . . . . . . . . . . . . . . . . . . . . . . . . . . . . . . . . . . . . . . . . 9
#6 Project Assessment. . . . . . . . . . . . . . . . . . . . . . . . . . . . . . . . . . . . . . . . . . . . . . . . .10
#7 Body Measurements and Pattern Size . . . . . . . . . . . . . . . . . . . . . . . . . . . . . . . . .11
#8 Altering a Pattern . . . . . . . . . . . . . . . . . . . . . . . . . . . . . . . . . . . . . . . . . . . . . . . . . .14
#9 Layout, Cutting, and Marking . . . . . . . . . . . . . . . . . . . . . . . . . . . . . . . . . . . . . . . .16
#10 Pressing and Ironing . . . . . . . . . . . . . . . . . . . . . . . . . . . . . . . . . . . . . . . . . . . . . . . .20
Table of Contents
Handout Pages

#15 Sewing Serger Seams . . . . . . . . . . . . . . . . . . . . . . . . . . . . . . . . . . . . . . . . . . . . . . .49
#16 Securing Serger Seams. . . . . . . . . . . . . . . . . . . . . . . . . . . . . . . . . . . . . . . . . . . . . .52
#17 Serging Curves and Corners . . . . . . . . . . . . . . . . . . . . . . . . . . . . . . . . . . . . . . . . .55
Skill Sheet Pages
Table of Contents (continued)
4 MANAGING LIFE SKILLS—Sewing Labs Copyright © by the McGraw-Hill Companies, Inc. All rights reserved.
#1 Beach Towel with Pockets . . . . . . . . . . . . . . . . . . . . . . . . . . . . . . . . . . . . . . . . . . .59
#2 Decorator Pillow . . . . . . . . . . . . . . . . . . . . . . . . . . . . . . . . . . . . . . . . . . . . . . . . . . .63
#3 Contour Neck Pillow. . . . . . . . . . . . . . . . . . . . . . . . . . . . . . . . . . . . . . . . . . . . . . . .65
#4 Fleece Booties . . . . . . . . . . . . . . . . . . . . . . . . . . . . . . . . . . . . . . . . . . . . . . . . . . . . .67
#5 Bath Accessories . . . . . . . . . . . . . . . . . . . . . . . . . . . . . . . . . . . . . . . . . . . . . . . . . . .70
#6 Cloud-Look Valance . . . . . . . . . . . . . . . . . . . . . . . . . . . . . . . . . . . . . . . . . . . . . . . .75
#7 Pieced Wall Hanging. . . . . . . . . . . . . . . . . . . . . . . . . . . . . . . . . . . . . . . . . . . . . . . .77
#8 Place Mats and Napkins . . . . . . . . . . . . . . . . . . . . . . . . . . . . . . . . . . . . . . . . . . . . .82
#9 Hanging Heart Sachets. . . . . . . . . . . . . . . . . . . . . . . . . . . . . . . . . . . . . . . . . . . . . .83
#10 Hooded Bath Towel . . . . . . . . . . . . . . . . . . . . . . . . . . . . . . . . . . . . . . . . . . . . . . . .84
#11 Fleece Cover-Up . . . . . . . . . . . . . . . . . . . . . . . . . . . . . . . . . . . . . . . . . . . . . . . . . . .86
#12 Recipe Card Holder. . . . . . . . . . . . . . . . . . . . . . . . . . . . . . . . . . . . . . . . . . . . . . . . .89
#13 Cloth Checkerboard . . . . . . . . . . . . . . . . . . . . . . . . . . . . . . . . . . . . . . . . . . . . . . . .91
#14 Herbal Dream Pillows. . . . . . . . . . . . . . . . . . . . . . . . . . . . . . . . . . . . . . . . . . . . . . .94
#15 Table Runner . . . . . . . . . . . . . . . . . . . . . . . . . . . . . . . . . . . . . . . . . . . . . . . . . . . . . .96
#16 Bedside Organizer. . . . . . . . . . . . . . . . . . . . . . . . . . . . . . . . . . . . . . . . . . . . . . . . . .98
#17 Wraparound Ankle Pocket. . . . . . . . . . . . . . . . . . . . . . . . . . . . . . . . . . . . . . . . . 100
#18 Hanging Pockets Organizer . . . . . . . . . . . . . . . . . . . . . . . . . . . . . . . . . . . . . . . . 103
#19 Pet Pillow . . . . . . . . . . . . . . . . . . . . . . . . . . . . . . . . . . . . . . . . . . . . . . . . . . . . . . . 107
#20 Fringed Fleece Scarf . . . . . . . . . . . . . . . . . . . . . . . . . . . . . . . . . . . . . . . . . . . . . . 111
Answer Key . . . . . . . . . . . . . . . . . . . . . . . . . . . . . . . . . . . . . . . . . . . . . . . . . . . . . . . . . . 112
Project Pages

Name _______________________________________ Date _______________ Class _____________
Copyright © by The McGraw-Hill Companies, Inc. All rights reserved. MANAGING LIFE SKILLS—Sewing Labs 5
Preventing Falls
• Pick up dropped objects from the fl oor immediately.
• Use a sturdy ladder or step stool for reaching high places. It is unsafe to stand on folding chairs, desks, boxes, or crates.
• Keep cabinet doors and drawers closed.
• Position cords so they won’t be tripped over.
Preventing Electrical Shock
• Plug the cord into the machine and food control before plugging into the electrical outlet. Disconnect the cord from the electrical outlet fi rst, then from the machine and foot control.
• Make sure all surfaces are dry before plugging in the machine.
• Keep electrical cords away from machine needles and cutting tools.
Preventing Cuts
• When handing scissors or seam rippers to a classmate, make sure you extend the handles rather than the points.
• Keep protective sheaths on scissors and seam rippers when not in use.
• Do not walk around with scissors or seam rippers out of their protective sheaths.
Preventing Needle and Pin Injuries
• Never hold needles or pins in your mouth.
• Use the appropriate needle size and type for the fabric you are sewing whether sewing by hand or by machine.
• Replace needles often to prevent breakage.
• Keep needles and pins in pincushions or on magnetic pin catchers when not in use. Pins kept in boxes spill easily.
• Never sew over needles or pins when using the sewing machine.
• Position fi ngers so that they are away from the machine needle. Keep the needle guard in place on your sewing machine.
• Avoid pulling or pushing the fabric through the machine when sewing to prevent needle breakage.
• Use the hand wheel to guide the needle through thick seams.
• Make sure the needle is out of the fabric before removing fabric from the machine or changing the stitch controls.
• Make sure the machine is turned off or unplugged when making repairs, changing needles, or cleaning the machine.
Preventing Burns and Electrical Shock While Using an Iron
• Plug the iron into the electrical outlet before turning the iron on. Turn the iron off before removing the plug from the electrical outlet to prevent electrical shocks.
• Position the iron cord so that it cannot be tripped over.
• Before fi lling a steam iron with water, make sure it is turned off and unplugged.
• Beware of steam coming from the iron. Keep hands, fi ngers, and other body parts away from the iron’s heat source.
• Place the iron on its heel when it is not in use.
• Be sure to turn the iron off and then unplug it when you are through using it.
• Empty any remaining water from the iron after it has been unplugged and cooled.
• Store the iron only after it has completely cooled.
Directions: Use the following suggestions for sewing safely in the classroom.
Handout 1
Sew Safely

1. __________________________________
2. __________________________________
3. __________________________________
4. __________________________________
5. __________________________________
6. __________________________________
7. __________________________________
8. __________________________________
9. __________________________________
10. __________________________________
11. __________________________________
12. __________________________________
13. __________________________________
14. __________________________________
15. __________________________________
Directions: Using the diagram that follows, list the appropriate machine part for each number.
Name _______________________________________ Date _______________ Class _____________
6 MANAGING LIFE SKILLS—Sewing Labs Copyright © by the McGraw-Hill Companies, Inc. All rights reserved.
1
2
3
4
5
6
7
8
9
0
a
b
c
d
e
Handout 2
Sewing Machine Parts—
Pretest/Post-Test

Copyright © by The McGraw-Hill Companies, Inc. All rights reserved. MANAGING LIFE SKILLS—Sewing Labs 7
1. __________________________________
2. __________________________________
3. __________________________________
4. __________________________________
5. __________________________________
6. __________________________________
7. __________________________________
8. __________________________________
9. __________________________________
10. __________________________________
11. __________________________________
12. __________________________________
13. __________________________________
14. __________________________________
15. __________________________________
16. __________________________________
17. __________________________________
18. ___________________________________
Name _______________________________________ Date _______________ Class _____________
Directions: Using the diagram that follows, list the appropriate machine part for each number.
1
2
3
4
5
67
8
9
a
0
bc
d
e
f
g
h
Handout 3
Parts of a Serger—
Pretest /Post-Test

12
3 4
5
6
78
9
a b
c
0
Name _______________________________________ Date _______________ Class _____________
8 MANAGING LIFE SKILLS—Sewing Labs Copyright © by the McGraw-Hill Companies, Inc. All rights reserved.
1. __________________________________
2. __________________________________
3. __________________________________
4. __________________________________
5. __________________________________
6. __________________________________
7. __________________________________
8. __________________________________
9. __________________________________
10. __________________________________
11. __________________________________
12. __________________________________
13. __________________________________
Directions: Using the diagram that follows, list the appropriate pattern symbol for each number.
Handout 4
Pattern Symbols—
Pretest/Post-Test

Copyright © by The McGraw-Hill Companies, Inc. All rights reserved. MANAGING LIFE SKILLS—Sewing Labs 9
Figure 5
Statement Teacher Response
Student Response
Yes No Yes No
1. Started working on project on time; used class time wisely.
2. Worked quietly without being disruptive.
3. Read and attempted to interpret instructions before asking questions.
4. Used sewing and pressing equipment in a safe manner.
5. Kept sewing materials and supplies organized and neat.
6. Had all sewing materials and supplies needed to work effectively on project.
7. Maintained a positive attitude about the sewing machine and sewing.
8. Worked with the teacher and classmates in a courteous and respectful manner.
9. Worked on project until instructed to put things away.
10. Put machines, materials, and supplies away neatly; left sewing area neat when class ended.
Total “Yes” Points = __________________________________________________________________
Name _______________________________________ Date _______________ Class _____________
Directions: Read each statement below. Then check “Yes” or “No” as it applies to the work you com-pleted in the sewing lab today. Have your teacher verify your responses. Total the number of “Yes” and “No” responses from the two columns in the space provided. Use the following scale to determine your grade for the day:
18–20 Yes = Excellent; 16–17 Yes = Good; 14–15 Yes = Average; 12–13 Yes = Fair; Less Than 12 Yes = Poor
Handout 5
Daily Lab Evaluation

Name _______________________________________ Date _______________ Class _____________
10 MANAGING LIFE SKILLS—Sewing Labs Copyright © by the McGraw-Hill Companies, Inc. All rights reserved.
Directions: Rate each step as you complete it using the scale below. Have your teacher respond after you have completed your project assessment. Total the number of points in the space provided at the bot-tom of the page.
10 = Excellent; 8 to 9 = Good; 5 to 7 = Average; 4 = Fair; 3 or below = Poor
Figure 6
Assessment Standards Teacher Student
Pattern Layout and Pinning
1. Pins are placed diagonally at corners and perpendicular to seam lines. Pin points are facing the cutting line and placed inside the stitching line.
2. Pattern is smooth, with adequate pins at fold lines, grain line arrows, corners, and notches. Grain line arrow is pinned parallel to the selvage when appropriate.
Cutting
3. For straight edges, cutting is done with shears, using long fi rm strokes along the cutting line. Fabric edges are smooth.
4. For curved areas, cutting is done with shears, using short strokes along the cutting line. Fabric edges are smooth.
5. When using a pattern, notches are cut so that they protrude beyond the cutting line.
Marking
6. The marking method/product selected is appropriate for the pattern and the fabric. Correct symbols are transferred from the pattern to the fabric. The markings do not show on the outside of the fi nished project.
Sewing
7. Seams are sewn with the fabric pieces joined with right or wrong sides together as indicated for project. Seams are straight and stitched at the correct seam width for project. The correct stitch length is used for the fabric.
8. Seams are appropriately fi nished, clipped, notched, trimmed, or graded as needed to lie fl at.
9. Other techniques—such as darts, zippers, casings, facings, pockets, hems, and fasteners—are correctly and neatly completed.
Finishing
10. Loose and hanging threads have been clipped off close to the fabric. The project has been appropriately pressed.
______ Total Teacher Points (100 points possible) ______ Total Student Points (100 points possible)
Handout 6
Project Assessment

Copyright © by The McGraw-Hill Companies, Inc. All rights reserved. MANAGING LIFE SKILLS—Sewing Labs 11
(Continued on next page)
1. Wear smooth-fitting clothes when measur-ing. Do not measure over a bulky sweater or jacket.
2. Measure your height. In your bare feet, stand straight and tall against the wall. Have another person make an erasable mark on the wall that is level with the top of your head. Step away from the wall and measure from this point to the floor.
3. For all other measurements, wear shoes. This will make your posture close to what it will be when you wear the clothing.
4. Tie a string or a length of narrow elastic around your waist. Measure the back waist length from the base of the neck (the point at which a collar seam falls on the neck) to the waistline (marked by the elastic).
5. When taking measurements around the body, keep the tape measure parallel to the floor. For accuracy, pull the tape measure snugly, but not too tightly, around your body. See Figure 7-1 and Figure 7-2 for measuring other parts of the body.
6. Compare your measurements with the pat-tern size charts found in the back of a pat-tern catalog in the fabric store. Look for your figure type, or size category, as deter-mined by height and figure development:
• Misses’ patterns are designed for the developed, well-proportioned figure—5�5� to 5�6� in height.
• Girls’ patterns are for growing girls, up to
5�1� in height, who have not yet begun to mature.
• Men’s patterns are for the average adult build—about 5�10� tall.
• Teen boys’ patterns are for growing boys, about 5�1� to 5�8� in height.
7. Choose the size within your figure type that comes closest to your measurements. You may not be able to match your measure-ments exactly to a pattern size because each person’s body is built differently. Some pat-terns are not identified by a single size but by measurements, such as by waist size for pants. Others may be sized small, medium, large, and extra large.
8. If your measurements fall between two sizes, choose the smaller size for a closer fit or if you are small-boned. Choose the larger size for a looser fit.
9. Consider the garment type. For skirts, pants, and shorts, choose pattern size by the waist measurement. If, however, your hips mea-sure two sizes larger than your waist, use the hip measurement. Taking a garment in at the waist is easier than letting it out at the hip. For dresses and blouses, use the bust measurement. For males, use the chest or neck size for determining a pattern size for shirts. Coat and jacket patterns assume that the garment will be worn over other clothing. Choose these patterns according to your normal measurements.
Name _______________________________________ Date _______________ Class _____________
Sewing an item of clothing usually starts with selecting a pattern. A pattern is a set of written direc-tions and printed paper pieces that shows you how to put a garment together. To know what size pattern to buy, you must fi rst know your body measurements. It is best to ask someone to help you take your measurements and write them down.
Supplies
• Tape measure and string or narrow elastic to tie around your waist.
Directions: Use the following directions to take your body measurements.
Handout 7
Body Measurements and
Pattern Size

12 MANAGING LIFE SKILLS—Sewing Labs Copyright © by the McGraw-Hill Companies, Inc. All rights reserved.
Measuring the Female Body
Back waist length. Measure from the base of the neck to the waistline.Sleeve length. Bend the elbow slightly. Measure from the top of the shoulder, over the bent elbow, down to the wrist.High bust. Measure around the body, under the arms.Bust. Measure at the fullest part of the bust line.Arm length. Bend the elbow slightly. Measure from the top of the shoulder, over the bent elbow, down to the wrist.Sleeve. With the elbow bent and hand on the hip, measure from the top of the shoulder to the wrist.Waist. Tie a string or piece of elastic around the waist to identify the narrowest point. Measure around the waist at this location.Hip. Measure around the fullest part of the hips, 7� to 9� below the waist.Inseam. Measure a pair of pants that fits well and is the correct length, measuring from the bottom of one leg to the seam at which the two pant legs are sewn together.Outseam. Measure along the outside of the leg from the waist, over the hips, to the desired length of the skirt or pants.
Measuring the Male Body
Neck. Measure around the fullest part of the neck, adding ½� for wearing ease. Compare to neckband measurement.Arm length. Bend the arm up. Measure from the base of the neck at the center back, across the shoulder to the crook of the elbow and up to the wrist bone. Compare this measurement to the pattern to see if alterations in sleeve length are needed.Chest. Measure the fullest part of the chest.Waist. Measure around the natural waist at the location where a belt or waistband feels most comfortable.Hip. Measure around the fullest part of the hips. This is usually 8� below the waist.Inseam. Measure a pair of pants that fits well and is the correct length, measuring from the bottom of one leg to the seam at which the two pant legs are sewn together.Outseam. Measure along the outside of the leg from waist to desired length of pants.
Female
Back
Bust
Highbust
Waist
Hips
Sleeve
In-seam
Out-seam
Handout 7
Body Measurements and Pattern Size (continued)
Male
Sleeve
Neckband
Chest
Waist
Hips
In-seam
Out-seam
(Continued on next page)
Name _______________________________________ Date _______________ Class _____________
Fig. 7-2Fig. 7-1
Body Measurements and Pattern Size (continued)
Handout 7
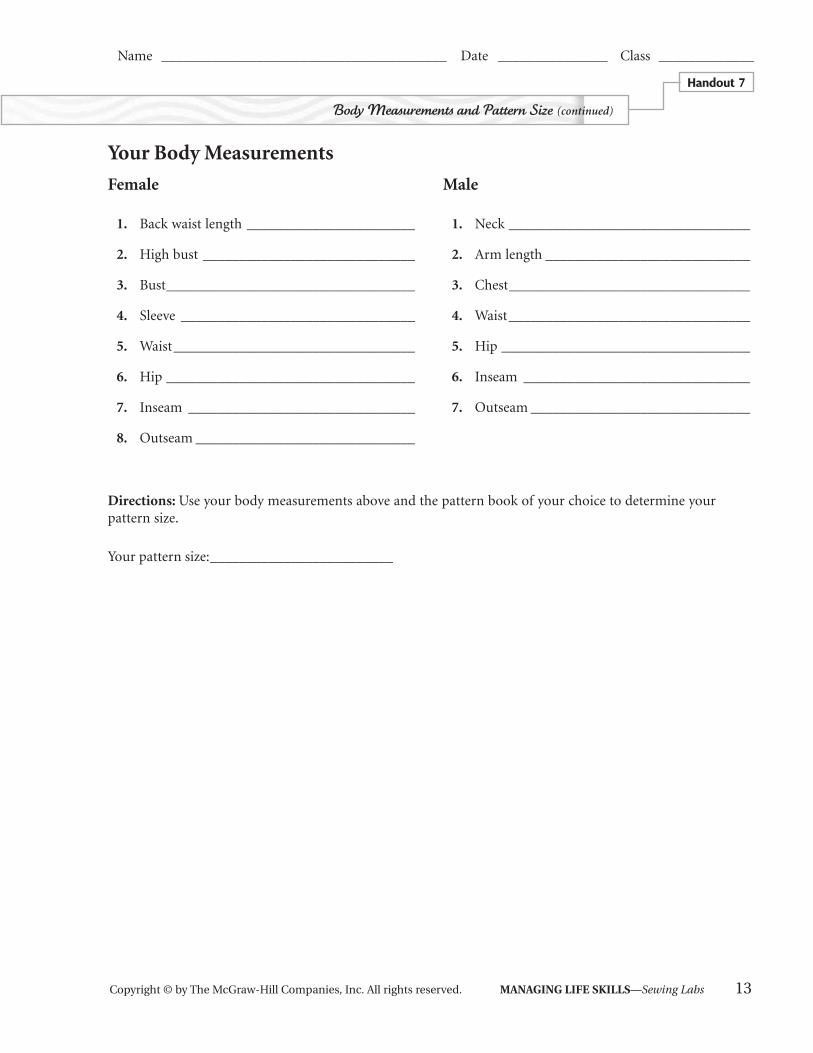
Your Body Measurements
Directions: Use your body measurements above and the pattern book of your choice to determine your pattern size.
Your pattern size: _________________________
Female
1. Back waist length _______________________
2. High bust _____________________________
3. Bust __________________________________
4. Sleeve ________________________________
5. Waist _________________________________
6. Hip __________________________________
7. Inseam _______________________________
8. Outseam ______________________________
Male
1. Neck _________________________________
2. Arm length ____________________________
3. Chest _________________________________
4. Waist _________________________________
5. Hip __________________________________
6. Inseam _______________________________
7. Outseam ______________________________
Copyright © by The McGraw-Hill Companies, Inc. All rights reserved. MANAGING LIFE SKILLS—Sewing Labs 13
Name _______________________________________ Date _______________ Class _____________

Name _______________________________________ Date _______________ Class _____________
14 MANAGING LIFE SKILLS—Sewing Labs Copyright © by the McGraw-Hill Companies, Inc. All rights reserved.
Directions: Follow these guidelines for successful pattern alterations:
• Adjustments for length and width must be made on both front and back pattern pieces.
• A width adjustment of 2 in. or less can be made along the side seams of a garment.
• Check to make sure the grain line remains straight.
• Redraw any design details or darts that are changed by the pattern alteration.
The following illustrations and directions explain some common pattern adjustments.
Lengthening a Pattern
1. Cut the pattern apart on the adjustment lines. 2. Tape tissue paper to one part of the pattern piece. 3. Using a measuring stick, extend the grain line by drawing one continuous straight line through the
tissue paper. 4. Measure down the amount needed for length. Tape the second piece of the pattern to the tissue
paper at that point, making sure the grain lines match up. 5. Connect the cutting lines. See Figure 8-1. 6. Use the same method to adjust the back pattern piece.
Shortening a Pattern
1. Measure the amount to be shortened upward from the adjustment line on the front pattern piece. 2. At that point, draw a second line that is parallel to the adjustment line. 3. Fold the pattern along the adjustment line and bring it down so that the adjustment line now lies
directly over the line you drew in Step 2. Match the grain line markings. Tape the fold in place. See Figure 8-2.
4. Use the same method to adjust the back pattern piece.
Shirt
Front
Re-draw
Lengthen
Fig. 8-1
Shirt
Front
Re-draw
Fig. 8-2
(Continued on next page)
Handout 8
Altering a Pattern

Increasing Pattern Width
1. Tape tissue paper along the pattern piece edge. 2. Divide the total adjustment needed by the number of seam allowances. If a garment has two side seams
and four seam allowances, the amount to be adjusted on each piece is one-fourth of the total. 3. Measure the amount needed outward from the cutting lines. For example, to increase the waistline by
1 in., add ¼ in. to the side seam of the front pattern piece and ¼ in. to the side seam of the back pat-tern piece. Both side seams will be increased by ½ in. and the total garment will be increased by 1 in. See Figure 8-3.
4. Carefully redraw the cutting lines and seam lines to blend in with areas of the pattern that did not need adjustment.
Decreasing Pattern Width
1. Divide the total amount of adjustment needed by the number of seam allowances. 2. Measure the amount needed inward from the cutting lines. 3. Redraw the cutting lines and seam lines to blend in with the areas that did not need to be decreased.
See Figure 8-4.
Handout 8
Fig. 8-3.
Increase
Pants
Front
Decrease
Pants
Front
Fig. 8-4
Copyright © by The McGraw-Hill Companies, Inc. All rights reserved. MANAGING LIFE SKILLS—Sewing Labs 15
Name _______________________________________ Date _______________ Class _____________
Altering a Pattern (continued)

Name _______________________________________ Date _______________ Class _____________
16 MANAGING LIFE SKILLS—Sewing Labs Copyright © by the McGraw-Hill Companies, Inc. All rights reserved.
This activity will give you practice in laying out, cutting out, and marking a pattern.
Supplies
• Fabric piece at least 11 in. � 14 in.
• Pins
• Shears
• Ruler
• Marking equipment
Directions: When using a commercial pattern, find and circle the correct layout on your pattern guide sheet. Check the layout instructions carefully. Note the following markings: right and wrong sides of fabric; right and wrong sides of the pattern (usually indicated by shaded pattern pieces on the layout; pattern pieces to be cut a second time; and any pieces to cut from a single layer of fabric. Then fold your fabric as shown in the layout diagram.
Using these general tips, follow the steps below to layout, cut, and mark your practice pattern pieces. Trace the pattern pieces on page 19 onto tissue paper, cut them out of the tissue, and use them as follows.
Laying Out the Pattern
1. Carefully place the pattern pieces on the fabric as shown. Use your eyes to line up the grain line arrows with the grain of the fabric, or place the piece on the fold if the pattern has the “fold” symbol on it. Use one or two pins to secure each piece. After you have pinned on a pattern piece, check it off on the guide sheet. Note that these pattern pieces are for practice purposes only. See Figure 9-1.
Fig. 9-1
(Continued on next page)
Handout 9
Layout, Cutting, and Marking

Layout, Cutting, and Marking (continued)
Handout 9
2. Pin each pattern piece securely to the fabric, check-ing grain lines. Start with large pattern pieces placed on the fold. Pin securely, smoothing out the pattern as you go.
3. Pin the remaining pattern pieces so the grain line symbol is straight on the fabric grain. Pin one end of the grain line symbol to the fabric. Measure the distance from that end of the arrow to the selvage. Then measure from the other end of the arrow to the selvage. If the measurements are not the same, move the pattern until they are. Smooth the pattern and pin. See Figure 9-2.
Cutting Out the Pattern
1. Cut out your fabric, following the outside edges of the cutting lines carefully. Do not cut on the fold line. Hold the pattern and fabric flat with one hand as you cut with the other to prevent the layers from shifting. Move around the table as you work instead of moving the fabric. See Figure 9-3.
2. Cut the notches outward, not inward. If there are two or three notches together, cut them across the top, as one long notch. See Figure 9-4.
3. Keep pattern pieces pinned to the fabric for mark-ing and identification. Note: If you are using inter-facing, cut out the interfacing when you finish cut-ting the fabric.
Le
ng
thw
ise
gra
in
B
Selv
ag
e
Fig. 9-2
Len
gth
wis
e
gra
in
B
Fig. 9-3
Fig. 9-4
Copyright © by The McGraw-Hill Companies, Inc. All rights reserved. MANAGING LIFE SKILLS—Sewing Labs 17
Name _______________________________________ Date _______________ Class _____________
(Continued on next page)

Transferring Pattern Markings
Transfer lines and symbols on your pattern pieces to the wrong side of the fabric before the pattern is unpinned. Here are some methods for marking your fabric:
Tracing Paper and Wheel
1. Choose a color of tracing paper that can be easily seen, but is close to the color of your fabric. Slide the tracing paper under the pattern so that the colored side is against the wrong side of the fabric. If you need to mark two layers of fabric, use two sheets of tracing paper.
2. Roll the tracing wheel along the necessary markings. Using a ruler will help keep the lines straight. Mark the dots with an “X.” See Figure 9-5.
Chalk and Pins
1. Put a pin through the pattern and the fab-ric at the place to be marked.
2. Make a chalk mark on the wrong side of both fabric layers at the pin marking. See Figure 9-6.
Washable Fabric Markers
1. Test markers on a scrap of fabric to be sure the markings can be removed.
2. Follow the directions for “Chalk and Pins.”
Fig. 9-5
Layout, Cutting, and Marking (continued)
Handout 9
Fig. 9-6
18 MANAGING LIFE SKILLS—Sewing Labs Copyright © by the McGraw-Hill Companies, Inc. All rights reserved.
Name _______________________________________ Date _______________ Class _____________
(Continued on next page)

Le
ng
thw
ise
g
rain
Le
ng
thw
ise
g
rain
Le
ng
thw
ise
g
rain
Pla
ce o
n f
old
A
B
C
D
Layout, Cutting, and Marking (continued)
Fig. 9-7
Copyright © by The McGraw-Hill Companies, Inc. All rights reserved. MANAGING LIFE SKILLS—Sewing Labs 19
Handout 9
Name _______________________________________ Date _______________ Class _____________

Pressing should not be confused with ironing. Pressing is an up-and-down motion; the iron is lowered onto an area of a garment or project and then raised, then lowered onto the next area and raised, and so forth. Ironing is gliding the iron back and forth over the fabric.
1. Press from the wrong side of the fabric whenever possible. That way all seams can be seen clearly and pressed correctly.
2. Sometimes you can’t press on the wrong side because the seams or garment sections are enclosed, as with patch pockets. When working from the right side, use a press cloth to prevent overpressing or a shiny mark on the fabric. A piece of lightweight fabric, such as batiste, organdy, or cheesecloth, works well. For fabrics with a nap, such as velveteen or corduroy, use a piece of the same fabric. Place the two naps face-to-face to prevent the nap from becoming crushed and prevent pressing marks on the fabric.
3. Never press over pins because they will leave an impression on your fabric and scratch your iron.
4. Be cautious when pressing over basting—it can leave marks on your fabric. Always use white or light color thread for basting because the steam may release the dye from the thread, which will mark your fabric.
5. Use the correct heat setting for your fabric. First, test the iron on a scrap of the fabric. If the scrap seems to stick, melt, pucker, or cre-ate smoke, the iron is much too hot. Synthetic fibers tend to be quite sensitive to heat, so set the iron on cooler settings.
6. Always press seams and darts before other seams are stitched across them. This helps reduce bulk and prevents a lumpy appearance in the finished product. See Figure 10-1.
7. Always press seams flat first, before you press them open. This allows the stitches to settle into the fabric before the seam is pressed open. It’s a good way to eliminate puckers on seams that do not appear flat. See Figure 10-2.
Fig. 10-1
Fig. 10-2
Name _______________________________________ Date _______________ Class _____________
20 MANAGING LIFE SKILLS—Sewing Labs Copyright © by the McGraw-Hill Companies, Inc. All rights reserved.
(Continued on next page)
Handout 10
Pressing and Ironing
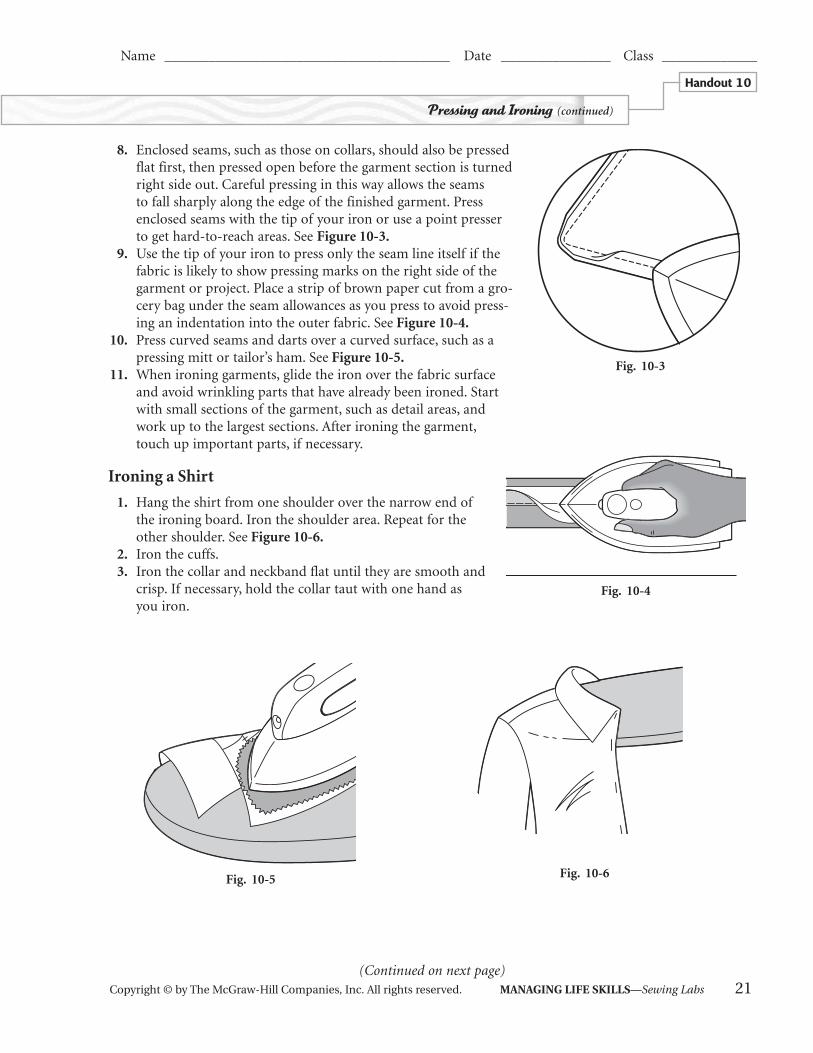
8. Enclosed seams, such as those on collars, should also be pressed flat first, then pressed open before the garment section is turned right side out. Careful pressing in this way allows the seams to fall sharply along the edge of the finished garment. Press enclosed seams with the tip of your iron or use a point presser to get hard-to-reach areas. See Figure 10-3.
9. Use the tip of your iron to press only the seam line itself if the fabric is likely to show pressing marks on the right side of the garment or project. Place a strip of brown paper cut from a gro-cery bag under the seam allowances as you press to avoid press-ing an indentation into the outer fabric. See Figure 10-4.
10. Press curved seams and darts over a curved surface, such as a pressing mitt or tailor’s ham. See Figure 10-5.
11. When ironing garments, glide the iron over the fabric surface and avoid wrinkling parts that have already been ironed. Start with small sections of the garment, such as detail areas, and work up to the largest sections. After ironing the garment, touch up important parts, if necessary.
Ironing a Shirt
1. Hang the shirt from one shoulder over the narrow end of the ironing board. Iron the shoulder area. Repeat for the other shoulder. See Figure 10-6.
2. Iron the cuffs. 3. Iron the collar and neckband flat until they are smooth and
crisp. If necessary, hold the collar taut with one hand as you iron.
Pressing and Ironing (continued)
Handout 10
Fig. 10-4
Fig. 10-5 Fig. 10-6
Fig. 10-3
(Continued on next page)Copyright © by The McGraw-Hill Companies, Inc. All rights reserved. MANAGING LIFE SKILLS—Sewing Labs 21
Name _______________________________________ Date _______________ Class _____________

Fig. 10-8
Fig. 10-9
4. Lay out one sleeve on the ironing board with the cuff opening up. Fold the sleeve with the underarm seam on the edge of the fold and smooth out the sleeve. Iron the sleeve flat, but not the cuff. Use the point of the iron to press neatly around the cuff opening and any tucks where the sleeve joins the cuff. Turn the sleeve over and lightly iron the other side, if necessary. See Figure 10-7.
5. Repeat for the other sleeve. Keep the ironed sleeve out of the way to avoid wrinkling it.
6. Place one side of the shirt front opening on the narrow end of the ironing board. Iron the front edge to make it smooth and crisp. See Figure 10-8.
7. Move the shirt around the board to iron the side, back, other side, and other front of the shirt. Use the point of the iron to press around the buttons.
8. Touch up the collar if necessary. To avoid wrin-kling the shirt, lay the collar on the edge of the ironing board with the shirt hanging off the edge. See Figure 10-9.
Pressing and Ironing (continued)
Handout 10
Fig. 10-7
22 MANAGING LIFE SKILLS—Sewing Labs Copyright © by the McGraw-Hill Companies, Inc. All rights reserved.
Name _______________________________________ Date _______________ Class _____________

Skill Sheet 1
Name _______________________________________ Date _______________ Class _____________
Copyright © by The McGraw-Hill Companies, Inc. All rights reserved. MANAGING LIFE SKILLS—Sewing Labs 23
Darts are used to add shape to garments and other projects. Using this skill sheet, you will stitch and press a dart.
Supplies
• Fabric piece 3 in. � 6 in.
• Pins
• Marking equipment
Directions: Use the pattern on this page to transfer the dart markings to the wrong side of the fabric, using a transfer method suitable for the fabric. See Figure 11-1.
Fo
ld l
ine
Le
ng
thw
ise
gra
in
Fig. 11-1
(Continued on next page)
Sewing Darts

3. Stitch the last several stitches along the dart fold line, ending at the large dot at the point of the dart. Leave the thread ends long.
4. Tie a small knot at the point of the dart so that the threads do not pull loose. Clip thread ends ¼ in. from the point. See Figure 11-3.
5. Press the dart to one side. Make sure that there are no puckers at the point of the dart.
Sewing Darts (continued)
Fig. 11-3
Skill Sheet 1
24 MANAGING LIFE SKILLS—Sewing Labs Copyright © by the McGraw-Hill Companies, Inc. All rights reserved.
Name _______________________________________ Date _______________ Class _____________
Fig. 11-2
1. Fold the fabric, right sides together, and match markings. Pin in place. See Figure 11-2.
2. Beginning at the wide end of the dart, backstitch and then con-tinue sewing the dart using a regular stitch length. Machine stitch from the wide end of the dart to the point, removing the pins as you come to them.

Skill Sheet 2
In this activity you will stitch, fi nish, and press a plain seam. Garment seams are usually 5/8 in. wide. Seams in home decorating and craft patterns are often ½ in. wide. Patchwork and quilting projects usually use ¼ in. seams. Serged seams are described on page 49.
Supplies
• Two woven fabric pieces, each 3 in. � 6 in.
• Pins
Directions: Complete the following steps to create a plain seam.
1. Place the two pieces of fabric with right sides together, matching all edges. (When you are follow-ing a pattern, you will also have to match notches.) Place pins 2 to 3 in. apart along the 6-in. side, at right angles to the seam line. See Figure 12-1.
2. Place the fabric under the presser foot, lining up the right edge with the 5⁄8 in. seam marking on the throat plate of the machine. Turn the hand wheel and insert the needle ½ in. from the top edge. Backstitch up to the top edge, then stitch forward to the other end, sewing a 5⁄8 in. seam. Your stitching should be directly or nearly directly on top of the backstitching. See Figure 12-2. Be sure to remove the pins as you sew.
3. Backstitch ½ in. at the end of the seam. Trim thread ends close to fabric. 4. Press the seam open.
Fig. 12-1
Backstitching
Fig. 12-2
Name _______________________________________ Date _______________ Class _____________
Copyright © by The McGraw-Hill Companies, Inc. All rights reserved. MANAGING LIFE SKILLS—Sewing Labs 25
Sewing Plain Seams
Skill Sheet 3
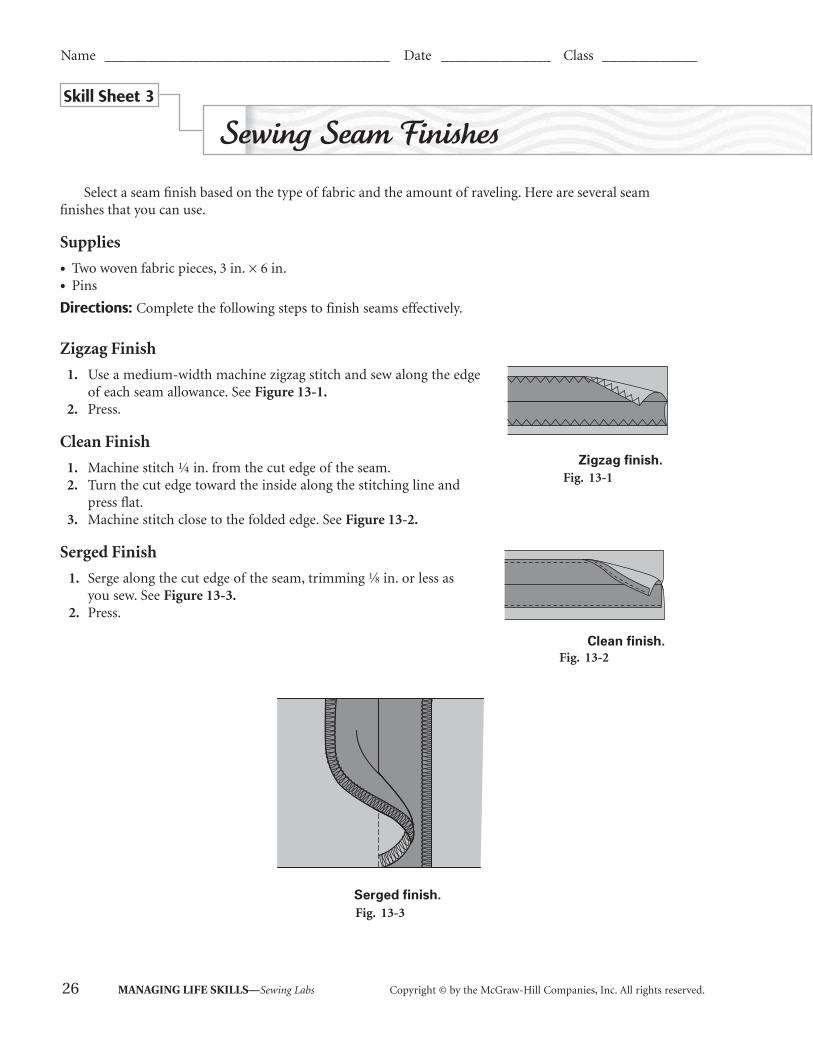
Select a seam fi nish based on the type of fabric and the amount of raveling. Here are several seam fi nishes that you can use.
Supplies
• Two woven fabric pieces, 3 in. × 6 in.
• Pins
Directions: Complete the following steps to finish seams effectively.
Zigzag Finish
1. Use a medium-width machine zigzag stitch and sew along the edge of each seam allowance. See Figure 13-1.
2. Press.
Clean Finish
1. Machine stitch ¼ in. from the cut edge of the seam. 2. Turn the cut edge toward the inside along the stitching line and
press flat. 3. Machine stitch close to the folded edge. See Figure 13-2.
Serged Finish
1. Serge along the cut edge of the seam, trimming 1⁄8 in. or less as you sew. See Figure 13-3.
2. Press.
Zigzag finish.
Fig. 13-1
Clean finish.
Fig. 13-2
Serged finish.
Fig. 13-3
Name _______________________________________ Date _______________ Class _____________
26 MANAGING LIFE SKILLS—Sewing Labs Copyright © by the McGraw-Hill Companies, Inc. All rights reserved.
Sewing Seam Finishes

Skill Sheet 4
In this activity, you will gather a larger piece of fabric and fit it to a smaller one.
Supplies
• Fabric piece 17 in. × 11 in.
• Pins
• Marking equipment
Directions: Use the pattern pieces, Figures 14-5 and 14-6, on page 28 to cut out pieces out of your fabric. Transfer seam markings to the wrong side of the fabric.
1. With the right side of the fabric facing up, stitch two rows of machine basting. Stitch one row on the seam line, 5/8 in. from the edge and the other ¼ in. inside the seam allow-ance from the first row. Leave thread tails about 2 in. long at each end. See Figure 14-1.
2. Pin piece 14-5 to piece 14-6, right sides together, matching notches and raw edges. Place the pins at right angles to the seam line at the notches.
3. At one end, secure the bobbin threads (the ones facing you, on the wrong side) by wrapping them around a pin in a figure eight. Gently pull both of the other bobbin threads. Slide the fabric evenly along the threads toward the cen-ter of the piece of fabric. Secure the threads you have just pulled by wrapping them around a pin. See Figure 14-2. Unwrap the bobbin threads at the other end and pull them, distributing the gathers evenly until piece 14-5 is the same length as piece 14-6.
4. Reset your machine stitch length for regular stitching. With the gathered side up, stitch on the seam line. See Figure 14-3. Backstitch at the begin-ning and end of the seam. As you stitch, hold the gathers evenly on both sides of the needle to prevent catching tiny tucks of fabric in the seam. Remove the pins as you sew.
5. Using just the tip of the iron, press the seam allowances flat, just as you have stitched them. See Figure 14-4.
1/4 inch
5/8 inch
Fig. 14-1
Fig. 14-3
Fig. 14-4
Fig. 14-2
Name _______________________________________ Date _______________ Class _____________
Copyright © by The McGraw-Hill Companies, Inc. All rights reserved. MANAGING LIFE SKILLS—Sewing Labs 27
(Continued on next page)
Sewing Gathers

A
Len
gth
wis
e g
rain
Pla
ce o
n f
old
Fig.
14-
6
Len
gth
wis
e g
rain
B
Fig.
14-
5
Skill Sheet 4
Sewing Gathers (continued)
28 MANAGING LIFE SKILLS—Sewing Labs Copyright © by the McGraw-Hill Companies, Inc. All rights reserved.
Name _______________________________________ Date _______________ Class _____________

Skill Sheet 5
In this activity, you will stitch and press a neckline facing, using the demonstration back and facing pieces on page 30.
Supplies
• Fabric piece 17 in. � 11 in.
• Pins
Directions: Use the pattern pieces Figures 15-5 and 15-6 on page 30 to cut the facing pieces out of your fabric.
1. Staystitch the notched edge of facing and garment neckline by stitching ½ in. from edge.
2. Clean finish the outer unnotched edge of the facing by turning it under ¼ in. and stitching close to the fold. See Figure 15-1.
3. Pin facing to garment piece, right sides together, matching notches. Stitch a 5⁄8 in. seam, backstitching at each end.
4. Trim and grade the curved seam allowance to reduce bulk. See Figure 15-2.
5. Clip neckline seam to staystitching line but not through it. This helps keep the facing flat when it is turned to the inside.
6. Open out the facing and press seam allowances flat, toward facing. Understitch the facing and seam allow-ances together. Stitch on the right side of the facing, 1⁄8 in. or less from the seam line. See Figure 15-3.
7. Turn the facing to the inside. Press. See Figure 15-4. On actual garments, tack the facing to the seam allowances.
Staystitching
Seamline
Fig. 15-2
1/4 inch
Clean-finished edge
Fig. 15-1
Fig. 15-4
Seamline
Seamline
Understitching
Fig. 15-3
Name _______________________________________ Date _______________ Class _____________
Copyright © by The McGraw-Hill Companies, Inc. All rights reserved. MANAGING LIFE SKILLS—Sewing Labs 29
(Continued on next page)
Sewing Facings

B
Garment
Back
Pla
ce
on
fo
ld
Fig. 15-6
A
Back Neck
Facing
Pla
ce o
n f
old
Fig. 15-5
Sewing Faces (continued)
Skill Sheet 5
30 MANAGING LIFE SKILLS—Sewing Labs Copyright © by the McGraw-Hill Companies, Inc. All rights reserved.
Name _______________________________________ Date _______________ Class _____________

Skill Sheet 6
In this activity, you will practice four hand-sewing stitches.
Supplies
• Four pieces of fabric, each cut 6 in. square
• Needle
• Four lengths of thread, 18 to 24 in. each
• Thimble (optional)
Backstitching
Directions: Use this stitch to repair machine-stitched seams and to anchor hand sewing.
1. Cut fabric square in half. Pin two long sides together with edges even. Beginning at the right, take a small stitch into the fabric and stitch two to three times over the first stitch to secure your stitching. This is called a backstitch tack.
2. Insert the needle about 1⁄8 in. behind the point where the thread emerges and bring it out 1⁄8 in. in front of that same point. Continue stitching, inserting the needle back one stitch length and bringing it out one stitch length ahead. The stitches on the underside will look twice as long as those on the upper side. See Figure 16-1.
3. Finish with another backstitch tack.
Running Stitch
Directions: Use this basic stitch for basting, gathering, tucking, and quilting.
1. Cut a fabric square in half. Pin the two long sides together, aligning the raw edges. Knot the end of the thread and secure it in the seam allowance.
2. About 5⁄8 in. from the raw edges, make even stitch-es about 1⁄8 to ¼ in. long. See Figure 16-2. If you are basting, make the stitches about ½ in. long for easier removal.
3. Finish with a backstitch tack.
1/8 inch
Fig. 16-1
Fig. 16-2
Name _______________________________________ Date _______________ Class _____________
Copyright © by The McGraw-Hill Companies, Inc. All rights reserved. MANAGING LIFE SKILLS—Sewing Labs 31
(Continued on next page)
Hand Sewing

Skills sheet 6
Hand Sewing (continued)
Hemming Stitch
Directions: Use this stitch where the hem edge is bound or clean finished.
1. Fold the finished edge down 1½ in. as shown in Figure 16-3. Press.
2. Inside the right edge of the hem, secure your thread with a knot or a backstitch tack. About ¼ in. to the left, take a tiny stitch in the garment, picking up just a few threads of fabric. Then bring the needle diagonally up through the folded edge of the fabric or binding.
3. Continue spacing stitches about ¼ in. apart. See Figure 16-4. Finish by securing your thread with a backstitch tack.
Slipstitch
Directions: This almost invisible stitch can be used to attach one bound or folded edge to another piece of fabric, as in linings, pockets, and trims.
1. To prepare your fabric, cut a fabric square in half. Press under 5⁄8 in. on one long edge. Lay fabric with folded edge over the other piece, right sides together. See Figure 16-5.
2. Secure the end of the thread with a knot. Slip the needle inside the folded edge of the upper fabric and bring it out on the fold line. Pick up one or two threads of the underlayer of fabric as close as possible to the fold line.
3. Insert the needle into the fold line about ¼ in. away and bring it out again. Pick up one to two threads of the underlayer and continue stitching, making sure the needle goes into the folded edge each time to conceal stitches. See Figure 16-6.
4. Finish with a backstitch tack.
Hemming stitch
Fig. 16-4
Fold
Fig. 16-6
Fold
Fig. 16-5
32 MANAGING LIFE SKILLS—Sewing Labs Copyright © by the McGraw-Hill Companies, Inc. All rights reserved.
Name _______________________________________ Date _______________ Class _____________
Fig. 16-3

Skill Sheet 7
In this activity, you will construct and attach an unlined patch pocket.
Supplies
• Fabric piece 9 in. � 18 in.; lengthwise grain should run on long side
• Pins
• Marking equipment
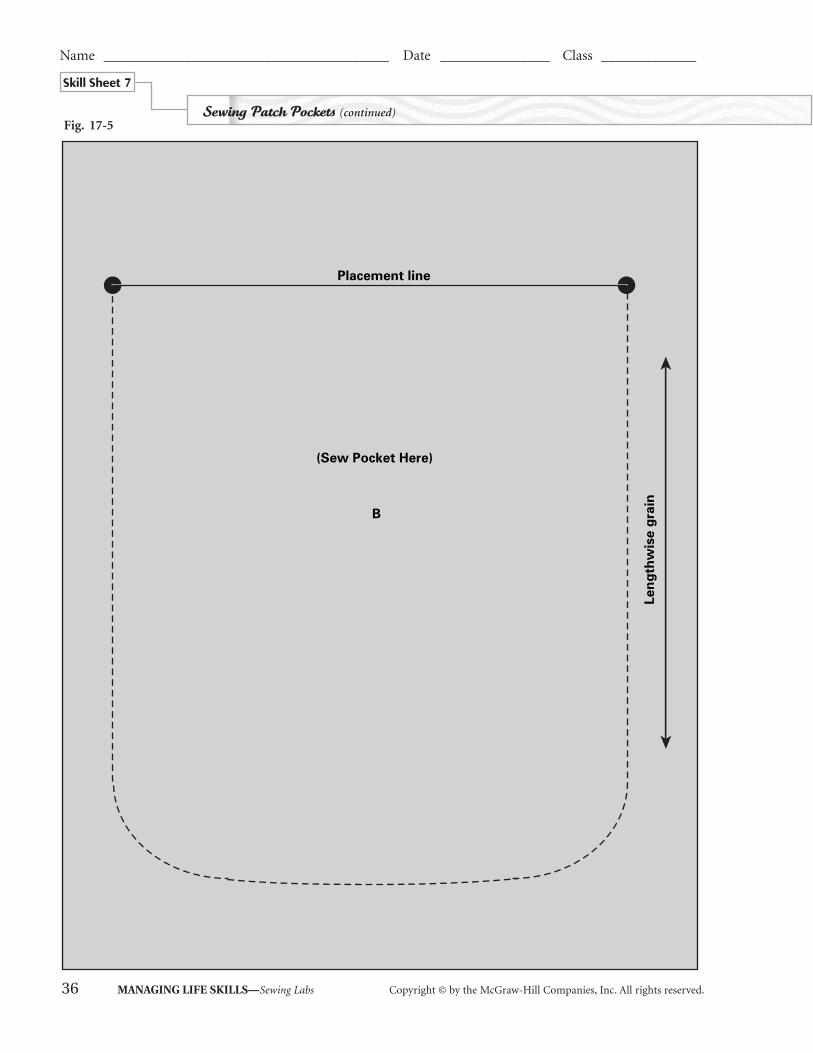
Directions: Use the patterns on pages 35-36 to complete this activity. See Figures 17-4 and 17-5.
1. Layout, pin, and cut pattern pieces. Transfer markings to wrong side of fabric. 2. Turn fabric under ¼ in. at top edge of pocket (Figure 17-4) and press. Stitch close to fold. 3. Fold upper edge of pocket along fold line with right sides together. Pin. 4. Stitch ends of pocket hem 5⁄8 in. from edge. Trim corners to ¼ in. See Figure 17-1 5. Turn pocket hem to the inside and press. Slipstitch or topstitch hem to pocket on inside. 6. Machine baste around the rounded corners, 3⁄8 in. from the edge.
5/8 inch
1/4 inch
1/4 inch
Fig. 17-1
Name _______________________________________ Date _______________ Class _____________
Copyright © by The McGraw-Hill Companies, Inc. All rights reserved. MANAGING LIFE SKILLS—Sewing Labs 33
(Continued on next page)
Sewing Patch Pockets

7. Turn seam allowance to the inside along seam line. Pull on the basting threads to ease in fullness and shape the pocket curves. See Figure 17-2. Press lightly with tip of iron to hold seam allowance in place.
8. Notch seam allowance on the curves to eliminate bulk and puckers, as shown in Figure 17-2.
9. Press pocket, forming smooth, evenly rounded corners and straight sides. Pin to fabric piece 17-5 along placement line, matching dots.
10. Topstitch close to the edge of pocket. Reinforce top corners with backstitching. See Figure 17-3. As an alternative, attach pocket to fabric by hand with slip stitches.
Machine basting
Fig. 17-2
Backstitching
Fig. 17-3
Skill Sheet 7
Sewing Patch Pockets (continued)
34 MANAGING LIFE SKILLS—Sewing Labs Copyright © by the McGraw-Hill Companies, Inc. All rights reserved.
Name _______________________________________ Date _______________ Class _____________
(Continued on next page)

Skill Sheet 7
Fold line
A
Len
gth
wis
e g
rain
Sewing Patch Pockets (continued)
Copyright © by The McGraw-Hill Companies, Inc. All rights reserved. MANAGING LIFE SKILLS—Sewing Labs 35
Name _______________________________________ Date _______________ Class _____________
(Continued on next page)
Fig. 17-4
Skill Sheet 7
Sewing Patch Pockets (continued)
(Sew Pocket Here)
B
Len
gth
wis
e g
rain
Placement line
36 MANAGING LIFE SKILLS—Sewing Labs Copyright © by the McGraw-Hill Companies, Inc. All rights reserved.
Name _______________________________________ Date _______________ Class _____________
Fig. 17-5

Skill Sheet 8
In this activity, you will construct a self-casing for elastic. Use the demonstration pattern pieces on page 38.
Supplies
Directions: Complete the following steps to create a casing. Use the pattern in Figure 18-4 on page 38 for your practice sample.
1. Layout, pin, and cut out the casing pattern piece. Transfer the seam line and fold line markings to wrong side of fabric.
2. With right sides together, match the notched edges of fabric and pin in place. Stitch a 5⁄8 in. seam. Press seam open. This will create a tube of fabric.
3. Turn under top edge of fabric (near fold line) ¼ in. and press. See Figure 18-1.
4. Fold fabric, wrong sides together, along fold line to form casing. Pin in place. Press fold of casing.
5. Machine stitch close to lower (free) edge of casing, leaving an opening of 1 to 2 in. at seam line to insert elastic. See Figure 18-2.
6. Attach the safety pin to one end of the elas-tic. Insert the closed safety pin into the cas-ing, using it to pull the elastic through the casing. Be sure to hold the unpinned end of the elastic so that it does not get pulled into the casing. Avoid twisting the elastic.
7. Pull both ends of elastic out through the opening and remove the pin. Overlap the elastic ends ½ in. Stitch a square and then diagonally across the square in the over-lapped area to secure the ends of the elastic. See Figure 18-3.
8. Close the opening with machine stitching, matching previous stitching lines. Use a backstitch tack to secure your stitching. Turn fabric right side out.
Fig. 18-1
Fig. 18-2
Fig. 18-3
• Fabric piece, 8 in. � 19 in.
• Pins
• Elastic, 9 in. long, 1 in. wide
• Large safety pin
• Marking equipment
Name _______________________________________ Date _______________ Class _____________
Copyright © by The McGraw-Hill Companies, Inc. All rights reserved. MANAGING LIFE SKILLS—Sewing Labs 37
(Continued on next page)
Sewing Casings
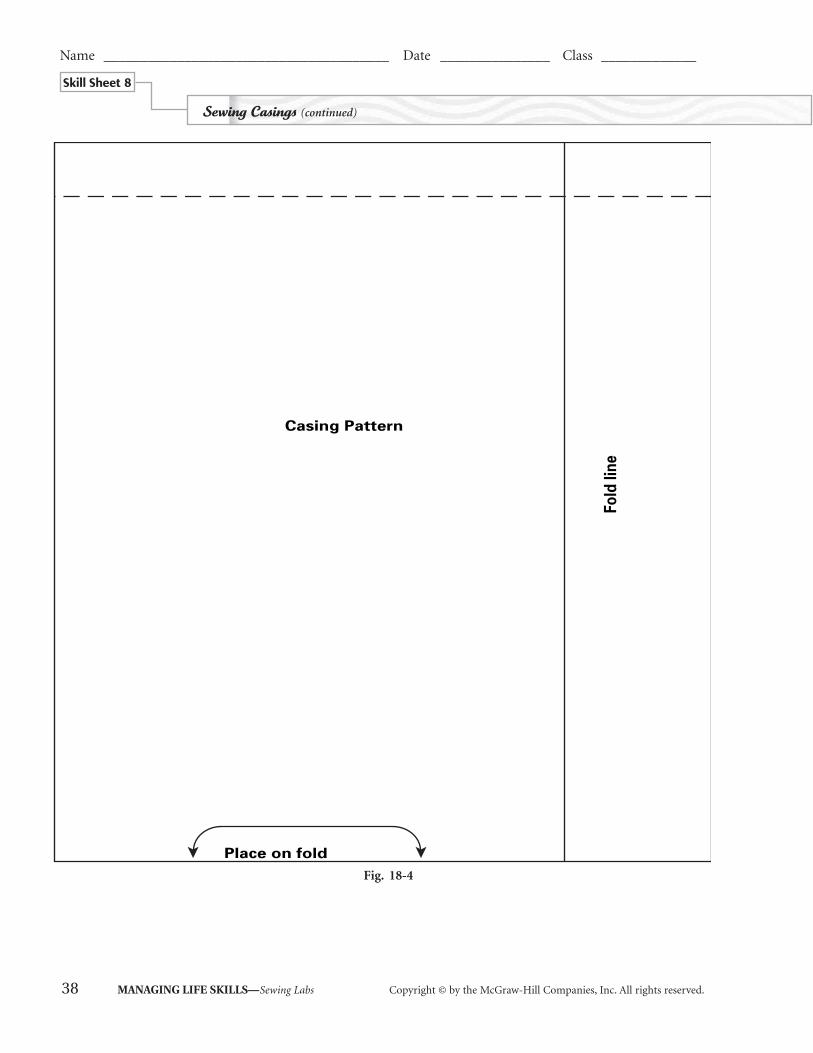
Skill Sheet 8
Sewing Casings (continued)
Casing Pattern
Place on fold
Fo
ld l
ine
Fig. 18-4
38 MANAGING LIFE SKILLS—Sewing Labs Copyright © by the McGraw-Hill Companies, Inc. All rights reserved.
Name _______________________________________ Date _______________ Class _____________

In this activity, you will sew a plain hem, a narrow hem, and a curved hem. Use the pattern pieces on page 40.
Supplies
Directions: Use the pattern pieces found in Figures 19-4 and 19-5 on page 40 to complete a plain hem, a narrow hem, and a curved hem. Fold fabric in half so that the piece measures 8½ in. × 15 in. Layout, pin, and cut two pieces from pattern piece Figure 19-4 and one from pattern piece Figure 19-5.
Plain Hem
1. Finish the lower raw edge (hem edge) of one pattern piece from Figure 19-4, using a suitable edge finish.
2. Measure and mark a fold line 1 in. up from the bottom edge and pin. Press the folded edge lightly with the tip of an iron.
3. Stitch hem in place with hemming stitches or slip stitches. Secure your stitches at the beginning and end of the hem.
Narrow Hem
1. Using the second piece cut from pattern Figure 19-4, stitch ¼ in. from edge.
2. Turn up fabric on stitching line and press. 3. Turn up ¼ in. again and press. Machine topstitch close
to this fold. See Figure 19-1.
Curved Hem
1. Finish the raw edge of pattern piece Figure 19-5, using a suitable edge finish.
2. With the fabric wrong side up, machine baste ¼ in. from curved edge.
3. Measure and mark a fold line ½ in. up from the bottom (curved) edge. Turn up hem and pin.
4. Pull on bobbin thread of basting stitches to ease in full-ness. See Figure 19-2. Carefully, using the tip of an iron, press hem allowance to shrink out excess fullness. Do not iron over pins.
5. Slip stitch hem in place. See Figure 19-3.
Skill Sheet 9
1/4 inch 1/4 inch
Fig. 19-1
Machine
basting
Fig. 19-2
Fig. 19-3
• Fabric piece 17 in. � 15 in.
• Pins• Needle
• Thread• Thimble
• Marking chalk
Name _______________________________________ Date _______________ Class _____________
Copyright © by The McGraw-Hill Companies, Inc. All rights reserved. MANAGING LIFE SKILLS—Sewing Labs 39
(Continued on next page)
Sewing Hems

Skill Sheet 9
Sewing Hems (continued)
A
Pla
ce o
n f
old
Len
gth
wis
e g
rain
Fig. 19-4
B
Pla
ce
on
fo
ld
Le
ng
thw
ise
gra
in
Fig. 19-5
40 MANAGING LIFE SKILLS—Sewing Labs Copyright © by the McGraw-Hill Companies, Inc. All rights reserved.
Name _______________________________________ Date _______________ Class _____________

Skill Sheet 10
Sewing ButtonsIn this activity, you will sew two types of buttons to a piece of fabric.
Supplies
Sew-Through Button
Directions: Complete the following steps for attaching a sew-through button.
1. Fold the fabric in half. Use a pin to mark the button location correctly on the fabric.
2. Using a double strand of thread, take two or three small stitches at the pin location to secure the thread. Remove the pin.
3. Place the button on the fabric at the marked location. Bring the needle up through one of the holes in the button. Place a toothpick on top of the button, between the holes. See Figure 20-1. Bringing the needle over the toothpick, insert the needle in a second hole of the button, pulling the thread through to the other side. Continue, making four to five stitches through the holes.
4. Position the needle between the button and the fabric. Remove the toothpick and raise the button away from the fabric. Wrap the thread four or five times around the stitches under the but-ton to form a thread shank. See Figure 20-2.
5. Bring the needle through to the underside of the fabric and use a backstitch tack to secure the thread before cutting.
Shank Button
Directions: Complete the following steps for attaching a shank button.
1. Mark the button position on the fabric as described in steps 1 and 2 above.
2. Place the button on the fabric. Stitch through the button shank and fabric with four to five small, even stitches. See Figure 20-3. Use a backstitch tack on the underside of the fabric to secure the thread before cutting.
• Fabric piece at least 4 in. � 6 in.
• Pins
• Needle
• Thread
• Sew-through button
• Shank button
• Thimble
Toothpick
Fig. 20-1
Thread
shank
Fig. 20-2
Fig. 20-3
Name _______________________________________ Date _______________ Class _____________
Copyright © by The McGraw-Hill Companies, Inc. All rights reserved. MANAGING LIFE SKILLS—Sewing Labs 41
Sewing Buttons

Zipper closures are used in a variety of projects ranging from garments to duffl e bags. Use the following information to insert lapped or centered zippers.
Supplies
• Two pieces of fabric, 6 in. × 10 in. for each zipper application
• One 7-inch zipper for each application
• Thread
• Hand sewing needle
Lapped Zipper Application
Directions: Use the following steps to complete the lapped zipper application.
1. With the right sides together, pin the seam that will include the zipper. Make sure the top edges of the fabric are even. With the wrong side up, place the zipper along the seam allowance. Position the top of the zipper teeth 1 in. from the top edge, and measure the length of the zipper opening. Use chalk to mark the bottom location of the zipper teeth on the seam allowance. See Figure 21-1.
2. Using a standard presser foot and regular stitch length, sew the seam from the bottom of the project up to the mark for the bottom of the zipper opening. Backstitch. Without removing the fabric from the machine, change the stitch length to basting. Continue sewing the seam to the top edge of the fabric. See Figure 21-2.
3. Press the seam open. 4. Attach the zipper foot to the machine. Position the
foot to the right of the needle. 5. Open the zipper. With the top edge of the project facing you,
place the zipper—right side down—on the right-hand side of the seam allowance. The zipper teeth should be on the seam line. Match the bottom of the zipper teeth with the chalk mark made in Step 1. Pin the zipper in place. See Figure 21-3.
6 . Machine baste from the bottom to the top of the zipper, 1⁄8 in. from the zipper teeth. Stitch only through the zipper tape and seam allowance. Remove the pins as you reach them.
1 Inch
Markchalk line
Fig. 21-1
Regularstitching
Backstitching
Switch tobasting inzipper area
Fig. 21-2
Skill Sheet 11
Start
Seamline
Fig. 21-3
Name _______________________________________ Date _______________ Class _____________
42 MANAGING LIFE SKILLS—Sewing Labs Copyright © by the McGraw-Hill Companies, Inc. All rights reserved.
(Continued on next page)
Sewing Lapped and Centered
Zippers

7. Close the zipper and turn it face up. Keep the project to the left of the needle. Fold the seam allowance away from the zip-per and pin in place. Move the zipper foot to the left side of the needle. Stitch through the folded edge of the seam allowance and the zipper tape from the bottom to the top of the zipper. This row of stitching should be close to the zipper teeth. See Figure 21-4.
8. Fold the zipper over so the right side is flat against the other seam allowance. Turn the project to the right. A tuck should form at the bottom of the zipper. Pin the zipper tape to the remaining seam allowance only. See Figure 21-5.
9. Machine baste the zipper to the seam allowance from the bot-tom to the top of the zipper. Stitch 1⁄8 in. from the zipper teeth.
10. Remove the project from the machine and turn it to the right side. Press lightly over the zipper area. Hand baste across the bottom of the zipper and up the side of the zipper, 3⁄8 in. out from the seam.
11. Move the zipper foot to the right side of the needle, and begin stitching at the bottom of the zipper. Sew along the hand bast-ing across the bottom of the zipper, stitching ½ in. out from the seam. To pivot the corner: stop with the needle in the fabric; lift the presser foot and turn the fabric so the top edge of the zipper is facing you; lower the presser foot. Continue stitching along the basting, ½ in from the seam to the top of the project. Backstitch ¼ in. at the top of the zipper to secure the stitching. See Figure 21-6.
12. Pull the upper thread at the bottom of the zipper to the inside of the garment by using a hand sewing needle. Tie the upper and bobbin threads together and clip the threads close to the project. See Figure 21-7. Remove all basting stitches. Press.
Skill Sheet 11
Sewing Lapped and Centered Zippers (continued)
StartSeam line
Fig. 21-4
Seam line
Tuck forms
Fig. 21-5
Start
Fig. 21-6 Fig. 21-7
Copyright © by The McGraw-Hill Companies, Inc. All rights reserved. MANAGING LIFE SKILLS—Sewing Labs 43
Name _______________________________________ Date _______________ Class _____________
(Continued on next page)

Centered Zipper Application
Directions: Prepare the fabric and seam allowance for the centered zipper using Steps 1 through 4 from the Lapped Zipper Application. See Figure 22-1. Then use the following steps to complete the centered zipper application.
1. Keep the zipper closed. Place the zipper right side down on the seam allowance with the zipper teeth on the seam line. Pin the zipper to the seam allowances only. The top teeth of the zipper should be 1 in. below the top edge. Position the zipper foot to the right of the needle.
2. Machine baste from the bottom to the top on the right-hand side of the zipper, stitching 1⁄8 in. from the zipper teeth. Reposition the zipper foot to the left side of the needle. Repeat basting on the left-hand side of the zipper. Stitch through the zipper tape and the seam allowance. Remove the pins as you reach them. See Figure 22-2.
3. Turn the project right side up. Press lightly over the zipper area. Beginning at the center seam, hand-baste along the bot-tom of the zipper and up one side ¼ in. from the seam. Stitch through the fabric and the zipper tape. Repeat along the other side of the zipper. See Figure 22-3.
4. With the zipper foot to the right of the needle, insert the machine needle on the seam line at the bottom of the zipper. Using the basting as a guide, stitch just outside the basting across the bot-tom, pivot the corner, and continue sewing along the basting up the right side of the zipper. Stitch to the top. Backstitch to secure stitching. Move the zipper foot to the left side of the needle. Repeat this process for the left side of the zipper.
5. Pull the upper threads at the bottom of the zipper to the inside of the project, using a hand-sewing needle. Tie the threads and clip the thread tails to ¼ in. Remove all basting stitches. Press.
Skill Sheet 11
Sewing Lapped and Centered Zippers (continued)
Machine
basting
Mark
showing
bottom of
zipper
Regular
stitches
Backstitching
Fig. 22-1
1/8 inch
Fig. 22-2
Fig. 22-3
44 MANAGING LIFE SKILLS—Sewing Labs Copyright © by the McGraw-Hill Companies, Inc. All rights reserved.
Name _______________________________________ Date _______________ Class _____________

Skill Sheet 12
Being able to mend your own clothing saves you money and extends the life of your clothes. When a seam tears from too much stress, it can be easily mended using the sewing machine and iron.
Supplies
• Thread to match fabric
• Iron-on mending tape or fusible interfacing, if necessary to repair fabric
Directions: Use the following steps to repair a seam if the seam allowances are still intact.
1. Remove the ripped stitches. 2. Restitch the seam by machine, starting ½ in. from the split.
Backstitch at the beginning and end of the repair stitches. See Figure 23-1. For a woven fabric, use a straight stitch. For a knit fabric, use a small zigzag. Note: To mend a split seam in a sweater, serge the seam with a three-thread overlock stitch. See pages 49-51. Because backstitching is not possible on the serger, secure the beginning and end of stitching with one of the methods on pages 52-54.
Directions: Use the following steps to repair a seam if the fabric is torn at the seam line.
1. Choose iron-on mending tape or fusible interfacing to patch the hole, based on fabric weight and firmness. Use mending tape for heavier, crisp fabrics. Use medium- to light-weight fusible interfacing for softer, finer fabrics. Cut a patch slightly larger than the hole to be covered. Round off the corners of the patch.
2. Working from the wrong side of the fabric, meet the torn edges. Remove ripped stitches and trim away any loose threads from the fabric. Place the patch over the hole. Press firmly with the iron, following the manufacturer’s directions for the iron-on tape or the interfacing. See Figure 23-2.
3. Restitch the seam as necessary, following the directions above for intact seam allowances.
Fig. 23-1
Cut patch slightly
larger all the way
around.
Fig. 23-2
Name _______________________________________ Date _______________ Class _____________
Copyright © by The McGraw-Hill Companies, Inc. All rights reserved. MANAGING LIFE SKILLS—Sewing Labs 45
Repairing Seams

Sewing a PatchWhen a hole develops in a casual garment, one of the most durable ways to mend it is to apply a
patch. Patches can be large or small and arranged artfully to cover other fabric blemishes besides holes, such as stains or snags.
Supplies
• Patch fabric to match garment or contrasting patch fabric
• Thread to match patch fabric
Directions: Complete the following steps to repair a garment with a patch.
1. Inspect the fabric around the hole for other frayed or threadbare spots. Then measure the size of the entire area to be patched.
2. Find a fabric similar to the garment you are patching. If necessary, “steal” fabric by stitching closed a pocket that does not get much use and cutting away the fabric from underneath. If you cannot find matching fabric, find one that’s close or, for a decorative look, choose a contrasting patch fab-ric.
3. Cut the patch ½ to ¾ in. larger than the entire area to be patched. 4. Right side up, pin the patch in place, centering it over the hole or weakened area. 5. Set up your sewing machine for a 4- or 5-mm wide zigzag stitch with a 0.5 mm or shorter stitch
length or use a decorative variation, such as the honeycomb. See Figure 24-1. For denim or other heavy, coarse fabric, replace the machine’s universal needle with a heavy-duty “jeans” needle.
Skill Sheet 13
Stitch patch with
decorative stitch,
such as honeycomb,
if desired.
Fig. 24-1
Name _______________________________________ Date _______________ Class _____________
46 MANAGING LIFE SKILLS—Sewing Labs Copyright © by the McGraw-Hill Companies, Inc. All rights reserved.
(Continued on next page)
Sewing a Patch

Slip pant legs and
sleeves over the
machine's free arm.
Fig. 24-2
7. Start stitching so that the needle makes its right swing just outside the edge of the patch. See Figure 24-3. Remove the pins as you come to them.
8. If the patch is a rectangle or square, stitch to the cor-ner. Stop when the right-hand swing of the needle is in the fabric outside the patch. Keeping the needle in the fabric, raise the presser foot, pivot 90 degrees, lower the foot, and stitch the next side of the patch. See Figure 24-4. At the next corner, repeat the procedure. If the patch is a circle, sew all the way around it, overlapping the stitching slightly at the end.
Skill Sheet 13
Sewing a Patch (continued)
Right-hand swing
of zigzag is just
outside the patch
Fig. 24-3
Pivot point
Fig. 24-4
Copyright © by The McGraw-Hill Companies, Inc. All rights reserved. MANAGING LIFE SKILLS—Sewing Labs 47
Name _______________________________________ Date _______________ Class _____________
6. Right side up, place the garment and patch under the presser foot, positioning the edge of the patch slightly to the right of the needle. Slip pant legs and sleeves over the machine’s free arm. See Figure 24-2. Note: If the pant leg is too narrow for maneuvering around all sides of the patch during sewing, then you will have to remove the stitching from one leg seam to open the pant leg.

Skill Sheet 14
Sergers are described in Chapter 45 of the text. One way in which a serger is different from a conventional sewing machine is that when you stop stitching, you do not pull serger threads back behind the needle. They are looped over the stitch fi ngers and there is no slack. The way to remove fabric after stitching is by “chaining off,” or making a thread chain, as in this activity.
Directions: Complete the following steps to make a serger thread chain.
1. First, check to see that the serger is threaded correctly. If you are not sure, ask your teacher to check it for you.
2. With the presser foot lowered, start running the serger slowly. (You will not use any fabric in this activity.) A chain of interlocked threads will form behind the presser foot. See Figure 25-1.
3. Create a thread chin of about 7 in. Clip the thread with a scissors about 4 in. behind the presser foot. See Figure 25-2.
4. A quick way to cut the thread is to bring the tail chain around to the front of the presser foot. As you continue to run the serger, guide the chain under the presser foot and the serger knife will clip the threads. See Figure 25-3.
4 in.
(10 cm)
Fig. 25-2 Fig. 25-3
Thread chain
Fig. 25-1
Name _______________________________________ Date _______________ Class _____________
48 MANAGING LIFE SKILLS—Sewing Labs Copyright © by the McGraw-Hill Companies, Inc. All rights reserved.
Making a Serger Thread Chain
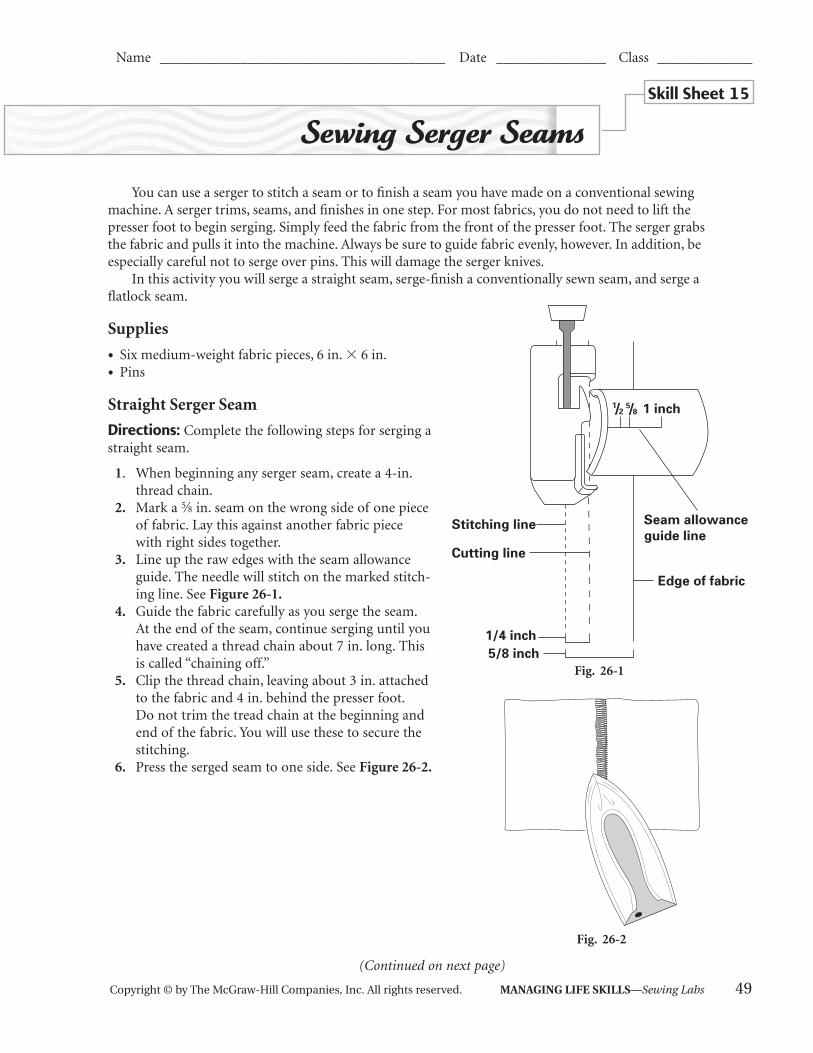
Skill Sheet 15
You can use a serger to stitch a seam or to fi nish a seam you have made on a conventional sewing machine. A serger trims, seams, and fi nishes in one step. For most fabrics, you do not need to lift the presser foot to begin serging. Simply feed the fabric from the front of the presser foot. The serger grabs the fabric and pulls it into the machine. Always be sure to guide fabric evenly, however. In addition, be especially careful not to serge over pins. This will damage the serger knives.
In this activity you will serge a straight seam, serge-fi nish a conventionally sewn seam, and serge a fl atlock seam.
Supplies
• Six medium-weight fabric pieces, 6 in. � 6 in.
• Pins
Straight Serger Seam
Directions: Complete the following steps for serging a straight seam.
1. When beginning any serger seam, create a 4-in. thread chain.
2. Mark a 5⁄8 in. seam on the wrong side of one piece of fabric. Lay this against another fabric piece with right sides together.
3. Line up the raw edges with the seam allowance guide. The needle will stitch on the marked stitch-ing line. See Figure 26-1.
4. Guide the fabric carefully as you serge the seam. At the end of the seam, continue serging until you have created a thread chain about 7 in. long. This is called “chaining off.”
5. Clip the thread chain, leaving about 3 in. attached to the fabric and 4 in. behind the presser foot. Do not trim the tread chain at the beginning and end of the fabric. You will use these to secure the stitching.
6. Press the serged seam to one side. See Figure 26-2.
Fig. 26-1
Fig. 26-2
Name _______________________________________ Date _______________ Class _____________
Copyright © by The McGraw-Hill Companies, Inc. All rights reserved. MANAGING LIFE SKILLS—Sewing Labs 49
(Continued on next page)
Sewing Serger Seams

Reinforced Seam
Directions: Complete the following steps to create a strong seam for areas of stress in a garment.
1. Pin two fabric pieces with right sides together. Stitch a 5⁄8 in. seam on a conventional sewing machine.
2. Press the seam allowances flat (not open). With the serger needle 1⁄8 in. from the seam line, serge the edges together. See Figure 26-3.
3. Press the serged seam allowance to one side. 4. You can also serge-finish each seam allowance
separately, trimming the edges 1⁄8 in. or less. See Figure 26-4.
Flatlock Seam
Directions: A flatlock seam is a decorative stitch used in areas of a garment where there will be little or no stress. Complete the following steps to create a flatlock serger seam.
1. Adjust the serger stitch length and width as your teacher directs. Thread both the upper and lower loopers and the needle.
2. Loosen the needle tension almost all the way. The needle thread should extend to the edge of the underside of the fabric. Tighten the lower-looper tension so that the lower-looper thread forms a straight line at the edge of the fabric. See Figure 26-5.
Skill Sheet 15
Sewing Serger Seams (continued)
Conventionally
sewn 5/8 inch
seam allowance
1/8 inch
Fig. 26-3
Fig. 26-4
Upper looper
thread
Lower looper
thread
Needle
thread
Fig. 26-5
50 MANAGING LIFE SKILLS—Sewing Labs Copyright © by the McGraw-Hill Companies, Inc. All rights reserved.
Name _______________________________________ Date _______________ Class _____________
(Continued on next page)

3. Test the stitch on fabric scraps, adjusting the tensions until stitching looks like Figure 26-5.
4. Decide whether you want the looped side or the ladder stitch side to show on the outside of the garment. See Figure 26-6. For a stitch with the loops showing, place your two fabric pieces wrong sides together. For a stitch with the ladder side showing, place the right sides of the fabric together.
5. Place fabric pieces together according to your choice in Step 4. Guide the fabric edges under the presser foot so that the stitches hang halfway off of the fabric. See Figure 26-7. This will allow room for the two layers to spread out when the seam is pulled flat.
6. Chain off at the end of the seam. 7. Open the fabric pieces and pull crosswise gently until
the stitches are flat, as shown in Figure 26-8.
Fig. 26-6
Edges of stitch
Edge of fabric
Fig. 26-7
Pull apart
Fig. 26-8
Skill Sheet 15
Sewing Serger Seams (continued)
Copyright © by The McGraw-Hill Companies, Inc. All rights reserved. MANAGING LIFE SKILLS—Sewing Labs 51
Name _______________________________________ Date _______________ Class _____________

In this activity you will learn how to prevent the thread chain at the end of the stitching from raveling. This is important, since a serger cannot backstitch to secure a seam. There are several methods for securing serger seams.
Supplies
• Five pairs of medium-weight fabric pieces 6 in. � 6 in. each seams along one side
• Liquid seam sealant
• Pin
• Tapestry needle, crochet hook, or loop turner
Using Seam Sealant
Directions: To use seam sealant properly, complete the following steps.
1. Carefully apply one or two drops of liquid seam sealant to the stitches at the end of the seam. See Figure 27-1.
2. Cut off the excess thread chain once the seam sealant dries.
Knotting the Threads
Directions: Use the following steps to secure a serger seam with a knot.
1. Tie the thread chin into a loose knot around a straight pin. Use the pin to slide the knot tightly against the fabric edge. See Figure 27-2.
2. Pull the knot tightly to secure it. Clip the thread chain close to the knot. You may want to combine this method with the previous one by adding a drop of seam sealant to the knot. Allow sealant to dry before cutting the thread chain ends.
Threading Ends Through Stitches
Directions: Use the following steps to pull the thread chain through the stitches.
1. Insert the thread chain through the eye of a tapes-try needle.
2. Guide the needle into the serger stitches at the end of the seam. Pull the needle and thread chain through the serged edge for 1 to 2 in. See Figure 27-3.
3. Trim the excess thread chain close to the serger stitches.
Skill Sheet 16
Seam
sealant
Fig. 27-1
Knot
Fig. 27-2
Up to 2 inches
Fig. 27-3
Name _______________________________________ Date _______________ Class _____________
52 MANAGING LIFE SKILLS—Sewing Labs Copyright © by the McGraw-Hill Companies, Inc. All rights reserved.
(Continued on next page)
Securing Serger Seams

4. To use the crochet hook or loop turner, guide the hook through the serger stitching, take hold of the thread chain, pull it back through the stitches, and cut off the excess. See Figure 27-4.
Machine Securing Beginning Threads
Directions: Use the following steps to machine-secure the begin-ning threads.
1. Stitch one or two stitches into the seam. Stop and raise the presser foot. Pull gently back on the thread chain to make it narrower; then bring it around to the front from the left side. See Figure 27-5.
2. Place the thread chain on the seam allowance just next to the stitching line. Serge over the thread chain for about 1 in. See Figure 27-6.
3. Cut off the excess thread chain or swing it to the right so that it is trimmed by the serger knives.
Machine Securing Ending Threads
Directions: Use the following steps to secure the threads at the end of a serger seam.
1. Serge on stitch beyond the fabric edge. Stop the serger. See Figure 27-7.
Fig. 27-4
Skill Sheet 16
Securing Serger Seams (continued)
Fig. 27-5
1 inch
Fig. 27-6
One stitch beyond fabric edge
Fig. 27-7
Copyright © by The McGraw-Hill Companies, Inc. All rights reserved. MANAGING LIFE SKILLS—Sewing Labs 53
Name _______________________________________ Date _______________ Class _____________
(Continued on next page)

Fig. 27-10 Stitch finger
Fig. 27-11
2. Raise the presser foot and carefully slip the thread chain off of the stitch finger. (See directions below.) Flip the fabric over so that the seam is in front of the presser foot.
3. Lower the presser foot and stitch 1 to 2 in. over the last stitches in the serged seam. See Figure 27-8.
4. Slide the fabric to the left and chain off. Trim the thread chain close to the seam. See Figure 27-9.
Clearing the Stitch Finger
Directions: Use the following steps for clearing the stitch finger.
1. Lift the presser foot and raise the needle. 2. Using a straight pin, pull out about ½ in. of slack in the
needle thread just above the eye of the needle. See Figure 27-10.
3. Gently pull the thread chain to the back to slide the stitches off of the stitch finger. See Figure 27-11.
4. Remove the slack you created in the needle thread by pulling it just above the tension dial or at the spool.
Skill Sheet 16
Securing Serger Seams (continued)
1-2 inches
Fig. 27-9
Fig. 27-8
Flip fabric over
54 MANAGING LIFE SKILLS—Sewing Labs Copyright © by the McGraw-Hill Companies, Inc. All rights reserved.
Name _______________________________________ Date _______________ Class _____________

In this activity, you will learn special techniques for serging curves and corners. Always serge slowly in these areas, and watch closely what you are doing.
Supplies
• Two fabric pieces, 4 in. � 10 in. for serging curves
• Three fabric pieces, 6 in. � 6 in. for serging corners
Stitching Outside Corners
Directions: Use the following steps for serging outside corners. Use the facing pattern, Figure 15-5, found on page 30 (see “Facings”) to cut out a piece of fabric.
1. Serge inward on the fabric, at an angle, until you reach the proper serging position. See Figure 28-1.
2. As you serge, guide the fabric to the right in front of the presser foot. See Figure 28-2. Avoid trimming more than ¼ in. from the edge. It will be easier to serge on the curve if you watch the knives instead of the needle. On tight curves, lift the presser foot as needed to ease the fabric under it.
3. When stitching around the outside of a complete circle, overlap about 1 in. of the previous stitches before you stop and lift the presser foot. Then shift the fabric so that it is behind the needle, lower the presser foot, and stitch straight off the edge. See Figure 28-3.
Stitching Inner Curves
Directions: Use the following steps for serging inner curves. Use the fac-ing pattern, Figure 15-5, found on page 30 (see “Facings”) to cut out a piece of fabric.
1. Serge an inside curve the same way that you did the outside curve, but guide the fabric to the left in front of the presser foot. See Figure 28-4.
Skill Sheet 17
Fig. 28-1
Fig. 28-2
Fig. 28-3 Fig. 28-4
Name _______________________________________ Date _______________ Class _____________
Copyright © by The McGraw-Hill Companies, Inc. All rights reserved. MANAGING LIFE SKILLS—Sewing Labs 55
(Continued on next page)
Serging Curves and Corners

Serging Outside Corners
(Procedure A)Directions: Use the following directions to serge an outside corner.
1. The easiest method for serging a corner involves serging off the edge of the fabric and then back on. Serge one side of a fabric square, continuing off of the corner for 1 in. See Figure 28-5.
2. Raise the presser foot, turn the fabric 90 degrees, lower the presser foot, and guide the fabric edge into the serger. Continue in this way on all four sides. Secure the thread chains.
Serging Outside Corners
(Procedure B)Directions: Use the following directions to serge an outside corner. In this method, you will serge a continuous outside corner.
1. First, trim about 2 in. along the cutting line from the second side you plan to serge. This will help you see where to place the fabric after you turn the corner. See Figure 28-6.
2. Serge a straight seam along the first side, serging past the corner just one stitch. Stop the serger with the needle in the up position.
3. Raise the presser foot and carefully slip the thread chain off of the stitch finger.
4. Turn the fabric 90 degrees. Using the hand wheel, lower the needle into the fabric on the new stitch-ing line. See Figure 28-7.
5. Continue serging to the next corner. Repeat Steps 3-5 for each corner.
Skill Sheet 17
Serging Curves and Corners (continued)
Fig. 28-5
2 inch
Cutting line
3/8 inch
Fig. 28-6
Cutting line
Stitching line
1/4 inch
Fig. 28-7
56 MANAGING LIFE SKILLS—Sewing Labs Copyright © by the McGraw-Hill Companies, Inc. All rights reserved.
Name _______________________________________ Date _______________ Class _____________
(Continued on next page)

Serging Inside Corners
Directions: Use the following steps to serge an inside corner.
1. Take one of the fabric squares and cut it to create an inside corner. Then pretrim the seam allowance from both edges of the inside corner before serging. See Figure 28-8.
2. Serge the first inside edge. You will not be trim-ming away any fabric with the serger knives because of the trimming in Step 1. Stop when the serger knives are about ½ in. from the cor-ner. Turn the hand wheel to insert the serger needle into the fabric.
3. Raise the presser foot and pull the fabric to the left so that the fabric forms a straight line in front of the presser foot. See Figure 28-9.
4. Lower the presser foot and continue serging the rest of the edge.
Skill Sheet 17
Serging Curves and Corners (continued)
Cutting line
2 i
nch
3/8 inch
2 inch
Fig. 28-8
Fig. 28-9
Copyright © by The McGraw-Hill Companies, Inc. All rights reserved. MANAGING LIFE SKILLS—Sewing Labs 57
Name _______________________________________ Date _______________ Class _____________

#1 Beach Towel with Pockets . . . . . . . . . . . . . . . . . . . . . . . . . . . . . . . . . . . . . . . . . . .59
#2 Decorator Pillow . . . . . . . . . . . . . . . . . . . . . . . . . . . . . . . . . . . . . . . . . . . . . . . . . . .63
#3 Contour Neck Pillow. . . . . . . . . . . . . . . . . . . . . . . . . . . . . . . . . . . . . . . . . . . . . . . .65
#4 Fleece Booties . . . . . . . . . . . . . . . . . . . . . . . . . . . . . . . . . . . . . . . . . . . . . . . . . . . . .67
#5 Bath Accessories . . . . . . . . . . . . . . . . . . . . . . . . . . . . . . . . . . . . . . . . . . . . . . . . . . .70
#6 Cloud-Look Valance . . . . . . . . . . . . . . . . . . . . . . . . . . . . . . . . . . . . . . . . . . . . . . . .75
#7 Pieced Wall Hanging. . . . . . . . . . . . . . . . . . . . . . . . . . . . . . . . . . . . . . . . . . . . . . . .77
#8 Place Mats and Napkins . . . . . . . . . . . . . . . . . . . . . . . . . . . . . . . . . . . . . . . . . . . . .82
#9 Hanging Heart Sachets. . . . . . . . . . . . . . . . . . . . . . . . . . . . . . . . . . . . . . . . . . . . . .83
#10 Hooded Bath Towel . . . . . . . . . . . . . . . . . . . . . . . . . . . . . . . . . . . . . . . . . . . . . . . .84
#11 Fleece Cover-Up . . . . . . . . . . . . . . . . . . . . . . . . . . . . . . . . . . . . . . . . . . . . . . . . . . .86
#12 Recipe Card Holder. . . . . . . . . . . . . . . . . . . . . . . . . . . . . . . . . . . . . . . . . . . . . . . . .89
#13 Cloth Checkerboard . . . . . . . . . . . . . . . . . . . . . . . . . . . . . . . . . . . . . . . . . . . . . . . .91
#14 Herbal Dream Pillows. . . . . . . . . . . . . . . . . . . . . . . . . . . . . . . . . . . . . . . . . . . . . . .94
#15 Table Runner . . . . . . . . . . . . . . . . . . . . . . . . . . . . . . . . . . . . . . . . . . . . . . . . . . . . . .96
#16 Bedside Organizer. . . . . . . . . . . . . . . . . . . . . . . . . . . . . . . . . . . . . . . . . . . . . . . . . .98
#17 Wraparound Ankle Pocket. . . . . . . . . . . . . . . . . . . . . . . . . . . . . . . . . . . . . . . . . 100
#18 Hanging Pockets Organizer . . . . . . . . . . . . . . . . . . . . . . . . . . . . . . . . . . . . . . . . 103
#19 Pet Pillow . . . . . . . . . . . . . . . . . . . . . . . . . . . . . . . . . . . . . . . . . . . . . . . . . . . . . . . 107
#20 Fringed Fleece Scarf . . . . . . . . . . . . . . . . . . . . . . . . . . . . . . . . . . . . . . . . . . . . . . 111
Projects Table of Contents
Project Pages
58 MANAGING LIFE SKILLS—Sewing Labs Copyright © by the McGraw-Hill Companies, Inc. All rights reserved.

This beach towel has two pockets to hold your beach supplies and can be rolled up and tied for easy carrying.
Supplies
• Large terry cloth beach towel (purchased)
• ½ yd. of 44–45-in. wide terry cloth fabric, in color(s) to harmonize with the towel
• Chalk for marking fabric
Directions: Locate the pattern pieces for Figures 29-8 and 29-9 on pages 61-62. Reproduce the tie pattern page so that you have four tie pattern pieces. Cut out all the pattern pieces along the solid outlines.
1. Fold the fabric with right sides together. Lay out all pattern pieces on the fabric according to Figure 29-2. Mark the solid fold lines and the dashed lines on the wrong side of each fabric piece.
2. On one pocket section, turn under the upper edge ¼ in. to the wrong side and press. Stitch close to the fold.
3. On the marked fold line, fold the pocket with right sides together to form a hem. Pin.
4. Starting at the upper right corner of the pocket, stitch 5⁄8 in. from the edge. Continue sewing around the pocket, pivoting at the lower corners, until you have reached the other upper corner. This stitching acts as stay stitching and as a guide for folding under the seam allowance before you stitch the pocket to the towel. Remove pins at the upper corners. See Figure 29-3.
5. Trim the seam allowances in the top hem area to ¼ in. See Figure 29-3. 6. Turn the pocket hem to the inside and press. At the same time, press the seam allowance to the
inside along the stay stitching all around the pocket, forming crisp corners at the lower edge. See Figure 29-4 on page 60. Machine baste the pocket ¼ in. from the folded edge on these three sides.
7. Repeat steps 3 through 7 for the second pocket section.
Project 1
Fold line
Fold line
Cut 2
Le
ng
thw
ise
gra
in
Pla
ce
on
fold
Se
lva
ge
s
Tie
Cu
t
4
Tie
Cu
t
4
Tie
Cu
t
4
Tie
Cu
t
4
Fo
ld
Figure 28-9
Fig
ure
29
-9
Fig. 29-2
5/8 inch
staystitching
Seam allowance
trimmed
to 1/4 inch
Right Side
Fig. 29-3
Name _______________________________________ Date _______________ Class _____________
Copyright © by The McGraw-Hill Companies, Inc. All rights reserved. MANAGING LIFE SKILLS—Sewing Labs 59
(Continued on next page)
Fig. 29-1
Beach Towel with Pockets

8. Turn under three raw edges of one tie section—both long sides but only one short side—along the dashed line. Press. Machine baste ¼ in. from the folded edge, pivoting at the corners. Leave one short edge as a raw edge.
9. Fold the tie in half along the long fold line, wrong sides together, and press. Make sure the basted edges are even. Pin the basted edges together. Then topstitch close to the edge along two sides as shown in Figure 29-5. Remove basting.
10. Repeat for all remaining tie sections. Press all four ties. 11. Lay the purchased beach towel right side up on a large, flat working
surface. Lay one prepared pocket section on the lower left corner of the towel, lining up the edges of the pocket with the edges of the towel. Pin the pocket in place along both sides and the bottom edge. Take two tie sections and hold one on top of the other with the raw short edges even. Slip them in about 5⁄8 in. between the pinned pocket and the towel at the bottom edge. See Figure 29-6. Secure with a pin or hand basting.
12. Starting at the upper corner of the pocket, topstitch the pocket to the beach towel. Pivot at both lower corners, being sure to secure the ties in the stitching as you sew. Backstitch at both upper cor-ners and over the ties to secure them. See Figure 29-7.
13. Repeat with remaining pocket and tie sections.14. You can store your sunblock, sunglasses, comb, and other belongings in the pockets of your beach
towel. Then fold each side of the towel, including pockets, in toward the center. Starting at the end without pockets, roll the towel toward the pockets. After the final roll, open out the ties so that the rolled towel is lying on top of them. Then wrap the ties around the rolled towel and tie them together.
1
2
Fig. 29-4
Remove
basting
Fo
ld
Machine
basting
Topstitching
1/4 inches
Fig. 29-5
5/8 in.
Fig. 29-6
Backstitching
Pivot
Fig. 29-7
Beach Towel with Pockets (continued)
Project 1
60 MANAGING LIFE SKILLS—Sewing Labs Copyright © by the McGraw-Hill Companies, Inc. All rights reserved.
Name _______________________________________ Date _______________ Class _____________
(Continued on next page)

Cut 2
Fold Line
Le
ng
thw
ise
gra
in
9 1
/4 i
n.
6 3/4 in.
1 1
/2 i
n.
Figure 29-8
Fig. 29-8
Beach Towel with Pockets (continued)
Project 1
Copyright © by The McGraw-Hill Companies, Inc. All rights reserved. MANAGING LIFE SKILLS—Sewing Labs 61
Name _______________________________________ Date _______________ Class _____________
(Continued on next page)

Project 1
Beach Towel with Pockets (continued)
Tie Cut 4
3 1/2 in.
Fold
line
Place on fold
9 1/
4 in
.
Figure 29-9
Fig. 29-9
62 MANAGING LIFE SKILLS—Sewing Labs Copyright © by the McGraw-Hill Companies, Inc. All rights reserved.
Name _______________________________________ Date _______________ Class _____________

Project 2
This 12-in. square color-blocked pillow will give your room a bold geometric accent.
Supplies
• Color 1: 3⁄8 yd. of 44/45-in. wide fabric (for pillow back, half of the front, and button tabs)
• Color 2: 3⁄8 yd. of 44/45-in. wide fabric
• Three buttons, 5⁄8 in. in diameter, to match color 2
• 12-in. square pillow form
• Chalk to mark fabric
Directions: Lay out your fabrics in a single layer on a large, flat surface. Use a yardstick and chalk to mark the following shapes on the color 1 fabric, as shown in Figures 30-1 and 30-2:
• Pillow back: 13¼ in. × 13¼ in.
• Front: 95⁄8 in. × 13¼ in.
• Tab: 12 in. × 3¾ in.
• Mark a rectangle 95⁄8 in. × 13¼ in. on the color 2 fabric, as shown in Figure 30-2.
Then, complete the following steps to create your decorator pillow. 1. Cut out all the pillow pieces from the fabric.
Selv
ag
e
Selv
ag
e
Lengthwise grain
Lengthwisegrain
Ta
b
Pillo
w
Fro
nt
Pillo
w
Ba
ck
Lengthwise grain
Fig. 30-1
Se
lva
ge
Se
lva
ge
Lengthwise grain
Pillo
w
Fro
nt
Fig. 30-2
Name _______________________________________ Date _______________ Class _____________
Copyright © by The McGraw-Hill Companies, Inc. All rights reserved. MANAGING LIFE SKILLS—Sewing Labs 63
(Continued on next page)
Decorator Pillow

2. To make the tabs, fold the tab piece in half lengthwise, right sides togeth-er. Stitch a 5⁄8 in. seam. Trim the seam to 3⁄8 in. Fold the tab piece so the seam is centered; press the seam open. Cut the tab piece into three 4 in. lengths. See Figure 30-3.
3. Stitch a 5⁄8 in. seam across one end of each tab. Clip corners and trim and grade seam the allowances. See Figure 30-4.
4. Turn the tabs right sides out, using a point turner to sharpen corners. Press. Measure 31⁄8 in. from the fin-ished end and mark with chalk. Cut on this line.
5. Measure your buttons to determine buttonhole length and stitch a buttonhole on each tab 3⁄8 in. from the finished end. Follow the directions for making buttonholes in the instructional manual for your sewing machine. Zigzag the open end of the tab to finish the raw edge. See Figure 30-5.
6. To make the color 1 pillow front, press the edge under 1½ in. on one long side. Press under anoth-er 1½ in. to make a double hem. Position tabs evenly and machine baste in place. Topstitch hem through all layers, securing the tabs in place. See Figure 30-6.
7. To make the color 2 front, press the edge under 1½ in. on one long side. Clean finish or zigzag the raw edge. Topstitch the hem in place (single-layer hem).
8. With right sides up, overlap tabbed front over other pillow front to form a 13¼ in. square. Secure with pins and machine baste the two fronts together. Remove the pins before you sew over them. Sew buttons in place under buttonholes. See Figure 30-7.
9. With right sides together, pin the pillow front to pillow back. Stitch a 5⁄8 in. seam. Trim corners diagonally about 1⁄8 in. from the stitching line. Then press the seams open. Turn the pillow right side out. Press.
10. Insert pillow form and fasten the button closures. See Figure 30-8.
Decorator Pillow (continued)
Project 2
Color 1Right Side
13 1/4 In.
Overlapand
Baste
PillowFront
Color 2Right Side
PillowFront
Fig. 30-7 Fig. 30-8
Cut
Cut
Fo
ld
Fo
ld
Fig. 30-3
(1/4 in.)
Fig. 30-5
WrongSide
Color 1
PillowFront
Fig. 30-6
Fig. 30-4
64 MANAGING LIFE SKILLS—Sewing Labs Copyright © by the McGraw-Hill Companies, Inc. All rights reserved.
Name _______________________________________ Date _______________ Class _____________

Designed to fi t the contours of the neck, this pillow makes an ideal companion for auto or airplane travel. It also can be warmed in the microwave to relieve neck discomfort at home.
Supplies
• 1⁄3 yd. fl eece or other soft fabric
• 5-lb. bag of rice for fi lling
Directions: Enlarge the pattern on page 66 (see Figure 31-4) 200% on a copy machine. Then complete the following steps.
1. Fold each selvage of your fabric to the center. Measure each side from the fold to the selvage to be sure the folds are on the straight grain.
2. Place the pattern on one fold of the fabric and pin in place along the fold. Pin the remainder of the pattern in place as indicated. Cut the pattern out of the fabric. Flip the pattern over and place it on the other fold. Pin it in place and cut out a second piece. See Figure 31-1.
3. Pin the fabric pieces with the right sides together. Stitch a ½ in. seam, leaving a 4-in. long opening in the straight area at the neck back. Stitch again, 1⁄16 in. from first stitching. Clip the inside curve at ¼ in. intervals up to the stitching, but not through the stitching. See Figure 31-2.
Project 3
1/3 yd.
Fold
Fold
Fold selvages to middle
Neck Pillow
Cut 2
Place on fold
Fig. 31-1
Clip insidecurve tostitching.
4" openingBackstitchingBackstitching
Fig. 31-2
Name _______________________________________ Date _______________ Class _____________
Copyright © by The McGraw-Hill Companies, Inc. All rights reserved. MANAGING LIFE SKILLS—Sewing Labs 65
(Continued on next page)
Contour Neck Pillow

4. Turn the pillow right side out. Using a paper cone or fun-nel, fill the pillow with rice or barley. Work over a tray or bowl to catch spills.
5. Turn in the seam allowances at opening and pin them together. Hand stitch the opening closed using a double thread and small slipstitches.
6. Pillow can be warmed in the microwave for 1 to 2 minutes before use. See Figure 31-3.
Project 3
Contour Neck Pillow (continued)
Fig. 31-3
Neck Pillow
Cut 2
Enlarge at 200%on a photocopier.
Pla
ce o
n f
old
Fig. 31-4
66 MANAGING LIFE SKILLS—Sewing Labs Copyright © by the McGraw-Hill Companies, Inc. All rights reserved.
Name _______________________________________ Date _______________ Class _____________

Project 4
These ankle-high booties are quick and easy to make from fl eece with soles of rubberized fabric to prevent skidding.
Supplies
• ¾ yd. of 60-in. wide fl eece fabric, such as Polarfl eece®
• 3⁄8 yd. of 15-in. wide rubberized, nonskid fabric
• 5⁄8 yd. of ¼-in. wide elastic
Directions: Enlarge the pattern pieces (Figures 32-6 and 32-7) 200% on a copy machine to make boo-ties for a woman’s shoe size 9. Measure the length and width of your foot and add to or subtract from the pattern pieces on the marked lines. For a man’s size 10, add 2 in. to the length and the width. (See the directions for pattern alterations given on pages 14–15.) The sole pattern piece (Figure 32-7) should measure 2 in. less than the length of the fleece bootie pattern. To sew the fleece booties, complete the following steps.
1. With right sides together, fold the fleece in half crosswise. Place the fleece bootie pattern with the back of the bootie on the fold. The stretch of the fabric will be going across the foot.
2. Cut one bootie; then cut a second bootie on the fold. Mark the center back of the bootie at the sole. See Figure 32-1.
3. With right sides together, fold the rubberized fabric in half crosswise. Pin the sole pattern on the fabric and cut to make two soles. Fold each sole in half lengthwise and mark the fold to indicate center front and center back.
4. Cut the elastic into two 10-in. long pieces. Mark each piece at the halfway point.
5. On the wrong side of each bootie, mark a line 4 in. from the top edge. Mark the halfway point on this line.
6. Pin the midpoint of the elastic to the midpoint of the fleece bootie and then pin the elastic and fleece together at each end. See Figure 32-2.
Fo
ldF
old
Selvage
Selvage
Mark center back
Cro
ssw
ise
fo
ld
Mark center back
Fig. 32-1
Midpoint
Centerback
Elastic4"
Fig. 32-2
Name _______________________________________ Date _______________ Class _____________
Copyright © by The McGraw-Hill Companies, Inc. All rights reserved. MANAGING LIFE SKILLS—Sewing Labs 67
(Continued on next page)
Fleece Booties

7. Set your sewing machine for a medium zigzag stitch.
8. Place the fleece bootie and elastic under the presser foot and take two or three stitches to secure. Stretch the elastic to fit the fleece as you continue to stitch the elastic to the bootie, holding the work in front of and behind the needle.
9. With right sides together, fold the bootie along the center back. Pin the front edges together. Stitch a ¼ in. seam. See Figure 32-3. Press the seam open at each end of stitching.
10. Press under the top edge of the bootie ½ in. Then press under another ½ in. to form a dou-ble hem. Topstitch the hem in place.
11. With right sides together, pin the soles to each bootie. Match the center mark on the wider end of the sole to the front seam on the bootie. Match the center mark on the narrow end to the center back mark on the bootie. Ease the bootie fabric as necessary to fit the sole. See Figure 32-4.
12. Stitch around each sole in a ¼ in. seam. Turn fleece booties to right side. See Figure 32-5.
Project 4
Fleece Booties (continued)
Fig. 32-5
Fig. 32-3
1/4" Seam
1/2" Hem
Fig. 32-4
(Continued on next page)68 MANAGING LIFE SKILLS—Sewing Labs Copyright © by the McGraw-Hill Companies, Inc. All rights reserved.
Name _______________________________________ Date _______________ Class _____________

Fleece Bootie
Pattern
Enlarge 200% on copy machine.
Cut 2
Cu
t 1 o
n f
old
Len
gth
en
or
sh
ort
en
on
th
is lin
e
Fig. 32-6
Fig. 32-7
Fleece Booties (continued)
Project 4
Copyright © by The McGraw-Hill Companies, Inc. All rights reserved. MANAGING LIFE SKILLS—Sewing Labs 69
Name _______________________________________ Date _______________ Class _____________

18
in
.
19
in
.
15 in.62 in.
2 1/2 yardsFold
(Cut 1)
(Cut 1)
(Cut 2)
DrawstringBag
Bath Wrap
Fold
Selvages
EuropeanWashcloth
8 1/2 in.
6 in
.
Fig. 33-1
Keep your bath essentials together in this terry cloth drawstring bag. A matching bath wrap, European washcloth, and mesh scrubby complete the set. With pretty lace trims, this set would make a nice gift for Mom or a friend.
Supplies
Directions: Fold the terry cloth fabric lengthwise with the selvages together. From one end, measure along the fold and along the selvages 62 in. and mark with chalk or washable marker. Use a yardstick to connect the marks with a straight line. At several points along the fold, measure from the fold toward the selvages 19 in. and mark. Connect your marks with a yardstick to make a straight line. Cut along the marked lines and open out the folded rectangle to make one piece 62 in. × 38 in. for the bath wrap. With the remaining fabric still folded lengthwise with selvages together, mark a 6 in. × 8½ in. rectangle on the fold for the European washcloth. Mark a 15 in. × 18 in. rectangle for the bag. See Figure 33-1.
Bath Wrap
1. Press under the short edges (what will become the wrap front) 1½ in. Clean finish, zigzag, or serge the edges. Topstitch the hems in place.
2. Follow the same procedure to hem the lower edge. 3. Follow the same procedure on the upper edge, but topstitch in the center only. Mark a point 12 in.
from each front edge. Backstitch at one mark and continue stitching to the other; backstitch again. See Figure 33-2 on page 71.
• 1 yd. of 1-in. wide elastic
• 6 in. of ¾-in. wide hook-and-loop tape fastener
• ½ yd. of 1¾-in. wide fl at, scallop-edge lace (optional)
• 7⁄8 yd. of 1-in. wide sturdy fl at lace with straight edges
• 27⁄8 yd. of ¾-in. wide satin ribbon
• 7⁄8 yd. of ½-in. wide gathered lace
• 3-in. length of 1⁄8 in. diameter cotton cording
• 1 yd. of 108-in. wide fi ne tulle (enough for two scrubbies)
• ½ yd. of ¼-in. wide satin ribbon
Name _______________________________________ Date _______________ Class _____________
70 MANAGING LIFE SKILLS—Sewing Labs Copyright © by the McGraw-Hill Companies, Inc. All rights reserved.
(Continued on next page)
Project 5
Bath Accessories

4. Cut elastic a comfortable upper chest measurement minus 10 in. Insert elastic through casing formed in Step 3. Stretch elastic so that it extends ½ in. beyond each end of the casing stitching line. Pin in place. Stitch across elastic ends to secure. See Figure 33-3.
5. Topstitch remaining upper hem in place.
Project 5
Bath Accessories (continued)
12 in.
Casing for elastic
12 in.
Fig. 33-2
Stitch elastic in place
Finish stitchingupper hem
Fig. 33-3
Copyright © by The McGraw-Hill Companies, Inc. All rights reserved. MANAGING LIFE SKILLS—Sewing Labs 71
Name _______________________________________ Date _______________ Class _____________
(Continued on next page)

6. Cut two 3-in. lengths of hook-and-loop tape fastener. Position the loop (soft) section under the right front. Position the hook (rough) section on the right side of the left front. Stitch around all four sides of each piece. See Figure 33-4.
7. Optional lace trim: Turn in ½ in. at one end of lace and pin in place, with scallop extending, where elastic ends on right front. Pin lace along upper and front edges, folding the lace in a miter at the corner. At the lower edge, turn under ½ in. and trim off any excess lace. Stitch lace in place along straight edge.
Drawstring Bag
8. On the right side of each bag section, measure down 2 in. from the top edge and mark a line with chalk or washable marker. Pin bag pieces right sides together. Stitch in a ¼ in. seam. Zigzag or serge the seam allowances together to finish. See Figure 33-5.
9. Measure across bag from seam to seam on the marked line and use this measurement to cut the 1-in. wide flat lace into two equal lengths for the drawstring casing. Turn in ½ in. on each end of each lace piece. Stitch across ends to secure.
10. Turn the bag to right side. Pin one lace piece to each side of the bag at the marked line with the lace just meeting at the side seams. Edgestitch both sides of the lace in place on the bag. See Figure 33-6 on page 73.
11. Zigzag or serge around upper edge of bag. Press edge under ¼ in. From the wrong side, pin gathered lace to edge and machine stitch in place.
12. Cut ribbon into two 45-in. lengths. (Set aside the remaining length for the washcloth.) Using a bodkin or large safety pin, thread one length of the ribbon through both casings, so the two ends meet on the same side of the bag. Tie ends together. Repeat with the second ribbon length, this time starting at the opening on the opposite side of the bag. Tie ends together. See Figure 33-7 on page 73.
Project 5
Bath Accessories (continued)
Hook-and-loop tape
hook fastener
Hook-and-looptape loop
Fig. 33-4
2 in
.
Zigzagor serge
(Marking for lace placement)
Wrong side
Drawstringbag
Fig. 33-5
72 MANAGING LIFE SKILLS—Sewing Labs Copyright © by the McGraw-Hill Companies, Inc. All rights reserved.
Name _______________________________________ Date _______________ Class _____________
(Continued on next page)

Project 5
Bath Accessories (continued)
Stitch lace in place on both edges
Lace
Fig. 33-6
Copyright © by The McGraw-Hill Companies, Inc. All rights reserved. MANAGING LIFE SKILLS—Sewing Labs 73
Name _______________________________________ Date _______________ Class _____________
(Continued on next page)
Bath Bag
Fig. 33-7

European-Style Washcloth
13. On one long edge, press under ½ in. Center the remaining length of ribbon over the turned-under edge. Pin in place. Edgestitch along both sides of the ribbon to encase the raw edge of the terry cloth fabric. Fold the cording in half to make a loop. Pin the loop on the right side (rib-bon side) of one short edge of the wash-cloth about 2 in. from the top. Stitch close to the edge to secure. See Figure 33-8.
14. With right sides together, fold the rect-angle in half crosswise. Pin the raw edges together. Stitch a ¼ in. seam, catching the loop ends in the stitching. Zigzag or serge the seam allowances together to finish. Turn the washcloth to the right side.
Mesh Scrubby
15. Cut the tulle in half on the crosswise grain (you will have two 54 in. × 36 in. pieces).
16. Lay out one piece of the tulle on a flat surface with the 54 in. length horizontal. Use both hands to gather up the tulle to make a scrunched-up roll. Machine stitch the tulle ½ in. from the edge at both ends to secure.
17. Fold up the scrunched length as shown in Figure 33-9, so the ends of the roll are folded to the inside. Tightly wrap a rubber band around the middle, making sure the ends are secured.
18. Wrap ribbon around the rubber band and knot tightly. Knot ribbon ends to form a loop for hanging. Unfold and fluff the tulle.
European washcloth
Stitch ribbonto cover row
edge
Press toright side
Fig. 33-8
Rubber band
Scrunch tulletogether andstitch 1/2 in.
from edge
Mesh Scrubby
Fig. 33-9
Project 5
Bath Accessories (continued)
74 MANAGING LIFE SKILLS—Sewing Labs Copyright © by the McGraw-Hill Companies, Inc. All rights reserved.
Name _______________________________________ Date _______________ Class _____________

This shirred valance gives you the look of a fluffy cloud shade but is much easier to make.
Supplies
For a 15-in. long valance to fi t a 36-in. wide window, you will need:
• 13⁄8 yd. of 44/45-in. wide light- to medium-weight cotton fabric
• Standard curtain rod
• 3 yd. of 1-in. wide grosgrain (GROH-grayn) ribbon to coordinate with the fabric
Directions: Measure the width of the window. Multiply the window’s width by two to determine the width to make your cloud valance. For example, for a 36-in. wide window, you would want a valance that is 72 in. wide. Add 4 in. to this figure for hem allowances, for a total of 76 in. Standard valance length is 15 in. finished. To this figure, add a hem allowance of 6 in. and a top casing allowance (for the curtain rod) of 3 in., for a total of 24 in. After taking your measurements, complete the following steps.
1. With right sides together, fold your fabric in half lengthwise and lay it out on a flat cutting surface. Straighten the cut ends.
2. Measure 24 in. from one cut end and mark a line across the fabric. Measure another 24 in. and mark another line across the fabric. Cut on the marked lines. See Figure 34-1.
3. Unfold the fabric to make two panels, each 24 in. × 45 in. Cut one panel in half lengthwise, parallel with the selvage.
4. With right sides together, sew the half panels to the ends of the full-width panel using 5⁄8 in. seams. Press the seams open. Zigzag or serge-finish the edges of the seam allowances as need-ed. See Figure 34-2.
Cut here
Selvages
Cut here
24 in.24 in.
22 1
/2 in
.
Fold
Fig. 34-1
5/8 in. seam
Full-widthpanel
(wrong side)
Half-widthpanel
Half-widthpanel
5/8 in. seam
Fig. 34-2
Name _______________________________________ Date _______________ Class _____________
Copyright © by The McGraw-Hill Companies, Inc. All rights reserved. MANAGING LIFE SKILLS—Sewing Labs 75
(Continued on next page)
Project 6
Cloud-Look Valance

5. Fold the pieced panel in half crosswise and match the seams. Measure and mark a line 38 in. from the fold. Cut on this line through both layers. This will give you a 76-in. wide panel (for a finished valance width of 72 in. with 1-in. wide double side hems). See Figure 34-3.
6. To hem the sides of the valance, press the sides under 1 in. Then press under another 1 in. to make a double hem. Machine stitch the hems in place close to the inside folded edge of the hem.
7. To make the casing, or rod pocket, press under ½ in. Then press under 2½ in. Machine stitch the rod pocket in place. See Figure 34-4.
8. To hem the lower edge, press under 3 in. Then press under another 3 in. Machine stitch the hem in place.
9. Insert the curtain rod through the rod pocket and install the rod on the window brackets. Adjust the valance for even full-ness on the rod.
10. Cut the ribbon into two equal lengths. Place the ribbons over the rod and space them about half the full width apart. Draw up the valance into scallops as you tie each ribbon in a bow. See Figure 34-5.
Cloud-Look Valance (continued)
Project 6
38"
Fo
ld
Cut herethroughbothlayers
Fig. 34-3
Fig. 34-5
1/2 in
.2 1/2 in
.
Fig. 34-4
76 MANAGING LIFE SKILLS—Sewing Labs Copyright © by the McGraw-Hill Companies, Inc. All rights reserved.
Name _______________________________________ Date _______________ Class _____________
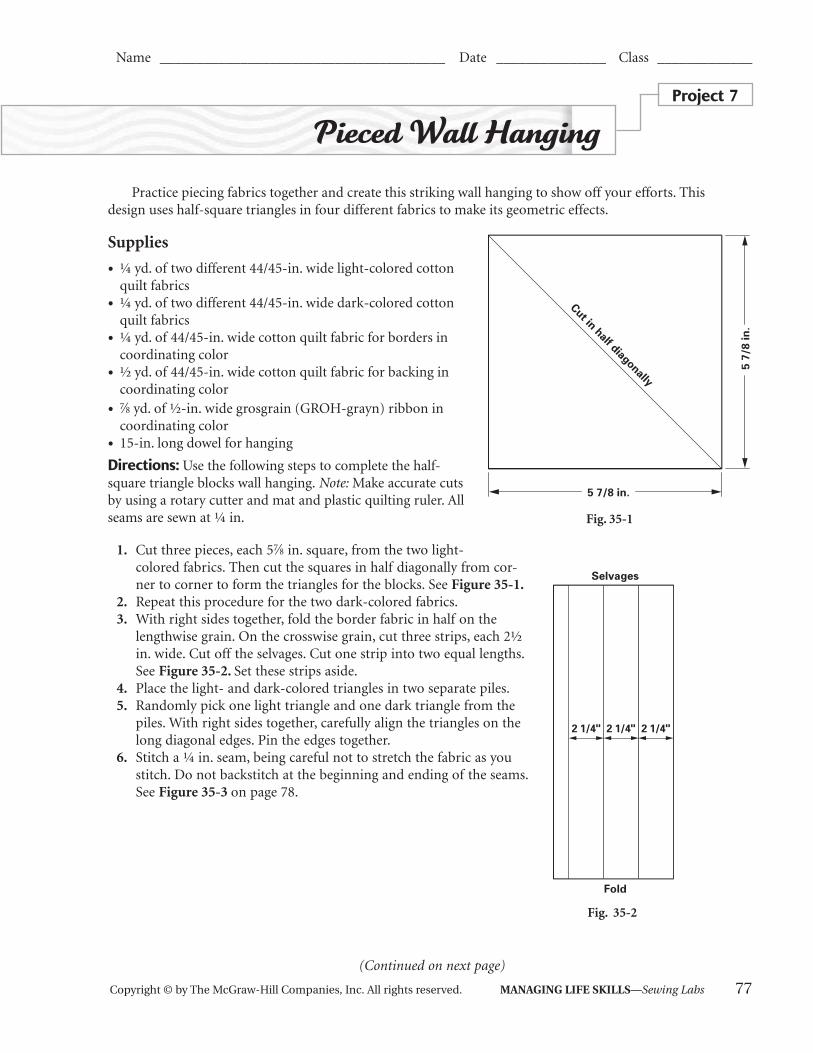
Practice piecing fabrics together and create this striking wall hanging to show off your efforts. This design uses half-square triangles in four different fabrics to make its geometric effects.
Supplies
• ¼ yd. of two different 44/45-in. wide light-colored cotton quilt fabrics
• ¼ yd. of two different 44/45-in. wide dark-colored cotton quilt fabrics
• ¼ yd. of 44/45-in. wide cotton quilt fabric for borders in coordinating color
• ½ yd. of 44/45-in. wide cotton quilt fabric for backing in coordinating color
• 7⁄8 yd. of ½-in. wide grosgrain (GROH-grayn) ribbon in coordinating color
• 15-in. long dowel for hanging
Directions: Use the following steps to complete the half-square triangle blocks wall hanging. Note: Make accurate cuts by using a rotary cutter and mat and plastic quilting ruler. All seams are sewn at ¼ in.
1. Cut three pieces, each 57⁄8 in. square, from the two light-colored fabrics. Then cut the squares in half diagonally from cor-ner to corner to form the triangles for the blocks. See Figure 35-1.
2. Repeat this procedure for the two dark-colored fabrics. 3. With right sides together, fold the border fabric in half on the
lengthwise grain. On the crosswise grain, cut three strips, each 2½ in. wide. Cut off the selvages. Cut one strip into two equal lengths. See Figure 35-2. Set these strips aside.
4. Place the light- and dark-colored triangles in two separate piles. 5. Randomly pick one light triangle and one dark triangle from the
piles. With right sides together, carefully align the triangles on the long diagonal edges. Pin the edges together.
6. Stitch a ¼ in. seam, being careful not to stretch the fabric as you stitch. Do not backstitch at the beginning and ending of the seams. See Figure 35-3 on page 78.
Fold
Selvages
2 1/4" 2 1/4" 2 1/4"
Fig. 35-2
Name _______________________________________ Date _______________ Class _____________
Copyright © by The McGraw-Hill Companies, Inc. All rights reserved. MANAGING LIFE SKILLS—Sewing Labs 77
(Continued on next page)
Project 7
Pieced Wall Hanging
5 7
/8 i
n.
5 7/8 in.
Cut in half diagonally
Fig. 35-1

78 MANAGING LIFE SKILLS—Sewing Labs Copyright © by the McGraw-Hill Companies, Inc. All rights reserved.
7. Do not cut the threads to remove the first set. Repeat step 5 and feed the second set of triangles into the sewing machine right after the first set; stitch. This is called chain piec-ing. See Figure 35-4.
8. Repeat steps 5 and 6 to make 12 half-square triangle blocks.
9. Cut the threads that hold the sets together. Press the seam toward the dark fabric on each pair of tri-angles. Trim off the small triangles of fabric that extend over the edge of the seam. See Figure 35-5.
10. Lay out the blocks as shown in Figure 35-6. 11. Sew the blocks into rows: with right sides together, place
block B on top of block A. Pin the edge where they will join. Stitch a ¼ in. seam. Press the seam following the directional arrow in Figure 35-6 for each row. Lay each row back in the quilt layout as you finish it.
Project 7
Pieced Wall Hanging (continued)
Name _______________________________________ Date _______________ Class _____________
(Continued on next page)
Chain piecing
Fig. 35-4
TrimPress the seam allowancetoward the dark fabric.
Trim
Fig. 35-5
Fig. 35-6
5 7/
8 in
.
5 7/8 in.
1/4 in. seam
Fig. 35-3

Pieced Wall Hanging (continued)
Copyright © by The McGraw-Hill Companies, Inc. All rights reserved. MANAGING LIFE SKILLS—Sewing Labs 79
12. Sew the rows: with right sides together, place row 1 on top of row 2. See Figure 35-7. Carefully pin the top edge, matching the seams. Sew a ¼ in. seam. With right sides together, place row 3 on top of row 2. Pin the bottom edge. Stitch. Repeat for the remaining rows. Press all the seams down toward the bottom of the wall hanging.
13. With right sides together, pin one short border strip to the top and one to the bottom of your wall hang-ing. Machine stitch ¼ in. seams. Press seams toward the strips. Trim the ends even with the sides of the wall hanging. See Figure 35-8.
Project 7
Name _______________________________________ Date _______________ Class _____________
(Continued on next page)
Row
1
2
3
4
5
6
Fig. 35-7
Trim endsof bordereven withsides ofwall hanging
Trim endsof bordereven withsides ofwall hanging
Fig. 35-8

80 MANAGING LIFE SKILLS—Sewing Labs Copyright © by the McGraw-Hill Companies, Inc. All rights reserved.
14. With right sides together, pin one long border strip to each side of the wall hanging. Machine stitch ¼ in. seams. Press seams toward the strips. Trim the ends even with the top and bottom of the wall hanging. See Figure 35-9.
15. Measure the dimensions of your wall hanging. Cut the backing into a rectangle the same size.16. Cut two 6-in. lengths of ribbon. Fold them in half, matching the cut ends and pin in place at the top of
the wall hanging as shown in Figure 35-10.17. With right sides together, pin the backing to the wall hanging, aligning edges. Note: The ribbon loops will
be sandwiched between the fabric layers. Chalk-mark a 5 in. opening on one long side of the wall hang-ing to allow for turning. See Figure 35-11.
Project 7
Pieced Wall Hanging (continued)
Name _______________________________________ Date _______________ Class _____________
(Continued on next page)
2 1/4 in.
2 1/4 in.
Fig. 35-10
Trim endsof bordereven withtop andbottom ofwall hanging
Border
Fig. 35-9

Copyright © by The McGraw-Hill Companies, Inc. All rights reserved. MANAGING LIFE SKILLS—Sewing Labs 81
18. Beginning at the bottom chalk mark, machine stitch around the wall hanging in a ¼ in. seam, ending at the top chalk mark. Backstitch at the beginning and end of stitching. Note: Keep the bottom of the wall hanging facing toward you as you begin to sew. See Figure 35-12.
19. Press the seams open, trim the corners, and grade the seam allowance. Turn the wall hanging right side out. Press the seamed edges flat.
20. Slip stitch the opening closed. 21. Slide the dowel through the ribbon loops. Tie the remaining 18 in. piece of ribbon on each side of the
dowel to form the hanger. See Figure 35-12.22. If desired, you can machine quilt your finished wall hanging by stitching-in-the-ditch around each tri-
angle. To stitch-in-the-ditch, sew in the groove of the seam line through all fabric layers.
Project 7
Pieced Wall Hanging (continued)
Name _______________________________________ Date _______________ Class _____________
1/4 in.Seam allowance
Sampler backing(wrong side)
5 in.opening
Backing
(wrong side)
Fig. 35-11
Fig. 35-12

Name _______________________________________ Date _______________ Class _____________
82 MANAGING LIFE SKILLS—Sewing Labs Copyright © by the McGraw-Hill Companies, Inc. All rights reserved.
You can make a rectangular place mat from quilted fabric. If you use a contrasting background—print or plaid on top and solid underneath—your place mat will be reversible. For additional weight, you may use a nonwoven interfacing between the two layers. But if you use a heavyweight fabric, you will not need interfacing. For napkins, use a lightweight polyester/cotton woven or linenlike fabric that does not have an obvious right or wrong side.
Supplies
• 11⁄8 yd. of 44/45-in. quilted fabric (for four place mats)
• 11⁄8 yd. of 44/45-in. contrasting quilted fabric (for four place mat backs)
• 11⁄8 yd. of nonwoven interfacing for place mats (optional)
• 1 yd. of 44/45-in. fabric for six napkins (should have no obvious right or wrong side)
• Seam sealant
• Glue stick
Place Mats
Directions: To sew your place mats, first mark and cut the place mat top and backing fabrics and inter-facing, if using, into six rectangles 14 in. � 18 in.
1. Place wrong sides together, with interfacing between the two layers (optional), aligning the cut edges. Use dots of glue to hold the layers together. See Figure 36-1.
2. Ask your teacher to adjust the serger for a stan-dard three-thread overlock stitch. Shorten the stitch length, so the stitches are closer together to fill in the edge.
3. Serge around all four sides and corners of one place mat, handling the layers as one. Serge continuous outside corners on each place mat. See Skill Sheet 17 for more information on serging continuous corners.
4. Secure your stitching. See Skill Sheet 16 for options for securing serger seams. 5. Repeat for all six place mats.
Napkins
Directions: Mark and cut from napkin fabric six 15-in. squares.
1. Ask your teacher to adjust the serger for a three-thread rolled hem.
2. Sew continuous outside corners for all six squares. 3. Secure your stitching. See Figure 36-2.
18 in.
Topfabric
Interfacing Backing fabric
14 in
.
Fig. 36-1
Fig. 36-2
Project 8
Place Mats and Napkins

Name _______________________________________ Date _______________ Class _____________
Copyright © by The McGraw-Hill Companies, Inc. All rights reserved. MANAGING LIFE SKILLS—Sewing Labs 83
Too pretty to hide in a drawer, these beribboned hanging-heart sachets make a great gift.
Supplies
• One 4 in. � 16 in. piece of lace fabric
• One 4 in. � 16 in. piece of lining fabric
• 1½ yd. of ¼ in. wide ribbon
• Potpourri to fi ll two sachets
Directions: Trace Figure 37-1 and enlarge it 200% on a copy machine.
1. Fold the lace in half crosswise and pin the heart pattern on the fabric. Cut two and then lay out the pattern again and cut two more hearts. Repeat for the lining. See Figure 37-2.
2. With right sides up, machine baste each heart piece to a lining piece. See Figure 37-3.
3. Matching lace sides, pin two hearts together. Stitch around the edge in a ¼ in. seam, leav-ing a 1-in. opening for turning and filling. Clip the inner corner and trim the outer cor-ner near the point close to the stitching line. See Figure 37-4.
4. Turn right side out. Fill with potpourri; avoid overfilling. Turn in the seam allow-ances at the opening and slip stitch the opening closed.
5. Cut one piece of ribbon 24 in. long. Tack each end to one heart sachet. See Figure 37-5.
6. Cut remaining ribbon into two equal lengths. Tie each one into a small bow. Cut the ends diagonally and tack the bows to cover ends of hanging ribbon. See Figure 37-6.
7. Drape over a hook or hanger in the closet.
1/4 in. seam
Heart Pattern
Cut 4 laceCut 4 lining
Trace andenlarge 200%using a copier
Fig. 37-1
Selv
ag
e
Fo
ld
Fig. 37-2
Wrong sideWrong side
Clip
1/4 in. seamBackstitch
Trim off point
Fig. 37-4
Tack
24 in. ribbon
Fig. 37-5
Fig. 37-3
Fig. 37-6
Project 9
Hanging Heart Sachets

Name _______________________________________ Date _______________ Class _____________
84 MANAGING LIFE SKILLS—Sewing Labs Copyright © by the McGraw-Hill Companies, Inc. All rights reserved.
You can make this bath towel as a baby gift for a relative or neighbor. Make the towel from soft terry cloth; make a washcloth to match.
Supplies
• Lightweight terry cloth, 32 in. � 42 in.
• Pins
• Glue stick
Directions: Mark and cut the following pieces, as shown in Figure 38-1: 30-in. square for towel, 10-in. square for hood piece, 7-in. square for washcloth. Then complete the following steps.
1. On the hood piece, draw a gently curved line that connects the two opposite corners. Cut along the curve. Round off the remaining corner of this piece, as well as the four corners of the 30-in. square towel, so that you can serge them as curves. See Figure 38-2.
(Continued on next page)
10 in.
10 in.
30 in.
30 in.
7 in.
7 in.
Fig. 38-1 Fig. 38-2
Project 10
Hooded Bath Towel

Copyright © by The McGraw-Hill Companies, Inc. All rights reserved. MANAGING LIFE SKILLS—Sewing Labs 85
2. Ask your teacher to adjust the serger for a standard three-thread overlock stitch. Serge finish the inner-curved cut edge of the hood. See Figure 38-3. Finish the edges of the washcloth, sewing continuous outside corners.
3. Pin or glue-baste the hood triangle to one corner of the towel, matching the unserged corners. Starting at the opposite corner of the towel, serge around all edges, attaching the hood to the towel as you finish the edges. See Figure 38-4. Guide the fabric to the right in front of the presser foot as you serge the curved edges.
4. When you reach the point where you started stitching, overlap about 1 in. of the beginning serger stitches. See Figure 38-5.
5. Stop with the needle in the fabric. Lift the presser foot.
6. Shift the fabric so that it is behind the needle, lower the presser foot and serge straight off the edge (see Figure 38-6). Create a thread chain about 7 in. long.
7. Clip the thread chain to leave 3 to 4 in. on the fabric and on the machine. Apply seam sealant or use another method to secure the stitches. See Skill Sheet 16 for more information.
Project 10
Xx(continued)Hooded Bath Towel (continued)
Name _______________________________________ Date _______________ Class _____________
Fig. 38-3
Fig. 38-4
Fig. 38-6
1 in.
Fig. 38-5

Name _______________________________________ Date _______________ Class _____________
86 MANAGING LIFE SKILLS—Sewing Labs Copyright © by the McGraw-Hill Companies, Inc. All rights reserved.
Curl up with this fl eece cover-up and you’ll keep warm and toasty all winter long.
Supplies• 1¼ yd. each of two colors of fl eece fabric, such as Polarfl eece®
• Regular sewing thread to match one of the colors
• Topstitching thread for decorative blanket stitching in a matching or contrasting color (optional)
• Hand sewing needle for topstitching thread
Directions: Fold one piece of fleece in half on the lengthwise grain with selvages even. Using a yardstick and chalk pencil, measure and mark a 30 in. � 40 in. rectangle on the fold of the fabric. Cut the fabric on these lines. See Figure 39-1. Repeat for the other piece of fleece. Open out the pieces to make two rect-angles, each 60 in. � 40 in. Place the pieces wrong sides together. Then complete the following steps.
1. Measure 6 in. from the shorter edges and use chalk and a yardstick to mark a line parallel to the edges. Pin the pieces together along this line and machine stitch. See Figure 39-2.
(Continued on next page)
Selvages
Fold
Fleece Cover-Up
40 in.
30 in
.
Chalk mark
Chalk mark
Fig. 39-1
Project 11
Fleece Cover-up

Copyright © by The McGraw-Hill Companies, Inc. All rights reserved. MANAGING LIFE SKILLS—Sewing Labs 87
2. On the longer edges, stitch the layers together between the previous stitching rows in a 3⁄8 in. seam. See Figure 39-3.
3. Stitch a second row 1⁄8 in. into the seam allowance, or hand sew a blanket stitch using topstitching thread. See Figure 39-4.
Project 11
Xx(continued)Fleece Cover-up (continued)
Name _______________________________________ Date _______________ Class _____________
Machine stitchon chalk lines
Machine stitch3/8 in. fromside edges
Fig. 39-3
Chalk mark
Chalk mark
6 in
.6 in
.
Fig. 39-2
Two rowsmachine stitching
Machine and handblanket stitching
or
Fig. 39-4

Color BSide 2
60 in.total
6 in.
6 in.
48 in.
1/2 in. strips Tie strips intoloose knotsfor fringe
Machine edgestitching
Machinestitches
Color A
Side 1
40 in.
Fig. 39-6
Color B
Mark fringe lineswith chalk
Cut fringe onchalk lines up
to stitching
Color A
Fig. 39-5
4. To create fringe, mark lines ½ in. apart along shorter edges. Slash through both layers to the stitching. See Figure 39-5.
5. Knot each pair of cut strips. Form knots consistently. See Figure 39-6.
Project 11
Fleece Cover-up (continued)
88 MANAGING LIFE SKILLS—Sewing Labs Copyright © by the McGraw-Hill Companies, Inc. All rights reserved.
Name _______________________________________ Date _______________ Class _____________

Keep your recipe at eye level and spatter free with this card holder that hangs on your cabinet door handle. This holder is designed for a 4 in. by 6 in. recipe card.
Supplies
• One 7½ in. × 10½ in. piece of crisp cotton fabric
• One 4½ in. × 6½ in. piece of clear vinyl
• ½ yd. of 1⁄8-in. wide ribbon
• Point turner
Directions: Use the following steps to complete the recipe card holder.
1. Fold the ribbon in half crosswise. With the fabric piece right side up, pin the ribbon at the center of one short side. See Figure 40-1.
2. Keeping the ribbon inside, fold the fabric piece in half crosswise, right sides together. Pin the cut edges. Stitch in a ¼ in. seam, leaving a 3-in. opening on one end. Backstitch at each side of opening. See Figure 40-2.
3. Trim corners and press seams open. Turn to right side. Press edges flat. Slip stitch the opening closed.
Name _______________________________________ Date _______________ Class _____________
Copyright © by The McGraw-Hill Companies, Inc. All rights reserved. MANAGING LIFE SKILLS—Sewing Labs 89
(Continued on next page)
Ribbon placement
Right side
(Fold here)
Fig. 40-1
1/4 in. seamallowance
3 in.opening
Wrong side
Fold
Fig. 40-2
Project 12
Recipe Card Holder

Name _______________________________________ Date _______________ Class _____________
(Continued on next page)
4. Center vinyl on one face of the cardholder. Hold in place with large paper clips except on the ribbon side. Stitch around the three sides through all layers, 1⁄8 in. from the vinyl edge. Do not backstitch and be sure to remove the clips before you come to them. See Figure 40-3.
5. Leave long thread tails, pull them to the back of the project, and tie them off with a pin. Insert the thread tails into a hand-sewing needle to hide them between the fabric layers. Insert the needle into the fabric as close to the knot as possible. Take a ½ in. stitch and clip the threads where they come back out of the fabric. See Figure 40-4.
6. Knot the ribbon ends to make a loop to hang over the cabinet door handle or leave them free to tie around the handle.
7. Insert your recipe card under the vinyl window.
Vinyl
Fig. 40-3
Fig. 40-4
Recipe Card Holder (continued)
Project 12
90 MANAGING LIFE SKILLS—Sewing Labs Copyright © by the McGraw-Hill Companies, Inc. All rights reserved.

Name _______________________________________ Date _______________ Class _____________
Copyright © by The McGraw-Hill Companies, Inc. All rights reserved. MANAGING LIFE SKILLS—Sewing Labs 91
(Continued on next page)
Checkers is a favorite game for all ages, and now you can make this giant fl oor version for fun at home, at parties, on picnics, or wherever friends and family gather. Red and black are the classic colors, but you can choose any two colors you like. Make a coordinating plaid drawstring bag to keep the checkers together for travel or storage.
Supplies
Directions: Complete the following steps to create cloth checkerboard.
1. Lay out the backing fabric in a single layer on a flat surface. Using a yardstick and chalk, mark the backing for a 28 in. square. Cut out the square.
2. Measure and mark a border line 2 in. from all edges. See Figure 41-1. 3. With a standard three-thread overlock stitch, serge around the backing, then press under ¼ in.
Stitch close to the fold, or skip the serging and press under and stitch a double ¼ in. hem. See Figure 41-2.
• 7⁄8 yd. of 60-in. wide cotton duck cloth or other heavy, coarse fabric for backing, in a color to match one of the checkerboard colors
• 3⁄8 yd. of each of two colors of 36-in. wide craft felt
• 13⁄8 yd. of 18-in. wide paper-backed fusible web
• Two 7 in. � 11½ in. pieces of cotton fabric for drawstring
bag, in a plaid to coordinate with checkerboard colors
• 1 yd. of cording for drawstring, cut into two equal lengths
• Rotary cutter and mat
• Clear plastic quilting ruler
28 in
.
28 in.
2 in.
2 in.
Fig. 41-1
Serge and press
under and stitch
Stitch a double
1/4 in. hem
Or
Fig. 41-2
Project 13
Cloth Checkerboard

Fig. 41-4
Checkerstemplate
(actual size)
Fig. 41-5
92 MANAGING LIFE SKILLS—Sewing Labs Copyright © by the McGraw-Hill Companies, Inc. All rights reserved.
4. Lay out the felt pieces on a large pressing surface. Fuse paper-backed fusible web to one side of each felt piece following the manufacturer’s instructions.
5. Using a rotary cutter and mat and plastic quilting ruler for the smoothest cuts, cut each felt color into thirty-two 3-in. squares.
6. Lay out the first row of eight squares, alternating colors and aligning with the marked borders. See Figure 41-3.
7. Cover very carefully with a press cloth and fuse the felt squares to the backing following the directions for the fusible web.
8. Working one row at a time, repeat with remaining seven rows, alternating colors with each row. Butt the squares together to avoid gaps. See Figure 41-4.
9. Make a round cardboard template 3 in. in diameter for the checkers pieces. Cut 12 pieces of each color of felt. See Figure 41-5.
Project 13
Cloth Ckeckerboard (continued)
Name _______________________________________ Date _______________ Class _____________
(Continued on next page)
Fig. 41-3

Copyright © by The McGraw-Hill Companies, Inc. All rights reserved. MANAGING LIFE SKILLS—Sewing Labs 93
Drawstring Bag
10. Right sides together, pin the bag pieces at the bottom and sides. Stitch along each side edge 2½ in. down from the top edge and backstitch. Leave a 1-in. open-ing and backstitch again, then stitch the remaining side seam and the bottom seam. Make standard 5⁄8 in. seams. See Figure 41- 6.
11. Zigzag or serge to finish the top edge of the bag. Press and pin 2 in. to the wrong side of the bag. Stitch around the bag above and below the casing openings. See Figure 41-7.
12. Turn the bag right side out and use a bodkin or safety pin to thread one cord into one opening, all around the casing, past the second opening, and out through the same opening. Thread the second cord into the opposite opening, all around the casing, and back out. See Figure 41-8.
13. Knot the ends of each pair of cords together and pull on them at the same time to draw the top of the bag closed. See Figure 41-9.
Project 13
Xx(continued)Cloth Ckeckerboard (continued)
Name _______________________________________ Date _______________ Class _____________
(Continued on next page)
Casing
Openings
Fig. 41-7
Cord #1 Cord #2
Fig. 41-8
Wrong side
of fabric
2 1/2 in.
1 in.
Fig. 41-6
Fig. 41-9
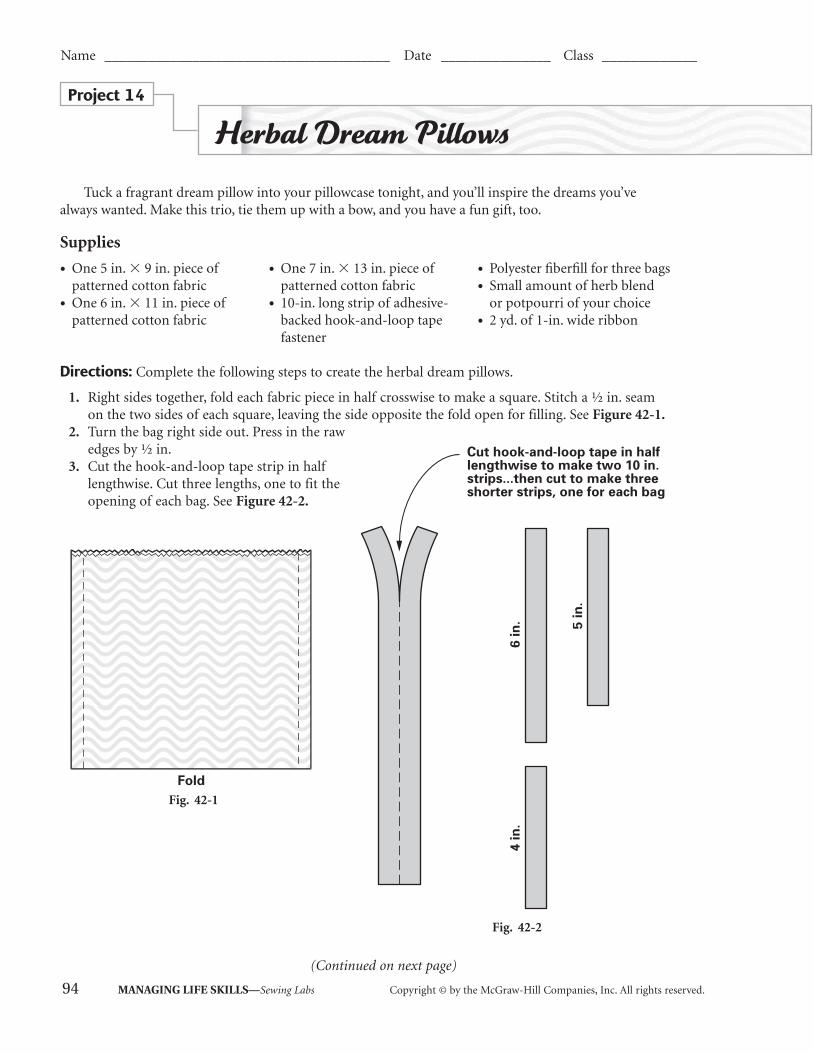
Name _______________________________________ Date _______________ Class _____________
94 MANAGING LIFE SKILLS—Sewing Labs Copyright © by the McGraw-Hill Companies, Inc. All rights reserved.
Tuck a fragrant dream pillow into your pillowcase tonight, and you’ll inspire the dreams you’ve always wanted. Make this trio, tie them up with a bow, and you have a fun gift, too.
Supplies
Directions: Complete the following steps to create the herbal dream pillows.
1. Right sides together, fold each fabric piece in half crosswise to make a square. Stitch a ½ in. seam on the two sides of each square, leaving the side opposite the fold open for filling. See Figure 42-1.
2. Turn the bag right side out. Press in the raw edges by ½ in.
3. Cut the hook-and-loop tape strip in half lengthwise. Cut three lengths, one to fit the opening of each bag. See Figure 42-2.
• One 5 in. � 9 in. piece of patterned cotton fabric
• One 6 in. � 11 in. piece of patterned cotton fabric
• One 7 in. � 13 in. piece of patterned cotton fabric
• 10-in. long strip of adhesive-backed hook-and-loop tape fastener
• Polyester fi berfi ll for three bags
• Small amount of herb blend or potpourri of your choice
• 2 yd. of 1-in. wide ribbon
Fig. 42-2
Fold
Fig. 42-1
(Continued on next page)
Project 14
Herbal Dream Pillows

Copyright © by The McGraw-Hill Companies, Inc. All rights reserved. MANAGING LIFE SKILLS—Sewing Labs 95
4. Remove the paper backing and press the adhesive side of the tape to the inside of the bag opening. See Figure 42-3.
5. Place one handful of fiberfill inside the bag. (Vary the handful slightly by the size of the bag.) Using your hands, make a well in the center of the fiberfill. Place herbs or potpourri in the well. Place a smaller amount of fiberfill over the herbs to cover. Add another handful of fiberfill to the pillow. Gently shape the pillow and press the hook-and-loop tape together to close the opening.
6. Stack the pillows and tie together with the ribbon. See Figure 42-4.
Project 14
Xx(continued)Herbal Dream Pillows (continued)
Name _______________________________________ Date _______________ Class _____________
Fig. 42-3
Fig. 42-4

21 in.
Fold
Selvages
Chalkmarking
Fig. 43-1
Project 15
Table Runner
Name _______________________________________ Date _______________ Class _________
96 MANAGING LIFE SKILLS—Sewing Labs Copyright © by the McGraw-Hill Companies, Inc. All rights reserved.
A table runner adds color and texture to the tabletop yet requires less fabric than other covers. Choose patterns or solid colors to coordinate with your dishes or the room’s décor. Such a runner can also be used atop a dresser in the bedroom.
Supplies
• 5⁄8 yd. of 45-in. wide tapestry or other mid-weight or heavier fabric
• T-square
• Chalk to mark fabric
• Two tassels to coordinate with fabric
Directions: Complete the following steps to create the table runner.
1. Right sides together, fold your fabric in half on the lengthwise grain, matching selvages. Using a T-square, chalk, and a yardstick, mark a line perpendicular to the selvages on one end of the fabric. Mark another line parallel to this one 21 in. away. Cut on these lines to make the table runner. See Figure 43-1.
(Continued on next page)

Table Runner (continued)
Copyright © by The McGraw-Hill Companies, Inc. All rights reserved. MANAGING LIFE SKILLS—Sewing Labs 97
2. On the long sides, turn under ¾ in. and press. Then turn under another ¾ in and press. From the right side, topstitch the hem in place 5⁄8 in. from each long edge.
3. At one end, fold the runner right sides together length-wise and match the edges. Stitch a seam across end, enclosing selvage edges in the seam allowance. Press the seam open. See Figure 43-2.
4. Turn right side out and press flat. See Figure 43-3. 5. Repeat for the other end. 6. Attach a decorative tassel to each pointed end of the
table runner with a hand-sewing needle and thread. See Figure 43-4.
Project 15
Name _______________________________________ Date _______________ Class _____________
Seam
en
ds
3/8 in. seam
Pre
ss s
eam
op
en
Fig. 43-2
Tu
rn a
nd
pre
ss
Fig. 43-3
Fig. 43-4

7 in
.
1/4 in.seam
Fig. 44-1
5 in.
Mark pocket stitching lines
Fig. 44-2
Project 16
Bedside Organizer
Name _______________________________________ Date _______________ Class _________
98 MANAGING LIFE SKILLS—Sewing Labs Copyright © by the McGraw-Hill Companies, Inc. All rights reserved.
Keep nighttime essentials at your fi ngertips with this clever bedside organizer that slips between the mattress and box springs. This one is made of a hand towel, so there are no edges to fi nish, but you can adapt these directions to make the organizer in any fabric you choose (even sheets) to coordinate with your bedroom.
Supplies
• 26 in. � 16 in. hand towel
• 5 in. piece of 1-in. wide elastic (optional)
Directions: Complete the following steps to create the bedside organizer.
1. Fold up one end of the towel 7 in. to form the pockets. Pin the side edges together. Topstitch each side using the inside edge of the selvage as a guide, or about ¼ in. from the edge. See Figure 44-1.
2. Determine the necessary width of individual pockets by positioning your choice of items—paper-back book, cell phone, notepad, TV remote control, eyeglasses, and the like—inside the wide pock-et. Mark desired pocket widths. Remove items and smooth out towel. Mark vertical stitching lines. If you will be adding the elastic loop for a water bottle, make at least one pocket 5 in. wide. See Figure 44-2.
(Continued on next page)
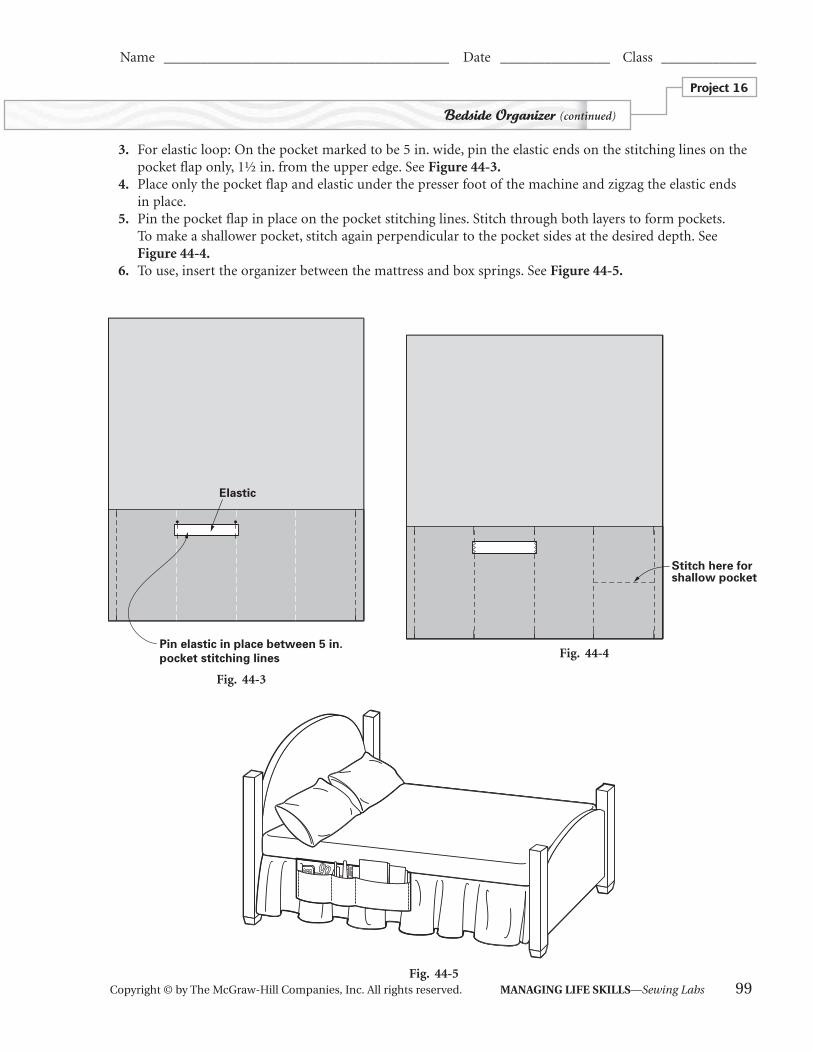
3. For elastic loop: On the pocket marked to be 5 in. wide, pin the elastic ends on the stitching lines on the pocket flap only, 1½ in. from the upper edge. See Figure 44-3.
4. Place only the pocket flap and elastic under the presser foot of the machine and zigzag the elastic ends in place.
5. Pin the pocket flap in place on the pocket stitching lines. Stitch through both layers to form pockets. To make a shallower pocket, stitch again perpendicular to the pocket sides at the desired depth. See Figure 44-4.
6. To use, insert the organizer between the mattress and box springs. See Figure 44-5.
Project 16
Xx(continued)Bedside Organizer (continued)
Fig. 44-5
Pin elastic in place between 5 in.
pocket stitching lines
Elastic
Fig. 44-3
Stitch here forshallow pocket
Fig. 44-4
Copyright © by The McGraw-Hill Companies, Inc. All rights reserved. MANAGING LIFE SKILLS—Sewing Labs 99
Name _______________________________________ Date _______________ Class _____________

Ankle measurement plus 2 in.
4 in
.
Fig. 45-1
Fig. 45-2
Project 17
Wraparound Ankle Pocket
Name _______________________________________ Date _______________ Class _____________
100 MANAGING LIFE SKILLS—Sewing Labs Copyright © by the McGraw-Hill Companies, Inc. All rights reserved.
When your clothes don’t have pockets—whether you are biking, in-line skating, or out for a walk—this handy ankle pocket comes to the rescue. There is room for a key and a little money, too.
Supplies
• 1⁄8 yd. cotton/Lycra® stretch fabric
• 7 in. zipper
• 2 in. strip of hook-and-loop tape fastener
• One 3 in. piece of 1⁄8 in. wide ribbon
Directions: Measure around your ankle and add 2 in. Cut two pieces of fabric this length by 4 in. wide. See Figure 45-1. Then complete the following steps.
1. Prepare to sew an exposed zipper on one of the fabric pieces. Press the zipper flat to remove any folds from packaging or storage. Attach the zipper foot to the sewing machine so that it is to the right of the needle.
2. Pin the zipper on the right side of the fabric with the coil 1¼ in. from one end. Stitch both sides of the zipper in place, close to the zipper tape edge and again just slightly away from the first stitching. Slide the zipper tab toward the middle and stitch across the ends. See Figure 45-2.
(Continued on next page)

Copyright © by The McGraw-Hill Companies, Inc. All rights reserved. MANAGING LIFE SKILLS—Sewing Labs 101
Project 17
Xx(continued)Wraparound Ankle Pocket (continued)
Name _______________________________________ Date _______________ Class _____________
(Continued on next page)
3. Cut off the zipper length that extends beyond the fabric edges. Carefully cut away the fabric from behind the zipper teeth. See Figure 45-3.
4. Right sides together, join the two fabric pieces with a ¼ in. seam. Leave a 2 in. opening at the end opposite the zipper tab. See Figure 45-4.
5. Clip the corners and grade the seam allowances. Turn right sides out. Press the edges flat, turning in the raw edges at the opening. Topstitch across the open end. Also stitch through each side of the zipper tape at each end (not through the coil). See Figure 45-5.
6. Center a 1 in. piece of hook tape (rough side) on the under-side of the pocket at the zipper end. Stitch it in place. See Figure 45-6.
Opening
Wrong side
of fabric
Fig. 45-4
Stitch through each
side of zipper tape
at each end
(not through coil)
Topstitchacross end
Fig. 45-5
Place "hook" part oftape on under side
Fig. 45-6
Right sideof fabric
Cut offzipperends
Cut awayfabric
behindzipper
Fig. 45-3

Stitching line forshorter pocket
(optional)
Fig. 45-8
Wraparound Ankle Pocket (continued)
102 MANAGING LIFE SKILLS—Sewing Labs Copyright © by the McGraw-Hill Companies, Inc. All rights reserved.
Project 17
Name _______________________________________ Date _______________ Class _____________
(Continued on next page)
7. Try the pocket around your ankle and deter-mine the placement for the loop tape (soft side). Stitch it in place on the outer side of the pocket. See Figure 45-7.
8. If you want to make the pocket shorter than full length, stitch across the ankle strip the desired distance from the zipper. See Figure 45-8.
9. Tie the ribbon to the zipper tab for easier pulling.
Determineplacement of"loop" portionof tape
Fig. 45-7

Name _______________________________________ Date _______________ Class _____________
Copyright © by The McGraw-Hill Companies, Inc. All rights reserved. MANAGING LIFE SKILLS—Sewing Labs 103
(Continued on next page)
Project 18
Hanging Pockets Organizer
Organize socks and pantyhose (or other items of your choice) in this handy pocket organizer that hangs in your closet on a standard tubular hanger.
Supplies
• ¾ yd. of 45-in. wide crisp cotton fabric for backing
• 3⁄8 yd. of 45-in. wide coordinating crisp cotton fabric for pockets
• One 15½ in. strip of hook-and-loop tape fastener
• One plastic tubular hanger
Directions: Fold each fabric in half on the lengthwise grain with selvages even. On the backing fabric, use a yardstick and chalk to measure and mark a 24½ in. � 16½ in. rectangle. On the pocket fabric, measure and mark two 20½ in. � 5½ in. rectangles. Cut out the pieces to make two backing sections and four pocket strips. See Figure 46-1. Then complete the following steps.
Fold Fold
Backing
Pockets Pockets
20 1/2 in.
X 5 1/2 in.
20 1/2 in.
X 5 1/2 in.
Selvages Selvages
24 1/2 in.
16 1
/2 in
.
Fig. 46-1

1. Zigzag or serge-finish one long edge on each pocket strip. Press under ¼ in. and straight stitch along the fold. See Figure 46-2.
2. Lay out each pocket strip horizontally. From one side, measure across 5¾ in. and make a small mark. Draw a vertical pocket stitching line 1 in. away and make another small mark 1 in. away from this. Measure 51⁄8 in. and make a small mark. Repeat for pocket stitching line and tuck mark. See Figure 46-3.
Straightstitch
Hemmed turnedunder 1/4 in.
Serging
Pocketstrip
(wrongside)
Fig. 46-2
5 3/4 in. 1 in. 1 in. 1 in. 1 in. 5 3/4 in.5 1/8 in.
Tuck mark
Right side
Po
cket
sti
tch
ing
lin
e
Po
cket
sti
tch
ing
lin
e
Fig. 46-3
104 MANAGING LIFE SKILLS—Sewing Labs Copyright © by the McGraw-Hill Companies, Inc. All rights reserved.
Project 18
Hanging Pockets Organizer (continued)
Name _______________________________________ Date _______________ Class _____________
(Continued on next page)

Copyright © by The McGraw-Hill Companies, Inc. All rights reserved. MANAGING LIFE SKILLS—Sewing Labs 105
Project 18
Xx(continued)Hanging Pockets Organizer (continued)
Name _______________________________________ Date _______________ Class _____________
(Continued on next page)
3. Fold tucks in each pocket strip by meeting small tuck marks to vertical stitching lines. Stitch across the folds ¼ in. from the lower edge. See Figure 46-4.
4. On the right side of one backing section, mark horizontal lines for pocket placement as shown in Figure 46-5.
5. Right sides together, position one pocket strip upside down with the unfinished edge on the placement line. Stitch through both layers ¼ in. from the unfinished edge. See Figure 46-6.
Tuck foldstogether
and stitch
Fig. 46-4
Placementline
Backinglower edge
Stitching
wrong side
right side
Backing
Fig. 46-6
5 3
/4 in
.5 in
.5 in
.5 in
.
Fig. 46-5

6. Fold up the pocket strips into their upright positions; press. Pin the pocket strips to the backing at the vertical stitching lines and at the sides. Stitch on the vertical lines to make pockets, backstitching at beginning and end of stitching. See Figure 46-7.
7. With the right side up, position the remaining pocket section at the lower edge of the backing. Pin at the bot-tom and sides. Stitch through both layers around the three sides of the project in a ¼ in. seam. Remove pins as you sew. See Figure 46-8.
8. With right sides together, pin the remaining backing section to the organizer. Stitch around all four sides in a ½ in. seam, leaving a 5 in. opening at the top for turning. Trim corners and grade seam allowances. Turn project right side out. Press seams flat. Slip stitch opening closed.
9. On the front of the project, glue-stick the loop (soft) side of the hook-and-loop tape at the top edge. Glue the hook (rough) side of the hook-and-loop tape 3½ in. from the top. Stitch both strips in place on all four sides. See Figure 46-9.
10. Hang the organizer over the lower bar of a plastic tubular hanger and fasten the hook-and-loop tape.
Sidestitching
right side
Backing
Verticalstitching
in fold
Pressupright
Fig. 46-7
106 MANAGING LIFE SKILLS—Sewing Labs Copyright © by the McGraw-Hill Companies, Inc. All rights reserved.
Project 18
Hanging Pockets Organizer (continued)
Name _______________________________________ Date _______________ Class _____________
Right side
Rightside
Fig. 46-8
3 1/2 in.Hook-and-looptape
Fig. 46-9

Name _______________________________________ Date _______________ Class _____________
Copyright © by The McGraw-Hill Companies, Inc. All rights reserved. MANAGING LIFE SKILLS—Sewing Labs 107
(Continued on next page)
Project 19
Pet Pillow
Let your small or medium-size pet relax in style on this fl oor pillow—a good way to recycle an old bed pillow that needs replacing. This pillow is embellished with a bone appliqué, but you can customize the pillow for your own pet using any appliqué you choose.
Supplies
• 5⁄8 yd. of 60-in. wide patterned fl eece fabric
• 3⁄8 yd. of coordinating solid-color fl eece fabric or washable craft felt for appliqué
• 12 in. � 22 in. or larger sheet of tear-away stabilizer
• 22 in. zipper
• Standard bed pillow: 20 in. � 26 in.
• Glue stick
Directions: Right sides together, fold the patterned fabric along the lengthwise grain with the selvages even. Using a yardstick and marking chalk, measure and mark a 27 in. × 21 in. rectangle. Cut to make the pillow front and back. See Figure 47-1. Enlarge the bone appliqué pattern (Figure 47-7 on page 110) 200% on a copy machine. Pin the pattern to one layer of the solid-color fabric and cut. Then complete the following steps.
21 in.
5/8 yd.
Fold
Selvages
Pillow
front
& back
Chalkmarkings
27 in
.
Fig. 47-1

1. Center the appliqué on the right side of one pillow cover. Pin or glue in place. Center the stabilizer on the underside of the pillow cover. See Figure 47-2.
2. Stitch the appliqué in place, using a straight stitch, small zigzag, or satin stitch, which is a zigzag with a very short stitch length.
3. With right sides together, pin front cover to back cover on one long side. Position the zipper along the pinned seam an equal distance from each end. Mark ends of zipper coil on the ¾ in. seam line. See Figure 47-3.
Wrong side
Mark ends ofzipper coil onseam line withchalk pencil
Fig. 47-3
Pillow front
right side
Tear-away stabilizer
(underneath pillow
cover fabric)
Applique
Fig. 47-2
108 MANAGING LIFE SKILLS—Sewing Labs Copyright © by the McGraw-Hill Companies, Inc. All rights reserved.
Project 19
Pet Pillow (continued)
Name _______________________________________ Date _______________ Class _____________
(Continued on next page)

Copyright © by The McGraw-Hill Companies, Inc. All rights reserved. MANAGING LIFE SKILLS—Sewing Labs 109
Project 19
Xx(continued)Pet Pillow (continued)
Name _______________________________________ Date _______________ Class _____________
(Continued on next page)
4. Stitch a ¾ in. seam, switching to basting between marks for zipper. See Figure 47-4. 5. Press the seam open. Place the closed zipper face down with the coil on the seam line between the marks.
Pin one side of the zipper tape to one seam allowance. Attach the zipper foot to your sewing machine and position it to the right of the needle. Stitching close to the coil, sew the zipper tape to the seam allowance. See Figure 47-5.
3/4 in. seam
Basting for zipper
Fig. 47-4
Topstitchacross end
Fig. 47-5

110 MANAGING LIFE SKILLS—Sewing Labs Copyright © by the McGraw-Hill Companies, Inc. All rights reserved.
Project 19
Pet Pillow (continued)
Name _______________________________________ Date _______________ Class _____________
6. With the right side up, lay the pillow cover flat. Pin through all layers perpendicular to the basted seam line, check-ing underneath that the zipper tape is caught in the pins. Reposition the zipper foot to the left of the needle. Place the cover under the zipper foot on the machine and lower the needle into the seam line at one end of the zipper. Backstitch, then stitch for 3⁄8 in. Pivot and continue stitch-ing parallel to the basted seam line. When you come to the other end of the zipper, pivot again and stitch to the seam line; backstitch. See Figure 47-6.
7. Remove the basting and open the zipper. Right sides togeth-er, pin remaining edges of pillow cover. Stitch in a ¾ in. seam.
8. Turn right side out and insert pillow. Zip closed.
Back
(right side)
Front
(right side)
Fig. 47-6
Applique
Cut 1
(For full size pillow cut 2)(Enlarge 200% on a copy machine)
Fig. 47-7

Name _______________________________________ Date _______________ Class _____________
Copyright © by The McGraw-Hill Companies, Inc. All rights reserved. MANAGING LIFE SKILLS—Sewing Labs 111
This cozy fl eece scarf will keep your neck warm all winter. Create it for yourself or use it for a gift.
Supplies• 9 in. each of 60-in. wide fl eece fabric in two contrasting colors
• Thread to match each of the fabrics
• Chalk pencil or washable fabric marker
Directions: Use the following directions to make the fringed fleece scarf.
1. Using the full length and width of each fabric, pin the fabrics together, aligning the long edges. Note that fleece, such as PolarFleece®, does not have a right or wrong side. Use a chalk pencil or washable fabric marker to mark a line 6 in. from the end of each long side. See Figure 48-1.
2. Thread the machine with thread to match the top fabric and the bobbin with thread to match the bottom fabric.
3. Machine stitch ¼ in. from the edge of the long sides of the scarf and along the marking line at each end of the scarf. As you stitch, pivot at the corners to ensure a continuous stitching line. Backstitch at the beginning and end of the seam. Remove the pins as you sew.
4. Using a sewing shears carefully cut through both layers of the fabric on the short sides to create the fringe. Cut fringe strips that are approximately ½ in. wide. See Figure 48-2.
6 in.
9 in.
48 in.6 in.
Fig. 48-1
Fig. 48-2
Project 20
Fringed Fleece Scarf