managing controller software and configurations - cisco · cisco wireless lan controller...
TRANSCRIPT

OL-17037-01
C H A P T E R 9
Managing Controller Software and ConfigurationsThis chapter describes how to manage configurations and software versions on the controllers. It contains these sections:
• Upgrading Controller Software, page 9-2
• Transferring Files to and from a Controller, page 9-13
• Saving Configurations, page 9-26
• Editing Configuration Files, page 9-27
• Clearing the Controller Configuration, page 9-28
• Erasing the Controller Configuration, page 9-28
• Resetting the Controller, page 9-28
9-1Cisco Wireless LAN Controller Configuration Guide

Chapter 9 Managing Controller Software and ConfigurationsUpgrading Controller Software
Upgrading Controller SoftwareWhen you upgrade the controller’s software, the software on the controller’s associated access points is also automatically upgraded. When an access point is loading software, each of its LEDs blinks in succession. Up to 10 access points can be concurrently upgraded from the controller.
Caution Do not power down the controller or any access point during this process; otherwise, you might corrupt the software image! Upgrading a controller with a large number of access points can take as long as 30 minutes, depending on the size of your network. However, with the increased number of concurrent access point upgrades supported in software release 4.0.206.0 and later, the upgrade time should be significantly reduced. The access points must remain powered, and the controller must not be reset during this time.
Note In controller software release 5.2.157.0, the WLAN override feature has been removed from both the controller GUI and CLI. If your controller is configured for WLAN override and you upgrade to controller software release 5.2.157.0, the controller deletes the WLAN configuration and broadcasts all WLANs. You can specify that only certain WLANs be transmitted by configuring access point groups. Each access point advertises only the enabled WLANs that belong to its access point group. Access point groups do not enable WLANs to be transmitted on per-radio interface of AP.
Guidelines for Upgrading Controller SoftwareFollow these guidelines before upgrading your controller to software release 5.2:
• Make sure you have a TFTP or FTP server available for the software upgrade. Keep these guidelines in mind when setting up a TFTP or FTP server:
– Controller software release 5.2 is greater than 32 MB; therefore, you must make sure that your TFTP server supports files that are larger than 32 MB. Some TFTP servers that support files of this size are tftpd32 and the TFTP server within WCS. If you attempt to download the 5.2 controller software and your TFTP server does not support files of this size, the following error message appears: “TFTP failure while storing in flash.”
– If you are upgrading through the service port, the TFTP or FTP server must be on the same subnet as the service port because the service port is not routable, or you must create static routes on the controller.
– If you are upgrading through the distribution system network port, the TFTP or FTP server can be on the same or a different subnet because the distribution system port is routable.
– A third-party TFTP or FTP server cannot run on the same computer as WCS because the WCS built-in TFTP or FTP server and the third-party TFTP or FTP server require the same communication port.
• You can upgrade or downgrade the controller software only between certain releases. In some instances, you must first install an intermediate release prior to upgrading to software release 5.2. Table 9-1 shows the upgrade path that you must follow prior to downloading software release 5.2.
9-2Cisco Wireless LAN Controller Configuration Guide
OL-17037-01

Chapter 9 Managing Controller Software and ConfigurationsUpgrading Controller Software
Note When you upgrade the controller to an intermediate software release, wait until all of the access points joined to the controller are upgraded to the intermediate release before you install the 5.2 software. In large networks, it may take some time to download the software on each access point.
• Cisco recommends that you install the Cisco Unified Wireless Network Controller Boot Software 5.2.157.0 ER.aes file on all controller platforms. This file resolves CSCsm03461 and is necessary to view the version information for ER.aes files in the output of the show sysinfo CLI command. If you do not install this ER.aes file, your controller does not obtain the fix for this defect, and “N/A” appears in the Field Recovery Image Version field in the output of this command.
Note The ER .aes files are independent from the controller software files. You can run any controller software file with any ER.aes file. However, installing the latest boot software file (5.2.157.0 ER.aes) ensures that the boot software modifications in all of the previous and current boot software ER.aes files are installed.
Caution If you require a downgrade from one release to another, you may lose the configuration from your current release. The workaround is to reload the previous controller configuration files saved on the backup server or to reconfigure the controller.
Guidelines for Upgrading to Controller Software 5.2 in Mesh Networks
Caution Before upgrading your controller to software release 5.2 in a mesh network, you must comply with the following rules.
Table 9-1 Upgrade Path to Controller Software Release 5.2
Current Software Release Upgrade Path to 5.2 Software
3.2.78.0 or later 3.2 release First upgrade to a 4.1 release and then upgrade to 4.2.176.0 before upgrading to 5.2.
4.0.155.5 or later 4.0 release Upgrade to 4.2.176.0 before upgrading to 5.2.
4.1.171.0 or later 4.1 release Upgrade to 4.2.176.0 before upgrading to 5.2.
4.1.191.xM or 4.1.192.xM You can upgrade directly to 5.2.
4.2.61.0, 4.2.99.0, or 4.2.112.0 Upgrade to 4.2.176.0 or to a 5.1 release before upgrading to 5.2.
4.2.130.0 Upgrade to 4.2.176.0 before upgrading to 5.2.
4.2.173.0 or 4.2.176.0 You can upgrade directly to 5.2.
5.0.148.0 or later 5.0 release You can upgrade directly to 5.2.
5.1.151.0 or later 5.1 release You can upgrade directly to 5.2.
9-3Cisco Wireless LAN Controller Configuration Guide
OL-17037-01
Chapter 9 Managing Controller Software and ConfigurationsUpgrading Controller Software
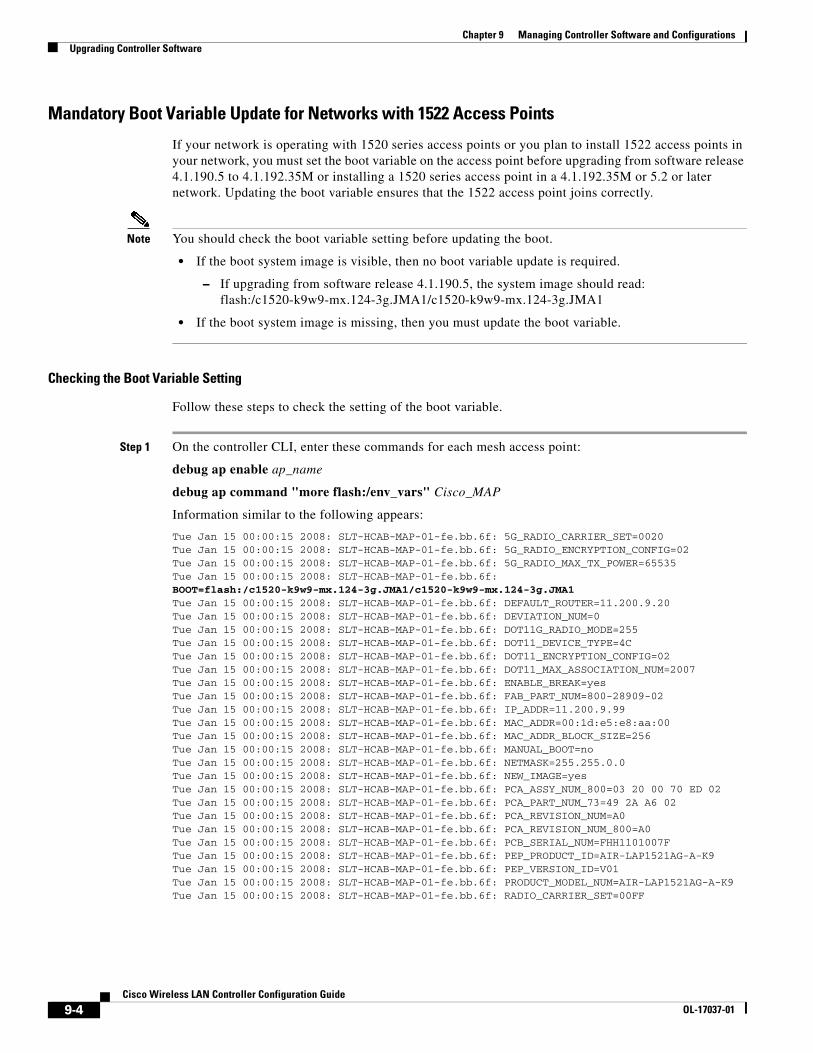
Mandatory Boot Variable Update for Networks with 1522 Access Points
If your network is operating with 1520 series access points or you plan to install 1522 access points in your network, you must set the boot variable on the access point before upgrading from software release 4.1.190.5 to 4.1.192.35M or installing a 1520 series access point in a 4.1.192.35M or 5.2 or later network. Updating the boot variable ensures that the 1522 access point joins correctly.
Note You should check the boot variable setting before updating the boot.
• If the boot system image is visible, then no boot variable update is required.
– If upgrading from software release 4.1.190.5, the system image should read: flash:/c1520-k9w9-mx.124-3g.JMA1/c1520-k9w9-mx.124-3g.JMA1
• If the boot system image is missing, then you must update the boot variable.
Checking the Boot Variable Setting
Follow these steps to check the setting of the boot variable.
Step 1 On the controller CLI, enter these commands for each mesh access point:
debug ap enable ap_name
debug ap command "more flash:/env_vars" Cisco_MAP
Information similar to the following appears:
Tue Jan 15 00:00:15 2008: SLT-HCAB-MAP-01-fe.bb.6f: 5G_RADIO_CARRIER_SET=0020Tue Jan 15 00:00:15 2008: SLT-HCAB-MAP-01-fe.bb.6f: 5G_RADIO_ENCRYPTION_CONFIG=02Tue Jan 15 00:00:15 2008: SLT-HCAB-MAP-01-fe.bb.6f: 5G_RADIO_MAX_TX_POWER=65535Tue Jan 15 00:00:15 2008: SLT-HCAB-MAP-01-fe.bb.6f: BOOT=flash:/c1520-k9w9-mx.124-3g.JMA1/c1520-k9w9-mx.124-3g.JMA1Tue Jan 15 00:00:15 2008: SLT-HCAB-MAP-01-fe.bb.6f: DEFAULT_ROUTER=11.200.9.20Tue Jan 15 00:00:15 2008: SLT-HCAB-MAP-01-fe.bb.6f: DEVIATION_NUM=0Tue Jan 15 00:00:15 2008: SLT-HCAB-MAP-01-fe.bb.6f: DOT11G_RADIO_MODE=255Tue Jan 15 00:00:15 2008: SLT-HCAB-MAP-01-fe.bb.6f: DOT11_DEVICE_TYPE=4CTue Jan 15 00:00:15 2008: SLT-HCAB-MAP-01-fe.bb.6f: DOT11_ENCRYPTION_CONFIG=02Tue Jan 15 00:00:15 2008: SLT-HCAB-MAP-01-fe.bb.6f: DOT11_MAX_ASSOCIATION_NUM=2007Tue Jan 15 00:00:15 2008: SLT-HCAB-MAP-01-fe.bb.6f: ENABLE_BREAK=yesTue Jan 15 00:00:15 2008: SLT-HCAB-MAP-01-fe.bb.6f: FAB_PART_NUM=800-28909-02Tue Jan 15 00:00:15 2008: SLT-HCAB-MAP-01-fe.bb.6f: IP_ADDR=11.200.9.99Tue Jan 15 00:00:15 2008: SLT-HCAB-MAP-01-fe.bb.6f: MAC_ADDR=00:1d:e5:e8:aa:00Tue Jan 15 00:00:15 2008: SLT-HCAB-MAP-01-fe.bb.6f: MAC_ADDR_BLOCK_SIZE=256Tue Jan 15 00:00:15 2008: SLT-HCAB-MAP-01-fe.bb.6f: MANUAL_BOOT=noTue Jan 15 00:00:15 2008: SLT-HCAB-MAP-01-fe.bb.6f: NETMASK=255.255.0.0Tue Jan 15 00:00:15 2008: SLT-HCAB-MAP-01-fe.bb.6f: NEW_IMAGE=yesTue Jan 15 00:00:15 2008: SLT-HCAB-MAP-01-fe.bb.6f: PCA_ASSY_NUM_800=03 20 00 70 ED 02Tue Jan 15 00:00:15 2008: SLT-HCAB-MAP-01-fe.bb.6f: PCA_PART_NUM_73=49 2A A6 02Tue Jan 15 00:00:15 2008: SLT-HCAB-MAP-01-fe.bb.6f: PCA_REVISION_NUM=A0Tue Jan 15 00:00:15 2008: SLT-HCAB-MAP-01-fe.bb.6f: PCA_REVISION_NUM_800=A0Tue Jan 15 00:00:15 2008: SLT-HCAB-MAP-01-fe.bb.6f: PCB_SERIAL_NUM=FHH1101007FTue Jan 15 00:00:15 2008: SLT-HCAB-MAP-01-fe.bb.6f: PEP_PRODUCT_ID=AIR-LAP1521AG-A-K9Tue Jan 15 00:00:15 2008: SLT-HCAB-MAP-01-fe.bb.6f: PEP_VERSION_ID=V01Tue Jan 15 00:00:15 2008: SLT-HCAB-MAP-01-fe.bb.6f: PRODUCT_MODEL_NUM=AIR-LAP1521AG-A-K9Tue Jan 15 00:00:15 2008: SLT-HCAB-MAP-01-fe.bb.6f: RADIO_CARRIER_SET=00FF
9-4Cisco Wireless LAN Controller Configuration Guide
OL-17037-01

Chapter 9 Managing Controller Software and ConfigurationsUpgrading Controller Software
Tue Jan 15 00:00:15 2008: SLT-HCAB-MAP-01-fe.bb.6f: RADIO_MAX_TX_POWER=65535Tue Jan 15 00:00:15 2008: SLT-HCAB-MAP-01-fe.bb.6f: SYSTEM_REVISION_NUM_800=A0Tue Jan 15 00:00:15 2008: SLT-HCAB-MAP-01-fe.bb.6f: TOP_ASSY_NUM_800=03 20 00 71 22 02Tue Jan 15 00:00:15 2008: SLT-HCAB-MAP-01-fe.bb.6f: TOP_ASSY_SERIAL_NUM=SJC1101007FTue Jan 15 00:00:15 2008: SLT-HCAB-MAP-01-fe.bb.6f: param-any=
Step 2 To turn off debug access, enter debug ap disable ap_name.
Note You do not need to turn off the debug access at this point if a boot update is required. Continue to the “Updating the Boot Variable” section on page 9-5.
Updating the Boot Variable
Follow these steps to update the boot variable on a 1520 series access point prior to a software upgrade.
Step 1 On the controller CLI, enter these commands for each mesh access point:
debug ap enable Cisco_MAP
debug ap command "debug lwapp con cli" Cisco_MAP
debug ap command "test mesh enable telnet" Cisco_MAP
show ap config general Cisco_MAP
Note Find the IP address for the access point in the show ap config general ap_name command and continue to Step 2.
Step 2 Telnet to the access point using the IP address identified in Step 1 by entering this command:
telnet IP_address
Step 3 From the AP console, enter these commands:
enable
debug lwapp console cli
show version
Look for the system image as noted in the example below:
System image file is “flash:/c1520-k9w9-mx.124-3g.JMA1/c1520-k9w9-mx.124-3g.JMA1”
Enter the image name (enclosed within quotes) into the boot system... command below.
config term
boot system flash:/c1520-k9w9-mx.124-3g.JMA1/c1520-k9w9-mx.124-3g.JMA1
Note The system image entered in the boot system image_name command must match the version identified in the show version command.
exit
9-5Cisco Wireless LAN Controller Configuration Guide
OL-17037-01

Chapter 9 Managing Controller Software and ConfigurationsUpgrading Controller Software
Enter the following command to verify that you typed the image string correctly.
more flash:/env_vars Cisco_MAP
Step 4 Disconnect Telnet.
Upgrade Compatibility Matrix
Table 2 outlines the upgrade compatibility of controller mesh and non-mesh releases and indicates the intermediate software releases required as part of the upgrade path.
Software Upgrade Notes
• You can upgrade from all mesh releases to controller software release 5.2 without any configuration file loss.
Note If you downgrade to a mesh release, you must then reconfigure the controller. Cisco recommends that you save the configuration from the mesh release before upgrading to release 5.2 for the first time. Then you can reapply the configuration if you need to downgrade.
• You cannot downgrade from controller software release 5.2 to a mesh release (4.1.190.5, 4.1.191.22M, or 4.1.192.xxM) without experiencing a configuration loss.
• Configuration files are in the binary state immediately after upgrade from a mesh release to controller software release 5.2. After reset, the XML configuration file is selected.
• Do not edit XML files.
• Any field with an invalid value is filtered out and set to default by the XML validation engine. Validation occurs during bootup.
9-6Cisco Wireless LAN Controller Configuration Guide
OL-17037-01

Chapter 9 Managing Controller Software and ConfigurationsUpgrading Controller Software
Table 2 Upgrade Compatibility Matrix for Controller Mesh and Non-Mesh ReleasesU
pgra
de to
5.2
4.1.
192.
35M
4.1.
191.
24M
4.1.
190.
5
4.1.
185.
0
4.1.
171.
0
4.0.
219.
0
4.0.
217.
204
4.0.
217.
0
4.0.
216.
0
4.0.
206.
0
4.0.
179.
11
4.0.
179.
8
4.0.
155.
5
4.0.
155.
0
3.2.
195.
10
3.2.
193.
5
3.2.
171.
6
3.2.
171.
5
3.2.
150.
10
3.2.
150.
6
3.2.
116.
21
3.2.
78.0
3.1.
111.
0
3.1.
105.
0
Upgrade from4.1.192.35M Y
4.1.192.22M Y Y
4.1.191.24M Y –
4.1.190.5 Y1
1. You can upgrade directly from software release 4.1.190.5 to 4.1.192.35M; however, upgrading to 4.1.191.24M before upgrading to 4.1.192.35M is highly recommended.
Y –
4.1.185.0 Y Y2
2. CUSTOMERS WHO REQUIRE DYNAMIC FREQUENCY SELECTION (DFS) FUNCTIONALITY SHOULD NOT USE THIS RELEASE. This release does not provide DFS functionality fixes found in release 4.0.217.204. Additionally, this release is not supported in ETSI-compliant countries or Singapore.
–
4.1.181.0 Y2 Y2
4.1.171.0 Y2 Y2 –
4.0.219.0 Y2 Y2 –
4.0.217.204 Y2 Y2 Y2 Y2 –
4.0.217.0 Y2 Y2 Y2 Y3
3. Release 4.0.217.204 provides fixes for DFS on 1510 series access points. This functionality is needed only in countries where DFS rules apply.
–
4.0.216.0 Y2 Y2 Y2 Y3 Y –
4.0.206.0 Y2 Y2 Y2 Y3 Y –
4.0.179.11 Y Y4 –
4.0.179.8 Y Y4 Y –
4.0.155.5 Y Y4 Y Y –
4.0.155.0 Y Y4 Y Y Y –
3.2.195.10 Y Y4 Y Y Y –
3.2.193.5 Y Y4 Y Y Y Y –
3.2.171.6 Y Y4 Y Y Y Y –
3.2.171.5 Y Y4 Y Y Y Y Y –
3.2.150.10 Y Y4 Y Y Y Y Y –
3.2.150.6 Y Y4 Y Y Y Y Y Y –
3.2.116.21 Y Y4 Y Y Y Y Y Y –
3.2.78.0 Y Y4 Y Y Y Y Y Y Y –
3.1.111.0 Y Y Y Y Y –
3.1.105.0 Y Y Y Y Y Y –
3.1.59.24 Y Y Y Y Y Y Y
9-7Cisco Wireless LAN Controller Configuration Guide
OL-17037-01

Chapter 9 Managing Controller Software and ConfigurationsUpgrading Controller Software
Using the GUI to Upgrade Controller SoftwareFollow these steps to upgrade the controller software using the GUI.
Note Do not install the 5.2 controller software file and the 5.2.157.0 ER.aes boot software file at the same time. Install one file and reboot the controller; then install the other file and reboot the controller.
Step 1 Upload your controller configuration files to a server to back them up.
Note Cisco highly recommends that you back up your controller’s configuration files prior to upgrading the controller software. See the “Uploading and Downloading Configuration Files” section on page 9-21 for instructions.
Step 2 Follow these steps to obtain the 5.2 controller software and the Cisco Unified Wireless Network Controller Boot Software 5.2.157.0 ER.aes file from the Software Center on Cisco.com:
a. Click this URL to go to the Software Center:
http://www.cisco.com/cisco/software/navigator.html
b. Click Wireless Software.
c. Click Wireless LAN Controllers.
d. Click Standalone Controllers or Integrated Controllers and Controller Modules.
e. Click a controller series.
f. If necessary, click a controller model.
g. If you chose Standalone Controllers in Step d., click Wireless LAN Controller Software.
h. If you chose Cisco Catalyst 6500 Series/7600 Series Wireless Services Module (WiSM) in Step e., click Wireless Services Modules (WiSM) Software.
i. Click a controller software release. The software releases are labeled as follows to help you determine which release to download:
• Early Deployment (ED)—These software releases provide new features and new hardware platform support as well as bug fixes.
• Maintenance Deployment (MD)—These software releases provide bug fixes and ongoing software maintenance.
• Deferred (DF)—These software releases have been deferred. Cisco recommends that you migrate to an upgraded release.
j. Click a software release number.
k. Click the filename (filename.aes).
l. Click Download.
m. Read Cisco’s End User Software License Agreement and then click Agree.
4. An upgrade to 4.0.206.0 is not allowed in the following country codes when operating with the following access points: Australia (1505 and 1510), Brazil (1505 and 1510), Hong Kong (1505 and 1510), India (1505 and 1510), Japan (1510), Korea (1505 and 1510), Mexico (1505 and 1510), New Zealand (1505 and 1510), and Russia (1505 and 1510). Note: The 1505 mesh access point is not supported in release 5.0 and later. The 1510 mesh access point is supported only in mesh releases 4.1.190.5, 4.1.191.22M, and 4.1.192.xxM.
9-8Cisco Wireless LAN Controller Configuration Guide
OL-17037-01

Chapter 9 Managing Controller Software and ConfigurationsUpgrading Controller Software
n. Save the file to your hard drive.
o. Repeat steps a. through n. to download the remaining file (either the 5.2 controller software or the Cisco Unified Wireless Network Controller Boot Software 5.2.157.0 ER.aes file).
Step 3 Copy the controller software file (filename.aes) and the Cisco Unified Wireless Network Controller Boot Software 5.2.157.0 ER.aes file to the default directory on your TFTP or FTP server.
Step 4 Disable the controller 802.11a and 802.11b/g networks.
Step 5 For Cisco WiSMs, shut down the controller port channel on the Catalyst switch to allow the controller to reboot before the access points start downloading the software.
Step 6 Disable any WLANs on the controller.
Step 7 Click Commands > Download File to open the Download File to Controller page (see Figure 9-1).
Figure 9-1 Download File to Controller Page
Step 8 From the File Type drop-down box, choose Code.
Step 9 From the Transfer Mode drop-down box, choose TFTP or FTP.
Step 10 In the IP Address field, enter the IP address of the TFTP or FTP server.
Step 11 If you are using a TFTP server, the default values of 10 retries and 6 seconds for the Maximum Retries and Timeout fields should work correctly without any adjustment. However, you can change these values. To do so, enter the maximum number of times that the TFTP server attempts to download the software in the Maximum Retries field and the amount of time (in seconds) that the TFTP server attempts to download the software in the Timeout field.
Step 12 In the File Path field, enter the directory path of the software.
Step 13 In the File Name field, enter the name of the controller software file (filename.aes).
Step 14 If you are using an FTP server, follow these steps:
a. In the Server Login Username field, enter the username to log into the FTP server.
b. In the Server Login Password field, enter the password to log into the FTP server.
c. In the Server Port Number field, enter the port number on the FTP server through which the download occurs. The default value is 21.
Step 15 Click Download to download the software to the controller. A message appears indicating the status of the download.
Step 16 After the download is complete, click Reboot.
Step 17 If prompted to save your changes, click Save and Reboot.
9-9Cisco Wireless LAN Controller Configuration Guide
OL-17037-01

Chapter 9 Managing Controller Software and ConfigurationsUpgrading Controller Software
Step 18 Click OK to confirm your decision to reboot the controller.
Step 19 After the controller reboots, repeat Step 7 to Step 18 to install the remaining file (either the 5.2 controller software or the Cisco Unified Wireless Network Controller Boot Software 5.2.157.0 ER.aes file).
Step 20 Re-enable the WLANs.
Step 21 For Cisco WiSMs, re-enable the controller port channel on the Catalyst switch.
Step 22 Re-enable your 802.11a and 802.11b/g networks.
Step 23 If desired, reload your latest configuration file to the controller.
Step 24 To verify that the 5.2 controller software is installed on your controller, click Monitor on the controller GUI and look at the Software Version field under Controller Summary.
Step 25 To verify that the Cisco Unified Wireless Network Controller Boot Software 5.2.157.0 ER.aes file is installed on your controller, enter the show sysinfo command on the controller CLI and look at the Field Recovery Image Version field.
Note If you do not install the 5.2.157.0 ER.aes file, the Field Recovery Image Version field shows “N/A.”
Using the CLI to Upgrade Controller SoftwareFollow these steps to upgrade the controller software using the CLI.
Note Do not install the 5.2 controller software file and the 5.2.157.0 ER.aes boot software file at the same time. Install one file and reboot the controller; then install the other file and reboot the controller.
Step 1 Upload your controller configuration files to a server to back them up.
Note Cisco highly recommends that you back up your controller’s configuration files prior to upgrading the controller software. See the “Uploading and Downloading Configuration Files” section on page 9-21 for instructions.
Step 2 Follow these steps to obtain the 5.2 controller software and the Cisco Unified Wireless Network Controller Boot Software 5.2.157.0 ER.aes file from the Software Center on Cisco.com:
a. Click this URL to go to the Software Center:
http://www.cisco.com/cisco/software/navigator.html
b. Click Wireless Software.
c. Click Wireless LAN Controllers.
d. Click Standalone Controllers, Wireless Integrated Routers, or Wireless Integrated Switches.
e. Click the name of a controller.
f. Click Wireless LAN Controller Software.
g. Click a controller software release.
9-10Cisco Wireless LAN Controller Configuration Guide
OL-17037-01
Chapter 9 Managing Controller Software and ConfigurationsUpgrading Controller Software
h. Click the filename (filename.aes).
i. Click Download.
j. Read Cisco’s End User Software License Agreement and then click Agree.
k. Save the file to your hard drive.
l. Repeat steps a. to k. to download the remaining file (either the 5.2 controller software or the Cisco Unified Wireless Network Controller Boot Software 5.2.157.0 ER.aes file).
Step 3 Copy the controller software file (filename.aes) and the Cisco Unified Wireless Network Controller Boot Software 5.2.157.0 ER.aes file to the default directory on your TFTP or FTP server.
Step 4 Disable the controller 802.11a and 802.11b/g networks.
Step 5 For Cisco WiSMs, shut down the controller port channel on the Catalyst switch to allow the controller to reboot before the access points start downloading the software.
Step 6 Disable any WLANs on the controller (using the config wlan disable wlan_id command).
Step 7 Log into the controller CLI.
Step 8 Enter ping server-ip-address to verify that the controller can contact the TFTP or FTP server.
Step 9 Enter transfer download start and answer n to the prompt to view the current download settings. Information similar to the following appears:
Mode........................................... TFTPData Type...................................... CodeTFTP Server IP................................. xxx.xxx.xxx.xxxTFTP Packet Timeout............................... 6TFTP Max Retries.................................. 10TFTP Path...................................... <directory path>TFTP Filename.................................. xxx.aes
This may take some time.Are you sure you want to start? (y/N) nTransfer Canceled
Step 10 Enter these commands to change the download settings, if necessary:
• transfer download mode {tftp | ftp}
• transfer download datatype code
• transfer download serverip server-ip-address
• transfer download filename filename
• transfer download path server-path-to-file
Note Pathnames on a TFTP or FTP server are relative to the server’s default or root directory. For example, in the case of the Solarwinds TFTP server, the path is “/”.
If you are using a TFTP server, also enter these commands:
• transfer download tftpMaxRetries retries
• transfer download tftpPktTimeout timeout
9-11Cisco Wireless LAN Controller Configuration Guide
OL-17037-01

Chapter 9 Managing Controller Software and ConfigurationsUpgrading Controller Software
Note The default values of 10 retries and a 6-second timeout should work correctly without any adjustment. However, you can change these values. To do so, enter the maximum number of times that the TFTP server attempts to download the software for the retries parameter and the amount of time (in seconds) that the TFTP server attempts to download the software for the timeout parameter.
If you are using an FTP server, also enter these commands:
• transfer download username username
• transfer download password password
• transfer download port port
Note The default value for the port parameter is 21.
Step 11 Enter transfer download start to view the updated settings and answer y to the prompt to confirm the current download settings and start the software download. Information similar to the following appears:
Mode........................................... TFTPData Type...................................... CodeTFTP Server IP.................................... xxx.xxx.xxx.xxxTFTP Packet Timeout............................... 6TFTP Max Retries............................... 10TFTP Path...................................... <directory path>TFTP Filename.................................. xxx.aes
Are you sure you want to start? (y/n) yTFTP Code transfer starting.TFTP receive complete... extracting components.Writing new bootloader to flash.Making backup copy of RTOS.Writing new RTOS to flash.Making backup copy of Code.Writing new Code to flash.TFTP File transfer operation completed successfully.
Please restart the switch (reset system) for update to complete.
Step 12 Enter reset system to save the code update to non-volatile NVRAM and reboot the controller. The controller completes the bootup process.
Step 13 After the controller reboots, repeat Step 9 to Step 12 to install the remaining file (either the 5.2 controller software or the Cisco Unified Wireless Network Controller Boot Software 5.2.157.0 ER.aes file).
Step 14 Enter config wlan enable wlan_id to re-enable the WLANs.
Step 15 For Cisco WiSMs, re-enable the controller port channel on the Catalyst switch.
Step 16 Re-enable your 802.11a and 802.11b/g networks.
Step 17 If desired, reload your latest configuration file to the controller.
Step 18 To verify that the 5.2 controller software is installed on your controller, enter show sysinfo and look at the Product Version field.
Step 19 To verify that the Cisco Unified Wireless Network Controller Boot Software 5.2.157.0 ER.aes file is installed on your controller, enter the show sysinfo command on the controller CLI and look at the Field Recovery Image Version field.
9-12Cisco Wireless LAN Controller Configuration Guide
OL-17037-01
Chapter 9 Managing Controller Software and ConfigurationsTransferring Files to and from a Controller
Note If you do not install the 5.2.157.0 ER.aes file, the Field Recovery Image Version field shows “N/A.”
Transferring Files to and from a ControllerControllers have built-in utilities for uploading and downloading various files. Follow the instructions in these sections to import files using either the controller GUI or CLI:
• Downloading Device Certificates, page 9-13
• Downloading CA Certificates, page 9-16
• Uploading PACs, page 9-19
• Uploading and Downloading Configuration Files, page 9-21
Downloading Device CertificatesEach wireless device (controller, access point, and client) has its own device certificate. For example, the controller is shipped with a Cisco-installed device certificate. This certificate is used by EAP-FAST (when not using PACs), EAP-TLS, PEAP-GTC, and PEAP-MSCHAPv2 to authenticate wireless clients during local EAP authentication. However, if you wish to use your own vendor-specific device certificate, it must be downloaded to the controller.
Note See the “Configuring Local EAP” section on page 5-38 for information on configuring local EAP.
Follow the instructions in this section to download a vendor-specific device certificate to the controller through the GUI or CLI. However, before you begin, make sure you have a TFTP or FTP server available for the certificate download. Keep these guidelines in mind when setting up a TFTP or FTP server:
• If you are downloading through the service port, the TFTP or FTP server must be on the same subnet as the service port because the service port is not routable, or you must create static routes on the controller.
• If you are downloading through the distribution system network port, the TFTP or FTP server can be on the same or a different subnet because the distribution system port is routable.
• A third-party TFTP or FTP server cannot run on the same computer as WCS because the WCS built-in TFTP or FTP server and the third-party TFTP or FTP server require the same communication port.
Note All certificates downloaded to the controller must be in PEM format.
9-13Cisco Wireless LAN Controller Configuration Guide
OL-17037-01

Chapter 9 Managing Controller Software and ConfigurationsTransferring Files to and from a Controller
Using the GUI to Download Device Certificates
Follow these steps to download a device certificate to the controller using the controller GUI.
Step 1 Copy the device certificate to the default directory on your TFTP or FTP server.
Step 2 Click Commands > Download File to open the Download File to Controller page (see Figure 9-2).
Figure 9-2 Download File to Controller Page
Step 3 From the File Type drop-down box, choose Vendor Device Certificate.
Step 4 In the Certificate Password field, enter the password that was used to protect the certificate.
Step 5 From the Transfer Mode drop-down box, choose TFTP or FTP.
Step 6 In the IP Address field, enter the IP address of the TFTP or FTP server.
Step 7 If you are using a TFTP server, the default values of 10 retries and 6 seconds for the Maximum Retries and Timeout fields should work correctly without any adjustment. However, you can change these values. To do so, enter the maximum number of times that the TFTP server attempts to download the certificate in the Maximum Retries field and the amount of time (in seconds) that the TFTP server attempts to download the certificate in the Timeout field.
Step 8 In the File Path field, enter the directory path of the certificate.
Step 9 In the File Name field, enter the name of the certificate.
Step 10 If you are using an FTP server, follow these steps:
a. In the Server Login Username field, enter the username to log into the FTP server.
b. In the Server Login Password field, enter the password to log into the FTP server.
c. In the Server Port Number field, enter the port number on the FTP server through which the download occurs. The default value is 21.
Step 11 Click Download to download the device certificate to the controller. A message appears indicating the status of the download.
Step 12 After the download is complete, click Commands > Reboot > Reboot.
Step 13 If prompted to save your changes, click Save and Reboot.
Step 14 Click OK to confirm your decision to reboot the controller.
9-14Cisco Wireless LAN Controller Configuration Guide
OL-17037-01

Chapter 9 Managing Controller Software and ConfigurationsTransferring Files to and from a Controller
Using the CLI to Download Device Certificates
Follow these steps to download a device certificate to the controller using the controller CLI.
Step 1 Log into the controller CLI.
Step 2 Enter transfer download mode {tftp | ftp}.
Step 3 Enter transfer download datatype eapdevcert.
Step 4 Enter transfer download certpassword password.
Step 5 Enter transfer download serverip server-ip-address.
Step 6 Enter transfer download path server-path-to-file.
Step 7 Enter transfer download filename filename.pem.
Step 8 If you are using a TFTP server, enter these commands:
• transfer download tftpMaxRetries retries
• transfer download tftpPktTimeout timeout
Note The default values of 10 retries and a 6-second timeout should work correctly without any adjustment. However, you can change these values. To do so, enter the maximum number of times that the TFTP server attempts to download the software for the retries parameter and the amount of time (in seconds) that the TFTP server attempts to download the software for the timeout parameter.
Step 9 If you are using an FTP server, enter these commands:
• transfer download username username
• transfer download password password
• transfer download port port
Note The default value for the port parameter is 21.
Step 10 Enter transfer download start to view the updated settings; then answer y when prompted to confirm the current settings and start the download process. This example shows the download command output:
Mode........................................... TFTPData Type................................... Vendor Dev CertTFTP Server IP.............................. 10.10.10.4TFTP Packet Timeout............................ 6TFTP Max Retries............................... 10TFTP Path................................... /tftpboot/username/TFTP Filename............................... filename.pem
This may take some time.Are you sure you want to start? (y/N) y
TFTP EAP Dev cert transfer starting.
Certificate installed.Reboot the switch to use the new certificate.
9-15Cisco Wireless LAN Controller Configuration Guide
OL-17037-01

Chapter 9 Managing Controller Software and ConfigurationsTransferring Files to and from a Controller
Step 11 Enter reset system to reboot the controller.
Step 12 After the controller reboots, enter show certificates local-auth to verify that the certificate is installed.
Downloading CA CertificatesControllers and access points have a Certificate Authority (CA) certificate that is used to sign and validate device certificates. The controller is shipped with a Cisco-installed CA certificate. This certificate may be used by EAP-FAST (when not using PACs), EAP-TLS, PEAP-GTC, and PEAP-MSCHAPv2 to authenticate wireless clients during local EAP authentication. However, if you wish to use your own vendor-specific CA certificate, it must be downloaded to the controller.
Note See the “Configuring Local EAP” section on page 5-38 for information on configuring local EAP.
Follow the instructions in this section to download CA certificates to the controller through the GUI or CLI. However, before you begin, make sure you have a TFTP or FTP server available for the certificate download. Keep these guidelines in mind when setting up a TFTP or FTP server:
• If you are downloading through the service port, the TFTP or FTP server must be on the same subnet as the service port because the service port is not routable, or you must create static routes on the controller.
• If you are downloading through the distribution system network port, the TFTP or FTP server can be on the same or a different subnet because the distribution system port is routable.
• A third-party TFTP or FTP server cannot run on the same computer as WCS because the WCS built-in TFTP or FTP server and the third-party TFTP or FTP server require the same communication port.
Note All certificates downloaded to the controller must be in PEM format.
Using the GUI to Download CA Certificates
Follow these steps to download a CA certificate to the controller using the controller GUI.
Step 1 Copy the CA certificate to the default directory on your TFTP or FTP server.
Step 2 Click Commands > Download File to open the Download File to Controller page (see Figure 9-3).
9-16Cisco Wireless LAN Controller Configuration Guide
OL-17037-01

Chapter 9 Managing Controller Software and ConfigurationsTransferring Files to and from a Controller
Figure 9-3 Download File to Controller Page
Step 3 From the File Type drop-down box, choose Vendor CA Certificate.
Step 4 From the Transfer Mode drop-down box, choose TFTP or FTP.
Step 5 In the IP Address field, enter the IP address of the TFTP or FTP server.
Step 6 If you are using a TFTP server, the default values of 10 retries and 6 seconds for the Maximum Retries and Timeout fields should work correctly without any adjustment. However, you can change these values. To do so, enter the maximum number of times that the TFTP server attempts to download the certificate in the Maximum Retries field and the amount of time (in seconds) that the TFTP server attempts to download the certificate in the Timeout field.
Step 7 In the File Path field, enter the directory path of the certificate.
Step 8 In the File Name field, enter the name of the certificate.
Step 9 If you are using an FTP server, follow these steps:
a. In the Server Login Username field, enter the username to log into the FTP server.
b. In the Server Login Password field, enter the password to log into the FTP server.
c. In the Server Port Number field, enter the port number on the FTP server through which the download occurs. The default value is 21.
Step 10 Click Download to download the CA certificate to the controller. A message appears indicating the status of the download.
Step 11 After the download is complete, click Commands > Reboot > Reboot.
Step 12 If prompted to save your changes, click Save and Reboot.
Step 13 Click OK to confirm your decision to reboot the controller.
Using the CLI to Download CA Certificates
Follow these steps to download a CA certificate to the controller using the controller CLI.
Step 1 Log into the controller CLI.
Step 2 Enter transfer download mode {tftp | ftp}.
Step 3 Enter transfer download datatype eapcacert.
9-17Cisco Wireless LAN Controller Configuration Guide
OL-17037-01

Chapter 9 Managing Controller Software and ConfigurationsTransferring Files to and from a Controller
Step 4 Enter transfer download serverip server-ip-address.
Step 5 Enter transfer download path server-path-to-file.
Step 6 Enter transfer download filename filename.pem.
Step 7 If you are using a TFTP server, enter these commands:
• transfer download tftpMaxRetries retries
• transfer download tftpPktTimeout timeout
Note The default values of 10 retries and a 6-second timeout should work correctly without any adjustment. However, you can change these values. To do so, enter the maximum number of times that the TFTP server attempts to download the software for the retries parameter and the amount of time (in seconds) that the TFTP server attempts to download the software for the timeout parameter.
Step 8 If you are using an FTP server, enter these commands:
• transfer download username username
• transfer download password password
• transfer download port port
Note The default value for the port parameter is 21.
Step 9 Enter transfer download start to view the updated settings; then answer y when prompted to confirm the current settings and start the download process. This example shows the download command output:
Mode........................................... TFTPData Type................................... Vendor CA CertTFTP Server IP.............................. 10.10.10.4TFTP Packet Timeout............................ 6TFTP Max Retries............................... 10TFTP Path................................... /tftpboot/username/TFTP Filename............................... filename.pem
This may take some time.Are you sure you want to start? (y/N) y
TFTP EAP CA cert transfer starting.
Certificate installed.Reboot the switch to use the new certificate.
Step 10 Enter reset system to reboot the controller.
Step 11 After the controller reboots, enter show certificates local-auth to verify that the certificate is installed.
9-18Cisco Wireless LAN Controller Configuration Guide
OL-17037-01

Chapter 9 Managing Controller Software and ConfigurationsTransferring Files to and from a Controller
Uploading PACsProtected access credentials (PACs) are credentials that are either automatically or manually provisioned and used to perform mutual authentication with a local EAP authentication server during EAP-FAST authentication. When manual PAC provisioning is enabled, the PAC file is manually generated on the controller.
Note See the “Configuring Local EAP” section on page 5-38 for information on configuring local EAP.
Follow the instructions in this section to generate and load PACs from the controller through the GUI or CLI. However, before you begin, make sure you have a TFTP or FTP server available for the PAC upload. Keep these guidelines in mind when setting up a TFTP or FTP server:
• If you are uploading through the service port, the TFTP or FTP server must be on the same subnet as the service port because the service port is not routable, or you must create static routes on the controller.
• If you are uploading through the distribution system network port, the TFTP or FTP server can be on the same or a different subnet because the distribution system port is routable.
• A third-party TFTP or FTP server cannot run on the same computer as WCS because the WCS built-in TFTP or FTP server and the third-party TFTP or FTP server require the same communication port.
Using the GUI to Upload PACs
Follow these steps to upload a PAC from the controller using the controller GUI.
Step 1 Click Commands > Upload File to open the Upload File from Controller page (see Figure 9-4).
Figure 9-4 Upload File from Controller Page
Step 2 From the File Type drop-down box, choose PAC (Protected Access Credential).
Step 3 In the User field, enter the name of the user who will use the PAC.
Step 4 In the Validity field, enter the number days for the PAC to remain valid. The default setting is zero (0).
Step 5 In the Password and Confirm Password fields, enter a password to protect the PAC.
9-19Cisco Wireless LAN Controller Configuration Guide
OL-17037-01

Chapter 9 Managing Controller Software and ConfigurationsTransferring Files to and from a Controller
Step 6 From the Transfer Mode drop-down box, choose TFTP or FTP.
Step 7 In the IP Address field, enter the IP address of the TFTP or FTP server.
Step 8 In the File Path field, enter the directory path of the PAC.
Step 9 In the File Name field, enter the name of the PAC file. PAC files have a .pac extension.
Step 10 If you are using an FTP server, follow these steps:
a. In the Server Login Username field, enter the username to log into the FTP server.
b. In the Server Login Password field, enter the password to log into the FTP server.
c. In the Server Port Number field, enter the port number on the FTP server through which the upload occurs. The default value is 21.
Step 11 Click Upload to upload the PAC from the controller. A message appears indicating the status of the upload.
Step 12 Follow the instructions for your wireless client to load the PAC on your client devices. Make sure to use the password that you entered above.
Using the CLI to Upload PACs
Follow these steps to upload a PAC from the controller using the controller CLI.
Step 1 Log into the controller CLI.
Step 2 Enter transfer upload mode {tftp | ftp}.
Step 3 Enter transfer upload datatype pac.
Step 4 Enter transfer upload pac username validity password.
Step 5 Enter transfer upload serverip server-ip-address.
Step 6 Enter transfer upload path server-path-to-file.
Step 7 Enter transfer upload filename manual.pac.
Step 8 If you are using an FTP server, enter these commands:
• transfer upload username username
• transfer upload password password
• transfer upload port port
Note The default value for the port parameter is 21.
Step 9 Enter transfer upload start to view the updated settings; then answer y when prompted to confirm the current settings and start the upload process. This example shows the upload command output:
Mode........................................... TFTPTFTP Server IP................................. 10.10.10.4TFTP Path...................................... /tftpboot/username/TFTP Filename..................................... manual.pacData Type......................................... PACPAC User.......................................... usernamePAC Validity...................................... 10 days
9-20Cisco Wireless LAN Controller Configuration Guide
OL-17037-01

Chapter 9 Managing Controller Software and ConfigurationsTransferring Files to and from a Controller
PAC Password................................... password
Are you sure you want to start? (y/N) y
PAC transfer starting.
File transfer operation completed successfully.
Step 10 Follow the instructions for your wireless client to load the PAC on your client devices. Make sure to use the password that you entered above.
Uploading and Downloading Configuration FilesCisco recommends that you upload your controller’s configuration file to a server to back it up. If you ever experience some loss of configuration, you can then download the saved configuration to the controller.
In controller software release 4.2 or later, the controller’s bootup configuration file is stored in an Extensible Markup Language (XML) format rather than in binary format. Therefore, you cannot download a binary configuration file onto a controller running software release 4.2 or later. However, when you upgrade a controller from a previous software release to 4.2 or later, the configuration file is migrated and converted to XML.
Note Controller software release 5.2 enables you to read and modify the configuration file. See the “Editing Configuration Files” section on page 9-27 for details. Controller software releases prior to 5.2 do not allow configuration files to be modified. If you attempt to make changes to a 4.2, 5.0, or 5.1 configuration file and then download the file to a controller, the controller displays a cyclic redundancy checksum (CRC) error while it is rebooting and returns the configuration parameters to their default values.
Uploading Configuration Files
You can upload configuration files using either the GUI or the CLI.
Using the GUI to Upload Configuration Files
Using the controller GUI, follow these steps to upload a configuration file to a server.
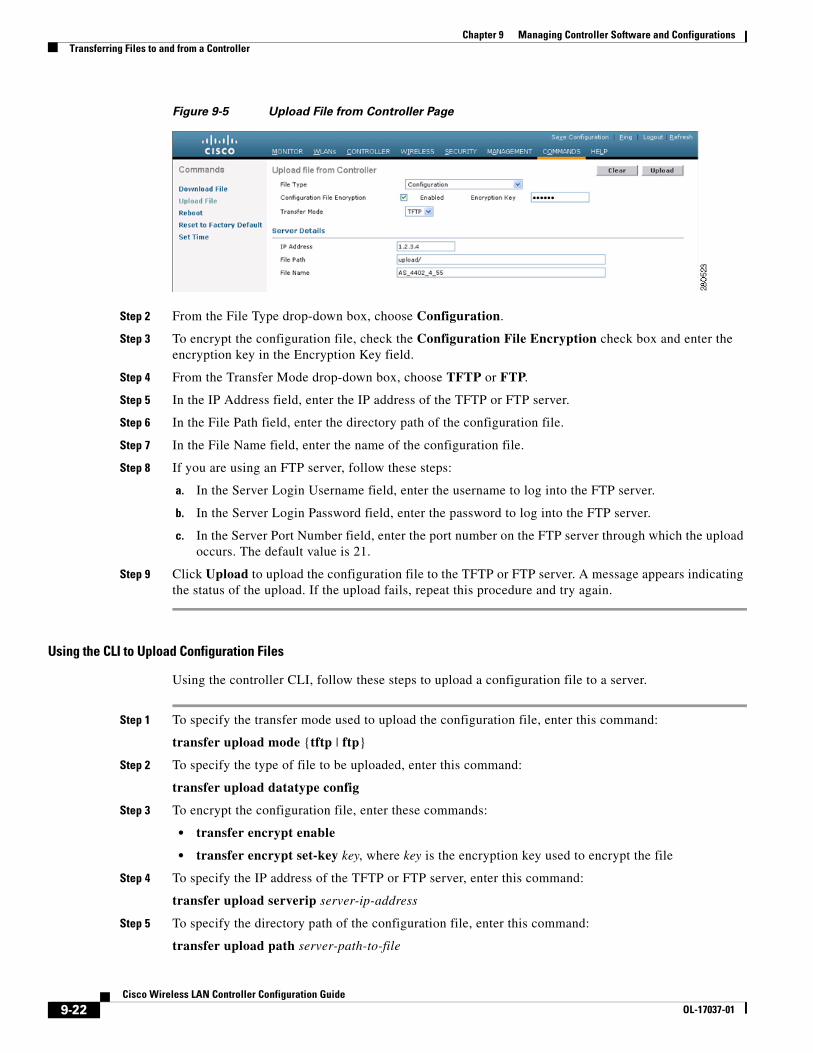
Step 1 Click Commands > Upload File to open the Upload File from Controller page (see Figure 9-5).
9-21Cisco Wireless LAN Controller Configuration Guide
OL-17037-01
Chapter 9 Managing Controller Software and ConfigurationsTransferring Files to and from a Controller
Figure 9-5 Upload File from Controller Page
Step 2 From the File Type drop-down box, choose Configuration.
Step 3 To encrypt the configuration file, check the Configuration File Encryption check box and enter the encryption key in the Encryption Key field.
Step 4 From the Transfer Mode drop-down box, choose TFTP or FTP.
Step 5 In the IP Address field, enter the IP address of the TFTP or FTP server.
Step 6 In the File Path field, enter the directory path of the configuration file.
Step 7 In the File Name field, enter the name of the configuration file.
Step 8 If you are using an FTP server, follow these steps:
a. In the Server Login Username field, enter the username to log into the FTP server.
b. In the Server Login Password field, enter the password to log into the FTP server.
c. In the Server Port Number field, enter the port number on the FTP server through which the upload occurs. The default value is 21.
Step 9 Click Upload to upload the configuration file to the TFTP or FTP server. A message appears indicating the status of the upload. If the upload fails, repeat this procedure and try again.
Using the CLI to Upload Configuration Files
Using the controller CLI, follow these steps to upload a configuration file to a server.
Step 1 To specify the transfer mode used to upload the configuration file, enter this command:
transfer upload mode {tftp | ftp}
Step 2 To specify the type of file to be uploaded, enter this command:
transfer upload datatype config
Step 3 To encrypt the configuration file, enter these commands:
• transfer encrypt enable
• transfer encrypt set-key key, where key is the encryption key used to encrypt the file
Step 4 To specify the IP address of the TFTP or FTP server, enter this command:
transfer upload serverip server-ip-address
Step 5 To specify the directory path of the configuration file, enter this command:
transfer upload path server-path-to-file
9-22Cisco Wireless LAN Controller Configuration Guide
OL-17037-01

Chapter 9 Managing Controller Software and ConfigurationsTransferring Files to and from a Controller
Step 6 To specify the name of the configuration file to be uploaded, enter this command:
transfer upload filename filename
Step 7 If you are using an FTP server, enter these commands to specify the username and password used to log into the FTP server and the port number through which the upload occurs:
• transfer upload username username
• transfer upload password password
• transfer upload port port
Note The default value for the port parameter is 21.
Step 8 To initiate the upload process, enter this command:
transfer upload start
Step 9 When prompted to confirm the current settings, answer y. This example shows the upload command output:
Mode............................................. TFTP TFTP Server IP................................... 10.10.10.4TFTP Path........................................ Config/TFTP Filename.................................... AS_4402_4_2_55_8_Config.xmlData Type........................................ Config File Encryption....................................... Disabled
***************************************************** WARNING: Config File Encryption Disabled *****************************************************
Are you sure you want to start? (y/N) y
File transfer operation completed successfully.
If the upload fails, repeat this procedure and try again.
Downloading Configuration Files
You can download configuration files using either the GUI or the CLI.
Using the GUI to Download Configuration Files
Using the controller GUI, follow these steps to download a configuration file to the controller.
Step 1 Click Commands > Download File to open the Download File to Controller page (see Figure 9-6).
9-23Cisco Wireless LAN Controller Configuration Guide
OL-17037-01

Chapter 9 Managing Controller Software and ConfigurationsTransferring Files to and from a Controller
Figure 9-6 Download File to Controller Page
Step 2 From the File Type drop-down box, choose Configuration.
Step 3 If the configuration file is encrypted, check the Configuration File Encryption check box and enter the encryption key used to decrypt the file in the Encryption Key field.
Note The key that you enter here should match the one entered during the upload process.
Step 4 From the Transfer Mode drop-down box, choose TFTP or FTP.
Step 5 In the IP Address field, enter the IP address of the TFTP or FTP server.
Step 6 If you are using a TFTP server, the default values of 10 retries and 6 seconds for the Maximum Retries and Timeout fields should work correctly without any adjustment. However, you can change these values. To do so, enter the maximum number of times that the TFTP server attempts to download the configuration file in the Maximum Retries field and the amount of time (in seconds) that the TFTP server attempts to download the configuration file in the Timeout field.
Step 7 In the File Path field, enter the directory path of the configuration file.
Step 8 In the File Name field, enter the name of the configuration file.
Step 9 If you are using an FTP server, follow these steps:
a. In the Server Login Username field, enter the username to log into the FTP server.
b. In the Server Login Password field, enter the password to log into the FTP server.
c. In the Server Port Number field, enter the port number on the FTP server through which the download occurs. The default value is 21.
Step 10 Click Download to download the file to the controller. A message appears indicating the status of the download, and the controller reboots automatically. If the download fails, repeat this procedure and try again.
9-24Cisco Wireless LAN Controller Configuration Guide
OL-17037-01

Chapter 9 Managing Controller Software and ConfigurationsTransferring Files to and from a Controller
Using the CLI to Download Configuration Files
Using the controller CLI, follow these steps to download a configuration file to the controller.
Note The controller does not support incremental configuration downloads. The configuration file contains all mandatory CLIs (all interface address CLIs, mgmtuser with read-write permission CLIs, and interface port or LAG enable or disable CLIs) required to successfully complete the download. For example, if you download only config time ntp server index server_address as part of the configuration file, the download fails. Only the CLI commands present in the configuration file are applied to the controller, and any configuration in the controller prior to the download is removed.
Step 1 To specify the transfer mode used to download the configuration file, enter this command:
transfer download mode {tftp | ftp}
Step 2 To specify the type of file to be downloaded, enter this command:
transfer download datatype config
Step 3 If the configuration file is encrypted, enter these commands:
• transfer encrypt enable
• transfer encrypt set-key key, where key is the encryption key used to decrypt the file
Note The key that you enter here should match the one entered during the upload process.
Step 4 To specify the IP address of the TFTP or FTP server, enter this command:
transfer download serverip server-ip-address
Step 5 To specify the directory path of the configuration file, enter this command:
transfer download path server-path-to-file
Step 6 To specify the name of the configuration file to be downloaded, enter this command:
transfer download filename filename
Step 7 If you are using a TFTP server, enter these commands:
• transfer download tftpMaxRetries retries
• transfer download tftpPktTimeout timeout
Note The default values of 10 retries and a 6-second timeout should work correctly without any adjustment. However, you can change these values. To do so, enter the maximum number of times that the TFTP server attempts to download the software for the retries parameter and the amount of time (in seconds) that the TFTP server attempts to download the software for the timeout parameter.
9-25Cisco Wireless LAN Controller Configuration Guide
OL-17037-01

Chapter 9 Managing Controller Software and ConfigurationsSaving Configurations
Step 8 If you are using an FTP server, enter these commands to specify the username and password used to log into the FTP server and the port number through which the download occurs:
• transfer download username username
• transfer download password password
• transfer download port port
Note The default value for the port parameter is 21.
Step 9 To view the updated settings, enter this command:
transfer download start
Step 10 When prompted to confirm the current settings and start the download process, answer y. This example shows the download command output:
Mode............................................. TFTP TFTP Server IP................................... 10.10.10.4TFTP Path........................................ Config/TFTP Filename.................................... AS_4402_4_2_55_8_Config.xmlData Type........................................ Config File Encryption....................................... Disabled
***************************************************** WARNING: Config File Encryption Disabled *****************************************************
Are you sure you want to start? (y/N) y
File transfer operation completed successfully.
If the download fails, repeat this procedure and try again.
Saving ConfigurationsControllers contain two kinds of memory: volatile RAM and NVRAM. At any time, you can save the configuration changes from active volatile RAM to non-volatile RAM (NVRAM) using one of these commands:
• save config—Saves the configuration from volatile RAM to NVRAM without resetting the controller.
• reset system—Prompts you to confirm that you want to save configuration changes before the controller reboots.
• logout—Prompts you to confirm that you want to save configuration changes before you log out.
9-26Cisco Wireless LAN Controller Configuration Guide
OL-17037-01

Chapter 9 Managing Controller Software and ConfigurationsEditing Configuration Files
Editing Configuration FilesWhen you save the controller’s configuration, the controller stores it in XML format in flash memory. Controller software release 5.2 enables you to easily read and modify the configuration file by converting it to CLI format. When you upload the configuration file to a TFTP or FTP server, the controller initiates the conversion from XML to CLI. You can then read or edit the configuration file in CLI format on the server. When you are finished, you download the file back to the controller, where it is reconverted to XML format and saved.
Follow these steps to edit the controller’s configuration file.
Step 1 To upload the configuration file to a TFTP or FTP server, perform one of the following:
• Upload the file using the controller GUI. Follow the instructions in the “Using the GUI to Upload Configuration Files” section on page 9-21.
• Upload the file using the controller CLI. Follow the instructions in the “Using the CLI to Upload Configuration Files” section on page 9-22.
Step 2 Read or edit the configuration file on the server. You can modify or delete existing CLI commands and add new CLI commands to the file.
Note To edit the configuration file, you can use either Notepad or WordPad on Windows or the VI editor on Linux.
Step 3 Save your changes to the configuration file on the server.
Step 4 To download the configuration file to the controller, perform one of the following:
• Download the file using the controller GUI. Follow the instructions in the “Using the GUI to Download Configuration Files” section on page 9-23.
• Download the file using the controller CLI. Follow the instructions in the “Using the CLI to Download Configuration Files” section on page 9-25.
The controller converts the configuration file to XML format, saves it to flash memory, and then reboots using the new configuration. CLI commands with known keywords and proper syntax are converted to XML while improper CLI commands are ignored and saved to flash memory. Any CLI commands that have invalid values are replaced with default values. To see any ignored commands or invalid configuration values, enter this command:
show invalid-config
Note You cannot execute this command after the clear config or save config command.
Step 5 If the downloaded configuration contains a large number of invalid CLI commands, you might want to upload the invalid configuration to the TFTP or FTP server for analysis. To do so, perform one of the following:
• Upload the invalid configuration using the controller GUI. Follow the instructions in the “Using the GUI to Upload Configuration Files” section on page 9-21 but choose Invalid Config from the File Type drop-down box in Step 2 and skip Step 3.
• Upload the invalid configuration using the controller CLI. Follow the instructions in the “Using the CLI to Upload Configuration Files” section on page 9-22 but enter this command in Step 2: transfer upload datatype invalid-config and skip Step 3.
9-27Cisco Wireless LAN Controller Configuration Guide
OL-17037-01

Chapter 9 Managing Controller Software and ConfigurationsClearing the Controller Configuration
Step 6 The controller does not support the uploading and downloading of port configuration CLI commands. If you want to configure the controller ports, enter these commands to do so now:
• config port linktrap {port | all} {enable | disable}—Enables or disables the up and down link traps for a specific controller port or for all ports.
• config port adminmode {port | all} {enable | disable}—Enables or disables the administrative mode for a specific controller port or for all ports.
Step 7 To save your changes, enter this command:
save config
Clearing the Controller ConfigurationFollow these steps to clear the active configuration in NVRAM.
Step 1 Enter clear config and enter y at the confirmation prompt to confirm the action.
Step 2 Enter reset system. At the confirmation prompt, enter n to reboot without saving configuration changes. When the controller reboots, the configuration wizard starts automatically.
Step 3 Follow the instructions in the “Using the Configuration Wizard” section on page 4-2 to complete the initial configuration.
Erasing the Controller ConfigurationFollow these steps to reset the controller configuration to default settings.
Step 1 Enter reset system. At the confirmation prompt, enter y to save configuration changes to NVRAM. The controller reboots.
Step 2 When you are prompted for a username, enter recover-config to restore the factory default configuration. The controller reboots and the configuration wizard starts automatically.
Step 3 Follow the instructions in the “Using the Configuration Wizard” section on page 4-2 to complete the initial configuration.
Resetting the ControllerYou can reset the controller and view the reboot process on the CLI console using one of the following two methods:
• Turn the controller off and then turn it back on.
• On the CLI, enter reset system. At the confirmation prompt, enter y to save configuration changes to NVRAM. The controller reboots.
9-28Cisco Wireless LAN Controller Configuration Guide
OL-17037-01

Chapter 9 Managing Controller Software and ConfigurationsResetting the Controller
When the controller reboots, the CLI console displays the following reboot information:
• Initializing the system.
• Verifying the hardware configuration.
• Loading microcode into memory.
• Verifying the operating system software load.
• Initializing with its stored configurations.
• Displaying the login prompt.
9-29Cisco Wireless LAN Controller Configuration Guide
OL-17037-01

Chapter 9 Managing Controller Software and ConfigurationsResetting the Controller
9-30Cisco Wireless LAN Controller Configuration Guide
OL-17037-01