making mitered boxes - · pdf file42 fine woodworking size the mitered end of each piece of...
TRANSCRIPT

40 F I N E W O O D W O R K I N G Photos, except where noted: Mark Schofield; this page: Rodney Diaz
I f a dovetailed box speaks volumes about your craftsmanship,what can a simple mitered box say? From a practical view,mitered joints require only a quick setup on the tablesaw, and
once set up, the cuts are repeatable; so a mitered box says thatyou’re frugal with your time. From an artistic view, mitered jointsare beautiful, with only long grain showing around the sides of thebox. Because mitered joints need strengthening, you have to addsplines or keys, but these can impart a distinctive and elegant fla-vor to your design. So, in the end, a mitered box also can speakwell about the level of your craft.
To achieve continuous grain on a box, resaw the parts from thickstock (see the facing page). For a four-sided box, cut carcasemiters on the tablesaw with the blade tipped to 45°. Use a mitergauge or a dedicated crosscut jig for these cuts. Don’t use a stan-dard crosscut jig for your angled cuts or you’ll end up with a gap-ing hole in the middle of the jig. Make a pair of practice cuts onscrapwood, and check the results with a combination square.
When making the cut on the second end of each side, be sureto use a stop on the jig to ensure that your cuts are made exactly tolength. If you need to make minor adjustments or clean up a rough
MakingMitered Boxes
Techniques for grain matching and achieving strong corner joints
B Y G A R Y R O G O W S K I
w

M A R C H / A P R I L 2 0 0 3 41Drawings: Michael Gellatly
sawcut, use a tuned and sharpened handplane. I use a low-angleblock plane because it cuts end grain effortlessly.
Assemble and glue up the boxesAll but the smallest of carcase miters need strengthening. Themitered joint is actually a cross between long grain and end grain,so it’s not the most optimal gluing surface. You can strengthen ajoint either before or after the box has been assembled. In eithercase, assembling a box miter requires planning. Lay out and prac-tice your clamping system before applying glue. Some finessing al-ways is required to get the pressure in exactly the right spots.
Band clamps work well if they don’t have to apply excessivepressure. Inaccurately cut joints will not pull together with bandclamps, but well-cut joints will snug right up with just one or twoband clamps. Masking tape also can provide light clamping pres-sure suitable for smaller boxes. Wrap a dry-assembled box withmasking tape across the width of each of the miter joints. Thenslice open one joint, lay out the box flat and apply glue to thejoints. Fold the box back together and retape that last joint.
Whatever kind of strengthening you employ, it is a good idea to
M A R C H / A P R I L 2 0 0 3 Resawing for continuous grain
Sides resawn from thick stock on the bandsaw will produce a boxwith four matching corners.
C D
B A
C
D
B
A
To minimize the gap in the grain caused by the miter cuts, set theblade height on the tablesaw to barely clear the top, or outside,face of the stock.
Before cutting the miters, label each side of the box so that thecorners match up.
Flipping over the resawn stock gives the outside of the box twocorners of continuous grain and two corners of book-matched grain.
42 F I N E W O O D W O R K I N G
size the mitered end of each piece of wood before assembling thebox. Wipe a thin layer of glue across the end grain and, before ithas dried hard, scrape off the excess glue. Now the porous endgrain won’t suck up the glue and weaken the joint when you’reready for final assembly.
Strengthen miters before you assemble the boxThe two simplest ways to strengthen the miter joints are to addbiscuits or through-splines before gluing up the box. Because youcut them in the length of the joint, the sides of the box still showonly long grain, and the biscuits and splines help align the jointsduring glue-up.
Biscuited miters provide unseen strength—With the miterscut and trimmed exactly to length, set the biscuit-joiner fence at45° and adjust for the proper depth of cut. Make the cuts aboutone-third in from the inside edge to use the greatest depth ofwood. If your biscuit joiner won’t make a cut this close to the
fence, attach a block of wood to the fence withdouble-sided tape (see the left photo below).Mark the center of the cut or cuts on the insideface of the stock, clamp the board securely andmake the cuts.
Through-splined miters are strong and dec-orative—The easiest method of cutting through-splines is to use the tablesaw. With the bladealready angled 45° from the miter cut, make thespline groove using a miter gauge and the sawfence. Set the blade height carefully and set thefence so that the groove is cut about two-thirdsback from the outside corner. This makes for alonger and stronger spline. If available, use a flat-tooth blade for a square-bottom groove.
Two methods of strengthening a joint before assembly
M I T E R A N DG L U E U PT H E B O X
When cutting splinedmiters on the tablesaw, setthe blade and fence tomake the spline cut in the thickest part of theworkpiece.
Cut the biscuit slot in theworkpiece one-third of theway in from the inside face.An auxiliary fence on thebiscuit joiner may be re-quired.
Reinforcing a miter joint with a concealed biscuit or a through-spline aids assembly by aligning the sides during gluing.
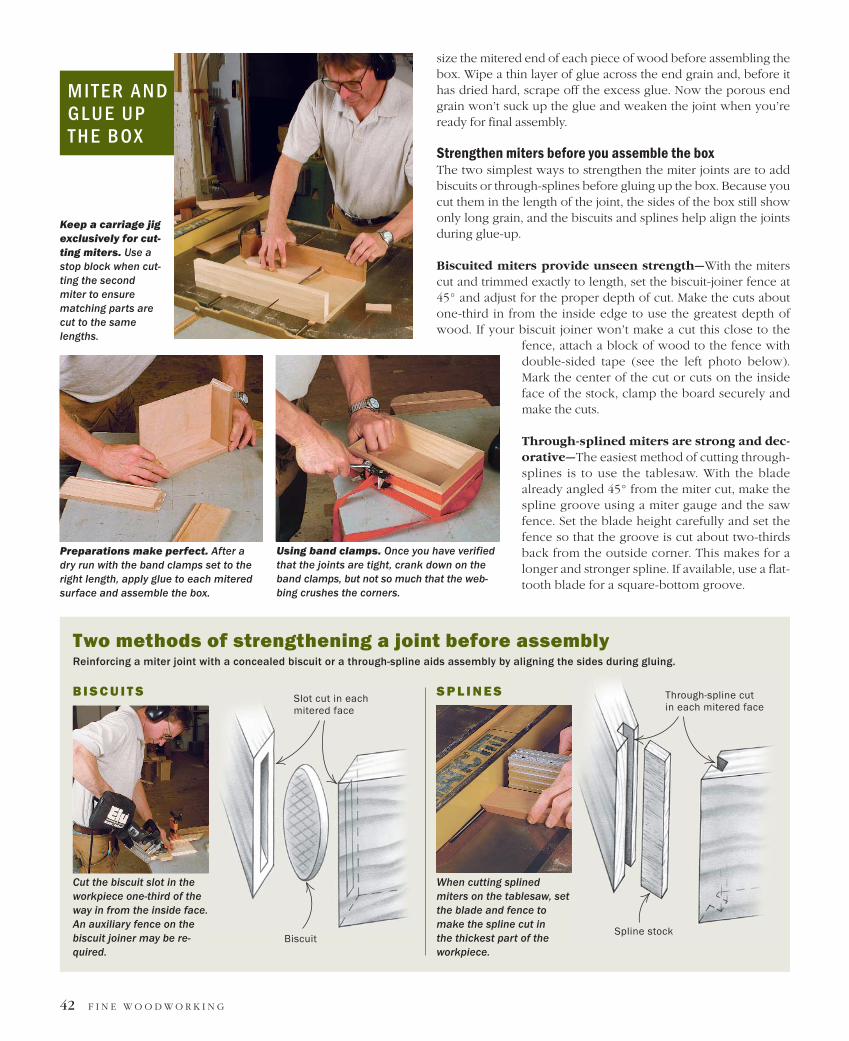
Keep a carriage jigexclusively for cut-ting miters. Use astop block when cut-ting the secondmiter to ensurematching parts arecut to the samelengths.
B I S C U I T S S P L I N E S
Using band clamps. Once you have verifiedthat the joints are tight, crank down on theband clamps, but not so much that the web-bing crushes the corners.
Preparations make perfect. After adry run with the band clamps set to theright length, apply glue to each miteredsurface and assemble the box.
Spline stockBiscuit
Slot cut in eachmitered face
Through-spline cutin each mitered face

M A R C H / A P R I L 2 0 0 3 43
For an interesting design detail, I like to make up spline stockfrom a contrasting wood. When doing so, it’s important that thegrain runs in the same direction as the box sides so that all of theparts shrink and expand in unison, but this is also the strongest orientation for the splines. Rough out the stock on the bandsaw as wide as you need it and close to thickness. Make the stocklong enough to easily hang onto, and trim it to thickness as if itwere a tenon, using a tenoning jig or holder to support the pieceas you pass it vertically by the sawblade. Then cut off a length ofspline material.
You’ll be working with some wide short-grain stock that willlikely break in your capable hands, but that won’t matter as longas the spline pieces fit snugly in the groove when you glue up.Make sure to cut the splines exactly to length, or a hair under, sothat the miters still fit together nicely. Use a block plane and abench hook to trim the splines to length or thickness. Leave thesplines a bit wider than necessary and clean them after you’re fin-ished gluing up.
Unlock different looks with keyed mitersPieces of wood inserted diagonally into the outside corner ofmiter joints are known as keys. Added after the box has been as-
Well-stuck keys. Itis important that thekeys are firmly seat-ed at the bottom ofthe groove whenthey are glued in.
Cutting keys. The carriage jig registers against the fence of the table-saw and slides on two sleds.
Don’t break thekeys. Plane awayfrom the corner ofthe box to avoidbreaking out theshort grain of thekeys.
Support blocks, 3⁄4 in. thick by 1 in.wide by 61⁄2 in. long
Box supportsare glued andbiscuitedtogether.
Front support,3⁄4 in. thick by 2 in. wide by 6 in. long
Make sure all screwsare above the highestlevel that you are likelyto raise the sawblade.
Rear support,3⁄4 in. thick by 6 in. wide by 6 in. long
Plywood sleds,3⁄4 in. thick by4 in. wide by11 in. long
For easy and precise key slots cut on thetablesaw, use this cradle jig that carries thebox at a 45° angle.
TA B L E S A W N K E Y S
For a video on cutting keys on the table-saw, go to www.finewoodworking.com.
Watch it on the web

sembled, keys can be made from wood that matches the carcaseor from a contrasting wood.
Hand-cut keyed miters—Place the box in a vise and, using yourbest backsaw, cut across the joint, making sure your sawcut depthis consistent on both sides. Use veneer stock for the key and fit thisto your sawcuts. If the veneer is too thick, pound it with a metalhammer. Don’t worry if it’s a bit loose; when the key hits the gluein the joint, it will swell up, providing a nice long-grain to long-grain joint. If you use the same wood, the keys almost disappearinto the joint and the surrounding wood.
Keyed miters on the tablesaw—There are two jigs you can useto hold the work when you cut keyed miters on the tablesaw. Forsmaller boxes, a keyed miter jig run against the tablesaw fenceworks fine. Screw a straight fence to a piece of medium-densityfiberboard (MDF) or plywood at a 45° angle. Make sure the screwsare higher than any possible cut you’ll ever make.
A more secure method for holding larger boxes is to use a cradlejig. Make this out of plywood or MDF with a right-angle support inthe center. Hold the box in the cradle and run the jig right againstthe fence to make the cut.
After the first cut has been made, rotate the box for the next cor-ner. When all four corners on the bottom are done, spin the boxand do the matching joints for the top of the box. Use a flat-toothblade for the nicest look, or clean up the bottom of the cuts with a1⁄8-in. chisel.
On the bandsaw, rough out stock for the keys, making themoversize in width but close in thickness and long enough to hangonto. Your key stock should be inserted with its grain running par-allel to the long grain of the box. Pass it by the tablesaw blade totrim it to size, using a thin push stick to hold it securely. When glu-ing in keys, use a hammer to tap down each key to the bottom ofthe slot on both sides of the corner.
Dovetails meet miters—Dovetailed keys employ the samekeyed miter jig used on the tablesaw. A cradle jig also may be used,but you likely will need a dovetail bit with an extralong shaft for
44 F I N E W O O D W O R K I N G
Use a dovetail bitto form the dovetailkey. Cut the stockhigher than neededto provide a surfaceto ride against thefence.
Two-step dovetails.Remove part of thewaste with a straightbit, then use a dove-tail bit to cut the fin-ished profile.
The right key. Check the fit of the key. If it is too tight, plane off a littlefrom the bottom of the key.
D O V E TA I L E D K E Y S
Take the topoff your boxLike the base, the lid fits
into a groove in the box
sides. After the box has
been glued together,
plan the spacing of the
keys to match where the
lid will be sawn off; then
saw it off with a table-
saw and a handsaw.
Clean up the edges with
a block plane and attach
hinges.
Auxiliary fence, 3⁄4 in. thick by 5 in. wide by 12 in. long
K E Y E D M I T E R J I G
Attach screwsabove thehighest pointof the bit.
Angle guide, 3⁄4 in. thick by2 in. wide by 10 in. long

M A R C H / A P R I L 2 0 0 3 45Photos, this page (bottom three): Michael Pekovich
this jig. First, rough out the waste with a straight bit, then set thedovetail bit to the final depth of cut and make the pass.
Mill the key stock out of a contrasting wood almost to width andtaller than required. This way, when routing the keys, there will besome wood left to run against the fence. Use the same bit to rout thedovetail slots, but set it for a slightly taller cut to make the key stock,which will allow the keys to slide more easily into the slots. Trimboth faces of the stock. If a key is just a hair too thick, plane off a
shaving from the bottom where it’s widest. Cut the keys overlongand glue them in place on the box. Clean up all your keyed miterjoints on the bandsaw first. Then, working down and away from thecorner of the box, use a block plane to smooth the keys. If you worktoward the corner, you will tear out the short grain of the keys. �
Gary Rogowski runs the Northwest Woodworking Studio in Portland, Ore.,and is a contributing editor.
Hand-cut key slots. Use a backsaw to cut diagonally into the corner.Make sure the depth of cut is even on both sides.
Tenderized veneer.If the veneer splineis too thick to slideinto the sawkerf, a few hammer blows will persuadeit to fit.
Thin but strong. Despite its flexibility,the long-grain to long-grain glue bondstrengthens the whole joint.
1. Through-cut. Set thetablesaw blade slightlyhigher than the thick-ness of the sides to cutthrough the two longsides.
2. Partial cut. Lower theblade to leave 1⁄16 in. ofwood on the short sides.This alleviates clampingor supporting the lid with shims during the final cut.
3. Final cut. Use a hand-saw to cut through the twoshort sides. Clean up theedges of the box and thelid with a block plane.
H A N D - C U T K E Y S
Blade cutsthrough thelong sides.
Boxtop
Box side Box side
Boxtop
Leave a bit ofstock on theshort sides.