maker: very low-cost experiments via 3-d printing and
TRANSCRIPT

Paper ID #11708
MAKER: Very Low Cost Experiments via 3-D Printing and Vacuum Form-ing
Prof. Robert F. Richards, Washington State University
Dr. Robert Richards received the PhD in Engineering from the University of California, Irvine. Hethen worked in the Building and Fire Research Laboratory at NIST as a Post-Doctoral Researcher beforejoining the faculty of the School of Mechanical and Materials Engineering at Washington State University.His research is in thermodynamics and heat and mass transfer. Over the last five years he has becomeinvolved in developing and disseminating research based learning methods. He was a participant in theNSF Virtual Communities of Practice (VCP) program in Spring, 2013, learning research based methodsto instruct thermodynamics. More recently he introduced the concept of fabricating very low cost thermalfluid experiments using 3-D printing and vacuum forming at the National Academy of Engineering’sFrontiers of Engineering Education in October, 2013. He is presently a co PI on the NSF IUSE: AffordableDesktop Learning Modules to Facilitate Transformation in Undergraduate Engineering Classes, HighSchool Recruitment and Retention.
Mr. Fanhe Shamus MengProf. Bernard J. Van Wie, Washington State University
Prof. Bernard J. Van Wie did his B.S., M.S. and Ph.D., and postdoctoral work at the University ofOklahoma where he also taught as a visiting lecturer. He has been on the Washington State Universityfaculty for 32 years and for the past 18 years has focused on innovative pedagogy research and technicalresearch in biotechnology. His 2007-2008 Fulbright exchange to Nigeria set the stage for him to receivethe Marian Smith Award given annually to the most innovative teacher at Washington State University.
Mr. Franco Louis Spadoni, Washington State UniversityMr. Angelo Laury Ivory
c©American Society for Engineering Education, 2015
Page 26.1121.1

MAKER: Very Low Cost Experiments via 3-D Printing and
Vacuum Forming
Abstract
We demonstrate a new approach to fabricate inexpensive fluid and thermal experiments
that engineering students can manipulate to master concepts in thermodynamics, fluid
mechanics and heat transfer. The approach is based on design for manufacture that
leverages flexible manufacturing tools such as CAD, 3-D printers and vacuum forming
machines to produce an array of simple and easy to use experimental hardware. Several
sets of experimental hardware have been developed: Venturi Nozzle experiments
conceived to exercise students’ understanding of the Bernoulli equation and Pipe Flow
experiments designed to help students’ master principles of head loss. The experimental
devices to be demonstrated here have been fabricated using a four step approach. First,
commercial CAD software is used to define the geometry of an experiment. Second, a
rapid prototyping machine is used to 3-D print a plastic mold of the design. Third, a
vacuum former is used to form thin plastic sheets around the 3-printed mold. Finally, the
vacuum formed sheets are assembled together to produce multiple copies of the
experiment. The result is an approach that allows the development of experiments that are
robust and inexpensive enough to distribute individual copies to small groups of students
with the cost to each student in the class comparable to the price of a textbook. This
approach opens up the possibility of a wide variety of experimental activities for active
learning that can be implemented in classrooms, for home use, and for distance
education.
Introduction
Unfortunately, much student learning in classrooms revolves around passively listening
to traditional lectures followed by solving textbook problems. While lectures may
transmit facts and solving textbook problems encourages the development of procedural
knowledge, neither approach is effective in developing a deeper conceptual
understanding of engineering topics. The present work aims to overcome these
deficiencies in common classroom techniques by providing students with simple,
inexpensive experimental devices, which students can manipulate in the classroom, to
stimulate active learning of important engineering concepts.
Active learning, especially experiential learning, has been shown by many educational
researchers to result in superior learning outcomes than traditional delivery methods like
lecturing.1 As a result, educators have developed various active learning activities based
on experiments that students can manipulate and learn firsthand for themselves. Several
approaches have been taken, with some researchers focusing on take-home experiments
that students can undertake as homework, others developing experiments that can be
accessed remotely for distance education, and a third group designing experiments for in-
class use.
Page 26.1121.2

In an example of this first group, T. Scott reported on two fluid mechanics experiments
designed to be completed as homework assignments by students in a fluid mechanics
course.2 Students were asked to assemble and use two simple experimental devices. First,
the students used a hydrometer to measure and report the specific gravity of common
household fluids. Second the students assembled a water manometer from vinyl tubing
and used it to measure the differential pressure across the side window of a moving car.
In each case the cost of the experimental apparatus was minimal, while the experience of
doing the experiments appeared to enhance the students’ understanding of the basic
concepts involved. Cimbala et al. took a similar approach and developed a take-home
experiment in which students characterized the performance of a small aquarium pump,
and compared their results with the manufacturer’s pump curve.3 The entire experimental
apparatus cost less than $20 for each student, but resulted in a significant gain in learning.
A number of education researchers have developed experiments that can be accessed
remotely, so that students can manipulate engineering hardware via the internet. Ogot et
al. reported on a jet thrust laboratory that students could access on-line, and perform
remotely. In this case, the experimental apparatus was assembled from high quality
components and housed and maintained in a traditional laboratory setting.4 Cost savings
came not from reducing the price of hardware, but from making expensive hardware
more freely available. In addition, interaction with the experiment came not from hands-
on manipulation of hardware, but via the software interface, Lab-View, and video flow
visualization. However, a comparison of students performing the lab hands-on and
students performing it remotely indicated statistically similar learning outcomes. Ellis et
al. documented a similar remotely accessed experiment that allowed student to operate
and make measurements on a Venturi nozzle.5 In this case an existing lab was retrofitted
with internet accessible controls and data acquisition to enable students at branch
campuses to remotely perform the experiment. Once again, an assessment of student
learning comparing students in the lab and students using remote access indicated similar
outcomes.
Finally, significant effort has been devoted to developing experiments suitable for in-
class use. In this approach, the goal has been to use student-centered, hands-on
experiments during regular class time to replace or supplement instructor-centered
pedagogies. Early work by Van Wie et al. involved having student teams put together
experiments to learn fluid flow and heat transfer concepts.6 Visco built on this concept,
with projects exemplifying engineering concepts built, and then modified and rebuilt by
subsequent student teams over the course of several years. In Visco’s model an
important goal the student-built experiments was compactness, so that each could fit
easily on a classroom desktop.7 Minnerick developed simple and inexpensive heat
transfer experiments that students could easily manipulate in the classroom.8
Van Wie et al. have worked to develop a system of compact experiments called Desktop
Learning Modules (DLM’s) that can be brought into the classroom. The DLM system is
based on a series of cartridges that can plug into a base unit with liquid reservoir, pump,
and data acquisition. Each cartridge holds the hardware for a particular thermofluid
experiment. Cartridges available include heat exchanger, pipe flow, fluidized bed, and
Page 26.1121.3

venturi nozzle experiments among others. Assessment of student learning using the
DLM system has shown significant gains for students using the active learning
approach.9,10
As a consequence of this success, a commercial version of the Van Wie
group DLM’s has been introduced by educational equipment supplier Armfield Ltd.
Active learning using thermofluid experiments has repeatedly been shown to enhance
student learning, whether used outside of class for take-home assignments, for students in
remote locations in distance learning environments, or brought into the classroom to
supplement or replace lecture-based pedagogies. In all of these applications, a major
consideration is the cost of the hardware used. For example, although the DLM’s
developed by the Van Wie group have demonstrated efficacy in enhancing learning
outcomes for students, a major factor impeding their widespread use is their cost.
Reducing that cost would make them far more attractive. In general, for active learning
strategies to be most successful there must be enough experimental stations for each
student to manipulate the hardware to be actively engaged. To make this a realistic
option, the cost of each station must be very low. Recent work has indicated a pathway
that might significantly lower the cost of these kinds of Modules. That work has shown
how very low cost thermofluid experimental hardware can be fabricated by leveraging
new capabilities in CAD, 3-D printing and vacuum forming.11, 12
The present work describes recent progress based on this approach, illustrating the design
and fabrication of experimental hardware that is inexpensive, simple and robust enough
to allow student groups as small as two or three to have their own experimental setup. By
focusing on developing means to manufacture very low-cost devices, we hope to
demonstrate a path to provide experimental hardware for active learning experiences that
will meet a broad range of engineering curricular needs.
Approach
The approach developed here is based on design for manufacture and leveraging new
manufacturing modalities such as rapid prototyping and vacuum forming in order to
produce an array of simple, inexpensive, and easy to use experimental hardware. We
believe that end product cost reductions can be achieved, by designing the hardware to
take advantage of specific strengths of new manufacturing routes, use of inexpensive
materials, and simplicity of concept.
Leveraging New Manufacturing Techniques
Recently developed manufacturing techniques are opening up new ways to fabricate
devices that can help students learn engineering concepts in ways that are more
motivating and that lead to deeper understanding. Leveraging these new manufacturing
approaches can enable educators to design and fabricate experimental hardware for
student use in ways that are dramatically less expensive and more flexible than anything
Page 26.1121.4

Figure 1 Design and fabrication strategy.
seen up to now. These new manufacturing techniques are expected to result in products
so inexpensive to produce, that there will be enough experimental hardware for every
student in a course to explore.
The key to this approach is to combine two complementary ideas. First, we make design
for manufacture a primary consideration, from the beginning of the development cycle
for each experiment. Second, we take advantage of new fabrication tools to speed up,
simplify and reduce the cost of manufacture.
In design for manufacture, the conception of each piece of experimental hardware to be
produced is considered from the perspective of reducing the number of parts to the
absolute minimum, designing those parts for easy assembly, and fabricating the parts
using simple, fast, and flexible processes requiring little or no skilled labor, while using
very low-cost, readily sourced materials. Taking advantage of new fabrication tools aids
greatly in realizing products conceived through this design philosophy. In particular, we
rely heavily on three current manufacturing processes: Computer Aided Design (CAD),
3-D printing and vacuum forming. Figure 1 outlines this design and fabrication strategy.
This approach, starting from defining hardware geometries using CAD, then employing
3-D printing to realize those hardware geometries in plastic molds, through producing
complete devices using vacuum forming, enables very fast design, and fabrication of
hardware. The time to realize a proposed experimental device from conception to
finished prototype can be as low as one week. As a result, we can run through multiple
design, build, and test iterations on proposed experiments over the course of semester.
Quick iteration of the design cycle in turn, greatly aids in the task of developing
experiments that students find appealing and easy to work with.
Design Experiment Using CAD
3-D Print Mold
Vacuum Form Parts
Assemble
Experiment
Test, Evaluate, & Redesign
Page 26.1121.5

One particularly appealing advantage of the proposed fabrication route is that it can take
advantage of the tight integration between widely used CAD software and 3-D printers.
That is, it enables hardware design via CAD, simplifying the specification of the precise
geometries necessary for the working engineering devices desired. It also means that
numerical analysis software (CFD or finite element structural software) can be integrated
into the design of experiments to predict and optimize device behavior. It allows multiple
designers to explore alternate design paths simultaneously, and significantly speed up the
design turn-around times. The use of CAD software with 3-D printed prototypes means
that design iterations are expected to take hours or days instead of weeks or months as for
traditionally machined parts. Likewise, costs for prototype designs are expected to be
much less than for machined parts, with single iterations of an experiment costing only a
few dollars for materials and processing.
A significant advantage of producing educational hardware using 3-D printers driven by
CAD software is that many undergraduate mechanical engineering students now learn to
use these commercial tools in introductory engineering courses (freshman and sophomore
level design classes). As a result we are able to include undergraduate students in the
design and fabrication of hardware. Thus, students using the experiments are able to see
and understand exactly how that hardware is designed and manufactured. In addition, it
should soon be possible for us to allow students using the experiments to propose their
own modifications of the hardware. Quick turn-around on fabrication via 3-D printing
and vacuum forming makes the option of student or instructor driven modification of
experiments an appealing possibility for future work.
Design of Experiments
In order to demonstrate the present approach of the design and fabrication of very low
cost experimental devices, we present two recently developed experiments: (1) a Venturi
nozzle, (2) a pipe flow/head loss experiment. A third experiment: (3) a concentric pipe
heat exchanger is currently in the design phase.
The venturi nozzle experiment is designed to demonstrate the way energy is transferred
between static pressure and fluid velocity (or kinetic energy), as a fluid passes through a
converging nozzle (conservation of mechanical energy). The pipe flow/head loss
experiment illustrates how static pressure falls as a fluid moves through a pipe
(conservation of energy), while fluid velocity remains constant (conservation of mass).
The concentric tube heat exchanger should enable students to explore how fluid-flow
rates and flow geometry, affect heat transfer rates and temperatures changes in two fluids
co-flowing or counter- flowing fluids (conservation of energy & heat transfer).
For these experiments to be effective, the experimental hardware must meet several
criteria. (1) The experimental hardware must be visually appealing, simple to operate and
hard to break. (2) Students should be able to easily control fluid flow rates in the
experiments. (3) Measurement techniques to determine fluid flow rates, pressures, and
temperatures must be precise enough to minimize experimental uncertainty, while being
Page 26.1121.6
simple and inexpensive to implement. Measurement techniques that are easily
understandable and that appeal to fundamental physical principles are the best.
The first requirement, hardware that is visually appealing, simple to operate and hard to
break, is at least partially fulfilled through the choice of thin sheets of transparent PETG
for the primary fabrication material. This plastic, most commonly seen in blister
packaging of retail products, is inexpensive, tough and attractive. Upon vacuum forming,
PETG retains a crystal-clear, smooth finish and is quite robust. A vacuum formed PETG
Venturi nozzle can be dropped to the ground from chest height with no loss of function.
The second requirement, easy control of fluid flow rates, is fulfilled through the choice of
small battery powered air and water pumps to move fluids. For safety and simplicity,
only air and water are used as fluids in the experiments described here. As a result,
battery powered water pumps designed for small water fountains and air pumps intended
to blow up inflatable mattresses and water toys are sufficient for the present set of
experiments. Such air and water pumps are mass marketed and can be readily purchased
for very low cost. For example, we were able to purchase miniature water pumps that
can produce flows of 2 L/min with a head of 2 m (9.8 kPa) while being powered by
rechargeable D-cell batteries for 12 dollars. Likewise, we found air pumps that can
produce flows of 1L/min, powered by D-cells for 24 dollars. The use of these
inexpensive, battery-powered pumps allows each experimental set-up to be completely
portable, while being very safe and simple to operate.
Water flow loops are assembled from flexible, vinyl tubing with flow control by cheap,
in-line ball valves. A plastic storage box is used both as a water reservoir and a base for
the experiment (either the vacuum-formed PETG Venturi Nozzle or the Pipe Flow/Head
Loss hardware). Assembling a water flow loop requires only connecting the water pump,
ball valve and vacuum-formed PETG experiment together, filling the reservoir with water,
and then dropping four D-cell batteries into the pump’s battery box. Water flow rate is
varied by adjusting the plastic ball valve.
Experiments using air as the working fluid are even simpler, since leaks are not an issue
and a closed fluid loop is not required. Vacuum-formed experiments are designed to
simply press fit up against the battery powered air pump. Air flow rate through the
experiments is varied by restricting air flow into the pump via a set of variously sized
plastic nozzles.
The third requirement is for simple, inexpensive measurement techniques for students to
determine fluid flow rates, pressures and temperatures. These measurement techniques
must also be sufficiently precise and repeatable to minimize experimental uncertainty.
There exists a real danger that poorly designed experiments will actually hinder student
learning. Such an outcome is possible if large experimental uncertainties or common
measurement blunders result in students obtaining results that actually contradict the
physical principles we are hoping that they will learn. Such outcomes increase student
misconceptions, and undermine confidence in the concepts we hope to reinforce with
these low-cost experiments. As a result, designing measurement techniques that are
Page 26.1121.7
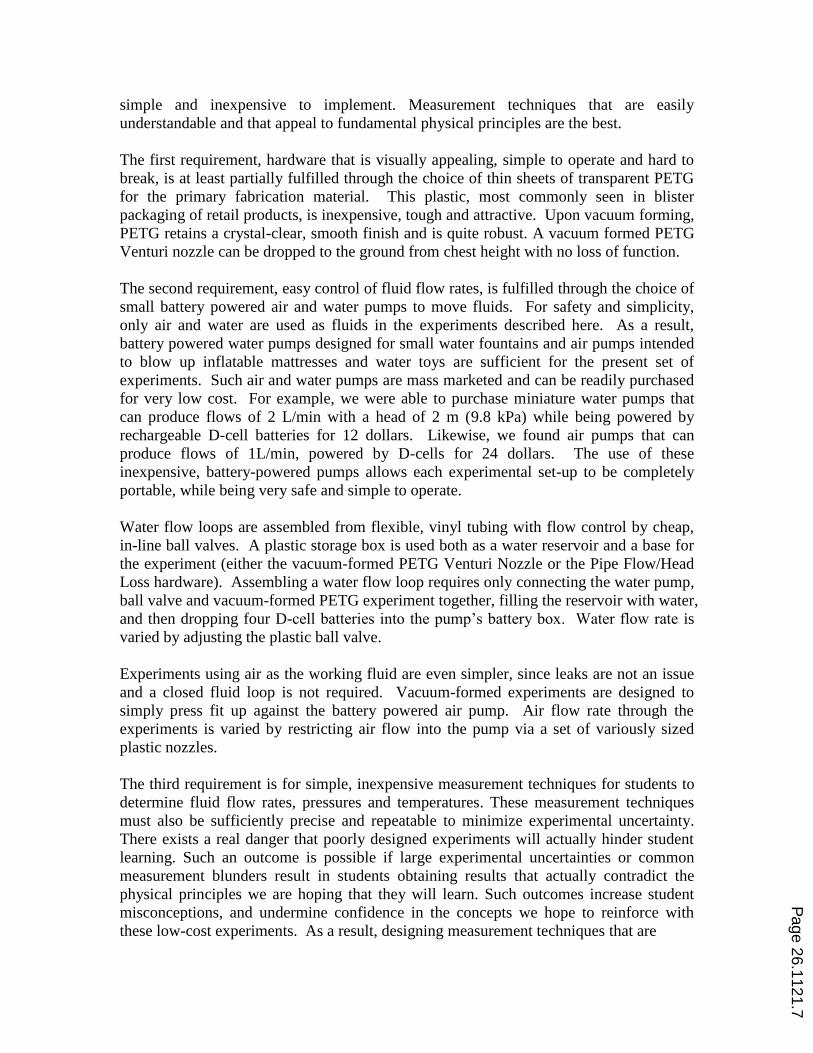
Figure 2. Venturi nozzle (a) CAD model dimensions, (b) CAD model rendering.
accurate, easy to use and easy to understand is of crucial importance. Measurement
techniques must be robust, simple to employ, as intuitive as possible to interpret, with
relatively low uncertainty. If at all possible, students should be able to easily grasp the
physical concepts underlying the measurement techniques.
To measure the flow rates of liquid, e.g. water, we have chosen to use a positive
displacement method: a “bucket and stopwatch” technique. Water flowing out of the
outlet of each experiment is caught in a 500 mL measuring cup. The time to fill the 500
mL is measured on a stopwatch. Unfortunately, we could devise no simple positive
displacement method to measure the flow rates of gases, e.g. air. As a result, we
purchased inexpensive turbine anemometers, designed and marketed to measure wind
speeds. We found rotary vane anemometers with a precision of 0.1 m/s for a cost of 30
dollars. However, obtaining accurate air velocity measurements with these rotary vane
anemometers requires a tight fit between the anemometer turbine shroud and the
experiment’s outlet, and a careful accounting of cross-sectional flow area through the
anemometer.
To measure pressure in all experiments, liquid (water) manometers were molded into the
flow hardware. In this way, the pressure drop along the pipe flow experiment and the
pressure drop and recovery through the Venturi nozzle are easily visualized as water
heights in liquid columns. Thus, fluid heights give a visual indicator proportional to
pressure. This approach results in two significant pedagogical advantages. First, the
height of a liquid column gives an easily interpreted visual cue as to the pressures in the
fluid. Second, calculating pressure from fluid height can be done by students from first
principles giving students an easily-understood, measure of pressure.
Manufacture of Experiments
Several initial prototype experiments have been manufactured in our labs and
implemented in undergraduate engineering classes. Two Venturi Nozzle experiments,
Page 26.1121.8

Figure 3. ABS plastic printout of the Venturi Figure 4. PETG sheet upon being
nozzle as taken from the 3-D printer. removed from the vacuum former.
one designed to use air, and one designed to use water as the working fluid can be used to
illustrate the proposed approach for the fabrication of the low-cost experiments.
The experimental hardware was designed using SolidWorks™ CAD software. Figure 2
(a) and (b) illustrates the CAD model developed for the Venturi nozzle experiment.
Figure 2 (a) gives the dimensions of the model, while Fig. 2 (b) shows a rendering of the
CAD model. The CAD models were exported to a Stratasys Uprint SE 3-D printer, to
produce three dimensional representations of the experimental hardware geometries in
ABS plastic. Two sets of molds, mirror images of each other, were required for each set
of experimental hardware produced. An ABS plastic printout of the Venturi nozzle with
manometer pressure taps taken directly from the 3-D printer is shown in Fig. 3. These 3-
D printouts were then used as molds for vacuum forming. Vacuum forming was
accomplished with an EZFORM LV 1827 using 0.20” thick sheets of transparent PETG.
Figure 4 illustrates the PETG sheet as it appeared upon being removed from the vacuum
forming machine. Each experimental device was then assembled by gluing together the
two mirror-image halves vacuum-formed in PETG. This was done by first cutting excess
plastic away from the PETG sheets, and then using Weld On 3 Acrylic cement to glue the
two mirror image sheets together. The assembled Venturi nozzle is shown in Fig. 5.
Note that the Venturi nozzle includes three manometers integrated into the nozzle entry,
throat and exit for pressure measurements.
All that is required to complete the experimental hardware for the Venturi nozzle shown
in Fig. 5 is to add a water flow loop. Figure 6 illustrates how this is done. In Fig. 6 a
miniature water pump, along with two plastic ball valves used to control water flow rates,
are connected to the PETG Venturi nozzle with flexible vinyl tubing. The water pump is
powered by D-cells inserted into the battery clip connected to the pump. To run the
experiment, the plastic Venturi nozzle is attached to a plastic tub with bolts, the tub is
filled with water, and the water pump dropped into the water. Figure 7 shows the fully
assembled experiment running.
Page 26.1121.9

Figure 5. Assembled Venturi Figure 6. Venturi nozzle with flow loop hardware.
Nozzle.
A similar Venturi nozzle experiment using air as the working fluid was manufactured in
much the same way. Figure 8 shows this Venturi nozzle in operation. In this case an air
pump is used to blow air through the nozzle. Students measure the differential pressure
across the nozzle with a water manometer and the velocity of the air through the Venturi
with a rotary vane anemometer.
A quick cost accounting of the manufactured hardware is shown in Table 1. The material
cost for one PETG Venturi nozzle was approximately $6 (including the cost of the 3-D
Table 1 Cost Breakdown of the Water and Air Venturi Nozzles
Water Venturi Nozzle Air Venturi Nozzle
3-D Printed Mold (ABS) $25
$1 each - used 25 X
$25
$1 each - used 25 X
Plastic Sheet (PETG) $5 $5
Flow Circuit Hardware
Pump (Air or Water)
Battery Box
Valves
Total
$12
$5
2 X $2 = $4
$20
$24
$5
-
$25
Batteries
(Rechargeable D Cells)
6 X $10 = $60
$0.6 each – recharged 100X
4 X $10 = $40
$0.4 each – recharged 100X
Plastic Carrying Box $5 $5
Anemometer - $28
Measuring Cups (Metric) $4 -
Cost per Experiment
(Assuming 25 Set ups)
$37 $69
Page 26.1121.10

Figure 7. Water Venturi nozzle experiment. Figure 8. Air Venturi Nozzle experiment.
printed mold and assuming 25 nozzles fabricated with one mold). The water pump cost
$12. The battery box was $5. Each ball valve cost $2 The vinyl tubing was
under $1. The plastic box used to hold all parts was $5. Excluding the cost of the 3-D
printer, vacuum former and labor, then the entire water Venturi nozzle experiment cost
$37 to assemble. The cost of the Pipe/Flow Head Loss experiment was similar. The air
Venturi nozzle experiment was more expensive. The PETG Venturi nozzle material cost
was about $5. The air pump was more expensive at $24.00. The most expensive
component, the rotary vane anemometers cost $28 each. As a result the air Venturi nozzle
experiment cost $69 to assemble (again excluding 3-D printer, vacuum former and labor).
Results
The Venturi nozzle experiment and a Pipe Flow/Head Loss experiment were
implemented as in-classroom active learning experiences in two junior-level engineering
classes: a mechanical engineering fluid mechanics course, and a chemical engineering
fluid mechanics and heat transfer course. The ME fluids class served 75 students, while
the ChE fluids and heat transfer class served 50 students. In both classes sufficient
numbers of experimental set-ups were manufactured to allow groups of three students to
have their own experiment. To this end, twenty air Venturi, twenty-five water Venturi,
and twenty-five Pipe Flow/Head Loss experiments were manufactured. In order to
minimize costs, the same flow loops (including water pumps with battery packs, ball
valves and vinyl tubing) were used for the water Venturi and Pipe Flow/Head Loss
experiments. The air Venturi utilized a separate set of air pumps.
An initial assessment of the experimental uncertainty expected for both the Venturi
nozzle and Pipe Flow/Head Loss experiments was conducted. Among expected errors
were errors attributable to dimensional variation caused by manufacturing tolerances, and
errors attributable to fluid flow perturbations caused by flow loop entrance effects and
pipe bends. The effect of dimensional variation due to manufacturing tolerances would
show up as random error when testing multiple devices, but bias error when testing a
Page 26.1121.11

Flow Rate (mL/s)
0 5 10 15 20 25 30
Wa
ter
He
ad
(cm
H2
O)
0
2
4
6
8
10
Flow Rate (mL/s)
0 5 10 15 20
He
ad
Lo
ss (
cm
H2
O)
0
1
2
3
4
5
6
Predicted
Measured
Figure 9. Measured and predicted performance of low cost PETG experiments
(a) Pressure change between inlet and throat vs flow rate for seven Venturi nozzles, and
(b) Head loss vs flow rate for one Pipe Flow/Head Loss experiment.
single device. The effect of flow perturbations due to device geometry would show up as
a bias error. Both types of errors were observed when manufactured hardware was tested.
Figure 9 shows experimental results for both Venturi and Pipe Flow/Head Loss
experimental hardware. Figure 9 (a) shows the results of tests run on seven PETG
Venturi nozzles. On the figure, symbols indicate the pressure drop (cm H2O) measured
between the entrance and throat is plotted against the flow rate (mL/s) for each nozzle.
The pressure drop predicted by Bernoulli’s equation is shown by a solid line. The random
errors in the measurements are seen to fall within a band of 20%.
Figure 9 (b) shows the results of tests run on a PETG Pipe Flow/Head Loss experiments.
On this figure symbols indicate the pressure drop (cm H2O) measured along twenty
centimeters of plastic pipe versus the flow rate (mL/s) through the pipe. The pressure
drop predicted by the Moody Diagram is shown by a solid line. In this case, the shift
from laminar to turbulent flow is clearly visible around a flow rate of 10 mL/s which
corresponds to a Reynolds number of ReD ~ 3000. The laminar to turbulent transition is
apparent both in the measured (symbols) and the predicted (solid line) pressure drop
measurements. However, a bias error of about + 5 mm H2O can be seen in the pressure
drops measured for the laminar regime. The measured and predicted pressure drops are
in excellent agreement for the turbulent regime data. The most likely explanation for this
bias error is a perturbation of the flow profile caused by the 180o bend some 4 cm
upstream of the first pressure measurement. The presence of the error in the laminar data
but not in the turbulent data is attributed to the much faster recovery of the turbulent flow
profile than the laminar flow profile. An effort to diagnose and correct this problem in
the Pipe Flow/Head Loss hardware is underway.
Conclusions
A new approach to fabricate inexpensive fluid and thermal experiments has been
demonstrated. The approach is based on a design for manufacture philosophy that
leverages flexible manufacturing tools to produce simple experimental hardware. The
Page 26.1121.12

experimental devices were fabricated using a four step approach. First, commercial CAD
software was used to define the geometry of an experiment. Second, a rapid prototyping
machine was used to 3-D print a plastic mold of the design. Third, a vacuum former was
used to form thin plastic sheets around the 3-printed mold. Finally, the vacuum formed
sheets were assembled together to produce multiple copies of the experiment.
Two Venturi Nozzle experiments and a Pipe Flow/Head Loss experiment were
developed. Sufficient copies of the hardware were manufactured to implement these
experiments in junior-level mechanical engineering and chemical engineering
classrooms. The cost per experimental set-up ranged from $29 dollars for the Venturi
nozzle and Pipe Flow experiments using water as the working fluid, to $53 dollars for the
Venturi nozzle experiment using air as the working fluid. Characterization of the
experiments indicates low random error due to manufacturing tolerances. A bias error
was found in the Pipe Flow Head Loss experiment. This bias error is believed to be most
likely due to an upstream bend in the flow path.
The fabrication approach described here appears to enable the development of
experiments that are robust and inexpensive enough to distribute individual copies to
small groups of students with the cost to each student in the class comparable to the price
of a textbook. This approach opens up the possibility of a wide variety of experimental
activities for active learning that can be implemented in classrooms, for home use, and
for distance education. Future work will involve bringing students and faculty using the
experiments into the design and fabrication loop to enable user-driven modification of the
hardware.
Acknowledgement
We gratefully acknowledge support from NSF through grant numbers DUE 1432674 and
DUE 1023121 and the Norcliffe Foundation for support of this work.
Bibliography
1. Prince, M.,Does active learning work? A review of the research, J. Eng. Ed., vol. 93, (3), pp. 223-
231, 2004.
2. Scott, T., “Two take home experiments in fluid mechanics,” Proc. ASEE, St. Louis, MO. pp.
6451-6458, 2000.
3. Cimbala, J., Pauley, L., Zappe, S., Hsieh, M.F., “Experiential learning in a fluid flow class via
take-home experiments,” Proc. ASEE, Chicago, IL. Paper No. 2006-1357, 2006.
4. Ogot, M., Elliott, G., Glumac, N., “Hands-on laboratory experience via remote control: Jet thrust
laboratory,” Proc. ASEE, Montreal, Quebec, pp.10357-10374, 2002.
5. Ellis, G., Richards, R., Richards, C., “A remote access laboratory for fluids education in
mechanical engineering,” iCEER, Hamilton, Quebec, 2014.
6. Van Wie, B.J., Poshusta, J.C., Greenlee, R.D., Brereton , R.A., “Fun ways to learn fluid mechanics
and heat transfer,” Chemical Engineering Education, 1994. 28: p. 188-192.
7. Visco, D.P. “Student Designed Desktop Modules in A Thermodynamics Course,” ASEE Ann.
Conf. Exp., 2011. Vancouver, BC.
Page 26.1121.13

8. Minerick, A., “A Desktop Experiment Module: Heat Transfer,” ASEE Ann. Conf. and Exp., 2009.
Austin, TX.
9. Abdul, B., Van Wie, B.J., Babauta, J.T., Golter, P.B., Brown, G.R,. Bako, R.P., Ahmed, A.S.,
Shide, E.G., Anafi, F.O., Olaofe, O.O. ,“Addressing Student Learning Barriers in Developing
Nations with a Novel Hands-on Active Pedagogy and Miniaturized Industrial Process Equipment:
The Case of Nigeria,” International Journal of Engineering Education, 2011. 27(1): p. 1-19.
10. Van Wie, B., Thiessen D., Compere, M., Toro, X. , Garrett, B., Adam, J., Brown,S., Easley, A.,
Li, X., Colpan, M., Gray, K., Reynolds, S., Golter, P., Adesope, O., “Multi-disciplinary hands-on
desktop learning modules and modern pedagogies,” Proc. ASEE, San Antonio, TX, Paper No.
AC2012-5271, 2012.
11. Richards, R.F., Low-Cost, Hands-On Thermal and Fluid Experiments, Frontiers of Eng. Ed. Symp.
Nat. Acad. Eng., 2013., Irvine, CA
12. Meng, F, Spadoni, F, Ivory, A., Richards, R., Very Low Cost Thermofluid Experiments via
Vacuum Formed Plastic Hardware for Active Learning in the Classroom, Proc. iCEER2014,
Hamilton, ON
Page 26.1121.14