make visual road inventory’s from smartphone data - … user guide - road... · make visual road...
TRANSCRIPT

User guide, Road Inventory App (V 0.2.8) and Inventory from video/photos – Jan 2018
~ 1 ~
Make visual road inventory’s from smartphone data
The Road Inventory App for android smartphones registers ocular inputs in 5 classification levels
from a library of inventory parameters. Data is collected from windshield while travelling and saved
every second with GPS-data. The library contains over 100 parameters ranging from different
conditions for paved and unpaved roads but also road side features (as drainages and guard rails).
The use guide also describes how to make inventories from photos – or video collected by the
Roadroid V2Pro app. Inventories from both the app and video is imported to the same web system.
View a separate guide for the Road Event Manager, where you register condition of static road
furniture’s (as culverts, road lights etc) and damages as potholes, washouts etc.

User guide, Road Inventory App (V 0.2.8) and Inventory from video/photos – Jan 2018
~ 2 ~
Benefits of the road inventory app:
- Saves time and increase safety! Don’t stop, locate and note – make registrations on the fly.
- Saves more time at office! Upload data and it´s at your desktop. No hand notes interpretation.
- Detailed - the app saves condition and location every second (every 10 meter in 36 km/h).
- Powerful and immediate visualization on maps - view collected layers in the web tool.
- Export as .txt files in 20-200 meter segments for direct import to assets management systems.
The Road inventory app is easy to use and portable - bring anywhere and run on battery.
Benefits of road inventory from photos/video:
- Photos or video with GPS data can be captured with the Roadroid apps for roughness IRI.
- So you get both objective road condition IRI – and records for road inventory’s.
- No need to travel to site to view or rate the conditions; it can be done from an office anywhere.
Photos needs a good GSM/4G connection to upload. Videos are more demanding and need a good stable WiFi.

User guide, Road Inventory App (V 0.2.8) and Inventory from video/photos – Jan 2018
~ 3 ~
Introduction Use an android smartphone/tablet with OS greater than 4.x. Download the installation file from
http://www.roadroid.com/home/app.
NOTE: You need to email us your device IMEI-number or MAC-address to get your device registered
and be able to upload data. We also need to register a user login to the Road Data Management
System at www.roadroid.com to access your data.
This user guide requires basic knowledge of Android phones and operating system. Please refer to your phone’s user guide or tutorials if you are unsure of Android operating system. Please also look for information at http://www.roadroid.com/Home/About Please also check out our updates at: - Twitter: www.twitter.com/roadroid - LinkedIn: https://www.linkedin.com/company/3737990

User guide, Road Inventory App (V 0.2.8) and Inventory from video/photos – Jan 2018
~ 4 ~
1 Using the Roadroid Inventory app Before use you need to set your email address under menu > settings > User Equipment ID.
1.1 Start and view parameters
When started, long press one of the 5 user configurable buttons (the long yellow ones) and select an
inventory category (0-9). If you scroll down in the inventory category list you can reset the buttons if
you earlier have assigned an inventory parameter to a specific button.
User guide, Road Inventory App (V 0.2.8) and Inventory from video/photos – Jan 2018
~ 5 ~
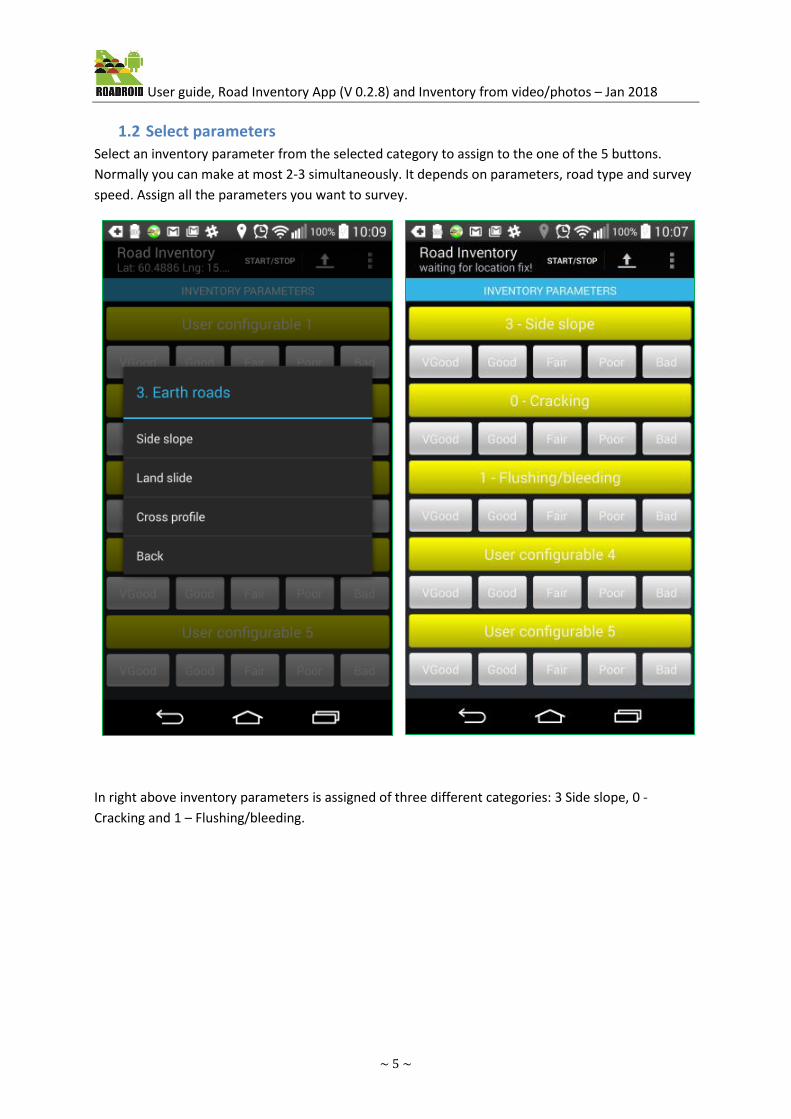
1.2 Select parameters
Select an inventory parameter from the selected category to assign to the one of the 5 buttons.
Normally you can make at most 2-3 simultaneously. It depends on parameters, road type and survey
speed. Assign all the parameters you want to survey.
In right above inventory parameters is assigned of three different categories: 3 Side slope, 0 -
Cracking and 1 – Flushing/bleeding.

User guide, Road Inventory App (V 0.2.8) and Inventory from video/photos – Jan 2018
~ 6 ~
1.3 Activate parameters (get ready)
Activate the inventory parameters you want to measure by short press (tap) the button. The chosen
inventory parameters (buttons) will turn from yellow to green color.
In the case below “3 - Earth roads” – isn’t activated and is still in yellow color.
Note: You need a GPS signal (Lat and Lng values) to start a survey.

User guide, Road Inventory App (V 0.2.8) and Inventory from video/photos – Jan 2018
~ 7 ~
1.4 Start and stop survey!
Start the survey by pressing the “START/STOP” text (button) in the action bar.
The action bar is located below the status bar (where the clock, battery indicator etc. is).
The app indicates its actually collecting data when “Recording!” is displayed. The distance
measurement starts to count when you move.
While surveying - press the corresponding “classification buttons” for each inventory parameter.
The Road inventory app is operator intensive – be active and remember to change all times
the status changes. Don’t operate the app and drive at the same time!
Classification Buttons*: VGood means Very Good and the scale is ranging down to Bad in 5 levels.
Refer to your road inspection manual to classify your parameters of choice (example right below).
Above: Example of classification guide to refer road inventory´s to. Left: Road inventory app while surveying.
To stop the survey/measurement press the START/STOP text (button) again in the action bar.

User guide, Road Inventory App (V 0.2.8) and Inventory from video/photos – Jan 2018
~ 8 ~
1.5 Upload your data
You don’t need an internet - 3G/WiFI connection While you are collecting data. But you need an
internet connection to upload your recorded data. You can verify that you have a connection by
using the internet browser or map.
To upload the survey data, press the UPLOAD text (button) in the action bar. If there is no room for
text an upload icon is visible instead. Data should upload and there should be an “Upload successful
message”.
1.6 Menu/Settings By pressing the overflow menu (the three square dots) in the action bar or menu button (if available
on your device) you enter the Settings menu. There you find different user settings available (as
language or to set your email address under User Equipment ID).

User guide, Road Inventory App (V 0.2.8) and Inventory from video/photos – Jan 2018
~ 9 ~
2 Road Inventory from photos It is now possible to record a video of the road being surveyed by Roadroid Pro App Version 2. To
make that, login to the Roadroid website -> Click on “Import History”.
From the import history list, click “File details” for the survey that you want to do the inventory on.
In file detail - select “Show survey data on map".
As the survey opens on the map, click on the first photo icon in the survey (the beginning of the
survey is marked by a green triangle and the end by a red triangle).

User guide, Road Inventory App (V 0.2.8) and Inventory from video/photos – Jan 2018
~ 10 ~
You can see 3 buttons at the bottom: Previous photo, Next photo and Show inventory tools.
• Previous photo: Click on this button to go to previous photo in the survey.
• Next photo: Click on this button to go to next photo in the survey.
• Show inventory tools: Click on this button to open the inventory section.
1. Click on Show inventory tools.
2. Click to add inventory category, choose inventory parameters (see appendix).
3. Once you selected parameters Classification Buttons (very good, good, etc.) appear
4. Enter your email address and the survey comment (as RoadID)
To perform the inventory, use previous/next button to go to previous/next image in survey.
Choose the classification that correspond to the image that you are viewing, click next button to
continue.
An inventory entry will be created for every GPS-point in the survey that’s between current image
and next image. Continue with this until you have gone through all images in the survey.
5. Click Save inventory to finish the inventory.
When finished, an inventory import file will be created in the background and automatically
imported to your account as any other inventory files (see ch. 4 for viewing)

User guide, Road Inventory App (V 0.2.8) and Inventory from video/photos – Jan 2018
~ 11 ~
3 Road Inventory from Video recorded by the Roadroid app It is possible to record a video of the road being surveyed by Roadroid Pro App Version 2. The
Roadroid Pro App is a separate application that automatically collects road roughness condition data
and photo/video. For more about “Roadroid 2 Pro App” please refer to: Roadroid Brochure .
When you have your recorded and uploaded a video with the “Roadroid 2 Pro App”, Login to the
Roadroid website > Click on “Import History”.
• From the import history list, click “File details” for survey that contains the desired video.
• In file detail - select “Zoom to measurement area on map".
• As the survey opens on the map, click on “Change” button and then select “Manage Map
Layers” from the menu opened to the right of the screen.
• Tick mark “Video” under the “Layers” to make the uploaded videos visible on the map.
• As a video icons appear on the map, click it to proceed to next step.
As you click on desired video icon the video will open into a new tab. You should be able play and
pause the video at this section. You can also adjust playback speed of the video.
Note: You need to learn how this work in your IT environment. Not all browsers might support the
video playback. And not all firewalls/networks allow video playback. Use your IT support to setup
your computer so it’s all playing correctly.

User guide, Road Inventory App (V 0.2.8) and Inventory from video/photos – Jan 2018
~ 12 ~
1. Click on “Inventory” button on the video player window and the inventory window will open.
2. “Click to add inventory category” to choose the road inventory parameters from the library
dived in 10 available categories.
3. Once you selected parameters Classification Buttons (very good, good, etc.) appear
4. Enter your email address and the survey comment (as RoadID)
5. Click on “Start inventory”.
As you start the survey; the video will play and classification for the chosen parameters is recorded
every second. It works like the inventory app, and the registrations here is using GPS-data from the
original survey file. Be active and click classification buttons rationally to the details you get from the
video playback.
6. Finish the survey by clicking on “Stop and save inventory” button.
Your inventory survey should be saved to the system, and be available on the “import history” where
you can view and analyze further.
1
2
3
4
5 6

User guide, Road Inventory App (V 0.2.8) and Inventory from video/photos – Jan 2018
~ 13 ~
4 View Data in Roadroid Web Services Whether you have done a road inventory survey from the road inventory app (chapter 1) a pre-
recorded video (chapter 2), the next step is to view, analyze and export reports. In order to do that,
login to www.roadroid.com and click on “Import history”.
• Find your survey from import history list and click on details. In next page; you will have the
options to:
o “Show measurement start- and endpoint in Google Maps” - a new pop-up window
will open the google maps.
o “Generate Shape File” – Shape files will be generated and downloaded in a zip folder.
o “Select aggregation length (meters)” and “Generate” – It will generate data in
preferred section lengths and downloaded as *.txt file for easy use to be pasted in
Excel, etc. 1 = Very Good and 5 = Bad.
o “Zoom to measurement area on map”.
o In this page you can also see the details of your file i.e. Import date, Inventory
parameters, etc.
• Click on Zoom to measurement area on map to see your survey on the map.
• Click on the button “Change” and from the appeared menu on right of the screen, set the
time period and choose map layers (Map/Satellite maps).
• Now from the list of parameters categories, find and select your parameters that your survey
is done for. As you select your parameter the classification dots will appear on the map
which shows your survey result.

User guide, Road Inventory App (V 0.2.8) and Inventory from video/photos – Jan 2018
~ 14 ~
Appendix: Table of inventory parameters
Average conditions VGood Good Fair Poor Bad Comment
Pavement Refer to inventory manuall
Cracking "
Gravel
Earth road
Flexible/DBST
Concrete
Shoulder
Sidecut
Drainage
Embankments
Cutting
Potholes
Loose chippings
Slippery road
Floodedarea
Paved roads VGood Good Fair Poor Bad Comment
Rutting
Cracking
Raveling
Flushing/bleeding
Shoving
Patching
Pumping
Corrugation
Sags and humps
Edge breaks
Pothole
Road marking
Camber/Profile
Pavement loss
Widening

User guide, Road Inventory App (V 0.2.8) and Inventory from video/photos – Jan 2018
~ 15 ~
Concrete road VGood Good Fair Poor Bad Comment
Cracking
Poppouts
Spalling
Corner Break
Scaling
Blowups
Faulting
Pumping
LTS Dropoff
Edge breaks
Severity Patch
Earth road VGood Good Fair Poor Bad Comment
Roughness
Top/Surface
Gradation/Mix
Binding/Dust
Cross section
Super-elevation
Side slope
Width
Stability
Road slide
Action: Grading/shaping
Action: Re-material Define levels
Action: Stab/dust ctrl
Gravel road VGood Good Fair Poor Bad Comment
Roughness
Side slope
Top/Surface
Gradation/Mix
Binding/Dust
Cross section
Super-elevation

User guide, Road Inventory App (V 0.2.8) and Inventory from video/photos – Jan 2018
~ 16 ~
Width <3,5 m 3,5-4,5 4,5-5,5 5,5-6,5 >6,5
Stability
Road slide
Action: Grading
Action: Regravel Define levels
Action: Stab/dust ctrl
Detailed cracking VGood Good Fair Poor Bad Comment
Alligator cracking "
Raveling cracking
Longitudinal cracking
Non WP long cracking
Transverse cracking
Block cracking
Thermal cracking
Wide cracking
FatigueCracking
DiagonalCracking
HairCracking
MapCracking
Crack seal condition
Road equipment VGood Good Fair Poor Bad Comment
Guard rails
Concrete barriers
Noise barriers
Road signs
Guid posts
Retaining wall
Erosion protection
Road Curb
Road marking
Reflexes/cateyes
Road side VGood Good Fair Poor Bad Comment
Road side safety
Illegal road signs

User guide, Road Inventory App (V 0.2.8) and Inventory from video/photos – Jan 2018
~ 17 ~
Sight distance
Vergemaintenance
Road_side_clerance
Plantations
Cut height/slope
Cut rock outcrops
Slip/Slide/Rockfall
Cross space
Winter roads VGood Good Fair Poor Bad Comment
Winter ruts
Slush on road
Ice on road
Snow on road
Road side marking
Snow ditches
Wall cutting
Snow fences
Frost damages
Action: Plowing
Action: Grading
Action: Salt spread Define levels
Action: Sand spread "
iRAP essentials VGood Good Fair Poor Bad Comment
Motorcycle flow None 1 2-3 4-5 6-7
Bicycle flow None 1 2-3 4-5 6-7
Ped. driver flow None 1 2-3 4-5 6-7
Ped. pass. flow None 1 2-3 4-5 6-7
Land_use_Driver_side Un-
developed Farm/
Agricult Commer-
sial Educat-
ional Industry/-
Manuf.
Land_use_Pass._side Un-
developed Farm/
Agricult Commer-
sial Educat-
ional Industry/-
Manuf.
Shoulder rumble strip Present
Not present
Centerl. rumble strip Present
Not present
Paved shoulder driver >2,4m 1-2,4 m
Narrow <1m None

User guide, Road Inventory App (V 0.2.8) and Inventory from video/photos – Jan 2018
~ 18 ~
Paved shoulder pass >2,4m 1-2,4 m
Narrow <1m None
Number of lanes One Two + One Two
Three + two Three
Lane width >3,25m 2,75-3,25 0-2,75
Skid resistance Sealed Adeq.
Sealed Med.
Sealed Poor
Unseal Adeq.
Unseal - poor
Street lightning Present Not
present
Road works No works Minor works
Major works
For a deeper explanation of how to make iRAP inspections, please refer to:
http://www.irap.org/en/resources/specifications