maintenance services 7. 2 engine oil and ... - mazda xedos...
TRANSCRIPT

Maintenance
MAINTENANCE SERVICES 7. 2ENGINE COMPARTMENT 7. 9
ENGINE OIL AND OIL FILTER 7.11ENGINE COOLING SYSTEM 7.14
BRAKESCLUTCH
POWER STEERINGMANUAL TRANSAXLE
AUTOMATIC TRANSAXLEOTHER LUBRICANTS AND FLUIDS
AIR CLEANERWIPER BLADES
BATTERYBELT TENSIONS
SPARK PLUGSTYRES
WHEELSLIGHT BULBS
LUBRICANT SPECIFICATIONSTROUBLESHOOTING
7-187-207-207-217-227-247-257-277-297-307-327-347-977-377-437-45
7-1

MAINTENANCE SERVTCES
Maintenance Services
You should exercise the utmost care to ore-vent damage to your vehicle and injury toyourself whenever using this manual formaintenance or inspection.Should you have any doubts concerning theinspection or servicing of your vehicle, westrongly recommend that you have a reliableand qualified service shop perform this work,preferably an Authorized Xedos Dealer.An Authorized Xedos Dealer has factory-trained technicians and genuine Xedos partsto service your vehicle properly. For expertadvice and quality service, see an Autho-rized Xedos Dealer.lnadequate, incomplete, or insufficient ser-vicing may result in operational problemswith your vehicle that could even lead to ve-hicle damage, an accident, or personalInJury.
Owner's Responsibility
Maintenance Services and RecordRetention are the owner's responsibility.
You should retain evrdence that proper main-tenance has been performed on your vehi-c l e rn acco rdance w i th schedu ledmarntenance, services chart starting on thefollowing page.Detailed warranty information is also provid-ed with your Xedos vehicle.Claims made during the warranty term willnot qualify under any warranty if they resultfrom lack of maintenance rather than fromdefective material or workmanshio. Werecommend that such maintenance be oer-formed by an Authorized Xedos Dealer us-ing genuine Xedos parts.
Scheduled MaintenanceServices
iNOTE iAfter 80,000 km (48,000 miles) or 48 months, 1continue to follow the described scheduled jmaintenance items and intervals OeriodicallV. j
Emission control and related systems: IThe ignition and fuel systems are vitally im- |portant to the proper operation of the emis- |sion control and related systems, as well as Ifor efficient engine operation. I
7-2

MAINTENANCE SERVICES
I : lnspect: visual examination and/or functional measurement of system's operation or penormance
A: Adiust: Examination resutting in adjustment or replacement R: Replace or change T: Tighten
ttutnU"r of months or km (miles), whichgve
Months" 1 2 24 36 48
km x1000 1 . 0 1 0 20 30 40 50 60 70 80
Miles x 1000 0.6 6 1 2 1 8 24 30 36 42 48
Exhaust manifold bolts and nuts T T T
Drive belts*2 A A A A A
Engine t iming belt.3 Replace every 100,000 km (6o'oou.
Enqine oi l .a R R R R R R R R R
Oil f i l ter.4 R R R R R R R R
Cooling system (including coolant level adjustment) I I
Engine coolant RePlace every z years
Major service interval at 12 months/20,000 km (12'000 miles)
LuUrication service based on distance only 10,000 km (6,000 miles) nottme,2 Adjust alternator and;;ter pump drive belt, power steering and air conditioner drive belt, if equipped-3 Replacement of timing belt is required at every roo,ooo t<ri (oo,ooo miles). Failure to replace timing belt may result in damage to the engine'
.4 lf the vehicle is operated under the following conditions, it is suggesteo that ihe ;ngine oil and oil filter be changed more often than at usual recom-
mended intervals.a) Driving in dusty conditions.ni ExtendeO periods of idling or low speed operation'cj oriuing roi a protongea p"eriod in cold temperatures or driving only short distance regularly'
7-3

MAINTENANCE SERVICES
MAINTENANCE
| : Inspect: Visual examination and/or functional measurement of system's operation or p,A: Adjust: Examination resulting ln adjustment or replacement R: Replace or chanqe
Number of months or km (miles), whichever comes first----r-\ rrt r EnYALo
I Months*l
MATNTENANCE -----r-
| km x 1OOOITEM
----r,\ mt"s
"1000
1 2 24 36 481 . 0 1 0 20 30 40 50 60 70 800.6 6 1 2 1 8 24 30 36 42 48
ldle speed A A A AAir cleaner element*s R I RFuel filter R RFuel lines and hoses I I IInit ial ignit ion t iming I I ISpark plugs A A A AE.G.R. system (2.0 l i tre) I I IEvaporative system I I IDash pot (1 .6 litre) A A A ABattery condition I IAll electrical systems.6 I I I I I
. 1 Major service interval at 12 months/20,000 km (12,000 miles)Lubrication service based on distance only 10,000 km (6,000 miles) not timelf the vehicle is operated in very dusty or sandy areas, inspect and, if necessary, replace more often than at usuat recommended intervars.This is a full function check of all electrical systems, i.e., all lights, washers linclJding condition of bladesj electric windows, sun roof, horn. erc..
. 5- 6
-47

MAINTENANCE SERVICES
| : Inspect: Visual examination and/or functional measurement of system's operation or performance
A: Adjust: Examination resulting in adjustment or replacement R: Replace or change
MAINTENANCEINTERVALS
MAINTENANCEITEM
Number ol months or km (miles), whichever comes first
Months*' 1 2 24 36 48
km x1000 1 . 0 1 0 20 30 40 50 60 70 80
Miles x 1000 0.6 6 1 2 1 8 24 30 36 42 48
Head light alignment A A A A
Clutch pedal I I I I
Brake lines, hoses, and connections I I
Brake pedal I l I I I
Brake and clutch f luid- I I R R
Parking brake A A A A
Power brake unit and hoses I I
Disc brakes I I
Power steering fluid I I I I
Power steering system and hoses I I
Steering and front suspension I I
Manual transaxle oil A R
Automatic transaxle fluid level ! I I
Major service interval at 12 months/20,000 km (12,000 miles)Lubrication service based on distance only 10,000 km (6,000 miles) nottimeReplace every 2 years.lf there has been continuoug hard driving, mountain driving, or if the brakes are used extensively or the vehicle is operated in extremely humid
climates, the brake fluid shduld be changed annually.
7-5

MAINTENANCE SERVICES
| : Inspect: Visual examination and/or functional measurement of system's operation or performancelA: Adjust: Examination resulting in adjustment or replacement T: Tighten
MAINTENANCEINTERVALS
MAINTENANCEITEM
Number of months or km (miles), whichever comes first
Months" 1 2 24 36 48
km x1000 1 . 0 1 0 20 30 40 50 60 70 80Miles x 1000 0.6 6 1 2 1 8 24 30 36 42 48
Drive shaft dust boots I I
Bolts and nuts on chassis and bodv T T T T TBody condition (for rust, corrosion, and perforation) Inspect annually
Exhaust svstem heat shield I
Tyres (including spare tyre, with inflation pressureadjustment)
I I
Hinoes and catches A A A AUnderside of vehicle I I
Seat Belts I I
Air conditioner system(if equipped)
Refrigerant Inspect the refrigerant amount annuallyCompressor Inspect the operation annually
Road test I
-.1 Major service interval at 12 months/20,000 km (12,000 miles)Lubrication service based on distance only 10,000 km (6,000 miles) nottime
7-6

MAINTENANCE SERVICES
Routine Service
It is strongly recommended that the follow-ing items be checked daily and/or weekly.
. Engine Oil Level(page 7-11)
. Engine Coolant Level(page 7-14)
o Brake and Clutch Fluid Level(page 7-18)
. Washer Fluid Level(pa1e 7-24)
. Tyre Inflation Pressure(page 7-34)
Maintenance ServicePrecautions
When performing any inspection or main-tenance work on your vehicle, always exer-cise care to reduce the risk of personal injuryor damage to the vehicle.Here are some general precautions thatshould be closely observed in carrying outany service operation.
o Do not work on the engine while it is hot.Always turn it off and allow it to cool.
. lf you must work with the engine running,make sure that no article of clothing, in-cluding neckties and handkerchiefs, canbecome entangled by any moving parts.Remove watches, bracelets, rings, neck-laces, and similar items. Keep hands,clothing, hair, and tools away from mov-ing fans and drive belts.
. Never get under the vehicle while it issupported by a jack. lf it is necessary towork under the vehicle, use safety stands.
r Keep smoking materials, f lames, andsparks away from the battery and all fueland fuel-related oarts.
o Never connect or disconnect either thebattery or any transistorized componentwhile the ignition switch is ON(ll).
. When connecting the battery cables, payspecial attention to their polarities. Neverconnect a positive cable to a negative ter-minal or a negative cable to a positiveterminal.
o Remember that the battery, ignition ca-bles, and vehicle wiring carry high cur-rents or voltage. Be careful not to causea short circuit.
r When performing any checks in an en-closed space with the engine running,such as in a garage, be sure there ispropqr ventilation.
. There are strict environmental lawsregarding the disposal of waste oils andfluids. Please dispose of your waste care-fully and with due regard to the en-vironment.We recommend that you entrust the oiland fluid changes of your vehicle to anAuthorized Xedos Dealer.
You should be aware that improper or in-complete servicing may result in operatingproblems. This section gives instructions onlyfor those items that are relatively easy for anowner to oerform.
7-7

MAINTENANCE SERVICES
Performing do-it-yourself maintenance dur-ing the warranty period may affect your war-ranty coverage. Read the separate XedosWarranty statement for details and sugges-tions. lf in doubt about any servicing, haveit done by an Authorized Xedos Dealer.
WARNING!o On vehicles equipped with an au-
tomatic transaxle, do not releasethe bonnet latch until the selec-tor lever has been securelylatched in P (Park) and the park-ing brake has been tirmly set.Turn the ignition switch off un-less it is necessary to check sys-tems with the engine running. Ifthe vehicle has a manual transax-le, do not release the bonnet latchunless the ignition switch is firstturned off , the shift lever isplaced in 1 (First), and the park-ing brake is firmly set.
o With a manual transaxle, if it isnecessary to check beneath thebonnet with the engine running,place the shift lever in NEUTRAL
7-8
and set the parking brake firmly.Unexpected and possibly suddenvehicle movement may occur itthese precautions are not taken.
o To avoid the possibility of per-sonal injury, you should alwaysturn off the ignition switch and re-move the key before working un-der the bonnet unless theprocedure specifically requiresotherwise. lf it requires runningthe engine while working underthe bonnet, do not permit anyclothing, such as neckties orhandkerchiefs, near the engine orcooling fan. They can become en-tangled in moving parts and re-sult in personal injury anddamage to the vehicle. Also re-move watches, bracelets, andrings for safety.

ENGINE COMPARTMENT
Engine Compartment Overview
Fuse block
' \Windshield washer reservoir
*some modets. 7'9

ENGINE COMPARTMENT
Brake/clutch fluid reservoir/ / / t I Sparkptuss
Automatic transaxle fluid-level dipstick.
Fuse block
o-L"^n*,
Windshieldwasner reservorr:
Ri)t"rn",.
7'1O *Some models.

ENGINE OIL AND OIL FILTER
Checking Engine Oil Level
Be sure the vehicle is on level ground.Warm up the engine to the normal oper-ating temperature.
1z
3. Turn off the engine and wait 5 minutesfor the oil to return to the oil oan.
4. Pull out the dipstick, wipe it clean, andreinsert it fully.
5. Pull the dipstick out again and check thelevel. lf the level is between F and L, itrs adeouate.lf i t is near or at L, add enough oil to bringthe level to F.Do not overtiil.
NOTEThe distance between L and F on the dip-stick represents the following.
1.6- l i t re engine;0.8 l itre (0.85 US qt, 0.7 lmp qt)
2.0-l itre engine:1.0 l i t re (1.1 US qt , 0 .9 tmp qt)
7-11

ENGINE OIL AND OIL FILTER
Changing Engine Oiland Filter
Change engine oil and filter according to theScheduled Maintenance on page 7-2through 7-6.
WARNING!Continuous contact with USED En-gine oil has caused skin cancer inIaboratory mice. Protect your skinby washing with soap and water.Keep all engine oil out of the reachof children.
1. Warm up the engine for a few minutesand then turn it off. Remove the oil{ l lercap.
2. Drain the oil into a suitable container af-ter removing the oil{ i l ler cap and drainptug.Both the oil and the engine are hot.Do not burn yourself.
Remove the engine oil f i l ter with an oil-f i l ter wrench.Use a clean rag to clean the mountingsurface of the oil f i l ter on the engine.Apply a small amount of engine oil to therubber seal of a new oil f i l ter.Install the oil f i l ter and tighten it.(Please refer to the oil f i l ter caution labelfor t ightening instructions.)Replace the drain plug tightly after the oilhas thoroughly drained.Refill the engine with new oil to the F markon the dipstick.Do not overtiil.
4.
6
7 .
8 .
o .
=-ffil\ :- oit fitterrgnlen
Drain plug Loosen
7-12

ENGINE OIL AND OIL FILTER
9. Refit the oilJi l ler cap securely.10. Start the engine and inspect around the
oil filter seal for leaks.11. Turn off the engine and wait 5 minutes
for the oil to return to the oil pan.
Check the oil level and fi l l to the F mark ifnecessary.
Oil capacity1.6-litre engine:
With oil filter3.6 l i tres(3.8 US qt, 3.2 lmp qt)
Without oil lilter3.2 l i tres(3.4 US qt, 2.8 lmp qt)
NOTEUse only the specified engine oil (refer tochart on page 7-43).
CAUTIONo Follow these instructions carefully.
An improper oil filter installation cancause oil leakage and engine dam-age.
r Although oil filters may have thesame external appearance, their in-ternal designs differ significantly.These filters are not interchangeable.To avoid potential engine damage,use only the specified filter for eachapplication.
2.0-l itre engine:
With oil filter4.0 l i tres(4.2 US qt, 3.5 lmp qt)
Without oil filter3.7 l i tres(3.9 US qt, 3.3 lmp qt)
7-13

ENGINE COOLING SYSTEM
Engine Cooling System
The cooling system is a high-pressure typewith a reservoir and is f i l led with year-roundantifreeze coolant at the factory.
Check the antifreeze protection and coolantlevel at least once ayear-at the beginningof the winter season-and before travelinoto a colder climate.
WARNING!. Never attempt to remove the radi-
ator cap or coolant filler cap whilethe engine is operating. Doing somight lead to cooling system andengine damage and could resultin serious personal injury fromescaping hot coolant or steam.Turn oft the engine and wait untilit has cooled. Even then, use ex-treme care when removing theradiator cap or coolant filler cap.Wrap a thick cloth around it, andturn it counterclockwise slowly tothe lirst stop.Step back while the pressure isreleased from the cooling system.When you are sure all the pres-
7-14
sure has been released, pressdown on the cap-still using acloth-turn it, and remove it.
. Even if the engine is not operat-ing, do not remove the radiatorcap or coolant filler cap while theengine and radiator are hot.Scalding hot coolant and steammay still blow out under pressure;this could cause serious injury.
Checking Coolant Level
Check the condition and connections of allcooling system hoses and heater hoses. Re-place any swollen or deteriorated hoses.
The coolant level should be full in the radia-tor and between F (full) and L (low) on thecoolant level gauge when the engine is cool.

ENGINE COOLING SYSTEM
Changing Coolant
Change coolant according to the ScheduledMaintenance Charts.
CAUTION. Use only soft (demineralized) water in
the coolant mixture.o The engine in your vehicle has
aluminium engine parts and must beprotected by an ethylene-glycolbased coolant to prevent corrosionand freezing.DO NOT USE alcohol or methanol an-tifreeze or mix them with the speci-fied coolant.
. Do not use a solution that containsmore than 60 percent antifreeze,which would reduce the effectivenessof solution.
For mixture percentage, refer to the follow-ing table.
Protection
Mixture percentage(volume)
Antifreezesolulion Water
Above -16oC (3"F) 35 65Above -26"C (-1soF) 45 55Above -40"C (-40oF) 55 45
WARNING!To prevent burning yourself, do notremove the radiator cap or coolanttiller cap or loosen the drain plug ifthe engine is hot.
2 .
The coolant diostick is attached to the reser-voir cap. Check the coolant level with the lev-el gauge.1. Remove the reservoir cap with the
diostick.Wioe it clean and reinsert it.Pull the dipstick out again. The coolantlevel should be between L and F.
lf the level is near or at L (low), add enoughspecified coolant to provide protectionagainst freezing and corrosion and to bringthe level to F (full). Do not overfill. ll fre-quent additions are required, see an Autho-rized Xedos Dealer for a cooling systeminspection.
7-15

ENGINE COOLING SYSTEM
Engine Cooling System
The cooling system is a high-pressure typewith a reservoir and is f i l led with year-roundantifreeze coolant at the factory.
Check the antifreeze protection and coolantlevel at least once a year-at the beginningof the winter season-and before travelinoto a colder climate.
WARNING!o Never attempt to remove the radi-
ator cap or coolant filler cap whilethe engine is operating. Doing somight lead to cooling system andengine damage and could resultin serious personal injury fromescaping hot coolant or steam.Turn off the engine and wait untitit has cooled. Even then, use ex-treme care when removing theradiator cap or coolant fiiler cap.Wrap a thick cloth around it, andturn it countercloclrwise slowty tothe first stop.Step back while the pressure isreleased from the cooling system.When you are sure all the pres-
7-14
Checking Coolant Level
sure has been released, pressdg*! on the cap-stiil using acloth-turn it, and remove it.
. Even if the engine is not operat-ing, do not remove the radiatorcap or coolant filler cap while theengine and radiator are hot.Scalding hot coolant and steammay still blow out under pressure;this could cause serious injury.
Check the condition and connections of all icooling system hoses and heater hoses. Re- Iplace any swollen or deteriorated hoses. I
The coolant level should be full in tne raOia. Itor and between F (full) and L (low) on the Icoolant level gauge when the engine is coot.
I
I

BRAKES
Checking Brake/Glutch FluidLevel
The brake fluid reservoir includes the clutchfluid reservoir.Check the fluid level in the reservoir period-ically; it should be between MAX and MINon tne reservolr.Before adding fluid, clean the area aroundthe reservoir cap thoroughly to preventbrake/clutch fluid contamination.lf the level is low, add fluid to the MAX level.The level will fall with accumulated distance.This is a normal condition associated withwear of brake/clutch l inings. lf the fluid levelis excessively low, have the brake/clutch sys-tem checked by an Authorized XedosDealer.
7-18
CAUTION. Use only the specified brake/clutch
fluid. (Refer to chart on page 7-43.). Do not mix different types of fluid.o In the event the brake/clutch system
requires lrequent supplies of f luid,the vehicle should be inspected by anAuthorized Xedos Dealer.
Checking Brake Pedal
CHECKING PEDAL FREE PLAYTurn off the engine and depress the brakepedal several t imes to deplete the vacuumin the power brake unit. Gently depress thebrake pedal by hand and measure the dis-tance it moves until slight resistance is felt.lf the free play is more or less than speci-fied, have the brakes adlusted by an Autho-rized Xedos Dealer.
Pedalfree play: 4-12mm (0.16-0.47 in)

BRAKES
Checking Parking Brake
Check the stroke of the parking brake bycounting the number of clicks heard whilefully applying it from the released position.Also, the parking brake alone should secure-ly hold the vehicle on a fairly steep grade.lf the number of clicks is more or less thanspecified, have the parking brake adjustedby an Authorized Xedos Dealer.
Stroke:5-7 clicks at a force of 10 kg (221b,98 N)
Checking Power Brakes
Check the power brakes for properooeration.r Depress the brake pedal a few times and
then hold it down. Start the engine andthe pedal should drop slightly.
. Depress the brake pedal, stop the en-gine, and hold the pedal down for about30 seconds. The pedal should neitherdrop nor rrse.
o Restart the engine, let it run for about aminute, and turn it off. Then firmly de-press the brake pedal several times. Thepedal travel should decrease with eachsubsequent stroke.
lf the brakes do not operate properly, havethe brake system checked by an AuthorizedXedos Dealer.
CHECKING PEDAL CLEARANCEStart the engine and check the brake pedalfor smooth operation and proper clearancewhen it is fully depressed (approximately 60kg [132 lb, 589 N]). The clearance is meas-ured between the centre of the upper sur-face of the brake pedal pad and thefloorboard without the carpet.lf i t is less than about 85mm (3.3 in), havethe brakes adjusted by an Authorized XedosDealer.
Clearance: about 85mm (3.3 in) min
7-19

CLUTCH, POWER STEERING
Checking Clutch Fluid Level
Refer to page 7-18 brake/clutch fluid level
Checking Power SteeringFluid Level
Check the fluid level in the power steeringreservoir periodically; it should be betweenHIGH and LOW on the reservoir.lf the level is low, add fluid to the HIGH level.
In the event the power steering system re-quires frequent supplies of f luid, the vehicleshould be inspected by an Authorized XedosDealer.
CAUTIONTo avoid damage to the power steeringpump, do not operate the vehicle forprolonged periods with a low powersteering fluid level.
NOTEUse only specified power steering fluid. (Re-fer to chart on page 7-43.)
7-20
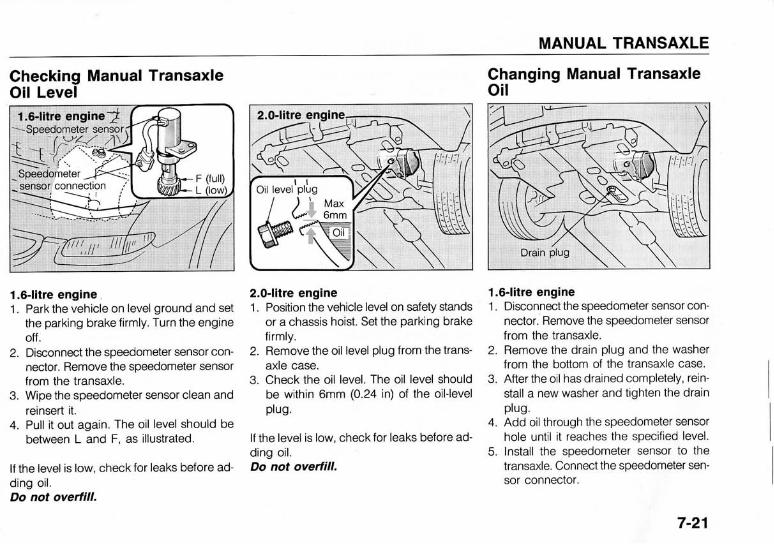
MANUAL TRANSAXLE
Checking Manual TransaxleOil Level
1.6-litre engine1. Park the vehicle on level ground and set
the parking brake firmly. Turn the engineoff.
2. Disconnect the speedometer sensor con-nector. Remove the speedometer sensorfrom the transaxle.
3. Wipe the speedometer sensor clean andreinsert it.
4. Pull i t out again. The oil level should bebetween L and F, as illustrated.
lf the level is low, check for leaks before ad-ding o i l .Do not overfill.
2.0-l itre engine1. Position the vehicle level on safety stands
or a chassis hoist. Set the parking brakefirmly.
2. Remove the oil level plug from the trans-axte case.
3. Check the oil level. The oil level shouldbe within 6mm (0.24 in) of the oil- levelptug.
lf the level is low, check for leaks before ad-ding o i l .Do not overtill.
Changing Manual Transaxleoi l
1.6-litre engine1 . Disconnect the speedometer sensor con-
nector. Remove the speedometer sensorfrom the transaxle.Remove the drain plug and the washerfrom the bottom of the transaxle case.After the oil has drained completely, rein-stall a new washer and tighten the drainptug.Add oil through the speedometer sensorhole until it reaches the specified level.lnstall the soeedometer sensor to thetransaxle. Connect the speedometer sen-sor connector.
z .
A
7-21
MANUAL TRANSAXLE, AUTOMATIC TRANSAXLE
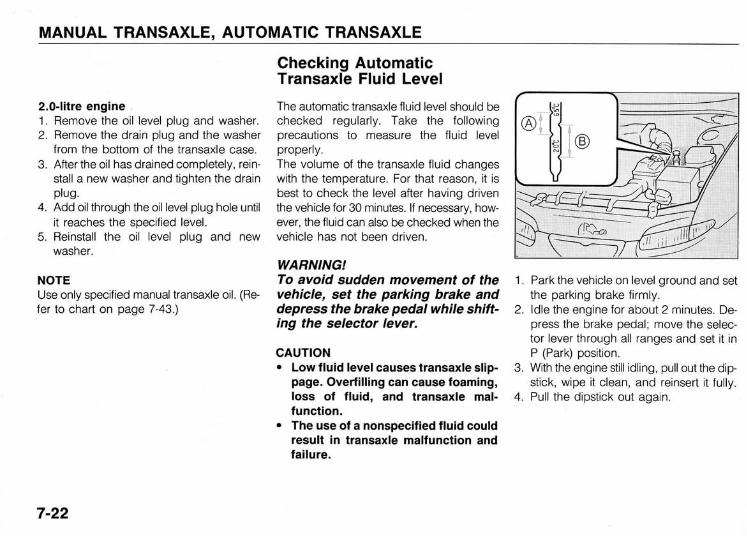
2.0-litre engine1. Remove the oil level plug and washer.2. Remove the drain plug and the washer
from the bottom of the transaxle case.3. After the oil has drained completely, rein-
stall a new washer and tighten the drainplug.
4. Add oilthrough the oil level plug hole unti lit reaches the specified level.
5. Reinstall the oil level plug and newwasner.
NOTEUse only specified manual transaxle oil. (Re-fer to chart on page 7-43.)
Checking AutomaticTransaxle Fluid Level
The automatic transaxle fluid level should bechecked regularly. Take the followingorecautions to measure the fluid levelproperly.The volume of the transaxle fluid changeswith the temperature. For that reason, it isbest to check the level after having driventhe vehicle for 30 minutes. lf necessary, how-ever, the fluid can also be checked when thevehicle has not been driven.
WARNING!To avoid sudden movement of thevehicle, set the parking brake anddepressthe brake pedal while shift-ing the selector lever.
CAUTIONo Low fluid level causes transaxle slip-
page. Overfilling can cause foaming,loss of fluid, and transaxle mal-function.
o The use of a nonspecified fluid couldresult in transaxle malfunction andfailure.
Park the vehicle on level ground and setthe parking brake firmly.ldle the engine for about 2 minutes. De-press the brake pedal; move the selec-tor lever through all ranges and set it inP (Park) position.With the engine still idling, pull out the dip-stick, wipe it clean, and reinsert it fully.Pull the dipstick out again.4 .
7-22

AUTOMATIC TRANSAXLE
The proper fluid level is marked as follows.Use fluid scale @:lf the vehicle has been driven and the fluidis warmed to normal operating temperatureof approximately 65oC (149"F), the fluid lev-el must be within the ($scale.Use fluid scale @:
-
lf the engine has not been running and theoutside temperature is approximately 20oC(68oF), the fluid level must be within the @scale,
NOTEUse the cold scale as a rough referenceonly.lf the outside temperature is lower than20oC (68oF), start the engine and meas-ure the fluid level after letting the enginereach operating temperature.lf the vehicle has been driven for an ex-tended period at high speeds or in citytraffic in hot weather, it is usually best tomeasure the fluid level after stopping theengine and allowing the fluid to cool for30 minutes.
When inserting the dipstick, be sure to in-sert it completely. When adding fluid, do sowhile measuring with the dipstick to makesure the fluid level does not go beyond theFull position.Do not overfill.
NOTEUse only the specified automatic transaxlefluid. (Refer to chart on page 7-43.)
7-23

OTHER LUBRICANTS AND FLUIDS
Checking Washer Fluid Level
Check fluid level in the washer fluid reser-voir and add fluid if necessary.The top of the float should be between FULLand LOW.Plain water may be used if washer fluid isnot available. However, use washer solutionin cold climates to prevent freezing.
Body Lubrication
All moving points of the body, such as doorand bonnet hrnges and locks, should belubricated each time the engine oil ischanged. Use a nonfreezing lubricant onlocks during cold weather.Make sure the engine bonnet's secondarylatch keeps the bonnet from opening whenthe primary latch is released.
WARNING!Do not use radiator coolant or anti-lreeze in the washer fluid reseruoir.Radiator coolant can severely affectvisibility when sprayed on the wind-shield and may cause damage topaint and body trim.
7-24

AIR CLEANER
Air Cleaner
ELEMENT REPLACEMENTA viscous paper air cleaner fi l ter is used. ltmust be replaced when necessary, and itshould not be cleaned and reused.
1.6-litre engine1. Unfasten the clamps of the air cleaner
cover.2. Wipe the inside of the air cleaner and cov-
er with a damp cloth.
3. Replace the air cleaner element.4. Install in the reverse order of removal.
Replace the element according to theScheduled Maintenance Charts.
7-25

AIR CLEANER
2.0-litre engine1. Remove the attaching bolts of the air
cleaner cover.2. Wipe the inside of the air cleaner and cov-
er with a damp cloth.
3. Replace the air cleaner element.4. lnstall in the reverse order of removal.
Replace the element according to theScheduled Maintenance Charts.
NOTElf the vehicle is operated in extremely dustyor sandy areas, replace this element moreoften than at the usual recommended in-tervals.
CAUTIONDo not drive with the air cleaner re-moved or excessive engine wear willresult.Driving without an air cleaner en-courages backfiring, which could causea fire in the engine compartment.
7-26

WIPER BLADESWiper Blades
WIPER BLADE MAINTENANCE
CAUTIONGommercial hot waxes applied by auto-matic car washes have been known toaffect the cleanabil ity of the window.
Contamination of either the window or thewiper blades with foreign matter can reducethe effectiveness of the window wipers. Com-mon sources of contamination are insects,tree sap, and hot wax treatments used bysome commercial car washes. lf the bladesare not wiping properly, clean both the win-dow and the blades with a good cleaner ormild detergent, and rinse thoroughly withclear water. Repeat if necessary.
CAUTIONTo prevent damage to wiper blades, donot use petrol, kerosene, paint thinner,or other solvents on or near them.
WINDSHIELD WIPER BLADEREPLACEMENTWhen the wipers no longer clean adequate-ly, the wiper blades may be worn or cracked,requiring replacement.
CAUTIONTo prevent damage to the wiper arms orother components, do not attempt tomove the wipers manually.
1. Raise the wiper arm and turn the wiperblade assembly to expose the plasticlocking clip.Compress the clip and slide the blade as-sembly downward; then lift i t off the arm.
CAUTIONDo not allow the wiper arm to fall againstthe windshield.
7-27
WIPER BLADES
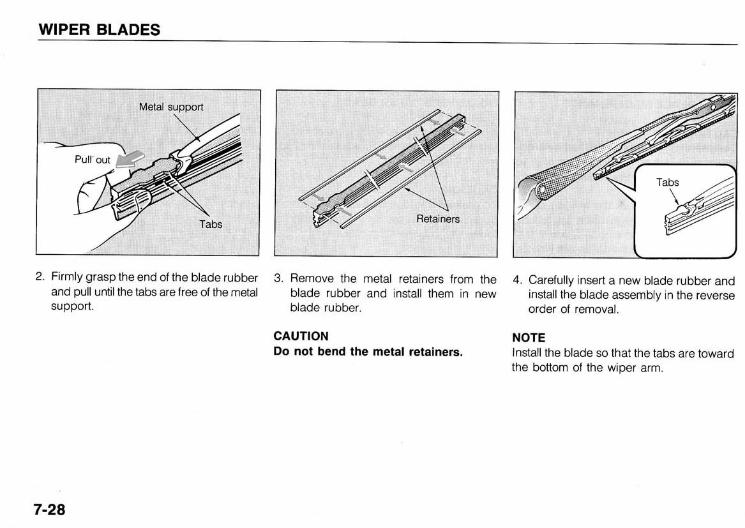
2. Fimly grasptheendof thebladerubber 3. Remove the metal retainers from theand pull until the tabs are free of the metal blade rubber and install them in newsupport. blade rubber.
CAUTIONDo not bend the metal retainers.
4. Carefully insert a new blade rubber andinstall the blade assembly in the reverseorder of removal.
NOTEInstall the blade so that the tabs are towardthe bottom of the wiper arm.
7-28

BATTERY
Battery
Your Xedos vehicle has a maintenance freebattery so you never have to add distilled wa-ter to it.l f you have any problems with your battery,have it checked at your Authorized XedosDealer.
WARNING!o KeeP lighted cigarettes and all
other flames or sparks away fromthe battery. Hydrogen, which is ahighly combustible gas, is alwayspresent in battery cells.
o Keep batteries out of the reach ofchildren because batteries con-tain SULPHURIC ACID. Preventits contact with skin, eyes, cloth-ing, and the vehiele.It electrolyte gets into your eyes,tlush them with clean water tor atleast 15 minutes and get immedi-ate medical attention. If possible,continue to apply water with asponge or cloth while en route tothe medical office.lf electrolyte gets on your skin,thoroughly wash the contacted
area. lf you teel a pain or a burn-ing sensation, get medical atten-tion immediately.
c When working near a battery,wear eye protection. Always pro-vide ventilation.When lifting a plastic-cased bat-tery, excessive pressure on theend walls could cause acid tospew through the vent caps,resulting in personal injury. Liftwith a battery carrier or with yourhands on opposite corners. MAINTENANCE
For best battery service:o Keep battery securely mounted.o Keep battery top clean and dry.. Keep terminals and connections clean,
tight, and coated with petroleum jelly orterminal grease.Rinse any spilled electrolyte from the bat-tery immediately with a solution of water^ ^ t h ^ t , l ^ ^ ^ ^ i ^d t r u u d n i l r g J U U d .
l f the vehicle is not going to be used foran extended time, disconnect the batterycaotes.
7-29
BATTERY, BELT TENSIONS
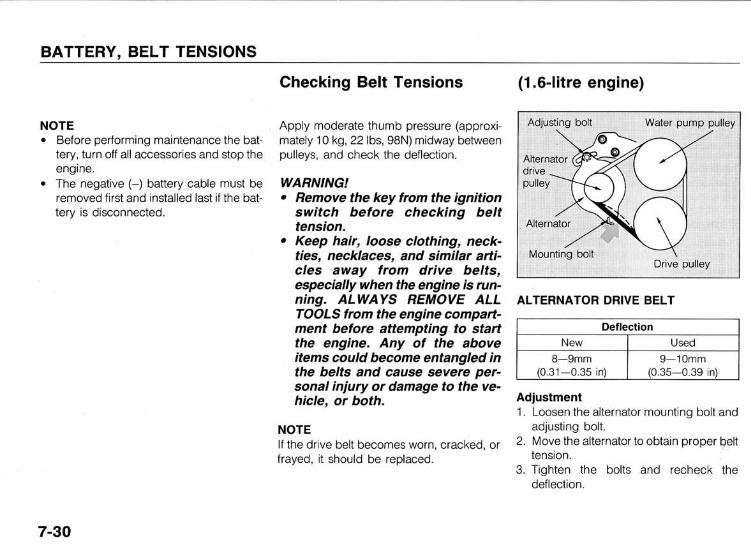
Checking Belt Tensions
NOTE Apply moderate thumb pressure (approxi-o Before performing maintenance the bat- mately 10 kg, 22 lbs, 98N) midway between
tery, turn off all accessories and stop the pulleys, and check the deflection.engrne.
o The negative (-) battery cable must be WAHMNG!removed first and installed last if the bat- .tery is disconnected.
Remove the key from the ignitionswitch before checking belttension.Keep hair, loose clothing, neck-ties, necklaces, and similar arti-cles away from drive belts,especially when the engine is run-ning. ALWAYS REMOVE ALLTOOLS from the engine compart-ment before attempting to startthe engine. Any of the aboveitems could become entangled inthe belts and cause severe per-sonal injury or damage to the ve-hicle. or both.
NOTElf the drive belt becomes worn, cracked, orfrayed, it should be replaced.
(1.6-l i t re engine)
ALTERNATOR DRIVE BELT
Adjustment1. Loosen the alternator mounting bolt and
adjusting bolt.2. Move the alternator to obtain proper belt
tension.3. Tighten the bolts and recheck the
deflection.
Deflection
New Used
B-9mm(0.31-0.35 in)
9-1Omm(0.35-0.39 in)
7-30

BELT TENSIONS
(2.0-litre engine)
ALTERNATOR DRIVE BELT
Adjustment1. Loosen the locknut.2" Turn the adjusting bolt unti l the correct
tension is obtained.3. Tighten the locknut and recheck the
deflection.
POWER STEERTNG (P/S) PUMP DR|VEBELT
A|R-CONDIT|ONER (A/C) AND POWERSTEER|NG (P/S) PUMP DRTVE BELT*
Adiustment'1 . Loosen the mounting bolt and locknuts.2. f urn the adjusting bolt until the correct
tension is obtained.3. Tighten the locknuts and mounting bolt
and recheck the deflection.
Adjustment1. Loosen the mounting bolt and locknuts.2. Turn the adjusting bolt unti l the correct
tension is obtained.3. Tighten the locknuts and mounting bolt
and recheck the deflection.
Deflection
New Used
B-9mm(0.31-0.35 in)
9-10mm(0.35-0.39 in)
Detlection
New Used
8-9mm(0.31-0.35 in)
9-10mm(0.35-0.s9 in)
Dellection
New Used
6-7mm(0.24-0.28 in)
7-Bmm(0.28-0.31 in)
*some modets. 7'31

BELT TENSIONS, SPARK PLUGS
Spark Plugs
A|R-CONDtTtONER (A/C) ANDALTERNAToR DRIVE BELT*
DeflectionNew Used
5.5-6.5mm(0.22-0.26 in)
6 .5 -7 .5mm(0 26-0.30 in)
Adjustment1. Loosen the locknut.2. Turn the adjusting bolt unti l the correct
tension is obtained.3. Tighten the locknut and recheck the
deflection.
Insulator
lf necessary, clean the electrodes with a finewire brush and carefully scrape the carbonoff the insulator with a small f i le.The spark plugs should then be blown cleanwith compressed air and the upper insula-tor wiped clean.
POWER STEERTNG (P/S) PUMP DRTVEBELT
Adjustment1. Loosen the locknut.2. f urn the adjusting bolt unti l the correct
tension is obtained.3. Tighten the locknut and recheck the
deflection.
7-32 *some modets.
Deflection
New Used6-7mm
(o.24-o.28 in)7-8mm
(0.28-0.31 in)

SPARK PLUGS
REPLACING SPARK PLUGS
WARNING!The spark plugs may be hot. Do notburn yourself.
1. Clean any dirt from around the spark plugbase of each spark plug.
2. Remove the plugs with a spark plugwrench.
3. Install each new plug by hand as far asit wil l go. lf necessary, a spark plugwrench may be used as an extension. lfa plug does not turn in smoothly, removeit and try again to ensure the correct en-gagement of the threads on the sparkplug with the threads in the cylinder head.
4. Tighten the plugs with a spark plugwrench. Do not overtlghten.
5. Make sure the spark plug leads are in-stalled in the correct order. Fasten theboot squarely over the end of each plug.
CAUTIONr The spark plugs must be securely
tightened, but not overtightened. Aplug that's too loose can get very hotand possibly damage the engine; onethat's too tight could damage thethreads in the cylinder head.
. Be sure the socket wrench is fitsquarely over the spark p!ug.
NOTEo When removing or unfastening the spark
plug cable leads, pull the boot, not thelead itself.
. When install ing the plugs, use a smallamount of ant ise ize compound ormolybdenum-based thread lubricant onthe first few threads.
7-33

SPARK PLUGS, TYRES
RECOMMENDED SPARK PLUGS
1.6-litre engine
N G K B K R s E 1 1 , B K R 6 E 1 1NIPPONDENSO K 1 6 P R - U 1 1 , K 2 O P R - U 1 1
CAUTIONNever use spark plugs with an improperheat range; they will adversely affect en-gine performance and durability.
Tyre Care
For proper performance, safety, and maxi-mum fuel economy, you must always main-tain recommended tyre inflation pressuresand stay within the load limits and weight dis-tribution recommended for vour vehicle.
INFLATION PRESSURESAll tyre pressures (including the spare)should be checked monthly when the tyresare cold. Recommended pressures must bemaintained for the best ride, top vehicle han-dling, and minimum tyre wear.Refer to tyre inflation pressure chart on page9-4.
NOTE. Warm tyres normally exceed recom-
mended pressures. Do not release airfrom warm tyres to adjust the pressure.
2.0-l itre engine
N G K B K R s E 1 1 , B K R 6 E 1 1BKRTE-1 1
NIPPONDENSO K 1 6 P R . U 1 1 , K 2 O P R . U 1 1K22PR-U11
7-34

TYRES
Underinflation results in excessive wear,poor handling, reduced fuel economy,and the possibility of blowouts of over-heated tyres. Also, low tyre pressure cancause poor sealing of the tyre bead, lf thetyre pressure is excessively low, wheeldeformation and/or tyre separation arepossible. So keep your tyre pressures atthe proper levels. lf a tyre frequentlyneeds refi l l ing, have it checked by anAuthorized Xedos Dealer or a tyre shop.Overinflation produces a harsh ride, han-dling problems, excessive wear at thecentre of the tyre tread, and a greaterpossibility of damage from road hazards.
WARNING!Overinllation or underinflation canreduce tyre life, adversely affect ve-hicle handling, and lead to suddentyre failure. This could result in lossof vehicle control.
TYRE ROTATIONTo equalize tread wear, it is recommendedthat the tyres be rotated every 10,000 km(6,000 miles) sooner if irregular wear de-velops. During rotation, check the tyres forcorrect balance.
When rotating tyres, check for uneven wearand damage. Abnormal wear is usuallycaused by incorrect tyre pressure, improperwheel alignment, out-of-balance wheels, orsevere braking.After rotation, be sure to bring the front andrear tyre pressures to specification andcheck lug nut t ightness.
Use of unidirectional tyresThe direction of tyre rotation is decided ac-cording to the tread pattern, which affectsthe tyre's performance in wet conditions.The unidirectional tyres must be installed ac-cording to the roll ing direction marks. Thesemarks are molded into the side wall of theryres.
CAUTIONUnidirectional tyres cannot be rotatedfrom the right side of the vehicle to theleft. lf they are rotated from right to left,tyre performance may be reduced in wetconditions.
NOTEDisc brake pads should be inspected forwear whenever tyres are rotated.
CAUTIONRotate radial tyres that have an asym-metric tread pattern only from front torear and not from right to left.
7-35
TYRES
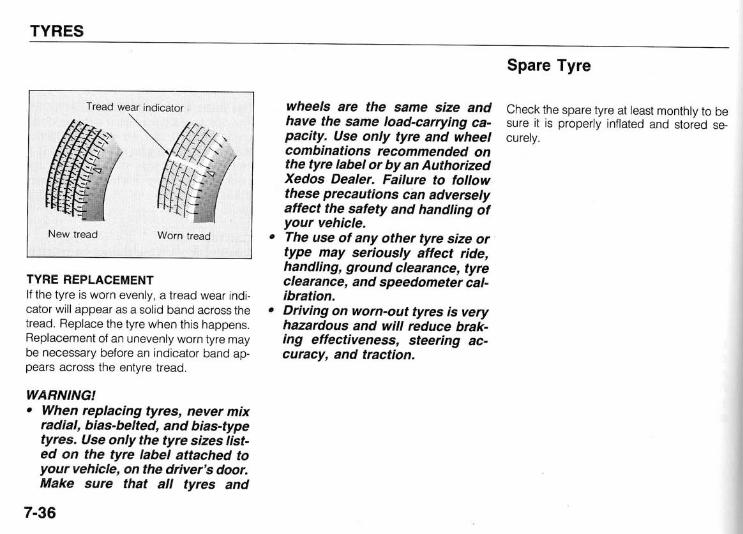
Tread wear indrcator
Worn treadNew tread
TYRE REPLACEMENTlf the tyre is worn evenly, a tread wear indi-cator will appear as a soild band across thetread. Replace the tyre when this happens.Replacement of an unevenly worn tyre maybe necessary before an indicator band ap-pears across the entyre tread.
WARNING!. When replacing tyres, never mix
radial, bias-belted, and bias-typetyres. Use only the tyre sizes list-ed on the tyre label attached toyour vehicle, an the driver's door.Make sure that all tyres and
7-36
wheels are the same size andhave the same load-carrying ca-pacity. Use only tyre and wheelcombinations recommended onthe tyre label or by an AuthorizedXedos Dealer. Failure to followthese precautions can adverselyaffect the satety and handling ofyour vehicle.The use of any other tyre size ortype may seriously aftect ride,handling, ground clearance, tyreclearance, and speedometer cal-ibration.Driving on worn-out tyres is veryhazardous and will reduce brak-ing effectiveness, steering ac-curacy, and traction.
Spare Tyre
Check the spare tyre at least monthly to besure it is properly inflated and stored se-curery.

WHEELS, LIGHT BULBS
Wheels
WHEEL REPLACEMENTWhen replacing wheels for any reason,make sure the new wheels are eouivalent tooriginal factory units in diameter, rim width,and offset.Proper tyre balancing provides the best rid-ing comfort and helps reduce tyre treadwear. Out-of-balance tyres can cause annoy-ing vibration and uneven tyre wear, such ascupping and flat spots.
CAUTIONA wrong-sized wheel may adversely af-fect wheel life and bearing life, brakingand stopping abilities, handling charac-teristics, ground clearance, body-to-tyrec learance, snow chain c learance,speedometer calibration, headlight aim,and bumper height.
Headlights
Your vehicle's headlights have replaceablehalogen bulbs. A burned-out bulb can bereplaced without disturbing the headlightbody.
HALOGEN BULBSHalogen bulbs contain pressurized gas thalwil l produce flying pieces of glass if broken.Always handle them carefully and avoidscratches and abrasion. lf the bulbs are l it,avoid their contact with l iquids. Never touchthe glass with bare hands. Residual oil maycause the bulb to overheat and burst whenlit. A bulb should be operated only when in-stalled in a headlight.lf a bulb becomes damaged or cracked, re-place it immediately and carefully disposeof it.Keep bulbs out of the reach of children.
7-37

LIGHT BULBS
HALOGEN HEADLIGHT BULBREPLACEMENT
WARNING!Wear eye protection when changinga bulb. Allow the bulb to cool beforehandling it.
1. Make sure the headlight switch is off.2. Lift the bonnet and locate the bulb in-
stalled in the rear of the headlight body.3. Unfasten the clip of the sealino cover.
Pinch the snap ring and,cgrefully removethe headlight bulb from its socket in thereflector by gently pulling it straight back-ward out of the socket. Do not rotate thebulb while removing it.Remove the electrical connector from thebulb by pull ing it.Install the new bulb in the reverse orderof removal.
4 .
(
6.
7-38

LIGHT BULBS
5j'
NOTE. Do not touch the glass portion of the bulb.o Install the bulb properly.o Install the sealing cover properly.. Check the aim of the headlights and ad-
just if necessary.. Use the protective cover and carton to
promptly dispose of the old bulb.. Your Xedos Dealer will be oleased to car-
ry out this operation on your behalf.
7-39
LIGHT BULBS
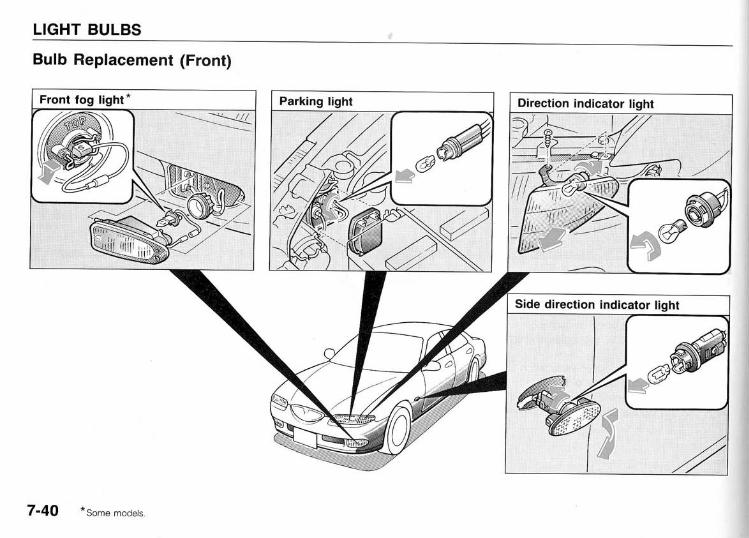
Bulb Replacement (Front)
7'4O *Some models
LIGHT BULBS
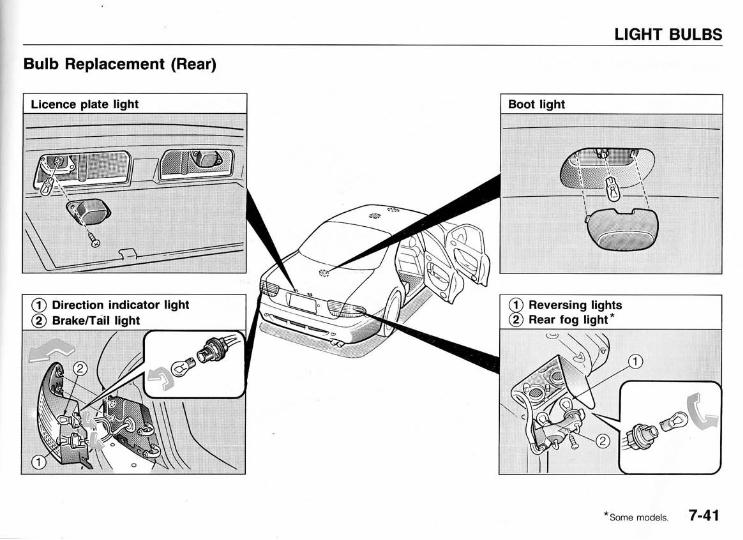
Bulb Replacement (Rear)
\,----_---_-
ffi
*some modets. 7'41

LIGHT BULBS
Bulb Replacement (lnterior)
7-42

LU BRICANT SPECI FICATIONS
Recommended Lubricants
* Refer to the recommended SAE viscosity numbers on the next page.
To help achieve proper engine and power-train performance and durabil ity, use onlylubricaling oils of the proper quality. The cor-rect oils also help promote engine efficien-cy that results in improved fuel economy.Engine oils labeled Energy Conserving Oilare now available. They contribute to fueleconomy by reducing the amount of fuelnecessary to overcome engine friction andin other ways. Often these improvements arediff icult to measure in everyday driving, butin a year's time, they can offer significant costand energy savings. These oils are recom-mended for use in conjunction with therecommended API classif ication.
Lubricant Classification
Engine o i l . API Service SGManual transaxle oil * API Service GL-4 or GL-5Automatic transaxle fluio ATF M-ll l or Dexron- l lPower steeringf lu id ATF M-ll l or Dexron'l lBrake/clutch fluid SAE J1703 or FMVSS116 DOT-3
7-43

LUBRICANT SPECIFICATIONS
Temperature Range for SAE Viscosity Numbers- U
lemperalure ,^-.' ( -r)-30 -20 -10 0 10 20 30 40 50-20 0 20 40 60 80 1oo 120
Engine oil <-- lomo :c"islllii]llr::,1:
rrii:1rrll:tlirlll:li:lill
:rir;llilrtai trllllllra,r:ar:i.:1ii:,,,lll,,l:ll,i;ilai't:i,til
Manual transaxleoil
l:fil.rl
t;,t:t::,1
l
Recommended SAE Viscosity Numbers
CAUTION BEFORE CHECKING LUBRICANTSAlways be sure to clean the area around any fi l ler plug, drain plug, and dipstick beforechecking or draining any lubricant. This is especially important in dusty/sandy areas andwhen the vehicle is used on unpaved roads. Cleaning the plug and dipstick areas wil l pre-vent dirt and grit from entering the engine and other mechanisms thev could damaoe.
Engine oil viscosity (thickness) has an effecton fuel economy and cold-weather opera- ltion (starting and oil flow). Lower-viscosity en-gine oils can provide better fuel economy iand cold-weather performance; however, Ihigher-temperature weather conditions re- Iquire higher-viscosity engine oils for satisfac- |tory lubrication. Using oils of any viscosity Iother than those recommended could result Iin engine damage. IWhen choosing an oil, consider the range Iof temperature your vehicle will be operat- |ed in before the next oil change. Then se- |lect the recommended oil viscosity from the Ichart.
IIIII
I7-44
TROUBLESHOOTING
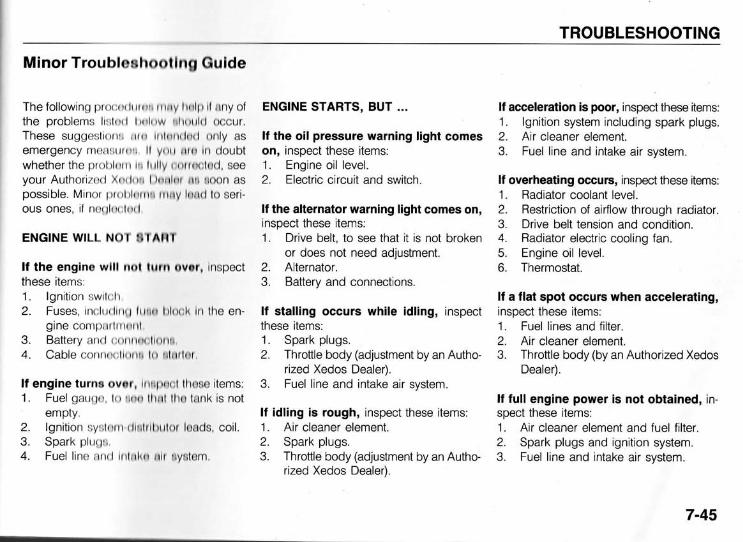
Minor Troublaahootlng Gulde
The following pro<:or lttter: trray ltelp lf any of ENGINE STARTS, BUT ... lf acceleration is poor, inspect these items:the problems lis:[rt l lrekrw clrolrlr l occur 1. lgnition system including spark plugs.These suggesli<lrrrr rlre lnlcrrrlerJ only as lf the oil pressure warning l ight comes 2. Air cleaner element.emergency mo{ll}urriEi lf you are In doubt on, inspect these items: 3. Fuel l ine and intake air system.whether the prot rk rn r In f r rl ly nnrrccled, see 1 . Engine oil level.your AuthorizorJ Xnrtrc l)celer ee Boon as 2. Electric circuit and switch. lf overheatingoccurs, inspecttheseitems:possible. Minor prol rlenrGi rnHy lecd to seri- 1. Radiator coolant level.ous ones, if no6;ltxller l, lf the alternator warning light comes on, 2. Restriction of airflow through radiator.
inspect these items: 3. Drive belt tension and condition.ENGINE WILL NOT ETART 1. Drive belt, to see that it is not broken 4. Radiator electric cooling fan.
or does not need adjustment. 5. Engine oil level.lf the englne wlll not lurn ovlr, Inepect 2. Alternator. 6. Thermostat.these items: 3. Battery and connections.1. lgnition swilclr, lf a flat spot occurs when acceleratingn2. Fuses, inchrrl lrrg tttee l i lrmk In tho en- lf stall ing occurs while idling, inspect inspect these items:
gine comprrtl i t iettt, these items: 1. Fuel l ines and fi l ter.3. Battery anci t:orrrrecllstrs, 1. Spark plugs. 2. Air cleaner element.4. Cable conrror;liorrc lR clcrter, 2. Throttle body (adjustment by an Autho- 3. Throttle body (by an Authorized Xedos
rized Xedos Dealer). Dealer).lf engine turnr ov€rr lrre;ta:l lhoee items: 3. Fuel l ine and intake air system.1. Fuel gaul;tt, kt eee that t lte tank is not l l full engine power is not obtained, in-
empty. lf idling is rough, lnspect these items: spect these items:2 . l gn i t i onsyu lo r r r r l l a t r l bu to r l eads ,co i l . 1 . A i r c l eane re lemen t . 1 . A l r c l eane re lemen tand fue l f i l t e r .3. Spark plLrgtr. 2. Spark plugs. 2. Spark plugs and ignition system.4. Fuel l ino nttt l l tt lakc elr ayetem. 3. Throttlebody(adjustmentbyanAutho- 3. Fuel l ine and intake air system.
rized Xedos Dealer).
7-45
TROUBLESHOOTING
ELECTRICAL SYSTEM PROBLEMS ...
lf a light does not come on, inspect thesertems.1. Bulb and fuse.2. Terminal connections and svstem
ground.
lf Braking-Steering coordination ispoor...The braking and steering systems form anintegrated system. lf you detect a malfunc-tion in any of their components, have yourvehicle inspected immediately at your Autho-rized Xedos Dealer.
7-46