maguire products, inc. information on the mlan protocol please call maguire products and ask for a...
TRANSCRIPT
MAGUIRE PRODUCTS, INC. 11 Crozerville Road Aston, PA 19014 USA tel: 610-459-4300 fax: 610-459-2700
MLAN WEIGH SCALE BLENDER July 13, 1999
Computer Communications MLAN – Maguire Local Area Network
Version 2.0
COMPUTER COMMUNICATIONS MLAN for Windows
COPYRIGHT MAGUIRE PRODUCTS, INC. 2000

2

3

Contents I. Overview 2 II. Hardware Requirements 3 III. Communication Wiring (MLAN or RS-232) 4 IV. New Program Chip — Installation 8 V. WSB Controller Identification Numbers 10 VI. Software Installation 11 VII. Operation 17 Brief Explanation of Options 17 Constant Scan of Weigh Scale Blenders 20 Examine a WSB 22 Materials 23 Recipes 24 Download Settings / Recipes to a WSB 26 Retrieval Times 27 Reports 28 Purge Totals 30 Enable Security 33 Login 34 User Edit 34 Change User Password 36 Who Am I 37 Disable Security 37 About 38 Load Certificate 38 VIII. Command Line Parameters 40 IX. MLAN Files 42 Appendix A: Order Form 46 Appendix B: User Security Options 47 Appendix C: Default Template Settings 49 Appendix D: Default Passwords 51 NOTE: Depending on the date of the chip in your controller, all features may not be available. The date is displayed as the controller is powered up. The format of the date is YMMDD, e.g. 41026 represents October 26, 1994. The chips can be upgraded, so if you need a newer chip, please call Maguire Products, Inc. The oldest chip that will provide the minimum features is October 26, 1994. Trademark Credits: Microsoft and MS-DOS are trademarks of Microsoft Corporation. IBM is a trademark of International Business Machine Corporation. Warranty Disclaimer: Maguire Products, Inc. disclaims all warranties, either expressed or implied, including but not limited to, the warranties of merchantability and fitness for a particular purpose.
2
I. Overview This manual is intended to provide information for individuals who are using the MLAN for Windows software package. This program provides material usage tracking reports and remote access of the basic control settings, such as recipes (materials and settings), work order numbers, and operator numbers. MLAN for Windows utilizes the Maguire Local Area Network (MLAN) protocol for communicating with Maguire Weigh Scale Blenders. In addition to MLAN for Windows, Maguire Products offers the complete documentation of the MLAN protocol. This documentation can be used by programmers to write custom software to communicate with the Maguire Weigh Scale Blender. For more information on the MLAN protocol please call Maguire Products and ask for a copy of the MLAN Protocol Manual. For a complete understanding of the operation of the Weigh Scale Blender (WSB), it is recommended that you have the four and/or twelve component controller manual(s) available as a reference. All numbers in this document are assumed to be decimal (base 10) unless otherwise noted. Also, when a year is represented by its last two digits, if it is between 90 and 99 its assumed to be between 1990 and 1999 and if it is between 00 and 89 its assumed to be between 2000 and 2089. The data files for MLAN are Microsoft Access 2.0 database files. This means that with a little knowledge of Microsoft Access you can use it to convert the data to another format.

3
II. Hardware Requirements Computer, monitor, keyboard, and mouse
Computer -- Pentium or Compatible Operating System -- MS-DOS with Windows 3.1, 3.11, 95, 98 (or Windows for
Workgroups 3.1, 3.11) Free HD Space -- 30 MB Minimum (40 MB recommended) Video -- VGA Memory -- 16 MB Minimum Port 1 Parallel port (may be used by a printer)
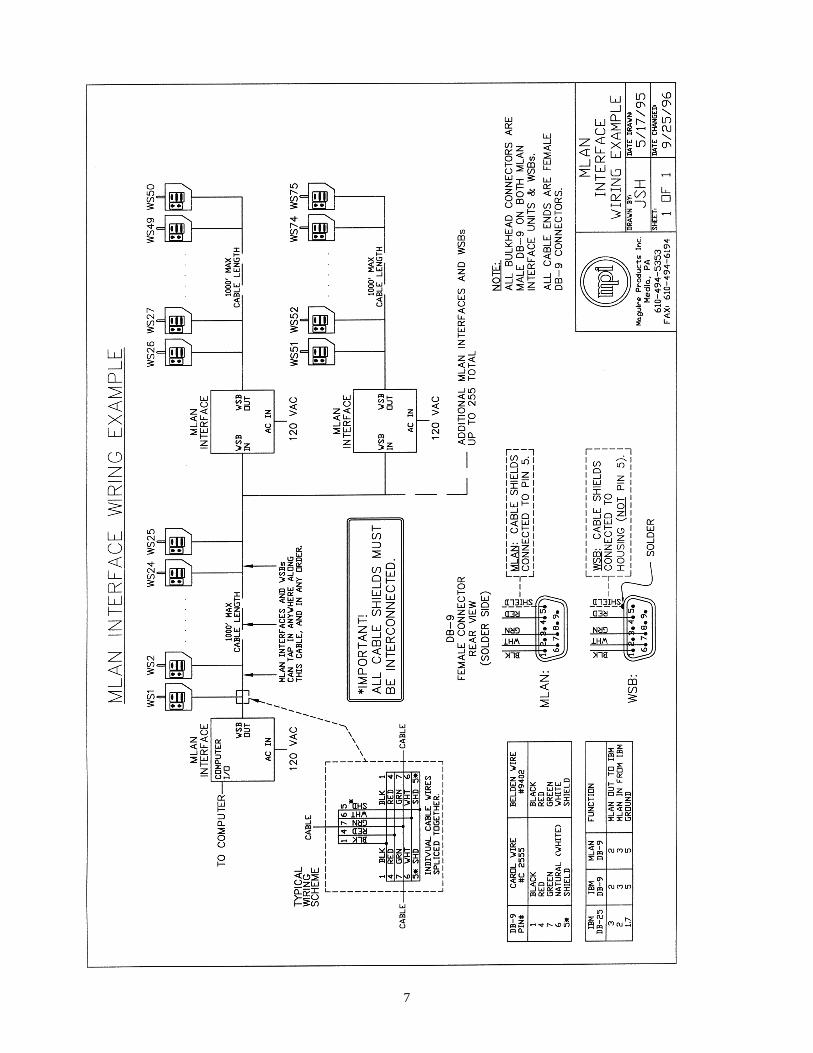
MLAN Interface, required for most installations (see Communication Wiring) This “black box” device is positioned next to the computer. If you are connecting to more
than 25 controllers or are running cable over 500 feet, additional MLAN interface devices may be required.
Communication Cable A single 4 conductor shielded cable connects all WSB controllers to the computer. This is
generally done with a single cable run through the ceiling over all of the process machines with “drops” to each controller. Be sure to read the Wiring Considerations section.
Printer A printer is required when you wish to obtain printed reports.

4
III. Communication Wiring (MLAN or RS-232) Weigh Scale Blender (WSB) controllers can communicate over two different protocols, MLAN and RS-232. Both are available at the DB9 port on the WSB controller. MLAN should be used in all factory installations; however, RS-232 may be used for lab testing and limited applications. RS-232 is NOT recommended for factory installations. MLAN Communication If you are communicating over a distance greater than 50 feet or with more than three WSBs, then you must use the MLAN Signal Amplifier (part # MLAN-SA). The MLAN-SA utilizes a stronger, more reliable signal transmission method than a standard RS-232 interface. It utilizes optically isolated couplers for all communication lines to reduce the potential of noise and other electrical interference from entering the computer circuitry. The standard computer RS-232 serial port signal is fed into the MLAN-SA unit and then sent out to the WSB controllers through optically isolated signal drivers. At the controller this MLAN signal is carried onto the board through additional optical couplers for further isolation. The MLAN-SA comes with a cable hardwired into it with a DB9 connector on the other end. The DB9 connector is for connecting the MLAN-SA to a computer’s RS-232 (serial) port. The cable from the MLAN-SA device to all WSB controllers (or to other MLAN-SA devices), utilizes the following pin connection:
MLAN TO CONTROLLER CABLE PINOUT
MLAN-SA Wire Color WSB Controller DB9 Connector pin # DB9 Connector pin # (or terminal strip) __________________________________________________________________ 1 Black 1 4 Red 4 6 White 6 7 Green 7 5 Shield connected to housing
Up to 25 WSB controllers may be connected in parallel using one MLAN-SA. If you are connecting more than 25 controllers or all your cabling (including drops) totals over 2000 feet, additional MLAN-SA devices are recommended. The shield is connected at all points except at the controller where is connected to the housing of the cable (see wiring diagram). This shield is intended to tie all external noise to ground at the MLAN-SA, at the computer and at the WSB controllers.

5
MLAN requires four (4) conductor cable with a shield for conveying information. Wire size should be 18 to 22 gauge. Use 18 gauge for the long runs (especially over 500 feet). Twenty-two (22) gauge is recommended for the “drops” to each controller. Twenty-two (22) gauge wire is used at each controller termination because it solders more easily to the DB9 connector required at each WSB controller location. We recommend: CAROL WIRE, Part #C2555 or BELDON WIRE, Part #9402 Conductors are Black, Red, White, and Green, plus a shield. Black is the positive power supply (16 to 24 volts)
Red is the neutral from the power supply White is communication from PC to WSB controller Green is communication from WSB controller to PC
Wiring generally requires a single cable run through the ceiling over all the process machines with “drops” to each controller. This main wire may “T” off to other locations if required for more efficient wiring. Be sure to read the WIRE CONSIDERATIONS section on page 6, also see wiring diagram on page 7. RS-232 Communication (for limited applications) RS-232 uses a direct connection from the computer to the WSB controller. This type of communication is reliable for short runs where little or no “noise” or static interference is present. This may be the case in a lab or another closely controlled environment. A low noise environment is not common in a factory and we do NOT recommend RS-232 for factory installation. Other restrictions are that the computer must be close (less than 50 feet) to the WSB controller and can only communicate with a few units (maximum of three). If all three conditions are met, then you may cable directly to the RS-232 serial port on your computer without any other hardware interface. Under these circumstances, the MLAN-SA is not required. The proper pin connections are as follows:
RS-232 TO WSB CONTROLLER CABLE PINOUT WSB DB9 Connector Computer Connector pin # DB9 or DB25 3 3 2 2 2 3 5 5 7 and 1 6, 7, 8 4, 5, 6 pins tied together
Do NOT use a standard off-the-shelf cable. Standard cables have ALL pins connected, or at least more than just those listed above. ALL pins connected will NOT work. You must wire a special cable according to the diagram provided. You may also obtain these cables from us.

6
Wiring Consideration The wiring of your communication lines is very important for reliable operation. To minimize problems, consider the following: 1. Communication lines are low voltage lines. Be sure that these lines are not bundled to any high
voltage lines. If you run them in conduit, do not run high and low voltage lines together. 2. It is not necessary to run this wire in conduit. If you do run cables without conduit, do not wire
tie these lines to material conveying lines or other conduit containing high voltage or high amperage electrical lines.
3. Keep all communication lines away from all vacuum loader conveying lines. Conveying plastic
produces extreme static charges. An electrical line, even in conduit, that runs next to a vacuum line, can introduce extreme static pulses into the processor. Keep these lines separated from conveying lines.
7

8
IV. New Program Chip — Installation In October 1994, the method MLAN for Windows uses to communicate with all WSB controllers was changed. All of your controllers MUST have software dated October 26, 1994 or later to operate with MLAN for Windows. To check the date of each controller’s software, watch the display closely when you turn power on. The first display you will see is the version date (V=41026A or V=41026T). This number is the year (4 for 1994), month (10 for October), and day (26 for the 26th). A “T” indicates 12 component software. If all version dates are October 26, 1994 or later, you do not need to change the chip. Chips with version dates before October 26, 1994 must be changed. If you need a new program chip and we have not provided one please call. There is no charge for these updated chips. Installation: 1. REMOVE THE LID The lid is held on by 10 screws (4 top, 3 left side, 3 right side). Then remove the three screws that
hold the panel front to the bottom. This will allow the panel front to lay down flat providing easy access to the circuit board.
2. REMOVE OLD CHIP FROM BOARD
The program chip is the one with a paper label on it (e.g. TC41026A or WS41026A). Stand in front of the controller and look down into the box at the circuit board. The program chip is located on the bottom edge of the circuit board to the right. It is near the side of the board that lies next to the thumbwheel switches. The program chip is right next to the memory chip. The memory chip stands higher off the board and may also have a small paper label on it. Be careful not to remove the memory chip. The program chip is to the right of the memory chip, closer to the thumbwheel switches.
Use a long thin screwdriver to slip behind the chip and pry it gently from its socket. 3. INSTALL NEW CHIP
One end of the chip has a small notch in it. Be sure that the chip is installed with the small notch up. BE CAREFUL NOT TO BEND ANY PINS. All pins should go into the socket. It is very easy to insert the chip one pin too high or one pin too low. The bottom of the chip will be even with the bottom of the socket if you have installed it correctly.
4. REPLACE PANEL FRONT AND LID

9
5. PERFORM THE “CLEAR ALL - RESTART” ROUTINE This is necessary to clear old memory information and assign new memory positions to match the new chip. Do the following: With power OFF, hold down the following three keys on the keypad: the TOP LEFT, TOP MIDDLE, and TOP RIGHT keys. These are the VIEW, BATCH, and EXIT keys. With all three keys held down, turn power on, then release. Watch the display. It must say “CLEAR ALL.” If it doesn’t, repeat this step until it does.
6. CONFIRM (OR SET) MODEL NUMBER
All newer versions of software allow the selection of different models. This presets a number of parameters for different types of equipment. Any time power is turned on, the model number is displayed. At this point, confirm that you have the proper model selected. There are various models; the 100 and 200 series display weights in 1/10 grams ( x.x), whereas the 400, 900, and 1800 series display weights in full grams ( x). To change models: Press: * Display will say (PASSWORD). Press: 97531 Display will say (MODEL 220) or current model. Press: * To walk through the available models. When the model you want is displayed, press EXIT.
7. RECALIBRATE - LOAD CELLS
Follow the Recalibrate Load Cells procedure given in the WSB Instruction Manual.

10
V. WSB Controller Identification Numbers Each WSB controller must have its own unique identification number. This number must be entered at the controller using the keypad. These numbers can range from 001 to 254. Do not use 000 or 255. If the same number is assigned to two or more controllers, these controllers will not communicate successfully with the computer. They will both answer to the same request. This ID number is used for all communications, and for identifying the source of all report information. It may be helpful to you if you choose a numbering sequence that relates in some way to each controller’s location. To enter an identification number into a controller, do the following (at the controller): Turn the “STOP END OF CYCLE” switch OFF (down), Turn power ON Press: * Display will say: (PASSWORD) Press: 22222 Display will say: (P x.x) Press: *66 Display will say: (ID 000) Enter: New correct ID Enter all 3 digits.
Use leading zeros. Correct entries are 001 to 254. Do not allow 2 controllers to have the same number.
Repeat this sequence for ALL controllers. Write down the numbers. This list must be entered into the computer using the SETUP routine before any communication can begin.

11
VI. Software Installation 1. Attach hardware key to computer’s printer (parallel) port. This key contains the version number and number of authorized blenders. Its presence is checked
by the software. It limits the software to the version specified and up to the number of blenders specified. The software will stop operating if the key is removed and it will run in DEMO mode if it is not found during initial startup.
2. Add SHARE.EXE to autoexec.bat (if needed)
a) Type C: and press the Enter key. b) Type CD \ and press the Enter key. c) Type Edit autoexec.bat and press the Enter key. d) Add the following line: LOADHIGH c:\dos\share.exe /L:500 /F:5100 Note: this line must be before any line that may start up Microsoft Windows. e) Select File Menu and choose Exit f) Press the y when the message “Loaded file is not saved. Save it now?” appears g) Reboot the computer.
3. Start Microsoft Windows. 4. Insert Disk 1 into drive A (or B). 5. From Program Manager, select File Menu and choose Run. 6. Type a:\setup (or b:\setup) and press the Enter key.
Follow the instructions shown on the screen. A new windows group named “Weigh Scale Blender” has been added. The new group contains one program named “Weigh Scale Blender”. This new icon may be used to start the program.
12
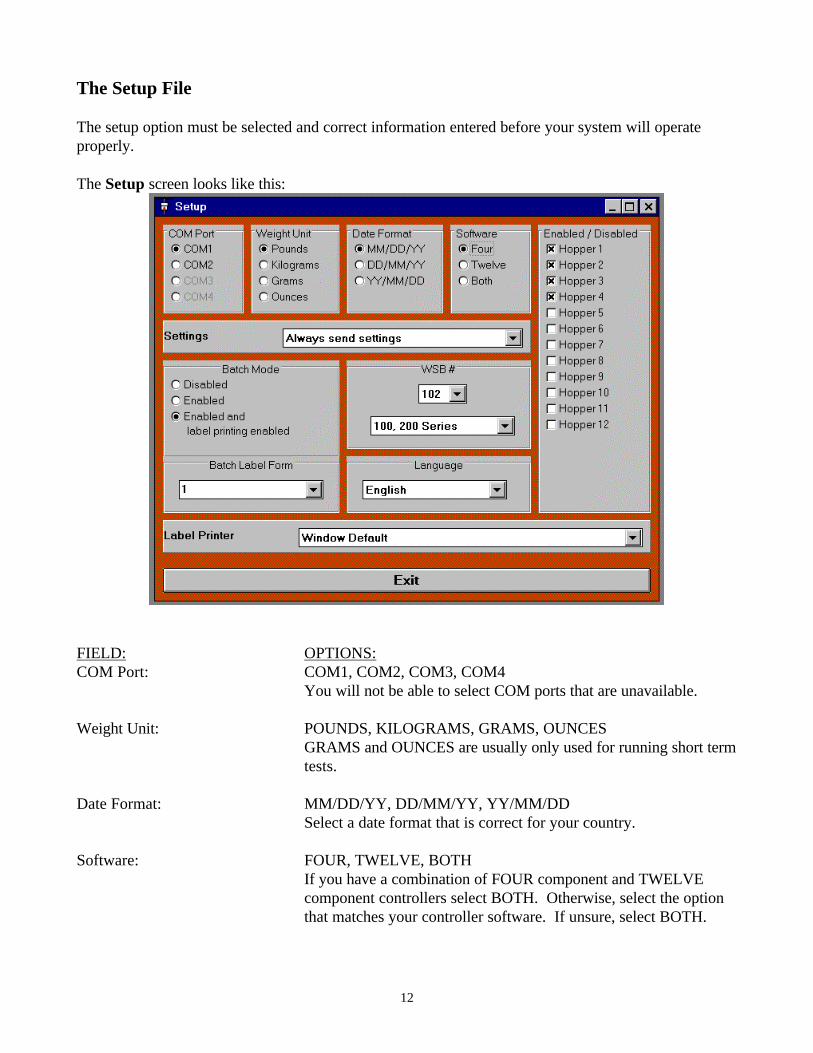
The Setup File The setup option must be selected and correct information entered before your system will operate properly. The Setup screen looks like this:
FIELD: OPTIONS: COM Port: COM1, COM2, COM3, COM4
You will not be able to select COM ports that are unavailable. Weight Unit: POUNDS, KILOGRAMS, GRAMS, OUNCES
GRAMS and OUNCES are usually only used for running short term tests.
Date Format: MM/DD/YY, DD/MM/YY, YY/MM/DD
Select a date format that is correct for your country. Software: FOUR, TWELVE, BOTH
If you have a combination of FOUR component and TWELVE component controllers select BOTH. Otherwise, select the option that matches your controller software. If unsure, select BOTH.

13
Enabled / Disabled: Hopper 1, Hopper 2, etc. Select ENABLED for all of the hoppers that are available on your most complex system. This option limits the entry of recipe settings to valid components only.
Select DISABLED for all component numbers that your system will
never specify as part of a recipe.
NOTE: Systems using FOUR software: Component 2, Natural, is always enabled. You will enable or disable only components 1, 3, and 4.
Systems using TWELVE software: Remember that auger feeders
that plug into the duplex receptacle on the front of the panel are always components 5 and 6 (Hoppers 5 and 6).
Settings Always Send Settings, Default To Send Settings, Always Ask User,
Default To Not Send Settings, Never Send Settings Controls the ability to be able to download the setting portion of a recipes. Always Send Settings:
Always include settings when downloading a recipe. The user will not have a choice.
Default To Send Settings:
When the download screen is loaded initial set the option to include the settings when downloading a recipe. The user may have a choice, if not running in the secure mode or if allowed by the users security profile.
Always Ask User:
The user will be required to set this option before each download.
Default To Not Send Settings:
When the download screen is loaded initial set the option to not include the settings when downloading a recipe. The user may have a choice, if not running in the secure mode or if allowed by the users security profile.
Never Send Settings:
Never include settings when downloading a recipe. The user will not have a choice.

14
Batch Mode Controls the ability to be able to download batch weights along with recipes. This allows you to run a blender in batch mode. See Weigh Scale Blender manual for more information on running batches. Enabled with label printing will cause a label to be printed automatically to the printer specified by the Label Printer box (see below).
Batch Label Form Controls the layout of the batch label. See Appendix E for sample
labels. Label Printer Tells the program which printer the labels should be printed on. WSB ID#: Numbers from 001 to 254
Enter every controller ID number you have assigned to your controllers. This is the list that the scanning routine will use to monitor all units. ID numbers 000 and 255 are reserved.
INACTIVE: When a WSB ID number is entered, you will be prompted for the 100, 200 Series correct model: 100, 200, 400, 900, 1800, or Inactive. Select one of 400, 900, 1800 Series these options.
Select 100, 200 Series: for WSB1xx models that use 1000 gram weigh bins. for WSB2xx models that use 2000 gram weigh bins. These models store and display weights in tenths (1/10) of grams. Select 400, 900, 1800 Series for WSB4xx models, that use 4000 gram weigh bins. for WSB9xx models that use 9000 gram weigh bins. for WSB18xx models that use 18000 gram weigh bins. These models store and display weights in whole grams. Select INACTIVE if you are discontinuing the use of this ID number. Inactive will remove this number from the list.
Language Tells the program what language should be used to display prompt
and message.

15
Check Out Procedure All Weigh Scale Blender Controllers must be powered on for the cable connections to that unit to be checked. The controllers do not have to be running, but the power switch must be in the on position. On every controller that you wish to check: Place STOP END-OF-CYCLE switch down, Have POWER turned ON, Be sure that this controller is listed in the SETUP file. Select “Constant Scan” from the WSB Menu to begin continuous scan. The Constant Scan screen looks like this:
A list of each unit scanned is displayed. If all WSB units are connected properly and are turned on and all WSB units have unique numbers, scanning will progress rapidly through all controllers, and continuously without interruption. Error Messages If scanning does not progress smoothly, an error message (“Error: No Response”) will appear indicating which blender did not scan correctly. If none of the blenders scan correctly, check for invalid COM port settings and that the MLAN box is plugged into the correct port.

16
If at least one blender scans correctly, but others don’t, check for loose connections at the WSB end. Also, check to make sure that the WSB ID numbers in the SETUP section match the actual ID numbers set on the controllers. REMEMBER: Only devices listed in the SETUP section are scanned. Be sure all units are listed. If a blender is in an alarm state, one of the following alarm messages will appear:
Alarm: Hopper <#> means that a problem has occurred with the material in the hopper that matches the number in the message. The reasons can range from that the hopper is out of material to the valve is stuck in the closed position.
Alarm: Batch means that a “Batch” has just completed. This alarm will only
occur if you are utilizing the “Batch” feature of the blender (e.g. filling a Gaylord).
Alarm: Maximum Wt. means the system has dispensed a quantity of material that
exceeds the “maximum” weight (generally 1.5 times a normal batch weight). This alarm will only occur if the *74 (Alarm on maximum weight flag) is enabled.
Alarm: Dump means that the weigh bin has an out of range weight reading. If
the tare weight is to large by at least 100 grams, the dump valve will operate to empty the bin and the alarm will occur. Also, if the tare weight is under by at least 50 grams, the alarm will occur (generally caused by a missing weight bin).
Alarming means an alarm has occurred but the type is unknown. This
would happen with WSBs that have old chip dates. Summary Once you are comfortable that data is being gathered correctly from all units, you will want to begin to incorporate the other features of the system. Entering retrieval times will allow you to study how much production you get during each shift or during any other time period you select. Entering the materials combined with the recipes, will allow you to track all materials used. After several days of gathering data, running the various reports will demonstrate exactly what information is available. If your particular requirements are not met with this system, call us and tell us what you need. This software is being developed further every day and your input will add to its versatility.

17
VII. Operation Overview The Maguire Local Area Network (MLAN) is the name we give to the software written exclusively for the MAGUIRE Weigh Scale Blenders. MLAN enables your IBM PC or compatible computer to communicate with one or more WSB controllers. MLAN provides two-way communication, both downloading and retrieval of information from WSB controllers for:
• PRECISE WEIGHT of all materials processed • SETTINGS • RECIPE number • WORK ORDER number • OPERATOR number
MLAN organizes and tracks your material usage, allowing you to gather accurate information according to the following factors:
• TIME range; e.g. by day, or shift, or for any time range you specify • MACHINE number • WORK ORDER number • OPERATOR number • RECIPE number
MLAN allows you to maintain a raw materials database, and then build recipes from this database for all of the products you manufacture. MLAN produces reports to show totals for each material used, according to selected dates, broken down by date, time, machine number, work order number, operator number, and recipe number. MLAN programs are menu driven, and very user friendly. The package is ready to go with very little training or start up time required. Brief Explanation of Options EXIT - will exit the program. WSB / Scan Once all WSBs - to retrieve from ALL units one time right now. WSB / Scan All WSBs Continuously - to continuously scan ALL blenders. This is what you want
running most of the time. You MUST be in this program to retrieve data. WSB / Examine a WSB - to look at ONE unit to see how it is set. Recipes / Edit - to build and edit the RECIPE file. Recipes / Download to a WSB - to download information to ONE unit. Recipes / Print / Recipe Sorted By Name - to print out a list of RECIPES that are sorted by the
recipe name field.
18
Recipes / Print / Recipe Sorted By Number - to print out a list of RECIPES that are sorted by the recipe number field.
Recipes / Materials / Edit - to build and edit a list of MATERIALS. Recipes / Materials / Print - to print out a list of MATERIALS. Setup / General Settings - to configure your system when it is first set up. Setup / Load Certificate - to add additional blender licenses. Setup / Retrieval Times / Edit - to set time periods for gathering tools. Setup / Retrieval Times / Print - to print out a list of RETRIEVAL TIMES. Utilities / Initialize - to reinitialize data files. This DELETES all data in the particular file, you usually
do not want to do this. Be very careful and make backups first. Utilities / Initialize / Setup File - to reinitialize setup information, such as COM port, active blenders,
date format, software type, etc. Utilities / Initialize / Material File - to reinitialize the material database. Utilities / Initialize / Recipe File - to reinitialize the recipe database. Utilities / Initialize / Retrieval Times File - to reinitialize the retrieval times database. Utilities / Initialize / Totals File - to reinitialize the totals database. This is the file that stores all of the
totals used for the material usage reports. Utilities / Initialize / Users File - to reinitialize the users database. This is the file that stores all of the
user login and privilege information. Utilities / Initialize / Simulator File - to reinitialize the simulated controllers database. This only
appears in demonstration mode. Utilities / Purge Old Totals - to selectively purge out old totals from the totals database. You may
want to do this after some amount of time. Be careful not to purge current data. Make backups first.
Utilities / Synchronize / Totals File to Material File - to rebuild the links in the total file which point to the material file. Make backups of the total file first.
Utilities / Synchronize / Totals File to Retrieval Times File - to rebuild the links in the total file which point to the retrieval times file. Make backups of the total file first.
Reports / Dump Totals File - to print a report of the records in the totals database. Reports / Communication Errors - to print a report of the communication errors that may have
occurred during the monitoring of the blenders. Reports / Material Usage By / Material Only - to print a material usage report broken down by
material only. Reports / Material Usage By / WSB ID # - to print a material usage report broken down by Weigh
Scale Blender ID #. Reports / Material Usage By / Operator # - to print a material usage report broken down by
Operator #.
Reports / Material Usage By / Work Order # - to print a material usage report broken down by Work Order #.
Reports / Material Usage By / Recipe # - to print a material usage report broken down by Recipe #.
Reports / Material Usage By / Time - to print a material usage report broken down by time range. Reports / Material Usage By / Time / WSB ID # - to print a material usage report broken down by
time range and Weigh Scale Blender ID #.

19
Reports / Material Usage By / Time / Operator # - to print a material usage report broken down by time range and Operator #.
Reports / Material Usage By / Time / Work Order # - to print a material usage report broken down by time range and by Work Order #.
Reports / Material Usage By / Time / Recipe # - to print a material usage report broken down by time range and Recipe #.
Reports / Material Usage By / Date / Time - to print a material usage report broken down by date and time range.
Reports / Material Usage By / Date / Time / WSB ID # - to print a material usage report broken down by date and time range and Weigh Scale Blender ID #.
Reports / Material Usage By / Date / Time / Operator # - to print a material usage report broken down by date and time range and Operator #.
Reports / Material Usage By / Date / Time / Work Order # - to print a material usage report broken down by date and time range and by Work Order #.
Reports / Material Usage By / Date / Time / Recipe # - to print a material usage report broken down by date and time range and Recipe #.
Security / Change User Password - to change a user’s password.
Security / User Edit - to add or modify a user’s privileges.
Security / Print User List / User List (Summary) - to print out a list of USERS with one line of information per user.
Security / Print User List / User List (Detail) - to print out a list of USERS with all of the users information (except the users password).
Security / Who Am I - to display information (user ID, name, and operator number)on the user that is currently logged in.
Security / Enable Security - to turn on the program security features while security is disabled. Security / Disable Security - to turn off the program security features while security is enabled. Login - to identify a user to the system. Logout - to terminate a user session. About - to display information about the program and hardware key.
20
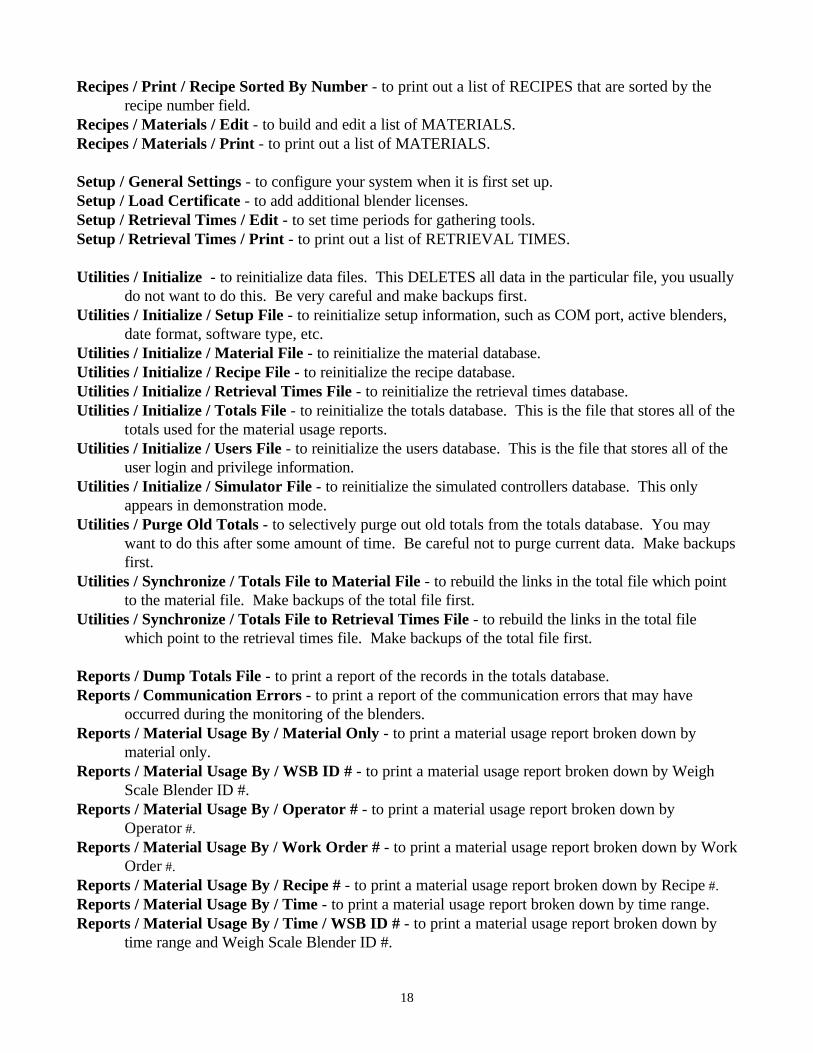
Constant Scan of Weigh Scale Blenders The Constant Scan screen looks like this:
The system retrieves data automatically in this mode. Retrievals occur only when this option is running. Keep this option running all of the time for the most accurate logging of information. The pause button stops the scanning process without exiting the scan routine. Each WSB unit is constantly accumulating total usage information for all components when it blends. The constant scan program retrieves these totals whenever one of the following conditions occur:
• When a TIME stored in the time file has been reached. In this case, information from all WSB
units is gathered. • When a SETTING has changed and additional usage has occurred. • When a different RECIPE number has been entered. • When a different WORK ORDER number has been entered. • When a different OPERATOR number has been entered.
Note: Retrieval does not occur if the TOTALS stored in the controller have not been incremented. In
other words, if the Weigh Scale Blender has not blended any materials since the last retrieval. CAUTION: When Running Other Menu Selections When the constant scan routine is not running, scanning does not take place. All controllers, however, will continue to gather data and maintain running totals of information. When you do return to the CONSTANT SCAN program, the conditions listed above will be checked and data will be

21
gathered if at least one condition is met. If the program is not left in scan mode, you may lose the exact totals that existed at the exact time that the condition changed. Overall totals are not affected. They are merely documented incorrectly. For example: If a WORK ORDER number change was made at 2 pm, but you failed to retrieve the data until 3 pm, then 1 hour of production will be incorrectly assigned to the previous work order number and not included in the new work order number. The totals are not lost; they are simply assigned incorrectly. Overall production totals are not affected. When the Batch mode is enabled with label printing enabled, the Reprint Batch Label button is displayed. When the Reprint Batch Label button is activated, the following the Batch Label RePrint screen is displayed and looks like this:
WSB ID #: The blender ID number that ran the Batch. Batch Date: The date on which the batch was completed. Batch Number: The batch number is equal to the number of batchs completed by the blender. This
number maybe found by using the batch key on the controller. Reprint Batch Label Now: Looks up and prints the batch information described by the fields above.

22
Examine a WSB The Examine a WSB screen looks like this:
The complete list of WSB units will be displayed in a drop down list. Select the WSB that you wish to examine. This option automatically retrieves information ONE TIME from one WSB unit. The Throughput, Settings, Recipe, Work Order, Operator, and Weight totals are retrieved. Three different display modes exist: totals, settings, and throughput. The “totals display” mode displays the current cumulative totals for the machine. The “settings display” mode displays the current material settings as a percentage of the total mix. The throughput display mode displays each material usage in terms of units (LB, kg, etc.) per hour.

23
Materials The Materials screen looks like this:
This option is for ADDING or CHANGING the MATERIALS file. This database should contain every material that you may possibly use in your plant. Code: is the unique name that you give this material. This is an alphanumeric field with a
maximum of 10 characters. Description: is to help you identify this material. This is an alphanumeric field with a maximum of
40 characters. Manufacturer: is for your own information. This is an alphanumeric field with a maximum of 40
characters. Recipes that specify material names are restricted to selecting from materials that are contained in this database. If a recipe uses a material that you have not yet identified, make an entry in the database named something general like REGRIND, NATURAL, MATERIAL, COLOR, or UNKNOWN, and then specify this material in the recipe. REMEMBER: All entries in a recipe must be found in the Material file.

24
Recipes The Recipes screen looks like this:
This option is for ADDING and CHANGING RECIPES. You should add materials first before building recipes, since the recipes consist of various materials. FOUR software allows only 3 components to be entered. These are regrind, color, and additive. Natural does not need a setting since natural always consists of the entire mix less the portion designated as the other components. However, you will specify what the natural component is, but you will not give it a setting. TWELVE software allows entry of up to TWELVE component settings. The SETUP file contains the list of valid component numbers based on your particular hardware configuration. This list restricts the recipe program to only component numbers that are valid. NOTE: When you get started building recipes, you will discover that you must have some materials listed in the material database from which to choose. Recipes can only be constructed from materials in the MATERIALS file. To make the job of getting started a little easier, you could place a few generic materials in the MATERIALS file. For example: enter three materials called “additive”, “regrind”, and “natural.” Then if you wish to enter a setting for an additive into a recipe but do not know exactly what color it will be at this time, you may just call it ADDITIVE.

25
REMEMBER: Without a material in the MATERIAL list, you will not be able to enter a setting into the RECIPE file. Name: Identifies the recipe on printed reports. The name may contain alphabetic (including accented),
0 through 9, -, /, @, #, !, $, and % characters. Number: Identified the recipe to a WSB controller. The number can range from 100 to 32767. Description: is display on the recipe, download, examine screens and the recipe reports. Batch Wt: The Batch Weight field is used when you want to run Batches with the Weigh Scale
Blender. For more information on batches see the blender’s manual. Material: This column contains the material codes that are used in this recipe. Type: This column contains the material types (i.e. regrind, natural, additive) for each material. Setting: This column contains the setting for each material. This number is expressed as a percentage.
For more information on batches see the blender’s manual. Recipe Type: is used to determine which controller can receive this recipe (4 Vs 12 component
controller software).
26
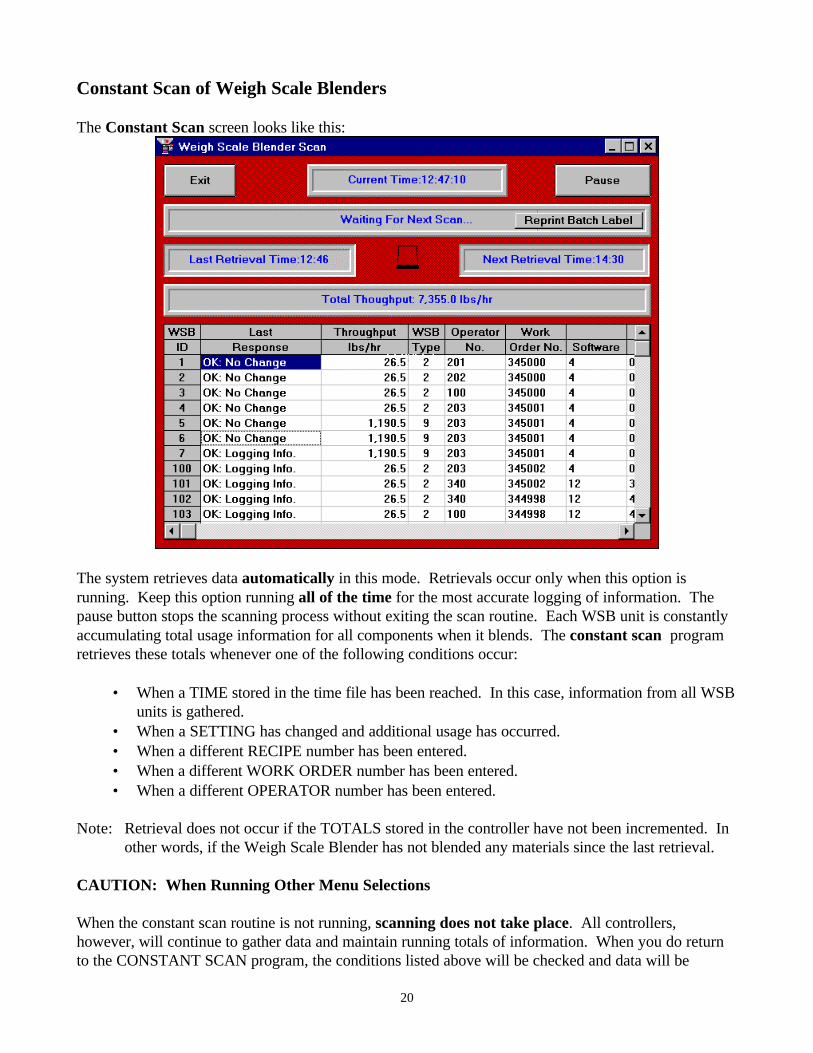
Download Settings / Recipes to a WSB The Download Settings screen looks like this:
The complete list of WSB units will be displayed in a drop down list. Select the WSB to which you wish to download a recipe. The current settings for the unit you have selected are displayed in the “current” column. The display provides for 12 components regardless of the number you are running. You may alter the current settings and send them back to the controller without selecting a recipe, by means of the “Copy” button. Alternatively, you may select a new recipe from the recipe file and compare the new recipe with current setting information before downloading. You may alter the new recipe settings before they are downloaded. Note that changed settings are not saved in the recipe file. Press the “Show Recipes” Button to display a list of recipes. CAUTION: When a recipe is downloaded with settings to a controller that has FOUR software, the
thumbwheels will become DISABLED. You may choose not to send the settings by checking the “No Settings” box. They can only be re-enabled at the controller by using the password and the “set” key. For more information, see the WSB Manual.

27
Retrieval Times The Retrieval Times screen looks like this:
This option is for adding or changing retrieval times. Data will be retrieved from ALL WSB units at the times that are listed in this file. Totals for material usage may then be summarized for the time periods between these listed times. Times should be entered in standard AM/PM format. Military times are NOT used. Enter the time, then use the SPACE bar to toggle between AM and PM. For NOON, enter 12:00 PM. MIDNIGHT, 12:00 AM, is present in the list as a default time. You do not have to keep it, but you do need to have at least one time in the file at all times. Since reports are run from one selected date to another, it is necessary to retrieve data at least once a day to keep totals properly assigned to the correct date. Therefore, there always needs to be at least one time in the time list. It follows, for the same reason, that all reports will break production at the first time of the day. For example, if the first time in the list is 6:00 am, then all material used from Midnight to 6:00 am will be assigned to the previous day. This gives the ability to indirectly set your end of day at 6:00 am, for example, instead of midnight—the default.
28
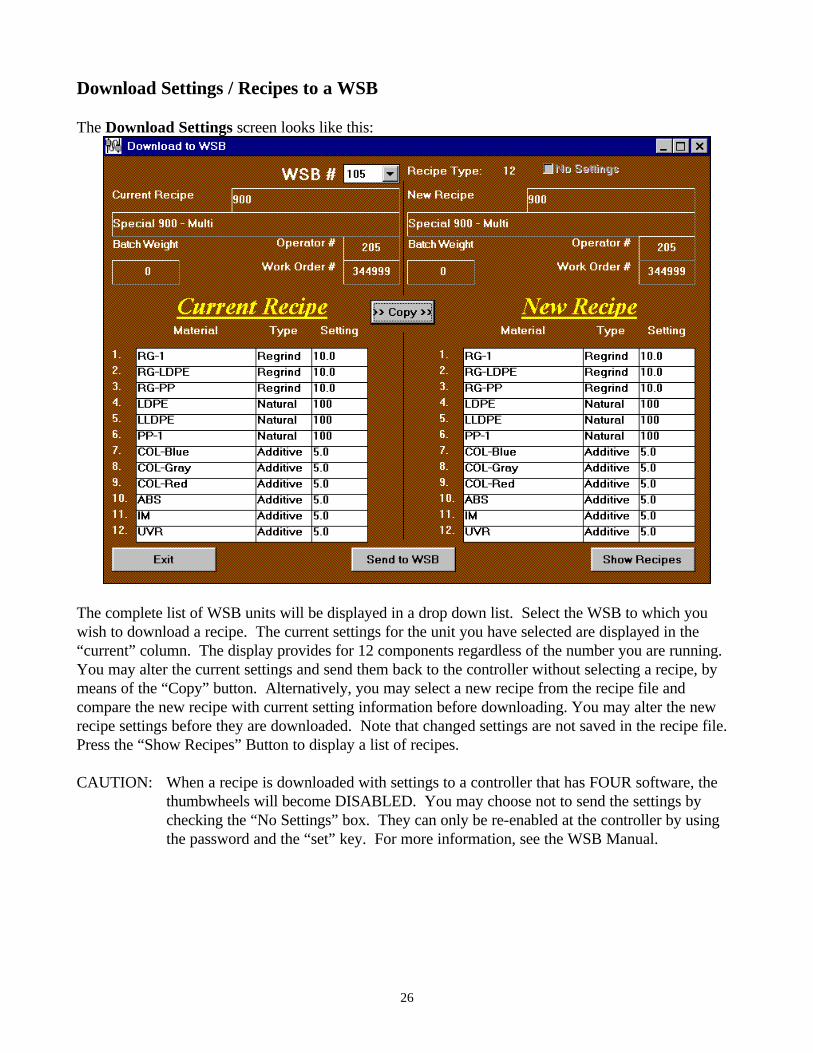
Reports A sample report selection screen may look like this:
All material usage reports are based upon the data collected by the MLAN “Constant Scan” routine which is placed in the TOTALS file. This file is then used to produce all of the reports. The reports are limited to information that can be derived from this data. For you to obtain meaningful reports, the times file must be set up to retrieve information at times that are meaningful to your operation, and the scan program must be left on and should be running at all times. You will probably want to pause the scan operation during report generation to speed up the report process. MLAN produces material usage reports showing separate totals for all materials blended between two dates broken down by date, time period, machine number, operator number, recipe number, and/or work order number. All reports may be limited to certain a date range, time periods, and/or a specific machine number. Some reports may also be limited to a specific operator number, recipe number, and/ or work order number. Non-material usage can be set to any output device. OUTPUT DEVICE: Reports can be output to a Window, Printer, or File
•Select Window to output the report to the SCREEN. •Select Printer to output to a PRINTER. •Select File to output the report to a disk file. A file name will be requested.

29
Start Date / Stop Date: All material usage reports request a start date and stop date. Enter dates in the format specified in the setup screen, such as MM/DD/YY. All reports are limited to information between and including these two dates.
WSB #: All material usage reports default to including all WSBs. Selecting the WSB # check box and
entering a blender number will limit the report to just that blender number. Materials: All material usage reports are broken down by each type of material processed. By default
all materials will be included in the report. Select Limit Materials to limit the report to one or more materials.
NOTE: Reports can only identify materials if:
• a recipe number was stored in the controller at the time the blend was run, and • a recipe exists for this number in the computer at the time the report is run.
If a recipe number was not stored, material used will be specified as HOPPER 1, HOPPER 2, HOPPER 3, etc. The recipe number is used to reference the recipe file and, from there, cross reference the material file to identify exactly what materials were run. This is the key to accurate inventory tracking and control.
Recipe #: Recipe related material usage reports default to include all recipes. Selecting the Recipe #
check box and entering a recipe number will limit the report to that specific recipe number. Operator #: Operator related material usage reports default to include all operator numbers.
Selecting the Operator # check box and entering an operator number will limit the report to that specific operator number.
Work Order #: Work order related material usage reports default to include all work orders.
Selecting the WORK ORDER # check box and entering a work order number will limit the report to that specific work order number.
Time Related Reports: When a time related material usage report is requested, the times list will
appear. You must indicate the times you wish to select for the report. Times are selected by clicking on the time, to select all times click on the column header. Deselecting times is done in the same manner. The times listed are retrieval times that were previously set up in the times file. When a report is run with all times selected, then the totals that you get will be for all time periods between all of the times listed. When only a few times are selected, totals are larger, reflecting the longer time periods between the selected times. For example: Selecting only 1 time period will give totals that represent a full 24-hour time
period. Likewise, selecting times that mark the end of each shift will give the totals for each shift.

30
Sample report (output to window)
Purge Totals This option is for REMOVING RECORD(s) from the totals file. The Purge Total screen will look like this:
There are two modes of operation: purging communication error records and purging records. At any time, communication error records may be purged by activating the Purge All Error Records button.

31
The other mode is purging of totals records. The records are selected by entering a Purge End Date. The purge end date is the date before which all records will be purge. For example, if the date entered was January 1, 1996, all records in 1995 or earlier would be deleted but not the records from January 1, 1996 or later. The actual deletion of the records happens by clicking on the Purge Records Now button. At this point you can enter a different date to select more records or exit from this option. Purge All Error Records: Permanently deletes all communication error records from the totals file. Purge End Date: The date before which all records will be purge. The date format is dependent on
the current setting found on the Setup File, e.g. MM/DD/YY. Advance Purge: Displays the advance purge screen (see below). Exit: Exit from the purge totals option. Purge Totals [Advanced] The Purge Totals [Advanced] screen looks like this:
This option offers a more controlled method of removing records from the totals file. There are two modes of operation: selecting/deleting or displaying/selecting/deleting. Both methods start by establishing the record selection and retrieval criteria. The first criterion is the start date and stop date (if blank the start date defaults to the date of the first record in the file and stop date to the last record in the file). The optional criteria are the WSB #, Recipe #, Operator #, and/or Work Order #.
32
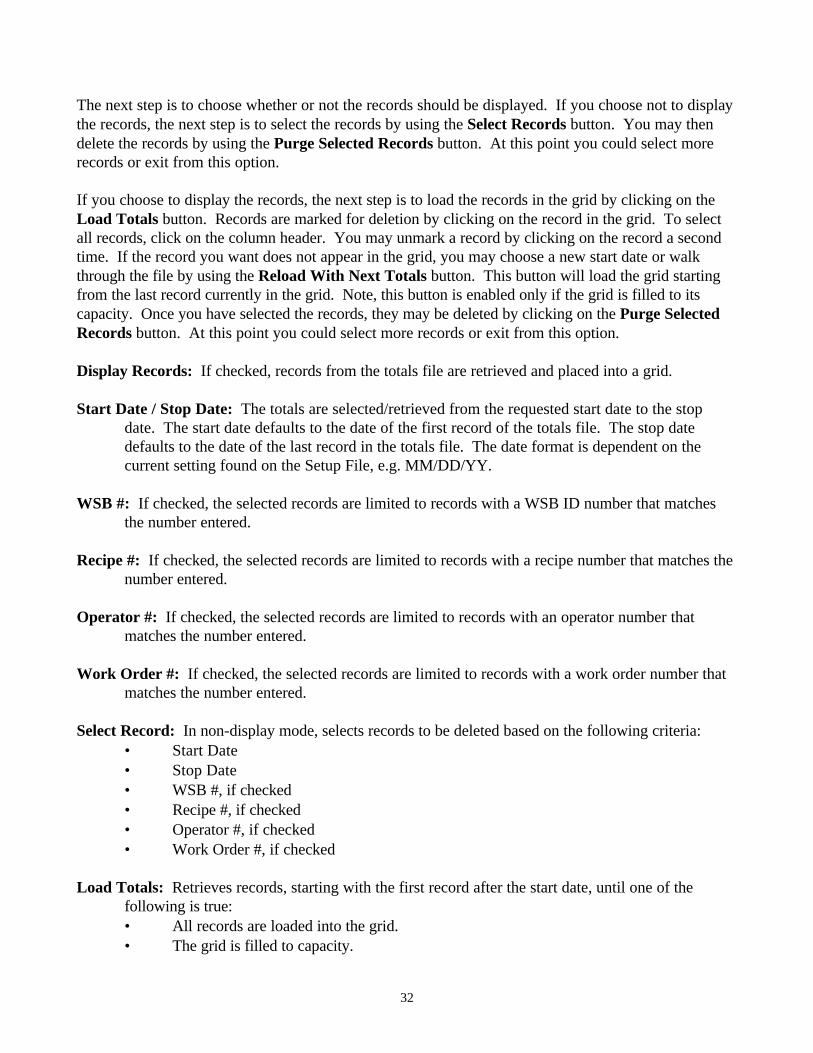
The next step is to choose whether or not the records should be displayed. If you choose not to display the records, the next step is to select the records by using the Select Records button. You may then delete the records by using the Purge Selected Records button. At this point you could select more records or exit from this option. If you choose to display the records, the next step is to load the records in the grid by clicking on the Load Totals button. Records are marked for deletion by clicking on the record in the grid. To select all records, click on the column header. You may unmark a record by clicking on the record a second time. If the record you want does not appear in the grid, you may choose a new start date or walk through the file by using the Reload With Next Totals button. This button will load the grid starting from the last record currently in the grid. Note, this button is enabled only if the grid is filled to its capacity. Once you have selected the records, they may be deleted by clicking on the Purge Selected Records button. At this point you could select more records or exit from this option. Display Records: If checked, records from the totals file are retrieved and placed into a grid. Start Date / Stop Date: The totals are selected/retrieved from the requested start date to the stop
date. The start date defaults to the date of the first record of the totals file. The stop date defaults to the date of the last record in the totals file. The date format is dependent on the current setting found on the Setup File, e.g. MM/DD/YY.
WSB #: If checked, the selected records are limited to records with a WSB ID number that matches
the number entered. Recipe #: If checked, the selected records are limited to records with a recipe number that matches the
number entered. Operator #: If checked, the selected records are limited to records with an operator number that
matches the number entered. Work Order #: If checked, the selected records are limited to records with a work order number that
matches the number entered. Select Record: In non-display mode, selects records to be deleted based on the following criteria:
• Start Date • Stop Date • WSB #, if checked • Recipe #, if checked • Operator #, if checked • Work Order #, if checked
Load Totals: Retrieves records, starting with the first record after the start date, until one of the
following is true: • All records are loaded into the grid. • The grid is filled to capacity.
33
Reload With Next Totals: Retrieves records, starting with the last record currently in the grid, until one of the following is true: • All records are loaded into the grid. • The grid is filled to capacity.
The last record in the grid will now become the first record in the grid. (Note, this button is enabled only if the grid is filled to its capacity.)
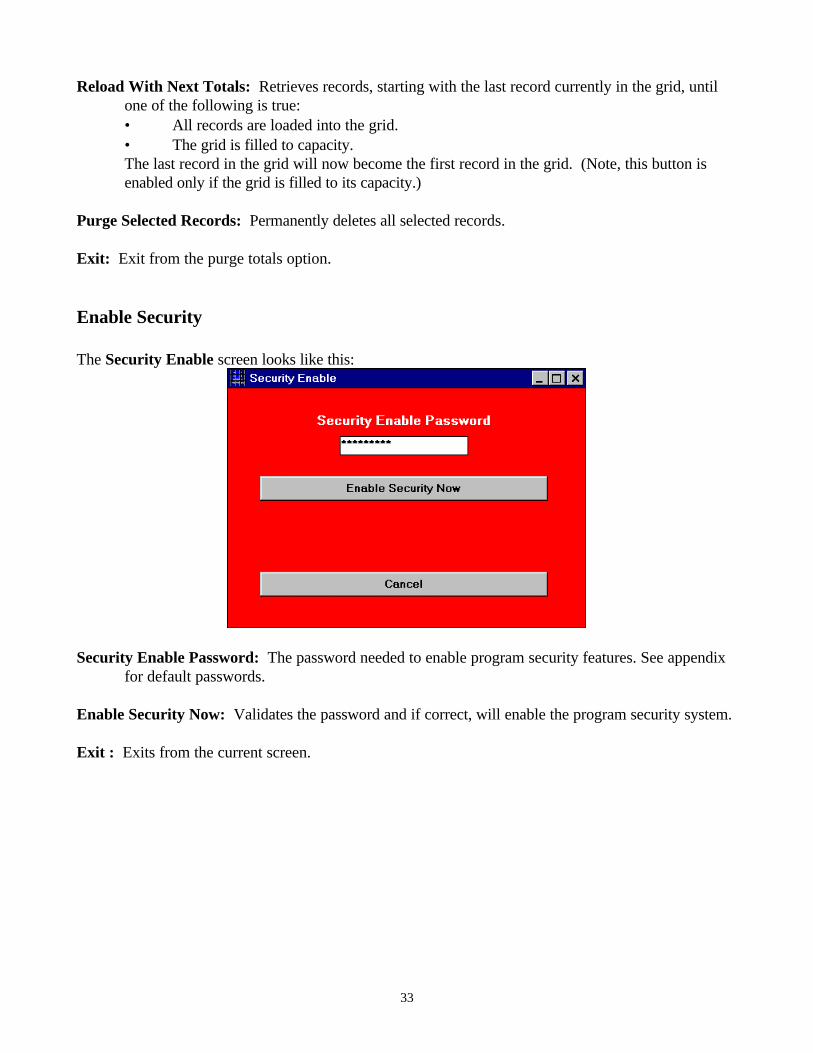
Purge Selected Records: Permanently deletes all selected records. Exit: Exit from the purge totals option. Enable Security The Security Enable screen looks like this:
Security Enable Password: The password needed to enable program security features. See appendix
for default passwords. Enable Security Now: Validates the password and if correct, will enable the program security system. Exit : Exits from the current screen.

34
Login The Login screen looks like this:
User ID: Unique identifier for each user. User Password: Current password for the user identified by the user ID field. Login Now: Validates the password and, if correct, allows the user to login. User Edit The User Edit screen looks like this:
35
Mode: The user screen operates in three modes: Adding Users, Changing Users, and Changing Template:
User Type: A user may belong to one of three classes: Operator, Supervisor, and Administrator.
Each class has a predefined template of privileges. Program Area: This is a list of different screens and areas of the program. Privileges: This is a list of privileges associated with the selected program area. See Appendix for
detailed information on each privilege. User ID: Unique identifier (or username) for each user. First Name: First name of the user. Last Name: Last name of the user. Operator #: Operator number assigned to this user. Password: Password for the user. Retype Password: Password typed again for verification purposes. Limit WSBs: This is the list of blenders a user has the ability to change. This does not apply to users
with the “All WSBs #”, under the “Download” program area, privilege. Limit Recipes: This is the list of recipes a user may download to a blender. This does not apply to
users with the “All Recipe #”, under the “Download” program area, privilege. Add: Adds a user. Update: Updates a user’s profile. Delete: Deletes a user. Exit : Exits from the current screen.

36
Change User Password The Change User Password screen looks like this:
User ID: This is the unique identifier for each user. It is an alphanumeric field with a maximum of 20
characters. Old User Password: This is the current password for the user. It is a case-sensitive alphanumeric field
with a maximum of 14 characters. Verify User: Verifies that the user ID exists and that the old password matches the one on file. New User Password: This is the new password chosen by the user. This is a case-sensitive
alphanumeric field with a maximum of 14 characters. Retype New User Password: This is the newly chosen password typed again for verification purposes.
This is a case-sensitive alphanumeric field with a maximum of 14 characters. Change Password Now : Updates the password information for this user. Exit: Exits from the change password screen.
37
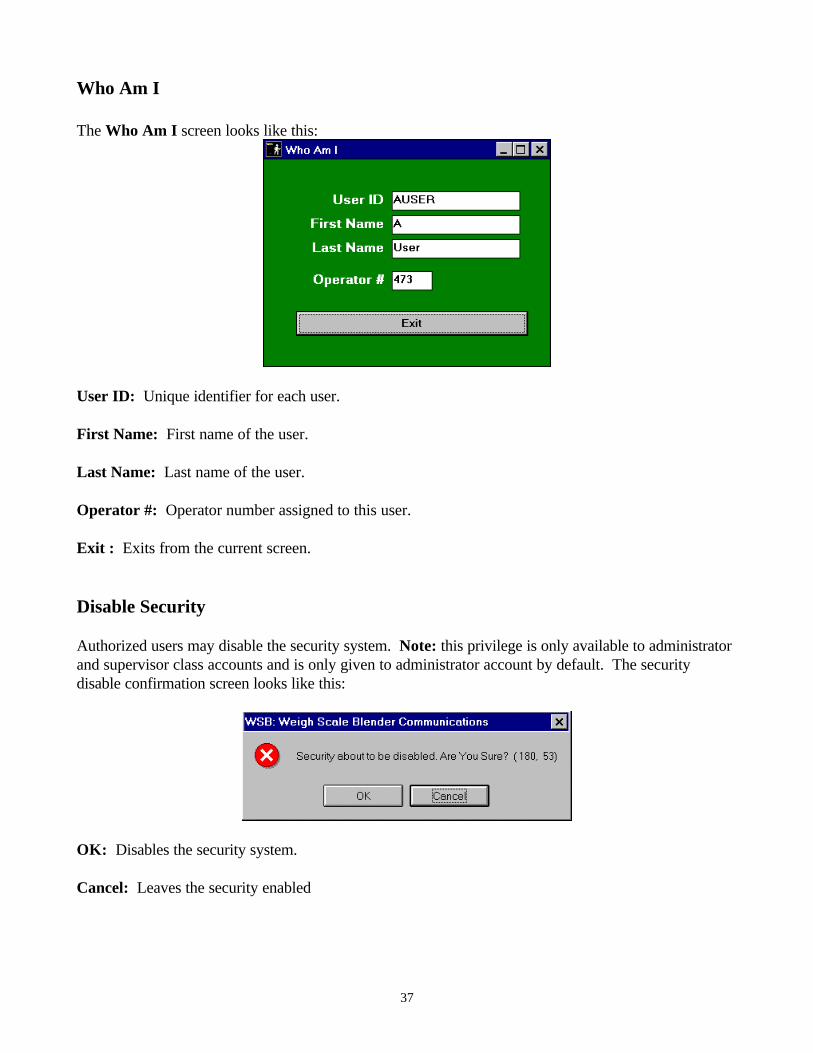
Who Am I The Who Am I screen looks like this:
User ID: Unique identifier for each user. First Name: First name of the user. Last Name: Last name of the user. Operator #: Operator number assigned to this user. Exit : Exits from the current screen. Disable Security Authorized users may disable the security system. Note: this privilege is only available to administrator and supervisor class accounts and is only given to administrator account by default. The security disable confirmation screen looks like this:
OK: Disables the security system. Cancel: Leaves the security enabled

38
About The About box will look like this:
The about box displays information about the program. It lists the version of the software, the version and serial number of the hardware key, and the number of authorized blenders. Load Certificate The Load Certificate screen looks like this:
The load certificate screen is used to make changes to the hardware key, such as adding the number of blenders with which the software can communicate.

39
Enter Master Certificate: The area in which to type a master certificate. Enter Sub Certificate: The area in which to type a sub certificate. Load Certificate: Processes the certificate. Exit : Exits from the current screen.

40
VIII. Command Line Parameters The following command line parameters change the behavior of the program.
/? Displays this usage information. /Debug Turns on the debug flag. Only to be used during program testing. Note, this
option may not be available in all versions. /Version Displays the program version number and copyright information. /Demo Puts the program in demonstration mode. Demonstration mode simulates all
controllers and uses a different set of files than the regular mode. /CopyToDemo Copies the regular file set to the demonstration mode file set and puts the
program in the demonstration mode. Note, this command is a ONE WAY copy. NO method is provided to copy the demonstration mode file set to the regular file set.
/SD:### Replace ### with the number of seconds to delay between checking blenders.
The range is from 0 second to 120 sec (2 minutes). The default is 2 seconds. /LD:#### Replace #### with the number of seconds to delay between the end of one
complete pass of all the blenders and the start of the next. The range is from 0 second to 1200 sec (20 minutes). The default is 10 seconds.
/CycleToCycle Logs totals when cycle number has changed. Also see /SD:### and /LD:####.

41
Demonstration Mode The first noticeable difference in demonstration mode is that the all screens have the word “DEMO” displayed in their title. For example, the demo screen of constant scan is displayed below.
Another difference in the demonstration mode is that this mode uses a different set of files than the regular mode. WSB ID numbers ranging from 1 to 100 are assumed to be 4 component software and 101 to 200 are assumed to be 12 component software. WSB ID numbers 201 to 254 are invalid and currently result in a communication error when scanned. All communication with a blender is simulated. The simulated blender makes one batch per minute, and rate (cycle time) is fixed. The throughput of a simulated blender is 12,000 g/hr for blenders weighing in tenths of grams (100 and 200 Series) and 540000 g/hr for blenders weighing in grams (400, 900, and 1800 Series). Recipe related information is stored for each simulated blender. The simulated blender tracks the recipe, recipe number, operator number, work order number, and totals for each component. Additionally, it automatically updates blender totals when the totals are requested and stores them in an extra database file.

42
IX. MLAN Files This section is intended to provide a better understanding of the information that is stored in each file. The data files are Microsoft Access 2.0 database files. This means that with a little knowledge of Microsoft Access you can use it to convert the data to another format. WINWSBS.MDB - The Setup File The SETUP file stores the following information: Communication Port: COM1, COM2, COM3, COM4 Weigh Unit: Pounds, Kilograms, Grams, Ounces Software: Four, Twelve, Both Weigh Scale ID #: Numbers from 1 to 254 Components: Hoppers 1 through 12 Date Format MM/DD/YY, DD/MM/YY, YY/MM/DD In addition to the setup information, rough totals for each blender are also stored in this file. When a retrieval is requested, a series of totals is sent back to the computer. These are cumulative weight totals for each component. This information is saved to the totals file. These totals are always growing unless you intentionally reset this data to zero. Interim totals for a single time period since the last retrieval are calculated by subtracting previous from current totals. This method of maintaining constantly growing totals assures that a single lost data line will not result in permanently lost information and subsequently inaccurate totals over an extended time period. There is never any need to clear totals to zero. When they overflow their register, the software detects this and makes the proper calculations to maintain accurate information. The totals will grow to 429,496,729.6 grams (or 4,294,967,296 grams, depending on the blender type) before overflowing to zero. Each recorded line of information retrieved contains the following information:
Current date Date at moment of retrieval Current time Time at moment of retrieval WSB ID number 3 digit permanent WSB ID number Blender WEIGHT type 1 digit; 2 or 9 (1/10 or full gram weight) SOFTWARE type 4 or 12 (four or twelve component) WORK ORDER number 6 digit work order number OPERATOR number 3 digit operator number RECIPE number 3 digit recipe number, if any is loaded Cycles Number of cycles dispensed
43
For each component: TYPE 1 character (R, N, C, or A). Four component software will show R, N, C, A for components 1, 2, 3, and 4. Twelve software will have R, N, or A. SETTING 3 digit current setting. USAGE WEIGHT Grams of materials used, this component.
TOTALS.MDB - The Totals File Material usage information is retrieved at certain specific times. 1. Whenever a time specified in the time file is reached, all controllers are polled for information. 2. Whenever a setting, work order number, operator number, or recipe number changes on any
single WSB controller, that controller is polled for information. The rough totals are stored in the WINWSBS.MDB file. As each new retrieval is made, the previous totals are extracted from the WINWSBS.MDB, and the material usage is calculated by taking the difference from the previous totals. The differences and header information (i.e. recipe number, operator number, etc.) is stored in the total file. The data is broken down into 4 tables easy of extraction while generating reports. TOTAL KEY table
Total Key Counter unique record number WSB ID 3 digit permanent WSB ID number Start Date Time the beginning date and time for the associate material usage Stop Date Time the ending date and time for the associate material usage RECIPE number 3 digit recipe number, if any is loaded Operator number 3 digit operator number Work Order number 6 digit work order number Cycles Number of cycles dispensed during this time period Rtcounter pointer to a retrieval timer record Flags a copy of the flags parameter from the controller Sequence batch sequence number
TOTAL DATA table
Total Key Counter unique record number Hopper position the hopper number that contain the material (1-12) MatCounter pointer to a material record Material Usage the amount of material used during this time period. This number is
expressed in grams.
44
TOTAL SETTING table Total Key Counter unique record number Hopper position the hopper number that contain the material (1-12) Material Type material type (e.g. Regrind, Natural, Additive, and Color) Setting actual setting used
TOTAL MISC table Total Key Counter unique record number Blender type 1 digit; 2 or 9 (1/10 or full gram weight) Software type 4 or 12 (four or twelve component)
The START / STOP DATE TIME are determined and assigned according to the date and time of the
computer, not the individual WSB controllers. The WSB ID number is a unique 3-digit number (001 to 254) that has been entered into the memory of
each WSB controller. This number must also be listed in the setup file of the computer. The BLENDER TYPE is either 2 or 9. All 100 and 200 series models will send back a 2. These models
use load cells that read weights in tenths of grams. All 400, 900, and 1800 series models will send back a 9. These models use load cells that read weights in full grams.
SOFTWARE type is either 4 or 12. A four indicates that four component software is being used by the
controller. A twelve indicates twelve component software is installed. The WORK ORDER number may be downloaded from the computer or entered at the controller using
the keypad. This 6-digit number is a part of all lines of data retrieved. Reports can summarize material used according to work order number.
The OPERATOR number may be downloaded from the computer or entered at the controller using the
keypad. This 3-digit number is a part of all lines of data retrieved. Reports can summarize material used according to operator number.
The RECIPE number allows you to cross reference material usage information to a materials file for
automatic and accurate inventory control. The recipe number is a 3-digit number that is stored in the recipe database.
The MATERIAL USAGE (weight) numbers are stored as grams and are converted to pounds (or
kilograms) when printed or displayed. Gram storage of numbers assures maximum accuracy and minimum error from rounding.

45
MATERIAL.MDB - The Materials File The MATERIALS file contains:
Code Name 10 character material identification name Description 40 character descriptive name Manufacturer 40 character supplier name Recipes number of recipes that this material appears in MatCounter unique record number MayDelete yes indicate that a user may delete this record
This file holds all of the various materials that are available for blending and that may become part of a recipe. All recipes are built using materials that reside in this list. Note, the total number of materials is limited to 2000. RECIPE.MDB - The Recipe File The RECIPE file contains:
Name 15 character identification name Recipe # 5 digit identification number (100 to 32767) Desc 40 character description Recipe type 4 (four component) or 12 (twelve component) BatchWt the desired weigh of a Batch in grams. Zero (0) indicates that the batch mode
will not be used with this recipe For each component: TYPE TYPE designation (R, N, A) is required by 12 software. Four software specifies (R, N, C, A) SETTING 3-digit setting required by the WSB MATERIAL 10-character material name necessary for correct inventory control
This file contains all the Material Blend RECIPES that you are going to run. Other blends are possible by entering settings individually but if you store a blend recipe for future retrieval, then it is stored here. As a recipe is built, all materials specified must reside in the MATERIALS file. Note, the total number of recipes is limited to 2000. RTIMES.MDB - The Retrieval Times File This file contains:
Rtcounter unique record number StartTime The first minute of the retrieval time period EndTime The last minute of the retrieval time period Description 40 characters, optional -for identification only FirstUse The date and time that the retrieval time was established LastUse The date and time that the retrieval time was last used. This field
indicates that the retrieval time is logically deleted but may still be needed to generate material usage reports.

46
Appendix A: Order Form
Maguire Products, Inc. 11 Crozerville Road Aston, PA 19014 USA Tel: 1-888-459-2412 Tel: 1-610-459-4300 Fax: 1-610-459-2700 E-Mail: [email protected]
Bill To: Ship To: ____________________________________ ____________________________________ ____________________________________ ____________________________________ ____________________________________ ____________________________________ ____________________________________ ____________________________________ Attn: _____________________________ Attn: _____________________________ Phone: _____________________________ Phone: _____________________________ Ship Method: FAX - fax number _______________________________________ E-Mail - e-mail address _______________________________________ US Mail United Parcel Service (UPS) Federal Express Payment Method: Purchase Order - _______________________________________ Net 30 days terms upon credit approval Check / Money Order COD Current: (The information needed below is found in the “About” box in the program.) Hardware key serial number 2 __ __ __ __ __ MLAN for Windows version # ________________ Number of authorized blenders ________________ MLAN-SL MLAN for Windows additional blender licenses Quantity _______
MLAN-SU MLAN for Windows software upgrade
Check if Quotation Only

47
Appendix B: User Security Options
Program Area Field Name Description
General Exit Determine if a user can end execution of the program.
Scan Scan Once all WSBs Allows a user to scan for a single time through each blender. Scan All WSBs Cont. Allows a user to scan multiple time through each blender. Pause Scan Allows a user to use the pause button on the scan screen. Exit Scan Allows a user to exit from the scan screen. Reprint Batch Labels Allows a user to reprint batch labels.
Examine Examine a WSB Allows a user to examine a single blender.
Recipe Recipe Edit Allows a user to access the recipe edit screen. Delete Recipe Allows a user to use the delete button on the recipe screen.
Download Download to a WSB Allows a user to access the recipe download screen. All WSBs # Allows a user to access any blender. This take precedence
over the Limit WSB list.
Limit WSB List A list of blender a user may change. Change Recipe # Allows a user to change the recipe running on a blender. The
blender must be within a user authorized list of blenders (see Limit WSB List). The recipe must be within a user authorized list of recipes (see Limit Recipe List).
All Recipe # Allows a user to download any recipe. This take precedence over the limit recipe list.
Limit Recipe List List recipes a user may download to a blender. Change Recipe Setting Allows a user to change the component percentages. Change Work Order # Allows a user to change the work order number running at a
blender.
Change Operator # Allows a user to change the operator number. If not granted, the current operator’s number will automatically be filled into the Operator number field.
Change Batch Weight Allows a user to change the batch weight. If not granted, the batch weight will automatically be filled into the Batch weight field.
Change Send Settings Allows a user to change the send setting. If not granted, the default send setting will automatically be filled into the Send setting field.
Material Material Edit Allows a user to access the material edit screen. Delete Material Allow a user to use the delete button on the material edit
screen.

48
Program Area Field Name Description
Setup General Settings Allows a user to access the program setup screen. Change WSB List Allows a user to enable and disable blenders. Change Hoppers Allows a user to enable and disable hoppers. Change Software Type Allows a user to change the type of controller that can be
downloaded.
Change Batch Mode Allows a user to enable and disable Batch mode. Change Label Printer Allows a user to Batch label printer. Change Label Format Allows a user to Batch label format. Change Language Allows a user to displayed language. Change Default Send
Settings Allows a user to change the default send setting
Retrieval Times Retrieval Times Edit Allows a user to access the retrieval times edit screen. Delete Retrieval Times Allow a user to use the delete button on the retrieval times edit
screen.
Initialize Initialize Files Allows a user to initialize all of the program database files.
Purge Purge Allows a user to purge totals from the totals file.
Synchronization Synchronize Database Files Allows a user to synchronize the totals file with other files.
Reports Dump Totals File Allows a user to run a "Dump Raw Totals" report. Communication Errors Allows a user to run a "Communications Error" report. Material Usage By Allows a user to run all of the material usage reports.
Security User Edit Allows a user to add and modify user access information. Change User Template Allows a user to change the group templates. Security Disable Allows a user to disable the program security features.

49
Appendix C: Default Template Settings
Default Template Program Area Field Name Admin sprvsr oper
General Exit Y Y N
Scan Scan Once all WSBs Y Y N Scan All WSBs Continuously Y Y Y Pause Scan Y Y N Exit Scan Y Y N Reprint Batch Labels Y Y N
Examine Examine a WSB Y Y Y
Recipe Recipe Edit Y Y N Delete Recipe Y Y N
Download Download to a WSB Y Y Y All WSBs # Y Y N Limit WSB List Y Y N Change Recipe # Y Y N All Recipe # Y Y N Limit Recipe List Y Y N Change Recipe Setting Y Y N Change Work Order # Y Y N Change Operator # Y Y N Change Batch Weight Y Y N Change Send Settings Y Y N
Material Material Edit Y Y N Delete Material Y Y N
Setup General Settings Y Y N Change WSB List Y Y N Change Hoppers Y N N Change Software TYpe Y N N Change Batch Mode Y Y N Change Label Printer Y Y N Change Label Format Y Y N Change Language Y Y N Change Default Send Settings Y Y N
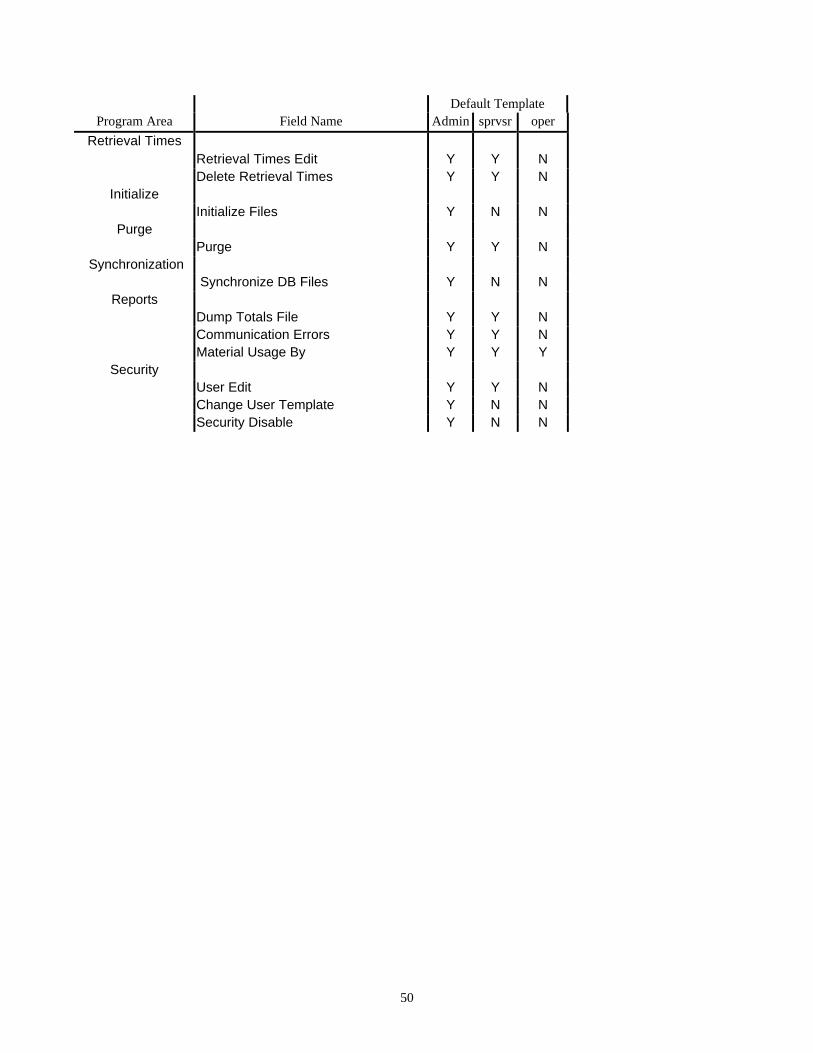
50
Default Template
Program Area Field Name Admin sprvsr oper
Retrieval Times Retrieval Times Edit Y Y N Delete Retrieval Times Y Y N
Initialize Initialize Files Y N N
Purge Purge Y Y N
Synchronization Synchronize DB Files Y N N
Reports Dump Totals File Y Y N Communication Errors Y Y N Material Usage By Y Y Y
Security User Edit Y Y N Change User Template Y N N Security Disable Y N N

51
Appendix D: Default Passwords The default password for the security enable section is “SecEnable”. The default password for the SysAdmin user is “Not Valid”. There is one space between the words Not and Valid. Note that, ALL passwords are case-sensitive. That is, “SecEnable” differs from “secenable”. When using the “/CopyToDemo” command line parameter all passwords are set equal to their corresponding user ID.
52
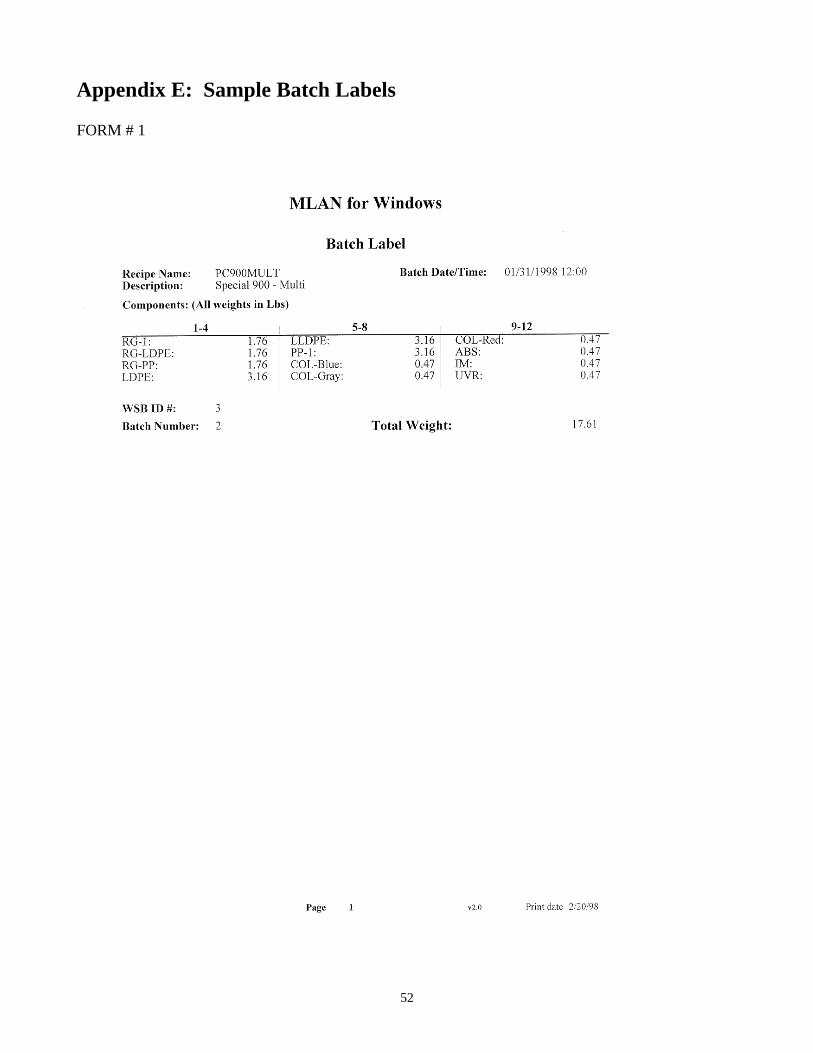
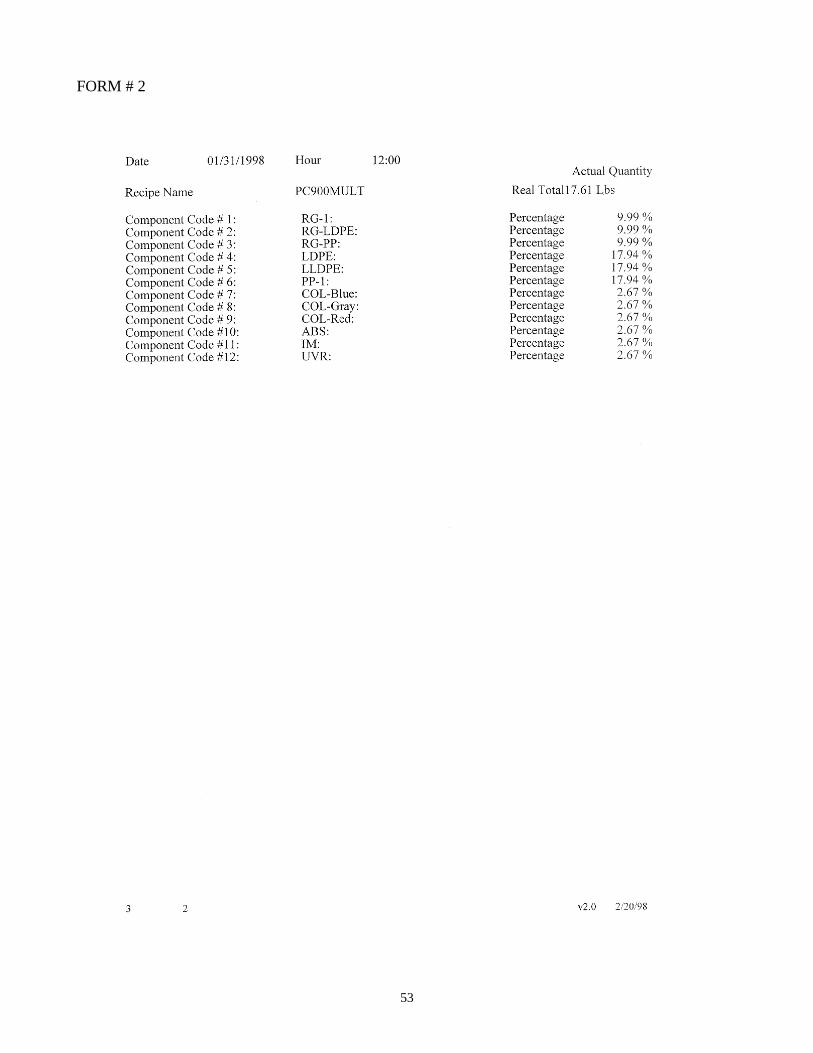
Appendix E: Sample Batch Labels FORM # 1
53
FORM # 2
54
Appendix F: Technical Support Request Form Name: _____________________________ Company: ____________________________________ Address: ____________________________________ ____________________________________ ____________________________________ Phone: _____________________________ Fax: _____________________________ E-Mail _____________________________ Current: (The information needed below is found in the “About” box in the program.) Hardware key serial number 2 __ __ __ __ __ MLAN for Windows version # ________________ Number of authorized blenders ________________ Problem: ______________________________________________________________________ __________________________________________________________________________________ __________________________________________________________________________________ Error Message: ________________________________________________________________ __________________________________________________________________________________ __________________________________________________________________________________ Error Message Number: ( __ __ __, __ __ __) A Maguire Products' Technical Support Specialist will contact you after receiving this form.

55
Send Technical Support Request To:
Your local distributor
OR
Europe:
Maguire Europe Unit 1, Brabazon Court, Borman Lichfield Road Industrial Estate Tamworth, Staffs B797TA UK
Tel: +44-(0)1827-61617 Fax: +44-(0)1827-67879
E-Mail: [email protected]
USA and All Others
Maguire Products, Inc. E-Mail: [email protected]
11 Crozerville Road Aston, PA 19014 USA
Tel: 1-888-459-2412
+1-610-459-4300 Fax: +1-610-459-2700