ma1904 inventor content center library advanced -...
TRANSCRIPT
Autodesk® Inventor® Content Center Library Advanced Management
Alessandro Gasso – Autodesk, Inc.
MA1904
In this class we will cover several workflows for customizing the Autodesk® Inventor® Content Center Library families. The topics are based on the most common questions from users for customizing the Content Center Library families. We will cover as well the workflows for updating the members inserted in the assemblies of the project before the customization of their families.
LearningObjectivesAt the end of this class, you will be able to:
Use the Material Guide for creating linked copies of a family Include the Steel Shape profile length in a custom property Edit the Custom Property Format of a parameter Set Part Number and Description in synch for Frames Set Browser name as Part Number and Filename Understand the workflow related to placing a component of a modified family from Content
Center in a Vault Project Update the Family members inserted in the assemblies
AbouttheSpeaker Alessandro Gasso is currently employed as Premium Support Specialist within Autodesk’s Premium Support Services – Global Services department. In his past eleven years with Autodesk he worked as Product Support Specialist for Inventor, supporting mainly South European Customers and Partners. Then, he has led for two years, the EMEA Inventor Product Support Team. In the last year, Alessandro was the EMEA Technical Lead of the Inventor product. Alessandro is a coauthor of the Being Inventive Inventor blog. Prior to Autodesk he worked for seven years as Mechanical Designer for a company in the Defense industry, using products as AutoCAD, Mechanical Desktop and Inventor. Alessandro is a native from Italy; he speaks English, Italian, French, Spanish and Portuguese and holds a Masters in electro-mechanical engineering from the University of Naples.

Autodesk® Inventor® Content Center Library Advanced Management
2
Preliminaryremark:
In order to modify the Library Families as described in the sections below you need to add a read/write library to the current project using the Configure Libraries dialog box.
Section1:CreatelinkedcopiesofaContentCenterfamilywithdifferentmaterialsusingtheMaterialGuideIn this section you find the procedure for creating copies of a Standard Content Center family in the way that each copy has a different material and that any change you make to the first copied family will apply to the other copies as well.
1. In the Content Center Editor, starting from one standard family and using the Material Guide, you need to create first an independent copy with a different material.

Autodesk® Inventor® Content Center Library Advanced Management
3
2. Then, from that family copy, with the Material Guide, create the other copies linked to parent family and assign to each copy a specific material.
3. After that, if you apply some changes to the first copied family and update the custom library, the changes will be propagated to the linked copied families.
Section2:IncludethelengthfromtheSteelShapeprofileinacustompropertyIn this section you find the procedure for editing a Structural Shapes family in the way that, inserting its members either with Frame Generator or with the command Place from Content Center, each frame contains a custom property displaying its length along with other properties (i.e.: Stock Number).
1. In the Content Center Editor, copy the Structural Shapes family in a Read/Write library.

Autodesk® Inventor® Content Center Library Advanced Management
4
2. Open the Family Table and add a new column.
3. In the Column Properties define the Expression as “={STOCKNUMBER}&-&<G_L>”. 4. Map the Column to the Custom Property and assign a name to it.
After that, inserting the frame you will get the profile length in the custom property, and the length value will update accordingly, if you edit the frame afterwards.

Autodesk® Inventor® Content Center Library Advanced Management
5
Section3:EditCustomPropertyFormatforastandardpartparameterIn this section you find the procedure for editing the format of a parameter you have included in a property of a Content Center family.
For instance you want to edit the format because you don’t want to display the Trailing Zeros and the Units String for this parameter in the custom property.
1. Open any member of the Family with the option “As Custom” setting any Length and save the file on the disk.
2. In the file parameter list, select the parameter, modify its Custom Property Format, removing the Trailing Zeros, Units String and save the file.

Autodesk® Inventor® Content Center Library Advanced Management
6
3. In the Content Center Editor, set the read/write library in the Library field and Replace Family Template selecting the modified component.
After that, inserting one family component either with Frame Generator or from the Content Center, the parameter will display as expected in the custom property.
Autodesk® Inventor® Content Center Library Advanced Management
7
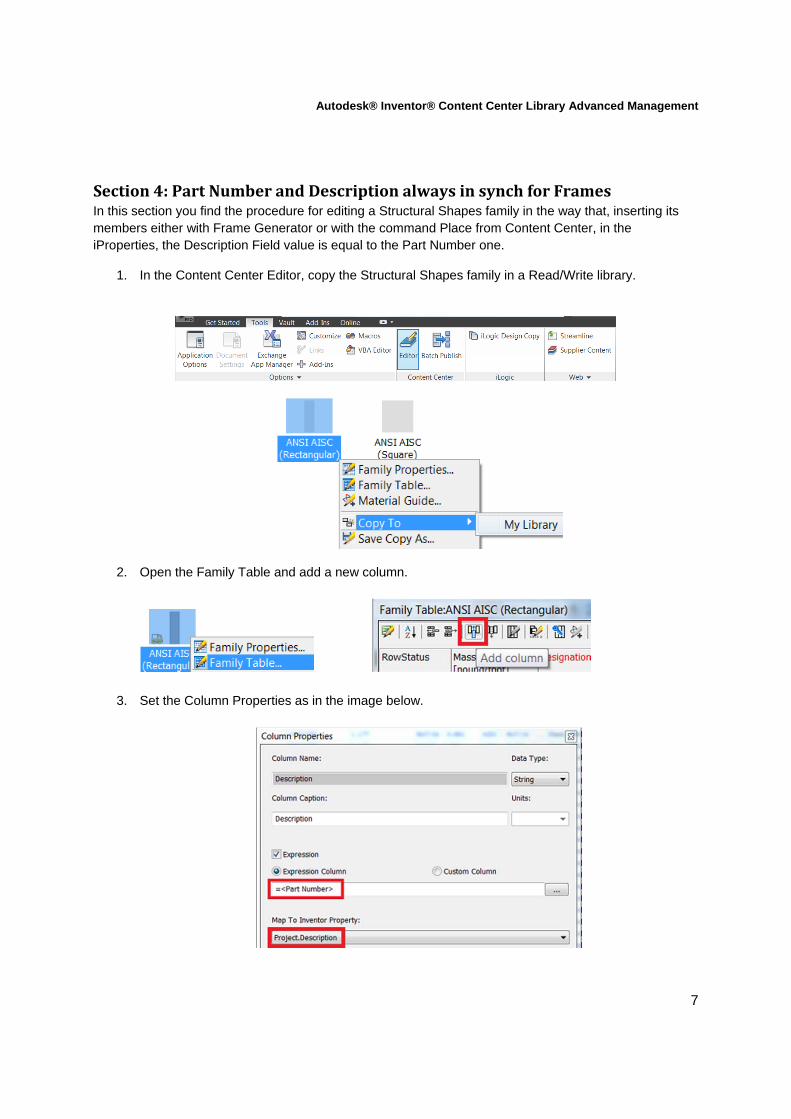
Section4:PartNumberandDescriptionalwaysinsynchforFramesIn this section you find the procedure for editing a Structural Shapes family in the way that, inserting its members either with Frame Generator or with the command Place from Content Center, in the iProperties, the Description Field value is equal to the Part Number one.
1. In the Content Center Editor, copy the Structural Shapes family in a Read/Write library.
2. Open the Family Table and add a new column.
3. Set the Column Properties as in the image below.
Autodesk® Inventor® Content Center Library Advanced Management
8
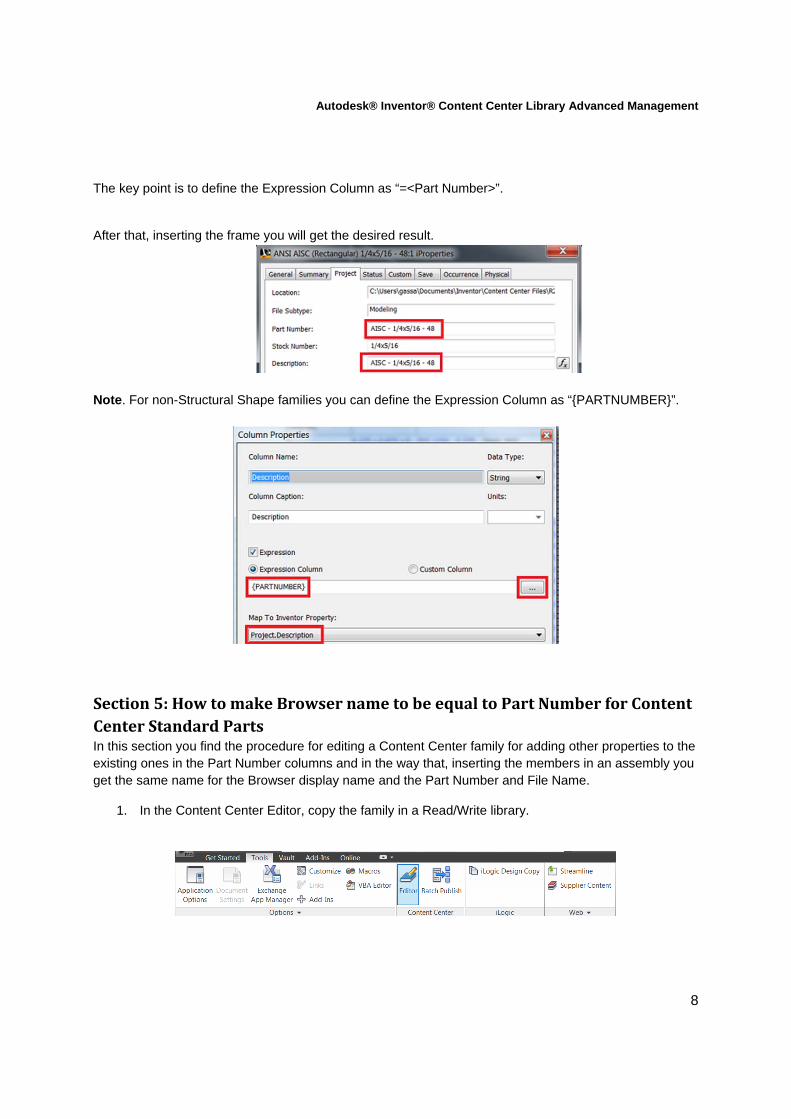
The key point is to define the Expression Column as “=<Part Number>”.
After that, inserting the frame you will get the desired result.
Note. For non-Structural Shape families you can define the Expression Column as “{PARTNUMBER}”.
Section5:HowtomakeBrowsernametobeequaltoPartNumberforContentCenterStandardPartsIn this section you find the procedure for editing a Content Center family for adding other properties to the existing ones in the Part Number columns and in the way that, inserting the members in an assembly you get the same name for the Browser display name and the Part Number and File Name.
1. In the Content Center Editor, copy the family in a Read/Write library.

Autodesk® Inventor® Content Center Library Advanced Management
9
2. Open the Family Table and add the required info editing the Part Number columns properties.
3. In the File Name columns properties define the Expression Column as “{PARTNUMBER}” and in the Map To Inventor Property field, select Member.Display Name.

Autodesk® Inventor® Content Center Library Advanced Management
10
After that, inserting one member of the family, the modifications appear correctly in the file properties and Browser name.
Section6:PlaceacomponentofamodifiedfamilyfromContentCenterinVaultProject
You are working with a Vault project where the Workspace and Content Center Files Folder of the project are mapped to the corresponding folder in Vault.
In the assemblies of the project have been inserted the components of one family.
The assemblies have been checked in the Vault and these members reside in the Vault as well under the folder of the family.

Autodesk® Inventor® Content Center Library Advanced Management
11
After that, you make some modification to the family of the components in the Content Center Editor.
In this section we are going to see what happens when you Place from the Content Center in an assembly of the project, one component of the modified family that has been already checked in the Vault before the modification, in different scenarios.
Component in
Vault
Component in local
CC Files folder
Refresh out‐of‐date standard parts during
placement
Scenario 1 Out‐of‐date Out‐of‐date NO
Scenario 2 Out‐of‐date Out‐of‐date YES
Scenario 3 Up‐to‐date Out‐of‐date NO
Scenario 4 Up‐to‐date Out‐of‐date YES
Scenario1
Component in
Vault
Component in local
CC Files folder
Refresh out‐of‐date standard parts during
placement
Scenario 1 Out‐of‐date Out‐of‐date NO
Scenario 2 Out‐of‐date Out‐of‐date YES
Scenario 3 Up‐to‐date Out‐of‐date NO
Scenario 4 Up‐to‐date Out‐of‐date YES
You have placed the component in the assemblies on your machine before modifying the family.
In this case, the component file is also in the Content Center Files family subfolder on your local machine in the location specified in the project.
Autodesk® Inventor® Content Center Library Advanced Management
12
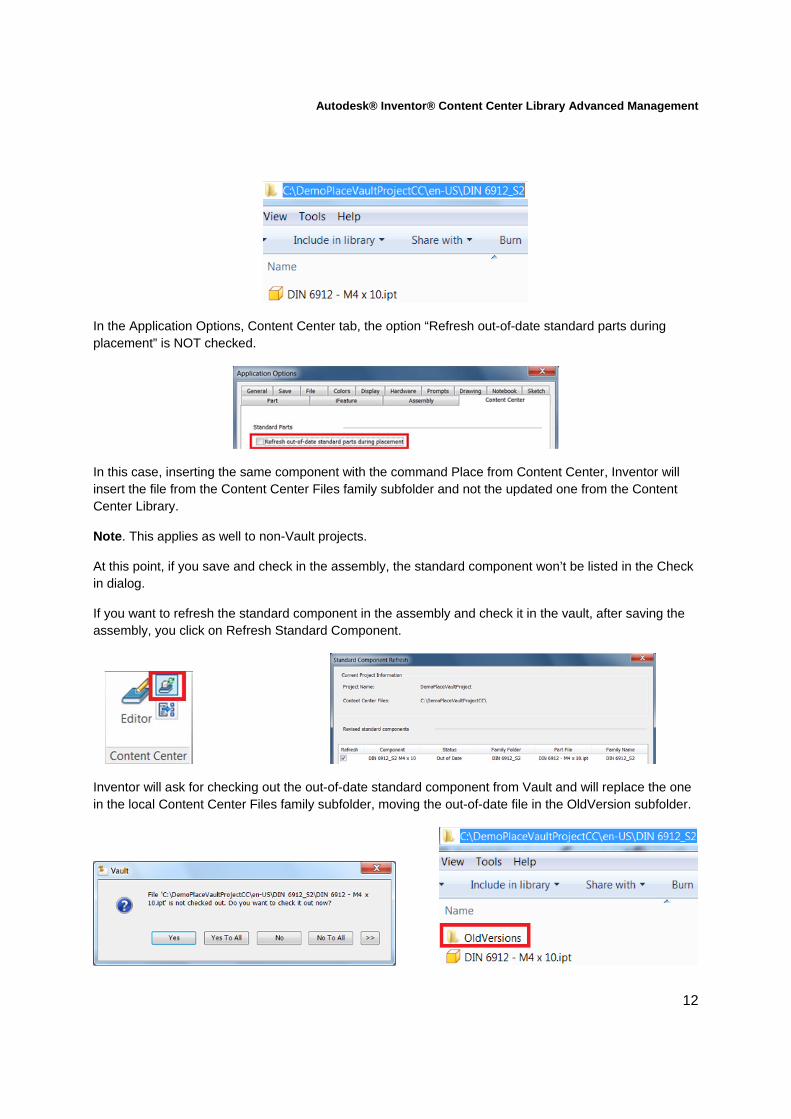
In the Application Options, Content Center tab, the option “Refresh out-of-date standard parts during placement” is NOT checked.
In this case, inserting the same component with the command Place from Content Center, Inventor will insert the file from the Content Center Files family subfolder and not the updated one from the Content Center Library.
Note. This applies as well to non-Vault projects.
At this point, if you save and check in the assembly, the standard component won’t be listed in the Check in dialog.
If you want to refresh the standard component in the assembly and check it in the vault, after saving the assembly, you click on Refresh Standard Component.
Inventor will ask for checking out the out-of-date standard component from Vault and will replace the one in the local Content Center Files family subfolder, moving the out-of-date file in the OldVersion subfolder.

Autodesk® Inventor® Content Center Library Advanced Management
13
Then, checking in the assembly, you check in as well the updated standard component in Vault.
Scenario2
Component in
Vault
Component in local
CC Files folder
Refresh out‐of‐date standard parts during
placement
Scenario 1 Out‐of‐date Out‐of‐date NO
Scenario 2 Out‐of‐date Out‐of‐date YES
Scenario 3 Up‐to‐date Out‐of‐date NO
Scenario 4 Up‐to‐date Out‐of‐date YES
Same as Scenario 1, but with the difference that in the Application Options, Content Center Files tab, the option “Refresh out-of-date standard parts during placement” IS checked.
In this case, inserting the same component with the command Place from Content Center, Inventor will ask to check out the out-of-date standard component from Vault and will replace the file in the local Content Center Files family subfolder with the up-to-date file, moving the out-of-date file in the OldVersion subfolder.

Autodesk® Inventor® Content Center Library Advanced Management
14
Note. This applies as well to non-Vault projects with the exception of the Vault check out dialog, of course.
Then, checking in the assembly, you check in as well the updated standard component in Vault.
Scenario3
Component in
Vault
Component in local
CC Files folder
Refresh out‐of‐date standard parts during
placement
Scenario 1 Out‐of‐date Out‐of‐date NO
Scenario 2 Out‐of‐date Out‐of‐date YES
Scenario 3 Up‐to‐date Out‐of‐date NO
Scenario 4 Up‐to‐date Out‐of‐date YES
You have placed the component in the assemblies on your machine before modifying the family.

Autodesk® Inventor® Content Center Library Advanced Management
15
A Co-worker, working on the same project has inserted the up-to-date component in one assembly and checked it in the Vault.
So, you have the out-of-date component file in the local Content Center Files family subfolder on your machine in the location specified in the project, and the up-to-date component in the Vault and, of course, the Content Center Library.
In the Application Options, Content Center Files tab, the option “Refresh out-of-date standard parts during placement” is NOT checked.
In this case, inserting the same component with the command Place from Content Center, Inventor will insert the file from the Content Center Files family subfolder and not the updated one from the Content Center Library or Vault.
But, if you switch to the Vault browser in Inventor, the icon near the standard component tells you that the one in Vault is different from the local component Inventor has inserted.
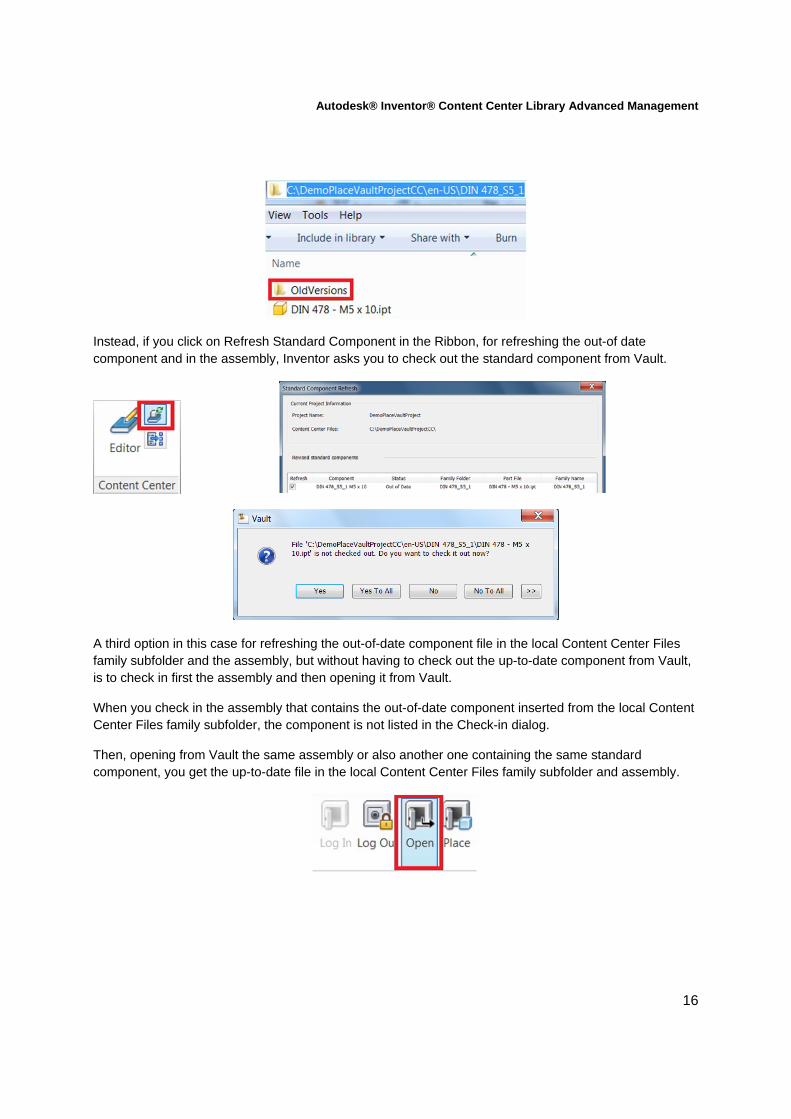
At this point, you can right-click the standard component and select “Get Revision” or “Refresh from Vault”, the out-of-date file in the local Content Center Files family subfolder will be replaced by the up-to-date one from the Vault and moved in the OldVersion folder and you get the up-to-date component in the assembly as well.
Autodesk® Inventor® Content Center Library Advanced Management
16
Instead, if you click on Refresh Standard Component in the Ribbon, for refreshing the out-of date component and in the assembly, Inventor asks you to check out the standard component from Vault.
A third option in this case for refreshing the out-of-date component file in the local Content Center Files family subfolder and the assembly, but without having to check out the up-to-date component from Vault, is to check in first the assembly and then opening it from Vault.
When you check in the assembly that contains the out-of-date component inserted from the local Content Center Files family subfolder, the component is not listed in the Check-in dialog.
Then, opening from Vault the same assembly or also another one containing the same standard component, you get the up-to-date file in the local Content Center Files family subfolder and assembly.

Autodesk® Inventor® Content Center Library Advanced Management
17
Scenario4
Component in
Vault
Component in local
CC Files folder
Refresh out‐of‐date standard parts during
placement
Scenario 1 Out‐of‐date Out‐of‐date NO
Scenario 2 Out‐of‐date Out‐of‐date YES
Scenario 3 Up‐to‐date Out‐of‐date NO
Scenario 4 Up‐to‐date Out‐of‐date YES
Same as Scenario 3, but with the difference that in the Application Options, Content Center Files tab, the option “Refresh out-of-date standard parts during placement” IS checked.
Inserting the same component with the command Place from Content Center, Inventor will ask to check out the standard component from Vault and will replace the file in the local Content Center Files family subfolder with the up-to-date file, moving the out-of-date file in the OldVersion subfolder.
Also in this case, if you want to avoid the check out the up-to-date standard component from the Vault, you can open from Vault an assembly that contains that component or get it from Vault Explorer.

Autodesk® Inventor® Content Center Library Advanced Management
18
In this way you will get the up-to-date file in the local Content Center Files family subfolder.
Note. For a graphical representation of the four workflows, please, refer to the document MA1904 – Addendum for Section 6.
Section7:UpdatethefamilymembersinsertedintheassembliesoftheprojectIn this section you find the procedures for updating the Content Center Family members inserted in the assemblies of the project, before editing the Family Table and / or the Template.
RefreshtheContentCenterfamilymembersinsertedinoneorfewassemblies.1. Open the assembly. 2. Menu Manage > Content Center > Refresh Standard Components.
3. In the following dialog click Refresh.
Autodesk® Inventor® Content Center Library Advanced Management
19
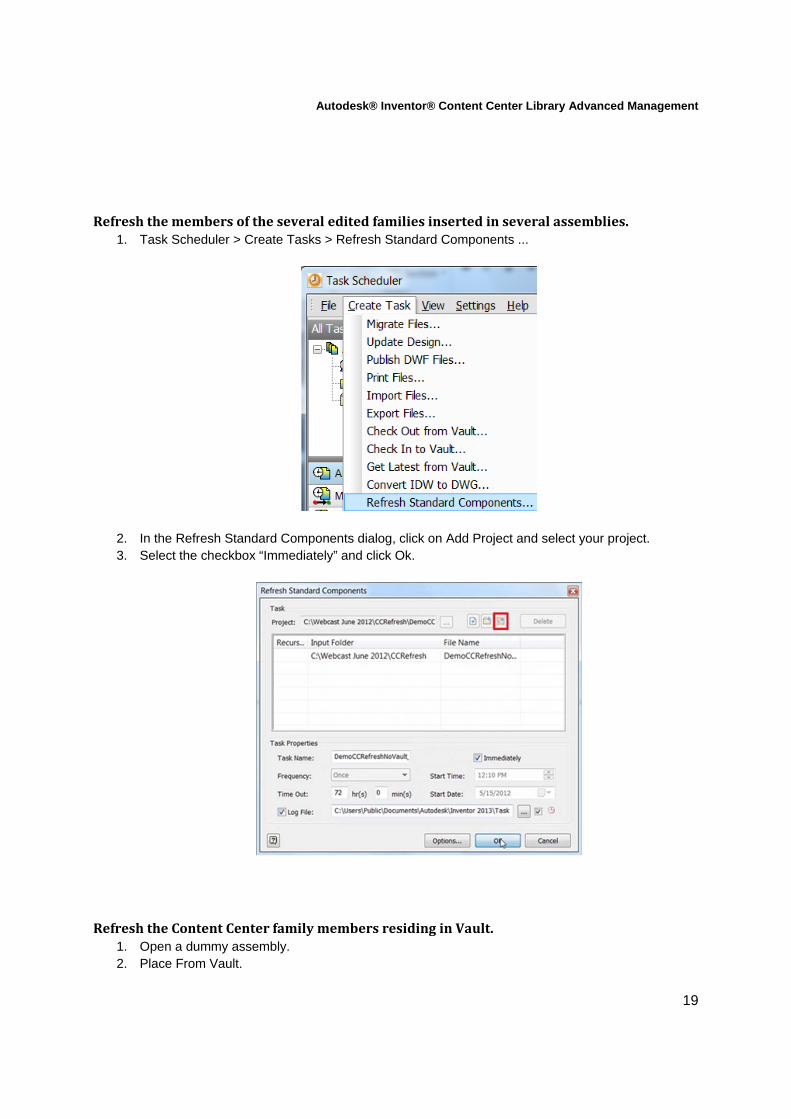
Refreshthemembersoftheseveraleditedfamiliesinsertedinseveralassemblies.1. Task Scheduler > Create Tasks > Refresh Standard Components ...
2. In the Refresh Standard Components dialog, click on Add Project and select your project. 3. Select the checkbox “Immediately” and click Ok.
RefreshtheContentCenterfamilymembersresidinginVault.1. Open a dummy assembly. 2. Place From Vault.

Autodesk® Inventor® Content Center Library Advanced Management
20
3. In the Select File from Vault dialog, in the Look in filed, locate the subfolder corresponding to the family you have modified in the Content Center Editor.
4. Shift + select all the files in this folder and insert them in the assembly. 5. Eventually, repeat the steps 3 and 4 for other families you have modified. 6. Save the assembly. 7. Menu Manage > Content Center > Refresh Standard Components. 8. In the following dialog click Refresh. 9. In the following Vault dialog, click “Yes to all” for checking out all the components to refresh.
10. When the process is complete, check in the assembly.

Autodesk® Inventor® Content Center Library Advanced Management
21
11. (Optional) Delete the dummy assembly from the Vault.
This procedure allows you to refresh the family members without having to check out / in several assemblies or all the assemblies in the Vault. Besides, it doesn’t change the version number of the assemblies, but it just replaces the Content Center members in Vault with the new versions.
Note
The procedures of this section do not refresh the family members inserted in the assemblies with the option “As custom”
For refreshing the Structural Shapes family members inserted with Frame Generator, use the
Refresh command (Design tab Frame panel Refresh). The command “Refresh” for Frame Generator applies just the changes done in the Family Table
and not in the Family Template (i.e.: it applies the changes described in Section 2, but not the ones in Section 3).

Autodesk® Inventor® Content Center Library Advanced Management
22
Summary
We had a good look at the possible solutions to some recurring questions from the users for customizing the Content Center Library.
We have seen as well the recommended workflows for updating the members inserted in the assemblies of the project in different scenarios.
For more tips and trick about these topics, refer to the Being Inventive Inventor blog, under the Content Center/ADMS Category.
Thanks for attending!