lx immersion circulator - labomoderne · 2015-04-14 · unpacking your immersion circulator ... 4...
TRANSCRIPT

110-874 PSC/EN 25 February 2014
LX Immersion Circulator
Operator’s Manual


110-874 1
Table of ContentsIntroduction ........................................................................ 2General Information ............................................................ 3
General Safety Information ................................................ 3Safety Recommendations .................................................. 4Regulatory Compliance and Testing .................................. 5Unpacking Your Immersion Circulator ................................ 6Package Contents ............................................................. 6Controls and Components ................................................. 7
Installation and Startup ...................................................... 9Normal Operation ............................................................. 10
Buttons and Controls ....................................................... 10Turning Your Circulator ON .............................................. 10Main Operational Displays ................................................11Set-Up Sub-Menus .......................................................... 12Adjusting the Temperature Set Point ................................ 13Selecting the Temperature Unit ....................................... 13Setting and Using the Timer ............................................ 14Loss of Power Restart ..................................................... 14Alarm Messages ............................................................. 15
Routine Maintenance and Troubleshooting ..................... 15Maintaining Clear Bath Water .......................................... 15Cleaning Your Immersion Circulator ................................ 16Resetting the Over-Temperature Safety ........................... 17Troubleshooting Chart ..................................................... 17
Technical Information ....................................................... 19Performance Specifications ............................................. 19Reservoir Fluids .............................................................. 19
Equipment Disposal (WEEE Directive) ............................ 20Service and Technical Support ........................................ 21Warranty ............................................................................ 21

2 110-874
WARNING: Circulating Baths are not intended for directly controlling the temperature of foods, pharmaceuticals, medicines or other objects which may be ingested by or injected in humans or animals. Any such objects must be isolated from contact with the bath fluids and bath surfaces.
!
Introduction
Thank you for choosing the LX Immersion Circulator. It is intended for the precise temperature control of suitable liquids in a reservoir.
Here are some of the features of the LX Immersion Circulator:• Simple, intuitive operation• Displays actual and set point temperature simultaneously• Powerful pump• Attaches securely to both flat and rounded tank walls• Converts any tank or vessel up to 20 liters into a reliable
circulating bath• Fully enclosed housing prevents direct contact with pump and
heater• Suitable for use with Class I non-flammable fluids per DIN
12876-1
We recommend that you read the Operator’s Manual thoroughly before you begin.
110-874 3
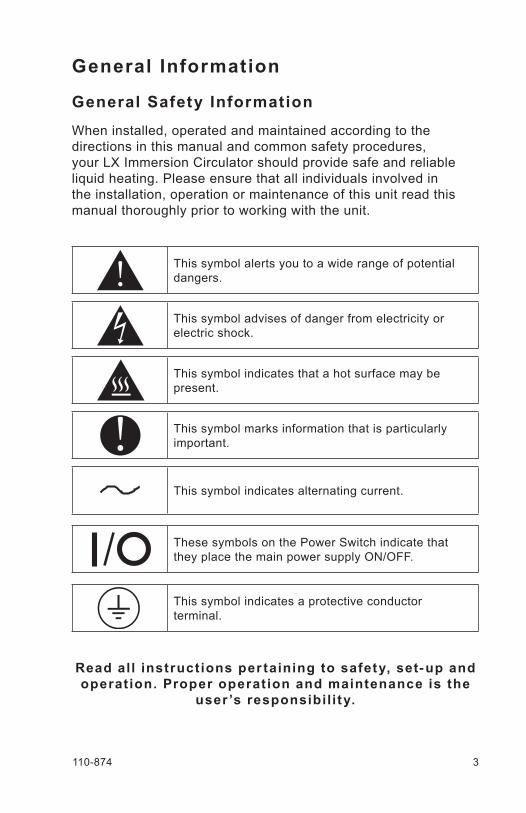
This symbol alerts you to a wide range of potential dangers.!
General Information
When installed, operated and maintained according to the directions in this manual and common safety procedures, your LX Immersion Circulator should provide safe and reliable liquid heating. Please ensure that all individuals involved in the installation, operation or maintenance of this unit read this manual thoroughly prior to working with the unit.
General Safety Information
Read all instructions per taining to safety, set-up and operat ion. Proper operat ion and maintenance is the
user ’s responsibil i ty.
This symbol advises of danger from electricity or electric shock.
This symbol indicates a protective conductor terminal.
This symbol marks information that is particularly important.!This symbol indicates that a hot surface may be present.
This symbol indicates alternating current.
These symbols on the Power Switch indicate that they place the main power supply ON/OFF.

4 110-874
Safety RecommendationsTo prevent injury to personnel and/or damage to property, follow your workplace’s safety procedures when operating this equipment. You should comply with the following safety recommendations:
WARNING:• This Immersion Circulator is suitable only for use
with Class I non-flammable fluids (per DIN 12876-1).
• Be aware of the chemical hazards that may be associated with the bath fluid used. Observe all safety warnings for the fluids used as well as those contained in the material safety data sheet.
• Use only recommended bath fluids.• Use only non-acid bath fluids.• Use fluids that satisfy safety, health and equipment
compatibility requirements.
!
WARNING:• Connect the power cord on this unit to a properly
grounded power outlet. Make certain that the outlet is the same voltage and frequency as your unit.
• Never operate the unit with a damaged power cord.• The use of an extension cord is not recommended.• Turn the unit OFF and disconnect mains power
before performing any maintenance or service.
WARNING:• Never operate the Circulator without bath fluid in
the reservoir. Periodically check the reservoir to ensure that the liquid depth is within acceptable levels. Refill the reservoir using the same bath fluid that is already in the reservoir. Bath oil must not contain any water contaminants and should be preheated to the actual bath temperature before adding as there is an explosion hazard at high temperatures.
• Drain all fluid from the reservoir before moving or lifting. Be sure to follow your organization’s procedures and practices regarding the safe lifting and relocation of heavy objects.
• Turn electrical power to the unit OFF and remove the Immersion Circulator from reservoir before draining.
!

110-874 5
WARNING: It is the user’s responsibility to properly decontaminate the unit in the event hazardous materials are spilled on exterior or interior surfaces. Consult manufacturer if there is any doubt regarding the compatibility of decontamination or cleaning agents.
!
WARNING:• Allow the bath fluid to return to ambient
temperature before draining.• Keep within the 85°C maximum operating
temperature limit if using a polycarbonate bath.
Regulatory Compliance and TestingThe following are the compliance certifications for the equipment.
120V Units - ETL Cer t i f icat ionUL 61010-1 / CSA C22.2 No. 61010-1, 2nd Edition 07/12/04 (R 10/28/2008)IEC 61010-2-010: 2003, CSA C22.2 No. 61010-2-010:2004/07/01 Ed:2 (R2009)IEC 61010-2-051: 2003, CSA C22.2 No. 61010-2-051:04 Ed:2 (R2009)
240V Units - CE ComplianceLow Voltage Directive 2006/95/ECEN 61010-1, 2nd Edition Issued March, 2001EN 61010-2-010 2nd Edition Issued October, 2003EN 61010-2-051 2nd Edition Issued October, 2003
EMC Directive 2004/108/ECEN 61326-1: 2006
Machinery Directive 2006/42/EC Annex I
All Units - RoHS2 2011/65/EU
6 110-874
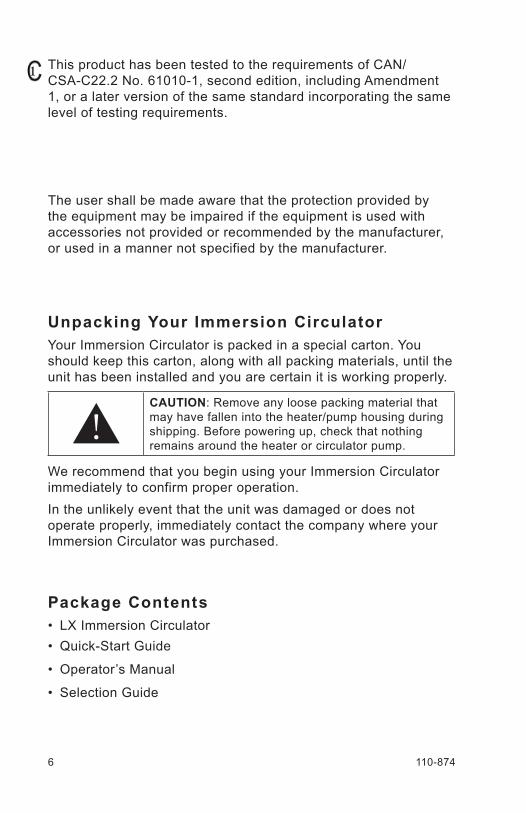
Unpacking Your Immersion CirculatorYour Immersion Circulator is packed in a special carton. You should keep this carton, along with all packing materials, until the unit has been installed and you are certain it is working properly.
CAUTION: Remove any loose packing material that may have fallen into the heater/pump housing during shipping. Before powering up, check that nothing remains around the heater or circulator pump.
!We recommend that you begin using your Immersion Circulator immediately to confirm proper operation.In the unlikely event that the unit was damaged or does not operate properly, immediately contact the company where your Immersion Circulator was purchased.
• LX Immersion Circulator• Quick-Start Guide
• Operator’s Manual
• Selection Guide
Package Contents
This product has been tested to the requirements of CAN/CSA-C22.2 No. 61010-1, second edition, including Amendment 1, or a later version of the same standard incorporating the same level of testing requirements.
The user shall be made aware that the protection provided by the equipment may be impaired if the equipment is used with accessories not provided or recommended by the manufacturer, or used in a manner not specified by the manufacturer.

110-874 7
Controls and Components
Backlit Display
Run Button
Stop Button
Increase Value Button
Decrease Value Button
Menu Button
Cover Plate for Over-Temperature Protection Reset Button
Minimum Liquid Level Line
Front Flow Port
Maximum Liquid Level Line

8 110-874
Mounting Clamp
Rear Flow Port
Power Switch
Electrical Power Cord
Removable Heater/Pump Access Cover
Circulating
Heating
Actual Fluid Temperature
Set Point Temperature
Countdown Timer

110-874 9
Installation and Star tup
1. Attach the Immersion Circulator to the reservoir (user-supplied). The mounting clamp mounts securely to both flat and rounded tank walls. Allow a minimum of 1.3 cm / 0.5 inch clearance between the bottom of the Circulator’s housing and the bottom of the reservoir.
2. Add liquid to the reservoir. The liquid in the reservoir should be maintained somewhere between the “Maximum” and “Minimum” liquid level lines embossed on the housing.
WARNING: See Reservoir Fluids (page 19).
WARNING: Read the safety data sheet for the bath fluid being used carefully before filling reservoir.
WARNING: If the proper fluid level is not maintained, the heater coil may become exposed and possibly damaged (fluid level too low) or the bath may overflow (fluid level too high).
!
3. Plug the power cord into a properly grounded electrical outlet. The LCD will light and the actual and set point temperatures will appear on the display.
WARNING: Make certain that the electrical outlet is the same voltage and frequency as your Circulator; the correct voltage and frequency are indicated on the identification label on the back of the unit.The use of an extension cord is not recommended. If one is necessary, it must be properly grounded and capable of handling the total wattage of the unit. The extension cord must not cause more than a 10% drop in voltage to the unit.
Minimum Liquid Level Line
Maximum Liquid Level Line
10 110-874
Normal Operation
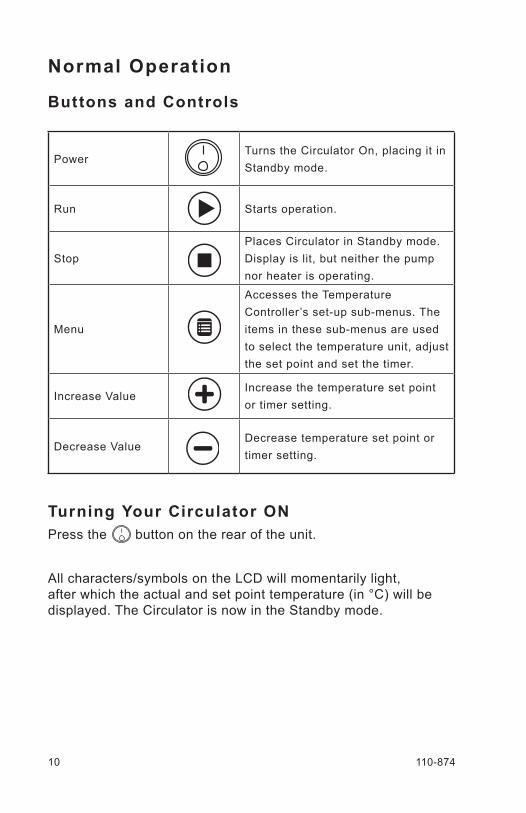
Buttons and Controls
PowerTurns the Circulator On, placing it in Standby mode.
Run Starts operation.
StopPlaces Circulator in Standby mode. Display is lit, but neither the pump nor heater is operating.
Menu
Accesses the Temperature Controller’s set-up sub-menus. The items in these sub-menus are used to select the temperature unit, adjust the set point and set the timer.
Increase ValueIncrease the temperature set point or timer setting.
Decrease ValueDecrease temperature set point or timer setting.
Turning Your Circulator ONPress the button on the rear of the unit.
All characters/symbols on the LCD will momentarily light, after which the actual and set point temperature (in °C) will be displayed. The Circulator is now in the Standby mode.

110-874 11
Main Operational Displays
Circulating
Heating*
Actual Bath Temperature
Set Point Temperature
Set Point Temperature/ Countdown Timer (alternating display)
Standby Mode
Run Mode
Actual Bath Temperature
*May be shown if set temperature is greater than actual temperature.

12 110-874
Set-Up Sub-Menus
IMPORTANT: The Circulator’s set-up sub-menus cannot be set/changed while the Circulator is heating or circulating the bath liquid. You must first place the unit in Standby by pressing .
!Press the Menu button to access the Temperature Controller’s set-up sub-menus.
To accept a value in a sub-menu, press the button.
Sub-MenuSelection /
RangeTo Change Current Value
Temperature Set Point
5° to 98°C
41° to 208 °F Press or until the desired temperature value is displayed.
Temperature Unit°C
°FPress once for °C.
Press three times for °F.
Timer 00:05 to 99:00Press twice and then enter
the desired time period using
and buttons.
110-874 13
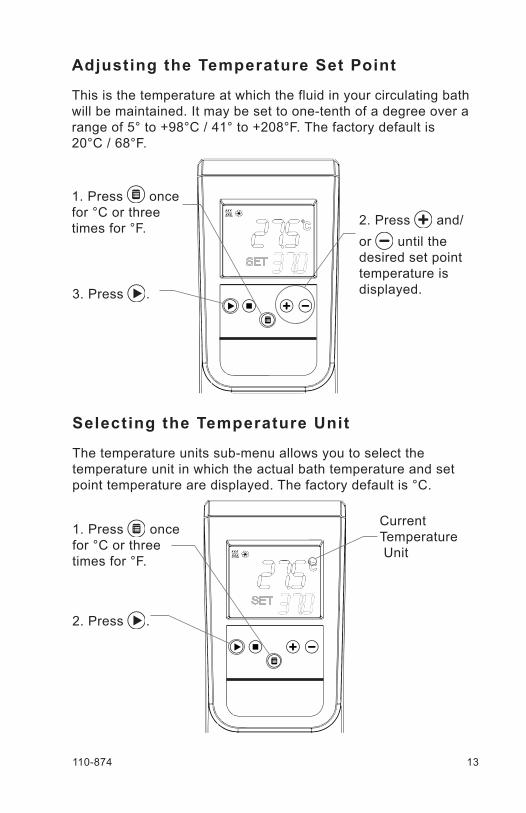
Adjusting the Temperature Set Point
This is the temperature at which the fluid in your circulating bath will be maintained. It may be set to one-tenth of a degree over a range of 5° to +98°C / 41° to +208°F. The factory default is 20°C / 68°F.
1. Press once for °C or three times for °F. 2. Press and/
or until the desired set point temperature is displayed.3. Press .
The temperature units sub-menu allows you to select the temperature unit in which the actual bath temperature and set point temperature are displayed. The factory default is °C.
2. Press .
1. Press once for °C or three times for °F.
Current Temperature Unit
Selecting the Temperature Unit

14 110-874
Setting and Using the Timer
Your LX Immersion Circulator has a timer that can be set for time periods from 5 minutes to 99 hours. The factory default is 24:00 hours.
2. Press and/or until the desired time period is displayed.
When the timer is running, the remaining time and the set point temperature appear alternately on the display. When the time period set has elapsed, the Circulator will beep three times, go silent for 15-20 seconds and then repeat. The Circulator will continue circulating the bath fluid and maintaining it at the set point temperature until the Stop button is pressed; this also resets the timer.
3. Press .
1. Press twice.
Loss of Power Restar t
If electrical power lost while your Circulator is in use, it will begin operating automatically once power is restored, with the temperature displayed in °C and the timer set for 24:00 hours.
WARNING: The unit will start automatically after a disruption in electrical power.!
110-874 15
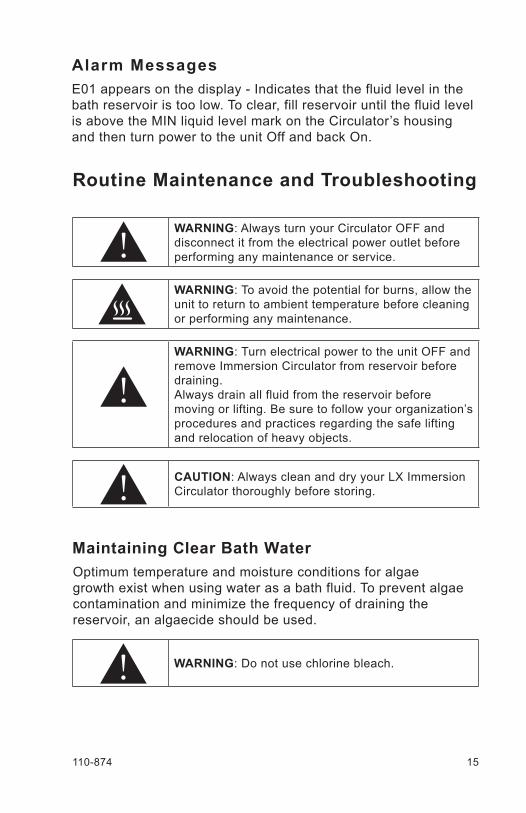
Alarm MessagesE01 appears on the display - Indicates that the fluid level in the bath reservoir is too low. To clear, fill reservoir until the fluid level is above the MIN liquid level mark on the Circulator’s housing and then turn power to the unit Off and back On.
Routine Maintenance and Troubleshooting
WARNING: Turn electrical power to the unit OFF and remove Immersion Circulator from reservoir before draining. Always drain all fluid from the reservoir before moving or lifting. Be sure to follow your organization’s procedures and practices regarding the safe lifting and relocation of heavy objects.
!
WARNING: To avoid the potential for burns, allow the unit to return to ambient temperature before cleaning or performing any maintenance.
WARNING: Always turn your Circulator OFF and disconnect it from the electrical power outlet before performing any maintenance or service.!
CAUTION: Always clean and dry your LX Immersion Circulator thoroughly before storing.!
Maintaining Clear Bath WaterOptimum temperature and moisture conditions for algae growth exist when using water as a bath fluid. To prevent algae contamination and minimize the frequency of draining the reservoir, an algaecide should be used.
WARNING: Do not use chlorine bleach.!

16 110-874
Cleaning Your Immersion Circulator
Temperature Controller
Place the unit in Standby by pressing , press on the rear of the unit to turn the unit OFF and unplug power cord from electrical outlet.Remove Temperature Controller from bath reservoir and, keeping it upright, wipe the housing with a clean cloth dampened with a mild detergent and water or mild all-purpose cleaner.
WARNING: It is the user’s responsibility to properly decontaminate the unit in the event hazardous materials are spilled on exterior or interior surfaces. Consult the manufacturer if there is any doubt regarding the compatibility of decontamination or cleaning agents.
!
CAUTION: Do not spray cleaning liquids directly onto the Temperature Controller or allow them to enter the Controller’s vents. Do not use abrasives as these could scratch the housing or the digital display.
!CAUTION: Never immerse the Circulator’s controls or display in water or other liquids or place under running water. Do not clean the unit in a glassware washer.
!Bath Reservoir and Wetted ComponentsA vinegar solution or calcium/lime/rust remover can be used to remove mineral deposits from the Temperature Controller’s wetted parts. The cleaner should be added to the bath reservoir at the prescribed dosage and circulated at 60°C / 140°F until the scale is removed. Pump ImpellerIn the unlikely event that debris becomes lodged in the pump impeller, a soft brush can be used to remove any lodged particles. If necessary, soak in a solution of distilled water and vinegar to soften before brushing.
CAUTION: Do not use hard utensils or abrasive pads to remove trapped debris.!

110-874 17
Resetting the Over-Temperature Safety
Troubleshooting Char t
Problem Possible Causes Corrective Action
Unit does not run (Digital Display is blank)
No power to unit
Over-temperature safety has tripped due to high liquid temperature
Check that the electrical cord is secure and connected to an operating electrical outlet.
Allow fluid in the reservoir to cool and reset over-temperature safety (see above).
Unit does not run (Neither the Circulating nor Heating icon is lit)
Unit in Standby mode
Press Run button.
No fluid circulation
Unit in Standby mode
Insufficient fluid in reservoir
Pump impeller jammed
Press Run button.
Add fluid to reservoir.
Inspect pump and remove debris as required.
*Over-Temperature Safety Reset Button
The Circulator’s automatic over-temperature safety* removes power from the unit whenever the fluid temperature exceeds a factory-set temperature. This safety is reset as follows:1. Place the power switch on the rear of the unit in the Off
position.2. Disconnect the electrical power cord from the electrical outlet.3. Allow the fluid in the reservoir to cool.4. Remove the plate covering the red reset button.5. Press the red reset button.6. Replace the cover plate.7. Restore power to the unit.8. Press the Run button.
If the problem persists, contact your supplier.

18 110-874
Problem Possible Causes Corrective Action
Insufficient circulation
Fluid viscosity too high
Low line voltage
Replace with lower viscosity bath fluid.
Check and correct as required.
Fluid circulating but circulating icon not lit
Momentary electronics problem
Turn power to the unit Off, back On and then press the Run button.
Unit does not heat
Unit in Standby mode
Insufficient fluid in reservoir
Temperature set point too low
Press Run button.
Add fluid to reservoir.
Increase temperature set point.
Insufficient Heating
Insufficient circulation
Low line voltage
Ambient temperature too cool
Excessive heat loss
See Insufficient circulation, above.
Check and correct as required.
Increase ambient temperature or relocate unit.
Check for vapor/heat loss from internal reservoir.
Temperature unstable
Insufficient circulation
Debris or mineral build-up on pump, heater or temperature sensor.
Check pump flow and operation.
Clean as required.
E01 appears on the display
Water level in the reservoir is too low
Add fluid to the reservoir and then turn power to the unit Off and then back On.

110-874 19
Technical Information
Operating Temperature Range:
Temperature Stability:Heater Wattage:Electrical Requirements:
Environmental Conditions
Per formance Specif ications
Specifications subject to change without notice.
Attainable Temperatures:Your LX Immersion Circulator can be used with reservoirs of various capacities and shapes as well as different fluids. These variables may adversely affect temperature accuracy and stability.
Ambient +10° to 98°C Ambient +20° to 208°F
±0.07°C / ±0.1°F
1200 watts
120V, 60Hz, 10 amps or 240V, 50Hz, 6 amps
Indoor use only Maximum Altitude: Operating Ambient: Relative Humidity: Installation Category: Pollution Degree: Ingress Protection: Output Waveform:
2000 meters 5° to 40°C (41° to 104°F) 85%, non-condensing II 2 IP X0 Sinusoidal
Reservoir Fluids
A variety of fluids can be used with your Immersion Circulator. The bath fluid must be chemically compatible with the reservoir and the materials in your Immersion Circulator, and must be suitable for the desired temperature range.
WARNING: Do not use a flammable liquid as a bath fluid as a fire hazard may result.!WARNING: Always use fluids that satisfy safety, health and equipment compatibility requirements.!
20 110-874
For optimum temperature stability, the fluid’s viscosity should be 50 centistokes (cSt) or less at its lowest operating temperature. This permits good fluid circulation and minimizes heating from the pump.
WARNING: DO NOT USE THE FOLLOWING LIQUIDS:• Automotive antifreeze with additives**• Hard tap water**• Deionized water with a specific resistance >1 meg
ohm• Any flammable fluids• Concentrations of acids or bases• Solutions with halides: chlorides, fluorides,
bromides, iodides or sulfur• Bleach (Sodium Hypochlorite)• Solutions with chromates or chroium salts• Glycerine• Syltherm fluids** At temperatures above 40°C, additives or mineral deposits can adhere to the heater. If deposits are allowed to build up, the heater may overheat and fail. Higher temperatures and higher concentrations of additives will hasten deposit build up.
!
Equipment Disposal (WEEE Directive)
This equipment is marked with the crossed out wheeled bin symbol to indicate it is covered by the Waste Electrical and Electronic Equipment (WEEE) Directive and is not to be disposed of as unsorted municipal waste. Products marked with this symbol must be collected separately, according to the regulatory guidelines in your area.
It is your responsibility to correctly dispose of this equipment at lifecycle-end by handing it over to an authorized facility for separate collection and recycling. It is your responsibility to decontaminate the equipment in case of biological, chemical and/or radiological contamination, so as to protect the persons involved in the disposal and recycling of the equipment from health hazards.
Requirements for waste collection, reuse, recycling and recovery programs vary by regulatory authority at your location. Contact your local responsible body (e.g., your laboratory manager) or authorized representative for information regarding applicable disposal regulations.

110-874 21
If you have followed the troubleshooting steps outlined previously and your Circulator still fails to operate properly, contact the supplier from whom the unit was purchased. Have the following information available for the customer service person:
• Model, Serial Number and Voltage (from back panel label)
• Date of purchase and purchase order number
• Supplier’s order number or invoice number
• A summary of the problem
Service and Technical Suppor t
The manufacturer agrees to correct for the original user of the product, either by repair (using new or refurbished parts), or at the manufacturer’s election, by replacement (with a new or refurbished product), any defects in material or workmanship which develop during the warranty period. The standard warranty is twenty-four (24) months after delivery of the product. In the event of replacement, the replacement unit will be warranted for the remainder of the original warranty period or ninety (90) days, whichever is longer. For purposes of this limited warranty, “refurbished” means a product or part that has been returned to its original specifications. In the event of a defect, these are your exclusive remedies.
If the product should require service, contact the manufacturer’s/supplier’s office for instructions. When return of the product is necessary, a return authorization number is assigned and the product should be shipped, transportation charges pre-paid, in either its original packaging or packaging affording an equal degree of protection to the indicated service center. To insure prompt handling, the return authorization number must be placed on the outside of the package. A detailed explanation of the defect should be enclosed with the item.
The warranty shall not apply if the defect or malfunction was caused by accident, neglect, unreasonable use, improper service, acts of God, modification by any part other than PolyScience or other causes not arising out of defects in material or workmanship.
EXCLUSION OF IMPLIED WARRANTIES. THERE ARE NO WARRANTIES, EXPRESSED OR IMPLIED, INCLUDING, BUT NOT LIMITED TO, THOSE OF MERCHANTABILITY OR FITNESS FOR A PARTICULAR PURPOSE WHICH EXTEND BEYOND THE DESCRIPTION AND PERIOD AS STATED IN THE OPERATOR’S MANUAL INCLUDED WITH EACH PRODUCT.
LIMITATION ON DAMAGES. THE MANUFACTURER’S SOLE OBLIGATION UNDER THE WARRANTY IS LIMITED TO THE REPAIR OR REPLACEMENT OF A DEFECTIVE PRODUCT AND POLYSCIENCE SHALL NOT, IN ANY EVENT, BE LIABLE FOR ANY INCIDENTAL OR CONSEQUENTIAL DAMAGES OF ANY KIND RESULTING FROM USE OR POSSESSION OF THIS PRODUCT.
Some states do not allow: (A) limitations on how long an implied warranty lasts; or (B) the exclusion or limitation of incidental or consequential damages, so the above limitations or exclusions may not apply to you. This warranty gives you specific legal rights and you may have other rights that vary from state to state.
Warranty

22 110-874
Manufactured by:
PolyScience6600 W. Touhy Avenue Niles, IL 60714 USA
1-800-229-7569•1-847-647-0611 www.polyscience.com