lp7510 user manual 英文 - v e s t i l d o · pdf filelocosc ningobo precision technology...
TRANSCRIPT
LP7510
Weighing Indicator
User’s Manual
Edition:01-081008
Locosc Precision
■ Load Cell ■ Controller ■ Scale
PDF 文件使用 "pdfFactory" 试用版本创建 炣 www.fineprint.cn

2
Preface
Thanks for using LP7510 Weighing indicator, ALL products are been strictly tested and inspected before shipment. You wil l benefit from its strong function and good quali ty. Locosc is devoted to weighing technology development, industrial scales produce and technical service. If you have any suggestion on our product, do not hesitate to contact us. Contact info. Is as bellows: LOCOSC NINGOBO PRECISION TECHNOLOGY CO.,LTD Website: www.locosc.com E-mail: [email protected] Tel: 86-574-87630101 Fax:86-574-87630707 Add.: No.137 Zhenyong RD. Yongjiang. Ningbo.China
PDF 文件使用 "pdfFactory" 试用版本创建 www.fineprint.cn
3
LIST
1 Safety instructions----------------------------------------------------- 4 1.Safety instructions---------------------------------------------------- 4 2.Notice for battery use------------------------------------------------ 5
2 Main function and technical parameter-------------------------- 6 1.Main function----------------------------------------------------------- 6 2.Technical parameter------------------------------------------------- 6
3 Installation and connection----------------------------------------- 7 1.Installation instructions----------------------------------------------- 7 2.Wire connection-------------------------------------------------------- 7 2.1.Power connection------------------------------------------------- 7 2.2.Load cell connection---------------------------------------------- 8 2.3.Serial interface------------------------------------------------------ 8 2.4.I/O card connection------------------------------------------------- 10
4 Operation instruction--------------------------------------------------- 12 1. Display and Key instruction---------------------------------------- 12 2. Basic Operation------------------------------------------------------- 14 3. Accumulate function ------------------------------------------------- 16 3. Counting function----------------------------------------------------- 17 4. Animal scale function------------------------------------------------ 18 5. Classifying scale operation ---------------------------------------- 19 6. Second display, print function, computer communication setting
operation --------------------------------------------------------------- 22 5 Wrong information management and daily maintenance-----24 6 Packing list and after-sales service ----------------------------------26
PDF 文件使用 "pdfFactory" 试用版本创建 www.fineprint.cn

4
1 Safety instruction and notice for battery use
safety instruction For safety operation pls. follow the safety instruction.
WARNING
The Non professional staff can not set. Calibrate, inspect or fix the the weighing display
WARNING
Pls. make sure the weighing display have good ground in using
WARNING
The indicator is the static and sensitive equipment,
cut off the power when doing electrical connections,
internal components touched by hand is prohibited,
and please take the measure of anti-static.
PDF 文件使用 "pdfFactory" 试用版本创建 www.fineprint.cn

5
Battery use instruction
The Company provided for the maintenance-free and rechargeable
battery , low self-discharge rate, long life, and work temperature -10-40 ℃. The
new battery will make the best effective after two or three complete charge.
Each time charge should keep at 6 to 8 hours, not more than 12 hours. when
use battery-powered, the work time is 20-30 hours when the battery fully
charged, when the indicator showed that "LOBATT", means the battery is
under power. Pls. charge at once.
Charging method: 1. Random specific power adapter plugged into AC power outlet, the
circular DC power supply plug into "DC" jack on the indicator back cover.
2. Open the power switch to "on", power-on self test, go into weighing
status . "batter" status light does not on, in a battery is charging
3. Charging time 6 to 8 hours later , take off the adapter, "battery" light on,
means battery-powered.
Note:
1. In order to keep the battery in best use condition, so suggest that monthly
charge and discharge the battery completely at least once, the method is to use
the indicator until the battery if finished automatically shut down the indicator
and then recharging again.
2. If the battery when not in use for a long time, please take out the
batteries from the indicator in order to avoid battery leakage and damage the
indicator .Do not use the battery for a long time, it is essential to charge the
batter every 2 or 3 month. Or the battery will expire.
3. Pls. make sure the indicator is powered off then change the batteries, or it
will have an impact on the indicator life.
PDF 文件使用 "pdfFactory" 试用版本创建 www.fineprint.cn
6
4. when replace the battery. The correct connection is : connect the red line
to the plugs in red mark; and the black line to the plugs in black mark, Be sure
wiring is correct, or it will cause damage to load cell, explosive, and the main
board damage
5. Our Company only responsible for approved the standard battery and
power adapter by our company. And not take any responsibility for any damage
by the accessories offered by third-party.
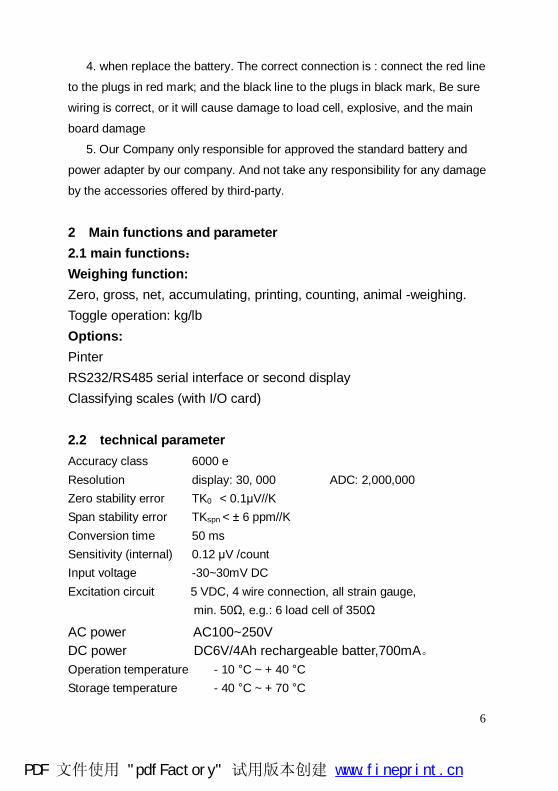
2 Main functions and parameter 2.1 main functions: Weighing function: Zero, gross, net, accumulating, printing, counting, animal -weighing. Toggle operation: kg/lb Options: Pinter RS232/RS485 serial interface or second display Classifying scales (with I/O card)
2.2 technical parameter Accuracy class 6000 e Resolution display: 30, 000 ADC: 2,000,000 Zero stability error TK0 < 0.1μV//K Span stability error TKspn < ± 6 ppm//K Conversion time 50 ms Sensitivity (internal) 0.12 μV /count Input voltage -30~30mV DC Excitation circuit 5 VDC, 4 wire connection, all strain gauge,
min. 50Ω, e.g.: 6 load cell of 350Ω
AC power AC100~250V DC power DC6V/4Ah rechargeable batter,700mA。 Operation temperature - 10 °C ~ + 40 °C Storage temperature - 40 °C ~ + 70 °C
PDF 文件使用 "pdfFactory" 试用版本创建 www.fineprint.cn

7
3 Installation and connection 3.1 Installation method
There are 3 installation method for LP7510 1. Wall mounting: Use screw M5 to fix the base of the weighing
display to the wall 2. Table mounting:Adjust the elevation of the weighing display
and the base. And then put it on the table. 3. Column mounting:Take off the base, then use screw M8 to fix
the feet to the column 3.2 Connection 3.2.1 Supply power connection
2 kinds of power supply : One is AC 100-240V; another is in-built storage battery DC supply power, with charger.
AC powered connection method: 1. Open the back cover of the weighing display. And take off the
Water-proof connector with AC mark. And insert the equipped power Line insider the back cover.
2. Fix the 3 core line to 5 bit terminal block J1 on the back cover AC power board. Shown as the below picture.
J1 pin Pin symbol AC supply power 1 GND Power ground line(yellow) 2 L Power fire line(brown) 3 N Power zero line(blue)
PDF 文件使用 "pdfFactory" 试用版本创建 炣 www.fineprint.cn
8
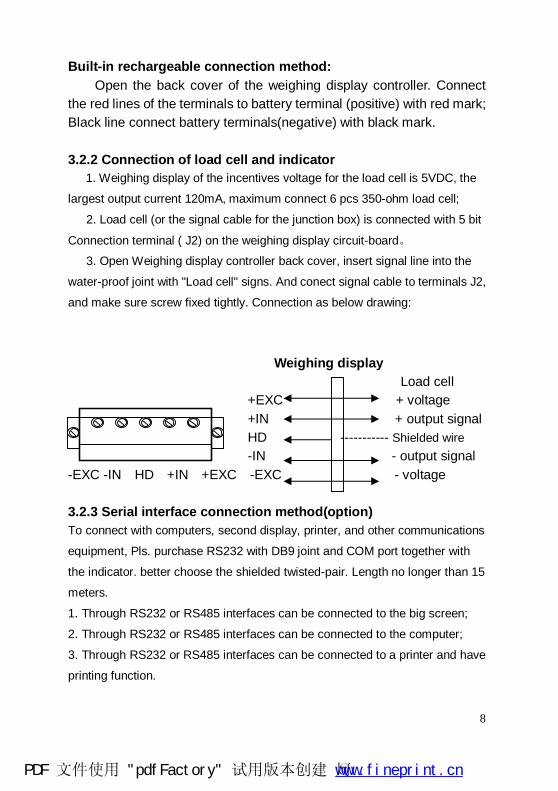
Built-in rechargeable connection method: Open the back cover of the weighing display controller. Connect the red lines of the terminals to battery terminal (positive) with red mark; Black line connect battery terminals(negative) with black mark. 3.2.2 Connection of load cell and indicator
1. Weighing display of the incentives voltage for the load cell is 5VDC, the
largest output current 120mA, maximum connect 6 pcs 350-ohm load cell;
2. Load cell (or the signal cable for the junction box) is connected with 5 bit
Connection terminal ( J2) on the weighing display circuit-board。
3. Open Weighing display controller back cover, insert signal line into the
water-proof joint with "Load cell" signs. And conect signal cable to terminals J2,
and make sure screw fixed tightly. Connection as below drawing:
Weighing display
Load cell +EXC + voltage +IN + output signal HD ----------- Shielded wire -IN - output signal -EXC -IN HD +IN +EXC -EXC - voltage 3.2.3 Serial interface connection method(option) To connect with computers, second display, printer, and other communications
equipment, Pls. purchase RS232 with DB9 joint and COM port together with
the indicator. better choose the shielded twisted-pair. Length no longer than 15
meters.
1. Through RS232 or RS485 interfaces can be connected to the big screen;
2. Through RS232 or RS485 interfaces can be connected to the computer;
3. Through RS232 or RS485 interfaces can be connected to a printer and have
printing function.
PDF 文件使用 "pdfFactory" 试用版本创建 炣 www.fineprint.cn

9
4. Serial communication interface at the back of the display controller marked
the RS232-joint BD9 as the below drawing:
5 4 3 2 1
9 8 7 6 Pin function and definition as bellows:
DB9 joint Definition Function 2 TXD Sending data 3 RXD Receiving data 5 GND Ground interface 6 V+ Printer power ( positive) 8 V- Printer power( negative)
Note: Only 2 pin and 5 pin connecting with second display 5. Serial interface reception command:
RS232COM serial interface can receive simple ASCII command. And Command word and role as follows: Command Name Role T Tare off command Save and clear tare Z Zero command Zero the gross weight P Print command Print the weight G Gross/net weight shift
command Gross/net weight shift
R Read gross/ net weight Read gross/net weight
6.Continuous output: Reaction of command “R” are same as continuous output , , R F
S 1 S 2 S 3 Data S 4
PDF 文件使用 "pdfFactory" 试用版本创建 炣 www.fineprint.cn
10
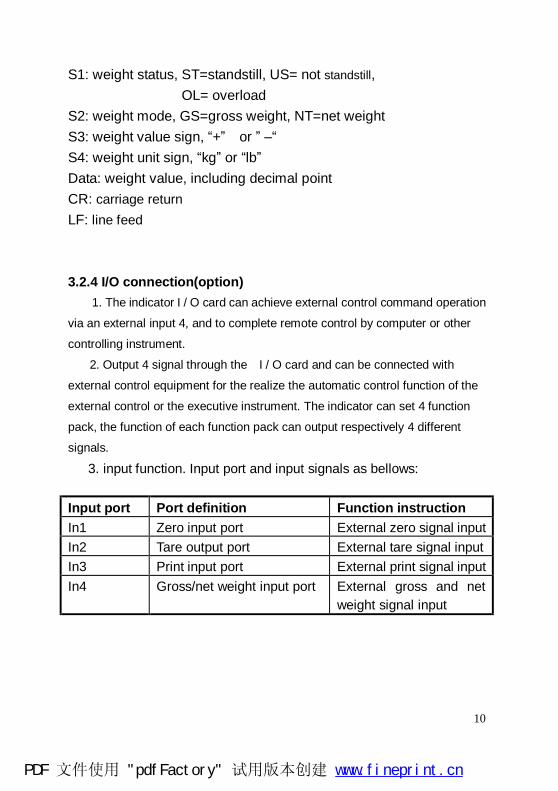
S1: weight status, ST=standstill, US= not standstill,
OL= overload S2: weight mode, GS=gross weight, NT=net weight S3: weight value sign, “+” or ” –“ S4: weight unit sign, “kg” or “lb” Data: weight value, including decimal point CR: carriage return LF: line feed 3.2.4 I/O connection(option)
1. The indicator I / O card can achieve external control command operation
via an external input 4, and to complete remote control by computer or other
controlling instrument.
2. Output 4 signal through the I / O card and can be connected with
external control equipment for the realize the automatic control function of the
external control or the executive instrument. The indicator can set 4 function
pack, the function of each function pack can output respectively 4 different
signals.
3. input function. Input port and input signals as bellows:
Input port Port definition Function instruction In1 Zero input port External zero signal input In2 Tare output port External tare signal input In3 Print input port External print signal input In4 Gross/net weight input port External gross and net
weight signal input
PDF 文件使用 "pdfFactory" 试用版本创建 www.fineprint.cn
11
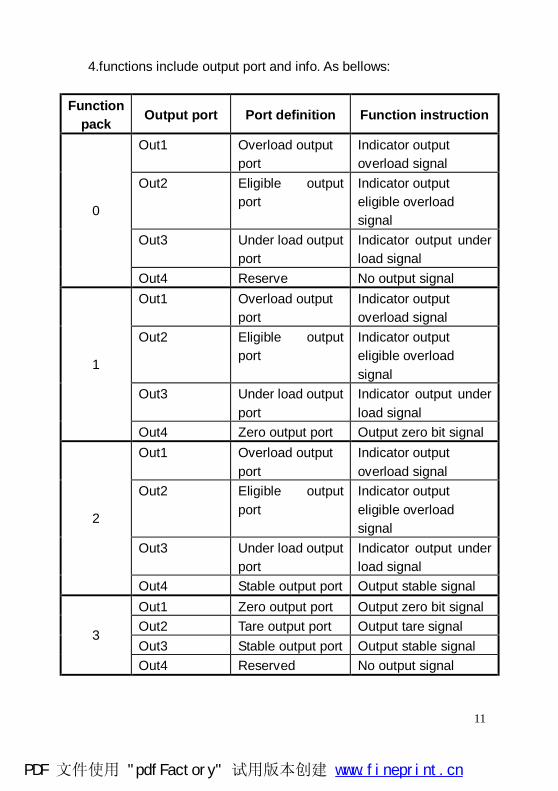
4.functions include output port and info. As bellows: Function
pack Output port Port definition Function instruction
Out1 Overload output port
Indicator output overload signal
Out2 Eligible output port
Indicator output eligible overload signal
Out3 Under load output port
Indicator output under load signal
0
Out4 Reserve No output signal Out1 Overload output
port Indicator output overload signal
Out2 Eligible output port
Indicator output eligible overload signal
Out3 Under load output port
Indicator output under load signal
1
Out4 Zero output port Output zero bit signal Out1 Overload output
port Indicator output overload signal
Out2 Eligible output port
Indicator output eligible overload signal
Out3 Under load output port
Indicator output under load signal
2
Out4 Stable output port Output stable signal Out1 Zero output port Output zero bit signal Out2 Tare output port Output tare signal Out3 Stable output port Output stable signal
3
Out4 Reserved No output signal
PDF 文件使用 "pdfFactory" 试用版本创建 www.fineprint.cn
12
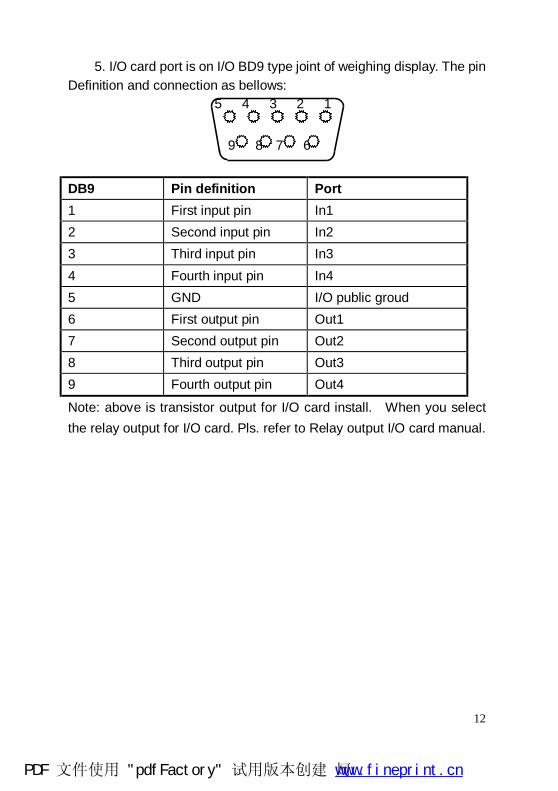
5. I/O card port is on I/O BD9 type joint of weighing display. The pin Definition and connection as bellows: 5 4 3 2 1 9 8 7 6
DB9 Pin definition Port 1 First input pin In1 2 Second input pin In2 3 Third input pin In3 4 Fourth input pin In4 5 GND I/O public groud 6 First output pin Out1 7 Second output pin Out2 8 Third output pin Out3 9 Fourth output pin Out4
Note: above is transistor output for I/O card install. When you select the relay output for I/O card. Pls. refer to Relay output I/O card manual.
PDF 文件使用 "pdfFactory" 试用版本创建 炣 www.fineprint.cn

13
4 Instruction 4.1 Display and main key
Instruction: When the light of status is on, the means are as follows: 【kg】——weight unit sign kg 【Ib】——weight unit sign lb 【count】——count function 【battery】——in-built battery is working 【zero】——weight is zero 【stable】——weight is standstill 【gross】——weight is gross 【net 】——weight is net 【tare】——have set tare 【total】——totalizing function level 【over】——weight is over upper limit 【ok】——acceptable weight 【under】——weight is under lower limit LED light on means- the weighing data show on the display or setting the is working Key functions of weighing level and operation
PDF 文件使用 "pdfFactory" 试用版本创建 www.fineprint.cn
14
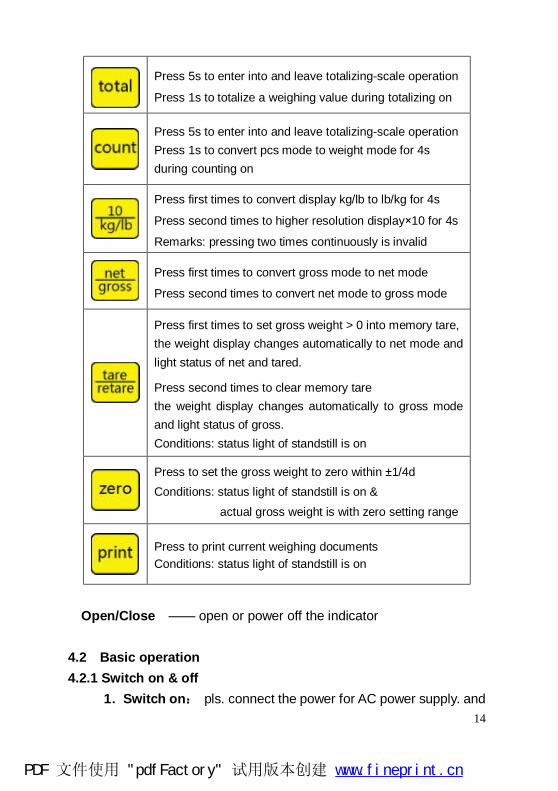
Press 5s to enter into and leave totalizing-scale operation
Press 1s to totalize a weighing value during totalizing on
Press 5s to enter into and leave totalizing-scale operation Press 1s to convert pcs mode to weight mode for 4s during counting on
Press first times to convert display kg/lb to lb/kg for 4s
Press second times to higher resolution display×10 for 4s
Remarks: pressing two times continuously is invalid
Press first times to convert gross mode to net mode
Press second times to convert net mode to gross mode
Press first times to set gross weight > 0 into memory tare, the weight display changes automatically to net mode and light status of net and tared. Press second times to clear memory tare the weight display changes automatically to gross mode and light status of gross. Conditions: status light of standstill is on
Press to set the gross weight to zero within ±1/4d Conditions: status light of standstill is on &
actual gross weight is with zero setting range
Press to print current weighing documents Conditions: status light of standstill is on
Open/Close —— open or power off the indicator
4.2 Basic operation 4.2.1 Switch on & off
1.Switch on: pls. connect the power for AC power supply. and
PDF 文件使用 "pdfFactory" 试用版本创建 www.fineprint.cn
15
connect the battery line for rechargeable battery. Before switch on the indicator. the “kg” light on. It means the connection is ok. then press
after 2s. the indicator show”000000-999999”. After the self inspection. It go the weighing mode.
2. Switch off: Press the key, 2s latter. Auto power off,
only kg light is on. Take off the AC power supply or the battery. The kg light off. 4.2.2 Zero operation
1. Initial zero setting When switching on the indicator, if the weight on the scale is within
the initial zero range, indicator will put is zero automatically, and gross weight will show zero.
2. Zero setting It is effective in gross weight status, when the minus data or
nonzero data is within the zero setting range. Press key.
Than go to the zero. 4.2.3 10 times higher resolution and toggle operation.
1. Press UNIT key. the 10 times higher resolution weighing data shown on the display. And after 4s back to weighing status. Press UNIT again, the indicator proceed the toggle operation. And after 4s return.
2. Weight unit---kg/lb toggle operation. If the unit is kg, the kg light
PDF 文件使用 "pdfFactory" 试用版本创建 www.fineprint.cn
16
is on. Press UNIT key. it change to lb. and lb light on. After 4s back to kg automatically. And kg light on at the same time. 4.2.4 Tare operation
1. Tare function When gross weight shown on the display, Press TARE key. the TARE light on. Indicator save the data and at same time NET light on. Net weight is zero.
2. Retare function When NET light on. Press TARE key, the TARE and NET light off .
It means the indicator already clean the tare. And show the gross weight.
3. Tare operation condition. Only the weight on the scales keep standstill and the light on. The
tare operation is effective.
4.2.5 G.W/N.W operation switch
When the indicator show the gross weight. Press key, the
net weight show. And light on. Press again. Back to gross
weight display. And N.W light off. G.W light on. 4.2.6 Weight accumulating operation
1. weight accumulating operation
1. when the weight is zero.. Press and keep it 2s latter.
PDF 文件使用 "pdfFactory" 试用版本创建 www.fineprint.cn
17
“SUON” show on the indicator. The light is on at same time. 2. when adding the weight to the scales. if you want the present
weight be added. Press 2s, and “ n 01” (means the first time
accumulating)show on the indicator, after 2s back to the present weight.
3. when the first weighing and accumulating is finished. Take off
the weight. And enter second weighing. Press 2s for
confirmation “(n 02)(means second accumulating). Then the total weight for the first & second weighing show on the display. After 2s back to the actual weight on the scales. repeat this operation again can accumulating many times.
4. when accumulating finish. Press for 2s. and “ SU
OFF” show on the indicator. Back to normal weighing status. Note: when weight is accumulated, the weight on the scale
should be standstill. And light on steadily 2.Check the total weight
Press . Firstly show the accumulating times( for example” n
02) then show the total weight. 2s latter back to the weighing. 4.2.7 Count operation
Two ways for count operation.
PDF 文件使用 "pdfFactory" 试用版本创建 www.fineprint.cn

18
1. sampling and then get the average unit weight.: If you don’t know the unit weight. firstly get the total weight. Then do sampling and get unit weight. Then input the quantity. and go to the count operation.
2. Input the average unit weight: if already known the unit weight, add the goods. Then input the unit weight. We can get the quantity
How to get the unit weight:
1. Press to display zero. Then put goods on the scales that you know the quantity.
2. Press till it show “ PC on”, then automatically show
“000” means it already go to the count
3. Press the and key, till “ PC 1” show on the
display, and 1 means sampling and then get the average unit weight.
Press and “PCS 00” show on the indicator
4. Use ← and → to shift the cursor, and ↑ and ↓ to adjust the parameter. Input the goods quantity on the scales. and suppose there are 5 pcs. Then input “ PCS 05”( Note: the sample qty should be below 99)
5. Press to perform parameter setting. And count.
6.Put goods on the scales. and the quantity show on the indicator.
PDF 文件使用 "pdfFactory" 试用版本创建 www.fineprint.cn

19
If you want the weight, Press . It will show on the indicator.
The weight status light and “ PCS” light on. 4s latter back to show qty.
4.3 Input the known average unit weight method: 1. when the weight is zero. Put goods that you already known the
unit weight.
2. Press till “ PC on” show on the indicator and then
“000” automatically show. Means already into counting.
3. Press and 1s and release, and “ PCS 1”
show on the indicator. use ← and → to shift the cursor, and ↑ and ↓ to adjust the parameter. And change the “ PCS 1” to “ PCS 2” 2 means input the known average unit weight mode.
4. Press and input known unit weight to count. “ 0000.00”
Show on the indicator. use ← and → to shift the cursor, and ↑ and ↓ to adjust the parameter. Input known average unit weight. Suppose the unit weight is 1 kg, then input “0001.00”
5. Press perform the set average unit weight to count.
Put goods on the scales. and the quantity will show on the indicator. If
you want the weight. press , weight will show on the indicator.
PDF 文件使用 "pdfFactory" 试用版本创建 www.fineprint.cn

20
And weight & “PCS” status light on. 4s latter automatically show quantity 4.4 Indicator for livestock scales(animal scales)
When the indicator used for livestock scales. only set the digital filter C13 1.and C14 2 is ok. steps as follows
1.Press and at the same time, enter into C13 by
pressing the ↑ ↓ ← → , press for confirmation. Then the press
↑ key to change “ C13 0” to “ C13 3”. At last press again
can enter into C14.
2. Press . Enter into” C14 3”. Change “C14 2” to “C14
1” . and the setting for livestock scales finish. Note: when for livestock weighing, set the digital filter 1 for C13.
The No. is bigger, the weighing will be more stable. And change is slower.
Set the digital filter 2 for C14, The No. is smaller. The weighing change faster. Adjust the C13 and C14 . can control the weighing stability and speed suitable for animal weighing.
4.5 Classifying scales operation The classifying function is optional, set the C20 C21 C22 C23 and it
PDF 文件使用 "pdfFactory" 试用版本创建 www.fineprint.cn
21
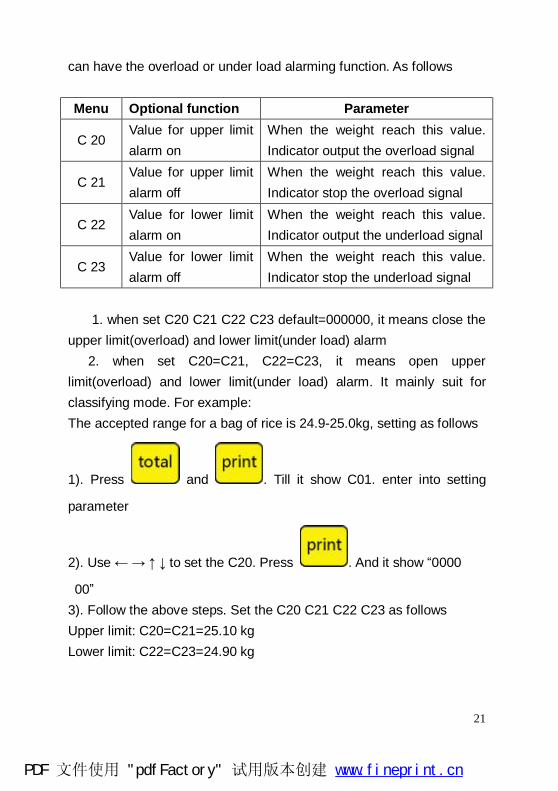
can have the overload or under load alarming function. As follows
Menu Optional function Parameter
C 20 Value for upper limit alarm on
When the weight reach this value. Indicator output the overload signal
C 21 Value for upper limit alarm off
When the weight reach this value. Indicator stop the overload signal
C 22 Value for lower limit alarm on
When the weight reach this value. Indicator output the underload signal
C 23 Value for lower limit alarm off
When the weight reach this value. Indicator stop the underload signal
1. when set C20 C21 C22 C23 default=000000, it means close the
upper limit(overload) and lower limit(under load) alarm 2. when set C20=C21, C22=C23, it means open upper limit(overload) and lower limit(under load) alarm. It mainly suit for classifying mode. For example: The accepted range for a bag of rice is 24.9-25.0kg, setting as follows
1). Press and . Till it show C01. enter into setting
parameter
2). Use ← → ↑ ↓ to set the C20. Press . And it show “0000
00” 3). Follow the above steps. Set the C20 C21 C22 C23 as follows Upper limit: C20=C21=25.10 kg Lower limit: C22=C23=24.90 kg
PDF 文件使用 "pdfFactory" 试用版本创建 www.fineprint.cn
22
4). Finish the setting. Press . Than back to weighing status
If the actual weight is 25.00kg,status light is ok
If the actual weight is 24.80kg, status light is under
If the actual weight is 25.20kg, status light is over
3. when set “0000.00” for C20=C21. and C22=lower limit
C23=upper limit. It means use lower & upper limit independent. for example the application for hopper scales: for a hopper scales. the target control weight is 100-150kg, the I/O card in the indicator to control the open & close the valve. As follows:
1). Set C20 C21 C22 C23 as above 2). Set C20=C21=0000.00 3). Set C22=lower limit alarm. C22=100kg 4). Set C23=upper limit alarm. C23=500kg 5). Return the menu. Back to weighing status. If the actual weight is under 100kg, UNDER light on. Indicator
output the Under weight signal. Open the valve to add goods If the actual weight is over 500kg, OVER light on. Indicator output
the Over weight signal. close the valve 4. when set C20>C21,C21<C23. it means delay the alarming.
For example: If the actual weight is over 90.00, open the over load alarm; when
the actual weight is under 12.00kg. open the under load alarm. Set an alarm delay data can avoid some untrue alarm. For
example when the actual weight is 89.90. it is within the acceptable arrange, but if the hopper is moved by wind or shake. The value possibly come to 90.1t. than the untrue alarm will happen. To avoid it. We can set a 0.5t alarm delay. As follows:
PDF 文件使用 "pdfFactory" 试用版本创建 www.fineprint.cn
23
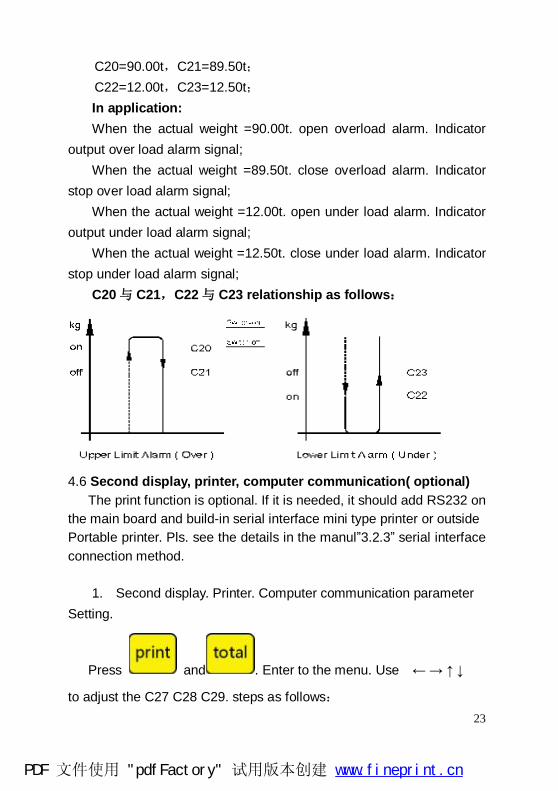
C20=90.00t,C21=89.50t; C22=12.00t,C23=12.50t; In application: When the actual weight =90.00t. open overload alarm. Indicator
output over load alarm signal; When the actual weight =89.50t. close overload alarm. Indicator
stop over load alarm signal; When the actual weight =12.00t. open under load alarm. Indicator
output under load alarm signal; When the actual weight =12.50t. close under load alarm. Indicator
stop under load alarm signal; C20与 C21,C22与 C23 relationship as follows:
4.6 Second display, printer, computer communication( optional) The print function is optional. If it is needed, it should add RS232 on the main board and build-in serial interface mini type printer or outside Portable printer. Pls. see the details in the manul”3.2.3” serial interface connection method.
1. Second display. Printer. Computer communication parameter Setting.
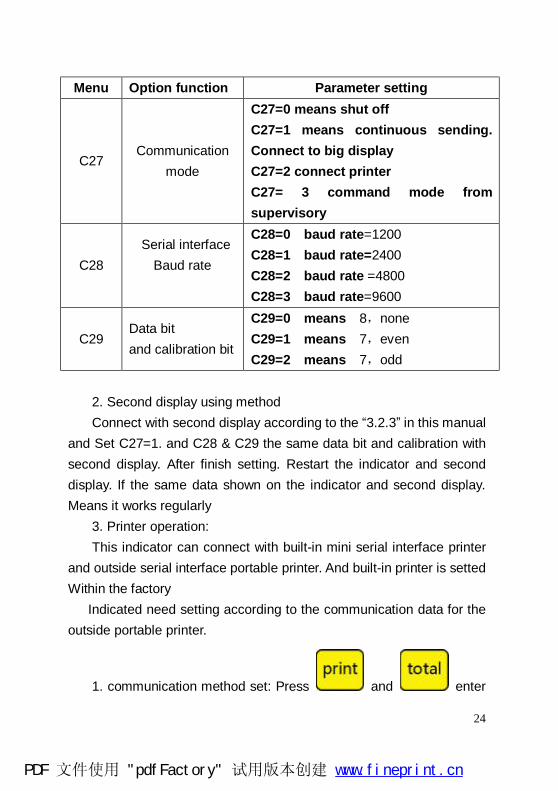
Press and . Enter to the menu. Use ← → ↑ ↓
to adjust the C27 C28 C29. steps as follows:
PDF 文件使用 "pdfFactory" 试用版本创建 www.fineprint.cn
24
Menu Option function Parameter setting
C27 Communication
mode
C27=0 means shut off C27=1 means continuous sending. Connect to big display C27=2 connect printer C27= 3 command mode from supervisory
C28 Serial interface
Baud rate
C28=0 baud rate=1200 C28=1 baud rate=2400 C28=2 baud rate =4800 C28=3 baud rate=9600
C29 Data bit and calibration bit
C29=0 means 8,none C29=1 means 7,even C29=2 means 7,odd
2. Second display using method Connect with second display according to the “3.2.3” in this manual
and Set C27=1. and C28 & C29 the same data bit and calibration with second display. After finish setting. Restart the indicator and second display. If the same data shown on the indicator and second display. Means it works regularly
3. Printer operation: This indicator can connect with built-in mini serial interface printer
and outside serial interface portable printer. And built-in printer is setted Within the factory Indicated need setting according to the communication data for the outside portable printer.
1. communication method set: Press and enter
PDF 文件使用 "pdfFactory" 试用版本创建 www.fineprint.cn
25
to function menu. Adjust to C27. press for confirm. And set
“C27 2” press again.
2. Serial interface baud rate set: after set the C27. indicator show
C28. press enter to C28 setting. Set the serial interface baud
rate the same with equipped printer. For example: the printer baud rate
is 9600 bt/s. set “ C28 3”. Press . Save the setting. Enter to
C29 3. Data bit and calibration bit set: the indictor show C29. Press
. Set the serial interface data bit and calibration bit the same
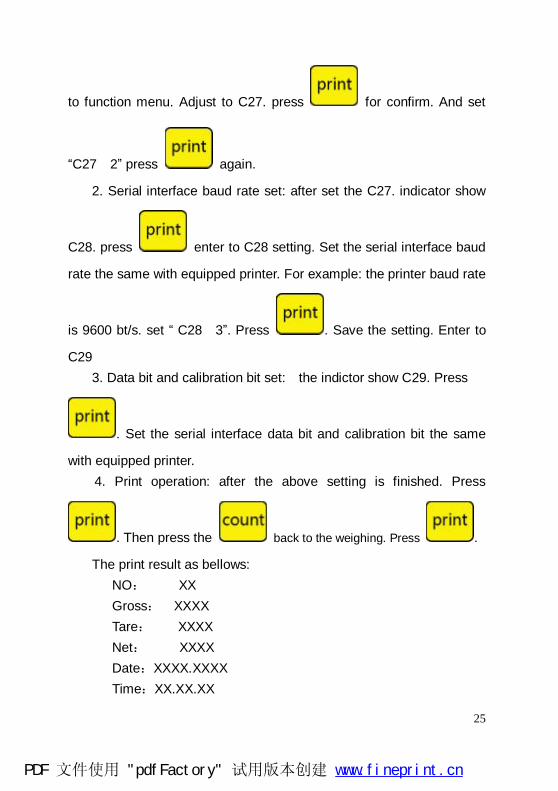
with equipped printer. 4. Print operation: after the above setting is finished. Press
. Then press the back to the weighing. Press .
The print result as bellows: NO: XX Gross: XXXX Tare: XXXX Net: XXXX Date:XXXX.XXXX Time:XX.XX.XX
PDF 文件使用 "pdfFactory" 试用版本创建 www.fineprint.cn
26
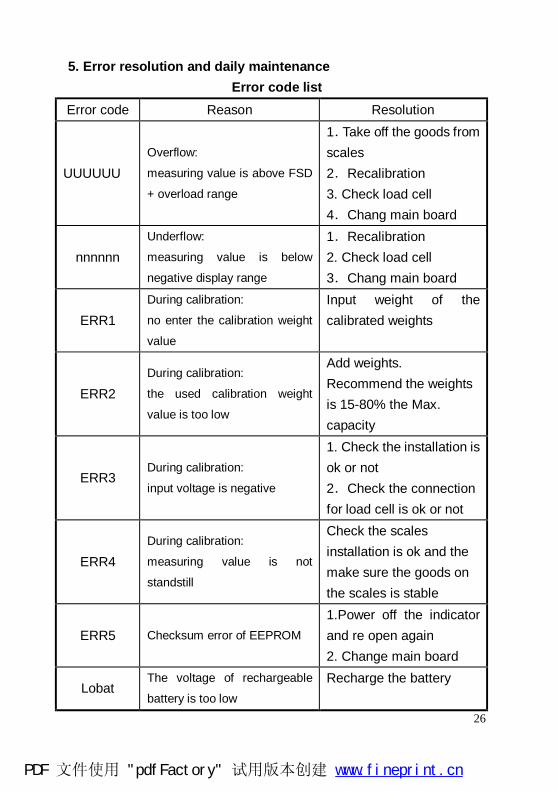
5. Error resolution and daily maintenance Error code list
Error code Reason Resolution
UUUUUU Overflow:
measuring value is above FSD
+ overload range
1.Take off the goods from scales 2.Recalibration 3. Check load cell 4.Chang main board
nnnnnn Underflow:
measuring value is below
negative display range
1.Recalibration 2. Check load cell 3.Chang main board
ERR1 During calibration:
no enter the calibration weight
value
Input weight of the calibrated weights
ERR2 During calibration:
the used calibration weight
value is too low
Add weights. Recommend the weights is 15-80% the Max. capacity
ERR3 During calibration:
input voltage is negative
1. Check the installation is ok or not 2.Check the connection for load cell is ok or not
ERR4 During calibration:
measuring value is not
standstill
Check the scales installation is ok and the make sure the goods on the scales is stable
ERR5 Checksum error of EEPROM 1.Power off the indicator and re open again 2. Change main board
Lobat The voltage of rechargeable
battery is too low Recharge the battery
PDF 文件使用 "pdfFactory" 试用版本创建 www.fineprint.cn

27
Daily maintenance 1. Regularly clean the panel and body with soft cotton sheets and cleaning
detergent. Industrial cleaning solvents can not be used to clean keyboard and
display panel, and the solvent can not spray directly on the instrument.
2. In order to ensure indicator display clearly and useful life, the instrument
should not be placed directly on sunlight. And can not be placed on dust and
vibration serious area.
3. Sensors and indicator should be well connected , the system should have
a good ground, away from strong electric field, magnetic field, sensors and
indicator should stay away from flammable and explosive materials.
Battery maintenance: 1. Please note that when used in the emerging low-voltage meter
"LOBATT" suggests that this occurred when prompted, for charging the battery
immediately.
2. Under charging and over charging is prohibited; when replace and
maintain the battery you should know the distinction between negative
electrode to prevent short-circuit and anti connection so as not to damage the
battery and instrumentation.
3. Battery can not close to flame or heat source to prevent damage of the
batteries and indicator or others
PDF 文件使用 "pdfFactory" 试用版本创建 www.fineprint.cn

28
6. Packing list LP7510 display controller packing list
Item No.
Name Model No. UNIT QTY
1 Display controller LP7510 SET 1 2 Packing bag PCS 1 3 Accessories bag PCS 1
GB/DC9V PCS 1 US/DC9V PCS 1 UK/DC/9V PCS 1 EU/DC9V PCS 1 AU/DC9V PCS 1
4 Power supply
Others PCS 1 User’s manual PCS 1 5 English/ Chinese
instruction Operating manual PCS 1 6 RS232 joint D 9 cores PCS 1 7 Load cell joint 5 core quick
connecter PCS 1
8 Serial interface signal line
Φ5/5 core shield line
PCS 1
9 AC Power supply 3 cores Φ0.75mm PCS 1 10 Fuse 0.5A fuse PCS 1 11 Base Wall type
installation base PCS 1
12 Product certification PCS 1 13 Packing list LP7510 PCS 1
Pls. check the goods and accessories according to the packing list After you open the carton. If anything missing or other question. Pls. contact us soonest. Our contact info. Is below the preface. We will resolve the problem soonest.
PDF 文件使用 "pdfFactory" 试用版本创建 www.fineprint.cn