load students and analysis - sd23
TRANSCRIPT

Scheduling Module 9
Load Students and
Analysis
April 2019 v1.2

Version History
Version Date Description
1.0 13 Apr 2015 Initial Draft
1.1 24 Mar 2016 Added section 3.1 Load Validation
1.2 29 Apr 2019 Added hyperlinks to Table of Contents
Confidentiality
This document contains information which is proprietary and confidential to Fujitsu Consulting (Canada) Inc. (including the information of third parties, including but not limited to, Follett of Canada Inc., submitted with their permission). In consideration of receipt of this document, the recipient agrees to treat this information as confidential and to not use or reproduce this information for any purpose other than its evaluation of this proposal or disclose this information to any other person for any purpose, without the express prior consent of Fujitsu Consulting (Canada) Inc. (and any applicable third party.)

Table of Contents
1.0 INTRODUCTION .............................................................................................................. 4
2.0 LOCK INDIVIDUAL STUDENT SCHEDULES ................................................................. 4
2.1 Lock a Student’s schedule ............................................................................................ 4
3.0 LOAD STUDENTS ........................................................................................................... 5
3.1 Load Validation ............................................................................................................. 5
3.2 All Students ................................................................................................................... 7
4.0 ANALYSIS ....................................................................................................................... 8
4.1 Conflict Summary .......................................................................................................... 9
5.0 REPORTS .......................................................................................................................12
5.1 Requests Not Scheduled..............................................................................................12
5.2 BC Master Schedule ....................................................................................................14
5.3 Unscheduled Room ......................................................................................................15
5.4 Unscheduled Teacher ..................................................................................................16
6.0 ADJUSTING A MASTER SCHEDULE ............................................................................16
6.1 Copy a Scenario ..........................................................................................................17
Load Students and Analysis v1.2 Page 4
1.0 Introduction
After you build your master schedule on the Workspace tab, load students into the finished master schedule. Loading students into the schedule maximizes section balances and requests satisfied.
After you load students, you can analyze the load results. The system provides reasons for each conflict a student's schedule has when trying to fulfill requests.
2.0 Lock Individual Student Schedules
Students can be hand scheduled before or after a load is run.
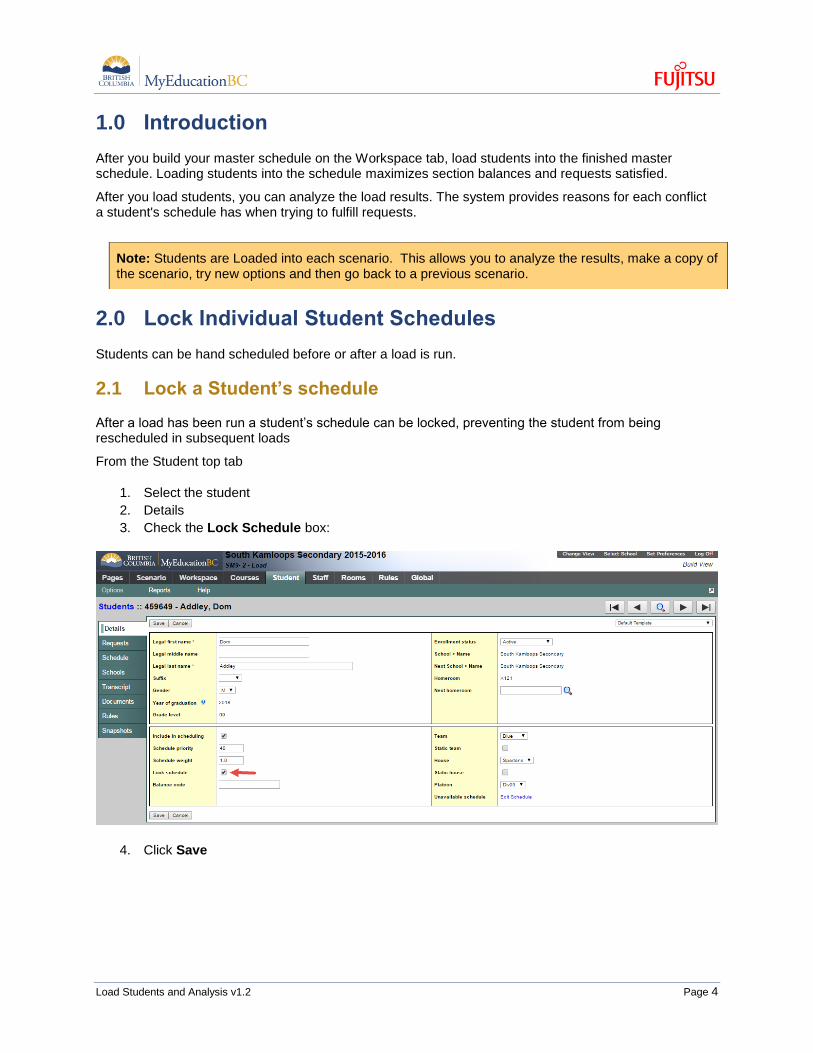
2.1 Lock a Student’s schedule
After a load has been run a student’s schedule can be locked, preventing the student from being rescheduled in subsequent loads
From the Student top tab
1. Select the student
2. Details
3. Check the Lock Schedule box:
4. Click Save
Note: Students are Loaded into each scenario. This allows you to analyze the results, make a copy of the scenario, try new options and then go back to a previous scenario.

Load Students and Analysis v1.2 Page 5
Individual scheduled sections can also be locked, from the Workspace > Schedules side tab.
3.0 Load Students
3.1 Load Validation
Prior to loading students, all fatal Load Validation errors must be corrected.
To Validate for Load:
1. Log on to the Build view.
2. Click the Workspace tab.
3. On the Options menu, click Load > Validate
4. Select Validate for Load.
If fatal errors are encountered go to Feedback side tab and click on the link to Fatal (Warnings can be ignored).
A list of errors will be presented:
The following are some examples and how to correct them:
1. Field Master > scheduleTermMap cannot be blank (record: MAC--11---002,). The cause of
this error is - There is no schedule expression (i.e. Period/Day) therefore the scheduleTermMap
does not exist.
2. Field Master > scheduleMatrix cannot be blank (record: MAC--11---002,). The cause of this
error is - There is no schedule expression (i.e. Period/Day) therefore the scheduleMatrix does not
exist.

Load Students and Analysis v1.2 Page 6
3. Master (MAC--11---002) was dropped. Reason: The schedule bitmap is empty or invalid.
The cause of this error is - There is no schedule expression (i.e. Period/Day) therefore the bitmap
does not exist.
The above three errors are all caused by the same issue, this section is not fully scheduled.
4. Request (student Anvar, Charla, course MDD--12--) was dropped. Reason: The preferred
teacher for the request does not teach the course. The cause of this error is – The student
has a request for the course and a specific teacher. The requested teacher, is not teaching any
sections of this course.

Load Students and Analysis v1.2 Page 7
Scheduled teacher is:
3.2 All Students
To load students into the master schedule:
1. Log on to the Build view.
2. Click the Workspace tab.
3. On the Options menu, click Load > Load.
4. The Load Students dialog box appears:
1. Select the Allow over max checkbox if you want the system to ignore the maximum enrollment
numbers you defined for sections. Then, enter the Percentage over max you want.
2. Select the Use alternates checkbox if you want the system to attempt to schedule students into
their alternate requests if primary requests are not available
3. Save load files does not have to be checked, unless directed by support staff.
4. Check Automatically import
5. Click OK. The progress meter displays the name of the student currently being scheduled, and the
number of students remaining to be scheduled.

Load Students and Analysis v1.2 Page 8
The order in which students are loaded can be controlled by setting a student Load priority. In the example below the priority has been set in ascending order. Grade 11 students have the lowest priority and Grade 7 the highest. With this setup, the Grade 11 students will be loaded first:
To Load by grade you must use the Include in Scheduling checkbox on student details.
Steps:
1. Set only those students, for example Gr. 11’s, to ‘Include in Scheduling = Checked’.
2. Set all others to ‘Include in Scheduling = Unchecked’.
3. Run the Load.
4. Lock Gr.11 student schedules.
5. Repeat for other grade levels, as desired.
4.0 Analysis
There are several ways to analyze the results and determine the overall build and success of the load. From the Workspace top tab, click on the Analysis side tab. This shows information from the latest load:
Last run type – shows either Build of Load.
Status – indicates if it has completed or in progress.

Load Students and Analysis v1.2 Page 9
Validation Errors – It there were errors the number would be indicated.
Requests satisfied – shows the overall number of request successfully scheduled.
Total request – the number of requests for all students at the school.
Students satisfied – the total number of students fully scheduled (all requests met).
Total students – number of students included in the load.
Total run time – the time it took to load.
4.1 Conflict Summary
After a load has been completed you can see which sections had conflicts; students that requested a course but did not get into a section.
From the Workspace top tab > Analysis side tab click on Course Summary
1. Select a department at the Department filter drop-down to view only courses in a specific
department.
2. Select the Conflicts checkbox to view only courses with conflicts. The Conflicts checkbox is
selected by default. Otherwise, the list shows all courses, including those without conflicts with
student requests.
3. Enter a value in the Section Count field to limit the courses that appear by the number of
sections. For example, to view how singletons were loaded, type 1.
4. Enter a value in the Minimum conflicts field to limit the courses that appear to courses with the
number of conflicts you identify and above. For example, to view courses which three or more
students requested and could not be scheduled in, type 3.
5. Click on the Conflicts column twice, to sort courses with the most conflicts to the top:

Load Students and Analysis v1.2 Page 10
6. Click the link (blue number) in the conflicts column to view the list of students who requested the
course, but could not be scheduled. The list of students appears:
7. To view why the system could not fulfill a student’s request for the course, select the student, and
click the Schedule side tab > Conflicts. The Comment column displays Request not
scheduled for any course the student was not scheduled in:

Load Students and Analysis v1.2 Page 11
8. Click Request not scheduled to view the 'Schedule conflict reasons' dialog box. The Conflict
Reason column displays the reason the student could not be scheduled for each section:
One of the following conflict reasons appears next to each section for the course:
Section is closed
Student is unavailable
Section conflicts with students preferred sections
Invalid course relationship with students preferred sections
Invalid section type
Invalid team code
Invalid house code
Invalid platoon code
Invalid as not preferred teacher
Invalid as not preferred term
Invalid as not preferred section

Load Students and Analysis v1.2 Page 12
Violation of student avoid student rule
Violation of student avoid teacher rule
Invalid as not matching content term code
Invalid not inclusion section for inclusion request
Violation of term link rule
Conflict with scheduled sections
Invalid course relationship with scheduled sections
Violation of inclusion ratio
Violation of inclusion count allowed
9. Use the value in the Conflict Reason column to make possible changes to the student’s schedule
to fulfill their requests.
Note: The system only updates these comments when you run another load, or you click Reschedule on the student workspace. Making manual changes to resolve conflicts, does not change the comments.
5.0 Reports
There are a variety of reports available to assist with the analysis of a schools master schedule and the resulting load of students.
5.1 Requests Not Scheduled
Run the Requests Not Scheduled report to view the courses each student requested, but did not get into when you built the master schedule and loaded students.
Use the results to determine if you need to change any section information and rebuild those sections to see if you can satisfy more student requests.
To run the Requests Not Scheduled report:
1. Log on to the Build view.
2. Click the Workspace tab.
3. On the Reports menu, click Requests Not Scheduled. The Requests Not Scheduled dialog box
appears:

Load Students and Analysis v1.2 Page 13
You can view these unsatisfied requests by student name, as in the following example, or by course:
Note: You can run the report by student or course.

Load Students and Analysis v1.2 Page 14
5.2 BC Master Schedule
This report shows all schedule and load information, including Classes enrollment totals.
To run the BC Master Schedule report:
1. Log on to the Build view.
2. Click the Workspace tab.
3. On the Reports menu, click BC Master Schedule. The BC Master Schedule dialog box appears:
The Class ID column shows the name and the Total enrollment for the grouping:

Load Students and Analysis v1.2 Page 15
5.3 Unscheduled Room
This report shows all Rooms that are free in each period and term.
To run the Unscheduled Room report:
1. Log on to the Build view.
2. Click the Workspace tab.
3. On the Reports menu
4. Click Rooms > Unscheduled Room. The Unscheduled Room dialog box appears:

Load Students and Analysis v1.2 Page 16
5.4 Unscheduled Teacher
This report shows all Teachers that are free in each period and term.
To run the Unscheduled Teacher report:
1. Log on to the Build view.
2. Click the Workspace tab.
3. On the Reports menu
4. Click Teachers > Unscheduled Teacher
6.0 Adjusting a Master Schedule
Once analysis is complete, decisions will need to be made about adjustments that are required to improve the schools master schedule. These may take many different forms and are unique to each school and their situation.
The following section reviews the process for making copies of a Scenario; as this often required to compare situations.

Load Students and Analysis v1.2 Page 17
6.1 Copy a Scenario
To copy a scenario:
1. From the Scenario tab.
2. Click into Details of the scenario you wish to copy.
3. Click Options > Copy Scenario…
4. The copy scenario dialogue box opens:
Select the pieces of the scenario you want to copy into this new scenario, such as the master schedule, student schedules, rules, and rotations.
Note: Ensure you review the Scenario preferences, covered in Scheduling Module 3 – Scenarios and Time Structures.