live it. love it. accordion album
TRANSCRIPT

Live It. Love It. Accordion Album By Tania Willis
Supplies: ST – 102 Reverie Garden/Rustic Red Linen ST – 105 Pants and Patches/Burlap Bag ST – 279 Chipboard Shapes ST – 222 Burlap Flowers ST – 230 Clear Cut Flowers ST – 277 Stick Pins ST – 135 Favorite Pieces Stickers ST – 140 Fresh Verse Stickers ST – 195 Dimensional Stickers ST – 100 Tear Out Ticket Booklet
12x12 Navy Cardstock (2 pcs) 12x12 Tan Cardstock Red Cardstock Adhesive/Glue Dots Paper Trimmer w/Scoring Blade Scissors Dimensional Foam Squares/Dots 1” Wide Ribbon (24” long) Red/White Bakers Twine 3 ½” Decorative Casing Blocks (2)
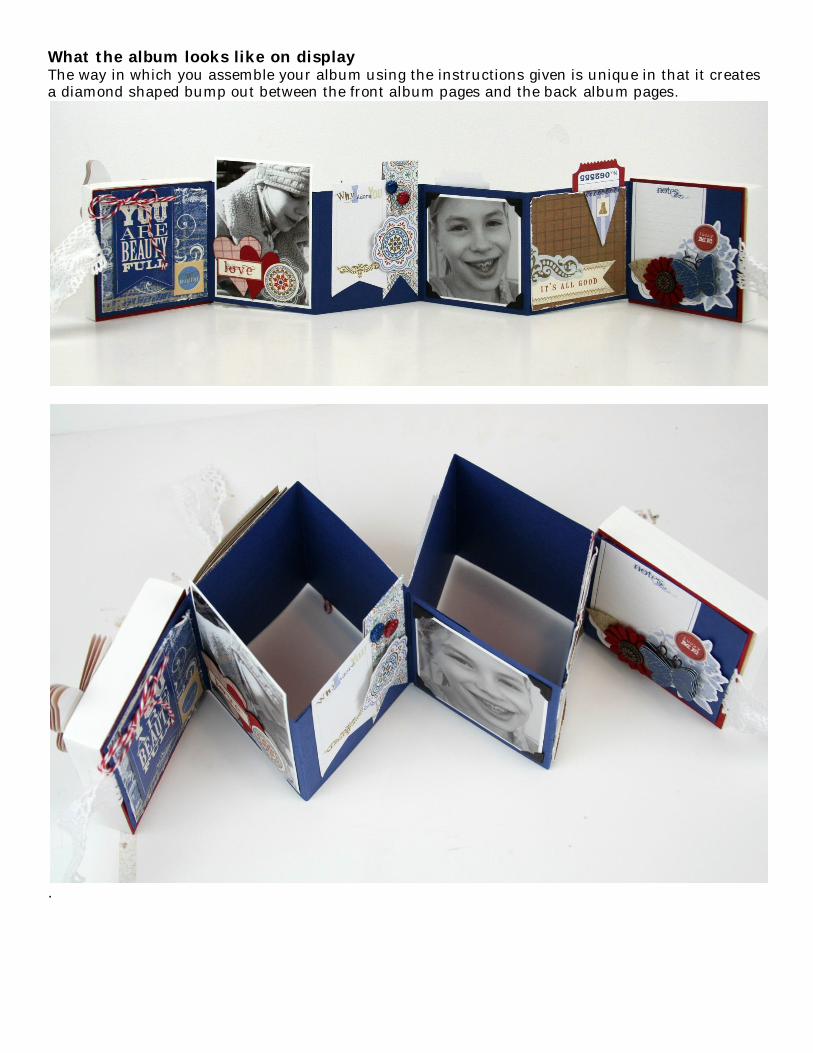
What the album looks like on display The way in which you assemble your album using the instructions given is unique in that it creates a diamond shaped bump out between the front album pages and the back album pages.
.
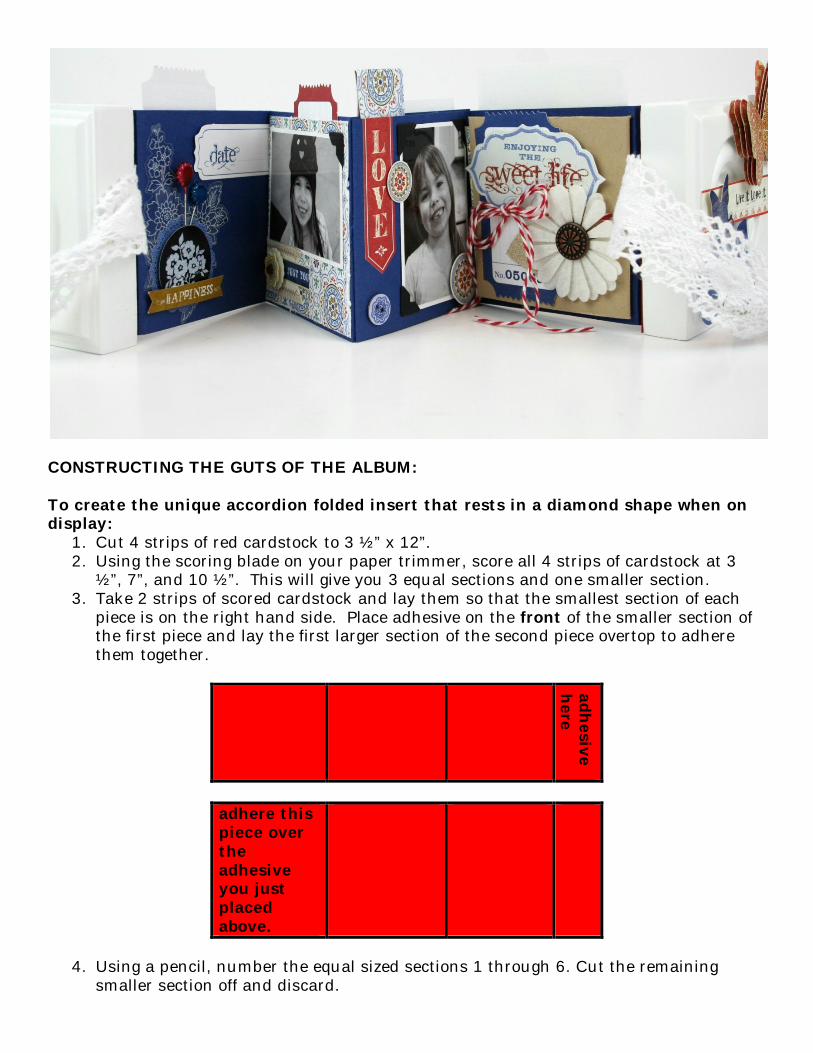
CONSTRUCTING THE GUTS OF THE ALBUM: To create the unique accordion folded insert that rests in a diamond shape when on display:
1. Cut 4 strips of red cardstock to 3 ½” x 12”. 2. Using the scoring blade on your paper trimmer, score all 4 strips of cardstock at 3
½”, 7”, and 10 ½”. This will give you 3 equal sections and one smaller section. 3. Take 2 strips of scored cardstock and lay them so that the smallest section of each
piece is on the right hand side. Place adhesive on the front of the smaller section of the first piece and lay the first larger section of the second piece overtop to adhere them together.
adhesive
here
adhere this piece over the adhesive you just placed above.
4. Using a pencil, number the equal sized sections 1 through 6. Cut the remaining
smaller section off and discard.

1
2
3
4
5
6
Cut off
5. Turn this over and lay it down on your workstation so the side numbered 6 is to your
left. Number them again with a pencil starting with 6 at your left and counting backwards to 1.
6. Take the 3rd strip of the scored cardstock and adhere the smaller section to the back
of page 6, matching the seams. Number the equal sized sections, 7, 8 and 9.
6 match this seam ------------>
5
4
3
2
1
adhesiv
e on
<--------- match this seam 7
8
9
7. Your new piece will look like this:
6
adhered
7
NO adhesive
8
NO adhesive
9
adhesive on back of this page
ONLY
2
1
8. Place adhesive on the back of page 9 and adhere page 9 to the back of page number 3. ***DO NOT PUT GLUE ON THE BACK OF PAGES 7 AND 8---ONLY page 9. ***
9. Take the last strip of the scored cardstock and number the equal sized sections 10, 11, and 12.
10 adhesive on
FRONT
11
12

10. Place adhesive on the front of page 10. Fold it to the back and adhere it to the FRONT of page number 9. Place adhesive on the back of the extra flap and glue to the back of page 1 matching the seams just like you did for the back of page 6. ***DO NOT PLACE ADHESIVE ON THE BACK OF PAGE 11 OR 12---ONLY THE FLAP***
6
adhere
7
8
11
12
adhesive
1
Now to embellish your pages
Page 1 Adhere a 3 ¼” x 3 ¼” piece of ST – Pants and Patches Patterned Paper centered on navy cardstock. Add a doubled strand of baker’s twine to the top of the “You Are Beauty Full” from ST – 279 Chipboard Shapes and adhere slightly off-center on the patterned paper. Add framed ‘beautiful’ sticker from ST – 140 Fresh Verse Stickers in lower left corner.

Page 2 Adhere a wallet-sized photo to navy cardstock panel allowing the top of the picture to overhang. Layer a heart cut from ST – Rustic Red Linen Patterned Paper together with a heart cut from red cardstock and adhere directly to the photo. Add “love” sticker from ST – 140 Fresh Verse Stickers overtop. Continue layering with a clear flower shape from ST – 230 Clear Cuts and a medallion sticker from ST – 135 Favorite Pieces Stickers.
Page 3 Cut a piece of ST – 102 Reverie Garden Patterned Paper to 1 ¼” x 5”. Create a triangular notch in one end. Adhere to the right side of the navy panel. Fold the patterned paper that overhangs the top of the panel over on itself and adhere to the back of the panel. Layer with the “Why I Adore You” ticket from ST – 1100 Tear Out Ticket Book. Add flower sticker form ST – 135 Favorite Pieces Stickers using dimensional foam squares/dots. Push two stick pins from ST – 277 Stick Pins through the dimensional foam squares so they are sandwiched between the patterned paper and the flower sticker. Page 4 Adhere a 3 ¼” square photo. Apply photo corners to each corner if desired.
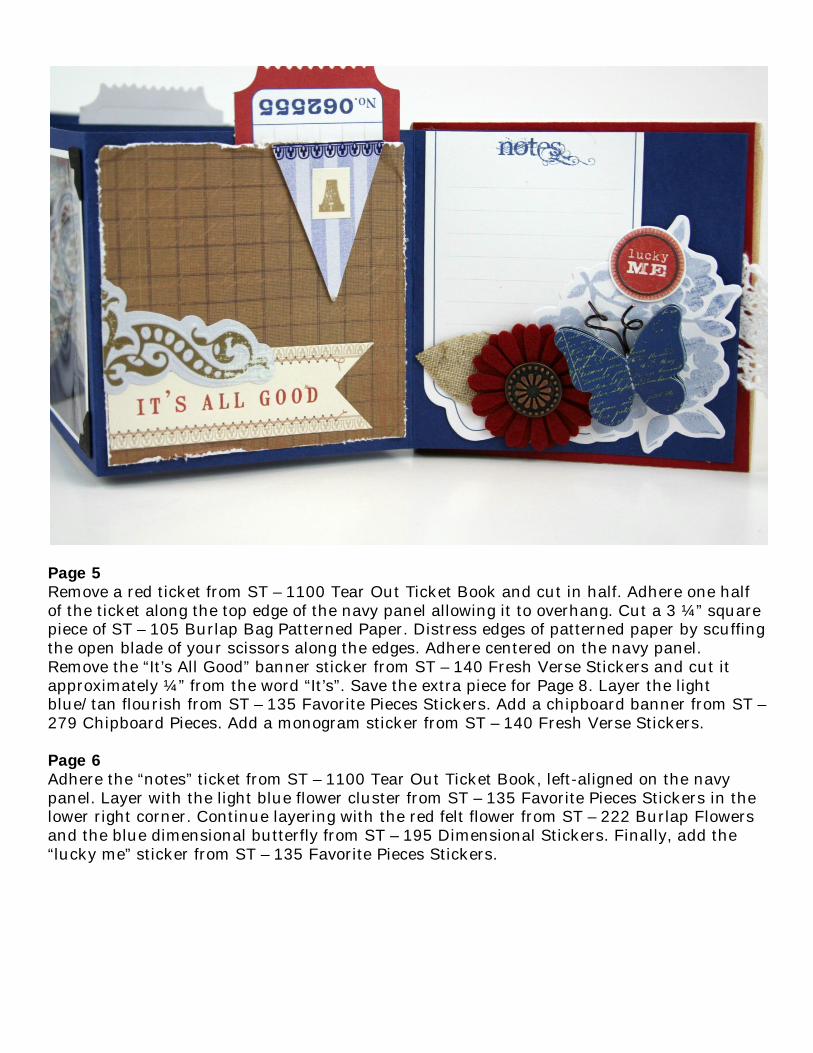
Page 5 Remove a red ticket from ST – 1100 Tear Out Ticket Book and cut in half. Adhere one half of the ticket along the top edge of the navy panel allowing it to overhang. Cut a 3 ¼” square piece of ST – 105 Burlap Bag Patterned Paper. Distress edges of patterned paper by scuffing the open blade of your scissors along the edges. Adhere centered on the navy panel. Remove the “It’s All Good” banner sticker from ST – 140 Fresh Verse Stickers and cut it approximately ¼” from the word “It’s”. Save the extra piece for Page 8. Layer the light blue/tan flourish from ST – 135 Favorite Pieces Stickers. Add a chipboard banner from ST – 279 Chipboard Pieces. Add a monogram sticker from ST – 140 Fresh Verse Stickers. Page 6 Adhere the “notes” ticket from ST – 1100 Tear Out Ticket Book, left-aligned on the navy panel. Layer with the light blue flower cluster from ST – 135 Favorite Pieces Stickers in the lower right corner. Continue layering with the red felt flower from ST – 222 Burlap Flowers and the blue dimensional butterfly from ST – 195 Dimensional Stickers. Finally, add the “lucky me” sticker from ST – 135 Favorite Pieces Stickers.

Page 7 Layer together a flower bouquet clear shape from DT – 230 Clear Cuts along with the “Happiness” cluster from ST – 195 Dimensional Stickers and place in the lower left corner. Push two stick pins from ST – 277 Stick Pins in to the dimensional foam adhesive. Trim the “date” ticket from ST – 1100 Tear Out Ticket Book and adhere in the upper right corner.

Page 8 Cut a 3 ¼” square piece of ST – 102 Reverie Garden. Distress edges by scuffing with the open blade of your scissors and adhere to the navy panel. Add a mini photo, and then layer with the leftover piece cut of banner sticker cut from the “It’s All Good” banner sticker (Page 5). Layer a portion of the “Just You & Me” dimensional sticker from ST – 195 Dimensional Stickers (cut off the ‘& me’ portion if it doesn’t apply to the photo). You should NOT have any pages numbered 9 and 10
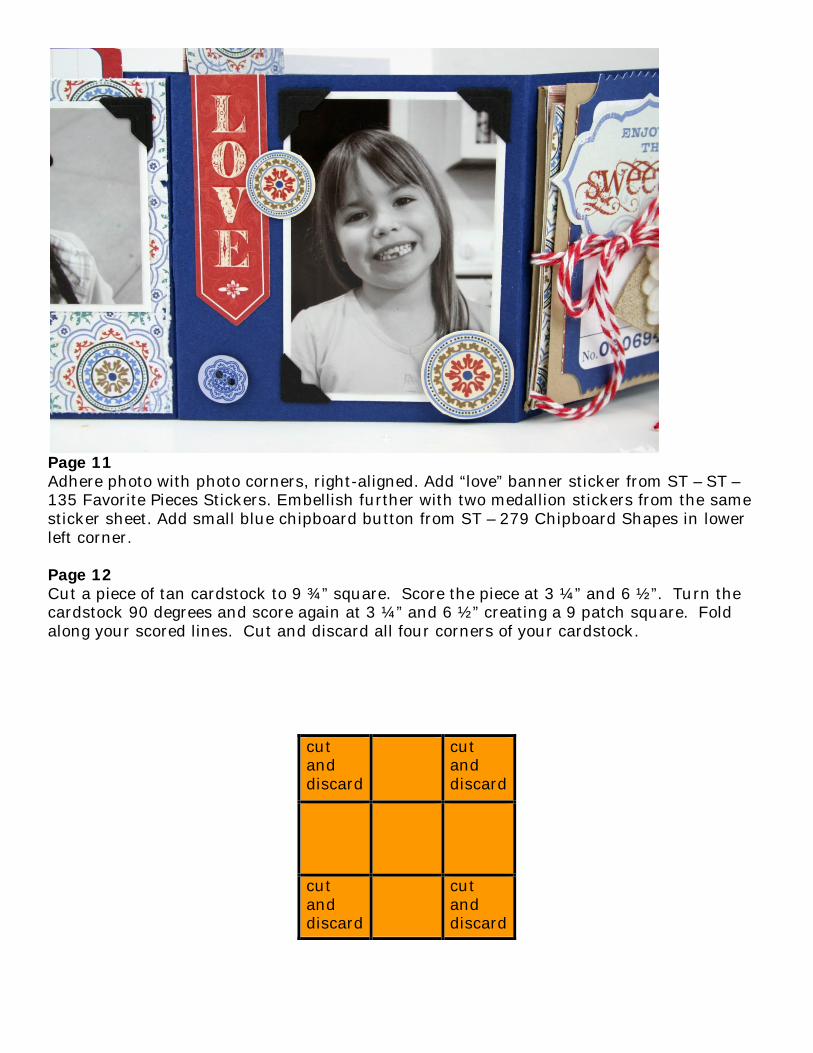
Page 11 Adhere photo with photo corners, right-aligned. Add “love” banner sticker from ST – ST – 135 Favorite Pieces Stickers. Embellish further with two medallion stickers from the same sticker sheet. Add small blue chipboard button from ST – 279 Chipboard Shapes in lower left corner. Page 12 Cut a piece of tan cardstock to 9 ¾” square. Score the piece at 3 ¼” and 6 ½”. Turn the cardstock 90 degrees and score again at 3 ¼” and 6 ½” creating a 9 patch square. Fold along your scored lines. Cut and discard all four corners of your cardstock.
cut and discard
cut and discard
cut and discard
cut and discard

You will then be left with this:
Decorating the booklet flaps.
Adhere four 3” square photos to the inside of each loose flap. Embellish with phrase stickers from ST – 135 Favorites Pieces. On the middle square add a blue flower clear shape from ST – 230 Clear Cuts to the lower left corner. Layer with the ‘enjoy the ride’ sticker from ST – 140 Fresh Verse Stickers using dimensional foam squares/dots. Add cream chipboard circle with blue flowers from ST – 279 Chipboard Shapes. Add chipboard banner from ST – 279 Chipboard Shapes to the upper right corner. Embellish with a monogram from ST – 140 Fresh Verse Stickers.

On the backside of one flap, add a 3 ¼” square of ST – 102 Rustic Red Linen. Layer with a butterfly clear cut from ST – 230 Clear Cuts, “Life is Lovely” sticker from ST – 140 Fresh Verse Stickers and a red scroll sticker from ST – 135 Favorite Pieces Stickers. On the backside of another flap, add a 3 ¼” square of ST – 102 Reverie Garden Patterned Paper.
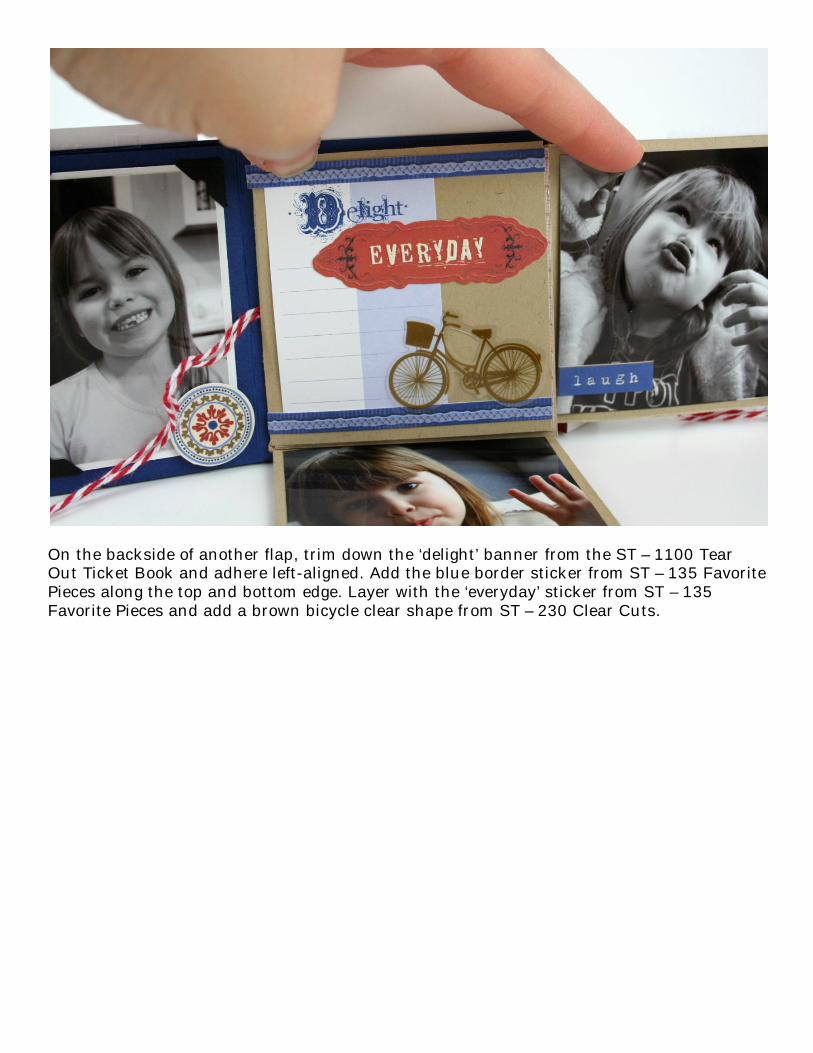
On the backside of another flap, trim down the ‘delight’ banner from the ST – 1100 Tear Out Ticket Book and adhere left-aligned. Add the blue border sticker from ST – 135 Favorite Pieces along the top and bottom edge. Layer with the ‘everyday’ sticker from ST – 135 Favorite Pieces and add a brown bicycle clear shape from ST – 230 Clear Cuts.

On the last flap, which will become the COVER of your interactive booklet, adhere the navy blue ticket from ST – 1100 Tear Out Ticket Book vertically. Layer with “enjoying the sweet life” sticker from ST – 135 Favorite Pieces and a cream felt flower from ST – 222 Burlap Flowers. Tie closed with the bakers twine. Lay two pieces of baker’s twine measuring 18” each, horizontally across the navy panel of page 12. Adhere the middle panel of the booklet to page twelve sandwiching the twine between the booklet and the navy panel. Wrap and tie twine around booklet to hold closed. Preparing your moulding squares for finishing the album Measure the back of your decorative casing squares and cut 2 pieces of red cardstock to that measurement. Mine were 3 ¾” square. Adhere cardstock to the flat back of each decorative casing. Lay decorative casing squares, decorative side down on your work surface. Lay a 12” piece of ribbon or lace horizontally across the center of the red cardstock on EACH square. Put adhesive on the back of Page 1 and adhere to the center of red cardstock of one square and put adhesive on the back of page 6 and adhere to the center of the red cardstock of the other square. Refold your accordion and tie your album closed on both sides.
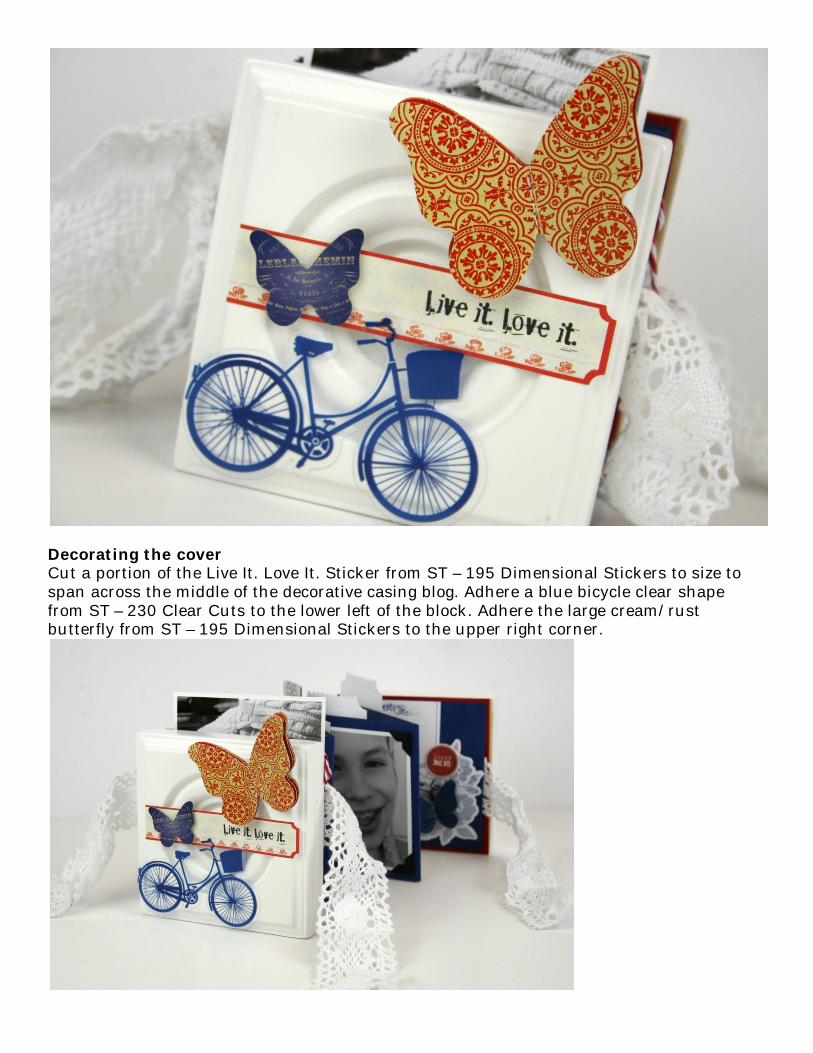
Decorating the cover Cut a portion of the Live It. Love It. Sticker from ST – 195 Dimensional Stickers to size to span across the middle of the decorative casing blog. Adhere a blue bicycle clear shape from ST – 230 Clear Cuts to the lower left of the block. Adhere the large cream/rust butterfly from ST – 195 Dimensional Stickers to the upper right corner.