little tank d15 - mooer|small,smart,originaltd15...little tank d15 modeling mini guitar amplifier...
TRANSCRIPT

L I T T L E T A N K D 1 5Modeling Mini Guitar Amplifier Head

CONTENTS
Precautions
Panel Instructions
Main Features
Operational Guidance Preset Selection
Tone Setting
Tone Saving
Quick Recall Buttons
Tuner
FX Loop
Aux In and Bluetooth
Connections
Effects Explanation
Specifications
Troubleshooting
Patch List
01
02
03
040506
0910
11
11
12
13
16
16
17
09
Restore Factory Setting 10

Precautions
Ower Supply:
Please connect the designated AC adapter to an AC outlet of the correct voltage. Please be sure to use only an AC adapter which supplies 18V DC, , 1200mA, center negative. Unplug the AC power adapter when not in use or during electrical storms.
Connections:
Always turn off the power of the D15 and all other equipment before connecting or disconnecting. This will help prevent malfunction and damage to any of the devices. Make sure to unplug all connection cables and power cords before moving this unit. Please be sure to connect the speaker out of the D15 to a speaker load of at least 4ohm rating before operation. Failure to do so could cause damage to the unit.
Location:
To avoid deformation, discoloration, or other serious damage, do not expose this unit to the following conditions:���� Direct sunlight
Heat sources
Magnetic fields
Extreme temperature or humidity
Excessively dusty or dirty location
High humidity or moisture
Strong vibration or shock
Interference with other electrical devices and Cleaning:
Radios and televisions placed nearby may experience reception interference. Operate this unit at a suitable distance from radios and televisions.Clean only with a soft, dry cloth.
Handling:Do not apply excessive force to the switches or controls. Do not let paper, metal, or other objects into this unit.Take care not to drop the unit, and do not subject it to shock or excessive pressure.
Please read carefully before proceeding
01
This device complies with Part 15 of the FCC Rules. Operation is subject to the following two conditions: This device may not cause harmful interference. This device must accept any interference received, including interference that may cause undesired operation.
FCC certification

1
2
5 6
73 1098
4
18
1514131211 16 17
Panel Instructions
LCD Display: Displays the User Interface and provides all information for presets and parameters
PLAY: Accesses preset page
A、B、C、D:Quickly recalls 4 of your favorite presets
TUNER:�Accesses the Tuning function page
01
02
03
04
02
05
06
07
08
09
10
11
12
13
14
15
16
17
18
SAVE:Access to saving custom user presets
AMP:Accesses the amp model and amplifier parameters page
CAB:Accesses the speaker cabinet simulation page
MOD:Accesses the modulation effects and parameters page
DLY:Accesses the delay effects and parameters page
REV:Accesses the reverb effects and parameters page
INPUT:1/4” audio jack, for connecting guitar or other instruments
GAIN:Adjusts the input gain of the selected amp model
TREBLE:Adjusts the treble frequency of the selected amp model
MID:Adjusts the middle frequency of the selected amp model
BASS:Adjusts the bass frequency of the selected amp model
MASTER:Adjusts the master output volume of the D15
VALUE:Used for adjusting various parameters and selections within the User
Interface
POWER:Switches the D15 on and off

03
23 22 21 20
19
24
SPEAKER OUT: Connects to an external speaker or speaker load(Please
connect 4ohm or over)�SEND:Connect this to the input of external time based or modulation effects.
RETURN:Connect this to the output of external time based or modulation effects
HEADPHONES: Stereo line out for connecting to a headset or other external
audio equipment (Main speaker sound is muted when a connector is inserted into
the headphones jack)AUX IN:Stereo line in for connection to external devices for audio playback.
DC IN:Connects to the supplied power adaptor(DC 18V1200mA ��������������������)
19
20
21
22
23
24
Main Features
25 high quality simulated amp models20 cabinet models9 modulation effects5 different Delay types
6 different Reverb types4 quick recall buttons to instantly recall your favorite presetsSerial effects loopAux in and Bluetooth capabilities for audio playback from an external deviceBuilt in 15Watt power amp for driving an external guitar cabinetDedicated controls for BASS, MID, TREBLE, GAIN and MASTER VOLUME for fast tone dialing.40 programmable presetsBuilt in guitar tuner
DC IN 18V 1.2A

Operational GuidancePower
Connect the supplied power adaptor to the DC-IN jack located on the rear side.18V, 1200mA, )Connect a speaker load of at least 4Ohm to the speaker out. Connect your instrument to the Input jack and power the D-15 on using the ON/OFF switch.
01
DC IN 18V 1.2A
04

Selecting Presets
Power on the D15 or press the play button to access the preset page. the LCD Display will
indicate the information of the current preset. Rotate the Value control to change the current
selected preset.
Note:1. When changing preset the AMP, CAB and EFFECTS buttons will illuminate
3
1
2
5 6 7
4
Preset Selection
01
1. Preset number 2. Preset name 3. Amp model 4. Cab model
5. Modulation model 6. Delay model 7. Reverb model
2.More details will be list on page 17.
if they are active
05

Tone settingsAMP Editing01
Press the AMP button to access the Amp model page.Press again to active the Amp
model. Here you can see the amp model which is selected and the levels of all various
amp settings. Rotate the VALUE control knob to change the amp model. Pressing the
VALUE control knob will select different individual parameters which can be easily
adjusted by then rotating the VALUE control.Press the Amp button to turn off the Amp
model while the Amp model is activating.
The following 3 parameters can only be adjusted using the VALUE control knob
"VOL" = Preset volume. This allows different Presets to have different relative volumes
"PRE" = Presence. A higher presence value will result in a brighter overall tone and a
lower presence value will result in a darker overall tone.
"NG" = Noise-gate. If you are finding that you have unwanted background noise like
hiss from using a high gain sound for example, you can adjust the noise gate to
remove it.
The other parameters represent the regular tone stack and gain controls found on
most amplifiers. These can be adjusted using the dedicated control knobs on the
front of the D15 or by using the VALUE control.
Pressing the AMP button again at any time while in this page will return the selected
parameter back to the amp model
06

Press the CAB button to access the speaker cabinet simulation page. Rotate the
VALUE control knob to select a different speaker cabinet
CAB Editing02
MOD Editing03
Press the MOD button to access the Modulation effect page. Rotating the VALUE
control knob will select different types of Modulation effects. Pressing the VALUE
control will select the various parameters which can then be adjusted by rotating
the VALUE control knob. Pressing the MOD button at any time while on this page
will return the parameter selection back to the modulation type selector.
07

DLY Editing04
Press the DLY button to access the Delay effects page. Rotating the VALUE control knob will select different types of Delay effects. Pressing the VALUE control will select the various parameters which can then be adjusted by rotating the VALUE control knob. Pressing the DLY button at any time while on this page will return the parameter selection back to the delay type selector.
REV Editing05
Press the REV button to access the Reverb effects page. Rotating the VALUE control knob will select different types of Reverb effects. Pressing the VALUE control will select the various parameters which can then be adjusted by rotating the VALUE control knob. Pressing the REV button at any time while on this page will return the parameter selection back to the Reverb type selector.
08

Tone saving
�
Press the SAVE button at any time to save your current tone and access the preset saving function page.
Rotate the VALUE control knob to select the preset number where you would like to save your tone. Press the VALUE control to switch between the preset number select and the name edit parameters.
Rotate the VALUE control knob to scroll through letters and press the VALUE control to select the letter and move to the next character.
When you're finished press the SAVE button again to finish saving. You will be returned to the preset selection page (PLAY)
note: . When saving a preset, every parameter will be saved except for the MASTER level control.
Quick recall buttons
Pressing the quick recall buttons A,B,C,D, let you instantly load up your 4 favorite
presets. To save a preset to one of the quick recall buttons, simply scroll to that preset
whilst in the preset selection page and hold the desired button A,B,C,D for at least one
second. To quickly recall that preset at any time just press the corresponding "quick
recall button".
09

10
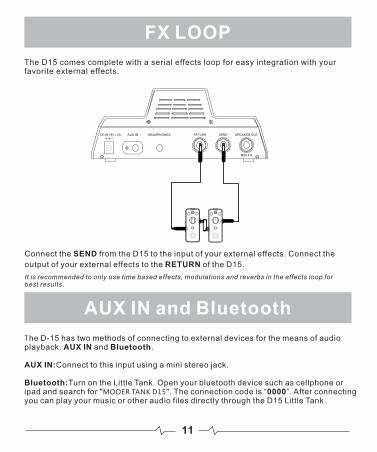
FX LOOP
The D15 comes complete with a serial effects loop for easy integration with your favorite external effects.
Connect the SEND from the D15 to the input of your external effects. Connect the
output of your external effects to the RETURN of the D15.
It is recommended to only use time based effects, modulations and reverbs in the effects loop for best results.
AUX IN and Bluetooth
The D-15 has two methods of connecting to external devices for the means of audio playback. AUX IN and Bluetooth.
AUX IN:Connect to this input using a mini stereo jack.
Bluetooth:Turn on the Little Tank. Open your bluetooth device such as cellphone or ipad and search for "MOOER TANK D15". The connection code is “0000”. After connecting you can play your music or other audio files directly through the D15 Little Tank.
DC IN 18V 1.2A
11

DC IN 18V 1.2A
Connections
12

Effect Explanation
1
2
3
4
5
6
7
8
9
10
11
12
13
14
15
16
17
18
19
20
21
22
23
24
25
26
AMP OFF
Uk30
Uk800 CL
TRIPLE
MK IV
F.CLEAN
Uk900 CL
JZ CLEAN
BSM 59
PL 100
UK-J45
HW 103
SLO100
PV 5150
ADC30
ROCK 50
Uk800 DS
MATCH30
POWER DS
MOGNER
JRT915
F.CRUNCH
MOOER RC
MOOER CL
MOOER CR
MOOER MT
OFF
AMP
NO. Name Specifications
Based on VOX AC30 Normal
Based on MARSHALL JCM 800 Clean
Based on MESA triple rectifier
Based on MESA MK IV
Based on FENDER TWIN REVERB
Based on MARSHALL JCM 900 CLEAN
Based on ROLAND Jc120
Based on FENDER BASSMAN
Based on MARSHALL PLEXI LEAD 100
Based on PEAVEY 5150
Based on MARSHALL JTM- 45
Based on HIWATT Dr103
Based on SOLDANO SLO100
Based on MATCHLESS Dc30
Based on ORANGE AD30TC
Based on ORANGE ROCKERVERB 50
Based on MARSHALL JCM 800 DIST
Based on ENGL POWERBALL
Based on BOGNER UBERSCHALL
Based on DIVIDED BY 13 JRT 9/15
Based on FENDER DELUXE REVERB
Based on MOOER ROCK
Based on MOOER CLASS A
Based on MOOER CRUNCH
Based on MOOER METAL
*NOTES: All product name called their company, here is only used in this product simulation effect of tone types.
13

1
2
3
4
5
6
7
8
9
10
11
12
13
14
15
16
17
18
19
20
21
OFF
UK 212
UK 412
US 412
FTR 212
RD 212
BSM 410
PV 412
HIWAY 412
SLO100 412
MATCH 212
OG 412
OG 212
EG 412
MOGNER 412
DIVIDE 212
FDR 212
MOOER 112
MOOER 212
MOOER 412OB
MOOER 412CB
OFF
NO. Name Specifications
Based on VOX AC30 212 cab
Based on Marshall 1960A 412 G12T-75 cab
Based on Mesa Boogie Rectifier 412 cab
Based on FENDER TWIN REVERB 212 cab
Based on ROLAND JC120 212 cab
Based on FENDER BASSMAN 410 cab
Based on PEAVEY VK412 cab
Based on HIWATT HG 412 cab
Based on SOLDANO 412 cab
Based on MATCHLESS DC30 212 cab
Based on ORANGE PPC412 cab
Based on ORANGE ROCKERVERB 50 212 cab
Based on ENGL 412 PRO cab
Based on BOGNER 412 cab
Based on DIVIDED By 13 212 cab
Based on FENDER DELUXE REVERB 212 cab
Based on MOOER cab
Based on MOOER cab
Based on MOOER cab
Based on MOOER cab
*NOTES: All product name called their company, here is only used in this product simulation effect of tone types.
CAB
14

1
2
3
4
5
6
7
8
9
10
OFF
CHORUS
FLANGER
PHASER
TREMOLO
VIBRATO
FILTER
RING MOD
STUTTER
PITCH
OFF
1
2
3
4
5
6
7
OFF
ROOM
HALL
CHURCH
PLATE
MOD
SPRING
OFF
NO. Name SpecificationsMOD
This effect creates a shining dimensional sound.
This effect produces an undulating and floating sound.
This effect creates a pulsing-like sound.
This effect periodically influences the volume of the signal.
This effect produces an intense vibrato sound.
This effect produces a sweeping filter sound.
This effect produces a sound which sounds like a ring bell.
This effect rhythmically cuts your sound similar to a killswitch.
This effect produces a sound which sounds like a pitch.
1
2
3
4
5
6
DIGITAL
OFF
ANALOG
DYNAMIC
ECHO
TP ECHO
OFF
NO. Name Specifications
DELAY
Repeats the signal with no special processing, creates the most clean delay sound.
Simulates analog delay equipment, produces a warm and vintage delay sound.The delay sound is low while playing, but increases when playing stops.
Simulates the sound of a real Echo, authentic and natural delay sound.
Simulates a vintage Tape Echo machine
Name Specifications
REVERB
NO.
Simulates the acoustics of a room
Simulates the acoustics of a concert hall.
Simulates the acoustics of a big church.
Simulates Plate reverberation.
Adds chorus effect to a hall reverb.
Similar to plate reverb but the effect is obtained from a vibrating spring, resulting in a very characteristic sound.
15

Specifications
Troubleshooting
No. of Effect Modules: 5 modules
No. of Effect Types: 65 Effect types
Preset Patch Memory: 40 patches
Input Jack: 1/4” mono audio jack
Speaker Ou t :
Se n d /Return:e
1/4” mono audio jack,connect over 4ohm speaker
” 1/4 mono audio jack
Headphone out: 1/8” stereo audio jack
Power requirements: AC adapter 18V DC,1200mA,
Watt: 15watt
Dimensions: 186mm X 96.5mm X 75.8mm
Weight: 0.67KG
Accessories: Owner’s Manual,18V DC Power Supply
Can not power on:Check power connection——Make sure the power is connected correctly.Check the adapter——Make sure the adapter’s type is DC 18V/1200mA/
No sound or low volume:Check connection of cables——Make sure all the cables are connected firmly.Check the on/off switch and the volume setting of amp——Make sure each equipment’s volume is set to an appropriate level.Make sure that the D-15 has a speaker load connected to the speaker out or a secure connection to the HEADPHONES output
High noise:Check the adapter——Make sure the adapter’s type is DC 18V/1200mA/Check the cables——Make sure the cables are connected firmly and have no quality problem.
16
Bluetooth: The connection code is “0000”

Patch List
17
No. Name of preset
1
2
3
4
5
6
7
8
9
10
11
12
13
14
15
16
17
18
19
20
21
22
23
24
25
26
27
28
29
30
31
32
33
34
35
36
37
38
39
40
No. Name of preset
77 DIST
NO DR
2P2
NU GUNS
AUTUMN
3RD
NEW
B FACE
DYN SOLO
LOFI
FUSION2
SHINE
GYRATE
BACK
SECRET
WHITE
FEEDBACK
DARK
CONFUSED
DUALCORE
BSM
SOLOMAN
JC ROOM
ROCK80
SWEET OD
EXTREME6
FUSION
POWER8
OLDTIMEY
SINE800
GOLDEN
POP CLN
TUBE
70 CLUB
SPRING
HEAVY
SYCAMORE
AUTOWAH
PH CLN
GOD LOVE

MOOER AUDIO CO.,LTD
Shenzhen, China
www.mooeraudio.com