lions e-clubhouse editing - lionnet - on the net, we serve · microsoft powerpoint - lions...
TRANSCRIPT

Creating a new Lions
e-Clubhouse Web site
Lions e-Clubhouse
Application
www.e-Clubhouse.org/application.php
We are very happy that we can incorporate the new Lions
Clubs International branding appearance into free & easy
webpages through the Lions e-Clubhouse initiatives. But
with the new look comes a responsibility. We all want
our clubs to have a more updated web site; New with
content, along with the new look. For the next few
minutes, I will be discussing how to edit the new Lions
e-Clubhouse web pages.
Getting started is simple.
Just visit www.e-Clubhouse.org/application.php

Fill in the ApplicationMandatory fields:
Club Name
District
Country
State
Club Number
Club Meeting Date & Time
Club Meeting Location
Presidents Name
Web Master Name
Web Master Email
Other fields of interest:
City - (If different from Club
Name)
Club Address
Club Telephone
Club Email
When you fill in the application, it is easy to fill out this
information about your club. Many of these fields will
then appear on your website. If your country does not
have States, just pick the first one on the list. Our
Administrators know and will BLANK that field for you.
This is EASY.

Approval notification via e-Mail
e-Mail will include
Login parameters:
Username & Password
Basic instructions to get started
You will receive an e-mail that indicates that your website
was approved. It will include the Username &
Password and basic instructions to help you get started.
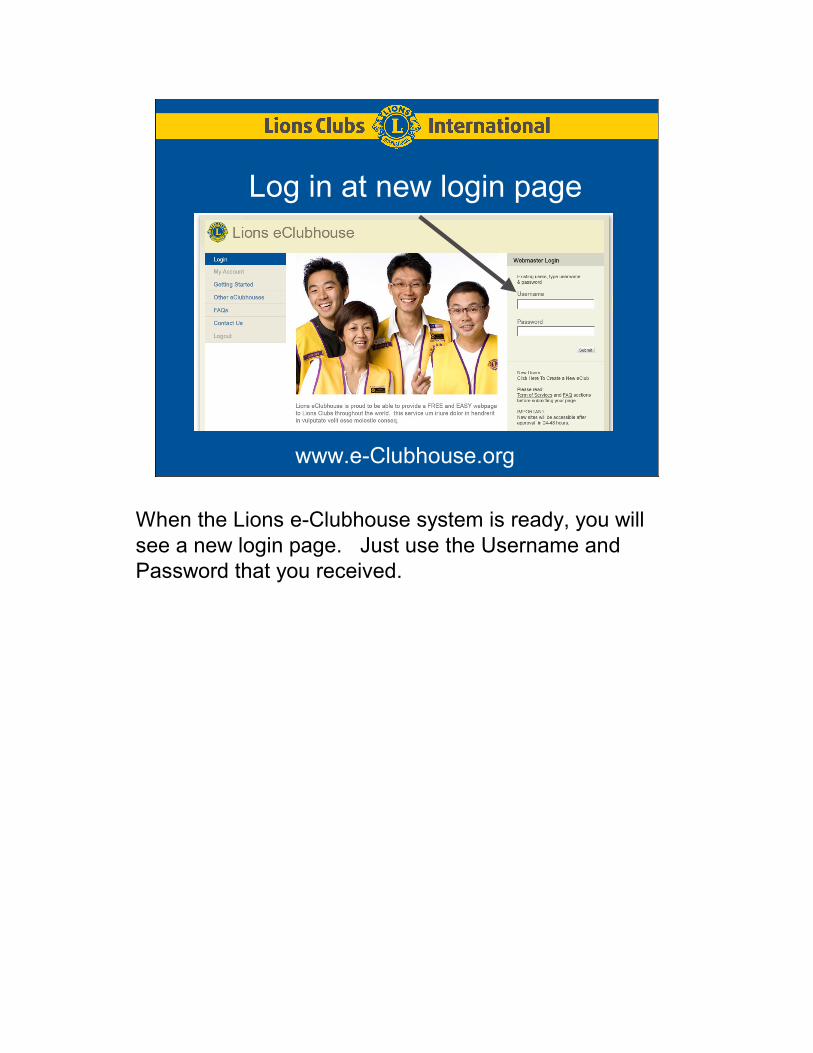
Log in at new login page
www.e-Clubhouse.org
When the Lions e-Clubhouse system is ready, you will
see a new login page. Just use the Username and
Password that you received.

Edit your Home page
Once logged in, click on MANAGE
PAGES
To edit your HOME page, CLICK on MANAGE PAGES.

Pick HOME PAGE
Click on Edit Live Page for the HOME page to begin
editing.
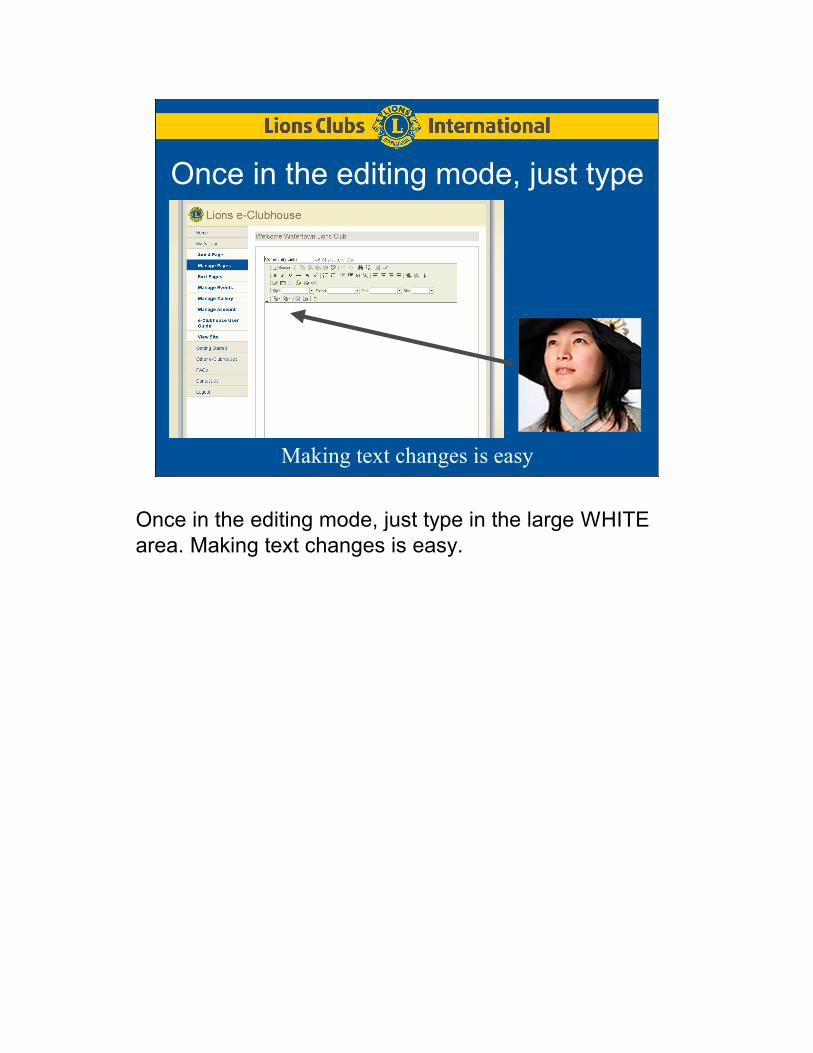
Once in the editing mode, just type
Making text changes is easy
Once in the editing mode, just type in the large WHITE
area. Making text changes is easy.

Before you go too far,
Preview then Publish
Before you go too far, Preview then Publish. The Lions
e-Clubhouse server will time-out while you sit and think,
so use the Preview, then Publish feature to save your
changes.

Review your page
Review your updated website.

Let’s ADD a photo
Then HIT the Submit button.
Let’s ADD a photo. Back to the EDITING mode on the
HOME page, let’s use the INSERT PICTURE button.

The Next Time that you EDIT
Click on UPLOAD to add a photo
From the UPLOAD section, you will be able to find
a photo on your computer to transfer to your website.
From the UPLOAD section, you will be able to find a
photo on your computer to transfer to your website

Click on the BROWSE
button to find a photo
Click on the BROWSE button to look for a photo on your
computer. This works like many other programs that help
you to change folders until the photo that you want
appears. PICK that file, then click on the OPEN button.

SEND IT TO THE SERVER
When successful, click OK.
Click on the SEND IT TO THE SERVER button. Once
that is successful, click OK.

Set the WIDTH to 470 or less
Back on the Image Info section, type over the current
width of the photo to 470 or less. Otherwise, the photo
will crowd the visitors computer screen. Then click OK.

Try to CENTER a photo
Try using the CENTER button to center a photo.

PREVIEW, then PUBLISH
then click VIEW SITE
Like before, use PREVIEW, then PUBLISH. Now would
be a good time to use the PREVIEW button at the
bottom of the page, then PUBLISH. Take another good
look at your work. Go back to editing and try a different
appearance. This is EASY.

Let’s ADD a LINK
Log in again to edit a page
Type in the basic text on the page first
Type in the basic text on the page first. Start with a
name of the page and heading, such as Community
Links. Then add the text that names these links or
locations. Town Hall, Public Library, Chamber of
Commerce. Of course, you should also add a link to your
District website.

Highlight the text to be linked
Click on the LINK tool
Highlight the text to be linked, then Click on the LINK
tool.

Now type in the LINK
Now type in the LINK. You might have that website open
with your internet browser, then use COPY and PASTE
from the Address field. This method can reduce errors.

Select the Target section
And pick New Window
Select the Target section, and select New Window
[ _blank ], then click OK. (if you want the link to open in
a new window)

What about a Newsletter?
•First, make that newsletter a PDF file,
under 2MB in size
(Try the free Cute PDF Maker from www.cutepdf.com)
•Rename the file to use only Letters and Numbers
(Example: WatertownCTJan2010.pdf)
•Use the UPLOAD section in the same
manner that you uploaded a photo.
•Then Link to it.
First, create a PDF file from the original. A PDF file is
universal so anyone can read or print it with any printer on
any paper. When you install a PDF maker program like
Cute PDF, it adds the PDF maker to your list of printers.
When using this, it creates the PDF file instead of printing out
to your printer. It is so easy to make a PDF file that anyone
can do it. Just visit www.CutePDF.com and try the free
program.
But rename that file so the name contains only letters and
numbers. WatertownCTJan2010.pdf is a perfect name.
Descriptive in name, but short.
While using the LINK tool, go to the UPLOAD section to
upload PDF files that are less than 2MB in size. For larger
newsletters, create multiple PDF files for different sections of
the newsletter. Even when full of photos, 4-page PDF files
should be less than 2MB. So you might need 2 PDF files for
an 8-page newsletter.
Then link to it. Make sure that the link name includes
“e-Clubhouse.org/ in front of the full filename path.

Pick PREVIEW, then Publish
Preview then Publish
Finally, Pick PREVIEW, then PUBLISH to save your
changes.

Let’s use the CalendarLog in again and
Click on MANAGE EVENTS
To make use of the Calendar, just log in and use the
Manage Events section.

Just Fill Out the Form
* Optional items
Fill out the form to describe your event. The Event
Name and Event Date fields are obviously
mandatory. You may use the other fields. Complete a
brief description of the event in the Event Description
field. It is easy to correct your Event later, but helps to try
to get things right the first time.
When you have completed typing in your Event, hit the
ADD button on the bottom of the page. This Event
instantly appears LIVE at the Calendar section of the
website; without the need to using the PREVIEW and
PUBLISH buttons.

Use FEATURED EVENT
Featured Events will appear on your HOME pageUse only one or two events
Select that event from the pull-down menu
Now you can select an upcoming event to appear on your
home page as a FEATURED EVENT. Just select that
event from the pull-down menu.

Just Click on the FEATURE Button
Click on the FEATURE button to make the selected event
FEATURED on the HOME page. Once you hit the
FEATURE button, that event immediately appears LIVE
at your Home Page.
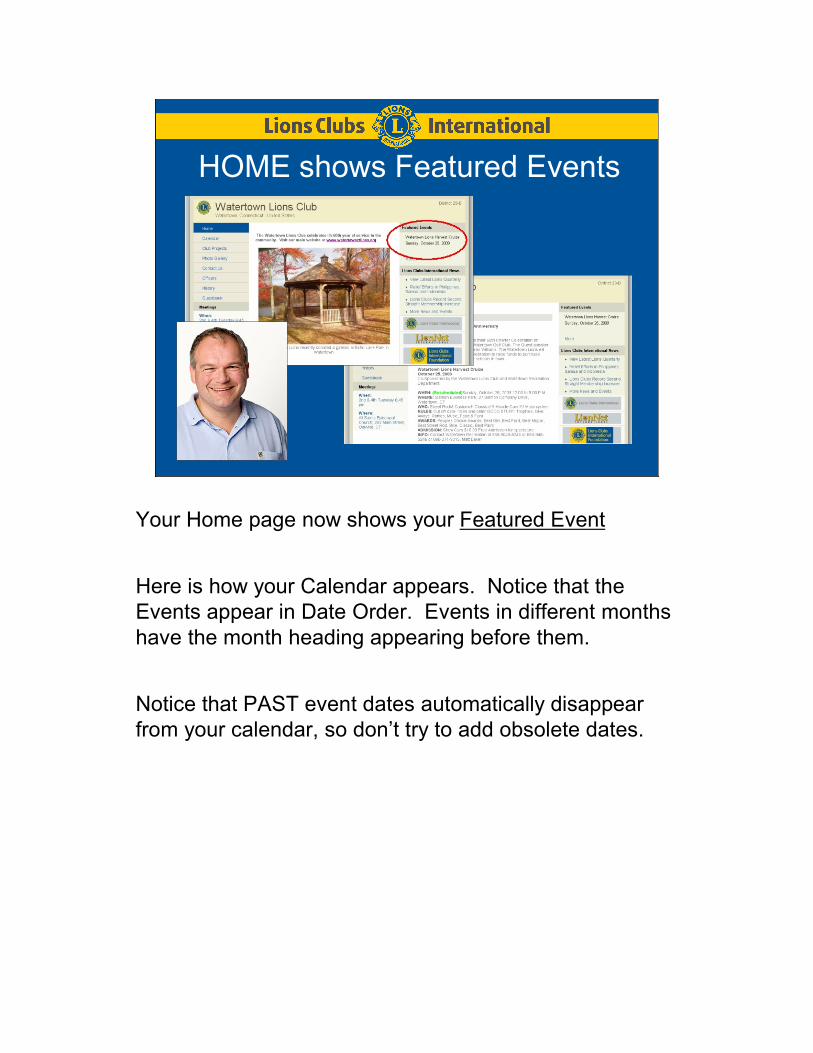
HOME shows Featured Events
Your Home page now shows your Featured Event
Here is how your Calendar appears. Notice that the
Events appear in Date Order. Events in different months
have the month heading appearing before them.
Notice that PAST event dates automatically disappear
from your calendar, so don’t try to add obsolete dates.

Let’s Get Connected!
Click
Encourage your club members to make use of social
networking. Use this to share information about your
Lions Club’s activities. Check to see if your Lions Club
website is included in the on-line directory of Lions web
sites at LionNet.