lingerie chest - woodworker's edge · pdf filelingerie chest this piece begins with...
TRANSCRIPT

Lingerie Chest
www.woodworkersedge.com
This piece begins with structural dovetails where the case
bottom to joins the case sides. Structural because they will
be hidden under a moulding when the piece is complete. Be-
gin the layout at the front edge of the case sides with a half
pin that is a 1/2” wide. The rear edge of the layout needs a
half pin as well, this one is 1-1/2” wide. The area in between
is then divided into tails of equal size while the pin size
should remain close to a 1/4” on the face side of the layout.
This will display hand-cut work. Extend the lines of your
dovetails down the non-face side at 90 degrees.
Make the cuts that define the dovetails. You can use a
hand saw or speed things up by setting the angle on
your jig saw to match the layout lines and cutting the
stock, I use 12 degrees. If you use the jig saw you will
only be able to cut one side of each tail without chang-
ing the angle to finish the opposite cuts. Also, slow the
speed of your saw if you can. This will give you more
control during the cut.
Make sure to keep the base of the jig saw level.
Any tilting of the saw will result in an over cut
on the face of the side panels.
Position the saw back to 90 degrees and remove a large
portion of the waste material in the dovetail socket areas.
With the Face of the sides against the bench, cut into the
socket and along the scribe line staying about an 1/8”
away. As you near the opposite cut you will need to tilt the
saw on it’s heal and complete the angled cut as shown. Cut
in one direction then turn and repeat the same style of cut
to remove the balance of the waste.
With the majority of the waste removed you can now complete the
dovetail sockets by placing the chisel into the scribe line and work-
ing the joint to the halfway mark, maintaining a 2 degree angle on
your chisel. Flip the side and complete the socket in the same man-
ner. This will result in a socket where the back edge is cut at a “V”
which will allow the joint to close tightly as the pins are driven into
the tails.
5.
3.
1. 2.
4

Lingerie Chest
www.woodworkersedge.com
6.
7.
8.
9.
10.
Transfer the layout of the pins onto the case bot-
tom. A sharp pencil or marking knife will give you
an accurate transfer.
Make the cuts to define the pins at the band saw (you could
also use the jig saw or cut by hand). Cut each side then add
a third cut in the middle of each pin waste area. This will
allow the waste to be removed more easily. Remember to
maintain that two degree angle to your chisel here as well.
When the dovetail joints are completed
we need to layout for the front drawer
dividers according to plan.
My favorite method for cutting the sliding dovetail
slots for the dividers is to use a square platform jig
along with a 3/4” outside diameter bushing and a
3/4”, 14 degree dovetail bit. The set up is simple and
can be repeated with ease. Place the jig along the lay-
out line, set the depth of cut at 1/2” and plow the cut to
the 2-1/2” line. After the first cut, and with the router
off, slide the bit to the back of the cut and draw a line
where the base sits. This will be the stopping point of
each cut in this operation.
Next, layout and cut the half tail socket on the
interior of the Sides for the Case Top Rail.

Lingerie Chest
www.woodworkersedge.com
11.
12.
13.
14.
15.
Create the 7/16” x 3/4” rabbet on the back edge of
the Sides for the backboards. I use the table saw in a
two step method. First cut with the interior of the
Sides against the saw, then the second cut as shown.
The Rear Case Top Rail is to be dovetailed into the sides.
While this layout will not help to keep the Sides from sepa-
rating, the backboards will complete this task, it does pre-
vent the piece from being pulled out of the case if you would
lift from the top. Complete the joint for both ends of the rail.
To create the dado for the inside drawer dividers and run-
ners I use a 1/2” pattern bit in conjunction with another ply-
wood straight edge. Set the cut to a 3/16” in depth and stop
at 1-1/4” from the front edge of the sides. Use the chisels to
square the ends of the dado.
Mill the material for the front drawer dividers accord-
ing to the cut sheet. Mill and extra piece of scrap for
set-up. Use the same bit for the dividers as you used to
cut the slots to insure a match for the joint. Set up the
cut in the router table.
First set and adjust for the height of the cut, then adjust for
the width of the tail. The operation needs to be in this order
because each adjustment of the height will in turn, change
the width. A snug fit is what your are looking for in this step.
If it is too tight the joint will not go together (Glue will swell
the pieces a small amount). You know the problem if the joint
is too loose!

Lingerie Chest
www.woodworkersedge.com
16.
17.
18.
19.
20.
The next step is to create the mortises for the drawer
runners. Notice that the bottom divider is not dovetailed.
It is simple cut to fit between the case sides. The mor-
tises are centered in the dividers and are 1” in length.
Cut the 1/4” x 1/2” x 1” mortises using a step method.
Plunge one cut, skip the second 1/4”, and make the next
plunge allowing equal pressure on all sides of the cut. Work
the entire length of the mortise and then remove the remain-
ing waste to complete each mortise.
Before doing any assembly, cut 3/4” off of the
back edge of the Case Bottom. Once the rabbets of
the Sides are complete you are able to get an ac-
curate measurement. Add glue to the dovetail
joints for the sides and bottom then slide them
together. Add clamps to secure. Attach the Rear
Rail and Front Rail with glue and clamps as well.
The installation of the dividers begins with the bottom di-
vider. Add a line of glue on the piece, position it into the
case and use clamps to hold it in place. Attach the divider
with #8 x 1-1/4” screws through the Case Bottom.
The balance of the Front Dividers are attached using glue at the
sliding dovetail area. You may find that you need a bit of persuasion
to align the joint. Use a scrap so as not to damage the divider.

Lingerie Chest
www.woodworkersedge.com
21.
22.
23.
24.
25.
The top is to be attached to the case with wooden
clips. The slots are cut using a biscuit cutter and you
need to make two passes. The first cut is from 3/4” to
5/8” while the send completes the groove at 1/2” down
from the top edge. The clips are 7/8” w x 3/4”d x 2-
1/4” l and the tongue is a 1/4” x 1/2”.
Mill the material
(dividers, runners
and guides) for the
interior drawer
area. Cut and fit the
Dividers into the
dados created in
step #13. Fit the
drawer runners into
the dados directly
behind those divid-
ers. Attach with glue
at the front few
inches and brads at
the rear of each
piece.
Create the Interior Side Spacers for the drawer area. Cut the
pieces to size and ad a 3/16” round-over edge detail. Install
the piece with glue and brads at the front edge of the dividers
to lessen the width of these drawers so that they will slide
between the doors when fully opened. Install the drawer
guides as shown. The Runners for the exterior drawers are next. Make a
1/4” tenon on one end of a wide piece of secondary
wood. Once the tongue is fit to the mortise in the divid-
ers, rip the board into the 1” strips that will be the
runners.
I like to clip the ends for aesthetics. Use a framing square to
draw the line for the runners squared off of the case front.
The runners are installed using glue for the first 4” and a
single nail (N-7) near the back of the case. Pre-drill a hole
through the runner and nail to the case side.

Lingerie Chest
www.woodworkersedge.com
26.
27.
28.
29.
30.
Mill the pieces for the base frame to size. The Base Frame
Front is mitered at 45 degrees on each end. The Frame
Sides are mitered at the front end and have 1/4” x 2-1/4” x
1-1/4” mortises at the rear. The Frame Rear Rail has a
tenon on each end. The tenons are created at the table saw
by setting the blade to a 1/4” in height and placing the
fence at 1-1/8” away from the blade. Make a pass on all
four sides of the Rear Rail to create the shoulder cuts.
Next, use the tenon jig to complete the cuts for the
cheeks. The rest of the waste material is removed
at the band saw to complete the tenons.
Cut for #20 biscuits at the intersection of the Front and Side
Frame rails, and glue into the mortises and onto the tenons.
Slide the joint together and clamp. Install the biscuits with
glue into position at the front and add the clamps.
Clamping the Base Frame in this manner is
most effective. You will need to work all
four clamps in unison to accurately close
the joint and square the frame. Set aside to
dry!
When the Base Frame is dry you can create the edge detail on
the frame. Mould the front and both sides, but not the back. I
have added a scrap along the rear rail to keep from allowing
the bit to roll around the corner as you route.

Lingerie Chest
www.woodworkersedge.com
31.
32.
33.
34.
35.
Develop the profile of the foot from the plans and
transfer it onto plywood to use as a pattern. Trace that
pattern onto the ends of the stock that you will use as
your feet. Raise the blade to the apex of the lower por-
tion of the cyma curve in the foot layout.
Next, set an auxiliary fence at an angle to the table saw
blade, removing the original fence. To orient that fence into
the correct position you need to use the stock with the pat-
terns. On the lead in end align the blade, just as it falls be-
low the table surface, with the foot layout as shown.
The same method is used to set up the fol-
lowing end which is closest to the auxiliary
fence. How you move the auxiliary fence will
result in a perfect set-up. Maneuver the
pieces along with the fence to achieve the
correct position.
When the settings is correct, lower the blade and take
several cuts over the blade raising the blade incremen-
tally as you go until the full height of the curve has been
reached.
.
Remove as much of the balance of the waste material
at the table as possible. Two passes may be needed to
accomplish this step.

Lingerie Chest
www.woodworkersedge.com
36.
37.
38.
39.
40.
Use the foot pattern to layout the necessary feet. Here you
will need to make sure that you have three feet from each
blank and that the are three feet facing right as well as
three feet facing left. Mark the hole of the spur with a small
drill bit .
Move to the drill press to remove the area that
will create the spur using a forstner bit.
Cut free each foot profile along the layout lines at the
band saw.
Set one of each profile of the feet aside for use as the
rear foot on the case side. The remaining feet will be
paired to make the front foot assemblies. You need to cut
the 45 degree miter on each of these feet. The first two
will be cut with the set-up as shown. The stop block
helps to keep the blank from moving away as the blades
cuts.
The second pair will be cut with the miter gauge reversed in the
same slot of the table saw. Here you can see that I have employed
the use of a push stick. Because we want to cut with the top of the
foot, or the longest side, against the miter fence, we need to hold the
foot against the fence as we guide the blank through the cut. The
push stick makes this a safe job!

Lingerie Chest
www.woodworkersedge.com
41.
42.
43.
44.
45.
I cut the slot for our spline while the blade is tipped to
45 degrees,. This cut into a 45 degree cut results in a
groove that is 90 degrees to the miter. Create the 1/4”
groove by making two passes at the blade.
Now is the time to assemble the front feet for the
chest. A plywood spline will reinforce the foot for
many years. Add glue, install the spline and to
hold the feet in position as the glue dries I use
Duct tape. Wrap it along the top edge of the feet
and one complete wrap at the bottom edge.
The rear Case side feet that we set aside before will be
dovetailed to the secondary blanks. To create the dovetail
sockets I complete the layout and use a forstner bit to hog
out as much waste as possible. Clean the openings with a
chisel and you are ready for the next step.
Scribe a line on the
secondary blanks
that matches the
depth of your dove-
tails then align the
ogee foot onto the
blank and transfer
the layout line of
the socket. Cut
those as we did in
step #7 and fit the
blanks to the foot.
Remove some of the
extra material from
the secondary
blank by cutting at
the miter saw. This
again is done for
aesthetics as much
as anything. When
ready assemble the
pieces with glue.
Sand each set of feet at the spindle sander if
needed.

Lingerie Chest
www.woodworkersedge.com
46.
47.
48.
49.
50.
Final sculpt the face of the assemblies with the Shinto
Rasp, planes and files. Sand the pieces to 180 grit and
you are ready to attach them to the Base Frame.
Add glue, lightly, to the top edge of the feet and
the area that the feet will meet on the Base Frame.
Position the assembly and add clamps to hold
until the glue dries.
I chose to use a stacked corner blocks for may feet. The
grain of these small blocks is alternated with each piece.
This will limit the amount of movement that you might
find in cross grain blocking (notice the piece to the right
of the cutting). I like to use hot hide glue for this step and
when the blocks are ready, I true each piece and cut a 45
degree area of waste away. Straight blocking can be used
for each wing of the foot assembly.
The glue blocks are positioned and attached to the feet
and Frame with brads. Once the entire Base assembly
is complete you can attach it to the case. Use #8 x 1-
1/4” screws along the front edge and nails at the back.
The screws will hold the relationship of the two steady
and any movement will be forced to the back of the
case which the use of nails will allow.
Next, create the transition moulding and attach it to the
case covering the joint of the two assemblies. Use glue
along the front piece and back the side pieces around 4”-
6”, then finish the installation with brads.

Lingerie Chest
www.woodworkersedge.com
51. 52.
53.
54.
55.
Run the edge profile for the case top and it is ready to be
installed. I selected a classic ogee bit for the top edge
and a simple 1/4” round-over to soften the bottom edge.
Sand the top to 180 and attach it to the case with nails into
the rear top case rail and screws through the wooden clips.
The under hung moulding is created with a roman
ogee router bit and fit to the case just under the
top. Add glue and brads as we did the transition
moulding.
The work on the doors begins by milling the rails and
stiles to size. Select the position of each piece and label it
appropriately. I have chosen the right stile of the left-hand
(or fixed) door to be the wide stile. This is the stile that the
opposite door will lip. Each stile will get a mortise that is
1/4” x 1-1/2” x 1” in depth. They begin at 1/2” in from the
end of the stile.
Once the mortises are cut you need to begin the work on the rails.
The matching tenons are started with the shoulder on the flat sides of
each rail. Set the blade to 1/4” in height and the fence at 7/8” away
from the blade, then run the two sides over the blade. Next, raise the
blade to 1/2” without changing the fence and create the cut on the
edge of each rail that will be nearest the raised panel.

Lingerie Chest
www.woodworkersedge.com
56.
57.
58.
59.
60.
Now, move the fence in exactly 3/8” and make the last
cut that defines the shoulders. This cut is offset to create
the haunched portion of the tenon that will fill the
groove cut for the panel. Complete the tenons at the table saw for the cheek
cuts and then at the band saw to finish the edge
cuts.
Run a 1/4” groove in the center of each rail and stile.
That groove needs to be 3/8” deep into the piece. After
removing a center cut, reposition the fence to a 1/4” from
the blade. Run the cut the entire length of each piece,
then reverse the piece and make a second cut at the same
setting. This insures that the grooves is centered in our
pieces. You want a snug fit, not tight.
Here are the completed rails and stiles. You can see
how the haunched tenon fills the groove area of the
stiles.
Mill the raised panel to size and tilt the blade to 12 de-
grees at the table saw. You need to set the fence at exactly
3/16” away from the blade as it tips below the table sur-
face. This will create the appropriate fit of the panel into
the groove of the door frame parts.

Lingerie Chest
www.woodworkersedge.com
61.
62.
63.
64.
65.
To create a classic raised panel you need to set the saw
blade so that the outer edge of the blade is flush with the
outside surface of the panel.
With everything set
you can run the first
series of cuts to make
the raised panel. No-
tice how the blade is
just protruding
through the panel.
Also, cut the end
grain first. This will
help to minimize the
tear out in the panel.
The first cut leaves an angled cut at the raised area of the pan-
els. We need to remove that angle cut with the second series of
cuts. The set-up for this cut can be the most difficult. You will
need to raise the blade to just the height of the previously cut
area and set the fence so that you are just nipping the 12 degree
cut. You are squaring the cut area to the panels. Once set you
can make the cuts on all four locations on each panel. Sand the
angled portion and the back of each panel (the area that you not
be able to get to after the doors are assembled) then glue the
doors at the mortise and tenon joints making sure not to get glue
on the raised panel.
Run a 1/4” round over profile on all four edges of
both doors. Then set up a rabbeting bit and create
a 3/8” rabbet on the top and bottom edge of both
doors and the middle stile of operable door
(shown on the left door in the picture). On the two
outer or hinge edges of the doors create an 1/8”
rabbet (shown on the right side in the picture).
The wider center stile gets treated differently. Here you need to not only
create that matching 1/4” round over detail, but also form the lipped
area that the second door will close against and cover the gap between
that doors as seen from the outside. The Ovolo bit will handle this task.
Set it up in the router table and use and auxiliary fence. Adjust the height
of your cut first, then set the cutter to just leave a 3/8” flat area as
shown. Test the fit of the doors in the case to see if you need to further cut
this area. You will run this door with the raised panel flat against the
table. Be careful not to rock the door frame as you cut.
Lingerie Chest
www.woodworkersedge.com
66.
67.
68.
69.
70.
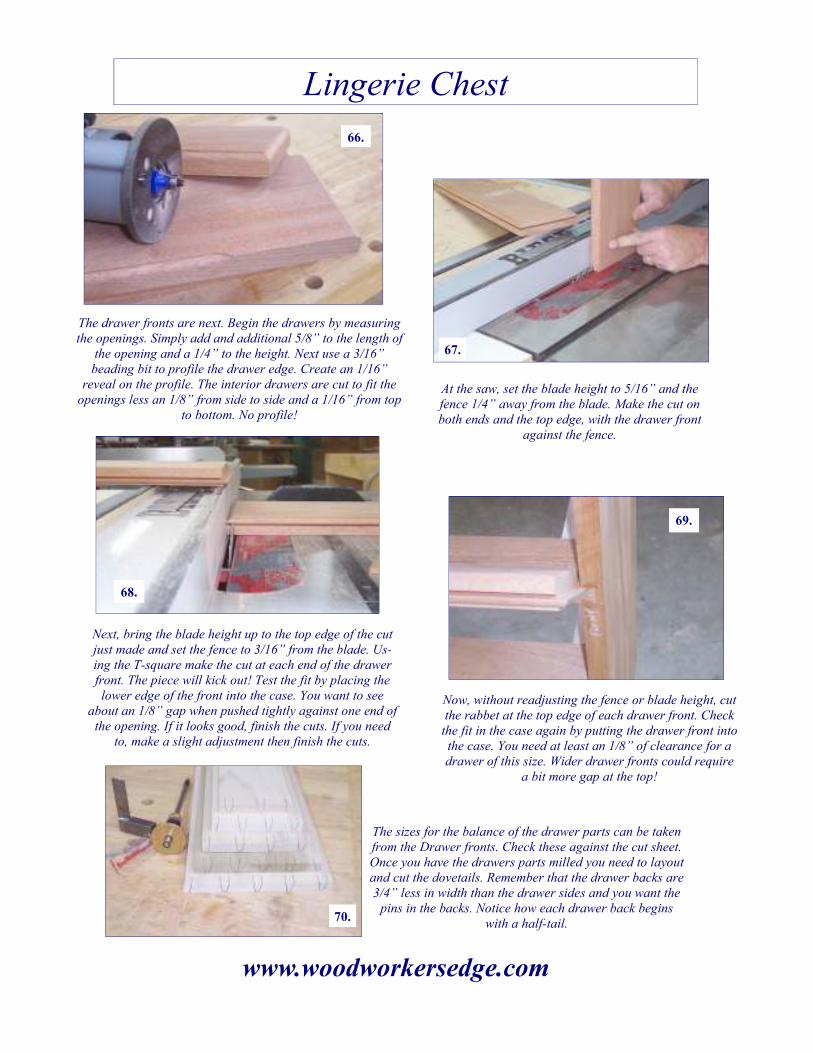
The drawer fronts are next. Begin the drawers by measuring
the openings. Simply add and additional 5/8” to the length of
the opening and a 1/4” to the height. Next use a 3/16”
beading bit to profile the drawer edge. Create an 1/16”
reveal on the profile. The interior drawers are cut to fit the
openings less an 1/8” from side to side and a 1/16” from top
to bottom. No profile!
At the saw, set the blade height to 5/16” and the
fence 1/4” away from the blade. Make the cut on
both ends and the top edge, with the drawer front
against the fence.
Next, bring the blade height up to the top edge of the cut
just made and set the fence to 3/16” from the blade. Us-
ing the T-square make the cut at each end of the drawer
front. The piece will kick out! Test the fit by placing the
lower edge of the front into the case. You want to see
about an 1/8” gap when pushed tightly against one end of
the opening. If it looks good, finish the cuts. If you need
to, make a slight adjustment then finish the cuts.
Now, without readjusting the fence or blade height, cut
the rabbet at the top edge of each drawer front. Check
the fit in the case again by putting the drawer front into
the case. You need at least an 1/8” of clearance for a
drawer of this size. Wider drawer fronts could require
a bit more gap at the top!
The sizes for the balance of the drawer parts can be taken
from the Drawer fronts. Check these against the cut sheet.
Once you have the drawers parts milled you need to layout
and cut the dovetails. Remember that the drawer backs are
3/4” less in width than the drawer sides and you want the
pins in the backs. Notice how each drawer back begins
with a half-tail.

Lingerie Chest
www.woodworkersedge.com
71.
72.
73.
74.
75.
With the pins completed in the backs use those to layout
the tails in your drawer sides, transfer the layout di-
rectly. Complete the work on the tails and test the fit.
Here you can see a tight fit as well as the offset in size
between the sides and the backs.
Turning our attention to the Drawer Fronts. The layout to
create these pins is a bit different from the backs. Now you
need to begin the layout with a half-pin on each end of the
fronts. Saw the lines that define the pins with your hand saw,
remove the waste area with your chisels. This too will be the
template by which you layout the tails, so keep the pins an-
gled and less than a 1/4” at the smallest area.
Transfer the layout onto the sides to complete the
drawer box. Cut the sides as we did in step #7. Test
the fit of the tails and pins and adjust as necessary.
Next we need to create the 1/4” x 1/4” groove for the
drawer bottoms. I use a 3-wing cutter that is set to 3/4” to
the top edge. This corresponds to the offset between the
drawer backs and sides. Run the groove on both drawer
sides and the Drawer Front only. The drawer back is not
grooved. Sand the interior of the drawer boxes and assem-
ble with glue.
Mill the panels for your drawer bottoms, cut them to sizes according
to your drawers and use the same set up that we used for the raised
panels of the doors to make the angled cut. This time allow the blade
to extend completely through the panel cutting an angle without the
shadow edge.

Lingerie Chest
www.woodworkersedge.com
76.
77.
78.
79.
80.
Slide the panel into the drawer boxes to test the fit and place
a short line on the bottom, at the drawer back on the inside
of the drawer. This is the height setting for the slot that the
nail with extend through and hold the drawer bottom in posi-
tion. A single pass at the table saw will make this slot.
At the saw, set the blade height to 5/16” and the
fence 1/4” away from the blade. Make the cut on
both ends and Sand the outsides of the drawer
boxes and the completed drawer bottom, then lock
the bottom into position with the nail. As the
drawer bottom expands and contracts, the nail
will allow for the movement and hold the bottom
tight to the drawer back. Slide the interior
drawers into the
case and align the
front edges with the
interior side spac-
ers. While holding
the drawers in
place use a bit of
glue and brads to
attach the drawer
stops as shown.
One for each side
of the drawers.
Next layout and cut the recess for the hinges. These are
known as clock hinges because they are normally used
for the lipped door on tall case clocks. This is the same
application. First cut the lip of the door with a saw and
remove the material until it is flush with the door edge.
I like to use a 1/4” straight bit to clean the most waste
from the hinge area. Then you need to finish with a
chisel. I find it most helpful to add a block to the back
of the door to stabilize the router as it is used.
The short leaf of the hinge should be flush with the door
edge after it is installed. I also set the top edge of the hinge
even with the inner edge of the rails.

Lingerie Chest
www.woodworkersedge.com
81.
82.
83.
Fit the hinges to the case. Remove the drawers and posi-
tion the doors to the case and transfer the hinge location
onto the case. You have access to the hinges from the
interior through the back of the piece. Scribe the hinge
to the case with a sharp knife. The removal of the waste
with the router setup is not so good in this scenario. You
cannot clean all of the waste away. You need to com-
plete the work with your chisel.
The fixed door, left hand door in my piece, set held with a
simple catch that is located on the door back just at the top
of the door. It is notched to allow it to lock over the Case Top
Rail and attached to the door with a single #8 x 1” wood
screw.
Final sand the exterior of the case and drawer fronts
to 180 and prepare for the finishing steps.