lilypond learning manual
DESCRIPTION
LilyPond Learning ManualTRANSCRIPT
LilyPondThe music typesetter
Learning Manual
The LilyPond development team
� �This file provides an introduction to LilyPond version 2.16.2.
� �For more information about how this manual fits with the other documentation, or to read thismanual in other formats, see Section “Manuals” in General Information.
If you are missing any manuals, the complete documentation can be found athttp://www.lilypond.org/.
Copyright c© 1999–2012 by the authors.
Permission is granted to copy, distribute and/or modify this document under theterms of the GNU Free Documentation License, Version 1.1 or any later versionpublished by the Free Software Foundation; with no Invariant Sections. A copy ofthe license is included in the section entitled “GNU Free Documentation License”.
For LilyPond version 2.16.2
i
Table of Contents
1 Tutorial . . . . . . . . . . . . . . . . . . . . . . . . . . . . . . . . . . . . . . . . . . . . . . . . . . . . . . . . . 11.1 Compiling a file . . . . . . . . . . . . . . . . . . . . . . . . . . . . . . . . . . . . . . . . . . . . . . . . . . . . . . . . . . . . . . . . . . . 1
1.1.1 Entering input . . . . . . . . . . . . . . . . . . . . . . . . . . . . . . . . . . . . . . . . . . . . . . . . . . . . . . . . . . . . . . . . 11.1.2 MacOS X . . . . . . . . . . . . . . . . . . . . . . . . . . . . . . . . . . . . . . . . . . . . . . . . . . . . . . . . . . . . . . . . . . . . . 21.1.3 Windows . . . . . . . . . . . . . . . . . . . . . . . . . . . . . . . . . . . . . . . . . . . . . . . . . . . . . . . . . . . . . . . . . . . . . 61.1.4 Command-line . . . . . . . . . . . . . . . . . . . . . . . . . . . . . . . . . . . . . . . . . . . . . . . . . . . . . . . . . . . . . . . 12
1.2 How to write input files . . . . . . . . . . . . . . . . . . . . . . . . . . . . . . . . . . . . . . . . . . . . . . . . . . . . . . . . . . 131.2.1 Simple notation . . . . . . . . . . . . . . . . . . . . . . . . . . . . . . . . . . . . . . . . . . . . . . . . . . . . . . . . . . . . . 131.2.2 Working on input files . . . . . . . . . . . . . . . . . . . . . . . . . . . . . . . . . . . . . . . . . . . . . . . . . . . . . . . 18
1.3 Dealing with errors . . . . . . . . . . . . . . . . . . . . . . . . . . . . . . . . . . . . . . . . . . . . . . . . . . . . . . . . . . . . . . . 191.3.1 General troubleshooting tips . . . . . . . . . . . . . . . . . . . . . . . . . . . . . . . . . . . . . . . . . . . . . . . . . 191.3.2 Some common errors . . . . . . . . . . . . . . . . . . . . . . . . . . . . . . . . . . . . . . . . . . . . . . . . . . . . . . . . 19
1.4 How to read the manuals . . . . . . . . . . . . . . . . . . . . . . . . . . . . . . . . . . . . . . . . . . . . . . . . . . . . . . . . . 191.4.1 Omitted material . . . . . . . . . . . . . . . . . . . . . . . . . . . . . . . . . . . . . . . . . . . . . . . . . . . . . . . . . . . . 191.4.2 Clickable examples . . . . . . . . . . . . . . . . . . . . . . . . . . . . . . . . . . . . . . . . . . . . . . . . . . . . . . . . . . 201.4.3 Overview of manuals . . . . . . . . . . . . . . . . . . . . . . . . . . . . . . . . . . . . . . . . . . . . . . . . . . . . . . . . 20
2 Common notation . . . . . . . . . . . . . . . . . . . . . . . . . . . . . . . . . . . . . . . . . . . . 212.1 Single staff notation . . . . . . . . . . . . . . . . . . . . . . . . . . . . . . . . . . . . . . . . . . . . . . . . . . . . . . . . . . . . . . 21
2.1.1 Bar checks . . . . . . . . . . . . . . . . . . . . . . . . . . . . . . . . . . . . . . . . . . . . . . . . . . . . . . . . . . . . . . . . . . 212.1.2 Accidentals and key signatures . . . . . . . . . . . . . . . . . . . . . . . . . . . . . . . . . . . . . . . . . . . . . . . 212.1.3 Ties and slurs . . . . . . . . . . . . . . . . . . . . . . . . . . . . . . . . . . . . . . . . . . . . . . . . . . . . . . . . . . . . . . . 232.1.4 Articulation and dynamics . . . . . . . . . . . . . . . . . . . . . . . . . . . . . . . . . . . . . . . . . . . . . . . . . . . 242.1.5 Adding text . . . . . . . . . . . . . . . . . . . . . . . . . . . . . . . . . . . . . . . . . . . . . . . . . . . . . . . . . . . . . . . . . 252.1.6 Automatic and manual beams . . . . . . . . . . . . . . . . . . . . . . . . . . . . . . . . . . . . . . . . . . . . . . . 252.1.7 Advanced rhythmic commands . . . . . . . . . . . . . . . . . . . . . . . . . . . . . . . . . . . . . . . . . . . . . . . 26
2.2 Multiple notes at once . . . . . . . . . . . . . . . . . . . . . . . . . . . . . . . . . . . . . . . . . . . . . . . . . . . . . . . . . . . . 272.2.1 Music expressions explained . . . . . . . . . . . . . . . . . . . . . . . . . . . . . . . . . . . . . . . . . . . . . . . . . 272.2.2 Multiple staves . . . . . . . . . . . . . . . . . . . . . . . . . . . . . . . . . . . . . . . . . . . . . . . . . . . . . . . . . . . . . . 292.2.3 Staff groups . . . . . . . . . . . . . . . . . . . . . . . . . . . . . . . . . . . . . . . . . . . . . . . . . . . . . . . . . . . . . . . . . 302.2.4 Combining notes into chords . . . . . . . . . . . . . . . . . . . . . . . . . . . . . . . . . . . . . . . . . . . . . . . . . 302.2.5 Single staff polyphony . . . . . . . . . . . . . . . . . . . . . . . . . . . . . . . . . . . . . . . . . . . . . . . . . . . . . . . 31
2.3 Songs . . . . . . . . . . . . . . . . . . . . . . . . . . . . . . . . . . . . . . . . . . . . . . . . . . . . . . . . . . . . . . . . . . . . . . . . . . . . 312.3.1 Setting simple songs . . . . . . . . . . . . . . . . . . . . . . . . . . . . . . . . . . . . . . . . . . . . . . . . . . . . . . . . . 312.3.2 Aligning lyrics to a melody . . . . . . . . . . . . . . . . . . . . . . . . . . . . . . . . . . . . . . . . . . . . . . . . . . 322.3.3 Lyrics to multiple staves . . . . . . . . . . . . . . . . . . . . . . . . . . . . . . . . . . . . . . . . . . . . . . . . . . . . . 36
2.4 Final touches . . . . . . . . . . . . . . . . . . . . . . . . . . . . . . . . . . . . . . . . . . . . . . . . . . . . . . . . . . . . . . . . . . . . . 362.4.1 Organizing pieces with variables . . . . . . . . . . . . . . . . . . . . . . . . . . . . . . . . . . . . . . . . . . . . . 362.4.2 Adding titles . . . . . . . . . . . . . . . . . . . . . . . . . . . . . . . . . . . . . . . . . . . . . . . . . . . . . . . . . . . . . . . . 382.4.3 Absolute note names . . . . . . . . . . . . . . . . . . . . . . . . . . . . . . . . . . . . . . . . . . . . . . . . . . . . . . . . 382.4.4 After the tutorial . . . . . . . . . . . . . . . . . . . . . . . . . . . . . . . . . . . . . . . . . . . . . . . . . . . . . . . . . . . . 40
3 Fundamental concepts . . . . . . . . . . . . . . . . . . . . . . . . . . . . . . . . . . . . . . . 413.1 How LilyPond input files work . . . . . . . . . . . . . . . . . . . . . . . . . . . . . . . . . . . . . . . . . . . . . . . . . . . . 41
3.1.1 Introduction to the LilyPond file structure . . . . . . . . . . . . . . . . . . . . . . . . . . . . . . . . . . . 413.1.2 Score is a (single) compound musical expression . . . . . . . . . . . . . . . . . . . . . . . . . . . . . . 433.1.3 Nesting music expressions . . . . . . . . . . . . . . . . . . . . . . . . . . . . . . . . . . . . . . . . . . . . . . . . . . . 45
ii
3.1.4 On the un-nestedness of brackets and ties . . . . . . . . . . . . . . . . . . . . . . . . . . . . . . . . . . . . 463.2 Voices contain music . . . . . . . . . . . . . . . . . . . . . . . . . . . . . . . . . . . . . . . . . . . . . . . . . . . . . . . . . . . . . 47
3.2.1 I’m hearing Voices . . . . . . . . . . . . . . . . . . . . . . . . . . . . . . . . . . . . . . . . . . . . . . . . . . . . . . . . . . . 483.2.2 Explicitly instantiating voices . . . . . . . . . . . . . . . . . . . . . . . . . . . . . . . . . . . . . . . . . . . . . . . . 523.2.3 Voices and vocals . . . . . . . . . . . . . . . . . . . . . . . . . . . . . . . . . . . . . . . . . . . . . . . . . . . . . . . . . . . . 56
3.3 Contexts and engravers . . . . . . . . . . . . . . . . . . . . . . . . . . . . . . . . . . . . . . . . . . . . . . . . . . . . . . . . . . . 583.3.1 Contexts explained . . . . . . . . . . . . . . . . . . . . . . . . . . . . . . . . . . . . . . . . . . . . . . . . . . . . . . . . . . 583.3.2 Creating contexts . . . . . . . . . . . . . . . . . . . . . . . . . . . . . . . . . . . . . . . . . . . . . . . . . . . . . . . . . . . . 593.3.3 Engravers explained . . . . . . . . . . . . . . . . . . . . . . . . . . . . . . . . . . . . . . . . . . . . . . . . . . . . . . . . . 613.3.4 Modifying context properties . . . . . . . . . . . . . . . . . . . . . . . . . . . . . . . . . . . . . . . . . . . . . . . . 623.3.5 Adding and removing engravers . . . . . . . . . . . . . . . . . . . . . . . . . . . . . . . . . . . . . . . . . . . . . . 67
3.4 Extending the templates . . . . . . . . . . . . . . . . . . . . . . . . . . . . . . . . . . . . . . . . . . . . . . . . . . . . . . . . . . 693.4.1 Soprano and cello . . . . . . . . . . . . . . . . . . . . . . . . . . . . . . . . . . . . . . . . . . . . . . . . . . . . . . . . . . . 693.4.2 Four-part SATB vocal score . . . . . . . . . . . . . . . . . . . . . . . . . . . . . . . . . . . . . . . . . . . . . . . . . 723.4.3 Building a score from scratch . . . . . . . . . . . . . . . . . . . . . . . . . . . . . . . . . . . . . . . . . . . . . . . . 783.4.4 Saving typing with variables and functions . . . . . . . . . . . . . . . . . . . . . . . . . . . . . . . . . . . 833.4.5 Scores and parts . . . . . . . . . . . . . . . . . . . . . . . . . . . . . . . . . . . . . . . . . . . . . . . . . . . . . . . . . . . . . 85
4 Tweaking output . . . . . . . . . . . . . . . . . . . . . . . . . . . . . . . . . . . . . . . . . . . . . 874.1 Tweaking basics . . . . . . . . . . . . . . . . . . . . . . . . . . . . . . . . . . . . . . . . . . . . . . . . . . . . . . . . . . . . . . . . . . 87
4.1.1 Introduction to tweaks . . . . . . . . . . . . . . . . . . . . . . . . . . . . . . . . . . . . . . . . . . . . . . . . . . . . . . . 874.1.2 Objects and interfaces . . . . . . . . . . . . . . . . . . . . . . . . . . . . . . . . . . . . . . . . . . . . . . . . . . . . . . . 874.1.3 Naming conventions of objects and properties . . . . . . . . . . . . . . . . . . . . . . . . . . . . . . . . 884.1.4 Tweaking methods . . . . . . . . . . . . . . . . . . . . . . . . . . . . . . . . . . . . . . . . . . . . . . . . . . . . . . . . . . 88
4.2 The Internals Reference manual . . . . . . . . . . . . . . . . . . . . . . . . . . . . . . . . . . . . . . . . . . . . . . . . . . 924.2.1 Properties of layout objects . . . . . . . . . . . . . . . . . . . . . . . . . . . . . . . . . . . . . . . . . . . . . . . . . . 924.2.2 Properties found in interfaces . . . . . . . . . . . . . . . . . . . . . . . . . . . . . . . . . . . . . . . . . . . . . . . . 964.2.3 Types of properties . . . . . . . . . . . . . . . . . . . . . . . . . . . . . . . . . . . . . . . . . . . . . . . . . . . . . . . . . . 97
4.3 Appearance of objects . . . . . . . . . . . . . . . . . . . . . . . . . . . . . . . . . . . . . . . . . . . . . . . . . . . . . . . . . . . . 984.3.1 Visibility and color of objects . . . . . . . . . . . . . . . . . . . . . . . . . . . . . . . . . . . . . . . . . . . . . . . . 984.3.2 Size of objects . . . . . . . . . . . . . . . . . . . . . . . . . . . . . . . . . . . . . . . . . . . . . . . . . . . . . . . . . . . . . . 1024.3.3 Length and thickness of objects . . . . . . . . . . . . . . . . . . . . . . . . . . . . . . . . . . . . . . . . . . . . . 105
4.4 Placement of objects . . . . . . . . . . . . . . . . . . . . . . . . . . . . . . . . . . . . . . . . . . . . . . . . . . . . . . . . . . . . 1064.4.1 Automatic behavior . . . . . . . . . . . . . . . . . . . . . . . . . . . . . . . . . . . . . . . . . . . . . . . . . . . . . . . . 1064.4.2 Within-staff objects . . . . . . . . . . . . . . . . . . . . . . . . . . . . . . . . . . . . . . . . . . . . . . . . . . . . . . . . 107
Fingering . . . . . . . . . . . . . . . . . . . . . . . . . . . . . . . . . . . . . . . . . . . . . . . . . . . . . . . . . . . . . . . . . . . . . . 1084.4.3 Outside-staff objects . . . . . . . . . . . . . . . . . . . . . . . . . . . . . . . . . . . . . . . . . . . . . . . . . . . . . . . . 111
4.5 Collisions of objects . . . . . . . . . . . . . . . . . . . . . . . . . . . . . . . . . . . . . . . . . . . . . . . . . . . . . . . . . . . . . 1164.5.1 Moving objects . . . . . . . . . . . . . . . . . . . . . . . . . . . . . . . . . . . . . . . . . . . . . . . . . . . . . . . . . . . . . 1164.5.2 Fixing overlapping notation . . . . . . . . . . . . . . . . . . . . . . . . . . . . . . . . . . . . . . . . . . . . . . . . . 1194.5.3 Real music example . . . . . . . . . . . . . . . . . . . . . . . . . . . . . . . . . . . . . . . . . . . . . . . . . . . . . . . . 124
4.6 Further tweaking . . . . . . . . . . . . . . . . . . . . . . . . . . . . . . . . . . . . . . . . . . . . . . . . . . . . . . . . . . . . . . . . 1324.6.1 Other uses for tweaks . . . . . . . . . . . . . . . . . . . . . . . . . . . . . . . . . . . . . . . . . . . . . . . . . . . . . . . 1324.6.2 Using variables for tweaks . . . . . . . . . . . . . . . . . . . . . . . . . . . . . . . . . . . . . . . . . . . . . . . . . . 1344.6.3 Style sheets . . . . . . . . . . . . . . . . . . . . . . . . . . . . . . . . . . . . . . . . . . . . . . . . . . . . . . . . . . . . . . . . 1354.6.4 Other sources of information . . . . . . . . . . . . . . . . . . . . . . . . . . . . . . . . . . . . . . . . . . . . . . . . 1394.6.5 Advanced tweaks with Scheme . . . . . . . . . . . . . . . . . . . . . . . . . . . . . . . . . . . . . . . . . . . . . . 140

iii
Appendix A Templates . . . . . . . . . . . . . . . . . . . . . . . . . . . . . . . . . . . . . . . 142A.1 Single staff . . . . . . . . . . . . . . . . . . . . . . . . . . . . . . . . . . . . . . . . . . . . . . . . . . . . . . . . . . . . . . . . . . . . . 142
A.1.1 Notes only . . . . . . . . . . . . . . . . . . . . . . . . . . . . . . . . . . . . . . . . . . . . . . . . . . . . . . . . . . . . . . . . . 142A.1.2 Notes and lyrics . . . . . . . . . . . . . . . . . . . . . . . . . . . . . . . . . . . . . . . . . . . . . . . . . . . . . . . . . . . 142A.1.3 Notes and chords . . . . . . . . . . . . . . . . . . . . . . . . . . . . . . . . . . . . . . . . . . . . . . . . . . . . . . . . . . 143A.1.4 Notes, lyrics, and chords. . . . . . . . . . . . . . . . . . . . . . . . . . . . . . . . . . . . . . . . . . . . . . . . . . . 143
A.2 Piano templates . . . . . . . . . . . . . . . . . . . . . . . . . . . . . . . . . . . . . . . . . . . . . . . . . . . . . . . . . . . . . . . . 144A.2.1 Solo piano . . . . . . . . . . . . . . . . . . . . . . . . . . . . . . . . . . . . . . . . . . . . . . . . . . . . . . . . . . . . . . . . . 144A.2.2 Piano and melody with lyrics . . . . . . . . . . . . . . . . . . . . . . . . . . . . . . . . . . . . . . . . . . . . . . 145A.2.3 Piano centered lyrics . . . . . . . . . . . . . . . . . . . . . . . . . . . . . . . . . . . . . . . . . . . . . . . . . . . . . . . 146
A.3 String quartet . . . . . . . . . . . . . . . . . . . . . . . . . . . . . . . . . . . . . . . . . . . . . . . . . . . . . . . . . . . . . . . . . . 147A.3.1 String quartet . . . . . . . . . . . . . . . . . . . . . . . . . . . . . . . . . . . . . . . . . . . . . . . . . . . . . . . . . . . . . 147A.3.2 String quartet parts . . . . . . . . . . . . . . . . . . . . . . . . . . . . . . . . . . . . . . . . . . . . . . . . . . . . . . . . 148
A.4 Vocal ensembles . . . . . . . . . . . . . . . . . . . . . . . . . . . . . . . . . . . . . . . . . . . . . . . . . . . . . . . . . . . . . . . . 151A.4.1 SATB vocal score . . . . . . . . . . . . . . . . . . . . . . . . . . . . . . . . . . . . . . . . . . . . . . . . . . . . . . . . . . 151A.4.2 SATB vocal score and automatic piano reduction . . . . . . . . . . . . . . . . . . . . . . . . . . . 153A.4.3 SATB with aligned contexts . . . . . . . . . . . . . . . . . . . . . . . . . . . . . . . . . . . . . . . . . . . . . . . . 155A.4.4 SATB on four staves . . . . . . . . . . . . . . . . . . . . . . . . . . . . . . . . . . . . . . . . . . . . . . . . . . . . . . . 156A.4.5 Solo verse and two-part refrain . . . . . . . . . . . . . . . . . . . . . . . . . . . . . . . . . . . . . . . . . . . . . 158A.4.6 Hymn tunes . . . . . . . . . . . . . . . . . . . . . . . . . . . . . . . . . . . . . . . . . . . . . . . . . . . . . . . . . . . . . . . 160A.4.7 Psalms . . . . . . . . . . . . . . . . . . . . . . . . . . . . . . . . . . . . . . . . . . . . . . . . . . . . . . . . . . . . . . . . . . . . 162
A.5 Orchestral templates . . . . . . . . . . . . . . . . . . . . . . . . . . . . . . . . . . . . . . . . . . . . . . . . . . . . . . . . . . . . 165A.5.1 Orchestra, choir and piano . . . . . . . . . . . . . . . . . . . . . . . . . . . . . . . . . . . . . . . . . . . . . . . . . 165
A.6 Ancient notation templates . . . . . . . . . . . . . . . . . . . . . . . . . . . . . . . . . . . . . . . . . . . . . . . . . . . . . 168A.6.1 Transcription of mensural music . . . . . . . . . . . . . . . . . . . . . . . . . . . . . . . . . . . . . . . . . . . . 168A.6.2 Gregorian transcription template . . . . . . . . . . . . . . . . . . . . . . . . . . . . . . . . . . . . . . . . . . . 174
A.7 Other templates . . . . . . . . . . . . . . . . . . . . . . . . . . . . . . . . . . . . . . . . . . . . . . . . . . . . . . . . . . . . . . . . 174A.7.1 Jazz combo . . . . . . . . . . . . . . . . . . . . . . . . . . . . . . . . . . . . . . . . . . . . . . . . . . . . . . . . . . . . . . . . 175
Appendix B GNU Free Documentation License . . . . . . . . . . . 181
Appendix C LilyPond index . . . . . . . . . . . . . . . . . . . . . . . . . . . . . . . . . 188
Chapter 1: Tutorial 1
1 Tutorial
This chapter gives a basic introduction to working with LilyPond.
1.1 Compiling a file
This section introduces “compiling”—the processing of LilyPond input files (written by you) toproduce output files.
1.1.1 Entering input
“Compiling” is the term used for processing an input file in LilyPond format to produce outputfile(s). Output files are generally PDF (for printing or viewing), MIDI (for playing), and PNG(for online use). LilyPond input files are simple text files.
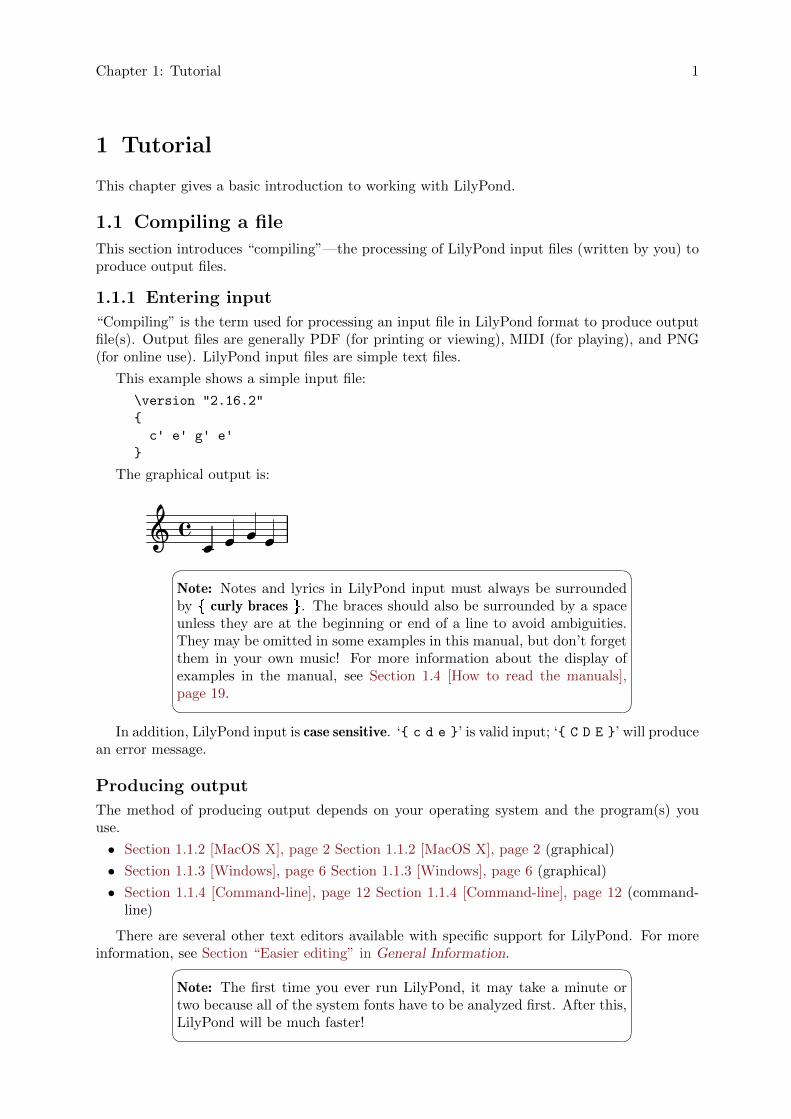
This example shows a simple input file:
\version "2.16.2"
{
c' e' g' e'
}
The graphical output is:
22 2�� 2� �Note: Notes and lyrics in LilyPond input must always be surroundedby { curly braces }. The braces should also be surrounded by a spaceunless they are at the beginning or end of a line to avoid ambiguities.They may be omitted in some examples in this manual, but don’t forgetthem in your own music! For more information about the display ofexamples in the manual, see Section 1.4 [How to read the manuals],page 19.
In addition, LilyPond input is case sensitive. ‘{ c d e }’ is valid input; ‘{ C D E }’ will producean error message.
Producing output
The method of producing output depends on your operating system and the program(s) youuse.
• Section 1.1.2 [MacOS X], page 2 Section 1.1.2 [MacOS X], page 2 (graphical)
• Section 1.1.3 [Windows], page 6 Section 1.1.3 [Windows], page 6 (graphical)
• Section 1.1.4 [Command-line], page 12 Section 1.1.4 [Command-line], page 12 (command-line)
There are several other text editors available with specific support for LilyPond. For moreinformation, see Section “Easier editing” in General Information.� �
Note: The first time you ever run LilyPond, it may take a minute ortwo because all of the system fonts have to be analyzed first. After this,LilyPond will be much faster!

Chapter 1: Tutorial 2
1.1.2 MacOS X� �Note: These instructions assume that you are using the LilyPond appli-cation. If you are using any of the programs described in Section “Easierediting” in General Information, please consult the documentation forthose programs if you have any problems.
Step 1. Create your ‘.ly’ file
Double click the LilyPond.app, an example file will open.
Chapter 1: Tutorial 3
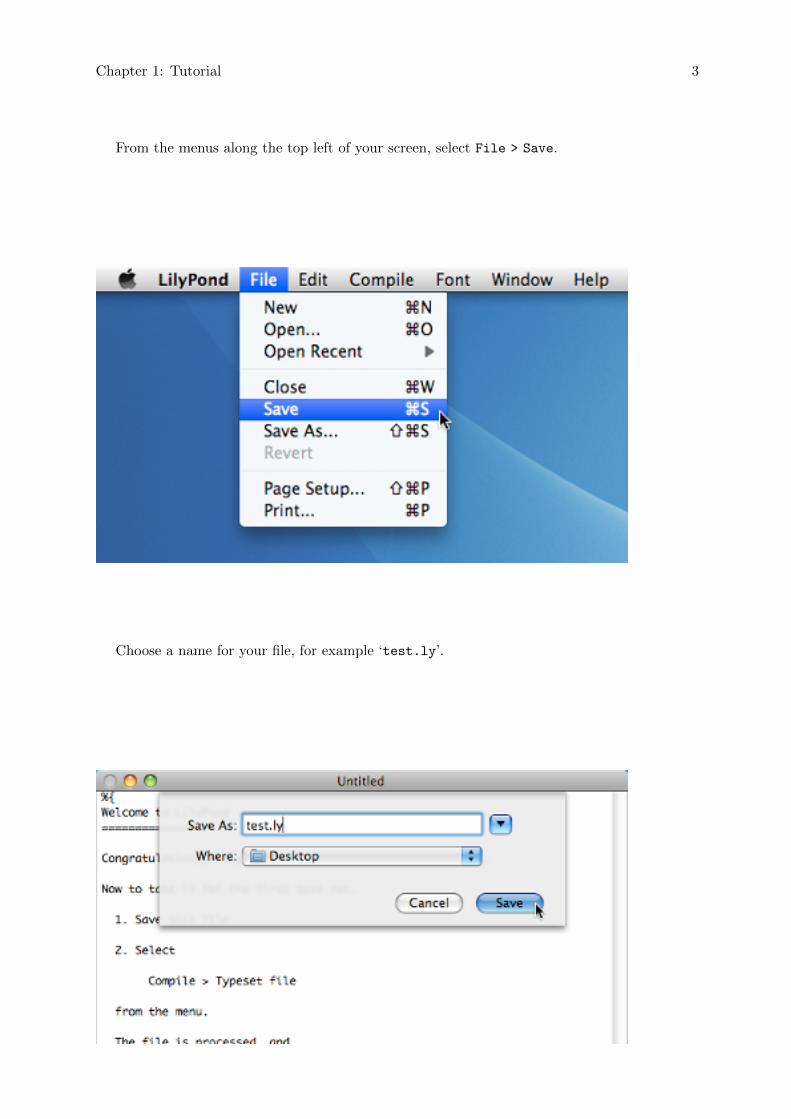
From the menus along the top left of your screen, select File > Save.
Choose a name for your file, for example ‘test.ly’.
Chapter 1: Tutorial 4
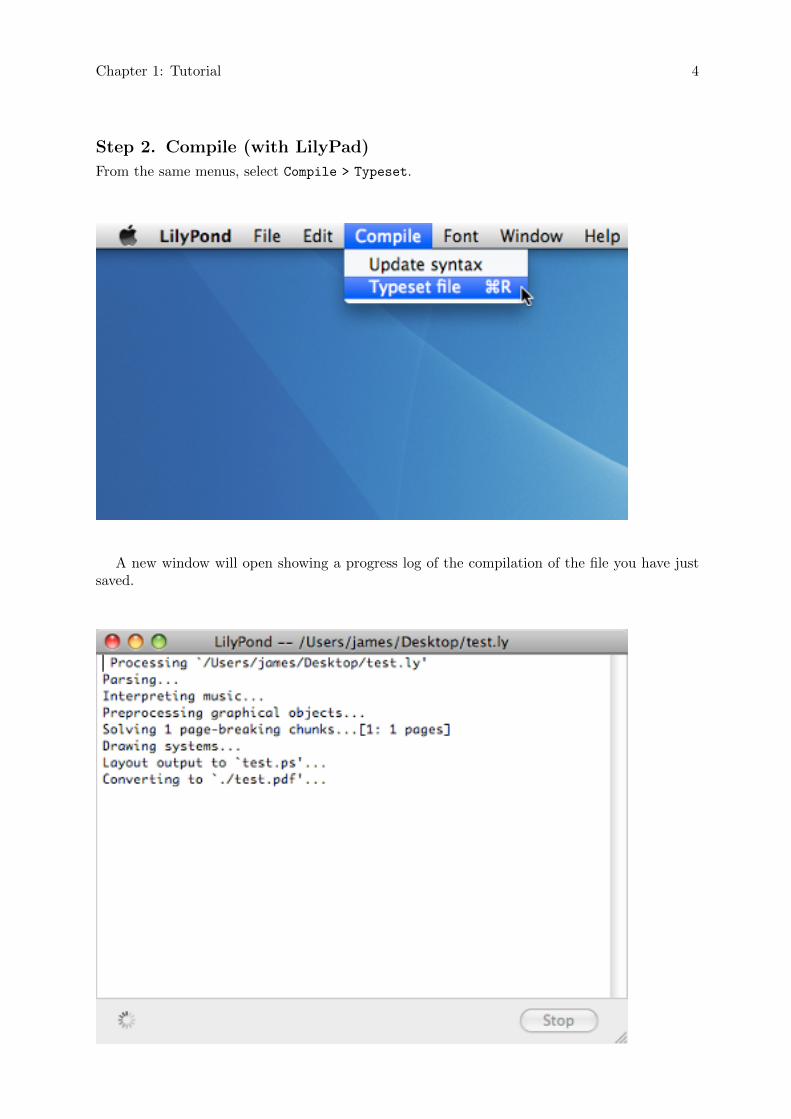
Step 2. Compile (with LilyPad)
From the same menus, select Compile > Typeset.
A new window will open showing a progress log of the compilation of the file you have justsaved.
Chapter 1: Tutorial 5
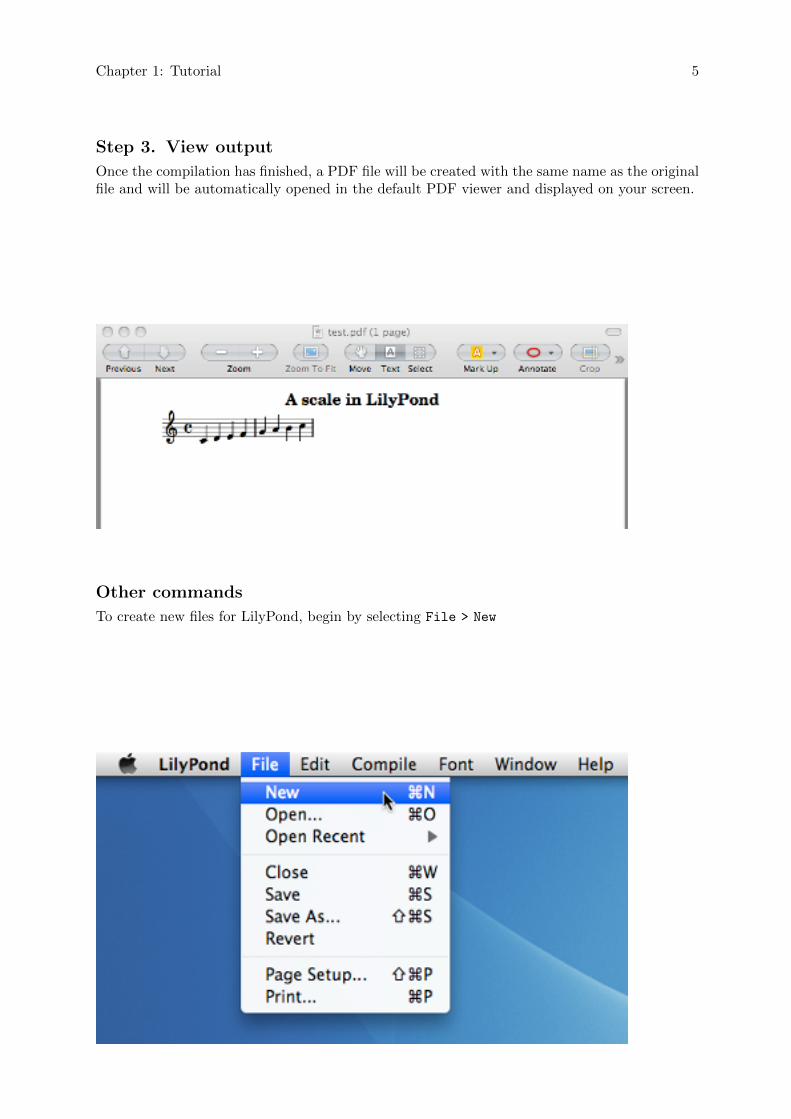
Step 3. View output
Once the compilation has finished, a PDF file will be created with the same name as the originalfile and will be automatically opened in the default PDF viewer and displayed on your screen.
Other commands
To create new files for LilyPond, begin by selecting File > New
Chapter 1: Tutorial 6
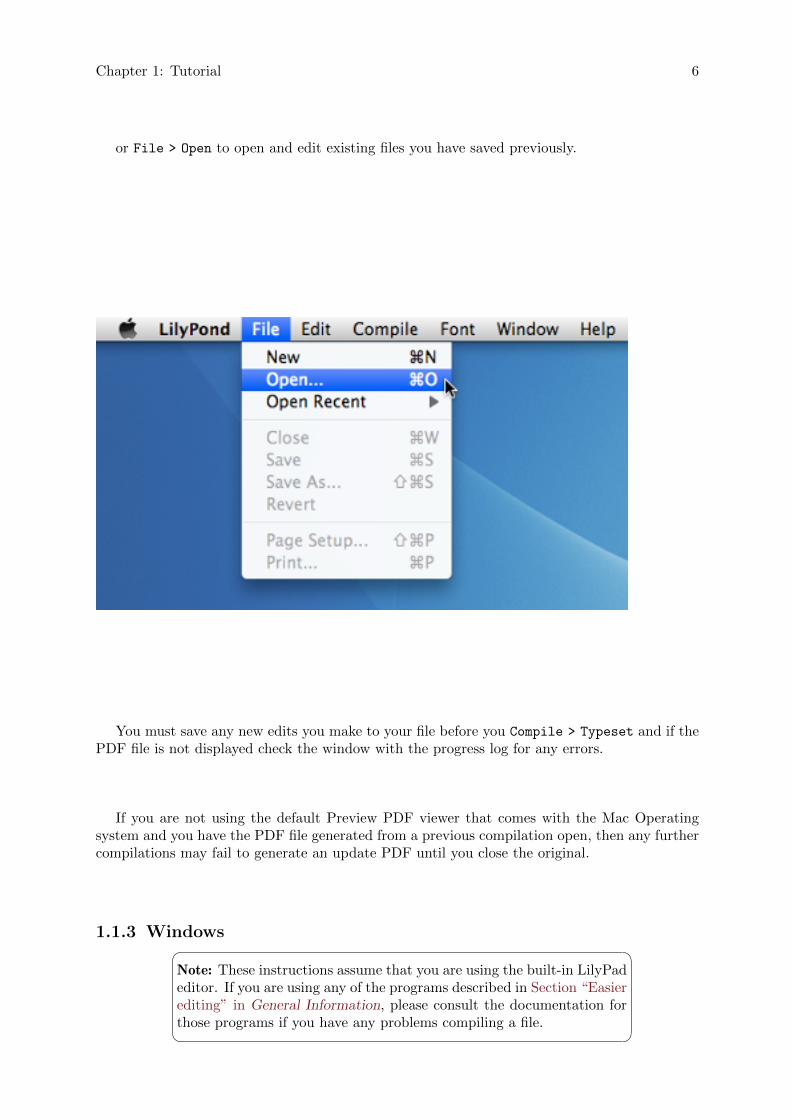
or File > Open to open and edit existing files you have saved previously.
You must save any new edits you make to your file before you Compile > Typeset and if thePDF file is not displayed check the window with the progress log for any errors.
If you are not using the default Preview PDF viewer that comes with the Mac Operatingsystem and you have the PDF file generated from a previous compilation open, then any furthercompilations may fail to generate an update PDF until you close the original.
1.1.3 Windows� �Note: These instructions assume that you are using the built-in LilyPadeditor. If you are using any of the programs described in Section “Easierediting” in General Information, please consult the documentation forthose programs if you have any problems compiling a file.

Chapter 1: Tutorial 7
Step 1. Create your ‘.ly’ file
Double-click the LilyPond icon on your desktop, an example file will open.
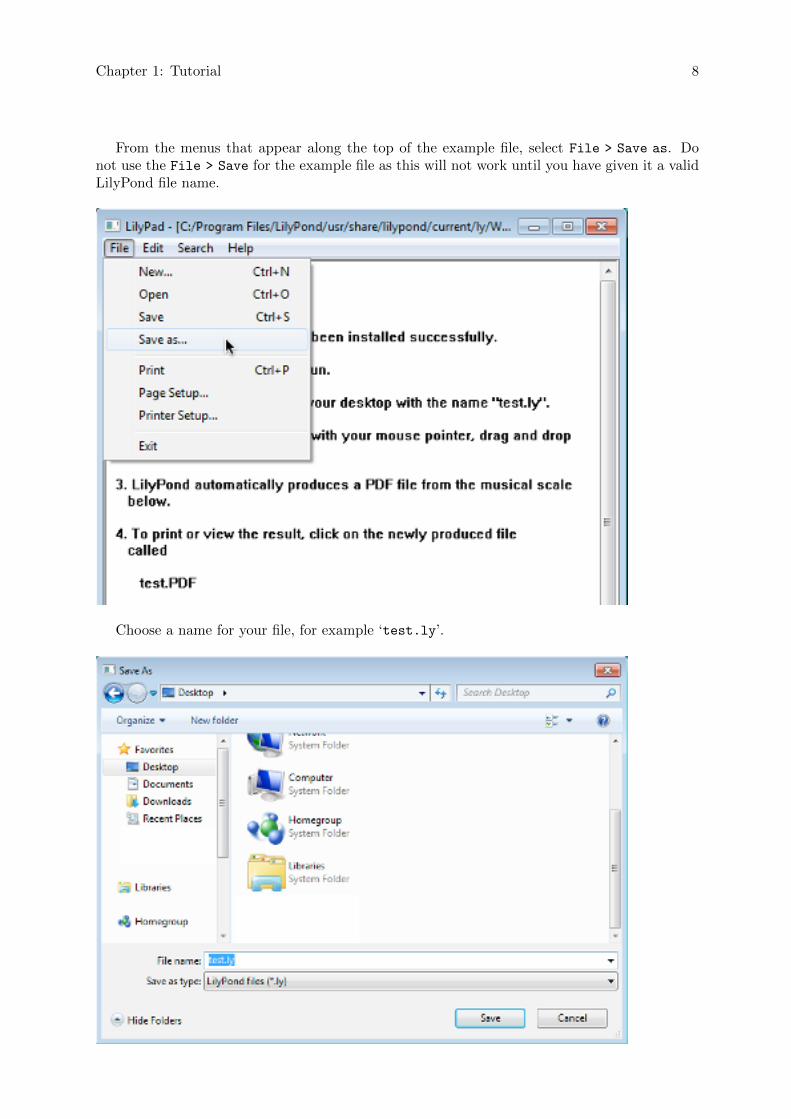
Chapter 1: Tutorial 8
From the menus that appear along the top of the example file, select File > Save as. Donot use the File > Save for the example file as this will not work until you have given it a validLilyPond file name.
Choose a name for your file, for example ‘test.ly’.
Chapter 1: Tutorial 9
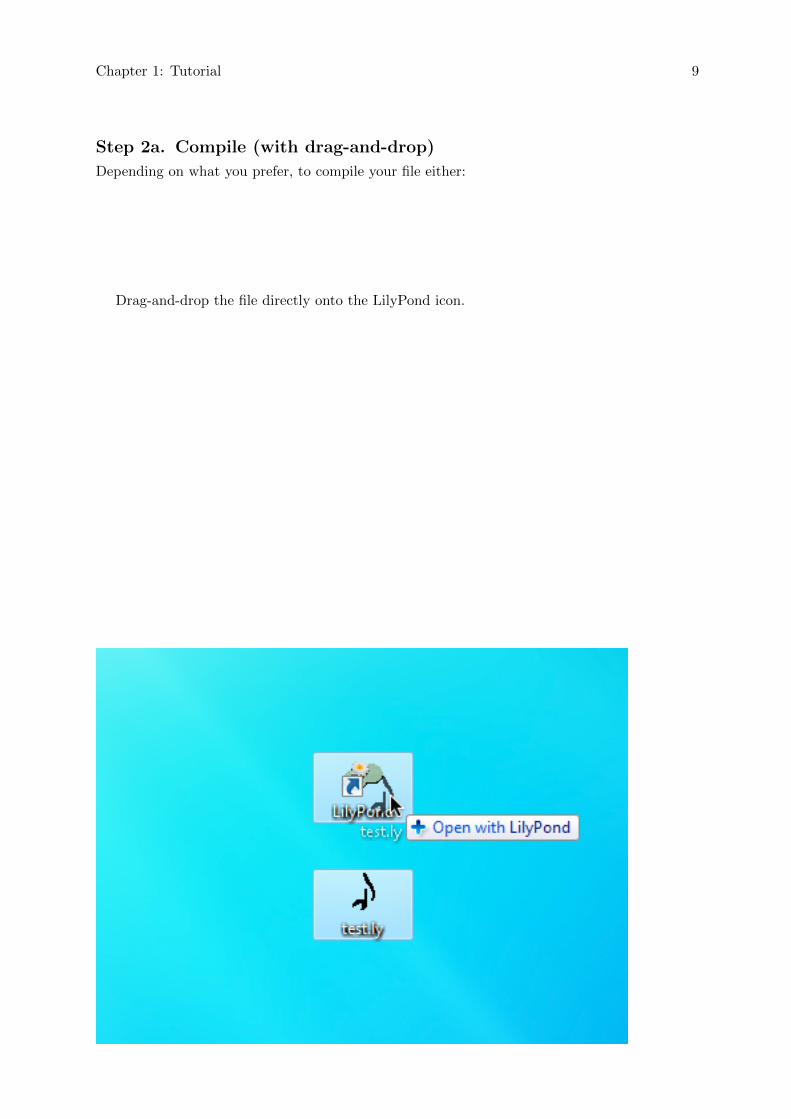
Step 2a. Compile (with drag-and-drop)
Depending on what you prefer, to compile your file either:
Drag-and-drop the file directly onto the LilyPond icon.

Chapter 1: Tutorial 10
Right-click on the file and from the pop-up context menu choose Open with > LilyPond.
Step 2b. Compile (with double-clicking)
Or simply double-click the ‘test.ly’.
Step 3. View output
During the compilation of the ‘test.ly’ file, a command window will, very briefly open andthen close. Three additional files will have been created during this process.
Chapter 1: Tutorial 11
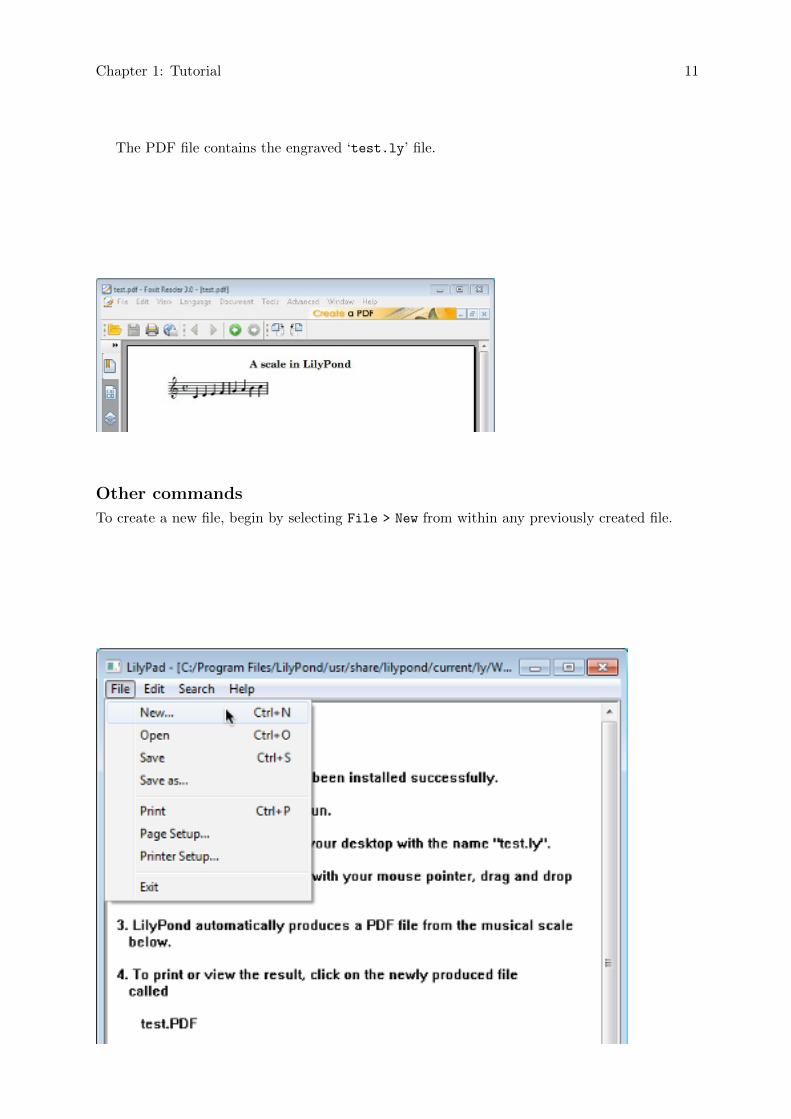
The PDF file contains the engraved ‘test.ly’ file.
Other commands
To create a new file, begin by selecting File > New from within any previously created file.
Chapter 1: Tutorial 12
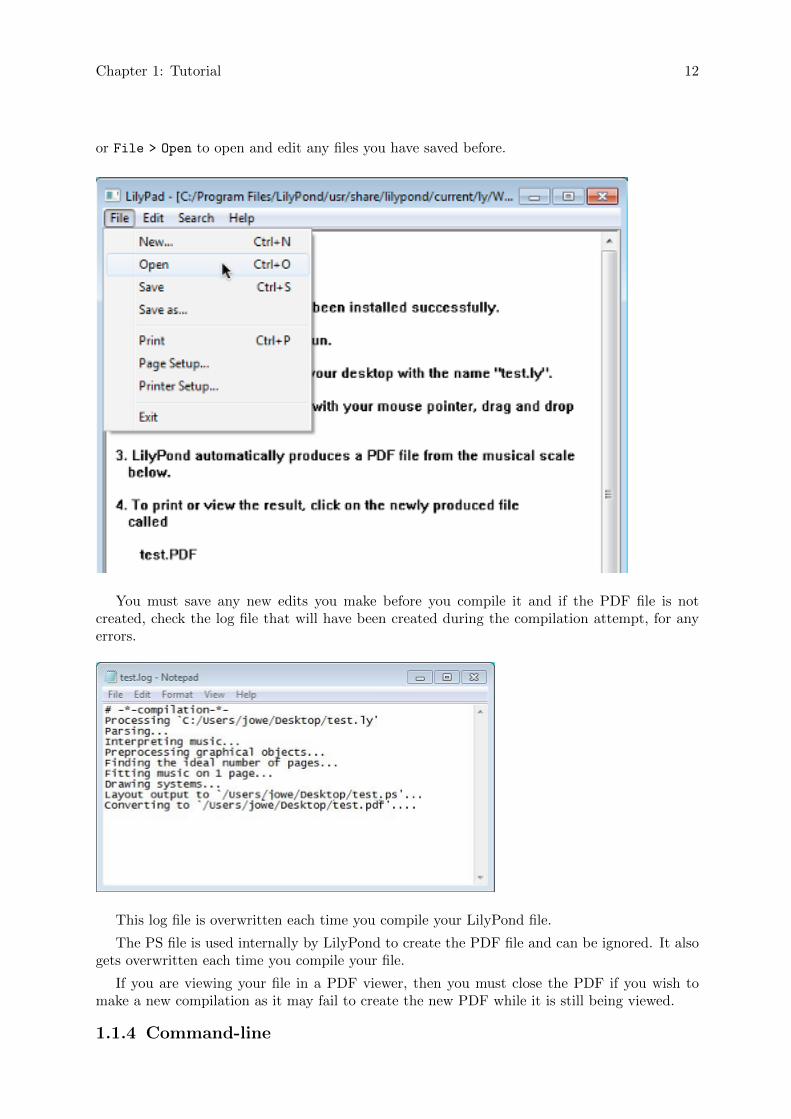
or File > Open to open and edit any files you have saved before.
You must save any new edits you make before you compile it and if the PDF file is notcreated, check the log file that will have been created during the compilation attempt, for anyerrors.
This log file is overwritten each time you compile your LilyPond file.
The PS file is used internally by LilyPond to create the PDF file and can be ignored. It alsogets overwritten each time you compile your file.
If you are viewing your file in a PDF viewer, then you must close the PDF if you wish tomake a new compilation as it may fail to create the new PDF while it is still being viewed.
1.1.4 Command-line
Chapter 1: Tutorial 13� �Note: These instructions assume that you are familiar with command-line programs. If you are using any of the programs described in Section“Easier editing” in General Information, please consult the documenta-tion for those programs if you have any problems compiling a file.
Step 1. Create your ‘.ly’ file
Create a text file called ‘test.ly’ and enter:
\version "2.16.1"
{
c' e' g' e'
}
Step 2. Compile (with command-line)
To process ‘test.ly’, type the following at the command prompt:
lilypond test.ly
You will see something resembling:
GNU LilyPond 2.16.1
Processing `test.ly'
Parsing...
Interpreting music...
Preprocessing graphical objects...
Solving 1 page-breaking chunks...[1: 1 pages]
Drawing systems...
Layout output to `test.ps'...
Converting to `./test.pdf'...
Success: compilation successfully completed
Step 3. View output
You may view or print the resulting ‘test.pdf’.
1.2 How to write input files
This section introduces some basic LilyPond syntax to help get you started writing input files.
1.2.1 Simple notation
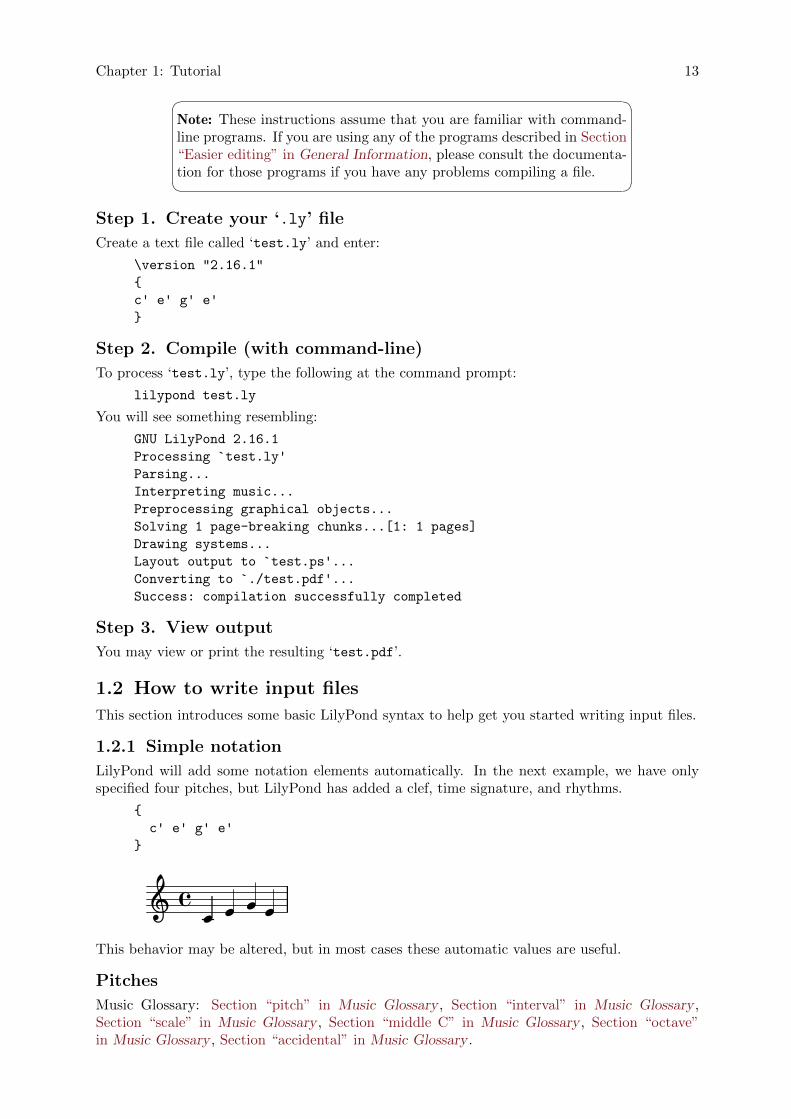
LilyPond will add some notation elements automatically. In the next example, we have onlyspecified four pitches, but LilyPond has added a clef, time signature, and rhythms.
{
c' e' g' e'
}
22 2�� 2This behavior may be altered, but in most cases these automatic values are useful.
Pitches
Music Glossary: Section “pitch” in Music Glossary , Section “interval” in Music Glossary ,Section “scale” in Music Glossary , Section “middle C” in Music Glossary , Section “octave”in Music Glossary , Section “accidental” in Music Glossary .
Chapter 1: Tutorial 14
The easiest way to enter notes is by using \relativemode. In this mode, the octave is chosenautomatically by assuming the following note is always to be placed closest to the previous note,i.e., it is to be placed in the octave which is within three staff spaces of the previous note. Webegin by entering the most elementary piece of music, a scale, in which every note is within justone staff space of the previous note.
% set the starting point to middle C
\relative c' {
c d e f
g a b c
}
ÎÎ Î� � ÎÎ ÎÎ ÎThe initial note is middle C . Each successive note is placed closest to the previous note –
in other words, the first c is the closest C to middle C. This is followed by the closest D to theprevious note. We can create melodies which have larger intervals, still using only \relative
mode:
\relative c' {
d f a g
c b f d
}
× ��� ���� ��It is not necessary for the first note of the melody to start on the note which specifies the startingpitch. In the previous example, the first note – the d – is the closest D to middle C.
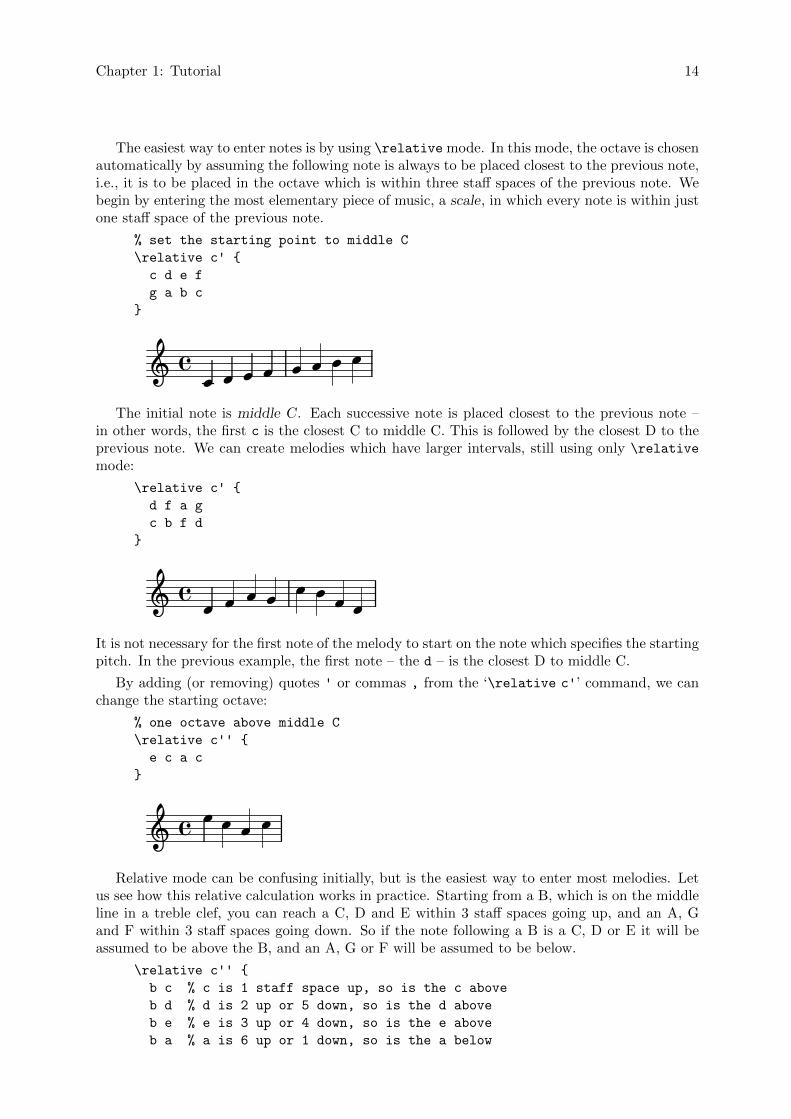
By adding (or removing) quotes ' or commas , from the ‘\relative c'’ command, we canchange the starting octave:
% one octave above middle C
\relative c'' {
e c a c
}
; � � � � �Relative mode can be confusing initially, but is the easiest way to enter most melodies. Let
us see how this relative calculation works in practice. Starting from a B, which is on the middleline in a treble clef, you can reach a C, D and E within 3 staff spaces going up, and an A, Gand F within 3 staff spaces going down. So if the note following a B is a C, D or E it will beassumed to be above the B, and an A, G or F will be assumed to be below.
\relative c'' {
b c % c is 1 staff space up, so is the c above
b d % d is 2 up or 5 down, so is the d above
b e % e is 3 up or 4 down, so is the e above
b a % a is 6 up or 1 down, so is the a below
Chapter 1: Tutorial 15
b g % g is 5 up or 2 down, so is the g below
b f % f is 4 up or 3 down, so is the f below
}
ÎÎ Î ÎÎ� ÎÎÎ� Î Î ÎÎExactly the same happens even when any of these notes are sharpened or flattened. Acci-
dentals are totally ignored in the calculation of relative position. Precisely the same staff spacecounting is done from a note at any other position on the staff.
To add intervals that are larger than three staff spaces, we can raise the octave by adding asingle quote ' (or apostrophe) to the note name. We can lower the octave by adding a comma, to the note name.
\relative c'' {
a a, c' f,
g g'' a,, f'
}
× ��� �����
�To change a note by two (or more!) octaves, we use multiple '' or ,, – but be careful that youuse two single quotes '' and not one double quote " !
Durations (rhythms)
Music Glossary: Section “beam” in Music Glossary , Section “duration” in Music Glossary ,Section “whole note” in Music Glossary , Section “half note” in Music Glossary , Section “quarternote” in Music Glossary , Section “dotted note” in Music Glossary .
The duration of a note is specified by a number after the note name: 1 for a whole note, 2for a half note, 4 for a quarter note and so on. Beams are added automatically.
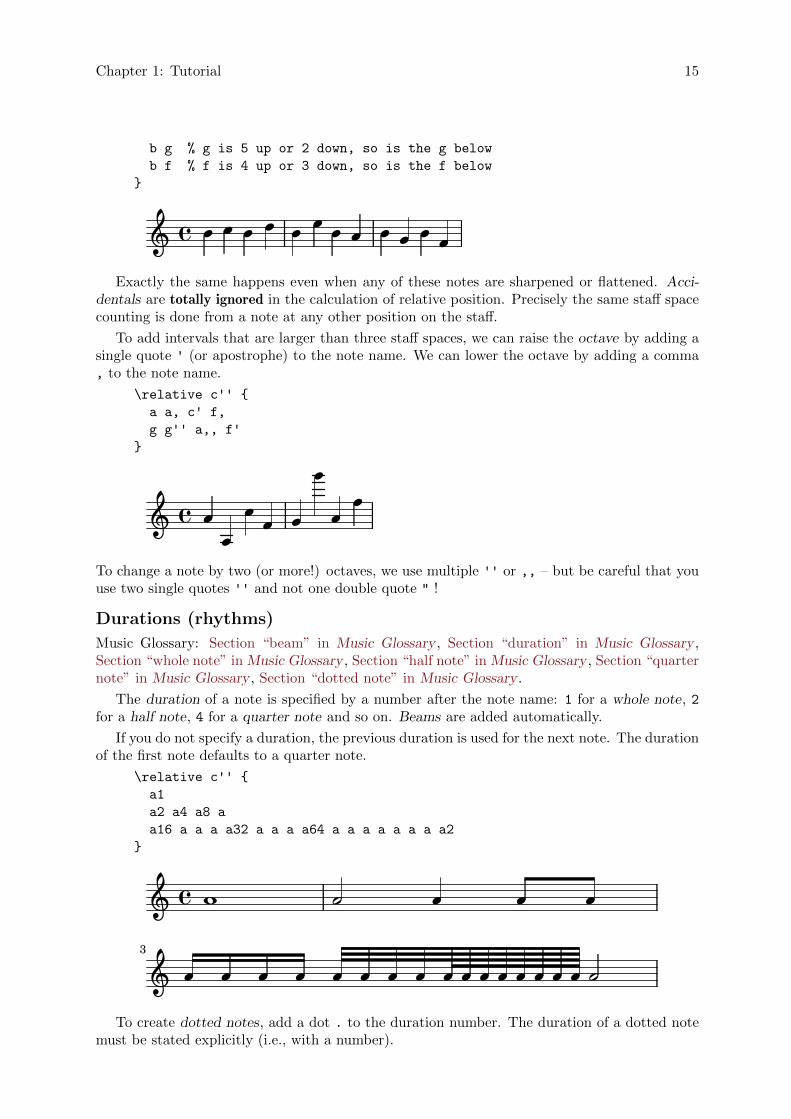
If you do not specify a duration, the previous duration is used for the next note. The durationof the first note defaults to a quarter note.
\relative c'' {
a1
a2 a4 a8 a
a16 a a a a32 a a a a64 a a a a a a a a2
}
a� � � ���
Î Î ÎÎ Î Î� Î ÎÎ ÎÎ Î3 Î Î �Î ÎTo create dotted notes, add a dot . to the duration number. The duration of a dotted note
must be stated explicitly (i.e., with a number).
Chapter 1: Tutorial 16
\relative c'' {
a4 a a4. a8
a8. a16 a a8. a8 a4.
}
Î ÎÎ Î �Î Î�Î� � Î ��� Î �ÎRests
Music Glossary: Section “rest” in Music Glossary .
A rest is entered just like a note with the name r :
\relative c'' {
a4 r r2
r8 a r4 r4. r8
}
× ���� ��� ����Time signature
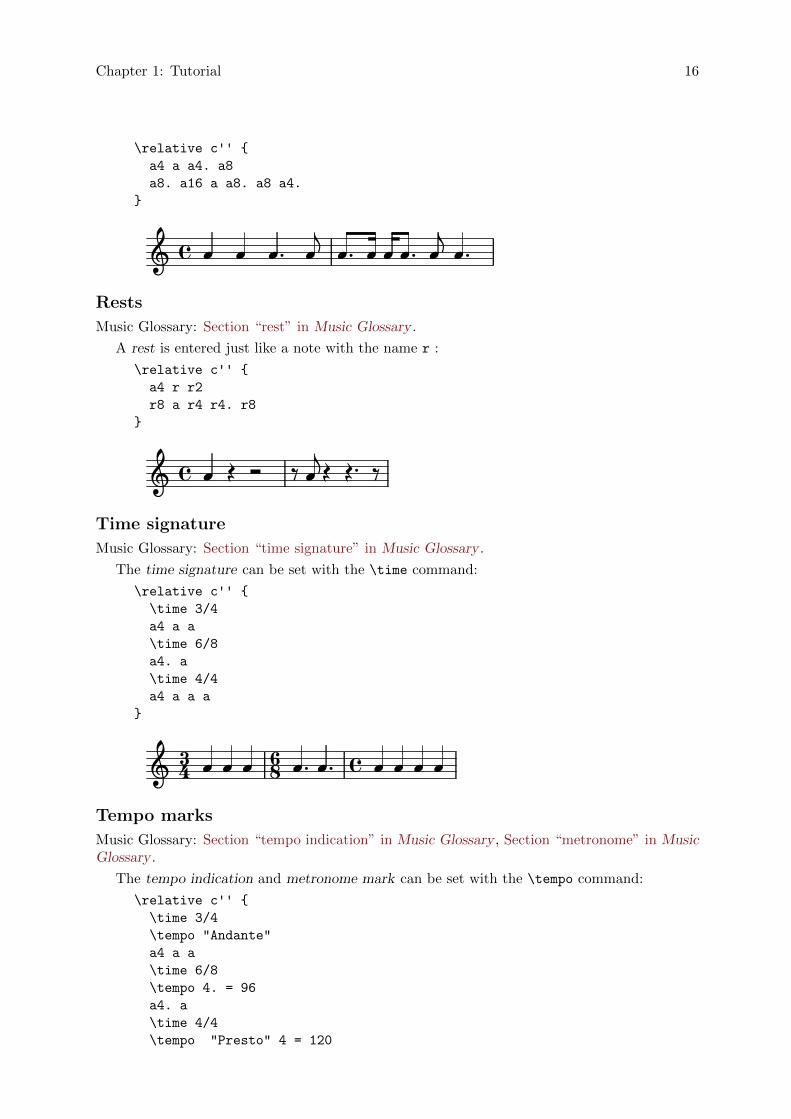
Music Glossary: Section “time signature” in Music Glossary .
The time signature can be set with the \time command:
\relative c'' {
\time 3/4
a4 a a
\time 6/8
a4. a
\time 4/4
a4 a a a
}
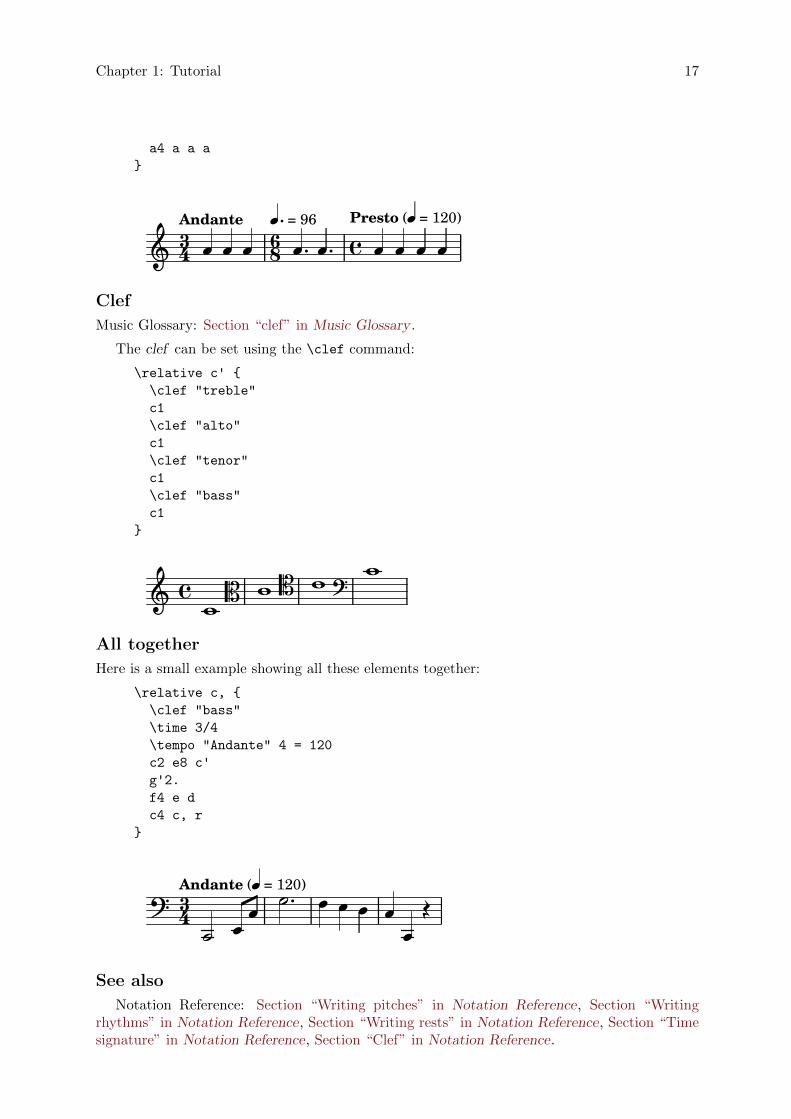
Î� ÎÎÎ ÎÎ�Î �86� Î43 ÎTempo marks
Music Glossary: Section “tempo indication” in Music Glossary , Section “metronome” in MusicGlossary .
The tempo indication and metronome mark can be set with the \tempo command:
\relative c'' {
\time 3/4
\tempo "Andante"
a4 a a
\time 6/8
\tempo 4. = 96
a4. a
\time 4/4
\tempo "Presto" 4 = 120
Chapter 1: Tutorial 17
a4 a a a
}
åå 86Andante
43� å å�Presto (å = 120)
å� ��å = 96
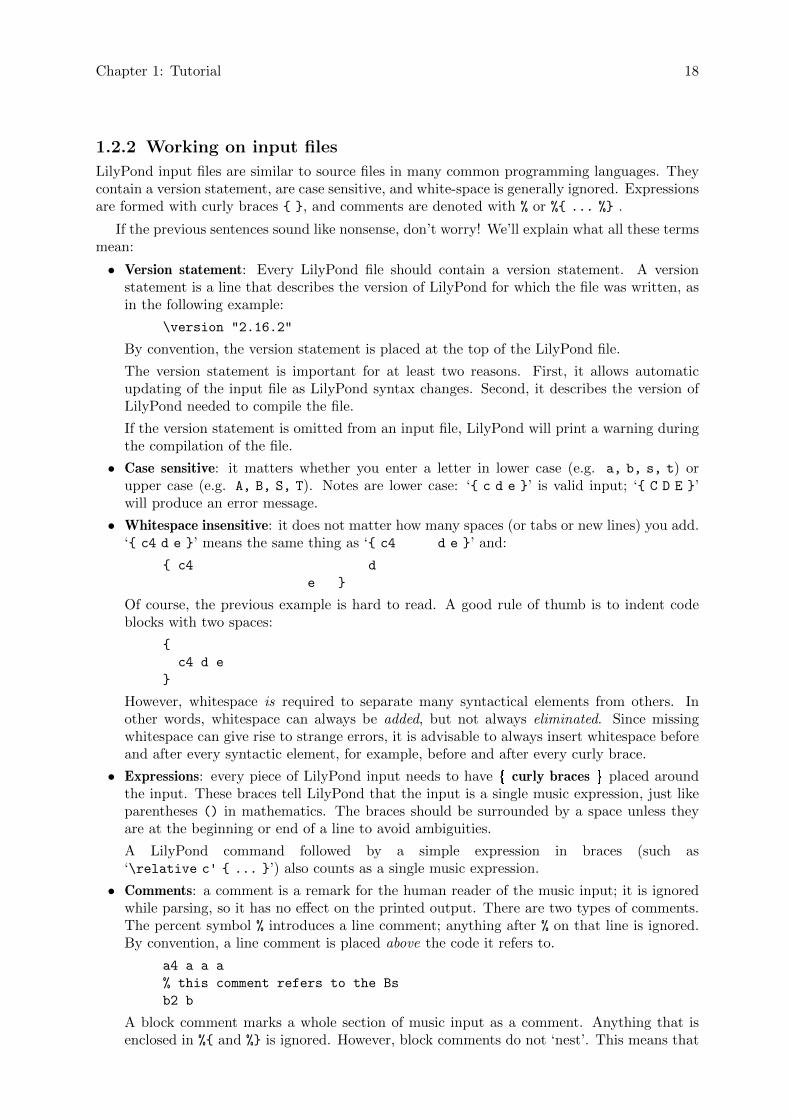
å åååClef
Music Glossary: Section “clef” in Music Glossary .
The clef can be set using the \clef command:
\relative c' {
\clef "treble"
c1
\clef "alto"
c1
\clef "tenor"
c1
\clef "bass"
c1
}
a� � �� ��� �
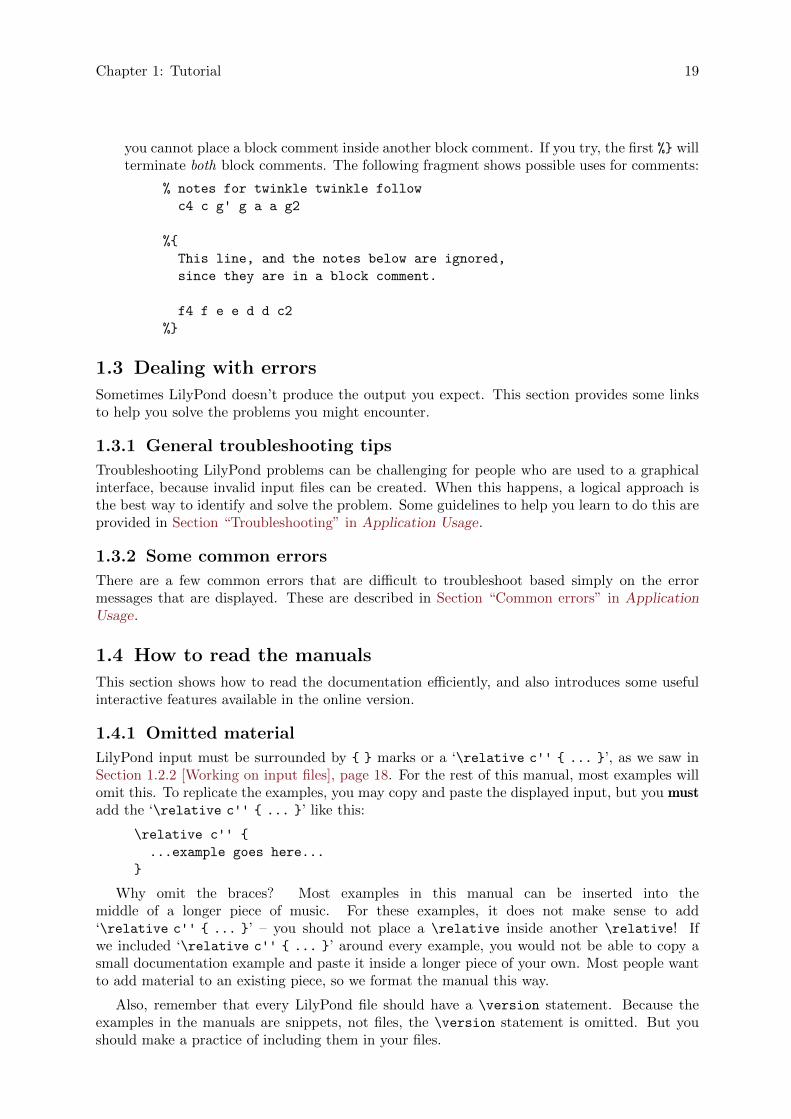
All together
Here is a small example showing all these elements together:
\relative c, {
\clef "bass"
\time 3/4
\tempo "Andante" 4 = 120
c2 e8 c'
g'2.
f4 e d
c4 c, r
}
å �å�
å�å
� åå �Andante (å = 120)
43 å
See also
Notation Reference: Section “Writing pitches” in Notation Reference, Section “Writingrhythms” in Notation Reference, Section “Writing rests” in Notation Reference, Section “Timesignature” in Notation Reference, Section “Clef” in Notation Reference.
Chapter 1: Tutorial 18
1.2.2 Working on input files
LilyPond input files are similar to source files in many common programming languages. Theycontain a version statement, are case sensitive, and white-space is generally ignored. Expressionsare formed with curly braces { }, and comments are denoted with % or %{ ... %} .
If the previous sentences sound like nonsense, don’t worry! We’ll explain what all these termsmean:
• Version statement: Every LilyPond file should contain a version statement. A versionstatement is a line that describes the version of LilyPond for which the file was written, asin the following example:
\version "2.16.2"
By convention, the version statement is placed at the top of the LilyPond file.
The version statement is important for at least two reasons. First, it allows automaticupdating of the input file as LilyPond syntax changes. Second, it describes the version ofLilyPond needed to compile the file.
If the version statement is omitted from an input file, LilyPond will print a warning duringthe compilation of the file.
• Case sensitive: it matters whether you enter a letter in lower case (e.g. a, b, s, t) orupper case (e.g. A, B, S, T). Notes are lower case: ‘{ c d e }’ is valid input; ‘{ C D E }’will produce an error message.
• Whitespace insensitive: it does not matter how many spaces (or tabs or new lines) you add.‘{ c4 d e }’ means the same thing as ‘{ c4 d e }’ and:
{ c4 d
e }
Of course, the previous example is hard to read. A good rule of thumb is to indent codeblocks with two spaces:
{
c4 d e
}
However, whitespace is required to separate many syntactical elements from others. Inother words, whitespace can always be added, but not always eliminated. Since missingwhitespace can give rise to strange errors, it is advisable to always insert whitespace beforeand after every syntactic element, for example, before and after every curly brace.
• Expressions: every piece of LilyPond input needs to have { curly braces } placed aroundthe input. These braces tell LilyPond that the input is a single music expression, just likeparentheses () in mathematics. The braces should be surrounded by a space unless theyare at the beginning or end of a line to avoid ambiguities.
A LilyPond command followed by a simple expression in braces (such as‘\relative c' { ... }’) also counts as a single music expression.
• Comments: a comment is a remark for the human reader of the music input; it is ignoredwhile parsing, so it has no effect on the printed output. There are two types of comments.The percent symbol % introduces a line comment; anything after % on that line is ignored.By convention, a line comment is placed above the code it refers to.
a4 a a a
% this comment refers to the Bs
b2 b
A block comment marks a whole section of music input as a comment. Anything that isenclosed in %{ and %} is ignored. However, block comments do not ‘nest’. This means that
Chapter 1: Tutorial 19
you cannot place a block comment inside another block comment. If you try, the first %} willterminate both block comments. The following fragment shows possible uses for comments:
% notes for twinkle twinkle follow
c4 c g' g a a g2
%{
This line, and the notes below are ignored,
since they are in a block comment.
f4 f e e d d c2
%}
1.3 Dealing with errors
Sometimes LilyPond doesn’t produce the output you expect. This section provides some linksto help you solve the problems you might encounter.
1.3.1 General troubleshooting tips
Troubleshooting LilyPond problems can be challenging for people who are used to a graphicalinterface, because invalid input files can be created. When this happens, a logical approach isthe best way to identify and solve the problem. Some guidelines to help you learn to do this areprovided in Section “Troubleshooting” in Application Usage.
1.3.2 Some common errors
There are a few common errors that are difficult to troubleshoot based simply on the errormessages that are displayed. These are described in Section “Common errors” in ApplicationUsage.
1.4 How to read the manuals
This section shows how to read the documentation efficiently, and also introduces some usefulinteractive features available in the online version.
1.4.1 Omitted material
LilyPond input must be surrounded by { } marks or a ‘\relative c'' { ... }’, as we saw inSection 1.2.2 [Working on input files], page 18. For the rest of this manual, most examples willomit this. To replicate the examples, you may copy and paste the displayed input, but you mustadd the ‘\relative c'' { ... }’ like this:
\relative c'' {
...example goes here...
}
Why omit the braces? Most examples in this manual can be inserted into themiddle of a longer piece of music. For these examples, it does not make sense to add‘\relative c'' { ... }’ – you should not place a \relative inside another \relative! Ifwe included ‘\relative c'' { ... }’ around every example, you would not be able to copy asmall documentation example and paste it inside a longer piece of your own. Most people wantto add material to an existing piece, so we format the manual this way.
Also, remember that every LilyPond file should have a \version statement. Because theexamples in the manuals are snippets, not files, the \version statement is omitted. But youshould make a practice of including them in your files.
Chapter 1: Tutorial 20
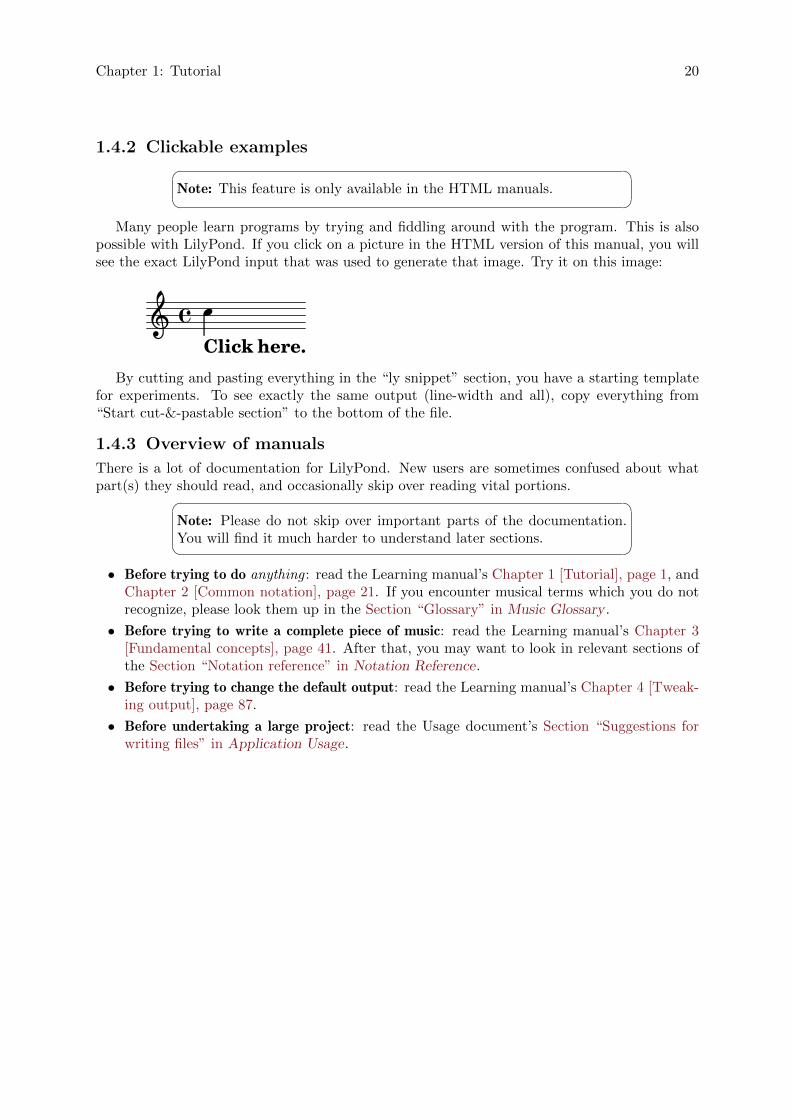
1.4.2 Clickable examples� �Note: This feature is only available in the HTML manuals.
Many people learn programs by trying and fiddling around with the program. This is alsopossible with LilyPond. If you click on a picture in the HTML version of this manual, you willsee the exact LilyPond input that was used to generate that image. Try it on this image:
a�Click here.
�
By cutting and pasting everything in the “ly snippet” section, you have a starting templatefor experiments. To see exactly the same output (line-width and all), copy everything from“Start cut-&-pastable section” to the bottom of the file.
1.4.3 Overview of manuals
There is a lot of documentation for LilyPond. New users are sometimes confused about whatpart(s) they should read, and occasionally skip over reading vital portions.� �
Note: Please do not skip over important parts of the documentation.You will find it much harder to understand later sections.
• Before trying to do anything : read the Learning manual’s Chapter 1 [Tutorial], page 1, andChapter 2 [Common notation], page 21. If you encounter musical terms which you do notrecognize, please look them up in the Section “Glossary” in Music Glossary .
• Before trying to write a complete piece of music: read the Learning manual’s Chapter 3[Fundamental concepts], page 41. After that, you may want to look in relevant sections ofthe Section “Notation reference” in Notation Reference.
• Before trying to change the default output: read the Learning manual’s Chapter 4 [Tweak-ing output], page 87.
• Before undertaking a large project: read the Usage document’s Section “Suggestions forwriting files” in Application Usage.
Chapter 2: Common notation 21
2 Common notation
This chapter explains how to create beautiful printed music containing common musical notation,following the material in Chapter 1 [Tutorial], page 1.
2.1 Single staff notation
This section introduces common notation that is used for one voice on one staff.
2.1.1 Bar checks
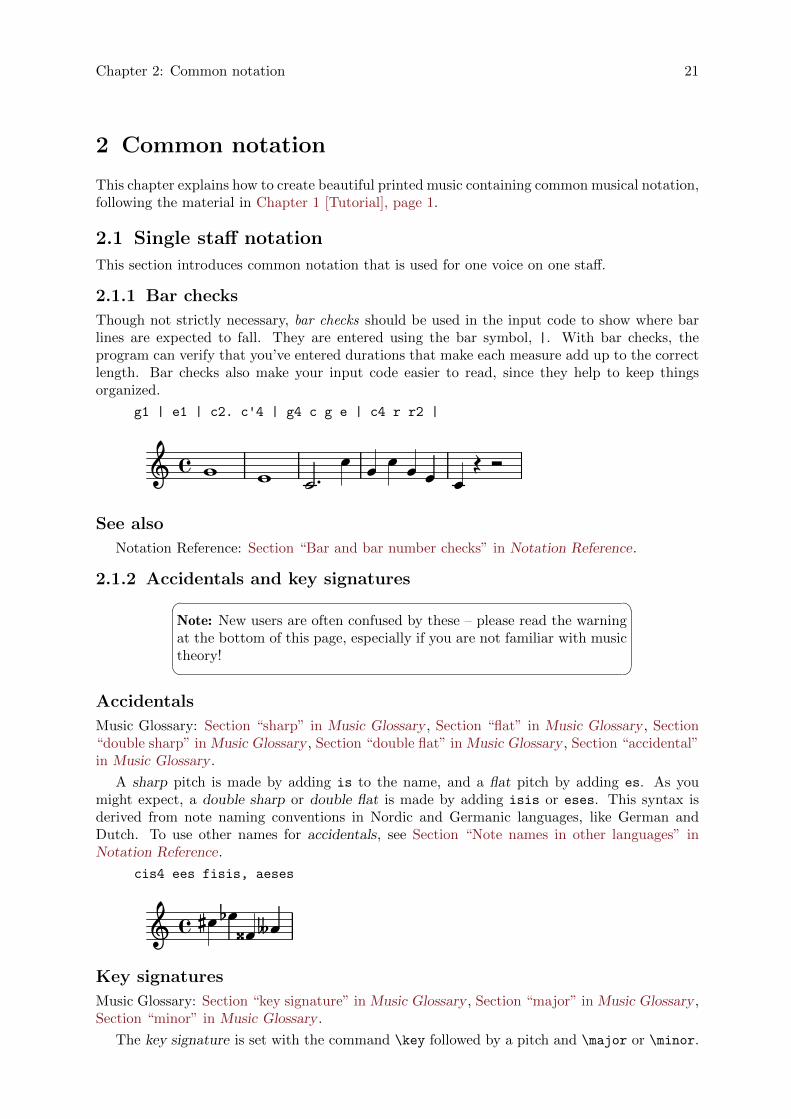
Though not strictly necessary, bar checks should be used in the input code to show where barlines are expected to fall. They are entered using the bar symbol, |. With bar checks, theprogram can verify that you’ve entered durations that make each measure add up to the correctlength. Bar checks also make your input code easier to read, since they help to keep thingsorganized.
g1 | e1 | c2. c'4 | g4 c g e | c4 r r2 |
Î � �Î� Î� Î�� �� ÎÎ
See also
Notation Reference: Section “Bar and bar number checks” in Notation Reference.
2.1.2 Accidentals and key signatures� �Note: New users are often confused by these – please read the warningat the bottom of this page, especially if you are not familiar with musictheory!
Accidentals
Music Glossary: Section “sharp” in Music Glossary , Section “flat” in Music Glossary , Section“double sharp” in Music Glossary , Section “double flat” in Music Glossary , Section “accidental”in Music Glossary .
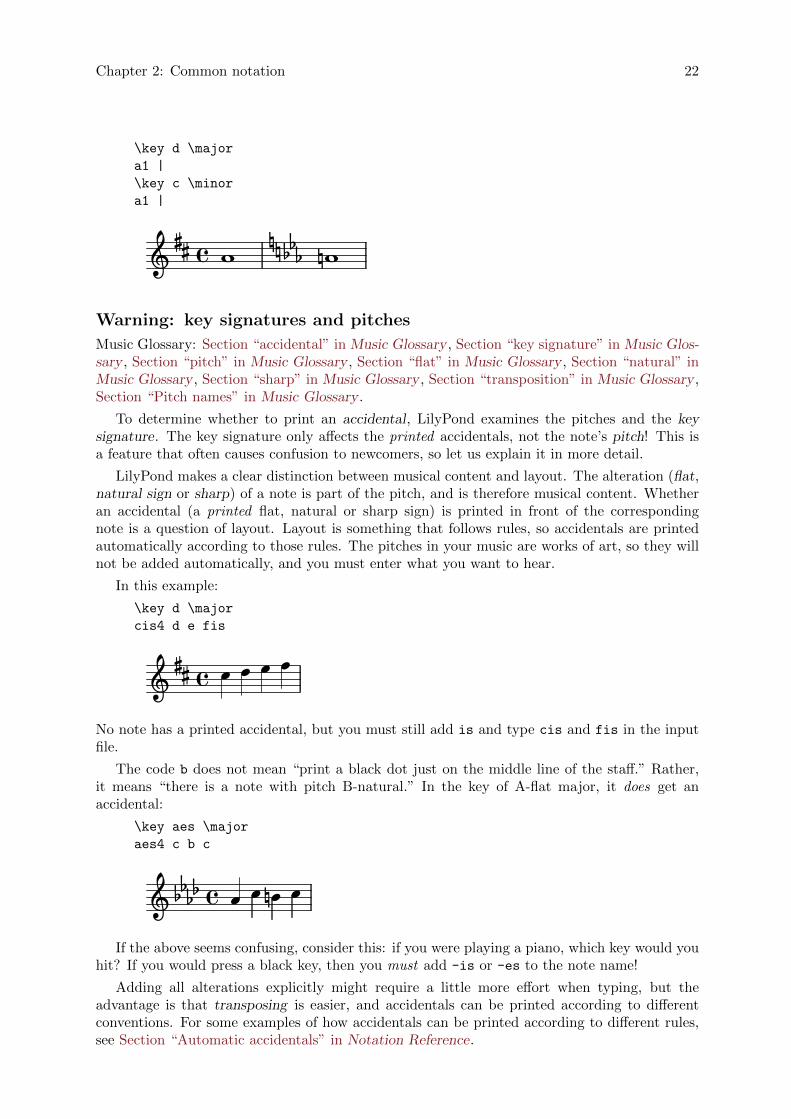
A sharp pitch is made by adding is to the name, and a flat pitch by adding es. As youmight expect, a double sharp or double flat is made by adding isis or eses. This syntax isderived from note naming conventions in Nordic and Germanic languages, like German andDutch. To use other names for accidentals, see Section “Note names in other languages” inNotation Reference.
cis4 ees fisis, aeses
� �� �� �� �Key signatures
Music Glossary: Section “key signature” in Music Glossary , Section “major” in Music Glossary ,Section “minor” in Music Glossary .
The key signature is set with the command \key followed by a pitch and \major or \minor.
Chapter 2: Common notation 22
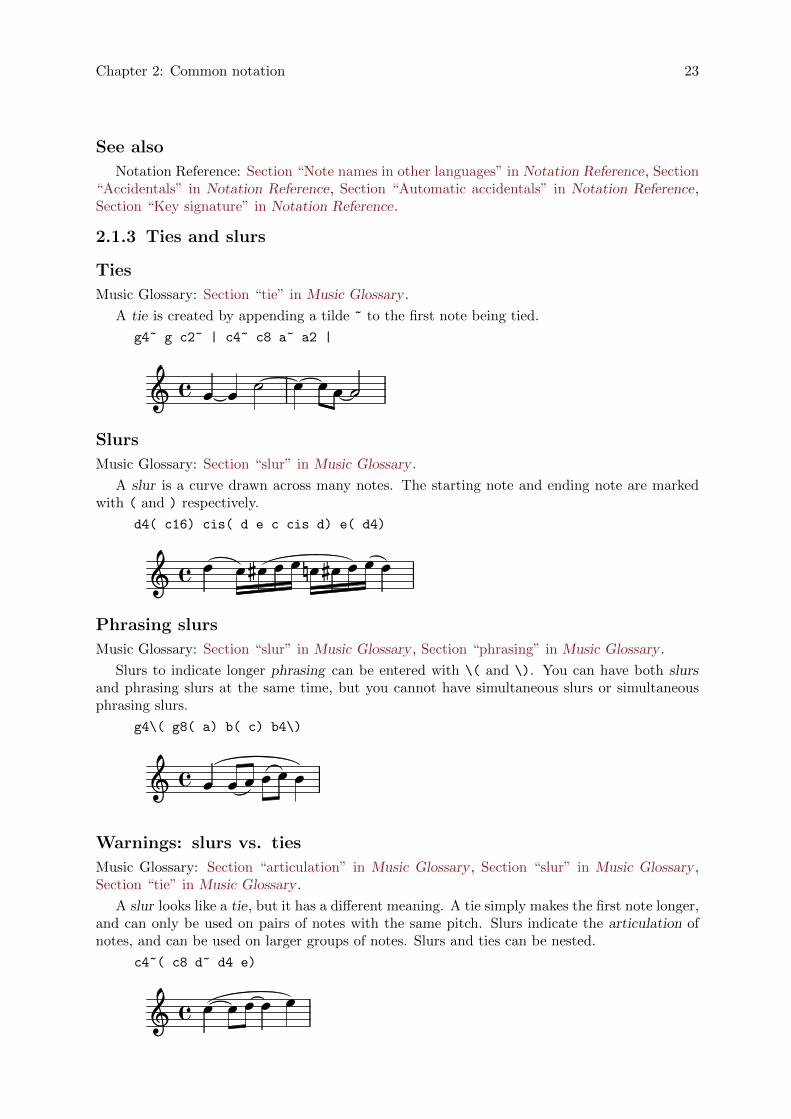
\key d \major
a1 |
\key c \minor
a1 |
òò �� � � ��� ���
Warning: key signatures and pitches
Music Glossary: Section “accidental” in Music Glossary , Section “key signature” in Music Glos-sary , Section “pitch” in Music Glossary , Section “flat” in Music Glossary , Section “natural” inMusic Glossary , Section “sharp” in Music Glossary , Section “transposition” in Music Glossary ,Section “Pitch names” in Music Glossary .
To determine whether to print an accidental, LilyPond examines the pitches and the keysignature. The key signature only affects the printed accidentals, not the note’s pitch! This isa feature that often causes confusion to newcomers, so let us explain it in more detail.
LilyPond makes a clear distinction between musical content and layout. The alteration (flat,natural sign or sharp) of a note is part of the pitch, and is therefore musical content. Whetheran accidental (a printed flat, natural or sharp sign) is printed in front of the correspondingnote is a question of layout. Layout is something that follows rules, so accidentals are printedautomatically according to those rules. The pitches in your music are works of art, so they willnot be added automatically, and you must enter what you want to hear.
In this example:
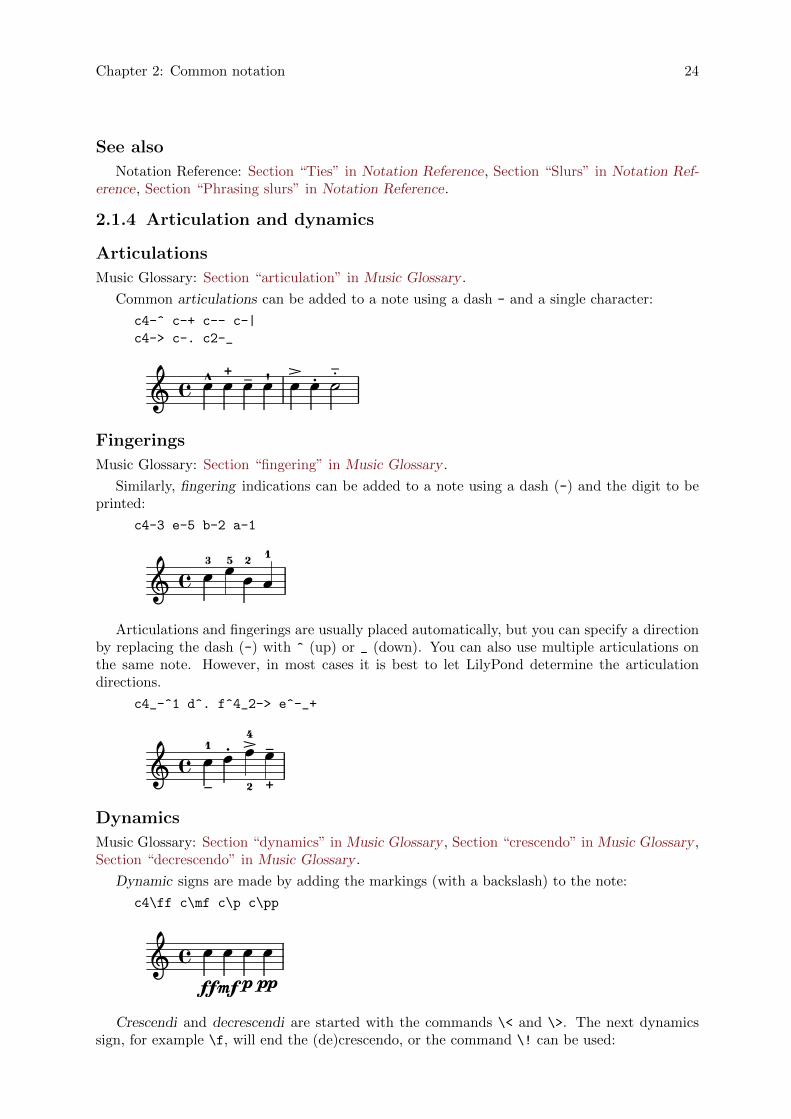
\key d \major
cis4 d e fis
; �� � � � � �
No note has a printed accidental, but you must still add is and type cis and fis in the inputfile.
The code b does not mean “print a black dot just on the middle line of the staff.” Rather,it means “there is a note with pitch B-natural.” In the key of A-flat major, it does get anaccidental:
\key aes \major
aes4 c b c
2������ �22 2If the above seems confusing, consider this: if you were playing a piano, which key would you
hit? If you would press a black key, then you must add -is or -es to the note name!
Adding all alterations explicitly might require a little more effort when typing, but theadvantage is that transposing is easier, and accidentals can be printed according to differentconventions. For some examples of how accidentals can be printed according to different rules,see Section “Automatic accidentals” in Notation Reference.
Chapter 2: Common notation 23
See also
Notation Reference: Section “Note names in other languages” in Notation Reference, Section“Accidentals” in Notation Reference, Section “Automatic accidentals” in Notation Reference,Section “Key signature” in Notation Reference.
2.1.3 Ties and slurs
Ties
Music Glossary: Section “tie” in Music Glossary .
A tie is created by appending a tilde ~ to the first note being tied.
g4~ g c2~ | c4~ c8 a~ a2 |
·� ·� �� �� �Slurs
Music Glossary: Section “slur” in Music Glossary .
A slur is a curve drawn across many notes. The starting note and ending note are markedwith ( and ) respectively.
d4( c16) cis( d e c cis d) e( d4)
2� �� 22 2 �2 2 22 2�2
Phrasing slurs
Music Glossary: Section “slur” in Music Glossary , Section “phrasing” in Music Glossary .
Slurs to indicate longer phrasing can be entered with \( and \). You can have both slursand phrasing slurs at the same time, but you cannot have simultaneous slurs or simultaneousphrasing slurs.
g4\( g8( a) b( c) b4\)
; �� ��� ��
Warnings: slurs vs. ties
Music Glossary: Section “articulation” in Music Glossary , Section “slur” in Music Glossary ,Section “tie” in Music Glossary .
A slur looks like a tie, but it has a different meaning. A tie simply makes the first note longer,and can only be used on pairs of notes with the same pitch. Slurs indicate the articulation ofnotes, and can be used on larger groups of notes. Slurs and ties can be nested.
c4~( c8 d~ d4 e)
2� � 22 22
Chapter 2: Common notation 24
See also
Notation Reference: Section “Ties” in Notation Reference, Section “Slurs” in Notation Ref-erence, Section “Phrasing slurs” in Notation Reference.
2.1.4 Articulation and dynamics
Articulations
Music Glossary: Section “articulation” in Music Glossary .
Common articulations can be added to a note using a dash - and a single character:
c4-^ c-+ c-- c-|
c4-> c-. c2-_
����� �� ��� � �� � �
Fingerings
Music Glossary: Section “fingering” in Music Glossary .
Similarly, fingering indications can be added to a note using a dash (-) and the digit to beprinted:
c4-3 e-5 b-2 a-1
23��1
225 22Articulations and fingerings are usually placed automatically, but you can specify a direction
by replacing the dash (-) with ^ (up) or _ (down). You can also use multiple articulations onthe same note. However, in most cases it is best to let LilyPond determine the articulationdirections.
c4_-^1 d^. f^4_2-> e^-_+
22�� 1
� 2
2��
� �2 4
Dynamics
Music Glossary: Section “dynamics” in Music Glossary , Section “crescendo” in Music Glossary ,Section “decrescendo” in Music Glossary .
Dynamic signs are made by adding the markings (with a backslash) to the note:
c4\ff c\mf c\p c\pp
ff���
p�mf� �pp
Crescendi and decrescendi are started with the commands \< and \>. The next dynamicssign, for example \f, will end the (de)crescendo, or the command \! can be used:
Chapter 2: Common notation 25
c4\< c\ff\> c c\!
2� � 2 2ff2
See also
Notation Reference: Section “Articulations and ornamentations” in Notation Reference,Section “Fingering instructions” in Notation Reference, Section “Dynamics” in Notation Refer-ence.
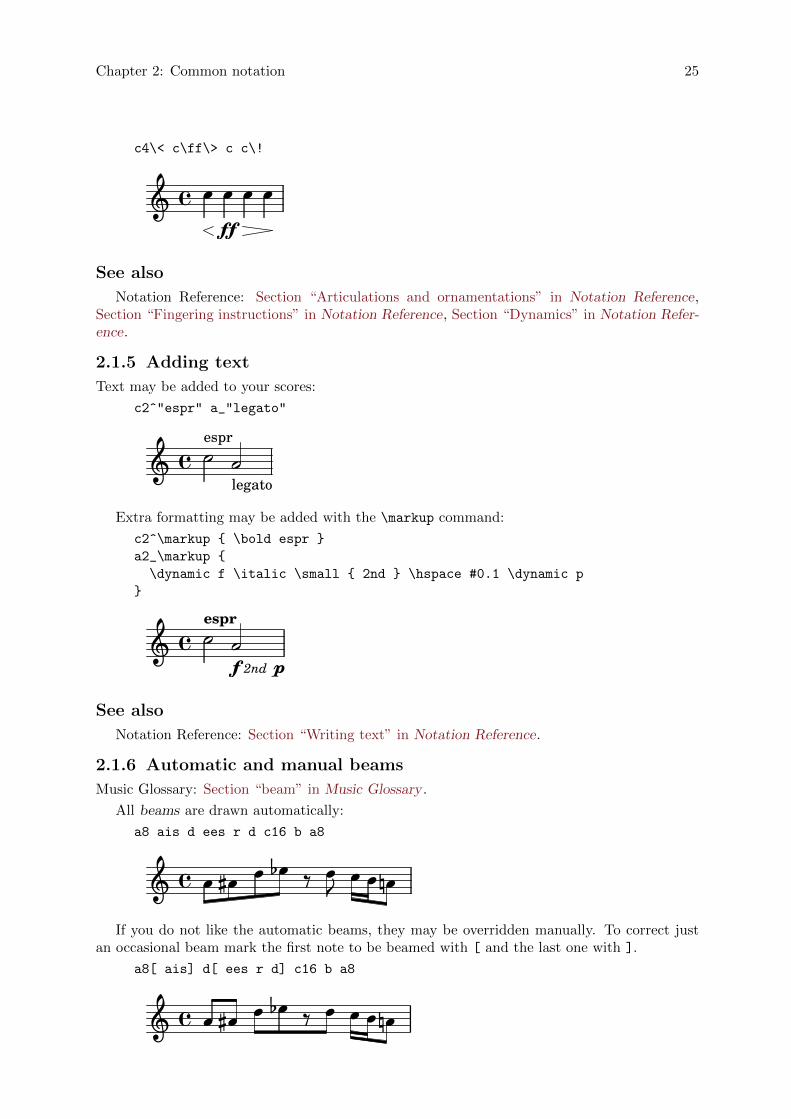
2.1.5 Adding text
Text may be added to your scores:
c2^"espr" a_"legato"
·espr
legato·��
Extra formatting may be added with the \markup command:
c2^\markup { \bold espr }
a2_\markup {
\dynamic f \italic \small { 2nd } \hspace #0.1 \dynamic p
}
ÎesprÎf 2nd p� �
See also
Notation Reference: Section “Writing text” in Notation Reference.
2.1.6 Automatic and manual beams
Music Glossary: Section “beam” in Music Glossary .
All beams are drawn automatically:
a8 ais d ees r d c16 b a8
22� � � 22� � �2 �22 2If you do not like the automatic beams, they may be overridden manually. To correct just
an occasional beam mark the first note to be beamed with [ and the last one with ].
a8[ ais] d[ ees r d] c16 b a8
2 2�� 2 2 � 2��2 �2 2
Chapter 2: Common notation 26
If you want to turn off automatic beaming entirely or for an extended section of music, usethe command \autoBeamOff to turn off automatic beaming and \autoBeamOn to turn it onagain.
\autoBeamOff
a8 c b4 d8. c16 b4 |
\autoBeamOn
a8 c b4 d8. c16 b4 |
� � � �� ����� ���� �� ��� �
See also
Notation Reference: Section “Automatic beams” in Notation Reference, Section “Manualbeams” in Notation Reference.
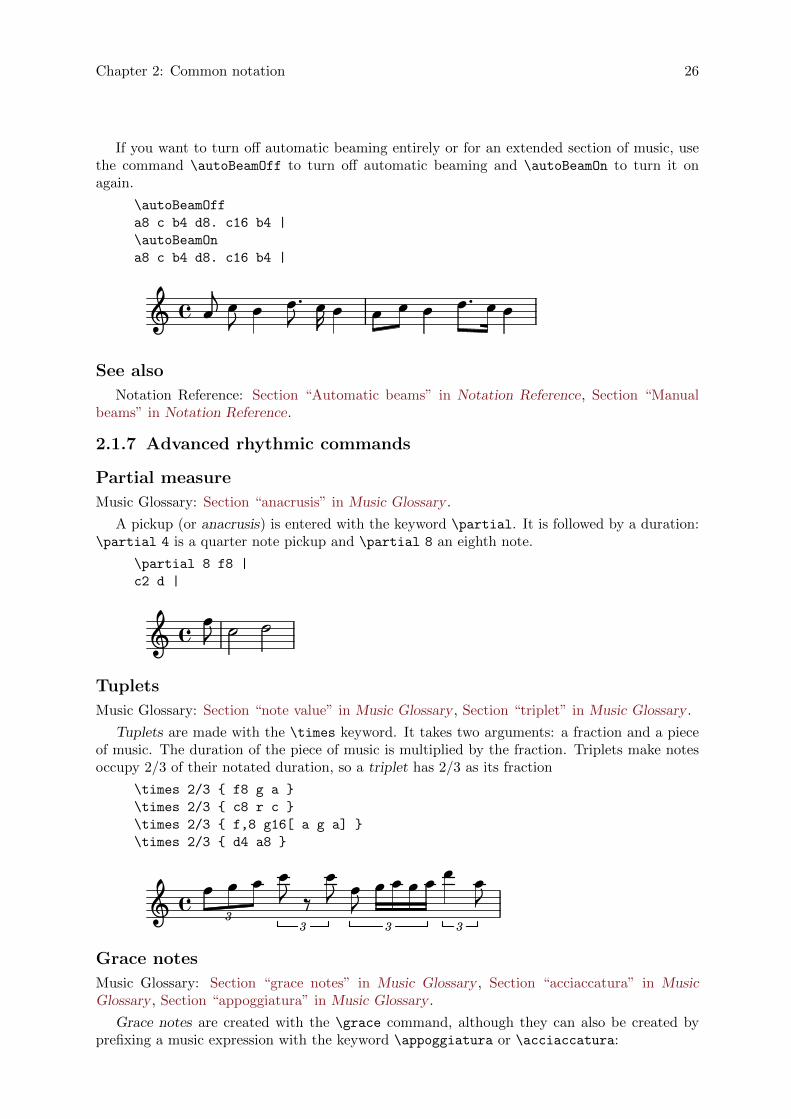
2.1.7 Advanced rhythmic commands
Partial measure
Music Glossary: Section “anacrusis” in Music Glossary .
A pickup (or anacrusis) is entered with the keyword \partial. It is followed by a duration:\partial 4 is a quarter note pickup and \partial 8 an eighth note.
\partial 8 f8 |
c2 d |
; � �� � �
Tuplets
Music Glossary: Section “note value” in Music Glossary , Section “triplet” in Music Glossary .
Tuplets are made with the \times keyword. It takes two arguments: a fraction and a pieceof music. The duration of the piece of music is multiplied by the fraction. Triplets make notesoccupy 2/3 of their notated duration, so a triplet has 2/3 as its fraction
\times 2/3 { f8 g a }
\times 2/3 { c8 r c }
\times 2/3 { f,8 g16[ a g a] }
\times 2/3 { d4 a8 }
Î ÎÎ�Î
�Î Î Î3
�3
�3
Î�Î ÎÎÎ�
3�
Grace notes
Music Glossary: Section “grace notes” in Music Glossary , Section “acciaccatura” in MusicGlossary , Section “appoggiatura” in Music Glossary .
Grace notes are created with the \grace command, although they can also be created byprefixing a music expression with the keyword \appoggiatura or \acciaccatura:
Chapter 2: Common notation 27
c2 \grace { a32[ b] } c2 |
c2 \appoggiatura b16 c2 |
c2 \acciaccatura b16 c2 |
· Î ·· ·· �· Î���� Î Î
See also
Notation Reference: Section “Grace notes” in Notation Reference, Section “Tuplets” in No-tation Reference, Section “Upbeats” in Notation Reference.
2.2 Multiple notes at once
This section introduces having more than one note at the same time: multiple instruments,multiple staves for a single instrument (i.e. piano), and chords.
Polyphony in music refers to having more than one voice occurring in a piece of music.Polyphony in LilyPond refers to having more than one voice on the same staff.
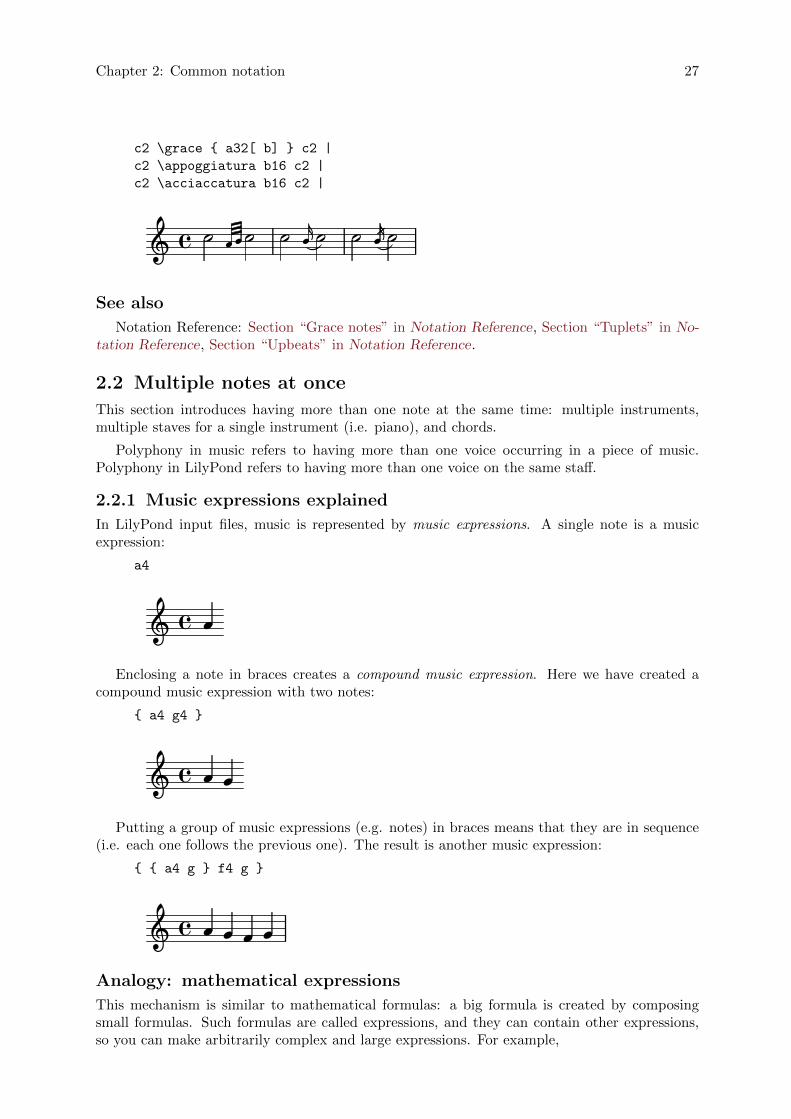
2.2.1 Music expressions explained
In LilyPond input files, music is represented by music expressions. A single note is a musicexpression:
a4
� �Enclosing a note in braces creates a compound music expression. Here we have created a
compound music expression with two notes:
{ a4 g4 }
2 2� �Putting a group of music expressions (e.g. notes) in braces means that they are in sequence
(i.e. each one follows the previous one). The result is another music expression:
{ { a4 g } f4 g }
Š�� �� �Analogy: mathematical expressions
This mechanism is similar to mathematical formulas: a big formula is created by composingsmall formulas. Such formulas are called expressions, and they can contain other expressions,so you can make arbitrarily complex and large expressions. For example,
Chapter 2: Common notation 28
1
1 + 2
(1 + 2) * 3
((1 + 2) * 3) / (4 * 5)
This is a sequence of expressions, where each expression is contained in the next (larger) one.The simplest expressions are numbers, and larger ones are made by combining expressions withoperators (like +, * and /) and parentheses. Like mathematical expressions, music expressionscan be nested arbitrarily deep, which is necessary for complex music like polyphonic scores.
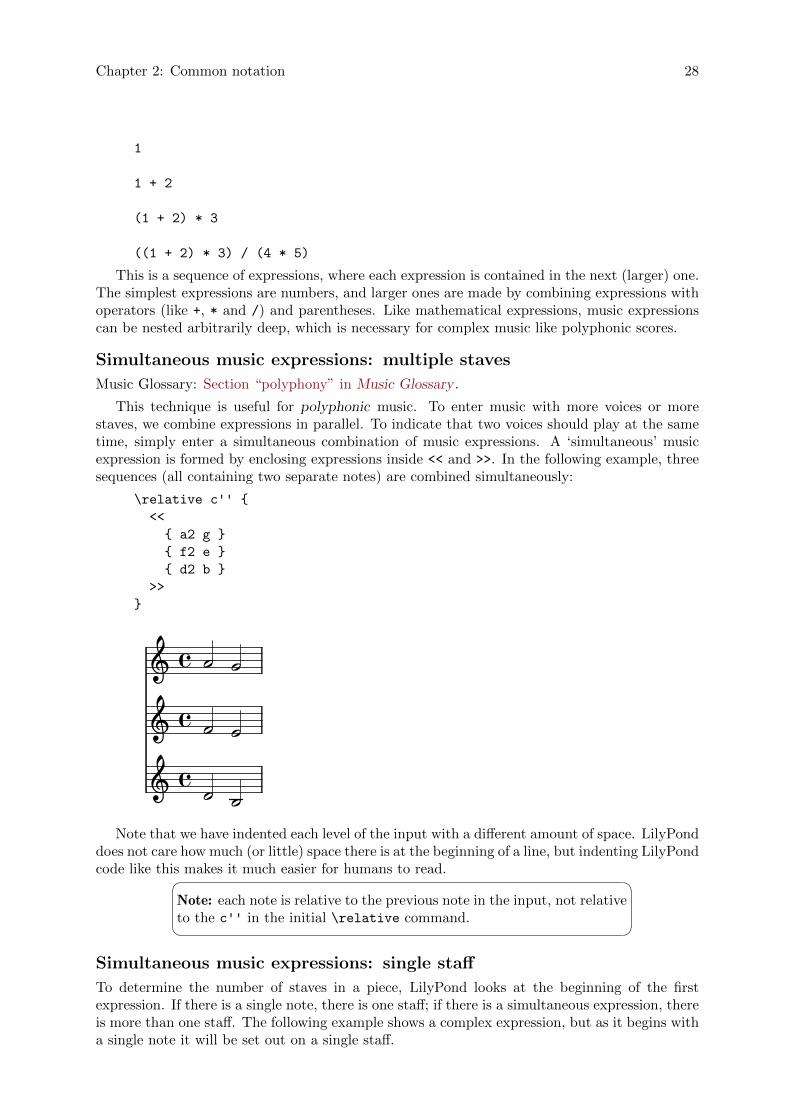
Simultaneous music expressions: multiple staves
Music Glossary: Section “polyphony” in Music Glossary .
This technique is useful for polyphonic music. To enter music with more voices or morestaves, we combine expressions in parallel. To indicate that two voices should play at the sametime, simply enter a simultaneous combination of music expressions. A ‘simultaneous’ musicexpression is formed by enclosing expressions inside << and >>. In the following example, threesequences (all containing two separate notes) are combined simultaneously:
\relative c'' {
<<
{ a2 g }
{ f2 e }
{ d2 b }
>>
}
�
��� �
�
�
�
�
� � �Note that we have indented each level of the input with a different amount of space. LilyPond
does not care how much (or little) space there is at the beginning of a line, but indenting LilyPondcode like this makes it much easier for humans to read.� �
Note: each note is relative to the previous note in the input, not relativeto the c'' in the initial \relative command.
Simultaneous music expressions: single staff
To determine the number of staves in a piece, LilyPond looks at the beginning of the firstexpression. If there is a single note, there is one staff; if there is a simultaneous expression, thereis more than one staff. The following example shows a complex expression, but as it begins witha single note it will be set out on a single staff.
Chapter 2: Common notation 29
\relative c'' {
c2 <<c e>> |
<< { e2 f } { c2 <<b d>> } >> |
}
a � ������ ��
2.2.2 Multiple staves
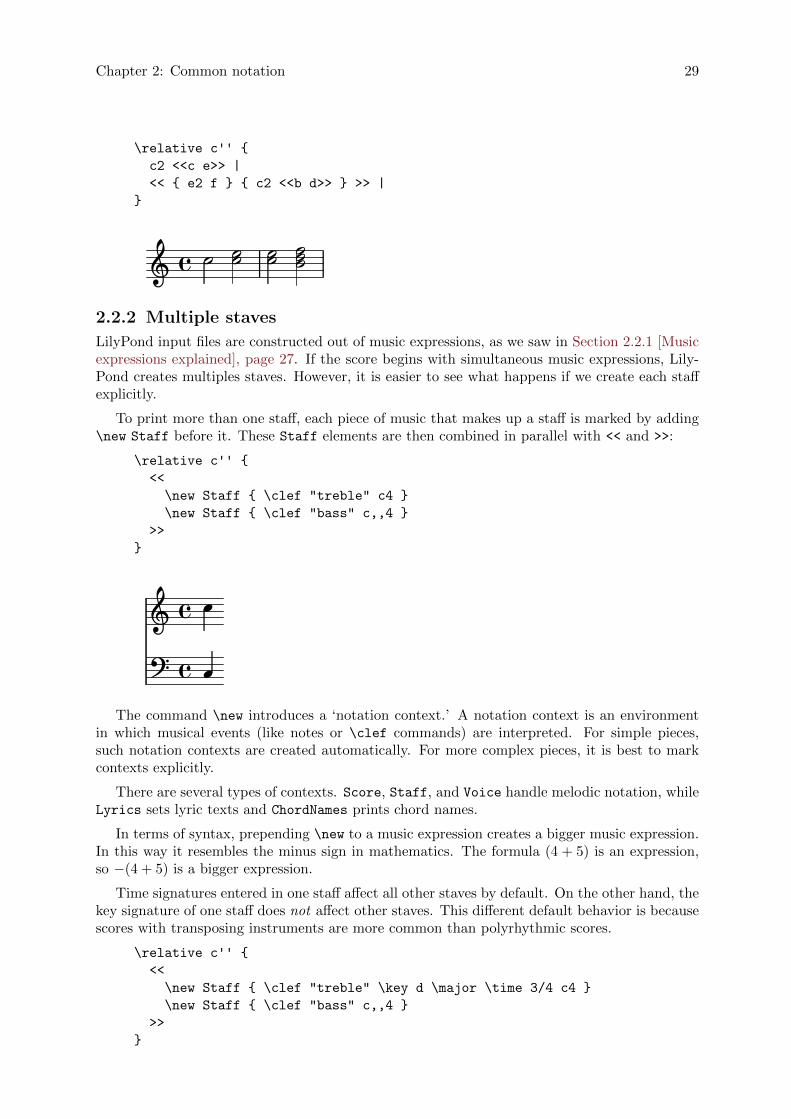
LilyPond input files are constructed out of music expressions, as we saw in Section 2.2.1 [Musicexpressions explained], page 27. If the score begins with simultaneous music expressions, Lily-Pond creates multiples staves. However, it is easier to see what happens if we create each staffexplicitly.
To print more than one staff, each piece of music that makes up a staff is marked by adding\new Staff before it. These Staff elements are then combined in parallel with << and >>:
\relative c'' {
<<
\new Staff { \clef "treble" c4 }
\new Staff { \clef "bass" c,,4 }
>>
}
2� �� �
2
The command \new introduces a ‘notation context.’ A notation context is an environmentin which musical events (like notes or \clef commands) are interpreted. For simple pieces,such notation contexts are created automatically. For more complex pieces, it is best to markcontexts explicitly.
There are several types of contexts. Score, Staff, and Voice handle melodic notation, whileLyrics sets lyric texts and ChordNames prints chord names.
In terms of syntax, prepending \new to a music expression creates a bigger music expression.In this way it resembles the minus sign in mathematics. The formula (4 + 5) is an expression,so −(4 + 5) is a bigger expression.
Time signatures entered in one staff affect all other staves by default. On the other hand, thekey signature of one staff does not affect other staves. This different default behavior is becausescores with transposing instruments are more common than polyrhythmic scores.
\relative c'' {
<<
\new Staff { \clef "treble" \key d \major \time 3/4 c4 }
\new Staff { \clef "bass" c,,4 }
>>
}
Chapter 2: Common notation 30
43��
� �� �
43
�
2.2.3 Staff groups
Music Glossary: Section “brace” in Music Glossary , Section “staff” in Music Glossary , Section“system” in Music Glossary .
Piano music is typeset in two staves connected by a brace. Printing such a staff is similarto the polyphonic example in Section 2.2.2 [Multiple staves], page 29. However, now this entireexpression is inserted inside a PianoStaff:
\new PianoStaff <<
\new Staff ...
\new Staff ...
>>
Here is a small example:
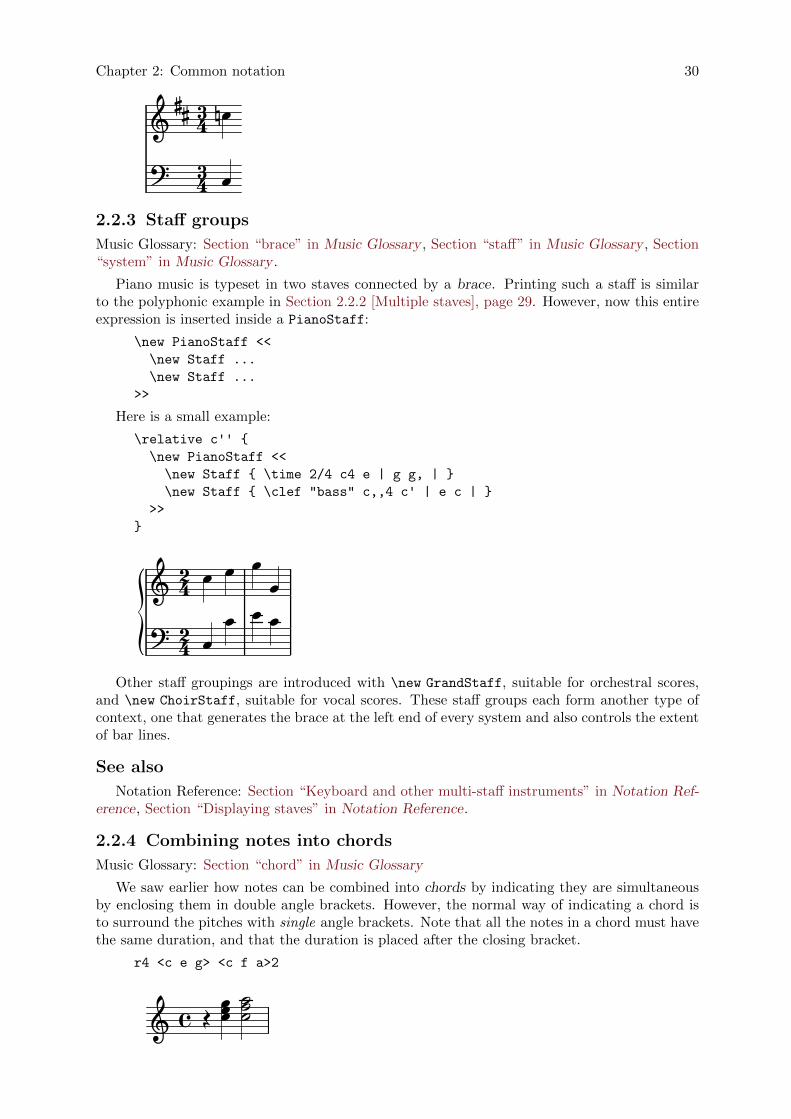
\relative c'' {
\new PianoStaff <<
\new Staff { \time 2/4 c4 e | g g, | }
\new Staff { \clef "bass" c,,4 c' | e c | }
>>
}
ÎÎ
42�ÎÎw Î
ÎÎ
Î42�Other staff groupings are introduced with \new GrandStaff, suitable for orchestral scores,
and \new ChoirStaff, suitable for vocal scores. These staff groups each form another type ofcontext, one that generates the brace at the left end of every system and also controls the extentof bar lines.
See also
Notation Reference: Section “Keyboard and other multi-staff instruments” in Notation Ref-erence, Section “Displaying staves” in Notation Reference.
2.2.4 Combining notes into chords
Music Glossary: Section “chord” in Music Glossary
We saw earlier how notes can be combined into chords by indicating they are simultaneousby enclosing them in double angle brackets. However, the normal way of indicating a chord isto surround the pitches with single angle brackets. Note that all the notes in a chord must havethe same duration, and that the duration is placed after the closing bracket.
r4 <c e g> <c f a>2
���� �� �� �
Chapter 2: Common notation 31
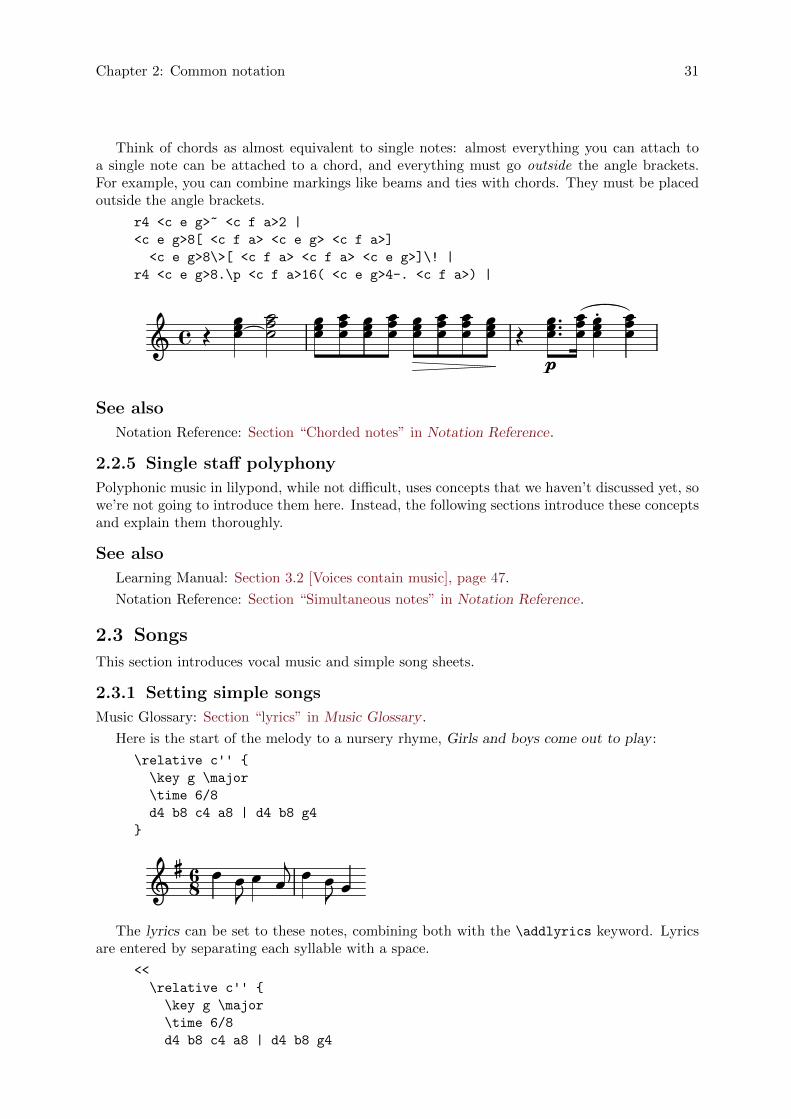
Think of chords as almost equivalent to single notes: almost everything you can attach toa single note can be attached to a chord, and everything must go outside the angle brackets.For example, you can combine markings like beams and ties with chords. They must be placedoutside the angle brackets.
r4 <c e g>~ <c f a>2 |
<c e g>8[ <c f a> <c e g> <c f a>]
<c e g>8\>[ <c f a> <c f a> <c e g>]\! |
r4 <c e g>8.\p <c f a>16( <c e g>4-. <c f a>) |
ÎÎÎ ��ÎÎÎ ÎÎÎ Îp�� ÎÎÎÎ ÎÎ ÎÎ�
� ÎÎÎ�� ÎÎÎ� ÎÎÎ� ÎÎÎÎ� ÎÎÎ ÎÎÎ ÎÎ
See also
Notation Reference: Section “Chorded notes” in Notation Reference.
2.2.5 Single staff polyphony
Polyphonic music in lilypond, while not difficult, uses concepts that we haven’t discussed yet, sowe’re not going to introduce them here. Instead, the following sections introduce these conceptsand explain them thoroughly.
See also
Learning Manual: Section 3.2 [Voices contain music], page 47.
Notation Reference: Section “Simultaneous notes” in Notation Reference.
2.3 Songs
This section introduces vocal music and simple song sheets.
2.3.1 Setting simple songs
Music Glossary: Section “lyrics” in Music Glossary .
Here is the start of the melody to a nursery rhyme, Girls and boys come out to play :
\relative c'' {
\key g \major
\time 6/8
d4 b8 c4 a8 | d4 b8 g4
}
Î Î� �� ÎÎ
Î�� Î86 Î
The lyrics can be set to these notes, combining both with the \addlyrics keyword. Lyricsare entered by separating each syllable with a space.
<<
\relative c'' {
\key g \major
\time 6/8
d4 b8 c4 a8 | d4 b8 g4
Chapter 2: Common notation 32
}
\addlyrics {
Girls and boys come | out to play,
}
>>
Î Î Î86 Îcome
Îand out
�play,
ÎboysGirls
�� �to
Î�� �Note: It is essential that the final syllable is separated from the ter-minating curly bracket by a space or a newline, or it will be assumedto be part of the syllable, giving rise to an obscure error, see Section“Apparent error in ../ly/init.ly” in Application Usage.
Note the double angle brackets << ... >> around the whole piece to show that the musicand lyrics are to occur at the same time.
2.3.2 Aligning lyrics to a melody
Music Glossary: Section “melisma” in Music Glossary , Section “extender line” in Music Glos-sary .
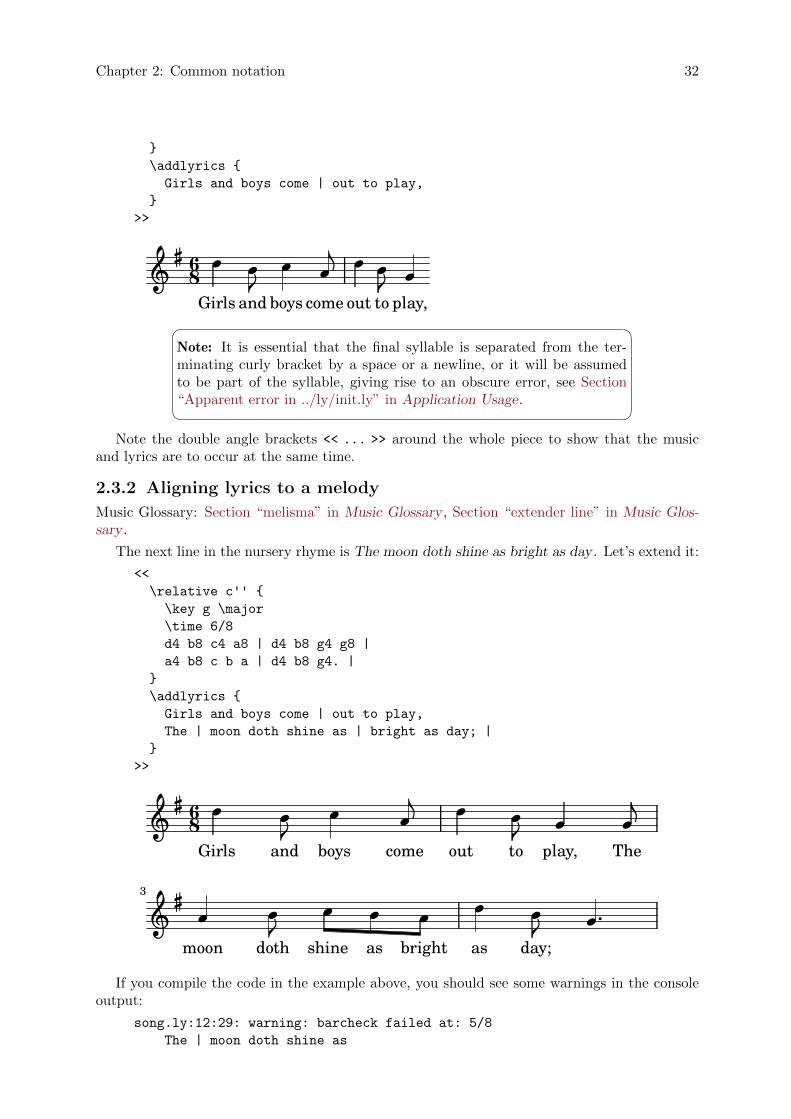
The next line in the nursery rhyme is The moon doth shine as bright as day . Let’s extend it:
<<
\relative c'' {
\key g \major
\time 6/8
d4 b8 c4 a8 | d4 b8 g4 g8 |
a4 b8 c b a | d4 b8 g4. |
}
\addlyrics {
Girls and boys come | out to play,
The | moon doth shine as | bright as day; |
}
>>
ΠΠ�Π�and
86 Îplay,
� �
boysGirls out
Îcome
Îto
��The
��doth
�as
����
3 ��day;asmoon bright
�� �shine
�
If you compile the code in the example above, you should see some warnings in the consoleoutput:
song.ly:12:29: warning: barcheck failed at: 5/8
The | moon doth shine as
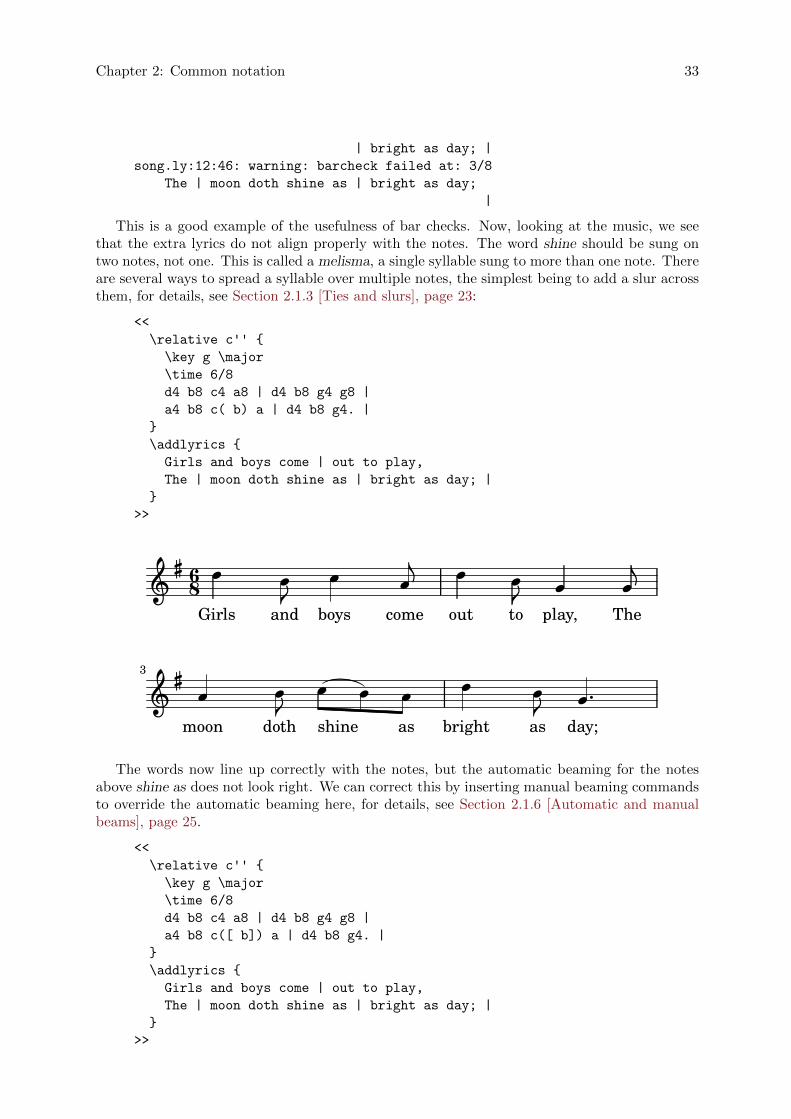
Chapter 2: Common notation 33
| bright as day; |
song.ly:12:46: warning: barcheck failed at: 3/8
The | moon doth shine as | bright as day;
|
This is a good example of the usefulness of bar checks. Now, looking at the music, we seethat the extra lyrics do not align properly with the notes. The word shine should be sung ontwo notes, not one. This is called a melisma, a single syllable sung to more than one note. Thereare several ways to spread a syllable over multiple notes, the simplest being to add a slur acrossthem, for details, see Section 2.1.3 [Ties and slurs], page 23:
<<
\relative c'' {
\key g \major
\time 6/8
d4 b8 c4 a8 | d4 b8 g4 g8 |
a4 b8 c( b) a | d4 b8 g4. |
}
\addlyrics {
Girls and boys come | out to play,
The | moon doth shine as | bright as day; |
}
>>
out86 �� �
The
� ��and
�Girls
�to
� �come
�boys
� �play,
�
bright
òas
� �moon
�as
��doth
� �� �shine
� �day;
�3
The words now line up correctly with the notes, but the automatic beaming for the notesabove shine as does not look right. We can correct this by inserting manual beaming commandsto override the automatic beaming here, for details, see Section 2.1.6 [Automatic and manualbeams], page 25.
<<
\relative c'' {
\key g \major
\time 6/8
d4 b8 c4 a8 | d4 b8 g4 g8 |
a4 b8 c([ b]) a | d4 b8 g4. |
}
\addlyrics {
Girls and boys come | out to play,
The | moon doth shine as | bright as day; |
}
>>
Chapter 2: Common notation 34
Îcome
Îboys The
Î �� Î Îto� Î�
out
Îand
�Girls play,
Î86�
×3 � � �
as
��shine
� � ��doth brightmoon
�as
�day;
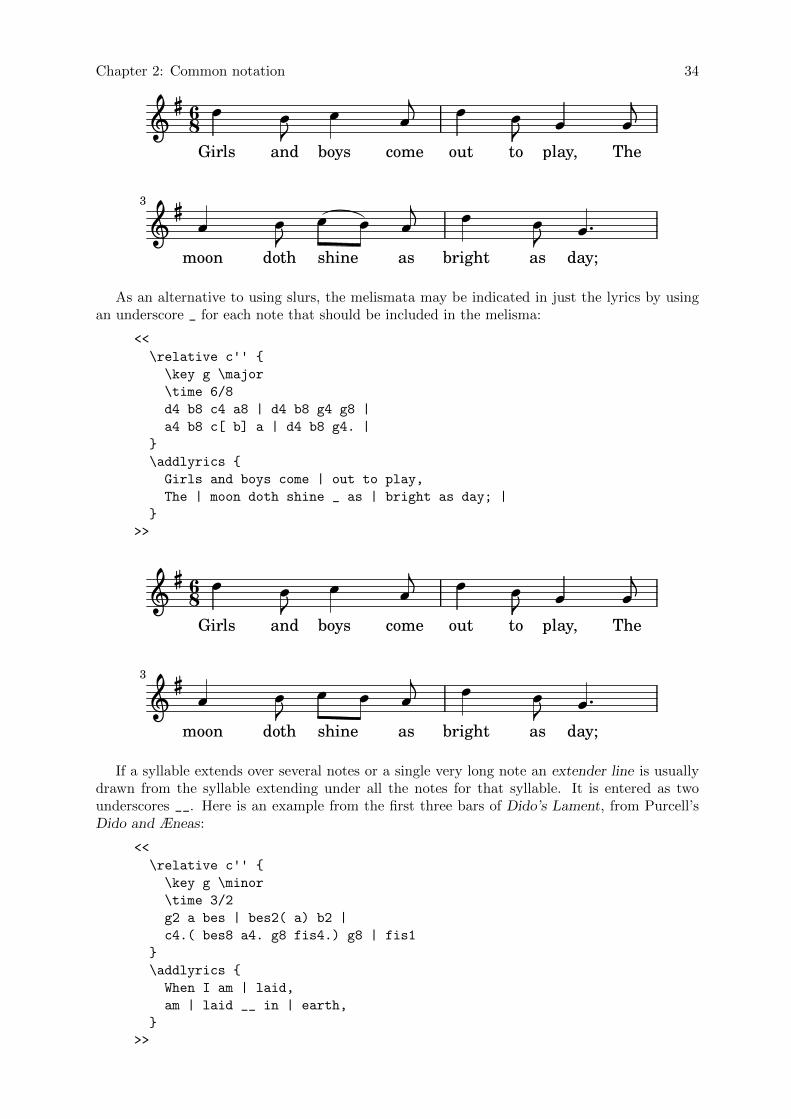
��As an alternative to using slurs, the melismata may be indicated in just the lyrics by using
an underscore _ for each note that should be included in the melisma:
<<
\relative c'' {
\key g \major
\time 6/8
d4 b8 c4 a8 | d4 b8 g4 g8 |
a4 b8 c[ b] a | d4 b8 g4. |
}
\addlyrics {
Girls and boys come | out to play,
The | moon doth shine _ as | bright as day; |
}
>>
��and play,
� �Girls
��to
�come
�out
� � ��� �
86Theboys
moon
Î Î Î �shine
���3
bright
Îas
�asdoth
Î Î �day;
Î
If a syllable extends over several notes or a single very long note an extender line is usuallydrawn from the syllable extending under all the notes for that syllable. It is entered as twounderscores __. Here is an example from the first three bars of Dido’s Lament, from Purcell’sDido and Æneas:
<<
\relative c'' {
\key g \minor
\time 3/2
g2 a bes | bes2( a) b2 |
c4.( bes8 a4. g8 fis4.) g8 | fis1
}
\addlyrics {
When I am | laid,
am | laid __ in | earth,
}
>>
Chapter 2: Common notation 35
�� �
am�� �� �23 �� ���
I
Î Îlaid
�When
� �Î Îlaid,
� Î �am earth,in
�
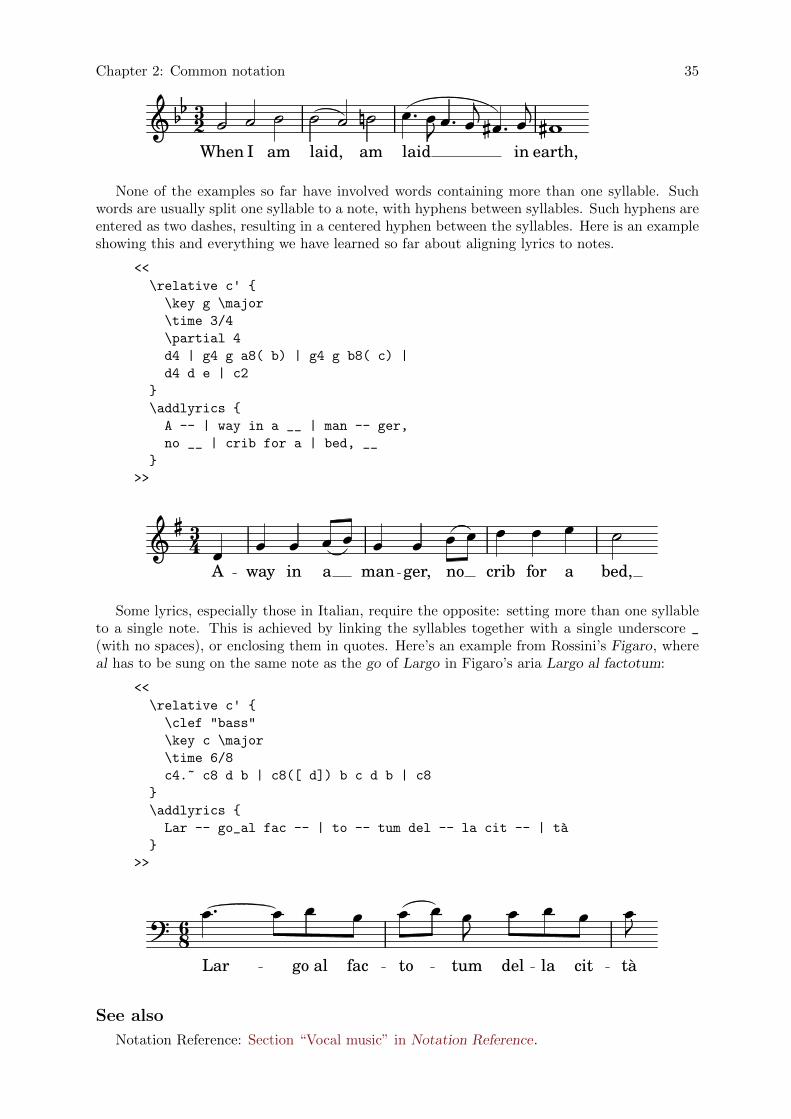
None of the examples so far have involved words containing more than one syllable. Suchwords are usually split one syllable to a note, with hyphens between syllables. Such hyphens areentered as two dashes, resulting in a centered hyphen between the syllables. Here is an exampleshowing this and everything we have learned so far about aligning lyrics to notes.
<<
\relative c' {
\key g \major
\time 3/4
\partial 4
d4 | g4 g a8( b) | g4 g b8( c) |
d4 d e | c2
}
\addlyrics {
A -- | way in a __ | man -- ger,
no __ | crib for a | bed, __
}
>>
ÎÎbed,a
ÎÎÎmanin
Î Î �noger,way
Î43� � ÎÎa
Îcrib for
ÎA
Some lyrics, especially those in Italian, require the opposite: setting more than one syllableto a single note. This is achieved by linking the syllables together with a single underscore _
(with no spaces), or enclosing them in quotes. Here’s an example from Rossini’s Figaro, whereal has to be sung on the same note as the go of Largo in Figaro’s aria Largo al factotum:
<<
\relative c' {
\clef "bass"
\key c \major
\time 6/8
c4.~ c8 d b | c8([ d]) b c d b | c8
}
\addlyrics {
Lar -- go_al fac -- | to -- tum del -- la cit -- | ta
}
>>
cit86 �
���
Lar
� �
la
�
fac
��
togo al
���
tum tà
� �
del
�
See also
Notation Reference: Section “Vocal music” in Notation Reference.
Chapter 2: Common notation 36
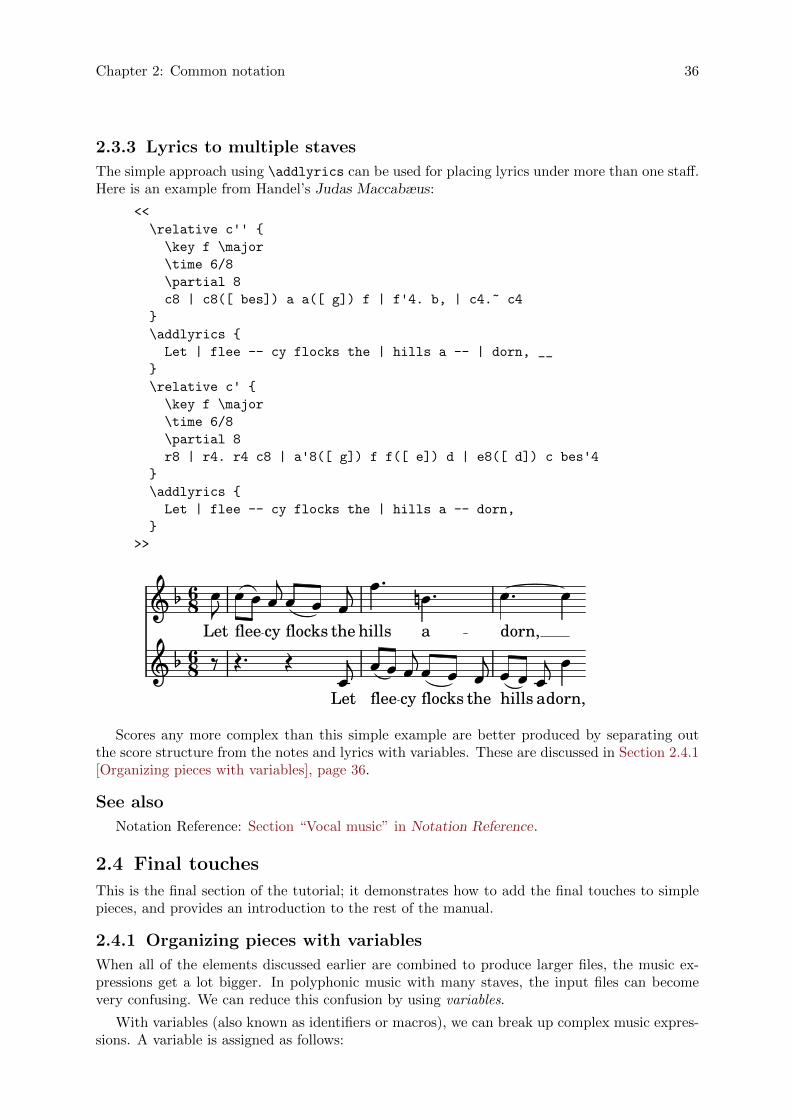
2.3.3 Lyrics to multiple staves
The simple approach using \addlyrics can be used for placing lyrics under more than one staff.Here is an example from Handel’s Judas Maccabæus:
<<
\relative c'' {
\key f \major
\time 6/8
\partial 8
c8 | c8([ bes]) a a([ g]) f | f'4. b, | c4.~ c4
}
\addlyrics {
Let | flee -- cy flocks the | hills a -- | dorn, __
}
\relative c' {
\key f \major
\time 6/8
\partial 8
r8 | r4. r4 c8 | a'8([ g]) f f([ e]) d | e8([ d]) c bes'4
}
\addlyrics {
Let | flee -- cy flocks the | hills a -- dorn,
}
>>
theÎÎ
�
hillsÎdorn,
�
�
cy
ÎÎ
� �
flocks
Îa
�86��
dorn,
Î86�
�
aÎÎ
�
�cy
��
Let
��
flee
Î �
flee
Îhills
ÎÎ�flocks
�
LetÎ
theÎ
Scores any more complex than this simple example are better produced by separating outthe score structure from the notes and lyrics with variables. These are discussed in Section 2.4.1[Organizing pieces with variables], page 36.
See also
Notation Reference: Section “Vocal music” in Notation Reference.
2.4 Final touches
This is the final section of the tutorial; it demonstrates how to add the final touches to simplepieces, and provides an introduction to the rest of the manual.
2.4.1 Organizing pieces with variables
When all of the elements discussed earlier are combined to produce larger files, the music ex-pressions get a lot bigger. In polyphonic music with many staves, the input files can becomevery confusing. We can reduce this confusion by using variables.
With variables (also known as identifiers or macros), we can break up complex music expres-sions. A variable is assigned as follows:
Chapter 2: Common notation 37
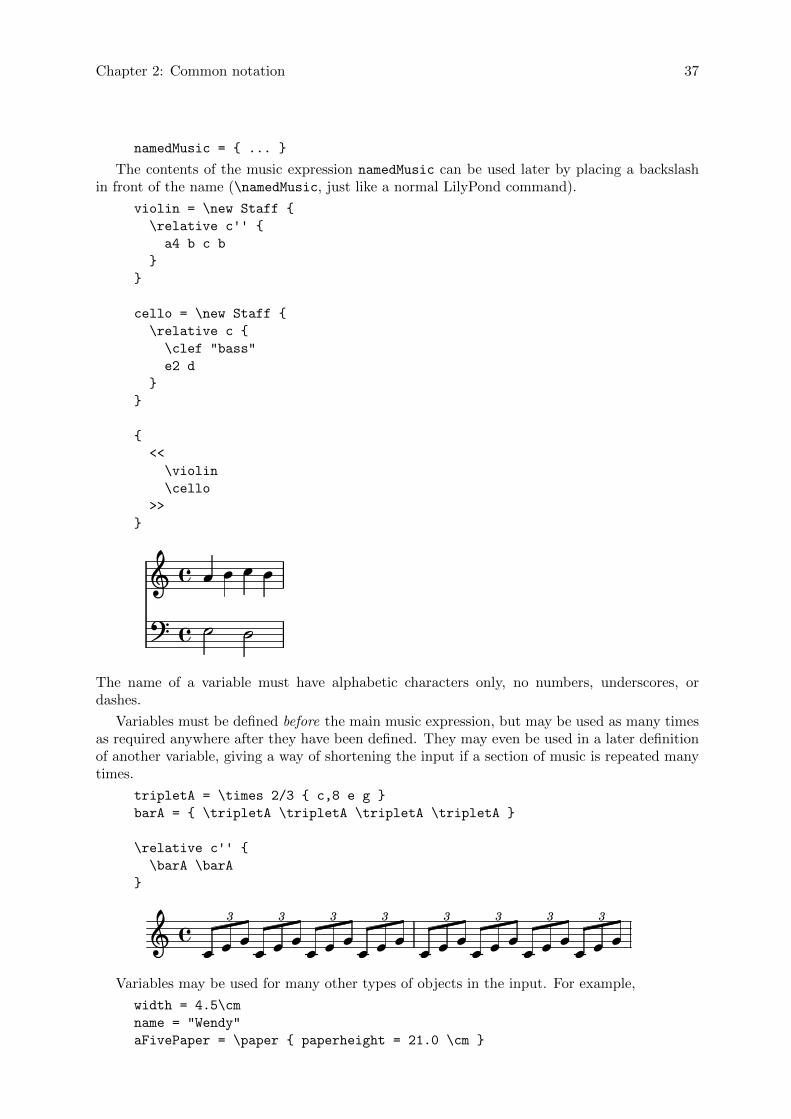
namedMusic = { ... }
The contents of the music expression namedMusic can be used later by placing a backslashin front of the name (\namedMusic, just like a normal LilyPond command).
violin = \new Staff {
\relative c'' {
a4 b c b
}
}
cello = \new Staff {
\relative c {
\clef "bass"
e2 d
}
}
{
<<
\violin
\cello
>>
}
2�
2 2�2��
��The name of a variable must have alphabetic characters only, no numbers, underscores, ordashes.
Variables must be defined before the main music expression, but may be used as many timesas required anywhere after they have been defined. They may even be used in a later definitionof another variable, giving a way of shortening the input if a section of music is repeated manytimes.
tripletA = \times 2/3 { c,8 e g }
barA = { \tripletA \tripletA \tripletA \tripletA }
\relative c'' {
\barA \barA
}
33
å� ååå ååå åååå åå ååå 3� å33
å3
å å3 3 åååå
Variables may be used for many other types of objects in the input. For example,
width = 4.5\cm
name = "Wendy"
aFivePaper = \paper { paperheight = 21.0 \cm }
Chapter 2: Common notation 38
Depending on its contents, the variable can be used in different places. The following exampleuses the above variables:
\paper {
\aFivePaper
line-width = \width
}
{
c4^\name
}
2.4.2 Adding titles
The title, composer, opus number, and similar information are entered in the \header block.This exists outside of the main music expression; the \header block is usually placed underneaththe version number.
\version "2.16.2"
\header {
title = "Symphony"
composer = "Me"
opus = "Op. 9"
}
{
... music ...
}
When the file is processed, the title and composer are printed above the music. More in-formation on titling can be found in Section “Creating titles headers and footers” in NotationReference.
2.4.3 Absolute note names
So far we have always used \relative to define pitches. This is the easiest way to enter mostmusic, but another way of defining pitches exists: absolute mode.
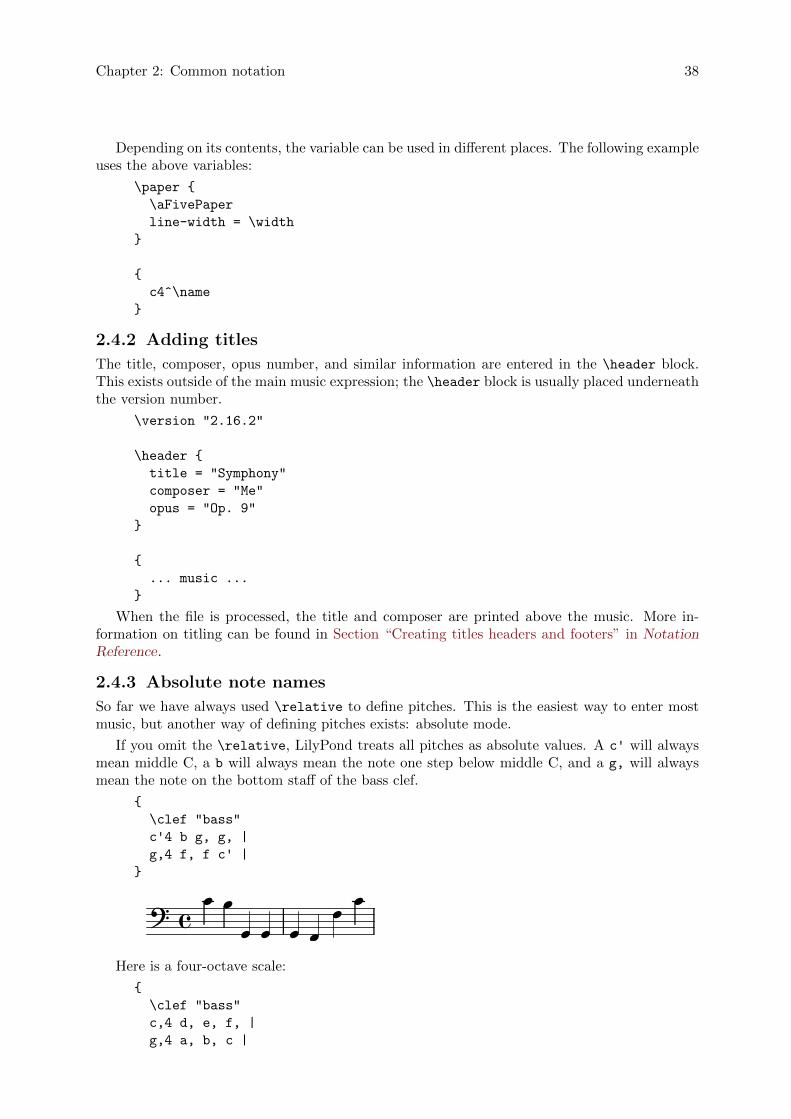
If you omit the \relative, LilyPond treats all pitches as absolute values. A c' will alwaysmean middle C, a b will always mean the note one step below middle C, and a g, will alwaysmean the note on the bottom staff of the bass clef.
{
\clef "bass"
c'4 b g, g, |
g,4 f, f c' |
}
© ��
� ��� ��
�
Here is a four-octave scale:
{
\clef "bass"
c,4 d, e, f, |
g,4 a, b, c |
Chapter 2: Common notation 39
d4 e f g |
a4 b c' d' |
\clef "treble"
e'4 f' g' a' |
b'4 c'' d'' e'' |
f''4 g'' a'' b'' |
c'''1 |
}
ÎÎ �Î ÎÎ Î
Î Î ÎÎ ÎÎ
Î� � ÎÎÎ
× ���� � � �� ���
5 � �
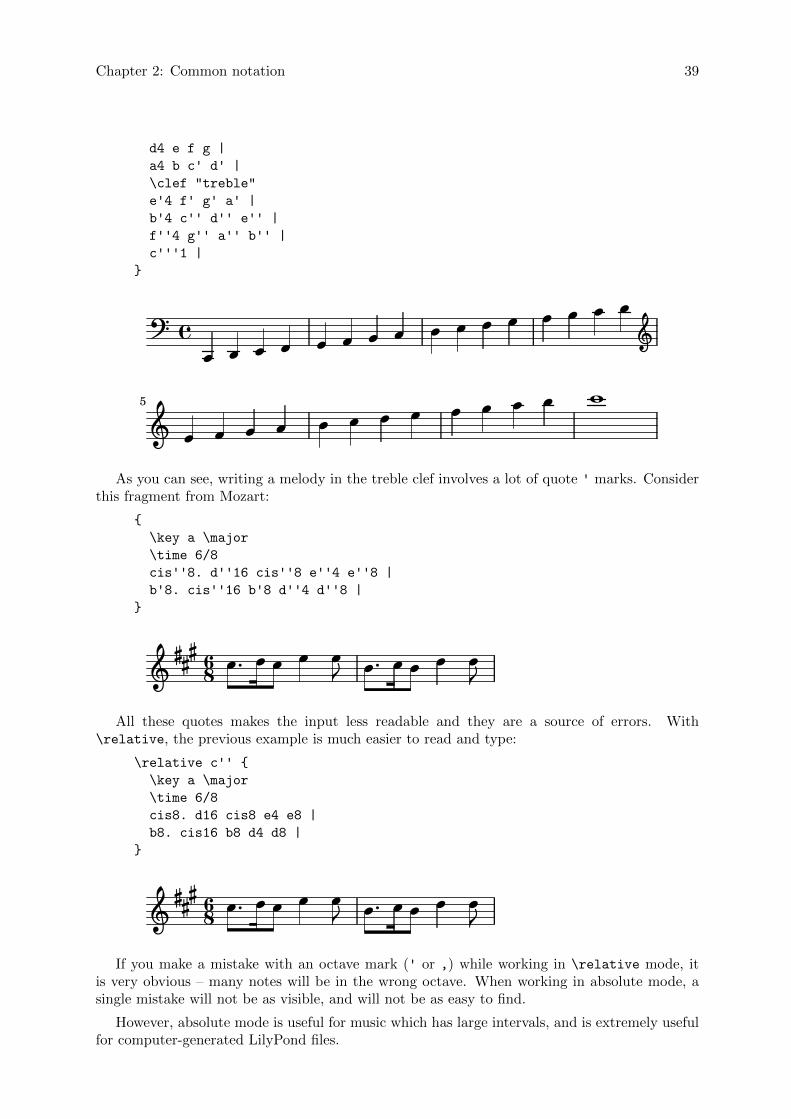
As you can see, writing a melody in the treble clef involves a lot of quote ' marks. Considerthis fragment from Mozart:
{
\key a \major
\time 6/8
cis''8. d''16 cis''8 e''4 e''8 |
b'8. cis''16 b'8 d''4 d''8 |
}
Î ÎÎÎ� 86��� �ÎÎ�Î �Î�ÎÎ
All these quotes makes the input less readable and they are a source of errors. With\relative, the previous example is much easier to read and type:
\relative c'' {
\key a \major
\time 6/8
cis8. d16 cis8 e4 e8 |
b8. cis16 b8 d4 d8 |
}
ÎÎ86���� Î�Î � �Î ÎÎ
�ÎÎ Î
If you make a mistake with an octave mark (' or ,) while working in \relative mode, itis very obvious – many notes will be in the wrong octave. When working in absolute mode, asingle mistake will not be as visible, and will not be as easy to find.
However, absolute mode is useful for music which has large intervals, and is extremely usefulfor computer-generated LilyPond files.
Chapter 2: Common notation 40
2.4.4 After the tutorial
After finishing the tutorial, you should probably try writing a piece or two. Start by addingnotes to one of the Appendix A [Templates], page 142. If you need any notation that was notcovered in the tutorial, look at the Notation Reference, starting with Section “Musical notation”in Notation Reference. If you want to write for an instrument ensemble that is not covered inthe templates, take a look at Section 3.4 [Extending the templates], page 69.
Once you have written a few short pieces, read the rest of the Learning Manual (chapters 3-5).There’s nothing wrong with reading it now, of course! However, the rest of the Learning Manualassumes that you are familiar with LilyPond input. You may wish to skim these chapters rightnow, and come back to them after you have more experience.
In this tutorial and in the rest of the Learning Manual, there is a paragraph See also atthe end of each section, which contains cross-references to other sections: you should not followthese cross-references at first reading; when you have read all of the Learning Manual, you maywant to read some sections again and follow cross-references for further reading.
If you have not done so already, please read Section 1.4.3 [Overview of manuals], page 20.There is a lot of information about LilyPond, so newcomers often do not know where they shouldlook for help. If you spend five minutes reading that section carefully, you might save yourselfhours of frustration looking in the wrong places!
Chapter 3: Fundamental concepts 41
3 Fundamental concepts
You’ve seen in the Tutorial how to produce beautifully printed music from a simple text file.This section introduces the concepts and techniques required to produce equally beautiful butmore complex scores.
3.1 How LilyPond input files work
The LilyPond input format is quite free-form, giving experienced users a lot of flexibility tostructure their files however they wish. But this flexibility can make things confusing for newusers. This section will explain some of this structure, but may gloss over some details in favorof simplicity. For a complete description of the input format, see Section “File structure” inNotation Reference.
3.1.1 Introduction to the LilyPond file structure
A basic example of a LilyPond input file is
\version "2.16.2"
\header { }
\score {
...compound music expression... % all the music goes here!
\layout { }
\midi { }
}
There are many variations of this basic pattern, but this example serves as a useful startingplace.
Up to this point none of the examples you have seen have used a \score{} command. Thisis because LilyPond automatically adds the extra commands which are needed when you give itsimple input. LilyPond treats input like this:
\relative c'' {
c4 a d c
}
as shorthand for this:
\book {
\score {
\new Staff {
\new Voice {
\relative c'' {
c4 a b c
}
}
}
\layout { }
}
}
In other words, if the input contains a single music expression, LilyPond will interpret thefile as though the music expression was wrapped up inside the commands shown above.
A word of warning! Many of the examples in the LilyPond documentation will omit the \newStaff and \new Voice commands, leaving them to be created implicitly. For simple examples
Chapter 3: Fundamental concepts 42
this works well, but for more complex examples, especially when additional commands are used,the implicit creation of contexts can give surprising results, maybe creating extra unwantedstaves. The way to create contexts explicitly is explained in Section 3.3 [Contexts and engravers],page 58. � �
Note: When entering more than a few lines of music it is advisable toalways create staves and voices explicitly.
For now, though, let us return to the first example and examine the \score command, leavingthe others to default.
A \score block must always contain just one music expression, and this must appear imme-diately after the \score command. Remember that a music expression could be anything froma single note to a huge compound expression like
{
\new StaffGroup <<
...insert the whole score of a Wagner opera in here...
>>
}
Since everything is inside { ... }, it counts as one music expression.
As we saw previously, the \score block can contain other things, such as
\score {
{ c'4 a b c' }
\header { }
\layout { }
\midi { }
}
Note that these three commands – \header, \layout and \midi – are special: unlike manyother commands which begin with a backward slash (\) they are not music expressions and arenot part of any music expression. So they may be placed inside a \score block or outside it. Infact, these commands are commonly placed outside the \score block – for example, \header isoften placed above the \score command, as the example at the beginning of this section shows.
Two more commands you have not previously seen are \layout { } and \midi {}. If theseappear as shown they will cause LilyPond to produce a printed output and a MIDI outputrespectively. They are described fully in the Notation Reference – Section “Score layout” inNotation Reference, and Section “Creating MIDI files” in Notation Reference.
You may code multiple \score blocks. Each will be treated as a separate score, but theywill be all combined into a single output file. A \book command is not necessary – one willbe implicitly created. However, if you would like separate output files from one ‘.ly’ file thenthe \book command should be used to separate the different sections: each \book block willproduce a separate output file.
In summary:
Every \book block creates a separate output file (e.g., a PDF file). If you haven’t explicitlyadded one, LilyPond wraps your entire input code in a \book block implicitly.
Every \score block is a separate chunk of music within a \book block.
Every \layout block affects the \score or \book block in which it appears – i.e., a \layout
block inside a \score block affects only that \score block, but a \layout block outside of a\score block (and thus in a \book block, either explicitly or implicitly) will affect every \score
in that \book.
For details see Section “Multiple scores in a book” in Notation Reference.

Chapter 3: Fundamental concepts 43
Another great shorthand is the ability to define variables, as shown in Section 2.4.1 [Orga-nizing pieces with variables], page 36. All the templates use this:
melody = \relative c' {
c4 a b c
}
\score {
\melody
}
When LilyPond looks at this file, it takes the value of melody (everything after the equalssign) and inserts it whenever it sees \melody. There’s nothing special about the name – it couldbe melody, global, keyTime, pianorighthand, or something else. Remember that you can usealmost any name you like as long as it contains just alphabetic characters and is distinct fromLilyPond command names. For more details, see Section 3.4.4 [Saving typing with variablesand functions], page 83. The exact limitations on variable names are detailed in Section “Filestructure” in Notation Reference.
See also
For a complete definition of the input format, see Section “File structure” in Notation Ref-erence.
3.1.2 Score is a (single) compound musical expression
We saw the general organization of LilyPond input files in the previous section, Section 3.1.1[Introduction to the LilyPond file structure], page 41. But we seemed to skip over the mostimportant part: how do we figure out what to write after \score?
We didn’t skip over it at all. The big mystery is simply that there is no mystery. This lineexplains it all:
A \score block must begin with a compound music expression.
To understand what is meant by a music expression and a compound music expression, you mayfind it useful to review the tutorial, Section 2.2.1 [Music expressions explained], page 27. In thatsection, we saw how to build big music expressions from small pieces – we started from notes,then chords, etc. Now we’re going to start from a big music expression and work our way down.For simplicity, we’ll use just a singer and piano in our example. We don’t need a StaffGroup
for this ensemble, which simply groups a number of staves together with a bracket at the left,but we do need staves for a singer and a piano, though.
\score {
<<
\new Staff = "singer" <<
>>
\new PianoStaff = "piano" <<
>>
>>
\layout { }
}
Here we have given names to the staves – “singer” and “piano”. This is not essential here,but it is a useful habit to cultivate so that you can see at a glance what each stave is for.
Remember that we use << ... >> instead of { ... } to show simultaneous music. Thiscauses the vocal part and piano part to appear one above the other in the score. The << ... >>
construct would not be necessary for the Singer staff in the example above if it were going tocontain only one sequential music expression, but << ... >> rather than braces is necessary if
Chapter 3: Fundamental concepts 44
the music in the Staff is to contain two or more simultaneous expressions, e.g. two simultaneousVoices, or a Voice with lyrics. We’re going to have a voice with lyrics, so angle brackets arerequired. We’ll add some real music later; for now let’s just put in some dummy notes andlyrics. If you’ve forgotten how to add lyrics you may wish to review \addlyrics in Section 2.3.1[Setting simple songs], page 31.
\score {
<<
\new Staff = "singer" <<
\new Voice = "vocal" { c'1 }
\addlyrics { And }
>>
\new PianoStaff = "piano" <<
\new Staff = "upper" { c'1 }
\new Staff = "lower" { c'1 }
>>
>>
\layout { }
}
× �
� �And
×
�×`
�
�
Now we have a lot more details. We have the singer’s staff: it contains a Voice (in LilyPond,this term refers to a set of notes, not necessarily vocal notes – for example, a violin generallyplays one voice) and some lyrics. We also have a piano staff: it contains an upper staff (righthand) and a lower staff (left hand), although the lower staff has yet to be given a bass clef.
At this stage, we could start filling in notes. Inside the curly braces next to \new Voice =
"vocal", we could start writing
\relative c'' {
r4 d8\noBeam g, c4 r
}
But if we did that, the \score section would get pretty long, and it would be harder tounderstand what was happening. So let’s use variables instead. These were introduced atthe end of the previous section, remember? To ensure the contents of the text variable areinterpreted as lyrics we preface them with \lyricmode. Like \addlyrics, this switches theinput mode to lyrics. Without that, LilyPond would try to interpret the contents as notes,which would generate errors. (Several other input modes are available, see Section “Inputmodes” in Notation Reference.)
So, adding a few notes and a bass clef for the left hand, we now have a piece of real music:
melody = \relative c'' { r4 d8\noBeam g, c4 r }
text = \lyricmode { And God said, }
upper = \relative c'' { <g d g,>2~ <g d g,> }
lower = \relative c { b2 e }
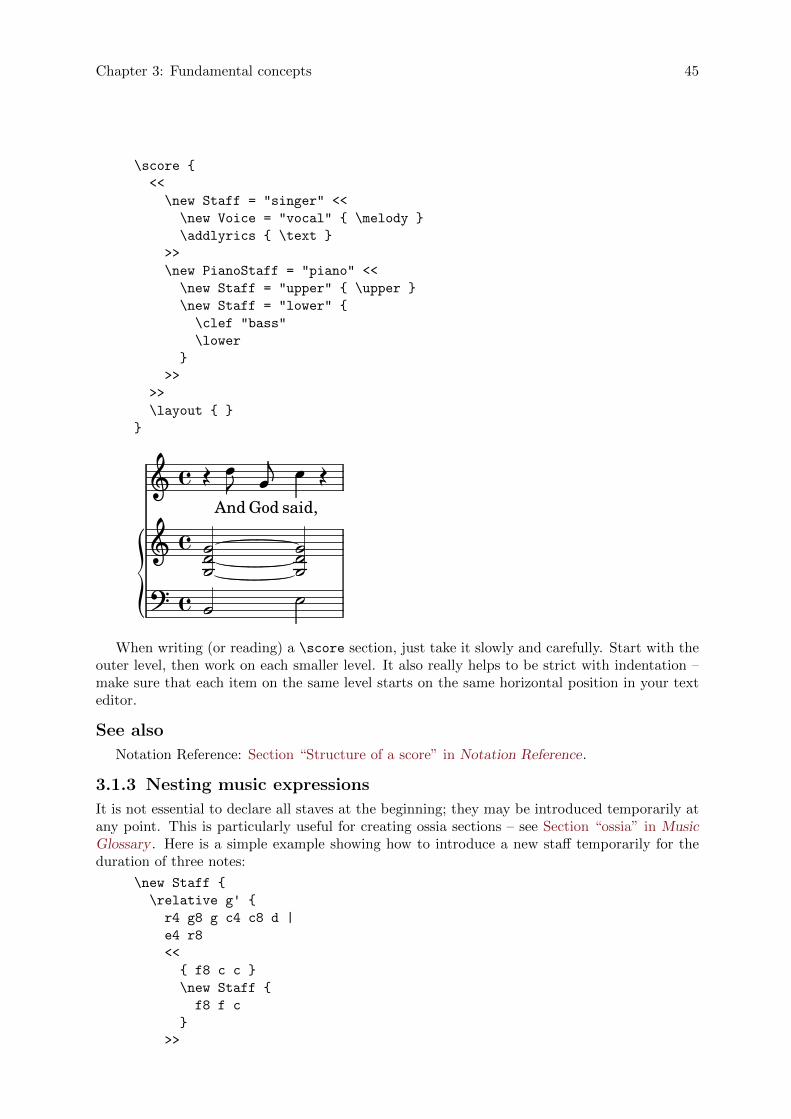
Chapter 3: Fundamental concepts 45
\score {
<<
\new Staff = "singer" <<
\new Voice = "vocal" { \melody }
\addlyrics { \text }
>>
\new PianoStaff = "piano" <<
\new Staff = "upper" { \upper }
\new Staff = "lower" {
\clef "bass"
\lower
}
>>
>>
\layout { }
}
¥Q
�
����
Q
�
� ��
�said,
�God��
And
�
����
�When writing (or reading) a \score section, just take it slowly and carefully. Start with the
outer level, then work on each smaller level. It also really helps to be strict with indentation –make sure that each item on the same level starts on the same horizontal position in your texteditor.
See also
Notation Reference: Section “Structure of a score” in Notation Reference.
3.1.3 Nesting music expressions
It is not essential to declare all staves at the beginning; they may be introduced temporarily atany point. This is particularly useful for creating ossia sections – see Section “ossia” in MusicGlossary . Here is a simple example showing how to introduce a new staff temporarily for theduration of three notes:
\new Staff {
\relative g' {
r4 g8 g c4 c8 d |
e4 r8
<<
{ f8 c c }
\new Staff {
f8 f c
}
>>
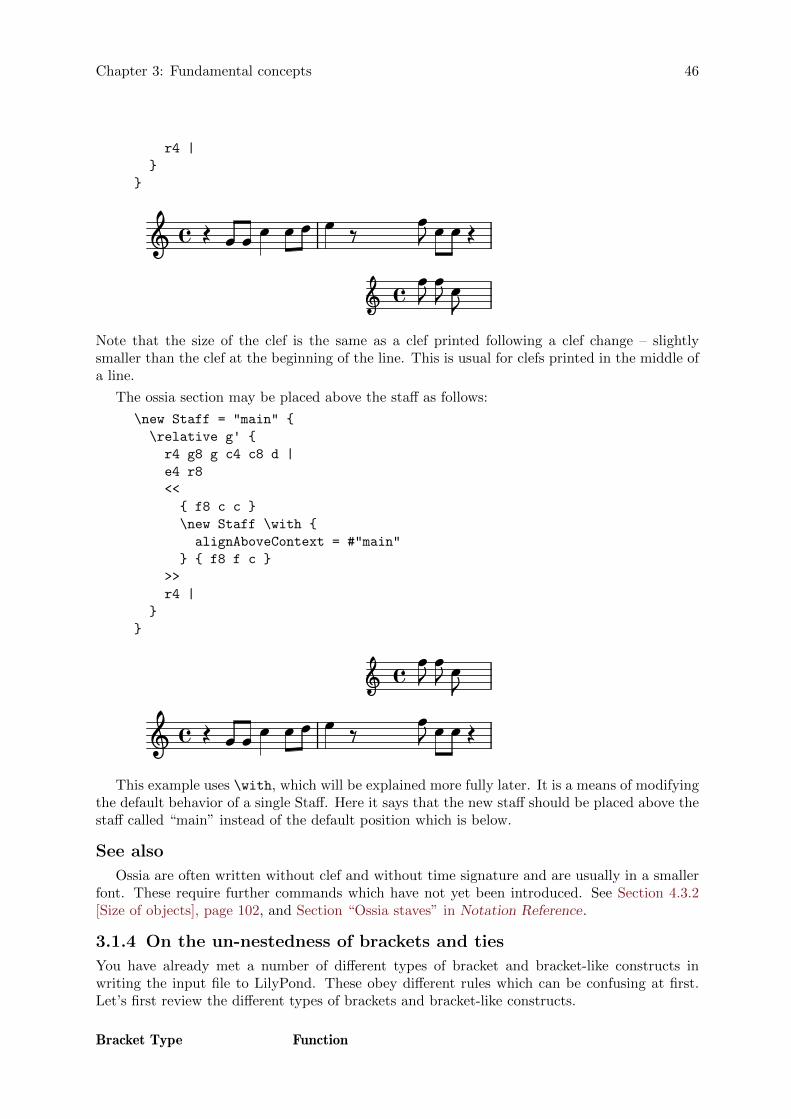
Chapter 3: Fundamental concepts 46
r4 |
}
}
a
���
�
�
�� a �� ��
� ��
� �� �
���
Note that the size of the clef is the same as a clef printed following a clef change – slightlysmaller than the clef at the beginning of the line. This is usual for clefs printed in the middle ofa line.
The ossia section may be placed above the staff as follows:
\new Staff = "main" {
\relative g' {
r4 g8 g c4 c8 d |
e4 r8
<<
{ f8 c c }
\new Staff \with {
alignAboveContext = #"main"
} { f8 f c }
>>
r4 |
}
}
Π�
Î Î��Î
� Î
��� ÎÎ� � Î�
Î
Î Î
�This example uses \with, which will be explained more fully later. It is a means of modifying
the default behavior of a single Staff. Here it says that the new staff should be placed above thestaff called “main” instead of the default position which is below.
See also
Ossia are often written without clef and without time signature and are usually in a smallerfont. These require further commands which have not yet been introduced. See Section 4.3.2[Size of objects], page 102, and Section “Ossia staves” in Notation Reference.
3.1.4 On the un-nestedness of brackets and ties
You have already met a number of different types of bracket and bracket-like constructs inwriting the input file to LilyPond. These obey different rules which can be confusing at first.Let’s first review the different types of brackets and bracket-like constructs.
Bracket Type Function
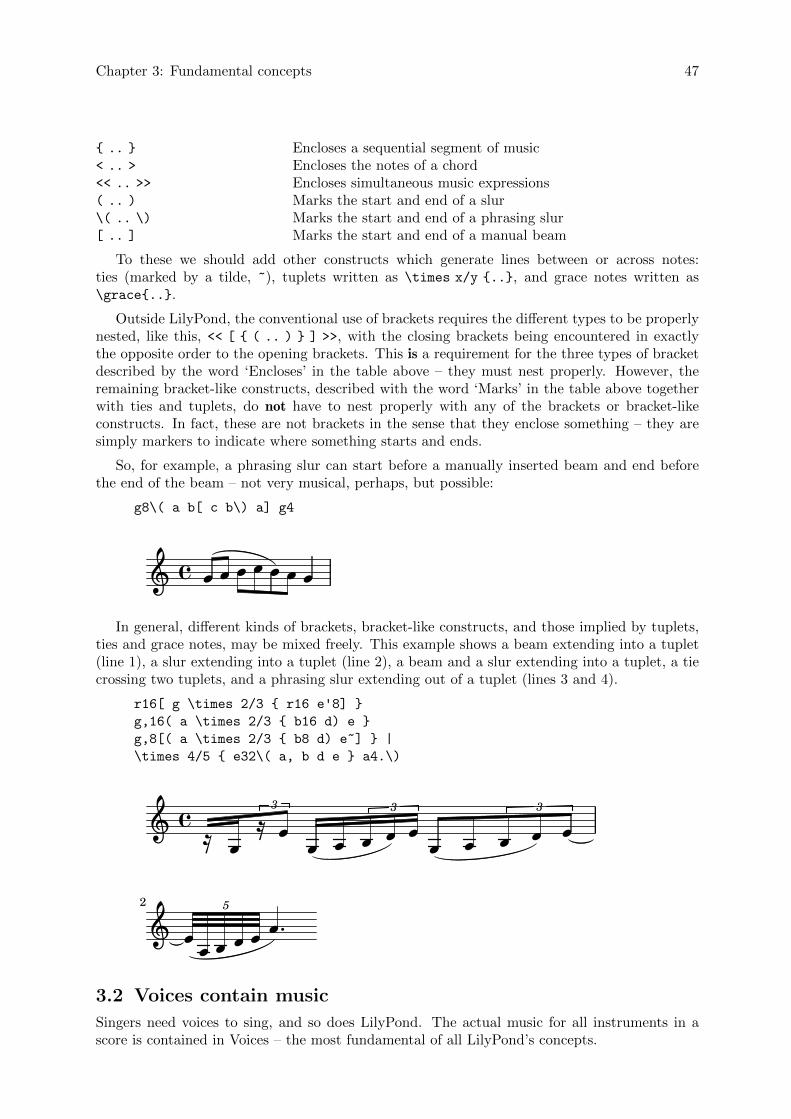
Chapter 3: Fundamental concepts 47
{ .. } Encloses a sequential segment of music< .. > Encloses the notes of a chord<< .. >> Encloses simultaneous music expressions( .. ) Marks the start and end of a slur\( .. \) Marks the start and end of a phrasing slur[ .. ] Marks the start and end of a manual beam
To these we should add other constructs which generate lines between or across notes:ties (marked by a tilde, ~), tuplets written as \times x/y {..}, and grace notes written as\grace{..}.
Outside LilyPond, the conventional use of brackets requires the different types to be properlynested, like this, << [ { ( .. ) } ] >>, with the closing brackets being encountered in exactlythe opposite order to the opening brackets. This is a requirement for the three types of bracketdescribed by the word ‘Encloses’ in the table above – they must nest properly. However, theremaining bracket-like constructs, described with the word ‘Marks’ in the table above togetherwith ties and tuplets, do not have to nest properly with any of the brackets or bracket-likeconstructs. In fact, these are not brackets in the sense that they enclose something – they aresimply markers to indicate where something starts and ends.
So, for example, a phrasing slur can start before a manually inserted beam and end beforethe end of the beam – not very musical, perhaps, but possible:
g8\( a b[ c b\) a] g4
2 22 22 2�� 2In general, different kinds of brackets, bracket-like constructs, and those implied by tuplets,
ties and grace notes, may be mixed freely. This example shows a beam extending into a tuplet(line 1), a slur extending into a tuplet (line 2), a beam and a slur extending into a tuplet, a tiecrossing two tuplets, and a phrasing slur extending out of a tuplet (lines 3 and 4).
r16[ g \times 2/3 { r16 e'8] }
g,16( a \times 2/3 { b16 d) e }
g,8[( a \times 2/3 { b8 d) e~] } |
\times 4/5 { e32\( a, b d e } a4.\)
å3
åå åå3
å� å� å� å3 å� å å
å� �å å åå2 å5
3.2 Voices contain music
Singers need voices to sing, and so does LilyPond. The actual music for all instruments in ascore is contained in Voices – the most fundamental of all LilyPond’s concepts.
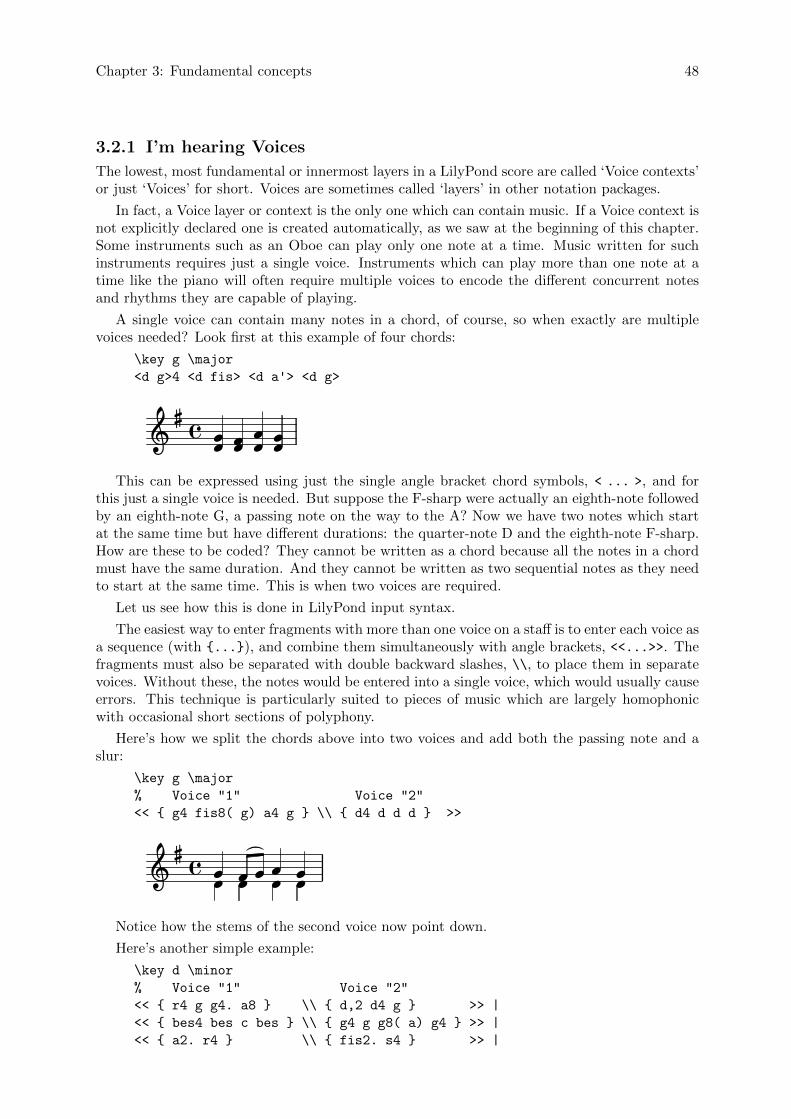
Chapter 3: Fundamental concepts 48
3.2.1 I’m hearing Voices
The lowest, most fundamental or innermost layers in a LilyPond score are called ‘Voice contexts’or just ‘Voices’ for short. Voices are sometimes called ‘layers’ in other notation packages.
In fact, a Voice layer or context is the only one which can contain music. If a Voice context isnot explicitly declared one is created automatically, as we saw at the beginning of this chapter.Some instruments such as an Oboe can play only one note at a time. Music written for suchinstruments requires just a single voice. Instruments which can play more than one note at atime like the piano will often require multiple voices to encode the different concurrent notesand rhythms they are capable of playing.
A single voice can contain many notes in a chord, of course, so when exactly are multiplevoices needed? Look first at this example of four chords:
\key g \major
<d g>4 <d fis> <d a'> <d g>
222� � 222�
22This can be expressed using just the single angle bracket chord symbols, < ... >, and for
this just a single voice is needed. But suppose the F-sharp were actually an eighth-note followedby an eighth-note G, a passing note on the way to the A? Now we have two notes which startat the same time but have different durations: the quarter-note D and the eighth-note F-sharp.How are these to be coded? They cannot be written as a chord because all the notes in a chordmust have the same duration. And they cannot be written as two sequential notes as they needto start at the same time. This is when two voices are required.
Let us see how this is done in LilyPond input syntax.
The easiest way to enter fragments with more than one voice on a staff is to enter each voice asa sequence (with {...}), and combine them simultaneously with angle brackets, <<...>>. Thefragments must also be separated with double backward slashes, \\, to place them in separatevoices. Without these, the notes would be entered into a single voice, which would usually causeerrors. This technique is particularly suited to pieces of music which are largely homophonicwith occasional short sections of polyphony.
Here’s how we split the chords above into two voices and add both the passing note and aslur:
\key g \major
% Voice "1" Voice "2"
<< { g4 fis8( g) a4 g } \\ { d4 d d d } >>
22��� 2222 222Notice how the stems of the second voice now point down.
Here’s another simple example:
\key d \minor
% Voice "1" Voice "2"
<< { r4 g g4. a8 } \\ { d,2 d4 g } >> |
<< { bes4 bes c bes } \\ { g4 g g8( a) g4 } >> |
<< { a2. r4 } \\ { fis2. s4 } >> |
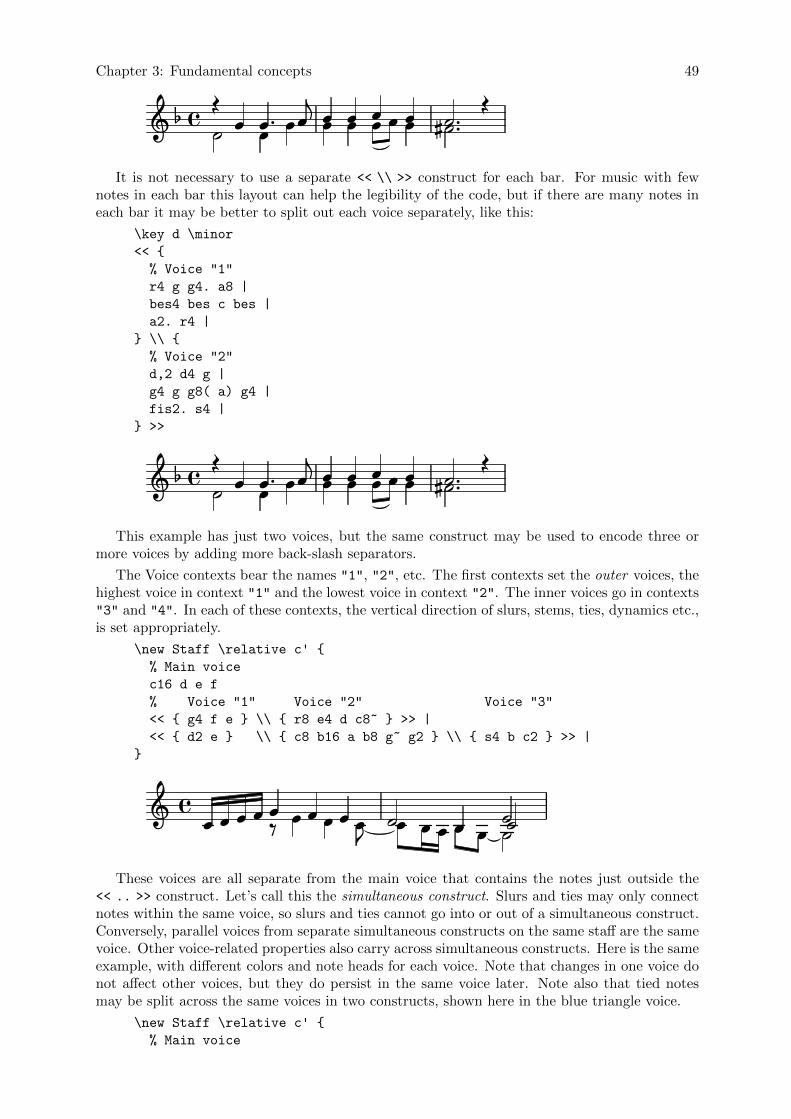
Chapter 3: Fundamental concepts 49
ÎÎ�� � Î�� Î� ÎÎ ���ÎÎ ÎÎ ÎÎ �Î Î� � �
It is not necessary to use a separate << \\ >> construct for each bar. For music with fewnotes in each bar this layout can help the legibility of the code, but if there are many notes ineach bar it may be better to split out each voice separately, like this:
\key d \minor
<< {
% Voice "1"
r4 g g4. a8 |
bes4 bes c bes |
a2. r4 |
} \\ {
% Voice "2"
d,2 d4 g |
g4 g g8( a) g4 |
fis2. s4 |
} >>
ÎÎ ÎÎÎ� Î� � � �Î Î�� �Î ÎÎ � ÎÎÎ �� ��
This example has just two voices, but the same construct may be used to encode three ormore voices by adding more back-slash separators.
The Voice contexts bear the names "1", "2", etc. The first contexts set the outer voices, thehighest voice in context "1" and the lowest voice in context "2". The inner voices go in contexts"3" and "4". In each of these contexts, the vertical direction of slurs, stems, ties, dynamics etc.,is set appropriately.
\new Staff \relative c' {
% Main voice
c16 d e f
% Voice "1" Voice "2" Voice "3"
<< { g4 f e } \\ { r8 e4 d c8~ } >> |
<< { d2 e } \\ { c8 b16 a b8 g~ g2 } \\ { s4 b c2 } >> |
}
Î� �Î ÎÎ Î Î Î�� �ÎÎÎ Î ��ÎÎ�ÎÎ Î
These voices are all separate from the main voice that contains the notes just outside the<< .. >> construct. Let’s call this the simultaneous construct. Slurs and ties may only connectnotes within the same voice, so slurs and ties cannot go into or out of a simultaneous construct.Conversely, parallel voices from separate simultaneous constructs on the same staff are the samevoice. Other voice-related properties also carry across simultaneous constructs. Here is the sameexample, with different colors and note heads for each voice. Note that changes in one voice donot affect other voices, but they do persist in the same voice later. Note also that tied notesmay be split across the same voices in two constructs, shown here in the blue triangle voice.
\new Staff \relative c' {
% Main voice
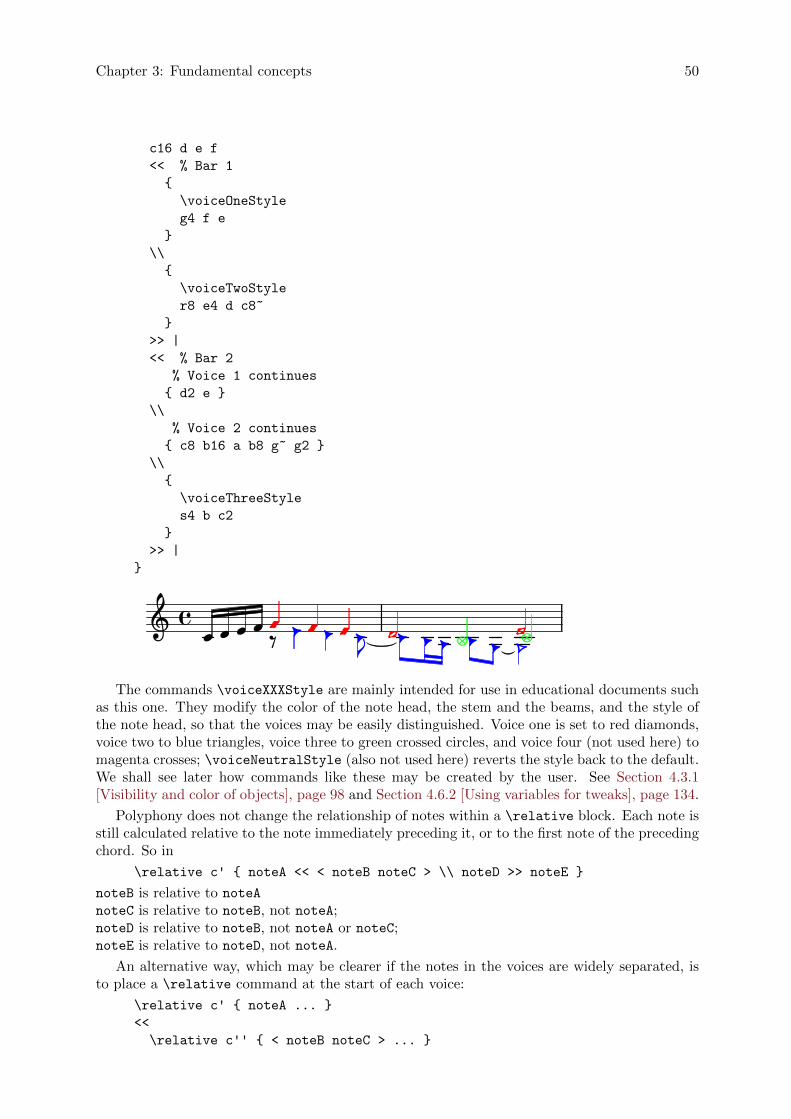
Chapter 3: Fundamental concepts 50
c16 d e f
<< % Bar 1
{
\voiceOneStyle
g4 f e
}
\\
{
\voiceTwoStyle
r8 e4 d c8~
}
>> |
<< % Bar 2
% Voice 1 continues
{ d2 e }
\\
% Voice 2 continues
{ c8 b16 a b8 g~ g2 }
\\
{
\voiceThreeStyle
s4 b c2
}
>> |
}
���� � ��� ��� � �� � ���
� � �� ��The commands \voiceXXXStyle are mainly intended for use in educational documents such
as this one. They modify the color of the note head, the stem and the beams, and the style ofthe note head, so that the voices may be easily distinguished. Voice one is set to red diamonds,voice two to blue triangles, voice three to green crossed circles, and voice four (not used here) tomagenta crosses; \voiceNeutralStyle (also not used here) reverts the style back to the default.We shall see later how commands like these may be created by the user. See Section 4.3.1[Visibility and color of objects], page 98 and Section 4.6.2 [Using variables for tweaks], page 134.
Polyphony does not change the relationship of notes within a \relative block. Each note isstill calculated relative to the note immediately preceding it, or to the first note of the precedingchord. So in
\relative c' { noteA << < noteB noteC > \\ noteD >> noteE }
noteB is relative to noteA
noteC is relative to noteB, not noteA;noteD is relative to noteB, not noteA or noteC;noteE is relative to noteD, not noteA.
An alternative way, which may be clearer if the notes in the voices are widely separated, isto place a \relative command at the start of each voice:
\relative c' { noteA ... }
<<
\relative c'' { < noteB noteC > ... }

Chapter 3: Fundamental concepts 51
\\
\relative g' { noteD ... }
>>
\relative c' { noteE ... }
Let us finally analyze the voices in a more complex piece of music. Here are the notes fromthe first two bars of the second of Chopin’s Deux Nocturnes, Op 32. This example will beused at later stages in this and the next chapter to illustrate several techniques for producingnotation, so please ignore for now anything in the underlying code which looks mysterious andconcentrate just on the music and the voices – the complications will all be explained in latersections.
× ��� ������� ����� � � �� ��
The direction of the stems is often used to indicate the continuity of two simultaneous melodiclines. Here the stems of the highest notes are all pointing up and the stems of the lower notesare all pointing down. This is the first indication that more than one voice is required.
But the real need for multiple voices arises when notes which start at the same time havedifferent durations. Look at the notes which start at beat three in the first bar. The A-flat isa dotted quarter note, the F is a quarter note and the D-flat is a half note. These cannot bewritten as a chord as all the notes in a chord must have the same duration. Neither can they bewritten as sequential notes, as they must start at the same time. This section of the bar requiresthree voices, and the normal practice would be to write the whole bar as three voices, as shownbelow, where we have used different note heads and colors for the three voices. Again, the codebehind this example will be explained later, so ignore anything you do not understand.
�������� ����� �����
Let us try to encode this music from scratch. As we shall see, this encounters some difficulties.We begin as we have learnt, using the << \\ >> construct to enter the music of the first bar inthree voices:
\new Staff \relative c'' {
\key aes \major
<<
{ c2 aes4. bes8 } \\ { <ees, c>2 des } \\ { aes'2 f4 fes }
>> |
<c ees aes c>1 |
}
� ���������� �� � ����
The stem directions are automatically assigned with the odd-numbered voices taking upwardstems and the even-numbered voices downward ones. The stems for voices 1 and 2 are right,but the stems in voice 3 should go down in this particular piece of music. We can correct this byskipping voice three and placing the music in voice four. This is done by simply adding anotherpair of \\.

Chapter 3: Fundamental concepts 52
\new Staff \relative c'' {
\key aes \major
<< % Voice one
{ c2 aes4. bes8 }
\\ % Voice two
{ <ees, c>2 des }
\\ % Omit Voice three
\\ % Voice four
{ aes'2 f4 fes }
>> |
<c ees aes c>1 |
}
· ������������� �··· ��·�
We see that this fixes the stem direction, but the horizontal placement of notes is not what wewant. LilyPond shifts the inner notes when they or their stems would collide with outer voices,but this is not appropriate for piano music. In other situations, the shifts LilyPond applies mightfail to clear the collisions. LilyPond provides several ways to adjust the horizontal placing ofnotes. We are not quite ready yet to see how to correct this, so we shall leave this problem untila later section — see the force-hshift property in Section 4.5.2 [Fixing overlapping notation],page 119. � �
Note: Lyrics, spanners (such as slurs, ties, hairpins etc.) cannot becreated ‘across’ voices.
See also
Notation Reference: Section “Multiple voices” in Notation Reference.
3.2.2 Explicitly instantiating voices
Voice contexts can also be created manually inside a << >> block to create polyphonic music,using \voiceOne . . . \voiceFour to indicate the required directions of stems, slurs, etc. Inlonger scores this method is clearer, as it permits the voices to be separated and to be givenmore descriptive names.
Specifically, the construct << \\ >> which we used in the previous section:
\new Staff {
\relative c' {
<< { e4 f g a } \\ { c,4 d e f } >>
}
}
is equivalent to
\new Staff <<
\new Voice = "1" { \voiceOne \relative c' { e4 f g a } }
\new Voice = "2" { \voiceTwo \relative c' { c4 d e f } }
>>
Both of the above would produce
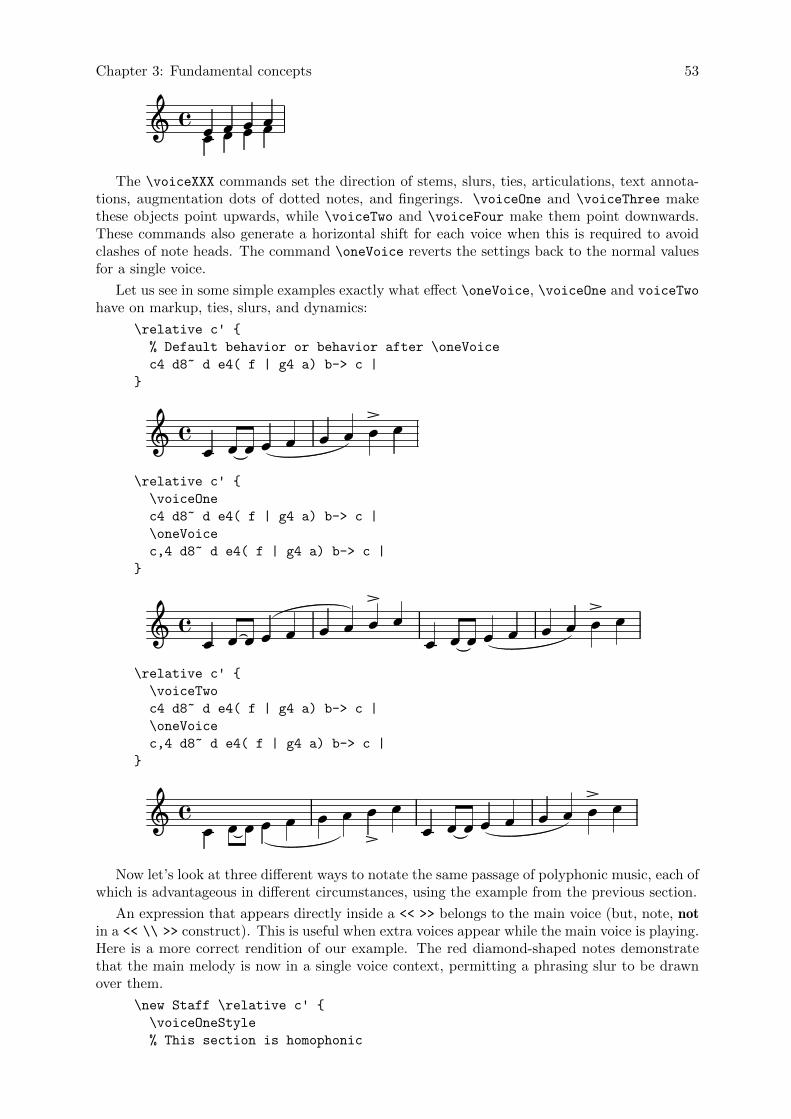
Chapter 3: Fundamental concepts 53
2� 2� 2 2 222 2The \voiceXXX commands set the direction of stems, slurs, ties, articulations, text annota-
tions, augmentation dots of dotted notes, and fingerings. \voiceOne and \voiceThree makethese objects point upwards, while \voiceTwo and \voiceFour make them point downwards.These commands also generate a horizontal shift for each voice when this is required to avoidclashes of note heads. The command \oneVoice reverts the settings back to the normal valuesfor a single voice.
Let us see in some simple examples exactly what effect \oneVoice, \voiceOne and voiceTwo
have on markup, ties, slurs, and dynamics:
\relative c' {
% Default behavior or behavior after \oneVoice
c4 d8~ d e4( f | g4 a) b-> c |
}
ÎÎ Î ÎÎ�ÎÎ�� Î Î
\relative c' {
\voiceOne
c4 d8~ d e4( f | g4 a) b-> c |
\oneVoice
c,4 d8~ d e4( f | g4 a) b-> c |
}
ÎÎ Î�
ÎÎ Î Î� ÎÎÎ Î�� Î Î Î ÎÎÎ Î
\relative c' {
\voiceTwo
c4 d8~ d e4( f | g4 a) b-> c |
\oneVoice
c,4 d8~ d e4( f | g4 a) b-> c |
}
Î Î Î ÎÎ ÎÎ Î�Î Î Î ÎÎ Î� Î Î� �
ÎÎ
Now let’s look at three different ways to notate the same passage of polyphonic music, each ofwhich is advantageous in different circumstances, using the example from the previous section.
An expression that appears directly inside a << >> belongs to the main voice (but, note, notin a << \\ >> construct). This is useful when extra voices appear while the main voice is playing.Here is a more correct rendition of our example. The red diamond-shaped notes demonstratethat the main melody is now in a single voice context, permitting a phrasing slur to be drawnover them.
\new Staff \relative c' {
\voiceOneStyle
% This section is homophonic
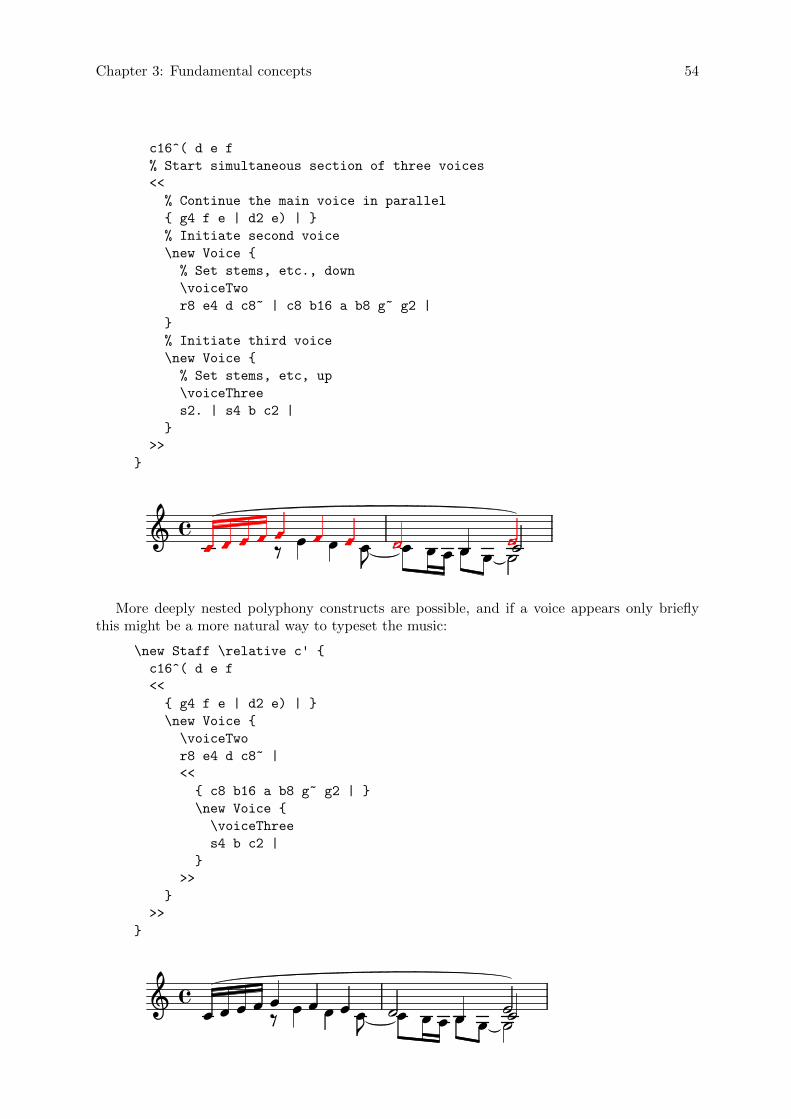
Chapter 3: Fundamental concepts 54
c16^( d e f
% Start simultaneous section of three voices
<<
% Continue the main voice in parallel
{ g4 f e | d2 e) | }
% Initiate second voice
\new Voice {
% Set stems, etc., down
\voiceTwo
r8 e4 d c8~ | c8 b16 a b8 g~ g2 |
}
% Initiate third voice
\new Voice {
% Set stems, etc, up
\voiceThree
s2. | s4 b c2 |
}
>>
}
Î ÎÎÎ� �Î ���� � ��� � Î � Î� �ÎÎ �
More deeply nested polyphony constructs are possible, and if a voice appears only brieflythis might be a more natural way to typeset the music:
\new Staff \relative c' {
c16^( d e f
<<
{ g4 f e | d2 e) | }
\new Voice {
\voiceTwo
r8 e4 d c8~ |
<<
{ c8 b16 a b8 g~ g2 | }
\new Voice {
\voiceThree
s4 b c2 |
}
>>
}
>>
}
Î ÎÎ � Î Î� ÎÎ� ÎÎ�
� ÎÎÎ �Î ��ÎÎ Î
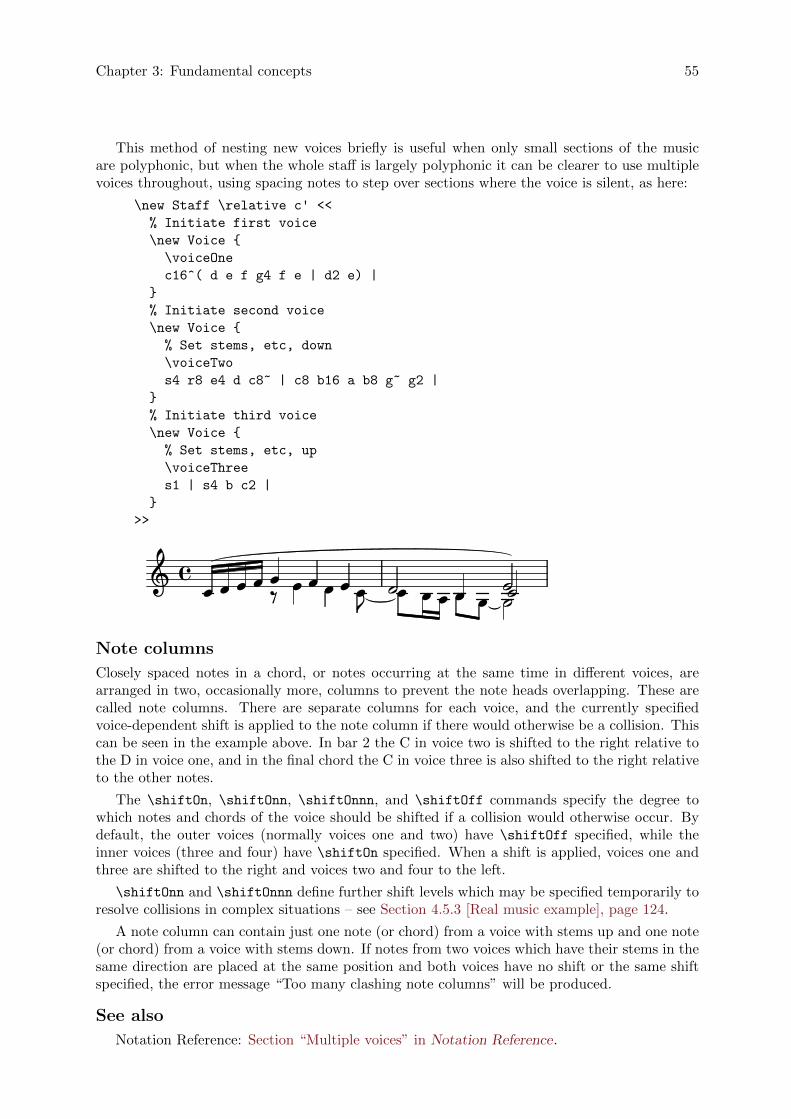
Chapter 3: Fundamental concepts 55
This method of nesting new voices briefly is useful when only small sections of the musicare polyphonic, but when the whole staff is largely polyphonic it can be clearer to use multiplevoices throughout, using spacing notes to step over sections where the voice is silent, as here:
\new Staff \relative c' <<
% Initiate first voice
\new Voice {
\voiceOne
c16^( d e f g4 f e | d2 e) |
}
% Initiate second voice
\new Voice {
% Set stems, etc, down
\voiceTwo
s4 r8 e4 d c8~ | c8 b16 a b8 g~ g2 |
}
% Initiate third voice
\new Voice {
% Set stems, etc, up
\voiceThree
s1 | s4 b c2 |
}
>>
ÎÎ Î�Î Î ÎÎ ÎÎÎ ��� � Î �Î Î� ÎÎ Î�
Note columns
Closely spaced notes in a chord, or notes occurring at the same time in different voices, arearranged in two, occasionally more, columns to prevent the note heads overlapping. These arecalled note columns. There are separate columns for each voice, and the currently specifiedvoice-dependent shift is applied to the note column if there would otherwise be a collision. Thiscan be seen in the example above. In bar 2 the C in voice two is shifted to the right relative tothe D in voice one, and in the final chord the C in voice three is also shifted to the right relativeto the other notes.
The \shiftOn, \shiftOnn, \shiftOnnn, and \shiftOff commands specify the degree towhich notes and chords of the voice should be shifted if a collision would otherwise occur. Bydefault, the outer voices (normally voices one and two) have \shiftOff specified, while theinner voices (three and four) have \shiftOn specified. When a shift is applied, voices one andthree are shifted to the right and voices two and four to the left.
\shiftOnn and \shiftOnnn define further shift levels which may be specified temporarily toresolve collisions in complex situations – see Section 4.5.3 [Real music example], page 124.
A note column can contain just one note (or chord) from a voice with stems up and one note(or chord) from a voice with stems down. If notes from two voices which have their stems in thesame direction are placed at the same position and both voices have no shift or the same shiftspecified, the error message “Too many clashing note columns” will be produced.
See also
Notation Reference: Section “Multiple voices” in Notation Reference.
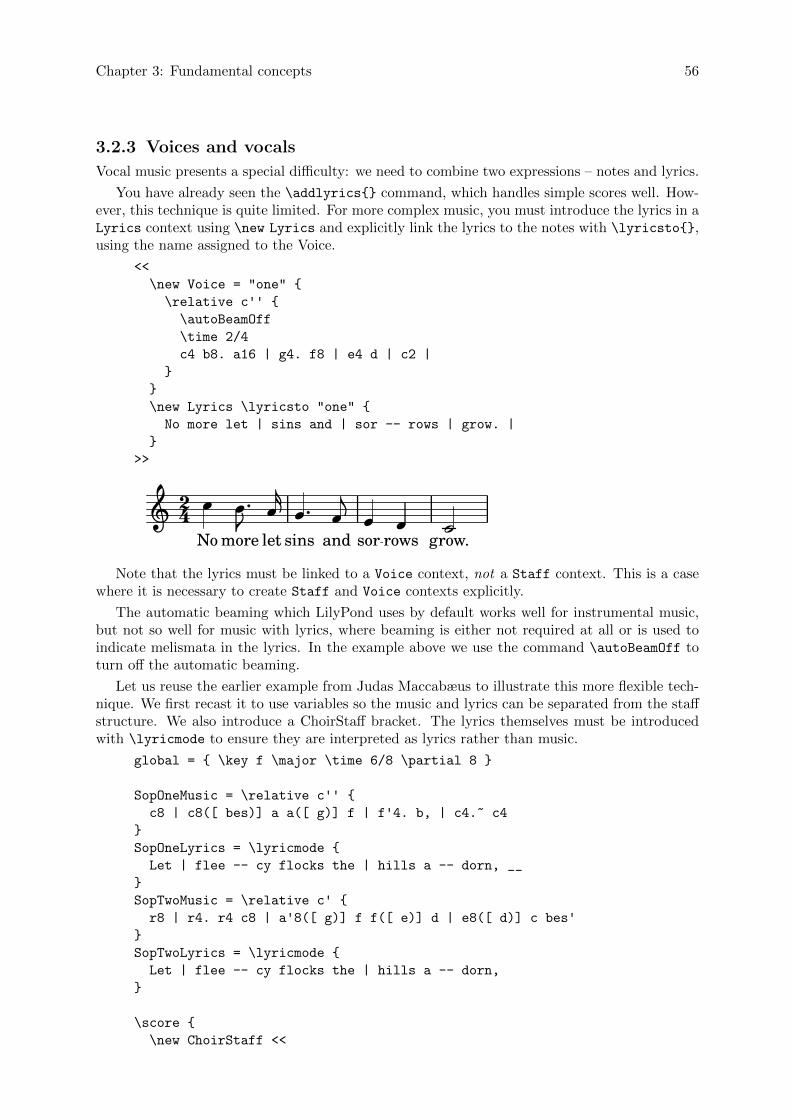
Chapter 3: Fundamental concepts 56
3.2.3 Voices and vocals
Vocal music presents a special difficulty: we need to combine two expressions – notes and lyrics.
You have already seen the \addlyrics{} command, which handles simple scores well. How-ever, this technique is quite limited. For more complex music, you must introduce the lyrics in aLyrics context using \new Lyrics and explicitly link the lyrics to the notes with \lyricsto{},using the name assigned to the Voice.
<<
\new Voice = "one" {
\relative c'' {
\autoBeamOff
\time 2/4
c4 b8. a16 | g4. f8 | e4 d | c2 |
}
}
\new Lyrics \lyricsto "one" {
No more let | sins and | sor -- rows | grow. |
}
>>
ÎsorÎ
andletmore rowsÎ
���
� Î �� Îgrow.No sins
� 42
Note that the lyrics must be linked to a Voice context, not a Staff context. This is a casewhere it is necessary to create Staff and Voice contexts explicitly.
The automatic beaming which LilyPond uses by default works well for instrumental music,but not so well for music with lyrics, where beaming is either not required at all or is used toindicate melismata in the lyrics. In the example above we use the command \autoBeamOff toturn off the automatic beaming.
Let us reuse the earlier example from Judas Maccabæus to illustrate this more flexible tech-nique. We first recast it to use variables so the music and lyrics can be separated from the staffstructure. We also introduce a ChoirStaff bracket. The lyrics themselves must be introducedwith \lyricmode to ensure they are interpreted as lyrics rather than music.
global = { \key f \major \time 6/8 \partial 8 }
SopOneMusic = \relative c'' {
c8 | c8([ bes)] a a([ g)] f | f'4. b, | c4.~ c4
}
SopOneLyrics = \lyricmode {
Let | flee -- cy flocks the | hills a -- dorn, __
}
SopTwoMusic = \relative c' {
r8 | r4. r4 c8 | a'8([ g)] f f([ e)] d | e8([ d)] c bes'
}
SopTwoLyrics = \lyricmode {
Let | flee -- cy flocks the | hills a -- dorn,
}
\score {
\new ChoirStaff <<
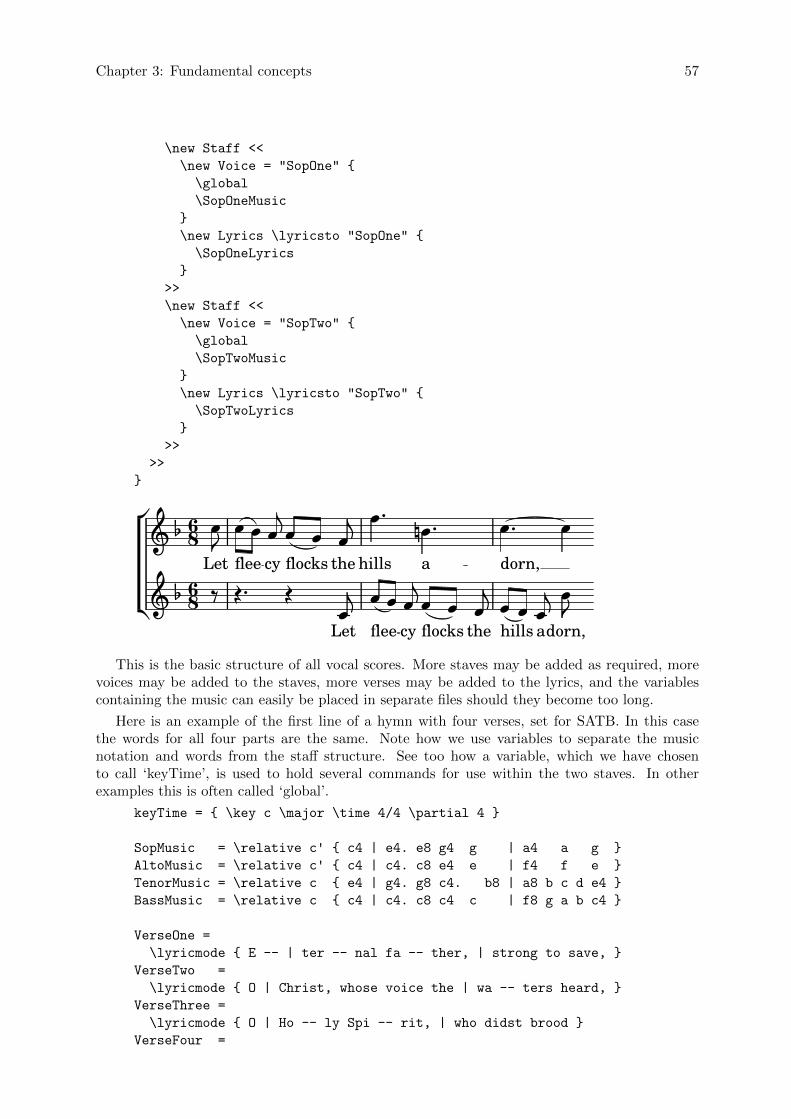
Chapter 3: Fundamental concepts 57
\new Staff <<
\new Voice = "SopOne" {
\global
\SopOneMusic
}
\new Lyrics \lyricsto "SopOne" {
\SopOneLyrics
}
>>
\new Staff <<
\new Voice = "SopTwo" {
\global
\SopTwoMusic
}
\new Lyrics \lyricsto "SopTwo" {
\SopTwoLyrics
}
>>
>>
}
flee
��
�
�86��
�
�cy
�hills
� �
�Let�
the�
�flee
� �
�
��
a�
flocks
�a
��
�
���
�flocks �
cy
� �dorn,
��
dorn,
�
�
hills�
the�86��
�Let �
�
This is the basic structure of all vocal scores. More staves may be added as required, morevoices may be added to the staves, more verses may be added to the lyrics, and the variablescontaining the music can easily be placed in separate files should they become too long.
Here is an example of the first line of a hymn with four verses, set for SATB. In this casethe words for all four parts are the same. Note how we use variables to separate the musicnotation and words from the staff structure. See too how a variable, which we have chosento call ‘keyTime’, is used to hold several commands for use within the two staves. In otherexamples this is often called ‘global’.
keyTime = { \key c \major \time 4/4 \partial 4 }
SopMusic = \relative c' { c4 | e4. e8 g4 g | a4 a g }
AltoMusic = \relative c' { c4 | c4. c8 e4 e | f4 f e }
TenorMusic = \relative c { e4 | g4. g8 c4. b8 | a8 b c d e4 }
BassMusic = \relative c { c4 | c4. c8 c4 c | f8 g a b c4 }
VerseOne =
\lyricmode { E -- | ter -- nal fa -- ther, | strong to save, }
VerseTwo =
\lyricmode { O | Christ, whose voice the | wa -- ters heard, }
VerseThree =
\lyricmode { O | Ho -- ly Spi -- rit, | who didst brood }
VerseFour =
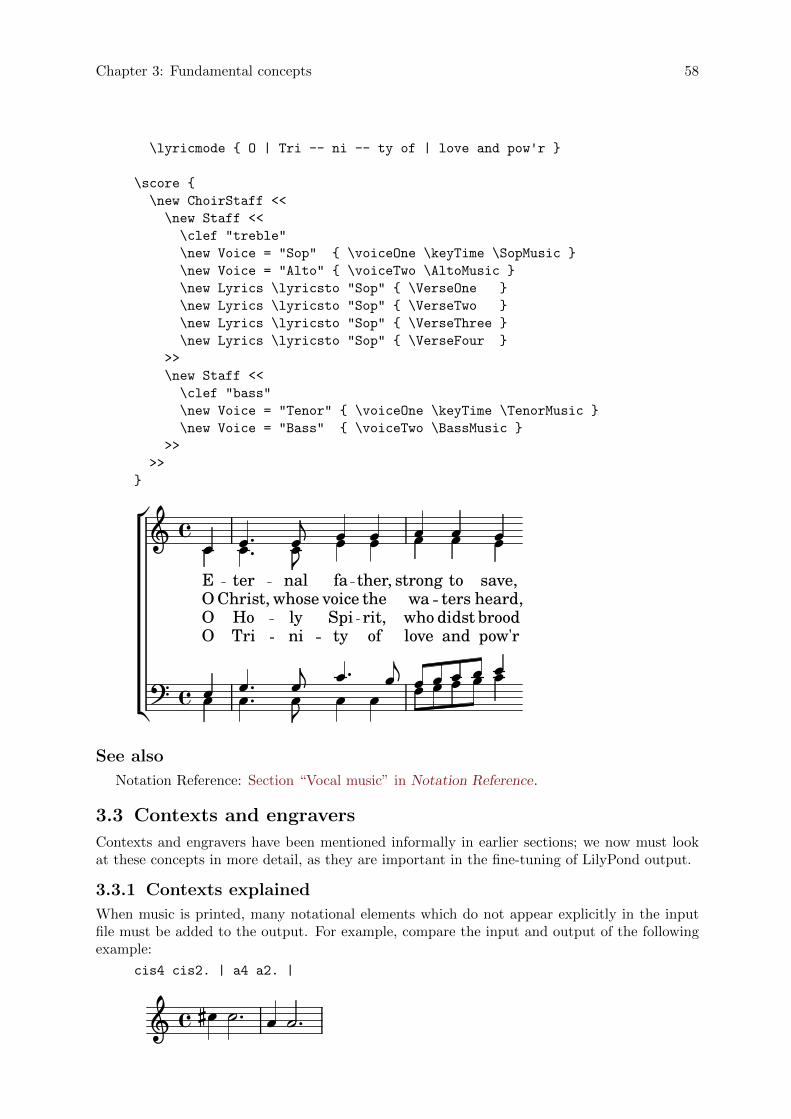
Chapter 3: Fundamental concepts 58
\lyricmode { O | Tri -- ni -- ty of | love and pow'r }
\score {
\new ChoirStaff <<
\new Staff <<
\clef "treble"
\new Voice = "Sop" { \voiceOne \keyTime \SopMusic }
\new Voice = "Alto" { \voiceTwo \AltoMusic }
\new Lyrics \lyricsto "Sop" { \VerseOne }
\new Lyrics \lyricsto "Sop" { \VerseTwo }
\new Lyrics \lyricsto "Sop" { \VerseThree }
\new Lyrics \lyricsto "Sop" { \VerseFour }
>>
\new Staff <<
\clef "bass"
\new Voice = "Tenor" { \voiceOne \keyTime \TenorMusic }
\new Voice = "Bass" { \voiceTwo \BassMusic }
>>
>>
}
ÎÎ ÎÎand
didsttersto
ÎÎÎ
�Î ÎÎlovewhowa
strong
�
� ��
��
ÎÎpow'rbroodheard,save,
ÎÎ
ÎÎ
��
ÎÎTriHo
Christ,
��
ter
OO
ÎÎ
E
Î
O
Î ÎÎ
�ÎÎty
Spivoice
fa
Îof
rit,the
ther,
ÎÎ��
ÎÎnily
whosenal
ÎÎ ÎÎ
��
See also
Notation Reference: Section “Vocal music” in Notation Reference.
3.3 Contexts and engravers
Contexts and engravers have been mentioned informally in earlier sections; we now must lookat these concepts in more detail, as they are important in the fine-tuning of LilyPond output.
3.3.1 Contexts explained
When music is printed, many notational elements which do not appear explicitly in the inputfile must be added to the output. For example, compare the input and output of the followingexample:
cis4 cis2. | a4 a2. |
a� �� � � � � �
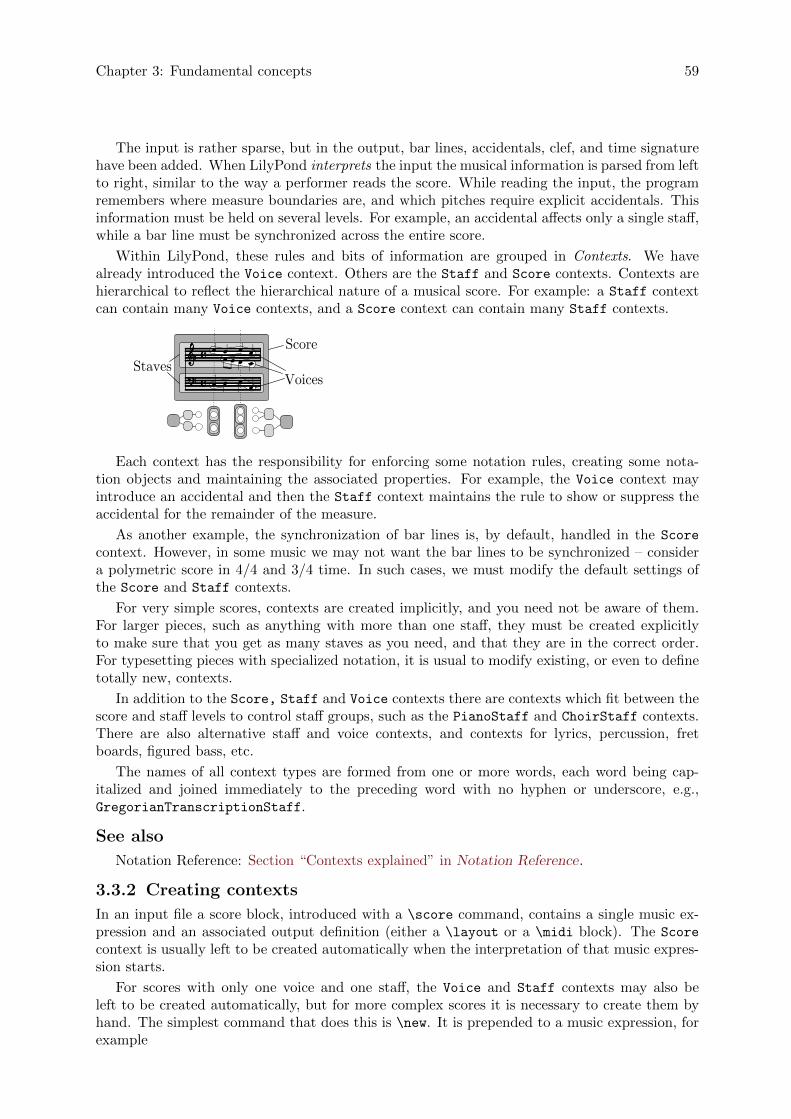
Chapter 3: Fundamental concepts 59
The input is rather sparse, but in the output, bar lines, accidentals, clef, and time signaturehave been added. When LilyPond interprets the input the musical information is parsed from leftto right, similar to the way a performer reads the score. While reading the input, the programremembers where measure boundaries are, and which pitches require explicit accidentals. Thisinformation must be held on several levels. For example, an accidental affects only a single staff,while a bar line must be synchronized across the entire score.
Within LilyPond, these rules and bits of information are grouped in Contexts. We havealready introduced the Voice context. Others are the Staff and Score contexts. Contexts arehierarchical to reflect the hierarchical nature of a musical score. For example: a Staff contextcan contain many Voice contexts, and a Score context can contain many Staff contexts.
Each context has the responsibility for enforcing some notation rules, creating some nota-tion objects and maintaining the associated properties. For example, the Voice context mayintroduce an accidental and then the Staff context maintains the rule to show or suppress theaccidental for the remainder of the measure.
As another example, the synchronization of bar lines is, by default, handled in the Score
context. However, in some music we may not want the bar lines to be synchronized – considera polymetric score in 4/4 and 3/4 time. In such cases, we must modify the default settings ofthe Score and Staff contexts.
For very simple scores, contexts are created implicitly, and you need not be aware of them.For larger pieces, such as anything with more than one staff, they must be created explicitlyto make sure that you get as many staves as you need, and that they are in the correct order.For typesetting pieces with specialized notation, it is usual to modify existing, or even to definetotally new, contexts.
In addition to the Score, Staff and Voice contexts there are contexts which fit between thescore and staff levels to control staff groups, such as the PianoStaff and ChoirStaff contexts.There are also alternative staff and voice contexts, and contexts for lyrics, percussion, fretboards, figured bass, etc.
The names of all context types are formed from one or more words, each word being cap-italized and joined immediately to the preceding word with no hyphen or underscore, e.g.,GregorianTranscriptionStaff.
See also
Notation Reference: Section “Contexts explained” in Notation Reference.
3.3.2 Creating contexts
In an input file a score block, introduced with a \score command, contains a single music ex-pression and an associated output definition (either a \layout or a \midi block). The Score
context is usually left to be created automatically when the interpretation of that music expres-sion starts.
For scores with only one voice and one staff, the Voice and Staff contexts may also beleft to be created automatically, but for more complex scores it is necessary to create them byhand. The simplest command that does this is \new. It is prepended to a music expression, forexample

Chapter 3: Fundamental concepts 60
\new type music-expression
where type is a context name (like Staff or Voice). This command creates a new context, andstarts interpreting the music-expression within that context.� �
Note: \new Score should not be used as the essential top-level Scorecontext is created automatically when the music expression within the\score block is interpreted. Score-wide default values of context prop-erties can be changed within the \layout block. See Section 3.3.4 [Mod-ifying context properties], page 62
You have seen many practical examples which created new Staff and Voice contexts inearlier sections, but to remind you how these commands are used in practice, here’s an annotatedreal-music example:
\score { % start of single compound music expression
<< % start of simultaneous staves section
\time 2/4
\new Staff { % create RH staff
\clef "treble"
\key g \minor
\new Voice { % create voice for RH notes
\relative c'' { % start of RH notes
d4 ees16 c8. |
d4 ees16 c8. |
} % end of RH notes
} % end of RH voice
} % end of RH staff
\new Staff << % create LH staff; needs two simultaneous voices
\clef "bass"
\key g \minor
\new Voice { % create LH voice one
\voiceOne
\relative g { % start of LH voice one notes
g8 <bes d> ees, <g c> |
g8 <bes d> ees, <g c> |
} % end of LH voice one notes
} % end of LH voice one
\new Voice { % create LH voice two
\voiceTwo
\relative g { % start of LH voice two notes
g4 ees |
g4 ees |
} % end of LH voice two notes
} % end of LH voice two
>> % end of LH staff
>> % end of simultaneous staves section
} % end of single compound music expression
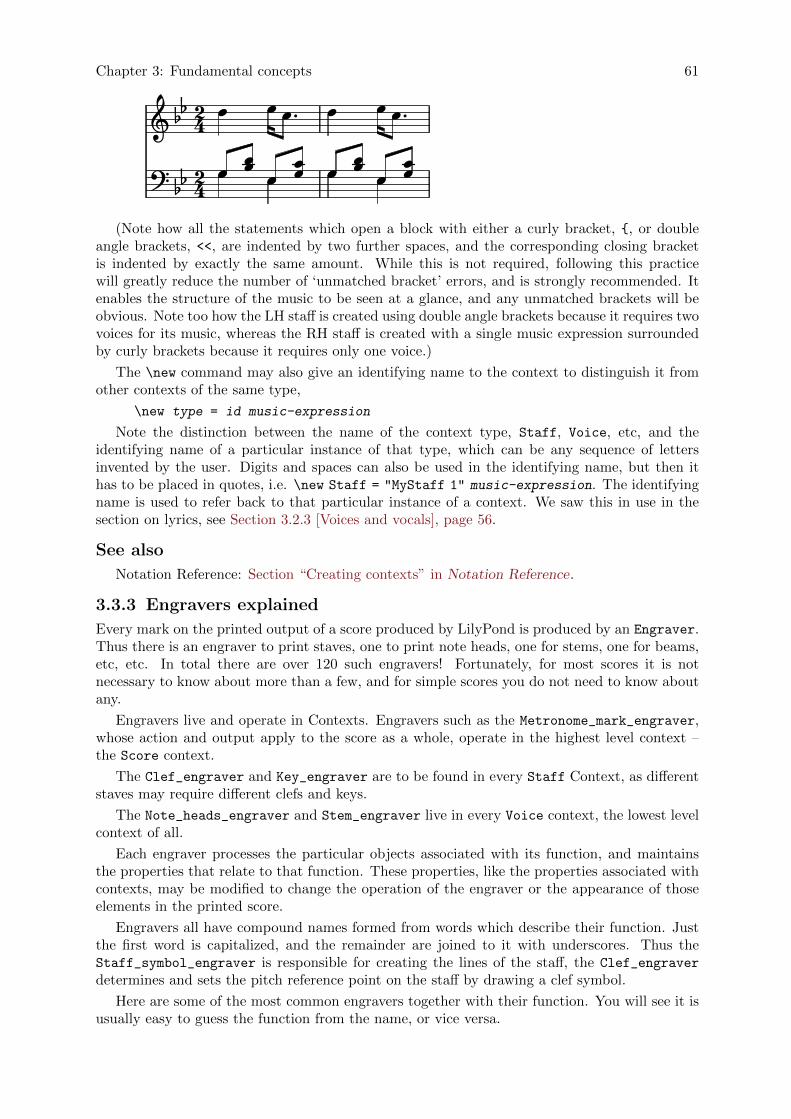
Chapter 3: Fundamental concepts 61
�
42���
� ��� �
�������
��42
� ��
��
�� �
����(Note how all the statements which open a block with either a curly bracket, {, or double
angle brackets, <<, are indented by two further spaces, and the corresponding closing bracketis indented by exactly the same amount. While this is not required, following this practicewill greatly reduce the number of ‘unmatched bracket’ errors, and is strongly recommended. Itenables the structure of the music to be seen at a glance, and any unmatched brackets will beobvious. Note too how the LH staff is created using double angle brackets because it requires twovoices for its music, whereas the RH staff is created with a single music expression surroundedby curly brackets because it requires only one voice.)
The \new command may also give an identifying name to the context to distinguish it fromother contexts of the same type,
\new type = id music-expression
Note the distinction between the name of the context type, Staff, Voice, etc, and theidentifying name of a particular instance of that type, which can be any sequence of lettersinvented by the user. Digits and spaces can also be used in the identifying name, but then ithas to be placed in quotes, i.e. \new Staff = "MyStaff 1" music-expression. The identifyingname is used to refer back to that particular instance of a context. We saw this in use in thesection on lyrics, see Section 3.2.3 [Voices and vocals], page 56.
See also
Notation Reference: Section “Creating contexts” in Notation Reference.
3.3.3 Engravers explained
Every mark on the printed output of a score produced by LilyPond is produced by an Engraver.Thus there is an engraver to print staves, one to print note heads, one for stems, one for beams,etc, etc. In total there are over 120 such engravers! Fortunately, for most scores it is notnecessary to know about more than a few, and for simple scores you do not need to know aboutany.
Engravers live and operate in Contexts. Engravers such as the Metronome_mark_engraver,whose action and output apply to the score as a whole, operate in the highest level context –the Score context.
The Clef_engraver and Key_engraver are to be found in every Staff Context, as differentstaves may require different clefs and keys.
The Note_heads_engraver and Stem_engraver live in every Voice context, the lowest levelcontext of all.
Each engraver processes the particular objects associated with its function, and maintainsthe properties that relate to that function. These properties, like the properties associated withcontexts, may be modified to change the operation of the engraver or the appearance of thoseelements in the printed score.
Engravers all have compound names formed from words which describe their function. Justthe first word is capitalized, and the remainder are joined to it with underscores. Thus theStaff_symbol_engraver is responsible for creating the lines of the staff, the Clef_engraver
determines and sets the pitch reference point on the staff by drawing a clef symbol.
Here are some of the most common engravers together with their function. You will see it isusually easy to guess the function from the name, or vice versa.
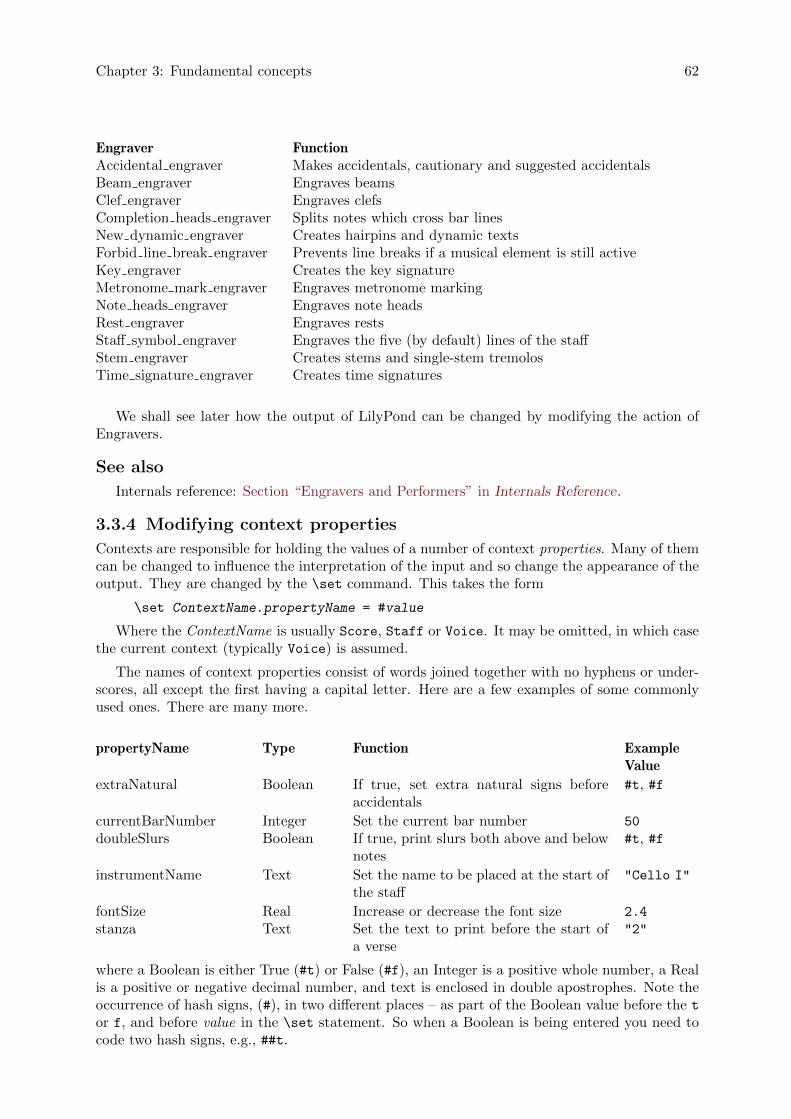
Chapter 3: Fundamental concepts 62
Engraver FunctionAccidental engraver Makes accidentals, cautionary and suggested accidentalsBeam engraver Engraves beamsClef engraver Engraves clefsCompletion heads engraver Splits notes which cross bar linesNew dynamic engraver Creates hairpins and dynamic textsForbid line break engraver Prevents line breaks if a musical element is still activeKey engraver Creates the key signatureMetronome mark engraver Engraves metronome markingNote heads engraver Engraves note headsRest engraver Engraves restsStaff symbol engraver Engraves the five (by default) lines of the staffStem engraver Creates stems and single-stem tremolosTime signature engraver Creates time signatures
We shall see later how the output of LilyPond can be changed by modifying the action ofEngravers.
See also
Internals reference: Section “Engravers and Performers” in Internals Reference.
3.3.4 Modifying context properties
Contexts are responsible for holding the values of a number of context properties. Many of themcan be changed to influence the interpretation of the input and so change the appearance of theoutput. They are changed by the \set command. This takes the form
\set ContextName.propertyName = #value
Where the ContextName is usually Score, Staff or Voice. It may be omitted, in which casethe current context (typically Voice) is assumed.
The names of context properties consist of words joined together with no hyphens or under-scores, all except the first having a capital letter. Here are a few examples of some commonlyused ones. There are many more.
propertyName Type Function ExampleValue
extraNatural Boolean If true, set extra natural signs beforeaccidentals
#t, #f
currentBarNumber Integer Set the current bar number 50
doubleSlurs Boolean If true, print slurs both above and belownotes
#t, #f
instrumentName Text Set the name to be placed at the start ofthe staff
"Cello I"
fontSize Real Increase or decrease the font size 2.4
stanza Text Set the text to print before the start ofa verse
"2"
where a Boolean is either True (#t) or False (#f), an Integer is a positive whole number, a Realis a positive or negative decimal number, and text is enclosed in double apostrophes. Note theoccurrence of hash signs, (#), in two different places – as part of the Boolean value before the tor f, and before value in the \set statement. So when a Boolean is being entered you need tocode two hash signs, e.g., ##t.
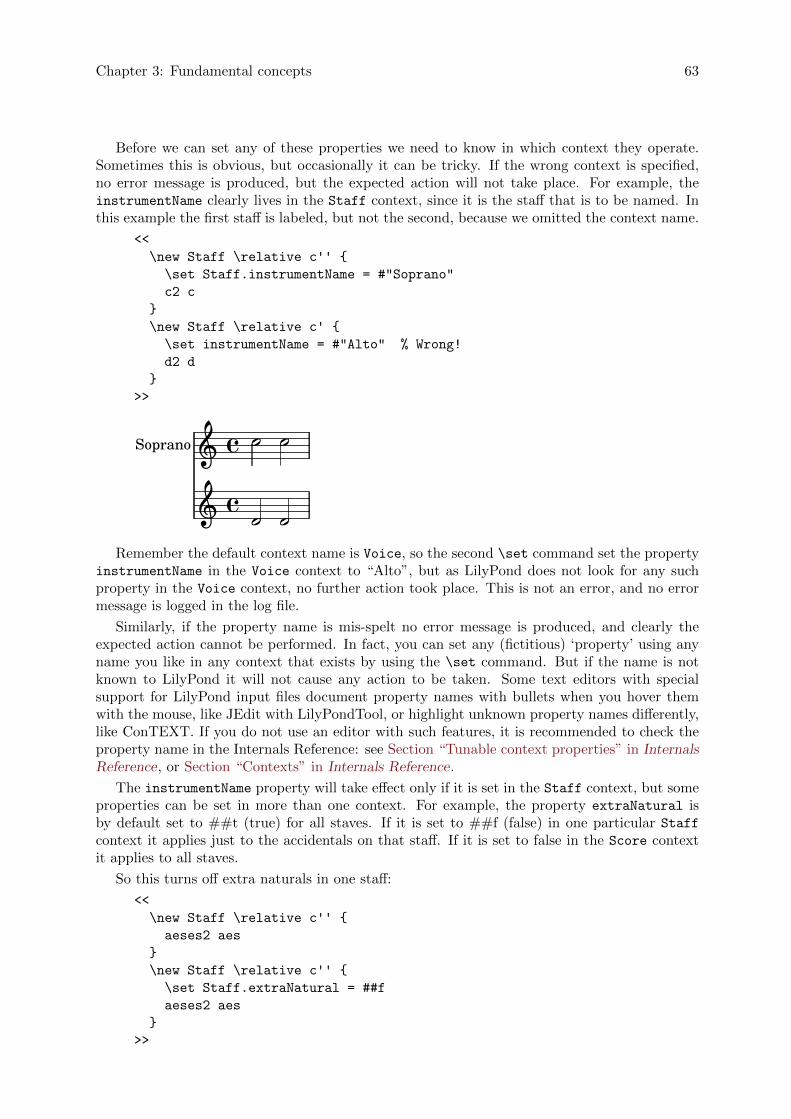
Chapter 3: Fundamental concepts 63
Before we can set any of these properties we need to know in which context they operate.Sometimes this is obvious, but occasionally it can be tricky. If the wrong context is specified,no error message is produced, but the expected action will not take place. For example, theinstrumentName clearly lives in the Staff context, since it is the staff that is to be named. Inthis example the first staff is labeled, but not the second, because we omitted the context name.
<<
\new Staff \relative c'' {
\set Staff.instrumentName = #"Soprano"
c2 c
}
\new Staff \relative c' {
\set instrumentName = #"Alto" % Wrong!
d2 d
}
>>
·
·��� ·Soprano
� ·Remember the default context name is Voice, so the second \set command set the property
instrumentName in the Voice context to “Alto”, but as LilyPond does not look for any suchproperty in the Voice context, no further action took place. This is not an error, and no errormessage is logged in the log file.
Similarly, if the property name is mis-spelt no error message is produced, and clearly theexpected action cannot be performed. In fact, you can set any (fictitious) ‘property’ using anyname you like in any context that exists by using the \set command. But if the name is notknown to LilyPond it will not cause any action to be taken. Some text editors with specialsupport for LilyPond input files document property names with bullets when you hover themwith the mouse, like JEdit with LilyPondTool, or highlight unknown property names differently,like ConTEXT. If you do not use an editor with such features, it is recommended to check theproperty name in the Internals Reference: see Section “Tunable context properties” in InternalsReference, or Section “Contexts” in Internals Reference.
The instrumentName property will take effect only if it is set in the Staff context, but someproperties can be set in more than one context. For example, the property extraNatural isby default set to ##t (true) for all staves. If it is set to ##f (false) in one particular Staffcontext it applies just to the accidentals on that staff. If it is set to false in the Score contextit applies to all staves.
So this turns off extra naturals in one staff:
<<
\new Staff \relative c'' {
aeses2 aes
}
\new Staff \relative c'' {
\set Staff.extraNatural = ##f
aeses2 aes
}
>>
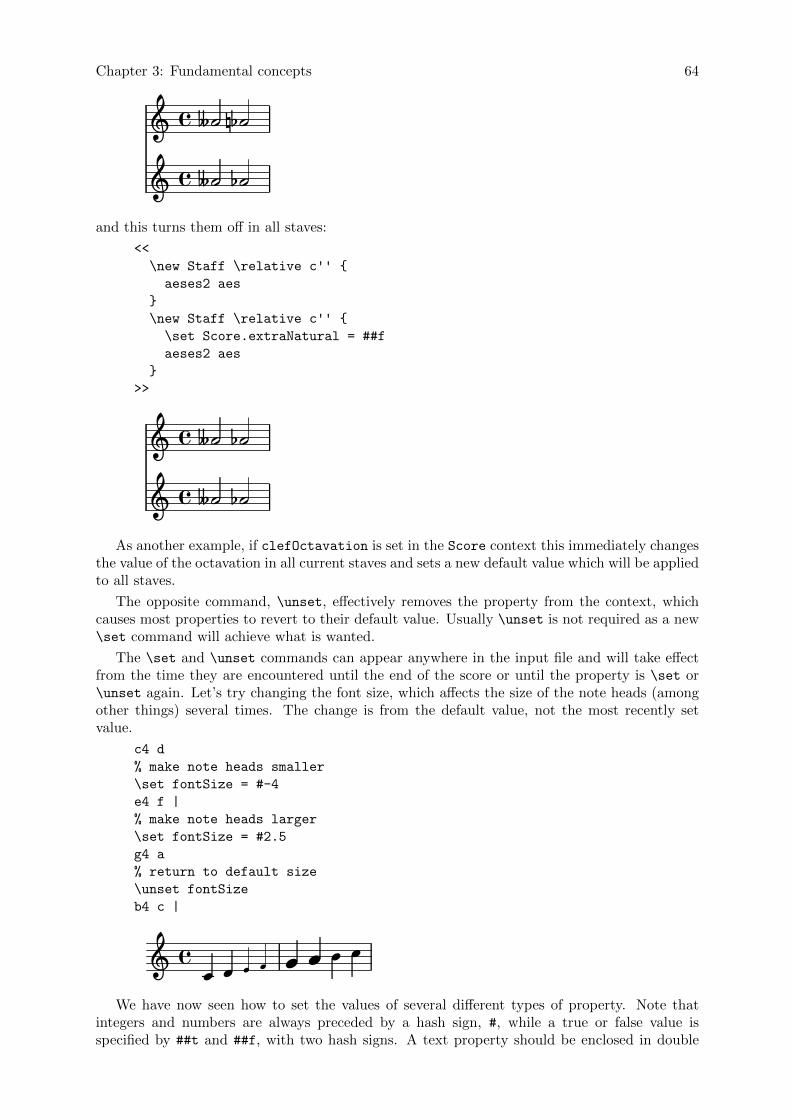
Chapter 3: Fundamental concepts 64
ì� �����
� ��� �ì
and this turns them off in all staves:
<<
\new Staff \relative c'' {
aeses2 aes
}
\new Staff \relative c'' {
\set Score.extraNatural = ##f
aeses2 aes
}
>>
����
��� �� �
� �As another example, if clefOctavation is set in the Score context this immediately changes
the value of the octavation in all current staves and sets a new default value which will be appliedto all staves.
The opposite command, \unset, effectively removes the property from the context, whichcauses most properties to revert to their default value. Usually \unset is not required as a new\set command will achieve what is wanted.
The \set and \unset commands can appear anywhere in the input file and will take effectfrom the time they are encountered until the end of the score or until the property is \set or\unset again. Let’s try changing the font size, which affects the size of the note heads (amongother things) several times. The change is from the default value, not the most recently setvalue.
c4 d
% make note heads smaller
\set fontSize = #-4
e4 f |
% make note heads larger
\set fontSize = #2.5
g4 a
% return to default size
\unset fontSize
b4 c |
× ÎÎ
�� � ��
We have now seen how to set the values of several different types of property. Note thatintegers and numbers are always preceded by a hash sign, #, while a true or false value isspecified by ##t and ##f, with two hash signs. A text property should be enclosed in double
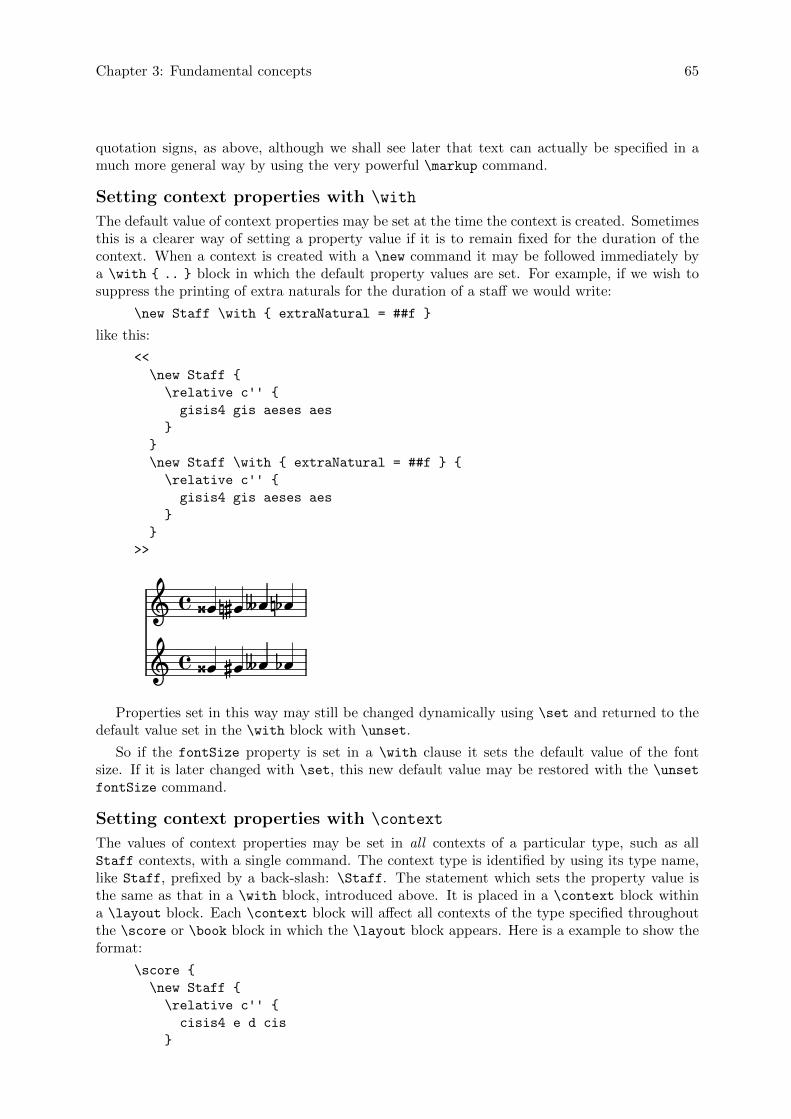
Chapter 3: Fundamental concepts 65
quotation signs, as above, although we shall see later that text can actually be specified in amuch more general way by using the very powerful \markup command.
Setting context properties with \with
The default value of context properties may be set at the time the context is created. Sometimesthis is a clearer way of setting a property value if it is to remain fixed for the duration of thecontext. When a context is created with a \new command it may be followed immediately bya \with { .. } block in which the default property values are set. For example, if we wish tosuppress the printing of extra naturals for the duration of a staff we would write:
\new Staff \with { extraNatural = ##f }
like this:
<<
\new Staff {
\relative c'' {
gisis4 gis aeses aes
}
}
\new Staff \with { extraNatural = ##f } {
\relative c'' {
gisis4 gis aeses aes
}
}
>>
22�
�2�
��� ��2
��2�22 �� 2�
Properties set in this way may still be changed dynamically using \set and returned to thedefault value set in the \with block with \unset.
So if the fontSize property is set in a \with clause it sets the default value of the fontsize. If it is later changed with \set, this new default value may be restored with the \unset
fontSize command.
Setting context properties with \context
The values of context properties may be set in all contexts of a particular type, such as allStaff contexts, with a single command. The context type is identified by using its type name,like Staff, prefixed by a back-slash: \Staff. The statement which sets the property value isthe same as that in a \with block, introduced above. It is placed in a \context block withina \layout block. Each \context block will affect all contexts of the type specified throughoutthe \score or \book block in which the \layout block appears. Here is a example to show theformat:
\score {
\new Staff {
\relative c'' {
cisis4 e d cis
}
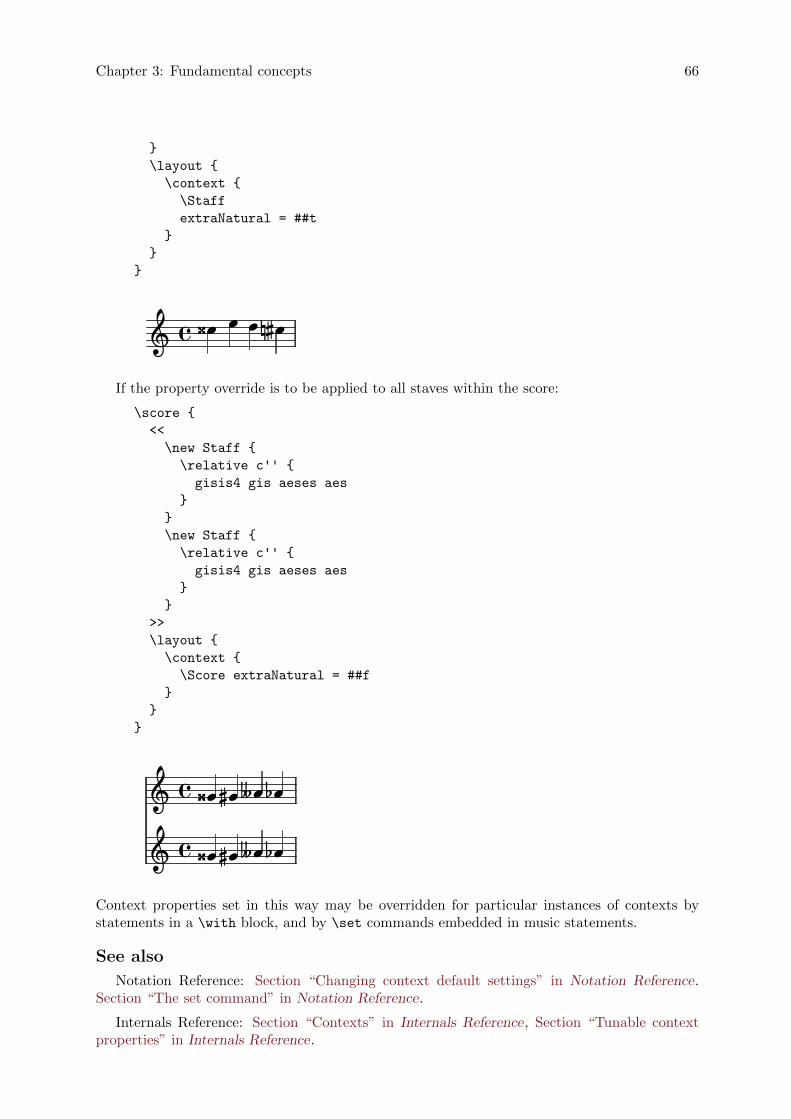
Chapter 3: Fundamental concepts 66
}
\layout {
\context {
\Staff
extraNatural = ##t
}
}
}
� �� � ���� �
If the property override is to be applied to all staves within the score:
\score {
<<
\new Staff {
\relative c'' {
gisis4 gis aeses aes
}
}
\new Staff {
\relative c'' {
gisis4 gis aeses aes
}
}
>>
\layout {
\context {
\Score extraNatural = ##f
}
}
}
£��
��
��
�� ���
£��
����
�Context properties set in this way may be overridden for particular instances of contexts bystatements in a \with block, and by \set commands embedded in music statements.
See also
Notation Reference: Section “Changing context default settings” in Notation Reference.Section “The set command” in Notation Reference.
Internals Reference: Section “Contexts” in Internals Reference, Section “Tunable contextproperties” in Internals Reference.
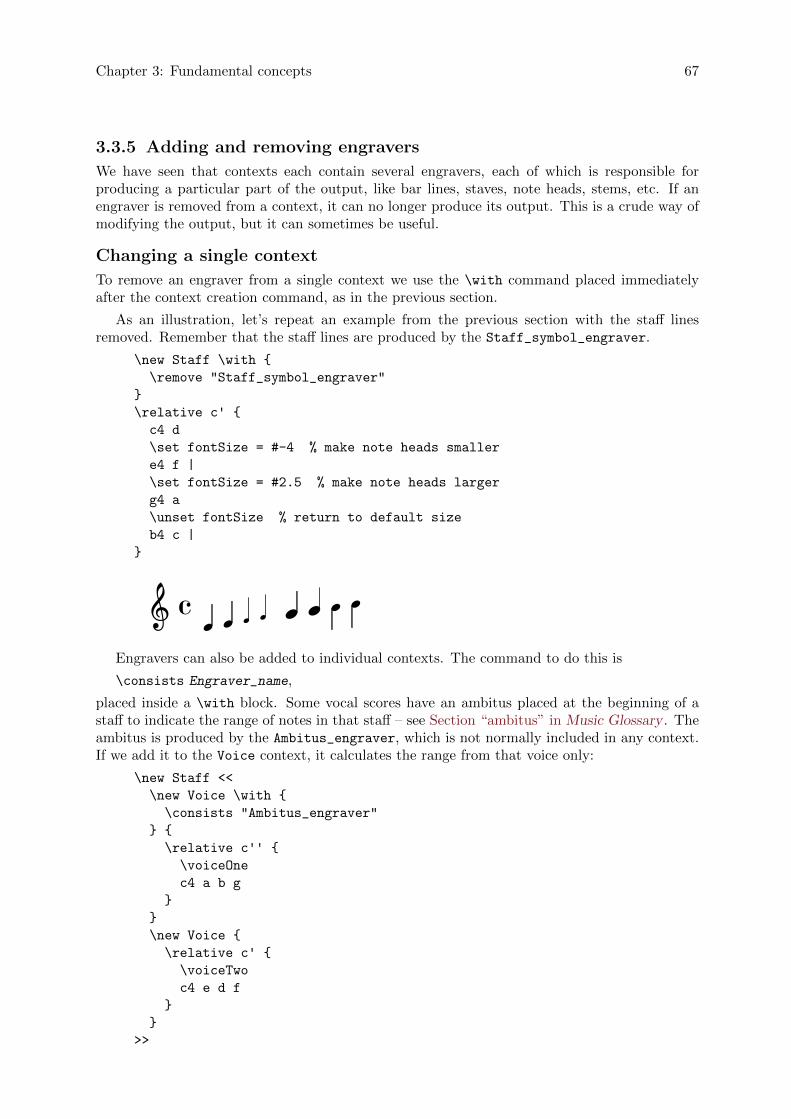
Chapter 3: Fundamental concepts 67
3.3.5 Adding and removing engravers
We have seen that contexts each contain several engravers, each of which is responsible forproducing a particular part of the output, like bar lines, staves, note heads, stems, etc. If anengraver is removed from a context, it can no longer produce its output. This is a crude way ofmodifying the output, but it can sometimes be useful.
Changing a single context
To remove an engraver from a single context we use the \with command placed immediatelyafter the context creation command, as in the previous section.
As an illustration, let’s repeat an example from the previous section with the staff linesremoved. Remember that the staff lines are produced by the Staff_symbol_engraver.
\new Staff \with {
\remove "Staff_symbol_engraver"
}
\relative c' {
c4 d
\set fontSize = #-4 % make note heads smaller
e4 f |
\set fontSize = #2.5 % make note heads larger
g4 a
\unset fontSize % return to default size
b4 c |
}
ÎÎÎ�� ÎÎ
ÎÎÎEngravers can also be added to individual contexts. The command to do this is
\consists Engraver_name,
placed inside a \with block. Some vocal scores have an ambitus placed at the beginning of astaff to indicate the range of notes in that staff – see Section “ambitus” in Music Glossary . Theambitus is produced by the Ambitus_engraver, which is not normally included in any context.If we add it to the Voice context, it calculates the range from that voice only:
\new Staff <<
\new Voice \with {
\consists "Ambitus_engraver"
} {
\relative c'' {
\voiceOne
c4 a b g
}
}
\new Voice {
\relative c' {
\voiceTwo
c4 e d f
}
}
>>
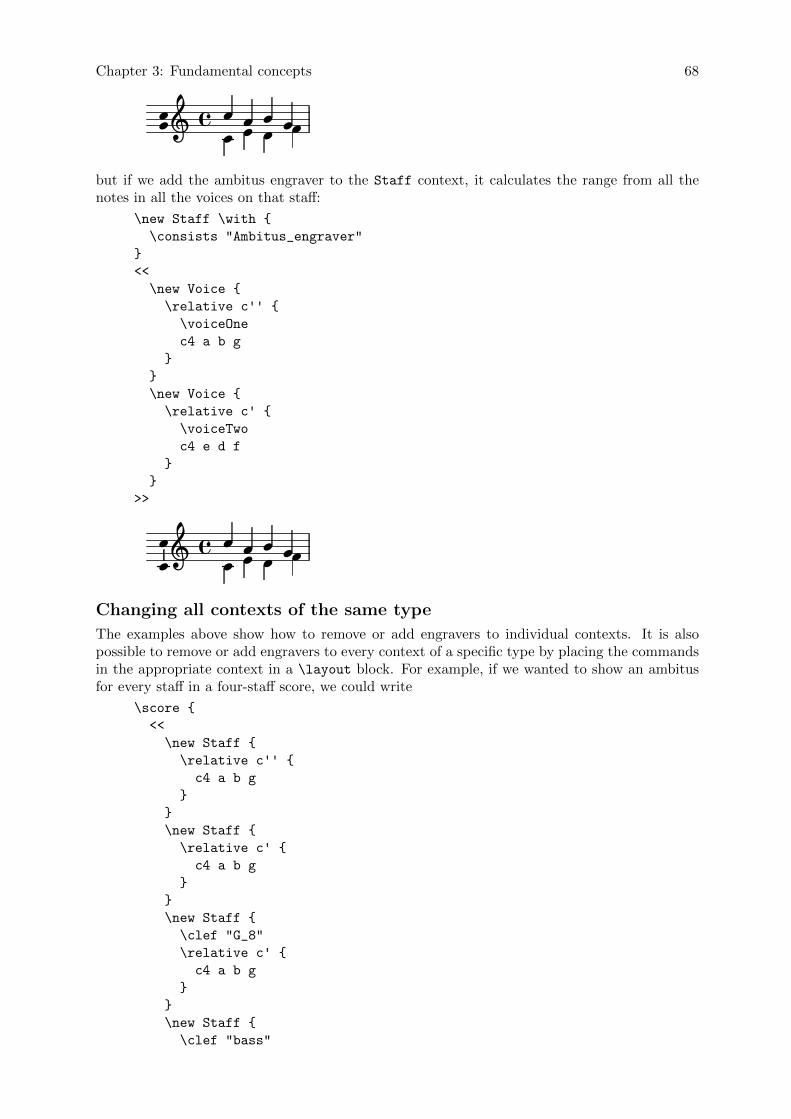
Chapter 3: Fundamental concepts 68
22 22 222 2�� 22but if we add the ambitus engraver to the Staff context, it calculates the range from all thenotes in all the voices on that staff:
\new Staff \with {
\consists "Ambitus_engraver"
}
<<
\new Voice {
\relative c'' {
\voiceOne
c4 a b g
}
}
\new Voice {
\relative c' {
\voiceTwo
c4 e d f
}
}
>>
222 2222 2� 22�
Changing all contexts of the same type
The examples above show how to remove or add engravers to individual contexts. It is alsopossible to remove or add engravers to every context of a specific type by placing the commandsin the appropriate context in a \layout block. For example, if we wanted to show an ambitusfor every staff in a four-staff score, we could write
\score {
<<
\new Staff {
\relative c'' {
c4 a b g
}
}
\new Staff {
\relative c' {
c4 a b g
}
}
\new Staff {
\clef "G_8"
\relative c' {
c4 a b g
}
}
\new Staff {
\clef "bass"
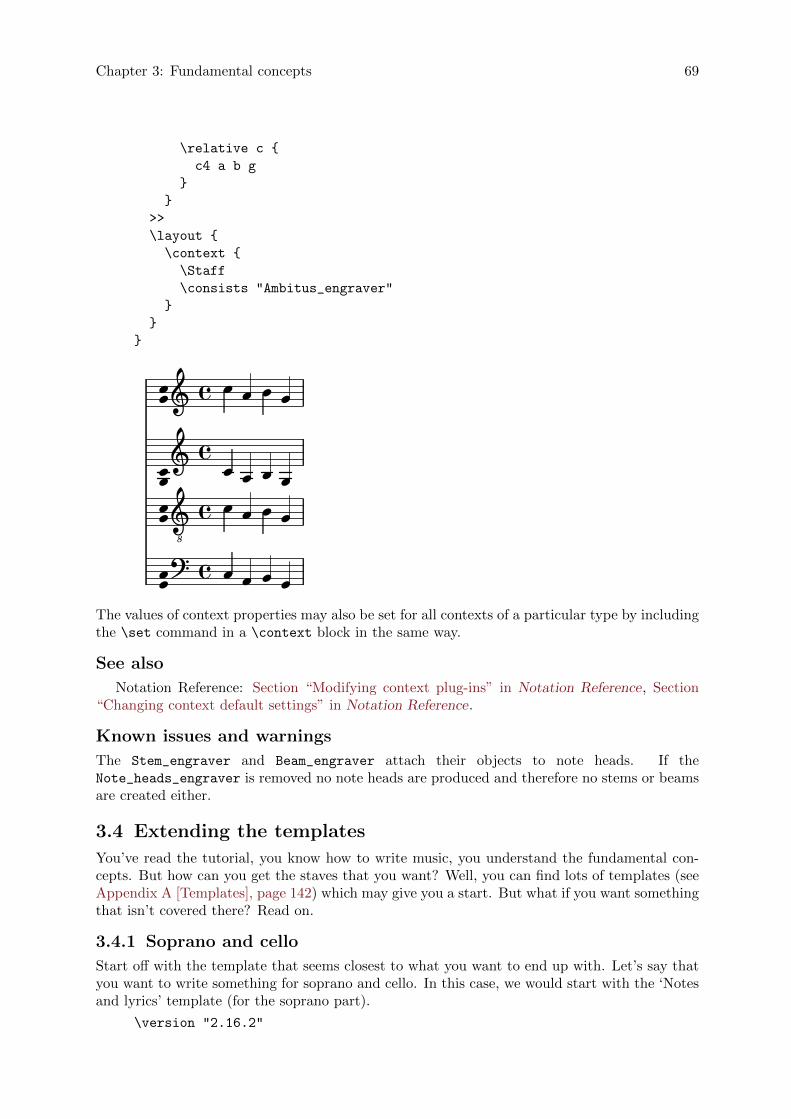
Chapter 3: Fundamental concepts 69
\relative c {
c4 a b g
}
}
>>
\layout {
\context {
\Staff
\consists "Ambitus_engraver"
}
}
}
a��
�8
�a�
�
�
a
�
� �
����
������
�
� �
�
�
�
�
�a
The values of context properties may also be set for all contexts of a particular type by includingthe \set command in a \context block in the same way.
See also
Notation Reference: Section “Modifying context plug-ins” in Notation Reference, Section“Changing context default settings” in Notation Reference.
Known issues and warnings
The Stem_engraver and Beam_engraver attach their objects to note heads. If theNote_heads_engraver is removed no note heads are produced and therefore no stems or beamsare created either.
3.4 Extending the templates
You’ve read the tutorial, you know how to write music, you understand the fundamental con-cepts. But how can you get the staves that you want? Well, you can find lots of templates (seeAppendix A [Templates], page 142) which may give you a start. But what if you want somethingthat isn’t covered there? Read on.
3.4.1 Soprano and cello
Start off with the template that seems closest to what you want to end up with. Let’s say thatyou want to write something for soprano and cello. In this case, we would start with the ‘Notesand lyrics’ template (for the soprano part).
\version "2.16.2"
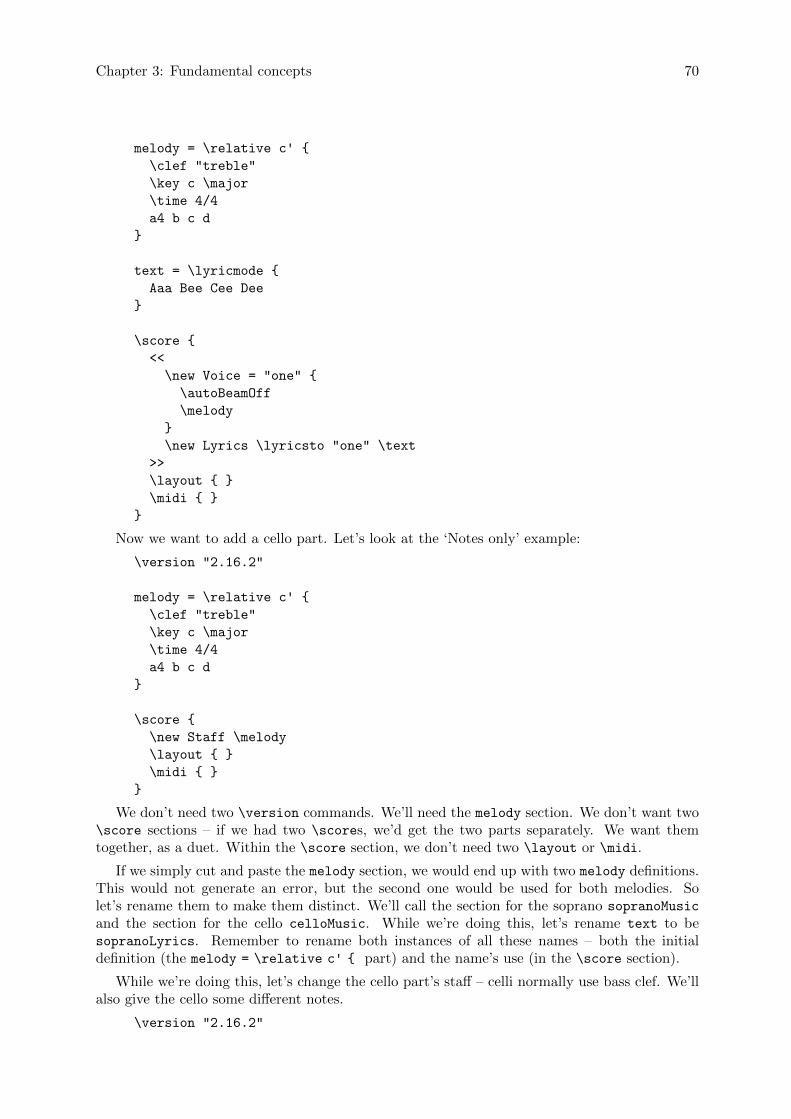
Chapter 3: Fundamental concepts 70
melody = \relative c' {
\clef "treble"
\key c \major
\time 4/4
a4 b c d
}
text = \lyricmode {
Aaa Bee Cee Dee
}
\score {
<<
\new Voice = "one" {
\autoBeamOff
\melody
}
\new Lyrics \lyricsto "one" \text
>>
\layout { }
\midi { }
}
Now we want to add a cello part. Let’s look at the ‘Notes only’ example:
\version "2.16.2"
melody = \relative c' {
\clef "treble"
\key c \major
\time 4/4
a4 b c d
}
\score {
\new Staff \melody
\layout { }
\midi { }
}
We don’t need two \version commands. We’ll need the melody section. We don’t want two\score sections – if we had two \scores, we’d get the two parts separately. We want themtogether, as a duet. Within the \score section, we don’t need two \layout or \midi.
If we simply cut and paste the melody section, we would end up with two melody definitions.This would not generate an error, but the second one would be used for both melodies. Solet’s rename them to make them distinct. We’ll call the section for the soprano sopranoMusic
and the section for the cello celloMusic. While we’re doing this, let’s rename text to besopranoLyrics. Remember to rename both instances of all these names – both the initialdefinition (the melody = \relative c' { part) and the name’s use (in the \score section).
While we’re doing this, let’s change the cello part’s staff – celli normally use bass clef. We’llalso give the cello some different notes.
\version "2.16.2"
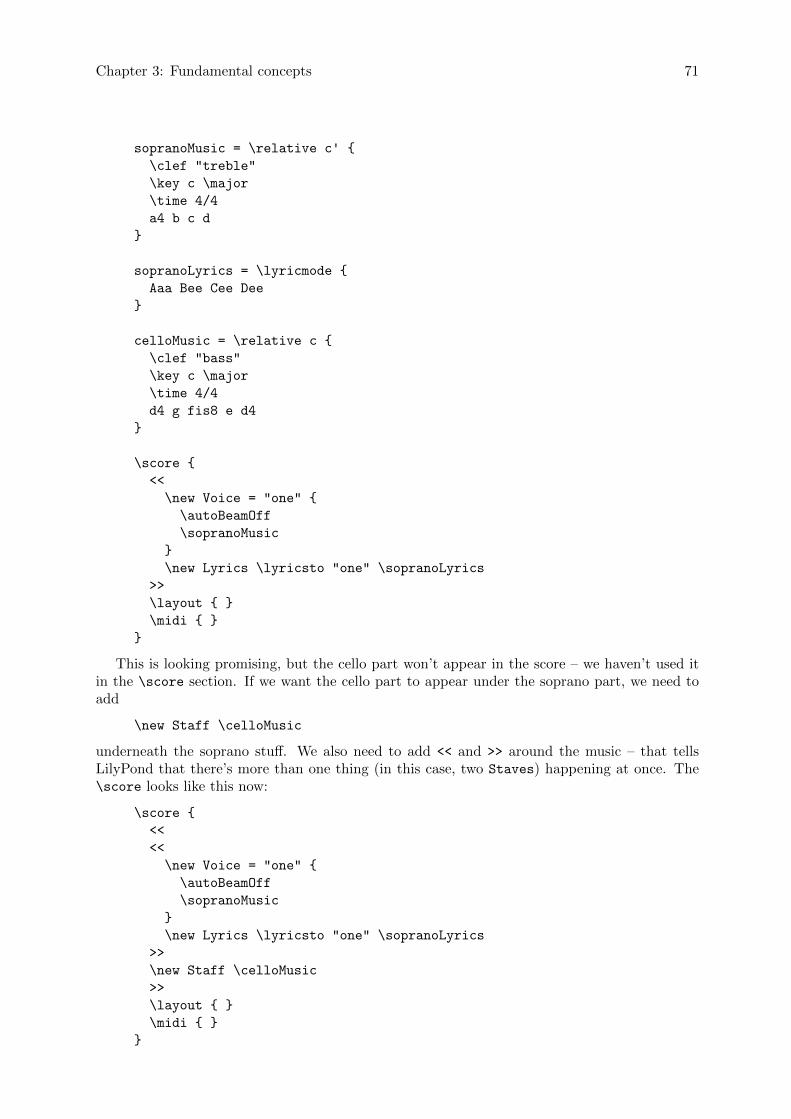
Chapter 3: Fundamental concepts 71
sopranoMusic = \relative c' {
\clef "treble"
\key c \major
\time 4/4
a4 b c d
}
sopranoLyrics = \lyricmode {
Aaa Bee Cee Dee
}
celloMusic = \relative c {
\clef "bass"
\key c \major
\time 4/4
d4 g fis8 e d4
}
\score {
<<
\new Voice = "one" {
\autoBeamOff
\sopranoMusic
}
\new Lyrics \lyricsto "one" \sopranoLyrics
>>
\layout { }
\midi { }
}
This is looking promising, but the cello part won’t appear in the score – we haven’t used itin the \score section. If we want the cello part to appear under the soprano part, we need toadd
\new Staff \celloMusic
underneath the soprano stuff. We also need to add << and >> around the music – that tellsLilyPond that there’s more than one thing (in this case, two Staves) happening at once. The\score looks like this now:
\score {
<<
<<
\new Voice = "one" {
\autoBeamOff
\sopranoMusic
}
\new Lyrics \lyricsto "one" \sopranoLyrics
>>
\new Staff \celloMusic
>>
\layout { }
\midi { }
}
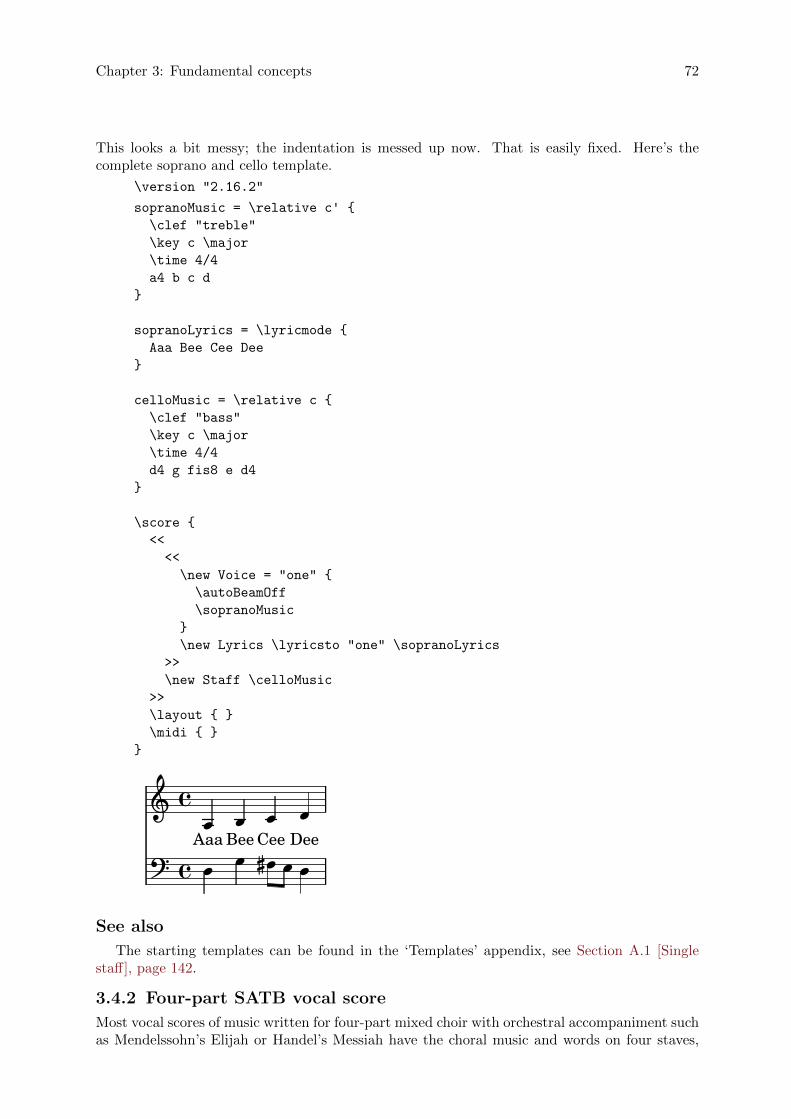
Chapter 3: Fundamental concepts 72
This looks a bit messy; the indentation is messed up now. That is easily fixed. Here’s thecomplete soprano and cello template.
\version "2.16.2"
sopranoMusic = \relative c' {
\clef "treble"
\key c \major
\time 4/4
a4 b c d
}
sopranoLyrics = \lyricmode {
Aaa Bee Cee Dee
}
celloMusic = \relative c {
\clef "bass"
\key c \major
\time 4/4
d4 g fis8 e d4
}
\score {
<<
<<
\new Voice = "one" {
\autoBeamOff
\sopranoMusic
}
\new Lyrics \lyricsto "one" \sopranoLyrics
>>
\new Staff \celloMusic
>>
\layout { }
\midi { }
}
ÎBee ÎCeeÎ
DeeÎ Î�ÎÎ Î
Aaa��
��
ÎSee also
The starting templates can be found in the ‘Templates’ appendix, see Section A.1 [Singlestaff], page 142.
3.4.2 Four-part SATB vocal score
Most vocal scores of music written for four-part mixed choir with orchestral accompaniment suchas Mendelssohn’s Elijah or Handel’s Messiah have the choral music and words on four staves,

Chapter 3: Fundamental concepts 73
one for each of SATB, with a piano reduction of the orchestral accompaniment underneath.Here’s an example from Handel’s Messiah:
åwas
å
was
ååå
åå
��
�Wor�
Wor
�
� ��� �� �
���
��
åwas
åwas
�slain
�slain�
slain�slain
åå
åååthe
åthe
�
åthe
åtheå
åå
åå
��
� ��
åthat
åthatåthat
åthat
å
lamb
�lamb�lamb
�lamb
���
��
��
åå
åå
�
�
� �� �
�Alto
Tenor
Bass
�
��
�
���
��
�8
�� �
� �� �
� �� �
åå åå
å
�
åisåis
ååå
�
���
Soprano
thy
åthyåthyåthy
å
Wor�Wor
��
�
Piano w
åis
åis
None of the templates provides this layout exactly. The nearest is ‘SATB vocal score andautomatic piano reduction’ – see Section A.4 [Vocal ensembles], page 151 – but we need tochange the layout and add a piano accompaniment which is not derived automatically from thevocal parts. The variables holding the music and words for the vocal parts are fine, but we shallneed to add variables for the piano reduction.
The order in which the contexts appear in the ChoirStaff of the template do not correspondwith the order in the vocal score shown above. We need to rearrange them so there are fourstaves with the words written directly underneath the notes for each part. All the voices shouldbe \voiceOne, which is the default, so the \voiceXXX commands should be removed. We alsoneed to specify the tenor clef for the tenors. The way in which lyrics are specified in the templatehas not yet been encountered so we need to use the method with which we are familiar. Weshould also add the names of each staff.
Doing this gives for our ChoirStaff:
\new ChoirStaff <<
\new Staff = "sopranos" <<
\set Staff.instrumentName = #"Soprano"
\new Voice = "sopranos" {
\global
\sopranoMusic
}
>>
\new Lyrics \lyricsto "sopranos" {
\sopranoWords
}
Chapter 3: Fundamental concepts 74
\new Staff = "altos" <<
\set Staff.instrumentName = #"Alto"
\new Voice = "altos" {
\global
\altoMusic
}
>>
\new Lyrics \lyricsto "altos" {
\altoWords
}
\new Staff = "tenors" <<
\set Staff.instrumentName = #"Tenor"
\new Voice = "tenors" {
\global
\tenorMusic
}
>>
\new Lyrics \lyricsto "tenors" {
\tenorWords
}
\new Staff = "basses" <<
\set Staff.instrumentName = #"Bass"
\new Voice = "basses" {
\global
\bassMusic
}
>>
\new Lyrics \lyricsto "basses" {
\bassWords
}
>> % end ChoirStaff
Next we must work out the piano part. This is easy - we just pull out the piano part fromthe ‘Solo piano’ template:
\new PianoStaff <<
\set PianoStaff.instrumentName = #"Piano "
\new Staff = "upper" \upper
\new Staff = "lower" \lower
>>
and add the variable definitions for upper and lower.
The ChoirStaff and PianoStaff must be combined using angle brackets as we want them tobe stacked one above the other:
<< % combine ChoirStaff and PianoStaff one above the other
\new ChoirStaff <<
\new Staff = "sopranos" <<
\new Voice = "sopranos" {
\global
\sopranoMusic
}
>>
\new Lyrics \lyricsto "sopranos" {
\sopranoWords
Chapter 3: Fundamental concepts 75
}
\new Staff = "altos" <<
\new Voice = "altos" {
\global
\altoMusic
}
>>
\new Lyrics \lyricsto "altos" {
\altoWords
}
\new Staff = "tenors" <<
\clef "G_8" % tenor clef
\new Voice = "tenors" {
\global
\tenorMusic
}
>>
\new Lyrics \lyricsto "tenors" {
\tenorWords
}
\new Staff = "basses" <<
\clef "bass"
\new Voice = "basses" {
\global
\bassMusic
}
>>
\new Lyrics \lyricsto "basses" {
\bassWords
}
>> % end ChoirStaff
\new PianoStaff <<
\set PianoStaff.instrumentName = #"Piano"
\new Staff = "upper" \upper
\new Staff = "lower" \lower
>>
>>
Combining all these together and adding the music for the three bars of the example abovegives:
\version "2.16.2"
global = { \key d \major \time 4/4 }
sopranoMusic = \relative c'' {
\clef "treble"
r4 d2 a4 | d4. d8 a2 | cis4 d cis2 |
}
sopranoWords = \lyricmode {
Wor -- thy | is the lamb | that was slain |
}
altoMusic = \relative a' {
\clef "treble"
Chapter 3: Fundamental concepts 76
r4 a2 a4 | fis4. fis8 a2 | g4 fis fis2 |
}
altoWords = \sopranoWords
tenorMusic = \relative c' {
\clef "G_8"
r4 fis2 e4 | d4. d8 d2 | e4 a, cis2 |
}
tenorWords = \sopranoWords
bassMusic = \relative c' {
\clef "bass"
r4 d2 cis4 | b4. b8 fis2 | e4 d a'2 |
}
bassWords = \sopranoWords
upper = \relative a' {
\clef "treble"
\global
r4 <a d fis>2 <a e' a>4 |
<d fis d'>4. <d fis d'>8 <a d a'>2 |
<g cis g'>4 <a d fis> <a cis e>2 |
}
lower = \relative c, {
\clef "bass"
\global
<d d'>4 <d d'>2 <cis cis'>4 |
<b b'>4. <b' b'>8 <fis fis'>2 |
<e e'>4 <d d'> <a' a'>2 |
}
\score {
<< % combine ChoirStaff and PianoStaff in parallel
\new ChoirStaff <<
\new Staff = "sopranos" <<
\set Staff.instrumentName = #"Soprano"
\new Voice = "sopranos" {
\global
\sopranoMusic
}
>>
\new Lyrics \lyricsto "sopranos" {
\sopranoWords
}
\new Staff = "altos" <<
\set Staff.instrumentName = #"Alto"
\new Voice = "altos" {
\global
\altoMusic
}
>>
\new Lyrics \lyricsto "altos" {
\altoWords
}
\new Staff = "tenors" <<
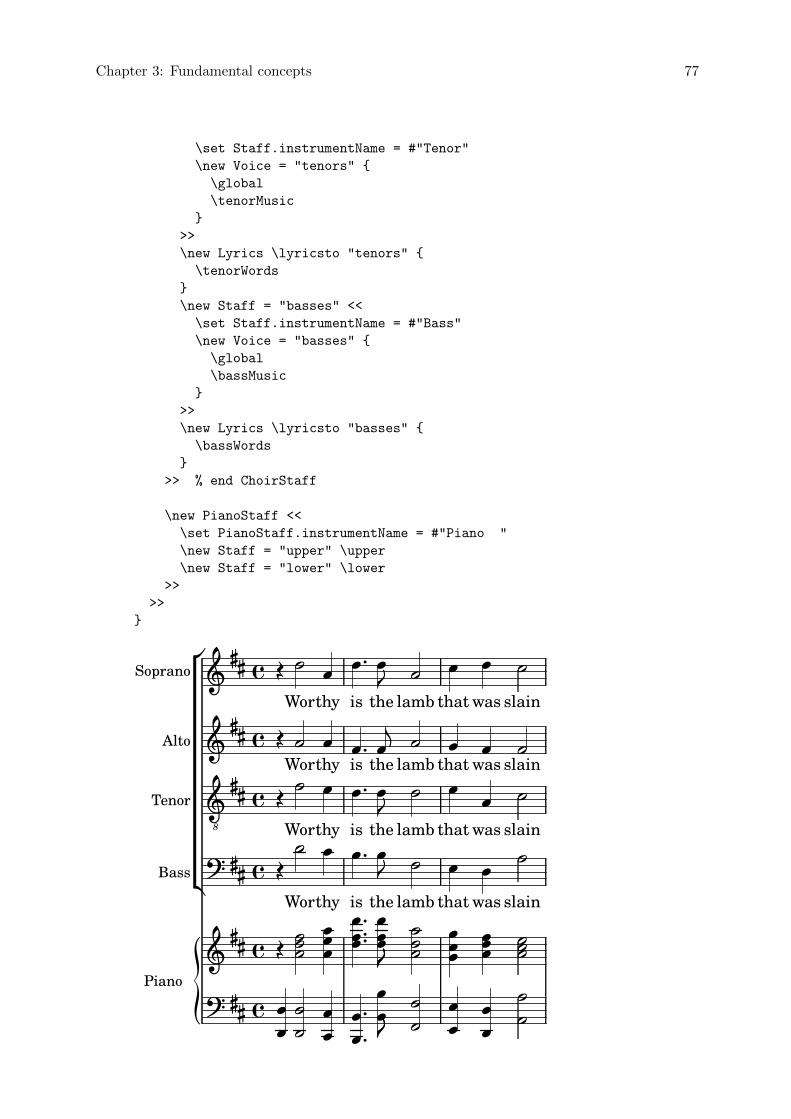
Chapter 3: Fundamental concepts 77
\set Staff.instrumentName = #"Tenor"
\new Voice = "tenors" {
\global
\tenorMusic
}
>>
\new Lyrics \lyricsto "tenors" {
\tenorWords
}
\new Staff = "basses" <<
\set Staff.instrumentName = #"Bass"
\new Voice = "basses" {
\global
\bassMusic
}
>>
\new Lyrics \lyricsto "basses" {
\bassWords
}
>> % end ChoirStaff
\new PianoStaff <<
\set PianoStaff.instrumentName = #"Piano "
\new Staff = "upper" \upper
\new Staff = "lower" \lower
>>
>>
}
��
���thy
�thy
�thy�
Soprano
Îlamb
Îlamb
ÎÎÎ
ÎÎ
�thy
ÎWor
ÎWorÎWorÎWor
ÎÎÎ
Î
� �was
�was
�was
�was
���
��
�
�
�that
�that�that
�that
���
��ÎÎ�
Îslain
ÎslainÎ
slainÎslain
ÎÎÎ
�����
� �� �
� �� �
�8
�� �
� �� �
� ��
�
�is
�is�is�is
���
��
�
���
�
��
���
the
�the�the�the
���
����
��
Îlamb
Îlamb
�
��
��
Tenor
Alto
Bass
Piano w
��
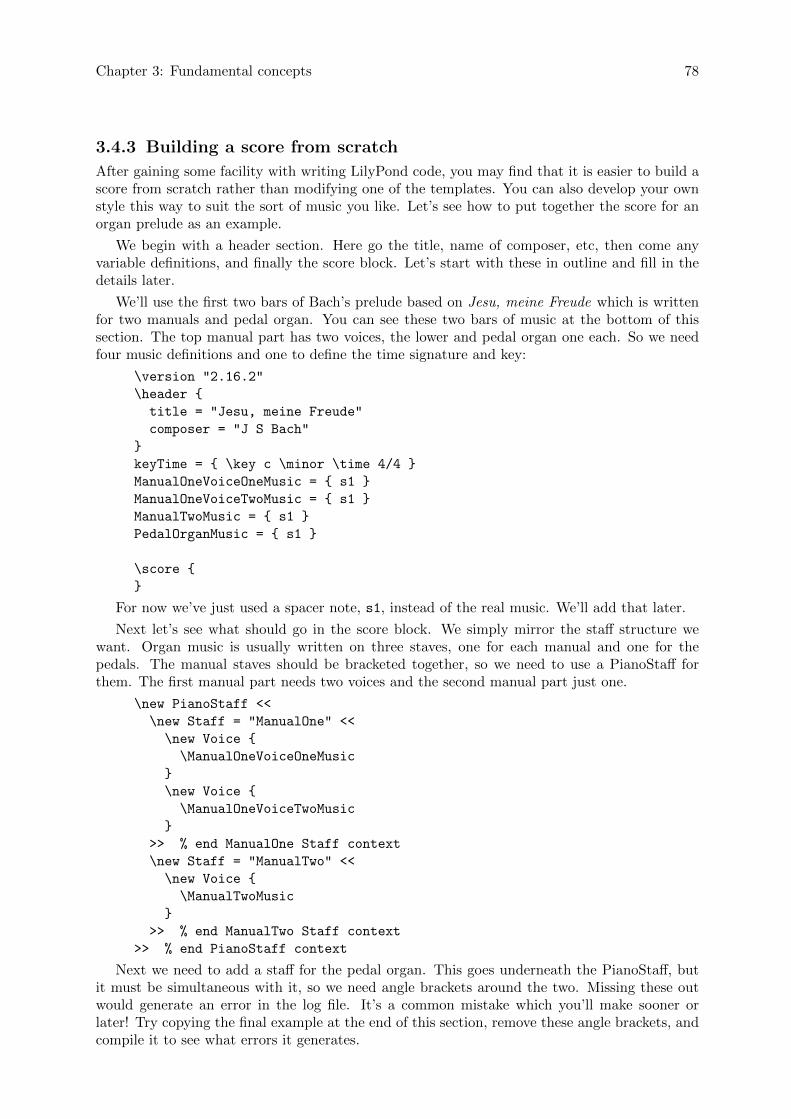
Chapter 3: Fundamental concepts 78
3.4.3 Building a score from scratch
After gaining some facility with writing LilyPond code, you may find that it is easier to build ascore from scratch rather than modifying one of the templates. You can also develop your ownstyle this way to suit the sort of music you like. Let’s see how to put together the score for anorgan prelude as an example.
We begin with a header section. Here go the title, name of composer, etc, then come anyvariable definitions, and finally the score block. Let’s start with these in outline and fill in thedetails later.
We’ll use the first two bars of Bach’s prelude based on Jesu, meine Freude which is writtenfor two manuals and pedal organ. You can see these two bars of music at the bottom of thissection. The top manual part has two voices, the lower and pedal organ one each. So we needfour music definitions and one to define the time signature and key:
\version "2.16.2"
\header {
title = "Jesu, meine Freude"
composer = "J S Bach"
}
keyTime = { \key c \minor \time 4/4 }
ManualOneVoiceOneMusic = { s1 }
ManualOneVoiceTwoMusic = { s1 }
ManualTwoMusic = { s1 }
PedalOrganMusic = { s1 }
\score {
}
For now we’ve just used a spacer note, s1, instead of the real music. We’ll add that later.
Next let’s see what should go in the score block. We simply mirror the staff structure wewant. Organ music is usually written on three staves, one for each manual and one for thepedals. The manual staves should be bracketed together, so we need to use a PianoStaff forthem. The first manual part needs two voices and the second manual part just one.
\new PianoStaff <<
\new Staff = "ManualOne" <<
\new Voice {
\ManualOneVoiceOneMusic
}
\new Voice {
\ManualOneVoiceTwoMusic
}
>> % end ManualOne Staff context
\new Staff = "ManualTwo" <<
\new Voice {
\ManualTwoMusic
}
>> % end ManualTwo Staff context
>> % end PianoStaff context
Next we need to add a staff for the pedal organ. This goes underneath the PianoStaff, butit must be simultaneous with it, so we need angle brackets around the two. Missing these outwould generate an error in the log file. It’s a common mistake which you’ll make sooner orlater! Try copying the final example at the end of this section, remove these angle brackets, andcompile it to see what errors it generates.
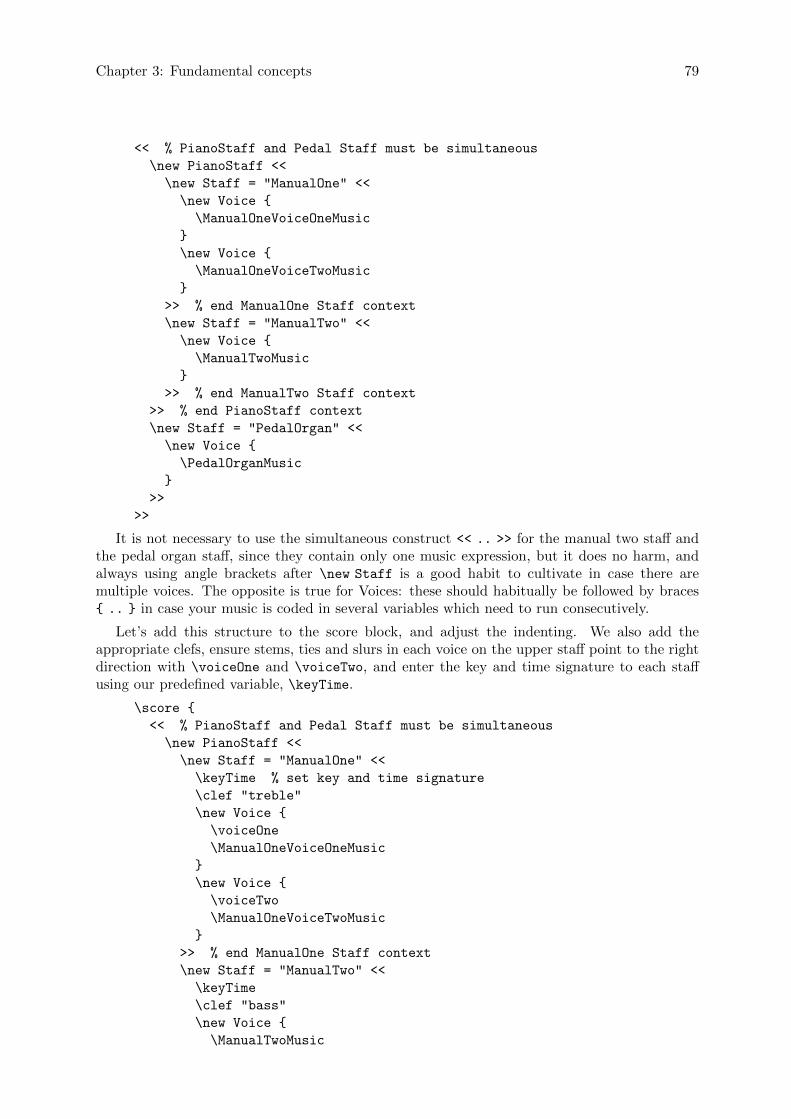
Chapter 3: Fundamental concepts 79
<< % PianoStaff and Pedal Staff must be simultaneous
\new PianoStaff <<
\new Staff = "ManualOne" <<
\new Voice {
\ManualOneVoiceOneMusic
}
\new Voice {
\ManualOneVoiceTwoMusic
}
>> % end ManualOne Staff context
\new Staff = "ManualTwo" <<
\new Voice {
\ManualTwoMusic
}
>> % end ManualTwo Staff context
>> % end PianoStaff context
\new Staff = "PedalOrgan" <<
\new Voice {
\PedalOrganMusic
}
>>
>>
It is not necessary to use the simultaneous construct << .. >> for the manual two staff andthe pedal organ staff, since they contain only one music expression, but it does no harm, andalways using angle brackets after \new Staff is a good habit to cultivate in case there aremultiple voices. The opposite is true for Voices: these should habitually be followed by braces{ .. } in case your music is coded in several variables which need to run consecutively.
Let’s add this structure to the score block, and adjust the indenting. We also add theappropriate clefs, ensure stems, ties and slurs in each voice on the upper staff point to the rightdirection with \voiceOne and \voiceTwo, and enter the key and time signature to each staffusing our predefined variable, \keyTime.
\score {
<< % PianoStaff and Pedal Staff must be simultaneous
\new PianoStaff <<
\new Staff = "ManualOne" <<
\keyTime % set key and time signature
\clef "treble"
\new Voice {
\voiceOne
\ManualOneVoiceOneMusic
}
\new Voice {
\voiceTwo
\ManualOneVoiceTwoMusic
}
>> % end ManualOne Staff context
\new Staff = "ManualTwo" <<
\keyTime
\clef "bass"
\new Voice {
\ManualTwoMusic
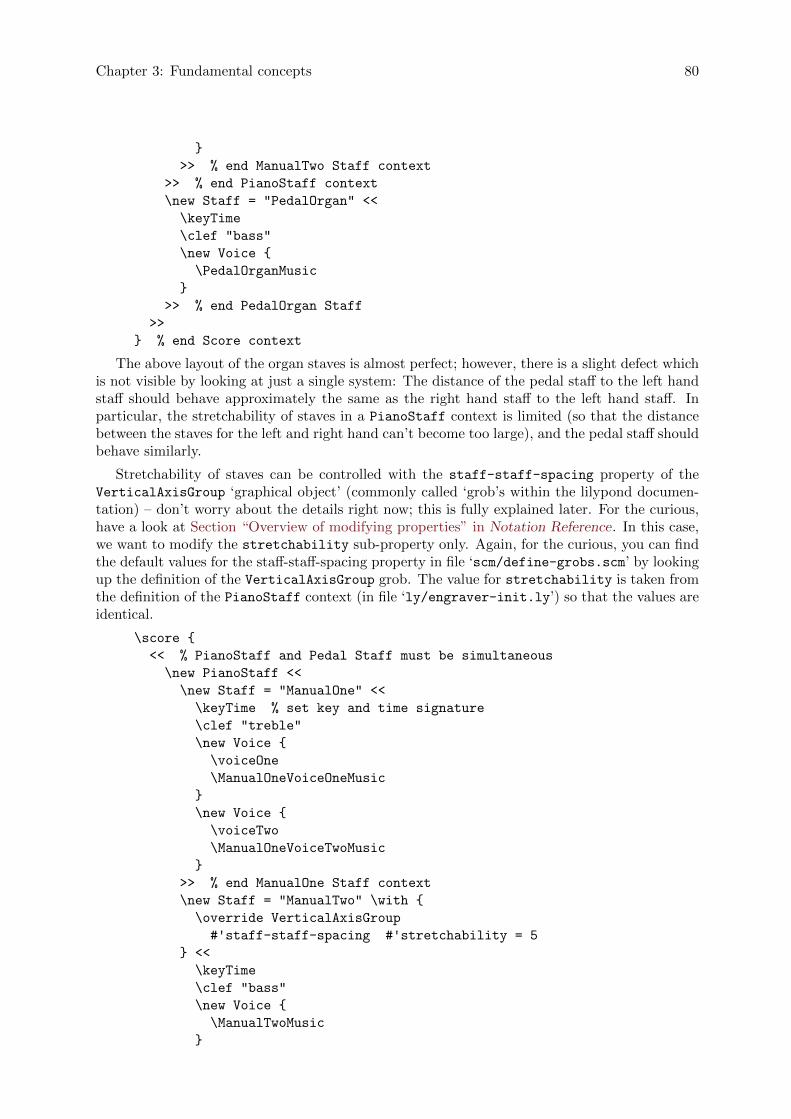
Chapter 3: Fundamental concepts 80
}
>> % end ManualTwo Staff context
>> % end PianoStaff context
\new Staff = "PedalOrgan" <<
\keyTime
\clef "bass"
\new Voice {
\PedalOrganMusic
}
>> % end PedalOrgan Staff
>>
} % end Score context
The above layout of the organ staves is almost perfect; however, there is a slight defect whichis not visible by looking at just a single system: The distance of the pedal staff to the left handstaff should behave approximately the same as the right hand staff to the left hand staff. Inparticular, the stretchability of staves in a PianoStaff context is limited (so that the distancebetween the staves for the left and right hand can’t become too large), and the pedal staff shouldbehave similarly.
Stretchability of staves can be controlled with the staff-staff-spacing property of theVerticalAxisGroup ‘graphical object’ (commonly called ‘grob’s within the lilypond documen-tation) – don’t worry about the details right now; this is fully explained later. For the curious,have a look at Section “Overview of modifying properties” in Notation Reference. In this case,we want to modify the stretchability sub-property only. Again, for the curious, you can findthe default values for the staff-staff-spacing property in file ‘scm/define-grobs.scm’ by lookingup the definition of the VerticalAxisGroup grob. The value for stretchability is taken fromthe definition of the PianoStaff context (in file ‘ly/engraver-init.ly’) so that the values areidentical.
\score {
<< % PianoStaff and Pedal Staff must be simultaneous
\new PianoStaff <<
\new Staff = "ManualOne" <<
\keyTime % set key and time signature
\clef "treble"
\new Voice {
\voiceOne
\ManualOneVoiceOneMusic
}
\new Voice {
\voiceTwo
\ManualOneVoiceTwoMusic
}
>> % end ManualOne Staff context
\new Staff = "ManualTwo" \with {
\override VerticalAxisGroup
#'staff-staff-spacing #'stretchability = 5
} <<
\keyTime
\clef "bass"
\new Voice {
\ManualTwoMusic
}
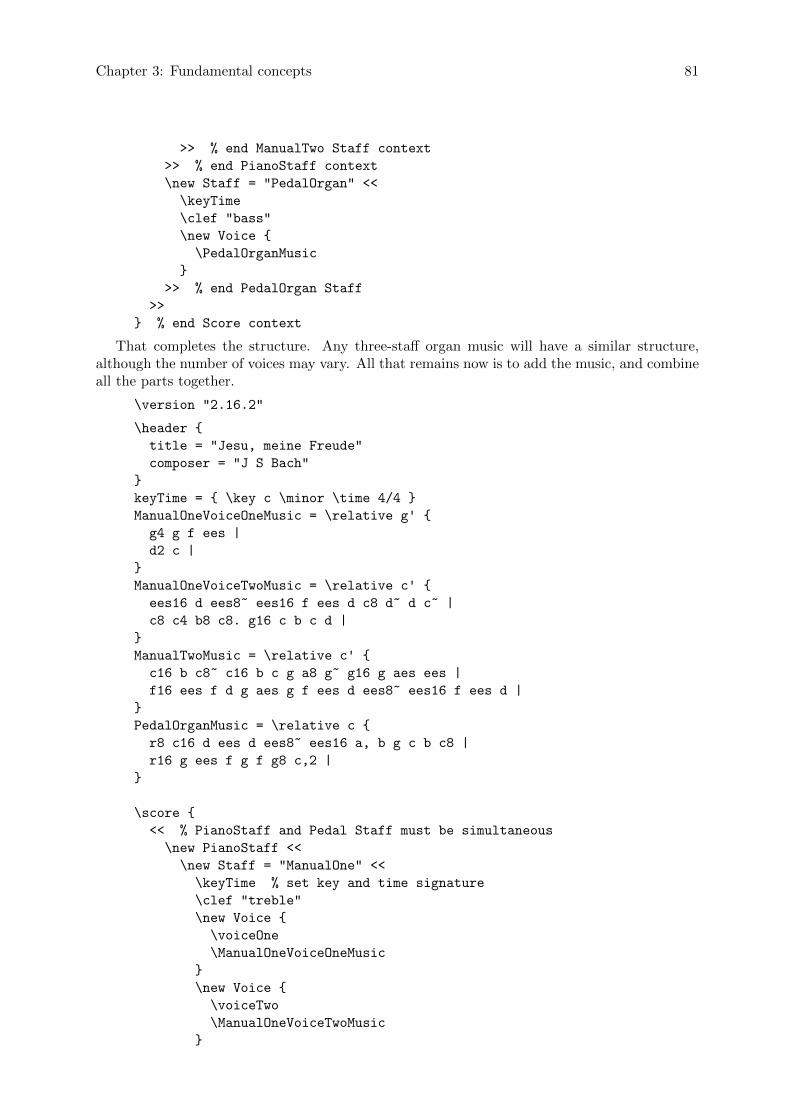
Chapter 3: Fundamental concepts 81
>> % end ManualTwo Staff context
>> % end PianoStaff context
\new Staff = "PedalOrgan" <<
\keyTime
\clef "bass"
\new Voice {
\PedalOrganMusic
}
>> % end PedalOrgan Staff
>>
} % end Score context
That completes the structure. Any three-staff organ music will have a similar structure,although the number of voices may vary. All that remains now is to add the music, and combineall the parts together.
\version "2.16.2"
\header {
title = "Jesu, meine Freude"
composer = "J S Bach"
}
keyTime = { \key c \minor \time 4/4 }
ManualOneVoiceOneMusic = \relative g' {
g4 g f ees |
d2 c |
}
ManualOneVoiceTwoMusic = \relative c' {
ees16 d ees8~ ees16 f ees d c8 d~ d c~ |
c8 c4 b8 c8. g16 c b c d |
}
ManualTwoMusic = \relative c' {
c16 b c8~ c16 b c g a8 g~ g16 g aes ees |
f16 ees f d g aes g f ees d ees8~ ees16 f ees d |
}
PedalOrganMusic = \relative c {
r8 c16 d ees d ees8~ ees16 a, b g c b c8 |
r16 g ees f g f g8 c,2 |
}
\score {
<< % PianoStaff and Pedal Staff must be simultaneous
\new PianoStaff <<
\new Staff = "ManualOne" <<
\keyTime % set key and time signature
\clef "treble"
\new Voice {
\voiceOne
\ManualOneVoiceOneMusic
}
\new Voice {
\voiceTwo
\ManualOneVoiceTwoMusic
}
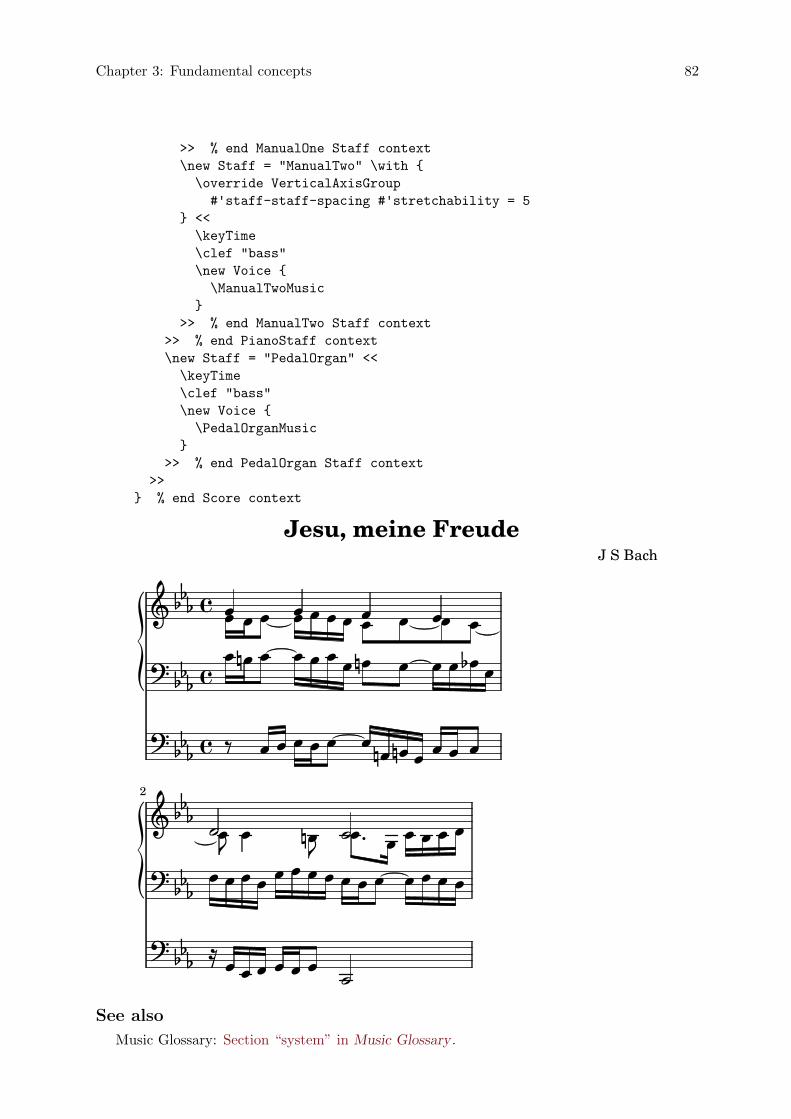
Chapter 3: Fundamental concepts 82
>> % end ManualOne Staff context
\new Staff = "ManualTwo" \with {
\override VerticalAxisGroup
#'staff-staff-spacing #'stretchability = 5
} <<
\keyTime
\clef "bass"
\new Voice {
\ManualTwoMusic
}
>> % end ManualTwo Staff context
>> % end PianoStaff context
\new Staff = "PedalOrgan" <<
\keyTime
\clef "bass"
\new Voice {
\PedalOrganMusic
}
>> % end PedalOrgan Staff context
>>
} % end Score context
Jesu, meine FreudeJ S Bach
ååå
å�
å
åå
�
å
åå
������
�Z
å
åå
����
������
å
åå
�
å
ååå
å�
ååå
å
åå
åå
å
å
åå
å
åååå
å
å
å
å
å
å
å�å
å
å�
�
åþ
åå
��������
����2
åå å
åå
åå
å
å�
å
� å å
å
åå
ååå
å
�
��
See also
Music Glossary: Section “system” in Music Glossary .
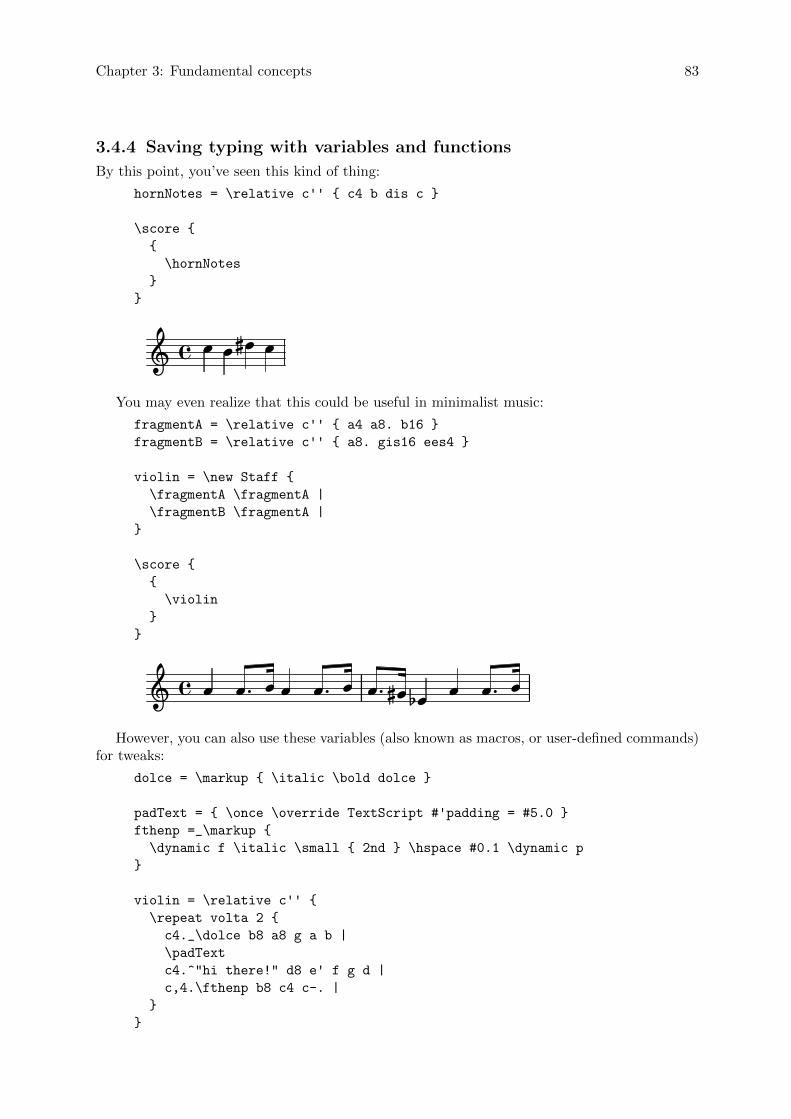
Chapter 3: Fundamental concepts 83
3.4.4 Saving typing with variables and functions
By this point, you’ve seen this kind of thing:
hornNotes = \relative c'' { c4 b dis c }
\score {
{
\hornNotes
}
}
2 �� 2� 22You may even realize that this could be useful in minimalist music:
fragmentA = \relative c'' { a4 a8. b16 }
fragmentB = \relative c'' { a8. gis16 ees4 }
violin = \new Staff {
\fragmentA \fragmentA |
\fragmentB \fragmentA |
}
\score {
{
\violin
}
}
Î Î ÎÎ ��Î ÎÎ� � �� � ÎÎ Î Î Î�However, you can also use these variables (also known as macros, or user-defined commands)
for tweaks:
dolce = \markup { \italic \bold dolce }
padText = { \once \override TextScript #'padding = #5.0 }
fthenp =_\markup {
\dynamic f \italic \small { 2nd } \hspace #0.1 \dynamic p
}
violin = \relative c'' {
\repeat volta 2 {
c4._\dolce b8 a8 g a b |
\padText
c4.^"hi there!" d8 e' f g d |
c,4.\fthenp b8 c4 c-. |
}
}
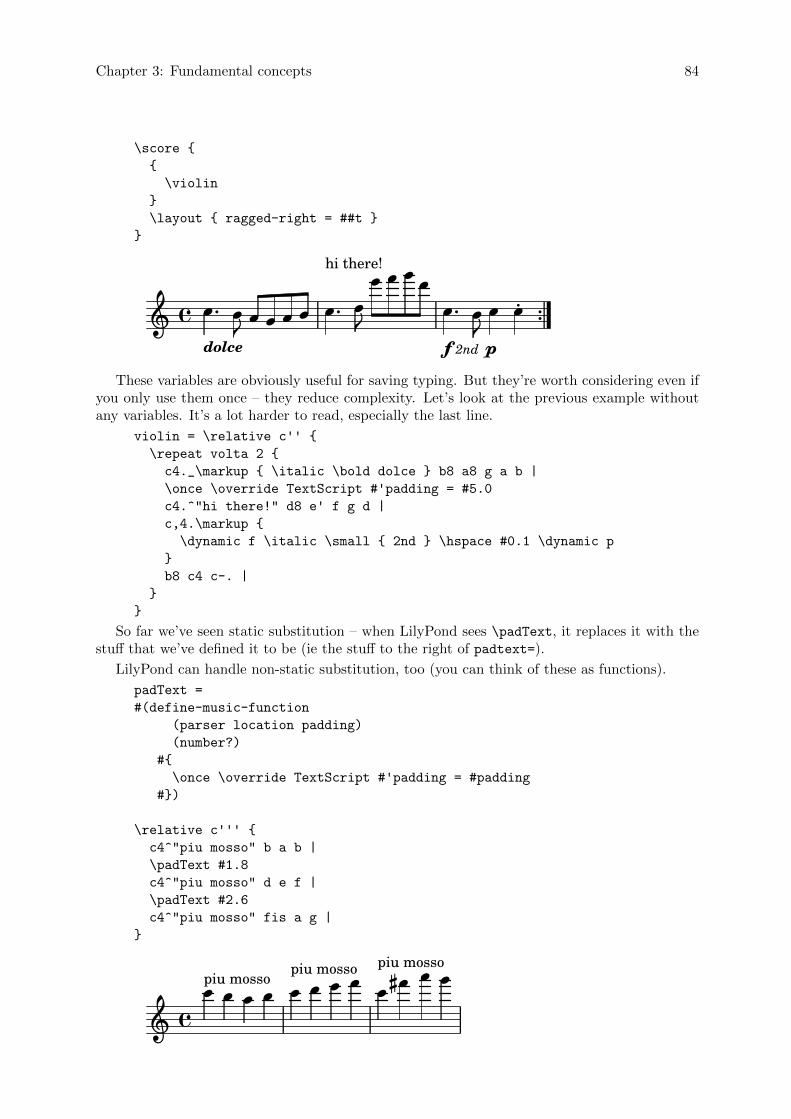
Chapter 3: Fundamental concepts 84
\score {
{
\violin
}
\layout { ragged-right = ##t }
}
..�� ��.� ��
..dolce
� ���� ���
��f 2nd p
hi there!
��
��
�
These variables are obviously useful for saving typing. But they’re worth considering even ifyou only use them once – they reduce complexity. Let’s look at the previous example withoutany variables. It’s a lot harder to read, especially the last line.
violin = \relative c'' {
\repeat volta 2 {
c4._\markup { \italic \bold dolce } b8 a8 g a b |
\once \override TextScript #'padding = #5.0
c4.^"hi there!" d8 e' f g d |
c,4.\markup {
\dynamic f \italic \small { 2nd } \hspace #0.1 \dynamic p
}
b8 c4 c-. |
}
}
So far we’ve seen static substitution – when LilyPond sees \padText, it replaces it with thestuff that we’ve defined it to be (ie the stuff to the right of padtext=).
LilyPond can handle non-static substitution, too (you can think of these as functions).
padText =
#(define-music-function
(parser location padding)
(number?)
#{
\once \override TextScript #'padding = #padding
#})
\relative c''' {
c4^"piu mosso" b a b |
\padText #1.8
c4^"piu mosso" d e f |
\padText #2.6
c4^"piu mosso" fis a g |
}
Îpiu mossoÎpiu mossoÎ Î� �
ÎÎ �Î piu mossoÎÎ Î ÎÎ
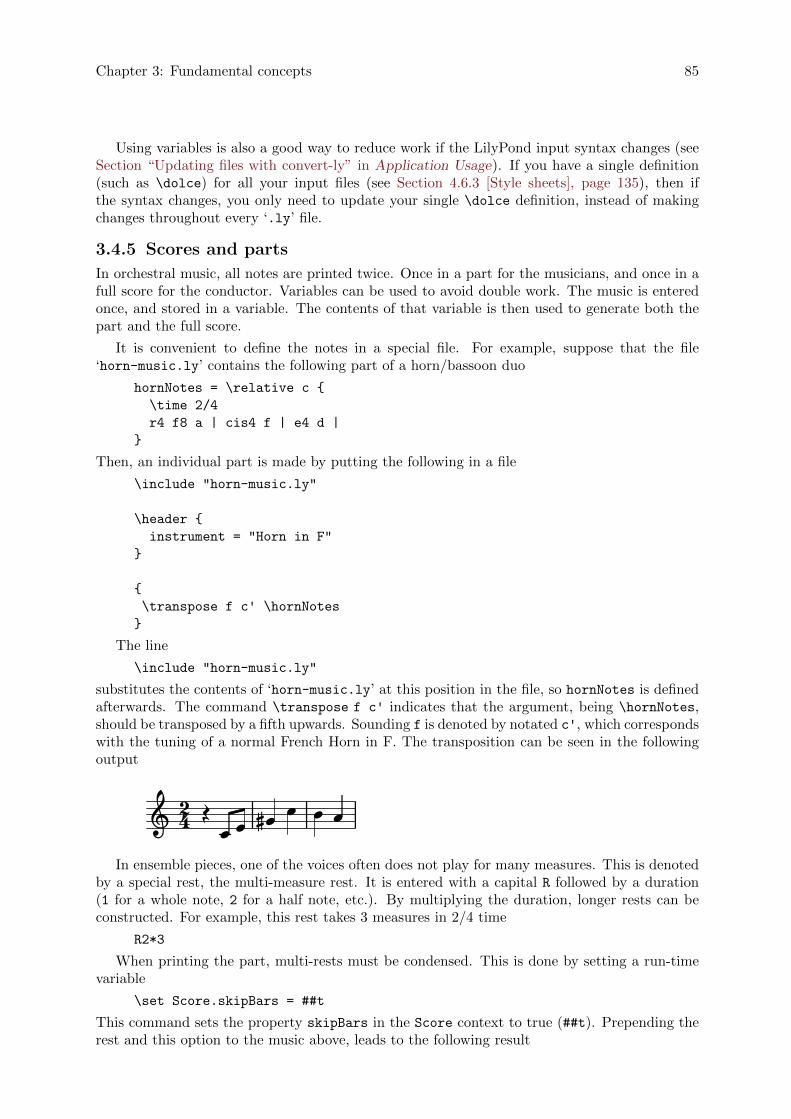
Chapter 3: Fundamental concepts 85
Using variables is also a good way to reduce work if the LilyPond input syntax changes (seeSection “Updating files with convert-ly” in Application Usage). If you have a single definition(such as \dolce) for all your input files (see Section 4.6.3 [Style sheets], page 135), then ifthe syntax changes, you only need to update your single \dolce definition, instead of makingchanges throughout every ‘.ly’ file.
3.4.5 Scores and parts
In orchestral music, all notes are printed twice. Once in a part for the musicians, and once in afull score for the conductor. Variables can be used to avoid double work. The music is enteredonce, and stored in a variable. The contents of that variable is then used to generate both thepart and the full score.
It is convenient to define the notes in a special file. For example, suppose that the file‘horn-music.ly’ contains the following part of a horn/bassoon duo
hornNotes = \relative c {
\time 2/4
r4 f8 a | cis4 f | e4 d |
}
Then, an individual part is made by putting the following in a file
\include "horn-music.ly"
\header {
instrument = "Horn in F"
}
{
\transpose f c' \hornNotes
}
The line
\include "horn-music.ly"
substitutes the contents of ‘horn-music.ly’ at this position in the file, so hornNotes is definedafterwards. The command \transpose f c' indicates that the argument, being \hornNotes,should be transposed by a fifth upwards. Sounding f is denoted by notated c', which correspondswith the tuning of a normal French Horn in F. The transposition can be seen in the followingoutput
Î42 �� Î� ÎÎ Î ÎIn ensemble pieces, one of the voices often does not play for many measures. This is denoted
by a special rest, the multi-measure rest. It is entered with a capital R followed by a duration(1 for a whole note, 2 for a half note, etc.). By multiplying the duration, longer rests can beconstructed. For example, this rest takes 3 measures in 2/4 time
R2*3
When printing the part, multi-rests must be condensed. This is done by setting a run-timevariable
\set Score.skipBars = ##t
This command sets the property skipBars in the Score context to true (##t). Prepending therest and this option to the music above, leads to the following result
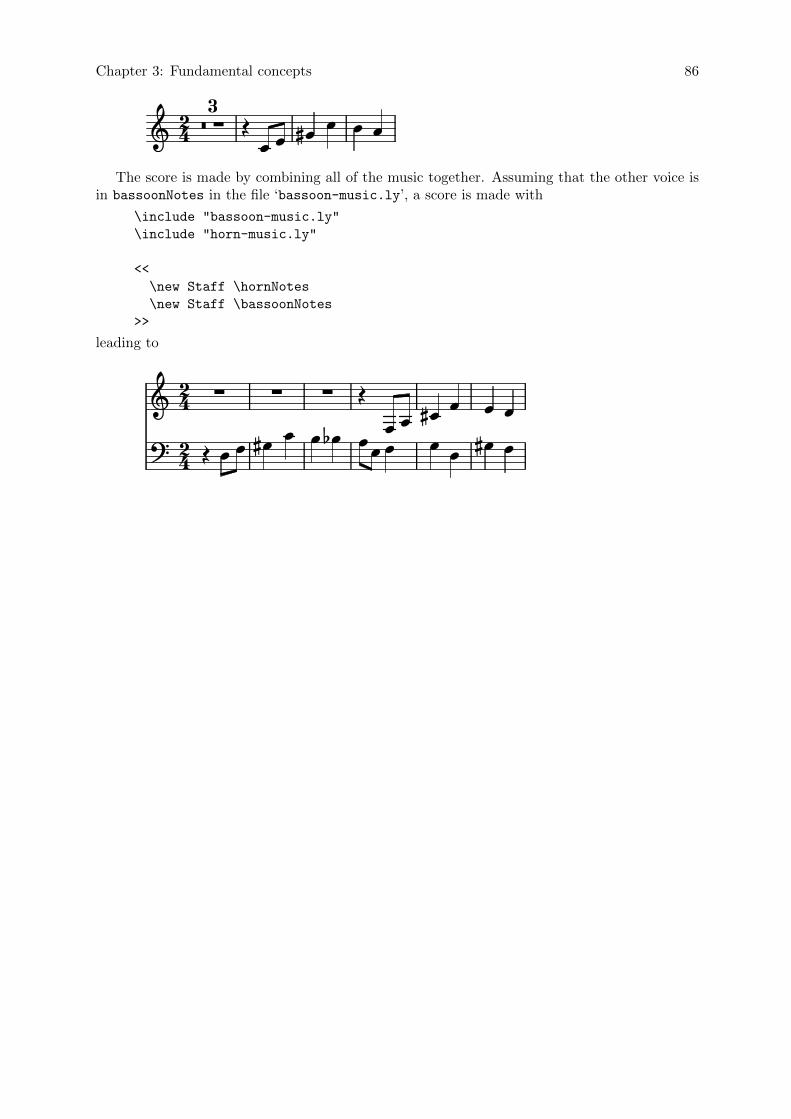
Chapter 3: Fundamental concepts 86
ÎÎÎ� � � Î42 Î�3 Î�The score is made by combining all of the music together. Assuming that the other voice is
in bassoonNotes in the file ‘bassoon-music.ly’, a score is made with
\include "bassoon-music.ly"
\include "horn-music.ly"
<<
\new Staff \hornNotes
\new Staff \bassoonNotes
>>
leading to
Î� Î�Î ÎÎ
� 42� 42
ÎÎ�Î
�Î
�ÎÎÎ�
Î ÎÎ
ÎÎ
ÎÎ�
��
Chapter 4: Tweaking output 87
4 Tweaking output
This chapter discusses how to modify output. LilyPond is extremely configurable; virtuallyevery fragment of output may be changed.
4.1 Tweaking basics
4.1.1 Introduction to tweaks
‘Tweaking’ is a LilyPond term for the various methods available to the user for modifying theactions taken during interpretation of the input file and modifying the appearance of the printedoutput. Some tweaks are very easy to use; others are more complex. But taken together themethods available for tweaking permit almost any desired appearance of the printed music tobe achieved.
In this section we cover the basic concepts required to understand tweaking. Later we give avariety of ready-made commands which can simply be copied to obtain the same effect in yourown scores, and at the same time we show how these commands may be constructed so that youmay learn how to develop your own tweaks.
Before starting on this Chapter you may wish to review the section Section 3.3 [Contextsand engravers], page 58, as Contexts, Engravers, and the Properties contained within them arefundamental to understanding and constructing Tweaks.
4.1.2 Objects and interfaces
Tweaking involves modifying the internal operation and structures of the LilyPond program, sowe must first introduce some terms which are used to describe those internal operations andstructures.
The term ‘Object’ is a generic term used to refer to the multitude of internal structures builtby LilyPond during the processing of an input file. So when a command like \new Staff isencountered a new object of type Staff is constructed. That Staff object then holds all theproperties associated with that particular staff, for example, its name and its key signature,together with details of the engravers which have been assigned to operate within that staff’scontext. Similarly, there are objects to hold the properties of all other contexts, such as Voiceobjects, Score objects, Lyrics objects, as well as objects to represent all notational elementssuch as bar lines, note heads, ties, dynamics, etc. Every object has its own set of propertyvalues.
Some types of object are given special names. Objects which represent items of notation onthe printed output such as note heads, stems, slurs, ties, fingering, clefs, etc are called ‘Layoutobjects’, often known as ‘Graphical Objects’, or ‘Grobs’ for short. These are still objects inthe generic sense above, and so they too all have properties associated with them, such as theirposition, size, color, etc.
Some layout objects are still more specialized. Phrasing slurs, crescendo hairpins, ottavamarks, and many other grobs are not localized in a single place – they have a starting point, anending point, and maybe other properties concerned with their shape. Objects with an extendedshape like these are called ‘Spanners’.
It remains to explain what ‘Interfaces’ are. Many objects, even though they are quite dif-ferent, share common features which need to be processed in the same way. For example, allgrobs have a color, a size, a position, etc, and all these properties are processed in the same wayduring LilyPond’s interpretation of the input file. To simplify these internal operations thesecommon actions and properties are grouped together in an object called a grob-interface.There are many other groupings of common properties like this, each one given a name ending
Chapter 4: Tweaking output 88
in interface. In total there are over 100 such interfaces. We shall see later why this is ofinterest and use to the user.
These, then, are the main terms relating to objects which we shall use in this chapter.
4.1.3 Naming conventions of objects and properties
We met some object naming conventions previously, in Section 3.3 [Contexts and engravers],page 58. Here for reference is a list of the most common object and property types togetherwith the conventions for naming them and a couple of examples of some real names. We haveused ‘A’ to stand for any capitalized alphabetic character and ‘aaa’ to stand for any number oflower-case alphabetic characters. Other characters are used verbatim.
Object/property type Naming convention ExamplesContexts Aaaa or AaaaAaaaAaaa Staff, GrandStaffLayout Objects Aaaa or AaaaAaaaAaaa Slur, NoteHeadEngravers Aaaa aaa engraver Clef engraver,
Note heads engraver
Interfaces aaa-aaa-interface grob-interface, break-aligned-interface
Context Properties aaa or aaaAaaaAaaa alignAboveContext,skipBars
Layout Object Properties aaa or aaa-aaa-aaa direction, beam-thickness
As we shall see shortly, the properties of different types of object are modified by differentcommands, so it is useful to be able to recognize the types of objects and properties from theirnames.
4.1.4 Tweaking methods
\override command
We have already met the commands \set and \with, used to change the properties ofcontexts and to remove and add engravers, in Section 3.3.4 [Modifying context properties],page 62, and Section 3.3.5 [Adding and removing engravers], page 67. We must now introducesome more important commands.
The command to change the properties of layout objects is \override. Because this com-mand has to modify internal properties deep within LilyPond its syntax is not as simple as thecommands you have used so far. It needs to know precisely which property of which object inwhich context has to be modified, and what its new value is to be. Let’s see how this is done.
The general syntax of this command is:
\override Context.LayoutObject #'layout-property =
#value
This will set the property with the name layout-property of the layout object with the nameLayoutObject, which is a member of the Context context, to the value value.
The Context can be omitted (and usually is) when the required context is unambiguouslyimplied and is one of lowest level contexts, i.e., Voice, ChordNames or Lyrics, and we shall omitit in many of the following examples. We shall see later when it must be specified.
Later sections deal comprehensively with properties and their values, see Section 4.2.3 [Typesof properties], page 97. But in this section we shall use just a few simple properties and valueswhich are easily understood in order to illustrate the format and use of these commands.
For now, don’t worry about the #', which must precede the layout property, and the #, whichmust precede the value. These must always be present in exactly this form. This is the mostcommon command used in tweaking, and most of the rest of this chapter will be directed to
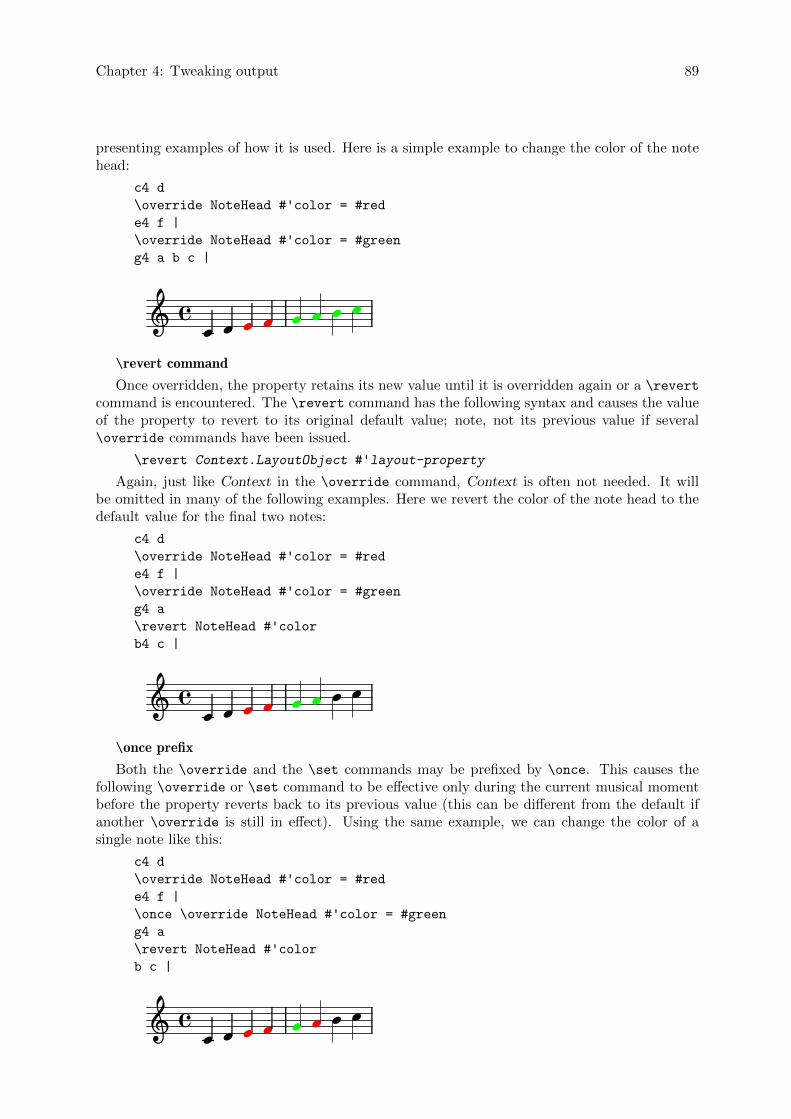
Chapter 4: Tweaking output 89
presenting examples of how it is used. Here is a simple example to change the color of the notehead:
c4 d
\override NoteHead #'color = #red
e4 f |
\override NoteHead #'color = #green
g4 a b c |
ÎÎÎ Î� ÎÎÎ Î�\revert command
Once overridden, the property retains its new value until it is overridden again or a \revert
command is encountered. The \revert command has the following syntax and causes the valueof the property to revert to its original default value; note, not its previous value if several\override commands have been issued.
\revert Context.LayoutObject #'layout-property
Again, just like Context in the \override command, Context is often not needed. It willbe omitted in many of the following examples. Here we revert the color of the note head to thedefault value for the final two notes:
c4 d
\override NoteHead #'color = #red
e4 f |
\override NoteHead #'color = #green
g4 a
\revert NoteHead #'color
b4 c |
× � ��� � �� ��\once prefix
Both the \override and the \set commands may be prefixed by \once. This causes thefollowing \override or \set command to be effective only during the current musical momentbefore the property reverts back to its previous value (this can be different from the default ifanother \override is still in effect). Using the same example, we can change the color of asingle note like this:
c4 d
\override NoteHead #'color = #red
e4 f |
\once \override NoteHead #'color = #green
g4 a
\revert NoteHead #'color
b c |
ÎÎ Î� Î ÎÎ� ÎÎ
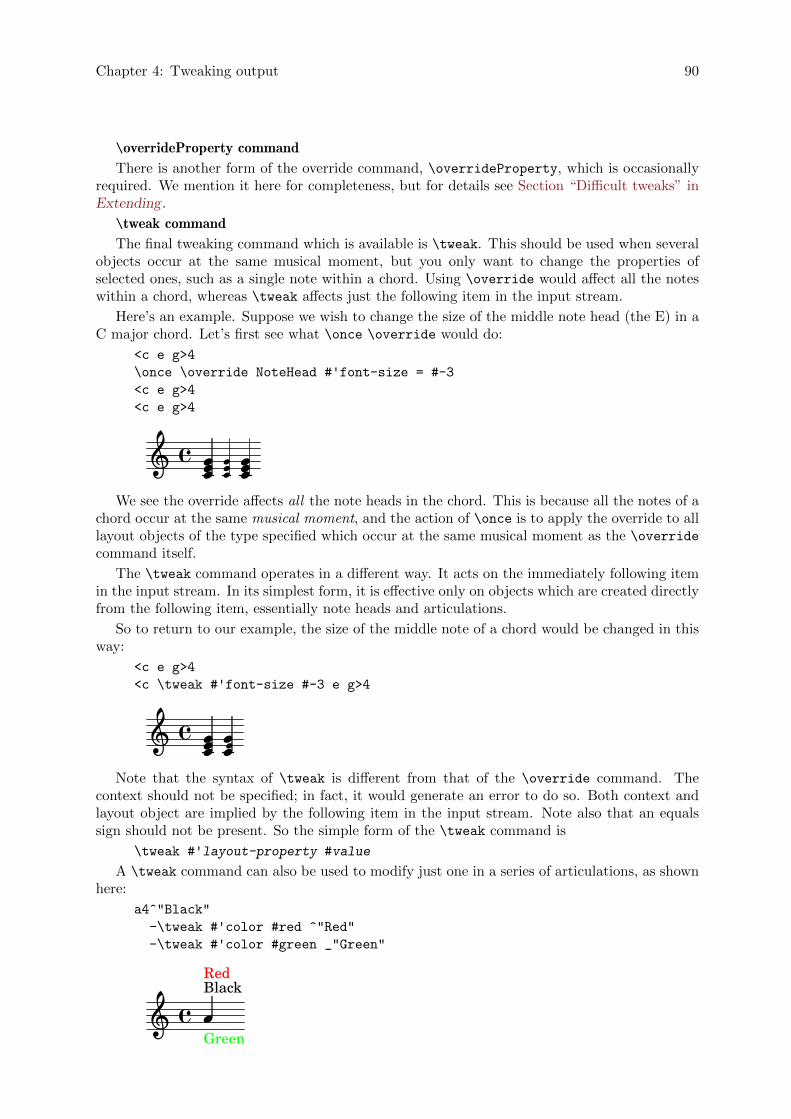
Chapter 4: Tweaking output 90
\overrideProperty command
There is another form of the override command, \overrideProperty, which is occasionallyrequired. We mention it here for completeness, but for details see Section “Difficult tweaks” inExtending .
\tweak command
The final tweaking command which is available is \tweak. This should be used when severalobjects occur at the same musical moment, but you only want to change the properties ofselected ones, such as a single note within a chord. Using \override would affect all the noteswithin a chord, whereas \tweak affects just the following item in the input stream.
Here’s an example. Suppose we wish to change the size of the middle note head (the E) in aC major chord. Let’s first see what \once \override would do:
<c e g>4
\once \override NoteHead #'font-size = #-3
<c e g>4
<c e g>4
222� 22� 2222
We see the override affects all the note heads in the chord. This is because all the notes of achord occur at the same musical moment, and the action of \once is to apply the override to alllayout objects of the type specified which occur at the same musical moment as the \overridecommand itself.
The \tweak command operates in a different way. It acts on the immediately following itemin the input stream. In its simplest form, it is effective only on objects which are created directlyfrom the following item, essentially note heads and articulations.
So to return to our example, the size of the middle note of a chord would be changed in thisway:
<c e g>4
<c \tweak #'font-size #-3 e g>4
2222 2� 2�
Note that the syntax of \tweak is different from that of the \override command. Thecontext should not be specified; in fact, it would generate an error to do so. Both context andlayout object are implied by the following item in the input stream. Note also that an equalssign should not be present. So the simple form of the \tweak command is
\tweak #'layout-property #value
A \tweak command can also be used to modify just one in a series of articulations, as shownhere:
a4^"Black"
-\tweak #'color #red ^"Red"
-\tweak #'color #green _"Green"
ÎGreen
Red
�Black�
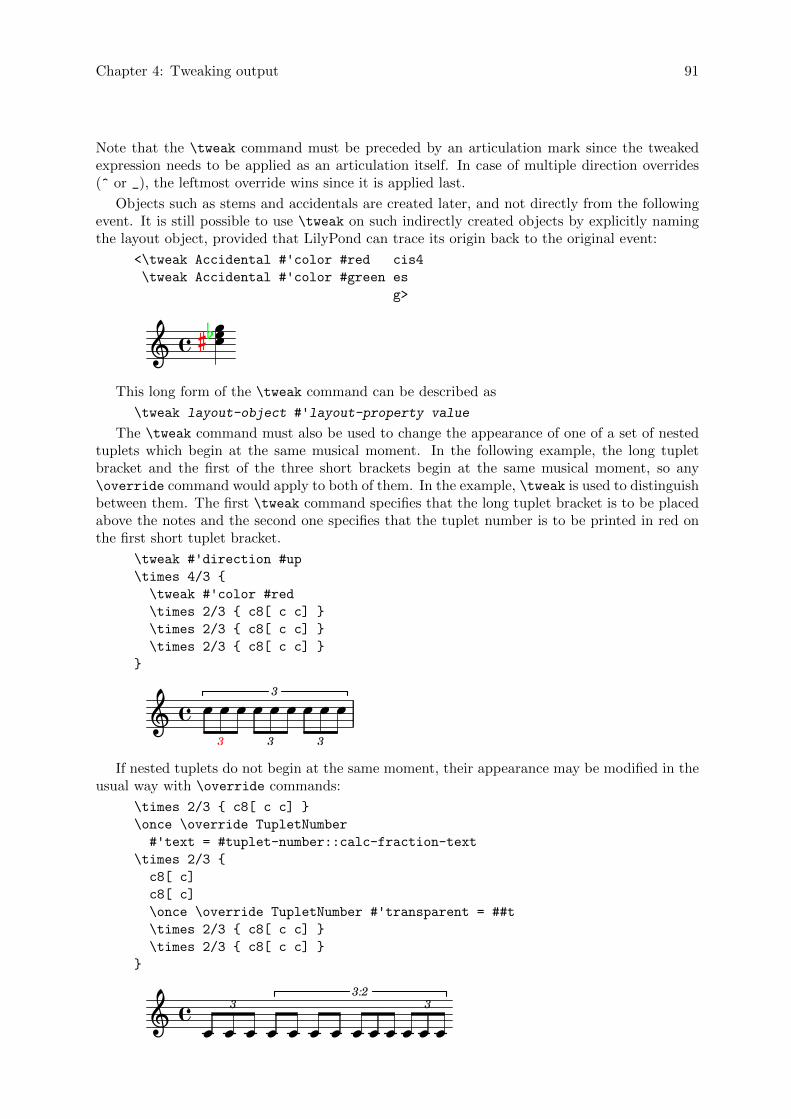
Chapter 4: Tweaking output 91
Note that the \tweak command must be preceded by an articulation mark since the tweakedexpression needs to be applied as an articulation itself. In case of multiple direction overrides(^ or _), the leftmost override wins since it is applied last.
Objects such as stems and accidentals are created later, and not directly from the followingevent. It is still possible to use \tweak on such indirectly created objects by explicitly namingthe layout object, provided that LilyPond can trace its origin back to the original event:
<\tweak Accidental #'color #red cis4
\tweak Accidental #'color #green es
g>
2�� 22� �
This long form of the \tweak command can be described as
\tweak layout-object #'layout-property value
The \tweak command must also be used to change the appearance of one of a set of nestedtuplets which begin at the same musical moment. In the following example, the long tupletbracket and the first of the three short brackets begin at the same musical moment, so any\override command would apply to both of them. In the example, \tweak is used to distinguishbetween them. The first \tweak command specifies that the long tuplet bracket is to be placedabove the notes and the second one specifies that the tuplet number is to be printed in red onthe first short tuplet bracket.
\tweak #'direction #up
\times 4/3 {
\tweak #'color #red
\times 2/3 { c8[ c c] }
\times 2/3 { c8[ c c] }
\times 2/3 { c8[ c c] }
}
Î3
Î� Î Î ÎÎÎ3
� Π3
3
If nested tuplets do not begin at the same moment, their appearance may be modified in theusual way with \override commands:
\times 2/3 { c8[ c c] }
\once \override TupletNumber
#'text = #tuplet-number::calc-fraction-text
\times 2/3 {
c8[ c]
c8[ c]
\once \override TupletNumber #'transparent = ##t
\times 2/3 { c8[ c c] }
\times 2/3 { c8[ c c] }
}
a 3
����� �3:2
� �3� �� � ��
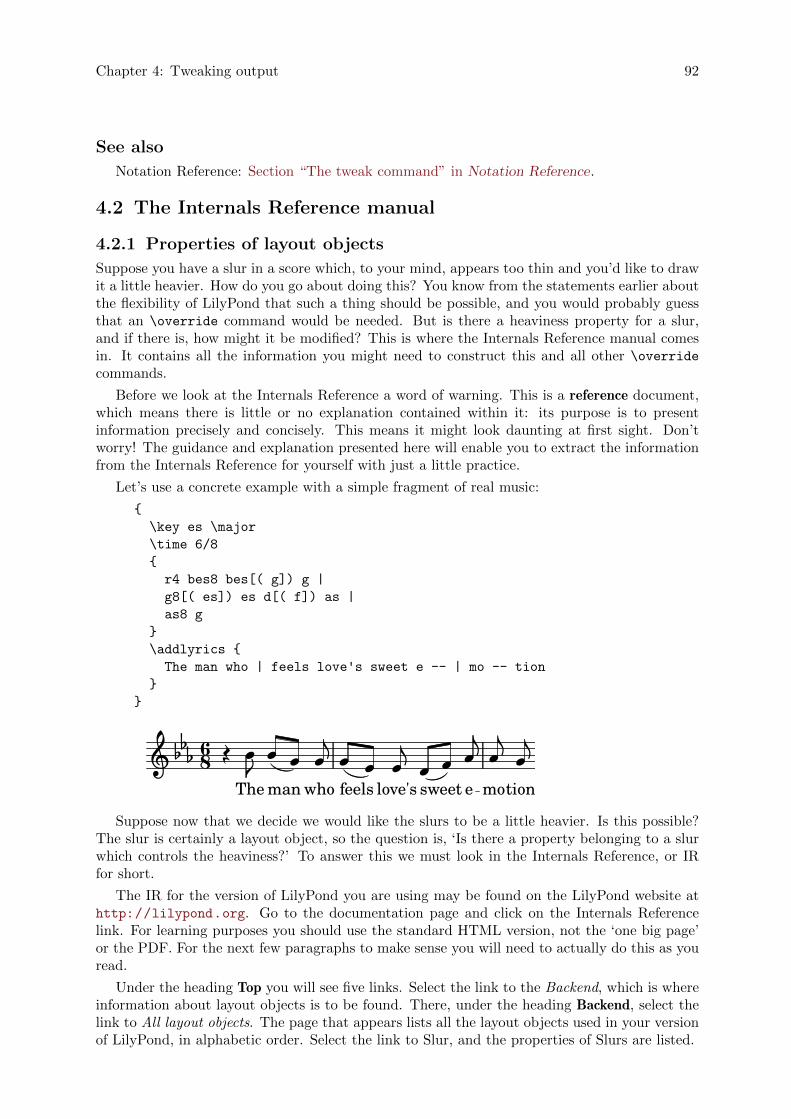
Chapter 4: Tweaking output 92
See also
Notation Reference: Section “The tweak command” in Notation Reference.
4.2 The Internals Reference manual
4.2.1 Properties of layout objects
Suppose you have a slur in a score which, to your mind, appears too thin and you’d like to drawit a little heavier. How do you go about doing this? You know from the statements earlier aboutthe flexibility of LilyPond that such a thing should be possible, and you would probably guessthat an \override command would be needed. But is there a heaviness property for a slur,and if there is, how might it be modified? This is where the Internals Reference manual comesin. It contains all the information you might need to construct this and all other \override
commands.
Before we look at the Internals Reference a word of warning. This is a reference document,which means there is little or no explanation contained within it: its purpose is to presentinformation precisely and concisely. This means it might look daunting at first sight. Don’tworry! The guidance and explanation presented here will enable you to extract the informationfrom the Internals Reference for yourself with just a little practice.
Let’s use a concrete example with a simple fragment of real music:
{
\key es \major
\time 6/8
{
r4 bes8 bes[( g]) g |
g8[( es]) es d[( f]) as |
as8 g
}
\addlyrics {
The man who | feels love's sweet e -- | mo -- tion
}
}
Îsweetlove's
Îtion
��� 86 Îe
ÎÎThe
Î Î��� Î
�feels mo
Î Îman
� Π�who
� �
Suppose now that we decide we would like the slurs to be a little heavier. Is this possible?The slur is certainly a layout object, so the question is, ‘Is there a property belonging to a slurwhich controls the heaviness?’ To answer this we must look in the Internals Reference, or IRfor short.
The IR for the version of LilyPond you are using may be found on the LilyPond website athttp://lilypond.org. Go to the documentation page and click on the Internals Referencelink. For learning purposes you should use the standard HTML version, not the ‘one big page’or the PDF. For the next few paragraphs to make sense you will need to actually do this as youread.
Under the heading Top you will see five links. Select the link to the Backend, which is whereinformation about layout objects is to be found. There, under the heading Backend, select thelink to All layout objects. The page that appears lists all the layout objects used in your versionof LilyPond, in alphabetic order. Select the link to Slur, and the properties of Slurs are listed.
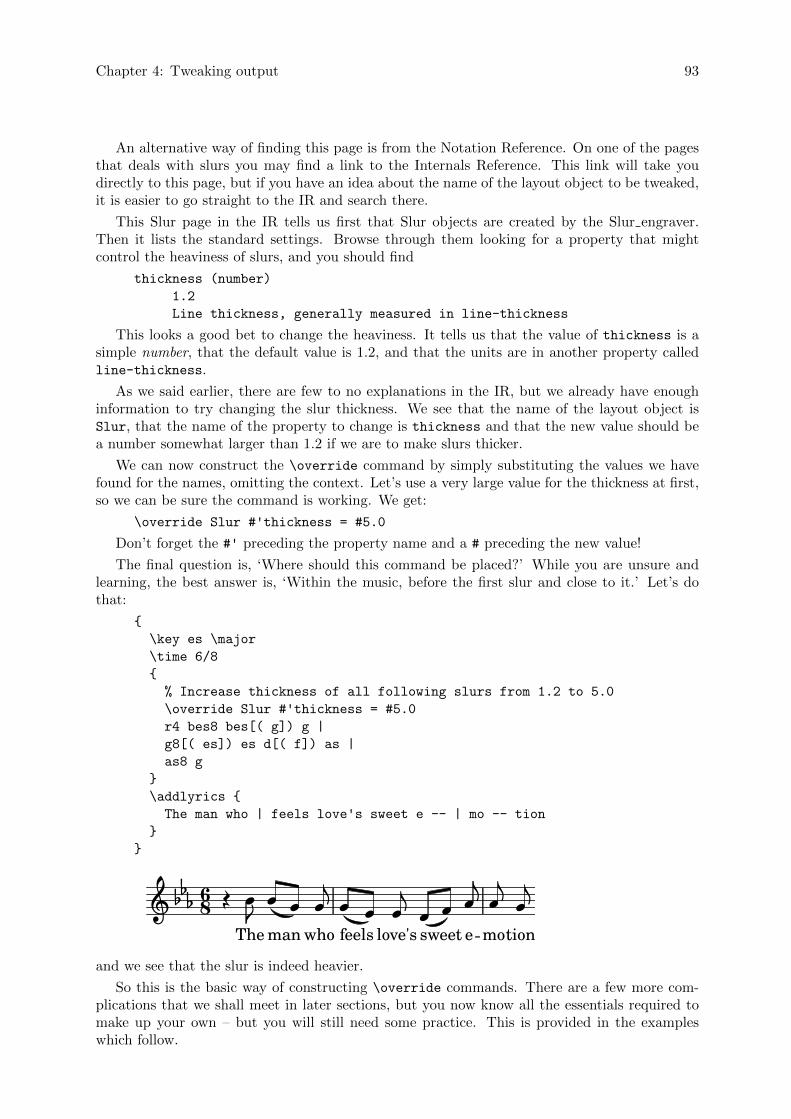
Chapter 4: Tweaking output 93
An alternative way of finding this page is from the Notation Reference. On one of the pagesthat deals with slurs you may find a link to the Internals Reference. This link will take youdirectly to this page, but if you have an idea about the name of the layout object to be tweaked,it is easier to go straight to the IR and search there.
This Slur page in the IR tells us first that Slur objects are created by the Slur engraver.Then it lists the standard settings. Browse through them looking for a property that mightcontrol the heaviness of slurs, and you should find
thickness (number)
1.2
Line thickness, generally measured in line-thickness
This looks a good bet to change the heaviness. It tells us that the value of thickness is asimple number, that the default value is 1.2, and that the units are in another property calledline-thickness.
As we said earlier, there are few to no explanations in the IR, but we already have enoughinformation to try changing the slur thickness. We see that the name of the layout object isSlur, that the name of the property to change is thickness and that the new value should bea number somewhat larger than 1.2 if we are to make slurs thicker.
We can now construct the \override command by simply substituting the values we havefound for the names, omitting the context. Let’s use a very large value for the thickness at first,so we can be sure the command is working. We get:
\override Slur #'thickness = #5.0
Don’t forget the #' preceding the property name and a # preceding the new value!
The final question is, ‘Where should this command be placed?’ While you are unsure andlearning, the best answer is, ‘Within the music, before the first slur and close to it.’ Let’s dothat:
{
\key es \major
\time 6/8
{
% Increase thickness of all following slurs from 1.2 to 5.0
\override Slur #'thickness = #5.0
r4 bes8 bes[( g]) g |
g8[( es]) es d[( f]) as |
as8 g
}
\addlyrics {
The man who | feels love's sweet e -- | mo -- tion
}
}
Î Îwho
Î��� � Î Îmo
�� ÎÎfeelsThe
� ��sweet
Îtion
Îlove's
�man e
�Î86
and we see that the slur is indeed heavier.
So this is the basic way of constructing \override commands. There are a few more com-plications that we shall meet in later sections, but you now know all the essentials required tomake up your own – but you will still need some practice. This is provided in the exampleswhich follow.
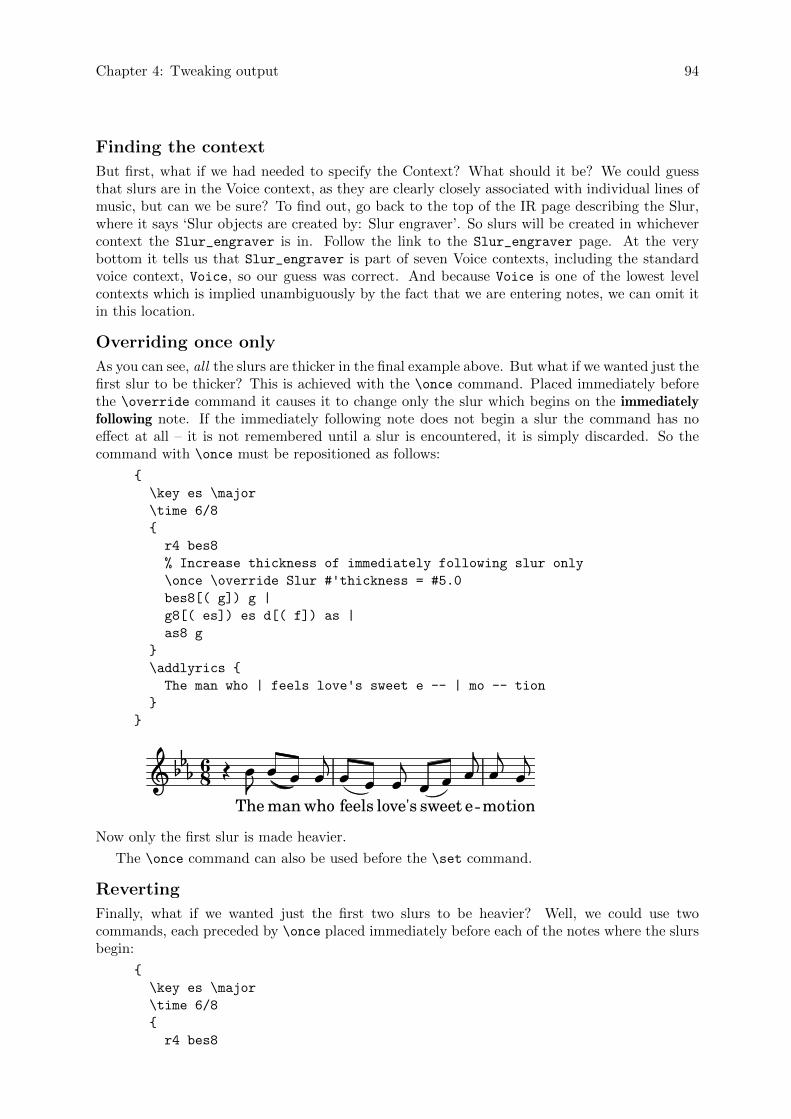
Chapter 4: Tweaking output 94
Finding the context
But first, what if we had needed to specify the Context? What should it be? We could guessthat slurs are in the Voice context, as they are clearly closely associated with individual lines ofmusic, but can we be sure? To find out, go back to the top of the IR page describing the Slur,where it says ‘Slur objects are created by: Slur engraver’. So slurs will be created in whichevercontext the Slur_engraver is in. Follow the link to the Slur_engraver page. At the verybottom it tells us that Slur_engraver is part of seven Voice contexts, including the standardvoice context, Voice, so our guess was correct. And because Voice is one of the lowest levelcontexts which is implied unambiguously by the fact that we are entering notes, we can omit itin this location.
Overriding once only
As you can see, all the slurs are thicker in the final example above. But what if we wanted just thefirst slur to be thicker? This is achieved with the \once command. Placed immediately beforethe \override command it causes it to change only the slur which begins on the immediatelyfollowing note. If the immediately following note does not begin a slur the command has noeffect at all – it is not remembered until a slur is encountered, it is simply discarded. So thecommand with \once must be repositioned as follows:
{
\key es \major
\time 6/8
{
r4 bes8
% Increase thickness of immediately following slur only
\once \override Slur #'thickness = #5.0
bes8[( g]) g |
g8[( es]) es d[( f]) as |
as8 g
}
\addlyrics {
The man who | feels love's sweet e -- | mo -- tion
}
}
Î� Îmo
�ÎÎ
The
�Î
love's
�e
Î Îsweet
�man
Î�� ��� Î Îtion
86feels
Îwho
�Î
Now only the first slur is made heavier.
The \once command can also be used before the \set command.
Reverting
Finally, what if we wanted just the first two slurs to be heavier? Well, we could use twocommands, each preceded by \once placed immediately before each of the notes where the slursbegin:
{
\key es \major
\time 6/8
{
r4 bes8
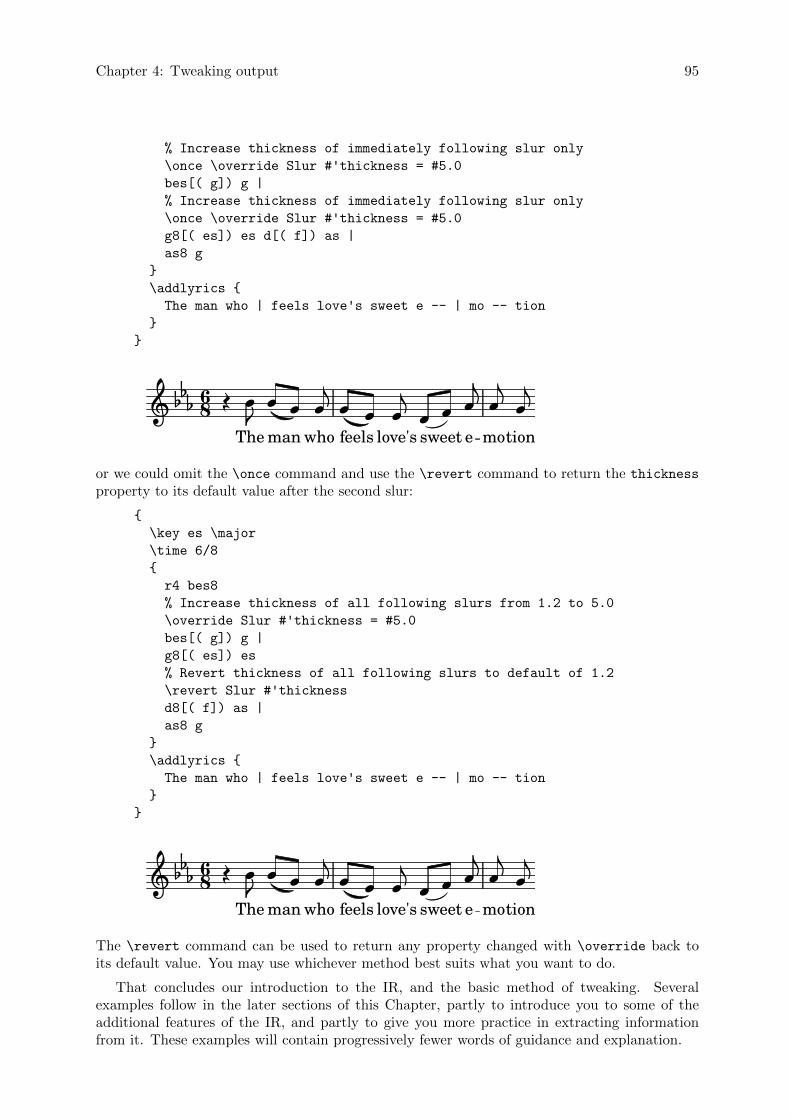
Chapter 4: Tweaking output 95
% Increase thickness of immediately following slur only
\once \override Slur #'thickness = #5.0
bes[( g]) g |
% Increase thickness of immediately following slur only
\once \override Slur #'thickness = #5.0
g8[( es]) es d[( f]) as |
as8 g
}
\addlyrics {
The man who | feels love's sweet e -- | mo -- tion
}
}
Îlove's
Îmo
ÎThe
86 Îe
�tion
Îwho
ÎÎ�
Î� Îman
�� ��feels
����sweet
or we could omit the \once command and use the \revert command to return the thicknessproperty to its default value after the second slur:
{
\key es \major
\time 6/8
{
r4 bes8
% Increase thickness of all following slurs from 1.2 to 5.0
\override Slur #'thickness = #5.0
bes[( g]) g |
g8[( es]) es
% Revert thickness of all following slurs to default of 1.2
\revert Slur #'thickness
d8[( f]) as |
as8 g
}
\addlyrics {
The man who | feels love's sweet e -- | mo -- tion
}
}
Îfeels
�Î Î �Î86
who e
Î �ÎÎ Î�� ����sweet
Îtion
Îlove's
Îmo
� ÎmanThe
�
The \revert command can be used to return any property changed with \override back toits default value. You may use whichever method best suits what you want to do.
That concludes our introduction to the IR, and the basic method of tweaking. Severalexamples follow in the later sections of this Chapter, partly to introduce you to some of theadditional features of the IR, and partly to give you more practice in extracting informationfrom it. These examples will contain progressively fewer words of guidance and explanation.
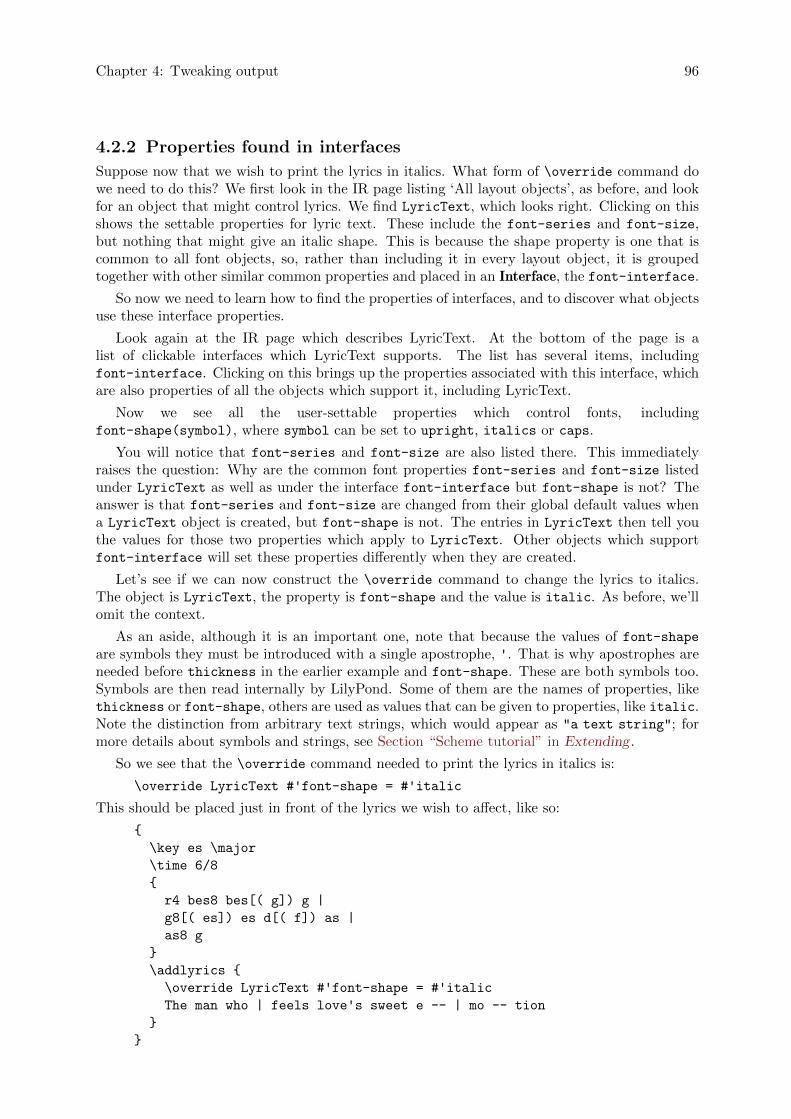
Chapter 4: Tweaking output 96
4.2.2 Properties found in interfaces
Suppose now that we wish to print the lyrics in italics. What form of \override command dowe need to do this? We first look in the IR page listing ‘All layout objects’, as before, and lookfor an object that might control lyrics. We find LyricText, which looks right. Clicking on thisshows the settable properties for lyric text. These include the font-series and font-size,but nothing that might give an italic shape. This is because the shape property is one that iscommon to all font objects, so, rather than including it in every layout object, it is groupedtogether with other similar common properties and placed in an Interface, the font-interface.
So now we need to learn how to find the properties of interfaces, and to discover what objectsuse these interface properties.
Look again at the IR page which describes LyricText. At the bottom of the page is alist of clickable interfaces which LyricText supports. The list has several items, includingfont-interface. Clicking on this brings up the properties associated with this interface, whichare also properties of all the objects which support it, including LyricText.
Now we see all the user-settable properties which control fonts, includingfont-shape(symbol), where symbol can be set to upright, italics or caps.
You will notice that font-series and font-size are also listed there. This immediatelyraises the question: Why are the common font properties font-series and font-size listedunder LyricText as well as under the interface font-interface but font-shape is not? Theanswer is that font-series and font-size are changed from their global default values whena LyricText object is created, but font-shape is not. The entries in LyricText then tell youthe values for those two properties which apply to LyricText. Other objects which supportfont-interface will set these properties differently when they are created.
Let’s see if we can now construct the \override command to change the lyrics to italics.The object is LyricText, the property is font-shape and the value is italic. As before, we’llomit the context.
As an aside, although it is an important one, note that because the values of font-shapeare symbols they must be introduced with a single apostrophe, '. That is why apostrophes areneeded before thickness in the earlier example and font-shape. These are both symbols too.Symbols are then read internally by LilyPond. Some of them are the names of properties, likethickness or font-shape, others are used as values that can be given to properties, like italic.Note the distinction from arbitrary text strings, which would appear as "a text string"; formore details about symbols and strings, see Section “Scheme tutorial” in Extending .
So we see that the \override command needed to print the lyrics in italics is:
\override LyricText #'font-shape = #'italic
This should be placed just in front of the lyrics we wish to affect, like so:
{
\key es \major
\time 6/8
{
r4 bes8 bes[( g]) g |
g8[( es]) es d[( f]) as |
as8 g
}
\addlyrics {
\override LyricText #'font-shape = #'italic
The man who | feels love's sweet e -- | mo -- tion
}
}
Chapter 4: Tweaking output 97
å åe
åmo
ålove's
�åsweet
� ��� 86�åtion
�man
å åwho
� åThe� å å
� �åfeels
and the lyrics are all printed in italics.
Specifying the context in lyric mode
In the case of lyrics, if you try specifying the context in the format given earlier the commandwill fail. A syllable entered in lyricmode is terminated by either a space, a newline or a digit.All other characters are included as part of the syllable. For this reason a space or newlinemust appear before the terminating } to prevent it being included as part of the final syllable.Similarly, spaces must be inserted before and after the period or dot, ‘.’, separating the contextname from the object name, as otherwise the two names are run together and the interpretercannot recognize them. So the command should be:
\override Lyrics . LyricText #'font-shape = #'italic� �Note: In lyrics always leave whitespace between the final syllable andthe terminating brace. � �Note: In overrides in lyrics always place spaces around the dot betweenthe context name and the object name.
See also
Extending: Section “Scheme tutorial” in Extending .
4.2.3 Types of properties
So far we have seen two types of property: number and symbol. To be valid, the value given toa property must be of the correct type and obey the rules for that type. The type of propertyis always shown in brackets after the property name in the IR. Here is a list of the types youmay need, together with the rules for that type, and some examples. You must always add ahash symbol, #, of course, to the front of these values when they are entered in the \override
command.
Property type Rules ExamplesBoolean Either True or False, represented by #t
or #f#t, #f
Dimension (in staffspace)
A positive decimal number (in units ofstaff space)
2.5, 0.34
Direction A valid direction constant or its numer-ical equivalent (decimal values between-1 and 1 are allowed)
LEFT, CENTER, UP, 1, -1
Integer A positive whole number 3, 1List A set of values separated by spaces, en-
closed in parentheses and preceded by anapostrophe
'(left-edge staff-bar),'(1), '(1.0 0.25 0.5)
Markup Any valid markup \markup { \italic "cresc."
}
Moment A fraction of a whole note constructedwith the make-moment function
(ly:make-moment 1 4),(ly:make-moment 3 8)
Number Any positive or negative decimal value 3.5, -2.45
Chapter 4: Tweaking output 98
Pair (of numbers) Two numbers separated by a ‘space .space’ and enclosed in brackets precededby an apostrophe
'(2 . 3.5), '(0.1 . -3.2)
Symbol Any of the set of permitted sym-bols for that property, preceded by anapostrophe
'italic, 'inside
Unknown A procedure, or #f to cause no action bend::print,ly:text-interface::print,#f
Vector A list of three items enclosed in paren-theses and preceded by apostrophe-hash,'#.
'#(#t #t #f)
See also
Extending: Section “Scheme tutorial” in Extending .
4.3 Appearance of objects
Let us now put what we have learned into practice with a few examples which show how tweaksmay be used to change the appearance of the printed music.
4.3.1 Visibility and color of objects
In the educational use of music we might wish to print a score with certain elements omitted asan exercise for the student, who is required to supply them. As a simple example, let us supposethe exercise is to supply the missing bar lines in a piece of music. But the bar lines are normallyinserted automatically. How do we prevent them printing?
Before we tackle this, let us remember that object properties are grouped in what are calledinterfaces – see Section 4.2.2 [Properties found in interfaces], page 96. This is simply to grouptogether those properties that may be used together to tweak a graphical object – if one ofthem is allowed for an object, so are the others. Some objects then use the properties in someinterfaces, others use them from other interfaces. The interfaces which contain the propertiesused by a particular grob are listed in the IR at the bottom of the page describing that grob,and those properties may be viewed by looking at those interfaces.
We explained how to find information about grobs in Section 4.2.1 [Properties of layoutobjects], page 92. Using the same approach, we go to the IR to find the layout object whichprints bar lines. Going via Backend and All layout objects we find there is a layout object calledBarLine. Its properties include two that control its visibility: break-visibility and stencil.Barline also supports a number of interfaces, including the grob-interface, where we find thetransparent and the color properties. All of these can affect the visibility of bar lines (and,of course, by extension, many other layout objects too.) Let’s consider each of these in turn.
stencil
This property controls the appearance of the bar lines by specifying the symbol (glyph) whichshould be printed. In common with many other properties, it can be set to print nothing bysetting its value to #f. Let’s try it, as before, omitting the implied Context, Voice:
{
\time 12/16
\override BarLine #'stencil = ##f
c4 b8 c d16 c d8 |
g,8 a16 b8 c d4 e16 |
e8

Chapter 4: Tweaking output 99
}
Î1612� Î �Î�
ÎÎ �ÎÎÎ Î Î ÎÎ ÎThe bar lines are still printed. What is wrong? Go back to the IR and look again at the page
giving the properties of BarLine. At the top of the page it says “Barline objects are createdby: Bar engraver”. Go to the Bar_engraver page. At the bottom it gives a list of Contexts inwhich the bar engraver operates. All of them are of the type Staff, so the reason the \overridecommand failed to work as expected is because Barline is not in the default Voice context.If the context is specified incorrectly, the command simply does not work. No error messageis produced, and nothing is logged in the log file. Let’s try correcting it by adding the correctcontext:
{
\time 12/16
\override Staff.BarLine #'stencil = ##f
c4 b8 c d16 c d8 |
g,8 a16 b8 c d4 e16 |
e8
}
ΠΠ��� �
Î Î1612 ÎÎÎ ÎÎ ÎÎ ÎNow the bar lines have vanished.
Note, though, that setting the stencil property to #f will cause errors when the dimensionsof the object are required for correct processing. For example, errors will be generated if thestencil property of the NoteHead object is set to #f. If this is the case, you can instead usethe point-stencil function, which sets the stencil to a object with zero size:
{
c4 c
\once \override NoteHead #'stencil = #point-stencil
c4 c
}
Š� �� �break-visibility
We see from the BarLine properties in the IR that the break-visibility property requires avector of three booleans. These control respectively whether bar lines are printed at the end ofa line, in the middle of lines, and at the beginning of lines. For our example we want all barlines to be suppressed, so the value we need is '#(#f #f #f). Let’s try that, remembering toinclude the Staff context. Note also that in writing this value we have #'# before the openingbracket. The '# is required as part of the value to introduce a vector, and the first # is required,as always, to precede the value itself in the \override command.
{
\time 12/16
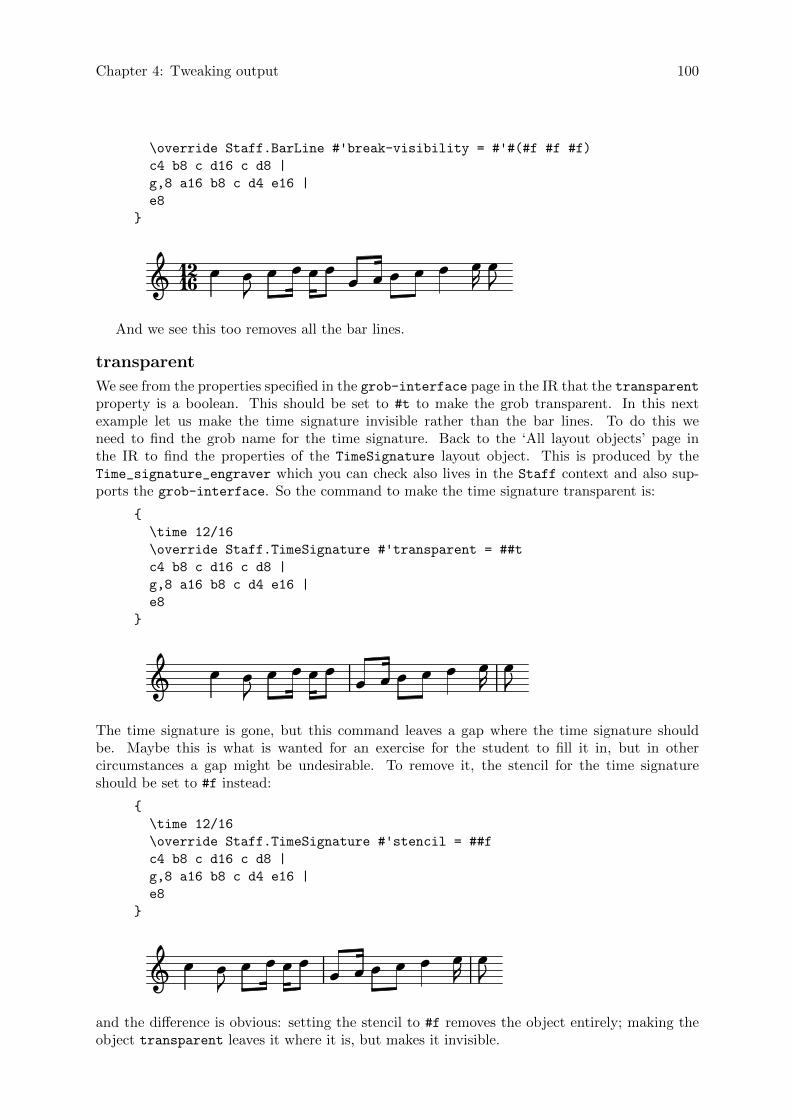
Chapter 4: Tweaking output 100
\override Staff.BarLine #'break-visibility = #'#(#f #f #f)
c4 b8 c d16 c d8 |
g,8 a16 b8 c d4 e16 |
e8
}
Î Î�ÎÎ1612� �ÎÎÎÎ�Î
Î ÎÎ ÎAnd we see this too removes all the bar lines.
transparent
We see from the properties specified in the grob-interface page in the IR that the transparentproperty is a boolean. This should be set to #t to make the grob transparent. In this nextexample let us make the time signature invisible rather than the bar lines. To do this weneed to find the grob name for the time signature. Back to the ‘All layout objects’ page inthe IR to find the properties of the TimeSignature layout object. This is produced by theTime_signature_engraver which you can check also lives in the Staff context and also sup-ports the grob-interface. So the command to make the time signature transparent is:
{
\time 12/16
\override Staff.TimeSignature #'transparent = ##t
c4 b8 c d16 c d8 |
g,8 a16 b8 c d4 e16 |
e8
}
Î ÎÎ� Î ÎÎ �Î Î �Î ÎÎ� ÎÎ
The time signature is gone, but this command leaves a gap where the time signature shouldbe. Maybe this is what is wanted for an exercise for the student to fill it in, but in othercircumstances a gap might be undesirable. To remove it, the stencil for the time signatureshould be set to #f instead:
{
\time 12/16
\override Staff.TimeSignature #'stencil = ##f
c4 b8 c d16 c d8 |
g,8 a16 b8 c d4 e16 |
e8
}
Î Î�ÎÎ� �ÎÎÎÎ�Î
Î ÎÎÎ
and the difference is obvious: setting the stencil to #f removes the object entirely; making theobject transparent leaves it where it is, but makes it invisible.
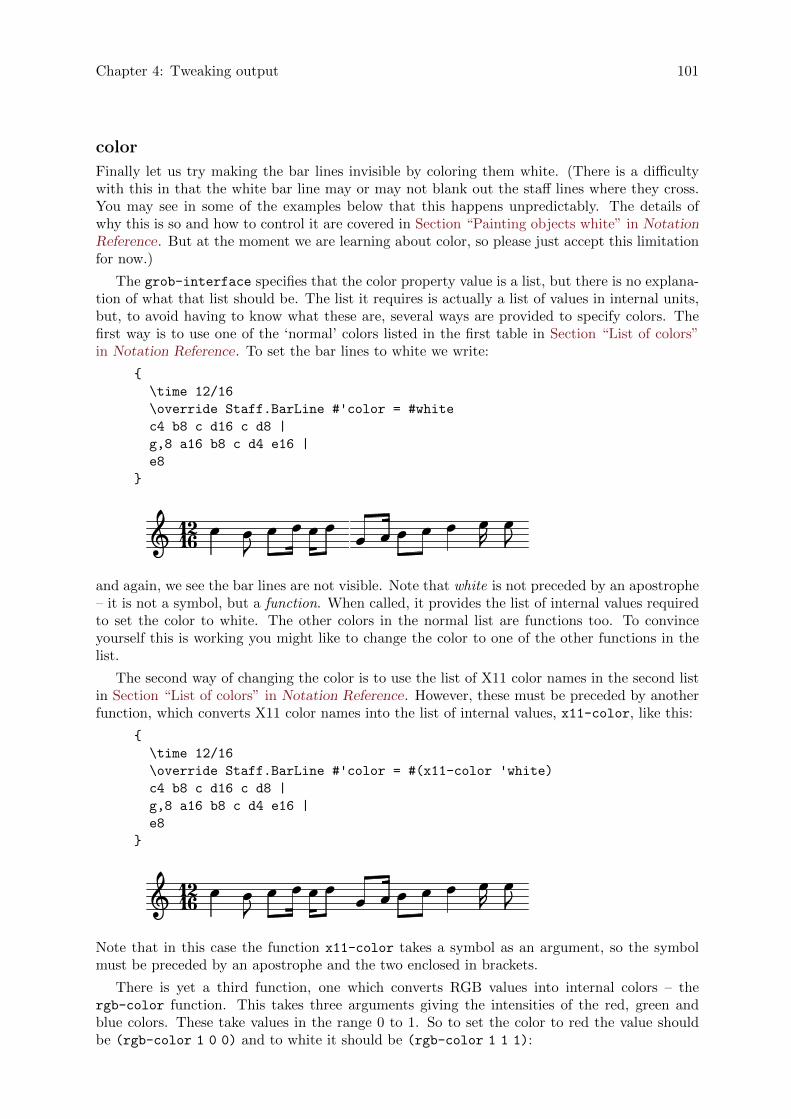
Chapter 4: Tweaking output 101
color
Finally let us try making the bar lines invisible by coloring them white. (There is a difficultywith this in that the white bar line may or may not blank out the staff lines where they cross.You may see in some of the examples below that this happens unpredictably. The details ofwhy this is so and how to control it are covered in Section “Painting objects white” in NotationReference. But at the moment we are learning about color, so please just accept this limitationfor now.)
The grob-interface specifies that the color property value is a list, but there is no explana-tion of what that list should be. The list it requires is actually a list of values in internal units,but, to avoid having to know what these are, several ways are provided to specify colors. Thefirst way is to use one of the ‘normal’ colors listed in the first table in Section “List of colors”in Notation Reference. To set the bar lines to white we write:
{
\time 12/16
\override Staff.BarLine #'color = #white
c4 b8 c d16 c d8 |
g,8 a16 b8 c d4 e16 |
e8
}
ÎÎ Î Î� Î Î �ÎÎ Î1612 Î �� ÎÎ Î
and again, we see the bar lines are not visible. Note that white is not preceded by an apostrophe– it is not a symbol, but a function. When called, it provides the list of internal values requiredto set the color to white. The other colors in the normal list are functions too. To convinceyourself this is working you might like to change the color to one of the other functions in thelist.
The second way of changing the color is to use the list of X11 color names in the second listin Section “List of colors” in Notation Reference. However, these must be preceded by anotherfunction, which converts X11 color names into the list of internal values, x11-color, like this:
{
\time 12/16
\override Staff.BarLine #'color = #(x11-color 'white)
c4 b8 c d16 c d8 |
g,8 a16 b8 c d4 e16 |
e8
}
� ��� ��� �� �� �1612 �� ���Note that in this case the function x11-color takes a symbol as an argument, so the symbolmust be preceded by an apostrophe and the two enclosed in brackets.
There is yet a third function, one which converts RGB values into internal colors – thergb-color function. This takes three arguments giving the intensities of the red, green andblue colors. These take values in the range 0 to 1. So to set the color to red the value shouldbe (rgb-color 1 0 0) and to white it should be (rgb-color 1 1 1):
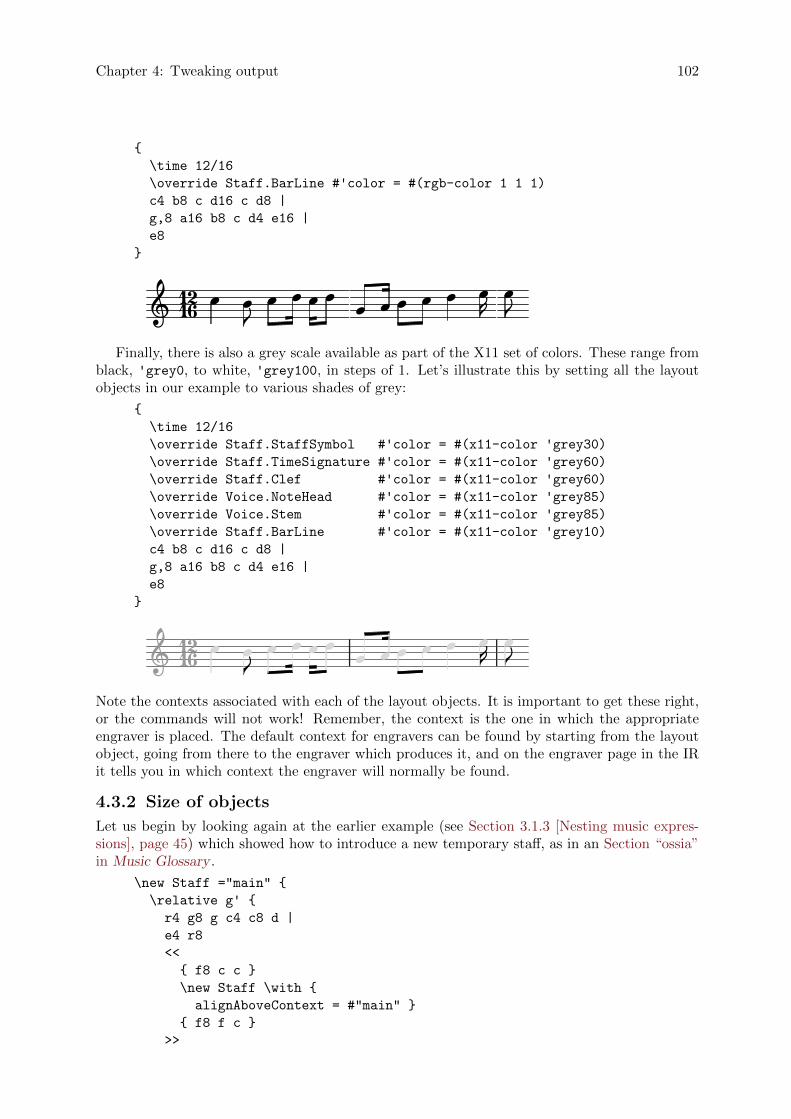
Chapter 4: Tweaking output 102
{
\time 12/16
\override Staff.BarLine #'color = #(rgb-color 1 1 1)
c4 b8 c d16 c d8 |
g,8 a16 b8 c d4 e16 |
e8
}
§1612 � � ������ � �� � ����
Finally, there is also a grey scale available as part of the X11 set of colors. These range fromblack, 'grey0, to white, 'grey100, in steps of 1. Let’s illustrate this by setting all the layoutobjects in our example to various shades of grey:
{
\time 12/16
\override Staff.StaffSymbol #'color = #(x11-color 'grey30)
\override Staff.TimeSignature #'color = #(x11-color 'grey60)
\override Staff.Clef #'color = #(x11-color 'grey60)
\override Voice.NoteHead #'color = #(x11-color 'grey85)
\override Voice.Stem #'color = #(x11-color 'grey85)
\override Staff.BarLine #'color = #(x11-color 'grey10)
c4 b8 c d16 c d8 |
g,8 a16 b8 c d4 e16 |
e8
}
§�� � �� �� � � ��� �1612� ��
Note the contexts associated with each of the layout objects. It is important to get these right,or the commands will not work! Remember, the context is the one in which the appropriateengraver is placed. The default context for engravers can be found by starting from the layoutobject, going from there to the engraver which produces it, and on the engraver page in the IRit tells you in which context the engraver will normally be found.
4.3.2 Size of objects
Let us begin by looking again at the earlier example (see Section 3.1.3 [Nesting music expres-sions], page 45) which showed how to introduce a new temporary staff, as in an Section “ossia”in Music Glossary .
\new Staff ="main" {
\relative g' {
r4 g8 g c4 c8 d |
e4 r8
<<
{ f8 c c }
\new Staff \with {
alignAboveContext = #"main" }
{ f8 f c }
>>
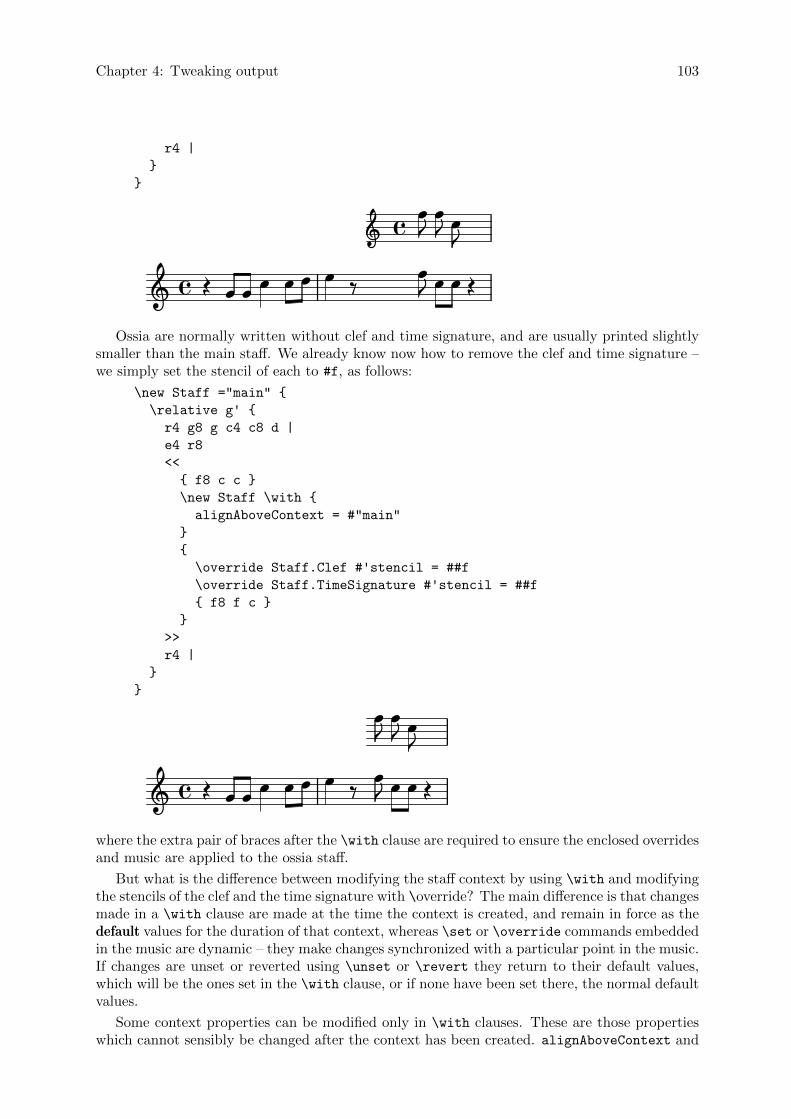
Chapter 4: Tweaking output 103
r4 |
}
}
Î
��
Î Î� ÎÎ� �
ÎÎ�
� Î
Î
�� � ÎÎÎ�
Ossia are normally written without clef and time signature, and are usually printed slightlysmaller than the main staff. We already know now how to remove the clef and time signature –we simply set the stencil of each to #f, as follows:
\new Staff ="main" {
\relative g' {
r4 g8 g c4 c8 d |
e4 r8
<<
{ f8 c c }
\new Staff \with {
alignAboveContext = #"main"
}
{
\override Staff.Clef #'stencil = ##f
\override Staff.TimeSignature #'stencil = ##f
{ f8 f c }
}
>>
r4 |
}
}
ÎÎ ÎÎ ��
Î
��
��
Î�ÎÎÎ
�� Î
Î
where the extra pair of braces after the \with clause are required to ensure the enclosed overridesand music are applied to the ossia staff.
But what is the difference between modifying the staff context by using \with and modifyingthe stencils of the clef and the time signature with \override? The main difference is that changesmade in a \with clause are made at the time the context is created, and remain in force as thedefault values for the duration of that context, whereas \set or \override commands embeddedin the music are dynamic – they make changes synchronized with a particular point in the music.If changes are unset or reverted using \unset or \revert they return to their default values,which will be the ones set in the \with clause, or if none have been set there, the normal defaultvalues.
Some context properties can be modified only in \with clauses. These are those propertieswhich cannot sensibly be changed after the context has been created. alignAboveContext and
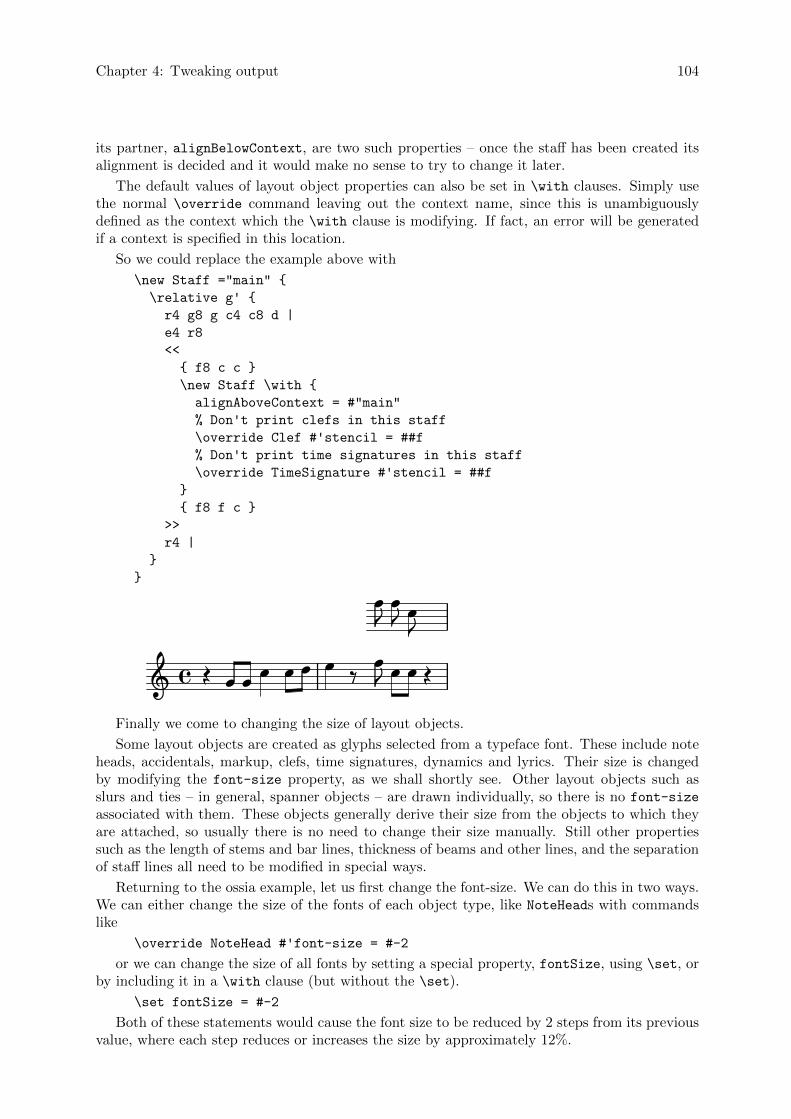
Chapter 4: Tweaking output 104
its partner, alignBelowContext, are two such properties – once the staff has been created itsalignment is decided and it would make no sense to try to change it later.
The default values of layout object properties can also be set in \with clauses. Simply usethe normal \override command leaving out the context name, since this is unambiguouslydefined as the context which the \with clause is modifying. If fact, an error will be generatedif a context is specified in this location.
So we could replace the example above with
\new Staff ="main" {
\relative g' {
r4 g8 g c4 c8 d |
e4 r8
<<
{ f8 c c }
\new Staff \with {
alignAboveContext = #"main"
% Don't print clefs in this staff
\override Clef #'stencil = ##f
% Don't print time signatures in this staff
\override TimeSignature #'stencil = ##f
}
{ f8 f c }
>>
r4 |
}
}
����
�
� ��� �� �� �
� � �
� �� �
Finally we come to changing the size of layout objects.
Some layout objects are created as glyphs selected from a typeface font. These include noteheads, accidentals, markup, clefs, time signatures, dynamics and lyrics. Their size is changedby modifying the font-size property, as we shall shortly see. Other layout objects such asslurs and ties – in general, spanner objects – are drawn individually, so there is no font-size
associated with them. These objects generally derive their size from the objects to which theyare attached, so usually there is no need to change their size manually. Still other propertiessuch as the length of stems and bar lines, thickness of beams and other lines, and the separationof staff lines all need to be modified in special ways.
Returning to the ossia example, let us first change the font-size. We can do this in two ways.We can either change the size of the fonts of each object type, like NoteHeads with commandslike
\override NoteHead #'font-size = #-2
or we can change the size of all fonts by setting a special property, fontSize, using \set, orby including it in a \with clause (but without the \set).
\set fontSize = #-2
Both of these statements would cause the font size to be reduced by 2 steps from its previousvalue, where each step reduces or increases the size by approximately 12%.
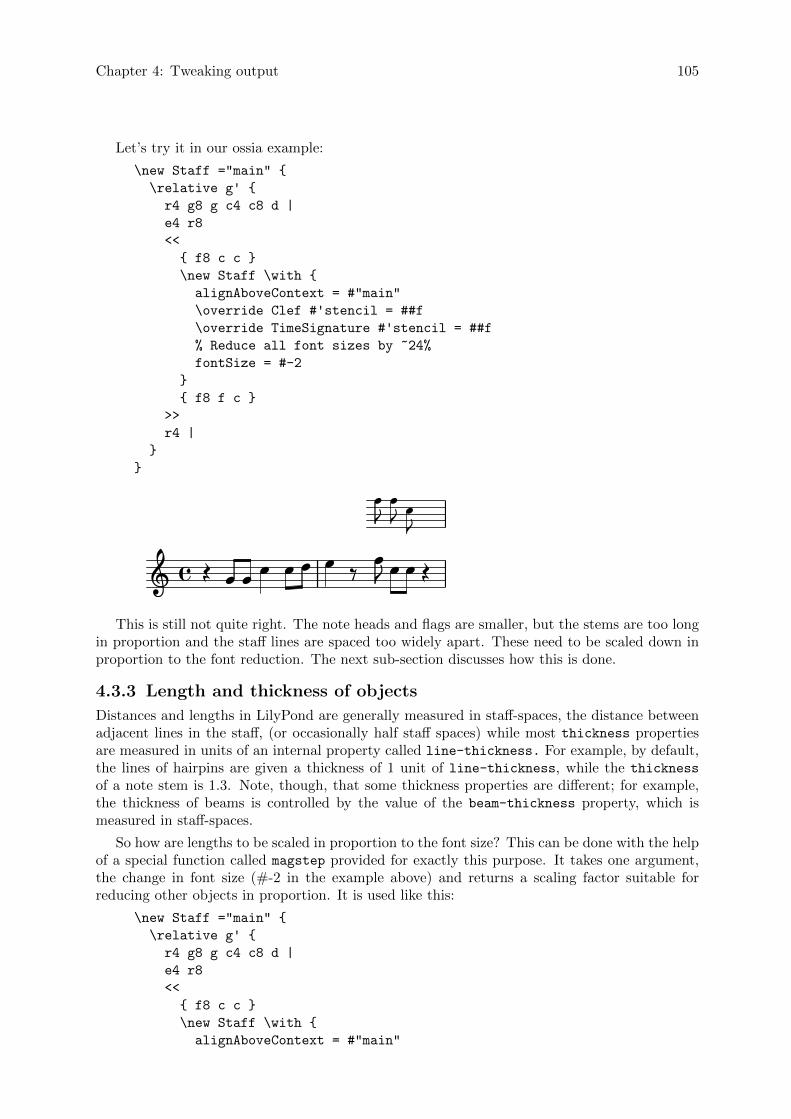
Chapter 4: Tweaking output 105
Let’s try it in our ossia example:
\new Staff ="main" {
\relative g' {
r4 g8 g c4 c8 d |
e4 r8
<<
{ f8 c c }
\new Staff \with {
alignAboveContext = #"main"
\override Clef #'stencil = ##f
\override TimeSignature #'stencil = ##f
% Reduce all font sizes by ~24%
fontSize = #-2
}
{ f8 f c }
>>
r4 |
}
}
�
�
��
Î
�
�
�� � Π� ΠΠ� �
Î Î
This is still not quite right. The note heads and flags are smaller, but the stems are too longin proportion and the staff lines are spaced too widely apart. These need to be scaled down inproportion to the font reduction. The next sub-section discusses how this is done.
4.3.3 Length and thickness of objects
Distances and lengths in LilyPond are generally measured in staff-spaces, the distance betweenadjacent lines in the staff, (or occasionally half staff spaces) while most thickness propertiesare measured in units of an internal property called line-thickness. For example, by default,the lines of hairpins are given a thickness of 1 unit of line-thickness, while the thickness
of a note stem is 1.3. Note, though, that some thickness properties are different; for example,the thickness of beams is controlled by the value of the beam-thickness property, which ismeasured in staff-spaces.
So how are lengths to be scaled in proportion to the font size? This can be done with the helpof a special function called magstep provided for exactly this purpose. It takes one argument,the change in font size (#-2 in the example above) and returns a scaling factor suitable forreducing other objects in proportion. It is used like this:
\new Staff ="main" {
\relative g' {
r4 g8 g c4 c8 d |
e4 r8
<<
{ f8 c c }
\new Staff \with {
alignAboveContext = #"main"
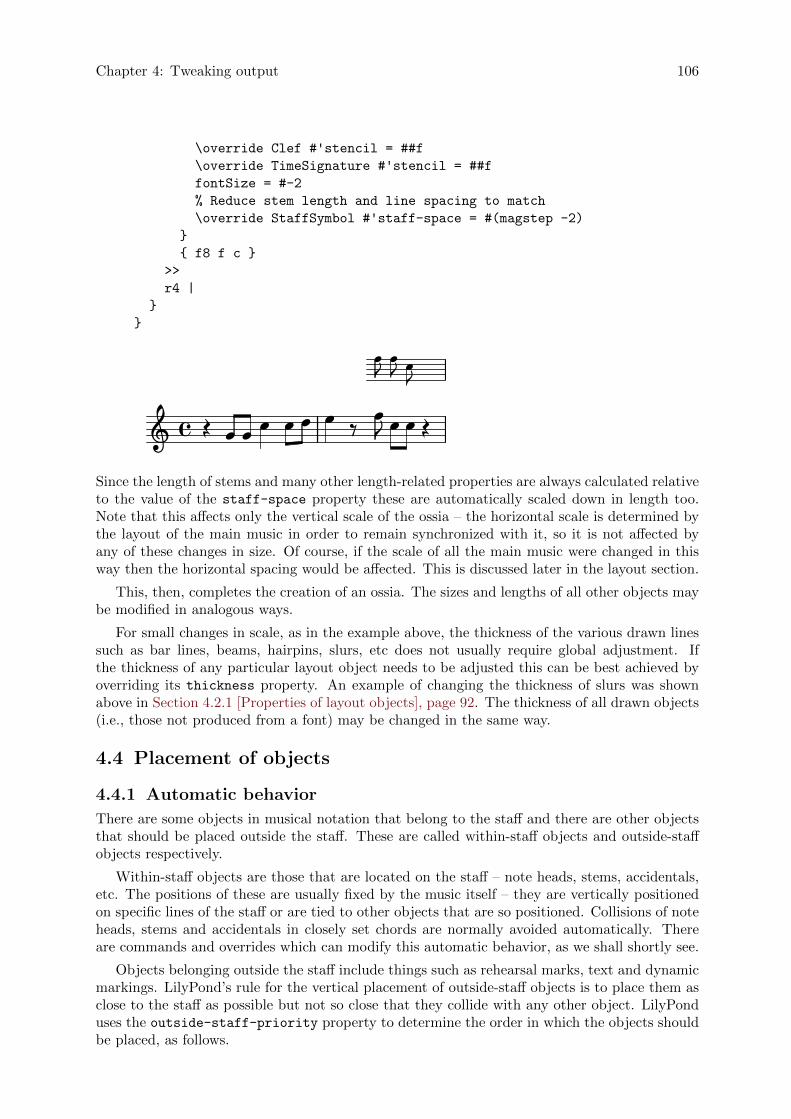
Chapter 4: Tweaking output 106
\override Clef #'stencil = ##f
\override TimeSignature #'stencil = ##f
fontSize = #-2
% Reduce stem length and line spacing to match
\override StaffSymbol #'staff-space = #(magstep -2)
}
{ f8 f c }
>>
r4 |
}
}
�
Î
�
��
Π�
�
Î� ÎÎ� Î ���
�ÎSince the length of stems and many other length-related properties are always calculated relativeto the value of the staff-space property these are automatically scaled down in length too.Note that this affects only the vertical scale of the ossia – the horizontal scale is determined bythe layout of the main music in order to remain synchronized with it, so it is not affected byany of these changes in size. Of course, if the scale of all the main music were changed in thisway then the horizontal spacing would be affected. This is discussed later in the layout section.
This, then, completes the creation of an ossia. The sizes and lengths of all other objects maybe modified in analogous ways.
For small changes in scale, as in the example above, the thickness of the various drawn linessuch as bar lines, beams, hairpins, slurs, etc does not usually require global adjustment. Ifthe thickness of any particular layout object needs to be adjusted this can be best achieved byoverriding its thickness property. An example of changing the thickness of slurs was shownabove in Section 4.2.1 [Properties of layout objects], page 92. The thickness of all drawn objects(i.e., those not produced from a font) may be changed in the same way.
4.4 Placement of objects
4.4.1 Automatic behavior
There are some objects in musical notation that belong to the staff and there are other objectsthat should be placed outside the staff. These are called within-staff objects and outside-staffobjects respectively.
Within-staff objects are those that are located on the staff – note heads, stems, accidentals,etc. The positions of these are usually fixed by the music itself – they are vertically positionedon specific lines of the staff or are tied to other objects that are so positioned. Collisions of noteheads, stems and accidentals in closely set chords are normally avoided automatically. Thereare commands and overrides which can modify this automatic behavior, as we shall shortly see.
Objects belonging outside the staff include things such as rehearsal marks, text and dynamicmarkings. LilyPond’s rule for the vertical placement of outside-staff objects is to place them asclose to the staff as possible but not so close that they collide with any other object. LilyPonduses the outside-staff-priority property to determine the order in which the objects shouldbe placed, as follows.
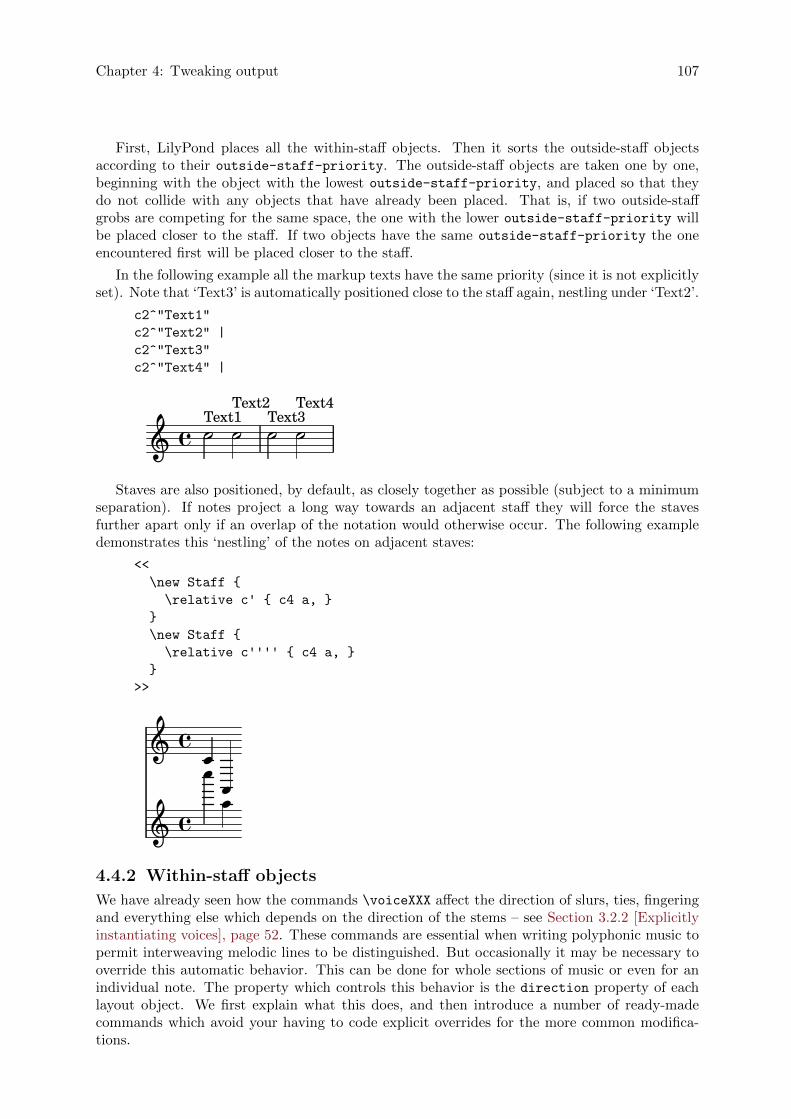
Chapter 4: Tweaking output 107
First, LilyPond places all the within-staff objects. Then it sorts the outside-staff objectsaccording to their outside-staff-priority. The outside-staff objects are taken one by one,beginning with the object with the lowest outside-staff-priority, and placed so that theydo not collide with any objects that have already been placed. That is, if two outside-staffgrobs are competing for the same space, the one with the lower outside-staff-priority willbe placed closer to the staff. If two objects have the same outside-staff-priority the oneencountered first will be placed closer to the staff.
In the following example all the markup texts have the same priority (since it is not explicitlyset). Note that ‘Text3’ is automatically positioned close to the staff again, nestling under ‘Text2’.
c2^"Text1"
c2^"Text2" |
c2^"Text3"
c2^"Text4" |
× Text1�Text4
Text3�Text2
���Staves are also positioned, by default, as closely together as possible (subject to a minimum
separation). If notes project a long way towards an adjacent staff they will force the stavesfurther apart only if an overlap of the notation would otherwise occur. The following exampledemonstrates this ‘nestling’ of the notes on adjacent staves:
<<
\new Staff {
\relative c' { c4 a, }
}
\new Staff {
\relative c'''' { c4 a, }
}
>>
Å
��
�
��
�
4.4.2 Within-staff objects
We have already seen how the commands \voiceXXX affect the direction of slurs, ties, fingeringand everything else which depends on the direction of the stems – see Section 3.2.2 [Explicitlyinstantiating voices], page 52. These commands are essential when writing polyphonic music topermit interweaving melodic lines to be distinguished. But occasionally it may be necessary tooverride this automatic behavior. This can be done for whole sections of music or even for anindividual note. The property which controls this behavior is the direction property of eachlayout object. We first explain what this does, and then introduce a number of ready-madecommands which avoid your having to code explicit overrides for the more common modifica-tions.
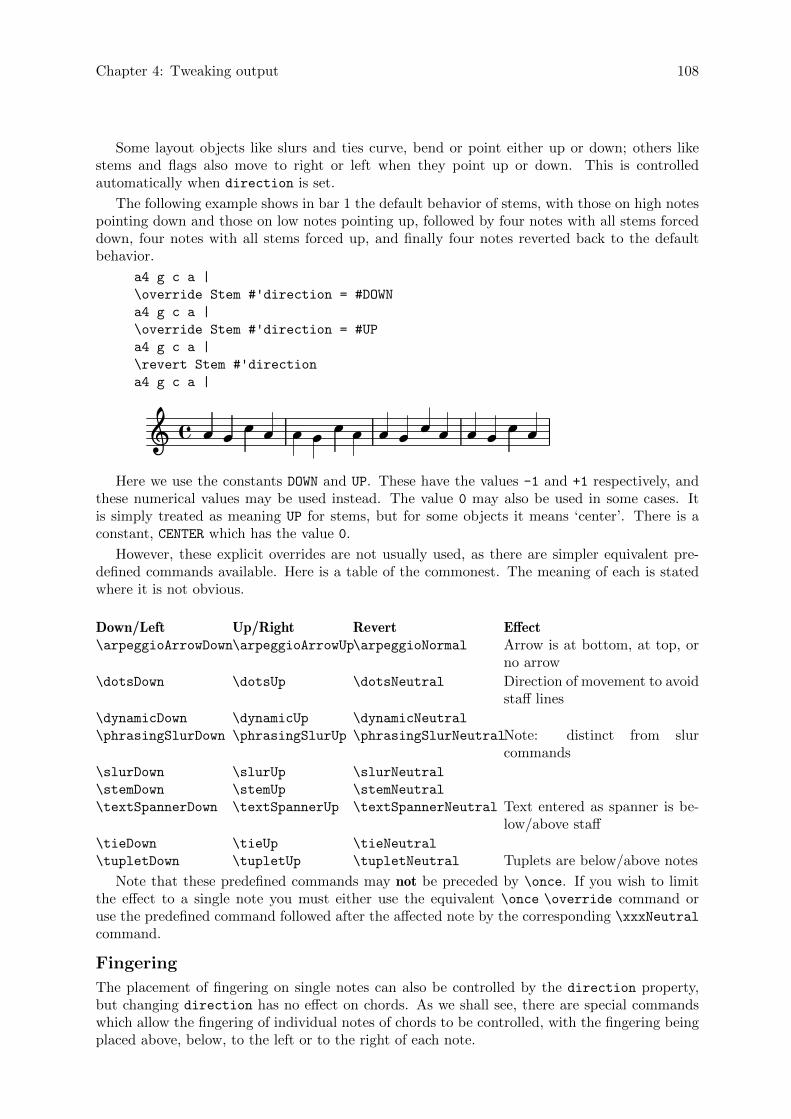
Chapter 4: Tweaking output 108
Some layout objects like slurs and ties curve, bend or point either up or down; others likestems and flags also move to right or left when they point up or down. This is controlledautomatically when direction is set.
The following example shows in bar 1 the default behavior of stems, with those on high notespointing down and those on low notes pointing up, followed by four notes with all stems forceddown, four notes with all stems forced up, and finally four notes reverted back to the defaultbehavior.
a4 g c a |
\override Stem #'direction = #DOWN
a4 g c a |
\override Stem #'direction = #UP
a4 g c a |
\revert Stem #'direction
a4 g c a |
ÎÎ� Î� Î Î ÎÎÎÎ ÎÎÎÎ Î Î ÎHere we use the constants DOWN and UP. These have the values -1 and +1 respectively, and
these numerical values may be used instead. The value 0 may also be used in some cases. Itis simply treated as meaning UP for stems, but for some objects it means ‘center’. There is aconstant, CENTER which has the value 0.
However, these explicit overrides are not usually used, as there are simpler equivalent pre-defined commands available. Here is a table of the commonest. The meaning of each is statedwhere it is not obvious.
Down/Left Up/Right Revert Effect\arpeggioArrowDown\arpeggioArrowUp\arpeggioNormal Arrow is at bottom, at top, or
no arrow
\dotsDown \dotsUp \dotsNeutral Direction of movement to avoidstaff lines
\dynamicDown \dynamicUp \dynamicNeutral
\phrasingSlurDown \phrasingSlurUp \phrasingSlurNeutralNote: distinct from slurcommands
\slurDown \slurUp \slurNeutral
\stemDown \stemUp \stemNeutral
\textSpannerDown \textSpannerUp \textSpannerNeutral Text entered as spanner is be-low/above staff
\tieDown \tieUp \tieNeutral
\tupletDown \tupletUp \tupletNeutral Tuplets are below/above notes
Note that these predefined commands may not be preceded by \once. If you wish to limitthe effect to a single note you must either use the equivalent \once \override command oruse the predefined command followed after the affected note by the corresponding \xxxNeutral
command.
Fingering
The placement of fingering on single notes can also be controlled by the direction property,but changing direction has no effect on chords. As we shall see, there are special commandswhich allow the fingering of individual notes of chords to be controlled, with the fingering beingplaced above, below, to the left or to the right of each note.
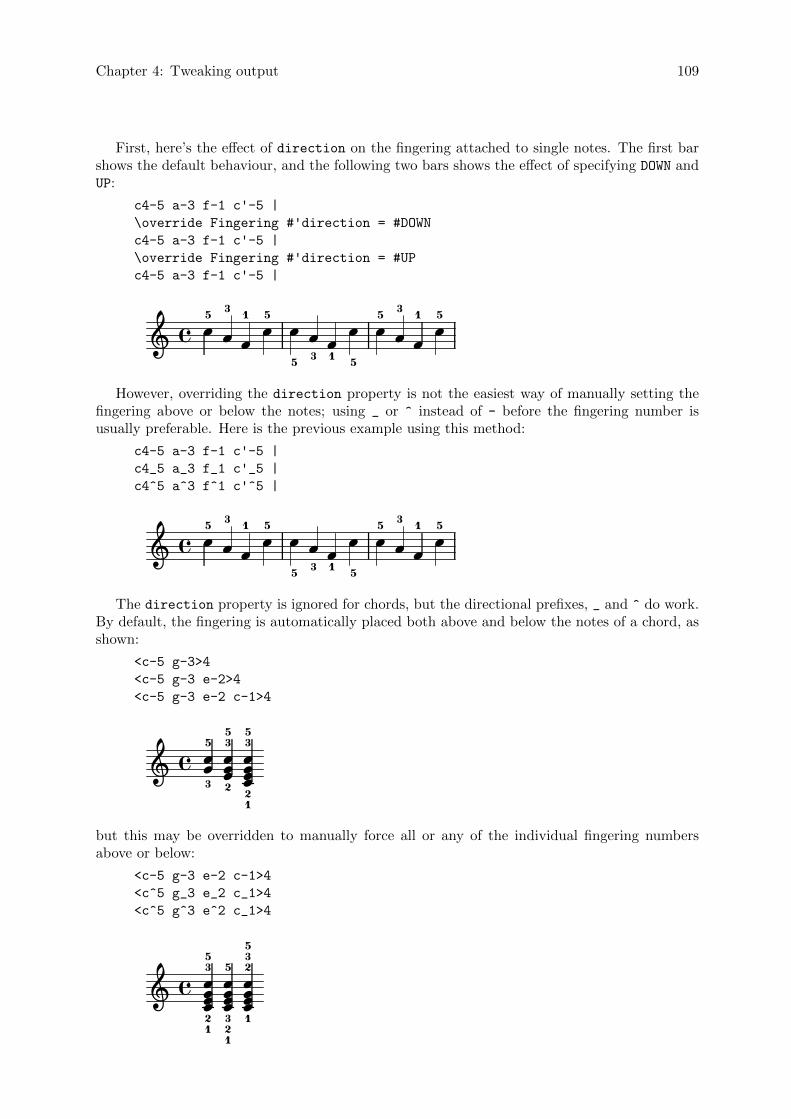
Chapter 4: Tweaking output 109
First, here’s the effect of direction on the fingering attached to single notes. The first barshows the default behaviour, and the following two bars shows the effect of specifying DOWN andUP:
c4-5 a-3 f-1 c'-5 |
\override Fingering #'direction = #DOWN
c4-5 a-3 f-1 c'-5 |
\override Fingering #'direction = #UP
c4-5 a-3 f-1 c'-5 |
5ÎÎ Î3
Î 5
1
5
��5
1ÎÎ5 ÎÎ3
5
ÎÎ Î31
However, overriding the direction property is not the easiest way of manually setting thefingering above or below the notes; using _ or ^ instead of - before the fingering number isusually preferable. Here is the previous example using this method:
c4-5 a-3 f-1 c'-5 |
c4_5 a_3 f_1 c'_5 |
c4^5 a^3 f^1 c'^5 |
3
Î5Î5
Î�� 5Î1
Î5ÎÎ
3
Î 15Î1
Î3
Î5
Î
The direction property is ignored for chords, but the directional prefixes, _ and ^ do work.By default, the fingering is automatically placed both above and below the notes of a chord, asshown:
<c-5 g-3>4
<c-5 g-3 e-2>4
<c-5 g-3 e-2 c-1>4
22 32� 5 225
2
1
� 225
3
23
22
but this may be overridden to manually force all or any of the individual fingering numbersabove or below:
<c-5 g-3 e-2 c-1>4
<c^5 g_3 e_2 c_1>4
<c^5 g^3 e^2 c_1>4
1
1
32
; �� �5
��3
2
5
����1
2
3
5
����
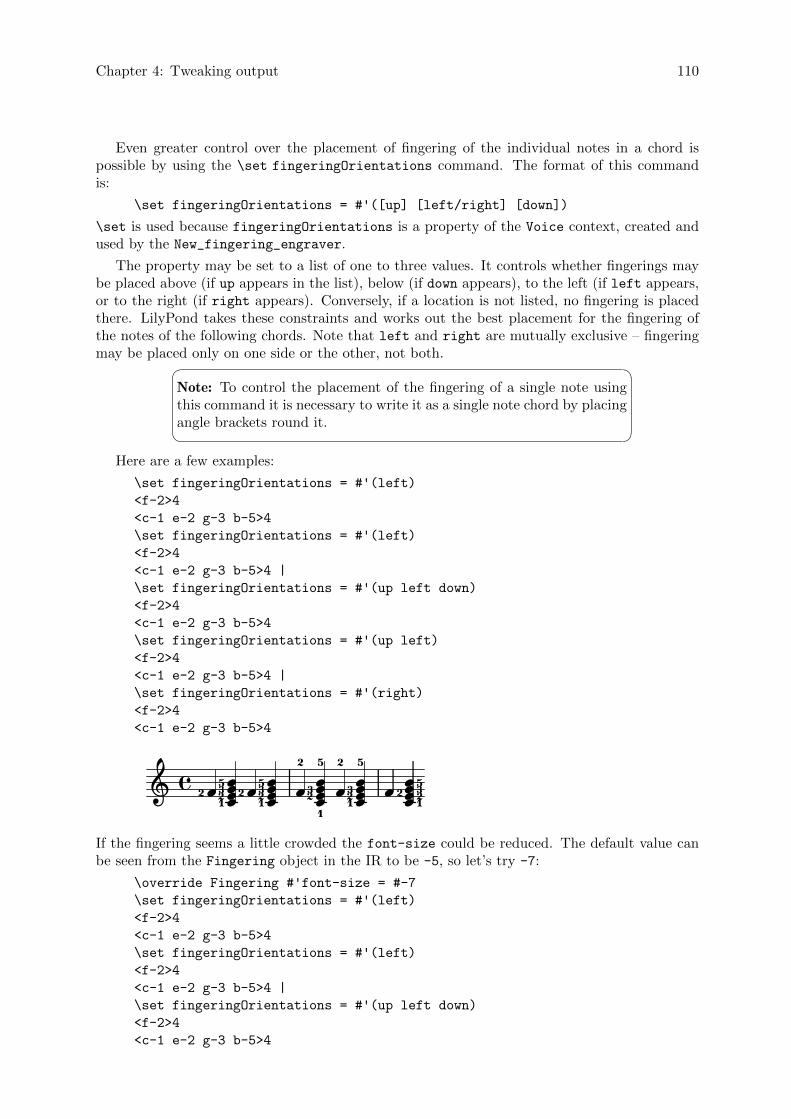
Chapter 4: Tweaking output 110
Even greater control over the placement of fingering of the individual notes in a chord ispossible by using the \set fingeringOrientations command. The format of this commandis:
\set fingeringOrientations = #'([up] [left/right] [down])
\set is used because fingeringOrientations is a property of the Voice context, created andused by the New_fingering_engraver.
The property may be set to a list of one to three values. It controls whether fingerings maybe placed above (if up appears in the list), below (if down appears), to the left (if left appears,or to the right (if right appears). Conversely, if a location is not listed, no fingering is placedthere. LilyPond takes these constraints and works out the best placement for the fingering ofthe notes of the following chords. Note that left and right are mutually exclusive – fingeringmay be placed only on one side or the other, not both.� �
Note: To control the placement of the fingering of a single note usingthis command it is necessary to write it as a single note chord by placingangle brackets round it.
Here are a few examples:
\set fingeringOrientations = #'(left)
<f-2>4
<c-1 e-2 g-3 b-5>4
\set fingeringOrientations = #'(left)
<f-2>4
<c-1 e-2 g-3 b-5>4 |
\set fingeringOrientations = #'(up left down)
<f-2>4
<c-1 e-2 g-3 b-5>4
\set fingeringOrientations = #'(up left)
<f-2>4
<c-1 e-2 g-3 b-5>4 |
\set fingeringOrientations = #'(right)
<f-2>4
<c-1 e-2 g-3 b-5>4
× ����2 � ��532
1
1
���� �� 2
� ���1 1
2
532 2
3�2
��2
����21
3
5
�2
5
35�
If the fingering seems a little crowded the font-size could be reduced. The default value canbe seen from the Fingering object in the IR to be -5, so let’s try -7:
\override Fingering #'font-size = #-7
\set fingeringOrientations = #'(left)
<f-2>4
<c-1 e-2 g-3 b-5>4
\set fingeringOrientations = #'(left)
<f-2>4
<c-1 e-2 g-3 b-5>4 |
\set fingeringOrientations = #'(up left down)
<f-2>4
<c-1 e-2 g-3 b-5>4
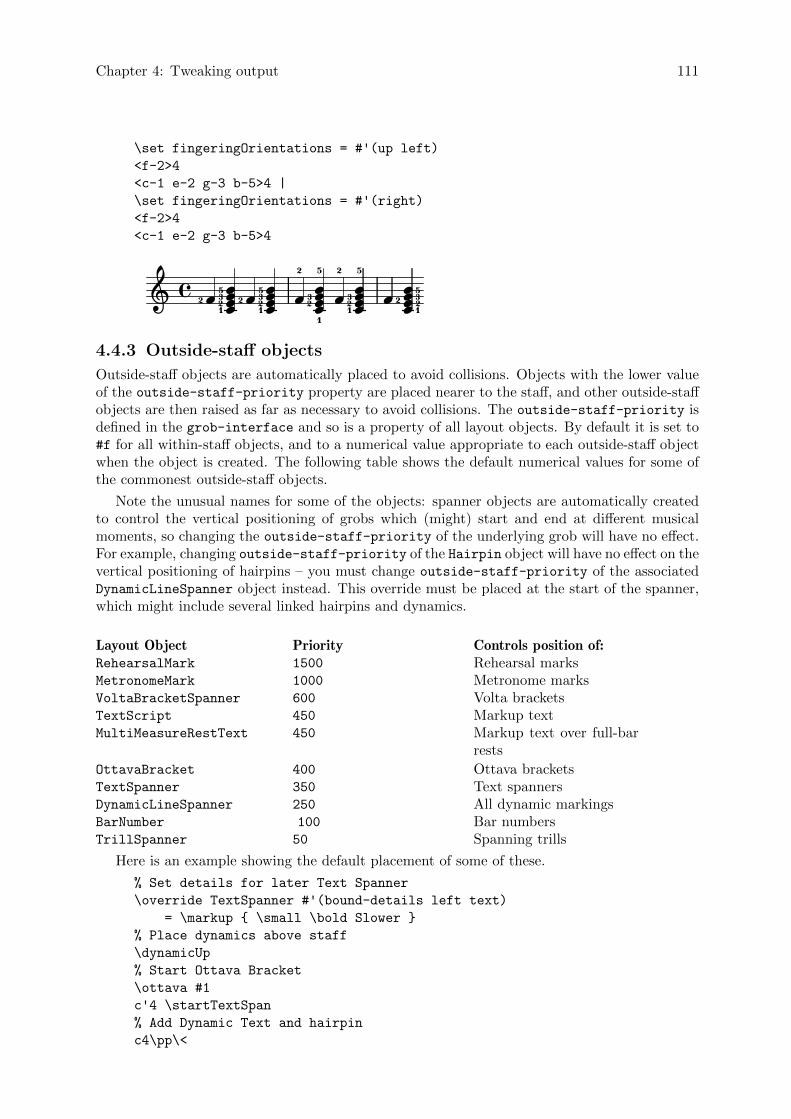
Chapter 4: Tweaking output 111
\set fingeringOrientations = #'(up left)
<f-2>4
<c-1 e-2 g-3 b-5>4 |
\set fingeringOrientations = #'(right)
<f-2>4
<c-1 e-2 g-3 b-5>4
21
Î5 Î5 ÎÎÎ ÎÎ2Î�
3 Î23 ÎÎ 3
12 Î Î
2
Î1
3Î 32
� ÎÎÎ22 5
Î1
5Î2 ÎÎÎ 2
1
Î5
Î4.4.3 Outside-staff objects
Outside-staff objects are automatically placed to avoid collisions. Objects with the lower valueof the outside-staff-priority property are placed nearer to the staff, and other outside-staffobjects are then raised as far as necessary to avoid collisions. The outside-staff-priority isdefined in the grob-interface and so is a property of all layout objects. By default it is set to#f for all within-staff objects, and to a numerical value appropriate to each outside-staff objectwhen the object is created. The following table shows the default numerical values for some ofthe commonest outside-staff objects.
Note the unusual names for some of the objects: spanner objects are automatically createdto control the vertical positioning of grobs which (might) start and end at different musicalmoments, so changing the outside-staff-priority of the underlying grob will have no effect.For example, changing outside-staff-priority of the Hairpin object will have no effect on thevertical positioning of hairpins – you must change outside-staff-priority of the associatedDynamicLineSpanner object instead. This override must be placed at the start of the spanner,which might include several linked hairpins and dynamics.
Layout Object Priority Controls position of:RehearsalMark 1500 Rehearsal marksMetronomeMark 1000 Metronome marksVoltaBracketSpanner 600 Volta bracketsTextScript 450 Markup textMultiMeasureRestText 450 Markup text over full-bar
rests
OttavaBracket 400 Ottava bracketsTextSpanner 350 Text spannersDynamicLineSpanner 250 All dynamic markingsBarNumber 100 Bar numbersTrillSpanner 50 Spanning trills
Here is an example showing the default placement of some of these.
% Set details for later Text Spanner
\override TextSpanner #'(bound-details left text)
= \markup { \small \bold Slower }
% Place dynamics above staff
\dynamicUp
% Start Ottava Bracket
\ottava #1
c'4 \startTextSpan
% Add Dynamic Text and hairpin
c4\pp\<
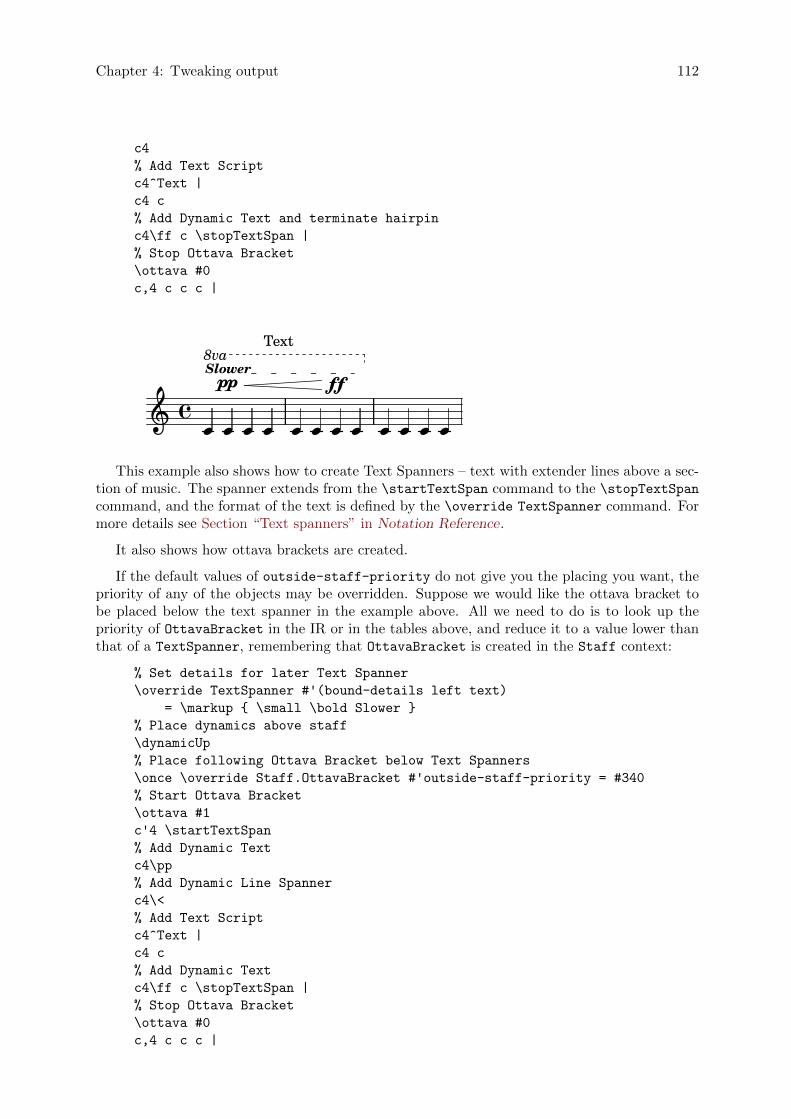
Chapter 4: Tweaking output 112
c4
% Add Text Script
c4^Text |
c4 c
% Add Dynamic Text and terminate hairpin
c4\ff c \stopTextSpan |
% Stop Ottava Bracket
\ottava #0
c,4 c c c |
ü üü
Text
üüü�ff
ü üpp
üSlower
�8va
üü üThis example also shows how to create Text Spanners – text with extender lines above a sec-
tion of music. The spanner extends from the \startTextSpan command to the \stopTextSpancommand, and the format of the text is defined by the \override TextSpanner command. Formore details see Section “Text spanners” in Notation Reference.
It also shows how ottava brackets are created.
If the default values of outside-staff-priority do not give you the placing you want, thepriority of any of the objects may be overridden. Suppose we would like the ottava bracket tobe placed below the text spanner in the example above. All we need to do is to look up thepriority of OttavaBracket in the IR or in the tables above, and reduce it to a value lower thanthat of a TextSpanner, remembering that OttavaBracket is created in the Staff context:
% Set details for later Text Spanner
\override TextSpanner #'(bound-details left text)
= \markup { \small \bold Slower }
% Place dynamics above staff
\dynamicUp
% Place following Ottava Bracket below Text Spanners
\once \override Staff.OttavaBracket #'outside-staff-priority = #340
% Start Ottava Bracket
\ottava #1
c'4 \startTextSpan
% Add Dynamic Text
c4\pp
% Add Dynamic Line Spanner
c4\<
% Add Text Script
c4^Text |
c4 c
% Add Dynamic Text
c4\ff c \stopTextSpan |
% Stop Ottava Bracket
\ottava #0
c,4 c c c |

Chapter 4: Tweaking output 113
ü üüü�8va
�Slower
üü ü
Text
ü üpp
üüff
üNote that some of these objects, in particular bar numbers, metronome marks and rehearsal
marks, live by default in the Score context, so be sure to use the correct context when theseare being overriden.
Slurs by default are classed as within-staff objects, but they often appear above the staff ifthe notes to which they are attached are high on the staff. This can push outside-staff objectssuch as articulations too high, as the slur will be placed first. The avoid-slur property of thearticulation can be set to 'inside to bring the articulation inside the slur, but the avoid-slurproperty is effective only if the outside-staff-priority is also set to #f. Alternatively, theoutside-staff-priority of the slur can be set to a numerical value to cause it to be placedalong with other outside-staff objects according to that value. Here’s an example showing theeffect of the two methods:
c4( c^\markup { \tiny \sharp } d4.) c8 |
c4(
\once \override TextScript #'avoid-slur = #'inside
\once \override TextScript #'outside-staff-priority = ##f
c4^\markup { \tiny \sharp } d4.) c8 |
\once \override Slur #'outside-staff-priority = #500
c4( c^\markup { \tiny \sharp } d4.) c8 |
ÎÎÎ �ÎÎÎ ò
� ��� �
�Î Îò
Î� ÎÎò
Changing the outside-staff-priority can also be used to control the vertical placementof individual objects, although the results may not always be desirable. Suppose we wouldlike “Text3” to be placed above “Text4” in the example under Automatic behavior, above (seeSection 4.4.1 [Automatic behavior], page 106). All we need to do is to look up the priority ofTextScript in the IR or in the tables above, and increase the priority of “Text3” to a highervalue:
c2^"Text1"
c2^"Text2" |
\once \override TextScript #'outside-staff-priority = #500
c2^"Text3"
c2^"Text4" |
Text3
Text4a ���Text1�Text2
�This certainly lifts “Text3” above “Text4” but it also lifts it above “Text2”, and “Text4”
now drops down. Perhaps this is not so good. What we would really like to do is to position allthe annotation at the same distance above the staff. To do this, we clearly will need to space thenotes out horizontally to make more room for the text. This is done using the textLengthOn
command.
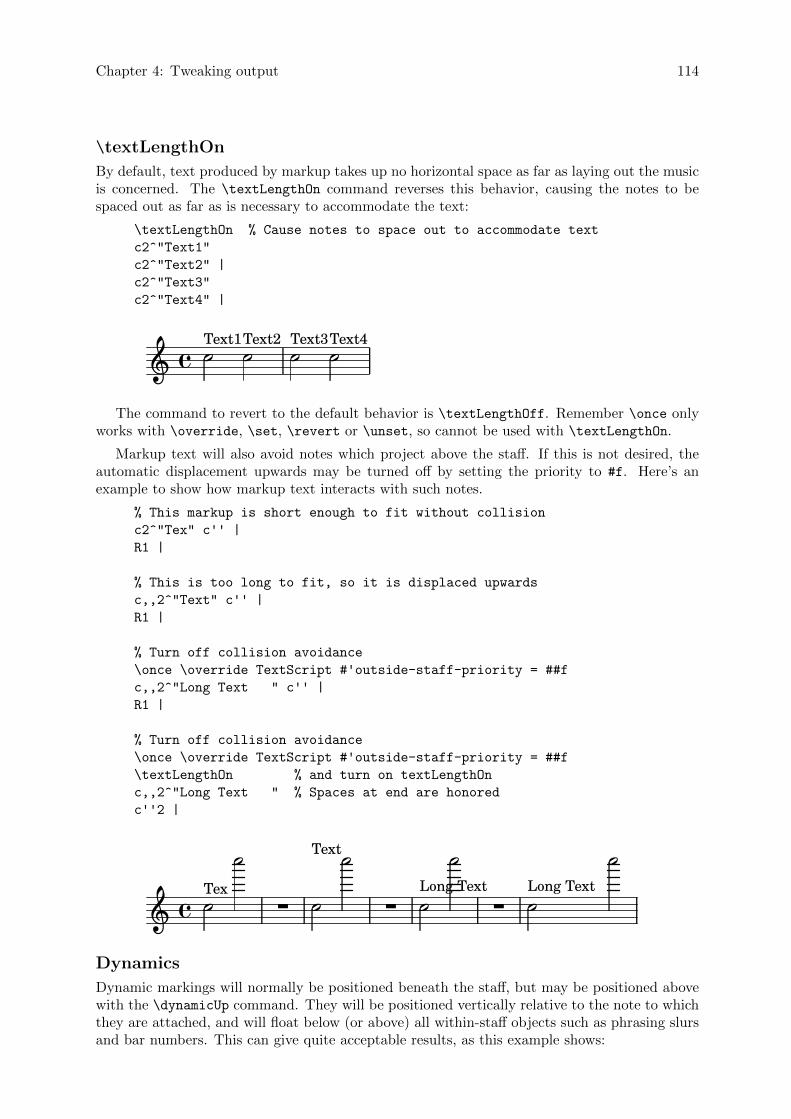
Chapter 4: Tweaking output 114
\textLengthOn
By default, text produced by markup takes up no horizontal space as far as laying out the musicis concerned. The \textLengthOn command reverses this behavior, causing the notes to bespaced out as far as is necessary to accommodate the text:
\textLengthOn % Cause notes to space out to accommodate text
c2^"Text1"
c2^"Text2" |
c2^"Text3"
c2^"Text4" |
Text3Text2·Text1 ·Text4··��The command to revert to the default behavior is \textLengthOff. Remember \once only
works with \override, \set, \revert or \unset, so cannot be used with \textLengthOn.
Markup text will also avoid notes which project above the staff. If this is not desired, theautomatic displacement upwards may be turned off by setting the priority to #f. Here’s anexample to show how markup text interacts with such notes.
% This markup is short enough to fit without collision
c2^"Tex" c'' |
R1 |
% This is too long to fit, so it is displaced upwards
c,,2^"Text" c'' |
R1 |
% Turn off collision avoidance
\once \override TextScript #'outside-staff-priority = ##f
c,,2^"Long Text " c'' |
R1 |
% Turn off collision avoidance
\once \override TextScript #'outside-staff-priority = ##f
\textLengthOn % and turn on textLengthOn
c,,2^"Long Text " % Spaces at end are honored
c''2 |
·· ·� Long Text �
··�Tex Long Text ��
·Text
· ·
Dynamics
Dynamic markings will normally be positioned beneath the staff, but may be positioned abovewith the \dynamicUp command. They will be positioned vertically relative to the note to whichthey are attached, and will float below (or above) all within-staff objects such as phrasing slursand bar numbers. This can give quite acceptable results, as this example shows:

Chapter 4: Tweaking output 115
\clef "bass"
\key aes \major
\time 9/8
\dynamicUp
bes4.~\f\< \( bes4 bes8 des4\ff\> c16 bes\! |
ees,2.~\)\mf ees4 r8 |
Î89
� �mf
�����
f�
� �
Î Î ÎÎff
However, if the notes and attached dynamics are close together the automatic placement willavoid collisions by displacing later dynamic markings further away, but this may not be theoptimum placement, as this rather artificial example shows:
\dynamicUp
a4\f b\mf c\mp b\p
; �f��� mf pmp�
Should a similar situation arise in ‘real’ music, it may be preferable to space out the notes alittle further, so the dynamic markings can all fit at the same vertical distance from the staff.We were able to do this for markup text by using the \textLengthOn command, but there isno equivalent command for dynamic marks. So we shall have to work out how to do this using\override commands.
Grob sizing
First we must learn how grobs are sized. All grobs have a reference point defined within themwhich is used to position them relative to their parent object. This point in the grob is thenpositioned at a horizontal distance, X-offset, and at a vertical distance, Y-offset, from itsparent. The horizontal extent of the object is given by a pair of numbers, X-extent, which saywhere the left and right edges are relative to the reference point. The vertical extent is similarlydefined by a pair of numbers, Y-extent. These are properties of all grobs which support thegrob-interface.
By default, outside-staff objects are given a width of zero so that they may overlap in thehorizontal direction. This is done by the trick of adding infinity to the leftmost extent and minusinfinity to the rightmost extent by setting the extra-spacing-width to '(+inf.0 . -inf.0).So to ensure they do not overlap in the horizontal direction we must override this value ofextra-spacing-width to '(0 . 0) so the true width shines through. This is the command todo this for dynamic text:
\override DynamicText #'extra-spacing-width = #'(0 . 0)
Let’s see if this works in our previous example:
\dynamicUp
\override DynamicText #'extra-spacing-width = #'(0 . 0)
a4\f b\mf c\mp b\p |
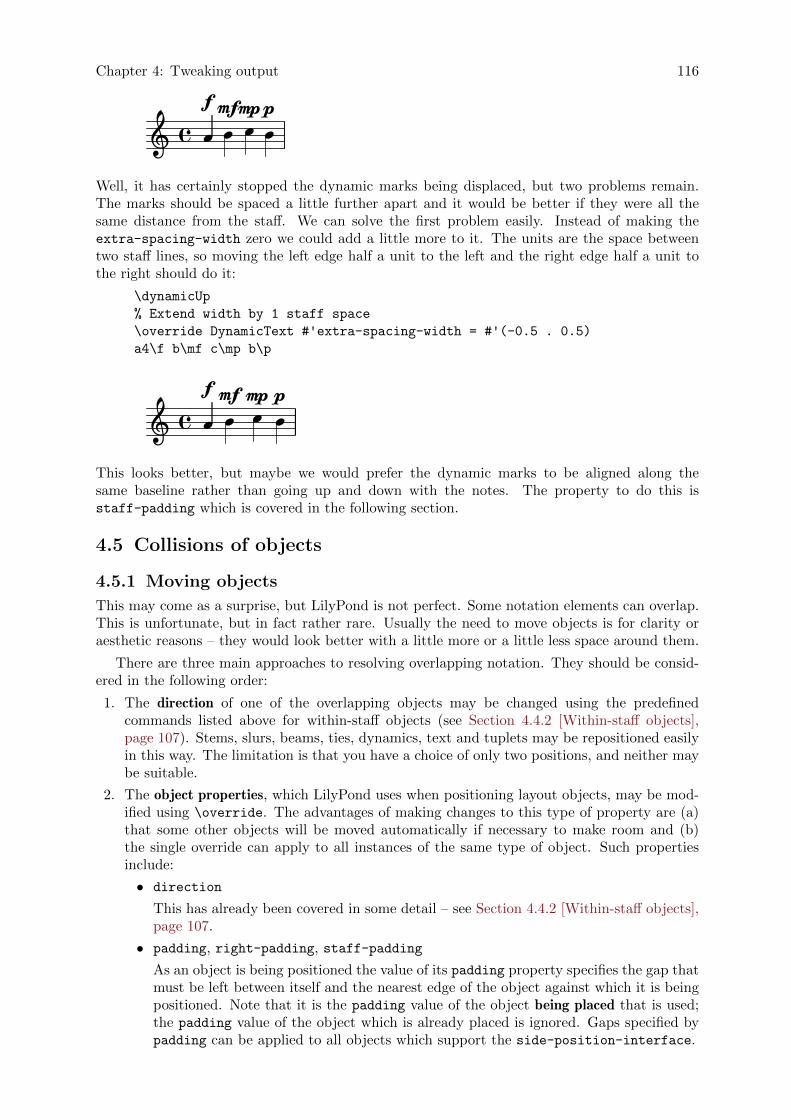
Chapter 4: Tweaking output 116
2� 2f
� 2pmp2mf
Well, it has certainly stopped the dynamic marks being displaced, but two problems remain.The marks should be spaced a little further apart and it would be better if they were all thesame distance from the staff. We can solve the first problem easily. Instead of making theextra-spacing-width zero we could add a little more to it. The units are the space betweentwo staff lines, so moving the left edge half a unit to the left and the right edge half a unit tothe right should do it:
\dynamicUp
% Extend width by 1 staff space
\override DynamicText #'extra-spacing-width = #'(-0.5 . 0.5)
a4\f b\mf c\mp b\p
� �f�mf �mp �p
This looks better, but maybe we would prefer the dynamic marks to be aligned along thesame baseline rather than going up and down with the notes. The property to do this isstaff-padding which is covered in the following section.
4.5 Collisions of objects
4.5.1 Moving objects
This may come as a surprise, but LilyPond is not perfect. Some notation elements can overlap.This is unfortunate, but in fact rather rare. Usually the need to move objects is for clarity oraesthetic reasons – they would look better with a little more or a little less space around them.
There are three main approaches to resolving overlapping notation. They should be consid-ered in the following order:
1. The direction of one of the overlapping objects may be changed using the predefinedcommands listed above for within-staff objects (see Section 4.4.2 [Within-staff objects],page 107). Stems, slurs, beams, ties, dynamics, text and tuplets may be repositioned easilyin this way. The limitation is that you have a choice of only two positions, and neither maybe suitable.
2. The object properties, which LilyPond uses when positioning layout objects, may be mod-ified using \override. The advantages of making changes to this type of property are (a)that some other objects will be moved automatically if necessary to make room and (b)the single override can apply to all instances of the same type of object. Such propertiesinclude:
• direction
This has already been covered in some detail – see Section 4.4.2 [Within-staff objects],page 107.
• padding, right-padding, staff-padding
As an object is being positioned the value of its padding property specifies the gap thatmust be left between itself and the nearest edge of the object against which it is beingpositioned. Note that it is the padding value of the object being placed that is used;the padding value of the object which is already placed is ignored. Gaps specified bypadding can be applied to all objects which support the side-position-interface.
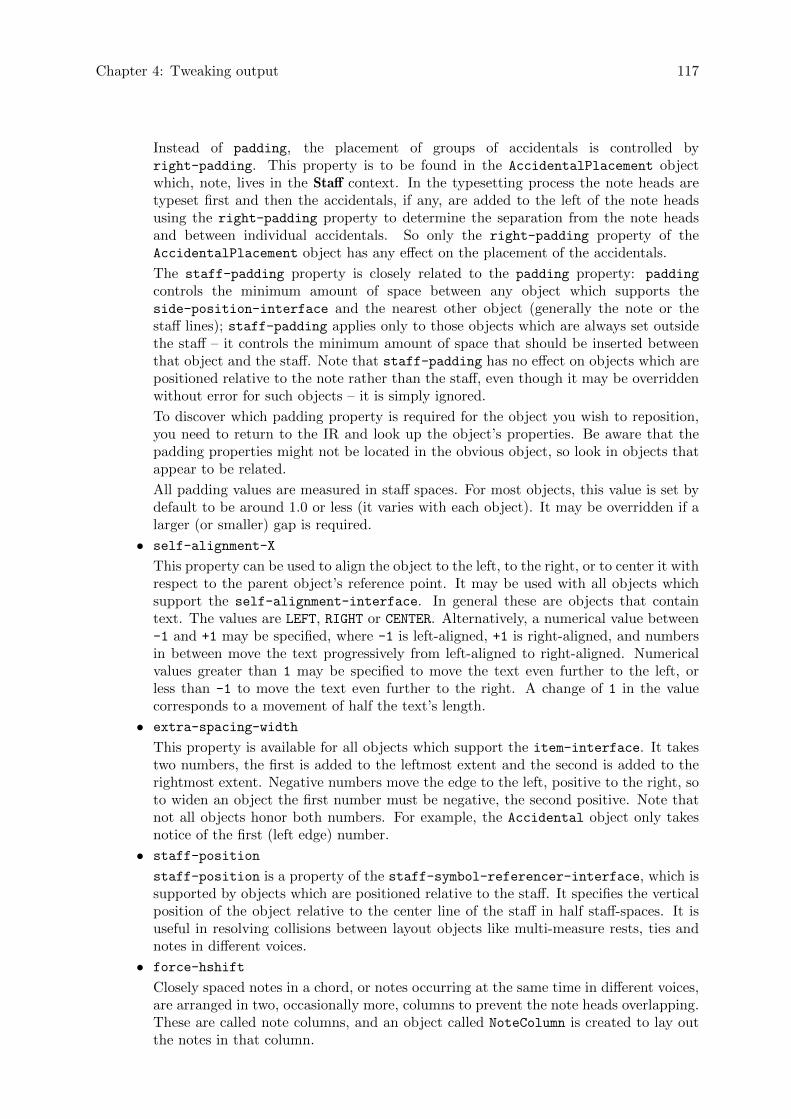
Chapter 4: Tweaking output 117
Instead of padding, the placement of groups of accidentals is controlled byright-padding. This property is to be found in the AccidentalPlacement objectwhich, note, lives in the Staff context. In the typesetting process the note heads aretypeset first and then the accidentals, if any, are added to the left of the note headsusing the right-padding property to determine the separation from the note headsand between individual accidentals. So only the right-padding property of theAccidentalPlacement object has any effect on the placement of the accidentals.
The staff-padding property is closely related to the padding property: padding
controls the minimum amount of space between any object which supports theside-position-interface and the nearest other object (generally the note or thestaff lines); staff-padding applies only to those objects which are always set outsidethe staff – it controls the minimum amount of space that should be inserted betweenthat object and the staff. Note that staff-padding has no effect on objects which arepositioned relative to the note rather than the staff, even though it may be overriddenwithout error for such objects – it is simply ignored.
To discover which padding property is required for the object you wish to reposition,you need to return to the IR and look up the object’s properties. Be aware that thepadding properties might not be located in the obvious object, so look in objects thatappear to be related.
All padding values are measured in staff spaces. For most objects, this value is set bydefault to be around 1.0 or less (it varies with each object). It may be overridden if alarger (or smaller) gap is required.
• self-alignment-X
This property can be used to align the object to the left, to the right, or to center it withrespect to the parent object’s reference point. It may be used with all objects whichsupport the self-alignment-interface. In general these are objects that containtext. The values are LEFT, RIGHT or CENTER. Alternatively, a numerical value between-1 and +1 may be specified, where -1 is left-aligned, +1 is right-aligned, and numbersin between move the text progressively from left-aligned to right-aligned. Numericalvalues greater than 1 may be specified to move the text even further to the left, orless than -1 to move the text even further to the right. A change of 1 in the valuecorresponds to a movement of half the text’s length.
• extra-spacing-width
This property is available for all objects which support the item-interface. It takestwo numbers, the first is added to the leftmost extent and the second is added to therightmost extent. Negative numbers move the edge to the left, positive to the right, soto widen an object the first number must be negative, the second positive. Note thatnot all objects honor both numbers. For example, the Accidental object only takesnotice of the first (left edge) number.
• staff-position
staff-position is a property of the staff-symbol-referencer-interface, which issupported by objects which are positioned relative to the staff. It specifies the verticalposition of the object relative to the center line of the staff in half staff-spaces. It isuseful in resolving collisions between layout objects like multi-measure rests, ties andnotes in different voices.
• force-hshift
Closely spaced notes in a chord, or notes occurring at the same time in different voices,are arranged in two, occasionally more, columns to prevent the note heads overlapping.These are called note columns, and an object called NoteColumn is created to lay outthe notes in that column.
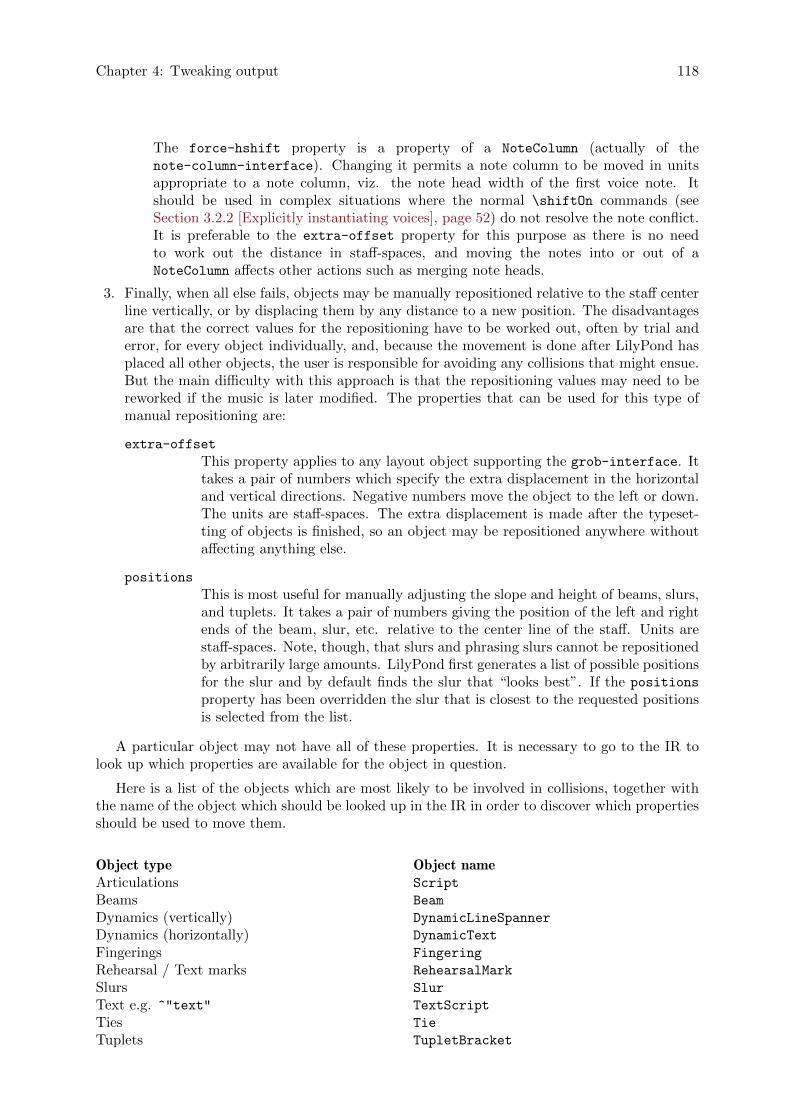
Chapter 4: Tweaking output 118
The force-hshift property is a property of a NoteColumn (actually of thenote-column-interface). Changing it permits a note column to be moved in unitsappropriate to a note column, viz. the note head width of the first voice note. Itshould be used in complex situations where the normal \shiftOn commands (seeSection 3.2.2 [Explicitly instantiating voices], page 52) do not resolve the note conflict.It is preferable to the extra-offset property for this purpose as there is no needto work out the distance in staff-spaces, and moving the notes into or out of aNoteColumn affects other actions such as merging note heads.
3. Finally, when all else fails, objects may be manually repositioned relative to the staff centerline vertically, or by displacing them by any distance to a new position. The disadvantagesare that the correct values for the repositioning have to be worked out, often by trial anderror, for every object individually, and, because the movement is done after LilyPond hasplaced all other objects, the user is responsible for avoiding any collisions that might ensue.But the main difficulty with this approach is that the repositioning values may need to bereworked if the music is later modified. The properties that can be used for this type ofmanual repositioning are:
extra-offset
This property applies to any layout object supporting the grob-interface. Ittakes a pair of numbers which specify the extra displacement in the horizontaland vertical directions. Negative numbers move the object to the left or down.The units are staff-spaces. The extra displacement is made after the typeset-ting of objects is finished, so an object may be repositioned anywhere withoutaffecting anything else.
positions
This is most useful for manually adjusting the slope and height of beams, slurs,and tuplets. It takes a pair of numbers giving the position of the left and rightends of the beam, slur, etc. relative to the center line of the staff. Units arestaff-spaces. Note, though, that slurs and phrasing slurs cannot be repositionedby arbitrarily large amounts. LilyPond first generates a list of possible positionsfor the slur and by default finds the slur that “looks best”. If the positions
property has been overridden the slur that is closest to the requested positionsis selected from the list.
A particular object may not have all of these properties. It is necessary to go to the IR tolook up which properties are available for the object in question.
Here is a list of the objects which are most likely to be involved in collisions, together withthe name of the object which should be looked up in the IR in order to discover which propertiesshould be used to move them.
Object type Object nameArticulations Script
Beams Beam
Dynamics (vertically) DynamicLineSpanner
Dynamics (horizontally) DynamicText
Fingerings Fingering
Rehearsal / Text marks RehearsalMark
Slurs Slur
Text e.g. ^"text" TextScript
Ties Tie
Tuplets TupletBracket
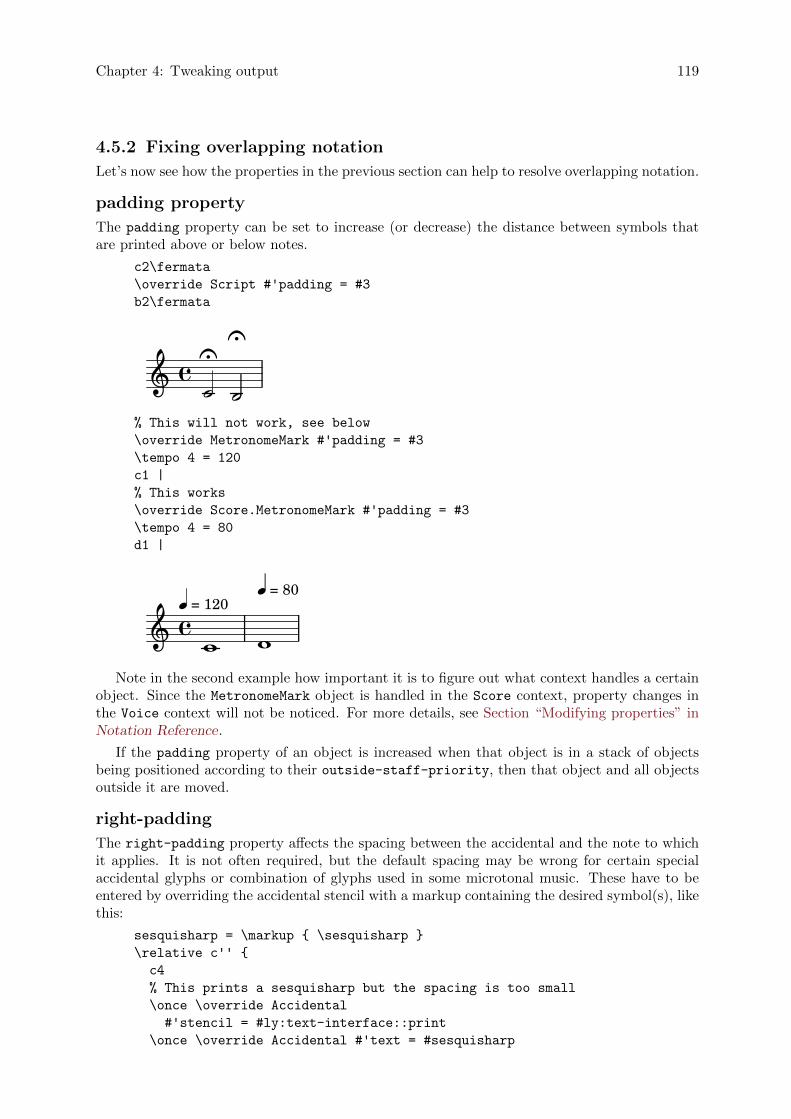
Chapter 4: Tweaking output 119
4.5.2 Fixing overlapping notation
Let’s now see how the properties in the previous section can help to resolve overlapping notation.
padding property
The padding property can be set to increase (or decrease) the distance between symbols thatare printed above or below notes.
c2\fermata
\override Script #'padding = #3
b2\fermata
��� ���
% This will not work, see below
\override MetronomeMark #'padding = #3
\tempo 4 = 120
c1 |
% This works
\override Score.MetronomeMark #'padding = #3
\tempo 4 = 80
d1 |
a�Π= 80
� �Π= 120
Note in the second example how important it is to figure out what context handles a certainobject. Since the MetronomeMark object is handled in the Score context, property changes inthe Voice context will not be noticed. For more details, see Section “Modifying properties” inNotation Reference.
If the padding property of an object is increased when that object is in a stack of objectsbeing positioned according to their outside-staff-priority, then that object and all objectsoutside it are moved.
right-padding
The right-padding property affects the spacing between the accidental and the note to whichit applies. It is not often required, but the default spacing may be wrong for certain specialaccidental glyphs or combination of glyphs used in some microtonal music. These have to beentered by overriding the accidental stencil with a markup containing the desired symbol(s), likethis:
sesquisharp = \markup { \sesquisharp }
\relative c'' {
c4
% This prints a sesquisharp but the spacing is too small
\once \override Accidental
#'stencil = #ly:text-interface::print
\once \override Accidental #'text = #sesquisharp
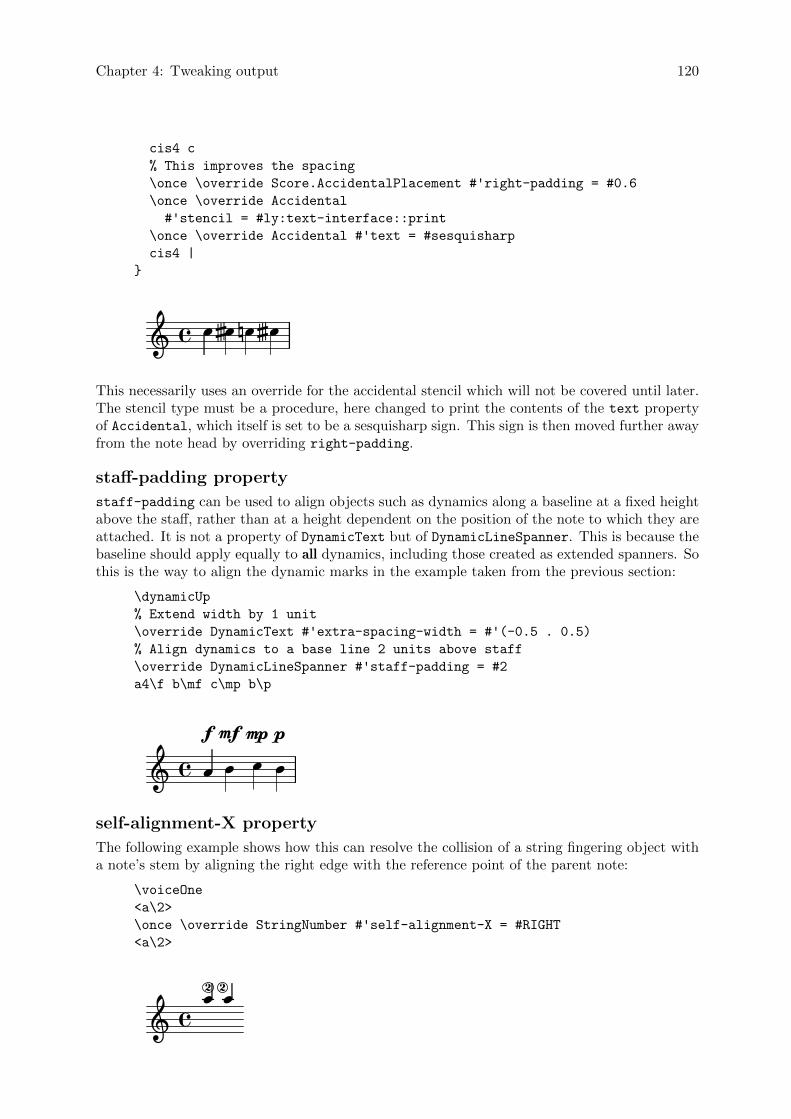
Chapter 4: Tweaking output 120
cis4 c
% This improves the spacing
\once \override Score.AccidentalPlacement #'right-padding = #0.6
\once \override Accidental
#'stencil = #ly:text-interface::print
\once \override Accidental #'text = #sesquisharp
cis4 |
}
���� �� ���This necessarily uses an override for the accidental stencil which will not be covered until later.The stencil type must be a procedure, here changed to print the contents of the text propertyof Accidental, which itself is set to be a sesquisharp sign. This sign is then moved further awayfrom the note head by overriding right-padding.
staff-padding property
staff-padding can be used to align objects such as dynamics along a baseline at a fixed heightabove the staff, rather than at a height dependent on the position of the note to which they areattached. It is not a property of DynamicText but of DynamicLineSpanner. This is because thebaseline should apply equally to all dynamics, including those created as extended spanners. Sothis is the way to align the dynamic marks in the example taken from the previous section:
\dynamicUp
% Extend width by 1 unit
\override DynamicText #'extra-spacing-width = #'(-0.5 . 0.5)
% Align dynamics to a base line 2 units above staff
\override DynamicLineSpanner #'staff-padding = #2
a4\f b\mf c\mp b\p
2f
�pmp
2 2mf2�
self-alignment-X property
The following example shows how this can resolve the collision of a string fingering object witha note’s stem by aligning the right edge with the reference point of the parent note:
\voiceOne
<a\2>
\once \override StringNumber #'self-alignment-X = #RIGHT
<a\2>
22� �
22
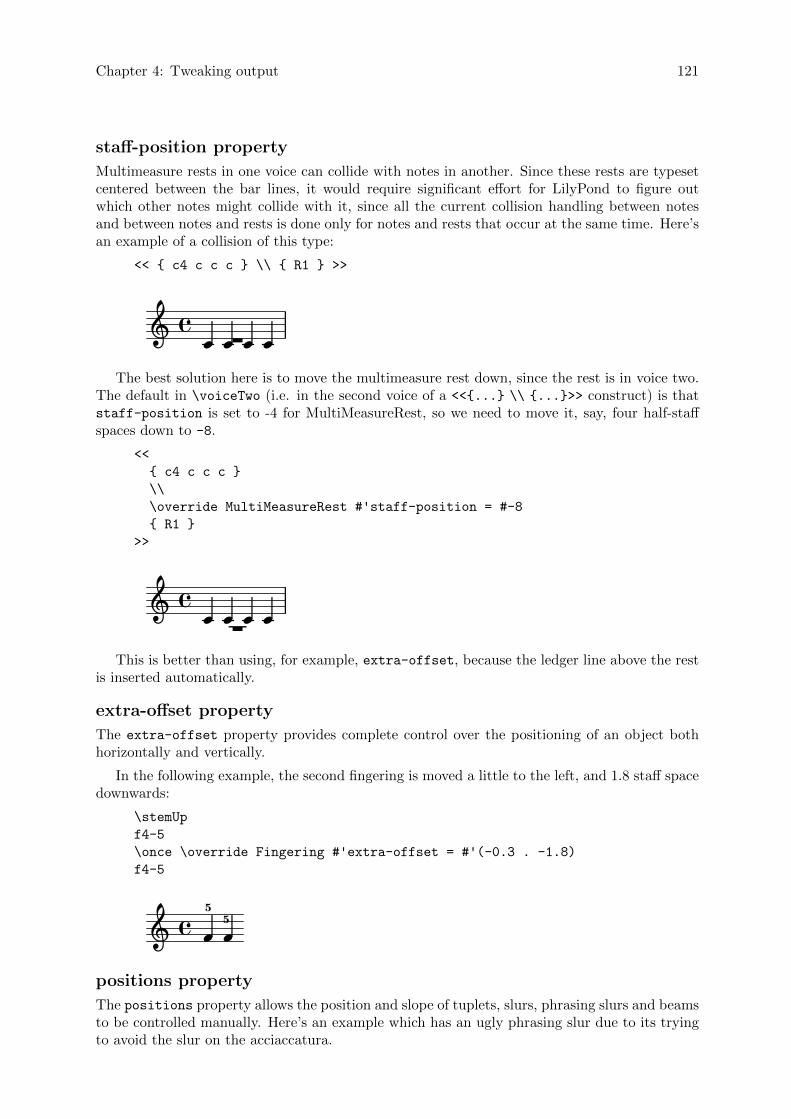
Chapter 4: Tweaking output 121
staff-position property
Multimeasure rests in one voice can collide with notes in another. Since these rests are typesetcentered between the bar lines, it would require significant effort for LilyPond to figure outwhich other notes might collide with it, since all the current collision handling between notesand between notes and rests is done only for notes and rests that occur at the same time. Here’san example of a collision of this type:
<< { c4 c c c } \\ { R1 } >>
2�� 222�The best solution here is to move the multimeasure rest down, since the rest is in voice two.
The default in \voiceTwo (i.e. in the second voice of a <<{...} \\ {...}>> construct) is thatstaff-position is set to -4 for MultiMeasureRest, so we need to move it, say, four half-staffspaces down to -8.
<<
{ c4 c c c }
\\
\override MultiMeasureRest #'staff-position = #-8
{ R1 }
>>
22 2� 2� �
This is better than using, for example, extra-offset, because the ledger line above the restis inserted automatically.
extra-offset property
The extra-offset property provides complete control over the positioning of an object bothhorizontally and vertically.
In the following example, the second fingering is moved a little to the left, and 1.8 staff spacedownwards:
\stemUp
f4-5
\once \override Fingering #'extra-offset = #'(-0.3 . -1.8)
f4-5
5
2 25� �positions property
The positions property allows the position and slope of tuplets, slurs, phrasing slurs and beamsto be controlled manually. Here’s an example which has an ugly phrasing slur due to its tryingto avoid the slur on the acciaccatura.
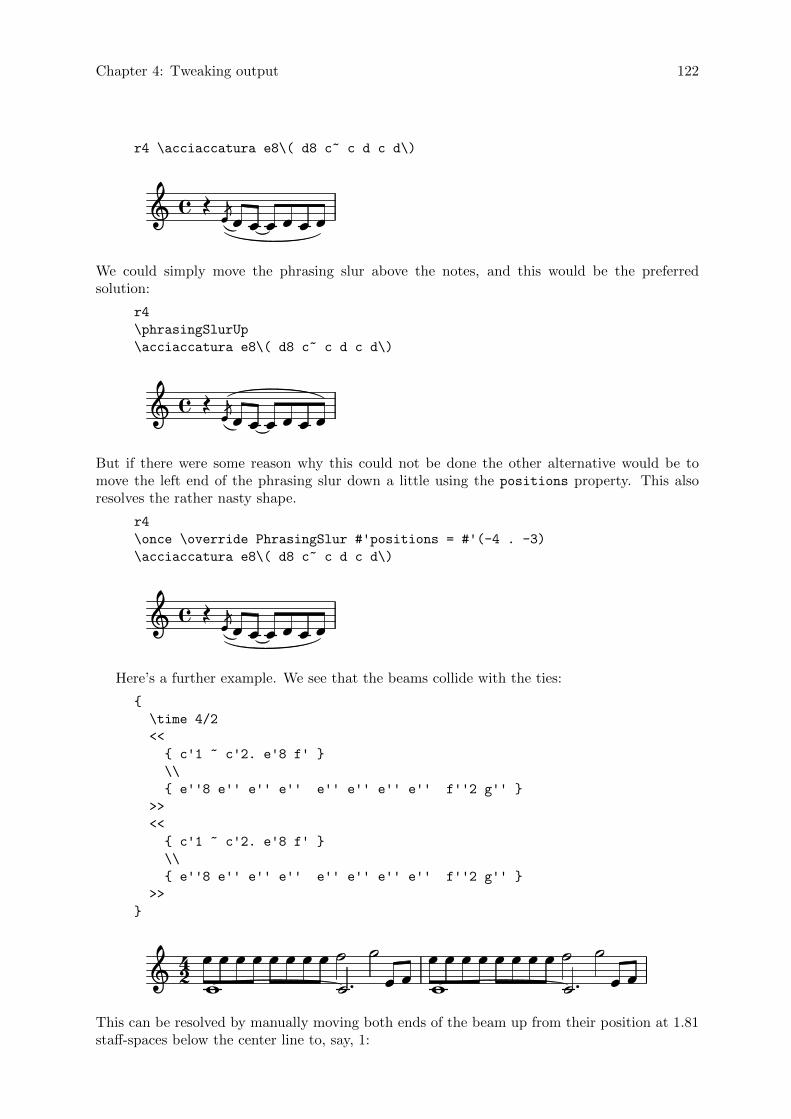
Chapter 4: Tweaking output 122
r4 \acciaccatura e8\( d8 c~ c d c d\)
22 22� 22� � 2��
We could simply move the phrasing slur above the notes, and this would be the preferredsolution:
r4
\phrasingSlurUp
\acciaccatura e8\( d8 c~ c d c d\)
£ �� g� ��� �� ��But if there were some reason why this could not be done the other alternative would be tomove the left end of the phrasing slur down a little using the positions property. This alsoresolves the rather nasty shape.
r4
\once \override PhrasingSlur #'positions = #'(-4 . -3)
\acciaccatura e8\( d8 c~ c d c d\)
2 2� 2�� 22 22��
Here’s a further example. We see that the beams collide with the ties:
{
\time 4/2
<<
{ c'1 ~ c'2. e'8 f' }
\\
{ e''8 e'' e'' e'' e'' e'' e'' e'' f''2 g'' }
>>
<<
{ c'1 ~ c'2. e'8 f' }
\\
{ e''8 e'' e'' e'' e'' e'' e'' e'' f''2 g'' }
>>
}
ÎÎ Î� ÎÎ ÎÎ Î Î
���
ÎÎ� � ���
Î Î �ÎÎ24 Î�
ÎÎ
This can be resolved by manually moving both ends of the beam up from their position at 1.81staff-spaces below the center line to, say, 1:
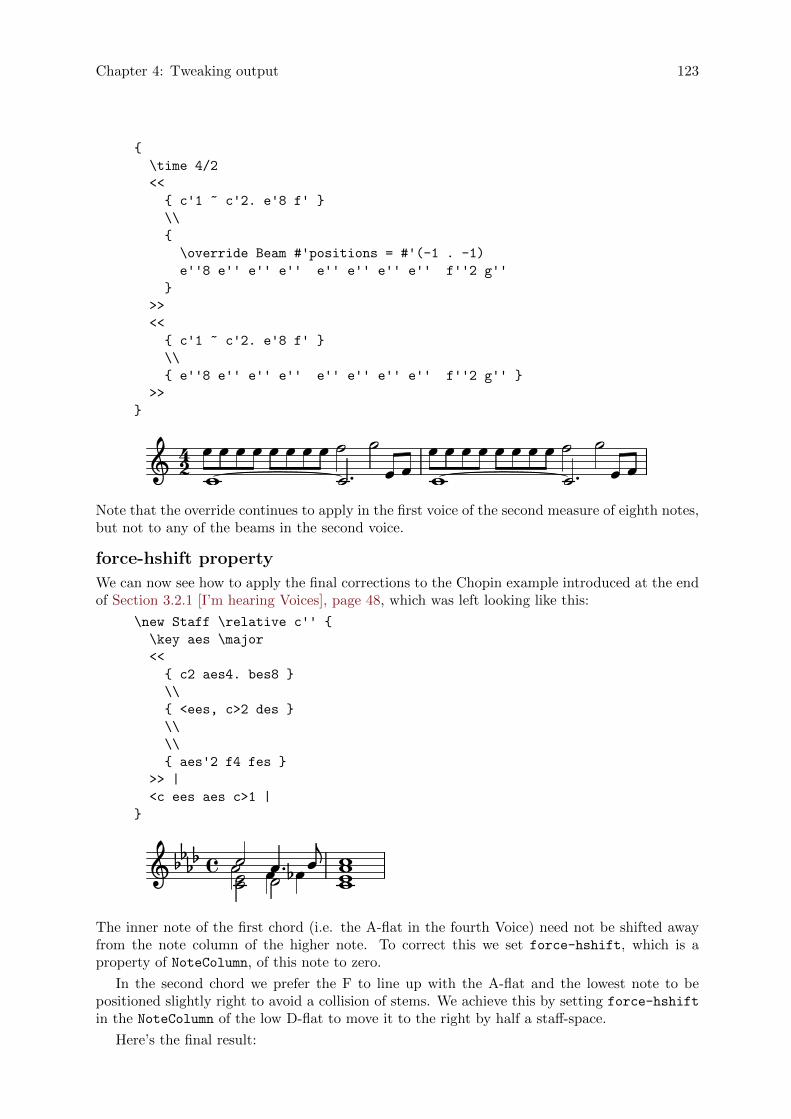
Chapter 4: Tweaking output 123
{
\time 4/2
<<
{ c'1 ~ c'2. e'8 f' }
\\
{
\override Beam #'positions = #'(-1 . -1)
e''8 e'' e'' e'' e'' e'' e'' e'' f''2 g''
}
>>
<<
{ c'1 ~ c'2. e'8 f' }
\\
{ e''8 e'' e'' e'' e'' e'' e'' e'' f''2 g'' }
>>
}
ÎÎÎ ÎÎ�24 Î Î
� ��
� Î ÎÎ� ÎÎ � ��
�
Î ÎÎ Î ÎÎÎ�
Note that the override continues to apply in the first voice of the second measure of eighth notes,but not to any of the beams in the second voice.
force-hshift property
We can now see how to apply the final corrections to the Chopin example introduced at the endof Section 3.2.1 [I’m hearing Voices], page 48, which was left looking like this:
\new Staff \relative c'' {
\key aes \major
<<
{ c2 aes4. bes8 }
\\
{ <ees, c>2 des }
\\
\\
{ aes'2 f4 fes }
>> |
<c ees aes c>1 |
}
a�������� ��� �� ��������
The inner note of the first chord (i.e. the A-flat in the fourth Voice) need not be shifted awayfrom the note column of the higher note. To correct this we set force-hshift, which is aproperty of NoteColumn, of this note to zero.
In the second chord we prefer the F to line up with the A-flat and the lowest note to bepositioned slightly right to avoid a collision of stems. We achieve this by setting force-hshift
in the NoteColumn of the low D-flat to move it to the right by half a staff-space.
Here’s the final result:

Chapter 4: Tweaking output 124
\new Staff \relative c'' {
\key aes \major
<<
{ c2 aes4. bes8 }
\\
{
<ees, c>2
\once \override NoteColumn #'force-hshift = #0.5
des2
}
\\
\\
{
\override NoteColumn #'force-hshift = #0
aes'2 f4 fes
}
>> |
<c ees aes c>1 |
}
��������� ���������
4.5.3 Real music example
We end this section on Tweaks by showing the steps to be taken to deal with a tricky examplewhich needs several tweaks to produce the desired output. The example has been deliberatelychosen to illustrate the use of the Notation Reference to resolve unusual problems with notation.It is not representative of the more usual engraving process, so please do not let these difficultiesput you off! Fortunately, difficulties like these are not very common!
The example is from Chopin’s Premiere Ballade, Op. 23, bars 6 to 9, the transition from theopening Lento to Moderato. Here, first, is what we want the output to look like, but to avoidover-complicating the example too much we have left out the dynamics, fingering and pedalling.
�
46 �46
Moderato
�� �� ��
��� �
���� ���¥ �
�� �
�
� ����
�����
� ��� � �� ��
�We note first that the right hand part in the third bar requires four voices. These are the
five beamed eighth notes, the tied C, the half-note D which is merged with the eighth note D,and the dotted quarter note F-sharp, which is also merged with the eighth note at the samepitch. Everything else is in a single voice, so the easiest way is to introduce these extra threevoices temporarily at the time they are needed. If you have forgotten how to do this, look atSection 3.2.1 [I’m hearing Voices], page 48 and Section 3.2.2 [Explicitly instantiating voices],page 52. Here we choose to use explicitly instantiated voices for the polyphonic passage, asLilyPond is better able to avoid collisions if all voices are instantiated explicitly in this way.
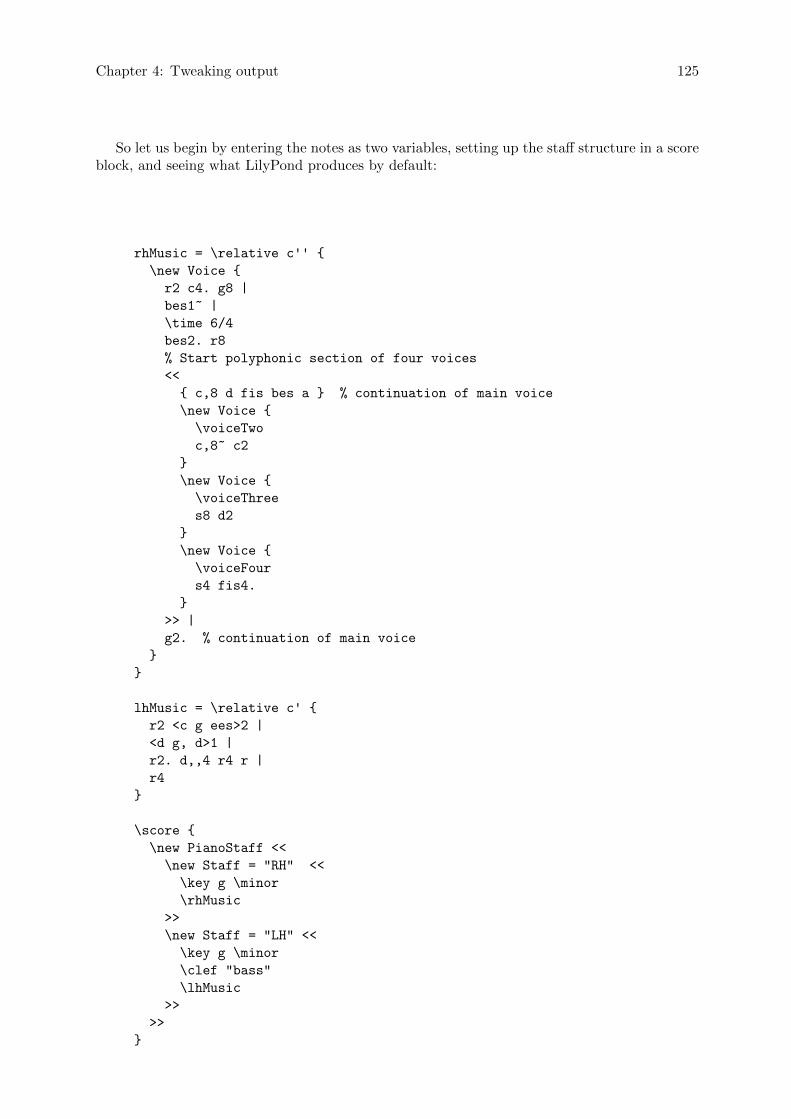
Chapter 4: Tweaking output 125
So let us begin by entering the notes as two variables, setting up the staff structure in a scoreblock, and seeing what LilyPond produces by default:
rhMusic = \relative c'' {
\new Voice {
r2 c4. g8 |
bes1~ |
\time 6/4
bes2. r8
% Start polyphonic section of four voices
<<
{ c,8 d fis bes a } % continuation of main voice
\new Voice {
\voiceTwo
c,8~ c2
}
\new Voice {
\voiceThree
s8 d2
}
\new Voice {
\voiceFour
s4 fis4.
}
>> |
g2. % continuation of main voice
}
}
lhMusic = \relative c' {
r2 <c g ees>2 |
<d g, d>1 |
r2. d,,4 r4 r |
r4
}
\score {
\new PianoStaff <<
\new Staff = "RH" <<
\key g \minor
\rhMusic
>>
\new Staff = "LH" <<
\key g \minor
\clef "bass"
\lhMusic
>>
>>
}
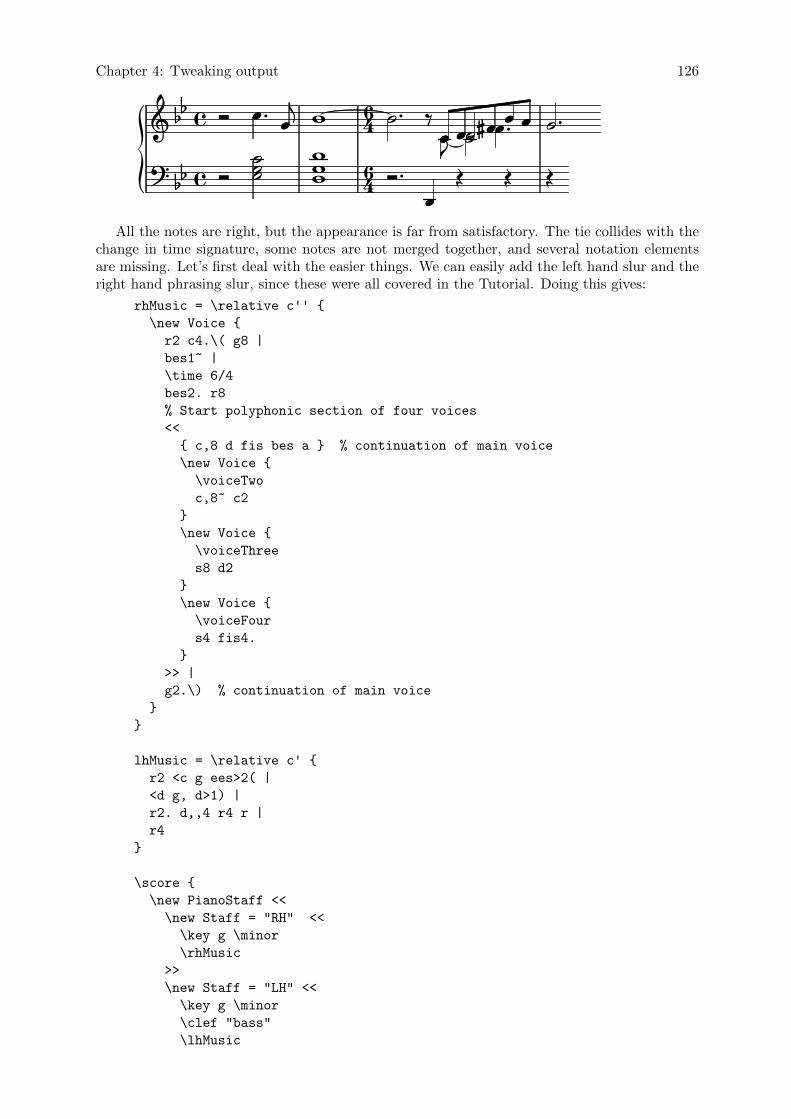
Chapter 4: Tweaking output 126
··���
�46��
�� ��
· �· ��
���
���� �� ��� �� �
�
��
46� � �··�
·�
All the notes are right, but the appearance is far from satisfactory. The tie collides with thechange in time signature, some notes are not merged together, and several notation elementsare missing. Let’s first deal with the easier things. We can easily add the left hand slur and theright hand phrasing slur, since these were all covered in the Tutorial. Doing this gives:
rhMusic = \relative c'' {
\new Voice {
r2 c4.\( g8 |
bes1~ |
\time 6/4
bes2. r8
% Start polyphonic section of four voices
<<
{ c,8 d fis bes a } % continuation of main voice
\new Voice {
\voiceTwo
c,8~ c2
}
\new Voice {
\voiceThree
s8 d2
}
\new Voice {
\voiceFour
s4 fis4.
}
>> |
g2.\) % continuation of main voice
}
}
lhMusic = \relative c' {
r2 <c g ees>2( |
<d g, d>1) |
r2. d,,4 r4 r |
r4
}
\score {
\new PianoStaff <<
\new Staff = "RH" <<
\key g \minor
\rhMusic
>>
\new Staff = "LH" <<
\key g \minor
\clef "bass"
\lhMusic
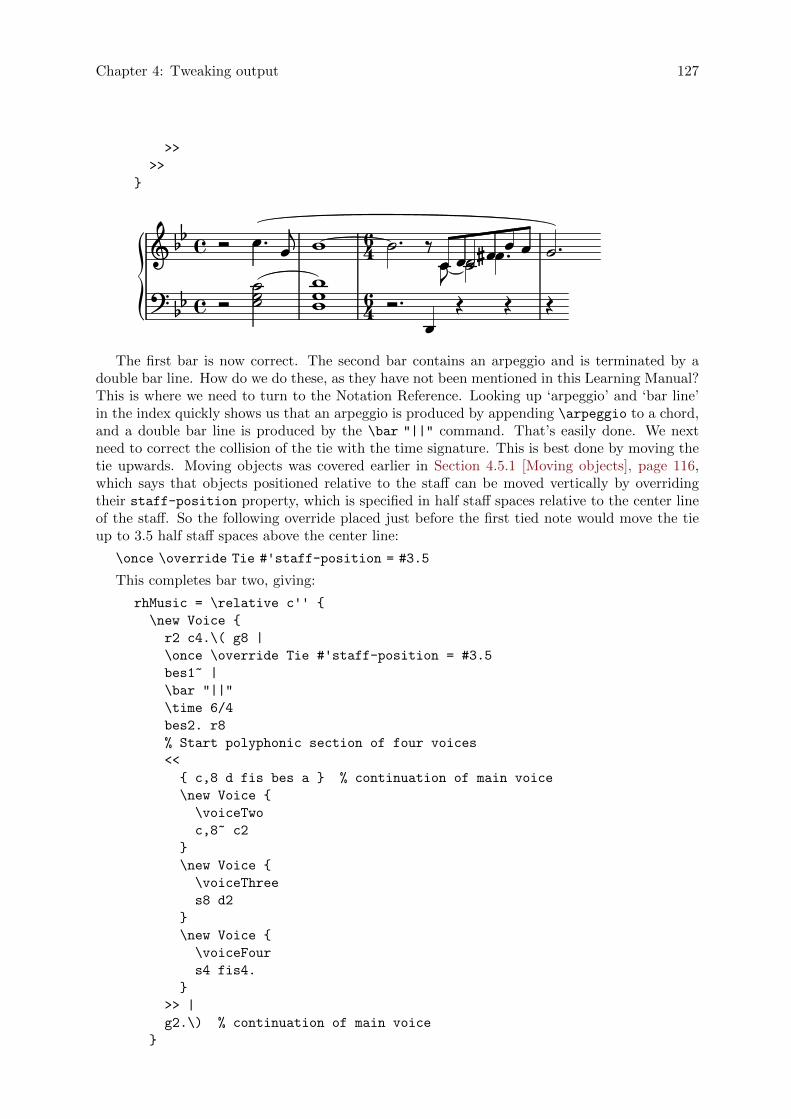
Chapter 4: Tweaking output 127
>>
>>
}
ÎÎ� Î ��Î
��� ��� �� � �
��
�
�Î
�� �
��� �46
46 ÎÎ�ÎÎ
���The first bar is now correct. The second bar contains an arpeggio and is terminated by a
double bar line. How do we do these, as they have not been mentioned in this Learning Manual?This is where we need to turn to the Notation Reference. Looking up ‘arpeggio’ and ‘bar line’in the index quickly shows us that an arpeggio is produced by appending \arpeggio to a chord,and a double bar line is produced by the \bar "||" command. That’s easily done. We nextneed to correct the collision of the tie with the time signature. This is best done by moving thetie upwards. Moving objects was covered earlier in Section 4.5.1 [Moving objects], page 116,which says that objects positioned relative to the staff can be moved vertically by overridingtheir staff-position property, which is specified in half staff spaces relative to the center lineof the staff. So the following override placed just before the first tied note would move the tieup to 3.5 half staff spaces above the center line:
\once \override Tie #'staff-position = #3.5
This completes bar two, giving:
rhMusic = \relative c'' {
\new Voice {
r2 c4.\( g8 |
\once \override Tie #'staff-position = #3.5
bes1~ |
\bar "||"
\time 6/4
bes2. r8
% Start polyphonic section of four voices
<<
{ c,8 d fis bes a } % continuation of main voice
\new Voice {
\voiceTwo
c,8~ c2
}
\new Voice {
\voiceThree
s8 d2
}
\new Voice {
\voiceFour
s4 fis4.
}
>> |
g2.\) % continuation of main voice
}
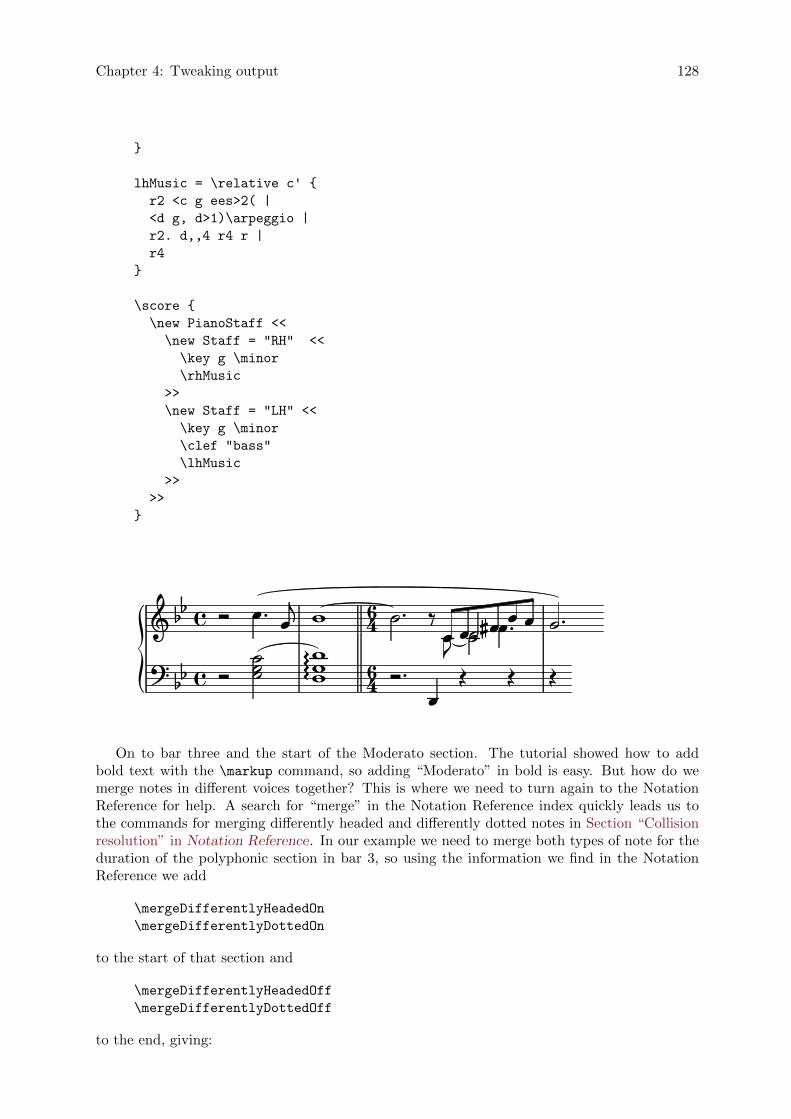
Chapter 4: Tweaking output 128
}
lhMusic = \relative c' {
r2 <c g ees>2( |
<d g, d>1)\arpeggio |
r2. d,,4 r4 r |
r4
}
\score {
\new PianoStaff <<
\new Staff = "RH" <<
\key g \minor
\rhMusic
>>
\new Staff = "LH" <<
\key g \minor
\clef "bass"
\lhMusic
>>
>>
}
·� �
��
���
·46�
��
�� ·
��46
������ � �
�� �·
�··�� ·
�� �
� �
On to bar three and the start of the Moderato section. The tutorial showed how to addbold text with the \markup command, so adding “Moderato” in bold is easy. But how do wemerge notes in different voices together? This is where we need to turn again to the NotationReference for help. A search for “merge” in the Notation Reference index quickly leads us tothe commands for merging differently headed and differently dotted notes in Section “Collisionresolution” in Notation Reference. In our example we need to merge both types of note for theduration of the polyphonic section in bar 3, so using the information we find in the NotationReference we add
\mergeDifferentlyHeadedOn
\mergeDifferentlyDottedOn
to the start of that section and
\mergeDifferentlyHeadedOff
\mergeDifferentlyDottedOff
to the end, giving:
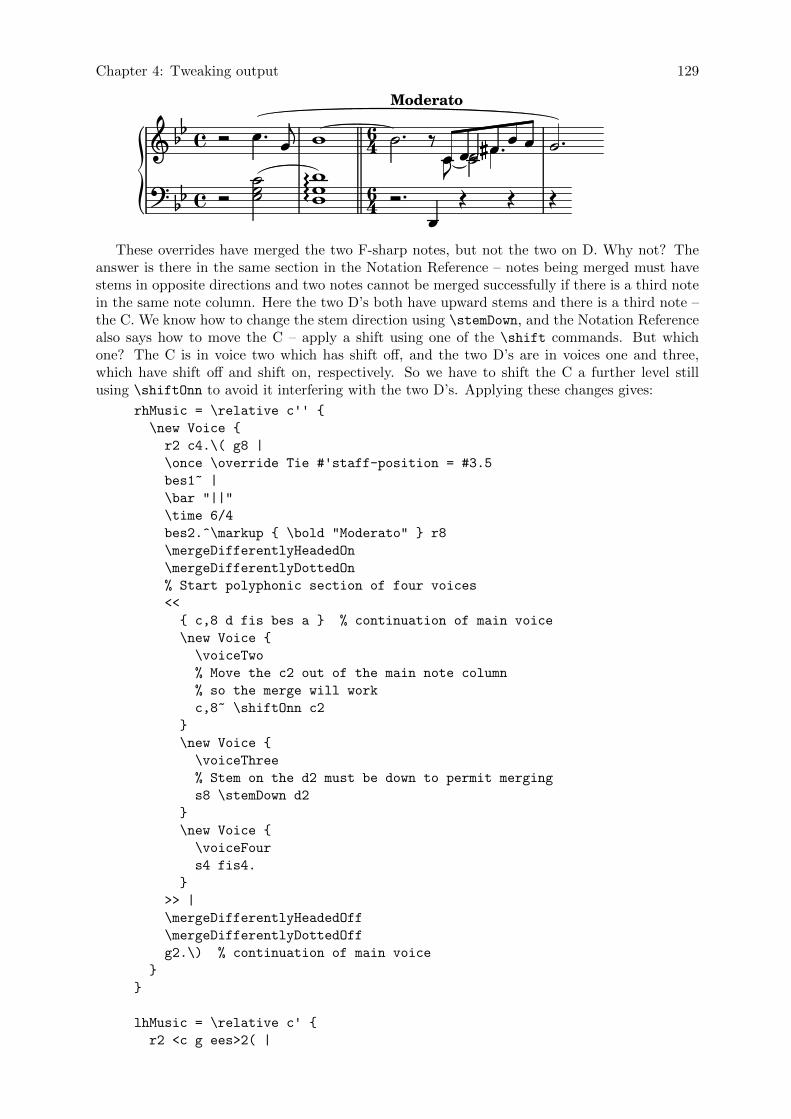
Chapter 4: Tweaking output 129
· �··��� �� �
� �� �� ����
Moderato
46�46�· �
��� � �
����¥
�
� ��
�� ��
These overrides have merged the two F-sharp notes, but not the two on D. Why not? Theanswer is there in the same section in the Notation Reference – notes being merged must havestems in opposite directions and two notes cannot be merged successfully if there is a third notein the same note column. Here the two D’s both have upward stems and there is a third note –the C. We know how to change the stem direction using \stemDown, and the Notation Referencealso says how to move the C – apply a shift using one of the \shift commands. But whichone? The C is in voice two which has shift off, and the two D’s are in voices one and three,which have shift off and shift on, respectively. So we have to shift the C a further level stillusing \shiftOnn to avoid it interfering with the two D’s. Applying these changes gives:
rhMusic = \relative c'' {
\new Voice {
r2 c4.\( g8 |
\once \override Tie #'staff-position = #3.5
bes1~ |
\bar "||"
\time 6/4
bes2.^\markup { \bold "Moderato" } r8
\mergeDifferentlyHeadedOn
\mergeDifferentlyDottedOn
% Start polyphonic section of four voices
<<
{ c,8 d fis bes a } % continuation of main voice
\new Voice {
\voiceTwo
% Move the c2 out of the main note column
% so the merge will work
c,8~ \shiftOnn c2
}
\new Voice {
\voiceThree
% Stem on the d2 must be down to permit merging
s8 \stemDown d2
}
\new Voice {
\voiceFour
s4 fis4.
}
>> |
\mergeDifferentlyHeadedOff
\mergeDifferentlyDottedOff
g2.\) % continuation of main voice
}
}
lhMusic = \relative c' {
r2 <c g ees>2( |
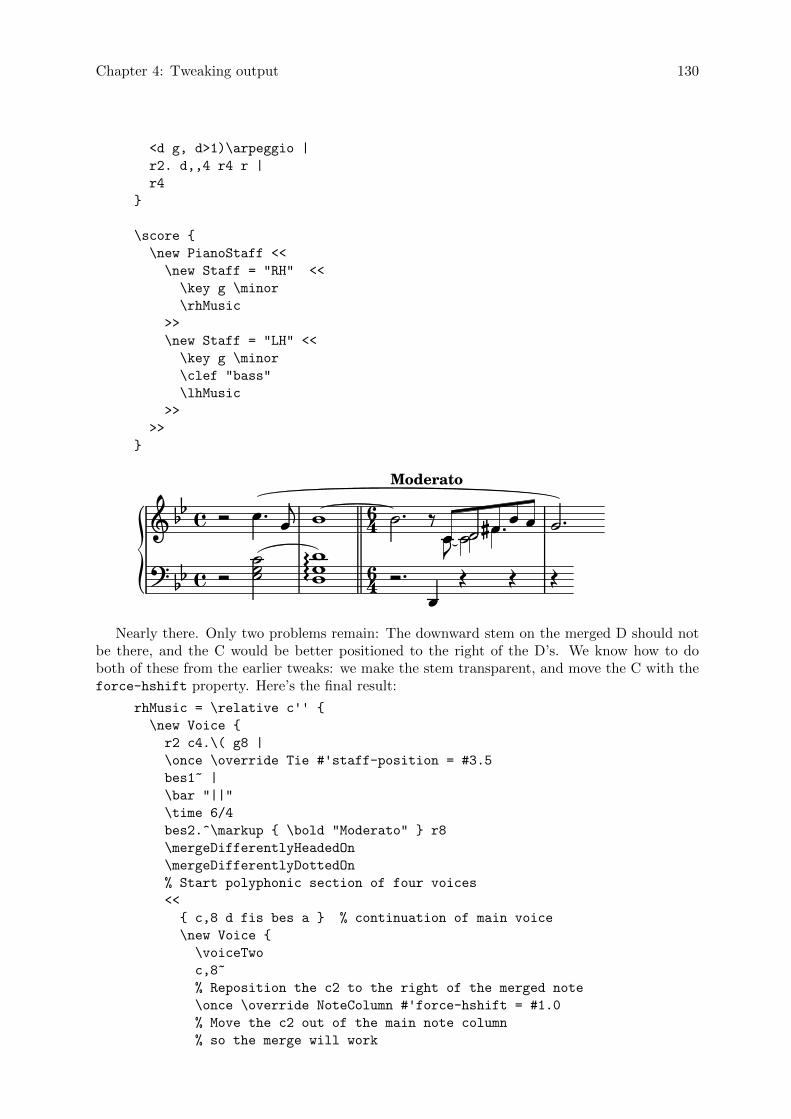
Chapter 4: Tweaking output 130
<d g, d>1)\arpeggio |
r2. d,,4 r4 r |
r4
}
\score {
\new PianoStaff <<
\new Staff = "RH" <<
\key g \minor
\rhMusic
>>
\new Staff = "LH" <<
\key g \minor
\clef "bass"
\lhMusic
>>
>>
}
¥ î �� ���
� �
����� �� ��46
� ��
�
�� ��
� ��
��
Moderato
46
�� �� ��
� �
Nearly there. Only two problems remain: The downward stem on the merged D should notbe there, and the C would be better positioned to the right of the D’s. We know how to doboth of these from the earlier tweaks: we make the stem transparent, and move the C with theforce-hshift property. Here’s the final result:
rhMusic = \relative c'' {
\new Voice {
r2 c4.\( g8 |
\once \override Tie #'staff-position = #3.5
bes1~ |
\bar "||"
\time 6/4
bes2.^\markup { \bold "Moderato" } r8
\mergeDifferentlyHeadedOn
\mergeDifferentlyDottedOn
% Start polyphonic section of four voices
<<
{ c,8 d fis bes a } % continuation of main voice
\new Voice {
\voiceTwo
c,8~
% Reposition the c2 to the right of the merged note
\once \override NoteColumn #'force-hshift = #1.0
% Move the c2 out of the main note column
% so the merge will work
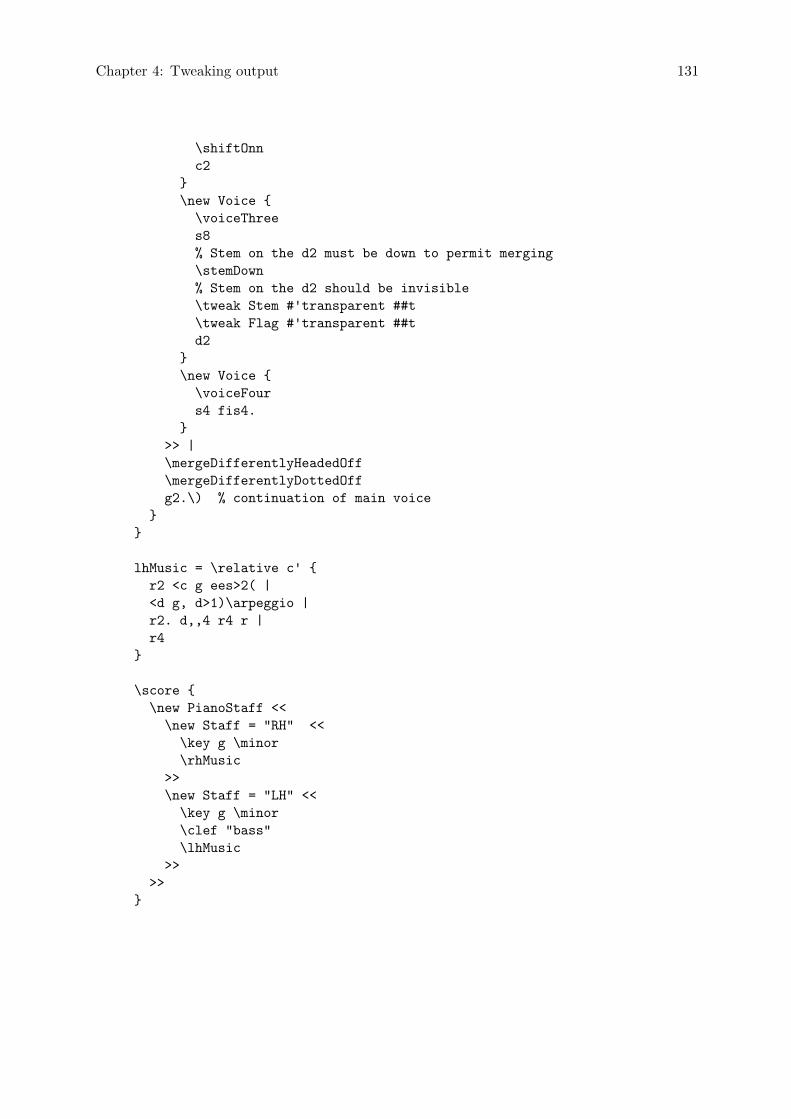
Chapter 4: Tweaking output 131
\shiftOnn
c2
}
\new Voice {
\voiceThree
s8
% Stem on the d2 must be down to permit merging
\stemDown
% Stem on the d2 should be invisible
\tweak Stem #'transparent ##t
\tweak Flag #'transparent ##t
d2
}
\new Voice {
\voiceFour
s4 fis4.
}
>> |
\mergeDifferentlyHeadedOff
\mergeDifferentlyDottedOff
g2.\) % continuation of main voice
}
}
lhMusic = \relative c' {
r2 <c g ees>2( |
<d g, d>1)\arpeggio |
r2. d,,4 r4 r |
r4
}
\score {
\new PianoStaff <<
\new Staff = "RH" <<
\key g \minor
\rhMusic
>>
\new Staff = "LH" <<
\key g \minor
\clef "bass"
\lhMusic
>>
>>
}
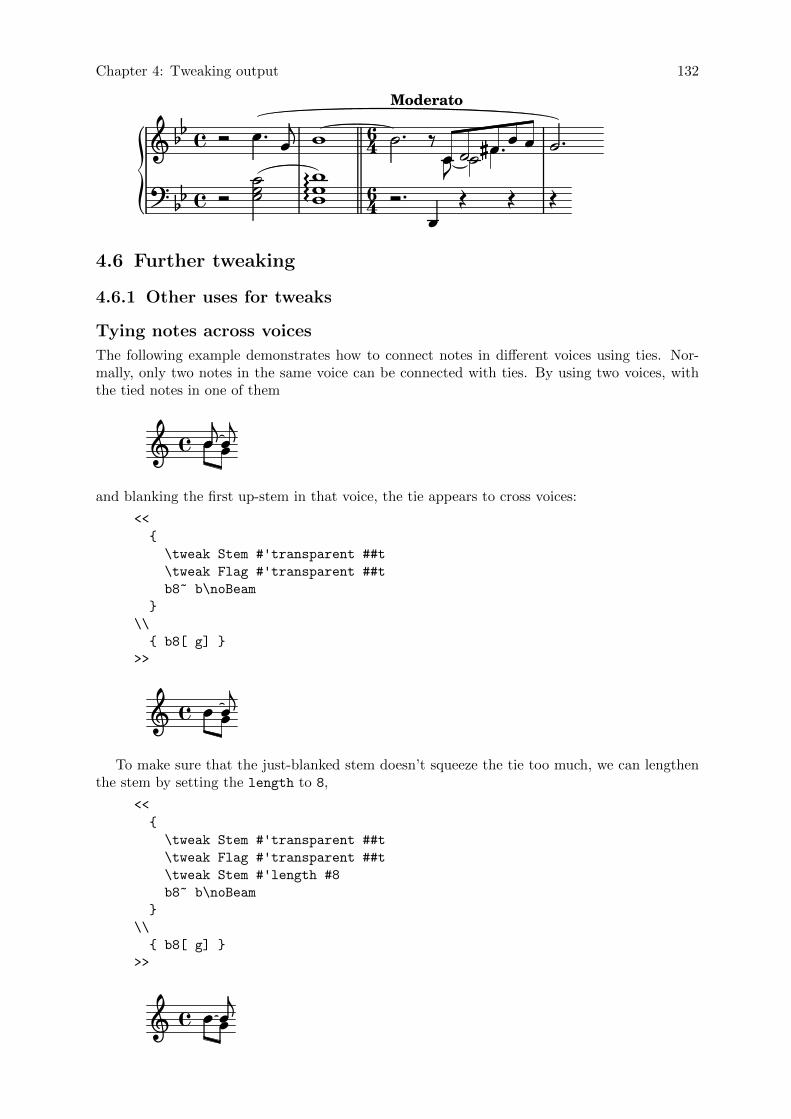
Chapter 4: Tweaking output 132
��
�����
����
�� �� �� �
��
�¥ ���
� � � ��
��� ���
��Moderato
46�46� �
4.6 Further tweaking
4.6.1 Other uses for tweaks
Tying notes across voices
The following example demonstrates how to connect notes in different voices using ties. Nor-mally, only two notes in the same voice can be connected with ties. By using two voices, withthe tied notes in one of them
222��2� �
and blanking the first up-stem in that voice, the tie appears to cross voices:
<<
{
\tweak Stem #'transparent ##t
\tweak Flag #'transparent ##t
b8~ b\noBeam
}
\\
{ b8[ g] }
>>
22 2� 2 ��To make sure that the just-blanked stem doesn’t squeeze the tie too much, we can lengthen
the stem by setting the length to 8,
<<
{
\tweak Stem #'transparent ##t
\tweak Flag #'transparent ##t
\tweak Stem #'length #8
b8~ b\noBeam
}
\\
{ b8[ g] }
>>
��� ����
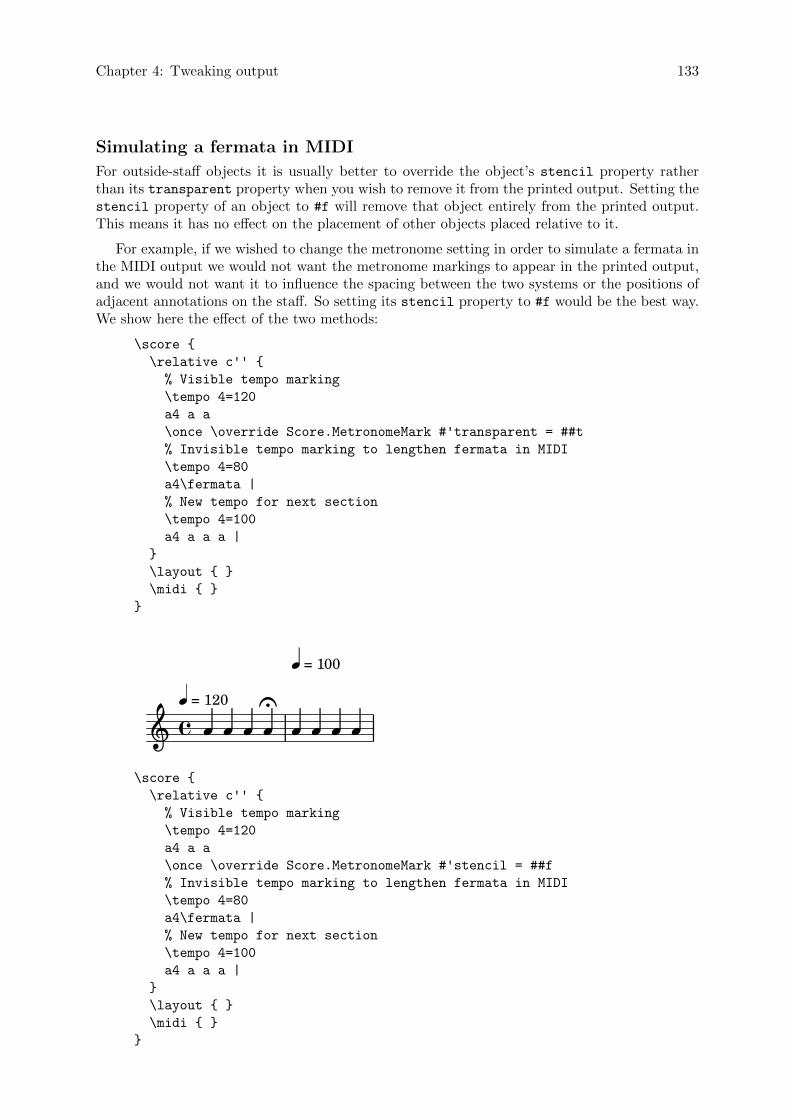
Chapter 4: Tweaking output 133
Simulating a fermata in MIDI
For outside-staff objects it is usually better to override the object’s stencil property ratherthan its transparent property when you wish to remove it from the printed output. Setting thestencil property of an object to #f will remove that object entirely from the printed output.This means it has no effect on the placement of other objects placed relative to it.
For example, if we wished to change the metronome setting in order to simulate a fermata inthe MIDI output we would not want the metronome markings to appear in the printed output,and we would not want it to influence the spacing between the two systems or the positions ofadjacent annotations on the staff. So setting its stencil property to #f would be the best way.We show here the effect of the two methods:
\score {
\relative c'' {
% Visible tempo marking
\tempo 4=120
a4 a a
\once \override Score.MetronomeMark #'transparent = ##t
% Invisible tempo marking to lengthen fermata in MIDI
\tempo 4=80
a4\fermata |
% New tempo for next section
\tempo 4=100
a4 a a a |
}
\layout { }
\midi { }
}
Î Î ÎÎ
Î = 100
Î ÎÎ�
� �Π= 120
Î\score {
\relative c'' {
% Visible tempo marking
\tempo 4=120
a4 a a
\once \override Score.MetronomeMark #'stencil = ##f
% Invisible tempo marking to lengthen fermata in MIDI
\tempo 4=80
a4\fermata |
% New tempo for next section
\tempo 4=100
a4 a a a |
}
\layout { }
\midi { }
}
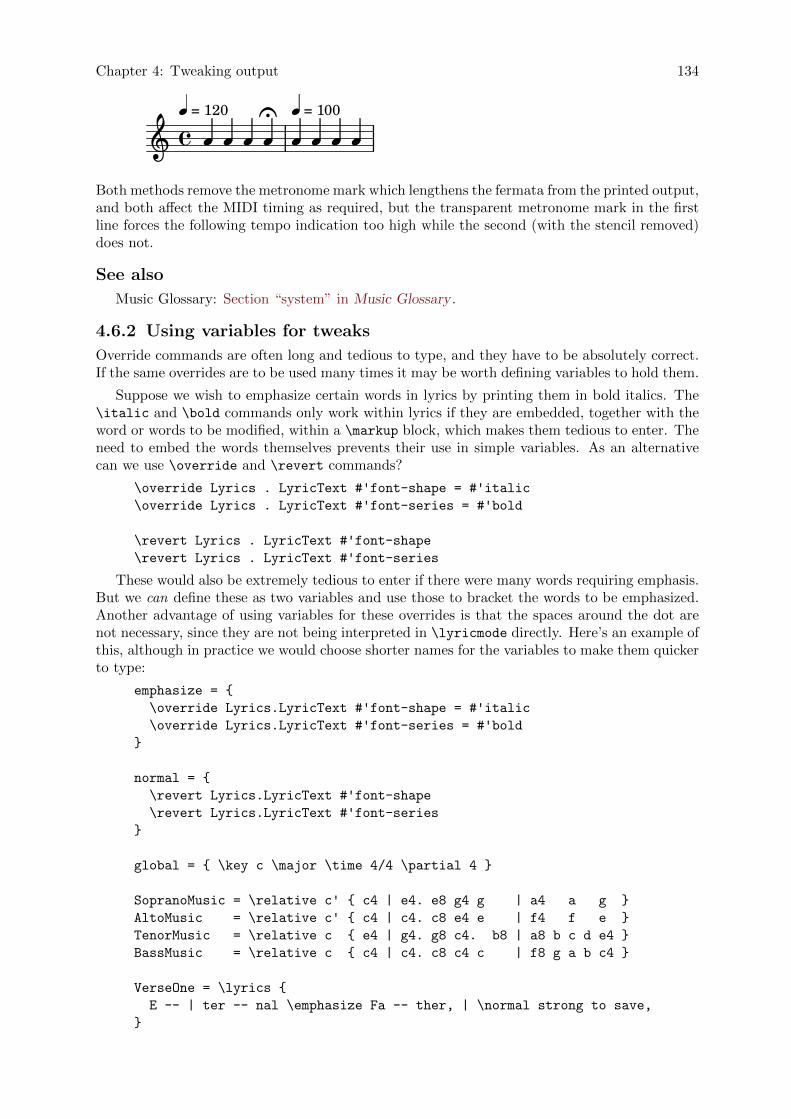
Chapter 4: Tweaking output 134
��� �� ���
Î = 120
� �Π= 100
�Both methods remove the metronome mark which lengthens the fermata from the printed output,and both affect the MIDI timing as required, but the transparent metronome mark in the firstline forces the following tempo indication too high while the second (with the stencil removed)does not.
See also
Music Glossary: Section “system” in Music Glossary .
4.6.2 Using variables for tweaks
Override commands are often long and tedious to type, and they have to be absolutely correct.If the same overrides are to be used many times it may be worth defining variables to hold them.
Suppose we wish to emphasize certain words in lyrics by printing them in bold italics. The\italic and \bold commands only work within lyrics if they are embedded, together with theword or words to be modified, within a \markup block, which makes them tedious to enter. Theneed to embed the words themselves prevents their use in simple variables. As an alternativecan we use \override and \revert commands?
\override Lyrics . LyricText #'font-shape = #'italic
\override Lyrics . LyricText #'font-series = #'bold
\revert Lyrics . LyricText #'font-shape
\revert Lyrics . LyricText #'font-series
These would also be extremely tedious to enter if there were many words requiring emphasis.But we can define these as two variables and use those to bracket the words to be emphasized.Another advantage of using variables for these overrides is that the spaces around the dot arenot necessary, since they are not being interpreted in \lyricmode directly. Here’s an example ofthis, although in practice we would choose shorter names for the variables to make them quickerto type:
emphasize = {
\override Lyrics.LyricText #'font-shape = #'italic
\override Lyrics.LyricText #'font-series = #'bold
}
normal = {
\revert Lyrics.LyricText #'font-shape
\revert Lyrics.LyricText #'font-series
}
global = { \key c \major \time 4/4 \partial 4 }
SopranoMusic = \relative c' { c4 | e4. e8 g4 g | a4 a g }
AltoMusic = \relative c' { c4 | c4. c8 e4 e | f4 f e }
TenorMusic = \relative c { e4 | g4. g8 c4. b8 | a8 b c d e4 }
BassMusic = \relative c { c4 | c4. c8 c4 c | f8 g a b c4 }
VerseOne = \lyrics {
E -- | ter -- nal \emphasize Fa -- ther, | \normal strong to save,
}
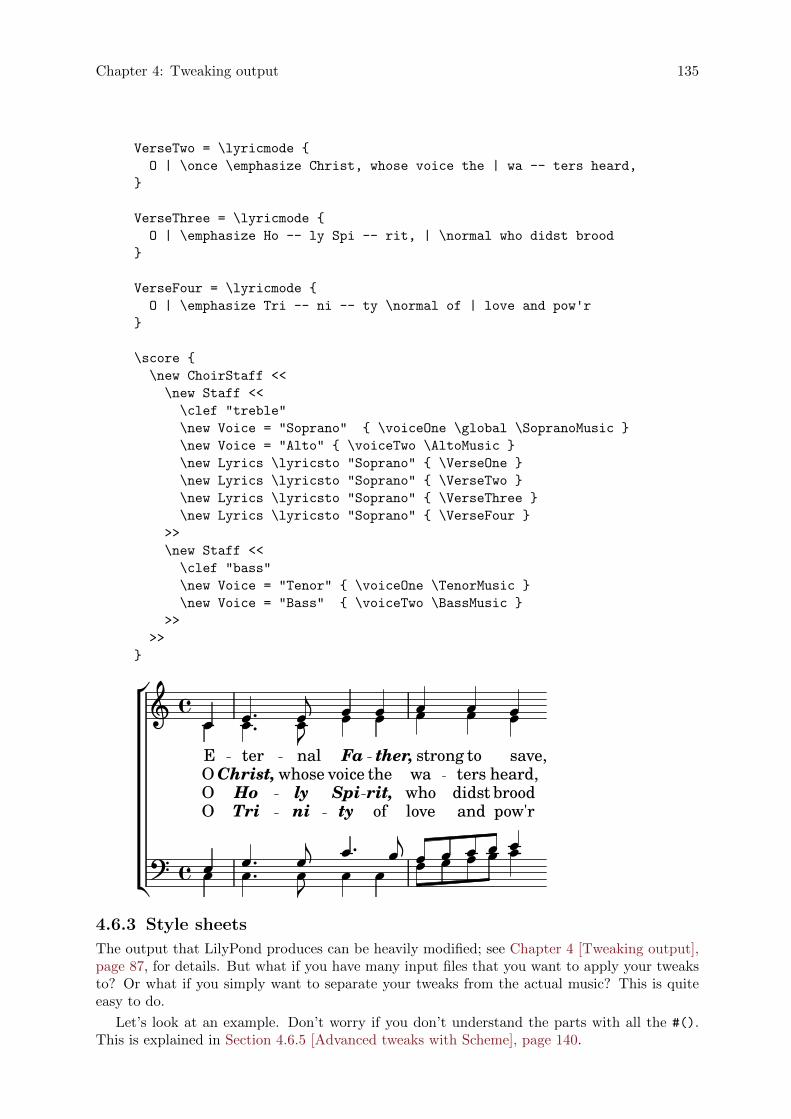
Chapter 4: Tweaking output 135
VerseTwo = \lyricmode {
O | \once \emphasize Christ, whose voice the | wa -- ters heard,
}
VerseThree = \lyricmode {
O | \emphasize Ho -- ly Spi -- rit, | \normal who didst brood
}
VerseFour = \lyricmode {
O | \emphasize Tri -- ni -- ty \normal of | love and pow'r
}
\score {
\new ChoirStaff <<
\new Staff <<
\clef "treble"
\new Voice = "Soprano" { \voiceOne \global \SopranoMusic }
\new Voice = "Alto" { \voiceTwo \AltoMusic }
\new Lyrics \lyricsto "Soprano" { \VerseOne }
\new Lyrics \lyricsto "Soprano" { \VerseTwo }
\new Lyrics \lyricsto "Soprano" { \VerseThree }
\new Lyrics \lyricsto "Soprano" { \VerseFour }
>>
\new Staff <<
\clef "bass"
\new Voice = "Tenor" { \voiceOne \TenorMusic }
\new Voice = "Bass" { \voiceTwo \BassMusic }
>>
>>
}
��O
��
��nily
whosenal
��ter
��
� �Ho
Christ,O
�
E
��
O
�ofrit,thether,
��
�lovewhowastrong
��SpivoiceFa
��
�� �
��ty
��
��Tri
�����
��save,
heard,broodpow'r
���
��
��
�� �
��to
tersdidstand
�
4.6.3 Style sheets
The output that LilyPond produces can be heavily modified; see Chapter 4 [Tweaking output],page 87, for details. But what if you have many input files that you want to apply your tweaksto? Or what if you simply want to separate your tweaks from the actual music? This is quiteeasy to do.
Let’s look at an example. Don’t worry if you don’t understand the parts with all the #().This is explained in Section 4.6.5 [Advanced tweaks with Scheme], page 140.
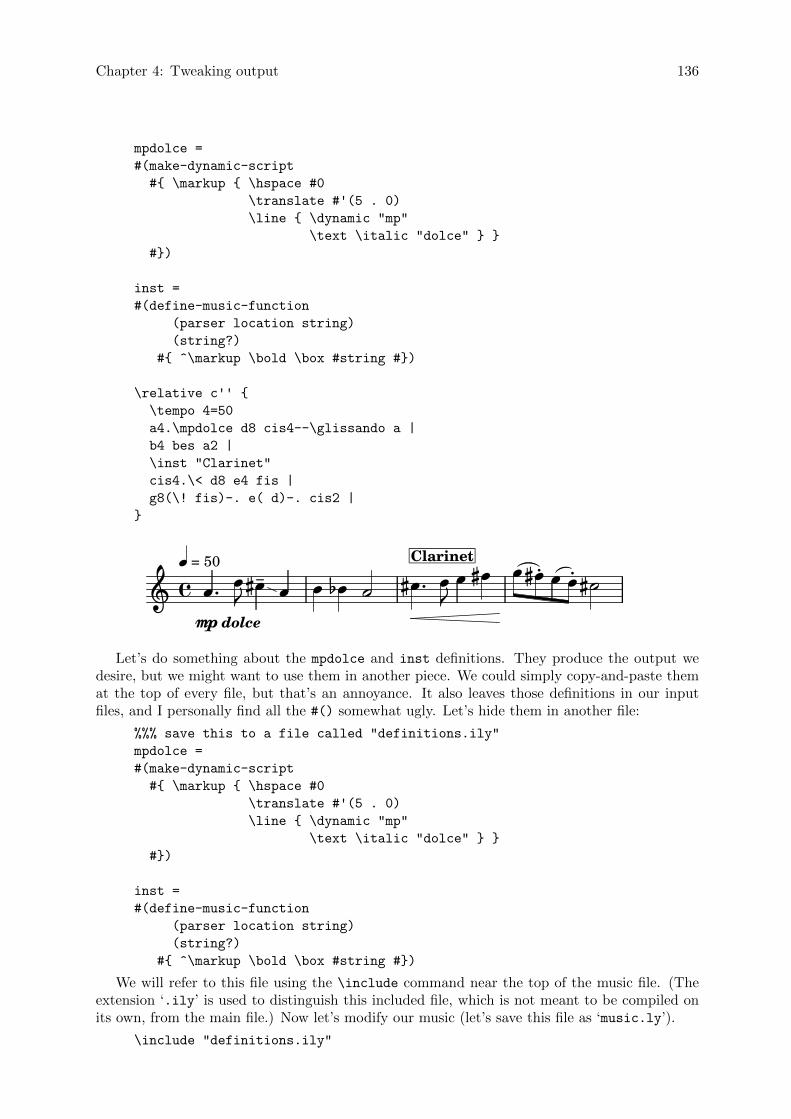
Chapter 4: Tweaking output 136
mpdolce =
#(make-dynamic-script
#{ \markup { \hspace #0
\translate #'(5 . 0)
\line { \dynamic "mp"
\text \italic "dolce" } }
#})
inst =
#(define-music-function
(parser location string)
(string?)
#{ ^\markup \bold \box #string #})
\relative c'' {
\tempo 4=50
a4.\mpdolce d8 cis4--\glissando a |
b4 bes a2 |
\inst "Clarinet"
cis4.\< d8 e4 fis |
g8(\! fis)-. e( d)-. cis2 |
}
üüClarinet
ü ü�üü = 50 ümp dolce�ü �� ü � � ü�ü ü� ü� � �
� �� ü �ü��
Let’s do something about the mpdolce and inst definitions. They produce the output wedesire, but we might want to use them in another piece. We could simply copy-and-paste themat the top of every file, but that’s an annoyance. It also leaves those definitions in our inputfiles, and I personally find all the #() somewhat ugly. Let’s hide them in another file:
%%% save this to a file called "definitions.ily"
mpdolce =
#(make-dynamic-script
#{ \markup { \hspace #0
\translate #'(5 . 0)
\line { \dynamic "mp"
\text \italic "dolce" } }
#})
inst =
#(define-music-function
(parser location string)
(string?)
#{ ^\markup \bold \box #string #})
We will refer to this file using the \include command near the top of the music file. (Theextension ‘.ily’ is used to distinguish this included file, which is not meant to be compiled onits own, from the main file.) Now let’s modify our music (let’s save this file as ‘music.ly’).
\include "definitions.ily"
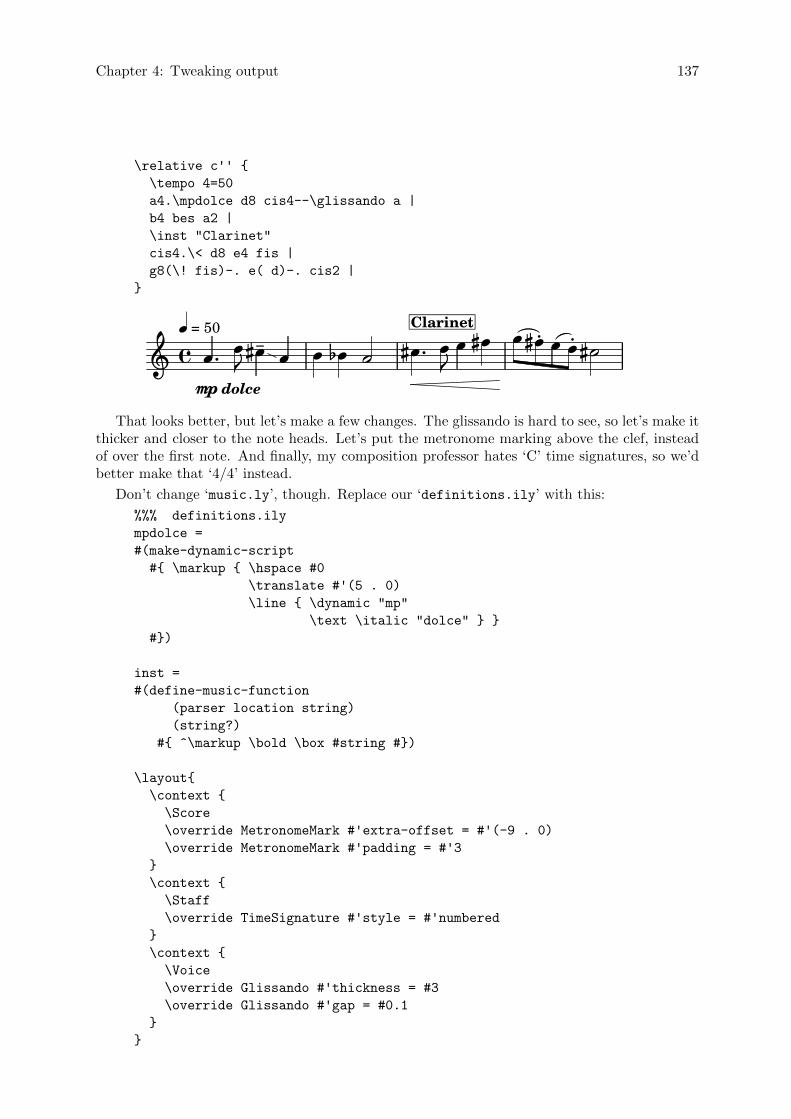
Chapter 4: Tweaking output 137
\relative c'' {
\tempo 4=50
a4.\mpdolce d8 cis4--\glissando a |
b4 bes a2 |
\inst "Clarinet"
cis4.\< d8 e4 fis |
g8(\! fis)-. e( d)-. cis2 |
}
üüClarinet
ü ü�üü = 50 ümp dolce�ü �� ü � � ü�ü ü� ü� � �
� �� ü �ü��
That looks better, but let’s make a few changes. The glissando is hard to see, so let’s make itthicker and closer to the note heads. Let’s put the metronome marking above the clef, insteadof over the first note. And finally, my composition professor hates ‘C’ time signatures, so we’dbetter make that ‘4/4’ instead.
Don’t change ‘music.ly’, though. Replace our ‘definitions.ily’ with this:
%%% definitions.ily
mpdolce =
#(make-dynamic-script
#{ \markup { \hspace #0
\translate #'(5 . 0)
\line { \dynamic "mp"
\text \italic "dolce" } }
#})
inst =
#(define-music-function
(parser location string)
(string?)
#{ ^\markup \bold \box #string #})
\layout{
\context {
\Score
\override MetronomeMark #'extra-offset = #'(-9 . 0)
\override MetronomeMark #'padding = #'3
}
\context {
\Staff
\override TimeSignature #'style = #'numbered
}
\context {
\Voice
\override Glissando #'thickness = #3
\override Glissando #'gap = #0.1
}
}
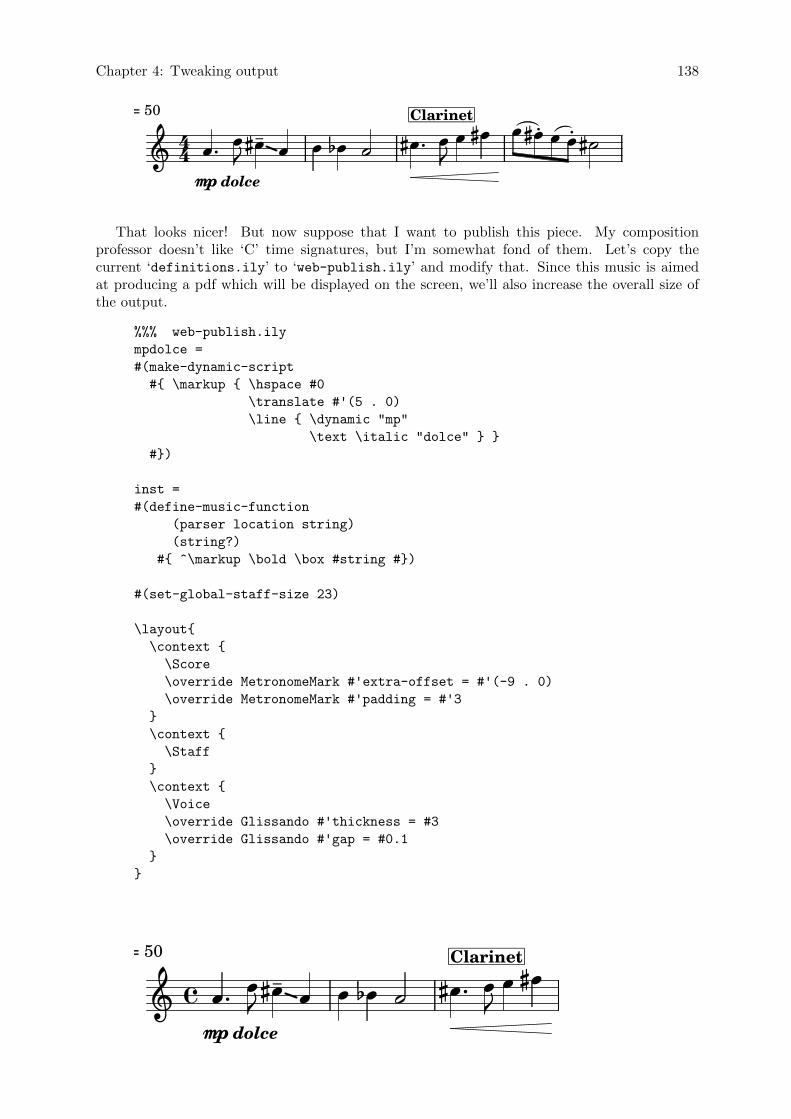
Chapter 4: Tweaking output 138
ü �ü � �ü �� ü44 ü� �� ü ü�ü
ü = 50
�Clarinet
� � ü� �ü ü üü��
mp dolceü
That looks nicer! But now suppose that I want to publish this piece. My compositionprofessor doesn’t like ‘C’ time signatures, but I’m somewhat fond of them. Let’s copy thecurrent ‘definitions.ily’ to ‘web-publish.ily’ and modify that. Since this music is aimedat producing a pdf which will be displayed on the screen, we’ll also increase the overall size ofthe output.
%%% web-publish.ily
mpdolce =
#(make-dynamic-script
#{ \markup { \hspace #0
\translate #'(5 . 0)
\line { \dynamic "mp"
\text \italic "dolce" } }
#})
inst =
#(define-music-function
(parser location string)
(string?)
#{ ^\markup \bold \box #string #})
#(set-global-staff-size 23)
\layout{
\context {
\Score
\override MetronomeMark #'extra-offset = #'(-9 . 0)
\override MetronomeMark #'padding = #'3
}
\context {
\Staff
}
\context {
\Voice
\override Glissando #'thickness = #3
\override Glissando #'gap = #0.1
}
}
ü � ü üü üüü = 50
�� ü� ��mp dolce
� �ü �ü� �Clarinet
ü�
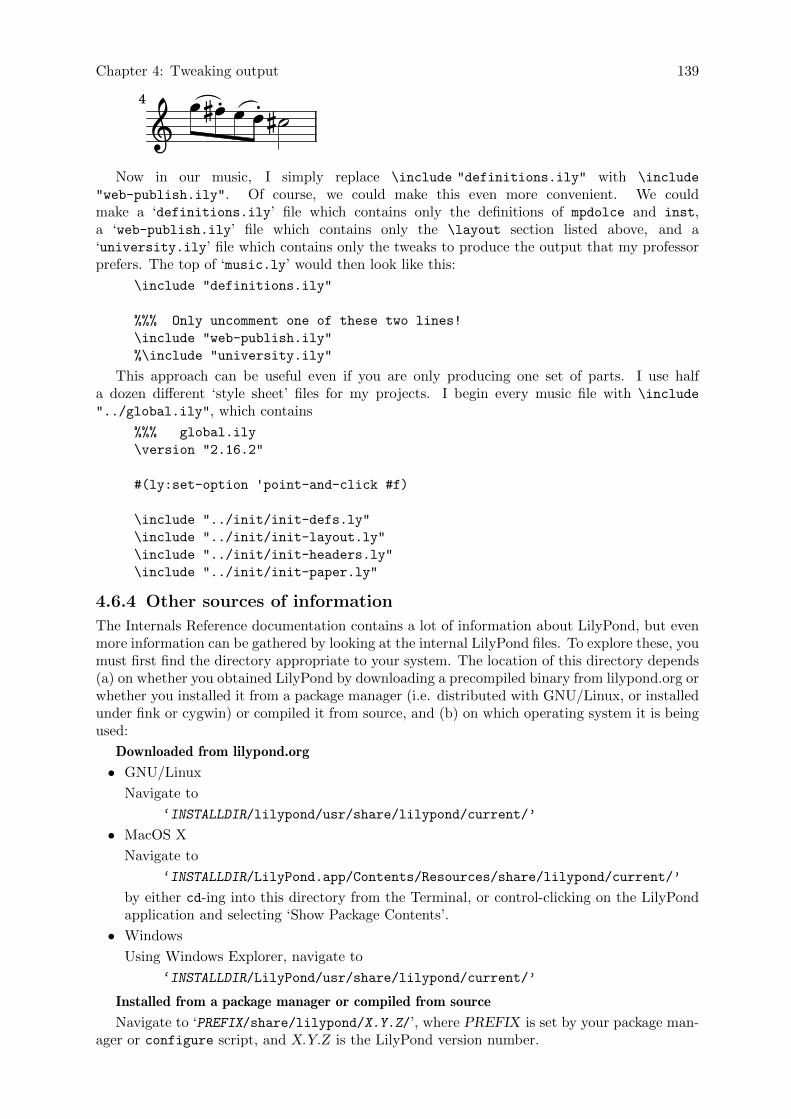
Chapter 4: Tweaking output 139
4 BB�� �� ����
Now in our music, I simply replace \include "definitions.ily" with \include
"web-publish.ily". Of course, we could make this even more convenient. We couldmake a ‘definitions.ily’ file which contains only the definitions of mpdolce and inst,a ‘web-publish.ily’ file which contains only the \layout section listed above, and a‘university.ily’ file which contains only the tweaks to produce the output that my professorprefers. The top of ‘music.ly’ would then look like this:
\include "definitions.ily"
%%% Only uncomment one of these two lines!
\include "web-publish.ily"
%\include "university.ily"
This approach can be useful even if you are only producing one set of parts. I use halfa dozen different ‘style sheet’ files for my projects. I begin every music file with \include
"../global.ily", which contains
%%% global.ily
\version "2.16.2"
#(ly:set-option 'point-and-click #f)
\include "../init/init-defs.ly"
\include "../init/init-layout.ly"
\include "../init/init-headers.ly"
\include "../init/init-paper.ly"
4.6.4 Other sources of information
The Internals Reference documentation contains a lot of information about LilyPond, but evenmore information can be gathered by looking at the internal LilyPond files. To explore these, youmust first find the directory appropriate to your system. The location of this directory depends(a) on whether you obtained LilyPond by downloading a precompiled binary from lilypond.org orwhether you installed it from a package manager (i.e. distributed with GNU/Linux, or installedunder fink or cygwin) or compiled it from source, and (b) on which operating system it is beingused:
Downloaded from lilypond.org
• GNU/Linux
Navigate to
‘INSTALLDIR/lilypond/usr/share/lilypond/current/’
• MacOS X
Navigate to
‘INSTALLDIR/LilyPond.app/Contents/Resources/share/lilypond/current/’
by either cd-ing into this directory from the Terminal, or control-clicking on the LilyPondapplication and selecting ‘Show Package Contents’.
• Windows
Using Windows Explorer, navigate to
‘INSTALLDIR/LilyPond/usr/share/lilypond/current/’
Installed from a package manager or compiled from source
Navigate to ‘PREFIX/share/lilypond/X.Y.Z/’, where PREFIX is set by your package man-ager or configure script, and X.Y.Z is the LilyPond version number.
Chapter 4: Tweaking output 140
Within this directory the two interesting subdirectories are
• ‘ly/’ - contains files in LilyPond format
• ‘scm/’ - contains files in Scheme format
Let’s begin by looking at some files in ‘ly/’. Open ‘ly/property-init.ly’ in a text editor.The one you normally use for .ly files will be fine. This file contains the definitions of all thestandard LilyPond predefined commands, such as \stemUp and \slurDotted. You will see thatthese are nothing more than definitions of variables containing one or a group of \overridecommands. For example, /tieDotted is defined to be:
tieDotted = {
\override Tie #'dash-period = #0.75
\override Tie #'dash-fraction = #0.1
}
If you do not like the default values these predefined commands can be redefined easily, justlike any other variable, at the head of your input file.
The following are the most useful files to be found in ‘ly/’:
Filename Contents‘ly/engraver-init.ly’ Definitions of engraver Contexts‘ly/paper-defaults-init.ly’ Specifications of paper-related defaults‘ly/performer-init.ly’ Definitions of performer Contexts‘ly/property-init.ly’ Definitions of all common predefined commands‘ly/spanner-init.ly’ Definitions of spanner-related predefined commands
Other settings (such as the definitions of markup commands) are stored as ‘.scm’ (Scheme)files. The Scheme programming language is used to provide a programmable interface intoLilyPond internal operation. Further explanation of these files is currently outside the scope ofthis manual, as a knowledge of the Scheme language is required. Users should be warned that asubstantial amount of technical knowledge or time is required to understand Scheme and thesefiles (see Section “Scheme tutorial” in Extending).
If you have this knowledge, the Scheme files which may be of interest are:
Filename Contents‘scm/auto-beam.scm’ Sub-beaming defaults‘scm/define-grobs.scm’ Default settings for grob properties‘scm/define-markup-commands.scm’ Specify all markup commands‘scm/midi.scm’ Default settings for MIDI output‘scm/output-lib.scm’ Settings that affect appearance of frets, colors, acciden-
tals, bar lines, etc
‘scm/parser-clef.scm’ Definitions of supported clefs‘scm/script.scm’ Default settings for articulations
4.6.5 Advanced tweaks with Scheme
Although many things are possible with the \override and \tweak commands, an even morepowerful way of modifying the action of LilyPond is available through a programmable interfaceto the LilyPond internal operation. Code written in the Scheme programming language can beincorporated directly in the internal operation of LilyPond. Of course, at least a basic knowledgeof programming in Scheme is required to do this, and an introduction is provided in the Section“Scheme tutorial” in Extending .
As an illustration of one of the many possibilities, instead of setting a property to a constantit can be set to a Scheme procedure which is then called whenever that property is accessed by
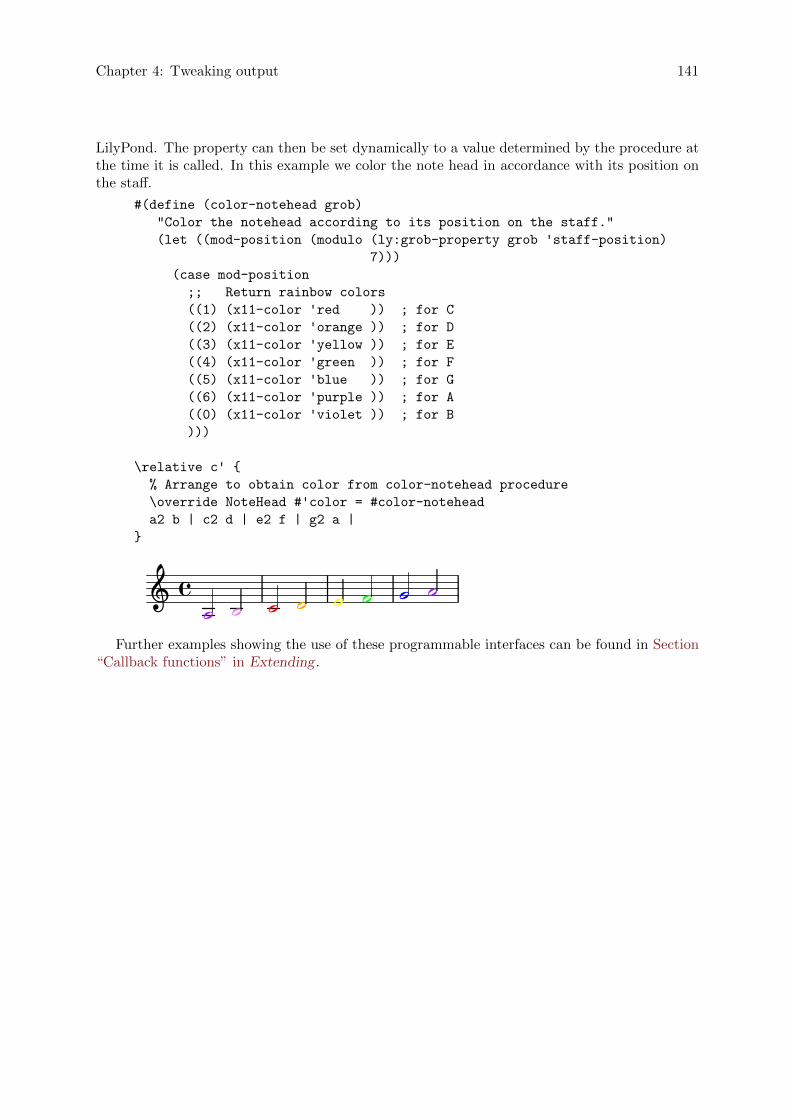
Chapter 4: Tweaking output 141
LilyPond. The property can then be set dynamically to a value determined by the procedure atthe time it is called. In this example we color the note head in accordance with its position onthe staff.
#(define (color-notehead grob)
"Color the notehead according to its position on the staff."
(let ((mod-position (modulo (ly:grob-property grob 'staff-position)
7)))
(case mod-position
;; Return rainbow colors
((1) (x11-color 'red )) ; for C
((2) (x11-color 'orange )) ; for D
((3) (x11-color 'yellow )) ; for E
((4) (x11-color 'green )) ; for F
((5) (x11-color 'blue )) ; for G
((6) (x11-color 'purple )) ; for A
((0) (x11-color 'violet )) ; for B
)))
\relative c' {
% Arrange to obtain color from color-notehead procedure
\override NoteHead #'color = #color-notehead
a2 b | c2 d | e2 f | g2 a |
}
··· ·� · ·� · ·Further examples showing the use of these programmable interfaces can be found in Section
“Callback functions” in Extending .
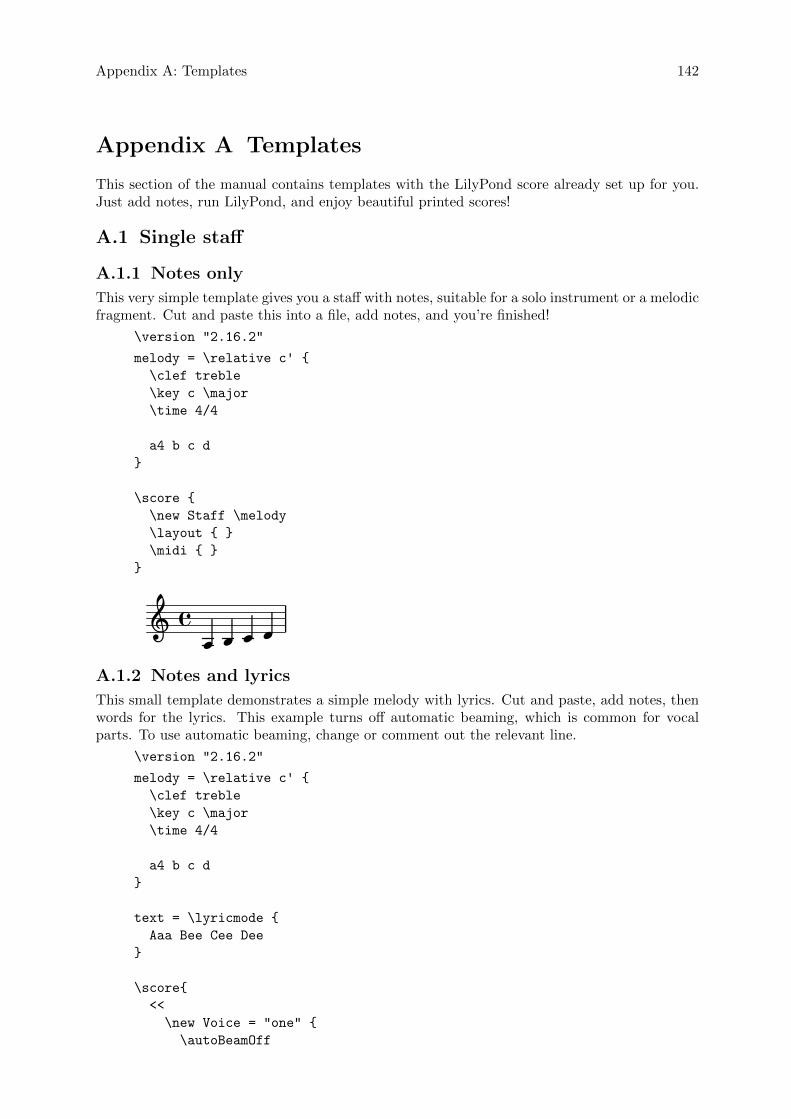
Appendix A: Templates 142
Appendix A Templates
This section of the manual contains templates with the LilyPond score already set up for you.Just add notes, run LilyPond, and enjoy beautiful printed scores!
A.1 Single staff
A.1.1 Notes only
This very simple template gives you a staff with notes, suitable for a solo instrument or a melodicfragment. Cut and paste this into a file, add notes, and you’re finished!
\version "2.16.2"
melody = \relative c' {
\clef treble
\key c \major
\time 4/4
a4 b c d
}
\score {
\new Staff \melody
\layout { }
\midi { }
}
2� 2� 22A.1.2 Notes and lyrics
This small template demonstrates a simple melody with lyrics. Cut and paste, add notes, thenwords for the lyrics. This example turns off automatic beaming, which is common for vocalparts. To use automatic beaming, change or comment out the relevant line.
\version "2.16.2"
melody = \relative c' {
\clef treble
\key c \major
\time 4/4
a4 b c d
}
text = \lyricmode {
Aaa Bee Cee Dee
}
\score{
<<
\new Voice = "one" {
\autoBeamOff
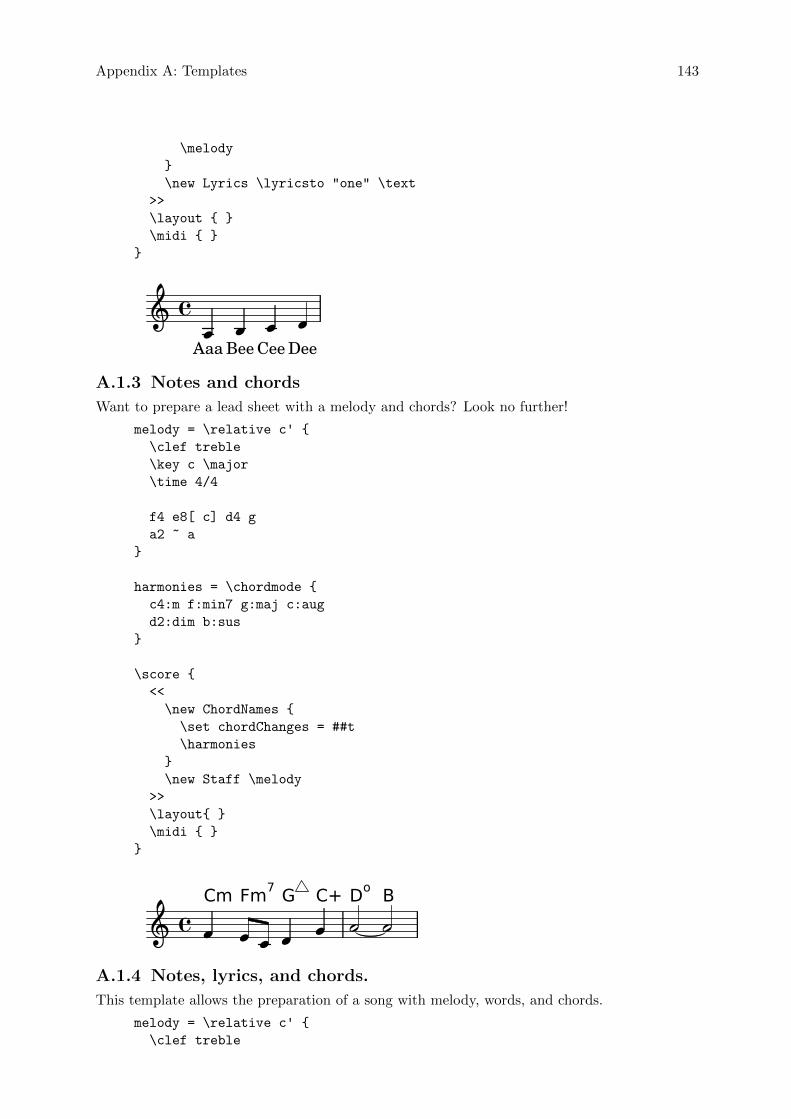
Appendix A: Templates 143
\melody
}
\new Lyrics \lyricsto "one" \text
>>
\layout { }
\midi { }
}
aDee�� �
Bee�
Cee�
Aaa
A.1.3 Notes and chords
Want to prepare a lead sheet with a melody and chords? Look no further!
melody = \relative c' {
\clef treble
\key c \major
\time 4/4
f4 e8[ c] d4 g
a2 ~ a
}
harmonies = \chordmode {
c4:m f:min7 g:maj c:aug
d2:dim b:sus
}
\score {
<<
\new ChordNames {
\set chordChanges = ##t
\harmonies
}
\new Staff \melody
>>
\layout{ }
\midi { }
}
5Do
�� �Cm
5B
�C+
�G
��Fm
7
A.1.4 Notes, lyrics, and chords.
This template allows the preparation of a song with melody, words, and chords.
melody = \relative c' {
\clef treble
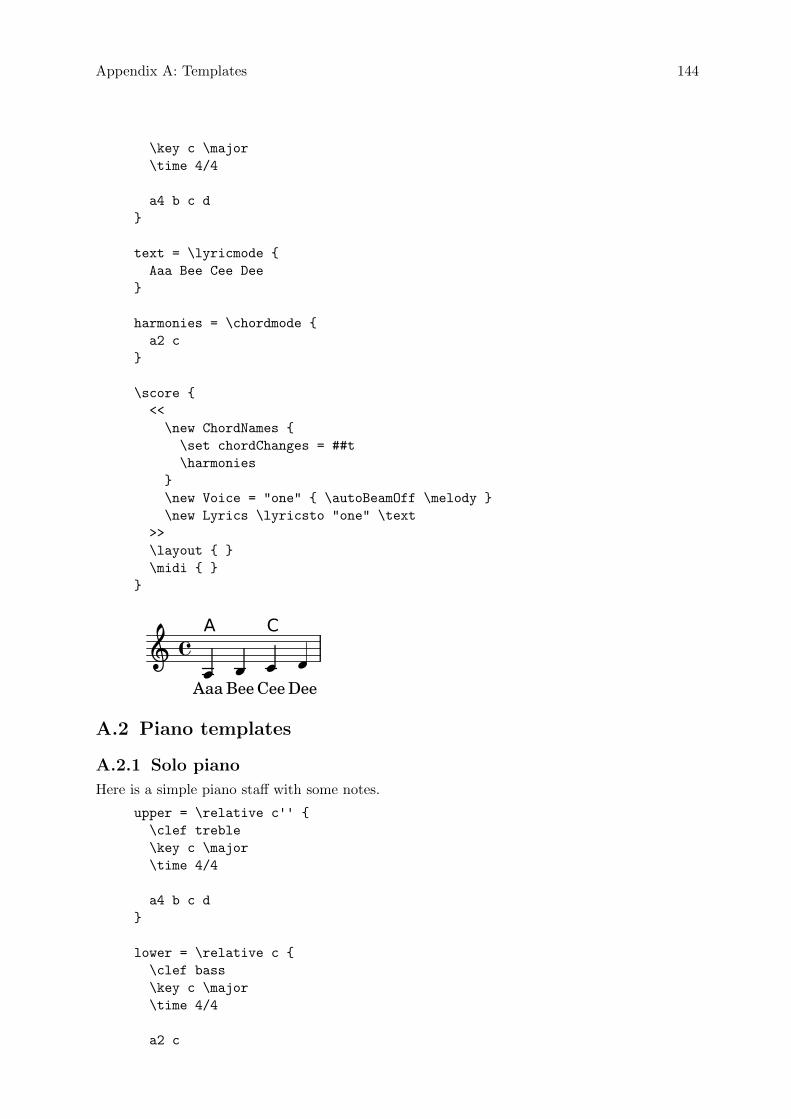
Appendix A: Templates 144
\key c \major
\time 4/4
a4 b c d
}
text = \lyricmode {
Aaa Bee Cee Dee
}
harmonies = \chordmode {
a2 c
}
\score {
<<
\new ChordNames {
\set chordChanges = ##t
\harmonies
}
\new Voice = "one" { \autoBeamOff \melody }
\new Lyrics \lyricsto "one" \text
>>
\layout { }
\midi { }
}
Cee
U A C
� �Dee
� �Aaa
�Bee
A.2 Piano templates
A.2.1 Solo piano
Here is a simple piano staff with some notes.
upper = \relative c'' {
\clef treble
\key c \major
\time 4/4
a4 b c d
}
lower = \relative c {
\clef bass
\key c \major
\time 4/4
a2 c
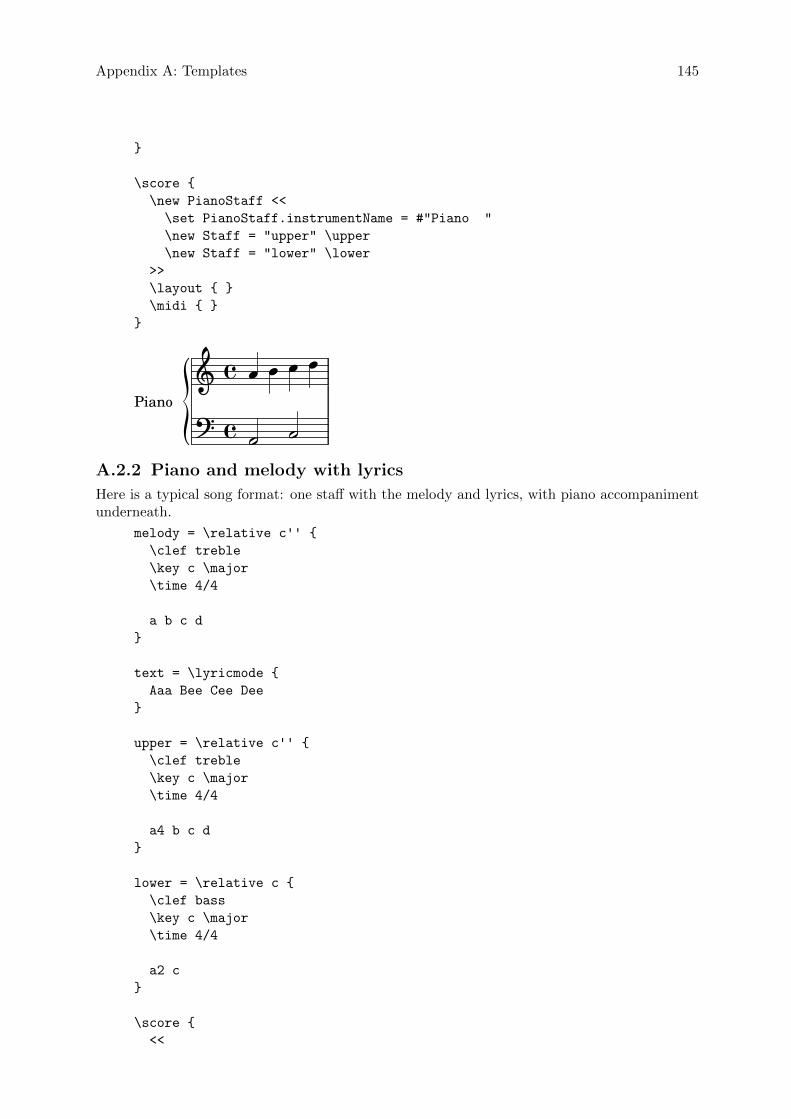
Appendix A: Templates 145
}
\score {
\new PianoStaff <<
\set PianoStaff.instrumentName = #"Piano "
\new Staff = "upper" \upper
\new Staff = "lower" \lower
>>
\layout { }
\midi { }
}
Î Î`Piano
�����
�
ÎÎ
A.2.2 Piano and melody with lyrics
Here is a typical song format: one staff with the melody and lyrics, with piano accompanimentunderneath.
melody = \relative c'' {
\clef treble
\key c \major
\time 4/4
a b c d
}
text = \lyricmode {
Aaa Bee Cee Dee
}
upper = \relative c'' {
\clef treble
\key c \major
\time 4/4
a4 b c d
}
lower = \relative c {
\clef bass
\key c \major
\time 4/4
a2 c
}
\score {
<<
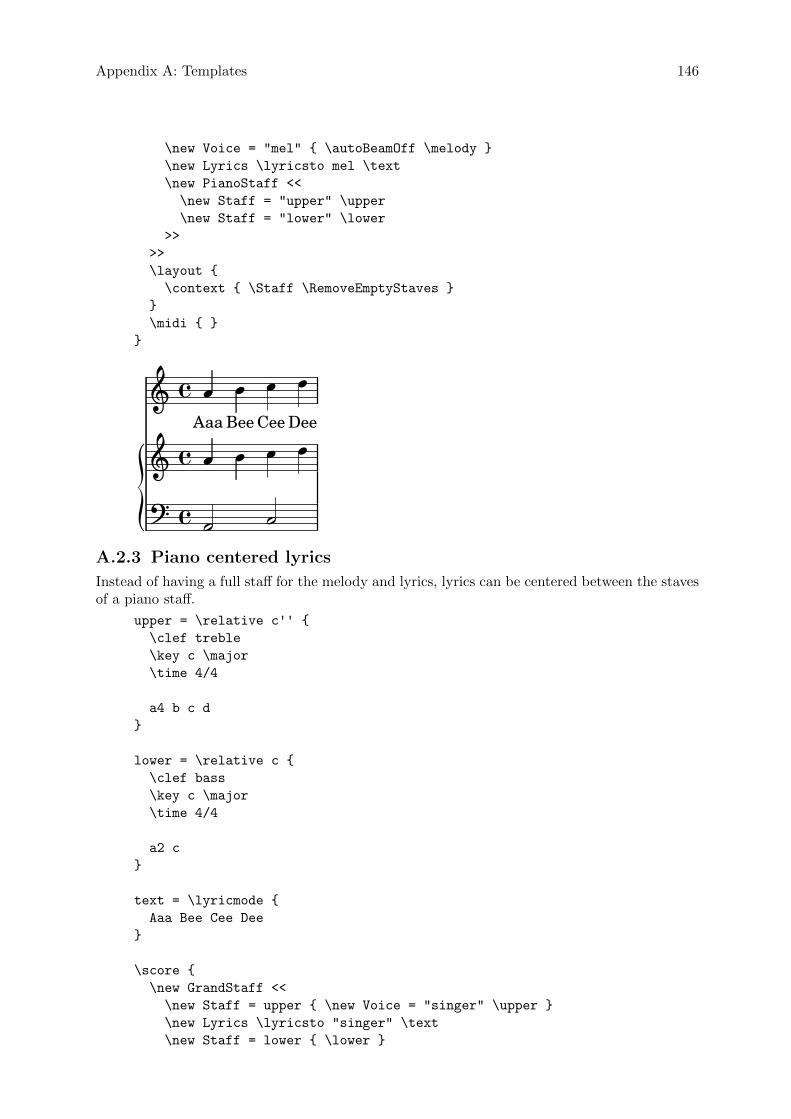
Appendix A: Templates 146
\new Voice = "mel" { \autoBeamOff \melody }
\new Lyrics \lyricsto mel \text
\new PianoStaff <<
\new Staff = "upper" \upper
\new Staff = "lower" \lower
>>
>>
\layout {
\context { \Staff \RemoveEmptyStaves }
}
\midi { }
}
a�
a�
` �Bee
�
�
�Aaa
��Dee
�
�
�Cee
�
�a
A.2.3 Piano centered lyrics
Instead of having a full staff for the melody and lyrics, lyrics can be centered between the stavesof a piano staff.
upper = \relative c'' {
\clef treble
\key c \major
\time 4/4
a4 b c d
}
lower = \relative c {
\clef bass
\key c \major
\time 4/4
a2 c
}
text = \lyricmode {
Aaa Bee Cee Dee
}
\score {
\new GrandStaff <<
\new Staff = upper { \new Voice = "singer" \upper }
\new Lyrics \lyricsto "singer" \text
\new Staff = lower { \lower }
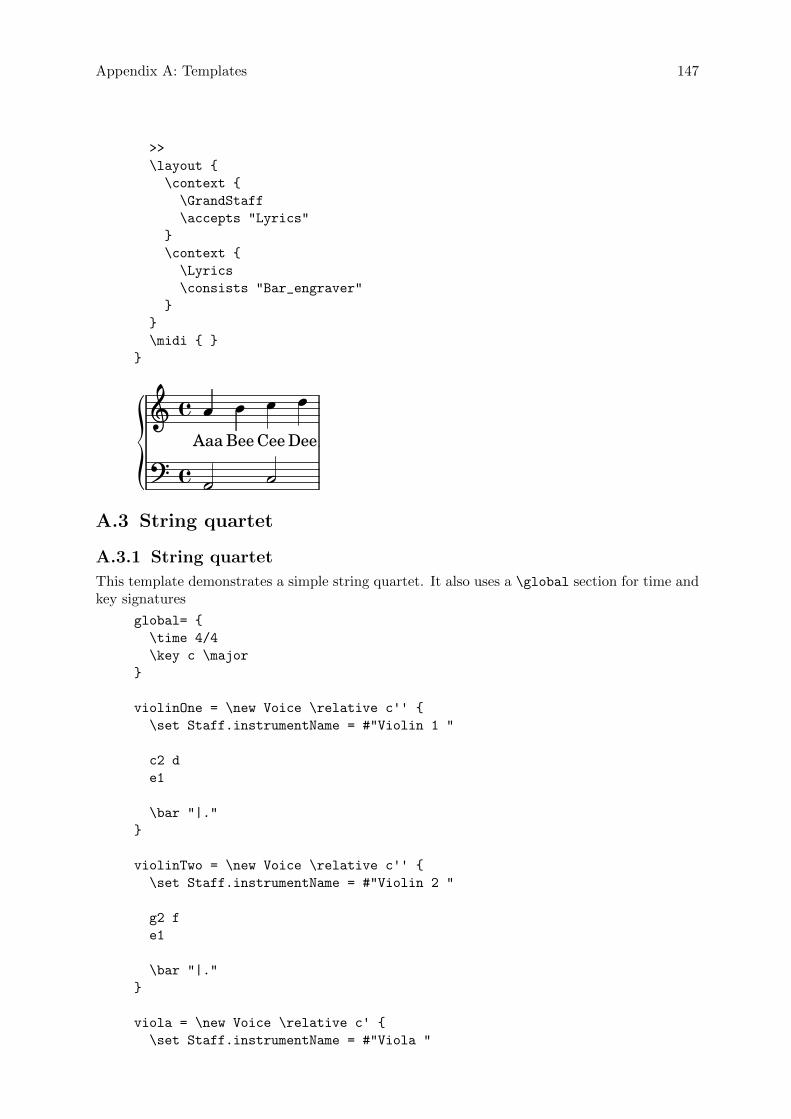
Appendix A: Templates 147
>>
\layout {
\context {
\GrandStaff
\accepts "Lyrics"
}
\context {
\Lyrics
\consists "Bar_engraver"
}
}
\midi { }
}
Î
�Bee Cee Dee
Î� Î
���
�Aaa
�A.3 String quartet
A.3.1 String quartet
This template demonstrates a simple string quartet. It also uses a \global section for time andkey signatures
global= {
\time 4/4
\key c \major
}
violinOne = \new Voice \relative c'' {
\set Staff.instrumentName = #"Violin 1 "
c2 d
e1
\bar "|."
}
violinTwo = \new Voice \relative c'' {
\set Staff.instrumentName = #"Violin 2 "
g2 f
e1
\bar "|."
}
viola = \new Voice \relative c' {
\set Staff.instrumentName = #"Viola "
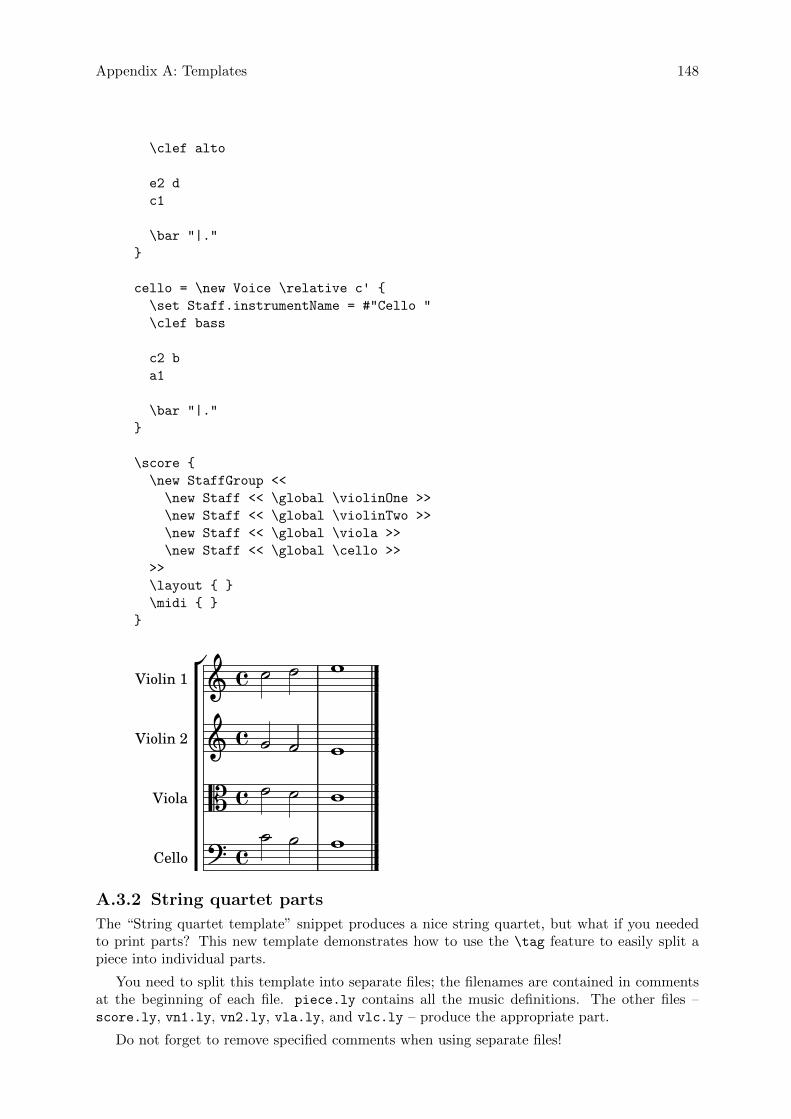
Appendix A: Templates 148
\clef alto
e2 d
c1
\bar "|."
}
cello = \new Voice \relative c' {
\set Staff.instrumentName = #"Cello "
\clef bass
c2 b
a1
\bar "|."
}
\score {
\new StaffGroup <<
\new Staff << \global \violinOne >>
\new Staff << \global \violinTwo >>
\new Staff << \global \viola >>
\new Staff << \global \cello >>
>>
\layout { }
\midi { }
}
× �
×
�
�
�Cello
Viola
Violin 2
Violin 1
�
� �
���
� �
�
���
��
��
A.3.2 String quartet parts
The “String quartet template” snippet produces a nice string quartet, but what if you neededto print parts? This new template demonstrates how to use the \tag feature to easily split apiece into individual parts.
You need to split this template into separate files; the filenames are contained in commentsat the beginning of each file. piece.ly contains all the music definitions. The other files –score.ly, vn1.ly, vn2.ly, vla.ly, and vlc.ly – produce the appropriate part.
Do not forget to remove specified comments when using separate files!
Appendix A: Templates 149
%%%%% piece.ly
%%%%% (This is the global definitions file)
global= {
\time 4/4
\key c \major
}
Violinone = \new Voice { \relative c''{
\set Staff.instrumentName = #"Violin 1 "
c2 d e1
\bar "|." }} %*********************************
Violintwo = \new Voice { \relative c''{
\set Staff.instrumentName = #"Violin 2 "
g2 f e1
\bar "|." }} %*********************************
Viola = \new Voice { \relative c' {
\set Staff.instrumentName = #"Viola "
\clef alto
e2 d c1
\bar "|." }} %*********************************
Cello = \new Voice { \relative c' {
\set Staff.instrumentName = #"Cello "
\clef bass
c2 b a1
\bar "|."}} %**********************************
music = {
<<
\tag #'score \tag #'vn1 \new Staff { << \global \Violinone >> }
\tag #'score \tag #'vn2 \new Staff { << \global \Violintwo>> }
\tag #'score \tag #'vla \new Staff { << \global \Viola>> }
\tag #'score \tag #'vlc \new Staff { << \global \Cello>> }
>>
}
%%% These are the other files you need to save on your computer
%%%%% score.ly
%%%%% (This is the main file)
%%% uncomment the line below when using a separate file
%\include "piece.ly"
#(set-global-staff-size 14)
Appendix A: Templates 150
\score {
\new StaffGroup \keepWithTag #'score \music
\layout { }
\midi { }
}
%{ Uncomment this block when using separate files
%%%%% vn1.ly
%%%%% (This is the Violin 1 part file)
\include "piece.ly"
\score {
\keepWithTag #'vn1 \music
\layout { }
}
%%%%% vn2.ly
%%%%% (This is the Violin 2 part file)
\include "piece.ly"
\score {
\keepWithTag #'vn2 \music
\layout { }
}
%%%%% vla.ly
%%%%% (This is the Viola part file)
\include "piece.ly"
\score {
\keepWithTag #'vla \music
\layout { }
}
%%%%% vlc.ly
%%%%% (This is the Cello part file)
\include "piece.ly"
\score {
\keepWithTag #'vlc \music
\layout { }
}
%}
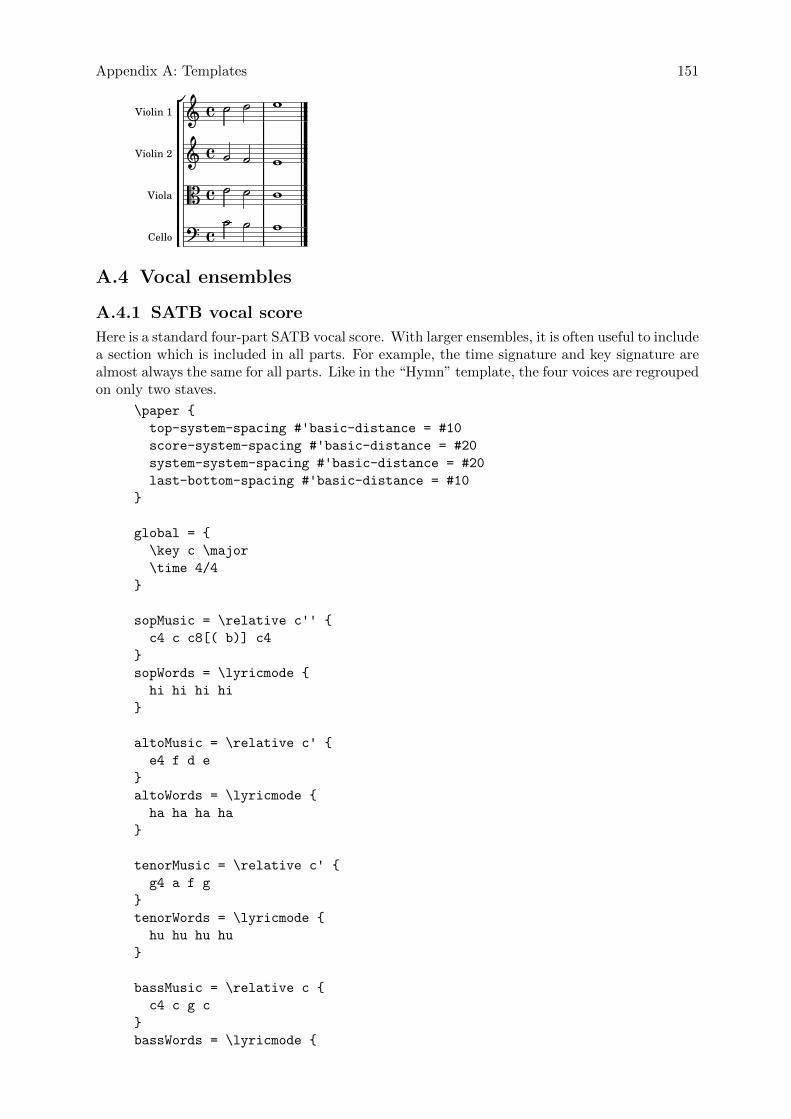
Appendix A: Templates 151
· �
�
�����·
�
·�
�
�Cello
Viola
Violin 2
Violin 1
�
��
····
·
A.4 Vocal ensembles
A.4.1 SATB vocal score
Here is a standard four-part SATB vocal score. With larger ensembles, it is often useful to includea section which is included in all parts. For example, the time signature and key signature arealmost always the same for all parts. Like in the “Hymn” template, the four voices are regroupedon only two staves.
\paper {
top-system-spacing #'basic-distance = #10
score-system-spacing #'basic-distance = #20
system-system-spacing #'basic-distance = #20
last-bottom-spacing #'basic-distance = #10
}
global = {
\key c \major
\time 4/4
}
sopMusic = \relative c'' {
c4 c c8[( b)] c4
}
sopWords = \lyricmode {
hi hi hi hi
}
altoMusic = \relative c' {
e4 f d e
}
altoWords = \lyricmode {
ha ha ha ha
}
tenorMusic = \relative c' {
g4 a f g
}
tenorWords = \lyricmode {
hu hu hu hu
}
bassMusic = \relative c {
c4 c g c
}
bassWords = \lyricmode {
Appendix A: Templates 152
ho ho ho ho
}
\score {
\new ChoirStaff <<
\new Lyrics = "sopranos" \with {
% this is needed for lyrics above a staff
\override VerticalAxisGroup #'staff-affinity = #DOWN
}
\new Staff = "women" <<
\new Voice = "sopranos" {
\voiceOne
<< \global \sopMusic >>
}
\new Voice = "altos" {
\voiceTwo
<< \global \altoMusic >>
}
>>
\new Lyrics = "altos"
\new Lyrics = "tenors" \with {
% this is needed for lyrics above a staff
\override VerticalAxisGroup #'staff-affinity = #DOWN
}
\new Staff = "men" <<
\clef bass
\new Voice = "tenors" {
\voiceOne
<< \global \tenorMusic >>
}
\new Voice = "basses" {
\voiceTwo << \global \bassMusic >>
}
>>
\new Lyrics = "basses"
\context Lyrics = "sopranos" \lyricsto "sopranos" \sopWords
\context Lyrics = "altos" \lyricsto "altos" \altoWords
\context Lyrics = "tenors" \lyricsto "tenors" \tenorWords
\context Lyrics = "basses" \lyricsto "basses" \bassWords
>>
}
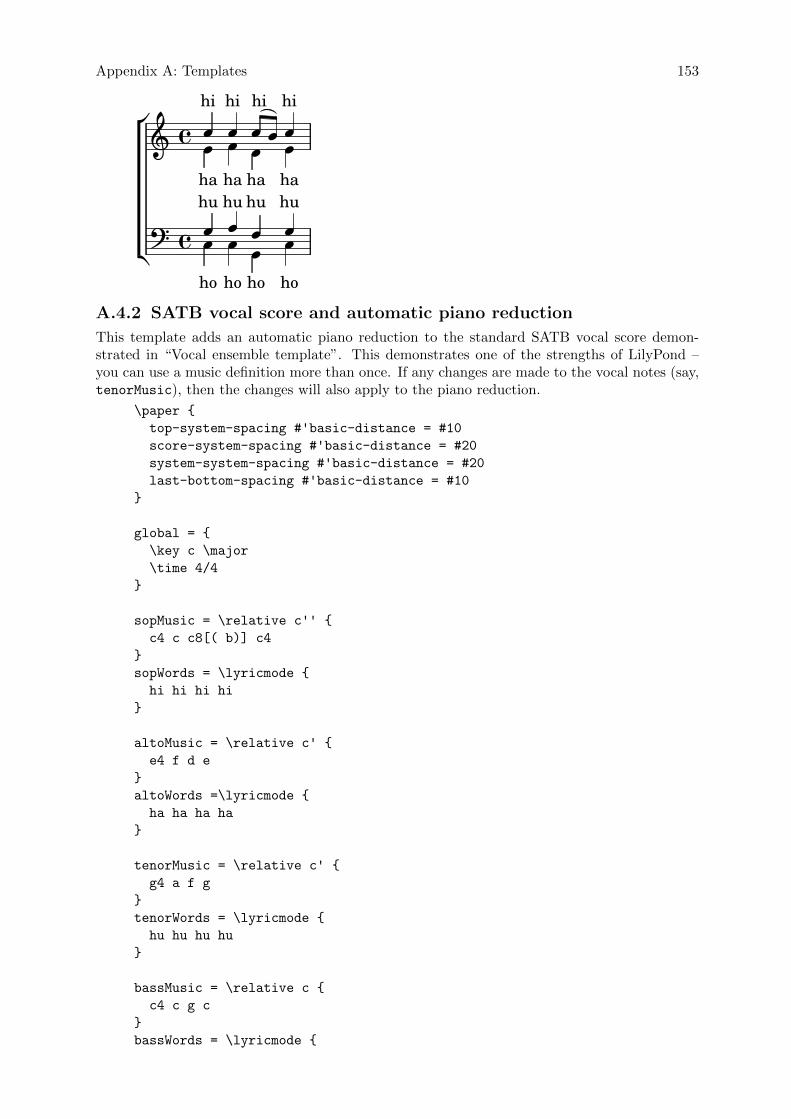
Appendix A: Templates 153
ÎÎho
�
� �hahu
Îha
Î
�
�
ÎÎhahuÎÎ
ho
hahu
hiÎ
hu
hiÎÎ�
ho
Î
ÎÎhiÎ
ÎÎho
hi
A.4.2 SATB vocal score and automatic piano reduction
This template adds an automatic piano reduction to the standard SATB vocal score demon-strated in “Vocal ensemble template”. This demonstrates one of the strengths of LilyPond –you can use a music definition more than once. If any changes are made to the vocal notes (say,tenorMusic), then the changes will also apply to the piano reduction.
\paper {
top-system-spacing #'basic-distance = #10
score-system-spacing #'basic-distance = #20
system-system-spacing #'basic-distance = #20
last-bottom-spacing #'basic-distance = #10
}
global = {
\key c \major
\time 4/4
}
sopMusic = \relative c'' {
c4 c c8[( b)] c4
}
sopWords = \lyricmode {
hi hi hi hi
}
altoMusic = \relative c' {
e4 f d e
}
altoWords =\lyricmode {
ha ha ha ha
}
tenorMusic = \relative c' {
g4 a f g
}
tenorWords = \lyricmode {
hu hu hu hu
}
bassMusic = \relative c {
c4 c g c
}
bassWords = \lyricmode {
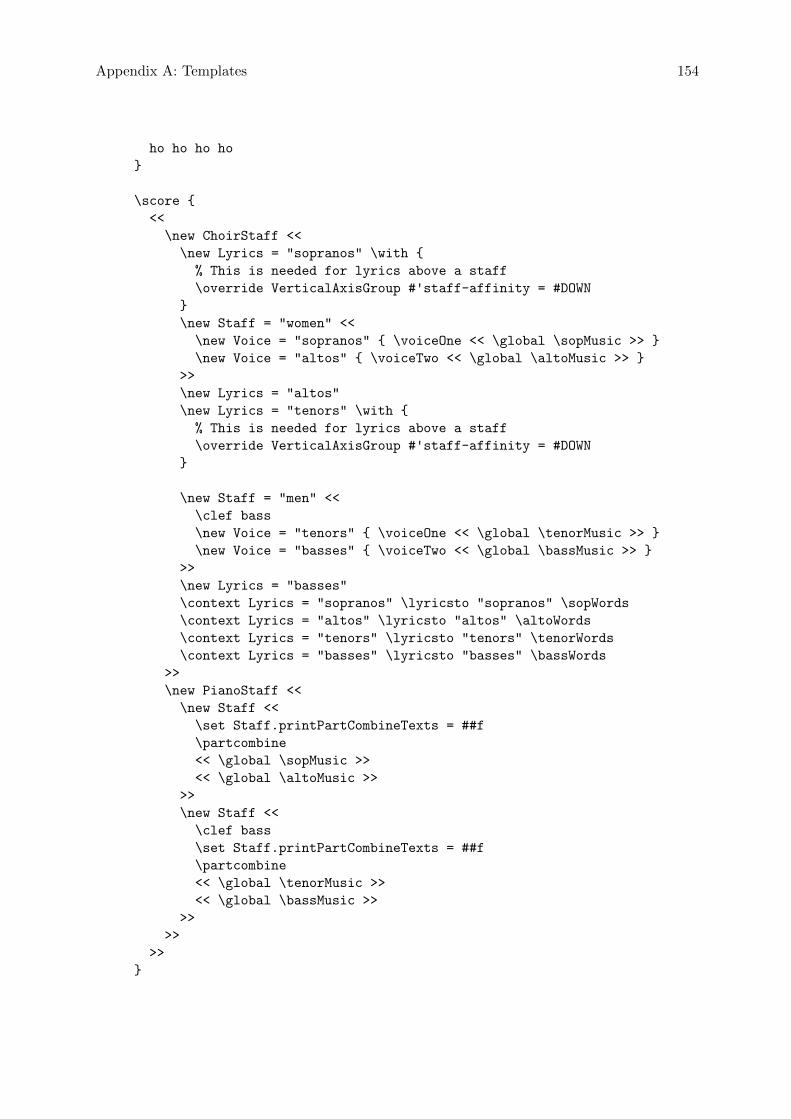
Appendix A: Templates 154
ho ho ho ho
}
\score {
<<
\new ChoirStaff <<
\new Lyrics = "sopranos" \with {
% This is needed for lyrics above a staff
\override VerticalAxisGroup #'staff-affinity = #DOWN
}
\new Staff = "women" <<
\new Voice = "sopranos" { \voiceOne << \global \sopMusic >> }
\new Voice = "altos" { \voiceTwo << \global \altoMusic >> }
>>
\new Lyrics = "altos"
\new Lyrics = "tenors" \with {
% This is needed for lyrics above a staff
\override VerticalAxisGroup #'staff-affinity = #DOWN
}
\new Staff = "men" <<
\clef bass
\new Voice = "tenors" { \voiceOne << \global \tenorMusic >> }
\new Voice = "basses" { \voiceTwo << \global \bassMusic >> }
>>
\new Lyrics = "basses"
\context Lyrics = "sopranos" \lyricsto "sopranos" \sopWords
\context Lyrics = "altos" \lyricsto "altos" \altoWords
\context Lyrics = "tenors" \lyricsto "tenors" \tenorWords
\context Lyrics = "basses" \lyricsto "basses" \bassWords
>>
\new PianoStaff <<
\new Staff <<
\set Staff.printPartCombineTexts = ##f
\partcombine
<< \global \sopMusic >>
<< \global \altoMusic >>
>>
\new Staff <<
\clef bass
\set Staff.printPartCombineTexts = ##f
\partcombine
<< \global \tenorMusic >>
<< \global \bassMusic >>
>>
>>
>>
}
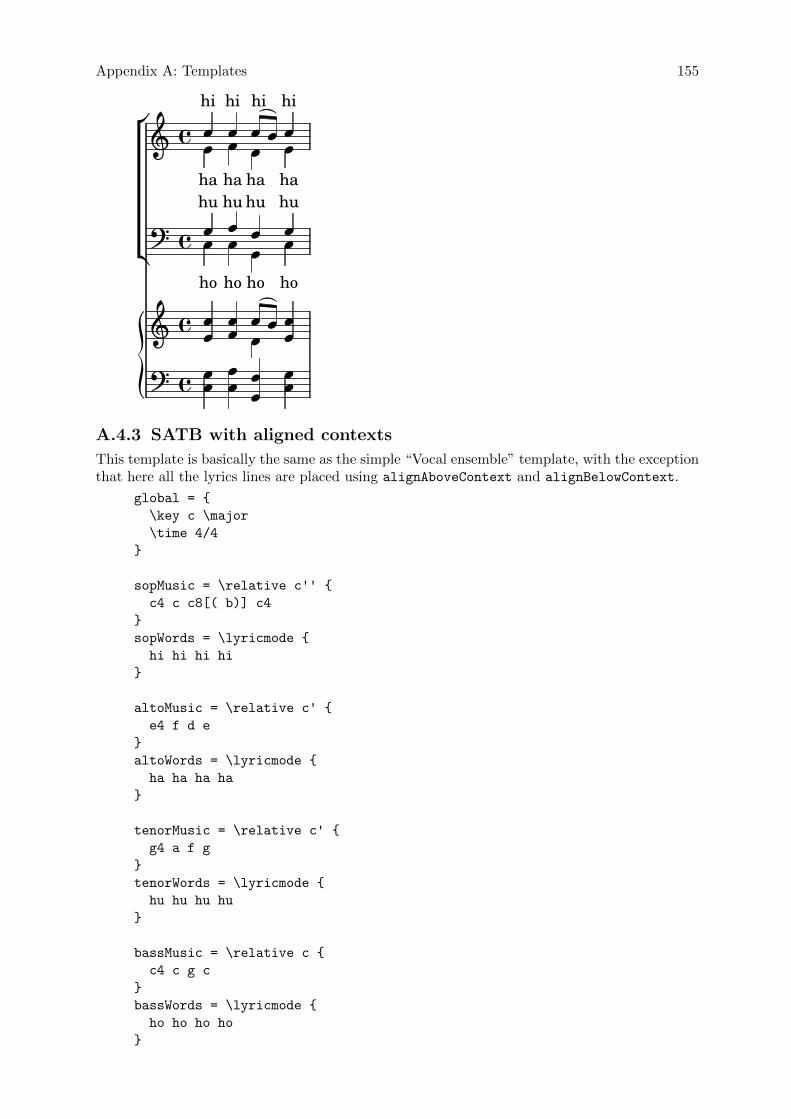
Appendix A: Templates 155
ÎÎÎ
Î
ho
Î
Î
Î
hiÎÎ
hahuÎ
�
�
`
ha
� �
� �
� �� �
hiÎÎ
hahuÎÎho
ÎÎÎÎ
hiÎÎ
huÎ
Î
Îho
ÎÎÎ
ÎÎÎÎ
ho
ÎÎhuha
ÎÎhi
A.4.3 SATB with aligned contexts
This template is basically the same as the simple “Vocal ensemble” template, with the exceptionthat here all the lyrics lines are placed using alignAboveContext and alignBelowContext.
global = {
\key c \major
\time 4/4
}
sopMusic = \relative c'' {
c4 c c8[( b)] c4
}
sopWords = \lyricmode {
hi hi hi hi
}
altoMusic = \relative c' {
e4 f d e
}
altoWords = \lyricmode {
ha ha ha ha
}
tenorMusic = \relative c' {
g4 a f g
}
tenorWords = \lyricmode {
hu hu hu hu
}
bassMusic = \relative c {
c4 c g c
}
bassWords = \lyricmode {
ho ho ho ho
}
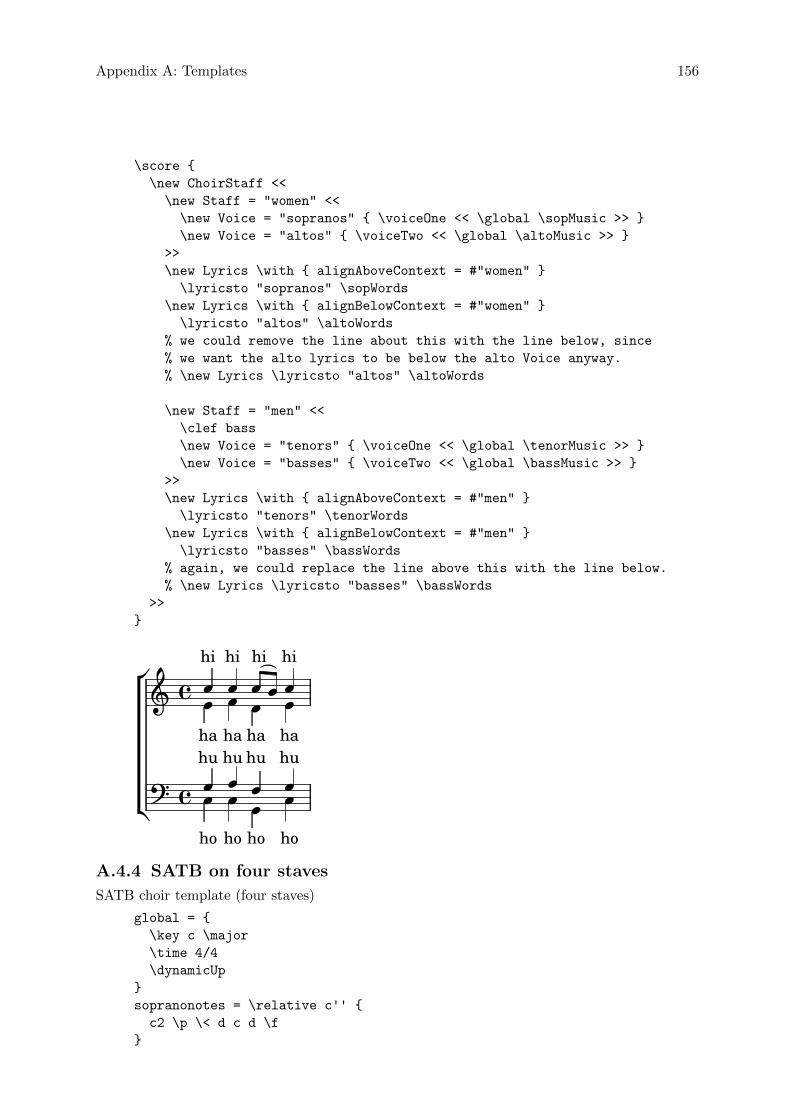
Appendix A: Templates 156
\score {
\new ChoirStaff <<
\new Staff = "women" <<
\new Voice = "sopranos" { \voiceOne << \global \sopMusic >> }
\new Voice = "altos" { \voiceTwo << \global \altoMusic >> }
>>
\new Lyrics \with { alignAboveContext = #"women" }
\lyricsto "sopranos" \sopWords
\new Lyrics \with { alignBelowContext = #"women" }
\lyricsto "altos" \altoWords
% we could remove the line about this with the line below, since
% we want the alto lyrics to be below the alto Voice anyway.
% \new Lyrics \lyricsto "altos" \altoWords
\new Staff = "men" <<
\clef bass
\new Voice = "tenors" { \voiceOne << \global \tenorMusic >> }
\new Voice = "basses" { \voiceTwo << \global \bassMusic >> }
>>
\new Lyrics \with { alignAboveContext = #"men" }
\lyricsto "tenors" \tenorWords
\new Lyrics \with { alignBelowContext = #"men" }
\lyricsto "basses" \bassWords
% again, we could replace the line above this with the line below.
% \new Lyrics \lyricsto "basses" \bassWords
>>
}
a
��hi
�
hu
� a
�
�
�
ha
��ha
�
�
�hu
hoho
�hi
ha
��
��hi
��hi
ha
��hu
ho
hu
ho
A.4.4 SATB on four staves
SATB choir template (four staves)
global = {
\key c \major
\time 4/4
\dynamicUp
}
sopranonotes = \relative c'' {
c2 \p \< d c d \f
}
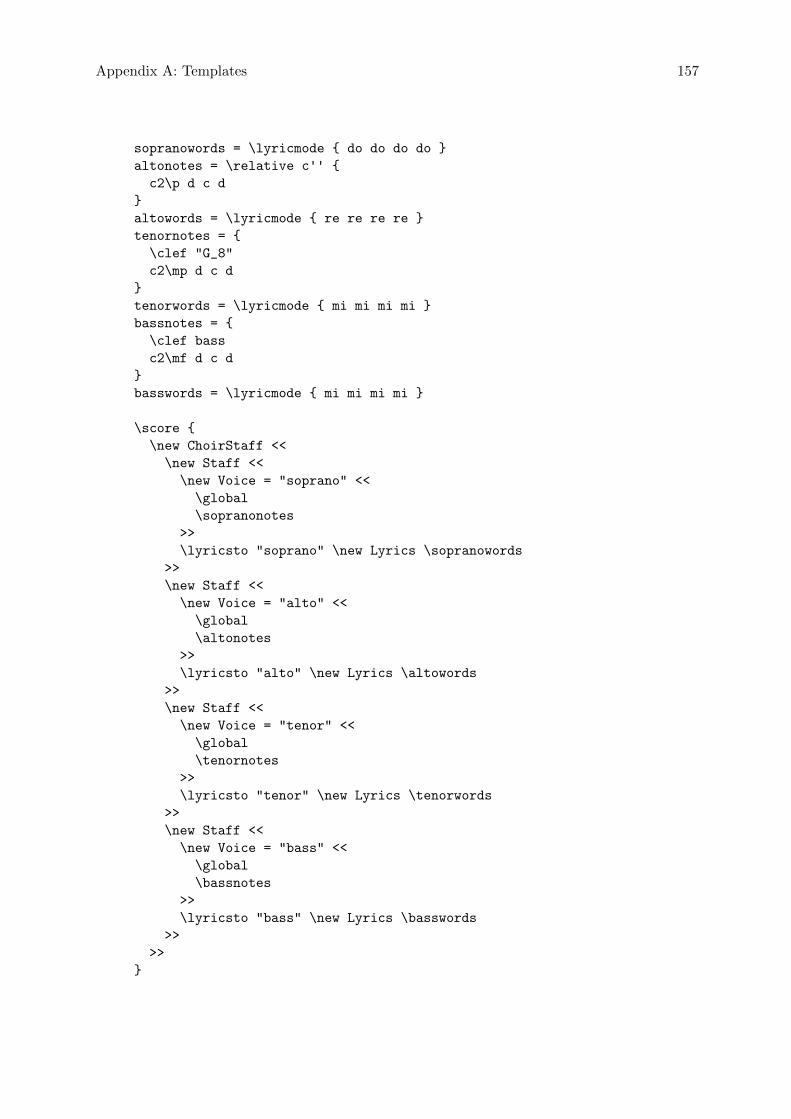
Appendix A: Templates 157
sopranowords = \lyricmode { do do do do }
altonotes = \relative c'' {
c2\p d c d
}
altowords = \lyricmode { re re re re }
tenornotes = {
\clef "G_8"
c2\mp d c d
}
tenorwords = \lyricmode { mi mi mi mi }
bassnotes = {
\clef bass
c2\mf d c d
}
basswords = \lyricmode { mi mi mi mi }
\score {
\new ChoirStaff <<
\new Staff <<
\new Voice = "soprano" <<
\global
\sopranonotes
>>
\lyricsto "soprano" \new Lyrics \sopranowords
>>
\new Staff <<
\new Voice = "alto" <<
\global
\altonotes
>>
\lyricsto "alto" \new Lyrics \altowords
>>
\new Staff <<
\new Voice = "tenor" <<
\global
\tenornotes
>>
\lyricsto "tenor" \new Lyrics \tenorwords
>>
\new Staff <<
\new Voice = "bass" <<
\global
\bassnotes
>>
\lyricsto "bass" \new Lyrics \basswords
>>
>>
}
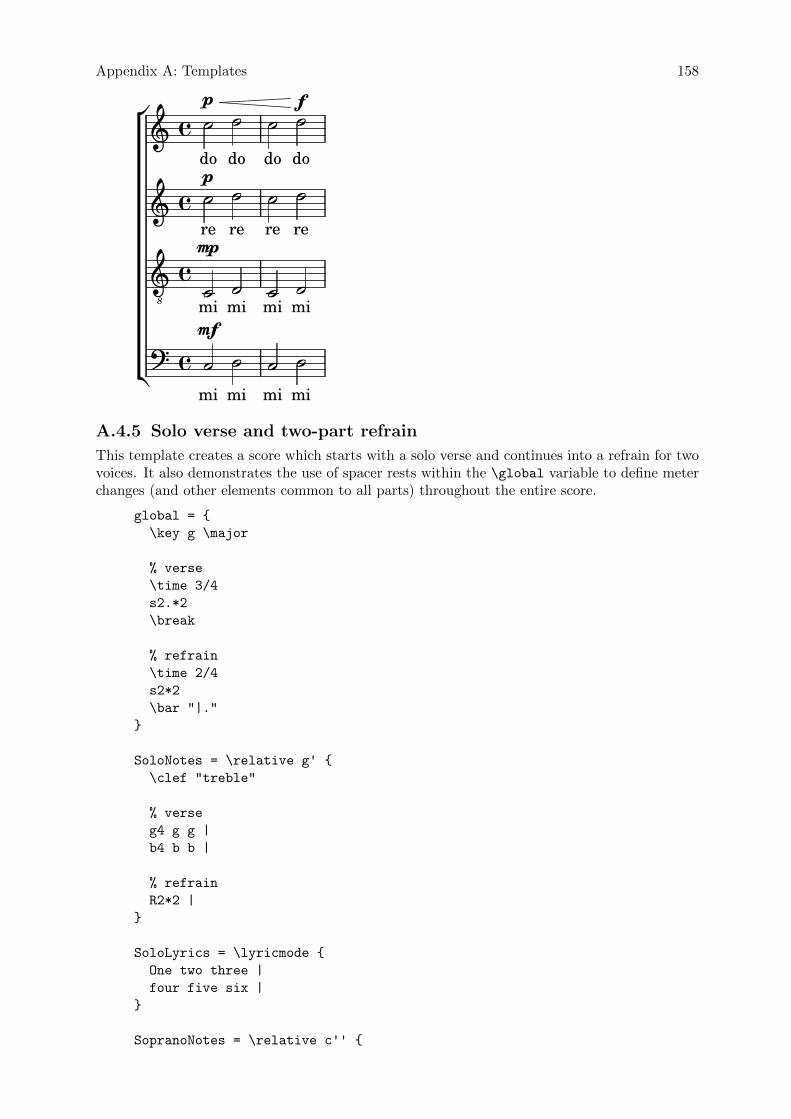
Appendix A: Templates 158
Îfdo
Îre
Îmi
Îmi
�
� �
� �
�8
�
�mi
Împmi
�
�
Îpdo
mf
re
Îp
Î
Îdo
Îre
Îmi
Îmi
Îdo
Îre
Îmi
Îmi
A.4.5 Solo verse and two-part refrain
This template creates a score which starts with a solo verse and continues into a refrain for twovoices. It also demonstrates the use of spacer rests within the \global variable to define meterchanges (and other elements common to all parts) throughout the entire score.
global = {
\key g \major
% verse
\time 3/4
s2.*2
\break
% refrain
\time 2/4
s2*2
\bar "|."
}
SoloNotes = \relative g' {
\clef "treble"
% verse
g4 g g |
b4 b b |
% refrain
R2*2 |
}
SoloLyrics = \lyricmode {
One two three |
four five six |
}
SopranoNotes = \relative c'' {
Appendix A: Templates 159
\clef "treble"
% verse
R2.*2 |
% refrain
c4 c |
g4 g |
}
SopranoLyrics = \lyricmode {
la la |
la la |
}
BassNotes = \relative c {
\clef "bass"
% verse
R2.*2 |
% refrain
c4 e |
d4 d |
}
BassLyrics = \lyricmode {
dum dum |
dum dum |
}
\score {
<<
\new Voice = "SoloVoice" << \global \SoloNotes >>
\new Lyrics \lyricsto "SoloVoice" \SoloLyrics
\new ChoirStaff <<
\new Voice = "SopranoVoice" << \global \SopranoNotes >>
\new Lyrics \lyricsto "SopranoVoice" \SopranoLyrics
\new Voice = "BassVoice" << \global \BassNotes >>
\new Lyrics \lyricsto "BassVoice" \BassLyrics
>>
>>
\layout {
ragged-right = ##t
\context { \Staff
% these lines prevent empty staves from being printed
\RemoveEmptyStaves
\override VerticalAxisGroup #'remove-first = ##t
}
}
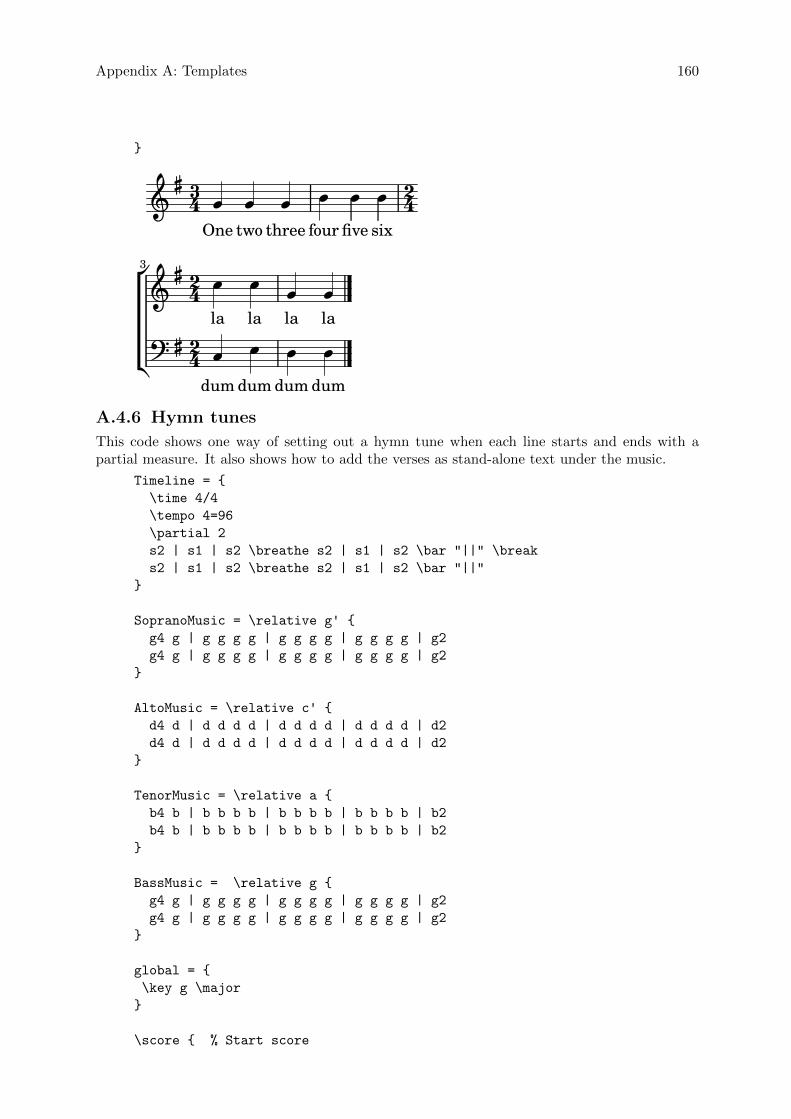
Appendix A: Templates 160
}
three
×five
��43
six
� �One
42��four
�two
dum dum
Î
�� �
� la
Îdum
42
42
3
la
Î
dum
laÎ
Î Îla
Î
�
� Î
A.4.6 Hymn tunes
This code shows one way of setting out a hymn tune when each line starts and ends with apartial measure. It also shows how to add the verses as stand-alone text under the music.
Timeline = {
\time 4/4
\tempo 4=96
\partial 2
s2 | s1 | s2 \breathe s2 | s1 | s2 \bar "||" \break
s2 | s1 | s2 \breathe s2 | s1 | s2 \bar "||"
}
SopranoMusic = \relative g' {
g4 g | g g g g | g g g g | g g g g | g2
g4 g | g g g g | g g g g | g g g g | g2
}
AltoMusic = \relative c' {
d4 d | d d d d | d d d d | d d d d | d2
d4 d | d d d d | d d d d | d d d d | d2
}
TenorMusic = \relative a {
b4 b | b b b b | b b b b | b b b b | b2
b4 b | b b b b | b b b b | b b b b | b2
}
BassMusic = \relative g {
g4 g | g g g g | g g g g | g g g g | g2
g4 g | g g g g | g g g g | g g g g | g2
}
global = {
\key g \major
}
\score { % Start score
Appendix A: Templates 161
<<
\new PianoStaff << % Start pianostaff
\new Staff << % Start Staff = RH
\global
\clef "treble"
\new Voice = "Soprano" << % Start Voice = "Soprano"
\Timeline
\voiceOne
\SopranoMusic
>> % End Voice = "Soprano"
\new Voice = "Alto" << % Start Voice = "Alto"
\Timeline
\voiceTwo
\AltoMusic
>> % End Voice = "Alto"
>> % End Staff = RH
\new Staff << % Start Staff = LH
\global
\clef "bass"
\new Voice = "Tenor" << % Start Voice = "Tenor"
\Timeline
\voiceOne
\TenorMusic
>> % End Voice = "Tenor"
\new Voice = "Bass" << % Start Voice = "Bass"
\Timeline
\voiceTwo
\BassMusic
>> % End Voice = "Bass"
>> % End Staff = LH
>> % End pianostaff
>>
} % End score
\markup {
\fill-line {
""
{
\column {
\left-align {
"This is line one of the first verse"
"This is line two of the same"
"And here's line three of the first verse"
"And the last line of the same"
}
}
}
""
}
}
\paper { % Start paper block
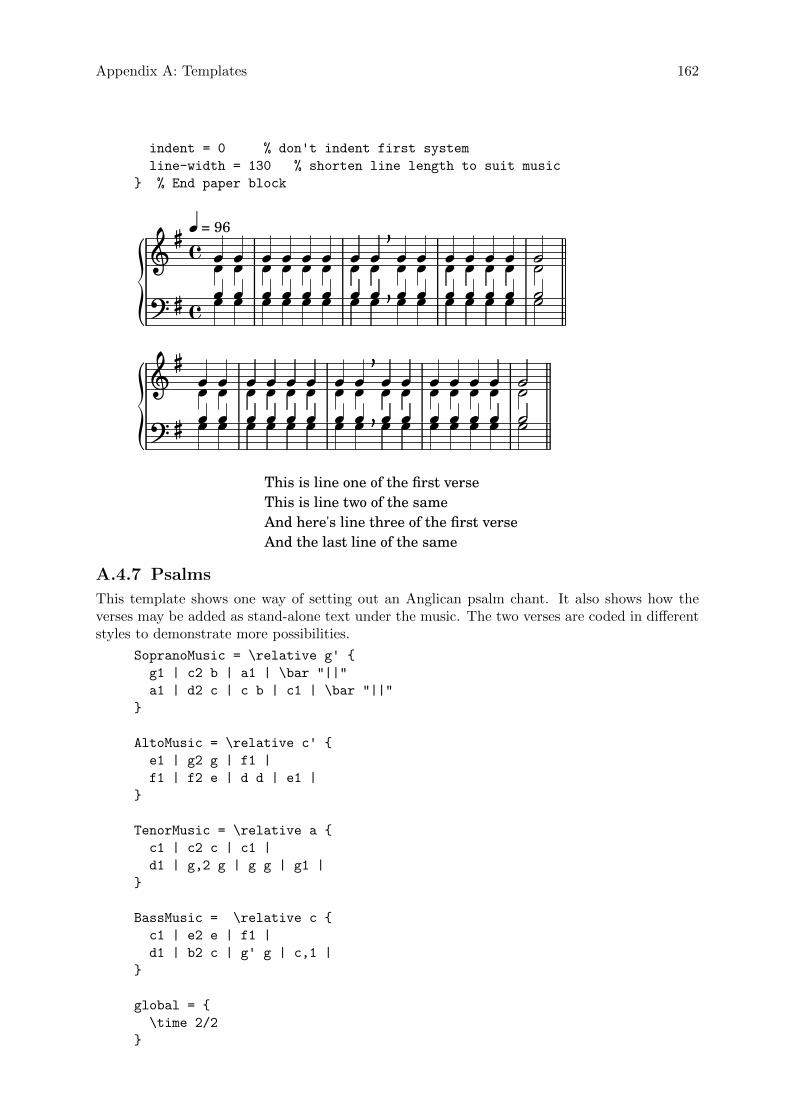
Appendix A: Templates 162
indent = 0 % don't indent first system
line-width = 130 % shorten line length to suit music
} % End paper block
× � �� � �
Î = 96
����
��� ������
����
� �����
�� ����
����
�����
���� ��
����
�� ��� ��
����
����
��
ÎÎÎÎ ÎÎ
ÎÎÎ� Î�Î� Î�Î
ÎÎÎÎ
ÎÎÎ
ÎÎÎÎ
ÎÎÎÎ
ÎÎÎÎ
����
ÎÎÎÎÎÎ ÎÎ
ÎÎÎÎÎÎ
��
��� ÎÎ ÎÎÎÎ
ÎÎÎ
This is line one of the first verseThis is line two of the sameAnd here's line three of the first verseAnd the last line of the same
A.4.7 Psalms
This template shows one way of setting out an Anglican psalm chant. It also shows how theverses may be added as stand-alone text under the music. The two verses are coded in differentstyles to demonstrate more possibilities.
SopranoMusic = \relative g' {
g1 | c2 b | a1 | \bar "||"
a1 | d2 c | c b | c1 | \bar "||"
}
AltoMusic = \relative c' {
e1 | g2 g | f1 |
f1 | f2 e | d d | e1 |
}
TenorMusic = \relative a {
c1 | c2 c | c1 |
d1 | g,2 g | g g | g1 |
}
BassMusic = \relative c {
c1 | e2 e | f1 |
d1 | b2 c | g' g | c,1 |
}
global = {
\time 2/2
}
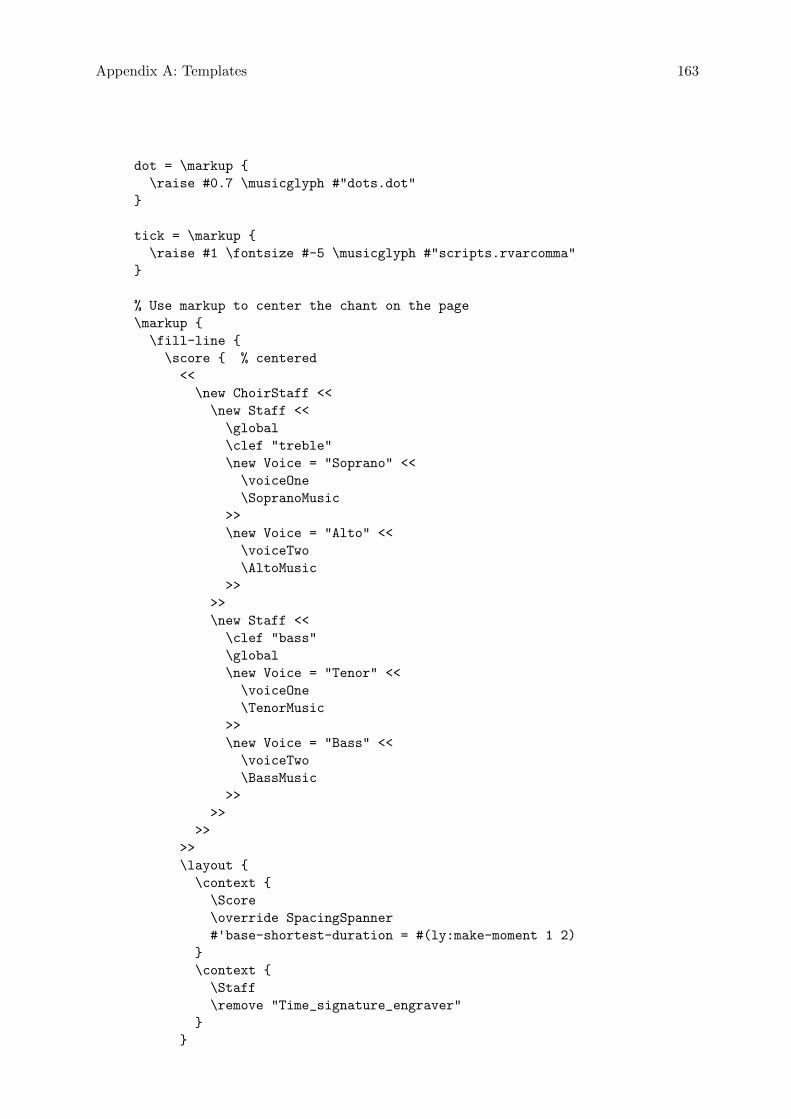
Appendix A: Templates 163
dot = \markup {
\raise #0.7 \musicglyph #"dots.dot"
}
tick = \markup {
\raise #1 \fontsize #-5 \musicglyph #"scripts.rvarcomma"
}
% Use markup to center the chant on the page
\markup {
\fill-line {
\score { % centered
<<
\new ChoirStaff <<
\new Staff <<
\global
\clef "treble"
\new Voice = "Soprano" <<
\voiceOne
\SopranoMusic
>>
\new Voice = "Alto" <<
\voiceTwo
\AltoMusic
>>
>>
\new Staff <<
\clef "bass"
\global
\new Voice = "Tenor" <<
\voiceOne
\TenorMusic
>>
\new Voice = "Bass" <<
\voiceTwo
\BassMusic
>>
>>
>>
>>
\layout {
\context {
\Score
\override SpacingSpanner
#'base-shortest-duration = #(ly:make-moment 1 2)
}
\context {
\Staff
\remove "Time_signature_engraver"
}
}
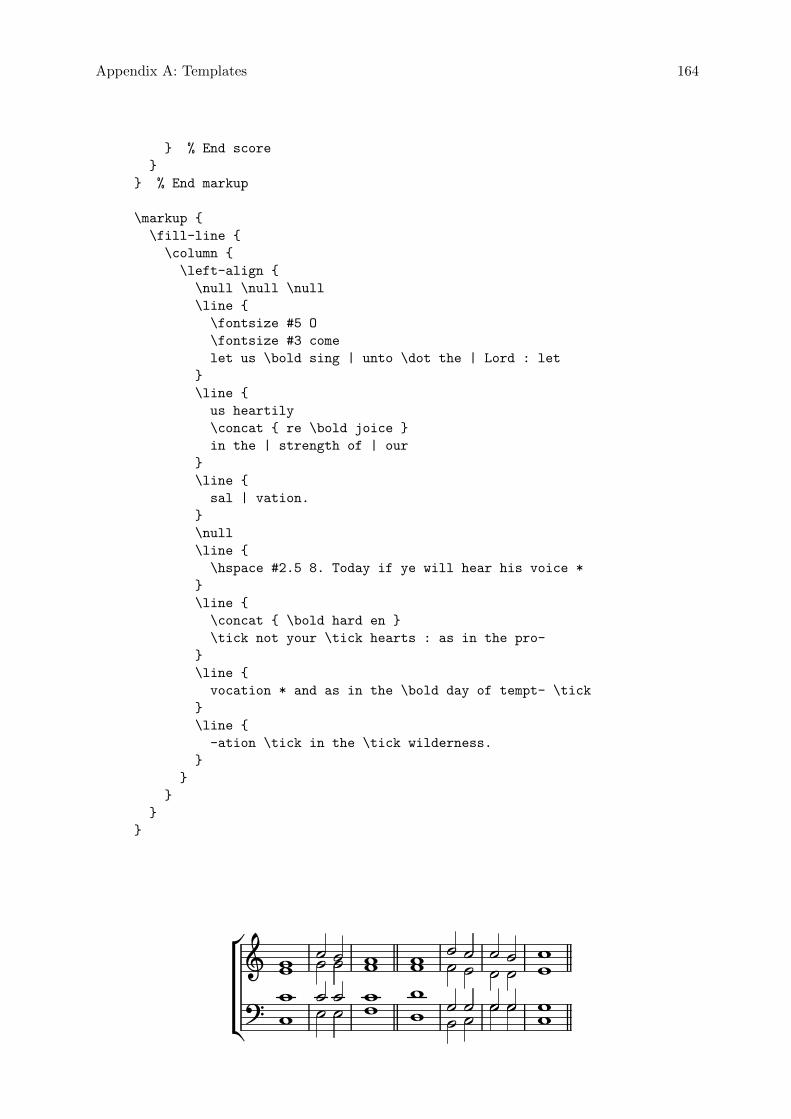
Appendix A: Templates 164
} % End score
}
} % End markup
\markup {
\fill-line {
\column {
\left-align {
\null \null \null
\line {
\fontsize #5 O
\fontsize #3 come
let us \bold sing | unto \dot the | Lord : let
}
\line {
us heartily
\concat { re \bold joice }
in the | strength of | our
}
\line {
sal | vation.
}
\null
\line {
\hspace #2.5 8. Today if ye will hear his voice *
}
\line {
\concat { \bold hard en }
\tick not your \tick hearts : as in the pro-
}
\line {
vocation * and as in the \bold day of tempt- \tick
}
\line {
-ation \tick in the \tick wilderness.
}
}
}
}
}
····
����
····
�
���
�� ���� �
����
···�·
··����
··����
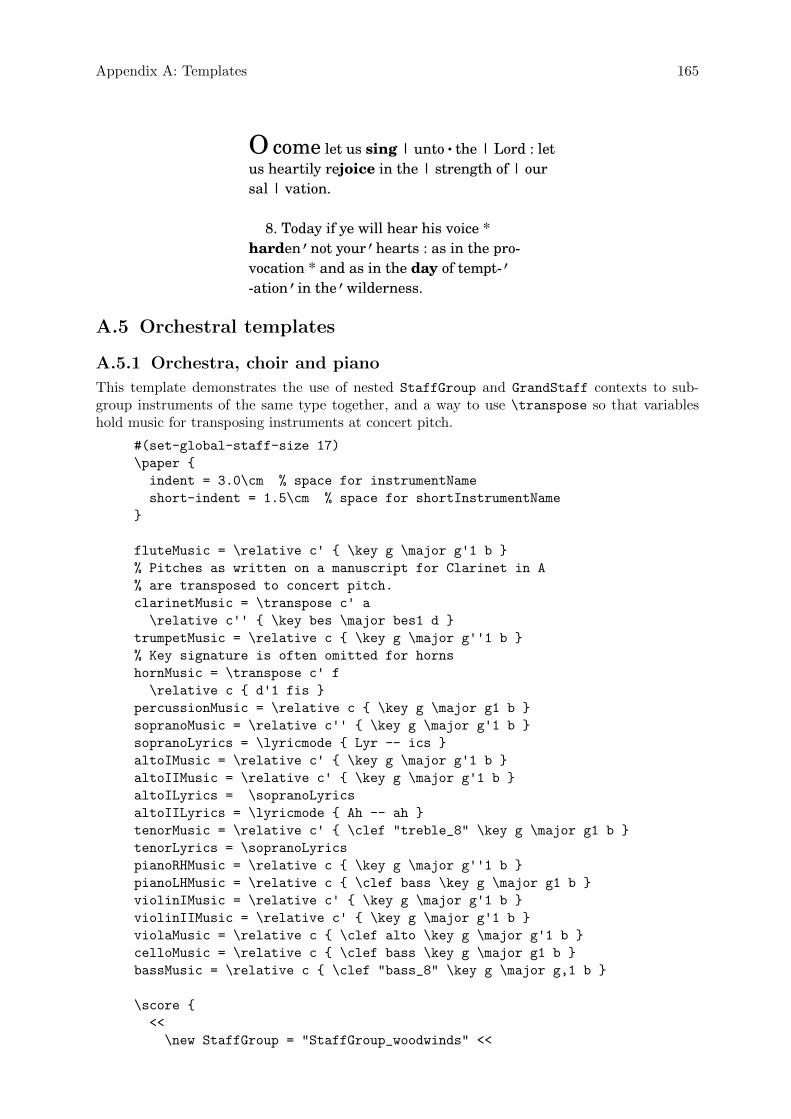
Appendix A: Templates 165
O come let us sing | unto � the | Lord : letus heartily rejoice in the | strength of | oursal | vation.
8. Today if ye will hear his voice *harden ¯ not your ¯ hearts : as in the pro-vocation * and as in the day of tempt- ¯-ation ¯ in the ¯ wilderness.
A.5 Orchestral templates
A.5.1 Orchestra, choir and piano
This template demonstrates the use of nested StaffGroup and GrandStaff contexts to sub-group instruments of the same type together, and a way to use \transpose so that variableshold music for transposing instruments at concert pitch.
#(set-global-staff-size 17)
\paper {
indent = 3.0\cm % space for instrumentName
short-indent = 1.5\cm % space for shortInstrumentName
}
fluteMusic = \relative c' { \key g \major g'1 b }
% Pitches as written on a manuscript for Clarinet in A
% are transposed to concert pitch.
clarinetMusic = \transpose c' a
\relative c'' { \key bes \major bes1 d }
trumpetMusic = \relative c { \key g \major g''1 b }
% Key signature is often omitted for horns
hornMusic = \transpose c' f
\relative c { d'1 fis }
percussionMusic = \relative c { \key g \major g1 b }
sopranoMusic = \relative c'' { \key g \major g'1 b }
sopranoLyrics = \lyricmode { Lyr -- ics }
altoIMusic = \relative c' { \key g \major g'1 b }
altoIIMusic = \relative c' { \key g \major g'1 b }
altoILyrics = \sopranoLyrics
altoIILyrics = \lyricmode { Ah -- ah }
tenorMusic = \relative c' { \clef "treble_8" \key g \major g1 b }
tenorLyrics = \sopranoLyrics
pianoRHMusic = \relative c { \key g \major g''1 b }
pianoLHMusic = \relative c { \clef bass \key g \major g1 b }
violinIMusic = \relative c' { \key g \major g'1 b }
violinIIMusic = \relative c' { \key g \major g'1 b }
violaMusic = \relative c { \clef alto \key g \major g'1 b }
celloMusic = \relative c { \clef bass \key g \major g1 b }
bassMusic = \relative c { \clef "bass_8" \key g \major g,1 b }
\score {
<<
\new StaffGroup = "StaffGroup_woodwinds" <<
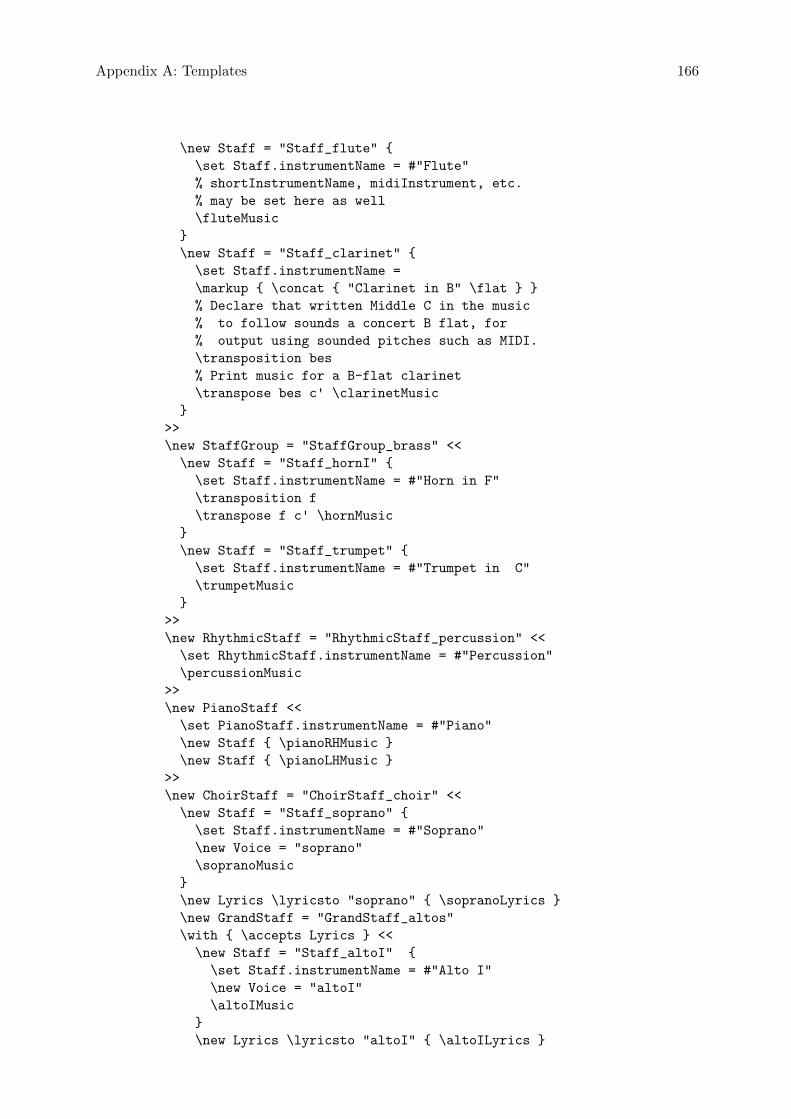
Appendix A: Templates 166
\new Staff = "Staff_flute" {
\set Staff.instrumentName = #"Flute"
% shortInstrumentName, midiInstrument, etc.
% may be set here as well
\fluteMusic
}
\new Staff = "Staff_clarinet" {
\set Staff.instrumentName =
\markup { \concat { "Clarinet in B" \flat } }
% Declare that written Middle C in the music
% to follow sounds a concert B flat, for
% output using sounded pitches such as MIDI.
\transposition bes
% Print music for a B-flat clarinet
\transpose bes c' \clarinetMusic
}
>>
\new StaffGroup = "StaffGroup_brass" <<
\new Staff = "Staff_hornI" {
\set Staff.instrumentName = #"Horn in F"
\transposition f
\transpose f c' \hornMusic
}
\new Staff = "Staff_trumpet" {
\set Staff.instrumentName = #"Trumpet in C"
\trumpetMusic
}
>>
\new RhythmicStaff = "RhythmicStaff_percussion" <<
\set RhythmicStaff.instrumentName = #"Percussion"
\percussionMusic
>>
\new PianoStaff <<
\set PianoStaff.instrumentName = #"Piano"
\new Staff { \pianoRHMusic }
\new Staff { \pianoLHMusic }
>>
\new ChoirStaff = "ChoirStaff_choir" <<
\new Staff = "Staff_soprano" {
\set Staff.instrumentName = #"Soprano"
\new Voice = "soprano"
\sopranoMusic
}
\new Lyrics \lyricsto "soprano" { \sopranoLyrics }
\new GrandStaff = "GrandStaff_altos"
\with { \accepts Lyrics } <<
\new Staff = "Staff_altoI" {
\set Staff.instrumentName = #"Alto I"
\new Voice = "altoI"
\altoIMusic
}
\new Lyrics \lyricsto "altoI" { \altoILyrics }
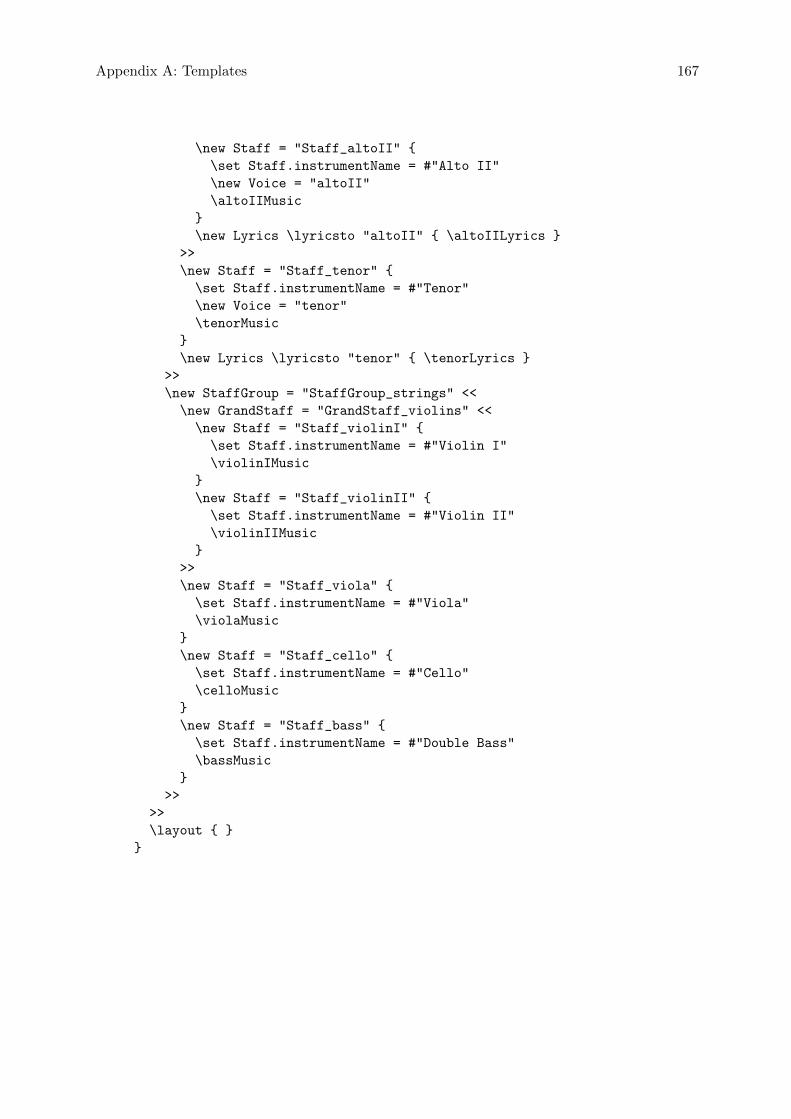
Appendix A: Templates 167
\new Staff = "Staff_altoII" {
\set Staff.instrumentName = #"Alto II"
\new Voice = "altoII"
\altoIIMusic
}
\new Lyrics \lyricsto "altoII" { \altoIILyrics }
>>
\new Staff = "Staff_tenor" {
\set Staff.instrumentName = #"Tenor"
\new Voice = "tenor"
\tenorMusic
}
\new Lyrics \lyricsto "tenor" { \tenorLyrics }
>>
\new StaffGroup = "StaffGroup_strings" <<
\new GrandStaff = "GrandStaff_violins" <<
\new Staff = "Staff_violinI" {
\set Staff.instrumentName = #"Violin I"
\violinIMusic
}
\new Staff = "Staff_violinII" {
\set Staff.instrumentName = #"Violin II"
\violinIIMusic
}
>>
\new Staff = "Staff_viola" {
\set Staff.instrumentName = #"Viola"
\violaMusic
}
\new Staff = "Staff_cello" {
\set Staff.instrumentName = #"Cello"
\celloMusic
}
\new Staff = "Staff_bass" {
\set Staff.instrumentName = #"Double Bass"
\bassMusic
}
>>
>>
\layout { }
}
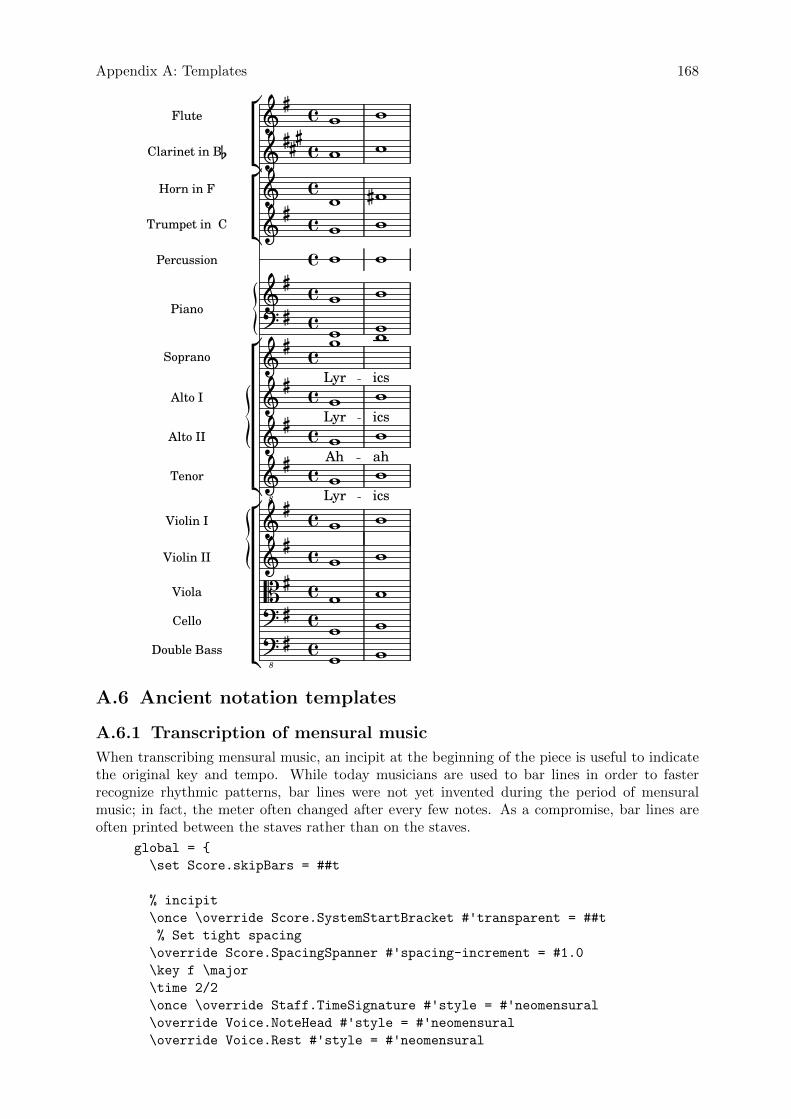
Appendix A: Templates 168
��
�
�
��
��
���
�
�
�
�
�� �8
�� �
�8
��
Alto II
Alto I
Soprano
�
�Piano
Percussion
�
�
Flute
Trumpet in C
Horn in F
Clarinet in B�
�
�Double Bass
Cello
Viola
Violin II
Violin I
�
�Tenor
�
�
�
���
ics�ics
��������
�
���
�
�
Ah��
Lyr
�����ics�ah
���
�Lyr
��
���
Lyr
����
A.6 Ancient notation templates
A.6.1 Transcription of mensural music
When transcribing mensural music, an incipit at the beginning of the piece is useful to indicatethe original key and tempo. While today musicians are used to bar lines in order to fasterrecognize rhythmic patterns, bar lines were not yet invented during the period of mensuralmusic; in fact, the meter often changed after every few notes. As a compromise, bar lines areoften printed between the staves rather than on the staves.
global = {
\set Score.skipBars = ##t
% incipit
\once \override Score.SystemStartBracket #'transparent = ##t
% Set tight spacing
\override Score.SpacingSpanner #'spacing-increment = #1.0
\key f \major
\time 2/2
\once \override Staff.TimeSignature #'style = #'neomensural
\override Voice.NoteHead #'style = #'neomensural
\override Voice.Rest #'style = #'neomensural
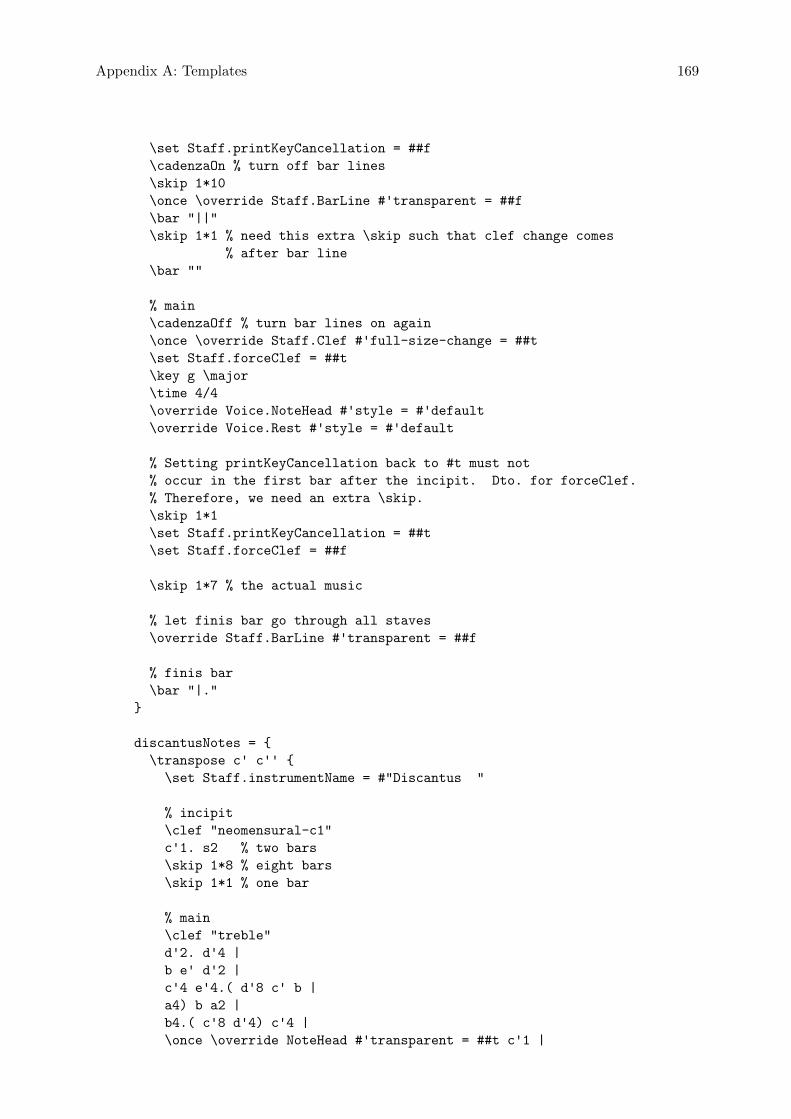
Appendix A: Templates 169
\set Staff.printKeyCancellation = ##f
\cadenzaOn % turn off bar lines
\skip 1*10
\once \override Staff.BarLine #'transparent = ##f
\bar "||"
\skip 1*1 % need this extra \skip such that clef change comes
% after bar line
\bar ""
% main
\cadenzaOff % turn bar lines on again
\once \override Staff.Clef #'full-size-change = ##t
\set Staff.forceClef = ##t
\key g \major
\time 4/4
\override Voice.NoteHead #'style = #'default
\override Voice.Rest #'style = #'default
% Setting printKeyCancellation back to #t must not
% occur in the first bar after the incipit. Dto. for forceClef.
% Therefore, we need an extra \skip.
\skip 1*1
\set Staff.printKeyCancellation = ##t
\set Staff.forceClef = ##f
\skip 1*7 % the actual music
% let finis bar go through all staves
\override Staff.BarLine #'transparent = ##f
% finis bar
\bar "|."
}
discantusNotes = {
\transpose c' c'' {
\set Staff.instrumentName = #"Discantus "
% incipit
\clef "neomensural-c1"
c'1. s2 % two bars
\skip 1*8 % eight bars
\skip 1*1 % one bar
% main
\clef "treble"
d'2. d'4 |
b e' d'2 |
c'4 e'4.( d'8 c' b |
a4) b a2 |
b4.( c'8 d'4) c'4 |
\once \override NoteHead #'transparent = ##t c'1 |

Appendix A: Templates 170
b\breve |
}
}
discantusLyrics = \lyricmode {
% incipit
IV-
% main
Ju -- bi -- |
la -- te De -- |
o, om --
nis ter -- |
ra, __ om- |
"..." |
-us. |
}
altusNotes = {
\transpose c' c'' {
\set Staff.instrumentName = #"Altus "
% incipit
\clef "neomensural-c3"
r1 % one bar
f1. s2 % two bars
\skip 1*7 % seven bars
\skip 1*1 % one bar
% main
\clef "treble"
r2 g2. e4 fis g | % two bars
a2 g4 e |
fis g4.( fis16 e fis4) |
g1 |
\once \override NoteHead #'transparent = ##t g1 |
g\breve |
}
}
altusLyrics = \lyricmode {
% incipit
IV-
% main
Ju -- bi -- la -- te | % two bars
De -- o, om -- |
nis ter -- ra, |
"..." |
-us. |
}
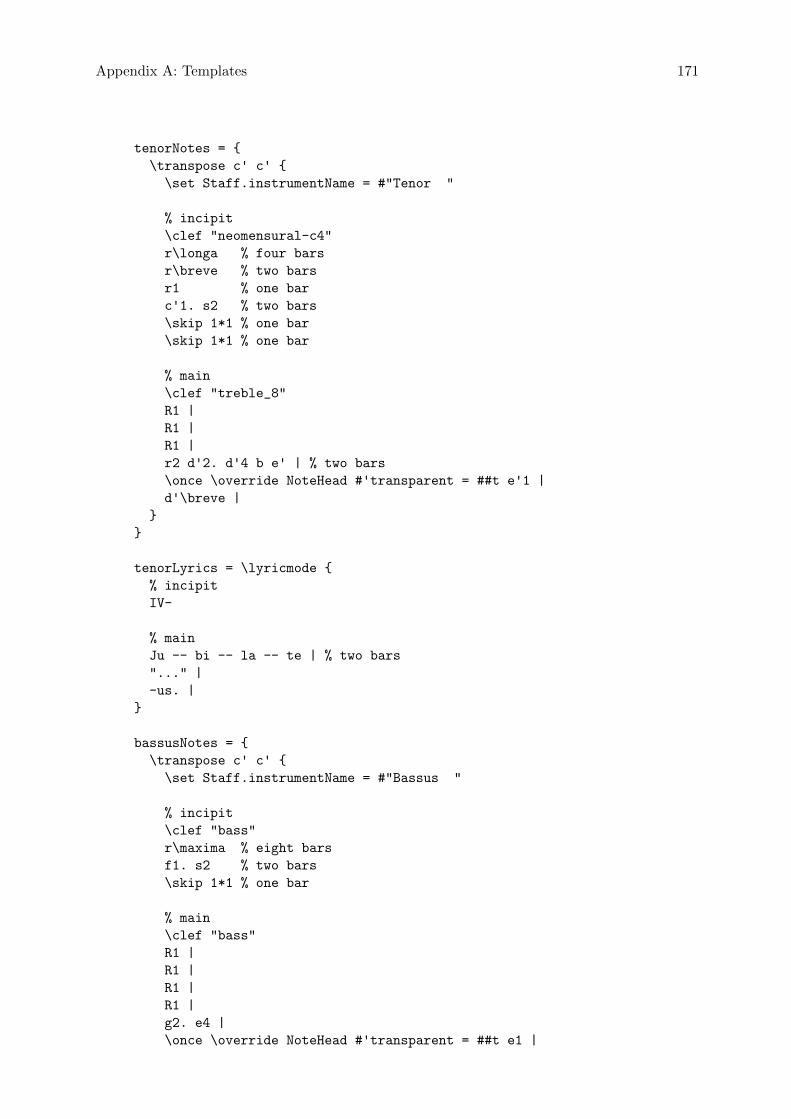
Appendix A: Templates 171
tenorNotes = {
\transpose c' c' {
\set Staff.instrumentName = #"Tenor "
% incipit
\clef "neomensural-c4"
r\longa % four bars
r\breve % two bars
r1 % one bar
c'1. s2 % two bars
\skip 1*1 % one bar
\skip 1*1 % one bar
% main
\clef "treble_8"
R1 |
R1 |
R1 |
r2 d'2. d'4 b e' | % two bars
\once \override NoteHead #'transparent = ##t e'1 |
d'\breve |
}
}
tenorLyrics = \lyricmode {
% incipit
IV-
% main
Ju -- bi -- la -- te | % two bars
"..." |
-us. |
}
bassusNotes = {
\transpose c' c' {
\set Staff.instrumentName = #"Bassus "
% incipit
\clef "bass"
r\maxima % eight bars
f1. s2 % two bars
\skip 1*1 % one bar
% main
\clef "bass"
R1 |
R1 |
R1 |
R1 |
g2. e4 |
\once \override NoteHead #'transparent = ##t e1 |
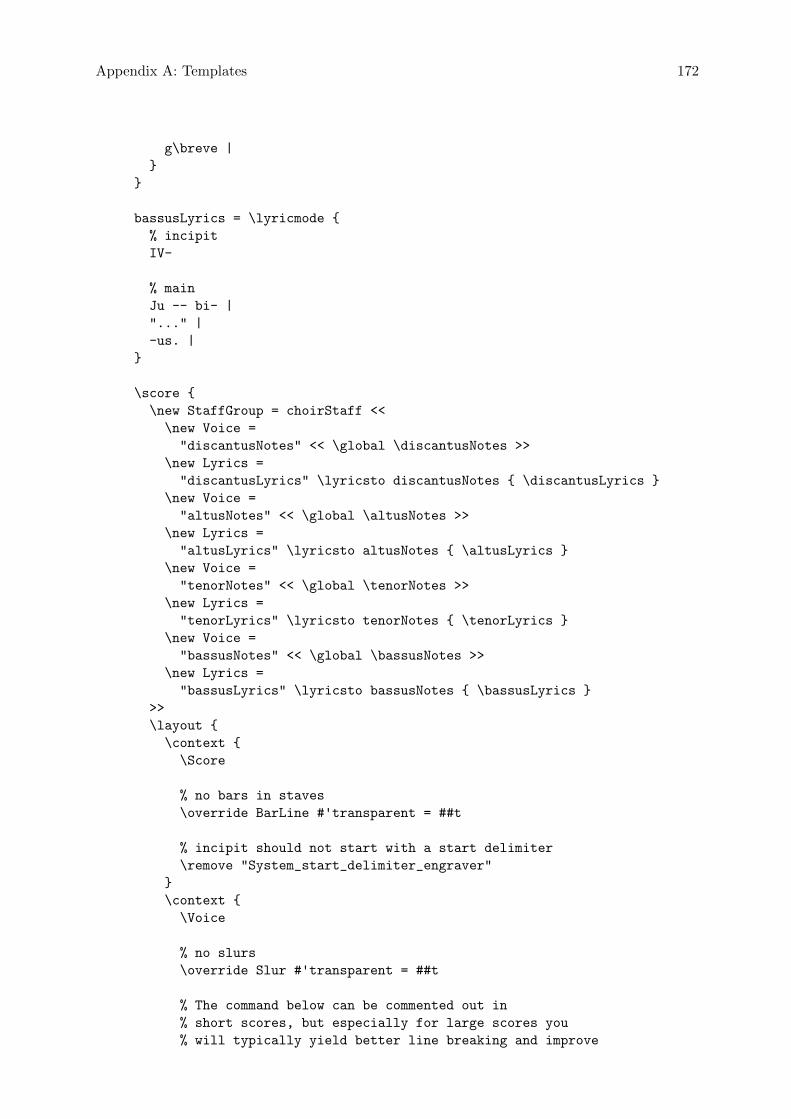
Appendix A: Templates 172
g\breve |
}
}
bassusLyrics = \lyricmode {
% incipit
IV-
% main
Ju -- bi- |
"..." |
-us. |
}
\score {
\new StaffGroup = choirStaff <<
\new Voice =
"discantusNotes" << \global \discantusNotes >>
\new Lyrics =
"discantusLyrics" \lyricsto discantusNotes { \discantusLyrics }
\new Voice =
"altusNotes" << \global \altusNotes >>
\new Lyrics =
"altusLyrics" \lyricsto altusNotes { \altusLyrics }
\new Voice =
"tenorNotes" << \global \tenorNotes >>
\new Lyrics =
"tenorLyrics" \lyricsto tenorNotes { \tenorLyrics }
\new Voice =
"bassusNotes" << \global \bassusNotes >>
\new Lyrics =
"bassusLyrics" \lyricsto bassusNotes { \bassusLyrics }
>>
\layout {
\context {
\Score
% no bars in staves
\override BarLine #'transparent = ##t
% incipit should not start with a start delimiter
\remove "System_start_delimiter_engraver"
}
\context {
\Voice
% no slurs
\override Slur #'transparent = ##t
% The command below can be commented out in
% short scores, but especially for large scores you
% will typically yield better line breaking and improve
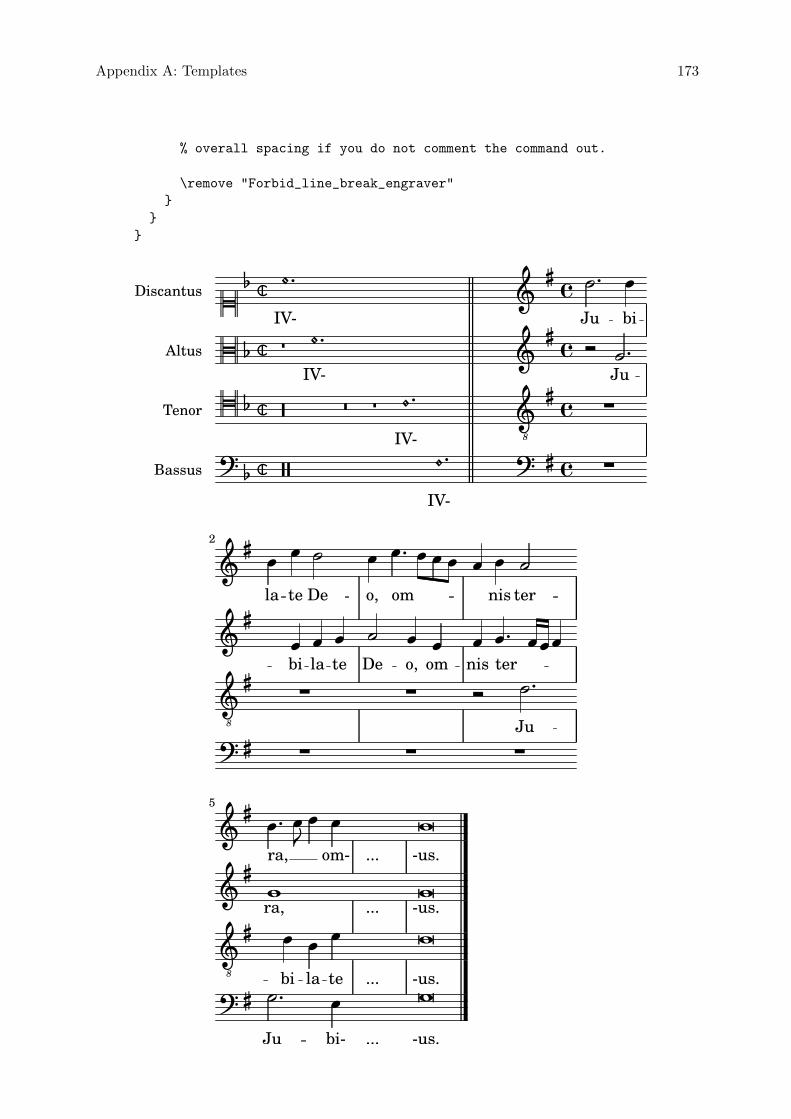
Appendix A: Templates 173
% overall spacing if you do not comment the command out.
\remove "Forbid_line_break_engraver"
}
}
}
�Ju�
�� � �Ju�� � �
�8
� �
Discantus
Altus
Tenor
Bassus
��
�bi
� �
IV-�
�
IV-
�
� �
�� �
� �
� � ��
�
� � IV-
�
IV-
ter
� �
�ter
�Ju
�nis
�
���
�8
�
��
��2
�
��
la
�
la�
�De
�o,
�
te� �
De
�
bi�te
�
��
��
o,�
�nis�
��
om
�
�om
�
�-us.
-us.
�
�5
-us.
�� �
� �
�8
�
� �
��
�bi
�
...
...
�
�la
...
�te�bi-
...
�
�-us.om-ra,
�
�
Ju
�
ra,
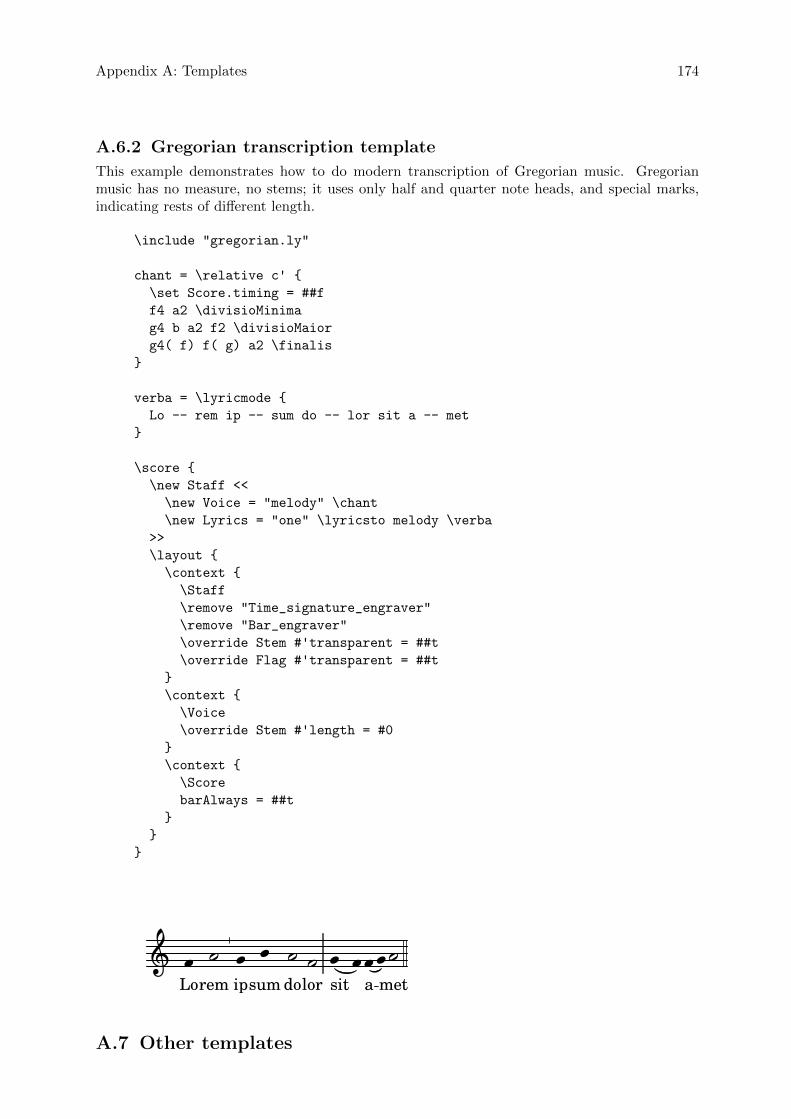
Appendix A: Templates 174
A.6.2 Gregorian transcription template
This example demonstrates how to do modern transcription of Gregorian music. Gregorianmusic has no measure, no stems; it uses only half and quarter note heads, and special marks,indicating rests of different length.
\include "gregorian.ly"
chant = \relative c' {
\set Score.timing = ##f
f4 a2 \divisioMinima
g4 b a2 f2 \divisioMaior
g4( f) f( g) a2 \finalis
}
verba = \lyricmode {
Lo -- rem ip -- sum do -- lor sit a -- met
}
\score {
\new Staff <<
\new Voice = "melody" \chant
\new Lyrics = "one" \lyricsto melody \verba
>>
\layout {
\context {
\Staff
\remove "Time_signature_engraver"
\remove "Bar_engraver"
\override Stem #'transparent = ##t
\override Flag #'transparent = ##t
}
\context {
\Voice
\override Stem #'length = #0
}
\context {
\Score
barAlways = ##t
}
}
}
× �rem
� � �aip
��sumLo
�� �lor
�sit
�metdo
A.7 Other templates
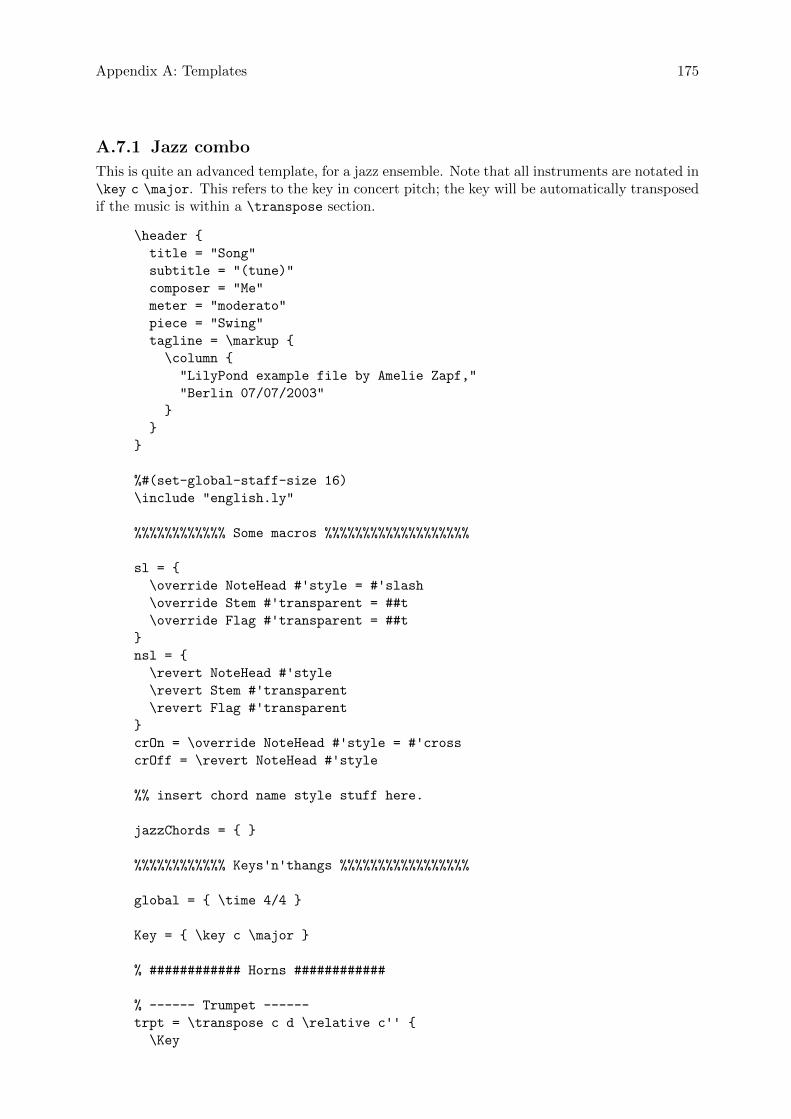
Appendix A: Templates 175
A.7.1 Jazz combo
This is quite an advanced template, for a jazz ensemble. Note that all instruments are notated in\key c \major. This refers to the key in concert pitch; the key will be automatically transposedif the music is within a \transpose section.
\header {
title = "Song"
subtitle = "(tune)"
composer = "Me"
meter = "moderato"
piece = "Swing"
tagline = \markup {
\column {
"LilyPond example file by Amelie Zapf,"
"Berlin 07/07/2003"
}
}
}
%#(set-global-staff-size 16)
\include "english.ly"
%%%%%%%%%%%% Some macros %%%%%%%%%%%%%%%%%%%
sl = {
\override NoteHead #'style = #'slash
\override Stem #'transparent = ##t
\override Flag #'transparent = ##t
}
nsl = {
\revert NoteHead #'style
\revert Stem #'transparent
\revert Flag #'transparent
}
crOn = \override NoteHead #'style = #'cross
crOff = \revert NoteHead #'style
%% insert chord name style stuff here.
jazzChords = { }
%%%%%%%%%%%% Keys'n'thangs %%%%%%%%%%%%%%%%%
global = { \time 4/4 }
Key = { \key c \major }
% ############ Horns ############
% ------ Trumpet ------
trpt = \transpose c d \relative c'' {
\Key
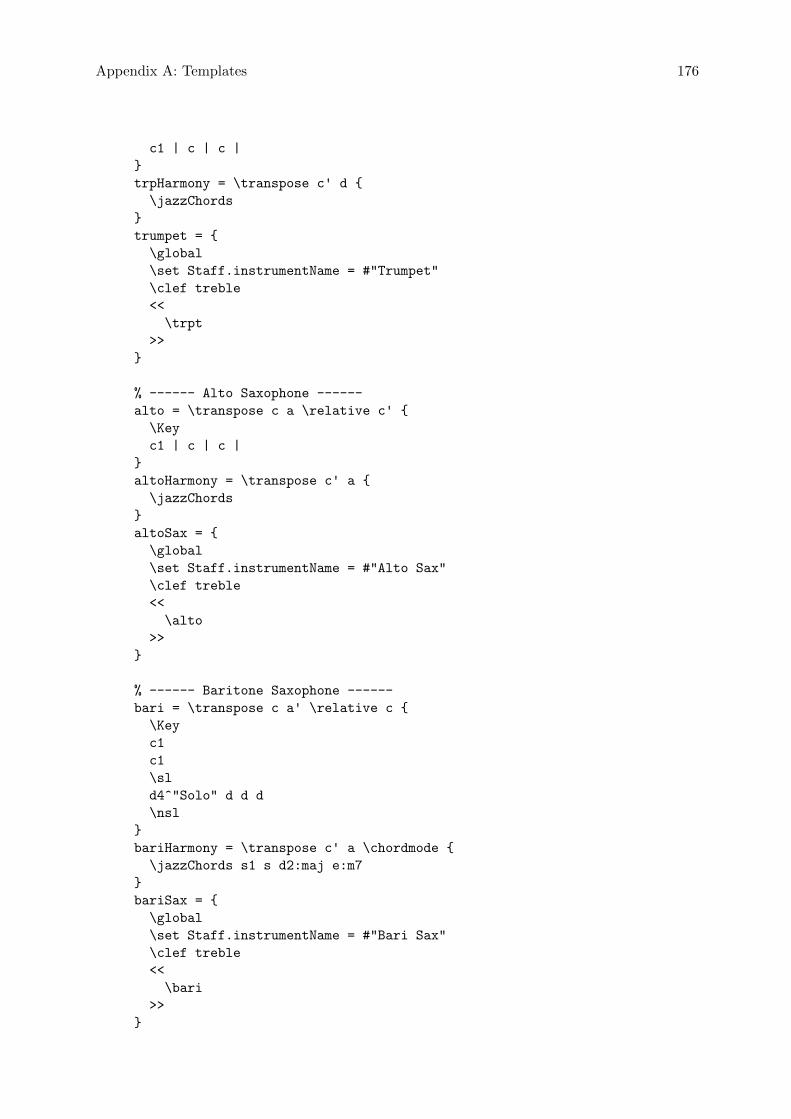
Appendix A: Templates 176
c1 | c | c |
}
trpHarmony = \transpose c' d {
\jazzChords
}
trumpet = {
\global
\set Staff.instrumentName = #"Trumpet"
\clef treble
<<
\trpt
>>
}
% ------ Alto Saxophone ------
alto = \transpose c a \relative c' {
\Key
c1 | c | c |
}
altoHarmony = \transpose c' a {
\jazzChords
}
altoSax = {
\global
\set Staff.instrumentName = #"Alto Sax"
\clef treble
<<
\alto
>>
}
% ------ Baritone Saxophone ------
bari = \transpose c a' \relative c {
\Key
c1
c1
\sl
d4^"Solo" d d d
\nsl
}
bariHarmony = \transpose c' a \chordmode {
\jazzChords s1 s d2:maj e:m7
}
bariSax = {
\global
\set Staff.instrumentName = #"Bari Sax"
\clef treble
<<
\bari
>>
}
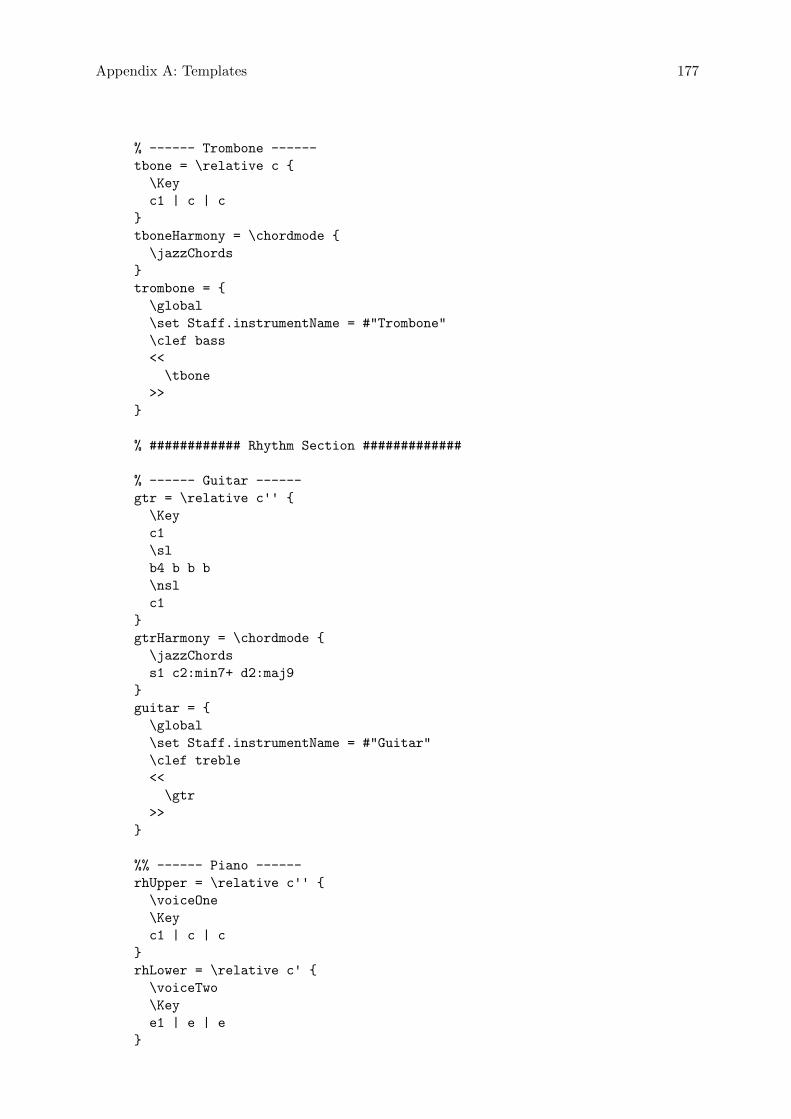
Appendix A: Templates 177
% ------ Trombone ------
tbone = \relative c {
\Key
c1 | c | c
}
tboneHarmony = \chordmode {
\jazzChords
}
trombone = {
\global
\set Staff.instrumentName = #"Trombone"
\clef bass
<<
\tbone
>>
}
% ############ Rhythm Section #############
% ------ Guitar ------
gtr = \relative c'' {
\Key
c1
\sl
b4 b b b
\nsl
c1
}
gtrHarmony = \chordmode {
\jazzChords
s1 c2:min7+ d2:maj9
}
guitar = {
\global
\set Staff.instrumentName = #"Guitar"
\clef treble
<<
\gtr
>>
}
%% ------ Piano ------
rhUpper = \relative c'' {
\voiceOne
\Key
c1 | c | c
}
rhLower = \relative c' {
\voiceTwo
\Key
e1 | e | e
}
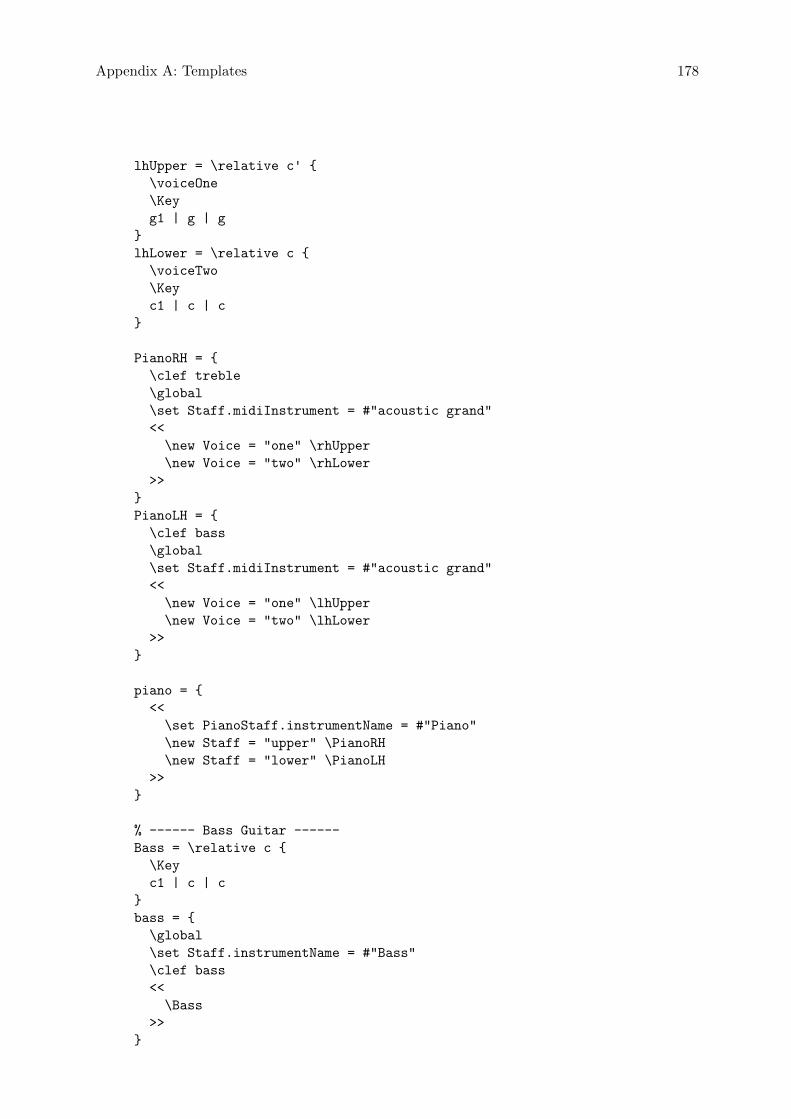
Appendix A: Templates 178
lhUpper = \relative c' {
\voiceOne
\Key
g1 | g | g
}
lhLower = \relative c {
\voiceTwo
\Key
c1 | c | c
}
PianoRH = {
\clef treble
\global
\set Staff.midiInstrument = #"acoustic grand"
<<
\new Voice = "one" \rhUpper
\new Voice = "two" \rhLower
>>
}
PianoLH = {
\clef bass
\global
\set Staff.midiInstrument = #"acoustic grand"
<<
\new Voice = "one" \lhUpper
\new Voice = "two" \lhLower
>>
}
piano = {
<<
\set PianoStaff.instrumentName = #"Piano"
\new Staff = "upper" \PianoRH
\new Staff = "lower" \PianoLH
>>
}
% ------ Bass Guitar ------
Bass = \relative c {
\Key
c1 | c | c
}
bass = {
\global
\set Staff.instrumentName = #"Bass"
\clef bass
<<
\Bass
>>
}
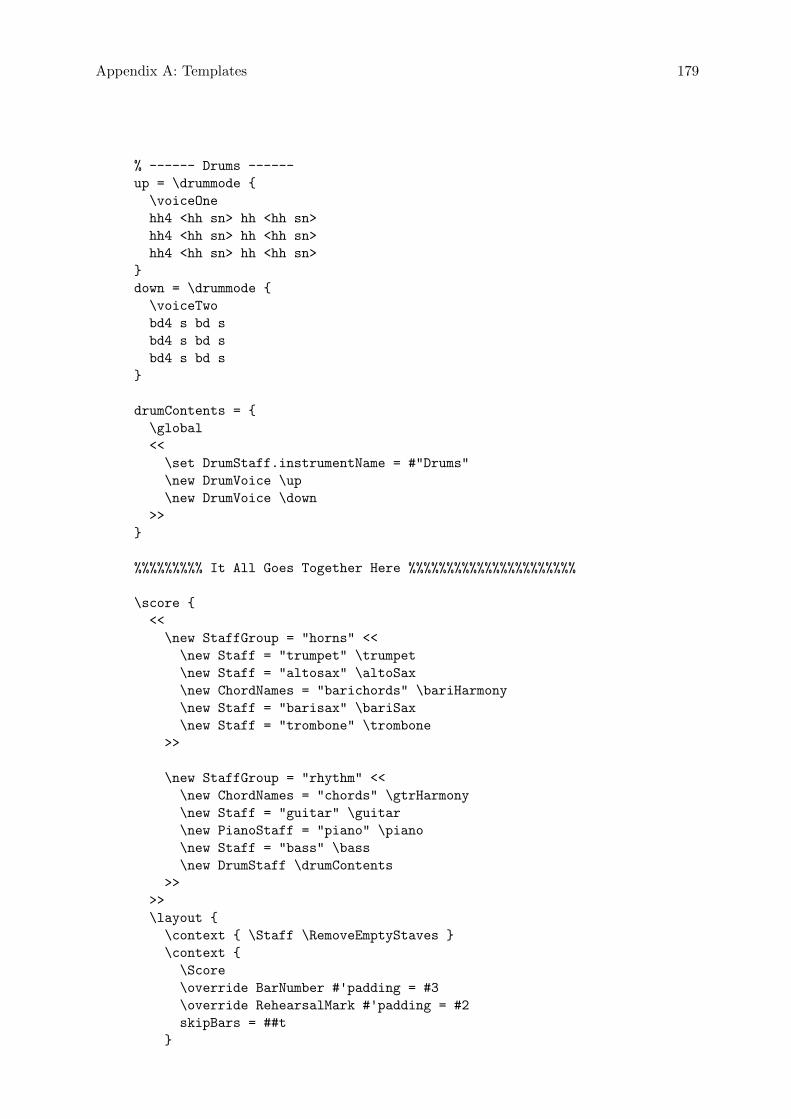
Appendix A: Templates 179
% ------ Drums ------
up = \drummode {
\voiceOne
hh4 <hh sn> hh <hh sn>
hh4 <hh sn> hh <hh sn>
hh4 <hh sn> hh <hh sn>
}
down = \drummode {
\voiceTwo
bd4 s bd s
bd4 s bd s
bd4 s bd s
}
drumContents = {
\global
<<
\set DrumStaff.instrumentName = #"Drums"
\new DrumVoice \up
\new DrumVoice \down
>>
}
%%%%%%%%% It All Goes Together Here %%%%%%%%%%%%%%%%%%%%%%
\score {
<<
\new StaffGroup = "horns" <<
\new Staff = "trumpet" \trumpet
\new Staff = "altosax" \altoSax
\new ChordNames = "barichords" \bariHarmony
\new Staff = "barisax" \bariSax
\new Staff = "trombone" \trombone
>>
\new StaffGroup = "rhythm" <<
\new ChordNames = "chords" \gtrHarmony
\new Staff = "guitar" \guitar
\new PianoStaff = "piano" \piano
\new Staff = "bass" \bass
\new DrumStaff \drumContents
>>
>>
\layout {
\context { \Staff \RemoveEmptyStaves }
\context {
\Score
\override BarNumber #'padding = #3
\override RehearsalMark #'padding = #2
skipBars = ##t
}
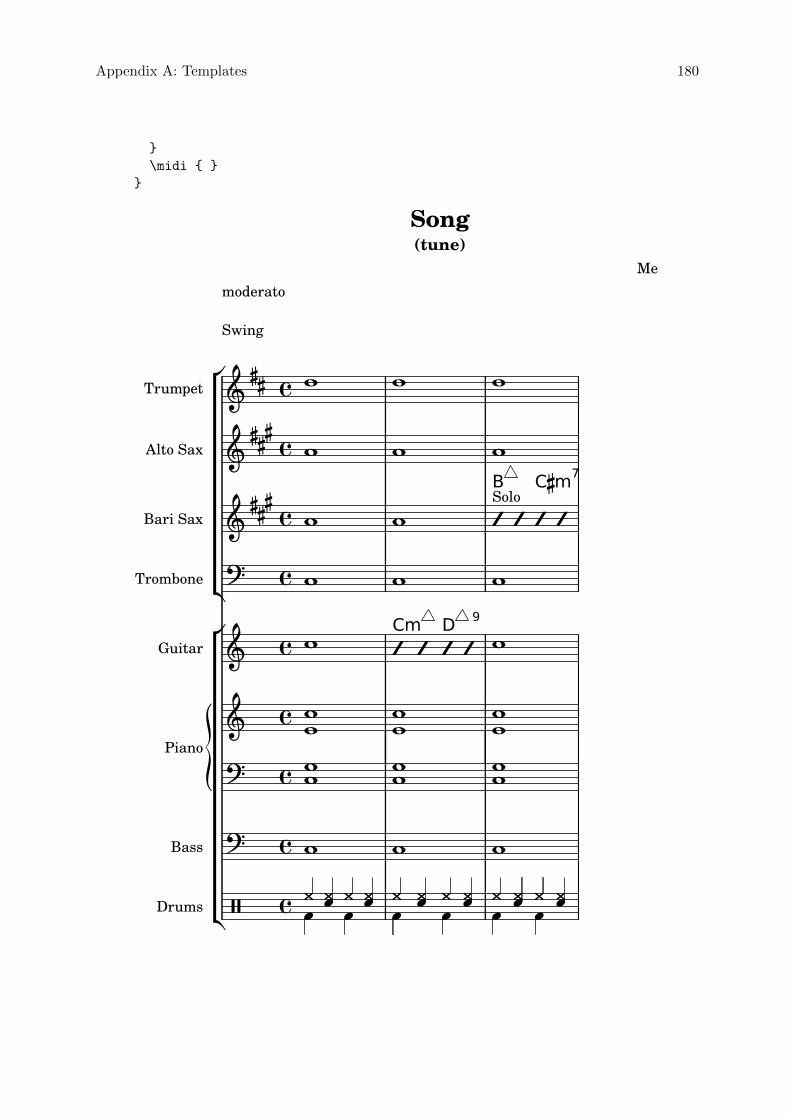
Appendix A: Templates 180
}
\midi { }
}
Song(tune)
Memoderato
Swing
5
5
5
5
5
5
5
��
5
��
��
5
��
5
��5
5555
�
�Drums
Bass
�Piano
Guitar
�
�Trombone
Bari Sax
Alto Sax
Trumpet
��
5
5
5
5
55
5
5
����
�
��
���
�
�
�5
5
5
��
�
� �
�
�
��
��� �
�
B
�Solo
5
�
�
�
�
C�m7
�
��
D9
�
�
��
���
Cm
�
�
5
�
Appendix B: GNU Free Documentation License 181
Appendix B GNU Free Documentation License
Version 1.3, 3 November 2008
Copyright c© 2000, 2001, 2002, 2007, 2008 Free Software Foundation, Inc.http://fsf.org/
Everyone is permitted to copy and distribute verbatim copiesof this license document, but changing it is not allowed.
0. PREAMBLE
The purpose of this License is to make a manual, textbook, or other functional and usefuldocument free in the sense of freedom: to assure everyone the effective freedom to copyand redistribute it, with or without modifying it, either commercially or noncommercially.Secondarily, this License preserves for the author and publisher a way to get credit for theirwork, while not being considered responsible for modifications made by others.
This License is a kind of “copyleft”, which means that derivative works of the documentmust themselves be free in the same sense. It complements the GNU General Public License,which is a copyleft license designed for free software.
We have designed this License in order to use it for manuals for free software, because freesoftware needs free documentation: a free program should come with manuals providing thesame freedoms that the software does. But this License is not limited to software manuals;it can be used for any textual work, regardless of subject matter or whether it is publishedas a printed book. We recommend this License principally for works whose purpose isinstruction or reference.
1. APPLICABILITY AND DEFINITIONS
This License applies to any manual or other work, in any medium, that contains a noticeplaced by the copyright holder saying it can be distributed under the terms of this License.Such a notice grants a world-wide, royalty-free license, unlimited in duration, to use thatwork under the conditions stated herein. The “Document”, below, refers to any such manualor work. Any member of the public is a licensee, and is addressed as “you”. You acceptthe license if you copy, modify or distribute the work in a way requiring permission undercopyright law.
A “Modified Version” of the Document means any work containing the Document or aportion of it, either copied verbatim, or with modifications and/or translated into anotherlanguage.
A “Secondary Section” is a named appendix or a front-matter section of the Documentthat deals exclusively with the relationship of the publishers or authors of the Documentto the Document’s overall subject (or to related matters) and contains nothing that couldfall directly within that overall subject. (Thus, if the Document is in part a textbook ofmathematics, a Secondary Section may not explain any mathematics.) The relationshipcould be a matter of historical connection with the subject or with related matters, or oflegal, commercial, philosophical, ethical or political position regarding them.
The “Invariant Sections” are certain Secondary Sections whose titles are designated, asbeing those of Invariant Sections, in the notice that says that the Document is releasedunder this License. If a section does not fit the above definition of Secondary then it is notallowed to be designated as Invariant. The Document may contain zero Invariant Sections.If the Document does not identify any Invariant Sections then there are none.
The “Cover Texts” are certain short passages of text that are listed, as Front-Cover Texts orBack-Cover Texts, in the notice that says that the Document is released under this License.A Front-Cover Text may be at most 5 words, and a Back-Cover Text may be at most 25words.

Appendix B: GNU Free Documentation License 182
A “Transparent” copy of the Document means a machine-readable copy, represented in aformat whose specification is available to the general public, that is suitable for revisingthe document straightforwardly with generic text editors or (for images composed of pixels)generic paint programs or (for drawings) some widely available drawing editor, and that issuitable for input to text formatters or for automatic translation to a variety of formatssuitable for input to text formatters. A copy made in an otherwise Transparent file formatwhose markup, or absence of markup, has been arranged to thwart or discourage subsequentmodification by readers is not Transparent. An image format is not Transparent if used forany substantial amount of text. A copy that is not “Transparent” is called “Opaque”.
Examples of suitable formats for Transparent copies include plain ascii without markup,Texinfo input format, LaTEX input format, SGML or XML using a publicly available DTD,and standard-conforming simple HTML, PostScript or PDF designed for human modifica-tion. Examples of transparent image formats include PNG, XCF and JPG. Opaque formatsinclude proprietary formats that can be read and edited only by proprietary word proces-sors, SGML or XML for which the DTD and/or processing tools are not generally available,and the machine-generated HTML, PostScript or PDF produced by some word processorsfor output purposes only.
The “Title Page” means, for a printed book, the title page itself, plus such following pagesas are needed to hold, legibly, the material this License requires to appear in the title page.For works in formats which do not have any title page as such, “Title Page” means thetext near the most prominent appearance of the work’s title, preceding the beginning of thebody of the text.
The “publisher” means any person or entity that distributes copies of the Document to thepublic.
A section “Entitled XYZ” means a named subunit of the Document whose title eitheris precisely XYZ or contains XYZ in parentheses following text that translates XYZ inanother language. (Here XYZ stands for a specific section name mentioned below, suchas “Acknowledgements”, “Dedications”, “Endorsements”, or “History”.) To “Preserve theTitle” of such a section when you modify the Document means that it remains a section“Entitled XYZ” according to this definition.
The Document may include Warranty Disclaimers next to the notice which states thatthis License applies to the Document. These Warranty Disclaimers are considered to beincluded by reference in this License, but only as regards disclaiming warranties: any otherimplication that these Warranty Disclaimers may have is void and has no effect on themeaning of this License.
2. VERBATIM COPYING
You may copy and distribute the Document in any medium, either commercially or noncom-mercially, provided that this License, the copyright notices, and the license notice sayingthis License applies to the Document are reproduced in all copies, and that you add noother conditions whatsoever to those of this License. You may not use technical measuresto obstruct or control the reading or further copying of the copies you make or distribute.However, you may accept compensation in exchange for copies. If you distribute a largeenough number of copies you must also follow the conditions in section 3.
You may also lend copies, under the same conditions stated above, and you may publiclydisplay copies.
3. COPYING IN QUANTITY
If you publish printed copies (or copies in media that commonly have printed covers) of theDocument, numbering more than 100, and the Document’s license notice requires CoverTexts, you must enclose the copies in covers that carry, clearly and legibly, all these CoverTexts: Front-Cover Texts on the front cover, and Back-Cover Texts on the back cover. Both
Appendix B: GNU Free Documentation License 183
covers must also clearly and legibly identify you as the publisher of these copies. The frontcover must present the full title with all words of the title equally prominent and visible.You may add other material on the covers in addition. Copying with changes limited tothe covers, as long as they preserve the title of the Document and satisfy these conditions,can be treated as verbatim copying in other respects.
If the required texts for either cover are too voluminous to fit legibly, you should put thefirst ones listed (as many as fit reasonably) on the actual cover, and continue the rest ontoadjacent pages.
If you publish or distribute Opaque copies of the Document numbering more than 100, youmust either include a machine-readable Transparent copy along with each Opaque copy,or state in or with each Opaque copy a computer-network location from which the generalnetwork-using public has access to download using public-standard network protocols acomplete Transparent copy of the Document, free of added material. If you use the latteroption, you must take reasonably prudent steps, when you begin distribution of Opaquecopies in quantity, to ensure that this Transparent copy will remain thus accessible at thestated location until at least one year after the last time you distribute an Opaque copy(directly or through your agents or retailers) of that edition to the public.
It is requested, but not required, that you contact the authors of the Document well beforeredistributing any large number of copies, to give them a chance to provide you with anupdated version of the Document.
4. MODIFICATIONS
You may copy and distribute a Modified Version of the Document under the conditionsof sections 2 and 3 above, provided that you release the Modified Version under preciselythis License, with the Modified Version filling the role of the Document, thus licensingdistribution and modification of the Modified Version to whoever possesses a copy of it. Inaddition, you must do these things in the Modified Version:
A. Use in the Title Page (and on the covers, if any) a title distinct from that of theDocument, and from those of previous versions (which should, if there were any, belisted in the History section of the Document). You may use the same title as a previousversion if the original publisher of that version gives permission.
B. List on the Title Page, as authors, one or more persons or entities responsible forauthorship of the modifications in the Modified Version, together with at least five ofthe principal authors of the Document (all of its principal authors, if it has fewer thanfive), unless they release you from this requirement.
C. State on the Title page the name of the publisher of the Modified Version, as thepublisher.
D. Preserve all the copyright notices of the Document.
E. Add an appropriate copyright notice for your modifications adjacent to the other copy-right notices.
F. Include, immediately after the copyright notices, a license notice giving the publicpermission to use the Modified Version under the terms of this License, in the formshown in the Addendum below.
G. Preserve in that license notice the full lists of Invariant Sections and required CoverTexts given in the Document’s license notice.
H. Include an unaltered copy of this License.
I. Preserve the section Entitled “History”, Preserve its Title, and add to it an item statingat least the title, year, new authors, and publisher of the Modified Version as givenon the Title Page. If there is no section Entitled “History” in the Document, createone stating the title, year, authors, and publisher of the Document as given on its
Appendix B: GNU Free Documentation License 184
Title Page, then add an item describing the Modified Version as stated in the previoussentence.
J. Preserve the network location, if any, given in the Document for public access to aTransparent copy of the Document, and likewise the network locations given in theDocument for previous versions it was based on. These may be placed in the “History”section. You may omit a network location for a work that was published at least fouryears before the Document itself, or if the original publisher of the version it refers togives permission.
K. For any section Entitled “Acknowledgements” or “Dedications”, Preserve the Titleof the section, and preserve in the section all the substance and tone of each of thecontributor acknowledgements and/or dedications given therein.
L. Preserve all the Invariant Sections of the Document, unaltered in their text and in theirtitles. Section numbers or the equivalent are not considered part of the section titles.
M. Delete any section Entitled “Endorsements”. Such a section may not be included inthe Modified Version.
N. Do not retitle any existing section to be Entitled “Endorsements” or to conflict in titlewith any Invariant Section.
O. Preserve any Warranty Disclaimers.
If the Modified Version includes new front-matter sections or appendices that qualify asSecondary Sections and contain no material copied from the Document, you may at youroption designate some or all of these sections as invariant. To do this, add their titles tothe list of Invariant Sections in the Modified Version’s license notice. These titles must bedistinct from any other section titles.
You may add a section Entitled “Endorsements”, provided it contains nothing but endorse-ments of your Modified Version by various parties—for example, statements of peer reviewor that the text has been approved by an organization as the authoritative definition of astandard.
You may add a passage of up to five words as a Front-Cover Text, and a passage of upto 25 words as a Back-Cover Text, to the end of the list of Cover Texts in the ModifiedVersion. Only one passage of Front-Cover Text and one of Back-Cover Text may be addedby (or through arrangements made by) any one entity. If the Document already includesa cover text for the same cover, previously added by you or by arrangement made by thesame entity you are acting on behalf of, you may not add another; but you may replace theold one, on explicit permission from the previous publisher that added the old one.
The author(s) and publisher(s) of the Document do not by this License give permission touse their names for publicity for or to assert or imply endorsement of any Modified Version.
5. COMBINING DOCUMENTS
You may combine the Document with other documents released under this License, underthe terms defined in section 4 above for modified versions, provided that you include in thecombination all of the Invariant Sections of all of the original documents, unmodified, andlist them all as Invariant Sections of your combined work in its license notice, and that youpreserve all their Warranty Disclaimers.
The combined work need only contain one copy of this License, and multiple identicalInvariant Sections may be replaced with a single copy. If there are multiple InvariantSections with the same name but different contents, make the title of each such sectionunique by adding at the end of it, in parentheses, the name of the original author orpublisher of that section if known, or else a unique number. Make the same adjustment tothe section titles in the list of Invariant Sections in the license notice of the combined work.

Appendix B: GNU Free Documentation License 185
In the combination, you must combine any sections Entitled “History” in the various originaldocuments, forming one section Entitled “History”; likewise combine any sections Entitled“Acknowledgements”, and any sections Entitled “Dedications”. You must delete all sectionsEntitled “Endorsements.”
6. COLLECTIONS OF DOCUMENTS
You may make a collection consisting of the Document and other documents released underthis License, and replace the individual copies of this License in the various documents witha single copy that is included in the collection, provided that you follow the rules of thisLicense for verbatim copying of each of the documents in all other respects.
You may extract a single document from such a collection, and distribute it individuallyunder this License, provided you insert a copy of this License into the extracted document,and follow this License in all other respects regarding verbatim copying of that document.
7. AGGREGATION WITH INDEPENDENT WORKS
A compilation of the Document or its derivatives with other separate and independentdocuments or works, in or on a volume of a storage or distribution medium, is called an“aggregate” if the copyright resulting from the compilation is not used to limit the legalrights of the compilation’s users beyond what the individual works permit. When theDocument is included in an aggregate, this License does not apply to the other works inthe aggregate which are not themselves derivative works of the Document.
If the Cover Text requirement of section 3 is applicable to these copies of the Document,then if the Document is less than one half of the entire aggregate, the Document’s CoverTexts may be placed on covers that bracket the Document within the aggregate, or theelectronic equivalent of covers if the Document is in electronic form. Otherwise they mustappear on printed covers that bracket the whole aggregate.
8. TRANSLATION
Translation is considered a kind of modification, so you may distribute translations of theDocument under the terms of section 4. Replacing Invariant Sections with translationsrequires special permission from their copyright holders, but you may include translationsof some or all Invariant Sections in addition to the original versions of these InvariantSections. You may include a translation of this License, and all the license notices inthe Document, and any Warranty Disclaimers, provided that you also include the originalEnglish version of this License and the original versions of those notices and disclaimers. Incase of a disagreement between the translation and the original version of this License or anotice or disclaimer, the original version will prevail.
If a section in the Document is Entitled “Acknowledgements”, “Dedications”, or “History”,the requirement (section 4) to Preserve its Title (section 1) will typically require changingthe actual title.
9. TERMINATION
You may not copy, modify, sublicense, or distribute the Document except as expressly pro-vided under this License. Any attempt otherwise to copy, modify, sublicense, or distributeit is void, and will automatically terminate your rights under this License.
However, if you cease all violation of this License, then your license from a particular copy-right holder is reinstated (a) provisionally, unless and until the copyright holder explicitlyand finally terminates your license, and (b) permanently, if the copyright holder fails tonotify you of the violation by some reasonable means prior to 60 days after the cessation.
Moreover, your license from a particular copyright holder is reinstated permanently if thecopyright holder notifies you of the violation by some reasonable means, this is the firsttime you have received notice of violation of this License (for any work) from that copyrightholder, and you cure the violation prior to 30 days after your receipt of the notice.
Appendix B: GNU Free Documentation License 186
Termination of your rights under this section does not terminate the licenses of partieswho have received copies or rights from you under this License. If your rights have beenterminated and not permanently reinstated, receipt of a copy of some or all of the samematerial does not give you any rights to use it.
10. FUTURE REVISIONS OF THIS LICENSE
The Free Software Foundation may publish new, revised versions of the GNU Free Doc-umentation License from time to time. Such new versions will be similar in spirit to thepresent version, but may differ in detail to address new problems or concerns. See http://www.gnu.org/copyleft/.
Each version of the License is given a distinguishing version number. If the Documentspecifies that a particular numbered version of this License “or any later version” appliesto it, you have the option of following the terms and conditions either of that specifiedversion or of any later version that has been published (not as a draft) by the Free SoftwareFoundation. If the Document does not specify a version number of this License, you maychoose any version ever published (not as a draft) by the Free Software Foundation. If theDocument specifies that a proxy can decide which future versions of this License can beused, that proxy’s public statement of acceptance of a version permanently authorizes youto choose that version for the Document.
11. RELICENSING
“Massive Multiauthor Collaboration Site” (or “MMC Site”) means any World Wide Webserver that publishes copyrightable works and also provides prominent facilities for anybodyto edit those works. A public wiki that anybody can edit is an example of such a server. A“Massive Multiauthor Collaboration” (or “MMC”) contained in the site means any set ofcopyrightable works thus published on the MMC site.
“CC-BY-SA” means the Creative Commons Attribution-Share Alike 3.0 license publishedby Creative Commons Corporation, a not-for-profit corporation with a principal place ofbusiness in San Francisco, California, as well as future copyleft versions of that licensepublished by that same organization.
“Incorporate” means to publish or republish a Document, in whole or in part, as part ofanother Document.
An MMC is “eligible for relicensing” if it is licensed under this License, and if all works thatwere first published under this License somewhere other than this MMC, and subsequentlyincorporated in whole or in part into the MMC, (1) had no cover texts or invariant sections,and (2) were thus incorporated prior to November 1, 2008.
The operator of an MMC Site may republish an MMC contained in the site under CC-BY-SA on the same site at any time before August 1, 2009, provided the MMC is eligible forrelicensing.
Appendix B: GNU Free Documentation License 187
ADDENDUM: How to use this License for your documents
To use this License in a document you have written, include a copy of the License in the documentand put the following copyright and license notices just after the title page:
Copyright (C) year your name.
Permission is granted to copy, distribute and/or modify this document
under the terms of the GNU Free Documentation License, Version 1.3
or any later version published by the Free Software Foundation;
with no Invariant Sections, no Front-Cover Texts, and no Back-Cover
Texts. A copy of the license is included in the section entitled ``GNU
Free Documentation License''.
If you have Invariant Sections, Front-Cover Texts and Back-Cover Texts, replace the“with. . .Texts.” line with this:
with the Invariant Sections being list their titles, with
the Front-Cover Texts being list, and with the Back-Cover Texts
being list.
If you have Invariant Sections without Cover Texts, or some other combination of the three,merge those two alternatives to suit the situation.
If your document contains nontrivial examples of program code, we recommend releasingthese examples in parallel under your choice of free software license, such as the GNU GeneralPublic License, to permit their use in free software.
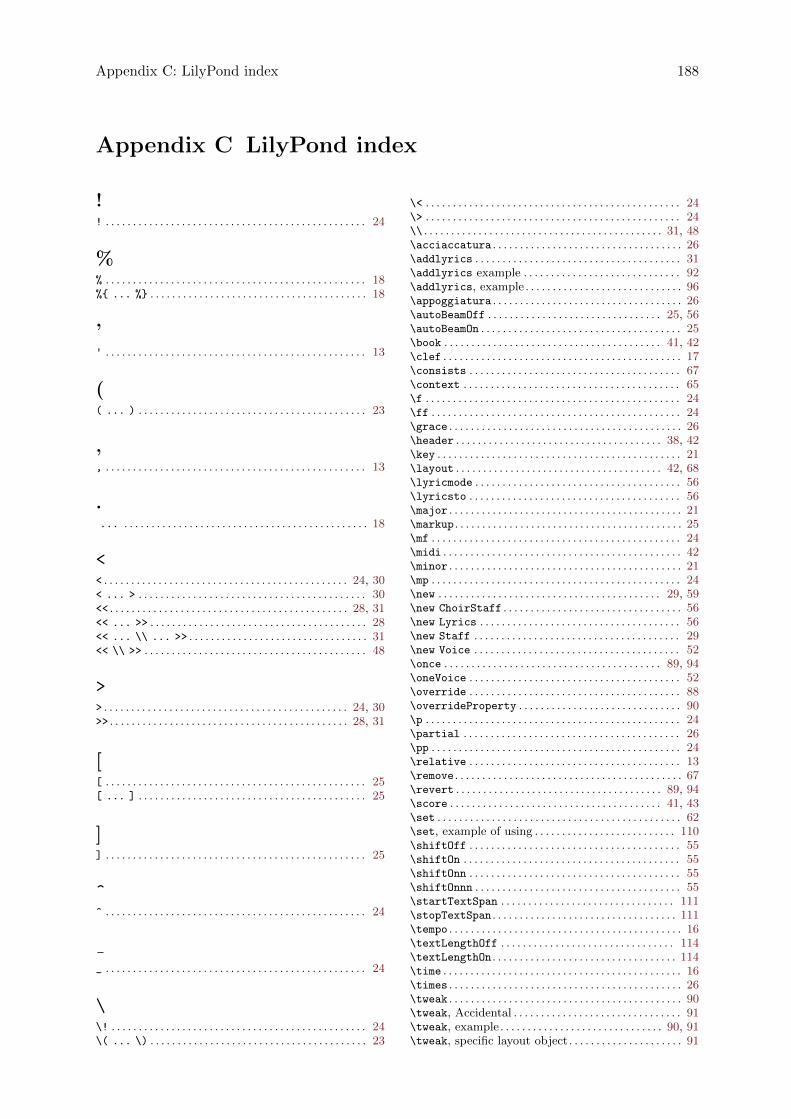
Appendix C: LilyPond index 188
Appendix C LilyPond index
!! . . . . . . . . . . . . . . . . . . . . . . . . . . . . . . . . . . . . . . . . . . . . . . . . 24
%% . . . . . . . . . . . . . . . . . . . . . . . . . . . . . . . . . . . . . . . . . . . . . . . . 18%{ ... %} . . . . . . . . . . . . . . . . . . . . . . . . . . . . . . . . . . . . . . . . 18
’' . . . . . . . . . . . . . . . . . . . . . . . . . . . . . . . . . . . . . . . . . . . . . . . . 13
(( ... ) . . . . . . . . . . . . . . . . . . . . . . . . . . . . . . . . . . . . . . . . . . 23
,, . . . . . . . . . . . . . . . . . . . . . . . . . . . . . . . . . . . . . . . . . . . . . . . . 13
.... . . . . . . . . . . . . . . . . . . . . . . . . . . . . . . . . . . . . . . . . . . . . . 18
<< . . . . . . . . . . . . . . . . . . . . . . . . . . . . . . . . . . . . . . . . . . . . . 24, 30< ... > . . . . . . . . . . . . . . . . . . . . . . . . . . . . . . . . . . . . . . . . . . 30<< . . . . . . . . . . . . . . . . . . . . . . . . . . . . . . . . . . . . . . . . . . . . 28, 31<< ... >> . . . . . . . . . . . . . . . . . . . . . . . . . . . . . . . . . . . . . . . . 28<< ... \\ ... >> . . . . . . . . . . . . . . . . . . . . . . . . . . . . . . . . . 31<< \\ >> . . . . . . . . . . . . . . . . . . . . . . . . . . . . . . . . . . . . . . . . . 48
>> . . . . . . . . . . . . . . . . . . . . . . . . . . . . . . . . . . . . . . . . . . . . . 24, 30>> . . . . . . . . . . . . . . . . . . . . . . . . . . . . . . . . . . . . . . . . . . . . 28, 31
[[ . . . . . . . . . . . . . . . . . . . . . . . . . . . . . . . . . . . . . . . . . . . . . . . . 25[ ... ] . . . . . . . . . . . . . . . . . . . . . . . . . . . . . . . . . . . . . . . . . . 25
]] . . . . . . . . . . . . . . . . . . . . . . . . . . . . . . . . . . . . . . . . . . . . . . . . 25
^^ . . . . . . . . . . . . . . . . . . . . . . . . . . . . . . . . . . . . . . . . . . . . . . . . 24
_ . . . . . . . . . . . . . . . . . . . . . . . . . . . . . . . . . . . . . . . . . . . . . . . . 24
\\! . . . . . . . . . . . . . . . . . . . . . . . . . . . . . . . . . . . . . . . . . . . . . . . 24\( ... \) . . . . . . . . . . . . . . . . . . . . . . . . . . . . . . . . . . . . . . . . 23
\< . . . . . . . . . . . . . . . . . . . . . . . . . . . . . . . . . . . . . . . . . . . . . . . 24\> . . . . . . . . . . . . . . . . . . . . . . . . . . . . . . . . . . . . . . . . . . . . . . . 24\\ . . . . . . . . . . . . . . . . . . . . . . . . . . . . . . . . . . . . . . . . . . . . 31, 48\acciaccatura . . . . . . . . . . . . . . . . . . . . . . . . . . . . . . . . . . . 26\addlyrics . . . . . . . . . . . . . . . . . . . . . . . . . . . . . . . . . . . . . . 31\addlyrics example . . . . . . . . . . . . . . . . . . . . . . . . . . . . . 92\addlyrics, example . . . . . . . . . . . . . . . . . . . . . . . . . . . . . 96\appoggiatura . . . . . . . . . . . . . . . . . . . . . . . . . . . . . . . . . . . 26\autoBeamOff . . . . . . . . . . . . . . . . . . . . . . . . . . . . . . . . 25, 56\autoBeamOn . . . . . . . . . . . . . . . . . . . . . . . . . . . . . . . . . . . . . 25\book . . . . . . . . . . . . . . . . . . . . . . . . . . . . . . . . . . . . . . . . 41, 42\clef . . . . . . . . . . . . . . . . . . . . . . . . . . . . . . . . . . . . . . . . . . . . 17\consists . . . . . . . . . . . . . . . . . . . . . . . . . . . . . . . . . . . . . . . 67\context . . . . . . . . . . . . . . . . . . . . . . . . . . . . . . . . . . . . . . . . 65\f . . . . . . . . . . . . . . . . . . . . . . . . . . . . . . . . . . . . . . . . . . . . . . . 24\ff . . . . . . . . . . . . . . . . . . . . . . . . . . . . . . . . . . . . . . . . . . . . . . 24\grace . . . . . . . . . . . . . . . . . . . . . . . . . . . . . . . . . . . . . . . . . . . 26\header . . . . . . . . . . . . . . . . . . . . . . . . . . . . . . . . . . . . . . 38, 42\key . . . . . . . . . . . . . . . . . . . . . . . . . . . . . . . . . . . . . . . . . . . . . 21\layout . . . . . . . . . . . . . . . . . . . . . . . . . . . . . . . . . . . . . . 42, 68\lyricmode . . . . . . . . . . . . . . . . . . . . . . . . . . . . . . . . . . . . . . 56\lyricsto . . . . . . . . . . . . . . . . . . . . . . . . . . . . . . . . . . . . . . . 56\major . . . . . . . . . . . . . . . . . . . . . . . . . . . . . . . . . . . . . . . . . . . 21\markup . . . . . . . . . . . . . . . . . . . . . . . . . . . . . . . . . . . . . . . . . . 25\mf . . . . . . . . . . . . . . . . . . . . . . . . . . . . . . . . . . . . . . . . . . . . . . 24\midi . . . . . . . . . . . . . . . . . . . . . . . . . . . . . . . . . . . . . . . . . . . . 42\minor . . . . . . . . . . . . . . . . . . . . . . . . . . . . . . . . . . . . . . . . . . . 21\mp . . . . . . . . . . . . . . . . . . . . . . . . . . . . . . . . . . . . . . . . . . . . . . 24\new . . . . . . . . . . . . . . . . . . . . . . . . . . . . . . . . . . . . . . . . . 29, 59\new ChoirStaff . . . . . . . . . . . . . . . . . . . . . . . . . . . . . . . . . 56\new Lyrics . . . . . . . . . . . . . . . . . . . . . . . . . . . . . . . . . . . . . 56\new Staff . . . . . . . . . . . . . . . . . . . . . . . . . . . . . . . . . . . . . . 29\new Voice . . . . . . . . . . . . . . . . . . . . . . . . . . . . . . . . . . . . . . 52\once . . . . . . . . . . . . . . . . . . . . . . . . . . . . . . . . . . . . . . . . 89, 94\oneVoice . . . . . . . . . . . . . . . . . . . . . . . . . . . . . . . . . . . . . . . 52\override . . . . . . . . . . . . . . . . . . . . . . . . . . . . . . . . . . . . . . . 88\overrideProperty . . . . . . . . . . . . . . . . . . . . . . . . . . . . . . 90\p . . . . . . . . . . . . . . . . . . . . . . . . . . . . . . . . . . . . . . . . . . . . . . . 24\partial . . . . . . . . . . . . . . . . . . . . . . . . . . . . . . . . . . . . . . . . 26\pp . . . . . . . . . . . . . . . . . . . . . . . . . . . . . . . . . . . . . . . . . . . . . . 24\relative . . . . . . . . . . . . . . . . . . . . . . . . . . . . . . . . . . . . . . . 13\remove . . . . . . . . . . . . . . . . . . . . . . . . . . . . . . . . . . . . . . . . . . 67\revert . . . . . . . . . . . . . . . . . . . . . . . . . . . . . . . . . . . . . . 89, 94\score . . . . . . . . . . . . . . . . . . . . . . . . . . . . . . . . . . . . . . . 41, 43\set . . . . . . . . . . . . . . . . . . . . . . . . . . . . . . . . . . . . . . . . . . . . . 62\set, example of using . . . . . . . . . . . . . . . . . . . . . . . . . . 110\shiftOff . . . . . . . . . . . . . . . . . . . . . . . . . . . . . . . . . . . . . . . 55\shiftOn . . . . . . . . . . . . . . . . . . . . . . . . . . . . . . . . . . . . . . . . 55\shiftOnn . . . . . . . . . . . . . . . . . . . . . . . . . . . . . . . . . . . . . . . 55\shiftOnnn . . . . . . . . . . . . . . . . . . . . . . . . . . . . . . . . . . . . . . 55\startTextSpan . . . . . . . . . . . . . . . . . . . . . . . . . . . . . . . . 111\stopTextSpan . . . . . . . . . . . . . . . . . . . . . . . . . . . . . . . . . . 111\tempo . . . . . . . . . . . . . . . . . . . . . . . . . . . . . . . . . . . . . . . . . . . 16\textLengthOff . . . . . . . . . . . . . . . . . . . . . . . . . . . . . . . . 114\textLengthOn . . . . . . . . . . . . . . . . . . . . . . . . . . . . . . . . . . 114\time . . . . . . . . . . . . . . . . . . . . . . . . . . . . . . . . . . . . . . . . . . . . 16\times . . . . . . . . . . . . . . . . . . . . . . . . . . . . . . . . . . . . . . . . . . . 26\tweak . . . . . . . . . . . . . . . . . . . . . . . . . . . . . . . . . . . . . . . . . . . 90\tweak, Accidental . . . . . . . . . . . . . . . . . . . . . . . . . . . . . . . 91\tweak, example . . . . . . . . . . . . . . . . . . . . . . . . . . . . . . 90, 91\tweak, specific layout object . . . . . . . . . . . . . . . . . . . . . 91
Appendix C: LilyPond index 189
\unset . . . . . . . . . . . . . . . . . . . . . . . . . . . . . . . . . . . . . . . . . . . 62\version . . . . . . . . . . . . . . . . . . . . . . . . . . . . . . . . . . . . . . . . 18\voiceFour . . . . . . . . . . . . . . . . . . . . . . . . . . . . . . . . . . . . . . 52\voiceFourStyle . . . . . . . . . . . . . . . . . . . . . . . . . . . . . . . . 50\voiceNeutralStyle . . . . . . . . . . . . . . . . . . . . . . . . . . . . . 50\voiceOne . . . . . . . . . . . . . . . . . . . . . . . . . . . . . . . . . . . . . . . 52\voiceOneStyle . . . . . . . . . . . . . . . . . . . . . . . . . . . . . . . . . 50\voiceThree . . . . . . . . . . . . . . . . . . . . . . . . . . . . . . . . . . . . . 52\voiceThreeStyle . . . . . . . . . . . . . . . . . . . . . . . . . . . . . . . 50\voiceTwo . . . . . . . . . . . . . . . . . . . . . . . . . . . . . . . . . . . . . . . 52\voiceTwoStyle . . . . . . . . . . . . . . . . . . . . . . . . . . . . . . . . . 50\with . . . . . . . . . . . . . . . . . . . . . . . . . . . . . . . . . . . . . . . . . . . . 65\with, example . . . . . . . . . . . . . . . . . . . 102, 103, 104, 105
~~ . . . . . . . . . . . . . . . . . . . . . . . . . . . . . . . . . . . . . . . . . . . . . . . . 23
Aabsolute mode . . . . . . . . . . . . . . . . . . . . . . . . . . . . . . . . . . . 38absolute note names . . . . . . . . . . . . . . . . . . . . . . . . . . . . . . 38absolute values for pitches . . . . . . . . . . . . . . . . . . . . . . . . 38accent . . . . . . . . . . . . . . . . . . . . . . . . . . . . . . . . . . . . . . . . . . . 24acciaccatura . . . . . . . . . . . . . . . . . . . . . . . . . . . . . . . . . . . . 26Accidental, example of overriding . . . . . . . . . . . . . . . 119AccidentalPlacement, example of overriding . . . . . 119accidentals . . . . . . . . . . . . . . . . . . . . . . . . . . . . . . . . . . . . . . . 21accidentals and key signature . . . . . . . . . . . . . . . . . . . . . 21accidentals and key signatures . . . . . . . . . . . . . . . . . . . . 21accidentals and relative mode . . . . . . . . . . . . . . . . . . . . 13adding engravers . . . . . . . . . . . . . . . . . . . . . . . . . . . . . . . . . 67adding text . . . . . . . . . . . . . . . . . . . . . . . . . . . . . . . . . . . . . . 25addlyrics . . . . . . . . . . . . . . . . . . . . . . . . . . . . . . . . . . . . . . . 31alignAboveContext property, example . . . . . . 102, 103,
104, 105aligning lyrics . . . . . . . . . . . . . . . . . . . . . . . . . . . . . . . . . . . . 32aligning objects on a baseline . . . . . . . . . . . . . . . . . . . 120alto . . . . . . . . . . . . . . . . . . . . . . . . . . . . . . . . . . . . . . . . . . . . . . 17ambitus engraver . . . . . . . . . . . . . . . . . . . . . . . . . . . . . . . . . 67anacrusis . . . . . . . . . . . . . . . . . . . . . . . . . . . . . . . . . . . . . . . . . 26appoggiatura . . . . . . . . . . . . . . . . . . . . . . . . . . . . . . . . . . . . . 26articulation . . . . . . . . . . . . . . . . . . . . . . . . . . . . . . . . . . . . . . 24articulations and slurs . . . . . . . . . . . . . . . . . . . . . . . . . . . 113assigning variables . . . . . . . . . . . . . . . . . . . . . . . . . . . . . . . 36autoBeamOff . . . . . . . . . . . . . . . . . . . . . . . . . . . . . . . . . 25, 56autoBeamOn . . . . . . . . . . . . . . . . . . . . . . . . . . . . . . . . . . . . . . 25automatic beams . . . . . . . . . . . . . . . . . . . . . . . . . . . . . . . . . 25
Bbar numbers, tweaking placement . . . . . . . . . . . . . . . 112BarLine, example of overriding . . . . . . 98, 99, 101, 102bass . . . . . . . . . . . . . . . . . . . . . . . . . . . . . . . . . . . . . . . . . . . . . 17Beam, example of overriding . . . . . . . . . . . . . . . . . . . . 122beaming . . . . . . . . . . . . . . . . . . . . . . . . . . . . . . . . . . . . . . . . . 25beaming and lyrics . . . . . . . . . . . . . . . . . . . . . . . . . . . . . . . 56beams, automatic . . . . . . . . . . . . . . . . . . . . . . . . . . . . . . . . 25beams, by hand . . . . . . . . . . . . . . . . . . . . . . . . . . . . . . . . . . 25beams, controlling manually . . . . . . . . . . . . . . . . . . . . . 121beams, manual . . . . . . . . . . . . . . . . . . . . . . . . . . . . . . . . . . . 25block comment . . . . . . . . . . . . . . . . . . . . . . . . . . . . . . . . . . . 18book . . . . . . . . . . . . . . . . . . . . . . . . . . . . . . . . . . . . . . . . . 41, 42book block, implicit . . . . . . . . . . . . . . . . . . . . . . . . . . . . . . 42bound-details property, example . . . . . . . . . . . . 111, 112
braces, curly . . . . . . . . . . . . . . . . . . . . . . . . . . . . . . . . . . . . . 18bracket types . . . . . . . . . . . . . . . . . . . . . . . . . . . . . . . . . . . . 46bracket, triplet . . . . . . . . . . . . . . . . . . . . . . . . . . . . . . . . . . . 91bracket, tuplet . . . . . . . . . . . . . . . . . . . . . . . . . . . . . . . . . . . 91brackets, enclosing vs. marking . . . . . . . . . . . . . . . . . . . 46brackets, nesting . . . . . . . . . . . . . . . . . . . . . . . . . . . . . . . . . 46break-visibility property . . . . . . . . . . . . . . . . . . . . . . . . . . 99break-visibility property, example . . . . . . . . . . . . . . . . 99
Ccase sensitive . . . . . . . . . . . . . . . . . . . . . . . . . . . . . . . . . . 1, 18center . . . . . . . . . . . . . . . . . . . . . . . . . . . . . . . . . . . . . . . . . . 108changing size of objects . . . . . . . . . . . . . . . . . . . . . . . . . 102characters allowed in variables . . . . . . . . . . . . . . . . . . . . 36choir staff . . . . . . . . . . . . . . . . . . . . . . . . . . . . . . . . . . . . 30, 56ChoirStaff . . . . . . . . . . . . . . . . . . . . . . . . . . . . . . . . . . 30, 56ChordNames . . . . . . . . . . . . . . . . . . . . . . . . . . . . . . . . . . . . . . 29chords . . . . . . . . . . . . . . . . . . . . . . . . . . . . . . . . . . . . . . . . . . . 30chords vs. voices . . . . . . . . . . . . . . . . . . . . . . . . . . . . . . . . . 48clef . . . . . . . . . . . . . . . . . . . . . . . . . . . . . . . . . . . . . . . . . . . . . 17Clef, example of overriding . . . . . . . . 102, 103, 104, 105clickable examples . . . . . . . . . . . . . . . . . . . . . . . . . . . . . . . . 19collisions, notes . . . . . . . . . . . . . . . . . . . . . . . . . . . . . . . . . . 55color property . . . . . . . . . . . . . . . . . . . . . . . . . . . . . . . . . . 101color property, example . . . . . . . . . . 89, 90, 91, 101, 102color property, setting to Scheme procedure . . . . . 141color, rgb . . . . . . . . . . . . . . . . . . . . . . . . . . . . . . . . . . . . . . . 101color, X11 . . . . . . . . . . . . . . . . . . . . . . . . . . . . . . . . . . . . . . 101combining expressions in parallel . . . . . . . . . . . . . . . . . 28comma . . . . . . . . . . . . . . . . . . . . . . . . . . . . . . . . . . . . . . . . . . . 13comment, line . . . . . . . . . . . . . . . . . . . . . . . . . . . . . . . . . . . . 18comments . . . . . . . . . . . . . . . . . . . . . . . . . . . . . . . . . . . . . . . . 18common errors . . . . . . . . . . . . . . . . . . . . . . . . . . . . . . . . . . . 19compiling . . . . . . . . . . . . . . . . . . . . . . . . . . . . . . . . . . . . . . . . . 1compound music expression . . . . . . . . . . . . . . . . . . . 27, 43concurrent music . . . . . . . . . . . . . . . . . . . . . . . . . . . . . . . . . 48consists . . . . . . . . . . . . . . . . . . . . . . . . . . . . . . . . . . . . . . . . 67constructing files, tips . . . . . . . . . . . . . . . . . . . . . . . . . . . . 19content vs. layout . . . . . . . . . . . . . . . . . . . . . . . . . . . . . . . . 21contents of a score block . . . . . . . . . . . . . . . . . . . . . . . . . 43context . . . . . . . . . . . . . . . . . . . . . . . . . . . . . . . . . . . . . . . . . . 29context . . . . . . . . . . . . . . . . . . . . . . . . . . . . . . . . . . . . . . . . . . 65context properties . . . . . . . . . . . . . . . . . . . . . . . . . . . . . . . . 62context properties, modifying . . . . . . . . . . . . . . . . . . . . . 62context properties, setting with \context . . . . . . . . . 65context properties, setting with \with . . . . . . . . . . . . 65context, finding . . . . . . . . . . . . . . . . . . . . . . . . . . . . . . . . . . 94context, identifying correct . . . . . . . . . . . . . . . . . . . . . . . 94context, notation . . . . . . . . . . . . . . . . . . . . . . . . . . . . . . . . . 29context, specifying in lyric mode . . . . . . . . . . . . . . . . . 97context, Voice . . . . . . . . . . . . . . . . . . . . . . . . . . . . . . . . . . . . 48contexts explained . . . . . . . . . . . . . . . . . . . . . . . . . . . . . . . 58contexts, creating . . . . . . . . . . . . . . . . . . . . . . . . . . . . . . . . 59contexts, implicit . . . . . . . . . . . . . . . . . . . . . . . . . . . . . . . . . 41contexts, naming . . . . . . . . . . . . . . . . . . . . . . . . . . . . . . . . . 61controlling tuplets, slurs, phrasing slurs, and beams
manually . . . . . . . . . . . . . . . . . . . . . . . . . . . . . . . . . . . 121creating contexts . . . . . . . . . . . . . . . . . . . . . . . . . . . . . . . . . 59crescendo . . . . . . . . . . . . . . . . . . . . . . . . . . . . . . . . . . . . . . . . 24curly braces . . . . . . . . . . . . . . . . . . . . . . . . . . . . . . . . . . . . . . 18
Appendix C: LilyPond index 190
Ddecrescendo . . . . . . . . . . . . . . . . . . . . . . . . . . . . . . . . . . . . . . 24default properties, reverting to . . . . . . . . . . . . . . . . . . . 94direction property, example . . . . . . . . . . . . . 91, 108, 109distances . . . . . . . . . . . . . . . . . . . . . . . . . . . . . . . . . . . . . . . . 105dotted note . . . . . . . . . . . . . . . . . . . . . . . . . . . . . . . . . . . . . . 15double flat . . . . . . . . . . . . . . . . . . . . . . . . . . . . . . . . . . . . . . . 21double sharp . . . . . . . . . . . . . . . . . . . . . . . . . . . . . . . . . . . . . 21down . . . . . . . . . . . . . . . . . . . . . . . . . . . . . . . . . . . . . . . . . . . 108durations . . . . . . . . . . . . . . . . . . . . . . . . . . . . . . . . . . . . . . . . 15DynamicLineSpanner, example of overriding . . . . . 120dynamics . . . . . . . . . . . . . . . . . . . . . . . . . . . . . . . . . . . . . . . . 24dynamics, tweaking placement . . . . . . . . . . . . . . . . . . 114DynamicText, example of overriding . . . 115, 116, 120
Eengravers . . . . . . . . . . . . . . . . . . . . . . . . . . . . . . . . . . . . . . . . 61engravers, adding . . . . . . . . . . . . . . . . . . . . . . . . . . . . . . . . 67engravers, removing . . . . . . . . . . . . . . . . . . . . . . . . . . . . . . 67errors, common . . . . . . . . . . . . . . . . . . . . . . . . . . . . . . . . . . 19es . . . . . . . . . . . . . . . . . . . . . . . . . . . . . . . . . . . . . . . . . . . . . . . 21eses . . . . . . . . . . . . . . . . . . . . . . . . . . . . . . . . . . . . . . . . . . . . . 21example of writing a score . . . . . . . . . . . . . . . . . . . . . . . . 78example, first . . . . . . . . . . . . . . . . . . . . . . . . . . . . . . . . . . . . . 1examples, clickable . . . . . . . . . . . . . . . . . . . . . . . . . . . . . . . 19expression, music . . . . . . . . . . . . . . . . . . . . . . . . . . . . . . . . . 27expressions . . . . . . . . . . . . . . . . . . . . . . . . . . . . . . . . . . . . . . . 18expressions, parallel . . . . . . . . . . . . . . . . . . . . . . . . . . . . . . 28extender line . . . . . . . . . . . . . . . . . . . . . . . . . . . . . . . . . . . . . 32extra-offset property . . . . . . . . . . . . . . . . . . . . . . . . . . . . 118extra-offset property, example . . . . . . . . . . . . . . . . . . . 121extra-spacing-width . . . . . . . . . . . . . . . . . . . . . . . . . . . 115extra-spacing-width property . . . . . . . . . . . . . . . . . . . . 117extra-spacing-width property, example . . . . . 115, 116,
120
Ffermata, implementing in MIDI . . . . . . . . . . . . . . . . . 133file structure . . . . . . . . . . . . . . . . . . . . . . . . . . . . . . . . . . . . . 41files, tips for constructing . . . . . . . . . . . . . . . . . . . . . . . . 19fingering . . . . . . . . . . . . . . . . . . . . . . . . . . . . . . . . . . . . . . . . . 24fingering example . . . . . . . . . . . . . . . . . . . . . . . . . . 109, 110fingering, chords . . . . . . . . . . . . . . . . . . . . . . . . . . . . . . . . 108Fingering, example of overriding . . . . . . . . . . . . 109, 121fingering, placement . . . . . . . . . . . . . . . . . . . . . . . . . . . . . 108fingeringOrientations property, example . . . . . . . . . 110first example . . . . . . . . . . . . . . . . . . . . . . . . . . . . . . . . . . . . . . 1fixing overlapping notation . . . . . . . . . . . . . . . . . . . . . . 119flat . . . . . . . . . . . . . . . . . . . . . . . . . . . . . . . . . . . . . . . . . . . . . . 21flat, double . . . . . . . . . . . . . . . . . . . . . . . . . . . . . . . . . . . . . . 21font-series property, example . . . . . . . . . . . . . . . . . . . . 134font-shape property, example . . . . . . . . . . . . . . . . 96, 134font-size property, example . . . . . . . . . . . . . . . . . . . . . . . 90fontSize property, example . . . . . . . . . . . . . . . . . . . . . . 105fontSize, default and setting . . . . . . . . . . . . . . . . . . . . . . 65force-hshift property . . . . . . . . . . . . . . . . . . . . . . . . . . . . 117force-hshift property, example . . . . . . . . . . . . . . 123, 130
Ggrace . . . . . . . . . . . . . . . . . . . . . . . . . . . . . . . . . . . . . . . . . . . . 26grace notes . . . . . . . . . . . . . . . . . . . . . . . . . . . . . . . . . . . . . . . 26
grand staff . . . . . . . . . . . . . . . . . . . . . . . . . . . . . . . . . . . . . . . 30GrandStaff . . . . . . . . . . . . . . . . . . . . . . . . . . . . . . . . . . . . . . 30graphical objects . . . . . . . . . . . . . . . . . . . . . . . . . . . . . . . . . 80grob . . . . . . . . . . . . . . . . . . . . . . . . . . . . . . . . . . . . . . . . . . . . . 87grob sizing . . . . . . . . . . . . . . . . . . . . . . . . . . . . . . . . . . . . . . 115grobs . . . . . . . . . . . . . . . . . . . . . . . . . . . . . . . . . . . . . . . . . . . . 80grobs, moving colliding . . . . . . . . . . . . . . . . . . . . . . . . . . 116grobs, positioning . . . . . . . . . . . . . . . . . . . . . . . . . . . . . . . 121grobs, properties of . . . . . . . . . . . . . . . . . . . . . . . . . . . . . . . 92
Hhalf note . . . . . . . . . . . . . . . . . . . . . . . . . . . . . . . . . . . . . . . . . 15header . . . . . . . . . . . . . . . . . . . . . . . . . . . . . . . . . . . . . . . 38, 42header block . . . . . . . . . . . . . . . . . . . . . . . . . . . . . . . . . . . . . 38headers . . . . . . . . . . . . . . . . . . . . . . . . . . . . . . . . . . . . . . . . . . 38hiding objects . . . . . . . . . . . . . . . . . . . . . . . . . . . . . . . . . . . 132how to read the manual . . . . . . . . . . . . . . . . . . . . . . . . . . 19hymn structure . . . . . . . . . . . . . . . . . . . . . . . . . . . . . . . . . . 57hyphens . . . . . . . . . . . . . . . . . . . . . . . . . . . . . . . . . . . . . . . . . . 32
Iidentifiers . . . . . . . . . . . . . . . . . . . . . . . . . . . . . . . . . . . . . . . . 36implicit book block . . . . . . . . . . . . . . . . . . . . . . . . . . . . . . . 42implicit contexts . . . . . . . . . . . . . . . . . . . . . . . . . . . . . . . . . 41input format . . . . . . . . . . . . . . . . . . . . . . . . . . . . . . . . . . . . . 41interface . . . . . . . . . . . . . . . . . . . . . . . . . . . . . . . . . . . . . . 87, 96interface properties . . . . . . . . . . . . . . . . . . . . . . . . . . . . . . . 96Internals Reference . . . . . . . . . . . . . . . . . . . . . . . . . . . . . . . 92Internals Reference manual . . . . . . . . . . . . . . . . . . . . . . . 92Internals Reference, example of using . . . . . . . . . . . . . 92invisible objects . . . . . . . . . . . . . . . . . . . . . . . . . . . . . . . . . 132is . . . . . . . . . . . . . . . . . . . . . . . . . . . . . . . . . . . . . . . . . . . . . . . 21isis . . . . . . . . . . . . . . . . . . . . . . . . . . . . . . . . . . . . . . . . . . . . . 21italic, example . . . . . . . . . . . . . . . . . . . . . . . . . . . . . . . . . . . 96
Kkey . . . . . . . . . . . . . . . . . . . . . . . . . . . . . . . . . . . . . . . . . . . . . . 21key signature . . . . . . . . . . . . . . . . . . . . . . . . . . . . . . . . . . . . 21key signature, setting . . . . . . . . . . . . . . . . . . . . . . . . . . . . 21
Llayers . . . . . . . . . . . . . . . . . . . . . . . . . . . . . . . . . . . . . . . . . . . . 48layout . . . . . . . . . . . . . . . . . . . . . . . . . . . . . . . . . . . . . . . 42, 68layout block, effect of location . . . . . . . . . . . . . . . . . . . . 42layout object . . . . . . . . . . . . . . . . . . . . . . . . . . . . . . . . . . . . . 87layout objects, properties of . . . . . . . . . . . . . . . . . . . . . . 92layout vs. content . . . . . . . . . . . . . . . . . . . . . . . . . . . . . . . . 21length . . . . . . . . . . . . . . . . . . . . . . . . . . . . . . . . . . . . . . . . . . 105line comment . . . . . . . . . . . . . . . . . . . . . . . . . . . . . . . . . . . . 18lyric mode, specifying context . . . . . . . . . . . . . . . . . . . . 97lyricmode . . . . . . . . . . . . . . . . . . . . . . . . . . . . . . . . . . . . . . . 56lyrics . . . . . . . . . . . . . . . . . . . . . . . . . . . . . . . . . . . . . . . . . . . . 31Lyrics . . . . . . . . . . . . . . . . . . . . . . . . . . . . . . . . . . . . . . . 29, 56lyrics and beaming . . . . . . . . . . . . . . . . . . . . . . . . . . . . . . . 56lyrics and multiple staves . . . . . . . . . . . . . . . . . . . . . . . . . 36Lyrics context, creating . . . . . . . . . . . . . . . . . . . . . . . . . . 56lyrics, aligning . . . . . . . . . . . . . . . . . . . . . . . . . . . . . . . . . . . 32lyrics, linking to voice . . . . . . . . . . . . . . . . . . . . . . . . . . . . 56lyrics, multi-syllable words . . . . . . . . . . . . . . . . . . . . . . . 32lyricsto . . . . . . . . . . . . . . . . . . . . . . . . . . . . . . . . . . . . . . . . 56
Appendix C: LilyPond index 191
LyricText, example of overriding . . . . . . . . . . . . . 96, 134
MMacOS X, running LilyPond . . . . . . . . . . . . . . . . . . . . . . 2macros . . . . . . . . . . . . . . . . . . . . . . . . . . . . . . . . . . . . . . . . . . . 36magstep . . . . . . . . . . . . . . . . . . . . . . . . . . . . . . . . . . . . . . . . 105magstep function, example of using . . . . . . . . . . . . . . 105major . . . . . . . . . . . . . . . . . . . . . . . . . . . . . . . . . . . . . . . . . . . . 21manual beams . . . . . . . . . . . . . . . . . . . . . . . . . . . . . . . . . . . 25manual, reading . . . . . . . . . . . . . . . . . . . . . . . . . . . . . . . . . . 19manually controlling tuplets, slurs, phrasing slurs,
and beams . . . . . . . . . . . . . . . . . . . . . . . . . . . . . . . . . 121Manuals . . . . . . . . . . . . . . . . . . . . . . . . . . . . . . . . . . . . . . . . . . . 1markup . . . . . . . . . . . . . . . . . . . . . . . . . . . . . . . . . . . . . . . . . . . 25markup example . . . . . . . . . . . . . . . . . . . . . . . . . . . . . . . . 107markup text, allowing collisions . . . . . . . . . . . . . . . . . 114melisma . . . . . . . . . . . . . . . . . . . . . . . . . . . . . . . . . . . . . . . . . . 32metronome mark, tweaking placement . . . . . . . . . . . 112metronome marks . . . . . . . . . . . . . . . . . . . . . . . . . . . . . . . . 16MetronomeMark, example of overriding . . . . . 119, 133midi . . . . . . . . . . . . . . . . . . . . . . . . . . . . . . . . . . . . . . . . . . . . . 42minor . . . . . . . . . . . . . . . . . . . . . . . . . . . . . . . . . . . . . . . . . . . . 21modifying context properties . . . . . . . . . . . . . . . . . . . . . 62modifying templates . . . . . . . . . . . . . . . . . . . . . . . . . . . . . 69moving colliding grobs . . . . . . . . . . . . . . . . . . . . . . . . . . 116moving colliding objects . . . . . . . . . . . . . . . . . . . . . . . . . 116moving overlapping objects . . . . . . . . . . . . . . . . . . . . . . 116MultiMeasureRest, example of overriding . . . . . . . . 121multiple staves . . . . . . . . . . . . . . . . . . . . . . . . . . . . . . . 28, 29multiple staves and lyrics . . . . . . . . . . . . . . . . . . . . . . . . . 36multiple vocal verses . . . . . . . . . . . . . . . . . . . . . . . . . . . . . 57multiple voices . . . . . . . . . . . . . . . . . . . . . . . . . . . . . . . 31, 48music expression . . . . . . . . . . . . . . . . . . . . . . . . . . . . . . . . . 27music expression, compound . . . . . . . . . . . . . . . . . . 27, 43music, concurrent . . . . . . . . . . . . . . . . . . . . . . . . . . . . . . . . 48music, simultaneous . . . . . . . . . . . . . . . . . . . . . . . . . . . . . . 48
Nnaming contexts . . . . . . . . . . . . . . . . . . . . . . . . . . . . . . . . . 61naming conventions for objects . . . . . . . . . . . . . . . . . . . 88naming conventions for properties . . . . . . . . . . . . . . . . 88nesting music expressions . . . . . . . . . . . . . . . . . . . . . . . . 54nesting simultaneous constructs . . . . . . . . . . . . . . . . . . 54nesting voices . . . . . . . . . . . . . . . . . . . . . . . . . . . . . . . . . . . . 54neutral . . . . . . . . . . . . . . . . . . . . . . . . . . . . . . . . . . . . . . . . . 108new . . . . . . . . . . . . . . . . . . . . . . . . . . . . . . . . . . . . . . . . . . 29, 59new contexts . . . . . . . . . . . . . . . . . . . . . . . . . . . . . . . . . . . . . 59new Staff . . . . . . . . . . . . . . . . . . . . . . . . . . . . . . . . . . . . . . . . 29notating durations . . . . . . . . . . . . . . . . . . . . . . . . . . . . . . . 15notating rests . . . . . . . . . . . . . . . . . . . . . . . . . . . . . . . . . . . . 16notation context . . . . . . . . . . . . . . . . . . . . . . . . . . . . . . . . . 29notation, simple . . . . . . . . . . . . . . . . . . . . . . . . . . . . . . . . . . 13note collisions . . . . . . . . . . . . . . . . . . . . . . . . . . . . . . . . . . . . 55note column . . . . . . . . . . . . . . . . . . . . . . . . . . . . . . . . . . . . . 55note durations . . . . . . . . . . . . . . . . . . . . . . . . . . . . . . . . . . . 15note durations in chords . . . . . . . . . . . . . . . . . . . . . . . . . . 30note names . . . . . . . . . . . . . . . . . . . . . . . . . . . . . . . . . . . . . . 38note names, absolute . . . . . . . . . . . . . . . . . . . . . . . . . . . . . 38NoteColumn, example of overriding . . . . . . . . . 123, 130NoteHead, example of overriding . . . . 89, 90, 102, 141notes, spreading out with text . . . . . . . . . . . . . . . . . . . 114
Oobject . . . . . . . . . . . . . . . . . . . . . . . . . . . . . . . . . . . . . . . . . . . . 87object collision within a staff . . . . . . . . . . . . . . . . . . . . 121object properties . . . . . . . . . . . . . . . . . . . . . . . . . . . . . . . . . 87object, layout . . . . . . . . . . . . . . . . . . . . . . . . . . . . . . . . . . . . 87objects, aligning on a baseline . . . . . . . . . . . . . . . . . . . 120objects, changing size of . . . . . . . . . . . . . . . . . . . . . . . . . 102objects, graphical . . . . . . . . . . . . . . . . . . . . . . . . . . . . . . . . 80objects, hiding . . . . . . . . . . . . . . . . . . . . . . . . . . . . . . . . . . 132objects, invisible . . . . . . . . . . . . . . . . . . . . . . . . . . . . . . . . 132objects, making invisible . . . . . . . . . . . . . . . . . . . . . . . . 132objects, moving colliding . . . . . . . . . . . . . . . . . . . . . . . . 116objects, naming conventions . . . . . . . . . . . . . . . . . . . . . . 88objects, outside-staff . . . . . . . . . . . . . . . . . . . . . . . . . . . . 106objects, positioning . . . . . . . . . . . . . . . . . . . . . . . . . . . . . 121objects, removing . . . . . . . . . . . . . . . . . . . . . . . . . . . . . . . 132objects, size of . . . . . . . . . . . . . . . . . . . . . . . . . . . . . . . . . . 102objects, within-staff . . . . . . . . . . . . . . . . . . . . . . . . . . . . . 106once . . . . . . . . . . . . . . . . . . . . . . . . . . . . . . . . . . . . . . . . . 89, 94once override . . . . . . . . . . . . . . . . . . . . . . . . . . . . . . . . . . . . . 94oneVoice . . . . . . . . . . . . . . . . . . . . . . . . . . . . . . . . . . . . . . . . 52ossias . . . . . . . . . . . . . . . . . . . . . . . . . . . . . . . . . . . . . . . . . . . . 45ottava bracket . . . . . . . . . . . . . . . . . . . . . . . . . . . . . . . . . . 111outside-staff objects . . . . . . . . . . . . . . . . . . . . . . . . . . . . . 106outside-staff-priority property, example . . . . . 113, 114overlapping notation . . . . . . . . . . . . . . . . . . . . . . . . . . . . 119override . . . . . . . . . . . . . . . . . . . . . . . . . . . . . . . . . . . . . . . . 88override command . . . . . . . . . . . . . . . . . . . . . . . . . . . . . . . 88override example . . . . . . . . . . . . . . . . . . . . . . . . . . . . . . . . . 92override syntax . . . . . . . . . . . . . . . . . . . . . . . . . . . . . . . . . . . 88overrideProperty . . . . . . . . . . . . . . . . . . . . . . . . . . . . . . . 90overrideProperty command . . . . . . . . . . . . . . . . . . . . . . . 90overriding once only . . . . . . . . . . . . . . . . . . . . . . . . . . . . . . 94
Ppadding . . . . . . . . . . . . . . . . . . . . . . . . . . . . . . . . . . . . 116, 119padding property . . . . . . . . . . . . . . . . . . . . . . . . . . . . . . . 116padding property, example . . . . . . . . . . . . . . . . . . . . . . 119parallel expressions . . . . . . . . . . . . . . . . . . . . . . . . . . . . . . . 28parallel expressions and relative notes . . . . . . . . . . . . 28partial . . . . . . . . . . . . . . . . . . . . . . . . . . . . . . . . . . . . . . . . . . 26partial measure . . . . . . . . . . . . . . . . . . . . . . . . . . . . . . . . . . 26PDF file . . . . . . . . . . . . . . . . . . . . . . . . . . . . . . . . . . . . . . . . . . 1phrasing slur . . . . . . . . . . . . . . . . . . . . . . . . . . . . . . . . . . . . . 23phrasing slurs, controlling manually . . . . . . . . . . . . . 121PhrasingSlur, example of overriding . . . . . . . . . . . . . 122piano staff . . . . . . . . . . . . . . . . . . . . . . . . . . . . . . . . . . . . . . . 30PianoStaff . . . . . . . . . . . . . . . . . . . . . . . . . . . . . . . . . . . . . . 30pickup . . . . . . . . . . . . . . . . . . . . . . . . . . . . . . . . . . . . . . . . . . . 26pitches . . . . . . . . . . . . . . . . . . . . . . . . . . . . . . . . . . . . . . . . . . . 13pitches, absolute values . . . . . . . . . . . . . . . . . . . . . . . . . . . 38polyphony . . . . . . . . . . . . . . . . . . . . . . . . . . . . . . . . 28, 31, 48polyphony and relative note entry . . . . . . . . . . . . . . . . 50positioning grobs . . . . . . . . . . . . . . . . . . . . . . . . . . . . . . . . 121positioning objects . . . . . . . . . . . . . . . . . . . . . . . . . . . . . . 121positions property . . . . . . . . . . . . . . . . . . . . . . . . . . . . . . . 118positions property, example . . . . . . . . . . . . . . . . . . . . . 122properties in interfaces . . . . . . . . . . . . . . . . . . . . . . . . . . . 96properties of grobs . . . . . . . . . . . . . . . . . . . . . . . . . . . . . . . 92properties of layout objects . . . . . . . . . . . . . . . . . . . . . . . 92properties operating in contexts . . . . . . . . . . . . . . . . . . 62properties, naming conventions . . . . . . . . . . . . . . . . . . . 88properties, object . . . . . . . . . . . . . . . . . . . . . . . . . . . . . . . . 87
Appendix C: LilyPond index 192
properties, sub-properties . . . . . . . . . . . . . . . . . . . . . . . . 80property types . . . . . . . . . . . . . . . . . . . . . . . . . . . . . . . . . . . 97
Qquarter note . . . . . . . . . . . . . . . . . . . . . . . . . . . . . . . . . . . . . 15quote, single . . . . . . . . . . . . . . . . . . . . . . . . . . . . . . . . . . . . . 13
Rreading the manual . . . . . . . . . . . . . . . . . . . . . . . . . . . . . . 19rehearsal marks, tweaking placement . . . . . . . . . . . . 112relative . . . . . . . . . . . . . . . . . . . . . . . . . . . . . . . . . . . . . . . . 13relative mode . . . . . . . . . . . . . . . . . . . . . . . . . . . . . . . . . . . . 13relative mode, and accidentals . . . . . . . . . . . . . . . . . . . . 13relative note entry and polyphony . . . . . . . . . . . . . . . . 50relative notes and parallel expressions . . . . . . . . . . . . 28relative notes and simultaneous music . . . . . . . . . . . . 28remove . . . . . . . . . . . . . . . . . . . . . . . . . . . . . . . . . . . . . . . . . . . 67removing engravers . . . . . . . . . . . . . . . . . . . . . . . . . . . . . . . 67removing objects . . . . . . . . . . . . . . . . . . . . . . . . . . . . . . . . 132rest . . . . . . . . . . . . . . . . . . . . . . . . . . . . . . . . . . . . . . . . . . . . . . 16rest, spacer . . . . . . . . . . . . . . . . . . . . . . . . . . . . . . . . . . . . . . 31revert . . . . . . . . . . . . . . . . . . . . . . . . . . . . . . . . . . . . . . . 89, 94revert command . . . . . . . . . . . . . . . . . . . . . . . . . . . . . . . . . . 89reverting to a single voice . . . . . . . . . . . . . . . . . . . . . . . . 53rgb colors . . . . . . . . . . . . . . . . . . . . . . . . . . . . . . . . . . . . . . . 101rgb-color . . . . . . . . . . . . . . . . . . . . . . . . . . . . . . . . . . . . . . 101rhythms . . . . . . . . . . . . . . . . . . . . . . . . . . . . . . . . . . . . . . . . . 15right-padding property . . . . . . . . . . . . . . . . . . . . . 116, 119right-padding property, example . . . . . . . . . . . . . . . . . 119running LilyPond under MacOS X . . . . . . . . . . . . . . . . . 2running LilyPond under Unix . . . . . . . . . . . . . . . . . . . . 12running LilyPond under Windows . . . . . . . . . . . . . . . . . 6
SSATB structure . . . . . . . . . . . . . . . . . . . . . . . . . . . . . . . . . . 57SATB template . . . . . . . . . . . . . . . . . . . . . . . . . . . . . . . . . . 72score . . . . . . . . . . . . . . . . . . . . . . . . . . . . . . . . . . . . . . . . 41, 43Score . . . . . . . . . . . . . . . . . . . . . . . . . . . . . . . . . . . . . . . . . . . . 29score block, contents of . . . . . . . . . . . . . . . . . . . . . . . . . . . 43score, example of writing . . . . . . . . . . . . . . . . . . . . . . . . . 78scores, multiple . . . . . . . . . . . . . . . . . . . . . . . . . . . . . . . . . . 42Script, example of overriding . . . . . . . . . . . . . . . . . . . . 119self-alignment-X property . . . . . . . . . . . . . . . . . . . . . . . 117self-alignment-X property, example . . . . . . . . . . . . . . 120set . . . . . . . . . . . . . . . . . . . . . . . . . . . . . . . . . . . . . . . . . . . . . . 62setting properties within contexts . . . . . . . . . . . . . . . . 62sharp . . . . . . . . . . . . . . . . . . . . . . . . . . . . . . . . . . . . . . . . . . . . 21sharp, double . . . . . . . . . . . . . . . . . . . . . . . . . . . . . . . . . . . . 21shift commands . . . . . . . . . . . . . . . . . . . . . . . . . . . . . . . . . . 55shiftOff . . . . . . . . . . . . . . . . . . . . . . . . . . . . . . . . . . . . . . . . 55shiftOn . . . . . . . . . . . . . . . . . . . . . . . . . . . . . . . . . . . . . . . . . . 55shiftOnn . . . . . . . . . . . . . . . . . . . . . . . . . . . . . . . . . . . . . . . . 55shiftOnnn . . . . . . . . . . . . . . . . . . . . . . . . . . . . . . . . . . . . . . . 55simple notation . . . . . . . . . . . . . . . . . . . . . . . . . . . . . . . . . . 13simultaneous music . . . . . . . . . . . . . . . . . . . . . . . . . . . . . . . 48simultaneous music and relative notes . . . . . . . . . . . . 28single staff polyphony . . . . . . . . . . . . . . . . . . . . . . . . . . . . 31size of objects . . . . . . . . . . . . . . . . . . . . . . . . . . . . . . . . . . . 102size, changing . . . . . . . . . . . . . . . . . . . . . . . . . . . . . . . . . . . 105sizing grobs . . . . . . . . . . . . . . . . . . . . . . . . . . . . . . . . . . . . . 115slur . . . . . . . . . . . . . . . . . . . . . . . . . . . . . . . . . . . . . . . . . . . . . . 23
Slur example of overriding . . . . . . . . . . . . . . . . . . . . . . . . 93Slur, example of overriding . . . . . . . . . . . . . . . . . . . 94, 95slur, phrasing . . . . . . . . . . . . . . . . . . . . . . . . . . . . . . . . . . . . 23slurs and articulations . . . . . . . . . . . . . . . . . . . . . . . . . . . 113slurs and outside-staff-priority . . . . . . . . . . . . . . . . . . . 113slurs crossing brackets . . . . . . . . . . . . . . . . . . . . . . . . . . . . 49slurs versus ties . . . . . . . . . . . . . . . . . . . . . . . . . . . . . . . . . . 23slurs, controlling manually . . . . . . . . . . . . . . . . . . . . . . 121songs . . . . . . . . . . . . . . . . . . . . . . . . . . . . . . . . . . . . . . . . . . . . 31spacer rest . . . . . . . . . . . . . . . . . . . . . . . . . . . . . . . . . . . . . . . 31spacing notes . . . . . . . . . . . . . . . . . . . . . . . . . . . . . . . . . . . . 55spanner . . . . . . . . . . . . . . . . . . . . . . . . . . . . . . . . . . . . . . . . . . 87spanners . . . . . . . . . . . . . . . . . . . . . . . . . . . . . . . . . . . . . . . . 111staccato . . . . . . . . . . . . . . . . . . . . . . . . . . . . . . . . . . . . . . . . . . 24Staff . . . . . . . . . . . . . . . . . . . . . . . . . . . . . . . . . . . . . . . . . . . . 29staff group . . . . . . . . . . . . . . . . . . . . . . . . . . . . . . . . . . . . . . . 30staff line spacing, changing . . . . . . . . . . . . . . . . . . . . . . 105staff, choir . . . . . . . . . . . . . . . . . . . . . . . . . . . . . . . . . . . . . . . 30staff, grand . . . . . . . . . . . . . . . . . . . . . . . . . . . . . . . . . . . . . . 30staff, piano . . . . . . . . . . . . . . . . . . . . . . . . . . . . . . . . . . . . . . . 30staff, positioning . . . . . . . . . . . . . . . . . . . . . . . . . . . . . . . . . 46staff-padding property . . . . . . . . . . . . . . . . . . . . . . . . . . 116staff-padding property, example . . . . . . . . . . . . . . . . . 120staff-position property . . . . . . . . . . . . . . . . . . . . . . . . . . 117staff-position property, example . . . . . . . . . . . . 121, 129staff-space property, example . . . . . . . . . . . . . . . . . . . . 105StaffSymbol, example of overriding . . . . . . . . . 102, 105startTextSpan . . . . . . . . . . . . . . . . . . . . . . . . . . . . . . . . . . 111staves, multiple . . . . . . . . . . . . . . . . . . . . . . . . . . . . . . . 28, 29staves, stretchability . . . . . . . . . . . . . . . . . . . . . . . . . . . . . 80staves, temporary . . . . . . . . . . . . . . . . . . . . . . . . . . . . . . . . 45stem directions and voices . . . . . . . . . . . . . . . . . . . . . . . . 51stem down . . . . . . . . . . . . . . . . . . . . . . . . . . . . . . . . . . . . . . . 51stem length, changing . . . . . . . . . . . . . . . . . . . . . . . . . . . 105stem up . . . . . . . . . . . . . . . . . . . . . . . . . . . . . . . . . . . . . . . . . . 51Stem, example of overriding . . . . . . . 102, 108, 130, 132stencil property . . . . . . . . . . . . . . . . . . . . . . . . . . . . . . . . . . 98stencil property, example . . 98, 99, 100, 103, 105, 119,
133stencil property, use of . . . . . . . . . . . . . . . . . . . . . . . . . . 133stopTextSpan . . . . . . . . . . . . . . . . . . . . . . . . . . . . . . . . . . . 111stretchability of staves . . . . . . . . . . . . . . . . . . . . . . . . . . . 80StringNumber, example of overriding . . . . . . . . . . . . 120sub-properties . . . . . . . . . . . . . . . . . . . . . . . . . . . . . . . . . . . . 80
Ttemplate, modifying . . . . . . . . . . . . . . . . . . . . . . . . . . . . . . 69template, SATB . . . . . . . . . . . . . . . . . . . . . . . . . . . . . . . . . . 72template, writing your own . . . . . . . . . . . . . . . . . . . . . . . 78templates . . . . . . . . . . . . . . . . . . . . . . . . . . . . . . . . . . . . . . . . 19tempo . . . . . . . . . . . . . . . . . . . . . . . . . . . . . . . . . . . . . . . . . . . . 16tempo marks . . . . . . . . . . . . . . . . . . . . . . . . . . . . . . . . . . . . . 16temporary staves . . . . . . . . . . . . . . . . . . . . . . . . . . . . . . . . . 45tenor . . . . . . . . . . . . . . . . . . . . . . . . . . . . . . . . . . . . . . . . . . . . 17text editors . . . . . . . . . . . . . . . . . . . . . . . . . . . . . . . . . . . . . . . 1text property, example . . . . . . . . . . . . . . . . . . . . . . 91, 119text spanner . . . . . . . . . . . . . . . . . . . . . . . . . . . . . . . . . . . . 111text, adding . . . . . . . . . . . . . . . . . . . . . . . . . . . . . . . . . . . . . . 25textLengthOff . . . . . . . . . . . . . . . . . . . . . . . . . . . . . . . . . . 114textLengthOn . . . . . . . . . . . . . . . . . . . . . . . . . . . . . . . . . . . 114TextScript, example of overriding . . . . . . . . . . . 113, 114TextSpanner, example of overriding . . . . . . . . . 111, 112thickness . . . . . . . . . . . . . . . . . . . . . . . . . . . . . . . . . . . . . . . . 105
Appendix C: LilyPond index 193
thickness property, example . . . . . . . . . . . . . . . 93, 94, 95tie . . . . . . . . . . . . . . . . . . . . . . . . . . . . . . . . . . . . . . . . . . . . . . . 23Tie, example of overriding . . . . . . . . . . . . . . . . . . . . . . . 129ties crossing brackets . . . . . . . . . . . . . . . . . . . . . . . . . . . . . 49time . . . . . . . . . . . . . . . . . . . . . . . . . . . . . . . . . . . . . . . . . . . . . 16time signature . . . . . . . . . . . . . . . . . . . . . . . . . . . . . . . . . . . 16times . . . . . . . . . . . . . . . . . . . . . . . . . . . . . . . . . . . . . . . . . . . . 26TimeSignature, example of overriding . . . . . . 100, 102,
103, 104, 105tips for constructing files . . . . . . . . . . . . . . . . . . . . . . . . . 19title . . . . . . . . . . . . . . . . . . . . . . . . . . . . . . . . . . . . . . . . . . . . . . 38transparency . . . . . . . . . . . . . . . . . . . . . . . . . . . . . . . . . . . . 100transparent property . . . . . . . . . . . . . . . . . . . . . . . . . . . . 100transparent property, example . . . . . 91, 100, 130, 132,
133transparent property, use of . . . . . . . . . . . . . . . . . . . . . 132treble . . . . . . . . . . . . . . . . . . . . . . . . . . . . . . . . . . . . . . . . . . . . 17triplet bracket . . . . . . . . . . . . . . . . . . . . . . . . . . . . . . . . . . . 91triplets . . . . . . . . . . . . . . . . . . . . . . . . . . . . . . . . . . . . . . . . . . . 26triplets, nested . . . . . . . . . . . . . . . . . . . . . . . . . . . . . . . . . . . 91troubleshooting . . . . . . . . . . . . . . . . . . . . . . . . . . . . . . . . . . 19tuplet beams, controlling manually . . . . . . . . . . . . . . 121tuplet bracket . . . . . . . . . . . . . . . . . . . . . . . . . . . . . . . . . . . . 91tuplet-number function, example . . . . . . . . . . . . . . . . . 91TupletBracket . . . . . . . . . . . . . . . . . . . . . . . . . . . . . . . . . . . 91TupletNumber, example of overriding . . . . . . . . . . . . . 91tuplets . . . . . . . . . . . . . . . . . . . . . . . . . . . . . . . . . . . . . . . . . . . 26tuplets, nested . . . . . . . . . . . . . . . . . . . . . . . . . . . . . . . . . . . 91tweak . . . . . . . . . . . . . . . . . . . . . . . . . . . . . . . . . . . . . . . . . . . . 90tweak command . . . . . . . . . . . . . . . . . . . . . . . . . . . . . . . . . . 90tweaking bar number placement . . . . . . . . . . . . . . . . . 112tweaking dynamics placement . . . . . . . . . . . . . . . . . . . 114tweaking methods . . . . . . . . . . . . . . . . . . . . . . . . . . . . . . . . 88tweaking metronome mark placement . . . . . . . . . . . 112tweaking rehearsal mark placement . . . . . . . . . . . . . . 112tweaks, using variables for . . . . . . . . . . . . . . . . . . . . . . . 134tying notes across voices . . . . . . . . . . . . . . . . . . . . . . . . 132
Uunderscore . . . . . . . . . . . . . . . . . . . . . . . . . . . . . . . . . . . . . . . 32Unix, running LilyPond . . . . . . . . . . . . . . . . . . . . . . . . . . 12unset . . . . . . . . . . . . . . . . . . . . . . . . . . . . . . . . . . . . . . . . . . . . 62up . . . . . . . . . . . . . . . . . . . . . . . . . . . . . . . . . . . . . . . . . . . . . . 108using variables . . . . . . . . . . . . . . . . . . . . . . . . . . . . . . . . . . . 36using variables for tweaks . . . . . . . . . . . . . . . . . . . . . . . 134
Vvariables . . . . . . . . . . . . . . . . . . . . . . . . . . . . . . . . . . 36, 42, 83variables, characters allowed in . . . . . . . . . . . . . . . . . . . 36variables, defining . . . . . . . . . . . . . . . . . . . . . . . . . . . . . . . . 36variables, using . . . . . . . . . . . . . . . . . . . . . . . . . . . . . . . . . . 36variables, using for tweaks . . . . . . . . . . . . . . . . . . . . . . . 134verses, multiple vocal . . . . . . . . . . . . . . . . . . . . . . . . . . . . . 57version . . . . . . . . . . . . . . . . . . . . . . . . . . . . . . . . . . . . . . . . . . . 18version number . . . . . . . . . . . . . . . . . . . . . . . . . . . . . . . . . . 18versioning . . . . . . . . . . . . . . . . . . . . . . . . . . . . . . . . . . . . . . . . 18viewing music . . . . . . . . . . . . . . . . . . . . . . . . . . . . . . . . . . . . . 1vocal score structure . . . . . . . . . . . . . . . . . . . . . . . . . . . . . 56vocal scores with multiple verses . . . . . . . . . . . . . . . . . . 57Voice . . . . . . . . . . . . . . . . . . . . . . . . . . . . . . . . . . . . . . . . . . . . 29Voice context . . . . . . . . . . . . . . . . . . . . . . . . . . . . . . . . . . . . 48voice contexts, creating . . . . . . . . . . . . . . . . . . . . . . . . . . . 52voiceFour . . . . . . . . . . . . . . . . . . . . . . . . . . . . . . . . . . . . . . . 52voiceOne . . . . . . . . . . . . . . . . . . . . . . . . . . . . . . . . . . . . . . . . 52voices and stem directions . . . . . . . . . . . . . . . . . . . . . . . . 51voices crossing brackets . . . . . . . . . . . . . . . . . . . . . . . . . . 49voices vs. chords . . . . . . . . . . . . . . . . . . . . . . . . . . . . . . . . . 48voices, more on one staff . . . . . . . . . . . . . . . . . . . . . . . . . 31voices, multiple . . . . . . . . . . . . . . . . . . . . . . . . . . . . . . . . . . 48voices, naming . . . . . . . . . . . . . . . . . . . . . . . . . . . . . . . . . . . 49voices, nesting . . . . . . . . . . . . . . . . . . . . . . . . . . . . . . . . . . . 54voices, reverting to single . . . . . . . . . . . . . . . . . . . . . . . . . 53voices, temporary . . . . . . . . . . . . . . . . . . . . . . . . . . . . . . . . 54voiceThree . . . . . . . . . . . . . . . . . . . . . . . . . . . . . . . . . . . . . . 52voiceTwo . . . . . . . . . . . . . . . . . . . . . . . . . . . . . . . . . . . . . . . . 52
Wwhitespace insensitive . . . . . . . . . . . . . . . . . . . . . . . . . . . . 18whole note . . . . . . . . . . . . . . . . . . . . . . . . . . . . . . . . . . . . . . . 15Windows, running LilyPond . . . . . . . . . . . . . . . . . . . . . . . 6with . . . . . . . . . . . . . . . . . . . . . . . . . . . . . . . . . . . . . . . . . . . . . 65within-staff objects . . . . . . . . . . . . . . . . . . . . . . . . . . . . . . 106words with multiple syllables in lyrics . . . . . . . . . . . . 32writing a score, example . . . . . . . . . . . . . . . . . . . . . . . . . . 78
XX11 colors . . . . . . . . . . . . . . . . . . . . . . . . . . . . . . . . . . . . . . 101x11-color . . . . . . . . . . . . . . . . . . . . . . . . . . . . . . . . . . . . . . 101x11-color function, example of using . . . . . . . . . . . . . 141x11-color, example of using . . . . . . . . . . . . . . . . . . . . . . 102