lesson plan wall framing, doors performance objective
TRANSCRIPT

Lesson Plan
Course Title: Building Trades
Session Title: Wall Framing, Doors
Performance Objective: Upon completion of this assignment, the student will be able to properly identify, gather sizing data, layout, size and assemble a door-framing unit. The student will communicate using proper framing terminology. Specific Objectives:
1) 2) 3) 4)
5) 6) 7) 8)
Define and use terminology related to wall framing. Identify and collect materials and tools needed to complete the assignment. Evaluate and explain areas in this assignment where safety is needed. List the steps and procedures to be successful A) Use the blue prints to locate door openings and sizing data. B) Gather materials and tools to be used. C) Work together as a group. D) Practice safety. E) Ability to Measure and Layout F) Ability to size and cut. G) Ability to assemble unit. H) Define terminology and understand what and where it is used. I) Pass a written test. Demonstrate the ability to perform the task- assignment Demonstrate proper safety practices though out the lesson / assignment. Participate in quality control through each step of the assignment. Clean up and organize the materials, tools, and lab areas.
Preparation
TEKS Correlations: §130.54. Building Maintenance Technology (c) Students will develop knowledge and skills pertaining to employment, safety, interpreting schematics, fuses, circuit breakers, lamps, fixtures, electrical test equipment, HVAC, copper/plastic piping and fittings, conventional and electric thermostats and landscaping. (2) Students will understand all aspects of contract documents, including architectural, engineering and shop drawings. (9) Students will install metal doors and related hardware in steel-framed, wood-framed, and masonry walls. §130.51. Construction Technology (c) Knowledge and skills. (9) The student gains knowledge of various types of windows, skylights, and exterior doors; and
(h) install a pre-hung exterior door.
Interdisciplinary Correlations: Accommodations for Learning Differences:
Lesson Plan/Curriculum Modifications Checklist

Guidelines and Procedures for Adapting Instructional Materials Instructor Format for Curriculum Customization for Learning Differences Sample Curriculum Customization for Learning Differences
Instructor/Trainer References:
Carpentry 3RD Edition. Delmar / Thomas Learning. Floyo Vogt / Kathy Sutphin. Carpentry. Delmar / Lewis. Timothy Lockley. Carpentry and Building construction. Glencoe / McGraw - Hill. Feirer / Hutchings / Feirer. Modern Carpentry. Goodheart / Willcox. Willis H. Wagner / Michael B. Kope. Curriculum, Building Trades East Texas State University. Commerce, Tx. Curriculum, Building Trades. Thomas Edison Vocational Technical H.S. Elisabeth, New Jersey Video: #3 Wood Floor Systems ? Wood Frame Walls. Thomas/Delmar Learning
Instructional Aids: Materials Needed:
1) Method for 2" x 4" Thick wall A) Quantity 4 2" x 4" x 8" #2 yellow pine
B) Quantity 24 #10 V. C. Nails C) Quantity 12 #12 V. C. Nails D) Quantity 1 Pre built door header from Lesson #6
2) Method for 2" x 6" Thick wall A) Quantity 4 2" x 6" x 8" #2 yellow pine B) Quantity 24 #10 V. C. Nails C) Quantity 12 #12 V.C. Nails D) Quantity 1
Equipment Needed:
1) Skillsaw 2) Extension Cord 3) Framing Square
Pre built door header from Lesson #6
4) 25' Tape Measure 5) Utility Knife 6) Carpentry Pencil 7) Speed Square 8) Safety Glasses 9) 20 oz. Straight claw hammer 10) Cats claw

11) Ripping Bar
Learner:
Read; Carpentry and Building Construction: Unit 30, Wall Framing Complete Worksheet: Unit 28, Wall Framing Students watch video on Wall Framing listed above or similar.
Introduction
Introduction (LSI Quadrant I):
• Ask: How many students have looked at a set of blueprints and are able to take blueprints information and construct a wall?
(show of hands) • Ask; What is some of the information we find in a set of blueprints needed to build a
wall section? Example: • 16" on center studs • Wall thickness • Rough openings • Intersecting walls • Studs line - up with floor joists • Studs line - up with Rafters / Ceiling Joists
• Ask; Does any one have any experiences framing a wall section? Shed, Garage, House
• Introduction; The door framing unit provides a type of "rough opening" found in a wall. The door rough openings are located in interior and/or exterior walls and are used to provide a passage way through a wall. Door framing units can be used with or without a door.
Outline
Outline (LSI Quadrant II):
1) • •••••••••
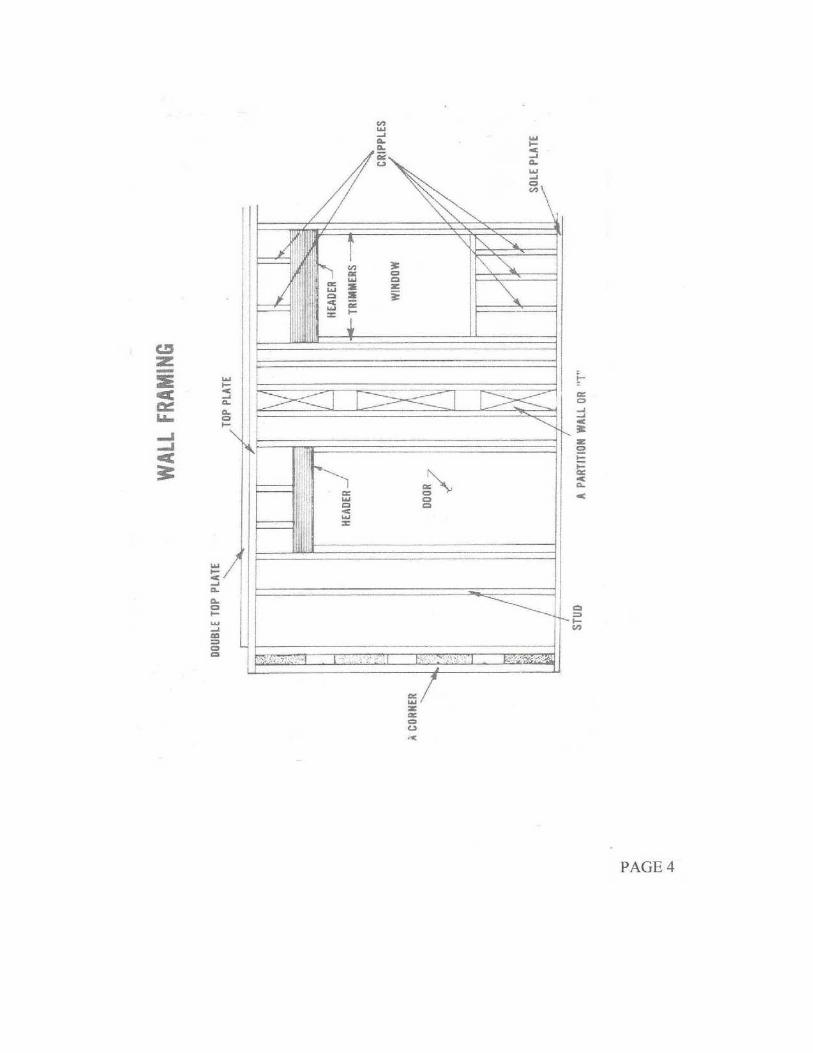
Define the Terminology Blueprints, Floor plans, Schedules Lay outs Sole (Bottom) plates Top plates Double top plates On center Rough opening, windows, doors, fireplaces Intersecting walls Corner post Layout symbols, X, T, C, D, K, S,

• Cripples • Trimmers • Butt-walls • By-walls • Header (Review with the students, students should have the following definitions) • Blueprints are the plans that the Architect uses to communicates to a Builder,
through lines, symbols, and dimensions, a project to be constructed. • Layout is the process of marking the locations of framing members to be cut and
assembled. • Sole (Bottom) plate is a framing member, laid horizontally to connect and support the
lower ends of the vertical-framing members. The sole plate is then secured to the floor.
• Top plate is a framing member, laid horizontally to connect and support the upper ends of the vertical-framing members.
• Double top plates lay horizontally on top of the top plate to help keep the wall straight; to tie connecting walls together, and as support strength for the rafters and/or floor joists to rest upon.
• On center is a layout that is in the middle of a framing, or sheathing, or other materials or layouts such as intersecting walls, rough opening for windows, doors, and fireplaces.
• Rough openings are areas in framing that are left open for doors, windows, and fireplaces.
• Intersecting walls, (partition walls), (king studs), are where two or more walls cross one another to form a "T" or "X" shape intersection.
• Corner post, where two walls come together to form a "L" shape corner that can be located interiorly and exteriorly on a structure.
• Layout symbols, "D" double stud, "X" stud, "C" cripple stud, "T" trimmer, "S" spacer, "K" king stud, intersecting wall.
• Cripples are short studs that are placed 16" or 24" on center where a full length stud can not be used, found mostly above headers and below sills.
• Trimmers are studs, which support the headers over a rough opening. • Studs are slender vertical members, usually 2"x4" or 2"x6" materials that are placed
16" or 24" on center. Studs support the top plates and provide a surface for sheathing to be nailed.
• Butt-walls, are walls that fit in between By-walls. • By-walls, are walls that run from the outside of the sub-floor to the outside edge of
the opposite end of the sub-floor. • Headers are used over door and window openings. Headers provide strength to the
double top plate for floor joists, ceiling joists, and rafters.
2.The students will use the blueprints with the Instructor to obtain the following Information. (Use Handouts page 1 and 2.) • The students will note that most doors and windows are laid-out to their centers.
(middle of the door / window.) • On the blue prints, the student should notice a door and a window schedule.

Most blue prints have these. A) Note that, the window schedule provides the rough opening size while the
door schedule provides the actual size of the door.
• Calculations for sizing. A) At this point, the students will be using the Handout #2 sheet to view the
formula for sizing the materials and collecting the quantity of materials that will be needed to complete the assignment.
• The students will be building a door framing unit for a 2" x 4" thick wall.
3.With the information obtained from step 2, the students will gather the needed Materials for the layout, sizing, and assembling of an assigned door framing unit.
• Four 2"x4"x8', #2 yellow pine are to be used to form the trimmers and precut studs that will support the header.
• Students will select materials free of the following; a. Warp b. Checks - Cracks c. Bow d. Twist e. Cup f. Knots g. Other damages
4.Using the information handout sheet #2, "Material List", have the students square-up and cut to length the two of the 2"x4"x8' pieces of #2 yellow pine material to the proper precut stud length. Second, have the students cut the other two 2"x4"x8' #2 yellow pine to the desired trimmer stud lengths. • Gather together the selected materials and the tools needed to complete the task. • Review with the students all areas and operations where safety practices may be
required. • Square-up one end of each board using a speed square and a skill-saw to remove
about a forth of an inch. • Measure from the squared end the size needed for the precut stud length, 92-5/8",
and cut off the waste. • Repeat the steps above to have two exact sized pieces. • Next, measure from the squared end of the remaining boards the size needed for the
trimmer stud length, 80-3/4", and cut off the waste. • Repeat the steps above to have two exact sized pieces. 5.Assemble the door framing unit. • The students will place one precut stud and trimmer stud face to face on top of each
other, aligning one end. • Aligned and ready, the students will start with two #10 V. C. nails and nail through
the face of the trimmer stud, at the flushed aligned end, and nail the corners together. The student will start with two nails and proceed to nail every 8 to 10 inches back and forth along the edge of the face of the trimmer stud until they finish with two nails at the other end's corners.
• The students will make two sets of Precut/trimmer studs. • *Note, at this time if Lesson #6 on the "Header" wasn't started or completed, please
complete it!

• • 6. • •• 7. •••
Align the pre-assembled header on top of the trimmer stud ends where the precut studs pass the header ends. The header face should align smoothly with the edge of the precut stud and the trimmer stud. Using six #12 V. C. nails on each side, nail six nails through each precut stud face into the header end, three nails in each header 2"x6" end. *Note while nailing keep checking to make sure the edges, faces, and ends stay aligned. Have students check for quality control. All measurements within a plus or minus of a sixteenth. Layout lines are sharp and straight. Proper labeling of parts. All students will participate in clean up. Proper cleaning and storage of tools. Organize and store both assignment and extra materials. Sweep up work areas and dispose of waste.
Application
Guided Practice (LSI Quadrant III):
The students will observe, ask questions, and analyze the demonstration to be presented by the Instructor. The Instructor will use the data compiled from Handout page1, and 2 to provide required measurements. The Students will check-off on Handout page 2 the step of procedures as completed. Handout page 4 and 5 gives the student a view of the "big picture". Handout pages 6 shows the window heights using a story pole. Handout 7 supports some layout and assembling procedures.
Independent Practice (LSI Quadrant III):
At this phase the students will work collaboratively in small groups to start and complete the assignment. Each group will be given the Handout Packets, pages 1-7 to use to achieve the group's objective.
Summary
Review (LSI Quadrants I and IV):
Review the student's Data sheet to evaluate if the group compiled the correct data and followed the correct procedures to complete the assignment.
Evaluation
Informal Assessment (LSI Quadrant III):

The Instructor will monitor each group as they independently work to complete the assignment. If a re-teach is needed on any information or procedure, all the groups will stop and participate in the re-teach.
Formal Assessment (LSI Quadrant III, IV):
The students will be assessed by the accuracy of the completed assignment. The Instructor will be looking for correct layout measurements, sharpness of lines, proper labeling, accurate sizing, square-ness of assembly, craftsmanship, etc. 100 points will be the high and minus 5 points for each mistake found.
Extension/Enrichment (LSI Quadrant IV):
The students will use the correctly sized and assembled door-framing unit in a future lesson on wall assembly.