lesson 4: assembly basics - jackson county school system 4... · lesson 4: assembly basics an...
TRANSCRIPT

An Introduction to Engineering Design with SolidWorks Student Workbook 35
4
Lesson 4: Assembly Basics
Goals of This Lesson
� Understand how parts and assemblies are related.
� Create and modify the part Tutor2 and create the Tutor assembly.
Before Beginning This Lesson
� Complete the tutor1 part in the previous lesson.
Resources for This Lesson
This lesson plan corresponds to Lesson 2– Assemblies in the SolidWorks Online Tutorials. For more information about the Online Tutorials, See “Online Tutorials” on page v.
Additional information about assemblies can be found in the Assembly Mates lesson in the SolidWorks Online Tutorials.
Tutor1 Tutor2
Tutor assembly

Lesson 4: Assembly Basics
36 An Introduction to Engineering Design with SolidWorks Student Workbook
Active Learning Exercises — Creating an Assembly
Follow the instructions in Getting Started: Lesson 2– Assemblies in the SolidWorks Online Tutorials. In this lesson you will first create Tutor2. Then you will create an assembly.
5 Minute Assessment
1 What features did you use to create Tutor2? ________________________________
_____________________________________________________________________
2 What two sketch tools did you use to create the extruded cut feature? ______________
_____________________________________________________________________
3 What does the Convert Entities sketch tool do?_______________________________
_____________________________________________________________________
4 What does the Offset Entities sketch tool do? ________________________________
_____________________________________________________________________
5 In an assembly, parts are referred to as: _____________________________________
_____________________________________________________________________
6 True or False. A fixed component is free to move. _____________________________
_____________________________________________________________________
7 True or False. Mates are relationships that align and fit components together in an assembly. _____________________________________________________________
_____________________________________________________________________
8 How many components does an assembly contain?_____________________________
_____________________________________________________________________
9 What mates are required for the Tutor assembly? __________________________
_____________________________________________________________________
Tutor1 Tutor2Tutor assembly

Lesson 4: Assembly Basics
An Introduction to Engineering Design with SolidWorks Student Workbook 37
Exercises and Projects — Creating the Switchplate Assembly
Task 1— Modifying Feature Size
The switchplate created in Lesson 3 requires two fasteners to complete the assembly.
Question:
How do you determine the size of the holes in the switchplate?
Answer:
________________________________________________
________________________________________________
________________________________________________
________________________________________________
________________________________________________
________________________________________________
_____________________________________________________________________
_____________________________________________________________________
Given:
� The diameter of the fastener is 3.5mm.
� The switchplate is 10mm deep.
Procedure:
1 Open the switchplate.
2 Modify the diameter of the two holes to 4mm.
3 Save the changes.

Lesson 4: Assembly Basics
38 An Introduction to Engineering Design with SolidWorks Student Workbook
Task 2 — Designing a Fastener
Design and model a fastener that is appropriate for the switchplate. Your fastener may (or may not) look like the one shown at the right.
Design Criteria:
� The fastener must be longer than the thickness of the switchplate.
� The switchplate is 10mm thick.
� The fastener must be 3.5mm in diameter.
� The head of the fastener must be larger than the hole in the switchplate.
Good Modeling Practice
Fasteners are almost always modeled in a simplified form. That is, although a real machine screw has threads on it, these are not included in the model.

Lesson 4: Assembly Basics
An Introduction to Engineering Design with SolidWorks Student Workbook 39
Task 3 — Creating an Assembly
Create the switchplate-fastener assembly.
Procedure:
1 Create a new assembly.
The fixed component is the switchplate.
2 Drag the switchplate into the assembly window.
3 Drag the fastener into the assembly window.
4 Use Move Component to position the fastener in front of the first hole.
The switchplate-fastener requires three mates to fully define the assembly.
5 Create a Concentric mate between the cylindrical face of the fastener and the cylindrical face of the hole in the switchplate.
6 Create a Coincident mate between the back flat face of the fastener and the flat front face of the switchplate.
7 Create a Parallel mate between one of the flat faces on the slot of the fastener and the flat top face of the switchplate.
Note: If the necessary faces do not exist in the fastener or the switchplate, create the parallel mate using the appropriate reference planes in each component.
Faces
Faces
Faces

Lesson 4: Assembly Basics
40 An Introduction to Engineering Design with SolidWorks Student Workbook
8 Add a second instance of the fastener to the assembly.
You can add components to an assembly by dragging and dropping:
• Hold the Ctrl key, and then drag the component either from the FeatureManager design tree, or from the graphics area.
• The pointer changes to .
• Drop the component in the graphics area by releasing the left mouse button and the Ctrl key.
9 Add three mates to fully define the second fastener to the switchplate-fastener assembly.
10 Save the switchplate-fastener assembly.

Lesson 4: Assembly Basics
An Introduction to Engineering Design with SolidWorks Student Workbook 41
Exercises and Projects:— Creating CD Storage Box Assembly
Assemble the cdcase and storagebox that you created in Lesson 3.
Procedure:
1 Create a new assembly.
The fixed component is the storagebox.
2 Drag the storagebox into the assembly window.
Locate the storagebox at the assembly origin using inferencing.
3 Drag the cdcase into the assembly window to the right of the storagebox.
4 Create a Coincident mate between the bottom face of the cdcase and the inside bottom face of the storagebox.
5 Create a Coincident mate between the back face of the cdcase and the inside back face of the storagebox.
Faces
Faces
Inside back face

Lesson 4: Assembly Basics
42 An Introduction to Engineering Design with SolidWorks Student Workbook
6 Create a Distance mate between the left face of the cdcase and the inside left face of the storagebox.
Enter 1cm for Distance.
7 Save the assembly.
Enter cdcase-storagebox for the filename.
Component Patterns
Create a linear pattern of the cdcase component in the assembly.
The cdcase is the seed component. The seed component is what gets copied in the pattern.
1 Click Insert, Component Pattern, Linear Pattern.
The Linear Pattern PropertyManager appears.
2 Define the direction for the pattern.Click inside the Pattern Direction text box to make it active.Click the top horizontal front edge of the storagebox.
3 Observe the direction arrow.
The preview arrow should point to the right. If itdoes not, click the Reverse Direction check box.
Faces

Lesson 4: Assembly Basics
An Introduction to Engineering Design with SolidWorks Student Workbook 43
4 Enter 1 for Spacing. Enter 25 for Instances.
The Local Component Pattern feature is added to the FeatureManager design tree.
5 Select the component to be patterned.
Make sure the Component to Pattern field is active, and then select the cdcase component from the FeatureManager design tree or the graphics area.Click OK.
6 Save the assembly.
Click Save. Use the name cdcase-storagebox.

Lesson 4: Assembly Basics
44 An Introduction to Engineering Design with SolidWorks Student Workbook
Exercises and Projects: — Assembling a Mechanical Claw
Assemble the claw mechanism shown at the right. This assembly will be used later, in Lesson 11, to create a movie using the SolidWorks Animator software.
Procedure:
1 Create a new assembly.
2 Save the assembly. Name it Claw-Mechanism.
3 Insert the Center-Post component into the assembly.The files for this exercises are found in the Claw folder in the Lesson04 folder.Position the Center-Post at the assembly origin. Make sure it is fully constrained.
4 Open the Collar part.
Arrange the windows as shown below.

Lesson 4: Assembly Basics
An Introduction to Engineering Design with SolidWorks Student Workbook 45
SmartMates
You can create some types of mating relationships automatically. Mates created with these methods are referred to as SmartMates.
You can create mates when you drag the part in specific ways from an open part window. The entity that you use to drag determines the types of mates that are added.
5 Select the cylindrical face of the Collar, and drag the Collar into the assembly. Point at the cylindrical face of the Center-Post in the assembly window.
When the pointer is over the Center-Post, the pointer changes to . This pointer indicates that a Concentric mate will result if the Collar is dropped at this location. A preview of the Collar snaps into place.
6 Drop the Collar.
A Concentric mate is added automatically.
Click Add/Finish Mate .
7 Close the Collar part document.

Lesson 4: Assembly Basics
46 An Introduction to Engineering Design with SolidWorks Student Workbook
8 Open the Claw.
Arrange the windows as shown below.
9 Add the Claw to the assembly using SmartMates
• Select the edge of the hole in the Claw.
It is important to select the edge and not the cylindrical face. This is because this type of SmartMate will add two mates:
• A Concentric mate between the cylindrical faces of the two holes.
• A Coincident mate between the planar face of the Claw and the arm of the Center-Post.

Lesson 4: Assembly Basics
An Introduction to Engineering Design with SolidWorks Student Workbook 47
10 Drag and drop the Claw onto the edge of the hole in the arm.
The pointer looks like this indicating that a Concentric and a Coincident mate will be added automatically. This SmartMate technique is ideal for putting fasteners into holes.
11 Close the Claw part document.
12 Add the Connecting-Rod to the assembly.
Use the same SmartMate technique you used in steps 9 and 10 to mate one end of the Connecting-Rod to the end of the Collar.
There should be two mates:
• Concentric between the cylindrical faces of the two holes.
• Coincident between the planar faces of the Connecting-Rod and the Collar.
13 Mate the Connecting-Rod to the Claw.
Add a Concentric mate between the hole in the Connecting-Rod and the hole in the Claw.
Do not add a Coincident mate between the Connecting-Rod and the Claw.
Lesson 4: Assembly Basics
48 An Introduction to Engineering Design with SolidWorks Student Workbook
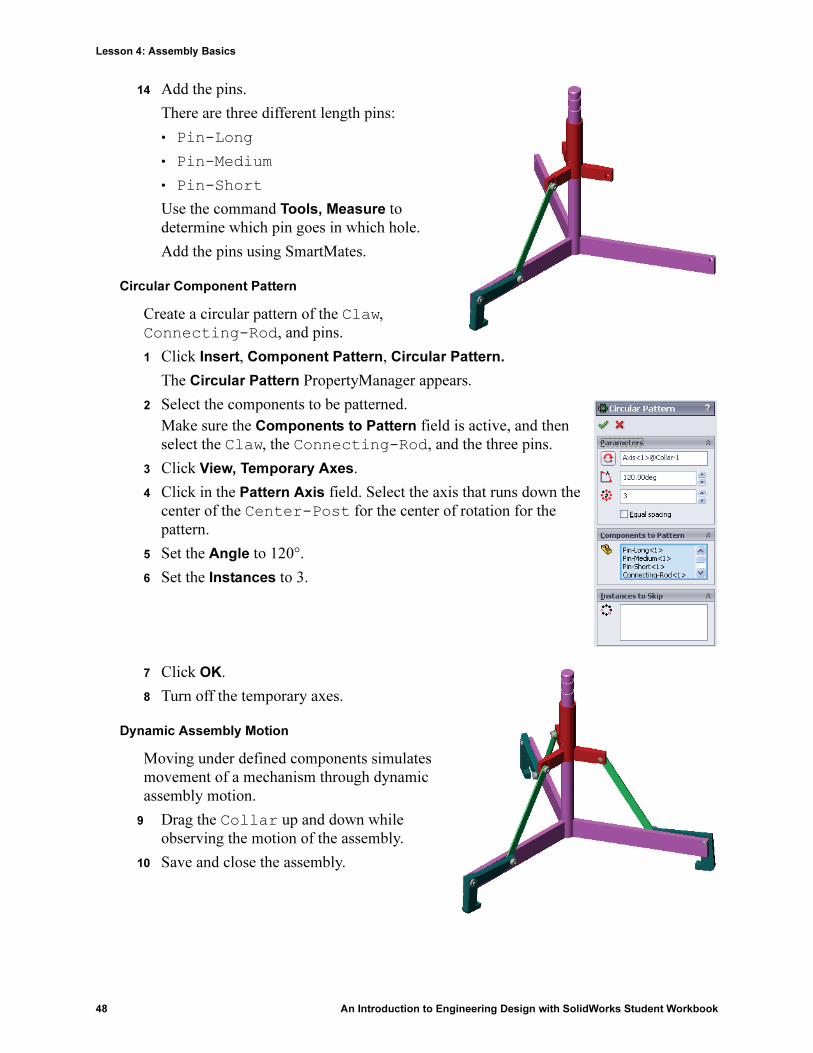
14 Add the pins.
There are three different length pins:
• Pin-Long
• Pin-Medium
• Pin-Short
Use the command Tools, Measure to determine which pin goes in which hole.
Add the pins using SmartMates.
Circular Component Pattern
Create a circular pattern of the Claw, Connecting-Rod, and pins.
1 Click Insert, Component Pattern, Circular Pattern.
The Circular Pattern PropertyManager appears.
2 Select the components to be patterned.
Make sure the Components to Pattern field is active, and then select the Claw, the Connecting-Rod, and the three pins.
3 Click View, Temporary Axes.
4 Click in the Pattern Axis field. Select the axis that runs down the center of the Center-Post for the center of rotation for the pattern.
5 Set the Angle to 120°.
6 Set the Instances to 3.
7 Click OK.
8 Turn off the temporary axes.
Dynamic Assembly Motion
Moving under defined components simulates movement of a mechanism through dynamic assembly motion.
9 Drag the Collar up and down while observing the motion of the assembly.
10 Save and close the assembly.

Lesson 4: Assembly Basics
An Introduction to Engineering Design with SolidWorks Student Workbook 49
Lesson 4 Vocabulary Worksheet
Name: _______________________________Class: _________ Date:_______________
Fill in the blanks with the words that are defined by the clues.
1 ____________________ copies one or more curves into the active sketch by projecting them onto the sketch plane.
2 In an assembly, parts are referred to as: ______________________________________
3 Relationships that align and fit components together in an assembly:_______________
4 The symbol (f) in the FeatureManager design tree indicates a component is:
_____________________________________________________________________
5 The symbol (-) indicates a component is: __________________________________
6 When you make a component pattern, the component you are copying is called the __________________ component.
7 A SolidWorks document that contains two or more parts:________________________
8 You cannot move or rotate a fixed component unless you __________________ it first.

Lesson 4: Assembly Basics
50 An Introduction to Engineering Design with SolidWorks Student Workbook
Lesson Summary
� An assembly contains two or more parts.
� In an assembly, parts are referred to as components.
� Mates are relationships that align and fit components together in an assembly.
� Components and their assembly are directly related through file linking.
� Changes in the components affect the assembly and changes in the assembly affect the components.
� The first component placed into an assembly is fixed.
� Under defined components can be moved using dynamic assembly motion. This simulates the movement of mechanisms.