lenovo sl300-500
DESCRIPTION
ThinkPad SL300-500 service manual and TroubleshootingTRANSCRIPT

ThinkPad® SL300, SL400, and SL500Service and Troubleshooting Guide


ThinkPad® SL300, SL400, and SL500Service and Troubleshooting Guide

NoteBefore using this information and the product it supports, be sure to read the following:
v Safety and Warranty Guide included in the package with this publication.
v Wireless related information in online Access Help and Appendix D, “Notices,” on page 61.
v Regulatory Notice included in the package with this publication.
The Safety and Warranty Guide and the Regulatory Notice have been uploaded on the Web site. To refer tothem, go to http://www.lenovo.com/think/support, click Troubleshooting, and then click User’s guides andmanuals.
First Edition (June 2008)
© Copyright Lenovo 2008. All rights reserved.
LENOVO products, data, computer software, and services have been developed exclusively at private expense andare sold to governmental entities as commercial items as defined by 48 C.F.R. 2.101 with limited and restricted rightsto use, reproduction and disclosure.
LIMITED AND RESTRICTED RIGHTS NOTICE: If products, data, computer software, or services are deliveredpursuant a General Services Administration ″GSA″ contract, use, reproduction, or disclosure is subject to restrictionsset forth in Contract No. GS-35F-05925.
© 2008 Lenovo

Contents
Read this first . . . . . . . . . . . v
Chapter 1. Finding information . . . . . 1This guide and other publications . . . . . 1Finding information with the Lenovo Carebutton . . . . . . . . . . . . . . 2
Chapter 2. Taking care of your ThinkPadcomputer . . . . . . . . . . . . . 3Important tips. . . . . . . . . . . . 3
Be careful about where and how you work 3Be gentle with your computer . . . . . 4Register your computer . . . . . . . 4Carry your computer properly . . . . . 4Connect the internal modem correctly . . . 4Handle storage media and drives properly 4Be sure not to modify your computer . . . 5Take care in setting passwords . . . . . 5Care for the fingerprint reader . . . . . 5Cleaning the cover of your computer . . . 5Cleaning your computer keyboard . . . . 6Cleaning your computer display . . . . 6
Chapter 3. Solving computer problems . . 7Frequently asked questions . . . . . . . 7Entering the BIOS Setup Utility . . . . . . 8Diagnosing problems . . . . . . . . . 9
Diagnosing problems using PC-Doctor fromthe service partition . . . . . . . . . 9
Troubleshooting . . . . . . . . . . . 10Error messages . . . . . . . . . . 10Errors without messages . . . . . . . 16Memory problems . . . . . . . . . 18Password problems . . . . . . . . 18Keyboard problems . . . . . . . . 19Pointing device problems . . . . . . 19Sleep (standby) or hibernation problems 20Computer screen problems . . . . . . 22Battery problems . . . . . . . . . 25AC adapter problems . . . . . . . . 25Hard disk drive (HDD) problems . . . . 26Fingerprint reader problems . . . . . 26Startup problems . . . . . . . . . 26
Chapter 4. Recovery options . . . . . . 29Introducing Rescue and Recovery . . . . . 29Restoring the factory contents . . . . . . 29Recovering data. . . . . . . . . . . 31
Chapter 5. Upgrading and replacingdevices . . . . . . . . . . . . . 33Replacing the battery . . . . . . . . . 33Upgrading the hard disk drive . . . . . . 34Replacing memory . . . . . . . . . . 37
Chapter 6. Getting help and service . . . 45Getting help and service . . . . . . . . 45Getting help on the Web . . . . . . . . 45Calling the Customer Support Center . . . 45Getting help around the world . . . . . . 47Worldwide telephone list. . . . . . . . 47
Appendix A. Warranty information . . . . 53Types of warranty service . . . . . . . 53
Appendix B. Customer Replaceable Units(CRUs) . . . . . . . . . . . . . 55
Appendix C. Features and Specifications 57Features . . . . . . . . . . . . . 57Specifications . . . . . . . . . . . 58
Appendix D. Notices. . . . . . . . . 61Notices. . . . . . . . . . . . . . 61
Export classification notice . . . . . . 62Electronic emissions notices . . . . . . . 62
Federal Communications Commission(FCC) Statement . . . . . . . . . 62Industry Canada Class B emissioncompliance statement . . . . . . . . 63Avis de conformité à la réglementationd’Industrie Canada. . . . . . . . . 63European Union EMC Directiveconformance statement . . . . . . . 63EU-EMC Directive (2004/108/EC) EN55022 class B Statement of Compliance . . 64Japanese VCCI Class B statement . . . . 65
EU WEEE Statements . . . . . . . . . 65
© Copyright Lenovo 2008 iii
Notice for users in the U.S.A. . . . . . . 65ENERGY STAR model information . . . . 66Notice for Regulatory information . . . . 68
Trademarks . . . . . . . . . . . . 69
Index . . . . . . . . . . . . . . 71
iv ThinkPad® SL300, SL400, and SL500 Service and Troubleshooting Guide

Read this first
Be sure to follow the important tips given here to continue to get the most useand enjoyment out of your computer. Failure to do so might lead todiscomfort or injury, or cause your computer to fail.
Protect yourself from the heat that your computer generates.
When your computer is turned on or the battery ischarging, the base, the palm rest, and some other parts maybecome hot. The temperature they reach depends on theamount of system activity and the level of charge in thebattery.
Extended contact with your body, even through clothing,could cause discomfort or even a skin burn.
v Avoid keeping your hands, your lap, or any other part ofyour body in contact with a hot section of the computerfor any extended time.
v Periodically take breaks from using the keyboard by liftingyour hands from the palm rest.
Protect yourself from the heat generated by the AC adapter.
When the AC adapter is connected to an electrical outletand your computer, it generates heat.
Extended contact with your body, even through clothing,may cause a skin burn.
v Do not place the AC adapter in contact with any part ofyour body while it is in use.
v Never use it to warm your body.
Prevent your computer from getting wet.
To avoid spills and the danger of electrical shock, keepliquids away from your computer.
© Copyright Lenovo 2008 v
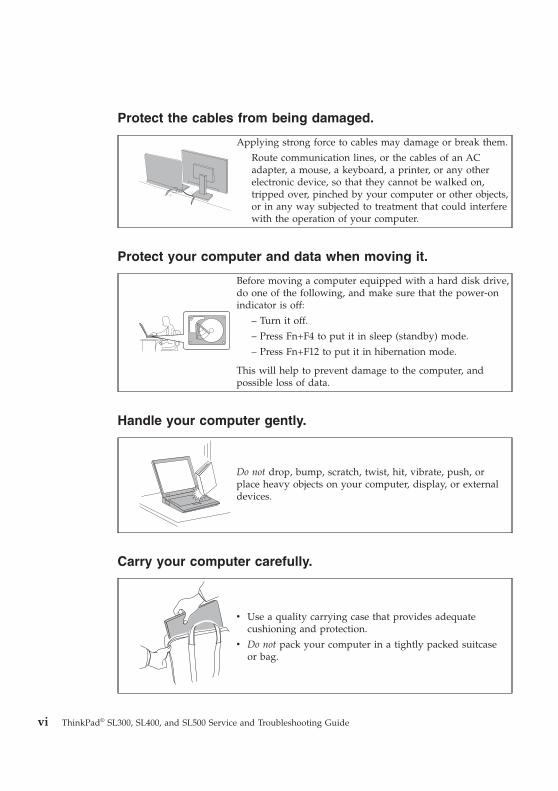
Protect the cables from being damaged.
Applying strong force to cables may damage or break them.
Route communication lines, or the cables of an ACadapter, a mouse, a keyboard, a printer, or any otherelectronic device, so that they cannot be walked on,tripped over, pinched by your computer or other objects,or in any way subjected to treatment that could interferewith the operation of your computer.
Protect your computer and data when moving it.
Before moving a computer equipped with a hard disk drive,do one of the following, and make sure that the power-onindicator is off:
– Turn it off.
– Press Fn+F4 to put it in sleep (standby) mode.
– Press Fn+F12 to put it in hibernation mode.
This will help to prevent damage to the computer, andpossible loss of data.
Handle your computer gently.
Do not drop, bump, scratch, twist, hit, vibrate, push, orplace heavy objects on your computer, display, or externaldevices.
Carry your computer carefully.
v Use a quality carrying case that provides adequatecushioning and protection.
v Do not pack your computer in a tightly packed suitcaseor bag.
vi ThinkPad® SL300, SL400, and SL500 Service and Troubleshooting Guide
Chapter 1. Finding information
This guide and other publications
helps you to unpack your ThinkPad® computer and get started. It includes afew tips for first-time users.
provides information about caring for your ThinkPad computer, basictroubleshooting information, some recovery procedures, help and serviceinformation, and warranty information for your computer. Thetroubleshooting information in this Guide applies only to problems that mightprevent you from accessing the comprehensive online manual, called AccessHelp, preinstalled on your ThinkPad computer.
is a comprehensive online manual that provides answers to most of yourquestions about your computer, helps you to configure preloaded features andtools, or solve problems. To open Access Help, do either of the following:v Press the Lenovo CareSM button. Under Quick Links in the Lenovo Care,
click Access on-system help.v Click Start, move the pointer to All Programs; then to ThinkVantage®.
Click Access Help.
includes general safety instructions and complete Lenovo™ Limited Warranty.
Setup Instructions
This Service and Troubleshooting Guide
Access Help
Safety and Warranty Guide
© Copyright Lenovo 2008 1

supplements this Guide. Read it before you use the wireless features of yourThinkPad computer. The ThinkPad computer complies with the radiofrequency and safety standards of any country or region in which it has beenapproved for wireless use. You are requested to install and use your ThinkPadcomputer in strict accordance with the local RF regulations.
Finding information with the Lenovo Care button
The blue Lenovo Care button can help you in many situations when yourcomputer is working normally, and even when it is not. Press the LenovoCare button to open the Lenovo Care and get access to informativeillustrations and easy-to-follow instructions for getting started and stayingproductive.
You can also use the Lenovo Care button to interrupt the startup sequence ofyour computer and start the Rescue and Recovery™ workspace, which runsindependently of the Windows® operating system and is hidden from it.
Regulatory Notice
2 ThinkPad® SL300, SL400, and SL500 Service and Troubleshooting Guide

Chapter 2. Taking care of your ThinkPad computer
Though your computer is designed to function reliably in normal workenvironments, you need to use common sense in handling it. By followingthese important tips, you will get the most use and enjoyment out of yourcomputer.
For the most important instructions for using your computer, see “Read thisfirst” on page v.
Important tips
Be careful about where and how you workv Store packing materials safely out of the reach of children to prevent the
risk of suffocation from plastic bags.v Keep your computer away from magnets, activated cellular phones,
electrical appliances, or speakers (within 13 cm or 5″).v Avoid subjecting your computer to extreme temperatures (below 5°C/41°F
or above 35°C/95°F).v Some appliances, such as certain portable desktop fans or air purifiers, can
produce negative ions. If a computer is close to such an appliance, and isexposed for an extended time to air containing negative ions, it maybecome electrostatically charged. Such a charge may be discharged throughyour hands when you touch the keyboard or other parts of the computer,or through connectors on I/O devices connected to it. Even though thiskind of electrostatic discharge (ESD) is the opposite of a discharge fromyour body or clothing to the computer, it poses the same risk of a computermalfunction.Your computer is designed and manufactured to minimize any effects ofelectrostatic charge. An electrostatic charge above a certain limit, however,can increase the risk of ESD. Therefore, when using the computer close toan appliance that can produce negative ions, give special attention to thefollowing:– Avoid directly exposing your computer to the air from an appliance that
can produce negative ions.– Keep your computer and peripherals as far as possible from such an
appliance.– Wherever possible, ground your computer to facilitate safe electrostatic
discharge.
© Copyright Lenovo 2008 3

Note: Not all such appliances cause a significant electrostatic charge.
Be gentle with your computerv Avoid placing any objects (including paper) between the display and the
keyboard or the palm rest.v Your computer display is designed to be opened and used at an angle
slightly greater than 90 degrees. Do not open the display beyond 150degrees, as this might damage the computer hinge.
v Do not turn your computer over while the AC adapter is plugged in. Thiscould break the adapter plug.
Register your computerv Register your ThinkPad products with Lenovo (visit the following Web site:
http://www.lenovo.com/register). This can help authorities return yourcomputer to you if it is lost or stolen. Registering your computer alsoenables Lenovo to notify you about possible technical information andupgrades.
Carry your computer properlyv Before moving your computer, be sure to remove any media, turn off
attached devices, and disconnect cords and cables.v When picking up your open computer, hold it by the bottom. Do not pick
up or hold your computer by the display.
Connect the internal modem correctlyv Your computer modem might use only an analog telephone network, or
public-switched telephone network (PSTN). Do not connect the modem to aPBX (private branch exchange) or any other digital telephone extension linebecause this could damage your modem. Analog phone lines are often usedin homes, while digital phone lines are often used in hotels or officebuildings. If you are not sure which kind of phone line you are using,contact your telephone company.
v Your computer might have both an Ethernet connector and a modemconnector. If so, be sure to connect your communication cable to the correctone, so your connector is not damaged.
Handle storage media and drives properlyv If your computer comes with an optical drive, do not touch the surface of a
disc or the lens on the tray.v Wait until you hear the CD or DVD click into the center pivot of an optical
drive before closing the tray.v When installing the HDD or optical drive, follow the instructions shipped
with your hardware, and apply pressure only where needed on the device.v Turn off your computer if you are replacing the HDD.v When replacing the primary HDD, reattach the cover of the drive slot.
4 ThinkPad® SL300, SL400, and SL500 Service and Troubleshooting Guide

v Store your external and removable hard disk or optical drives in theappropriate containers or packaging when they are not being used.
v Before you install any of the following devices, touch a metal table or agrounded metal object. This action reduces any static electricity from yourbody. The static electricity could damage the device.– Memory module– PCI Express Mini Card– ExpressCard– Memory Card, such as xD-Picture Card, SD Card, Memory Stick, and
MultiMediaCard
Note: When transferring data to or from a Flash Media Card, such as an SDcard, do not put your computer in sleep (standby) or hibernation mode beforethe data transfer is complete. To do so might cause damage to your data.
Be sure not to modify your computerv Only an authorized ThinkPad repair technician should disassemble and
repair your computer.v Do not modify or tape the latches to keep the display open or closed.
Take care in setting passwordsv Remember your passwords. If you forget a supervisor or hard disk
password, Lenovo authorized service provider cannot reset it, and you willhave to replace your system board, or HDD.
Care for the fingerprint readerThe following actions could damage the fingerprint reader or cause it not towork properly:v Scratching the surface of the reader with a hard, pointed object.v Scraping the surface of the reader with your nail or anything hard.v Using or touching the reader with a dirty finger.
If you notice any of the following conditions, gently clean the surface of thereader with a dry, soft, lint-free cloth:v The surface of the reader is dirty or stained.v The surface of the reader is wet.v The reader often fails to enroll or authenticate your fingerprint.
Cleaning the cover of your computerOccasionally clean your computer as follows:1. Prepare a mixture of a gentle kitchen-use detergent (one that does not
contain abrasive powder or strong chemicals such as acid or alkaline). Use5 parts water to 1 part detergent.
2. Absorb the diluted detergent into a sponge.
Chapter 2. Taking care of your ThinkPad computer 5

3. Squeeze excess liquid from the sponge.4. Wipe the cover with the sponge, using a circular motion and taking care
not to let any excess liquid drip.5. Wipe the surface to remove the detergent.6. Rinse the sponge with clean running water.7. Wipe the cover with the clean sponge.8. Wipe the surface again with a dry, soft lint-free cloth.9. Wait for the surface to dry completely and remove any cloth fibers from
the computer surface.
Cleaning your computer keyboard1. Absorb some isopropyl rubbing alcohol on a soft, dust-free cloth.2. Wipe each keytop surface with the cloth. Wipe the keys one by one; if you
wipe several keys at a time, the cloth may hook onto an adjacent key andpossibly damage it. Make sure that no liquid drips onto or between thekeys.
3. Allow to dry.4. To remove any crumbs and dust from beneath the keys, you can use a
camera blower with a brush or cool air from a hair drier.
Note: Avoid spraying cleaner directly on the display or the keyboard.
Cleaning your computer display1. Gently wipe the display with a dry, soft lint-free cloth. If you see a
scratch-like mark on your display, it might be a stain transferred from thekeyboard or the TrackPoint® pointing stick when the cover was pressedfrom the outside.
2. Wipe or dust the stain gently with a soft, dry cloth.3. If the stain remains, moisten a soft, lint-free cloth with water or a 50-50
mixture of isopropyl alcohol and water that does not contain impurities.4. Wring out as much of the liquid as you can.5. Wipe the display again; do not let any liquid drip into the computer.6. Be sure to dry the display before closing it.
6 ThinkPad® SL300, SL400, and SL500 Service and Troubleshooting Guide

Chapter 3. Solving computer problems
Frequently asked questions
This section lists frequently asked questions and tells where you can finddetailed answers. For details about each publication included in the packagewith the ThinkPad computer, see “This guide and other publications” on page1.
What safety precautions should I follow when using my ThinkPadcomputer?
See the separate Safety and Warranty Guide for detailed informationabout safety.
How can I prevent problems with my ThinkPad computer?See “Read this first” on page v, and also Chapter 2, “Taking care ofyour ThinkPad computer,” on page 3 of this Guide. More tips can befound in the following sections of Access Help:v Preventing problemsv Troubleshooting
What are the main hardware features of my new ThinkPad computer?See “About your computer” in Access Help.
Where can I find the detailed specifications for my ThinkPad computer?See http://www.lenovo.com/think/support.
I need to upgrade a device or I need to replace one of the following: theHDD, the PCI Express Mini Card, the memory, the keyboard, or the palmrest. See the Appendix B, “Customer Replaceable Units (CRUs),” on page
55 of this Guide for the list of Customer Replaceable Units and thelocation of the instructions for removing or replacing components.
My computer is not operating properly.See “Problem solving” in Access Help. This guide describes methods oftroubleshooting for use when online Access Help is inaccessible.
Where are the recovery discs?Your computer may have come with or without a recovery disc orWindows disc depending on your model. For an explanation of thealternative recovery methods offered by Lenovo, see “Restoring thefactory contents” on page 29 of this Guide.
Note: See Access Help if your system is running and Access Help is accessible. This chapter presentsinformation for use when Access Help is inaccessible.
© Copyright Lenovo 2008 7
How can I contact the Customer Support Center?See Chapter 6, “Getting help and service,” on page 45 of this Guide.For the phone numbers of the Customer Support Center nearest toyou, see “Worldwide telephone list” on page 47.
Where can I find warranty information?See the separate Safety and Warranty Guide for detailed warrantyinformation. For the warranty applicable to your computer, includingthe warranty period and type of warranty service, see Appendix A,“Warranty information,” on page 53.
Entering the BIOS Setup Utility
Your computer provides a program, called BIOS Setup Utility, that enablesyou to select various setup parameters.v Main: Display the system information of your computer.v Config: Set the configuration of your computer.v Date/Time: Set the date and time.v Security: Set security features.v Startup: Set the startup device.v Restart: Restart the system.
To enter the BIOS Setup Utility, do as follows:1. To protect yourself against accidental loss of data, back up your data and
computer registry. For details, see “Basics” in Access Help.2. Turn off the computer, and then turn it on again.3. When the ThinkPad logo comes up, immediately press F1 to enter the
BIOS Setup Utility.If you have set a supervisor password, the BIOS Setup Utility menuappears after you enter the password. You can start the utility by pressingEnter instead of entering the supervisor password; however, you cannotchange the parameters that are protected by the supervisor password. Formore information, see the on-board help.
4. Using the cursor keys, move to an item you want to change. When theitem you want is highlighted, press Enter. A submenu is displayed.
5. Change the items you wish to change. To change the value of an item, usethe + or - key. If the item has a submenu, you can display it by pressingEnter.
6. Press Esc to exit from the submenu. If you are in a nested submenu, pressEsc repeatedly until you reach the BIOS Setup Utility menu.Note: If you need to restore the settings to their original state as of thetime of purchase, press F9 key to load the default settings. You can alsoselect an option in the Restart submenu to load manufacture default oruser defaults settings or discard the changes.
8 ThinkPad® SL300, SL400, and SL500 Service and Troubleshooting Guide

7. Select Restart; then press Enter. Move the cursor to the option you wantfor restarting your computer; then press Enter. Your computer restarts.
Diagnosing problems
If you have a problem with your computer, you can test it by usingPC-Doctor® for Windows.
To run PC-Doctor for Windows, do as follows:1. Click Start.2. Move the pointer to All Programs and then to PC-Doctor for Windows.3. Click PC-Doctor for Windows.
For more information about PC-Doctor for Windows, see the Help for theprogram.
Attention:
v If you need help or further information about the problem, chooseany of the following:– Lenovo Troubleshooting Center– Update System Drivers– System Information
v Running any tests may take up to several minutes or longer. Makesure you have time to run the entire test; do not interrupt the testwhile it is running.
When preparing to contact the Customer Support Center, be sure to print thetest log so that you can rapidly provide information to the help technician.
Diagnosing problems using PC-Doctor from the service partition
By using PC-Doctor from the Rescue and Recovery workspace in the servicepartition of the hard disk drive, you can diagnose your system withoutstarting up the operating system.
To run PC-Doctor, do as follows:1. Turn off the computer, and then turn it on again.2. When the ThinkPad logo comes up, immediately press the Lenovo Care
button, F11, or Enter key. The Rescue and Recovery workspace opens.3. Click Diagnose hardware.
For more information about PC-Doctor, see the Help for the program.
Chapter 3. Solving computer problems 9
Troubleshooting
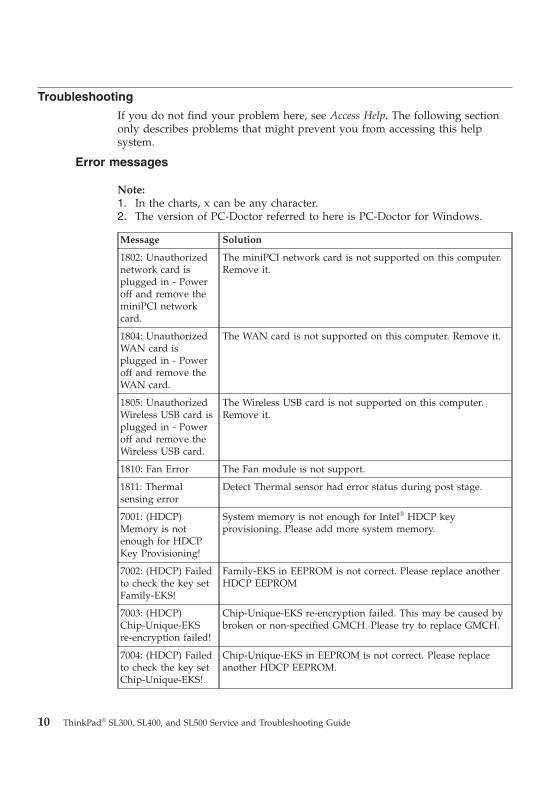
If you do not find your problem here, see Access Help. The following sectiononly describes problems that might prevent you from accessing this helpsystem.
Error messages
Note:1. In the charts, x can be any character.2. The version of PC-Doctor referred to here is PC-Doctor for Windows.
Message Solution
1802: Unauthorizednetwork card isplugged in - Poweroff and remove theminiPCI networkcard.
The miniPCI network card is not supported on this computer.Remove it.
1804: UnauthorizedWAN card isplugged in - Poweroff and remove theWAN card.
The WAN card is not supported on this computer. Remove it.
1805: UnauthorizedWireless USB card isplugged in - Poweroff and remove theWireless USB card.
The Wireless USB card is not supported on this computer.Remove it.
1810: Fan Error The Fan module is not support.
1811: Thermalsensing error
Detect Thermal sensor had error status during post stage.
7001: (HDCP)Memory is notenough for HDCPKey Provisioning!
System memory is not enough for Intel® HDCP keyprovisioning. Please add more system memory.
7002: (HDCP) Failedto check the key setFamily-EKS!
Family-EKS in EEPROM is not correct. Please replace anotherHDCP EEPROM
7003: (HDCP)Chip-Unique-EKSre-encryption failed!
Chip-Unique-EKS re-encryption failed. This may be caused bybroken or non-specified GMCH. Please try to replace GMCH.
7004: (HDCP) Failedto check the key setChip-Unique-EKS!
Chip-Unique-EKS in EEPROM is not correct. Please replaceanother HDCP EEPROM.
10 ThinkPad® SL300, SL400, and SL500 Service and Troubleshooting Guide
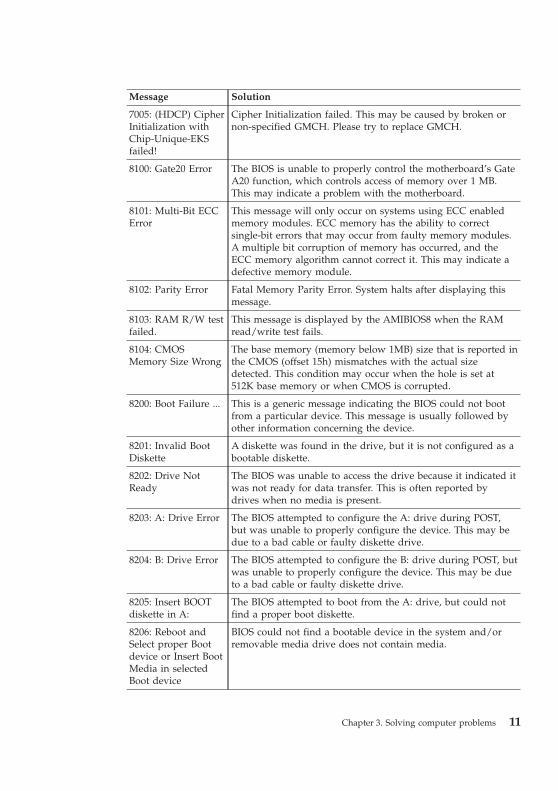
Message Solution
7005: (HDCP) CipherInitialization withChip-Unique-EKSfailed!
Cipher Initialization failed. This may be caused by broken ornon-specified GMCH. Please try to replace GMCH.
8100: Gate20 Error The BIOS is unable to properly control the motherboard’s GateA20 function, which controls access of memory over 1 MB.This may indicate a problem with the motherboard.
8101: Multi-Bit ECCError
This message will only occur on systems using ECC enabledmemory modules. ECC memory has the ability to correctsingle-bit errors that may occur from faulty memory modules.A multiple bit corruption of memory has occurred, and theECC memory algorithm cannot correct it. This may indicate adefective memory module.
8102: Parity Error Fatal Memory Parity Error. System halts after displaying thismessage.
8103: RAM R/W testfailed.
This message is displayed by the AMIBIOS8 when the RAMread/write test fails.
8104: CMOSMemory Size Wrong
The base memory (memory below 1MB) size that is reported inthe CMOS (offset 15h) mismatches with the actual sizedetected. This condition may occur when the hole is set at512K base memory or when CMOS is corrupted.
8200: Boot Failure ... This is a generic message indicating the BIOS could not bootfrom a particular device. This message is usually followed byother information concerning the device.
8201: Invalid BootDiskette
A diskette was found in the drive, but it is not configured as abootable diskette.
8202: Drive NotReady
The BIOS was unable to access the drive because it indicated itwas not ready for data transfer. This is often reported bydrives when no media is present.
8203: A: Drive Error The BIOS attempted to configure the A: drive during POST,but was unable to properly configure the device. This may bedue to a bad cable or faulty diskette drive.
8204: B: Drive Error The BIOS attempted to configure the B: drive during POST, butwas unable to properly configure the device. This may be dueto a bad cable or faulty diskette drive.
8205: Insert BOOTdiskette in A:
The BIOS attempted to boot from the A: drive, but could notfind a proper boot diskette.
8206: Reboot andSelect proper Bootdevice or Insert BootMedia in selectedBoot device
BIOS could not find a bootable device in the system and/orremovable media drive does not contain media.
Chapter 3. Solving computer problems 11

Message Solution
8207: NO ROMBASIC
This message occurs on some systems when no bootable devicecan be detected.
8318: S.M.A.R.T.Capable butCommand Failed
The BIOS tried to send a S.M.A.R.T. message to a hard disk,but the command transaction failed. This message can bereported by an ATAPI device using the S.M.A.R.T. errorreporting standard.S.M.A.R.T. failure messages may indicatethe need to replace the hard disk.
8319: S.M.A.R.T.Command Failed
The BIOS tried to send a S.M.A.R.T. message to a hard disk,but the command transaction failed. This message can bereported by an ATAPI device using the S.M.A.R.T. errorreporting standard.S.M.A.R.T. failure messages may indicatethe need to replace the hard disk.
831A: S.M.A.R.T.Status BAD, Backupand Replace
A S.M.A.R.T. capable hard disk sends this message when itdetects an imminent failure. This message can be reported byan ATAPI device using the S.M.A.R.T. error reporting standard.S.M.A.R.T. failure messages may indicate the need to replacethe hard disk.
831B: S.M.A.R.T.Capable and StatusBAD
A S.M.A.R.T. capable hard disk sends this message when itdetects an imminent failure. This message can be reported byan ATAPI device using the S.M.A.R.T. error reporting standard.S.M.A.R.T. failure messages may indicate the need to replacethe hard disk.
8400: BootSectorWrite !!
The BIOS has detected software attempting to write to adrive’s boot sector. This is flagged as possible virus activity.This message will only be displayed if Virus Detection isenabled in AMIBIOS setup.
8401: VIRUS:Continue (Y/N)?
If the BIOS detects possible virus activity, it will prompt theuser. This message will only be displayed if Virus Detection isenabled in AMIBIOS setup.
8500: DMA-1 Error Error initializing primary DMA controller. This is a fatal error,often indicating a problem with system hardware.
8501: DMA-2 Error Error initializing secondary DMA controller. This is a fatalerror, often indicating a problem with system hardware.
8502: DMAController Error
POST error while trying to initialize the DMA controller. Thisis a fatal error, often indicating a problem with systemhardware.
8503: CheckingNVRAM..UpdateFailed
BIOS could not write to the NVRAM block. This messageappears when the FLASH part is write-protected or if there isno FLASH part (System uses a PROM or EPROM).
12 ThinkPad® SL300, SL400, and SL500 Service and Troubleshooting Guide
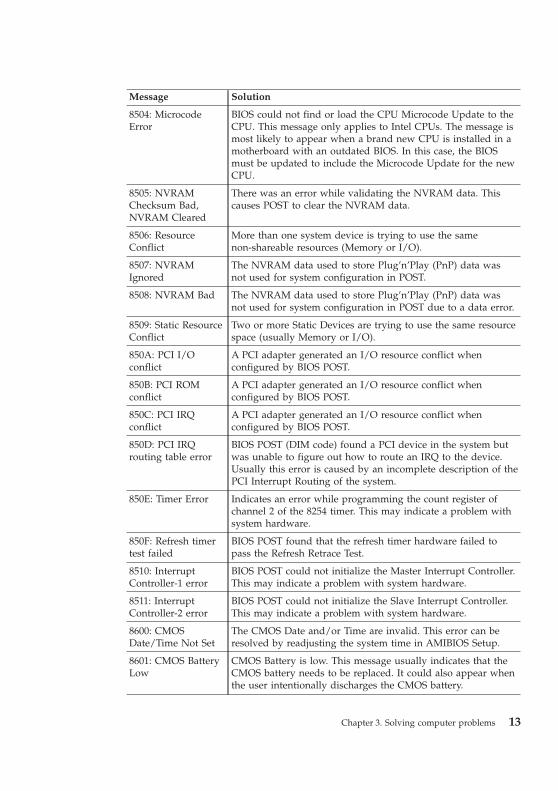
Message Solution
8504: MicrocodeError
BIOS could not find or load the CPU Microcode Update to theCPU. This message only applies to Intel CPUs. The message ismost likely to appear when a brand new CPU is installed in amotherboard with an outdated BIOS. In this case, the BIOSmust be updated to include the Microcode Update for the newCPU.
8505: NVRAMChecksum Bad,NVRAM Cleared
There was an error while validating the NVRAM data. Thiscauses POST to clear the NVRAM data.
8506: ResourceConflict
More than one system device is trying to use the samenon-shareable resources (Memory or I/O).
8507: NVRAMIgnored
The NVRAM data used to store Plug’n’Play (PnP) data wasnot used for system configuration in POST.
8508: NVRAM Bad The NVRAM data used to store Plug’n’Play (PnP) data wasnot used for system configuration in POST due to a data error.
8509: Static ResourceConflict
Two or more Static Devices are trying to use the same resourcespace (usually Memory or I/O).
850A: PCI I/Oconflict
A PCI adapter generated an I/O resource conflict whenconfigured by BIOS POST.
850B: PCI ROMconflict
A PCI adapter generated an I/O resource conflict whenconfigured by BIOS POST.
850C: PCI IRQconflict
A PCI adapter generated an I/O resource conflict whenconfigured by BIOS POST.
850D: PCI IRQrouting table error
BIOS POST (DIM code) found a PCI device in the system butwas unable to figure out how to route an IRQ to the device.Usually this error is caused by an incomplete description of thePCI Interrupt Routing of the system.
850E: Timer Error Indicates an error while programming the count register ofchannel 2 of the 8254 timer. This may indicate a problem withsystem hardware.
850F: Refresh timertest failed
BIOS POST found that the refresh timer hardware failed topass the Refresh Retrace Test.
8510: InterruptController-1 error
BIOS POST could not initialize the Master Interrupt Controller.This may indicate a problem with system hardware.
8511: InterruptController-2 error
BIOS POST could not initialize the Slave Interrupt Controller.This may indicate a problem with system hardware.
8600: CMOSDate/Time Not Set
The CMOS Date and/or Time are invalid. This error can beresolved by readjusting the system time in AMIBIOS Setup.
8601: CMOS BatteryLow
CMOS Battery is low. This message usually indicates that theCMOS battery needs to be replaced. It could also appear whenthe user intentionally discharges the CMOS battery.
Chapter 3. Solving computer problems 13

Message Solution
8602: CMOS SettingsWrong
CMOS settings are invalid. This error can be resolved by usingAMIBIOS Setup.
8603: CMOSChecksum Bad
CMOS contents failed the Checksum check. Indicates that theCMOS data has been changed by a program other than theBIOS or that the CMOS is not retaining its data due tomalfunction. This error can typically be resolved by usingAMIBIOS Setup.
8700: KBC BAT Testfailed
Keyboard controller BAT test failed. This may indicate aproblem with keyboard controller initialization.
8701: KeyboardError
Keyboard is not present or the hardware is not respondingwhen the keyboard controller is initialized.
8702: PS2 Keyboardnot found
PS2 Keyboard support is enabled in the BIOS setup but thedevice is not detected.
8703: PS2 Mouse notfound
PS2 Mouse support is enabled in the BIOS setup but the deviceis not detected
8704:Keyboard/InterfaceError
Keyboard Controller failure. This may indicate a problem withsystem hardware.
8705: UnlockKeyboard
PS2 keyboard is locked. User needs to unlock the keyboard tocontinue the BIOS POST.
8706: System Halted The system has been halted. A reset or power cycle is requiredto reboot the machine. This message appears after a fatal errorhas been detected.
8707: <INS> Pressed Indicates that <INS> key is pressed during the BIOS POST. ThePOST will load and use default CMOS settings.
8708: Passwordcheck failed
The password entered does not match the password set in thesetup. This condition may occur for both Supervisor and Userpassword verification.
8709: UnknownBIOS error.Error code = 004Ah
This message is displayed when ADM module is not present inthe AMIBIOS8 ROM.
870A: UnknownBIOS error.Error code = 004Bh
This message is displayed when language module is notpresent in the AMIBIOS8 ROM.
870B: FloppyController Failure
Error in initializing legacy Floppy Controller.
8800: Warning!Unsupported USBdevice found anddisabled!
This message is displayed when a non-bootable USB device isenumerated and disabled by the BIOS.
14 ThinkPad® SL300, SL400, and SL500 Service and Troubleshooting Guide

Message Solution
8801: Warning!Port 60h/64hemulation is notsupported by thisUSB Host Controller!
This message is displayed to indicate that port 60h/64hemulation mode cannot be enabled for this USB host controller.This condition occurs if USB KBC emulation option is set fornon-SMI mode.
8802: Warning!EHCI controllerdisabled. It requires64bit data support inthe BIOS.
This message is displayed to indicate that EHCI controller isdisabled because of incorrect data structure. This conditionoccurs if the USB host controller needs 64-bit data structurewhile the USB is ported with 32-bit data structure.
8900: Not enoughspace in Runtimearea!!. SMBIOS datawill not be available.
This message is displayed when the size of the SMBIOS dataexceeds the available SMBIOS runtime storage size.
8A00: Warning!This system boarddoes not support thepower requirementsof the installedprocessor. Theprocessor will be runat a reducedfrequency, whichwill impact systemperformance.
This message is displayed when the power requirements of theboard do not match the power requirement of the CPU.
8B00: InsufficientRuntime space forMPS data! Systemmay operate in PICor Non-MPS mode.
This message is displayed when there is not enough space inthe 0F000h runtime area for creating MPS table.
Beep errors
One beep and ablank, unreadable, orflashing LCD
If an external monitor is attached, confirm that the cable of theexternal monitor is connected to the system. If the problempersists, contact the administrator.
One long and twoshort beeps, and ablank or unreadableLCD
Confirm that the memory cards have been installed correctly. Ifthe problem persists, contact the administrator.
Two short beepswith error codes
Refer to POST error or POST message.
Two short beeps anda blank screen
Confirm that the memory cards have been installed correctly. Ifthe problem persists, contact the administrator.
Chapter 3. Solving computer problems 15
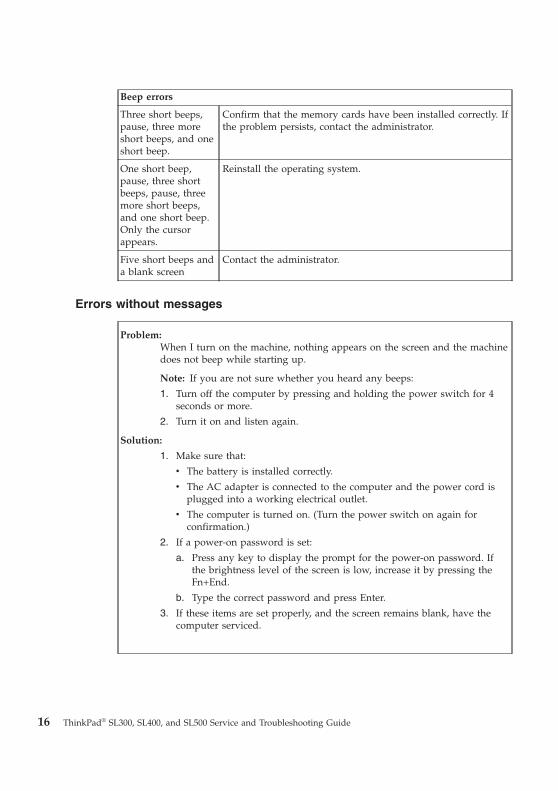
Beep errors
Three short beeps,pause, three moreshort beeps, and oneshort beep.
Confirm that the memory cards have been installed correctly. Ifthe problem persists, contact the administrator.
One short beep,pause, three shortbeeps, pause, threemore short beeps,and one short beep.Only the cursorappears.
Reinstall the operating system.
Five short beeps anda blank screen
Contact the administrator.
Errors without messages
Problem:When I turn on the machine, nothing appears on the screen and the machinedoes not beep while starting up.
Note: If you are not sure whether you heard any beeps:
1. Turn off the computer by pressing and holding the power switch for 4seconds or more.
2. Turn it on and listen again.
Solution:
1. Make sure that:
v The battery is installed correctly.
v The AC adapter is connected to the computer and the power cord isplugged into a working electrical outlet.
v The computer is turned on. (Turn the power switch on again forconfirmation.)
2. If a power-on password is set:
a. Press any key to display the prompt for the power-on password. Ifthe brightness level of the screen is low, increase it by pressing theFn+End.
b. Type the correct password and press Enter.
3. If these items are set properly, and the screen remains blank, have thecomputer serviced.
16 ThinkPad® SL300, SL400, and SL500 Service and Troubleshooting Guide

Problem:When I turn on the machine, only a white cursor appears on a blank screen.
Solution:Note: If you have modified a partition on your HDD by using a partitionsoftware, information about that partition, or the master boot record, mayhave been destroyed.
1. Turn off the computer, and then turn it on again.
2. If you still see only the cursor on the screen, do the following:
v If you have used the partition software, examine the partition on theHDD by using the software, and recover the partition if required.
v Use either the Rescue and Recovery workspace or the recovery discs torestore the system to the factory state.
For details about restoring the system to the factory state, seeChapter 4, “Recovery options,” on page 29.
3. If the problem persists, have the computer serviced.
Problem:The screen goes blank while the computer is on.
Solution:Your screen saver or power management may be enabled.
Do either of the following:
v Move the TrackPoint or press a key to exit the screen saver.
v Press the power switch to resume from sleep (standby) or hibernation.
Problem:The computer does not respond.
Solution:
1. Turn off the computer by pressing and holding the power switch for 4seconds or more.
2. If the computer still does not respond, remove and reinstall the ACadapter and the battery.
Your computer might lock when it enters sleep (standby) mode during acommunication operation. Disable the sleep (standby) timer when you areworking on the network.
Chapter 3. Solving computer problems 17

Memory problems
Problem:Your memory is not operating properly.
Solution:
1. Verify that the memory is installed and seated correctly in yourcomputer.
It may be necessary to remove all added memories to test the computerwith only the factory-installed memories, and then reinstall the memoryone at a time to ensure a proper connection. For the procedures toremove and reinstall a memory, refer to “Replacing memory” on page 37.
2. Check for error messages during startup.
Follow the appropriate corrective actions for Power-on self-test (POST)error messages.
3. Verify that the latest BIOS for your computer has been installed.
4. Verify the proper memory configuration and compatibility including themaximum memory size and the memory speed.
For details, refer to the instructions in “Replacing memory” on page 37.
5. Run PC-Doctor for Windows.
If you cannot startup Windows, use PC-Doctor from the service partitionon your hard disk drive.
Password problems
Problem:You forgot your password.
Solution:
v If you forget your power-on password, you must take your computer to aLenovo authorized servicer or a marketing representative to have thatpassword canceled.
v If you forget your hard disk password, a Lenovo authorized servicercannot reset your password or recover data from the HDD. You must takeyour computer to a Lenovo authorized servicer or a marketingrepresentative to have the HDD replaced. Proof of purchase is required,and a fee will be charged for parts and service.
v If you forget your supervisor password, a Lenovo authorized servicercannot reset your password. You must take your computer to a Lenovoauthorized servicer or a marketing representative to have the systemboard replaced. Proof of purchase is required, and a fee will be chargedfor parts and service.
18 ThinkPad® SL300, SL400, and SL500 Service and Troubleshooting Guide

Keyboard problems
Problem:All or some keys on the keyboard do not work.
Solution:For Windows Vista®:
1. Click Start → Control Panel.
2. Click Hardware and Sound, and then click Keyboard.
3. Select the Hardware tab. In the Device Properties, make sure that theDevice Status is This device is working properly.
For Windows XP:
1. Click Start → Control Panel.
2. Click Printers and Other Hardware, and then click Keyboard.
3. Select the Hardware tab. In the Device Properties, make sure that theDevice Status is This device is working properly.
If keys on the keyboard still do not work, have the computer serviced.
Problem:A number appears when you type a letter.
Solution:The numeric lock function is on. To disable it, press and hold Shift or Fn andthen press NmLk (Delete).
Problem:All or some keys on the external keyboard or numeric keypad do not work.
Solution:Make sure that the external keyboard or numeric keypad is correctlyconnected to the computer.
Pointing device problems
Problem:The scrolling or magnifying glass function does not work.
Solution:Check the mouse driver in the Device Manager window, and make sure thatthe ThinkPad UltraNav® Pointing Device driver is installed.
Chapter 3. Solving computer problems 19

Sleep (standby) or hibernation problems
Problem:The computer enters sleep (standby) mode (the sleep/standby indicatorturns on) immediately after Power-on self-test (POST).
Solution:
1. Make sure that:
v The battery is charged.
v The operating temperature is within the acceptable range. See“Specifications” on page 58.
2. If these items are correct, have the computer serviced.
Problem:The critical low-battery error message is displayed, and the computerimmediately turns off.
Solution:The battery power is getting low.
Do either of the following:
v Connect the AC adapter to the computer and plug it into an electricaloutlet.
v Replace the battery with a fully charged one.
Problem:When you take action to return from sleep (standby) mode, the computerdisplay remains blank.
Solution:
1. Check whether an external monitor was turned off while the computerwas in sleep (standby) mode.
2. Do either of the following:
v Turn on the external monitor to display the image on it.
v Press Fn+F7 to bring up the image on the computer screen.
Note: If you use the Fn+F7 key combination to apply a presentationscheme, press Fn+F7 at least three times in three seconds.
3. If the problem persists, do the Solution in the following Problem.
20 ThinkPad® SL300, SL400, and SL500 Service and Troubleshooting Guide

Problem:While operating with the battery, the computer does not return from sleep(standby) mode, or the sleep (standby) indicator stays on and the computerdoes not work.
Solution:The system may have entered sleep (standby) or hibernation modeautomatically because the battery is depleted.
1. Connect the AC adapter to the computer.
2. If the sleep (standby) indicator is on, press Fn. If the sleep (standby)indicator is off, press the power switch to resume operation.
3. If you press Fn or the power switch, and the system does not return fromsleep (standby) or hibernation mode, the computer stops responding andcannot be turned off:
a. Turn off the computer by pressing and holding the power switch for4 seconds or more. Unsaved data may be lost.
b. If the computer still does not respond, remove and reinstall the ACadapter and the battery.
Problem:The computer enters sleep (standby) mode unexpectedly.
Solution:
1. Make sure that the settings in Power Manager are set properly.
a. Start Power Manager by clicking Start → All programs →ThinkVantage → Power Manager.
b. On the Power Plan tab (in Windows XP, On the Power Scheme tab),select the name of the Plan you want. Under System settings, checkthe setting of Enter System standby.
c. On the Global Power Settings tab, make sure that the settings underAlarms are set properly.
2. Make sure that no object blocks the air vents of the computer.
When the processor overheats, the computer automatically enters sleep(standby) mode to cool down and to protect the processor and otherinternal components.
a. Allow the computer to cool.
b. Press Fn to return from sleep (standby) mode.
3. If the computer still enters sleep (standby) mode unexpectedly, theinternal fan or other parts may have failed. Have the computer serviced.
Chapter 3. Solving computer problems 21
Computer screen problems
Problem:Incorrect characters appear on the screen.
Solution:
1. Make sure that the operating system and the application program areinstalled correctly.
2. If they are installed and configured correctly, have the computer serviced.
Problem:Missing, discolored, or bright dots appear on the screen every time I turn onmy computer.
Solution:This is an intrinsic characteristic of the TFT technology. Your computer’sdisplay contains multiple thin-film transistors (TFTs). A small number ofmissing, discolored, or bright dots on the screen might exist all the time.
Problem:The screen is blank.
Solution:
1. Do the following:
v Press Fn+F7 to bring up the image.
Note: If you use the Fn+F7 key combination to apply a presentationscheme, press Fn+F7 at least three times in three seconds.
v If you are using the AC adapter, or using the battery, and the batterystatus indicator is on (is green), press Fn+End to make the screenbrighter.
v If the sleep (standby) status indicator is on (is green), press Fn toresume from the sleep (standby) mode.
2. If the problem persists, do the Solution in the following Problem.
22 ThinkPad® SL300, SL400, and SL500 Service and Troubleshooting Guide

Problem:The screen is unreadable or distorted.
Solution:Make sure that:
v The screen resolution and color quality are correctly set.
v The display device driver is installed correctly.
v The monitor type is correct.
To check these settings, do as follows:
For Windows Vista:
1. Right-click on the desktop, click Personalize, then click Display Settings.
2. Check whether the screen resolution and color quality are correctly set.
3. Click Advanced Settings.
4. Click the Adapter tab.
5. Make sure that the correct device driver name is shown in the adapterinformation window.Note: The device driver name depends on the video chip that has beeninstalled on your computer.
6. Click the Properties button. If you are prompted for an administratorpassword or confirmation, type the password or provide confirmation.Check the ″Device status″ box and make sure that the device is workingproperly. If not, click the Troubleshoot button.
7. Click the Monitor tab.
8. Make sure that the information is correct.
9. Click the Properties button. If you are prompted for an administratorpassword or confirmation, type the password or provide confirmation.Check the ″Device status″ box and make sure the device is workingproperly. If not, click the Troubleshoot button.
Chapter 3. Solving computer problems 23

Solution (continued):
For Windows XP:
1. Right-click on the desktop, click Properties to open the DisplayProperties window, then click the Settings tab.
2. Check whether the screen resolution and color quality are correctly set.
3. Click Advanced.
4. Click the Adapter tab.
5. Make sure that the correct device driver name is shown in the adapterinformation window.Note: The device driver name depends on the video chip that has beeninstalled on your computer.
6. Click the Properties button. Check the ″Device status″ box and make surethat the device is working properly. If not, click the Troubleshoot button.
7. Click the Monitor tab.
8. Make sure that the information is correct.
9. Click the Properties button. Check the ″Device status″ box and make surethat the device is working properly. If not, click the Troubleshoot button.
Problem:A message, “Unable to create overlay window,” appears when I try to startDVD playback.-or-I get poor or no playback while running video playback, DVD playback, orgame applications.
Solution:Do either of the following:
v If you are using 32-bit color mode, change the color depth to 16-bit mode.
v If you are using an external display device with a desktop size of 1600 ×1200 or larger (4:3), or 1680 × 1050 (16:10) or larger, reduce the refresh rateor color depth.
24 ThinkPad® SL300, SL400, and SL500 Service and Troubleshooting Guide

Battery problems
Problem:The battery does not charge.-or-The operating time for a fully charged battery is short.-or-The battery cannot be fully charged by the power-off method in the standardcharge time for the computer.
Solution:For details, see ″Problem solving″ in Access Help
Problem:The computer does not operate with a fully charged battery.
Solution:The surge protector in the battery might be active. Turn off the computer forone minute to reset the protector; then turn on the computer again.
Problem:The computer shuts down before the battery status indicator shows empty.-or-The computer operates after the battery status indicator shows empty.
Solution:Discharge and recharge the battery.
AC adapter problems
Problem:The AC adapter is connected to the computer and the working electricaloutlet, but the power adapter (power plug) icon is not displayed on the taskbar. Also the AC power indicator does not light up.
Solution:
1. Make sure that the connection of the AC adapter is correct. Forconnecting the AC adapter, see the Setup Instructions manual included inthe shipping contents of your computer.
2. If the above step is correct, turn off the computer, then disconnect the ACadapter and uninstall the main battery.
3. Reinstall the battery and reconnect the AC adapter, then turn on thecomputer.
4. If the power adapter icon still does not appear on the task bar and theAC power indicator does not light up, have the AC adapter and yourcomputer serviced.
Chapter 3. Solving computer problems 25

Hard disk drive (HDD) problems
Problem:After setting a hard disk password on the HDD of the computer, you movedthe drive to another computer. Now you cannot unlock the hard diskpassword.
Solution:Your computer supports an enhanced password algorithm. Computers olderthan yours may not support such a security function.
Fingerprint reader problems
Problem:You cannot register or authenticate your finger.
Solution:If your finger has any of the following conditions, you may not be able toregister or authenticate it.
v Your finger is wrinkled, rough, dry, injured, stained, oily, or wet.
v The surface of your finger is very different from when you enrolled yourfingerprint.
To improve the situation, try the following:
v If your hands are too dry, apply lotion to them.
v Clean or wipe your hands to remove any excess dirt or moisture from thefingers.
v Enroll and use a different finger for authentication.
Startup problems
Problem:The Microsoft® Windows operating system will not start.
Solution:Use the Rescue and Recovery workspace or recovery discs to help solve oridentify your problem. For details about Rescue and Recovery, see Chapter 4,“Recovery options,” on page 29.
26 ThinkPad® SL300, SL400, and SL500 Service and Troubleshooting Guide

Problem:When you start up your computer, the operating system does not start upfrom the device that should start it up.
Solution:You may need to confirm the startup sequence of your computer as follows:
1. Turn off the computer, and then turn it on again.
2. When the ThinkPad logo comes up, immediately press F1 to enter theBIOS Setup Utility.
3. Select Startup, and press Enter.
4. Select Boot, and press Enter.
5. Make sure that the device is configured so that it can start up theoperating system.
6. To save the change, press F10. Select Yes and press Enter.
Chapter 3. Solving computer problems 27

28 ThinkPad® SL300, SL400, and SL500 Service and Troubleshooting Guide
Chapter 4. Recovery options
Introducing Rescue and Recovery
If Windows is not running properly, use the Rescue and Recovery workspaceto help solve or identify your problem.1. Turn off the computer, and then turn it on again.2. When the ThinkPad logo comes up, immediately press the Lenovo Care
button, F11, or Enter key.3. After the Rescue and Recovery workspace opens, you can do the
following:v Rescue and Restore your files, folders, or backups.v Configure your system settings and passwords.v Communicate using the Internet and link to the support site.v Troubleshoot and diagnose problems using diagnostics.
For more information about using Rescue and Recovery features, see“Problem solving” in Access Help.
Restoring the factory contents
The complete backup of all the files and programs that Lenovo preinstalled onyour computer may have shipped on recovery discs with your computer orresides in a hidden protected area, or partition, of the HDD. Although hidden,the backups in the partition consume the drive space. Therefore, whenchecking the capacity of your HDD according to Windows, you might notethat the total capacity of the storage drive appears to be smaller thananticipated. This discrepancy is explained by the contents of the hiddenpartition.
The Product Recovery Program contained within this area enables you torestore the complete contents of your HDD to the same state as it was whenoriginally shipped from the factory.
If you are using the recovery discs that are shipped with your computer, theProduct Recovery Program will be restored to your computer in addition toall other content originally shipped from the factory. This will take upadditional capacity on your HDD if your computer did not initially ship withthe Product Recovery Program.
© Copyright Lenovo 2008 29
Attention:
v All files on the primary storage drive partition (usually drive C) will be deleted inthe recovery process. However, before any data is overwritten, you will be giventhe opportunity to save one or more files to other media.
v If your optical drive is not attached to your ThinkPad computer during recovery,DVD software and CD-recording software will not be installed. To ensure that theywill be installed correctly, install the optical drive before performing a recoveryoperation.
v Recovery takes several hours. The length of time depends on the method you use.If you use recovery discs which you have created or purchased, recovery takes atleast five hours.
Before restoring the system, initialize the settings of the BIOS Setup Utility:1. Enter BIOS Setup Utility.2. Press F9 to restore the default system settings. Select Yes and press Enter.3. Press F10 to save the system settings. Select Yes and press Enter. The
computer will restart.
Restoring the factory contents from the service partition1. If possible, save all your files and shut down your operating system.2. Turn off the computer, and then turn it on again.3. When the ThinkPad logo comes up, immediately press the Lenovo Care
button, F11, or Enter key. The Rescue and Recovery workspace opens.4. Click Full Restore and follow the instructions on the screen.
Restoring the factory contents using the recovery discs
If a set of recovery discs is enclosed with your computer, or you have createdor purchased recovery discs, you can restore the factory contents by using thediscs in the following procedure:1. Make sure that in the BIOS Setup Utility the startup sequence is set so that
the system starts up from the recovery discs.2. Insert the Rescue and Recovery disc into the DVD drive.3. Restart the computer. After a short wait, the Rescue and Recovery
workspace opens.4. Click Full Restore and follow the instructions on the screen.
30 ThinkPad® SL300, SL400, and SL500 Service and Troubleshooting Guide

Recovering data
If you performed a backup operation using the Rescue and Recoveryprogram, you also have one or more backups stored that reflect the contentsof the HDD as it existed at various points in time. These backups might bestored on your HDD, or a network drive, or on removable media, dependingon the options you selected during the backup operation.
You can use either the Rescue and Recovery program or the Rescue andRecovery workspace to restore the contents of the HDD to an earlier stateusing any of the stored backups. The Rescue and Recovery workspace onyour HDD model runs independently of the Windows operating system.Therefore, you can start it by pressing the Lenovo Care button, F11, or Enterkey when prompted during startup.
After the Rescue and Recovery workspace opens you can perform a recoveryoperation, even if you are unable to start Windows.
Chapter 4. Recovery options 31

32 ThinkPad® SL300, SL400, and SL500 Service and Troubleshooting Guide

Chapter 5. Upgrading and replacing devices
Replacing the battery
Important:
Read Safety and Warranty Guide before replacing the battery.
To replace the battery, do the following:1. Turn off the computer, or enter hibernation mode. Then disconnect the
AC adapter and all cables from the computer.2. Close the computer display, and turn the computer over.3. Unlock the battery latch by sliding it to the left �1�. Then, remove the
battery �2�.
2
1
4. Install a fully charged battery.
© Copyright Lenovo 2008 33
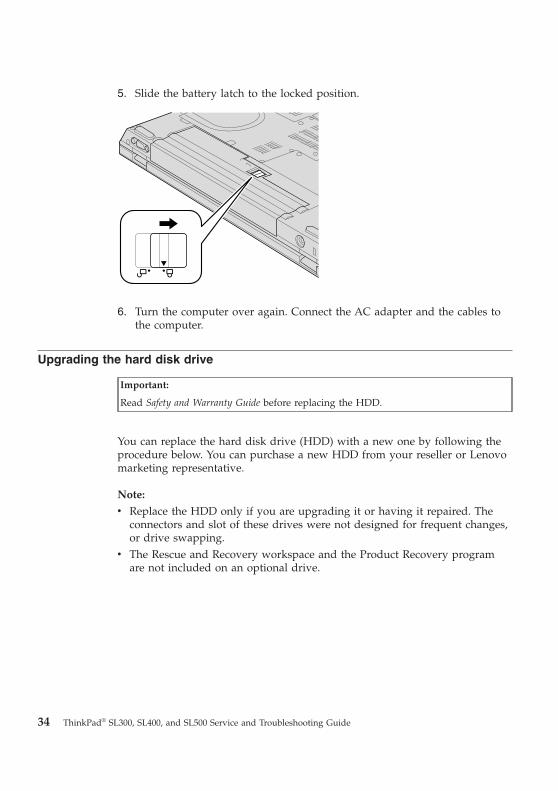
5. Slide the battery latch to the locked position.
6. Turn the computer over again. Connect the AC adapter and the cables tothe computer.
Upgrading the hard disk drive
Important:
Read Safety and Warranty Guide before replacing the HDD.
You can replace the hard disk drive (HDD) with a new one by following theprocedure below. You can purchase a new HDD from your reseller or Lenovomarketing representative.
Note:
v Replace the HDD only if you are upgrading it or having it repaired. Theconnectors and slot of these drives were not designed for frequent changes,or drive swapping.
v The Rescue and Recovery workspace and the Product Recovery programare not included on an optional drive.
34 ThinkPad® SL300, SL400, and SL500 Service and Troubleshooting Guide

Attention:
Handling an HDD
v Do not drop the drive or subject it to physical shocks. Place the drive on a softmaterial, such as cloth, which absorbs physical shock.
v Do not apply pressure to the cover of the drive.
v Do not touch the connector.
The drive is very sensitive. Incorrect handling can cause damage and permanent lossof data on the drive. Before removing the HDD, make a backup copy of all the dataon the drive, and turn the computer off. Never remove the drive while the system isoperating, in standby mode, or in hibernation mode.
To replace the HDD, do the following:1. Turn off the computer; then disconnect the AC adapter and all cables
from the computer.2. Close the computer display, and turn the computer over.3. Remove the battery.4. Remove the screw that secures the slot cover �1�, and remove the slot
cover �2�.
1
2
Chapter 5. Upgrading and replacing devices 35
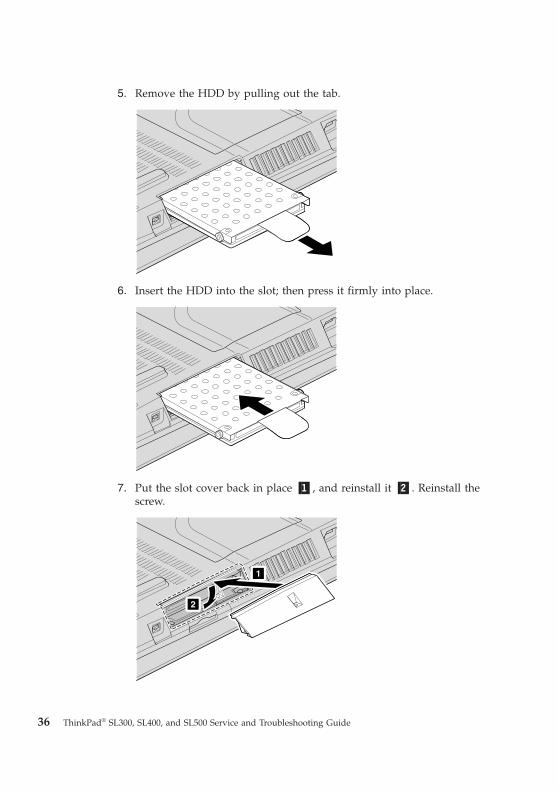
5. Remove the HDD by pulling out the tab.
6. Insert the HDD into the slot; then press it firmly into place.
7. Put the slot cover back in place �1�, and reinstall it �2�. Reinstall thescrew.
1
2
36 ThinkPad® SL300, SL400, and SL500 Service and Troubleshooting Guide

8. Reinstall the battery.9. Turn the computer over again. Connect the AC adapter and the cables to
the computer.
Replacing memory
Important:
Read Safety and Warranty Guide before replacing memory.
Increasing memory capacity is an effective way to make programs run faster.You can increase the amount of memory in your computer by installing adouble data rate two (DDR2) synchronous dynamic random access memory(SDRAM) unbuffered small outline dual inline memory module (SO-DIMM),available as an option, in the memory slot of your computer. SO-DIMMs withdifferent capacities are available.
Note: Use only the memory types supported by your computer. If youincorrectly install the optional memory or install an unsupported memorytype, a warning beep will sound when you try to start the computer.
To install an SO-DIMM, do the following:1. Touch a metal table or a grounded metal object. This action reduces any
static electricity in your body, which could damage the SO-DIMM. Donot touch the contact edge of the SO-DIMM.
2. Turn off the computer; then disconnect the AC adapter and all cablesfrom the computer.
3. Close the computer display, and turn the computer over.4. Remove the battery.
Chapter 5. Upgrading and replacing devices 37

5. Loosen the screws �1�, and then remove the memory slot cover �2�.
ThinkPad SL 300:
2
1
ThinkPad SL 400:
1
2
38 ThinkPad® SL300, SL400, and SL500 Service and Troubleshooting Guide
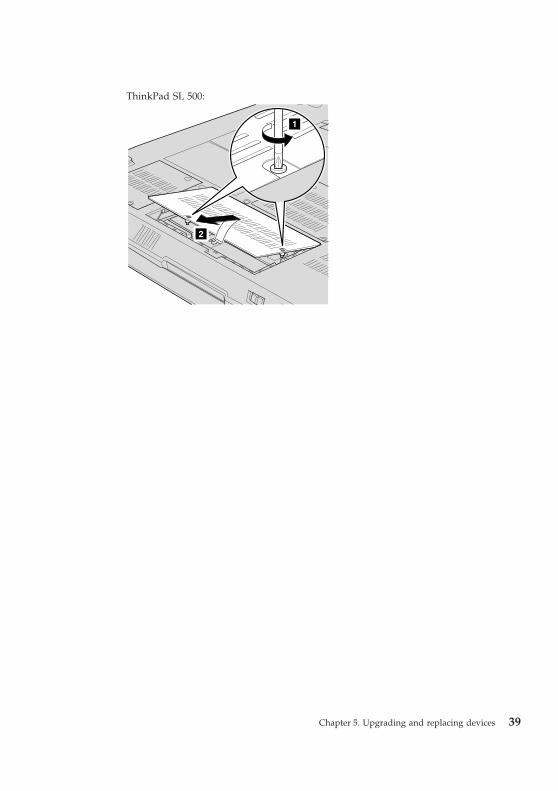
ThinkPad SL 500:
2
1
Chapter 5. Upgrading and replacing devices 39

6. If the two SO-DIMMs are already installed in the memory slots, removean SO-DIMM to make room for the new one by pressing out on thelatches on both edges of the socket at the same time. Be sure to save itfor future use.
ThinkPad SL 300:
2
1 1
ThinkPad SL 400 and SL500:
2
1 1
7. Find the notch on the contact edge of the SO-DIMM.
Attention: To avoid damaging the SO-DIMM, do not touch its contactedge.
40 ThinkPad® SL300, SL400, and SL500 Service and Troubleshooting Guide

8. With the notched end of the SO-DIMM toward the contact edge side ofthe socket, insert the SO-DIMM into the socket at an angle of about 20degrees �1�; then press it firmly�2�.
ThinkPad SL 300:
2
1
ThinkPad SL 400 and SL500:
20
1
2
1
2
9. Pivot the SO-DIMM downward until it snaps into place.10. Make sure that the card is firmly fixed in the slot and does not move
easily.
Chapter 5. Upgrading and replacing devices 41

11. Align the memory slot cover as shown in the drawing �1�, and put itback into place �2�. Tighten the screws �3�.
ThinkPad SL 300:
11
3
2
ThinkPad SL 400:
11
1
1
1
3
2
42 ThinkPad® SL300, SL400, and SL500 Service and Troubleshooting Guide

ThinkPad SL 500:
2
1
1
1
3
12. Reinstall the battery.13. Turn the computer over, and reconnect the AC adapter and the cables to
the computer.
To make sure that the SO-DIMM is installed correctly, do as follows:1. Turn on the computer.2. When the ThinkPad logo comes up, immediately press F1 to enter the
BIOS Setup Utility.3. The “Installed memory” item shows the total amount of memory installed
in your computer.
Chapter 5. Upgrading and replacing devices 43

44 ThinkPad® SL300, SL400, and SL500 Service and Troubleshooting Guide

Chapter 6. Getting help and service
Getting help and service
If you need help, service, technical assistance, or just want more informationabout ThinkPad computers, you will find a wide variety of sources availablefrom Lenovo to assist you. This section contains information about where togo for additional information about ThinkPad computers, what to do if youexperience a problem with your computer, and whom to call for serviceshould it be necessary.
Microsoft Service Packs are the latest software source for Windows productupdates. They are available via Web download (connection charges mayapply) or via a disc. For more specific information and links, please go to theMicrosoft Web site at http://www.microsoft.com. Lenovo offers Up andRunning technical assistance with installation of, or questions related to,Service Packs for your Lenovo-preinstalled Microsoft Windows product. Forinformation, please contact the Customer Support Center at the phonenumber(s) listed in “Worldwide telephone list” on page 47. Some fees mightapply.
Getting help on the Web
The Lenovo Web site on the World Wide Web has up-to-date informationabout ThinkPad computers and support. The address for the PersonalComputing home page is http://www.lenovo.com/think.
You can find support information for your ThinkPad computer athttp://www.lenovo.com/think/support. Research this Web site to learn howto solve problems, find new ways to use your computer, and learn aboutoptions that can make working with your ThinkPad computer even easier.
Calling the Customer Support Center
If you have tried to correct the problem yourself and still need help, duringthe warranty period, you can get help and information by telephone throughthe Customer Support Center. The following services are available during thewarranty period:v Problem determination - Trained personnel are available to assist you with
determining if you have a hardware problem and deciding what action isnecessary to fix the problem.
© Copyright Lenovo 2008 45

v Lenovo hardware repair - If the problem is determined to be caused byLenovo hardware under warranty, trained service personnel are available toprovide the applicable level of service.
v Engineering change management - Occasionally, there might be changesthat are required after a product has been sold. Lenovo or your reseller, ifauthorized by Lenovo, will make selected Engineering Changes (ECs)available that apply to your hardware.
The following items are not covered:v Replacement or use of parts not manufactured for or by Lenovo or
nonwarranted parts
Note: All warranted parts contain a 7-character identification in the formatFRU XXXXXXX
v Identification of software problem sourcesv Configuration of BIOS as part of an installation or upgradev Changes, modifications, or upgrades to device driversv Installation and maintenance of network operating systems (NOS)v Installation and maintenance of application programs
To determine if your machine is in warranty and when the warranty expires,go to http://www.lenovo.com/think/support, and click Warranty, thenfollow the instructions on the screen.
For the terms and conditions of the Lenovo Limited Warranty that applies toyour Lenovo hardware product, see Chapter 3, ″Warranty information″ in theSafety and Warranty Guide included with your Lenovo hardware product.
If possible, be near your computer when you make your call in case thetechnical assistance representative needs to help you resolve a computerproblem. Please ensure that you have downloaded the most current driversand system updates, run diagnostics, and recorded information before youcall. When calling for technical assistance, please have the followinginformation available:v Machine Type and Modelv Serial numbers of your computer, monitor, and other components, or your
proof of purchasev Description of the problemv Exact wording of any error messagesv Hardware and software configuration information for your system
The telephone numbers for your Customer Support Center location arelocated in the “Worldwide telephone list” on page 47 section of this guide.
Note: Telephone numbers are subject to change without notice. For the latestlist of Customer Support Center telephone numbers and hours of operation,
46 ThinkPad® SL300, SL400, and SL500 Service and Troubleshooting Guide

visit the Support Web site at http://www.lenovo.com/support/phone. If thenumber for your country or region is not listed, contact your Lenovo reselleror Lenovo marketing representative.
Getting help around the world
If you travel with your computer or relocate it to a country where yourThinkPad machine type is sold, your computer might be eligible forInternational Warranty Service, which automatically entitles you to obtainwarranty service throughout the warranty period. Service will be performedby service providers authorized to perform warranty service.
Service methods and procedures vary by country, and some services mightnot be available in all countries. International Warranty Service is deliveredthrough the method of service (such as depot, carry-in, or on-site service) thatis provided in the servicing country. Service centers in certain countries mightnot be able to service all models of a particular machine type. In somecountries, fees and restrictions might apply at the time of service.
To determine whether your computer is eligible for International WarrantyService and to view a list of the countries where service is available, go tohttp://www.lenovo.com/think/support, click Warranty, and follow theinstructions on the screen.
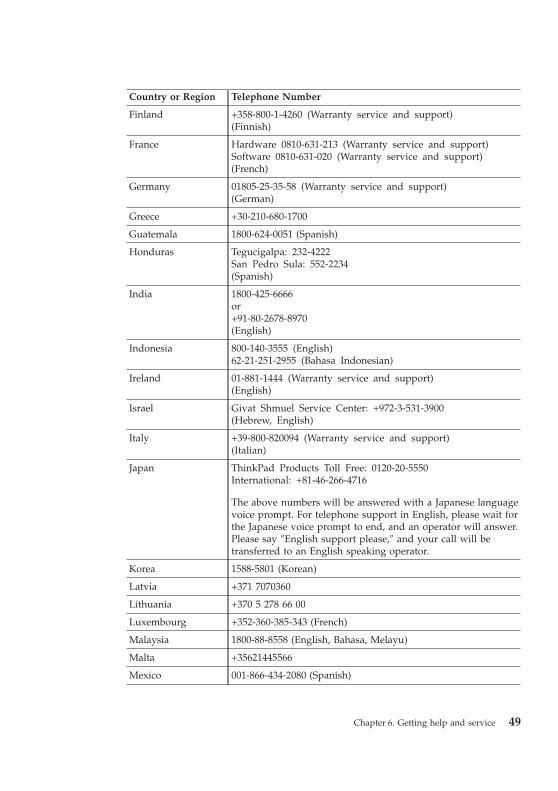
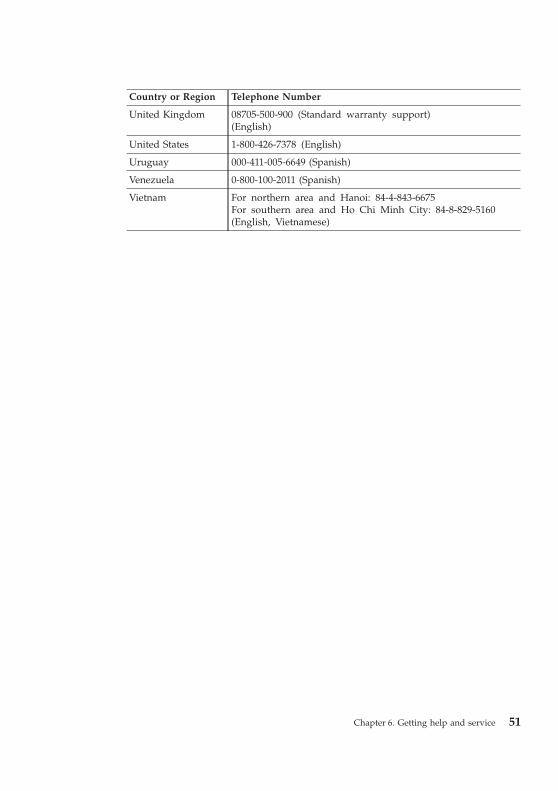
Worldwide telephone list
Phone numbers are subject to change without notice. For the most currentphone numbers, go to http://www.lenovo.com/support/phone.
Country or Region Telephone Number
Africa Africa: +44 (0)1475-555-055South Africa: +27-11-3028888 and 0800110756Central Africa: Contact the nearest Lenovo Business Partner
Argentina 0800-666-0011 (Spanish)
Australia 131-426 (English)
Austria 01-211-454-610 (Warranty service and support)(German)
Belgium 02-225-3611 (Warranty service and support)(Dutch, French)
Bolivia 0800-10-0189 (Spanish)
Chapter 6. Getting help and service 47

Country or Region Telephone Number
Brazil Sao Paulo region: (11) 3889-8986Outside Sao Paulo region: 0800-701-4815(Brazilian Portuguese)
Canada 1-800-565-3344(English, French)In Toronto only call 416-383-3344
Chile 800-361-213188-800-442-488(Spanish)
China Technical Support Line800-990-888886-10-58851110(Mandarin)
China(Hong Kong S.A.R.)
ThinkPad (Technical enquiry hotline):2516-3939 (Hong Kong)
ThinkPad Service Center:2825-6580 (Hong Kong)
Multimedia Home PC:800-938-228 (Hong Kong)
(Cantonese, English, Mandarin)
China(Macau S.A.R.)
ThinkPad (Technical enquiry hotline):0800-839 (Macau)
ThinkPad Service Center:2871-5399 (Macau)
Multimedia Home PC:0800-336 (Macau)
(Cantonese, English, Mandarin)
Colombia 1-800-912-3021 (Spanish)
Costa Rica 0-800-011-1029 (Spanish)
Croatia 0800-0426
Cyprus +357-22-841100
Czech Republic +420-2-7213-1316
Denmark 7010-5150 (Warranty service and support)(Danish)
Dominican Republic 1-866-434-2080 (Spanish)
Ecuador 1-800-426911 (Spanish)
Egypt +202-35362525
El Salvador 800-6264 (Spanish)
Estonia +372 66 00 800+372 6776793
48 ThinkPad® SL300, SL400, and SL500 Service and Troubleshooting Guide
Country or Region Telephone Number
Finland +358-800-1-4260 (Warranty service and support)(Finnish)
France Hardware 0810-631-213 (Warranty service and support)Software 0810-631-020 (Warranty service and support)(French)
Germany 01805-25-35-58 (Warranty service and support)(German)
Greece +30-210-680-1700
Guatemala 1800-624-0051 (Spanish)
Honduras Tegucigalpa: 232-4222San Pedro Sula: 552-2234(Spanish)
India 1800-425-6666or+91-80-2678-8970(English)
Indonesia 800-140-3555 (English)62-21-251-2955 (Bahasa Indonesian)
Ireland 01-881-1444 (Warranty service and support)(English)
Israel Givat Shmuel Service Center: +972-3-531-3900(Hebrew, English)
Italy +39-800-820094 (Warranty service and support)(Italian)
Japan ThinkPad Products Toll Free: 0120-20-5550International: +81-46-266-4716
The above numbers will be answered with a Japanese languagevoice prompt. For telephone support in English, please wait forthe Japanese voice prompt to end, and an operator will answer.Please say ″English support please,″ and your call will betransferred to an English speaking operator.
Korea 1588-5801 (Korean)
Latvia +371 7070360
Lithuania +370 5 278 66 00
Luxembourg +352-360-385-343 (French)
Malaysia 1800-88-8558 (English, Bahasa, Melayu)
Malta +35621445566
Mexico 001-866-434-2080 (Spanish)
Chapter 6. Getting help and service 49

Country or Region Telephone Number
Middle East +44 (0)1475-555-055
Netherlands +31-20-514-5770 (Dutch)
New Zealand 0800-733-222 (English)
Nicaragua 001-800-220-1830 (Spanish)
Norway 8152-1550 (Warranty service and support)(Norwegian)
Panama 206-6047001-866-434-2080(Lenovo Customer Support Center- toll Free)(Spanish)
Peru 0-800-50-866 (Spanish)
Philippines 1800-1888-1426 (English)63-2-995-8420 (Filipino)
Poland +48-22-878-6999
Portugal +351 21 892 7046 (Portuguese)
Romania +4-021-224-4015
Russia Moscow: +7 (495) 258 6300Toll free: 8 800 200 6300(Russian)
Singapore 1800-3172-888 (English, Bahasa, Melayu)
Slovakia +421-2-4954-5555
Slovenia +386-1-200-50-60
Spain 91-714-79830901-100-000(Spanish)
Sri Lanka +9411 2493547+9411 2493548(English)
Sweden 077-117-1040 (Warranty service and support)(Swedish)
Switzerland 0800-55-54-54 (Warranty service and support)(German, French, Italian)
Taiwan 886-2-8723-9799or0800-000-700(Mandarin)
Thailand 1-800-299-229 (Thai)
Turkey 00800-4463-2041 (Turkish)
50 ThinkPad® SL300, SL400, and SL500 Service and Troubleshooting Guide
Country or Region Telephone Number
United Kingdom 08705-500-900 (Standard warranty support)(English)
United States 1-800-426-7378 (English)
Uruguay 000-411-005-6649 (Spanish)
Venezuela 0-800-100-2011 (Spanish)
Vietnam For northern area and Hanoi: 84-4-843-6675For southern area and Ho Chi Minh City: 84-8-829-5160(English, Vietnamese)
Chapter 6. Getting help and service 51

52 ThinkPad® SL300, SL400, and SL500 Service and Troubleshooting Guide

Appendix A. Warranty information
This Appendix provides information regarding the warranty period and typeof warranty service applicable to your Lenovo hardware product in yourcountry or region. For the terms and conditions of the Lenovo LimitedWarranty that applies to your Lenovo hardware product, see Chapter 3,Warranty Information in the Safety and Warranty Guide included with yourLenovo hardware product.
MachineType
Country or Region of Purchase Warranty period Types ofWarrantyService
2738, 2743,2746
US, Canada, Mexico, Brazil,Australia, and Japan
Parts and Labor - 1 years 3
Battery pack - 1 year 1
Other Parts and Labor - 1 years 4
Battery pack - 1 year 1
Types of warranty service
1. Customer Replaceable Unit (″CRU″) Service
Under CRU Service, your Service Provider will ship CRUs to you forinstallation by you. CRU information and replacement instructions areshipped with your product and are available from Lenovo at any timeupon request. CRUs that are easily installed by you are called Self-serviceCRUs, while Optional-service CRUs may require some technical skill andtools. Installation of Self-service CRUs is your responsibility. You mayrequest that a Service Provider install Optional-service CRUs under one ofthe other types of warranty service designated for your product. Anoptional service offering may be available for purchase from Lenovo tohave Lenovo install Self-service CRUs for you. You may find a list ofCRUs and their designation in the publication that ships with yourproduct or at http://www.lenovo.com/CRUs. The requirement to return adefective CRU, if any, will be specified in the materials shipped with areplacement CRU. When return is required, 1) return instructions, aprepaid return shipping label, and a container will be included with thereplacement CRU; and 2) you may be charged for the replacement CRU ifyour Service Provider does not receive the defective CRU within thirty(30) days of your receipt of the replacement.
© Copyright Lenovo 2008 53

2. On-site Service
Under On-Site Service, your Service Provider will either repair orexchange the product at your location. You must provide a suitableworking area to allow disassembly and reassembly of the Lenovo product.For some products, certain repairs may require your Service Provider tosend the product to a designated service center.
3. Courier or Depot Service
Under Courier or Depot Service, your product will be repaired orexchanged at a designated service center, with shipping arranged by yourService Provider. You are responsible for disconnecting the product. Ashipping container will be provided to you for you to return your productto a designated service center. A courier will pick up your product anddeliver it to the designated service center. Following its repair or exchange,the service center will arrange the return delivery of the product to you.
4. Customer Carry-In or Mail-In Service
Under Customer Carry-In or Mail-In Service, your product will berepaired or exchanged at a designated service center, with delivery orshipping arranged by you. You are responsible to deliver or mail, as yourService Provider specifies, (prepaid by you unless specified otherwise) theproduct, suitably packaged to a designated location. After the product hasbeen repaired or exchanged, it will be made available for your collection.Failure to collect the product may result in your Service Providerdisposing of the product as it sees fit. For Mail-in Service, the product willbe returned to you at Lenovo’s expense, unless your Service Providerspecifies otherwise.
5. Product Exchange Service
Under Product Exchange Service, Lenovo will ship a replacement productto your location. You are responsible for its installation and verification ofits operation. The replacement product becomes your property in exchangefor the failed product, which becomes the property of Lenovo. You mustpack the failed product in the shipping carton used to ship thereplacement product and return it to Lenovo. Transportation charges, bothways, are paid by Lenovo. Failure to use the carton in which thereplacement product was received may result in your responsibility fordamage to the failed product during shipment. You may be charged forthe replacement product if Lenovo does not receive the failed productwithin thirty (30) days of your receipt of the replacement product.
54 ThinkPad® SL300, SL400, and SL500 Service and Troubleshooting Guide
Appendix B. Customer Replaceable Units (CRUs)
Customer Replaceable Units (CRUs) are computer parts that the customer canupgrade or replace. There are two types of CRU: self-service andoptional-service. Self-service CRUs are easy to install. They may be standaloneor latched, or require a screwdriver to remove a maximum of two screws,whereas optional-service CRUs require some technical skill, as well as toolssuch as a screwdriver. However, both self-service and optional-service CRUsare safe for the customer to remove and replace.
Customers are responsible for replacing all self-service CRUs. Optional-serviceCRUs can be removed and installed by customers or, during the warrantyperiod, by a Lenovo service technician.
Lenovo notebook computers contain both self-service and optional-serviceCRUs:v Self-service CRUs: these CRUs can be unplugged, or are secured by no
more than two screws. Examples of this type of CRU are the AC adapter,the power cord, the battery, and the hard drive. In some products, suchcomponents as memory, wireless cards, notebook keyboards, and palm restswith fingerprint reader and touchpad may also be CRUs.
v Optional-service CRUs: these CRUs are isolated parts within the computerthat are concealed by an access panel, which is typically secured by morethan two screws. Once the access panel is removed, the CRU is visible. Bothtypes of CRU are listed in the table on the following page.
Online Access Help and the Lenovo Limited Warranty-01 (LLW) warranty URL“http://www.lenovo.com/CRUs” provide instructions for replacingself-service and optional-service CRUs. To start the Access Help program, clickStart, move the pointer to All Programs; then to ThinkVantage. Click AccessHelp. CRU URL offers three options: auto detect, “key in the machine type,”and a “drop down and select.” Additionally, the Service and TroubleshootingGuide (this guide) and Setup Instructions provide instructions for severalcritical CRUs.
If you are unable to access these instructions or if you have difficultyreplacing a CRU, you can use either of the following additional resources:v The Online Hardware Maintenance Manual and Online Videos, available
from the Support Web site http://www.lenovo.com/think/support/site.wss/document.do?lndocid=part-video.
© Copyright Lenovo 2008 55

v The Customer Support Center. For the telephone number of the SupportCenter for your country or region, see “Worldwide telephone list” on page47.
Note: Use only computer parts provided by Lenovo. For warrantyinformation about the CRUs for your machine type, see Chapter 3, WarrantyInformation in the Safety and Warranty Guide.
The following table provides a list of CRUs for your computer and tells whereto find the replacement instructions.
Service andTroubleshootingGuide
SetupInstructions
AccessHelp
OnlineHardwareMaintenanceManual
OnlineVideo
Self-service CRUs
AC adapter X
Power cord forAC adapter
X
TrackPoint cap X
Battery X X X X X
Hard diskdrive
X X X X
Memory X X X X
Optical drive X X X
Optional-service CRUs
Palm rest X X X
PCI ExpressMini Card forwirelessLAN/WiMAX
X X X
PCI ExpressMini Card forwireless WAN
X X X
Intel TurboMemory card
X X X
56 ThinkPad® SL300, SL400, and SL500 Service and Troubleshooting Guide
Appendix C. Features and Specifications
Features
Processorv See the system properties of your computer. You can do this as follows:
Click Start, right-click Computer (in Windows XP, My Computer); thenfrom the pull down menu select Properties.
Memoryv Double data rate (DDR) 2 synchronous dynamic random access memory
Storage devicev 2.5-inch (64 mm) hard disk drive
DisplayThe color display uses TFT technology:v Size: 13.3 inch (338 mm)
Resolution:– LCD: Up to 1280-by-800– External monitor: Up to 2048-by-1536
v Size: 14.1 inch (358 mm)Resolution:– LCD: Up to 1440-by-900, depending on the model– External monitor: Up to 2048-by-1536
v Size: 15.4 inch (391 mm)Resolution:– LCD: Up to 1680-by-1050, depending on the model– External monitor: Up to 2048-by-1536
v Brightness controlv Integrated camera (on some models)
Keyboardv 84-key, 85-key, or 89-keyv UltraNav (TrackPoint and touch pad)v Fn key functionv Lenovo Care buttonv Volume control buttons
Interfacev External-monitor connectorv Stereo headphone jack
© Copyright Lenovo 2008 57

v Microphone jackv 3 Universal Serial Bus (USB) connectorsv IEEE 1394 connectorv RJ11 Modem connectorv RJ45 Ethernet connector
Card slotv Express Cardv 7-in-1 Media Card Reader
Optical drive
v Combo, Multi-Burner, or Blu-ray drive, depending on the model
Wireless features
v Integrated wireless LANv Integrated Bluetooth (on some models)v Integrated wireless WAN (on some models)v Integrated WiMax (on some models)
Security features
v Fingerprint reader (on some models)
Specifications
Size
ThinkPad SL300v Width: 320 mm (12.6 inch)v Depth: 238 mm (9.4 inch)v Height: 30 to 34 mm (1.18 inch to 1.34 inch)
ThinkPad SL400v Width: 336 mm (13.2 inch)v Depth: 247 mm (9.7 inch)v Height: 33.5 to 38.5 mm (1.31 inch to 1.52 inch)
ThinkPad SL500v Width: 358 mm (14.1 inch)v Depth: 260 mm (10.2 inch)v Height: 37 to 39 mm (1.46 inch to 1.54 inch)
58 ThinkPad® SL300, SL400, and SL500 Service and Troubleshooting Guide

Environmentv Maximum altitude without pressurization: 3048 m (10,000 ft)v Temperature
– At altitudes up to 2438 m (8000 ft)Operating: 5.0°C to 35.0°C (41°F to 95°F)Non-operating: 5.0°C to 43.0°C (41°F to 109°F)
– At altitudes above 2438 m (8000 ft)Maximum temperature when operating under the unpressurizedcondition: 31.3°C (88°F)
Note: When you charge the battery pack, its temperature must be at least10°C (50°F).
v Relative humidity:– Operating: 8% to 80%– Non-operating: 5% to 95%
Heat outputv 65 W (222 Btu/hr) maximum or 90 W (307 Btu/hr) maximum (depending
on the model)
Power source (AC adapter)v Sine-wave input at 50 to 60 Hzv Input rating of the AC adapter: 100-240 V AC, 50 to 60 Hz
Battery packv Lithium-ion (Li-Ion) battery pack
– Nominal voltage: 10.8 V DC– Capacity: 4.8 AH
Note: On your computer the modem connector adjoins the battery slot. If aThinkPad 9-Cell Li-Ion Battery is installed, to use the modem connector youneed to replace the battery with a ThinkPad 4-Cell Li-Ion Battery or ThinkPad6-Cell Li-Ion Battery.
Battery life
v For percentage of remaining battery power, see the Power Manager Gaugeon the task bar.
Appendix C. Features and Specifications 59

60 ThinkPad® SL300, SL400, and SL500 Service and Troubleshooting Guide
Appendix D. Notices
Notices
Lenovo may not offer the products, services, or features discussed in thisdocument in all countries. Consult your local Lenovo representative forinformation on the products and services currently available in your area. Anyreference to a Lenovo product, program, or service is not intended to state orimply that only that Lenovo product, program, or service may be used. Anyfunctionally equivalent product, program, or service that does not infringeany Lenovo intellectual property right may be used instead. However, it is theuser’s responsibility to evaluate and verify the operation of any other product,program, or service.
Lenovo may have patents or pending patent applications covering subjectmatter described in this document. The furnishing of this document does notgive you any license to these patents. You can send license inquiries, inwriting, to:
Lenovo (United States), Inc.1009 Think Place - Building OneMorrisville, NC 27560U.S.A.Attention: Lenovo Director of Licensing
LENOVO PROVIDES THIS PUBLICATION “AS IS” WITHOUT WARRANTYOF ANY KIND, EITHER EXPRESS OR IMPLIED, INCLUDING, BUT NOTLIMITED TO, THE IMPLIED WARRANTIES OF NON-INFRINGEMENT,MERCHANTABILITY OR FITNESS FOR A PARTICULAR PURPOSE. Somejurisdictions do not allow disclaimer of express or implied warranties incertain transactions, therefore, this statement may not apply to you.
This information could include technical inaccuracies or typographical errors.Changes are periodically made to the information herein; these changes willbe incorporated in new editions of the publication. Lenovo may makeimprovements and/or changes in the product(s) and/or the program(s)described in this publication at any time without notice.
The products described in this document are not intended for use inimplantation or other life support applications where malfunction may resultin injury or death to persons. The information contained in this documentdoes not affect or change Lenovo product specifications or warranties.Nothing in this document shall operate as an express or implied license orindemnity under the intellectual property rights of Lenovo or third parties. All
© Copyright Lenovo 2008 61

information contained in this document was obtained in specific environmentsand is presented as an illustration. The result obtained in other operatingenvironments may vary.
Lenovo may use or distribute any of the information you supply in any wayit believes appropriate without incurring any obligation to you.
Any references in this publication to non-Lenovo Web sites are provided forconvenience only and do not in any manner serve as an endorsement of thoseWeb sites. The materials at those Web sites are not part of the materials forthis Lenovo product, and use of those Web sites is at your own risk.
Any performance data contained herein was determined in a controlledenvironment. Therefore, the result obtained in other operating environmentsmay vary significantly. Some measurements may have been made ondevelopment-level systems and there is no guarantee that these measurementswill be the same on generally available systems. Furthermore, somemeasurements may have been estimated through extrapolation. Actual resultsmay vary. Users of this document should verify the applicable data for theirspecific environment.
Export classification noticeThis product is subject to the United States Export Administration Regulations(EAR) and has an Export Classification Control Number (ECCN) of 4A994.b.It can be re-exported except to any of the embargoed countries in the EAR E1country list.
Electronic emissions notices
The following information refers to ThinkPad SL300, SL400, and SL500,machine type 2738, 2743, and 2746.
Federal Communications Commission (FCC) StatementThis equipment has been tested and found to comply with the limits for aClass B digital device, pursuant to Part 15 of the FCC Rules. These limits aredesigned to provide reasonable protection against harmful interference in aresidential installation. This equipment generates, used, and can radiate radiofrequency energy and, if not installed and used in accordance with theinstructions, may cause harmful interference to radio communications.However, there is no guarantee the interference will not occur in a particularinstallation. If this equipment does cause harmful interference to radio ortelevision reception, which can be determined by turning the equipment offand on, the user is encouraged to try to correct the interference by one ormore of the following measures:v Reorient or relocate the receiving antenna.v Increase the separation between the equipment and receiver.
62 ThinkPad® SL300, SL400, and SL500 Service and Troubleshooting Guide
v Connect the equipment into an outlet on a circuit different from that towhich the receiver is connected.
v Consult an authorized dealer or service representative for help.
Properly shielded and grounded cables and connectors must be used in orderto meet FCC emission limits. Proper cables and connectors are available fromLenovo authorized dealers. Lenovo is not responsible for any radio ortelevision interference caused by using other than recommended cables orconnectors or by unauthorized changes or modifications to this equipment.Unauthorized changes or modifications could void the user’s authority tooperate the equipment.
This device complies with Part 15 of the FCC Rules. Operation is subject tothe following two conditions: (1) this device may not cause harmfulinterference, and (2) this device must accept any interference received,including interference that may cause undesired operation.
Responsible party:Lenovo (United States) Incorporated1009 Think Place - Building OneMorrisville, NC 27560Telephone: 1-919-294-5900
Industry Canada Class B emission compliance statementThis Class B digital apparatus complies with Canadian ICES-003.
Avis de conformité à la réglementation d’Industrie CanadaCet appareil numérique de la classe B est conforme à la norme NMB-003 duCanada.
European Union EMC Directive conformance statementThis product is in conformity with the protection requirements of EU CouncilDirective 2004/108/EC on the approximation of the laws of the MemberStates relating to electromagnetic compatibility. Lenovo cannot acceptresponsibility for any failure to satisfy the protection requirements resultingfrom a nonrecommended modification of the product, including theinstallation of non-Lenovo option cards.
This product has been tested and found to comply with the limits for Class BInformation Technology Equipment according to CISPR 22/European
Appendix D. Notices 63
Standard EN 55022. The limits for Class B equipment were derived for typicalresidential environments to provide reasonable protection against interferencewith licensed communication devices.
EU-EMC Directive (2004/108/EC) EN 55022 class B Statement ofCompliance
Deutschsprachiger EU Hinweis
Hinweis für Geräte der Klasse B EU-Richtlinie zur ElektromagnetischenVerträglichkeit
Dieses Produkt entspricht den Schutzanforderungen der EU-Richtlinie2004/108/EG (früher 89/336/EWG) zur Angleichung der Rechtsvorschriftenüber die elektromagnetische Verträglichkeit in den EU-Mitgliedsstaaten undhält die Grenzwerte der EN 55022 Klasse B ein.
Um dieses sicherzustellen, sind die Geräte wie in den Handbüchernbeschrieben zu installieren und zu betreiben. Des Weiteren dürfen auch nurvon der Lenovo empfohlene Kabel angeschlossen werden. Lenovo übernimmtkeine Verantwortung für die Einhaltung der Schutzanforderungen, wenn dasProdukt ohne Zustimmung der Lenovo verändert bzw. wennErweiterungskomponenten von Fremdherstellern ohne Empfehlung derLenovo gesteckt/eingebaut werden.
Deutschland:
Einhaltung des Gesetzes über die elektromagnetische Verträglichkeit vonGeräten
Dieses Produkt entspricht dem “Gesetz über die elektromagnetischeVerträglichkeit von Betriebsmitteln“ EMVG (früher “Gesetz über dieelektromagnetische Verträglichkeit von Geräten“). Dies ist die Umsetzung derEU-Richtlinie 2004/108/EG (früher 89/336/EWG) in der BundesrepublikDeutschland.
Zulassungsbescheinigung laut dem Deutschen Gesetz über dieelektromagnetische Verträglichkeit von Betriebsmitteln, EMVG vom 20. Juli2007 (früher Gesetz über die elektromagnetische Verträglichkeit vonGeräten), bzw. der EMV EG Richtlinie 2004/108/EC (früher 89/336/EWG), fürGeräte der Klasse B.
Dieses Gerät ist berechtigt, in Übereinstimmung mit dem Deutschen EMVGdas EG-Konformitätszeichen - CE - zu führen. Verantwortlich für dieKonformitätserklärung nach Paragraf 5 des EMVG ist die Lenovo(Deutschland) GmbH, Gropiusplatz 10, D-70563 Stuttgart.
64 ThinkPad® SL300, SL400, and SL500 Service and Troubleshooting Guide
Informationen in Hinsicht EMVG Paragraf 4 Abs. (1) 4:Das Gerät erfüllt die Schutzanforderungen nach EN 55024 undEN 55022 Klasse B.
Japanese VCCI Class B statement
EU WEEE Statements
The Waste Electrical and Electronic Equipment (WEEE) mark applies only tocountries within the European Union (EU) and Norway. Appliances arelabeled in accordance with European Directive 2002/96/EC concerning wasteelectrical and electronic equipment (WEEE). The Directive determines theframework for the return and recycling of used appliances as applicablethroughout the European Union. This label is applied to various products toindicate that the product is not to be thrown away, but rather reclaimed uponend of life per this Directive.
Users of electrical and electronic equipment (EEE) with the WEEE markingper Annex IV of the WEEE Directive must not dispose of end of life EEE asunsorted municipal waste, but use the collection framework available to themfor the return, recycle, recovery of WEEE and minimize any potential effectsof EEE on the environment and human health due to the presence ofhazardous substances. For additional WEEE information go to:http://www.lenovo.com/lenovo/environment.
Notice for users in the U.S.A.
California Perchlorate Information:
Products containing CR (manganese dioxide) lithium coin cell batteries maycontain perchlorate.
Perchlorate Material — special handling may apply. See the flowing web site:
http://www.dtsc.ca.gov/hazardouswaste/perchlorate
Appendix D. Notices 65

ENERGY STAR model information
ENERGY STAR® is a joint program of the U.S. Environmental ProtectionAgency and the U.S. Department of Energy aimed at saving money andprotecting the environment through energy efficient products and practices.
Lenovo is proud to offer our customers products with the ENERGY STARqualified designation. Lenovo computers of the following machine types, ifthe ENERGY STAR mark is affixed, have been designed and tested to conformto the ENERGY STAR 4.0 program requirements for computers.
2738, 2743, 2746
By using ENERGY STAR qualified products and taking advantage of thepower-management features of your computer, you can help reduce theconsumption of electricity. Reduced electrical consumption can contribute topotential financial savings, a cleaner environment, and the reduction ofgreenhouse gas emissions.
For more information about ENERGY STAR, visit the following Web site:
http://www.energystar.gov
Lenovo encourages you to make efficient use of energy an integral part ofyour day-to-day operations. To help in this endeavor, Lenovo has preset thefollowing power-management features to take effect when your computer hasbeen inactive for a specified length of time:
66 ThinkPad® SL300, SL400, and SL500 Service and Troubleshooting Guide

Windows XP Windows Vista
v Power plan: Energy Star at AC mode
Turn off monitor: After 10 minutes
Turn off hard disks: After 15minutes
System standby: After 25 minutes
System hibernates: Never
v Power plan: Energy Star at AC mode
Turn off the display: After 10minutes
Put the computer to sleep: After 25
Advanced power settings:
- Turn off hard disks: After 15minutes
- Hibernate: Never
To awaken your computer from Sleep (Windows Vista) or System Standby(Windows XP) mode, press Fn key on your keyboard. For more informationabout these settings, see your Windows Help and Support informationsystem.
The Wake on LAN® function is set to Enable when your Lenovo computer isshipped from the factory, and the setting remains valid even when thecomputer is in Sleep or Standby mode. If you do not need to have Wake onLAN set to Enable while your computer is in Sleep or Standby mode, you canreduce the power consumption and prolong the time in Sleep or Standbymode, by switching the setting of Wake on LAN for Sleep or Standby mode toDisable. To switch the setting of Wake on LAN, go to Device Manager and doas follows:
For Windows Vista:
1. Click Start → Control panel.2. Click Hardware and Sound → Device Manager.3. In the Device Manager window, expand Network adapters.4. Right-click your network adapter device, and click Properties.5. Click the Power Management tab.6. Clear the Allow this device to wake the computer check box.7. Click OK
For Windows XP:
1. Click Start → Control panel.2. Click Performance and Maintenance → System.3. Click the Hardware tab, and click Device Manager.4. In the Device Manager window, expand Network adapters.5. Right-click your network adapter device, and click Properties.6. Click the Power Management tab.
Appendix D. Notices 67

7. Clear the Allow this device to bring the computer out of standby checkbox.
8. Click OK.
Notice for Regulatory information
The latest Regulatory Notice has been uploaded on the Web site. To refer to it,go to http://www.lenovo.com/think/support, click Troubleshooting, and thenclick User’s guides and manuals.
68 ThinkPad® SL300, SL400, and SL500 Service and Troubleshooting Guide
Trademarks
The following terms are trademarks of Lenovo in the United States, othercountries, or both:
LenovoLenovo CareSM
ThinkPad®
Rescue and RecoveryThinkVantage®
TrackPoint®
UltraNav®
Wake on LAN is a registered trademark of International Business MachinesCorporation in the United States, other countries, or both.
Intel is a registered trademark of Intel Corporation or its subsidiaries in theUnited States and other countries.
Microsoft, Windows and Windows Vista are trademarks or registeredtrademarks of Microsoft Corporation in the United States, other countries, orboth.
Other company, product, or service names may be trademarks or servicemarks of others.
© Copyright Lenovo 2008 69

70 ThinkPad® SL300, SL400, and SL500 Service and Troubleshooting Guide

Index
AAC adapter
troubleshooting 25Access Help 1, 7, 10
Bbattery
replacing 33troubleshooting 25
BIOS Setup Utility 8initializing 30
Ccarrying the computer 4cleaning
computer cover 5computer display 6keyboard 6
computer displaycleaning 6
computer screentroubleshooting 22
CRU (customer replaceableunits) 55
Customer Replaceable Unit(CRU) 55
customer support center 45worldwide telephone list 47
Ddiagnosing
system 9diagnosing problems 9drives
handling 4
Eerror messages
troubleshooting 10
Ffactory contents
restoring 29features
hardware 57features and specifications 57finding information 1fingerprint reader
caring for 5
fingerprint reader (continued)troubleshooting 26
frequently asked questions 7
Hhard disk drive
troubleshooting 26upgrading 34
help and service 45hibernation mode
troubleshooting 20
Iimportant instructions vimportant tips 3
Kkeyboard
cleaning 6troubleshooting 19
LLenovo Care 2Lenovo Care button 1, 2
Mmemory
replacing 37troubleshooting 18
modem connection 4
Nnegative ions 3notices 61
electronic emissions 62EU environmental 65Export classification 62FCC statement 62for US users 65Regulatory information 68
Ppacking material 3password
setting 5troubleshooting 18
PC-Doctor 9for Windows 9
pointing devicetroubleshooting 19
product features 57product specifications 58product warranty 53
International WarrantyService 47
publication guide 1
Rrecovering data 31recovery discs
restoring the factory contents 30recovery options 29registering your computer 4Regulatory Notice 2replacing devices 33Rescue and Recovery 2, 29Rescue and Recovery workspace 9restoring the factory contents 29
SSafety and Warranty Guide 1service and help 45service partition
diagnosing the system 9restoring the factory contents 30
Setup Instructions 1sleep mode
troubleshooting 20specifications
hardware 58startup problems
troubleshooting 26storage media
handling 4
Ttaking care of your computer 3tips, important 3trademarks 69troubleshooting 10
AC adapter 25battery 25computer screen 22error messages 10errors without messages 16fingerprint reader 26keyboard 19memory 18password 18pointing device 19
© Copyright Lenovo 2008 71
troubleshooting (continued)sleep or hibernation 20startup problems 26storage device 26
Uupgrading devices 33
Wwarranty information 53Web help 45worldwide support telephone
list 47
72 ThinkPad® SL300, SL400, and SL500 Service and Troubleshooting Guide


Part Number: 43Y6727
Printed in China
(1P) P/N: 43Y6727