lecture 1 - eecs.umich.edu
TRANSCRIPT
EECS 473Advanced Embedded Systems
Lecture 1:
Class introductionDesign in this class
Creating software interfaces to hardware

Welcome
• This is a class on embedded systems. We will
be…
– Learning more about embedded systems
• Lecture, labs, and, homework.
– Gaining experience working as a group…
• …but also working by yourself on researching and learning
material without an instructor’s guidance
– Learning (more?) about the design cycle
• Both theory in lecture and by doing a paper-to-prototype-to-
project design.
Overview/
Welcome

Who am I?
• Dr. Mark Brehob
– Prefer “Mark”, “Dr. Brehob” is okay too.
– Full-time teacher (lecturer)
• Been here for 20+ years and I’ve taught a wide
variety of courses (100, 101, 203, 270, 281, 370,
373, 376, 452, 470, 473)
– PhD is in the intersection of computer
architecture and theoretical computer science
as it relates to caches.
– See http://web.eecs.umich.edu/~brehob/
Overview/
Welcome

Staff
• Senior Engineer
– Matt Smith
• Runs 270/373/473 labs
• GSIs:
– Ben Cyr
– Cameron Kabacinski
– Luke Cohen

On-line resources for the class
• Web site (primary location for course materials)
– http://www.eecs.umich.edu/courses/eecs473/
– Includes all labs, handouts, old exams, etc.
– Links to Piazza and Gradescope pages at the top.
• Gradscope
– Entry code: JBGGXR
– All assignments will be turned in there.
– All graded assignments and exams will be posted there.
• Piazza
– Class forum. Please feel free to answer each others questions.

Today
• Class intro
– Grading, schedule, etc.
• A bit on design
– Design requirements, engineering
specifications, etc.
• Start on hardware interfaces
– I’ve got a lot more slides than I expect to use
• Hope to get through the breakout room stuff.
• The Arudino stuff at the end is just reference.
Overview/
Welcome

Class Introduction
• Learning more about embedded systems
• You’ll do 5 labs in 5 weeks
– Labs 1 and 2 are microcontroller/rapid prototyping/interfacing
– Lab 3 covers real-time operating systems (RTOS)
– Lab 4 introduces embedded Linux and writing Linux device drivers
– Lab 5 gives an introduction to PCB design
• For the first 4 weeks, lecture will be mostly about supporting lab.
– But will then focus on other issues including PCB power,
embedded wireless, and DSP as (the) example of application-
specific CPUs.
• Homework
– Give you more practice working with technical documents related
to embedded systems
– Review material learned in lecture
Class overview

We will be…
• Gaining experience working as a group…
• This is more-or-less the other side of your
Engineering 100 experience.
– We want you to use the technical knowledge you’ve learned
in the last few years to make it through the whole
engineering cycle with a team design.
• Your labs will be in groups of 2
• Your projects will be in groups of 4 to 5
– Your group will make a schedule, create a budget, and
divide up the work.
Class overview

We will be…
• …but also working by yourself on researching
and learning material without an instructor’s
guidance
– The project will be done without lecture to guide you.
» Each group will be doing something different and your group
will be more expert than any of us on the topic (at least by
the time you are done…)
Class overview

We will be…
• Learning (more?) about the design cycle
– Both theory in lecture and by doing a paper-to-
prototype-to-project design.
– Back to Engin 100 principles but with your
engineering knowledge and 373 experience to
provide context.
Class overview

Prerequisites
• You must have a background in
– Embedded design
• Memory-mapped I/O, interrupts, serial bus interfacing, etc.
(EECS 373)
– Digital logic, C and assembly programming
• Pointers, Verilog/VHDL, etc. (EECS 280, 270, 370)
– And either
• A solid programming background (EECS 281)
• Or a reasonable circuits background (EECS 215)
Class overview

Warning
• If you don’t have 281
– Lab 3 and 4 are going to be
rough.
• If you don’t have any circuits or
electromagnetics background
(EECS 215 or Physics 240)
– About 2 weeks of lecture are
going to be very difficult.
– Come to office hours.
• If you’ve never taken an
embedded systems class
before
– You’re in the wrong place.
• Also, you’d ideally have some
soldering experience including
surface mount work. If not, we
hope to have some lessons
available in the next few
weeks.
Class structure
• We will meet for 3 hours/week as a class
• Weekly labs for the first 5 weeks
– Though the last lab is a bit shorter and different.
• During the first 4 weeks
– we are going to “over staff” the labs.
• 2 of us in the lab.
– And have about 10 hours/week of lab office hours.
• After week 4 we’ll spread out support more
– We’ll drop down to 1 person in lab during lab times
– More office hours will be added.
Class overview

Office hours
Instructor
• Mark Brehob (brehob)– Hours in 4632 Beyster
– Wednesday 11am-noon
– Friday 3-4pm
– Sunday online 6:45pm-7:45pm
• Zoom link on website
Lab folks (in lab, 2334 EECS)• Ben Cyr (bencyr)
– Sat noon-4pm
• Cameron Kabacinski (camkab)– Monday 7-9pm– Thursday noon-2pm
• Luke Cohen (lukecohe)– Monday noon to 3pm
• Matt Smith (matsmith)– TBA
Class overview
We are double and triple staffing lab during September. Once lab is over, the GSIs will be adding more
hours and maybe changing others.

Covid stuff
• Should only be in the lab if working at a station
– No hanging out at the front tables etc.
• Need to wear a mask in lab and in class at all times.
– If you are working with something where a mask could be dangerous, talk to us.
– No food in the lecture or lab.
Class overview

Work/grades
• 20% Labs
• 5% Homework and guest speaker
attendance
• 5% Presentation/video
• 15% Midterm
• 15% Final exam
• 40% Final Project
Work/Grades

Labs
• There are 5 labs– 2 Prototyping with Arduino, 1 RTOS, 1 Embedded Linux, 1 PCB
– Pre-labs are done individually and are worth ~25% of the lab grade.
• They are due before lab starts
– In-labs and post-labs are done in groups of two.• They have two parts: a “sign-off” part and a “question” part.
• The post-labs are just an extension of the “question” part of the in-lab
• They are due before the start of the next lab.
– Late labs lose 10% per school day late.
• Lab 5 is done entirely individually. – Can be done outside of the lab.
Work/Grades

Project (1/2)
• You will work in groups of 4-5 on designing and
building an embedded system of your choosing
– Significant budget
• ~$200/student– Huge thanks to Stryker!!!
– There will be an emphasis on having a reliable
system in place.
– If you have an external group that wants something
made and is willing to pay for it.• I’m open to discussion
Work/Grades
Project (2/2)
• There will be a number of due dates (proposal, milestones, final project)
• There will be a significant degree of formalism in your reports and presentations.
• Your project will be presented at the CoE design expo on Thursday Dec 9th.
• You have significant design freedom.– The only real restrictions are that it has to use a processor, be
doable in the time given, be technically interesting, and do something useful or interesting.
• We expect groups will make a PCB.
– As you think of ideas, please feel free to run them past me.
Work/Grades

Exams
• A bit after the 5 labs are done, there will
be an exam. It will cover the lab/class
material up to that point.
– Midterm is probably Thursday 10/21 at 6pm
• Please let me know if you have a conflict ASAP.
Work/Grades

Homework
• You will have three homework assignments.
– The first is to propose project ideas (HW0)
• Already sent out and posted.
– The other two will be used to reinforce
classroom material or to give you a chance to
drill down a bit farther on topics then we can in
class/lab.
Work/Grades

Schedule

A (Very Brief) Introduction to Design
Thinking about how to think about building things.
(yes, it’s that abstract, but also critical)

What is the design process?
• Unlike the material in 95% of your
engineering classes, this question is a
matter of opinion.
– There are tons of books on the topic, and they
all use different words and emphasize
different things.
– That said, they (almost) all have similar ideas.
Brief design overview

The stages of design
• Where design ends is debated.
– Pretty much everyone agrees that identifying
a problem to be solved is the first step.
• Though some have some pretty significant steps to
be taken here (requirements gathering, user
surveys, marketing analysis etc.)
– But is the last step:
• Handing off the design to be manufactured?
• Dealing with manufacturing issues?
• Supporting users of the design?
• Dealing with end-of-life issues?
Brief design overview

Design stages in this class (1/4)
• Identifying the purpose*
– Identifying a problem
• Design requirements
– What characteristics does the device
need?
• This should be things like “light-weight” or
“easy to use” rather than “less than 8oz” or
“iPhone-like interface”
Brief design overview
*There is often a research step between this step and developing the design
requirements. What are current solutions/workarounds? What do people
really want? What is doable in this space?

Design stages in this class (2/4)
• Engineering specification
– The design requirements turned into
measurable outcomes.
• “8 oz or less”
• “New users can start measurement in less
than 10 seconds on the average”
• “48-hour battery life in the worst case”
Brief design overview

Design stages in this class (3/4)
• Work out possible solutions
– Identify a few ways to solve this problem
• Pick a solution
– Find the one you like best.
• Prototyping
– Building a prototyped device
• Likely not the right form-factor etc.
• Probably on a breadboard, but mechanical issues also need
to be addressed.
– Let’s you see what’s doable.
• Also gives you a testbed to develop your solution
Brief design overview

Design stages in this class (4/4)
• Implement your design
– For us this involves ordering and assembling
a PCB and getting your software up and
running.
• Test and debug
– Get everything working
– Test to see if engineering requirements are
met.
Brief design overview

Design and this class
• This class is about getting a useful design
done.
– Following the steps of the design process
helps a lot more than you might think.
• Though we have such a time crunch that they will
have to overlap a bit.
Brief design overview

Creating good interfaces to hardware
Figure from Embedded Systems Architecture
by Tammy Noergaard

What is a hardware interface?
• A hardware interface is a set of functions, macros, or other programming constructs which allows the programmer to not worry about how exactly the hardware works.– It creates a level of abstraction so the programmer
only needs to think about a subset of the problem.
– This is creates a nice boundary where high-level code can be handed off.
• Also extremely useful even when you are the only programmer!
Interfaces
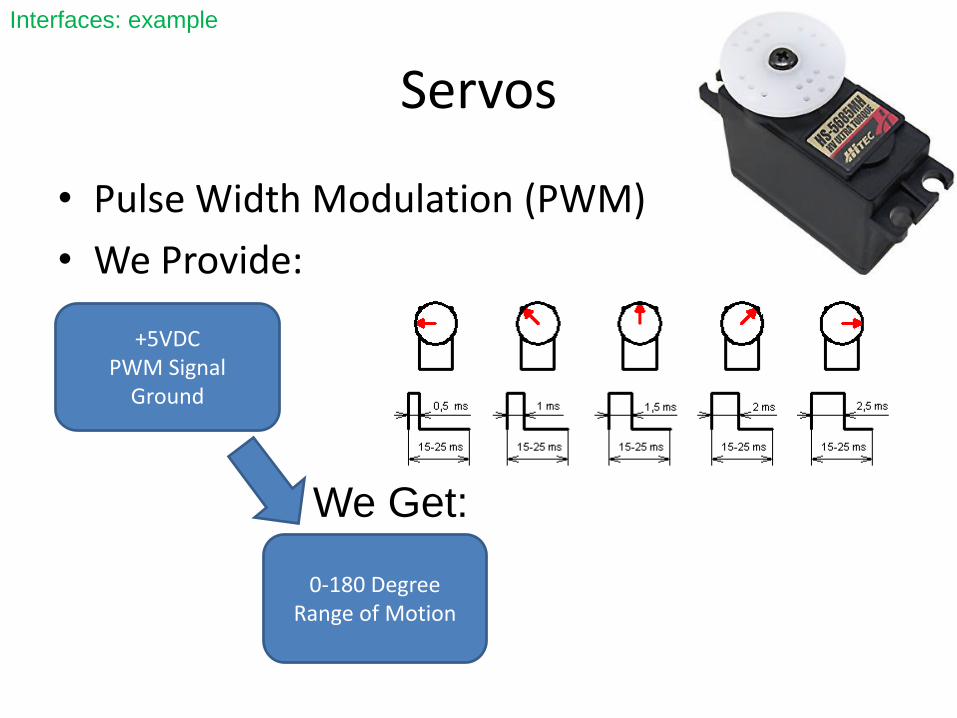
Servos
• Pulse Width Modulation (PWM)
• We Provide:
+5VDCPWM Signal
Ground
0-180 DegreeRange of Motion
We Get:
Interfaces: example

Talking directly to the servo
• In fact we probably aren’t talking to the servo.
– Instead there is (hopefully) a timer that supports PWM.
• We can specify a period by writing a register – or more likely a series of registers (prescalar, clock select, etc.)
• We can specify the duty cycle in a similar way– Generally a single register where the duty cycle is in terms of
clock ticks
• We probably need to configure the timer to do PWM
Interfaces: example

What should the interface be for a servo?
• What I want you to do is to discuss:
– What basic functions you want.
– What the interface to those functions should be like.
– Try to get a formal description of as much as you can.
– You will have about 5 minutes.
– Do it yourself—no web searches.
Interfaces: example

Discuss ideas

Things change…
• Might get a new servo
– So period and duty cycle might be different
• Might get a new processor
– So timer configuration might change.
• Might need additional functionality
– Perhaps want to include stepper motors
Interfaces: example

…but in 373 we didn’t…
• Most of you didn’t create any meaningful interfaces in 373*– Exposed the low-level details to the programmer
• After all you were the programmer and interface design takes time.
– Plus you often don’t yet know what you’re going to need.
– This makes it easy to do boneheaded things.• Wrong MMIO address, lots of replicated code, etc.
– It also makes it hard to write good code. • You are worrying about too many things at once.• Keep worrying about things like bounds checking when
interface should do that.
*Though some did. Often the more successful groups had well-defined and reasonably well-documented interfaces.
Interfaces: why?
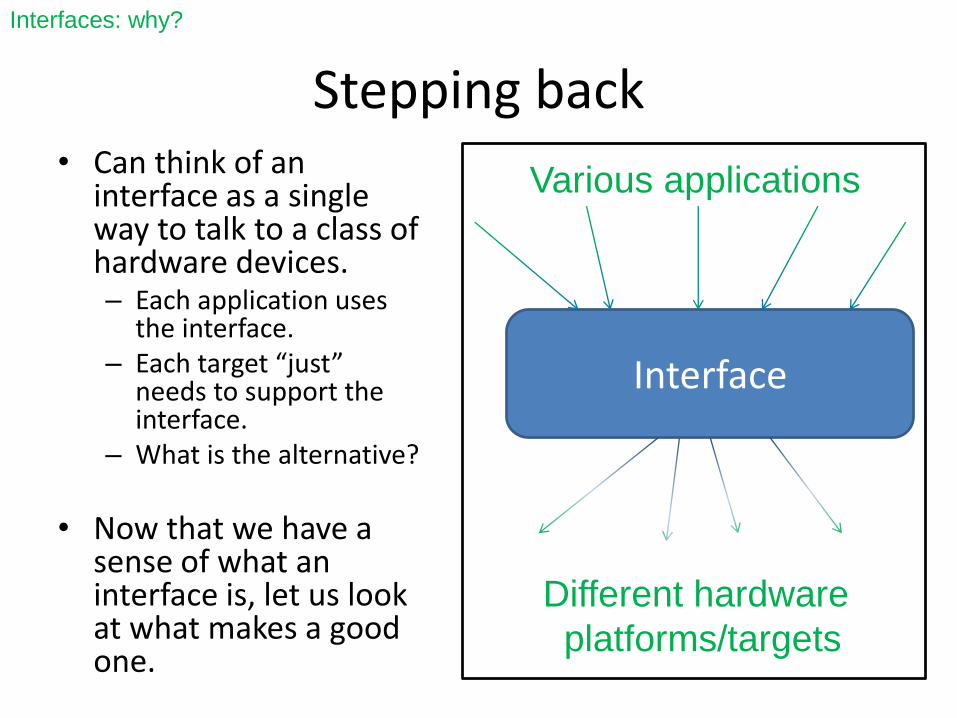
Stepping back• Can think of an
interface as a single way to talk to a class of hardware devices.– Each application uses
the interface.– Each target “just”
needs to support the interface.
– What is the alternative?
• Now that we have a sense of what an interface is, let us look at what makes a good one.
Interface
Various applications
Different hardware
platforms/targets
Interfaces: why?
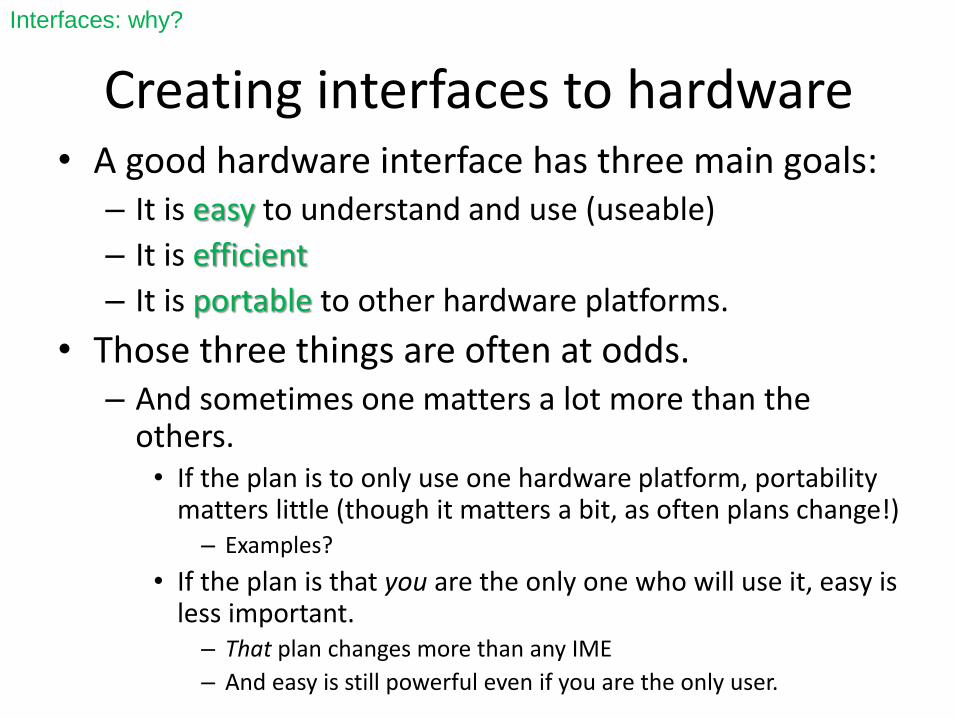
Creating interfaces to hardware• A good hardware interface has three main goals:
– It is easy to understand and use (useable)
– It is efficient
– It is portable to other hardware platforms.
• Those three things are often at odds.– And sometimes one matters a lot more than the
others.• If the plan is to only use one hardware platform, portability
matters little (though it matters a bit, as often plans change!) – Examples?
• If the plan is that you are the only one who will use it, easy is less important.
– That plan changes more than any IME
– And easy is still powerful even if you are the only user.
Interfaces: why?

What makes an interface easy to understand and use?
Interfaces

What does an interface have to do with efficiency?
• On the silly side:– One could imagine our servo interface having only a
“turn 1 degree” function (direction specified)• Covers all functionality
• But big turns require a lot of code to run.
• On the less silly side– If we use angles (in degrees) as the basis for the
interface, that is going to require some math in the interface itself to convert to a register value.
• Perhaps the programmer could skip a lot of that.
– Other places we might see inefficiency for our servo?
Interfaces: efficiency

Look at Open Systems Interconnect(OSI)
This degree of layering is considered largely necessary, but it clearly creates a lot of overhead (inefficiencies)
Figures from Embedded Systems Architecture
by Tammy Noergaard
Interfaces: efficiency

So what makes hardware-interface design difficult?
• Mainly the three competing requirements of usability, efficiency and portability.
– As discussed, they often fight with each other.
• But there are a few other things…
Interfaces

Software in parallel with hardware (1/2)
• When developing an embedded system, it is often necessary to select hardware and start on software in parallel.– Not just because of time constraints. Hardware side
needs a solid understanding of software’s needs before picking a processor
• Memory and CPU requirements etc.
• Certain peripherals might greatly reduce CPU needs – e.g. Don’t need to bit-bang for a servo if you have PWM support.
But if CPU otherwise idle, bit-banging might be okay.
• Might want/need more than one processor– More on that later…
Interfaces
Software in parallel with hardware (2/2)
• Developing software, or even specifying interfaces, while selecting hardware is tricky.– Often some of the functionality will be impacted by
hardware/component choices.• Can buttons detect level of pressure? Do we have multi-
touch support? Does our processor have enough SPI busses that we can support a second ADC?
• But it’s common to do software design before hardware is selected.– Scheduling pressure
– HR issues (software people are otherwise idle)
– Hardware people need answers from software folks
Interfaces

Terminology
• There is a lot of terminology wrapped around hardware interfacing. – Terms like: HAL (hardware abstraction layer),
Middleware, and Device Driver are all related to hardware interfacing.
• And it’s not unusual to see different people use those terms differently.
– We’ll try to take a look at that terminology later on.
• I’ll generally use “device driver” or “system software layer”
Interfaces

Summary
• It’s a good idea to have at least one layer between applications and hardware.– Hardware interface
• Hardware interfaces have three main goals– Efficiency– Usability– Portability
• And those three things are often at odds.
Interfaces

Hardware/software co-design
• While a bit outside of the scope of this class, this is a good time to discuss hardware/software co-design– This phrase generically means “designing software and
hardware a the same time”– But often used to describe automatic methods or tools to do
the partitioning. • Might end up with an ISA/architecture for a CPU and application-
specific code to run on it for example– HP has been doing this for printers for a while apparently
• Might end up with three processors and code “done for you” once the problem is specified.
– There is a lot of literature dating back decades on the topic.
Interfaces: Bonus topic

Introduction to Arduino
Stolen from Chris Meyer
(CC-SA)
http://www.danielandrade.net/
Arduino
ARRRR, like a pirate /
/ DWEE, just say "do we“ fast /
/ NO, as in no.
”ARRR-DWEE-NO”
http://www.arduino.cc/cgi-bin/yabb2/YaBB.pl?num=1191602549%3Bstart=all

What is Arduino?• Open Source Hardware Development
Platform
• USB Programmable Microcontroller (MCU)
$30
Investment!

Shields?
• Shields break-out/wire-up
additional components to MCU
Prototyping
Audio / MP3
Ethernet
GPS
Servo/Stepper/
DC Motors

More Shields!LCD
WIFI
Zigbee
MIDI
LED
Display

So What?
• Previously, MCU’s
were very difficult to
learn to use
• Required learning
libraries, specialized
protocols, timings,
code minimization,
1,000+ page
documentation

Arduino makes it Easy!
@Arduino.cc

Question
If hardware interface design involves tradeoffs
between three things, where in the triangle would
you suspect Arduino was targeted?
Efficiency
PortabilityUsability