lecoaspira genius - m0s09128 1q01:layout 1 · the bright lcd display allows ... • do not use the...
TRANSCRIPT

Polti S.p.A. - 22070 Bulgarograsso (CO) - Italy - Via Ferloni, 83www.polti.com
Fig. 2 Fig. 3 Fig. 4
Fig. 5 Fig. 7
Fig. 9
Fig. 6aFig. 6
Fig. 8 Fig. 10
Fig. 11a Fig. 11b
MAX
Fig. 1
Fig. 12 Fig. 14
Fig. 13
Fig. E
2
1
Fig. A Fig. D
Fig. B
Fig. C
COP - LECOASPIRA GENIUS - M0S09128 1Q01:V_tto_1300cop.qxd 18/01/2010 16.43 Pagina 2
QQW1 W2 W4
B3
B2W5T
F
Q
M
R
S
E5
G
24
25
26
23
17
27
13
14
15
16
18
19
22
20
20-A
W3
V
WW
Vaporetto Lecoaspira Genius - M0S09128 Edizione 1Q01
12
1
6
10
7
9 11
X
X1
Y Y1
Z
8
3
2
8G
8E
8C8A
8D
8H
8F
5
4
8B
E7
E6
B3
B1
B2
A5
A1
A3A4
A2
U
K
K1 L
EE1E1
E3
E4
E2
D C
N
P
O
O1
TB TB1
COP - LECOASPIRA GENIUS - M0S09128 1Q01:V_tto_1300cop.qxd 18/01/2010 16.42 Pagina 1

Polti S.p.A. - 22070 Bulgarograsso (CO) - Italy - Via Ferloni, 83www.polti.com
Fig. 2 Fig. 3 Fig. 4
Fig. 5 Fig. 7
Fig. 9
Fig. 6aFig. 6
Fig. 8 Fig. 10
Fig. 11a Fig. 11b
MAX
Fig. 1
Fig. 12 Fig. 14
Fig. 13
Fig. E
2
1
Fig. A Fig. D
Fig. B
Fig. C
COP - LECOASPIRA GENIUS - M0S09128 1Q01:V_tto_1300cop.qxd 18/01/2010 16.43 Pagina 2

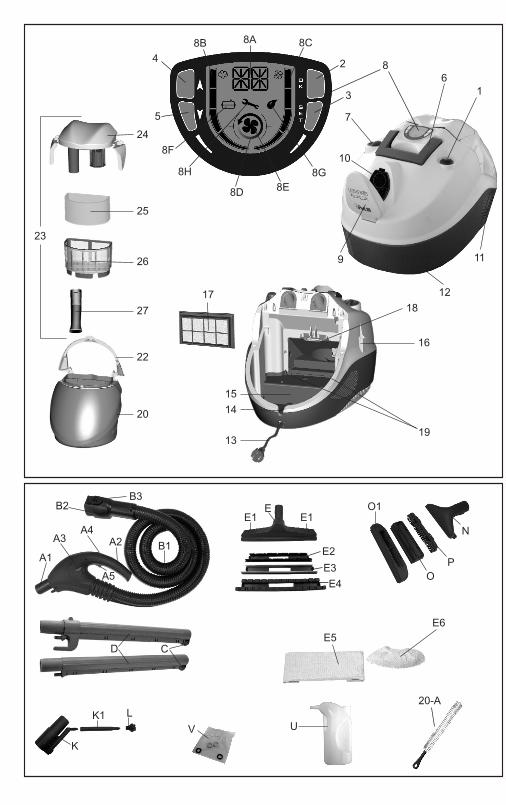
KEY1) Main switch2) “OK” button3) “SET” button4) Steam/programme “UP” button5) Steam/programme “DOWN” button6) Carrying handle7) Tank cap8) Display
8A) Programme indicator8B) Steam quantity indicator8C) Suction speed indicator8D) Steam indicator8E) Suction indicator8F) Boiler indicator8G) Lamp indicating lack of water in tank 8H) Maintenance indicator
9) Built-in socket door10) Built-in socket11) Air output screen12) Castors13) Power cable14) Power cable passage15) Power cable compartment16) Tool holder17) Hepa filter18) Hepa filter release lever19) Hepa filter housing20) Dirt container21) MAX level (fig. 5)22) Dirt container handle 23) “EcoActive Filter” water filter assembly24) “EcoActive Filter” water filter assembly
cover25) Shaped filtering sponge 26) Filter with microholed net27) Tube elbow
SUCTION- STEAM ACCESSORIESA1) Fitting for connecting accessoriesA2) HandleA3) Safety buttonA4) Suction buttonA5) Steam request buttonB1) Steam+suction hoseB2) Monobloc plugB3) Locking button of the monobloc plug
C) Accessory locknutD) Flexible steam + suction tubes E) Universal brush
E1) Frame lock slides
E2) Bristle fittingE3) Liquid suction insertsE4) Insert for fitted carpetE5) Cotton clothsE6) Terry cloth coverE7) Parquet cloth with velcroK) 120° steam-suction tool
K1) Steam lanceL) Coloured 120° steam-suction brushesN) Small steam-suction upholstery nozzleO) 130 mm window-cleaning fitting for small
steam-suction upholstery nozzleO1) 200 mm window-cleaning fitting for small
steam-suction upholstery nozzleP) Bristle fitting for small steam-suction
upholstery nozzleU) Filler bottleV) Spare gaskets
20-A)Dirt container cleaning brush
ACCESSORIES FOR SUCTION ONLYM) Small nozzleQ) Upholstery nozzleR) LanceS) Radiator brushT) Suction brush
TB) Turbo brushTB1) Surface type selector
X) Telescopic tubeX1) Telescopic tube release button
Y) Universal brushY1) Universal brush selector
Z) Parquet brush
OPTIONAL ACCESSORIES F) Joker brushG) Parquet accessoryW) Iron
W1) Continuous Steam request buttonW2) Steam request buttonW3) “Iron heating” indicator lightW4) Temperature control knobW5) Iron mat
EENN
GGLL
II SSHH
66
LECOASPIRA GENIUS
LECOASPIRA GENIUS - M0S09128 1Q01:Layout 1 19/01/2010 12.23 Pagina 66

Dear customer, Thank you for choosing Polti. In choosing Vaporetto Lecoaspira, you have shown that youcare about keeping your home clean and your family healthy, because Vaporetto Lecoaspiraallows you to clean all washable surfaces in your home with the power of steam, dissolvingand detaching dirt and suctioning up dust, dust mites and allergens in water.
Vaporetto Lecoaspira combines the power and effectiveness of Polti products with the mostadvanced functions of modern electronics. Vaporetto Lecoaspira offers a choice of 10 clean-ing programmes, automatically adjusting suction power and stream pressure and guiding youthrough cleaning operations by starting up its functions at just the right time. The exclusiveEcoActive-Filter means that when you have finished cleaning, you can just pour out the dirtywater, without releasing dust into the air.
A new handle makes Vaporetto Lecoaspira more comfortable to use and the complete set ofaccessories allows you to solve any cleaning problem quickly and easily.
A new handle makes Vaporetto Lecoaspira more comfortable to use and the complete set of ac-cessories allows you to solve any cleaning problem quickly and easily. The appliance’s controlsare on the handle, for immediate control without bending down. The bright LCD display allowsyou to see all Vaporetto Lecoaspira ‘s functions clearly and accurately. With VaporettoLecoaspira you can decide whether to use steam and suction power together for a completecleaning session, suction only to pick up dust efficiently, or steam only for specific cleaning tasks.
Furthermore, Lecoaspira provides for increased energy savings, thanks to the new alu-minium heater which allows for improved heat distribution and rapid production of the re-quired steam pressure.
What is the EcoActive-Filter? The EcoActive-Filter is a revolutionary patented Polti water filter. The EcoActive-Filter usesthe natural cleaning power of water to capture dirt, ensuring that you have no contact with thedust and preventing it from being dispersed in the environment. It is the bubbling water con-tained in the special filter that makes cleaning with Vaporetto Lecoaspira even more effective.
This unit conforms with EC-directives 2004/108/EC (EMC) and2006/95/EC (low voltage).
Polti S.p.A. reserves the right to change equipment or accessory specification wi-thout prior notice.
Read these instructions carefully before using the appliance.
EENN
GGLL
II SSHH
67
LECOASPIRA GENIUS
LECOASPIRA GENIUS - M0S09128 1Q01:Layout 1 19/01/2010 12.23 Pagina 67
EENN
GGLL
II SSHH
68
LECOASPIRA GENIUSPPRREECCAAUUTTIIOONNSS
KEEP THESE INSTRUCTIONS• Read these instructions for use carefully be-
fore using the appliance.• Any use which does not comply with these
instructions will invalidate the warranty.• The wiring system to which the appliance is
connected must always comply with the lawsin force.
• Before connecting the appliance, make surethat the mains voltage is the same as thevoltage indicated on the data label of the ap-pliance and that the power outlet is con-nected to earth
• Always turn off the appliance at the on/offswitch before unplugging it.
• If the appliance is left unused, always dis-connect it from the mains. Never leave theappliance unattended with the cable pluggedinto the mains.
• Always make sure the appliance is un-plugged before performing maintenancework of any kind
• Do not pull the power cord out of the socket,but grasp the plug itself to avoid damage tothe socket.
• Do not allow the power cord to be twisted,crushed, stretched, or come into contact withsharp or hot surfaces.
• Do not use the appliance if the power cableor other important parts are damaged.
• Do not use electric extension leads that arenot authorized by the manufacturer, as theymay cause damage or fire.
• If it is necessary to replace the power supplycable, please refer to the nearest Polti autho-rised service centre, since the use of a spe-cial tool is necessary.
• Never touch the appliance with wet hands orfeet with the cable plugged into the mains.
• Do not use the appliance when barefoot.• Do not use the appliance near a bathtub,
shower or container full of water• Never immerse the appliance, the cable or
the plugs in water or another liquid.• Use of the appliance in places where there is
a danger of explosions is prohibited.• Do not use the product with toxic sub-
stances.• Do not lay the hot appliance on surfaces
sensitive to heat.
• Do not leave the appliance exposed to windor rain.
• Do not place the appliance near a live ele-ment, an electric stove or any other source ofheat.
• Do not expose the appliance to extreme tem-peratures
• Never let children or people who are not fa-miliar with how the appliance works use it.
• Do not press the buttons hard or with apointed object such as a pen.
• Always rest the appliance on a stable sur-face.
• In case of accidental fall of the appliance it isnecessary to have it checked by an author-ized Service Centre as the internal safetyfeatures may have been affected.
• In case of breakdown or malfunction switchoff the appliance and never attempt to disas-semble it, but refer to an authorized ServiceCentre.
• In order to avoid prejudicing the safety of theappliance, use only original spare parts andaccessories approved by the manufacturer.
• Do not wind the power cord around the appli-ance, especially when the appliance is stillhot.
• Do not use the appliance to suck up acids orsolvents, as these might cause serious dam-age to the appliance and above all do notsuck in explosive dust or liquids, as thesecould cause explosions on coming into con-tact with the inside components of the appli-ance.
• Do not vacuum up toxic substances.• Do not suck up burning or incandescent ob-
jects such as embers, ash or other materialin which combustion is taking place.
• Water tank can be filled with tap water.• Do not vacuum up materials such as cement,
chalk etc. which solidify once they came incontact with water thus damaging the appli-ance
• During refilling with water, switch off and dis-connect the appliance from the mains.
• It is necessary to keep the unit in horizontalposition during operation.
• Do not direct the steam jet on electrical appli-ances.
• Leave the appliance to cool down beforecleaning it.
LECOASPIRA GENIUS - M0S09128 1Q01:Layout 1 19/01/2010 12.23 Pagina 68
EENN
GGLL
II SSHH
69
LECOASPIRA GENIUS• Before storing the appliance be sure that it
has completely cooled down.• This appliances is equipped with safety de-
vices which are to be replaced only by a suit-ably qualified technician.
• Do not direct the steam jet at people, ani-mals or debris.
• Never place your hands inside the jet ofsteam.
• Do not put any detergent or chemical sub-stance in the boiler. Water by its nature con-tains magnesium, mineral salts and other de-posits which in hard water areas cancontribute to limescale build up in the tank.To avoid these problems, it is necessary toswill out with tapwater and empty the gener-ator tank after every 3 or 4 uses.In very hardwater areas we recommend the use of ourKALSTOP FP 2003, a special natural-basedecalcifier which inhibits and breaks downlimescale, making it easy to remove just byswilling out the tank with a little tapwater.This is a preventive against scale build-upand protects the metal walls of the steamgenerator tank. KALSTOP is available fromPolti dealers or by mail-order from your PoltiService Centre.
• We recommend only using original Poltiproducts as other products may not besuitable for use with Polti appliances andmay cause serious damage.
• Never use distilled water or scented wa-ter.
• Do not use demineralised water alone, butmix it with tap water as described above.
• If you iron sitting down, do not place yourlegs under the ironing board, the steam cancause burns.
• Iron only on heat resistant surfaces and onsurfaces that allow the steam to escape e.g.mesh ironing boards.
• For iron stand replacement use only originalspare parts.
• Check that the continuous steam requestbutton is switched off before connecting theappliance to the mains.
• The iron must be used and rested on a sta-
ble surface.• When placing the iron on its stand, make
sure that the surface on which the stand isplaced is stable.
• This appliance is not intended for use by per-sons (including children) with reduced physi-cal, sensory or mental capabilities, or lack ofexperience and knowledge, unless they havebeen given supervision or instruction concer-ning use of the appliance by a person re-sponsible for their safety.
• Children should be supervised to ensure thatthey do not play with the appliance.
• The appliance should not be used if it hasfallen, is visibly damaged or is leaking.
• The power cord (or the y-shaped connector)may not be replaced by the user, and shouldonly be replaced by an authorised TechnicalAssistance Centre technician.
CCOORRRREECCTT UUSSEE OOFF TTHHEE PPRROODDUUCCTTThis appliance is intended for home use as asteam generator and for sucking liquids andsolids as described and in accordance with theinstructions provided in this manual.Please read these instructions carefully andkeep them, as you may find them useful in fu-ture.
Polti declines liability for any damage or ac-cident derived from any use of VaporettoLecoaspira which is not in conformity withthe instructions contained in this booklet.
AATTTTEENNTTIIOONNDirective 2002/96/EC (Waste Electrical andElectronic Equipment - WEEE): information forusersThis product complies with EU Directive2002/96/EC.
The crossed-out wastebasket symbolon the appliance means that at theend of its useful lifespan, the productmust be disposed of separately from
ordinary household wastes.
The user is responsible for delivering the ap-pliance to an appropriate collection facility atthe end of its useful lifespan. Appropriate separate collection to permit recy-
ATTENTION:Danger of burns!
LECOASPIRA GENIUS - M0S09128 1Q01:Layout 1 19/01/2010 12.23 Pagina 69

EENN
GGLL
II SSHH
70
LECOASPIRA GENIUScling, treatment and environmentally compati-ble disposal helps prevent negative impact onthe environment and human health and promo-tes recycling of the materials making up theproduct. For more information on available col-lection facilities, contact your local waste col-lection service or the shop where you boughtthis appliance.
PPRREEPPAARRAATTIIOONN FFOORR UUSSEE• Unscrew the self-refilling tank cap (7) (Fig.1)
and fill the tank with about 560 cc of water byusing the filler bottle (U) supplied.
• Water by its nature contains magnesium,mineral salts and other deposits which inhard water areas can contribute to limescalebuild up in the tank. To avoid these problems,it is necessary to swill out with tapwater andempty the generator tank after every 3 or 4uses.In very hard water areas we recom-mend the use of our KALSTOP FP 2003, aspecial natural-base decalcifier which inhibitsand breaks down limescale. This is a pre-ventive against limescale build-up and pro-tects the metal walls of the steam generatortank. KALSTOP is available from Polti deal-ers or by mail-order from your Polti ServiceCentre.Do not use demineralised water alone, butmix it with tap water as described above. We recommend only using original Poltiproducts as other products may not besuitable for use with Polti appliances andmay cause serious damage.Never use distilled water or scented wa-ter.
• Carefully screw on the sealing cap (7) tohand tight.
• Lift the dirt container handle (22) unhookingit from its position (Fig. 2) and remove thecontainer (20) (Fig. 3).
• Turn the dirt container handle (22) as shownin figure 4, and remove the “Eco ActiveFilter”water filter assembly (23).
• Fill the dirt container (20) with about 1.2 litresof simple tap water until the MAX level indi-cator (21) is reached, as in fig. 5.
• Put the filter assembly (23) back into place inthe dirt container (20) returning it to its initialposition.
• Replace the dirt container, following the re-
verse steps you used to remove it.• Support the handle (22) until it hooks into
place on the dirt container (20).
OOPPEERRAATTIIOONN• Open the door on the Built-in socket (9); plug
in the monobloc plug (B2) by pushing it untilit clicks into place, without pressing the but-ton, and then checking that it is firmly con-nected (fig. 6).
• To disconnect the Built-in socket (B2) from theappliance, press the button (B3) and pull themonobloc plug off the appliance (fig. 6a).Note: the handle (A2) has a safety button (A3)to prevent steam from being accidentally di-spensed by children or people not familiar withthe appliance. If you need to leave the ap-pliance momentarily unattended, put the safetybutton (A3) in the locked position. Put it back inthe starting position to resume using steam.
• Plug into a suitable outlet.• Turn on the appliance by pressing the main
switch (1) (fig.7).
PPRROOGGRRAAMMMMEESSThe appliance has 10 preset programmes plusone manual programme.The following programmes are available:• MA : MANUAL PROGRAMME• P1 : CARPET/RUG• P2 : PARQUET• P3 : GLASS/ MIRROR/ TILES/ CERAMIC• P4 : LOCALISED STAINS / DEPOSITS/
GAPS BETWEEN TILES• P5 : UPHOLSTERY/ WALLPAPER/
AUTOMOBILE INTERIORS• P6 : BEDS / MATTRESSES• P7: HEAVY COURTAINS• P8: PLANTS• P9: IRON (only if Polti iron is connected)• P0: TURBO VACUUM
When it is turned on, the appliance starts up inmanual mode, MA. • To select a preset programme, press SET
(3), and the indicator (8A) will display MA fla-shing. Use the Up (4) and DOWN (5) buttonsto choose the desired programme. Press OK(2) to confirm your choice.
• Repeat to change the programme.
LECOASPIRA GENIUS - M0S09128 1Q01:Layout 1 19/01/2010 12.23 Pagina 70

EENN
GGLL
II SSHH
71
LECOASPIRA GENIUSMMAANNUUAALL PPRROOGGRRAAMMMMEE
• Press the main switch (1): the appliance willcome on in manual or “MA” mode.
In this mode you can manually adjust theamount of steam to be dispensed and the suc-tion speed.
STEAM• Press UP (4) to turn on the boiler. Each time
you press the UP button (4) again steampressure will increase. Every time you pressthe UP button (4) one of the steam pressureindicator lights (8B) will come on.
• DOWN (5) has the opposite effect: everytime you press it steam pressure decreasesand one of the indicator lights (8B) goes off.
• If you wish to turn off the boiler, press DOWN(5) until all the indicator lights (8B) go off.
Strong steam: (4 indicators on)to remove stubborn deposits, stains andgrease or to sanitise;Normal steam: (2 or 3 indicator lights on)for rugs, carpets, glass, floors;Gentle steam: (1 indicator light on) to spray plants, clean delicate fabrics, wallpa-per, sofas, etc.
• When the boiler comes on the indicator lights(8B) and (8F) will flash. When the boiler indi-cator light (8F) stays on, this means the ap-pliance has reached the minimum pressurefor dispensing steam. Wait until the other in-dicator lights (8B) also stop flashing, mea-ning that steam pressure has reached theselected pressure.
• Press the Steam request button (A5) on thehandle to dispense steam.Indicator light (8D) comes on when steam isbeing dispensed.
SUCTIONINGYou may adjust suction power to suit the sur-face to be cleaned: the numbers correspond tosegments in the indicator light (8C) on.1 for curtains2 for sofas and cushions3 for carpets4 for hard floor surfaces and to suction up liq-uids
Using suction controlsSimply press the suction button (A4) to startvacuuming.Hold down the suction button (A4) to selectthe appropriate speed for the surface to becleaned. As suction power increases, thenumber of indicator segments lit up willincrease (8C); as suction power deceases thenumber of segments will decrease.To stop vacuuming while the appliance isturned on, simply press the suction button(A4).NOTE: When you start suctioning, the appli-ance starts vacuuming at the speed it was setto when it was last turned off.
PPRROOGGRRAAMMMMEE PP11:: RRUUGGSS // CCAARRPPEETTSS• Connect the two extension tubes (D) to the
handle, and connect the multipurpose brush(E) to them with the carpet attachment withrigid inserts (E4).
• Wait until indicator lights (8B) and (8F) stopflashing. At this point the appliance is readyto dispense steam.
• Hold down the Steam request button (A5) todispense steam. When you release the but-ton (A5) or after a maximum of 150 secondssuctioning will start automatically to dry thesteam-cleaned surface.
• Suctioning automatically stops after anamount of time proportionate to the amountof time for which steam was dispensed. Youmay stop the programme manually by pres-sing the suction button (A4).
• When cleaning large surfaces, you may startup the programme immediately upon com-pleting the cycle to finish cleaning the entiresurface.
NOTE: suction speed and steam quantity arepreset and cannot be adjusted manually.Vacuum up hair and dust in manual (MA) modebefore steam cleaning surfaces.
PPRROOGGRRAAMMMMEE PP22:: PPAARRQQUUEETT• Hold down the Steam request button (A5) to
dispense alternating steam cycles and startsuctioning. Release the button (A5) to stopdispensing steam, while suctioning will conti-nue for a few more seconds to allow thesteam cleaned surface to dry.
• To avoid damaging delicate surfaces, we
LECOASPIRA GENIUS - M0S09128 1Q01:Layout 1 19/01/2010 12.23 Pagina 71

EENN
GGLL
II SSHH
72
LECOASPIRA GENIUSrecommend always using the parquetfunction with the universal brush (E), to-gether with the liquid suction insert (E3)or with the insert for fitted carpet (E4),wrapped in a parquet cloth with velcro(E7).
NOTE: suction speed and steam quantity arepreset and cannot be adjusted manually.
PPRROOGGRRAAMMMMEE PP33:: GGLLAASSSS // MMIIRRRROORRSS //TT IILLEESS // CCEERRAAMMIICC
When cleaning glass in cold weather, preheatthe glass by starting to dispense steam about50 cm from the glass surface.. • Using the small nozzle (N) with the window-
cleaning fitting (O or O1), start up the pro-gramme by pressing the Steam request but-ton (A5) and holding it down to start applyingsteam to the glass.
• Apply plenty of steam to the surface to becleaned.
• When you release the button (A5) and in anycase after a maximum of 30 seconds, suctio-ning will automatically begin.
• Suctioning stops automatically after anamount of time proportionate to the time forwhich steam is dispensed. In any case youcan stop the programme manually by pres-sing the suction button (A4).
• When cleaning very large surfaces, you maystart the programme again as soon as it iscompleted to finish cleaning the entire sur-face.
• When you have completed the cycle, youcan start suctioning manually by pressingbutton (A4) to get rid of any remaining dampon areas adjacent to the treated surface.
NOTE: suction speed and steam quantity arepreset and cannot be manually adjusted.
PPRROOGGRRAAMMMMEE PP44:: LLOOCCAALLIISSEEDD SSTTAAIINNSS// DDEEPPOOSSIITTSS // GGAAPPSS BBEETTWWEEEENN TTIILLEESS
• Assemble the 120° tool (K).• Start the programme by pressing the Steam
request button (A5) and holding it down.• Apply steam to the surface to be treated.• When you release the button (A5) and in any
case after a maximum of 20 seconds, suctio-ning will begin automatically.
• Suctioning stops automatically after anamount of time proportionate to the time for
which steam is dispensed. In any case youcan stop the programme manually by pres-sing the suction button (A4).
• When you have completed the cycle, youcan start suctioning manually by pressingbutton (A4) to get rid of any remaining dampon areas adjacent to the treated surface.
• To remove stubborn stains or deposits, youmay apply a coloured brush to the 120° tool.This combines the action of steam with themechanical action of the bristles.
NOTE: suction speed and steam quantity arepreset and cannot be manually adjusted.
PPRROOGGRRAAMMMMEE PP55:: UUPPHHOOLLSSTTEERRYY //WWAALLLLPPAAPPEERR // VVEEHHIICCLLEE IINNTTEERRIIOORRSS
• Hold down the Steam request button (A5) todispense alternating steam cycles and startsuctioning. Release the button (A5) to stopdispensing steam, while suctioning will conti-nue for a few more seconds to allow thesteam cleaned surface to dry.
• Use the small nozzle (N) with the bristle fit-ting (P) and the terry-cloth cover (E6).
NOTE: suction speed and steam quantity arepreset and cannot be manually adjusted.Vacuum up hair and dust in manual (MA) modebefore steam cleaning surfaces.
PPRROOGGRRAAMMMMEE PP66:: BBEEDDSS //MMAATTTTRREESSSSEESS
• Use the small nozzle (N) with the bristle fit-ting (P) and the terry-cloth cover (E6).
• Start the programme by pressing the steamrequest button (A5) and holding it down.
• Apply steam to the surface to be treated.• When you release the button (A5) or in any
case after a maximum of 60 seconds, suctio-ning will begin automatically.
• Suctioning stops automatically after anamount of time proportionate to the time forwhich steam is dispensed. In any case youcan stop the programme manually by pres-sing the suction button (A4).
NOTE: suction speed and steam quantity arepreset and cannot be manually adjusted.Vacuum up hair and dust in manual (MA) modebefore steam cleaning surfaces.
LECOASPIRA GENIUS - M0S09128 1Q01:Layout 1 19/01/2010 12.23 Pagina 72

EENN
GGLL
II SSHH
73
LECOASPIRA GENIUSPPRROOGGRRAAMMMMEE PP77:: HHEEAAVVYY CCOOUURRTTAAIINNSS
• Use the small nozzle (N) with the bristle fit-ting (P) and the terry-cloth cover (E6).
• Hold down the steam request button (A5) todispense alternating steam cycles and startsuctioning . Release the button (A5) to stopdispensing steam, while suctioning will conti-nue for a few more seconds to allow thesteam cleaned surface to dry.
• The programme is designed for treatingheavy fabrics. Do not use on lightweightcurtains.
NOTE: suction speed and steam quantity arepreset and cannot be manually adjusted.
PPRROOGGRRAAMMMMEE PP88:: PPLLAANNTTSSThis programme is useful for cleaning plantsand leaves and for humidifying the room.• To take care of your plants, we recommend
spraying them from a minimum distance of50 cm and only using the handle (A2) or the120° steam-suction tool (K).
• Hold down the steam request button (A5) todispense steam.
• Release the button (A5) to stop dispensingsteam.
NOTE: steam quantity is preset and cannot bemanually adjusted. Suctioning is disabled andcannot be used.
• To protect users, European regulation60335-2-54 states that steam must be di-spensed intentionally. This is why the pro-grammes described do not include automaticsteam dispensing.
PPRROOGGRRAAMMMMEE PP99:: IIRROONNIRON (W) (OPTIONAL)
Vaporetto Lecoaspira can be quickly transfor-med into a highly effective ironing system foreffortless ironing in less time. Simply attach theVaporetto Lecoaspira optional iron to the pro-duct (model PFEU0021). The optional iron maybe purchased at Polti Technical AssistanceCentres and in the best appliance shops.• Connect the iron (B2) to the monobloc plug
as described on the section on “Operation”.The amount of steam dispensed may be con-trolled manually to suit your requirements usingthe UP (4) and DOWN (5) buttons and is di-
splayed by indicator lights (8B) coming on; fol-low the instructions below to adjust the amountof steam to suit the fabric you are ironing:
NOTE: Because of the product’s high steampressure, the maximum amount of steam youcan select for the ironing programme is 3 bars.This is sufficient to obtain good results on eventhe heaviest fabrics.• To optimise ironing time, iron the most deli-
cate fabrics first (steam quantity 0 to 1) andthen go on to fabrics requiring higher steampressure. If you do not do this, steam produc-tion will not be inhibited, but you will have towait for the boiler to cool down to allow the ap-pliance to reach the selected steam pressure.
Check the manufacturer’s laundry instructionson the garment before ironing it. Choose the most appropriate type of ironing onthe basis of the table below:
STEAM IRONING• To steam iron, adjust iron temperature by
setting the temperature control knob (W4) toCOTTON-LINEN.
• Wait a few minutes for the “Iron heating” indi-cator light (W3) to go out indicating that the
Steam ironing allowed--set the dial to itsMAXIMUM travel at the end of the 3dots symbol on your Polti iron
Steam ironing allowed--set the dial to itsMAXIMUM travel at the end of theTHREE (nb THREE, not two) dots sym-bol on your Polti iron
DRY IRON only, with iron dial set at onedot. N.B. NEVER CALL FOR STEAMBY PRESSING STEAM REQUESTBUTTON when DRY ironing. See spe-cial instructions for DRY ironing in theinstruction book.
DO NOT IRON. Neither steam nor dryironing allowed.
1 level on = WOOL
2 levels on = COTTON
3 levels on = LINEN
all levels off = SYNTHETICS and SILK
LECOASPIRA GENIUS - M0S09128 1Q01:Layout 1 19/01/2010 12.23 Pagina 73
EENN
GGLL
II SSHH
74
LECOASPIRA GENIUSiron has reached the desired temperature.
• Press the Steam request button (W2) to letsteam out.The steam flow will stop when you releasethe button. When you first start to use theiron, a few drops of water mixed with steammay come out because the temperature hasnot yet stabilised; apply the first jet of steamon a rag.
• To obtain a continuous jet of steam, movethe button (W1) forward. Steam will continueto be released even after you release theSteam request button (W2). To stop dispen-sing steam, move the continuous steam jetbutton (W1) back.
IRONING WITHOUT STEAM • Leave the boiler turned off (all indicators (8B)
off). Adjust iron temperature by turning theknob (W4) to the appropriate temperature forthe fabric as shown on the knob.
IMPORTANT• Do not leave the iron unattended while it is
turned on.• Iron only on heat-resistant surfaces permea-
ble to steam.• If you accidentally drop the iron, have it in-
spected by an authorised Technical ServiceCentre to make sure that no internal malfun-ctioning has been caused that could affectproduct safety.
• WARNING If you iron sitting down, be carefulto make sure that you do not direct the jet ofsteam toward your legs. Steam can causescalding.
• The iron must be used and rested on a sta-ble surface.
• When replacing the iron on its base, makesure that the surface the base is resting on isstable.
PPRROOGGRRAAMMMMEE PP00:: TTUURRBBOOSSUUCCTTIIOONNIINNGG
Programme P0 is useful for vacuuming particu-larly dirty surfaces or suctioning up liquids.Fasten the two extension tubes (D) to the han-dle and attach the universal brush (E) to them.Use the attachment appropriate to the type ofsurface to be cleaned, as described in the sec-tion on “advice for use of accessories”.• Press the suction button (A4) to start suctio-
ning at maximum power; press the suctionbutton (A4) again to stop suctioning.
This programme also effectively removesanimal fur from floors, carpets and rugs orfrom sofas and textiles when the smallsteam-suction upholstery nozzle (N) andthe bristle fitting (P) are used.
FFIILLLLIINNGG TTHHEE BBOOIILLEERRThe automatic topping up system means youno longer need to stop and wait before fillingthe boiler with water again.When the water level in the boiler is low, the le-vel probe automatically requests water from thetank, using a pump to fill the boiler.When the water level in the automatic fillingtank is low, the Lamp indicating lack of water intank light (8G) will come on and a signal willsound. To continue working, simply proceed as descri-bed in the section on “Preparation for use“.
CCAABBLLEE CCOOMMPPAARRTTMMEENNTTBefore putting the Vaporetto Lecoaspira away,stash the power cable (13) in the cable com-partment (15) as follows: • remove the dirt container (20) as described
in the section on “preparation for use”;• manually wind up the cable uniformly and
store it in the compartment provided (15),passing it through the power cable passage(14) (Fig. 8);
• put the dirt container (20) back into its hou-sing, being careful to position it correctly.
UUSSIINNGG TTHHEE TTOOOOLL HHOOLLDDEERRThe tool holder (16) may be used to anchor thetube with the brush on it to the body of the ap-pliance.To hook the tube to the appliance, slide thehook on the tube into the tool holder on the ap-pliance (Fig. 9).
CCOONNNNEECCTTIINNGG AACCCCEESSSSOORRIIEESSAll Vaporetto Lecoaspira accessories may beconnected directly to the handle (A2) or to theextension tubes (D).Proceed as follows to connect up the accesso-ries for suction and steam cleaning (D-E-K-N):• Position the accessory locknut (C) (on every
LECOASPIRA GENIUS - M0S09128 1Q01:Layout 1 19/01/2010 12.23 Pagina 74

EENN
GGLL
II SSHH
75
LECOASPIRA GENIUSaccessory) in the OPEN position (fig. A).
• Attach the selected accessory to the handle.• Move button (C) to the CLOSED position (fig.
B).• Ensure the connection is secure.• An additional fastening button is located on
the flexible steam + suction tubes (D). Pro-ceed as shown previously for the other ac-cessories and attach the tubes by sliding thebutton to the locked position.
To connect accessories for suction only (F-M-Q-R-T-TB-X-Y-Z), simply connect them withouthooking them up using the locknut.IMPORTANT: in this case it is important todisable the steam function using the safetybutton (A3) to prevent accidental releasingof steam.
SSUUCCTTIIOONNIINNGG UUPP SSOOLLIIDDSS AANNDD LLIIQQUUIIDDSSThe appliance may be used to vacuum up dustor liquids.In either case, if the water in the filter is verydirty, replace it as described in the section on“Emptying and cleaning the dirt container”.
IMPORTANT: When dirt vacuumed up in thedirt container (20) reaches the maximumpermitted level, suctioning will automati-cally be stopped by the safety float (you willhear the engine speed increase).
After 10 seconds the appliance will automati-cally shut down and the suction speed indica-tors (8C) and suction indicator (8E) will flash.
Turn off the appliance and do not turn it onagain until you have replaced the water in thetank, as described in the section on “Emptyingand cleaning the dirt container”. If you turn it onagain immediately, you may damage the filteron the air outlet.To resume cleaning, proceed as described inthe section on “Emptying and cleaning the dirtcontainer”, and then replace the water in thecontainer.
BBIIOOEECCOOLLOOGGIICCOONB DO NOT USE BIOECOLOGICO OROTHER PRODUCTS IN THE STEAM GENE-RATOR TANK, BUT ONLY IN THE DIRT CON-TAINER (20).
To ensure the proper operation of the applianceduring suction, Polti recommends using Bioe-cologico inside the dirt container (20).Bioecologico is a natural deodorising, foam-free product that prevents foam build-up in thewater filter to ensure proper operation of theappliance.Bioecologico also acts as an effective deodo-rant when using the appliance because it is di-luted in the dirt container before the applianceis switched on, and ingredients such as TeaTree and L(+) lactic acid prevent bad odoursfrom forming in the dirt container and release,instead, a clean scent into the air.Use:• shake the bottle before use and remove the
lid• hold the bottle upright and squeeze 5 ml into
the dispenser. Stop squeezing and pour thecontents of the dispenser into the dirt contai-ner on the appliance;
• add water according to the instructions in thesection “preparation for use”.
Bioecologico is available for sale in applianceshops and at authorised Technical AssistanceCentres.Bioecologico is available in pine or citrusscents.
EEMMPPTTYYIINNGG AANNDD CCLLEEAANNIINNGG TTHHEE DDIIRRTTCCOONNTTAAIINNEERR
Turn off the appliance with the main switch (1)and disconnect the power cable from the powersupply.Lift the dirt container (20) out of its housingusing the container handle (22) (Fig. 3).Turn the handle as shown in Fig. 4 and pull outthe “EcoActiveFilter” (23). Empty the tank by pouring the water out withthe spout (Fig.10).Pull the tube elbow (27) out of the filter bodywith the microholed net (26) all the way out(Fig. 11a).Separate all the components and rinse them inrunning water. (If the filtering sponge is torn, re-place it; you may purchase a replacement froman authorised Polti Service Centre).If you wish to continue working, refill the contai-ner with water.Put the “EcoActiveFilter” filter assembly (23)back in the dirt container (20).
LECOASPIRA GENIUS - M0S09128 1Q01:Layout 1 19/01/2010 12.23 Pagina 75

EENN
GGLL
II SSHH
76
LECOASPIRA GENIUSMPORTANT: align the arrow on the bent tube(27) with the notch on the filter body (26)(Fig.11b).Put the dirt container (20) back in the applianceas described in the section on “preparation foruse”.Note: empty the dirt container (20) before put-ting the Vaporetto Lecoaspira away.One of the biggest advantages of the VaporettoLecoaspira is that it can be put away clean!
Recommendations for cleaning the contai-ner:cleaning the container on your Lecoaspira isvery simple, thanks to its ability to vacuum upliquids.Once cleaning is complete, empty the contai-ner as described and place it back in its hou-sing on the body of the appliance.Then vacuum up approximately 1.5 litres ofclean water using the suction function for a fewseconds.The water vortex created inside the containerwill rinse the sides and remove any dirt. Theclean water will also clean the inside of the tu-bes as it travels through them. Empty the container again and put VaporettoLecoaspira away.
RREECCOOMMMMEENNDDAATTIIOONNSS FFOORR TTOOOOLL UUSSEE Before steam treating leather, special fabricsand wooden surfaces, consult the manufactu-rer’s instructions and conduct a test on a hid-den corner or a sample. Let the steam treatedpart dry and check that there has been nochange in colour or deformation.Be particularly careful when cleaning woodensurfaces (furniture, doors, etc.) and treatedterra cotta floors, as prolonged use of steammay damage the wax, polish or colour of thesurface.Steam should be applied to surfaces of thiskind only very briefly; alternatively, they may becleaned using steam on a cloth.Use steam at a minimum level on particularlydelicate surfaces (such as synthetic materials,lacquered surfaces, etc.).When cleaning glass surfaces in particularlycold weather, preheat glass with steam from adistance of about 50 cm. Spray plants from adistance of at least 50 cm.
SSTTEEAAMM AANNDD SSUUCCTTIIOONN TTOOOOLLSSUNIVERSAL BRUSH (E)
Use this brush on large surfaces, ceramic, mar-ble and parquet floors, carpets, etc., applyingthe following inserts:• Bristle fitting (E2) for suction only.• Liquid suction inserts (E3), recommended for
washing floors and picking up any moisture.• Insert for fitted carpet (E4), recommended for
rugs and carpets.The universal brush may be connected directlyto the handle or to the sheath with the exten-sion tubes (D).ASSEMBLING INSERTS:To attach the different fittings on the universalbrush, slide the two slides (E1) on the back ofthe brush outwards and attach the fitting mostsuited to the surface to be cleaned. Slide thetwo slides (E1) inwards (fig. C) to lock the fittinginto place.
120° STEAM-SUCTION ACCESSORY (K)This accessory is recommended for hiddenspots which are hard to reach with other tools.The 120° tool may be used to:• treat stains on rugs and carpets before bru-
shing them;• clean stainless steel, glass, mirrors, stratified
coatings and enamels;• clean corners such as steps, window frames,
door jambs and aluminium profiles;• clean around the base of taps;• clean shutters, radiators, vehicle interiors;• spray steam onto house plants from a di-
stance.The 120° tool may be connected directly to thehandle (A2) or to the sheath through the exten-sion tubes (D).The 120° tool may be used in combination withthe following tools:• coloured 120° brush (L), recommended to
remove dirt deposited on very narrow surfa-ces such as hobs, blinds, gaps between tiles,bathroom fixtures, etc..Different colours allow you to use the samebrush each time you clean the same surface.
• steam lance (K1) for even the hardest to re-ach spots, perfect for cleaning radiators,door and window frames, bathroom fixturesand shutters.To connect the lance to the 120° tool, simply
LECOASPIRA GENIUS - M0S09128 1Q01:Layout 1 19/01/2010 12.23 Pagina 76
EENN
GGLL
II SSHH
77
LECOASPIRA GENIUSscrew it onto it like the coloured brushes,which can in turn be screwed onto the lance.
• Small nozzle (M), recommended for vacuu-ming up dirt dislodged from narrow surfacessuch as gaps between tiles, door jambs,openings in shutters, etc.
• Lance (R), recommended for thorough va-cuuming of hard-to-reach spots such as skir-ting boards, folds in sofas, armchairs, uphol-stered furniture, car seats. Apply the radiatorbrush (S) to the tip of the lance (R) to cleandust in radiators.
SMALL STEAM-SUCTION UPHOLSTERYNOZZLE (N)
This tool may be used on large glass surfacesand mirrors, smooth surfaces of all kinds andfor washing textiles such as sofas, mattresses,etc., using the following attachments:• 130 mm window cleaning fitting (O) for small,
smooth surfaces;• the 200 mm window-cleaning fitting (O1) for
glass and larger surfaces;• the bristle fitting (P) is recommended for car-
pets, stairs, vehicle interiors and textile surfa-ces of all kinds (after testing on a hidden cor-ner) and may also be used to remove pethair from these surfaces; the terry cloth co-ver (E6) may be applied to the nozzle.
Insert the nozzle in the specific housing on thefittings and fasten it as shown in fig. D.To use the steam-suction window-cleaning fit-ting correctly:• spray steam evenly over the surface to be
cleaned to dislodge dirt.• press the rubber wiper against the surface to
be cleaned, working from the top downwardswhile vacuuming.
Important: when temperatures are particularlylow, preheat glass surfaces by spraying steamfrom about 50 cm away.
TTOOOOLLSS FFOORR SSUUCCTTIIOONN OONNLLYYTo connect accessories for suction only (F-M-Q-R-T-TB-X-Y-Z), simply connect them withouthooking them up using the locknut.These accessories may be used with the pro-gramme “P0” or with the programme “MA” forsuction use only.IMPORTANT: in this case it is important todisable the steam function using the safety
button (A3) to prevent accidental releasingof steam.
UPHOLSTERY NOZZLE (Q) Recommended for cleaning fabric surfacessuch as sofa joints, armchairs, mattresses, carseats, etc..
SUCTION BRUSH (T)With soft bristles for brushing delicate surfacessuch as picture frames, books, etc..
TURBO BRUSH (TB)The turbo brush uses a turbine system whichoperates on suction power only, without electri-city. The turbo brush increases the effectivenessand efficiency of suction on soft furnishingssuch as carpets and fitted carpeting since itcombines suction with a mechanical action toremove dust and dirt (organic and inorganic)and fibres (hair, etc.). By using the turbo-brushon carpets you can refresh the fibres thanks tothe action of the roller, which separates themso that the cleaner can reach right down intothe carpets.The turbo brush can be used as a traditionalbrush on hard surfaces since it has a by-passsystem which diverts the air flow directly to thesuction pipe.Use: A cursor on the back of the turbo brushpermits you to adapt it to any kind of surface:slide the cursor (TB1) to the left for hard surfa-ces, and slide it to the right for carpets and fit-ted carpeting. The cursor adjusts the speed ofthe turbine system: when it is moved comple-tely to the right, the turbine works at the maxi-mum rotation speed, while when it is movedcompletely to the left there is no rotation andthe brush operates as a normal floor brush.The turbine can be easily accessed for clea-ning thanks to the practical flap (fig.E).
TELESCOPIC TUBE (X)You may adjust the length of the telescopictube from a minimum of about 60cm to a maxi-mum of 1 metre. Press button (X1) and extendor reduce length as desired.
LECOASPIRA GENIUS - M0S09128 1Q01:Layout 1 19/01/2010 12.23 Pagina 77
EENN
GGLL
II SSHH
78
LECOASPIRA GENIUSUSING THE UNIVERSAL BRUSH (Y)
Connect the brush to the telescopic tube. Shiftthe selector on the brush (Y1) with your foot tochange the suction surface without bendingdown. The position with bristles out is recom-mended for all floors. The position without bri-stles is recommended for rugs and carpeting.
PARQUET BRUSH (Z)The parquet brush is designed to clean delicatesurfaces and fitted with bristles and wheels de-signed not to damage surfaces.
OOPPTTIIOONNAALL TTOOOOLLSSJOKER BRUSH (F)
The Joker brush may be used to suction up alltypes of solid and liquid dirt and is appropriatefor all surfaces.
PARQUET ACCESSORY (G)This tool is meant to be used exclusively withthe Joker brush.Place the joker brush on the Parquet accessoryas shown in figure 12. Apply the brush to thetool, following the direction of the arrow so thatit is aligned, and snap it in place.To release the Parquet accessory from the Jo-ker brush, pull the two levers on the sides ofthe attachment outwards and lift the brush.(Fig. 13).
GGEENNEERRAALL MMAAIINNTTEENNAANNCCEEMake sure that the power cable is unpluggedbefore performing any maintenance on the ap-pliance.Let the brushes cool down in their natural posi-tion after using them to prevent deformation.Periodically check the condition of the gasketsin the monobloc plug (B2) and replace them ifnecessary. Also check the seals connecting theextension tubes (D) and the handle (A2).Wipe the outside of the appliance with a dampcloth. Do not use solvents or cleaning productswhich may damage plastic surfaces.
To clean the “ECOACTIVE-FILTER” and cleanor replace the filtering sponge, proceed as de-scribed in the section on “EMPTYING ANDCLEANING THE DIRT CONTAINER”.
WWAASSHHAABBLLEE HHEEPPAA FFIILLTTEERRIMPORTANT: the filter supplied with the Vapo-retto Lecoaspira is washable. Proceed as fol-lows to clean it:• Release the dirt container handle (22) and
remove the container (20) as described inthe section on “PREPARATION FOR USE”.
• Lift the Hepa filter release handle (18) andpull the filter out of its housing (Fig.14).
• Rinse the filter under cold running water.Shake it gently after washing to eliminateany residual dirt and excess water.NOTE: air dry the filter far away from heatand light sources. Wait 24 hours before put-ting the filter back into the appliance.
• Replace the filter if it is torn.• Clean the filter every 4 months.• To position the Hepa filter (17) correctly,
make sure that it is inside its housing (19)and is locked in place by the lever (18)(Fig.14).
IMPORTANT: • Do not clean the filter with the brush as this
could damage it and decrease its filtering ca-pacity.
• Do not use cleaning products, do not rub thefilter, and do not wash it in the dishwasher.
LECOASPIRA GENIUS - M0S09128 1Q01:Layout 1 19/01/2010 12.23 Pagina 78

TTRROOUUBBLLEESSHHOOOOTTIINNGG
TROUBLE CAUSE SOLUTION
The suction fan does not start No power supply Check the cable, plug andsocket
The boiler filling pump can beheard working continuously
Air in the boiler circuit. Switch off the appliance, allow itto cool and repeat the opera-tions described in the “OPERA-TION” chapter.
The suction power drops The upholstery nozzle, the flexi-ble tube or the stiff suction tubeare clogged.
The Hepa filter is exhausted
Clen the filter and remove anyobstruction from the tubes andaccessories.
Follow the instructions in theparagraph headed “GENERALMAINTENANCE”
Water is spilled while suckingup liquids.
Float device clogged Clean the “EcoActive Filter” wa-ter filter assembly.
The vacuum cleaner shutsdown while vacuuming and thesuction speed indicators (8C)and suction indicator (8E) flash.
The liquid level in the watercontainer is too high.
The selected power level is toohigh for the surface beingcleaned.
Proceed as described in the sec-tion on “Emptying and cleaningthe water container” to resumecleaning.
Press the main switch (1), unplugthe power cable and leave the ap-pliance unplugged for at least 30seconds to allow the safety de-vice to reset.
The appliance shuts down and“E1” appears on the display.
The electronic card has detec-ted low water level in the boiler.
Turn off the appliance for a fewminutes and then turn it backon. If the problem appearsagain, contact an authorisedservice centre.
The appliance shuts down and“E2” appears on the display.
The electronic card has detec-ted an incorrect operating tem-perature.
Turn off the appliance for a fewminutes and then turn it backon. If the problem appearsagain, contact an authorisedservice centre
EENN
GGLL
II SSHH
79
LECOASPIRA GENIUS
LECOASPIRA GENIUS - M0S09128 1Q01:Layout 1 19/01/2010 12.23 Pagina 79