learning beaglebone python programming - sample chapter
TRANSCRIPT

C o m m u n i t y E x p e r i e n c e D i s t i l l e d
Unleash the potential of BeagleBone using Python
Learning BeagleBone Python ProgrammingA
lexander Hiam
Learning BeagleBone Python Programming
BeagleBone is a barebone computer that can be confi gured and customized for different applications and is almost half the price of a standard computer. This book will cover the basics of how BeagleBone Black's hardware interface subsystems work, and can be controlled using two popular Python libraries for BeagleBone Black. You will be introduced to BeagleBone Black's GPIO, PWM, ADC, UART, SPI, I2C, and eQEP subsystems. We will then dive deep into more complex built-in peripherals, demonstrating different ways to receive input from a user including buttons, potentiometers, and rotary encoders with the eQEP module. We will also learn about interfacing with external devices; this will be demonstrated using the serial modules to interface with external devices such as temperature sensors and accelerometers. Towards the end of the book, we will present a couple of real-world problems and demonstrate how to solve them with the skills you've acquired.
Who this book is written for
If you have experience with the Python language and are interested in getting started with electronics, then BeagleBone Black is the perfect platform for you and this book will provide you with the information you need.
$ 39.99 US£ 26.99 UK
Prices do not include local sales tax or VAT where applicable
Alexander HiamVisit www.PacktPub.com for books, eBooks,
code, downloads, and PacktLib.
What you will learn from this book
Set up BeagleBone Black for development with the PyBBIO and Adafruit_BBIO Python libraries
Understand how each of BeagleBone Black's hardware interface subsystems work
Connect many different types of hardware to BeagleBone Black
Use Python code to control and communicate with external hardware
Write programs that interact with the physical world around you
Learning BeagleB
one Python Programm
ing"CommunityExperienceDistilled"

In this package, you will find: The author biography
A preview chapter from the book, Chapter 1 'Before We Begin'
A synopsis of the book’s content
More information on Learning BeagleBone Python Programming

About the Author
Alexander Hiam is a freelance embedded systems designer. He has a bachelor's degree in computer science (embedded systems) from Marlboro College. He is the sole proprietor of Gray Cat Labs, where he has been doing contract software and hardware development since 2012.
Alex developed and actively maintains the PyBBIO Python library for BeagleBone. He has designed BeagleBone Capes professionally for clients, and he also actively contributes to the BeagleBone community by helping provide support on the mailing list and IRC channel and mentoring for the BeagleBoard.org organization during Google Summer of Code.

PrefaceThe BeagleBone Black is a powerful system that can be used in a huge number of cool projects and is a great platform to learn about embedded systems and embedded Linux, but it can be diffi cult for beginners to fi nd the resources they need to get started with it. The goal of this book is to use the Python programming language to introduce you to many of the different hardware interfaces available on the BeagleBone Black, and to teach you how to use them to communicate with external hardware with the help of the PyBBIO and Adafruit_BBIO Python libraries. This book will take you through the system, from initial setup to creating complete programs, and each new concept along the way is introduced with practical and contextual examples.
What this book coversChapter 1, Before We Begin, introduces you to the BeagleBone Black and to each of its hardware interfaces that are used throughout the book.
Chapter 2, Getting Started, takes you through the initial steps to get your BeagleBone Black setup and ready to use, and briefl y introduces you to the PyBBIO and Adafruit_BBIO Python libraries.
Chapter 3, Digital Outputs, goes more in depth into using the GPIO modules to generate digital outputs, and guides you through your fi rst hardware interface programs to blink some LEDs.
Chapter 4, PWM and ADC Subsystems, describes in more detail the pulse width modulation and analog-to-digital converter subsystems, and guides you through using them to fade LEDs, control servo motors, measure light levels, and more. It also introduces some basic concepts for analog signal conditioning.

Preface
Chapter 5, User Input, presents some methods of using external hardware to interface with your BeagleBone programs, including potentiometers, buttons, and rotary encoders.
Chapter 6, Program Output, covers some methods of using external hardware to provide feedback to the user, from LED and LCD displays to sending e-mails and text messages.
Chapter 7, Serial Communication, describes in more depth the UART, I2C, and SPI serial subsystems and how they can be used to communicate with external digital devices.
Chapter 8, Interfacing with External Devices, walks you through the steps required to interface with a new digital device by writing a Python module to communicate with an accelerometer over I2C.
Chapter 9, Using the Network, shows you some ways of taking advantage of the BeagleBone Black's network connection to remotely control and monitor your applications.
Chapter 10, A Practical Example, walks you through using what you've learned to build a BeagleBone Black weather station with remote monitoring and automatic over/under temperature e-mail or text message alarms.
Appendix A, The BeagleBone Black Pinout, provides you with a visual description of the BeagleBone Black's expansion headers and the different ways each pin can be used.
Appendix B, Disabling HDMI, teaches you to disable the HDMI output.

[ 1 ]
Before We BeginBefore we start hooking up hardware and writing code, we'll need to have an understanding of what we're working with. This chapter will introduce you to the BeagleBone and highlight the various interfaces it provides to connect to external devices. It will cover:
• An overview of the BeagleBone system• An overview of the BeagleBone's peripheral interfaces, and what types of
external devices each can connect to• Some additional hardware and tools that you will need if you want to
duplicate the examples given throughout the book, and where you canbuy them
An overview of BeagleBoneThe BeagleBone boards are a series of small, powerful, and affordable Linux computers that are perfect for embedded applications such as home automation, robotics, industrial control, and much more. They are designed by BeagleBoard.org (http://beagleboard.org/) and are fully open source. They are based on the Texas Instruments AM335x 1GHz ARM Cortex-A8 series of microprocessors, and can run a number of different operating systems, including various GNU/Linux distributions, Android, and even Windows Embedded CE. The current BeagleBone model being produced is the BeagleBone Black rev C, which ships with a Debian GNU/Linux distribution. Therefore, this book will focus on using Debian on the BeagleBone Black, though much of the information given will apply to other BeagleBone models and Linux distributions as well.

Before We Begin
[ 2 ]
The following screenshot shows the BeagleBone board:
The BeagleBone Black's AM335x microprocessor contains a number of built-in peripheral interface subsystems, enabling it to accept and generate many different forms of inputs and outputs. The BeagleBone Black includes two 2 x 23 pin rows of female header pins, giving a total of 92 connection points for hardware expansion using the processor's peripheral interface subsystems.
General purpose input/outputThe general purpose input/output (GPIO) module handles all the digital input and output. In this context, digital refers to the fact that the signals are binary; they are either 1 or 0, represented by fully on and fully off respectively. In the case of the AM335x, the fully-on level is 3.3V, and the fully-off level is 0V. The GPIO module is used for inputs such as switches and buttons, which are either on or off. Its outputs can be used to control devices, such as LEDs, buzzers, and relays.

Chapter 1
[ 3 ]
Analog-to-digital converterThe analog-to-digital converter (ADC) module is used to measure analog voltages. The AM335x ADC can only measure voltages between 0V and 1.8V (and voltages outside this range may damage your BeagleBone), but, in later chapters, you will learn how to divide larger voltages to be within this range. The ADC can be used to receive inputs from devices such as potentiometers, which can be used to create varying voltages, measure the voltage output of analog sensors for temperature, light, sound, and different types of gases, and with some additional external components it can be used to measure electrical current.

Before We Begin
[ 4 ]
Pulse width modulationThe pulse width modulation (PWM) module is essentially used to generate a square wave signal at a fi xed frequency, and then vary its duty cycle. It gives us the ability to accurately generate pulses of a confi gured duration, repeating at a confi gured frequency. Like the GPIO module, the PWM module on the BeagleBone Black operates at 3.3V. These PWM signals can be used to control servo motors, vary the speed of DC motors and the brightness of LEDs, and with some additional external components they can be used to generate varying voltages.
Universal asynchronous receiver/transmitterThe universal asynchronous receiver/transmitter (UART) modules are used to transmit and receive RS-232 style serial signals, which is an industry standard for serializing and transferring information between two devices using a pair of unidirectional digital signals. They can be used to communicate with PCs, Bluetooth and Wi-Fi radio modules, and GPS receivers. The BeagleBone Black's UART modules also operate at 3.3V.

Chapter 1
[ 5 ]
Serial peripheral interfaceThe serial peripheral interface (SPI) module is used to communicate over SPI, which is another industry standard serial protocol. Whereas UARTs are generally used to connect two devices, SPI is made to connect one master device to one or many slave devices. It is commonly used on devices such as small character and graphics LCD screens, external ADCs, and DACs (Digital-to-Analog converters), as well as on many different types of sensor. The BeagleBone Black's SPI modules operate at 3.3V as well.

Before We Begin
[ 6 ]
Inter-Integrated CircuitInter-Integrated Circuit (I2C) is yet another industry standard serial protocol. It also allows a master device to communicate with a bus of many slave devices, but it requires fewer pins than SPI. It is commonly used by real-time clocks (RTCs), as well as in many types of sensors, including Micro-Electro-Mechanical Systems (MEMS) devices, such as accelerometers, magnetometers, and gyroscopes. The BeagleBone's I2C modules operate at 3.3V.
Tools and additional hardwareThe majority of the demo programs in this book use external hardware that must be purchased separately. Each time a demo program is given, which requires additional parts, they will be listed by part number and/or description. We will do our best to use the most readily available and lowest cost parts. All of the parts used can be purchased from one or more of the following resources:
• SparkFun: https://www.sparkfun.com/• Adafruit Industries: http://www.adafruit.com/• Digi-Key: http://www.digikey.com/• Mouser: http://www.mouser.com/• Farnell / Newark / Element14: http://www.farnell.com/

Chapter 1
[ 7 ]
The circuits in each demo will be assembled using solderless breadboard and jumper wires. Both come in many different shapes and sizes.
Breadboards and jumper wires can be purchased from any of the preceding links, and you'll probably want to start out with one standard-sized breadboard and a jumper wire kit, such as that from Adafruit:
• Breadboard: http://www.adafruit.com/products/239• Jumper wires: http://www.adafruit.com/products/153
That should provide enough breadboard space and jumper wires to assemble most, if not all, of the demo circuits in this book.
Before We Begin
[ 8 ]
Just like with software, it is inevitable when assembling hardware that things won't always work the fi rst time. There are many tools that can greatly reduce the time it takes to fi x these problems. The most useful for the circuits in this book will be a multimeter, which is a tool that measures voltage and current, and often additional properties such as resistance, capacitance, and frequency. Both SparkFun and Adafruit carry very affordable digital multimeters. While these are not high quality measurement tools, they are certainly suitable for these circuits. Though not essential, I would highly recommend having some sort of multimeter on hand when building the circuits in this book.
More helpful than a multimeter for debugging tools such as PWM and serial protocols is an oscilloscope, which shows you a plot of voltage over time to visualize many different signals in a circuit. This is a more expensive tool, and will be less necessary for these circuits. Throughout the book, however, you will see screen captures of an oscilloscope to show various signals, and it should become evident just how helpful they can be. Again, Adafruit and SparkFun carry affordable oscilloscopes.
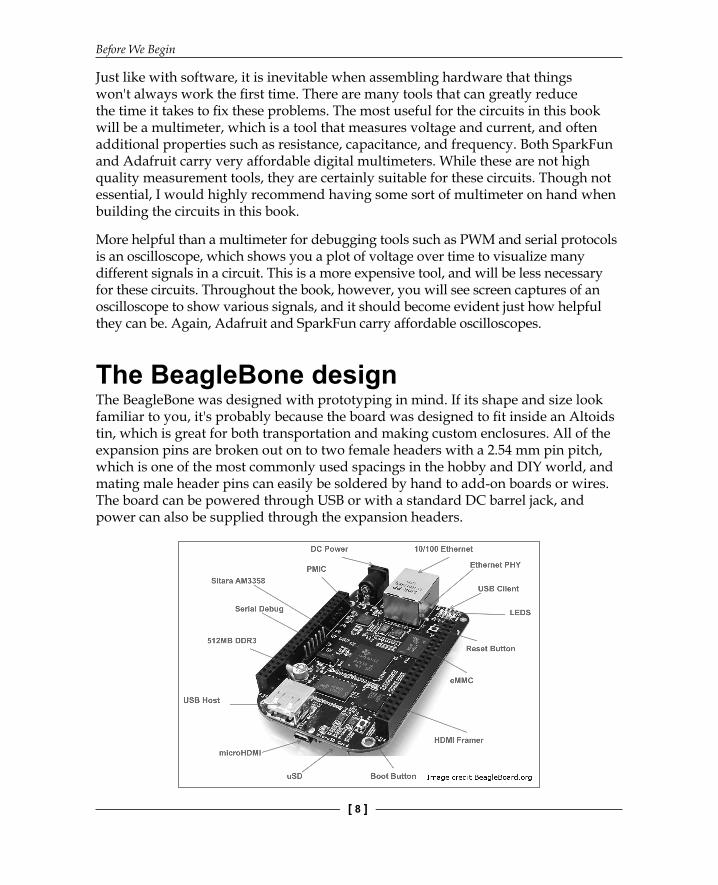
The BeagleBone designThe BeagleBone was designed with prototyping in mind. If its shape and size look familiar to you, it's probably because the board was designed to fi t inside an Altoids tin, which is great for both transportation and making custom enclosures. All of the expansion pins are broken out on to two female headers with a 2.54 mm pin pitch, which is one of the most commonly used spacings in the hobby and DIY world, and mating male header pins can easily be soldered by hand to add-on boards or wires. The board can be powered through USB or with a standard DC barrel jack, and power can also be supplied through the expansion headers.

Chapter 1
[ 9 ]
Board comparisonThere are a number of low-cost single-board GNU/Linux computers on the market these days, so let's take a look at how the BeagleBone Black stacks up against a couple of its most popular competitors.
BeagleBone Black Intel Edison Raspberry Pi 2 BCPU 1 GHz single-core
ARM Cortex-A8500 MHz dual-core Intel Atom
900 MHz quad-core ARM Cortex-A7
Flash 4 GB eMMC, expandable with uSD
4 GB eMMC uSD card
RAM 512 MB 1 GB 1 GBVideo microHDMI N/A HDMI, CompositeNetwork 10/100 Mbit Ethernet Dual-band a/b/g/n
Wi-Fi, Bluetooth 4.010/100 Mbit Ethernet
GPIO pins 65 20 40ADC channels 7 6 N/APWM channels 8 4 2UARTs 4 1 1SPI ports 2 1 1I2C ports 2 1 2Coprocessor 2x 200 MHz 32-bit
PRU microcontrollers100 MHz 32-bit Intel Quark
N/A
Price (USD) $49 $49.95 $39.95
The BeagleBone Black offers great performance and far more hardware expansion capabilities at about the same cost as the Edison and Raspberry Pi 2 B. That combined with its active open source community makes it a great choice for a huge variety of projects.
Another important feature of the BeagleBone is the two built-in PRU (programmable real-time unit) microcontrollers. These are built right into the AM335x CPU and are on the ARM interconnect, so they can share memory with the ARM processor as well as provide direct access to the peripherals. This means high-speed, real-time tasks can be executed on the PRUs asynchronously without any interruption from the Linux kernel. With growing kernel driver support and documentation to compile and load fi rmware to PRUs, and for communicating with the code running on them from GNU/Linux user space, they really set the BeagleBone apart from much of its competition. The PRUs are outside the scope of this book, but there are plenty of tutorials and examples to be found on the Web.
Before We Begin
[ 10 ]
Helpful resourcesOne of the BeagleBone Black's strong suits is the large community surrounding it.
The offi cial site at http://beagleboard.org/ has lots of great information.
The main source for help with BeagleBone-related issues is the mailing list at https://groups.google.com/forum/#!forum/beagleboard.
There are also plenty of helpful people on the #beagle IRC channel at http://beagleboard.org/Community/Live%20Chat.
There are also many resources online that can help fi ll the gaps this book leaves on the electrical side. For instance, the Element14 community at http://www.element14.com/community/welcome and the EEVBlog at http://www.eevblog.com/, both contain a wealth of great material, as well as very active electronics forums.
SummaryYou should now have a better understanding of what the BeagleBone has to offer, and maybe even some insight into the types of devices we will be interfacing with in later chapters.
In the next chapter, you will be plugging in your BeagleBone Black and learning how to log in and get everything we need installed and up to da te.

Where to buy this book You can buy Learning BeagleBone Python Programming from the
Packt Publishing website.
Alternatively, you can buy the book from Amazon, BN.com, Computer Manuals and most internet
book retailers.
Click here for ordering and shipping details.
www.PacktPub.com
Stay Connected:
Get more information Learning BeagleBone Python Programming