lazreport tutorial
DESCRIPTION
Lazarus Lazreport TutorialTRANSCRIPT
LazReport TutorialFrom Lazarus wiki
Contents
1 Overview2 Starting with LazReport
2.1 Setting up your form2.2 Setting up variables2.3 Objects and bands2.4 Report title2.5 The main event: showing data in the master data band
2.5.1 Formatting output2.5.2 A picture is worth...
2.6 Loading the report from the form2.7 Printing2.8 Report options2.9 General purpose variables
3 See also
Overview
This page started as a translation of the Portuguese language Tutorial de LazReport (which itself appears to be a translation from a French document). It wasupdated for LazReport (instead of FastReport) on Lazarus (instead of Delphi), using T*Connection instead of a DBase table.
Starting with LazReport
We're going to use a demo database which is provided by Delphi (DBDEMOS). You'll need to create a new application with a main form Form1.
We're assuming you already have your database set up as specified in SQLdb Tutorial0. If not, please do so.
Setting up your form
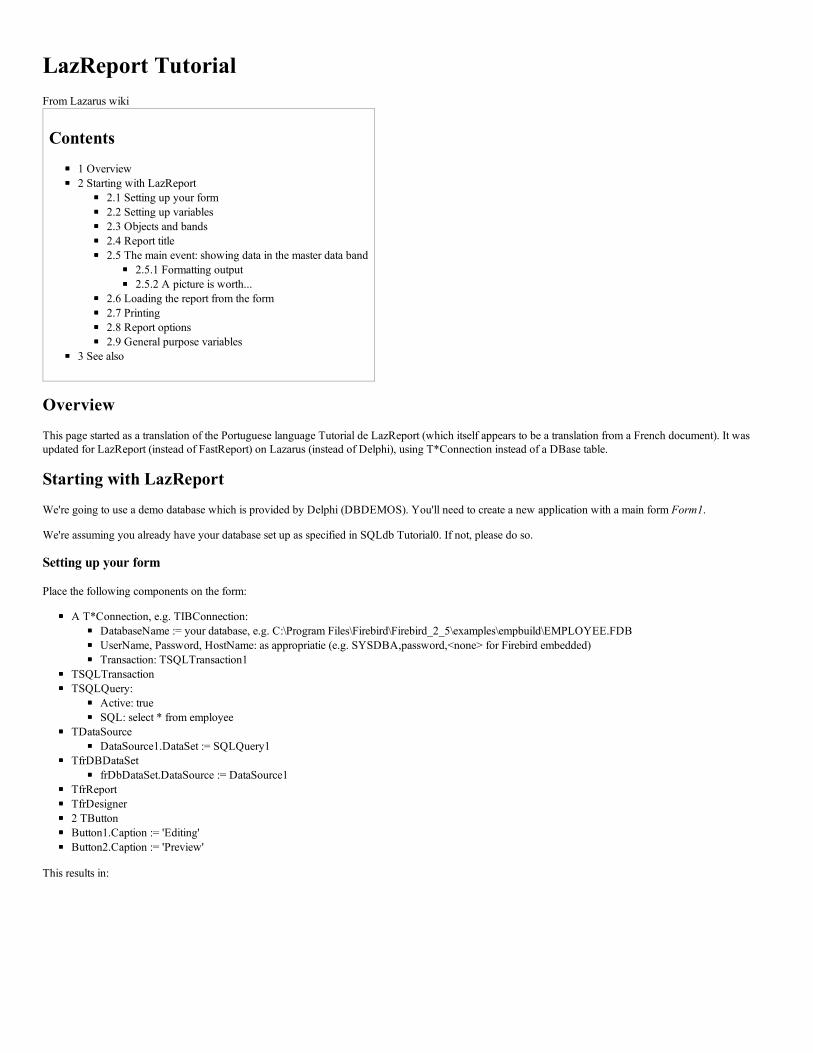
Place the following components on the form:
A T*Connection, e.g. TIBConnection:DatabaseName := your database, e.g. C:\Program Files\Firebird\Firebird_2_5\examples\empbuild\EMPLOYEE.FDBUserName, Password, HostName: as appropriatie (e.g. SYSDBA,password,<none> for Firebird embedded)Transaction: TSQLTransaction1
TSQLTransactionTSQLQuery:
Active: trueSQL: select * from employee
TDataSourceDataSource1.DataSet := SQLQuery1
TfrDBDataSetfrDbDataSet.DataSource := DataSource1
TfrReportTfrDesigner2 TButtonButton1.Caption := 'Editing'Button2.Caption := 'Preview'
This results in:
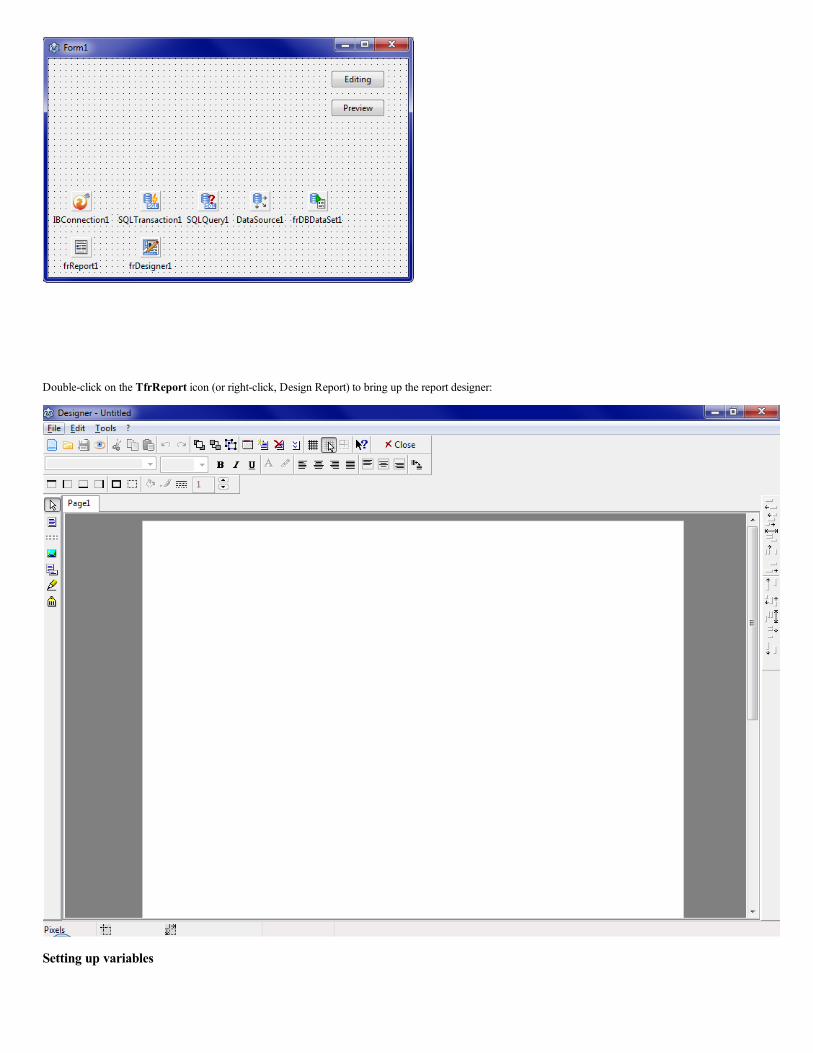
Double-click on the TfrReport icon (or right-click, Design Report) to bring up the report designer:
Setting up variables
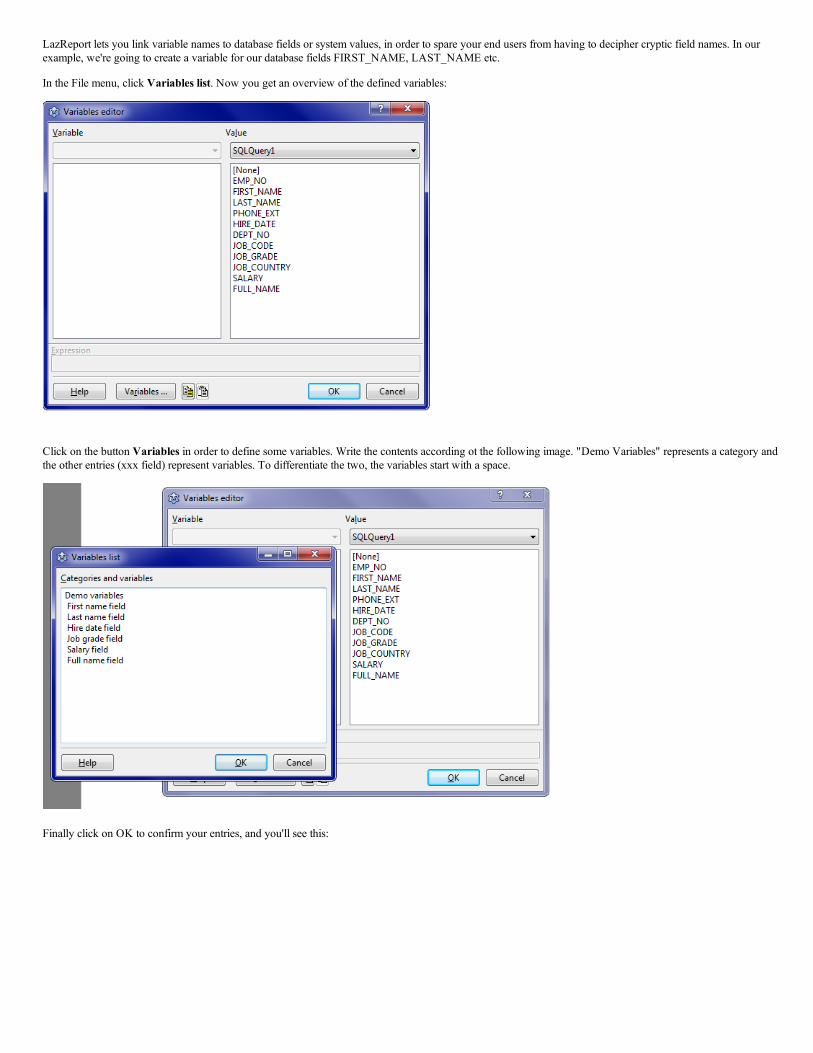
LazReport lets you link variable names to database fields or system values, in order to spare your end users from having to decipher cryptic field names. In ourexample, we're going to create a variable for our database fields FIRST_NAME, LAST_NAME etc.
In the File menu, click Variables list. Now you get an overview of the defined variables:
Click on the button Variables in order to define some variables. Write the contents according ot the following image. "Demo Variables" represents a category andthe other entries (xxx field) represent variables. To differentiate the two, the variables start with a space.
Finally click on OK to confirm your entries, and you'll see this:
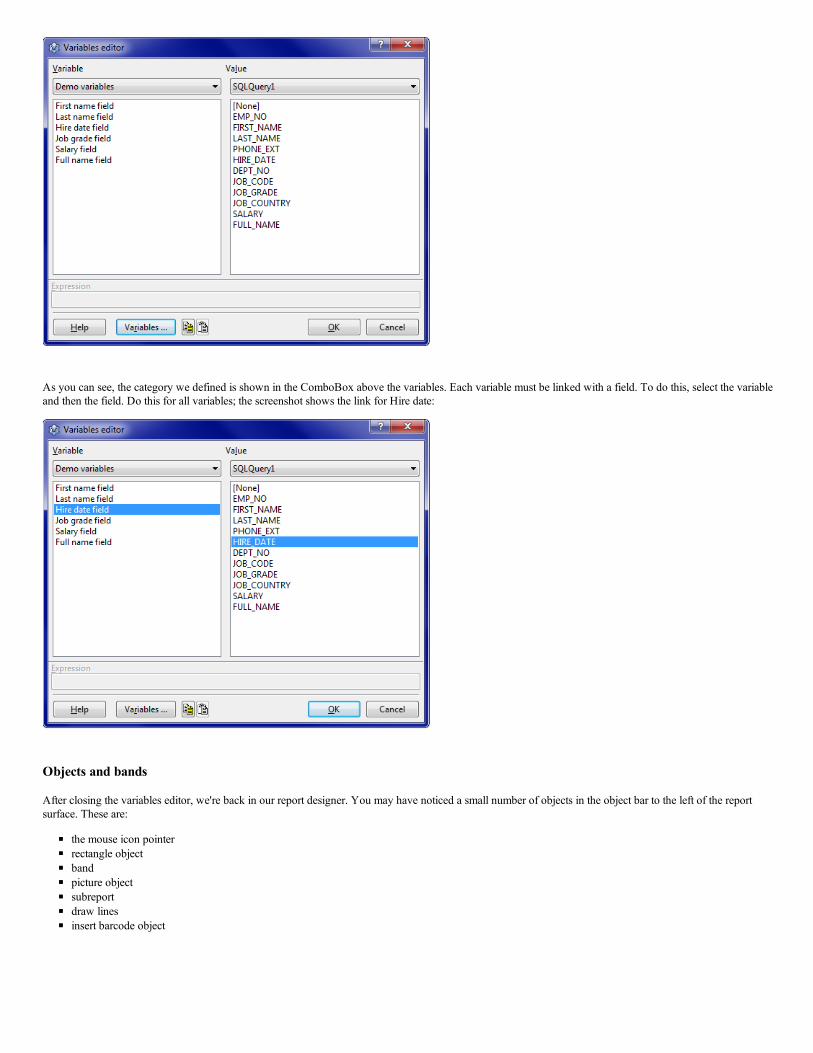
As you can see, the category we defined is shown in the ComboBox above the variables. Each variable must be linked with a field. To do this, select the variableand then the field. Do this for all variables; the screenshot shows the link for Hire date:
Objects and bands
After closing the variables editor, we're back in our report designer. You may have noticed a small number of objects in the object bar to the left of the reportsurface. These are:
the mouse icon pointerrectangle objectbandpicture objectsubreportdraw linesinsert barcode object
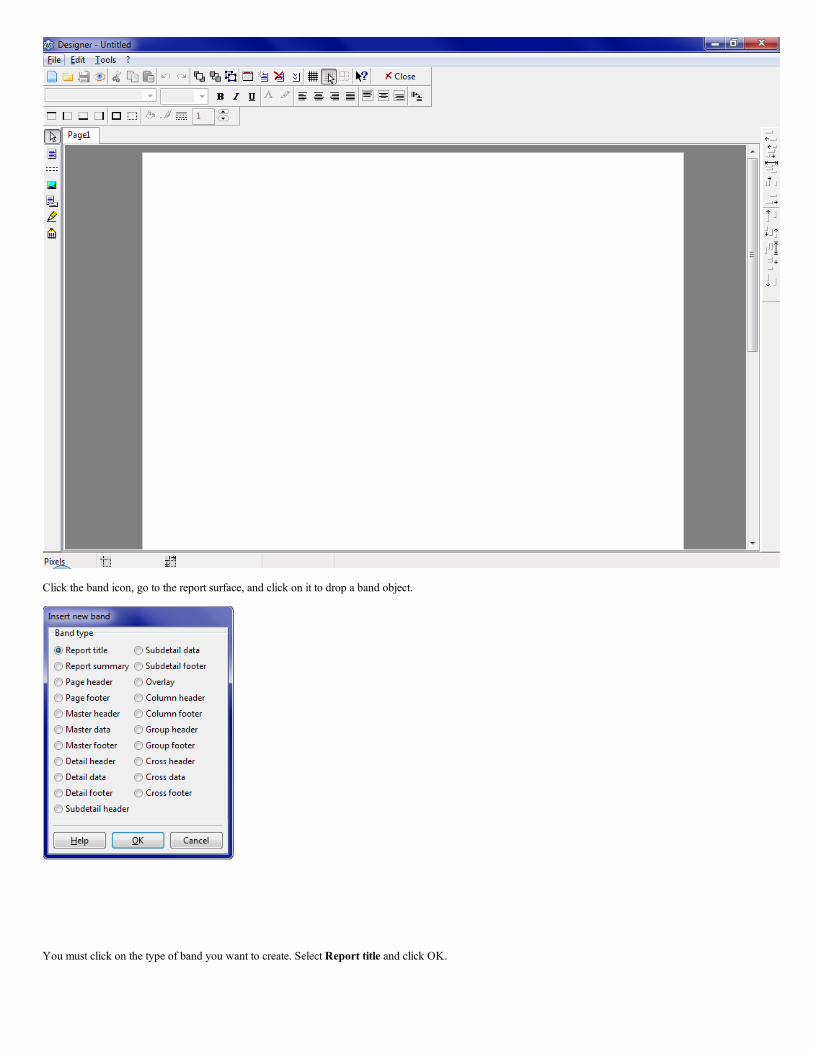
Click the band icon, go to the report surface, and click on it to drop a band object.
You must click on the type of band you want to create. Select Report title and click OK.
Band type Use
Report title Shown only on the first page
Report summary Shown only on the last page
Page header Shown at the top of each page
Page footer Shown at the bottomof each page
Master header Shown at the beginning of the first detail band/level
Master data First detail level data; repeated for each record in dataset
Master footer Shown at the end of the first detail band/level
Detail header Shown at the beginning of the second detail band/level
Detail data Second detail level data
Detail footer Shown at the end of the second detail band/level
Subdetail header Shown at the beginning of the third detail band/level
Subdetail data Third detail level data
Subdetail footer Shown at the end of the third detail band/level
Overlay Shown once on each page lower layer
Column header Shown at the top of every column
Column footer Shown at the bottom of every column
Group header Shown at the top of every group
Group footer Shown at the bottom of every group
Cross header Shown at the top of cross tables/pivot tables
Cross data Shows cross tables/pivot table data
Cross footer Shown at the bottom of cross tables/pivot tables
Report title
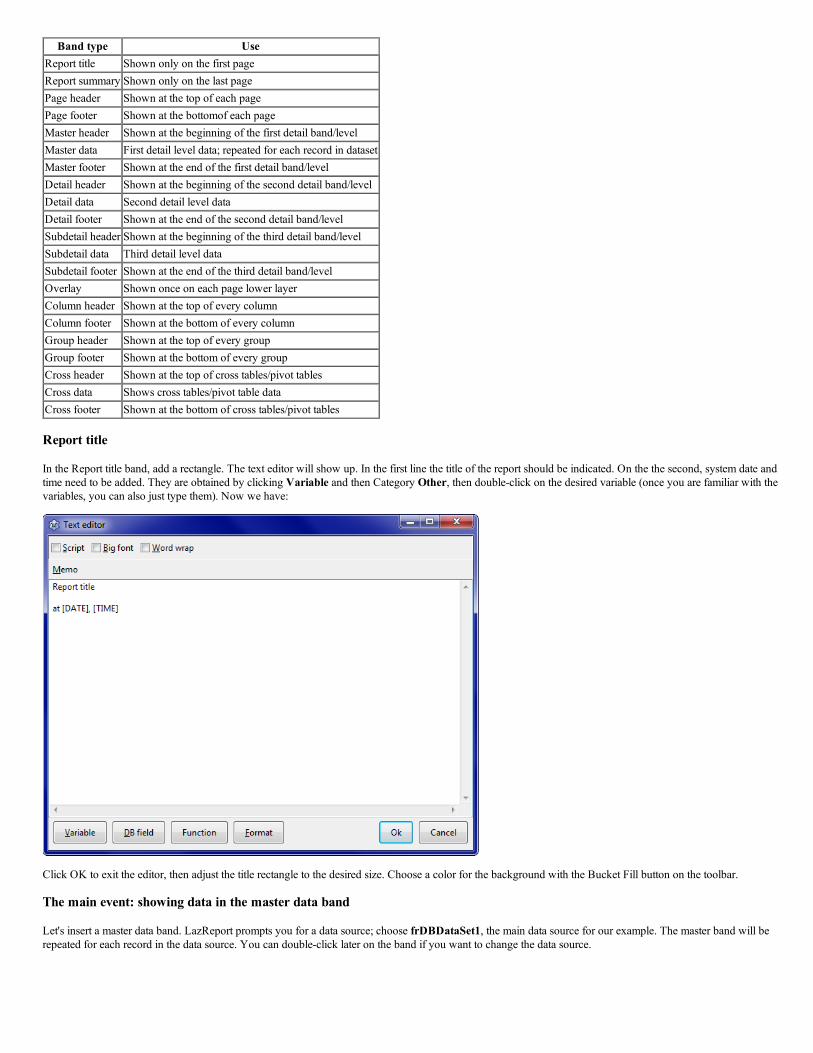
In the Report title band, add a rectangle. The text editor will show up. In the first line the title of the report should be indicated. On the the second, system date andtime need to be added. They are obtained by clicking Variable and then Category Other, then double-click on the desired variable (once you are familiar with thevariables, you can also just type them). Now we have:
Click OK to exit the editor, then adjust the title rectangle to the desired size. Choose a color for the background with the Bucket Fill button on the toolbar.
The main event: showing data in the master data band
Let's insert a master data band. LazReport prompts you for a data source; choose frDBDataSet1, the main data source for our example. The master band will berepeated for each record in the data source. You can double-click later on the band if you want to change the data source.

In the left half of the band we insert a rectangle and double click. The familiar text editor appears.
Now we will add several fields in the one rectangle. If needed though, you can use one rectangle per field if you want to apply different formatting etc.
The first line Name [Full name field] is obtained by writing Name and then, with the Variable button, entering the variable [Field Name]. Alternatively, asindicated before, you can write the resulting text directly.
The next line Salary [Salary field] is written similarly.
The third line - Salary divided by job grade [[Salary field]/[Job grade field]] - is done likewise. This shows you can perform calculations with fields coming fromthe data source. Note the extra set of square brackets around the calculation. As you may guess, you can not only use the variables listed via the Variable button,but also database fields via DB Field'.
You can use all kinds of operators and functions in your calculations; see LazReport Documentation#Documentation for an overview.
Formatting output
You can control how the text in the rectangles is displayed.
Let's first add a new rectangle with the Hire date field variable.
In the variable editor, let's set a format. A format is valid for all variables of a rectangle/object. To show the format editor, double click on a rectangle to get theText Editor, then click the Format button.
Let's set the date format you want here:

The first ComboBox indicates the type of data (text, numeric, date, time, logical/boolean). The second lets you select a preset format.... with some obviousrestrictions:
The Text type does not allow any Number type formatting.The Number type requires a decimal number with a comma (Please verify this and adjust article if needed. Is this country specific?). Except for Textand Logic types, you can use the formatting strings you also use in Lazarus.
Other formatting options are present on the button bare below the menu (e.g. bold, italic, highlighting).
Highlighting is very useful for emphasizing data. You can specify a condition that determines when highlighting is applied.
For that, use the keyword Value to indicate the value of the variable. Here is the highlighting for all hire dates later than 1989. Because Hire date is a TDateTimefield (which internally is a float), I cheated by just using the float value of January 1st, 1990 which is 32874. By default highlighter is a simple bold on whitebackground. You can set these parameters to an area by clicking the Highlight button.
A picture is worth...
If you haven't already, we'll need to add a PHOTO field to our test database; using an SQL statement like this (note: unfortunately different databases use differentsyntax; BLOB can be CLOB,IMAGE,OLE...):
ALTER TABLE EMPLOYEE ADD PHOTO BLOB;
Now add some test data - the example here uses jpg files - into the PHOTO field with your favourite database tool. Note: this is the way Delphi DBImage works:just binary blobs with image data. By default, Lazarus DBImage is more flexible and stores the file extension before the image data, allowing different file formatsto be used. For simplicity's sake, we'll use the Delphi approach.
Note: For this "DBImage BLOB without file extension info" to work, you'll need the patch from issue 25453/at least revision ... of LazReport
Now we have to tell the report it needs to treat all image data as binary jpg files. Click on frReport1, go to the Object Inspector, Events, and start anOnDBImageReader procedure:
procedure TForm1.frReport1DBImageRead(Sender: TObject; S: TStream;var GraphExt: string);
begin// Force TDBImage to Delphi compatible behaviour: only accept a single file type, e.g. jpg// this means that the BLOBs in your database must be just jpg binary files without any other dataGraphExt:='jpg';
end;
In File>Variables List, add the SQLQuery1.PHOTO field as variable Photo field, similarly to how you did this before. If you don't see the field, you may need toset the form's SQLQuery to inactive and active again to refresh the list of columns.
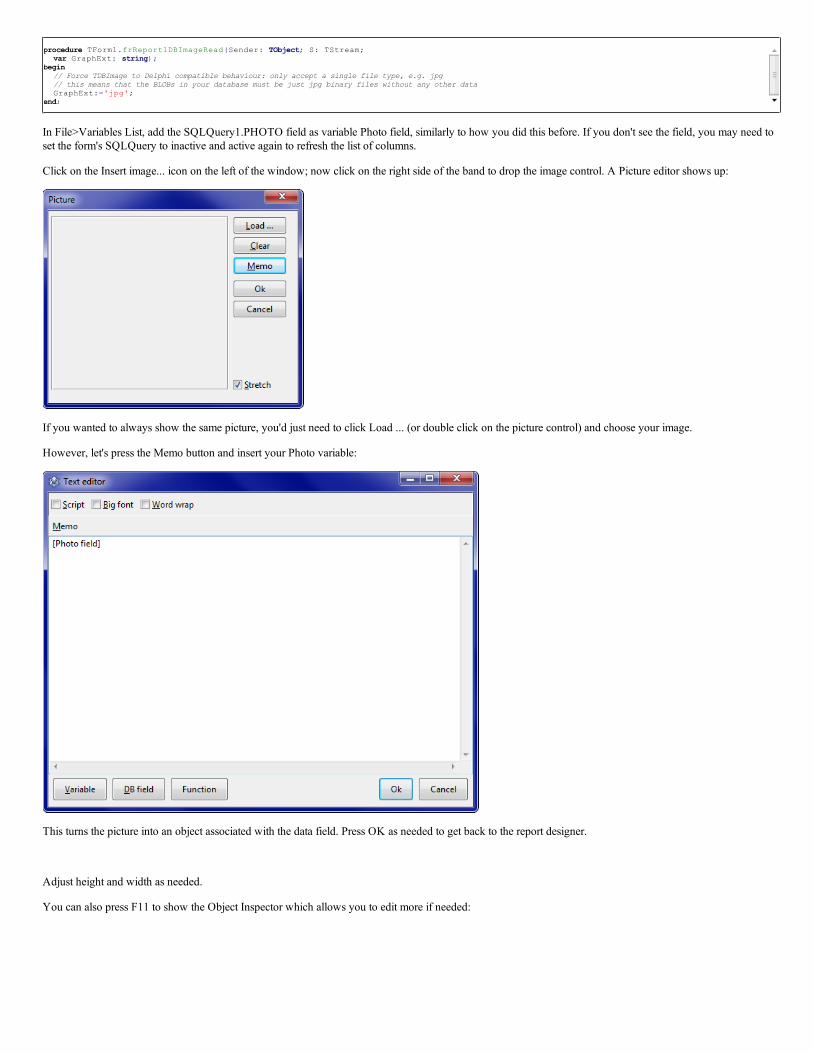
Click on the Insert image... icon on the left of the window; now click on the right side of the band to drop the image control. A Picture editor shows up:
If you wanted to always show the same picture, you'd just need to click Load ... (or double click on the picture control) and choose your image.
However, let's press the Memo button and insert your Photo variable:
This turns the picture into an object associated with the data field. Press OK as needed to get back to the report designer.
Adjust height and width as needed.
You can also press F11 to show the Object Inspector which allows you to edit more if needed:

Close the report editor and save the report definition (with the same name, lazreporttutorial.lrf).
If you go to File>Preview, you'll see your report includes the images.
Close the report editor and save the report definition as lazreporttutorial.lrf.
Loading the report from the form
Now let's write the code required to load and view or edit our report. To this add the following code to the project:
TForm1.Button2Click(Sender procedure: TObject);begin
frReport1.LoadFromFile('lazreporttutorial.lrf');frReport1.ShowReport;
end;TForm1.ButtonClick(Sender procedure: TObject);begin
frReport1.LoadFromFile('lazreporttutorial.lrf');frReport1.DesignReport;
end;
You have a preview option that gives end users a way to modify the report without changing the basic application.
Printing
Now we're going to add features to our basic example.
Add a TButton component with Caption := 'Print...', and a TPrintDialog. Behind the scenes, a project dependency on the Printer4Lazarus packages will beadded by the IDE, so make sure that package is installed.
We end up with this:
Now add the printers unit to your form's uses clauses.
Put the following code in the OnClick event of the Print button:

procedure TForm1.Button3Click(Sender: TObject);var
FromPage, ToPage, NumberCopies: Integer;ind: Integer;AppDirectory: String;Collap: Boolean;
begin// Load report definition from application directoryAppDirectory:=ExtractFilePath(ParamStr(0));frReport1.LoadFromFile(AppDirectory+'lazreporttutorial.lrf');// Need to keep track of which printer was originally selected to check for user changesind:= Printer.PrinterIndex;// Prepare the report and just stop if we hit an error as continuing makes no senseif not frReport1.PrepareReport then Exit;// Set up dialog with some sensible defaults which user can changewith PrintDialog1 dobegin
Options:=[poPageNums ]; // allows selecting pages/page numbersCopies:=1;Collate:=true; // ordened copiesFromPage:=1; // start pageToPage:=frReport1.EMFPages.Count; // last pageMaxPage:=frReport1.EMFPages.Count; // maximum allowed number of pagesif Execute then // show dialog; if succesful, process user feedbackbegin
if (Printer.PrinterIndex <> ind ) // verify if selected printer has changedor frReport1.CanRebuild // ... only makes sense if we can reformat the reportor frReport1.ChangePrinter(ind, Printer.PrinterIndex) //... then change printerthenfrReport1.PrepareReport //... and reformat for new printer
elseexit; // we couldn't honour the printer change
if PrintDialog1.PrintRange = prPageNums then // user made page range selectionbegin
FromPage:=PrintDialog1.FromPage; // first pageToPage:=PrintDialog1.ToPage; // last page
end;NumberCopies:=PrintDialog1.Copies; // number of copies// Print the report using the supplied pages & copiesfrReport1.PrintPreparedReport(inttostr(FromPage)+'-'+inttostr(ToPage), NumberCopies);
end;end;
end;
It's a bit long, but if needed, you can create a descendant of TfrReport with an easier printing method or class , create a PrintReport (Report: string) procedure toload the report and print.
When double clicking on frReport1, in the report designer File>Page Options menu you get this:
Select paper size:
Choose desired margins, number of columns, and the space between them, layout order etc.

Report options
Via File>Report Options you can set a default printer that will be used for the report (using the "Select when report loaded" checkbox).
If you want to include the total number of pages with the page number on each page, you need to select Two-pass report (which tells Lazreport to build thereport twice, inserting total number of pages on the second run).
On the Other tab, you can fill out some report metadata, as is done on the screenshot below:

General purpose variables
Now we'll add some report variables unrelated to the database data in our example. They let you e.g. show different names according to the context.
To do this, open the report editor and select the File menu and the Variable List. Add a Test category, and a test1 variable the same way we did earlier (with aspace before the variable name):
The only difference is that you will not select a value field, but leave None (the default value):

Return to Lazarus (do not forget to save your report, if necessary) and set up the OnGetValue event of the frReport1' component by adding the following code:
procedure TForm1.frReport1GetValue(const ParName: String; var ParValue: Variant);
begin// Conditionally assign value:if UpperCase(ParName)=' TEST' then
ParValue:='Answer: Variable "test1"'; //perhaps replace with a call to a random function or something?end;
Please verify this and adjust article if needed: should the test for ParName really be (category) TEST and not TEST1? Also, don't we need to add arectangle somewhere and show variable test1?
Alternatively, you can also pass the value directly to the variable using the following code:
procedure TForm1.Button1Click(Sender:TObject);begin
frReport1.Values.FindVariable('test').Field := QuotedStr('test1');frReport1.ShowReport;
end;
See also
Tutorial de LazReport Version used as a basis for this translation.LazReport Documentation
Retrieved from "http://wiki.lazarus.freepascal.org/index.php?title=LazReport_Tutorial&oldid=75144"Categories: Tutorials Lazarus LazReport
This page was last modified on 24 December 2013, at 15:20.Content is available under .