latex for word processor users version 1.0 -...
TRANSCRIPT
LATEX for Word Processor Users
version 1.0.5
Guido Gonzato, Ph.D. <[email protected]>
Universita di Verona (Italy)Facolta di Scienze MM. FF. NN.†
August 15, 2003
Abstract
Text processing with LATEX offers several advantages over word processing. However, itis often hard for beginners to figure out how to perform common tasks and obtain certainfeatures. This manual attempts to ease the transition by drawing comparisons between wordprocessing and LATEX typesetting. The main word processor capabilities are listed, along withtheir equivalent LATEX commands. Lots of examples are provided.
Contents
1 Introduction 1
1.1 Preliminaries . . . . . . . . . . . . . . . . . . . . . . . . . . . . . . . . . . . . . . . . . . . . . . . . 2
1.1.1 Editor-Supported Features . . . . . . . . . . . . . . . . . . . . . . . . . . . . . . . . . . . . 3
1.1.2 Adding Packages . . . . . . . . . . . . . . . . . . . . . . . . . . . . . . . . . . . . . . . . . . 3
1.2 The Golden Rules . . . . . . . . . . . . . . . . . . . . . . . . . . . . . . . . . . . . . . . . . . . . . 5
2 The File Menu 5
2.1 File/New . . . . . . . . . . . . . . . . . . . . . . . . . . . . . . . . . . . . . . . . . . . . . . . . . . . 5
2.2 File/Save As. . . . . . . . . . . . . . . . . . . . . . . . . . . . . . . . . . . . . . . . . . . . . . . . . . 6
2.3 File/Save As Template . . . . . . . . . . . . . . . . . . . . . . . . . . . . . . . . . . . . . . . . . . . 6
2.4 File/Import . . . . . . . . . . . . . . . . . . . . . . . . . . . . . . . . . . . . . . . . . . . . . . . . . 6
2.5 File/Page Setup . . . . . . . . . . . . . . . . . . . . . . . . . . . . . . . . . . . . . . . . . . . . . . . 7
2.5.1 Page Setup/Headers and Footers . . . . . . . . . . . . . . . . . . . . . . . . . . . . . . . . . . 8
2.6 File/Printer Setup . . . . . . . . . . . . . . . . . . . . . . . . . . . . . . . . . . . . . . . . . . . . . . 8
2.7 File/Print Preview . . . . . . . . . . . . . . . . . . . . . . . . . . . . . . . . . . . . . . . . . . . . . . 8
2.8 File/Print . . . . . . . . . . . . . . . . . . . . . . . . . . . . . . . . . . . . . . . . . . . . . . . . . . 8
2.9 File/Versions . . . . . . . . . . . . . . . . . . . . . . . . . . . . . . . . . . . . . . . . . . . . . . . . . 9
3 The Edit Menu 9
3.1 Edit/Autotext . . . . . . . . . . . . . . . . . . . . . . . . . . . . . . . . . . . . . . . . . . . . . . . . 9
†Ca’ Vignal II, Strada Le Grazie 15, 37134 Verona (Italy)
i
4 The Insert Menu 9
4.1 Insert/Breaks . . . . . . . . . . . . . . . . . . . . . . . . . . . . . . . . . . . . . . . . . . . . . . . . 9
4.2 Insert/Enumerated List . . . . . . . . . . . . . . . . . . . . . . . . . . . . . . . . . . . . . . . . . . . 10
4.3 Insert/Special Character . . . . . . . . . . . . . . . . . . . . . . . . . . . . . . . . . . . . . . . . . . . 11
4.3.1 The ¤ Sign . . . . . . . . . . . . . . . . . . . . . . . . . . . . . . . . . . . . . . . . . . . . . 13
4.4 Insert/Formula . . . . . . . . . . . . . . . . . . . . . . . . . . . . . . . . . . . . . . . . . . . . . . . . 13
4.5 Insert/Footnote . . . . . . . . . . . . . . . . . . . . . . . . . . . . . . . . . . . . . . . . . . . . . . . 13
4.5.1 Footnotes at End of Document . . . . . . . . . . . . . . . . . . . . . . . . . . . . . . . . . . 14
4.6 Insert/Indices . . . . . . . . . . . . . . . . . . . . . . . . . . . . . . . . . . . . . . . . . . . . . . . . 15
4.7 Insert/Vertical and Horizontal Space . . . . . . . . . . . . . . . . . . . . . . . . . . . . . . . . . . . . 15
4.8 Insert/Tabs . . . . . . . . . . . . . . . . . . . . . . . . . . . . . . . . . . . . . . . . . . . . . . . . . 15
4.9 Insert/Cross Reference . . . . . . . . . . . . . . . . . . . . . . . . . . . . . . . . . . . . . . . . . . . 16
4.10 Insert/Margin Notes . . . . . . . . . . . . . . . . . . . . . . . . . . . . . . . . . . . . . . . . . . . . . 16
4.11 Insert/Frame . . . . . . . . . . . . . . . . . . . . . . . . . . . . . . . . . . . . . . . . . . . . . . . . . 16
4.12 Insert/Figure . . . . . . . . . . . . . . . . . . . . . . . . . . . . . . . . . . . . . . . . . . . . . . . . . 16
4.12.1 Wrapping Figures . . . . . . . . . . . . . . . . . . . . . . . . . . . . . . . . . . . . . . . . . 18
4.13 Insert/Shapes . . . . . . . . . . . . . . . . . . . . . . . . . . . . . . . . . . . . . . . . . . . . . . . . 19
4.14 Insert/Line . . . . . . . . . . . . . . . . . . . . . . . . . . . . . . . . . . . . . . . . . . . . . . . . . . 19
4.15 Insert/Hyperlink . . . . . . . . . . . . . . . . . . . . . . . . . . . . . . . . . . . . . . . . . . . . . . . 20
4.16 Insert/Comment . . . . . . . . . . . . . . . . . . . . . . . . . . . . . . . . . . . . . . . . . . . . . . . 20
5 The Format Menu 20
5.1 Format/Line Spacing . . . . . . . . . . . . . . . . . . . . . . . . . . . . . . . . . . . . . . . . . . . . 20
5.2 Format/Character . . . . . . . . . . . . . . . . . . . . . . . . . . . . . . . . . . . . . . . . . . . . . . 22
5.2.1 Format/Character Size . . . . . . . . . . . . . . . . . . . . . . . . . . . . . . . . . . . . . . . 22
5.2.2 Format/Character Font . . . . . . . . . . . . . . . . . . . . . . . . . . . . . . . . . . . . . . . 23
5.2.3 Format/Character Colour . . . . . . . . . . . . . . . . . . . . . . . . . . . . . . . . . . . . . . 24
5.3 Format/Paragraph . . . . . . . . . . . . . . . . . . . . . . . . . . . . . . . . . . . . . . . . . . . . . . 24
5.3.1 Format/Paragraph Horizontal Alignment . . . . . . . . . . . . . . . . . . . . . . . . . . . . . . 25
5.3.2 Format/Paragraph Vertical Alignment . . . . . . . . . . . . . . . . . . . . . . . . . . . . . . . 25
5.3.3 Format/Paragraph Margins . . . . . . . . . . . . . . . . . . . . . . . . . . . . . . . . . . . . . 27
5.3.4 Format/Paragraph Indentation . . . . . . . . . . . . . . . . . . . . . . . . . . . . . . . . . . . 27
5.4 Format/Paragraph Border and Shade . . . . . . . . . . . . . . . . . . . . . . . . . . . . . . . . . . . . 27
5.5 Format/Colour . . . . . . . . . . . . . . . . . . . . . . . . . . . . . . . . . . . . . . . . . . . . . . . . 28
5.6 Format/Columns . . . . . . . . . . . . . . . . . . . . . . . . . . . . . . . . . . . . . . . . . . . . . . . 29
6 The Table Menu 29
6.1 Line Spacing . . . . . . . . . . . . . . . . . . . . . . . . . . . . . . . . . . . . . . . . . . . . . . . . 31
6.2 Aligning Numbers . . . . . . . . . . . . . . . . . . . . . . . . . . . . . . . . . . . . . . . . . . . . . 31
6.3 Importing Data in LATEX Tables . . . . . . . . . . . . . . . . . . . . . . . . . . . . . . . . . . . . . . 32
7 The Tools Menu 33
7.1 Tools/Make Index . . . . . . . . . . . . . . . . . . . . . . . . . . . . . . . . . . . . . . . . . . . . . . 33
7.2 Tools/Mail Merges . . . . . . . . . . . . . . . . . . . . . . . . . . . . . . . . . . . . . . . . . . . . . 33
7.3 Tools/Labels . . . . . . . . . . . . . . . . . . . . . . . . . . . . . . . . . . . . . . . . . . . . . . . . . 34
ii
1 INTRODUCTION
7.4 Tools/Default Language . . . . . . . . . . . . . . . . . . . . . . . . . . . . . . . . . . . . . . . . . . . 35
7.5 Tools/Hyphenation . . . . . . . . . . . . . . . . . . . . . . . . . . . . . . . . . . . . . . . . . . . . . 36
7.6 Tools/Spell Check . . . . . . . . . . . . . . . . . . . . . . . . . . . . . . . . . . . . . . . . . . . . . . 36
8 The Help Menu 36
9 The End 37
A Document Templates 38
List of Tables
1 Useful key bindings for Emacs, Vim, and Jed in IDE mode. . . . . . . . . . . . . . . . . . . . . . . 4
2 How to obtain some special characters. . . . . . . . . . . . . . . . . . . . . . . . . . . . . . . . . . . 12
3 Font attributes. . . . . . . . . . . . . . . . . . . . . . . . . . . . . . . . . . . . . . . . . . . . . . . . 21
4 Font sizes . . . . . . . . . . . . . . . . . . . . . . . . . . . . . . . . . . . . . . . . . . . . . . . . . . 22
5 Common font families. . . . . . . . . . . . . . . . . . . . . . . . . . . . . . . . . . . . . . . . . . . . 23
6 Standard LATEX environments. . . . . . . . . . . . . . . . . . . . . . . . . . . . . . . . . . . . . . . 26
7 A sample table. . . . . . . . . . . . . . . . . . . . . . . . . . . . . . . . . . . . . . . . . . . . . . . . 30
List of Figures
1 A smiley representing the author of this guide. . . . . . . . . . . . . . . . . . . . . . . . . . . . . . 17
2 A Gnuplot graph. . . . . . . . . . . . . . . . . . . . . . . . . . . . . . . . . . . . . . . . . . . . . . . 17
3 Book template. . . . . . . . . . . . . . . . . . . . . . . . . . . . . . . . . . . . . . . . . . . . . . . . 38
4 Report template. . . . . . . . . . . . . . . . . . . . . . . . . . . . . . . . . . . . . . . . . . . . . . . 39
5 Letter template. . . . . . . . . . . . . . . . . . . . . . . . . . . . . . . . . . . . . . . . . . . . . . . 39
6 How to write a notice. . . . . . . . . . . . . . . . . . . . . . . . . . . . . . . . . . . . . . . . . . . . 40
7 How to write a poster. . . . . . . . . . . . . . . . . . . . . . . . . . . . . . . . . . . . . . . . . . . . 41
1 Introduction
First of all, let me state that this is not a LATEX primer! If you’re reading this, I assume that youhave at least a smattering of LATEX and its basic commands. In this document, I’ll explain whyLATEX is a viable alternative to word processors. One may even think that LATEX is better thanany word processor. . . and this is definitely true, especially if you write complex documentswith lots of maths.Nevertheless, word processors are the ‘killer app’ in modern office automation. They’re perceivedto be easier than LATEX as they have a friendly WYSIWYG interface, and the average secretarywill learn to use them in a relatively short time. The problem is, these beasts keep growing slow,bloated1, buggy, expensive, virus ridden, and incompatible with each other.
1once upon a time, I wrote my thesis on a 128k, Z80-based home computer. The word processor WordStarand my thesis fit on a single CP/M-bootable 720K floppy, with lots of room to spare!
1
1 INTRODUCTION 1.1 Preliminaries
LATEX might be a good alternative. It actually is, but if you try to write casual, unstructureddocuments, LATEX will rightly stand in the way. You could resort to plain TEX, but you wouldlose many facilities that LATEX provides.To sum up, sometimes you may want to use word processor-like features—but using LATEX. Itwould be nice to know how to obtain some effects with LATEX when you know how to get themwith your once-favourite :-) word processor.That’s why I wrote this quick reference. As I said, it assumes that you already have a basicunderstanding of LATEX; if not, I suggest that you go to http://www.ctan.org/starter.htmland download ‘The (Not So) Short Introduction to LATEX2e’ (and possibly ‘A Gentle Introductionto TEX’).In the following sections, we shall navigate through the menus and menu items of an imaginaryword processor, finding out the corresponding LATEX way of doing the same work. If you’re aLATEX purist and this approach makes you sick. . . don’t hurt yourself, please stop here.
1.1 Preliminaries
Many word processor features are implemented by the editor; others by standard LATEX com-mands; others still are obtained using packages. These are sets of macros that extend LATEXproviding new commands and environments. There are lots of packages around: the only prob-lem is knowing where they are, what they do, and how to install them. More about packages inSection 1.1.2.Packages and other TEX-related material are available at many sites that constitute the CTAN,the Comprehensive TeX Archive Network. I already mentioned http://www.ctan.org; this sitehas a comprehensive list of mirrors. From now on, CTAN: means ‘your favourite CTAN mirrorhere, starting from the TEX directory’. For instance, you can get LATEX for your platform fromCTAN://systems (e.g. http://www.tex.ac.uk/tex-archive/systems/).Another obvious question is this: LATEX will typeset the text for me, but what should I useto write it? The answer is: a good editor—a LATEX-aware one, if possible. There exist editorsdedicated to writing LATEX source, and some are WYSIWYG or nearly so.Although any editor capable of saving plain text will do (even Windows’ notepad), mostTEXnicians will recommend that you use one of the following:
• GNU Emacs (http://www.gnu.org/software/emacs/emacs.html) or Xemacs (http://www.xemacs.org) with AUC TEX, CTAN://support/auctex/;
• vi or one of its clones, Vim (http://www.vim.org) being the most popular;
• my personal choice is Jed (http://www.jedsoft.org/jed/), a light Emacs clone thatalso supports emulation of other editors. I wrote a LATEX mode for Jed, available fromCTAN://support/jed;
• Kile (http://soliton.science.uva.nl/~wijnhout/Kite/), a very nice and completeLATEX shell for the KDE;
• Texmaker (http://perso.club-internet.fr/pascal.brachet/texmaker/index.html)is very similar to Kile, but doesn’t require KDE;
2
1 INTRODUCTION 1.1 Preliminaries
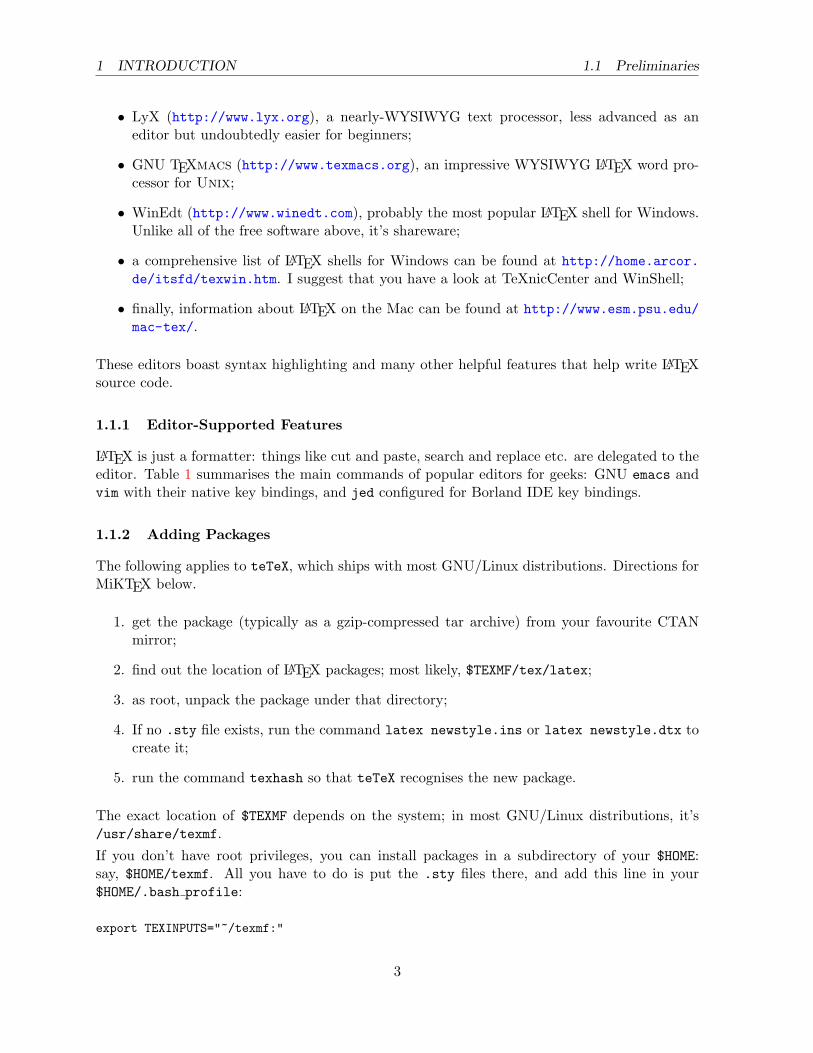
• LyX (http://www.lyx.org), a nearly-WYSIWYG text processor, less advanced as aneditor but undoubtedly easier for beginners;
• GNU TEXmacs (http://www.texmacs.org), an impressive WYSIWYG LATEX word pro-cessor for Unix;
• WinEdt (http://www.winedt.com), probably the most popular LATEX shell for Windows.Unlike all of the free software above, it’s shareware;
• a comprehensive list of LATEX shells for Windows can be found at http://home.arcor.de/itsfd/texwin.htm. I suggest that you have a look at TeXnicCenter and WinShell;
• finally, information about LATEX on the Mac can be found at http://www.esm.psu.edu/mac-tex/.
These editors boast syntax highlighting and many other helpful features that help write LATEXsource code.
1.1.1 Editor-Supported Features
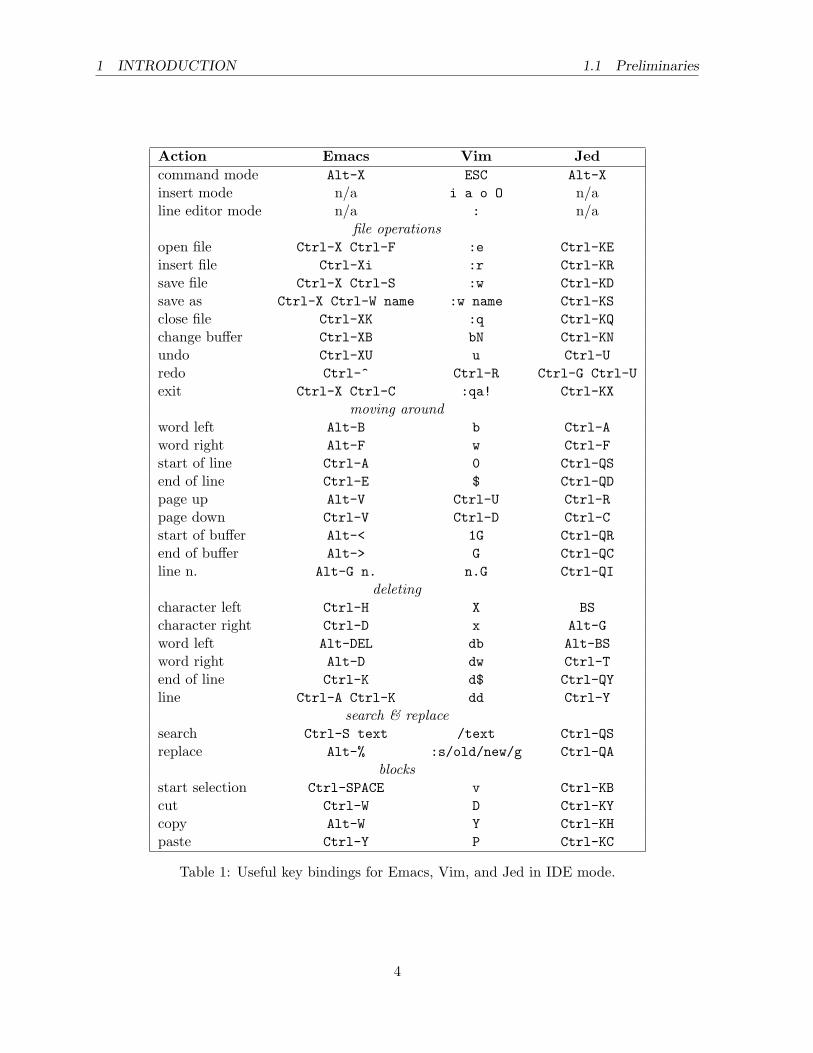
LATEX is just a formatter: things like cut and paste, search and replace etc. are delegated to theeditor. Table 1 summarises the main commands of popular editors for geeks: GNU emacs andvim with their native key bindings, and jed configured for Borland IDE key bindings.
1.1.2 Adding Packages
The following applies to teTeX, which ships with most GNU/Linux distributions. Directions forMiKTEX below.
1. get the package (typically as a gzip-compressed tar archive) from your favourite CTANmirror;
2. find out the location of LATEX packages; most likely, $TEXMF/tex/latex;
3. as root, unpack the package under that directory;
4. If no .sty file exists, run the command latex newstyle.ins or latex newstyle.dtx tocreate it;
5. run the command texhash so that teTeX recognises the new package.
The exact location of $TEXMF depends on the system; in most GNU/Linux distributions, it’s/usr/share/texmf.If you don’t have root privileges, you can install packages in a subdirectory of your $HOME:say, $HOME/texmf. All you have to do is put the .sty files there, and add this line in your$HOME/.bash profile:
export TEXINPUTS="~/texmf:"
3
1 INTRODUCTION 1.1 Preliminaries
Action Emacs Vim Jedcommand mode Alt-X ESC Alt-Xinsert mode n/a i a o O n/aline editor mode n/a : n/a
file operationsopen file Ctrl-X Ctrl-F :e Ctrl-KEinsert file Ctrl-Xi :r Ctrl-KRsave file Ctrl-X Ctrl-S :w Ctrl-KDsave as Ctrl-X Ctrl-W name :w name Ctrl-KSclose file Ctrl-XK :q Ctrl-KQchange buffer Ctrl-XB bN Ctrl-KNundo Ctrl-XU u Ctrl-Uredo Ctrl-^ Ctrl-R Ctrl-G Ctrl-Uexit Ctrl-X Ctrl-C :qa! Ctrl-KX
moving aroundword left Alt-B b Ctrl-Aword right Alt-F w Ctrl-Fstart of line Ctrl-A 0 Ctrl-QSend of line Ctrl-E $ Ctrl-QDpage up Alt-V Ctrl-U Ctrl-Rpage down Ctrl-V Ctrl-D Ctrl-Cstart of buffer Alt-< 1G Ctrl-QRend of buffer Alt-> G Ctrl-QCline n. Alt-G n. n.G Ctrl-QI
deletingcharacter left Ctrl-H X BScharacter right Ctrl-D x Alt-Gword left Alt-DEL db Alt-BSword right Alt-D dw Ctrl-Tend of line Ctrl-K d$ Ctrl-QYline Ctrl-A Ctrl-K dd Ctrl-Y
search & replacesearch Ctrl-S text /text Ctrl-QSreplace Alt-% :s/old/new/g Ctrl-QA
blocksstart selection Ctrl-SPACE v Ctrl-KBcut Ctrl-W D Ctrl-KYcopy Alt-W Y Ctrl-KHpaste Ctrl-Y P Ctrl-KC
Table 1: Useful key bindings for Emacs, Vim, and Jed in IDE mode.
4
2 THE FILE MENU 1.2 The Golden Rules
To add a package to MiKTEX, create the directory \latex\newpackage under C:\localtexmf\tex and put the relevant files in there. Proceed as above, then run MiKTeX Options and clickon the ‘Refresh now’ button. Alternatively, issue the command initexmf -u. That’s it!
1.2 The Golden Rules
Before we start, please keep this in mind:
1. get used to structuring your documents: think in terms of parts, chapters, sections, andso on. This holds even if you are not writing a scientific paper.
2. LATEX explicitly discourages the user from messing about with formatting parameters.Don’t worry too much about the looks of what you’re writing, concentrate on the contents.
Convince yourself, apply the rules, and your printed material will magically look professional!Again, let me recommend that you study a real LATEX primer.These rules apply to most documents. However, if the stuff you are going to write is intrinsicallyunstructured (circulars, notices, etc.), then you asked for that: go ahead and read the rest ofthis guide.
✍ ✍ ✍ ✍ ✍ ✍ ✍ ✍ ✍ ✍ ✍ ✍ ✍ ✍ ✍ ✍ ✍ ✍ ✍ ✍ ✍ ✍ ✍ ✍ ✍
2 The File Menu
Obviously, some entries of this menu have nothing to do with LATEX: File/Open, File/Save,File/Close depend on the editor.
2.1 File/New
This is the LATEX equivalent of a blank page:
\documentclass{article}\begin{document}% This is a comment. Write your stuff here.\end{document}
As documents written in LATEX are inherently structured, this is a more realistic example:
\documentclass[a4paper,12pt]{article}\begin{document}\title{My Document}\author{John Smith}\date{London, \today}\maketitle\begin{abstract}This is a very short article.
5
2 THE FILE MENU 2.2 File/Save As. . .
\end{abstract}\tableofcontents\listoftables\listoffigures\section{First Section}\label{sec:start}This is the text of the section. See \cite{Gonzato} for details.\section{End}\label{sec:end}This is the end of the document. Please go to Section\ref{sec:start} to read it again.\begin{thebibliography}{99}\bibitem{Gonzato} Gonzato G. \textit{\LaTeX{} for Word ProcessorUsers}. CTAN, 2001.\end{thebibliography}\end{document}
More document templates are listed in Appendix A.
2.2 File/Save As. . .
The following tools are handy if you want to convert LATEX to other formats:
• latex2html: http://saftsack.fs.uni-bayreuth.de/~latex2ht/,CTAN://support/latex2html
• latex2rtf: CTAN://support/latex2rtf
See also Section 2.7 for details on PDF creation.
2.3 File/Save As Template
Saving a LATEX ‘template’ would mean, as I see it, create a new LATEX package. This is complexmatter that goes beyond the scopes of this guide.
2.4 File/Import
These tools convert from other formats to LATEX:
• rtf2latex: CTAN://support/rtf2latex
• html2latex: CTAN://support/html2latex
• wvware is a set of tools that convert from MS Word to several formats including LATEX;http://wvware.sourceforge.net
• the free word processor Abiword, http://www.abisource.com, imports MS Word and canexport LATEX.
6
2 THE FILE MENU 2.5 File/Page Setup
• txt2tex: CTAN://support/txt2tex does a fairly good job at converting plain text filesinto LATEX.
Other *2latex converters are available at the same address.
2.5 File/Page Setup
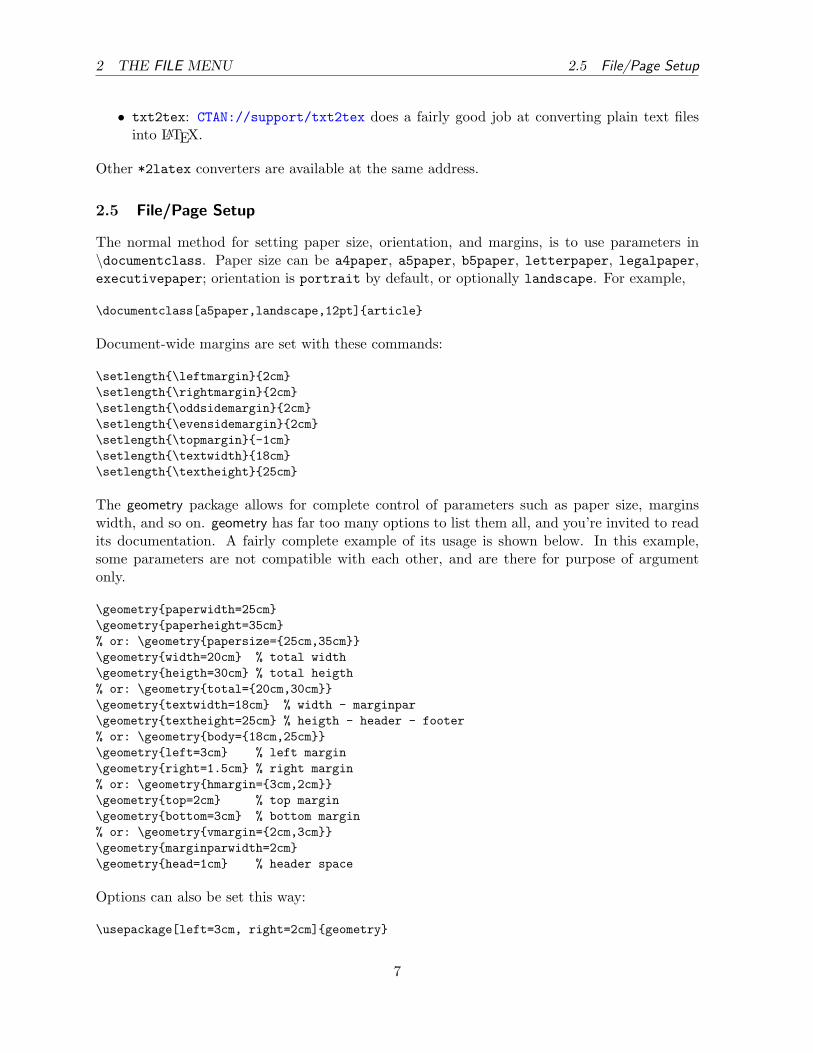
The normal method for setting paper size, orientation, and margins, is to use parameters in\documentclass. Paper size can be a4paper, a5paper, b5paper, letterpaper, legalpaper,executivepaper; orientation is portrait by default, or optionally landscape. For example,
\documentclass[a5paper,landscape,12pt]{article}
Document-wide margins are set with these commands:
\setlength{\leftmargin}{2cm}\setlength{\rightmargin}{2cm}\setlength{\oddsidemargin}{2cm}\setlength{\evensidemargin}{2cm}\setlength{\topmargin}{-1cm}\setlength{\textwidth}{18cm}\setlength{\textheight}{25cm}
The geometry package allows for complete control of parameters such as paper size, marginswidth, and so on. geometry has far too many options to list them all, and you’re invited to readits documentation. A fairly complete example of its usage is shown below. In this example,some parameters are not compatible with each other, and are there for purpose of argumentonly.
\geometry{paperwidth=25cm}\geometry{paperheight=35cm}% or: \geometry{papersize={25cm,35cm}}\geometry{width=20cm} % total width\geometry{heigth=30cm} % total heigth% or: \geometry{total={20cm,30cm}}\geometry{textwidth=18cm} % width - marginpar\geometry{textheight=25cm} % heigth - header - footer% or: \geometry{body={18cm,25cm}}\geometry{left=3cm} % left margin\geometry{right=1.5cm} % right margin% or: \geometry{hmargin={3cm,2cm}}\geometry{top=2cm} % top margin\geometry{bottom=3cm} % bottom margin% or: \geometry{vmargin={2cm,3cm}}\geometry{marginparwidth=2cm}\geometry{head=1cm} % header space
Options can also be set this way:
\usepackage[left=3cm, right=2cm]{geometry}
7
2 THE FILE MENU 2.6 File/Printer Setup
2.5.1 Page Setup/Headers and Footers
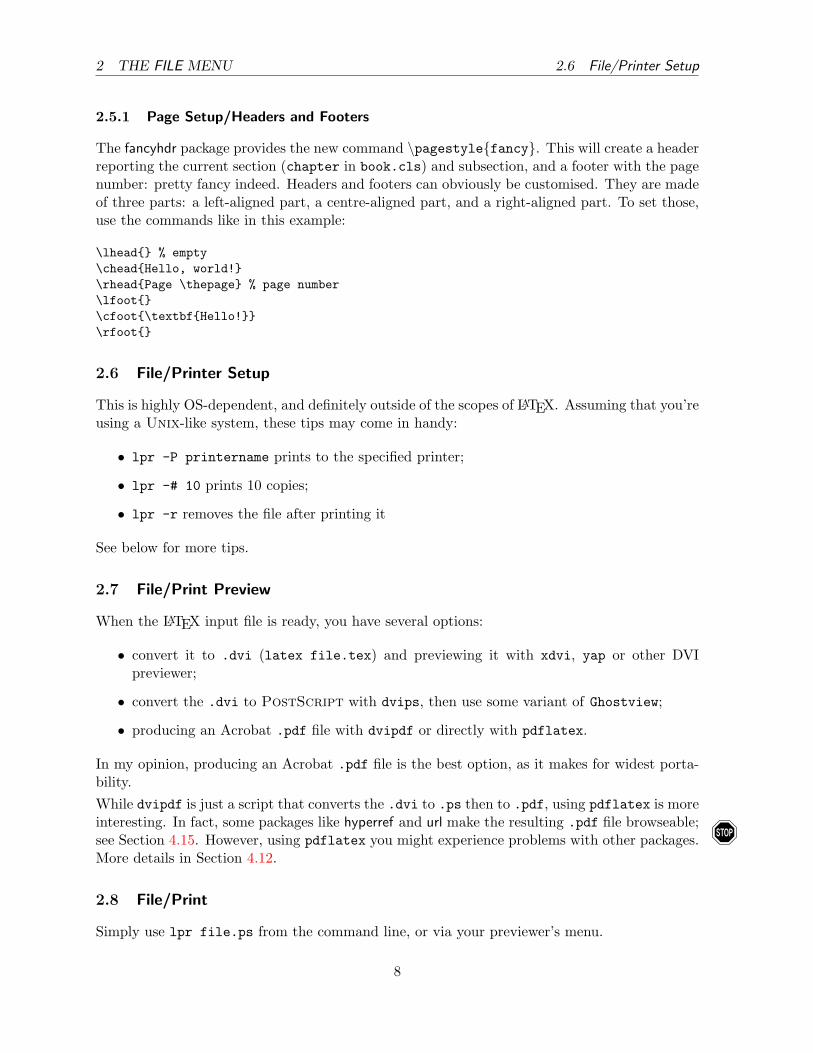
The fancyhdr package provides the new command \pagestyle{fancy}. This will create a headerreporting the current section (chapter in book.cls) and subsection, and a footer with the pagenumber: pretty fancy indeed. Headers and footers can obviously be customised. They are madeof three parts: a left-aligned part, a centre-aligned part, and a right-aligned part. To set those,use the commands like in this example:
\lhead{} % empty\chead{Hello, world!}\rhead{Page \thepage} % page number\lfoot{}\cfoot{\textbf{Hello!}}\rfoot{}
2.6 File/Printer Setup
This is highly OS-dependent, and definitely outside of the scopes of LATEX. Assuming that you’reusing a Unix-like system, these tips may come in handy:
• lpr -P printername prints to the specified printer;
• lpr -# 10 prints 10 copies;
• lpr -r removes the file after printing it
See below for more tips.
2.7 File/Print Preview
When the LATEX input file is ready, you have several options:
• convert it to .dvi (latex file.tex) and previewing it with xdvi, yap or other DVIpreviewer;
• convert the .dvi to PostScript with dvips, then use some variant of Ghostview;
• producing an Acrobat .pdf file with dvipdf or directly with pdflatex.
In my opinion, producing an Acrobat .pdf file is the best option, as it makes for widest porta-bility.While dvipdf is just a script that converts the .dvi to .ps then to .pdf, using pdflatex is moreinteresting. In fact, some packages like hyperref and url make the resulting .pdf file browseable;see Section 4.15. However, using pdflatex you might experience problems with other packages. !More details in Section 4.12.
2.8 File/Print
Simply use lpr file.ps from the command line, or via your previewer’s menu.
8
4 THE INSERT MENU 2.9 File/Versions
2.9 File/Versions
Although the version package provides basic facilities for versioning LATEX sources, it’s betterto use external tools like RCS (Revision Control System) or CVS (Concurrent Version ControlSystem), possibly integrated with the editor. For a quick introduction to CVS and RCS, pleasevisit http://www.linuxdoc.org/HOWTO/CVS-RCS-HOWTO.html.
3 The Edit Menu
This menu has more to do with the editor than LATEX features. To begin with, refer to Table 1that shows the key bindings for the entries Edit/Cut, Edit/Copy, Edit/Paste, Edit/Find, andEdit/Replace of some common editors.The selection of text is not only performed for subsequent cut and paste, but also for applyingstyles to the selected text. The equivalent action in LATEX is to enclose the text either betweenbraces, or in an environment. For example, to apply the bold attribute to a portion of text youwill use one of the following:
this is \textbf{bold text;}\\this is also{\bfseries bold text;}\\\begin{bfseries}this is bold text, too!\end{bfseries}
this is bold text;this is also bold text;this is bold text, too!
3.1 Edit/Autotext
We call autotext the feature that makes you type, say, ‘PS’ to have the word ‘PostScript’automatically expanded. This is an editor feature, but there’s a rough LATEX equivalent:
\def\PS {\textsc{PostScript}}
which will insert the equivalent of \textsc{PostScript} whenever you type \PS. Beware, caseis important.
4 The Insert Menu
4.1 Insert/Breaks
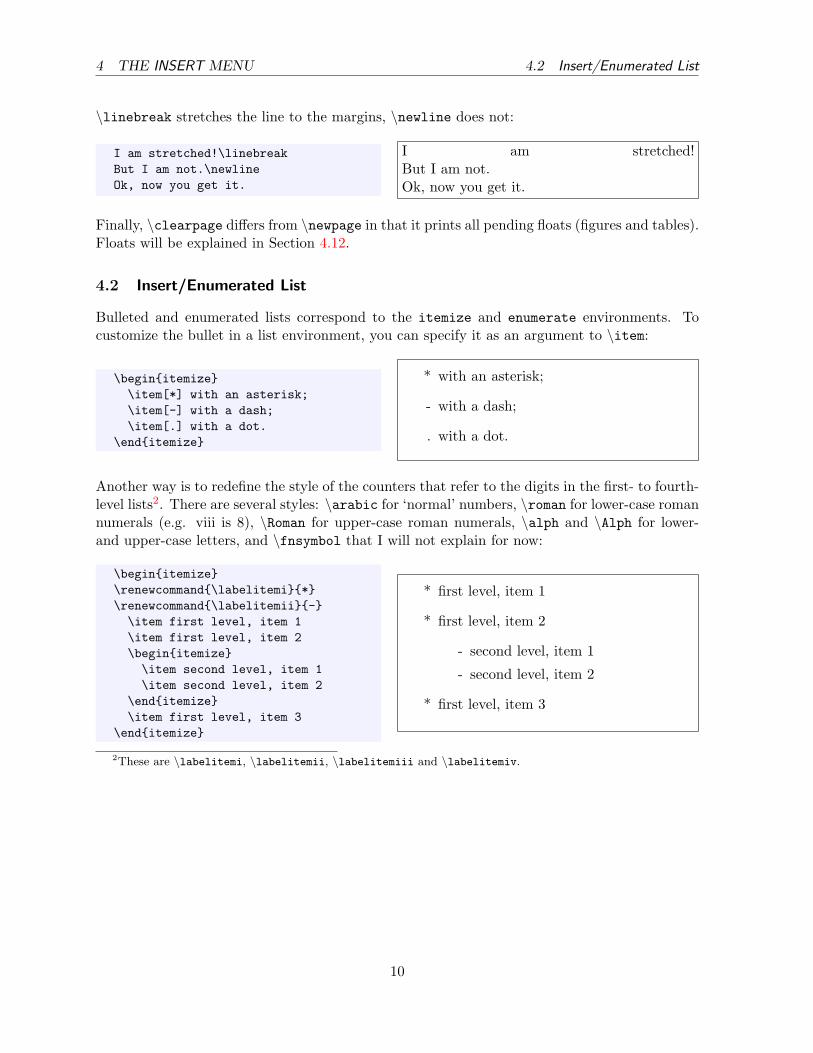
• a non-breakable space is set with ∼
• to force a line break, use \linebreak or \newline; see below for details
• to start a new paragraph use a blank line, or \\ (possibly followed by an optional space,as in \\[1cm]), or \par
• finally, for a page break use \newpage or \clearpage
9
4 THE INSERT MENU 4.2 Insert/Enumerated List
\linebreak stretches the line to the margins, \newline does not:
I am stretched!\linebreakBut I am not.\newlineOk, now you get it.
I am stretched!But I am not.Ok, now you get it.
Finally, \clearpage differs from \newpage in that it prints all pending floats (figures and tables).Floats will be explained in Section 4.12.
4.2 Insert/Enumerated List
Bulleted and enumerated lists correspond to the itemize and enumerate environments. Tocustomize the bullet in a list environment, you can specify it as an argument to \item:
\begin{itemize}\item[*] with an asterisk;\item[-] with a dash;\item[.] with a dot.
\end{itemize}
* with an asterisk;
- with a dash;
. with a dot.
Another way is to redefine the style of the counters that refer to the digits in the first- to fourth-level lists2. There are several styles: \arabic for ‘normal’ numbers, \roman for lower-case romannumerals (e.g. viii is 8), \Roman for upper-case roman numerals, \alph and \Alph for lower-and upper-case letters, and \fnsymbol that I will not explain for now:
\begin{itemize}\renewcommand{\labelitemi}{*}\renewcommand{\labelitemii}{-}\item first level, item 1\item first level, item 2\begin{itemize}
\item second level, item 1\item second level, item 2
\end{itemize}\item first level, item 3
\end{itemize}
* first level, item 1
* first level, item 2
- second level, item 1
- second level, item 2
* first level, item 3
2These are \labelitemi, \labelitemii, \labelitemiii and \labelitemiv.
10
4 THE INSERT MENU 4.3 Insert/Special Character
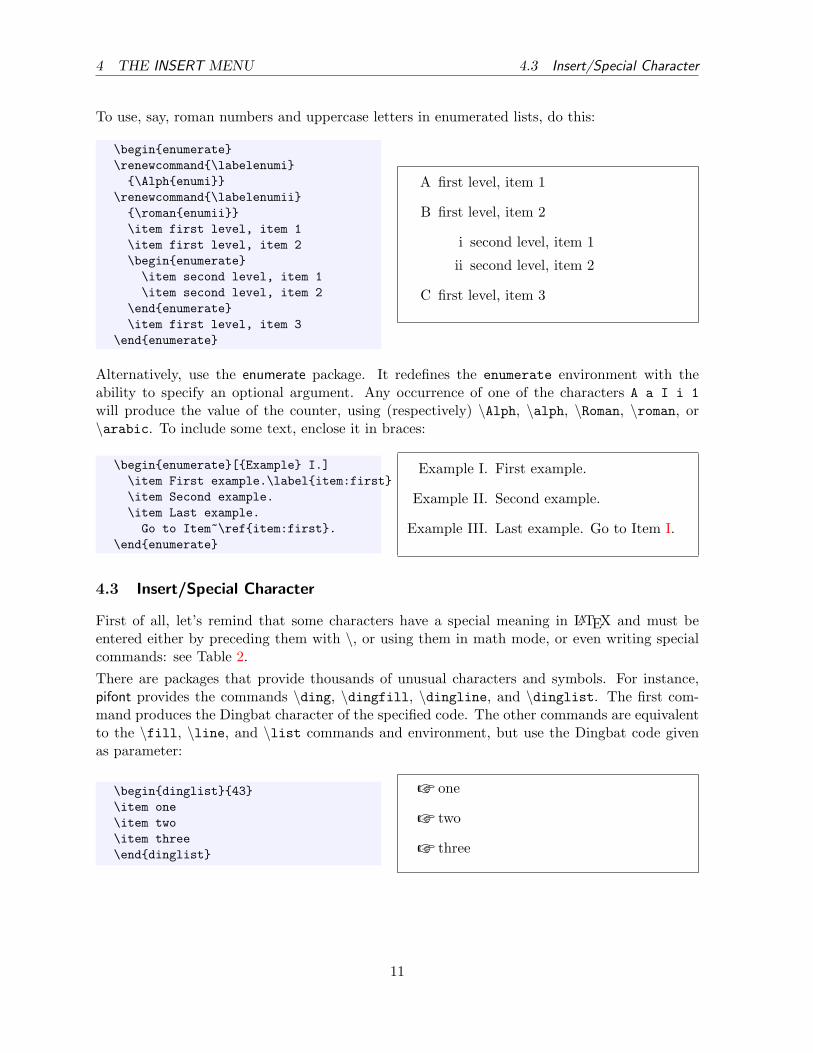
To use, say, roman numbers and uppercase letters in enumerated lists, do this:
\begin{enumerate}\renewcommand{\labelenumi}{\Alph{enumi}}
\renewcommand{\labelenumii}{\roman{enumii}}\item first level, item 1\item first level, item 2\begin{enumerate}
\item second level, item 1\item second level, item 2
\end{enumerate}\item first level, item 3
\end{enumerate}
A first level, item 1
B first level, item 2
i second level, item 1
ii second level, item 2
C first level, item 3
Alternatively, use the enumerate package. It redefines the enumerate environment with theability to specify an optional argument. Any occurrence of one of the characters A a I i 1will produce the value of the counter, using (respectively) \Alph, \alph, \Roman, \roman, or\arabic. To include some text, enclose it in braces:
\begin{enumerate}[{Example} I.]\item First example.\label{item:first}\item Second example.\item Last example.
Go to Item~\ref{item:first}.\end{enumerate}
Example I. First example.
Example II. Second example.
Example III. Last example. Go to Item I.
4.3 Insert/Special Character
First of all, let’s remind that some characters have a special meaning in LATEX and must beentered either by preceding them with \, or using them in math mode, or even writing specialcommands: see Table 2.There are packages that provide thousands of unusual characters and symbols. For instance,pifont provides the commands \ding, \dingfill, \dingline, and \dinglist. The first com-mand produces the Dingbat character of the specified code. The other commands are equivalentto the \fill, \line, and \list commands and environment, but use the Dingbat code givenas parameter:
\begin{dinglist}{43}\item one\item two\item three\end{dinglist}
☞ one
☞ two
☞ three
11
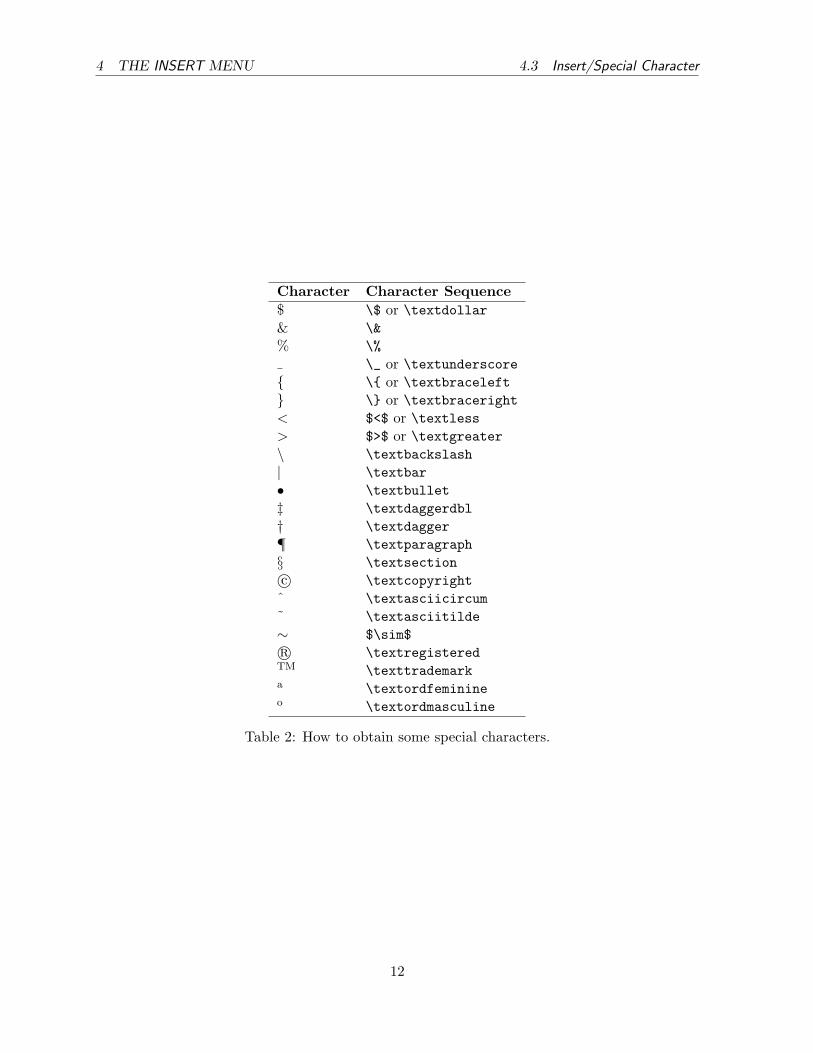
4 THE INSERT MENU 4.3 Insert/Special Character
Character Character Sequence$ \$ or \textdollar& \&% \%
\_ or \textunderscore{ \{ or \textbraceleft} \} or \textbraceright< $<$ or \textless> $>$ or \textgreater\ \textbackslash| \textbar• \textbullet‡ \textdaggerdbl† \textdagger¶ \textparagraph§ \textsectionc© \textcopyrightˆ \textasciicircum˜ \textasciitilde∼ $\sim$r© \textregisteredTM \texttrademarka \textordfeminineo \textordmasculine
Table 2: How to obtain some special characters.
12
4 THE INSERT MENU 4.4 Insert/Formula
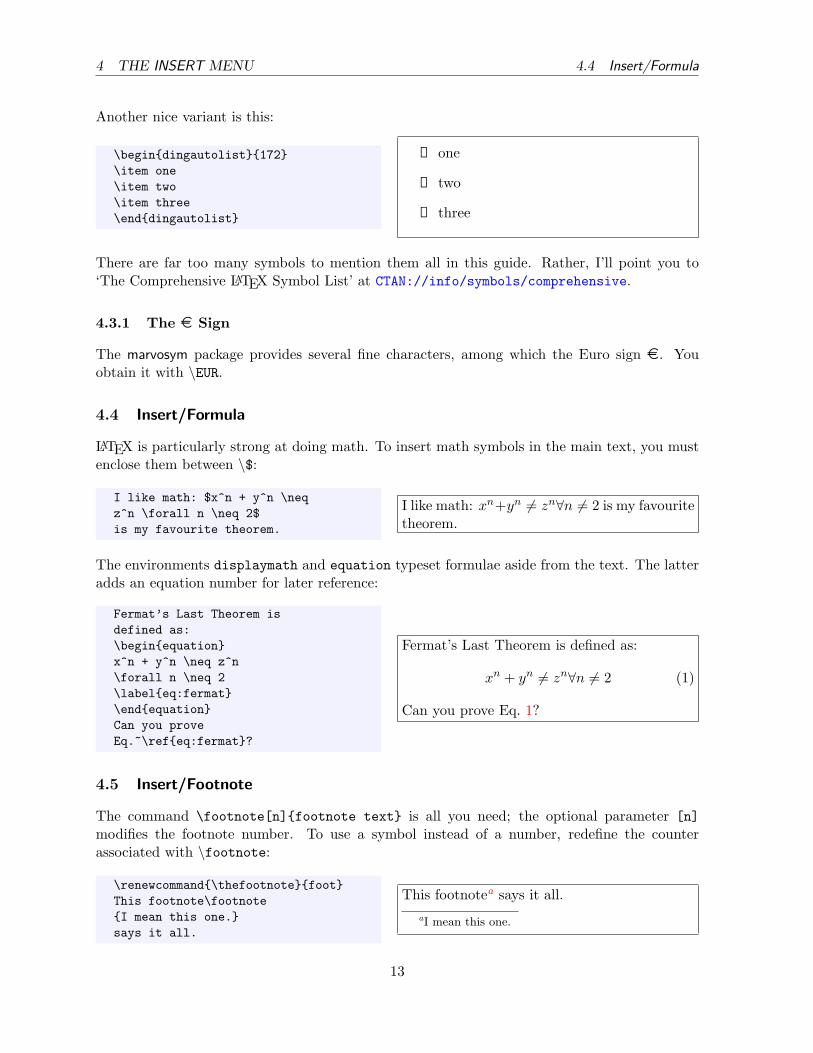
Another nice variant is this:
\begin{dingautolist}{172}\item one\item two\item three\end{dingautolist}
① one
② two
③ three
There are far too many symbols to mention them all in this guide. Rather, I’ll point you to‘The Comprehensive LATEX Symbol List’ at CTAN://info/symbols/comprehensive.
4.3.1 The ¤ Sign
The marvosym package provides several fine characters, among which the Euro sign ¤. Youobtain it with \EUR.
4.4 Insert/Formula
LATEX is particularly strong at doing math. To insert math symbols in the main text, you mustenclose them between \$:
I like math: $x^n + y^n \neqz^n \forall n \neq 2$is my favourite theorem.
I like math: xn+yn 6= zn∀n 6= 2 is my favouritetheorem.
The environments displaymath and equation typeset formulae aside from the text. The latteradds an equation number for later reference:
Fermat’s Last Theorem isdefined as:\begin{equation}x^n + y^n \neq z^n\forall n \neq 2\label{eq:fermat}\end{equation}Can you proveEq.~\ref{eq:fermat}?
Fermat’s Last Theorem is defined as:
xn + yn 6= zn∀n 6= 2 (1)
Can you prove Eq. 1?
4.5 Insert/Footnote
The command \footnote[n]{footnote text} is all you need; the optional parameter [n]modifies the footnote number. To use a symbol instead of a number, redefine the counterassociated with \footnote:
\renewcommand{\thefootnote}{foot}This footnote\footnote{I mean this one.}says it all.
This footnotea says it all.aI mean this one.
13
4 THE INSERT MENU 4.5 Insert/Footnote
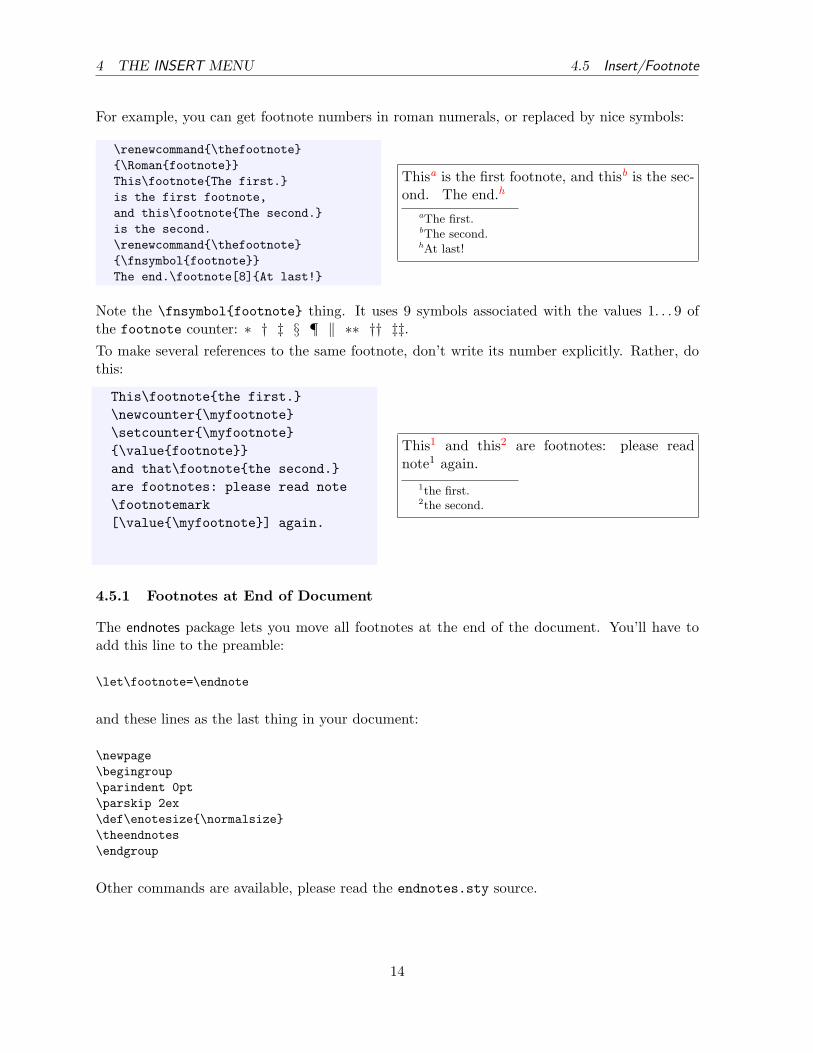
For example, you can get footnote numbers in roman numerals, or replaced by nice symbols:
\renewcommand{\thefootnote}{\Roman{footnote}}This\footnote{The first.}is the first footnote,and this\footnote{The second.}is the second.\renewcommand{\thefootnote}{\fnsymbol{footnote}}The end.\footnote[8]{At last!}
Thisa is the first footnote, and thisb is the sec-ond. The end.h
aThe first.bThe second.hAt last!
Note the \fnsymbol{footnote} thing. It uses 9 symbols associated with the values 1. . . 9 ofthe footnote counter: ∗ † ‡ § ¶ ‖ ∗∗ †† ‡‡.To make several references to the same footnote, don’t write its number explicitly. Rather, dothis:
This\footnote{the first.}\newcounter{\myfootnote}\setcounter{\myfootnote}{\value{footnote}}and that\footnote{the second.}are footnotes: please read note\footnotemark[\value{\myfootnote}] again.
This1 and this2 are footnotes: please readnote1 again.
1the first.2the second.
4.5.1 Footnotes at End of Document
The endnotes package lets you move all footnotes at the end of the document. You’ll have toadd this line to the preamble:
\let\footnote=\endnote
and these lines as the last thing in your document:
\newpage\begingroup\parindent 0pt\parskip 2ex\def\enotesize{\normalsize}\theendnotes\endgroup
Other commands are available, please read the endnotes.sty source.
14
4 THE INSERT MENU 4.6 Insert/Indices
4.6 Insert/Indices
Generating and inserting a table of contents, list of tables, and list of figures is a trivial task inLATEX. All you have to do is insert these lines before the first \section or \chapter of yourdocument:
\tableofcontents\listoffigures\listoftables
4.7 Insert/Vertical and Horizontal Space
This entry doesn’t actually exist in any word processor I am aware of. This is in fact a limitationthat LATEX fills in a very elegant way.Space filling is used to center text horizontally, vertically, or both; this is a difficult task toperform with any word processor, and requires a lot of trial end error. Use a combination of\null or ~ to set fixed marks, followed by \vfill and \hfill like in this example:
one \hfill two\\\vfill~ \hfill three \hfill ~\\\vfillfour \hfill five\null
one two
three
four five
Normally, LATEX won’t let you insert blank spaces at your will. However, if you do want to makeyour document look messy, use ~ to make a non-breakable space.Also, use the command \hspace like in this example:
This is a \hspace{2cm}2-cm-wide hole.
This is a 2-cm-wide hole.
4.8 Insert/Tabs
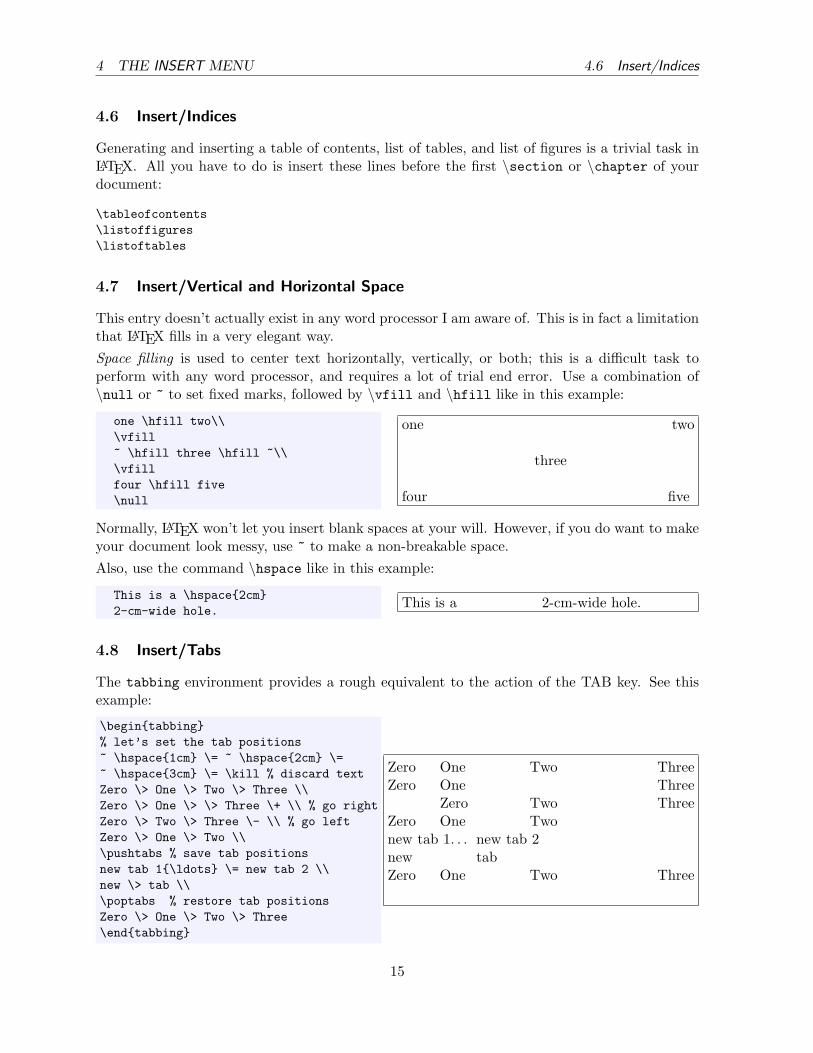
The tabbing environment provides a rough equivalent to the action of the TAB key. See thisexample:
\begin{tabbing}% let’s set the tab positions~ \hspace{1cm} \= ~ \hspace{2cm} \=~ \hspace{3cm} \= \kill % discard textZero \> One \> Two \> Three \\Zero \> One \> \> Three \+ \\ % go rightZero \> Two \> Three \- \\ % go leftZero \> One \> Two \\\pushtabs % save tab positionsnew tab 1{\ldots} \= new tab 2 \\new \> tab \\\poptabs % restore tab positionsZero \> One \> Two \> Three\end{tabbing}
Zero One Two ThreeZero One Three
Zero Two ThreeZero One Twonew tab 1. . . new tab 2new tabZero One Two Three
15
4 THE INSERT MENU 4.9 Insert/Cross Reference
See also the tabular and table environments.
4.9 Insert/Cross Reference
The commands \label, \ref, and \pageref are all you need to insert labels in the text and docross referencing. The standard format of labels is the prefix:suffix form, where prefix isone of the following: cha for chapters, eq for equations, fig for figures, sec for (sub)sections,and tab for tables.References to a page (section, table, figure, etc.) number can be obtained using \label and\ref as in this example:
\paragraph{Example.}\label{par:example}This paragraph appearsin Section~\ref{par:example}on page \pageref{par:example}.
Example. This paragraph appears in Sec-tion 4.9 on page 16.
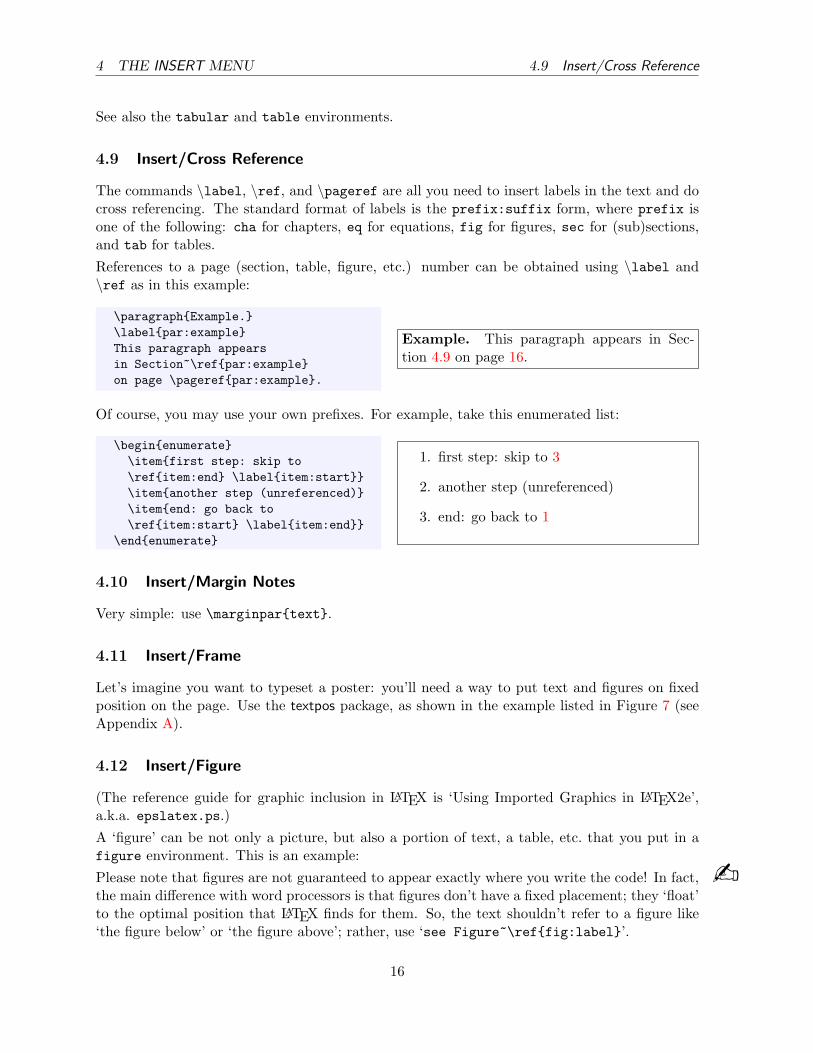
Of course, you may use your own prefixes. For example, take this enumerated list:
\begin{enumerate}\item{first step: skip to\ref{item:end} \label{item:start}}\item{another step (unreferenced)}\item{end: go back to\ref{item:start} \label{item:end}}
\end{enumerate}
1. first step: skip to 3
2. another step (unreferenced)
3. end: go back to 1
4.10 Insert/Margin Notes
Very simple: use \marginpar{text}.
4.11 Insert/Frame
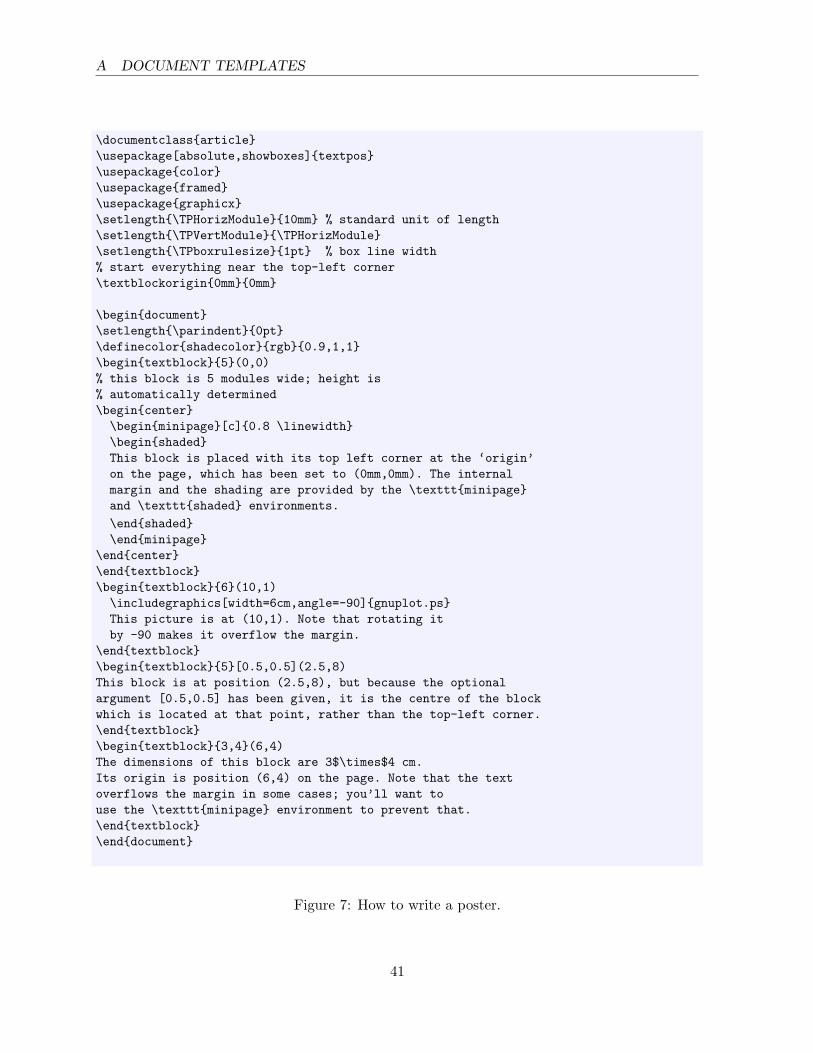
Let’s imagine you want to typeset a poster: you’ll need a way to put text and figures on fixedposition on the page. Use the textpos package, as shown in the example listed in Figure 7 (seeAppendix A).
4.12 Insert/Figure
(The reference guide for graphic inclusion in LATEX is ‘Using Imported Graphics in LATEX2e’,a.k.a. epslatex.ps.)A ‘figure’ can be not only a picture, but also a portion of text, a table, etc. that you put in afigure environment. This is an example:Please note that figures are not guaranteed to appear exactly where you write the code! In fact, bthe main difference with word processors is that figures don’t have a fixed placement; they ‘float’to the optimal position that LATEX finds for them. So, the text shouldn’t refer to a figure like‘the figure below’ or ‘the figure above’; rather, use ‘see Figure~\ref{fig:label}’.
16
4 THE INSERT MENU 4.12 Insert/Figure
\begin{figure}[htbp]% [htbp] specifies the% preferred placement: here, top,% bottom, or separate page.
\centering{\texttt{=8-)}}\caption{A smiley representing
the author of this guide.}\label{fig:mysmiley}
\end{figure}
=8-)
Figure 1: A smiley representing the author ofthis guide.
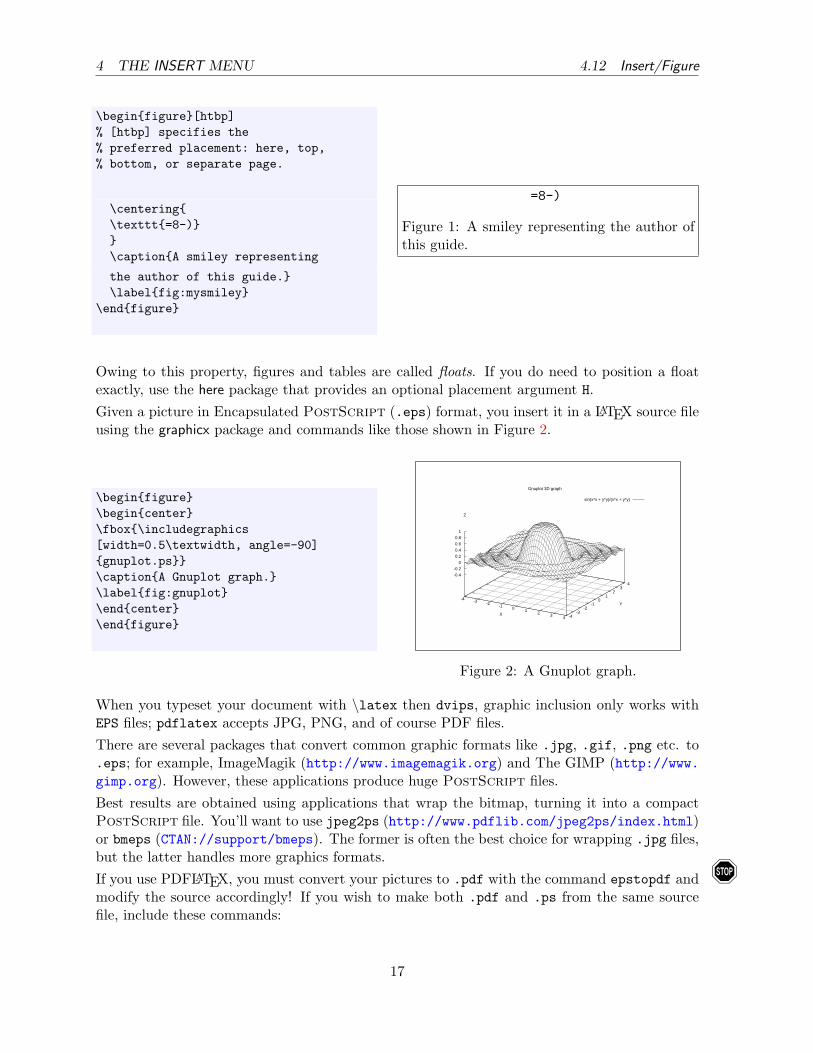
Owing to this property, figures and tables are called floats. If you do need to position a floatexactly, use the here package that provides an optional placement argument H.Given a picture in Encapsulated PostScript (.eps) format, you insert it in a LATEX source fileusing the graphicx package and commands like those shown in Figure 2.
\begin{figure}\begin{center}\fbox{\includegraphics[width=0.5\textwidth, angle=-90]{gnuplot.ps}}\caption{A Gnuplot graph.}\label{fig:gnuplot}\end{center}\end{figure}
Gnuplot 3D graph
sin(x*x + y*y)/(x*x + y*y)
-4 -3 -2 -1 0 1 2 3 4X -4
-3-2
-10
12
34
Y
-0.4
-0.2
0
0.2
0.4
0.6
0.8
1
Z
Figure 2: A Gnuplot graph.
When you typeset your document with \latex then dvips, graphic inclusion only works withEPS files; pdflatex accepts JPG, PNG, and of course PDF files.There are several packages that convert common graphic formats like .jpg, .gif, .png etc. to.eps; for example, ImageMagik (http://www.imagemagik.org) and The GIMP (http://www.gimp.org). However, these applications produce huge PostScript files.Best results are obtained using applications that wrap the bitmap, turning it into a compactPostScript file. You’ll want to use jpeg2ps (http://www.pdflib.com/jpeg2ps/index.html)or bmeps (CTAN://support/bmeps). The former is often the best choice for wrapping .jpg files,but the latter handles more graphics formats.If you use PDFLATEX, you must convert your pictures to .pdf with the command epstopdf and !modify the source accordingly! If you wish to make both .pdf and .ps from the same sourcefile, include these commands:
17
4 THE INSERT MENU 4.12 Insert/Figure
% define the variable \ifpdf\newif\ifpdf\ifx\pdfoutput\undefined\pdffalse
\else\pdfoutput=1\pdftrue
\fi...% include the right options\ifpdf\usepackage[pdftex]{graphicx}\pdfcompresslevel=9
\else\usepackage{graphicx}
\fi...% include the right graphic file\ifpdf\includegraphics{file.pdf}
\else\includegraphics{file.eps}
\fi
If you have more than 18 figures without text between them, you’ll get the infamous ‘Too many !unprocessed floats’ LATEX error. The quickest solution to this problem3 is to put \clearpageafter three or four figures.
4.12.1 Wrapping Figures
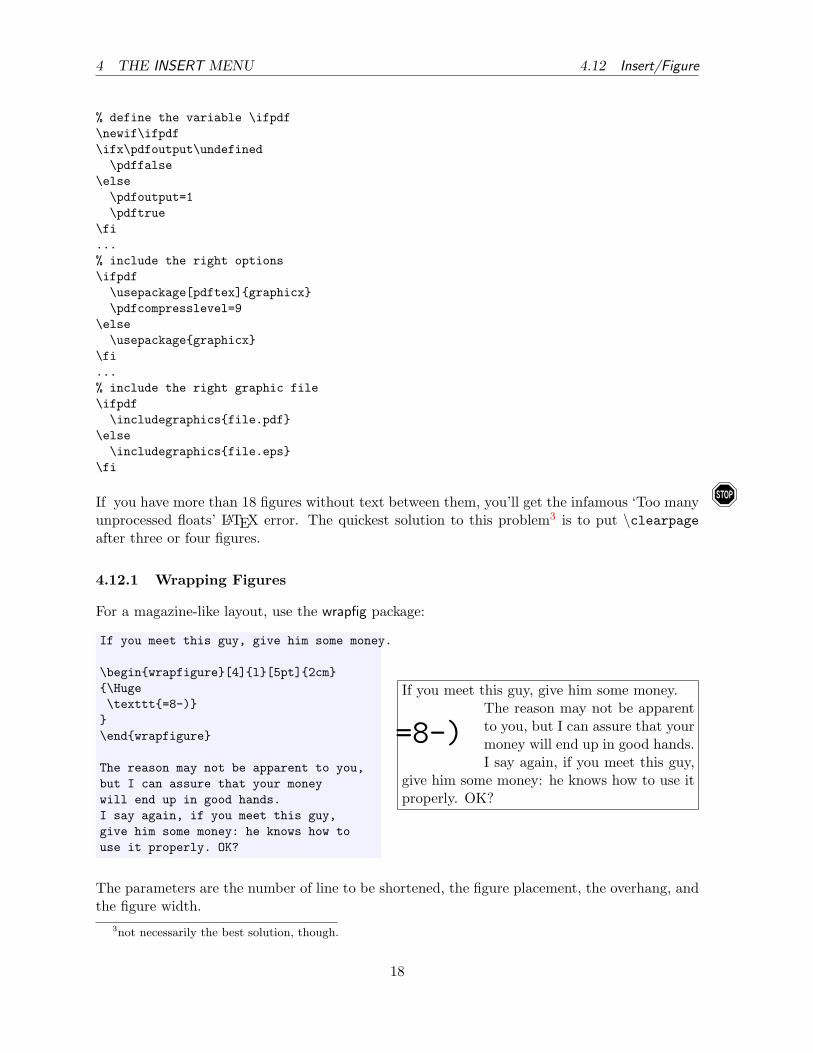
For a magazine-like layout, use the wrapfig package:
If you meet this guy, give him some money.
\begin{wrapfigure}[4]{l}[5pt]{2cm}{\Huge\texttt{=8-)}}\end{wrapfigure}
The reason may not be apparent to you,but I can assure that your moneywill end up in good hands.I say again, if you meet this guy,give him some money: he knows how touse it properly. OK?
If you meet this guy, give him some money.
=8-)The reason may not be apparentto you, but I can assure that yourmoney will end up in good hands.I say again, if you meet this guy,
give him some money: he knows how to use itproperly. OK?
The parameters are the number of line to be shortened, the figure placement, the overhang, andthe figure width.
3not necessarily the best solution, though.
18
4 THE INSERT MENU 4.13 Insert/Shapes
4.13 Insert/Shapes
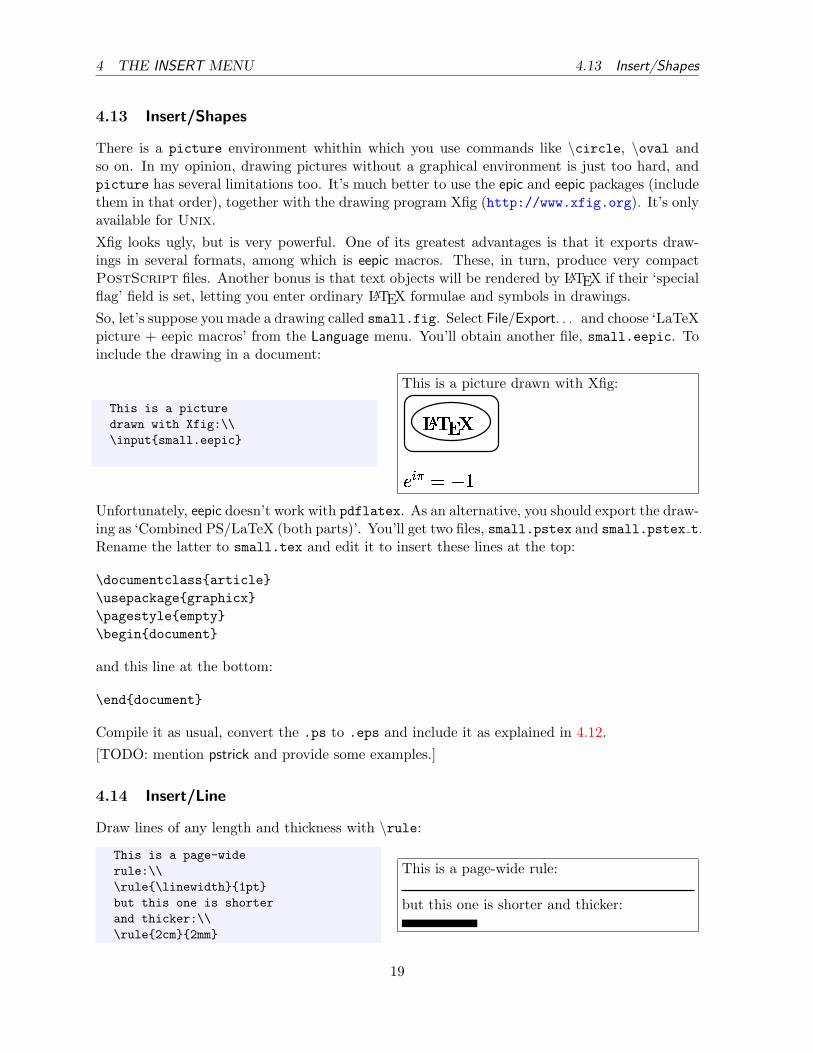
There is a picture environment whithin which you use commands like \circle, \oval andso on. In my opinion, drawing pictures without a graphical environment is just too hard, andpicture has several limitations too. It’s much better to use the epic and eepic packages (includethem in that order), together with the drawing program Xfig (http://www.xfig.org). It’s onlyavailable for Unix.Xfig looks ugly, but is very powerful. One of its greatest advantages is that it exports draw-ings in several formats, among which is eepic macros. These, in turn, produce very compactPostScript files. Another bonus is that text objects will be rendered by LATEX if their ‘specialflag’ field is set, letting you enter ordinary LATEX formulae and symbols in drawings.So, let’s suppose you made a drawing called small.fig. Select File/Export. . . and choose ‘LaTeXpicture + eepic macros’ from the Language menu. You’ll obtain another file, small.eepic. Toinclude the drawing in a document:
This is a picturedrawn with Xfig:\\\input{small.eepic}
This is a picture drawn with Xfig:
���������
� ��� ���
Unfortunately, eepic doesn’t work with pdflatex. As an alternative, you should export the draw-ing as ‘Combined PS/LaTeX (both parts)’. You’ll get two files, small.pstex and small.pstex t.Rename the latter to small.tex and edit it to insert these lines at the top:
\documentclass{article}\usepackage{graphicx}\pagestyle{empty}\begin{document}
and this line at the bottom:
\end{document}
Compile it as usual, convert the .ps to .eps and include it as explained in 4.12.[TODO: mention pstrick and provide some examples.]
4.14 Insert/Line
Draw lines of any length and thickness with \rule:
This is a page-widerule:\\\rule{\linewidth}{1pt}but this one is shorterand thicker:\\\rule{2cm}{2mm}
This is a page-wide rule:
but this one is shorter and thicker:
19
5 THE FORMAT MENU 4.15 Insert/Hyperlink
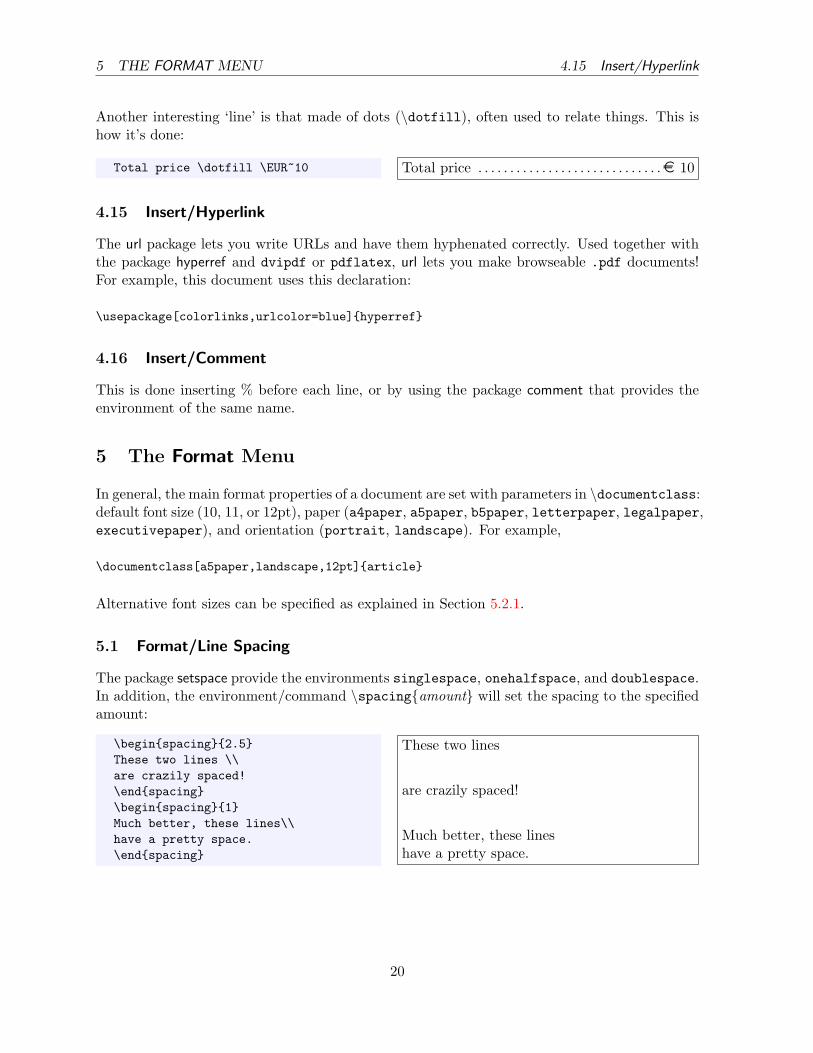
Another interesting ‘line’ is that made of dots (\dotfill), often used to relate things. This ishow it’s done:
Total price \dotfill \EUR~10 Total price . . . . . . . . . . . . . . . . . . . . . . . . . . . . .¤ 10
4.15 Insert/Hyperlink
The url package lets you write URLs and have them hyphenated correctly. Used together withthe package hyperref and dvipdf or pdflatex, url lets you make browseable .pdf documents!For example, this document uses this declaration:
\usepackage[colorlinks,urlcolor=blue]{hyperref}
4.16 Insert/Comment
This is done inserting % before each line, or by using the package comment that provides theenvironment of the same name.
5 The Format Menu
In general, the main format properties of a document are set with parameters in \documentclass:default font size (10, 11, or 12pt), paper (a4paper, a5paper, b5paper, letterpaper, legalpaper,executivepaper), and orientation (portrait, landscape). For example,
\documentclass[a5paper,landscape,12pt]{article}
Alternative font sizes can be specified as explained in Section 5.2.1.
5.1 Format/Line Spacing
The package setspace provide the environments singlespace, onehalfspace, and doublespace.In addition, the environment/command \spacing{amount} will set the spacing to the specifiedamount:
\begin{spacing}{2.5}These two lines \\are crazily spaced!\end{spacing}\begin{spacing}{1}Much better, these lines\\have a pretty space.\end{spacing}
These two lines
are crazily spaced!
Much better, these lineshave a pretty space.
20
5 THE FORMAT MENU 5.1 Format/Line Spacing
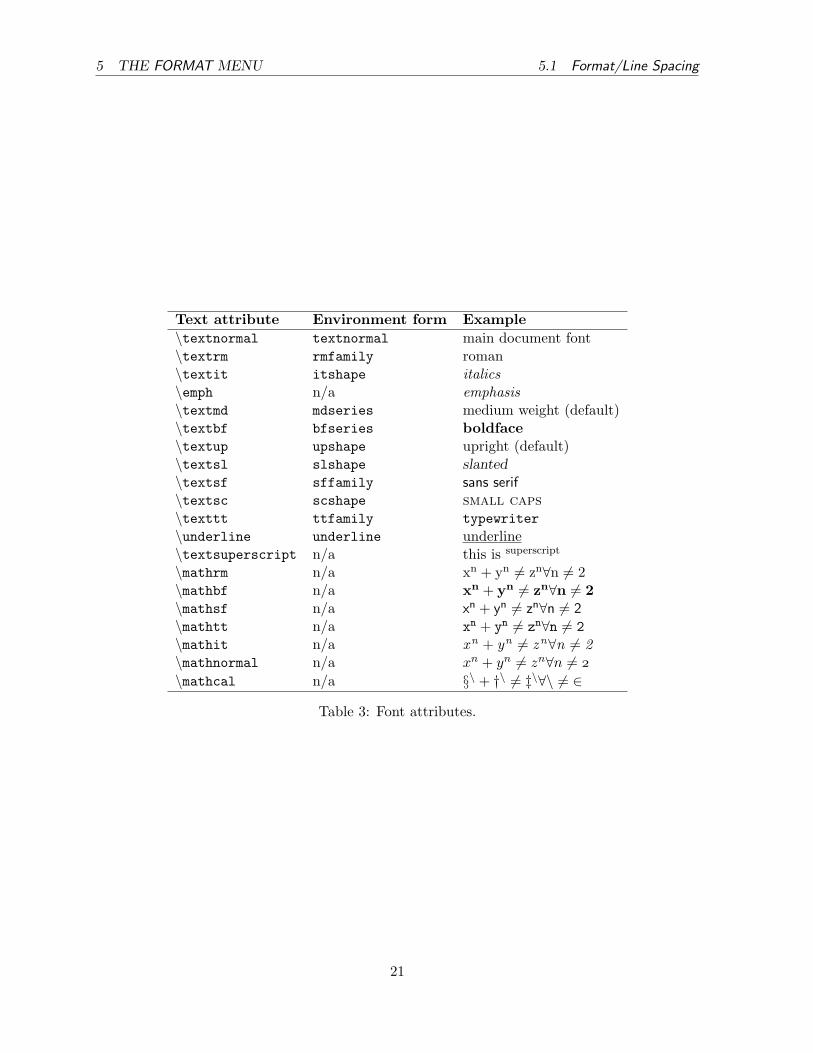
Text attribute Environment form Example\textnormal textnormal main document font\textrm rmfamily roman\textit itshape italics\emph n/a emphasis\textmd mdseries medium weight (default)\textbf bfseries boldface\textup upshape upright (default)\textsl slshape slanted\textsf sffamily sans serif\textsc scshape small caps\texttt ttfamily typewriter\underline underline underline\textsuperscript n/a this is superscript
\mathrm n/a xn + yn 6= zn∀n 6= 2\mathbf n/a xn + yn 6= zn∀n 6= 2\mathsf n/a xn + yn 6= zn∀n 6= 2\mathtt n/a xn + yn 6= zn∀n 6= 2\mathit n/a xn + yn 6= zn∀n 6= 2\mathnormal n/a xn + yn 6= zn∀n 6=
\mathcal n/a §\ + †\ 6= ‡\∀\ 6= ∈
Table 3: Font attributes.
21
5 THE FORMAT MENU 5.2 Format/Character
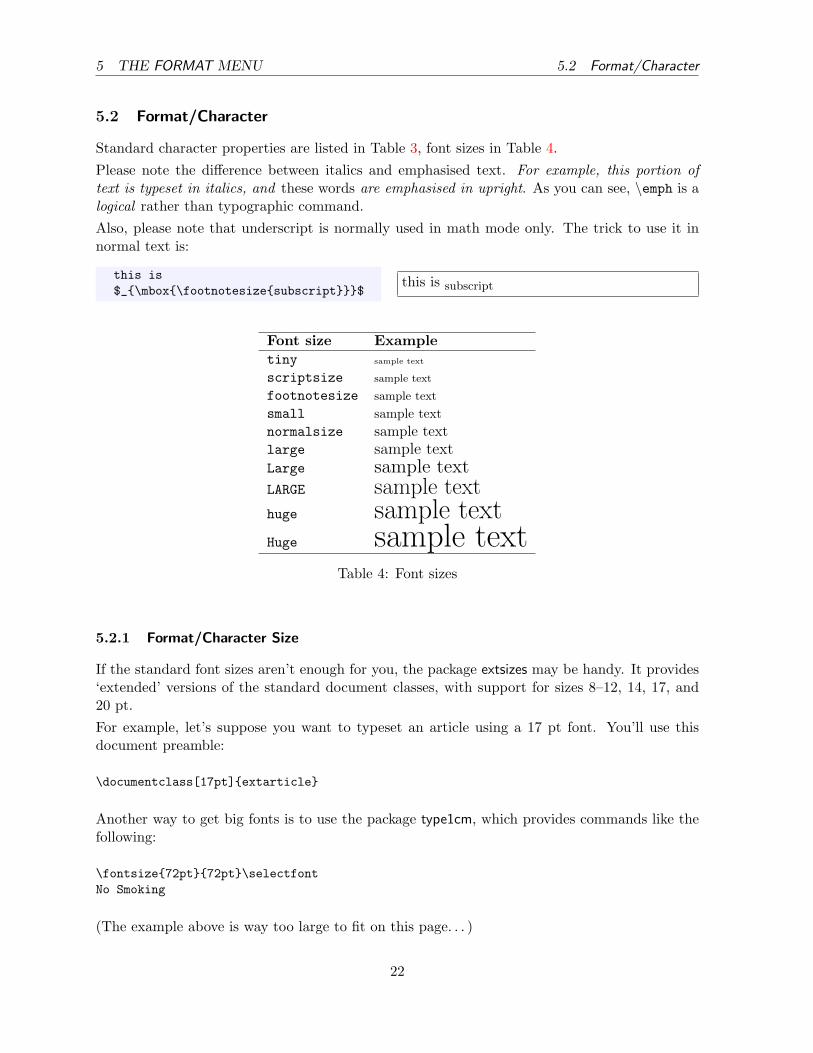
5.2 Format/Character
Standard character properties are listed in Table 3, font sizes in Table 4.Please note the difference between italics and emphasised text. For example, this portion oftext is typeset in italics, and these words are emphasised in upright. As you can see, \emph is alogical rather than typographic command.Also, please note that underscript is normally used in math mode only. The trick to use it innormal text is:
this is$_{\mbox{\footnotesize{subscript}}}$
this is subscript
Font size Exampletiny sample text
scriptsize sample text
footnotesize sample text
small sample textnormalsize sample textlarge sample textLarge sample textLARGE sample texthuge sample textHuge sample text
Table 4: Font sizes
5.2.1 Format/Character Size
If the standard font sizes aren’t enough for you, the package extsizes may be handy. It provides‘extended’ versions of the standard document classes, with support for sizes 8–12, 14, 17, and20 pt.For example, let’s suppose you want to typeset an article using a 17 pt font. You’ll use thisdocument preamble:
\documentclass[17pt]{extarticle}
Another way to get big fonts is to use the package type1cm, which provides commands like thefollowing:
\fontsize{72pt}{72pt}\selectfontNo Smoking
(The example above is way too large to fit on this page. . . )
22
5 THE FORMAT MENU 5.2 Format/Character
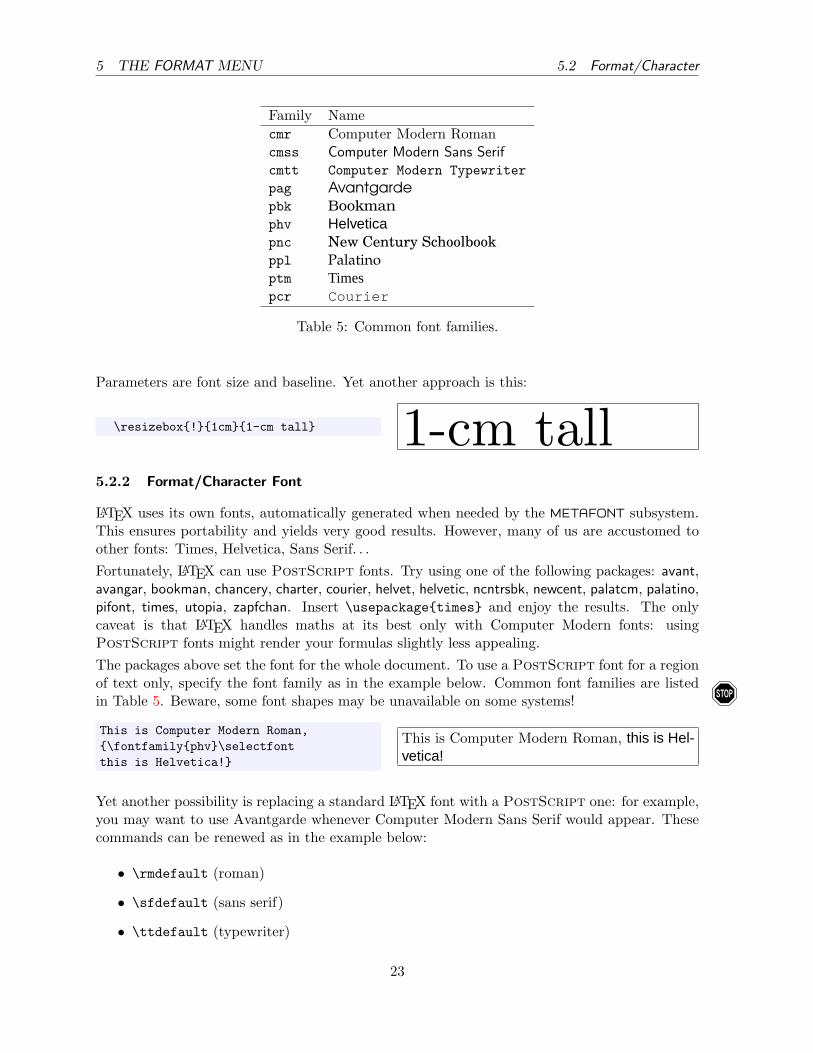
Family Namecmr Computer Modern Romancmss Computer Modern Sans Serifcmtt Computer Modern Typewriterpag Avantgardepbk Bookmanphv Helveticapnc New Century Schoolbookppl Palatinoptm Timespcr Courier
Table 5: Common font families.
Parameters are font size and baseline. Yet another approach is this:
\resizebox{!}{1cm}{1-cm tall} 1-cm tall5.2.2 Format/Character Font
LATEX uses its own fonts, automatically generated when needed by the METAFONT subsystem.This ensures portability and yields very good results. However, many of us are accustomed toother fonts: Times, Helvetica, Sans Serif. . .Fortunately, LATEX can use PostScript fonts. Try using one of the following packages: avant,avangar, bookman, chancery, charter, courier, helvet, helvetic, ncntrsbk, newcent, palatcm, palatino,pifont, times, utopia, zapfchan. Insert \usepackage{times} and enjoy the results. The onlycaveat is that LATEX handles maths at its best only with Computer Modern fonts: usingPostScript fonts might render your formulas slightly less appealing.The packages above set the font for the whole document. To use a PostScript font for a regionof text only, specify the font family as in the example below. Common font families are listedin Table 5. Beware, some font shapes may be unavailable on some systems! !This is Computer Modern Roman,{\fontfamily{phv}\selectfontthis is Helvetica!}
This is Computer Modern Roman, this is Hel-vetica!
Yet another possibility is replacing a standard LATEX font with a PostScript one: for example,you may want to use Avantgarde whenever Computer Modern Sans Serif would appear. Thesecommands can be renewed as in the example below:
• \rmdefault (roman)
• \sfdefault (sans serif)
• \ttdefault (typewriter)
23
5 THE FORMAT MENU 5.3 Format/Paragraph
• \bfdefault (boldface)
• \mddefault (medium)
• \itdefault (italics)
• \sldefault (slanted)
• \scdefault (small caps)
• \updefault (upright)
% Avantgarde replaces sans serif\renewcommand{\sfdefault}{pag}
5.2.3 Format/Character Colour
You can colour words using the package color and appropriate commands. Predefined coloursare black, white, red, green, blue, cyan, magenta, and yellow; you can also define your own.
\textcolor{red}{This is red.}\\\color{blue}This text is blue!\\So is this. Let’s change.\\\definecolor{mygreen}{rgb}{0.1,1,0.1}\color{mygreen}This is my shade of green!\\\color{black}\colorbox{cyan}{A cyan box}\\\fcolorbox{blue}{green}{A green box in a blue frame}
This is red.This text is blue!So is this. Let’s change.This is my shade of green!A cyan box
A green box in a blue frame
Moreover, the command \pagecolor lets you specify. . . guess what?
5.3 Format/Paragraph
Let’s remind what a paragraph is according to LATEX: a portion of text that either ends with\\, or is followed by a blank line.Environments are LATEX’s way of specifying properties like text alignment or font selection fora given portion of text. It’s like selecting text with the mouse, then choosing the property youwish from a menu or clicking on a button. Another way is to enclose the text between brackets.Environments have this general form:
\begin{environment}...text goes here...\end{environment}
24
5 THE FORMAT MENU 5.3 Format/Paragraph
For example, if you want to center a paragraph you’ll use the center environment:
\begin{center}this text is centered\end{center}
this text is centered
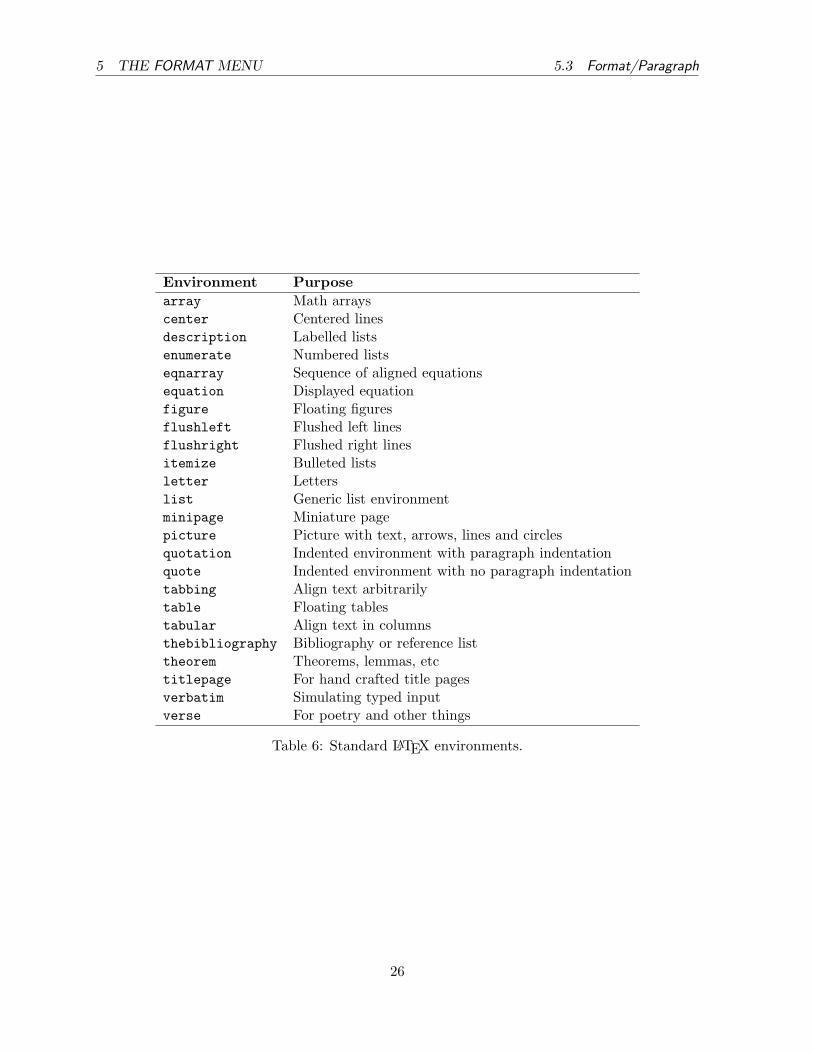
Standard environments are listed in Table 6. In the following sections, I’ll show you what to useand when.
5.3.1 Format/Paragraph Horizontal Alignment
By default, the text is justified. To get left–aligned, right–aligned or centered text, use theflushleft, flushright and center environments. The commands \raggedright, \raggedleft,and \centering are equivalent to their correspondent environments, but they do not start anew paragraph.
5.3.2 Format/Paragraph Vertical Alignment
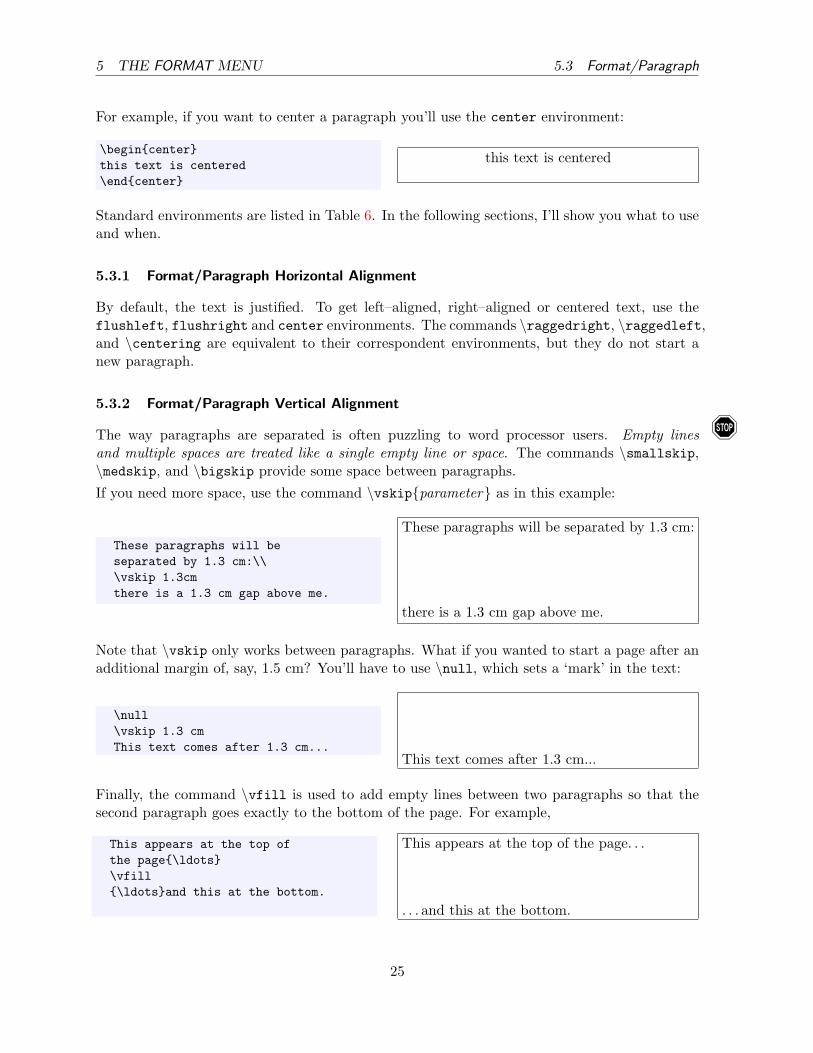
The way paragraphs are separated is often puzzling to word processor users. Empty lines !and multiple spaces are treated like a single empty line or space. The commands \smallskip,\medskip, and \bigskip provide some space between paragraphs.If you need more space, use the command \vskip{parameter} as in this example:
These paragraphs will beseparated by 1.3 cm:\\\vskip 1.3cmthere is a 1.3 cm gap above me.
These paragraphs will be separated by 1.3 cm:
there is a 1.3 cm gap above me.
Note that \vskip only works between paragraphs. What if you wanted to start a page after anadditional margin of, say, 1.5 cm? You’ll have to use \null, which sets a ‘mark’ in the text:
\null\vskip 1.3 cmThis text comes after 1.3 cm...
This text comes after 1.3 cm...
Finally, the command \vfill is used to add empty lines between two paragraphs so that thesecond paragraph goes exactly to the bottom of the page. For example,
This appears at the top ofthe page{\ldots}\vfill{\ldots}and this at the bottom.
This appears at the top of the page. . .
. . . and this at the bottom.
25
5 THE FORMAT MENU 5.3 Format/Paragraph
Environment Purposearray Math arrayscenter Centered linesdescription Labelled listsenumerate Numbered listseqnarray Sequence of aligned equationsequation Displayed equationfigure Floating figuresflushleft Flushed left linesflushright Flushed right linesitemize Bulleted listsletter Letterslist Generic list environmentminipage Miniature pagepicture Picture with text, arrows, lines and circlesquotation Indented environment with paragraph indentationquote Indented environment with no paragraph indentationtabbing Align text arbitrarilytable Floating tablestabular Align text in columnsthebibliography Bibliography or reference listtheorem Theorems, lemmas, etctitlepage For hand crafted title pagesverbatim Simulating typed inputverse For poetry and other things
Table 6: Standard LATEX environments.
26

5 THE FORMAT MENU 5.4 Format/Paragraph Border and Shade
5.3.3 Format/Paragraph Margins
Normally, the margins are set for the whole document as seen in Section 2.5. Redefining themfor a section of text will not work: if you want to set a paragraph’s margins, you’ll have to createa new environment like in the following example:
\newenvironment{margins}[2]{\begin{list}{} {\setlength{\leftmargin}{#1}\setlength{\rightmargin}{#2}
} \item }{\end{list}}
Then you will use the new environment:
As you can see, this paragraphhas normal margins.\begin{margins}{0.5cm}{1cm}But please note that thisparagraph has custom margins.
\end{margins}
As you can see, this paragraph has normalmargins.
But please note that this paragraphhas custom margins.
5.3.4 Format/Paragraph Indentation
To set the amount of indentation of the first line of a paragraph, use the command \parindent.In the following example, we set a 1-cm indentation:
\setlength{\parindent}{1cm}
The commands \indent and \noindent allow/disallow indentation on the following paragraph.Finally, the distance between paragraphs is set by \parskip:
\setlength{\parskip}{3pt}
5.4 Format/Paragraph Border and Shade
To get framed (bordered) paragraphs or words, you have the choice of using the framed packageor the \parbox command. The package calc is required in the latter case.This is the simplest method, using framed:
\setlength{\FrameRule}{2pt}\setlength{\FrameSep}{5pt}\begin{framed}this is a framed paragraph!
\end{framed}\definecolor{shadecolor}{rgb}{0.9,0.8,1}\begin{shaded}this is a shaded paragraph,do you like it?
\end{shaded}
this is a framed paragraph!
this is a shaded paragraph, do you like it?
27
5 THE FORMAT MENU 5.5 Format/Colour
Equivalently, use the boxedminipage package and the equally named environment. For those whowant to know more: the commands
\framebox{\begin{minipage}[c]{\linewidth}text to be framed\end{minipage}
}
are functionally equivalent to the boxedminipage environment.This example uses \parbox:
\noindent\fbox{\parbox{\linewidth
-2 \fboxsep -2 \fboxrule}{again, a framed paragraph!}
}
again, a framed paragraph!
\linewidth sets the width of the minipage equal to that of the remaining text. Obviously, youcan specify the width as you like.Finally, to frame something adapting the frame to the width of the text:
this is a\framebox[\width]{framed}word
this is a framed word
Modifying the parameter, you can adjust the frame width:
this is another\framebox[2\width][r]{framed}word
this is another framed word
Note that the second optional parameter specifies the alignment (to the right in this example).
5.5 Format/Colour
Now that you have a bordered paragraph, you’ll want to set its colour too. Do this:
\colorbox{yellow}{\begin{minipage}{0.8\linewidth}I am a minipage, my colouris yellow!\end{minipage}
}
I am a minipage, my colour is yellow!
More about colours in Section 5.2.3.
28
6 THE TABLE MENU 5.6 Format/Columns
5.6 Format/Columns
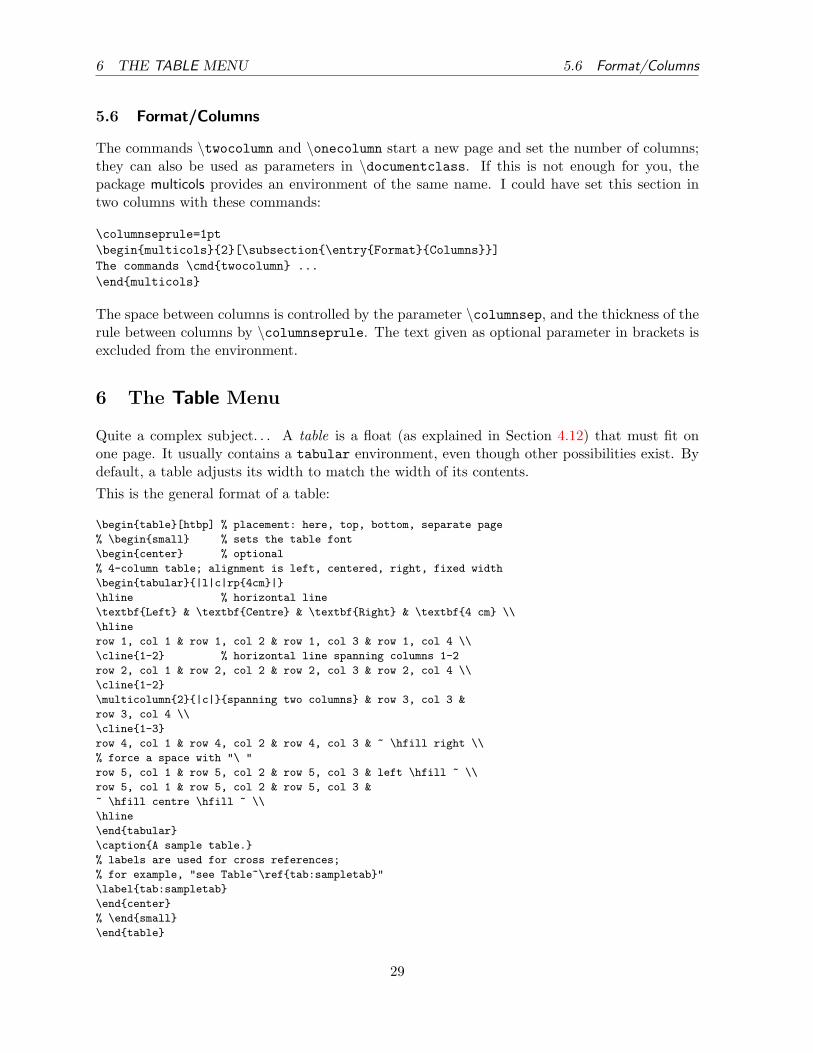
The commands \twocolumn and \onecolumn start a new page and set the number of columns;they can also be used as parameters in \documentclass. If this is not enough for you, thepackage multicols provides an environment of the same name. I could have set this section intwo columns with these commands:
\columnseprule=1pt\begin{multicols}{2}[\subsection{\entry{Format}{Columns}}]The commands \cmd{twocolumn} ...\end{multicols}
The space between columns is controlled by the parameter \columnsep, and the thickness of therule between columns by \columnseprule. The text given as optional parameter in brackets isexcluded from the environment.
6 The Table Menu
Quite a complex subject. . . A table is a float (as explained in Section 4.12) that must fit onone page. It usually contains a tabular environment, even though other possibilities exist. Bydefault, a table adjusts its width to match the width of its contents.This is the general format of a table:
\begin{table}[htbp] % placement: here, top, bottom, separate page
% \begin{small} % sets the table font
\begin{center} % optional
% 4-column table; alignment is left, centered, right, fixed width
\begin{tabular}{|l|c|rp{4cm}|}
\hline % horizontal line
\textbf{Left} & \textbf{Centre} & \textbf{Right} & \textbf{4 cm} \\
\hline
row 1, col 1 & row 1, col 2 & row 1, col 3 & row 1, col 4 \\
\cline{1-2} % horizontal line spanning columns 1-2
row 2, col 1 & row 2, col 2 & row 2, col 3 & row 2, col 4 \\
\cline{1-2}
\multicolumn{2}{|c|}{spanning two columns} & row 3, col 3 &
row 3, col 4 \\
\cline{1-3}
row 4, col 1 & row 4, col 2 & row 4, col 3 & ~ \hfill right \\
% force a space with "\ "
row 5, col 1 & row 5, col 2 & row 5, col 3 & left \hfill ~ \\
row 5, col 1 & row 5, col 2 & row 5, col 3 &
~ \hfill centre \hfill ~ \\
\hline
\end{tabular}
\caption{A sample table.}
% labels are used for cross references;
% for example, "see Table~\ref{tab:sampletab}"
\label{tab:sampletab}
\end{center}
% \end{small}
\end{table}
29
6 THE TABLE MENU
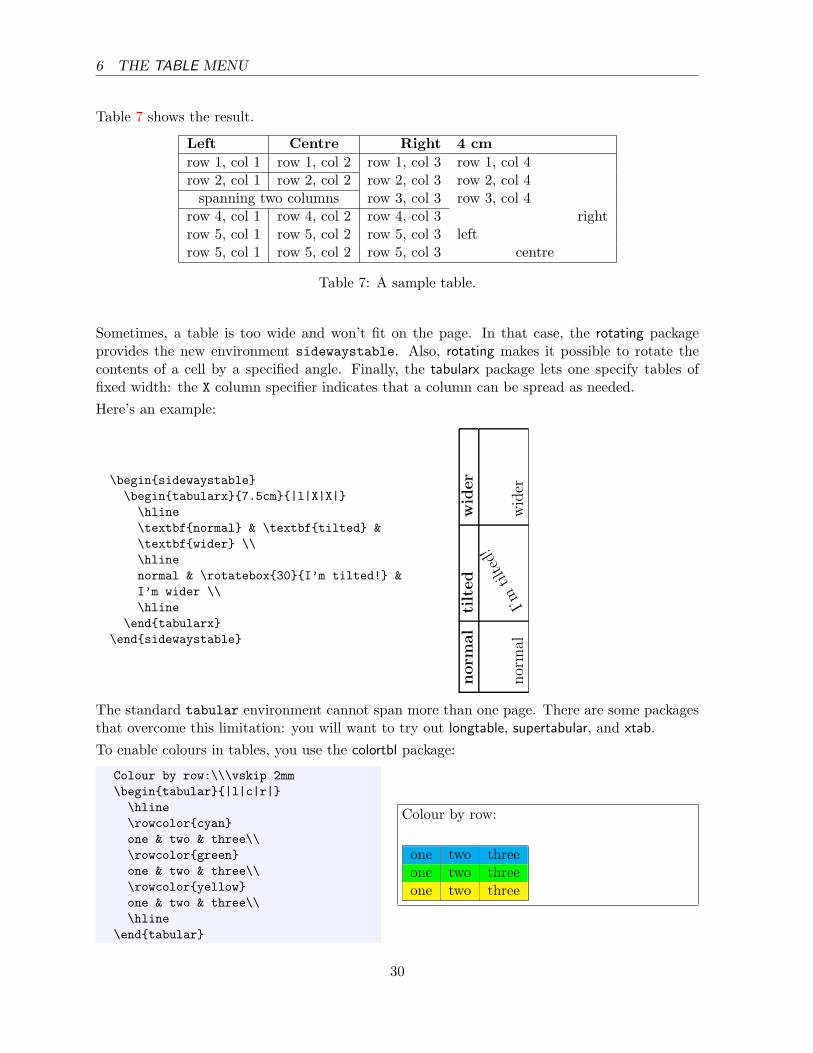
Table 7 shows the result.
Left Centre Right 4 cmrow 1, col 1 row 1, col 2 row 1, col 3 row 1, col 4row 2, col 1 row 2, col 2 row 2, col 3 row 2, col 4
spanning two columns row 3, col 3 row 3, col 4row 4, col 1 row 4, col 2 row 4, col 3 rightrow 5, col 1 row 5, col 2 row 5, col 3 leftrow 5, col 1 row 5, col 2 row 5, col 3 centre
Table 7: A sample table.
Sometimes, a table is too wide and won’t fit on the page. In that case, the rotating packageprovides the new environment sidewaystable. Also, rotating makes it possible to rotate thecontents of a cell by a specified angle. Finally, the tabularx package lets one specify tables offixed width: the X column specifier indicates that a column can be spread as needed.Here’s an example:
\begin{sidewaystable}\begin{tabularx}{7.5cm}{|l|X|X|}\hline\textbf{normal} & \textbf{tilted} &\textbf{wider} \\\hlinenormal & \rotatebox{30}{I’m tilted!} &I’m wider \\\hline
\end{tabularx}\end{sidewaystable}
norm
al
tilted
wid
er
norm
al
I’m
tilted!
wid
er
The standard tabular environment cannot span more than one page. There are some packagesthat overcome this limitation: you will want to try out longtable, supertabular, and xtab.To enable colours in tables, you use the colortbl package:
Colour by row:\\\vskip 2mm\begin{tabular}{|l|c|r|}\hline\rowcolor{cyan}one & two & three\\\rowcolor{green}one & two & three\\\rowcolor{yellow}one & two & three\\\hline
\end{tabular}
Colour by row:
one two threeone two threeone two three
30

6 THE TABLE MENU 6.1 Line Spacing
Colour by column:\\\vskip 2mm\begin{tabular}{|>{\columncolor{cyan}}l|>{\color{red}\columncolor{green}}c|>{\columncolor{yellow}}r|}\hlineone & two & three\\one & two & three\\one & two & three\\\hline
\end{tabular}
Colour by column:
one two threeone two threeone two three
6.1 Line Spacing
A line adjusts itself to the height of the text it contains. To add some space before a line, thetrick is to start it with a \rule of 0 length and specified height. To add space after a line, use\\ followed by optional space. Here is an example:
\begin{tabular}{lll}one & two & three\\0.3 centimeters & \textbf{below} &this line\\[0.3cm]
one & two & three\\one & two & three\\\rule{0pt}{1.2cm}1.2 centimeters &\textbf{above} & this line\\
\end{tabular}
one two three0.3 centimeters below this line
one two threeone two three
1.2 centimeters above this line
6.2 Aligning Numbers
A special case of a tabular environment is when we want to align numbers with respect to thedecimal positions. You use the dcolumn package, which adds the D column specifier. D has threearguments: the separator to use in the LATEX source and in output (usually the same, ‘.’), andthe number of digits to the right of the decimal place indicator. Optionally, the third argumentcan specify the number of digits to the left and to the right of the decimal place indicator,separated by a dot. Lastly, if the third argument is -1, the material of the column is centeredaround the separator.All material in the table is typeset in math mode. To insert headings, you’ll have to put thetext in an \mbox.
31
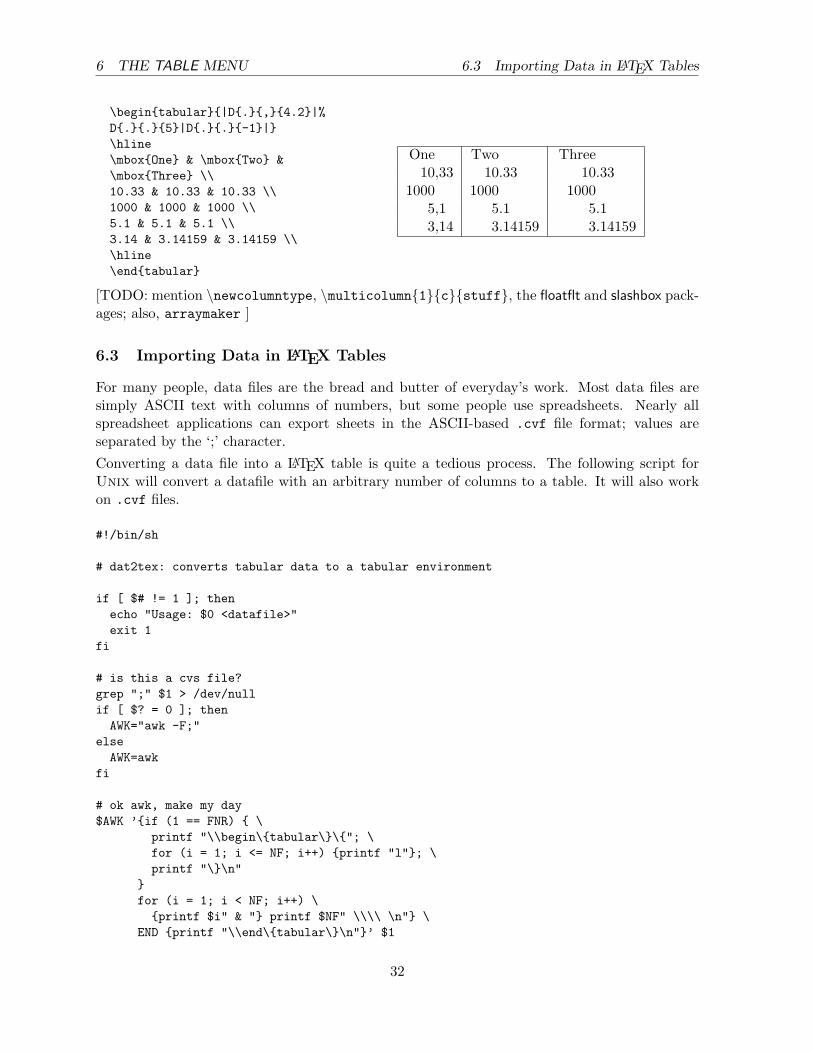
6 THE TABLE MENU 6.3 Importing Data in LATEX Tables
\begin{tabular}{|D{.}{,}{4.2}|%D{.}{.}{5}|D{.}{.}{-1}|}\hline\mbox{One} & \mbox{Two} &\mbox{Three} \\10.33 & 10.33 & 10.33 \\1000 & 1000 & 1000 \\5.1 & 5.1 & 5.1 \\3.14 & 3.14159 & 3.14159 \\\hline\end{tabular}
One Two Three10,33 10.33 10.33
1000 1000 10005,1 5.1 5.13,14 3.14159 3.14159
[TODO: mention \newcolumntype, \multicolumn{1}{c}{stuff}, the floatflt and slashbox pack-ages; also, arraymaker ]
6.3 Importing Data in LATEX Tables
For many people, data files are the bread and butter of everyday’s work. Most data files aresimply ASCII text with columns of numbers, but some people use spreadsheets. Nearly allspreadsheet applications can export sheets in the ASCII-based .cvf file format; values areseparated by the ‘;’ character.Converting a data file into a LATEX table is quite a tedious process. The following script forUnix will convert a datafile with an arbitrary number of columns to a table. It will also workon .cvf files.
#!/bin/sh
# dat2tex: converts tabular data to a tabular environment
if [ $# != 1 ]; thenecho "Usage: $0 <datafile>"exit 1
fi
# is this a cvs file?grep ";" $1 > /dev/nullif [ $? = 0 ]; thenAWK="awk -F;"
elseAWK=awk
fi
# ok awk, make my day$AWK ’{if (1 == FNR) { \
printf "\\begin\{tabular\}\{"; \for (i = 1; i <= NF; i++) {printf "l"}; \printf "\}\n"
}for (i = 1; i < NF; i++) \
{printf $i" & "} printf $NF" \\\\ \n"} \END {printf "\\end\{tabular\}\n"}’ $1
32
7 THE TOOLS MENU
# end of dat2tex
7 The Tools Menu
7.1 Tools/Make Index
As you may expect, there’s a fairly simple way to produce an index out of your LATEX document.TO BE WRITTEN
7.2 Tools/Mail Merges
This useful and time-saving tool is implemented in LATEX by the textmerg package. Let’s considera simple document, in which the name, surname, and title of people we’re writing to may vary.The remaining text does not change.We’ll define three fields, which are the variable part of the text: \Name, \Surname, and \Title.Their values will be gathered from an external file, data.dat.
\documentclass{article}\usepackage{textmerg}\begin{document}% let’s declare the variable fields:% \Void is for empty lines\Fields{\Name\Surname\Title-\Void}\Merge{data.dat}{%Dear \Title{} \Surname,\\may I call you \Name?\\Yours,\\\hspace{3cm}Guido\clearpage}\end{document}
The fourth field, \Void, isn’t really necessary and it’s there for illustration. It’s preceded bya minus sign, which indicates that it can be empty in the data file. Simply put, we want toseparate the records using empty lines.The file data.dat reads:
GuidoGonzatoDr.
FrancescoMulargiaProf.
CarolJohn-Paul IIPope
33
7 THE TOOLS MENU 7.3 Tools/Labels
That’s it: the resulting output will contain the merged text, one page for each recipient.
7.3 Tools/Labels
If making mail merges was easy, making labels is even trivial. Let’s suppose you want to make20 equal labels on a 3×8 peel–off label sheet. The package to use, predictably, is called labels.In this example, we’ll make 10 plain labels and 10 boxed labels:
\documentclass[a4paper,12pt]{article}\usepackage{labels}\LabelCols=3 % n. of columns of labels\LabelRows=8 % n. of rows of labels\LeftBorder=8mm % borders of each label\RightBorder=8mm\TopBorder=5mm\BottomBorder=5mm\LabelGridtrue % show the grid\numberoflabels=10 % number of labels of each type to print% the text of the label is specified by% the \addresslabel[]{} macro:\begin{document}\addresslabel[\large] % optional arguments{\textbf{Guido Gonzato}, Ph.D.\\\textsl{Linux system manager}}% now on to the boxed labels\boxedaddresslabel[\fboxsep=4mm\fboxrule=1mm]{\textbf{Guido Gonzato}, Ph.D.\\\textsl{Linux system manager}}
\end{document}
To make labels containing different addresses, you may use either an external file or insert theaddresses in the main file:
\documentclass[a4paper,12pt]{article}\usepackage{labels}\LabelCols=3\LabelRows=8\LeftBorder=3mm\RightBorder=3mm\TopBorder=8mm\BottomBorder=8mm\LabelGridtrue\begin{document}% use either this environment:\begin{labels}1$^{st}$ name1$^{st}$ address1$^{st}$ city, state, zipcode
2$^{nd}$ name
34
7 THE TOOLS MENU 7.4 Tools/Default Language
2$^{nd}$ address2$^{nd}$ city, state, zipcode
3$^{rd}$ name3$^{rd}$ address3$^{rd}$ city, state, zipcode
\end{labels}% or an external file containing exactly the same text:% \labelfile{addresses.dat}\end{document}
It is left to you to combine textmerg and labels!
7.4 Tools/Default Language
LATEX default language is English, but other languages are supported. By language support Imean the translation of terms like ‘Chapter’ or ‘Index’, correct hyphenation, and the possibilityof inserting characters like ‘c’ or ‘e’ directly via your keyboard. (The normal way being typing\c c and \’e.)Your LATEX distribution contains a file called language.dat (teTEX places it in $TEXMF/tex/generic/config/language.dat that contains a list of languages. Editing this file you choosethe languages for which you want hyphenation patterns.If you are not a native English speaker, you’ll want to use the package babel like in the followingexample:
\usepackage[italian,english]{babel}
In addition, to type accented letters and in general non-standard ASCII characters4 you maywant to use the package isolatin1. However, this is not a recommended practice, because itreduces the legibility and portability of your file: you had better stick to the TEX way.If you just can’t stand typying all those three- or four-letter clusters, then you could configureyour editor to type those for you. For example, I set up my editor of choice (jed) to have itinsert \’e whenever I type ‘e’. I included this in my .jedrc:
define latex_mode_hook (){set_abbrev_mode (1);if ( () = abbrev_table_p ("LaTeX") )use_abbrev_table ("LaTeX");
#ifdef WIN32% prevent clash with movement keysundefinekey ("aa", "LaTeX-Mode");definekey (" \\‘a", "aa", "LaTeX-Mode");
#elselocal_setkey (" \\‘a", "a");
4in computer jargon, ‘standard ASCII characters’ are the characters whose code is included between 32 (space)and 126 (tilde).
35
8 THE HELP MENU 7.5 Tools/Hyphenation
#endiflocal_setkey (" \\’e", "e");local_setkey (" \\‘e", "e");local_setkey (" \\‘\\i{}", "ı");local_setkey (" \\‘o", "o");local_setkey (" \\‘u", "u");
}
Please consult your editor’s documentation.
7.5 Tools/Hyphenation
Although LATEX does a good job at hyphenating words, sometimes manual intervention mayyield better results. Manual hyphens are specified inserting \- where we want the word to bebroken. A better way is to declare hyphenation rules:
\hyphenation{ge-o-phy-sics, ge-o-lo-gy, earth}
The above declaration instructs LATEX not to hyphen the word ‘earth’. Another way to preventa word to be hyphenated is to put it in \mbox:
Do not hyphen \mbox{internationalisation}, please.
7.6 Tools/Spell Check
LATEX is not aware of spell spelling. This task is done using external tools like ispell, aspellor others. Under Unix, you can use ispell this way:
shell> ispell -t mydocument.tex
The -t switch instructs ispell to ignore TEX and LATEX commands. If your language is notEnglish, specify the appropriate dictionary with the -d switch:
shell> ispell -d italiano -t mydocument.tex
8 The Help Menu
There are many ways of getting help with LATEX, both online and offline. The best place to startis the CTAN site, http://www.ctan.org/tex-archive/info/.
• info latex (Unix systems) gives a concise but very complete on-line summary of com-mands and concepts;
• http://www.giss.nasa.gov/latex/ is a comprehensive on-line reference. Lots of usefullinks!
36
9 THE END
• http://www.ctan.org/tex-archive/info/LatexHelpBook/ is a very nice help systemfor LATEX, fully integrated with Windows.
• don’t forget the news:comp.text.latex newsgroup.
Many GNU/Linux distributions ship with teTeX, one of the most complete TEX/LATEX systems.A lot of documentation is provided, and is usually found in TEXMF/doc. Point your browserthere, and be happy.[TODO: mention translations.]
9 The End
This document is copyright c© Guido Gonzato, 2001–2003, and released under the GNU GeneralPublic Licence. I really hope you’ll find this guide useful. For any suggestions or comments,please feel free to contact me.
37
A DOCUMENT TEMPLATES
A Document Templates
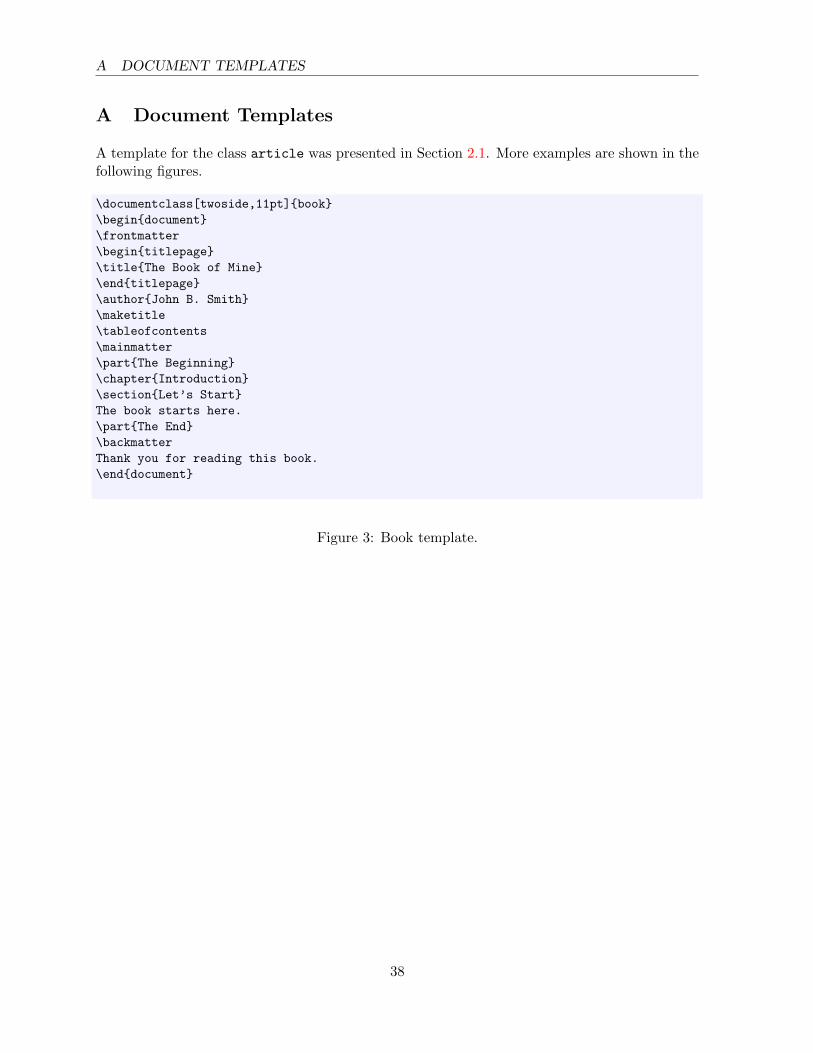
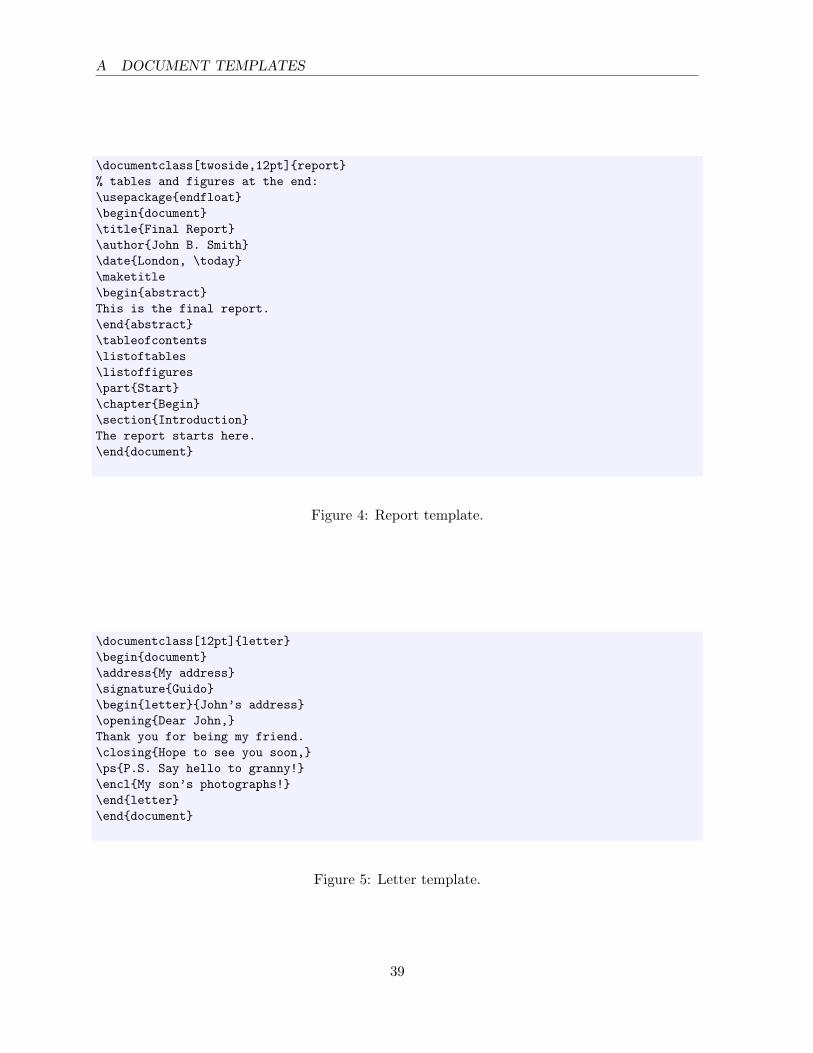
A template for the class article was presented in Section 2.1. More examples are shown in thefollowing figures.
\documentclass[twoside,11pt]{book}\begin{document}\frontmatter\begin{titlepage}\title{The Book of Mine}\end{titlepage}\author{John B. Smith}\maketitle\tableofcontents\mainmatter\part{The Beginning}\chapter{Introduction}\section{Let’s Start}The book starts here.\part{The End}\backmatterThank you for reading this book.\end{document}
Figure 3: Book template.
38
A DOCUMENT TEMPLATES
\documentclass[twoside,12pt]{report}% tables and figures at the end:\usepackage{endfloat}\begin{document}\title{Final Report}\author{John B. Smith}\date{London, \today}\maketitle\begin{abstract}This is the final report.\end{abstract}\tableofcontents\listoftables\listoffigures\part{Start}\chapter{Begin}\section{Introduction}The report starts here.\end{document}
Figure 4: Report template.
\documentclass[12pt]{letter}\begin{document}\address{My address}\signature{Guido}\begin{letter}{John’s address}\opening{Dear John,}Thank you for being my friend.\closing{Hope to see you soon,}\ps{P.S. Say hello to granny!}\encl{My son’s photographs!}\end{letter}\end{document}
Figure 5: Letter template.
39

A DOCUMENT TEMPLATES
\documentclass[a4paper]{article}\usepackage{type1cm}\usepackage{times}\usepackage{color}\usepackage{rotating}\pagestyle{empty}\begin{document}\begin{sidewaysfigure}\fontsize{2.5cm}{2.5cm}\selectfont\centerline{\textcolor{blue}{\textbf{Please:}}}\vskip 1cm\fontsize{4cm}{3cm}\selectfont\centerline{\textcolor{red}{DO NOT}}\centerline{\textcolor{red}{SMOKE}}\centerline{\textcolor{red}{HERE!}}\vskip 1cm\fontsize{2cm}{2cm}\selectfont\centerline{\textcolor{magenta}{If you do,}}\centerline{\textcolor{magenta}{you’ll be \emph{deboned!}}}
\end{sidewaysfigure}\end{document}
Figure 6: How to write a notice.
40
A DOCUMENT TEMPLATES
\documentclass{article}\usepackage[absolute,showboxes]{textpos}\usepackage{color}\usepackage{framed}\usepackage{graphicx}\setlength{\TPHorizModule}{10mm} % standard unit of length\setlength{\TPVertModule}{\TPHorizModule}\setlength{\TPboxrulesize}{1pt} % box line width% start everything near the top-left corner\textblockorigin{0mm}{0mm}
\begin{document}\setlength{\parindent}{0pt}\definecolor{shadecolor}{rgb}{0.9,1,1}\begin{textblock}{5}(0,0)% this block is 5 modules wide; height is% automatically determined\begin{center}\begin{minipage}[c]{0.8 \linewidth}\begin{shaded}This block is placed with its top left corner at the ‘origin’on the page, which has been set to (0mm,0mm). The internalmargin and the shading are provided by the \texttt{minipage}and \texttt{shaded} environments.
\end{shaded}\end{minipage}
\end{center}\end{textblock}\begin{textblock}{6}(10,1)\includegraphics[width=6cm,angle=-90]{gnuplot.ps}This picture is at (10,1). Note that rotating itby -90 makes it overflow the margin.
\end{textblock}\begin{textblock}{5}[0.5,0.5](2.5,8)This block is at position (2.5,8), but because the optionalargument [0.5,0.5] has been given, it is the centre of the blockwhich is located at that point, rather than the top-left corner.\end{textblock}\begin{textblock}{3,4}(6,4)The dimensions of this block are 3$\times$4 cm.Its origin is position (6,4) on the page. Note that the textoverflows the margin in some cases; you’ll want touse the \texttt{minipage} environment to prevent that.\end{textblock}\end{document}
Figure 7: How to write a poster.
41