laminex laboratory compact laminate - tlgcms.co.nz · laminex ® laboratory compact laminate is a...
TRANSCRIPT

1 Issued September 2013
Physical Properties
Unit
Compact Laminate General Purpose Standard Grade (CGS) EN438-4
Test Method
EN438-2:2000
Specific (minimum)
Weight 13 mm thickness
Weight 16 mm thickness
Weight 18 mm thickness
kg/m3
kg/m2
kg/m2
kg/m2
1420
18 5
23 7
25 5
N 438-4
COMPACT L AMINATES
Laminex® Laboratory Compact Laminate
Laminex® Laboratory Compact
Laminate is a high pressure
decorative compact laminate
manufactured especially for
demanding chemical laboratory
environments. With an Electro
Beam Cured (EBC) surface for
extra stain resistance and
hygiene, Laboratory Compact
Laminate panels are a durable
and versatile solution.
PRODUCT CHARACTERISTICS PROPERTIES
Finish Carbide
Colours 3 Standard Colours
Thickness 16mm
Decorated Single Sided
Core Black
Panel Dimension 3670x1530mm
Applications: Laboratory Worktops,
Laboratory Furniture
INSPECTION REQUIREMENTS
Tests are based on the European Standard EN438-2:2005.
General Inspection Requirements
Viewing distance Approximately 150cm
Light conditions Intensity 800 – 1000 lux over the whole area Light type Overhead white fluorescent lights, of colour temperature approximately 5000K
Inspection Requirements of Colour, Pattern and Surface Finish
Colour and Pattern When inspected in daylight or D65 standard illuminant, and under tungsten illuminant, there shall be no
significant difference between the corresponding colour or pattern reference sample held by the supplier and
the specimen under test.
Surface Finish When inspected at different viewing angles, there shall be no significant difference between corresponding surface-finish reference sample held by the supplier and the specimen under test.
Visual Inspection
Dirt, spots and similar Max. 1 mm2/m2 and is proportional to the sheet size. Total admissible area of contamination may be surface defects concentrated in one spot or dispersed over an unlimited amount of smaller defects. Fibres, hairs and scratches Max. 10 mm/m2 and proportional to the sheet size. Total admissible area of contamination may be concentrated
in one spot or dispersed over an unlimited amount of smaller defects. Edge quality: chipping Max. 3mm/side
Issued September 2013
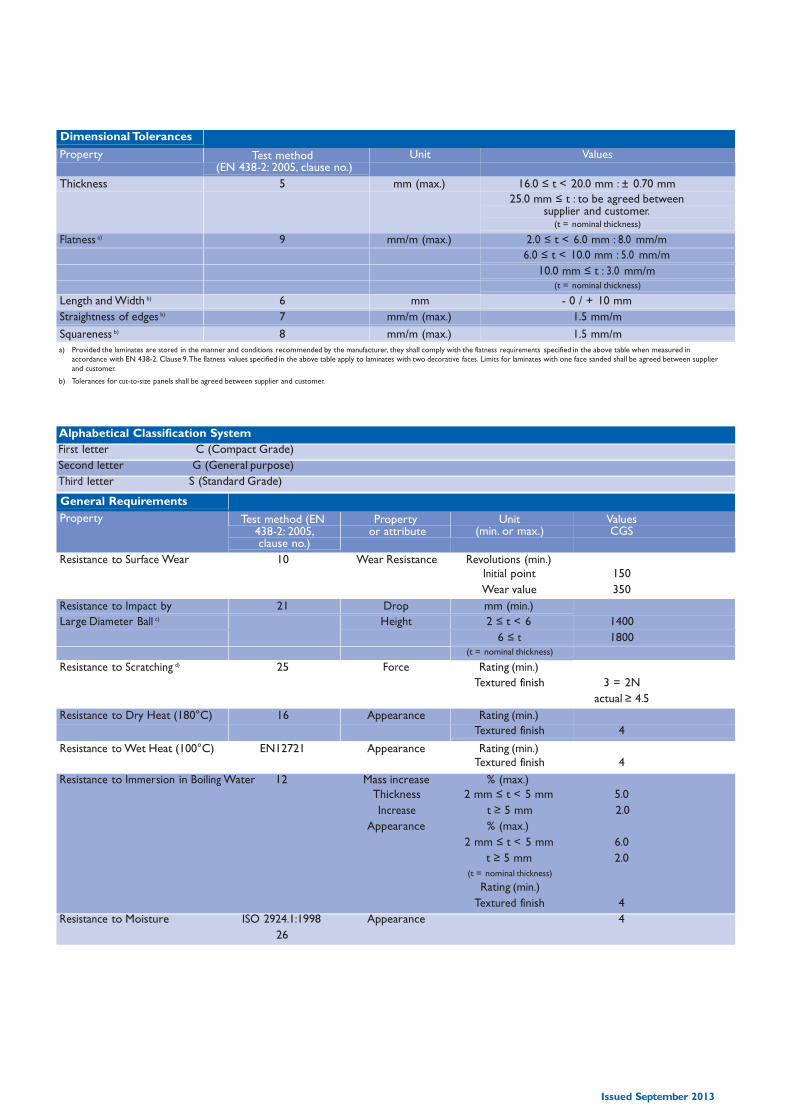
Dimensional Tolerances Property Test method
(EN 438-2: 2005, clause no.) Unit Values
Thickness 5 mm (max.) 16.0 ≤ t < 20.0 mm : ± 0.70 mm
25.0 mm ≤ t : to be agreed between supplier and customer.
(t = nominal thickness)
Flatness a) 9 mm/m (max.) 2.0 ≤ t < 6.0 mm : 8.0 mm/m
6.0 ≤ t < 10.0 mm : 5.0 mm/m
10.0 mm ≤ t : 3.0 mm/m
(t = nominal thickness)
Length and Width b) 6 mm - 0 / + 10 mm
Straightness of edges b) 7 mm/m (max.) 1.5 mm/m
Squareness b) 8 mm/m (max.) 1.5 mm/m
a) Provided the laminates are stored in the manner and conditions recommended by the manufacturer, they shall comply with the flatness requirements specified in the above table when measured in
accordance with EN 438-2, Clause 9. The flatness values specified in the above table apply to laminates with two decorative faces. Limits for laminates with one face sanded shall be agreed between supplier
and customer.
b) Tolerances for cut-to-size panels shall be agreed between supplier and customer.
Alphabetical Classification System
First letter C (Compact Grade)
Second letter G (General purpose)
Third letter S (Standard Grade)
General Requirements Property Test method (EN
438-2: 2005, clause no.)
Property or attribute
Unit (min. or max.)
Values CGS
Resistance to Surface Wear 10 Wear Resistance Revolutions (min.) Initial point 150
Wear value 350
Resistance to Impact by 21 Drop mm (min.) Large Diameter Ball c)
Height 2 ≤ t < 6 1400
6 ≤ t 1800
(t = nominal thickness) Resistance to Scratching d)
25 Force Rating (min.) Textured finish 3 = 2N
actual ≥ 4.5
Resistance to Dry Heat (180°C) 16 Appearance Rating (min.) Textured finish 4
Resistance to Wet Heat (100°C) EN12721 Appearance Rating (min.) Textured finish 4
Resistance to Immersion in Boiling Water 12 Mass increase % (max.)
Thickness 2 mm ≤ t < 5 mm 5.0
Increase t ≥ 5 mm 2.0
Appearance % (max.)
2 mm ≤ t < 5 mm 6.0
t ≥ 5 mm 2.0
(t = nominal thickness)
Rating (min.)
Textured finish 4
Resistance to Moisture ISO 2924.1:1998 Appearance 4
26
3 Issued September 2013
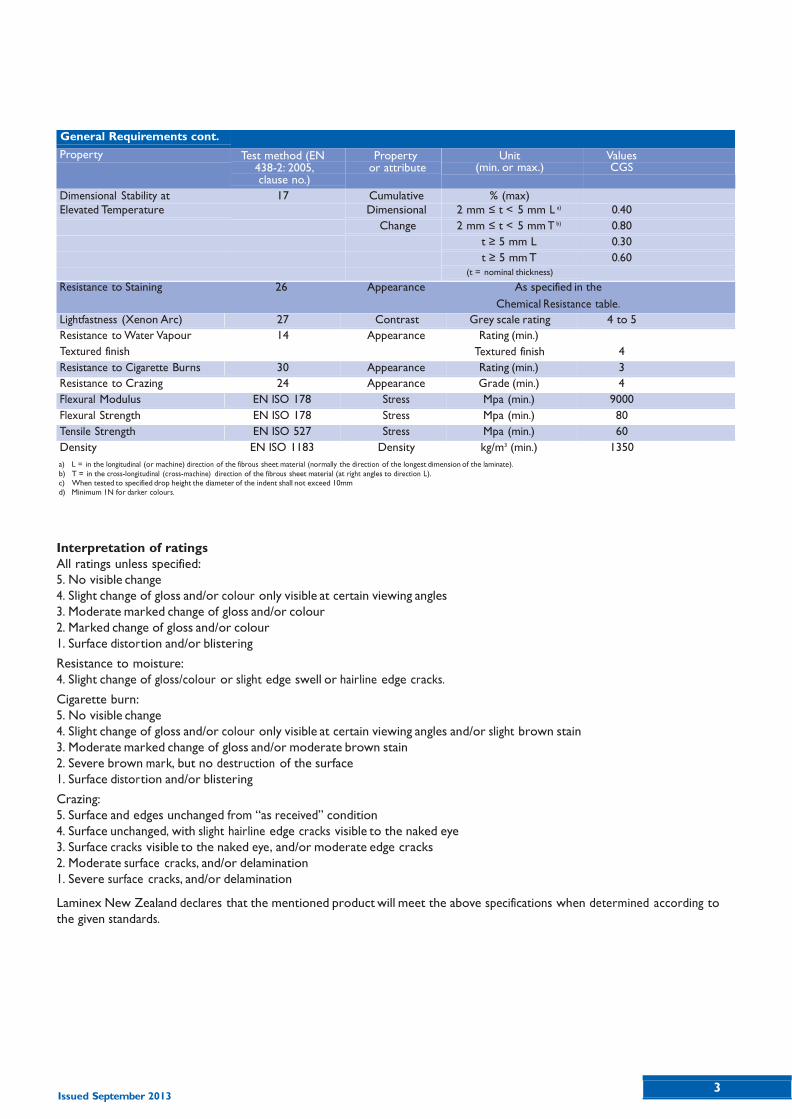
General Requirements cont. Property Test method (EN
438-2: 2005, clause no.)
Property or attribute
Unit (min. or max.)
Values CGS
Dimensional Stability at 17 Cumulative % (max) Elevated Temperature Dimensional 2 mm ≤ t < 5 mm L a)
0.40
Change 2 mm ≤ t < 5 mm T b) 0.80
t ≥ 5 mm L 0.30
t ≥ 5 mm T 0.60
(t = nominal thickness) Resistance to Staining 26 Appearance As specified in the
Chemical Resistance table.
Lightfastness (Xenon Arc) 27 Contrast Grey scale rating 4 to 5
Resistance to Water Vapour
Textured finish
14 Appearance Rating (min.)
Textured finish
4
Resistance to Cigarette Burns 30 Appearance Rating (min.) 3
Resistance to Crazing 24 Appearance Grade (min.) 4
Flexural Modulus EN ISO 178 Stress Mpa (min.) 9000
Flexural Strength EN ISO 178 Stress Mpa (min.) 80
Tensile Strength EN ISO 527 Stress Mpa (min.) 60
Density EN ISO 1183 Density kg/m3 (min.) 1350
a) L = in the longitudinal (or machine) direction of the fibrous sheet material (normally the direction of the longest dimension of the laminate).
b) T = in the cross-longitudinal (cross-machine) direction of the fibrous sheet material (at right angles to direction L).
c) When tested to specified drop height the diameter of the indent shall not exceed 10mm
d) Minimum 1N for darker colours.
Interpretation of ratings
All ratings unless specified:
5. No visible change
4. Slight change of gloss and/or colour only visible at certain viewing angles
3. Moderate marked change of gloss and/or colour
2. Marked change of gloss and/or colour
1. Surface distor tion and/or blistering
Resistance to moisture:
4. Slight change of gloss/colour or slight edge swell or hairline edge cracks.
Cigarette burn:
5. No visible change
4. Slight change of gloss and/or colour only visible at certain viewing angles and/or slight brown stain
3. Moderate marked change of gloss and/or moderate brown stain
2. Severe brown mark, but no destruction of the surface
1. Surface distor tion and/or blistering
Crazing:
5. Surface and edges unchanged from “as received” condition
4. Surface unchanged, with slight hairline edge cracks visible to the naked eye
3. Surface cracks visible to the naked eye, and/or moderate edge cracks
2. Moderate surface cracks, and/or delamination
1. Severe surface cracks, and/or delamination
Laminex New Zealand declares that the mentioned product will meet the above specifications when determined according to
the given standards.
Issued September 2013
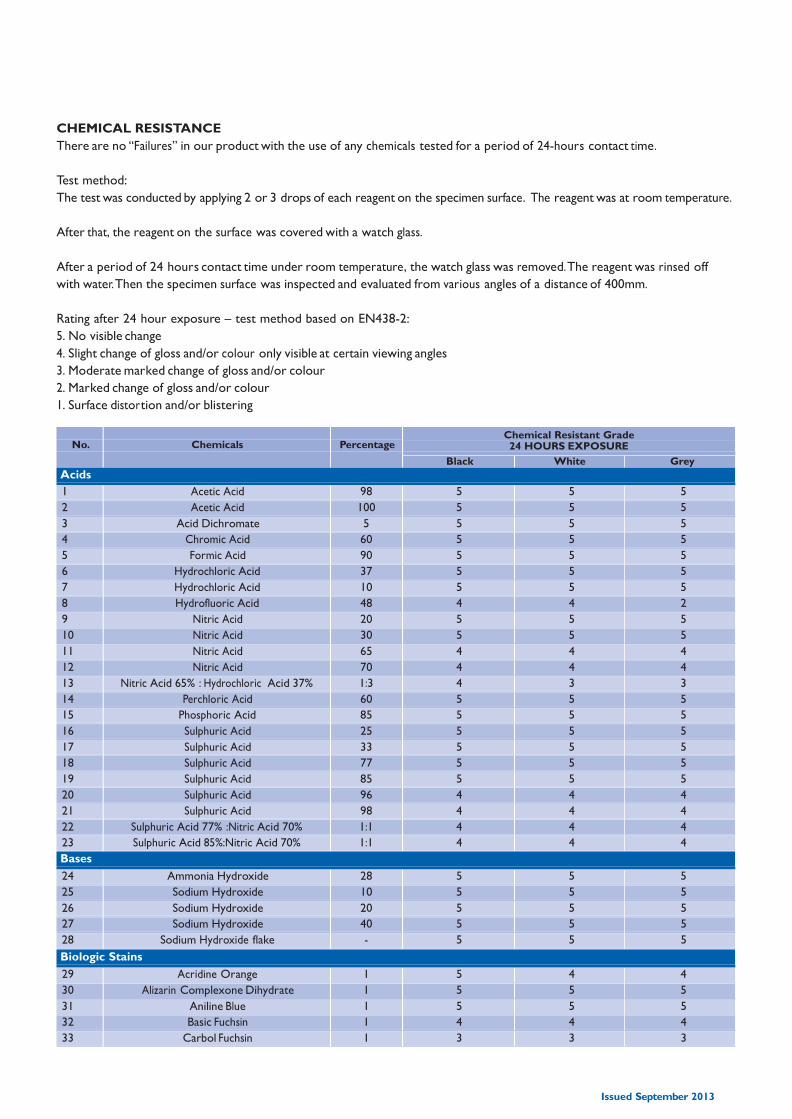
CHEMICAL RESISTANCE
There are no “Failures” in our product with the use of any chemicals tested for a period of 24-hours contact time.
Test method:
The test was conducted by applying 2 or 3 drops of each reagent on the specimen surface. The reagent was at room temperature.
After that, the reagent on the surface was covered with a watch glass.
After a period of 24 hours contact time under room temperature, the watch glass was removed. The reagent was rinsed off
with water. Then the specimen surface was inspected and evaluated from various angles of a distance of 400mm.
Rating after 24 hour exposure – test method based on EN438-2:
5. No visible change
4. Slight change of gloss and/or colour only visible at certain viewing angles
3. Moderate marked change of gloss and/or colour
2. Marked change of gloss and/or colour
1. Surface distor tion and/or blistering
No.
Chemicals
Percentage Chemical Resistant Grade 24 HOURS EXPOSURE
Black White Grey
Acids
1 Acetic Acid 98 5 5 5
2 Acetic Acid 100 5 5 5
3 Acid Dichromate 5 5 5 5
4 Chromic Acid 60 5 5 5
5 Formic Acid 90 5 5 5
6 Hydrochloric Acid 37 5 5 5
7 Hydrochloric Acid 10 5 5 5
8 Hydrofluoric Acid 48 4 4 2
9 Nitric Acid 20 5 5 5
10 Nitric Acid 30 5 5 5
11 Nitric Acid 65 4 4 4
12 Nitric Acid 70 4 4 4
13 Nitric Acid 65% : Hydrochloric Acid 37% 1:3 4 3 3
14 Perchloric Acid 60 5 5 5
15 Phosphoric Acid 85 5 5 5
16 Sulphuric Acid 25 5 5 5
17 Sulphuric Acid 33 5 5 5
18 Sulphuric Acid 77 5 5 5
19 Sulphuric Acid 85 5 5 5
20 Sulphuric Acid 96 4 4 4
21 Sulphuric Acid 98 4 4 4
22 Sulphuric Acid 77% :Nitric Acid 70% 1:1 4 4 4
23 Sulphuric Acid 85%:Nitric Acid 70% 1:1 4 4 4
Bases
24 Ammonia Hydroxide 28 5 5 5
25 Sodium Hydroxide 10 5 5 5
26 Sodium Hydroxide 20 5 5 5
27 Sodium Hydroxide 40 5 5 5
28 Sodium Hydroxide flake - 5 5 5
Biologic Stains
29 Acridine Orange 1 5 4 4
30 Alizarin Complexone Dihydrate 1 5 5 5
31 Aniline Blue 1 5 5 5
32 Basic Fuchsin 1 4 4 4
33 Carbol Fuchsin 1 3 3 3
Issued September 2013
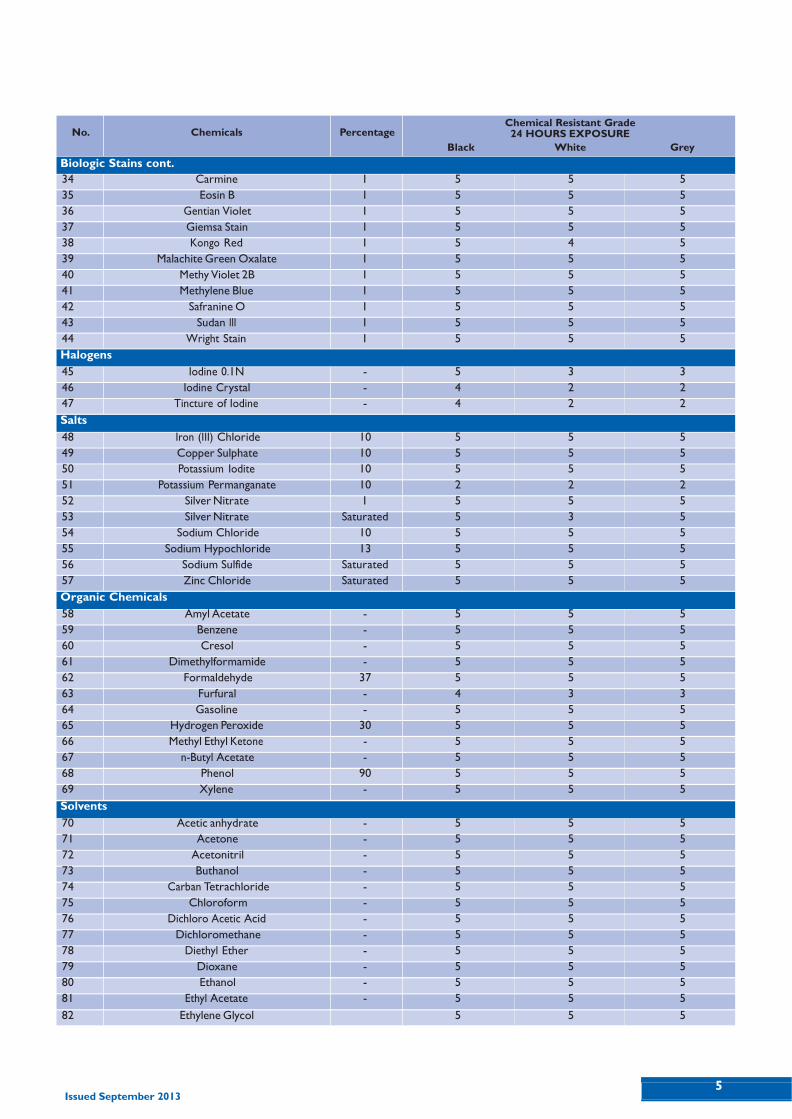
No.
Biologic Stains cont.
Chemicals
Percentage
Chemical Resistant Grade 24 HOURS EXPOSURE
Black White Grey
34 Carmine 1 5 5 5
35 Eosin B 1 5 5 5
36 Gentian Violet 1 5 5 5
37 Giemsa Stain 1 5 5 5
38 Kongo Red 1 5 4 5
39 Malachite Green Oxalate 1 5 5 5
40 Methy Violet 2B 1 5 5 5
41 Methylene Blue 1 5 5 5
42 Safranine O 1 5 5 5
43 Sudan III 1 5 5 5
44 Wright Stain 1 5 5 5
Halogens
45 Iodine 0.1N - 5 3 3
46 Iodine Cr ystal - 4 2 2
47 Tincture of Iodine - 4 2 2
Salts
48 Iron (III) Chloride 10 5 5 5
49 Copper Sulphate 10 5 5 5
50 Potassium Iodite 10 5 5 5
51 Potassium Permanganate 10 2 2 2
52 Silver Nitrate 1 5 5 5
53 Silver Nitrate Saturated 5 3 5
54 Sodium Chloride 10 5 5 5
55 Sodium Hypochloride 13 5 5 5
56 Sodium Sulfide Saturated 5 5 5
57 Zinc Chloride Saturated 5 5 5
Organic Chemicals
58 Amyl Acetate - 5 5 5
59 Benzene - 5 5 5
60 Cresol - 5 5 5
61 Dimethylformamide - 5 5 5
62 Formaldehyde 37 5 5 5
63 Furfural - 4 3 3
64 Gasoline - 5 5 5
65 Hydrogen Peroxide 30 5 5 5
66 Methyl Ethyl Ketone - 5 5 5
67 n-Butyl Acetate - 5 5 5
68 Phenol 90 5 5 5
69 Xylene - 5 5 5
Solvents
70 Acetic anhydrate - 5 5 5
71 Acetone - 5 5 5
72 Acetonitril - 5 5 5
73 Buthanol - 5 5 5
74 Carban Tetrachloride - 5 5 5
75 Chloroform - 5 5 5
76 Dichloro Acetic Acid - 5 5 5
77 Dichloromethane - 5 5 5
78 Diethyl Ether - 5 5 5
79 Dioxane - 5 5 5
80 Ethanol - 5 5 5
81 Ethyl Acetate - 5 5 5
82 Ethylene Glycol 5 5 5
5

Issued September 2013
No.
Chemicals
Percentage
Chemical Resistant Grade 24 HOURS EXPOSURE
Black White Grey
Solvents cont.
83 Hexane - 5 5 5
84 Methanol - 5 5 5
85 Methyl Chloride - 5 5 5
86 Methylisobutylketone - 5 5 5
87 Mono Chlorobenzene - 5 5 5
88 Naphthalene - 5 5 5
89 Tetrahydrofuran - 5 5 5
90 Toluene - 5 5 5
91 Trichloroethylene - 5 5 5
Rating after 24 hour exposure – test method based on EN438-2:
5. No Effect : No visible change of colour / corrosion / damage on surface.
4. Excellent : Very slight change of colour, only visible at certain viewing angles.
3. Good : Slight change of colour of surface.
2. Fair : Moderate change of colour of surface.
1. Failure : Corrosion / damage on surface.
The results of the chemical tests in the char t above were based on the lowest result achieved for three different Laminex
Laboratory Compact Laminate proper ties. The individual exceptions to the results are as below:
Item Group % Night Shadow Ashen Vapour
a Hydroflouric Acid 48 Excellent Fair Excellent
b Nitric Acid 65% : Hydrochloric Acid 37% 1:3 Excellent Good Good
c Acridine Orange 1 No Effect No effect Excellent
d Kongo Red 1 No Effect No effect Excellent
e Iodine 0.1 N - No Effect Good Good
f Iodine Cr ystal - Excellent Fair Fair
g Tincture of Iodine - Excellent Fair Fair
h Silver Nitrate Saturated No Effect No effect Good
i Futural - Excellent Good Good
WHEN SPECIFYING
Materials shall be Laminex
Laboratory Compact Laminate of
nominal thickness of .......... mm, as
supplied by Laminex New Zealand.
Colour shall be
.......................................................................
GENERAL KNOWLEDGE
a. As a compact panel is made of
approximately 70% kraft paper, it has
similar behaviour to wood. Therefore
Laminex Compact will be affected by
moisture. The effect of the surrounding
temperature will not affect the
expansion and contraction of the panels
but it will be influenced by the moisture
content within the environment.
Hence if the temperature and relative
humidity is high in the environment, it
will speed up the expansion process
and the opposite will cause
contraction in the panels.
Usually thinner panels will expand
faster than thicker panels as moisture
penetration is faster for thinner
panels in a high moisture content
environment.
Maximum expansion or contraction
of Compact Laminate panels is
approximately 2.5mm/m in length
and it is not dependable on the
panel thickness, hence always leave a
sufficient gap between the two
adjoining panels and near the edges
of the walls as shown below.
Wall Wall
Compact panel equilibrium condition is
usually at 25ºC with relative humidity
of approximately 50%.
b. When subjected to moisture, compact
panels will expand more in the cross
sectional direction than the longitudinal
direction. The ratio of expansion rate
is approximately 1:2. This means that
the cross sectional direction will
expand at about 2 times more than
the longitudinal direction.
c. Even though Laboratory Compact
has high chemical resistance, if there is
any chemical spillage on the surface,
clean it as soon as possible.
7 Issued September 2013
Any residual adhesive, paint and dyes
will need to be removed quickly to
avoid permanent staining of the surface.
Always use suitable type of solvent or
mild household cleaning liquid to
clean away these residues as required,
use a non-abrasive cloth to clean it.
Some reagents may become more
concentrated if allowed to evaporate
on the laminate surface, therefore it
is advisable to wash and rinse off all
spills as soon as possible.
d. Do not use strong acid or alkaline
cleaning agents, steel wool or abrasive
pads that may damage the surface.
e. Common alcohol based disinfectants
or acetone can be used to disinfect
the surface.
To prolong the life of the surface:
f. Avoid sliding sharp objects over the
surface as it can scratch.
g. Although the surface can resist 180ºC
dry heat temperature, it is not
advisable to leave prolonged high
temperature objects on the surface.
Always use insulated hot pads to put
the hot objects on it instead of
placing it directly onto the surface.
h. Do not chop, slice, pound or hammer
directly onto the Laboratory
Compact surface.
i. Do not allow burning cigarettes to
remain in contact with the laminate
surface.
SITE WORK NOTES
Safety First
In the event of any chemical spill on
Laminex Laboratory Compact Laminate,
first decide if you are trained,
knowledgeable and equipped to handle
the incident. Immediately evacuate the lab
and notify your supervisor if there is
possibility of an acute respiratory hazard
present or
if you need assistance to clean up the spill.
Never attempt to clean up the spill if you
do not know the hazards associated with
the chemical or if you are unsure of the
correct clean up procedure. Most
chemical spills will not cause
discolouration or leave marks on the
Laminex Laboratory Compact Laminate
surface if cleaned within 24 hours.
Fabrication
Laminex Laboratory Compact Laminate
can be cut, drilled and machined with
standard woodworking equipment fitted
with tungsten carbide edges.
Select brackets, hinges screws and
fastening equipment etc. to suit the
environment of the installation. Higher
corrosive atmospheres such as salty and
chlorine environments may be more
corrosive than inland dryer climates.
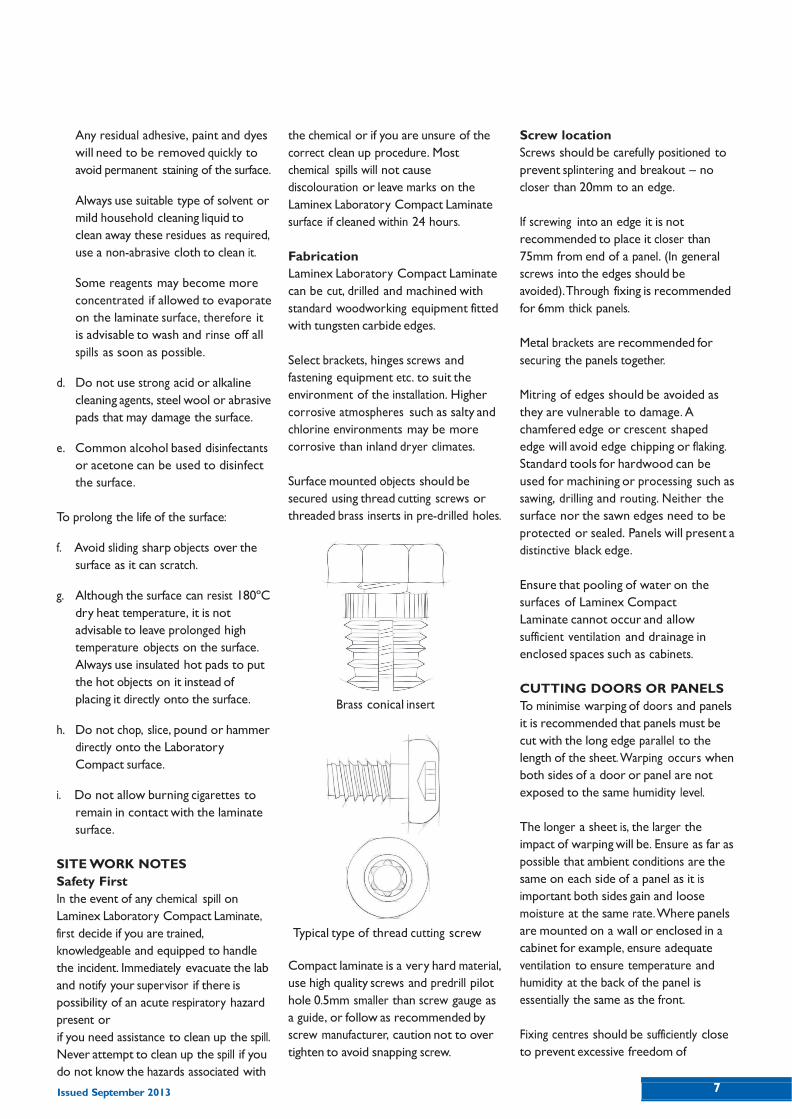
Surface mounted objects should be
secured using thread cutting screws or
threaded brass inserts in pre-drilled holes.
Brass conical insert Typical type of thread cutting screw
Compact laminate is a very hard material,
use high quality screws and predrill pilot
hole 0.5mm smaller than screw gauge as
a guide, or follow as recommended by
screw manufacturer, caution not to over
tighten to avoid snapping screw.
Screw location
Screws should be carefully positioned to
prevent splintering and breakout – no
closer than 20mm to an edge.
If screwing into an edge it is not
recommended to place it closer than
75mm from end of a panel. (In general
screws into the edges should be
avoided).Through fixing is recommended
for 6mm thick panels.
Metal brackets are recommended for
securing the panels together.
Mitring of edges should be avoided as
they are vulnerable to damage. A
chamfered edge or crescent shaped
edge will avoid edge chipping or flaking.
Standard tools for hardwood can be
used for machining or processing such as
sawing, drilling and routing. Neither the
surface nor the sawn edges need to be
protected or sealed. Panels will present a
distinctive black edge.
Ensure that pooling of water on the
surfaces of Laminex Compact
Laminate cannot occur and allow
sufficient ventilation and drainage in
enclosed spaces such as cabinets.
CUTTING DOORS OR PANELS
To minimise warping of doors and panels
it is recommended that panels must be
cut with the long edge parallel to the
length of the sheet. Warping occurs when
both sides of a door or panel are not
exposed to the same humidity level.
The longer a sheet is, the larger the
impact of warping will be. Ensure as far as
possible that ambient conditions are the
same on each side of a panel as it is
important both sides gain and loose
moisture at the same rate. Where panels
are mounted on a wall or enclosed in a
cabinet for example, ensure adequate
ventilation to ensure temperature and
humidity at the back of the panel is
essentially the same as the front.
Fixing centres should be sufficiently close
to prevent excessive freedom of
Issued September 2013
movement. Cubical doors for example
greater than 1500mm high should have 3
hinges as a minimum guide.
Note: An exception is when Laminex
Laboratory Compact Laminate is used for
sash doors. The panels have to be cut out
of the width of the basic sheets instead of
the length. If a sash door is cut out of the
length of a sheet the horizontal bow will
interfere with the sliding action of the
door. It is preferable to have a vertical bow
for this application and cutting out of the
width of the basic sheet is recommended.
If black core is scorched due to dull blades
or jamming when cutting, the edge can be
restored by taking a fine cut or sanding
back to restore the black edge.
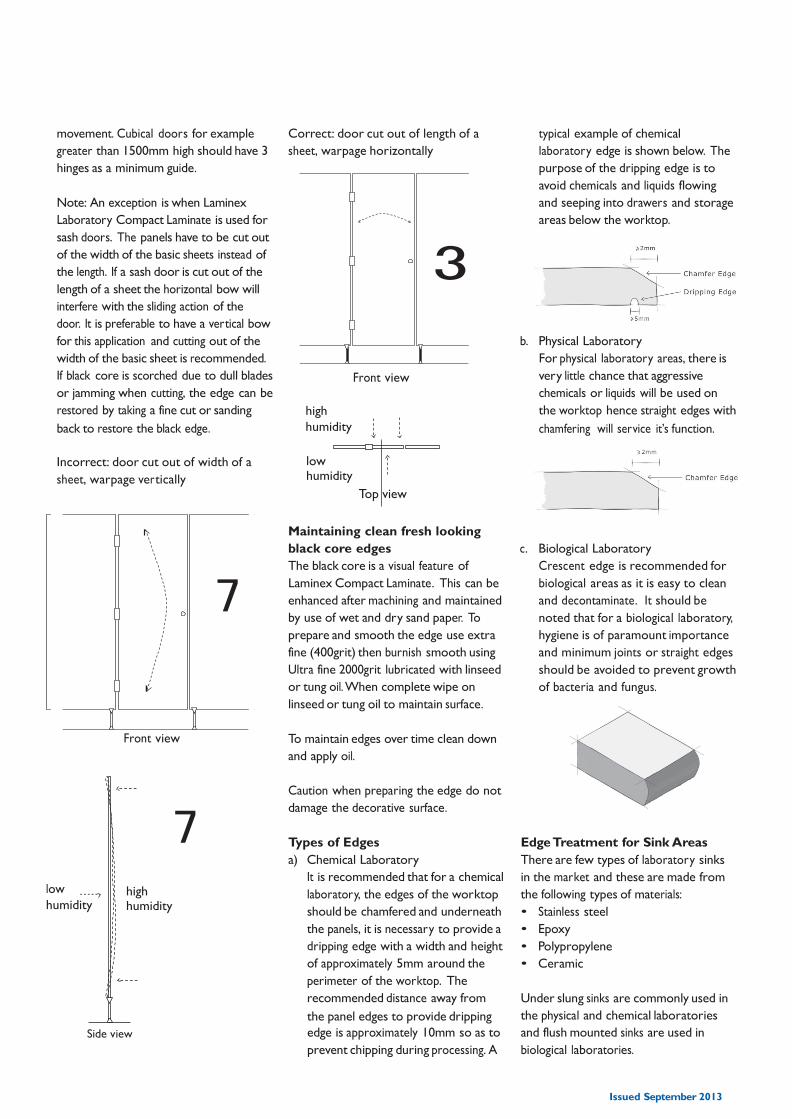
Correct: door cut out of length of a
sheet, warpage horizontally
3
Front view
high
humidity
typical example of chemical
laboratory edge is shown below. The
purpose of the dripping edge is to
avoid chemicals and liquids flowing
and seeping into drawers and storage
areas below the worktop.
b. Physical Laboratory
For physical laboratory areas, there is
very little chance that aggressive
chemicals or liquids will be used on
the worktop hence straight edges with
chamfering will service it’s function.
Incorrect: door cut out of width of a
sheet, warpage ver tically
low humidity
Top view
7
Front view
Maintaining clean fresh looking
black core edges
The black core is a visual feature of
Laminex Compact Laminate. This can be
enhanced after machining and maintained
by use of wet and dry sand paper. To
prepare and smooth the edge use extra
fine (400grit) then burnish smooth using
Ultra fine 2000grit lubricated with linseed
or tung oil. When complete wipe on
linseed or tung oil to maintain surface.
To maintain edges over time clean down
and apply oil.
c. Biological Laboratory
Crescent edge is recommended for
biological areas as it is easy to clean
and decontaminate. It should be
noted that for a biological laboratory,
hygiene is of paramount importance
and minimum joints or straight edges
should be avoided to prevent growth
of bacteria and fungus.
low
humidity
7 high humidity
Caution when preparing the edge do not
damage the decorative surface.
Types of Edges
a) Chemical Laboratory
It is recommended that for a chemical
laboratory, the edges of the worktop
should be chamfered and underneath
the panels, it is necessary to provide a
dripping edge with a width and height
of approximately 5mm around the
perimeter of the worktop. The
recommended distance away from
the panel edges to provide dripping
Edge Treatment for Sink Areas
There are few types of laboratory sinks
in the market and these are made from
the following types of materials:
• Stainless steel
• Epoxy
• Polypropylene
• Ceramic
Under slung sinks are commonly used in
the physical and chemical laboratories
Side view edge is approximately 10mm so as to
prevent chipping during processing. A
and flush mounted sinks are used in
biological laboratories.

9 Issued September 2013
For a chemical laboratory sink hole area,
it is advisable to provide a dripping edge
along the perimeter of the sink in order
to prevent liquid from seeping through
the joints as shown.
Since biological areas require a high level
of hygiene, it is recommended that flush
mounted sinks are installed onto rebated
joints on the worktop. Using flexible and
biological type sealant to seal the joints is
essential to avoid liquids and contaminants
building up around the areas.
Splashbacks
Splashbacks are required at the sink areas
to avoid liquids splashing onto other furniture
and to keep the surrounding area dry and
clean. There are a few methods for fixing the
splash back.
PROCESSING
Sawing
It is strongly recommended that all
sawing operations for Laminex
Compact should be done with a
stationery circular saw to achieve the
optimum finishing effect. Always use
some trial panels to test first before
actual operation. Always make sure
that the decorative surface is facing
upwards to prevent damage or
chipping of the edges on the surface.
A carbide or diamond tipped saw
blade should be used to saw the
panels.
The height setting of the saw blade
should be approximately 30-40mm
above the decorative surface. The
image below illustrates the correct
setting of the saw blade so as to avoid
chipping.
Entry rake angle of about 45º will
achieve straight sawn edges as shown
below.
The saw blade must always be sharp
and if necessary, remove it to sharpen
or change to a new one before
continuing the sawing operation.
All sharp sawn edges should be
removed with fine sand paper or
router to achieve a good and smooth
finishing effect.
Routering
Routering of edges require hard metal
or diamond cutter at slow speed to
achieve good finishing without burn
marks on the phenolic core surface.
This operation can be done with either a
CNC machine or manual operated
routering cutter. Depending on the type
of router shapes, the cutter bits below
can achieve the desired effect.
Types of Router Bits for Different
Types of Edge Finishing Edge Finishing Type of Bit
Bevelling Straight and Slanted
Rounded Hollow or Round Groove Diamond Groove
For CNC operation, please follow the
machine manufacturer instructions. For
manual operated routering, the table
below shows essential information for
the operation.
DRILLING
The most suitable drills used on
compact laminates are those designed
for plastic sheet materials. These drills
have a point angle of 60° - 80° instead
of the normal 120° for drilling metal.
To avoid breakout on the reverse side,
the feed speed of the drill head and the
pressure applied should be gradually
reduced approaching the point of
breakthrough. Working on a firm
underlay, such as plywood or chipboard,
will also reduce the risk of breakout.
Issued September 2013
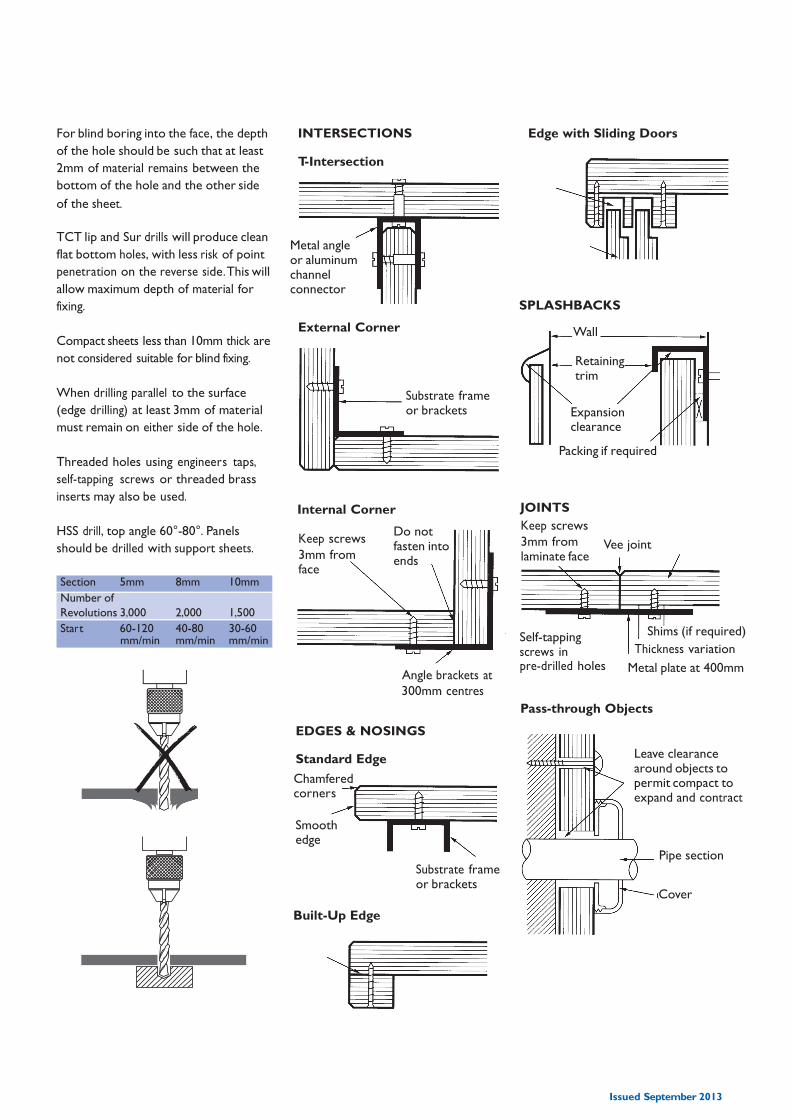
For blind boring into the face, the depth
of the hole should be such that at least
2mm of material remains between the
bottom of the hole and the other side
of the sheet.
INTERSECTIONS
T-Intersection
Edge with Sliding Doors
TCT lip and Sur drills will produce clean
flat bottom holes, with less risk of point
penetration on the reverse side. This will
allow maximum depth of material for
fixing.
Compact sheets less than 10mm thick are
not considered suitable for blind fixing.
When drilling parallel to the surface
(edge drilling) at least 3mm of material
must remain on either side of the hole.
Threaded holes using engineers taps,
self-tapping screws or threaded brass
inserts may also be used.
Metal angle or aluminum channel connector
External Corner
Internal Corner
Substrate frame or brackets
SPLASHBACKS
Wall
Retaining trim
Expansion clearance
Packing if required JOINTS
HSS drill, top angle 60°-80°. Panels
should be drilled with support sheets.
Section 5mm 8mm 10mm
Number of
Revolutions 3,000 2,000 1,500
Star t 60-120 40-80 30-60 mm/min mm/min mm/min
Keep screws
3mm from face
Do not fasten into ends
Keep screws
3mm from laminate face Self-tapping screws in
Vee joint
Shims (if required)
Thickness variation
Angle brackets at
300mm centres
pre-drilled holes Metal plate at 400mm
EDGES & NOSINGS
Standard Edge
Chamfered corners
Pass-through Objects
Leave clearance around objects to permit compact to expand and contract
Smooth edge
Built-Up Edge
Substrate frame or brackets
Pipe section
Cover
11 Issued September 2013
GLUING
1. Laminex Compact can be glued to
other types of materials with either
epoxy or polyurethane adhesives. Both
types of adhesives usage is
approximately 100-250 g/m3 with
applied pressure of at least 0.2 N/mm2
for about 4-8 hours at 20ºC to ensure
proper adhesion to the joining parts.
2. It is also advisable to use mechanical
fastening to provide sufficient press
pressure to the glued area to ensure
that both components are properly
intact after the adhesive is fully
cured, for this please refer to the
usage and instruction guidelines of
the glue manufacturer.
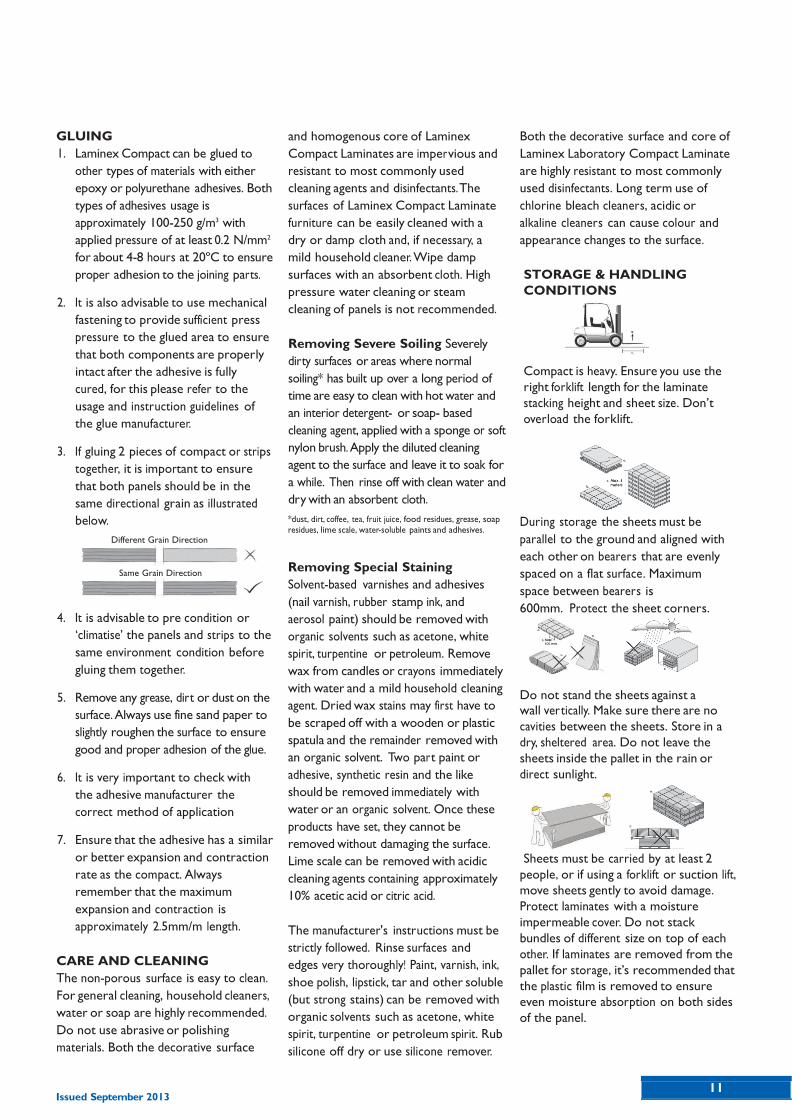
3. If gluing 2 pieces of compact or strips
together, it is important to ensure
that both panels should be in the
same directional grain as illustrated
below.
Different Grain Direction
Same Grain Direction
4. It is advisable to pre condition or
‘climatise’ the panels and strips to the
same environment condition before
gluing them together.
5. Remove any grease, dirt or dust on the
surface. Always use fine sand paper to
slightly roughen the surface to ensure
good and proper adhesion of the glue.
6. It is very important to check with
the adhesive manufacturer the
correct method of application
7. Ensure that the adhesive has a similar
or better expansion and contraction
rate as the compact. Always
remember that the maximum
expansion and contraction is
approximately 2.5mm/m length.
CARE AND CLEANING
The non-porous surface is easy to clean.
For general cleaning, household cleaners,
water or soap are highly recommended.
Do not use abrasive or polishing
materials. Both the decorative surface
and homogenous core of Laminex
Compact Laminates are imper vious and
resistant to most commonly used
cleaning agents and disinfectants. The
surfaces of Laminex Compact Laminate
furniture can be easily cleaned with a
dry or damp cloth and, if necessary, a
mild household cleaner. Wipe damp
surfaces with an absorbent cloth. High
pressure water cleaning or steam
cleaning of panels is not recommended.
Removing Severe Soiling Severely
dirty surfaces or areas where normal
soiling* has built up over a long period of
time are easy to clean with hot water and
an interior detergent- or soap- based
cleaning agent, applied with a sponge or soft
nylon brush. Apply the diluted cleaning
agent to the surface and leave it to soak for
a while. Then rinse off with clean water and
dry with an absorbent cloth.
*dust, dirt, coffee, tea, fruit juice, food residues, grease, soap
residues, lime scale, water-soluble paints and adhesives.
Removing Special Staining
Solvent-based varnishes and adhesives
(nail varnish, rubber stamp ink, and
aerosol paint) should be removed with
organic solvents such as acetone, white
spirit, turpentine or petroleum. Remove
wax from candles or crayons immediately
with water and a mild household cleaning
agent. Dried wax stains may first have to
be scraped off with a wooden or plastic
spatula and the remainder removed with
an organic solvent. Two par t paint or
adhesive, synthetic resin and the like
should be removed immediately with
water or an organic solvent. Once these
products have set, they cannot be
removed without damaging the surface.
Lime scale can be removed with acidic
cleaning agents containing approximately
10% acetic acid or citric acid.
The manufacturer's instructions must be
strictly followed. Rinse surfaces and
edges very thoroughly! Paint, varnish, ink,
shoe polish, lipstick, tar and other soluble
(but strong stains) can be removed with
organic solvents such as acetone, white
spirit, turpentine or petroleum spirit. Rub
silicone off dry or use silicone remover.
Both the decorative surface and core of
Laminex Laboratory Compact Laminate
are highly resistant to most commonly
used disinfectants. Long term use of
chlorine bleach cleaners, acidic or
alkaline cleaners can cause colour and
appearance changes to the surface.
STORAGE & HANDLING
CONDITIONS
Compact is heavy. Ensure you use the
right forklift length for the laminate
stacking height and sheet size. Don’t
overload the forklift.
During storage the sheets must be
parallel to the ground and aligned with
each other on bearers that are evenly
spaced on a flat surface. Maximum
space between bearers is
600mm. Protect the sheet corners.
Do not stand the sheets against a
wall ver tically. Make sure there are no
cavities between the sheets. Store in a
dry, sheltered area. Do not leave the
sheets inside the pallet in the rain or
direct sunlight.
Sheets must be carried by at least 2
people, or if using a forklift or suction lift,
move sheets gently to avoid damage.
Protect laminates with a moisture
impermeable cover. Do not stack
bundles of different size on top of each
other. If laminates are removed from the
pallet for storage, it’s recommended that
the plastic film is removed to ensure
even moisture absorption on both sides
of the panel.