lagoon requirements - miami county, ks
TRANSCRIPT

Miami County, Kansas Code Services Department
Building Inspection ● Environmental Health Code Enforcement ● Sewer District Operations 201 S Pearl Street ● Paola, Kansas 66071-1777
Phone: 913-294-4145 ● Fax: 913-294-9545 www.miamicountyks.org
“This institution is an equal opportunity provider and employer.”
LAGOON REQUIREMENTS
SET-BACK DISTANCES: 100 FEET FROM A PROPERTY LINE
25 FEET FROM A PRIVATE WATER LINE
50 FEET FROM A PUBLIC WATER MAIN
50 FEET FROM A HABITABLE BUILDING
25 FEET FROM AN UNINHABITABLE BUILDING
50 FEET FROM A CISTERN
100 FEET FROM WATER WELLS, PONDS, CREEKS, ETC.
ALL SET-BACK DISTANCES ARE MEASURED FROM THE FIVE-FOOT WATER LEVEL OF THE
FINISHED LAGOON.
A TWO-COMPARTMENT SEPTIC TANK MUST PRECEDE THE LAGOON.
AN APPROVED FENCE MUST BE INSTALLED THAT MEETS THE ATTACHED GUIDELINES –
MUST BE AT LEAST 4 FEET TALL AND HAVE A GATE AT LEAST OUR (4) FEET WIDE TO
ACCOMMODATE THE ENTRANCE OF A MOWER. THE FENCE SHOULD BE LOCATED AT
LEAST THREE FEET OUTSIDE THE EMBANKMENT TOE.
ROOF DRAINS MAY BE DISCHARGED TO THE LAGOON AS LONG AS AN APPROVED
CONTROL ARRANGEMENT IS PROVIDED TO READILY FACILITATE A DIVERSION FROM
THE SEWER SYSTEM.
A FINAL OCCUPANCY PERMIT WILL NOT BE ISSUED UNTIL THE FENCE HAS BEEN INSTALLED. A
TEMPORARY OCCUPANCY PERMIT CAN BE ISSUED IF AT LEAST $1,000.00 IS PLACED IN AN
ESCROW ACCOUNT AND SPECIFIED FOR COMPLETION OF THE FENCE

Two types of onsite wastewater treatment
systems are in general use in Kansas, septic tank-
soil absorption systems and wastewater
stabilization lagoons. Where soil is sandy or
loamy, the septic tank-soil absorption system is the
best choice. Where soil is clayey with poor
drainage and space is available, lagoons are often
the best alternative for treatment and disposal.
A wastewater stabilization lagoon is among the
least expensive onsite treatment options, and
maintenance is not excessive. A lagoon should be
the first consideration for wastewater systems
where soils have severe limitations for soil
absorption systems but are well suited for lagoon
construction and enough area is available to meet
separation distance requirements.
When soil, site conditions, or closely spaced
homes make a typical soil absorption system or
lagoon unsuitable, enhanced treatment methods
such as sand or media filter, rock-plant filter,
mound, aerated tank, or other method should be
considered. Surface discharge for individual
homes or other establishments is not legal in
Kansas.
A wastewater stabilization lagoon is a small
fenced water body with a 3 to 5 foot liquid depth
that receives septic tank effluent. The lagoon size
is determined by the number of occupants, size of
home, the amount of wastewater, evaporation, and
soil. Effluent enters the pond by a pipe below the
surface but above the bottom, near the center of the
lagoon. Lagoons must be nondischarging, meaning
no overflow. Water is disposed of by percolation
and evaporation.
How Wastewater Stabilization Lagoons Work
A wastewater stabilization lagoon is a nutrient
enriched complex ecosystem. Bacteria and other
microorganisms consume oxygen as they feed on
sewage components and give off carbon dioxide
used by algae. Unlike other ponds, a lagoon’s
water should be green, because microscopic plants
(algae) produce much of the needed oxygen.
Oxygen also enters as air blows across the water
surface. Wastes are broken down
by microorganisms into water, gasses, and residual
solids, which settle and accumulate in the pond.
Properly sized, carefully-constructed, well-
operated, and routinely maintained lagoons have
no offensive odor.
Although odor from a good lagoon is rare, when
it occurs, it is usually because the natural
biological system is upset. Upsets can be caused
by chemicals that disrupt the natural system,
organic overload from highly concentrated or too
much waste, or accumulation of too much sludge.
Extended cloudy weather and spring or fall
turnover also may contribute to temporary odor.
All trees should be at least 30 feet and shrubs 15
feet outside of the embankment. Because sunlight
is essential for algae to produce oxygen, the east,
south and west sides of the pond should not be
shaded. Vegetation no taller than a 22 degree
angle (2 2/3: 2 slope) from the berm is
recommended, see figure 1. The minimum setback
distance (d) in feet from the berm to plants, trees or
shrubs that reaches a height of (h) in feet is given
by the formula d= 2 ½ x h. For example, a screen
of lilac bushes will reach 12 feet tall so they should
not be planted closer than 2 ½ x 12 or 30 feet from
the berm.
Tree leaves, plant debris, or wildlife in or near
the lagoon will contribute to sludge accumulation,
which may require sludge removal after 12 years or
more.
Wastewater Stabilization Lagoon Location
A lagoon is best located down slope and away
from the establishment so the sewer line to the
lagoon flows by gravity at the correct slope. When
choosing the site, nuisance conditions, which could
result from odors or accidental discharge should be
considered. Odors would least likely affect the
owner when a pond is located northeast or east of
the house.
WASTEWATER STABILIZATION LAGOON DESIGN
AND CONSTRUCTION
Select an inconspicuous place 50 feet or more
from the house, 100 feet from property lines, 100
feet from any surface water or well, 25 feet away
from private water lines, out of the 100-year flood
plain, and away from easements or rights-of-way.
A site plan showing all physical features, surface
and buried, and contour elevations will help to
locate and design a lagoon. The bottom of the
lagoon should be at least 4 feet above the highest
groundwater level.
The top of the lagoon embankment shall be
below the outlet of the septic tank. This will avoid
any drain back from the lagoon to the tank if the
lagoon is at full capacity. If this is not possible or
the lagoon is located upgrade of the establishment,
a pump chamber and pump must be used.
Wastewater Stabilization Lagoon Appearance
Some people don’t want a lagoon because it is
visible. Lagoons need not be ugly, nevertheless
many are. A well designed, constructed, and
landscaped lagoon can be pleasing in appearance
and inconspicuous. Maintenance of the lagoon
and fence are essential to keep them attractive.
Hints to make a lagoon more attractive include:
Locate the lagoon to blend in with existing
topography and landscape. Do not place in the
center of a large open meadow.
Where possible, dig the lagoon into ground (if
clearance to groundwater allows) with low
berms to prevent surface inflow rather than
making it shallow with high berms.
Use trees, shrubs, and landscaping berms in
line-of-sight or to draw attention away from the
lagoon.
Use round, oval, or other shaped lagoons rather
than square.
Incorporate wood or other natural material in
the fence or use colored fencing so lagoon is
less visible.
Size of Wastewater Stabilization Lagoon
Size and design of the lagoon involve several
considerations. The water surface area must be
large enough to provide adequate oxygen to keep
the lagoon aerobic.
Kansas law prohibits discharge from private
lagoons, so they must hold all wastewater. Losses
are through leakage or seepage (maximum of ¼
inch per day) and evaporation. Maximum losses
total 10 feet or less in eastern Kansas per year.
A 5-foot water depth with 2 feet of freeboard is
ideal for easy maintenance of vegetation between
the water level and top of embankment. The
minimum depth to prevent rooted aquatic growth
in the pond and exposure of the inlet pipe is 3 feet.
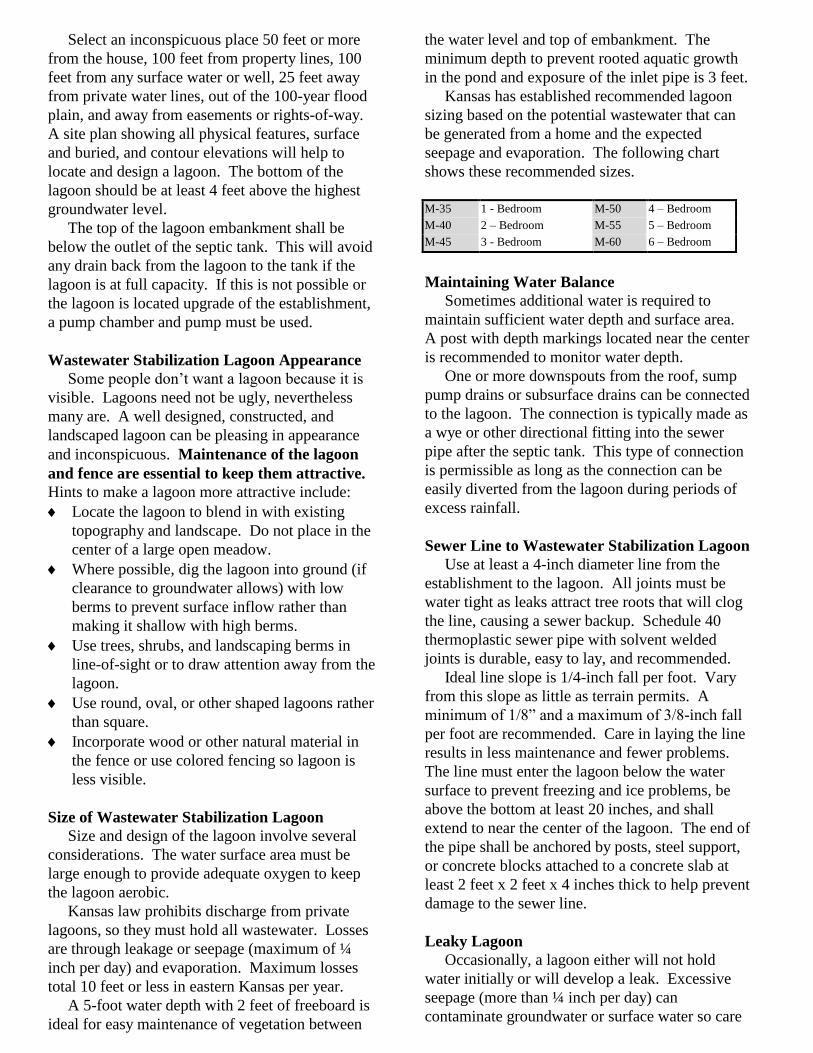
Kansas has established recommended lagoon
sizing based on the potential wastewater that can
be generated from a home and the expected
seepage and evaporation. The following chart
shows these recommended sizes.
M-35 1 - Bedroom M-50 4 – Bedroom
M-40 2 – Bedroom M-55 5 – Bedroom
M-45 3 - Bedroom M-60 6 – Bedroom
Maintaining Water Balance
Sometimes additional water is required to
maintain sufficient water depth and surface area.
A post with depth markings located near the center
is recommended to monitor water depth.
One or more downspouts from the roof, sump
pump drains or subsurface drains can be connected
to the lagoon. The connection is typically made as
a wye or other directional fitting into the sewer
pipe after the septic tank. This type of connection
is permissible as long as the connection can be
easily diverted from the lagoon during periods of
excess rainfall.
Sewer Line to Wastewater Stabilization Lagoon
Use at least a 4-inch diameter line from the
establishment to the lagoon. All joints must be
water tight as leaks attract tree roots that will clog
the line, causing a sewer backup. Schedule 40
thermoplastic sewer pipe with solvent welded
joints is durable, easy to lay, and recommended.
Ideal line slope is 1/4-inch fall per foot. Vary
from this slope as little as terrain permits. A
minimum of 1/8” and a maximum of 3/8-inch fall
per foot are recommended. Care in laying the line
results in less maintenance and fewer problems.
The line must enter the lagoon below the water
surface to prevent freezing and ice problems, be
above the bottom at least 20 inches, and shall
extend to near the center of the lagoon. The end of
the pipe shall be anchored by posts, steel support,
or concrete blocks attached to a concrete slab at
least 2 feet x 2 feet x 4 inches thick to help prevent
damage to the sewer line.
Leaky Lagoon
Occasionally, a lagoon either will not hold
water initially or will develop a leak. Excessive
seepage (more than ¼ inch per day) can
contaminate groundwater or surface water so care

in construction is essential. Materials that can be
used to seal the bottom and sides of leaking ponds
include bentonite clay, treatment additives for
native clay or membrane lining.
Recommendations for using these materials may be
obtained from county Extension office or Natural
Resource Conservation Service.
Large House with few People
The most difficult problem for wastewater
stabilization lagoon sizing is a large house (several
bedrooms) with only a few occupants. Design
practice for individual wastewater systems is based
on two people per bedroom and assumes flows of
75 gallons per person (150 gallons per bedroom)
per day. Excess unused capacity is no problem for
a conventional soil absorption system. However,
low flow into a lagoon causes shallow depth rooted
vegetation, habitat for vectors that can transmit
disease, poor operation, and often odor problems.
Options that help remedy these problems include:
1. Use a two-cell lagoon with the first cell sized
for the minimum number of occupants and the
two cells together for the full size of the home.
Use an over flow pipe that maintains at least
three feet of water in the first cell before over
flowing to the second cell. Ideally, water
should rise to at least 4 ½ feet deep and then be
drawn down to no less than three feet. This
balances water in the two cells. Both cells must
be fenced.
2. Size a cell for the minimum number of
occupants with an over flow pipe at the 5 feet
depth. Construct a second shallow (maximum
3 feet deep) wetland cell to receive the over
flow. Select plants that do not have seed easily
transported by wind or birds. Fence both cells.
3. Size the lagoon for the number of bedrooms
but dig the bottom deeper so the bottom is the
same size as a lagoon for only a few people.
Use of a Septic Tank
A two-compartment septic tank must precede
the lagoon. Septic tank use reduces organic
strength by 40 percent; reduces solids load, which
allows a small diameter effluent line, and effluent
pump; allows greater variability in sewer grade and
greater flexibility for placement; reduces likelihood
of odors; and reduces sludge accumulation in the
pond.
Constructing A Wastewater Stabilization
Lagoon System
A small bulldozer or front loader is ideal for
building a lagoon. Make side slopes no steeper
above the normal depth and a minimum berm top
width of 5 feet. Divert surface water from the
lagoon with the embankment or a diversion on the
upslope side. Finish the berm to a uniform surface
above the water line for ease in mowing.
Many soils have a topsoil layer that is more
permeable than the high clay subsoil. When
constructing a lagoon the permeable (topsoil) layer
must be stripped from the surface and embankment
base before excavating the bottom and forming the
embankment. Compact undisturbed sides in place.
Embankment fill should be compacted in layers no
more than 6 inches thick. When rock is
encountered during excavation, the hole must be
over excavated by at least 1 foot to remove rock,
then fill and compact with at least 1 foot of clay
material.
Compaction has a wide range of meanings
depending on viewpoint. A minimum is to
consolidate and fill large openings by running over
the fill with construction machinery. The best
method is to compact moist 6-inch fill layers,
sides, and bottom, with a sheep’s foot roller until it
walks out (compacts enough that spikes no longer
penetrate).
Moisture content has more effect on compaction
than the type of machinery used.
When the soil is muddy, it is too wet to compact
well. The best condition is when the soil is moist
enough to easily work into a ball. The more the
soil is manipulated at this moisture condition the
more voids will be worked out of it and the less
permeable it will be. Careful compaction is
important for soil that is borderline for wastewater
ponds.
Finally after the embankment berms are
complete, replace the topsoil over the outside, top
and upper few feet of the inside of the
embankment. Seed the embankment to perennial
grass and apply and anchor a straw cover or
erosion blanket for soil protection.
The sewer line trench bottom should be on
undisturbed soil and free of rocks that could break
the line. Back fill and compact around the sides
and over the pipe until 2 inches of fill cover the
pipe. Compact the remainder of the trench fill in
6-inch layers. Finally mound over the trench about
6 inches to allow for settling of the trench fill.

Wastewater Stabilization Lagoon plan, dimensions and cross-section
* Other shapes may be used but length should not exceed twice the width. Also surface area square footage and volume requirements must be met.
SQUARE Area
Square Foot
(5’ depth)
Volume
5 foot
Depth
RETANGULAR
7 Foot
depth
Bottom 5 Foot
depth
Slope 7 Foot
Depth
Bottom
5 Foot
Depth
M-35 47’ 5’ 35’ 3:1 1,225 18,000
M-40 52’ 10’ 40’ 3:1 1,600 26,000
M-45 59’ 10’ 45’ 3.5:1 2,025 32,000 69’ X 51’ 8’ X 25’ 55’ X 37’
M-50 64’ 15’ 50’ 3.5:1 2,500 43,000 85’ X 49’ 5’ X 41’ 71’ X 35’
M-55 69’ 20’ 55’ 3.5:1 3,025 56,000 92’ X 53’ 9’ X 48’ 78’ X 39’
M-60 74’ 25’ 60’ 3.5:1 3,600 71,000 100’ X 56’ 12’ X 56’ 86’ X 42’
ROUND
7 Foot
Depth
Bottom
Diameter
5’ Depth
Diameter
Slope Area
Square
Foot
Volume
5’ Depth
M-45 63’ 14’ 49’ 3.5:1 1,886 32,100
M-50 68’ 19’ 54’ 3.5:1 2,290 42,100
M-55 74’ 25’ 60’ 3.5:1 2,827 56,100
M-60 79’ 30’ 65’ 3.5:1 3,318 72,100

WASTEWATER STABILIZATION LAGOON FENCE
Drowning is the second leading cause of accidental death of children. Fencing of wastewater
lagoon is essential to protect children, pets, and other animals. These lagoons contain sewage
that can easily spread disease and when unfenced they are a health hazard and a liability. State
standards and county codes require that lagoons be fenced.
Requirements for all Fencing Materials
The fence shall be located at least three feet outside the embankment toe. Here it makes
mowing the embankment easier and looks more pleasing. (See detail sheet for fencing
placement) A large, (at least 4 feet wide), rigidframed, hinged gate shall be provided to allow
easy access. The fence and gate shall be at least four feet tall but may need to be taller. The gate
and fencing material shall be no more than 2 inches from ground surface. When the gate is
installed at a corner, it shall be hinged from the brace post not the corner post and an additional
brace post is installed near the post on which the gate is hinged.
Fence openings shall be no larger than about eight square inches (2 inches X 4 inches) when
using wire or chain link fencing, and vertical slots shall be no wider than 1.5 inches when using
wooden fencing. The fencing material should be strong enough to stand up to children, wildlife,
and livestock if present. The kind and size of animals that may be present must be considered in
selecting the fence material.
Fencing Options
1. Wooden Fencing:
A wood fence can completely hide the wastewater pond from view except from above, but
should not extend more than two feet above the top of the embankment. Corners with two
45-degree bends eight to twelve feet apart can be attractive. One barb wire strand must be
placed at the bottom edge of the fence to discourage animals from going under. One barb
wire strand should top the fence when livestock are present. All wire shall be stretched tight
using a come along, (wire stretcher), tractor or other method.
2. Woven or Welded Wire Fencing:
When using woven or welded wire, corner post material should be either pressure treated or
Osage Orange also commonly called Hedge. Corner posts should be eight feet long with a
top diameter of eight inches or greater. Brace posts used at the corners should be at least
eight feet long with a top diameter of six inches or greater. Cross brace material could consist
of a six-inch diameter wood post, a 4-inch by 4-inch post, a two-inch diameter pipe or even
two-inch square tubing. Line posts may be either metal tee posts or 3-three-inch diameter
pressure treated or Osage Orange wood posts installed on sixteen-foot centers. Metal tee
posts should be 6 feet long with the spade of the post driven just below ground surface.
Wooden line posts need to be six to eight feet long. Wood corner brace posts and wood line
posts can be placed two feet deep if they are cemented in. Any other type of backfill on
wood posts would require the posts to be placed three feet deep. (See following pages for
illustrations of fencing specifications)

3. Chain Link Fencing:
Chain link fencing is an accepted option and can be more attractive than woven or welded
wire fencing. If chain link fencing is selected, it must be installed per manufactures
guidelines and meet all other minimum code requirements regarding fence height, gate width
and height, etc. (See the following pages for chain link fence placement and design criteria.)
4. Other:
If any fencing or post materials other than those specified above are to be used, plans must be
submitted and reviewed and approved prior to the issuance of any installation permit for the
lagoon.
Fencing materials and installation techniques
1. Wooden and Steel Fence posts
Some major advantages of wooden fence posts are strength and resistance to bending,
misalignment and withdrawal. Lagoon fences will require decay resistant fence posts. The
most common wooden posts are pine pressure treated with CCA (chromated copper
arsenate). These posts have a greenish color, and they last longer and are harder than older
treatments such as creosote and Penta. Some native, untreated trees, usually Osage Orange,
are used for fence posts. The life expectancy of Osage Orange when in contact with the soil
is twenty to twenty-five years.
Be careful when buying wooden posts that the posts are properly treated for contact with the
soil. Most treated lumber bought in builder’s supply stores is treated at 0.25 lb of CCA per
cubic foot of lumber. This level of treatment will not protect against termites. Many people
are tempted to use “landscape timbers” for fence posts because they are extremely cheap at
times due to over supply. These timbers are a byproduct of the plywood industry. The
danger in using these for fence posts is that many times they are not treated for ground
contact since they are not designed to support a load and sometimes are not labeled, so it is
unclear what, if any, treatment has been applied.
Remember that the larger the top diameter of a wooden post, the stronger the post. Line
posts can be as small as three inches in diameter, but larger ones will provide for a stronger,
more durable fence. Corner and gateposts shall have a top diameter of at least eight
inches. Brace posts should be six inches or more in diameter.
Steel posts may be used for line posts and have several advantages over wooden posts. They
cost less, weigh less, can be driven into the ground rather easily, and are fireproof. They also
help ground the fence against lightning when the soil is moist. Steel posts vary from five to
eight feet long. A wide variety of steel posts are available with widely varying prices and
quality, so be careful when comparison shopping to make sure you are comparing equal
quality posts.
2. Bracing
For any wire fence, corner-post and end-post assemblies are probably the most important
structures in the entire fence. They are the foundation upon which the fence is built. When
wire is first stretched, the pulling force on a corner or end may be 3000 pounds. Winter cold

can cause contraction of wire, which increases that force to 4500 pounds. Both corner and
end assemblies must be strong enough to withstand these forces. Typically, the strongest
brace assembly is the “H” style brace. Other brace assemblies such as the “N” style brace
work fine for short fence pulls.
3. Fence Post Setting
Steel posts are almost always hand or power driven. Wood posts are frequently driven with
power driving equipment. Driving posts is faster than digging holes and tamping posts in.
Driving also results in a stronger foundation for the post. Posts should be driven with the
small end down. The results may look strange, (large end up), but they are much stronger
and damage to the post during driving is minimized. Corner posts can be driven as well, but
it is sometimes necessary and always advisable to drill a pilot hole about 3 to 4 inches
smaller than the post before driving. The pilot hole reduces driving resistance and gives
more control over the direction of lean of the post.
4. Installing Wire on Fences
In general, you will want to install and stretch wire in sections, running from one corner
and/or brace post assembly to the next. Remember that only woven wire can truly be
stretched. Because of its ability to be stretched, woven wire is preferred over welded
wire. Use galvanized staples, 8- or 9- gauge, with cut points and barbs or the wire clips that
come with steel posts to attach wire to posts. Staples should never be small than 1 ½ inches
long and preferably 1 ¾ or 2 inches. Do not staple the vertical or stay wires of woven wire.
Drive staples so the wire is held close to the post but not tight (a). The wire should be able to
move through the staple to allow expansion and contraction of the wire. Good brace
assemblies should keep the wire tight. Driving staples parallel with the grain should be
avoided since that will weaken the grip of the wood on the staple. Slash cut staples should be
rotated in a certain direction depending on whether the staples are right or left cut (b). Place
the staples parallel to the grain and then rotate slightly away from the flat faces of the staple
points. This will result in the desired direction of staple penetration (c) and a staple that has
40 percent more resistance to withdrawal than staples rotated the wrong way. The following
figures show proper stapling techniques.
a.
b. c.


Kansas State University Agricultural Experiment Station and Cooperative Extension Service
Wastewater Pond Operation,
Maintenance and Repair
Wastewater ponds, or lagoons, are used to treat and disperse wastewater from individual homes, churches, businesses
and institutions. The desirability of a new lagoon depnds largely on its design and construction. However, the desirability of an established lagoon (more than three years old) depends more on the operation maintenance and repair it receives.
A desirable lagoon looks like it has received good care, which includes:
• a secure and tight fence and gate that keeps children and animals out,
• a 3 feet deep water level,• no plants floating on the water or tall plants
at the water’s edge or that droop into the water,
• a vigorous and dense perennial grass cover on the embankment (berm),
• no trees or woody plants that shade the lagoon or whose roots would get into the berm,
• grass is no taller than 8 inches on the inside berm surfaces,
• the berm top around the lagoon is level and is at least 4 feet wide, and
• the berm slopes have no eroded or damaged spots.
The owner or user is responsible for operation, maintenance and repair of the lagoon. This publication gives an overview and provides guidance for these tasks.
Figure 1 shows a lagoon with features that indicate a good condition and Figure 2 depicts a neglected lagoon that will not give desirable results. This publication gives an overview and provides guidance for operation, maintenance, and repair.
Operation Assessment
All lagoons should be desirable wastewater treatment systems. The assessment involves evaluating the lagoon condition to maintain a standard of good care. This includes oversight, identifying maintenance and repair needs, and management decisions regarding the lagoon. The assessment needs to be done regularly, usually monthly, but does not necessarily require a lot of time. The required tasks are discussed here and the actions are covered in later sections.
Check vegetation in and near water. Watch for new plants, such as cattails, at the water’s edge and for floating plants, like duckweed, that need to be controlled. Note tall plants that could droop onto the
Table 1. Color an Indicator of Lagoon Condition
COLOR CONDITIONS CAUSE OR SYMPTOM
Dark sparkling green Good; best condition Dissolved oxygen (DO) and pH high.
Dull green to yellow Not so good DO and pH are less than optimum. Blue-green algae may be becoming predominant.
Gray to black Very bad Anaerobic or septic conditions prevail; odors likely. Too much sludge is possible.
Tan to brown Bad in Kansas where this algae is not found
Usually means erosion or inflow of surface water. Okay if brown algae.
Source: EPA, Operations Manual: Stabilization Ponds, MO-15, 430/9-77-012, August 1997

water and the health of perennial grass on the lagoon embankment (berm). Is more frequent mowing needed to keep the grass no taller than 6 or 8 inches on the inside slope?
Observe and record water color. The lagoon water’s color indicates its condition. Green is the goal as it indicates balanced pH and a good oxygen level. Table 1 shows the color, the interpretation, and what causes the color. A decline to a less-desirable color has a cause and may require a correction. Observe and chart a record of the water’s color, date and water depth.
Measure and record water level. Recording lagoon water level is a good operation practice. Depth can be obtained from a post with depth marks, installed in the center of an empty lagoon, or by measuring from a permanent reference on the berm. Keep a record of water levels and dates for at least five years and use this to identify problems and make operating decisions.
Look for indicators and needed repair. Evidence of possible problems include: odor, high or low water levels, profuse algae bloom, and rooted plants in the water. These indicators may result from too much sludge or other causes. The operator must also look for erosion, damage to fence, and other problems that require immediate repair.
MaintenanceMaintenance includes tasks done on a routine
schedule: monthly, seasonally, or annually.Caution: Take precautions to minimize
exposure to wastewater by wearing protective clothing and waterproof gloves. After working
with wastewater, thoroughly wash hands or shower and disinfect any breaks in the skin.
Control rooted plants in water. Rooted plants in the water promote mosquito breeding, encourage aquatic animals, and add to sludge. The desired 3-feet minimum water depth helps control rooted plants. Plants at the waters edge can be controlled either by physical removal or herbicide treatment. Pull or dig them when plants first appear and before the root system is established.
When plants are well established, control is quite difficult and may not be successful. Dead plants are organic debris that may cause odor, and add to the sludge. To control, use herbicides that protect algae and are labeled for the target plants. Apply it directly using an applicator. Use broadcast spraying sparingly because it requires more chemical and may get into the water.
Control vegetation on berm. To keep the grass on the inside slope no taller than 6 to 8 inches, mow often enough that no more than half of the growth is removed each time. Mow cool-season grasses such as fescue every week or two in cool months and monthly when it is hot. Discharge clippings away from the water or collect and remove them.
Mow the top and outside of the berm to stimulate a dense, healthy grass cover. Cut cool-season grasses in early May and mid-June. Cut warm-season (native) species in early July and mid-August. Burn areas as needed to control woody plants, residue, and unwanted species. The ideal time to burn is in the spring when new growth is just beginning. Try every three to five years for warm-season grasses and every five to seven years for cool-season
Figure 1. A lagoon with a good fence and gate outside the toe of the embankment.
Figure 2. This neglected lagoon shows animal damage and poor grass care.

grasses. Always follow fire safety precautions and check with local authority before burning.
Control floating plants. Remember, green color is good. Bacteria are essential for good treatment in lagoons and they require oxygen. This is best supplied by dispersed, single-cell algae, which are green. Sunlight must penetrate the water and reach the algae to produce the oxygen. Floating plants like water lilies, duck weed, or filamentous algae (moss) intercept the light. This causes the oxygen level to drop and when that happens the lagoon color will not be as green. As discussed for rooted plants, control floating plants when they first appear either by removal or with herbicides.
Adjust supplemental water. Because of low inflow or seepage losses many lagoons need supplemental water to maintain the 3-foot depth needed to control rooted plants. Supplemental water may be added from downspouts or hose, but it must be easily controllable. A 2-foot vertical distance, or freeboard, above the water level to the top of the berm is essential to prevent overflow from an extreme rainfall. When the depth approaches the freeboard reserve, shut off or divert supplemental water.
Check and adjust fence and gate. Check the fence and gate at least twice a year to be sure it is in good condition. The gap between the gate and post or space at the bottom of the fence to the ground should not be wider than 2 inches. Holes in the fencing should not be larger than two by four inches. Check for loose or damaged posts, loose anchors to posts, sags in wire or gate, and any damage. Add or remove treated boards on the posts or gate for adjustment to keep the gap no more than 2 inches and to allow the gate to move freely. The fence must keep animals, especially pets, and children away from the lagoon.
Remove trees and woody plants. Remove trees within 50 feet and shrubs within 20 feet of the berm to reduce shading and the risk of roots in the berm and lagoon. This also helps keep leaves out of the lagoon and avoids their addition to sludge. Remove or trim trees that shade the lagoon on the east, south, and west sides. Sunlight must reach the surface year around and air must freely move across it. Oxygen enters the water through exchange at the water surface and photosynthesis by algae.
Check sludge. For best lagoon performance, maintain at least 18 inches of water above the
sludge. Measure the depth to sludge in the same area, preferably near the center after 10 years and again every three to five years. Measuring the depth to sludge is not easy. It is not safe to walk into a lagoon with waders, so do not try that. A good option is to use a small pump with an intake suspended from a float at an adjustable depth. Move the intake deeper until solids are first noticed; the depth of the intake below the surface is the depth to sludge. Keep a record of depths to sludge and the years it was measured.
RepairsRepairs are unscheduled work needed to prevent
further malfunction, damage, or possible failure of the lagoon.
Repair fence and gate. The fence should be tight and securely attached to sturdy posts. A good fence has a barbed wire not more than an inch from the ground. When large animals are near, two tight barbed wire strands should top the fence to discourage them from reaching over it. Holes in the fence or gate larger than two by four inches must be repaired so animals and children cannot get through. The gap between the gate and posts should be no more than 2 inches. Attach a board to the post to fill a wider gap. Be sure the gate is securely hung and opens and closes easily. Keep it locked to prevent unauthorized entry.
Repair leakage. There should never be evidence of leakage around a lagoon. Leakage must be corrected by repairing the berm and sealing the inside surface to meet the KDHE guideline of less than a ¼ inch per day loss. Leakage is best controlled by thorough compaction of thin layers of wet soil during the construction process, creating a compacted lining at least 18 inches thick. If a leak can be found in an existing lagoon, adding bentonite clay or soil amendments may fix it. Prevent surface inflow to the lagoon with good drainage and keeping the top of the berm at least a foot above the adjacent surface or highest flood level.
Fill eroded places and reseed. The berm must be maintained at the original elevation and surface shape. Any time there is erosion or damage to the berm, the affected area must be filled, compacted, smoothed, and reseeded to the desired perennial grass. Mulching helps control erosion until vegetation is established. Watering can help establish the grass without repeated seeding.