labor management - store & retrieve data anywhere€¦ · ii declarations warranties although...
TRANSCRIPT

Re,m
micros® Systems, Inc.
Labor Management
Setup Guide
Copyright 1999-2002 MICROS Systems, Inc. Columbia, MD USA All Rights Reserved Part Number: 100147-503 3rd Edition

ii
DECLARATIONS
Warranties
Although the best efforts are made to ensure that the information in this manual is complete and accurate, MICROS Systems, Inc. makes no warranty of any kind with regard to this material, including but not limited to the implied warranties or the marketability and fitness for a particular purpose. Information in this manual is subject to change without notice. No part of this manual may be reproduced or transmitted in any form or by any means, electronic or mechanical, including photocopying, recording, or information recording and retrieval systems, for any purpose other than for personal use, without the express written permission of MICROS Systems, Inc.
MICROS Systems, Inc. shall not be liable for errors contained herein or for incidental or consequential damages in connection with furnishing, performance, or use of this setup guide.
Trademarks
Microsoft, Windows and Windows NT are either registered trademarks or trademarks of Microsoft Corporation in the USA and other countries.
Design and Production
The manual was written with Microsoft Word 2002.
Printing History
New editions of this manual incorporate new and changed material since the previous edition. Minor corrections and updates may be incorporated into reprints of the current edition without changing the publication date or the edition number.
Edition Month Year Software Version
1st June 1999 2.6
2nd
August 2000 3.0
3rd
May 2002 3.1

Table of Contents
iii
DECLARATIONS II Warranties ii Trademarks ii Design and Production ii Printing History ii
WELCOME 1 How This Document Is Organized 1 Who Should Use This Document? 1 How to Use This Document 1 Additional Information 1
CONTACT SHEET 2
COMMON COMPONENTS FOR ENTERPRISE OFFICE 2
GENERAL SITE INFORMATION SETUP 3
SECURITY ACCESS 3
LM ACCESS 4
LICENSING 8
EMPLOYEE CLASSES (IN POS CONFIGURATOR) 9
FORM DESIGNER 10
LABOR MANAGEMENT SETUP 13
EMPLOYEE CHANGE TRACKING 13
COUNTRY DESCRIPTORS 15
LABOR MANAGEMENT CALENDAR 17
LABOR MANAGEMENT PARAMETERS 19
PAYROLL BANK 22
SCHOOL DISTRICTS 24
USER DEFINED DOMAIN 26
REASONS 28
RESTAURANT 30
CLEAR ALL LABOR 32
RULES AND LAWS 33
WORK RULES 33
WORK HOURS 35
OVERTIME DEFINITION 37

Table of Contents
iv
LABOR LAWS 41
SCHEDULING BREAK RULES 48
TIME AND ATTENDANCE 50
JOBS 58
SKILL LEVELS 64
DEDUCTIONS 65
FORECASTING 67
DAY PARTS 67
HISTORICAL INFORMATION 69
SRG SETUP 71
TEMPLATE SETS 74
PREMIUM PAY 75
HUMAN RESOURCES 79
EMPLOYEE SETUP 79
FIELD DESCRIPTIONS 107
AVAILABILITY 109
EXCEPTIONS 112
EVALUATIONS/CERTIFICATIONS 115
RECURRING DEDUCTIONS 118
AVAILABLITY WIZARDS 120
SCHEDULING 122
WEEKLY ASSIGNMENTS 122
SCHEDULE TEMPLATES 133
SCHEDULE PLACE HOLDER SETUP 135
FORECAST SETUP 137
FORECASTING EXPLORER 137
EVENT TYPES 143
EVENT SCHEDULE 145
FORECASTING 147
GENERATE FORECASTS 147
EDIT FORECASTS 150
EDIT HISTORICAL INFORMATION 158

Table of Contents
v
PAYROLL PREPROCESSING 160
TIME CARDS 160
OTHER PAY 165
PAYROLL JOB SUMMARY 167
REPORT EXPLORER 170
EMPLOYEE INFORMATION SHEET 172
PROGRESS CHECK LIST 177


Labor Management Setup Guide
1
WELCOME
The purpose of this document is to guide MICROS customers through the setup of an Enterprise Office/Labor Management (EO/LM) database.
How This Document Is Organized
This manual is organized in the same order that an EO/LM database is set up.
The EO/LM database forms are described (e.g., Labor Management Setup, Human Resources, Payroll Preprocessing, etc.), and some tips on how to complete them are provided.
At the end of the setup guide, a progress checklist and a set of worksheets are provided to help organize the information.
Who Should Use This Document?
This manual is designed for MICROS customers who install EO/LM.
Restaurant and corporate personnel who will use and maintain the software should be actively involved in designing and building the EO/LM database.
How to Use This Document
Use this document as a guide to sequentially complete the EO/LM database forms.
Each section contains a series of definitions, questions and examples. Refer to the examples, and decide how they should be tailored to meet the user’s specific needs. There is a corresponding worksheet for each section. Use the worksheets to organize and record the information.
Additional Information
For additional information, refer to Setup - Entering Basic Information in online help or contact a MICROS representative.

Labor Management Setup Guide
2
CONTACT SHEET
Enter the MICROS Systems, Inc. contact (installer) information here to use as future reference in the event that you have any questions or concerns regarding Labor Management.
COMMON COMPONENTS FOR ENTERPRISE OFFICE
• Security
• Licensing
• Employee Classes
• Forms Designer

Labor Management Setup Guide
3
GENERAL SITE INFORMATION SETUP
SECURITY ACCESS
Description
Select MICROS Desktop | Set Security (policeman icon) to open this form.
Security Access is used to define security access for all of the EO applications and the system. Security Access can also be opened through Labor Management | General.
Once security access is defined, the employees can be linked to a Back Office Class that will only allow access to certain applications that your company defines for that class.
Note Be careful when defining security access for your employees. You don’t want to give a manager/supervisor more access than he or she actually needs. Remember, you must create a class for employees, even though they may not have access to perform any security-related functions.

Labor Management Setup Guide
4
LM ACCESS
Descriptions
Select MICROS Desktop | System Configuration | LM Security & Privileges | LM Access.
Labor Management uses security features to restrict access to certain areas of the application. You will define these access levels for each back office class. Keep in mind that the default access level is for full access.

Labor Management Setup Guide
5
Access levels are based on back office classes, which are defined in MICROS Desktop | Set Security (described on the previous page). A back office class may be allowed to access and work on all areas, or may be restricted to read-only access to selected areas.
Field Descriptions
Forecast – Apply Event Adjustments Select this feature to allow the user to apply an event to a generated forecast in Forecasting | Edit Forecasts. If the user does not have access to apply an event, this button will be grayed out.
Forecast – Approve Forecast Select this feature to allow the user to approve an adjusted forecast. If the user does not have access to approve a forecast, this option will be grayed out.
HR – Delete Evaluations Select this feature to allow the user to delete a selected evaluation from an employee record. If the user does not have access to delete evaluations, this button will be grayed out.
HR – Delete Exceptions Select this feature to allow the user to delete a selected exception from an employee record. If the user does not have access to delete exceptions, this button will be grayed out.
HR - Edit Terminated Employees This feature allows you to edit Terminated information on the Employee Status form (Human Resources | Employee Setup). If you do not have access to edit this information, this section of the
form will be grayed out. If set to Full Access, you can view and edit all fields in the Termination
box. If set to None or View Only, you can view this information but cannot edit it, and you will not be allowed to read termination notices.
HR – Hide Employee IDs Select this feature to allow the user to view employee IDs. If the user does not have access to view employee IDs, all IDs will appear as asterisks. This feature is also available in POS Configurator.
Note This feature only hides employee IDs in the Human Resources application; it is not applied in POS Configurator. To apply this feature in POS Configurator, turn on the option, “POS Configurator emp ID,” under the Hide Employees IDs – PC Only Header in Employee Classes | Options.
HR – Modify Hourly Pay Rates Select this feature to allow the user to access the Hourly Job tab. This tab is used to assign an hourly job to an employee. If the user does not have access to view this tab, it does not display.
HR – Modify POS Information Select this feature to allow the user to access the POS tab. This tab is used to assign a Revenue Center cash drawer to an employee. View access only allows an employee to see the tab and its contents. If the user does not have access to view this tab, it does not display.

Labor Management Setup Guide
6
HR – Modify Salary Pay Select this feature to allow the user to access the Salary Job tab. This tab is used to assign a salary job to an employee. If the user does not have access to view this tab, it will not display.
HR – Modify Security Information Select this feature to allow the user to access the Security tab. This tab is used to assign employee IDs, employee class, and back office employee class. If the user does not have access to view this tab, it will not display.
HR – Terminate/Place an Employee on Leave Select this feature to allow the user to access the Employee Status tab. If an employee has privileges to add another employee, he or she must have at least view access to this tab since the system requires a hire date to be entered for the added employee. If the user does not have access to view this tab, it will not display.
HR - View/Modify Direct Deposit This feature allows access to the direct deposit information on the Payroll Information form (MICROS Desktop | Employee Maintenance | Employee Setup), and is assigned per back office
class. If set to Full Access, you can view and edit each of these fields. If set to View Only or None, you can view this information but you cannot make changes. However, if set to None, viewing privileges are restricted with asterisks displaying in place of the account and routing numbers for both sets of bank account information.
PP – Close Payroll Select this feature to allow the user to close the payroll period in Payroll Preprocessing | Payroll Summary. If the user does not have access to close the period, this button will be grayed out.
PP – Import Schedules to Payroll Select this feature to permit or restrict the ability of a particular back office class to import a
schedule into the Payroll Preprocessing module. This option can only be used if the Import payroll
from schedule option is enabled through MICROS Desktop |LM Setup | Time and Attendance | Time and Attendance | Time Clock Schedule.
PP – View/Modify Salary Pay Select this feature to allow the user to filter out salaried employees from the Other Pay tab in Payroll Preprocessing. A user must have full access to view and edit a salaried employee’s pay.
PP – View/Modify Sales and Tips Select this feature to allow the user to update sales and tips for each employee. A user must have full access to update this information. No access and view access only allows the user to view the sales and tips for each employee.
Scheduling – Copy From Schedule Select this feature to allow the user to copy schedules from previous weeks into the current week. If the user does not have full access for Copy From Schedule, the Schedule tab will not display.

Labor Management Setup Guide
7
Scheduling – Copy From Template Select this feature to allow the user to copy templates from previous weeks into the current week. If the user does not have full access for Copy From Template, the Template Tab will not display.
Scheduling - Overwrite Requirements This feature allows you to overwrite previously generated staff requirements for a particular week when using the Staff Requirements Generation function.
Scheduling - Use Automatic Scheduling This feature provides access to the Automatic Scheduling function on the Weekly Assignments form to create schedules from schedule standards and templates.
Gathering Tips
It is recommended to review your security requirements with the MICROS installer.

Labor Management Setup Guide
8
LICENSING
Description
Select Start Menu | Programs | MICROS Applications | Utilities | License Manager to open this form.
Install the software key and enter the license numbers. Click Reload after all license codes are entered.
Enter each license code inthe corresponding boxes.
After all of the codes areentered, click the Reload keyand all of the Xs will turn intocheck marks.

Labor Management Setup Guide
9
EMPLOYEE CLASSES (IN POS CONFIGURATOR)
Description
Select Start Menu | Programs | MICROS Applications | POS Configurator | Employees | Employee Classes to open this form.
Add a class for employees for time and attendance only. This class is primarily used for back-of- the-house employees, such as Cooks and Dishwashers. If programmed correctly, employees who are linked to this class will only be allowed to clock in and out on the workstations. These employees will not be able to create checks.

Labor Management Setup Guide
10
FORM DESIGNER
Description
Select MICROS Desktop | Employee Maintenance | Employee Setup to open this form.
When Form Designeris enabled, right-clickon a field to displaythis list. Use this list toset fields to berequired, change thetab order of the fields,and more.

Labor Management Setup Guide
11
Form Designer allows the user to change the layout of the selected form. Any tab that has a Form Designer icon will allow the user to delete certain fields that the site is not using. For example, on the General tab, the site is only using two of the user-defined fields. Therefore, Form Designer can be used to delete the two fields that will not be used.
The Contact Information tab contains fields that may require information from an employee when he or she is hired. For example, an emergency contact name and phone number may be programmed to be “required.” Form Designer can be used to make fields required, which means when a manager adds an employee to the system, all information must be completely filled out before saving the new employee’s information. This feature helps to enforce that managers enter all of the proper information when new employees are hired.
Form Designer is only available for Employee Setup and LM Setup forms. In order to enable it, you must select Edit | Enable Form Designer from the menu bar on the Setup form. You must then exit and reload the form. Upon re-entry to the form, the Form Designer icon will be visible and will remain enabled until the module is closed. Please note that Form Designer is enabled only in the module in which it is activated, but will be active on all Setup forms within the module.
From the Menu Bar, select Edit, then Enable Form Designer. You must close the Employee Setup form, then reopen it before the Form Designer icon will appear.
Open a form and click the Form Designer icon. A window will display with a list of fields, which can then be altered. Fields that are not listed in this window can be moved around, but not removed from the form. They are required fields.
Select the desired field by holding down the left mouse button and dragging it. The field can be dragged to another location on the form, or completely off the form. Use the Remove All button to take all the listed fields off the form.
Click the Restore Default button to bring the form back to its original state if you are not satisfied with how the form looks, or if you have made a mistake. You can restore the form back to its original state any time.
Close the Field Palette form to save your changes.

Labor Management Setup Guide
12
Field Descriptions
Remove Select this option to remove a field without having to drag it off the tab manually.
Tab Order Select this option to define the order in which the cursor will move from field to field on the screen as the Tab key is pressed.
Center Horz Select this option to center the selected field horizontally.
Center Vert Select this option to center the selected field vertically.
Align Select this option to align the field left or right. This feature is not available in all applications.
Required Select this option to make fields required. Making a field required forces the employee to enter information in the selected field for a new employee. A required field can be reverted to “not required” at any time by deselecting this option.

Labor Management Setup Guide
13
LABOR MANAGEMENT SETUP
EMPLOYEE CHANGE TRACKING
Description
Select MICROS Desktop | System Configuration | Labor | General | Employee Change Tracking to open this form.
Enter information in these fields only if the operation will be interfacing with a corporate Human Resources program, and to keep a separate table of changes that have occurred in the Employee Setup screen.
This table identifies the field information that should be sent to the corporate office if changes have been made in Human Resources | Employee Setup.

Labor Management Setup Guide
14
Field Descriptions
Name Enter a descriptive name for this record.
Code Code names can characterize names of employee changes, or they can be more general. Enter a code name that will be understood by all users. For example:
• Update - Address Line 1
• Update - DOB (Date of Birth)
Table Name Select the name of the table that is being tracked in the database.
Column Name Select the name of the column that is being tracked in the database.
Changes made to any of these fields defined here will write a record to emp_corp_chng_status.

Labor Management Setup Guide
15
COUNTRY DESCRIPTORS
Description
Select MICROS Desktop | System Configuration | Restaurant & Regional Settings | Regional Settings | Country Descriptor to open this form.

Labor Management Setup Guide
16
Field Descriptions
General Tab Name Select the name of the country where the operation is located.
Abbreviation Enter the abbreviation of the country’s name (e.g., USA for United States of America).
State/Province Tab Name Select the state(s) or province(s) where the employees live.
Abbreviation Enter the abbreviation of the state or province.
Note Set up all states/provinces where employees may reside. This information will be populated in a drop-down list for future use in other LM Applications.
Labor Management Setup Guide
17
LABOR MANAGEMENT CALENDAR
Description
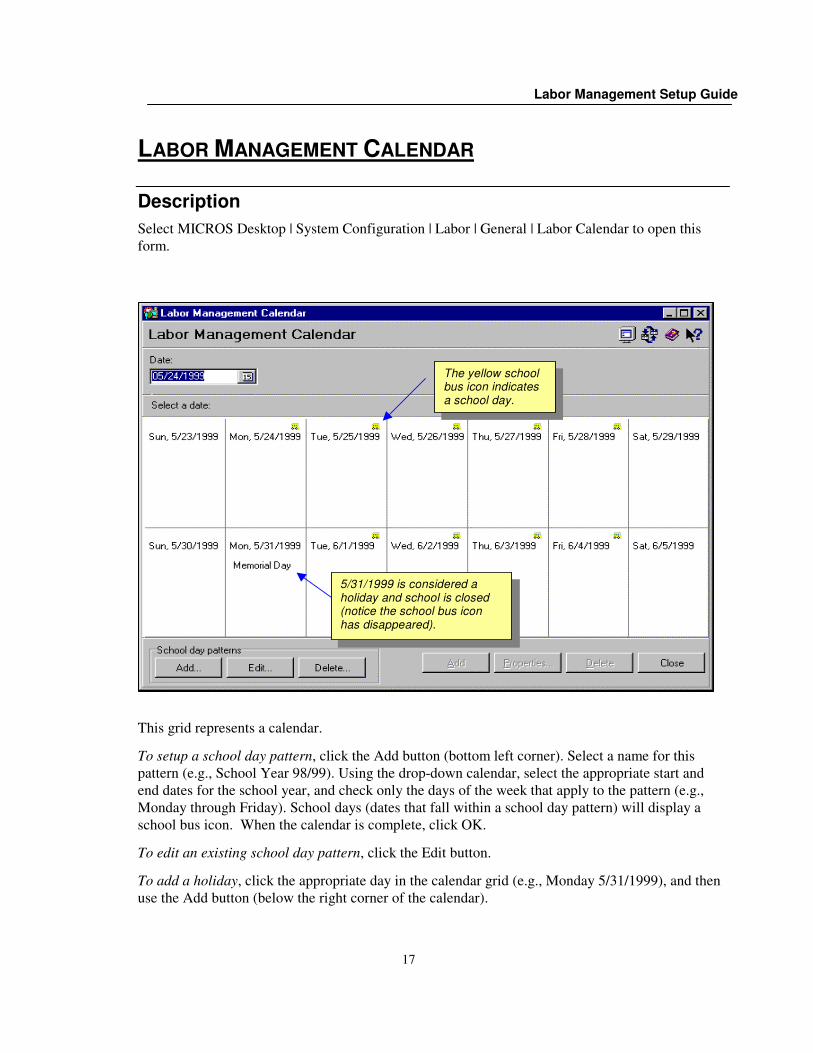
Select MICROS Desktop | System Configuration | Labor | General | Labor Calendar to open this form.
This grid represents a calendar.
To setup a school day pattern, click the Add button (bottom left corner). Select a name for this pattern (e.g., School Year 98/99). Using the drop-down calendar, select the appropriate start and end dates for the school year, and check only the days of the week that apply to the pattern (e.g., Monday through Friday). School days (dates that fall within a school day pattern) will display a school bus icon. When the calendar is complete, click OK.
To edit an existing school day pattern, click the Edit button.
To add a holiday, click the appropriate day in the calendar grid (e.g., Monday 5/31/1999), and then use the Add button (below the right corner of the calendar).
5/31/1999 is considered aholiday and school is closed(notice the school bus iconhas disappeared).
The yellow schoolbus icon indicatesa school day.

Labor Management Setup Guide
18
To edit a holiday name, highlight the holiday name in the calendar grid, and then type the new name. Click on another date in the grid to save the name changes.
To change holiday properties (e.g., override the school day pattern), click the Properties button. Overriding a school day pattern means the calendar date is a holiday and there is no school that day. The school bus icon will not display on dates that are holidays.
To delete a holiday, click the Delete button.
Note All school and non-school days must be setup to support the scheduling of minor employees in accordance to the state labor laws. Remember that the school day pattern only needs to apply to the school district in which the operation is located, not the school districts where the employees reside. Early school day closings are not supported. They are still considered school days.
Gathering Tips
Contact a school administrator in the school district and request a calendar.

Labor Management Setup Guide
19
LABOR MANAGEMENT PARAMETERS
Description
Select MICROS Desktop | System Configuration | Labor | General | Labor Parameters to open this form.
Setup any information on this tab that you wish to control.
Select this option tointerface with acorporate (or third-party) HRapplication.
Labor Management Setup Guide
20
Field Descriptions
General Tab Name This column displays the name of the restaurant. It is a read-only field. Restaurant names are setup in POS Configurator | System | Restaurant.
SSN validation type Select a SSN validation type from the drop-down menu. This means that the SSN/SIN will be formatted and validated in the Human Resources application to ensure the valid SSN/SIN is entered correctly.
LM Licensing Select the licensing type from the drop-down menu.
Employee evaluations Enter the number of days to keep employee evaluations in the database.
Employee requests Enter the number of days to keep employee requests in the database. Employee requests can be requests for time off or to work certain shifts.
Terminated employees Enter the number of days to keep data about terminated employees in the database.
Employee Status History Enter the number of days to keep employee status information in the database. This information must be retained as long as or longer than the Terminated employee’s information.
Job Rate History Enter the number of days to keep employee job rate information in the database.
Note The maximum number of days to keep evaluations, requests, and terminated employee information in the database is 9999. If any employee-related data exists in the database (such as evaluations), terminated employees will not be purged.

Labor Management Setup Guide
21
HR interface enabled Select this option if the site will be interfacing with a Human Resources system.
Minimum employee object number Assign a starting number for the range of object numbers that can be assigned to Human Resources records.
Maximum employee object number Assign the highest number in the range of object numbers that can be assigned to Human Resources records.
Note
If interfacing to a corporate Human Resources system, object numbers for employees cannot be changed in the Human Resources application. When a new employee is added, the assigned object number is the next available number in the specified range.
User Defined Fields Tab Alpha fields Enter a specific caption to display above the user-defined fields that are being used in the Human Resources Module (e.g., use these fields to help track Accrued Vacation Hours and Accrued Sick Hours).
Numeric fields Enter a specific caption to display above the user-defined fields that are being used in the Human Resources Module (e.g., use these fields to help track Accrued Vacation Hours and Accrued Sick Hours).
Note User Defined fields display in MICROS Desktop | Human Resources Module | Employee Setup. Alphanumeric/Numeric fields 1 and 2 display in the General Tab. Alphanumeric/Numeric fields 3, 4, and 5 display in the Personal Tab. Alphanumeric/Numeric fields 6, 7, and 8 display in the Security Tab. Up to 32 characters are available for each User Defined field. Alpha fields support both alpha and numeric values. Numeric fields only support numeric values.

Labor Management Setup Guide
22
PAYROLL BANK
Description
Select MICROS Desktop | System Configuration | Labor | General | Payroll Banks to open this form.
Payroll Banks are the banks that are affiliated with each employee and their direct deposit information. The information on this form is used to setup direct deposit for employees.
The Building societyroll number of thepayroll bank is usedin certain countries,such as the UK.

Labor Management Setup Guide
23
Field Descriptions
This section is used to define bank information if the operation offers direct deposit to the employees.
Name Enter the bank’s name.
Bank Address Enter the bank’s street address.
City Enter the bank’s city.
County Enter the bank’s county.
Country Select the bank’s country from the drop-down menu. Countries are defined in the Country Descriptor tab.
State Select the bank’s state from the drop-down menu. States are defined in the Country Descriptor tab.
Postal code Enter the bank’s postal code.
Building society roll number Enter the bank’s building society roll number (if applicable).
Gathering Tips
Collect payroll bank information from employees, banks, and your own payroll department. Setup the largest local banks that are used regularly, and then add other banks as needed.

Labor Management Setup Guide
24
SCHOOL DISTRICTS
Descriptions
Select MICROS Desktop | System Configuration | Restaurant & Regional Settings | Regional Settings | School Districts to open this form.
Enter the name of all the school districts that apply to the employees. This information is used for tax purposes.
The country and statedrop-down menus aredefined on the CountryDescriptor form.
Labor Management Setup Guide
25
Field Descriptions
County Enter the name of the county where the school district is located.
Country Select the country where the school district is located from the drop-down menu. Countries are defined in the Country Descriptor form.
State Select the state where the school district is located from the drop-down menu. States are defined in the Country Descriptor form.
Note School district names must be setup for tax purposes. If your local government does not
have a school district tax, this information is not required.
Labor Management Setup Guide
26
USER DEFINED DOMAIN
Descriptions
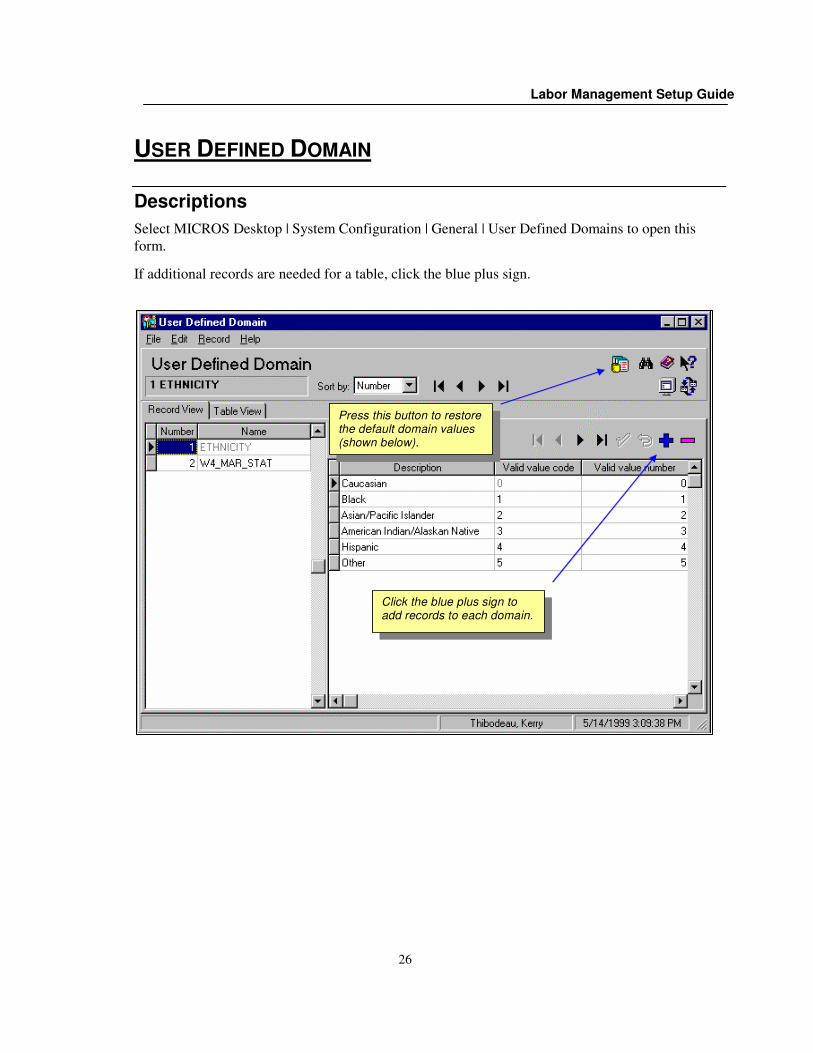
Select MICROS Desktop | System Configuration | General | User Defined Domains to open this form.
If additional records are needed for a table, click the blue plus sign.
Click the blue plus sign to add records to each domain.
Press this button to restore the default domain values (shown below).

Labor Management Setup Guide
27
Field Descriptions
Restore Default Domain Value If you add a record and decide later that it isn’t necessary, press this button to restore the defaults.
Note Both the record name on the parent grid and the records in the child grid may be modified. If not referenced elsewhere, records may be deleted from the child grid (Ethnicities), but records in the parent grid may only be renamed. Restore Defaults will undo all changes.

Labor Management Setup Guide
28
REASONS
Description
Select MICROS Desktop | System Configuration | Restaurant & Regional Settings | Restaurant Information | Reasons to open this form.
Reasons for availability requests, terminations, and leaves of absence must be added on the Reasons form.
This field only applies toreasons for leaves ofabsence.

Labor Management Setup Guide
29
Field Descriptions
Name Enter a name for the reason defined on this form.
Description Enter a name for the reason defined on this form. Up to 64 characters are allowed in this field. This description appears in Human Resources for availability requests, terminations, and leaves of absence.
Use with voids Select this option if the selected reason is used with voids.
Use with returns Select this option if the selected reason is used with returns (refer to the 3700 Feature Reference for a definition of “Return”).
Use with time card adjustment Select this option if the selected reason is used with time card adjustments.
Use with availability requests Select this option if the selected reason is used with availability requests.
Use with terminations Select this option if the selected reason is used with terminations.
Use with leaves of absence Select this option if the selected reason is used with leaves of absence.
Days allowed Enter the number of days allowed for the selected reason (if applicable). This field is enabled only if the Use with leaves of absence field is used.
Note Reason codes to be used with time card adjustments, exceptions to availability, terminations, and leave of absences must be added on this form. Leaves of absence require a maximum number of days allowed for each leave type. In the Human Resources application, if the leave of absence “Inactive From” and “Inactive To” dates exceed the Days Allowed for the selected reason, a Business Rule Warning (BRW) will display in the “Inactive To” field.

Labor Management Setup Guide
30
RESTAURANT
Descriptions
Select MICROS Desktop | System Configuration | Labor | General | Labor Settings to open this form.
With the exception of the Labor tab, all of the other tabs here are populated with information from POS Configurator | System | Restaurant.
The Employer ID isused for taxpurposes.

Labor Management Setup Guide
31
Field Descriptions
Labor Tab Work hours Select the work hours for this restaurant from the drop-down menu.
Note
Work hours are programmed in Labor Management Setup | Rules/Laws | Work Hours. The Rules/Laws section must be setup before work hours can be completed.
Employer ID Enter the Employer ID. This field is used for tax purposes.
Labor law state Select the state in which labor laws apply to this restaurant from the drop-down menu. A state must be selected to enable the overtime feature.
Forecast element Select the forecast element associated with this job (e.g., restaurant sales). The forecast element linked here will determine the forecast totals that appear in the Scheduling application.
Note Forecast Element is used only with the Forecasting application is installed
Labor Management Setup Guide
32
CLEAR ALL LABOR
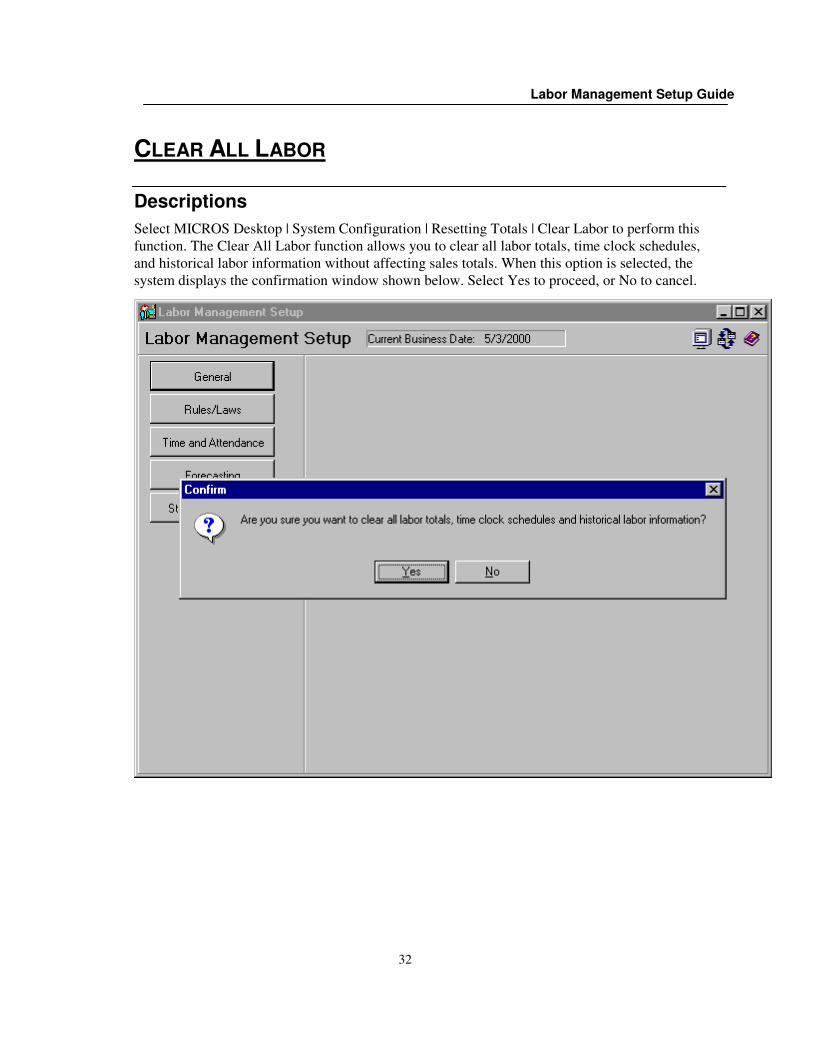
Descriptions
Select MICROS Desktop | System Configuration | Resetting Totals | Clear Labor to perform this function. The Clear All Labor function allows you to clear all labor totals, time clock schedules, and historical labor information without affecting sales totals. When this option is selected, the system displays the confirmation window shown below. Select Yes to proceed, or No to cancel.

Labor Management Setup Guide
33
RULES AND LAWS
WORK RULES
Description
Select MICROS Desktop | System Configuration | Labor | Rules/Laws | Work Rules to open this form.
Work rules are the standards the company recommends that an employee should be scheduled. Rules represent the daily and weekly minimum and maximum number of hours an employee should work. This information is used when an employee is hired. With each new employee, establish the minimum and maximum number of hours of his or her availability.
If the information on this form is not completely filled out, each employee will get a Business Rule Warning (BRW) when the schedule is being created.
This information applies to all employees.However, this information can be overriddenon an employee level in HR | Availability tab.

Labor Management Setup Guide
34
Field Descriptions
Work Week Rules Tab Name Enter a name for the set of work rules described on this form (e.g. Corporate Policy or Unit Work Rules).
Minimum hours/week Enter the minimum hours per week that is the company standard for an employee to work.
Maximum hours/week Enter the maximum hours per week that is the company standard for an employee to work.
Minimum hours/day Enter the minimum hours per day that is the company standard for an employee to work.
Maximum hours/day Enter the maximum hours per day that is the company standard for an employee to work.
Note The information entered here becomes the default daily and weekly minimum and maximum number of hours for availability in the Human Resources application.

Labor Management Setup Guide
35
WORK HOURS
Description
Select MICROS Desktop | System Configuration | Labor | Rules/Laws | Work Hours to open this form.
Setup work hours (i.e., basic hours and days of operation) to be used to spread the labor cost of salaried employees equally across each day. These work hours will be linked in the Restaurant tab, as well as in Staff Requirements Generation setup.

Labor Management Setup Guide
36
Field Descriptions
Name Enter a name for the restaurant that will be easily associated with the hours of operation (e.g., Unit Open Hours, and Hours of Operation).
Day Select the days of the week for which to establish the hours of operation.
Start time Enter the start time for this restaurant. For example, if the restaurant opens at 10:00am, but the first employees arrive at 6:00am, consider starting the work hours at 5:00am.
End time Enter the end time for this restaurant. For example, if the restaurant closes at 10:00pm, but the last employees leave at midnight, consider ending the work hours at 1:00am.
Note Labor costs for salaried employees will be divided across the hours associated with each area. If an establishment’s start and end times extend from 7:00am to 11:00pm daily, the cost of salaried employees will be distributed among the labor costs for that period. Only one set of work hours is supported in LM Version 1.00.

Labor Management Setup Guide
37
OVERTIME DEFINITION
Description
Select MICROS Desktop | System Configuration | Labor | Rules/Laws | Overtime Definition to open this form.

Labor Management Setup Guide
38
Field Descriptions
Overtime Level Definition Tab Name Enter an overtime level name. An overtime level defines different overtime rates, such as “Time and a Half” or “Double Time.” Up to four overtime levels can be defined.
Wage multiplier Enter how much the regular pay rate is multiplied by to create the overtime level pay rate.
Note If a wage multiplier is used, overtime pay is automatically calculated and cannot be edited. For employees who work overtime for a job that allows tip credit, the overtime calculation is: ((minimum wage) x (wage multiplier)) – tip credit
Overtime Rule Definition Tab Name Enter an overtime rule name. Overtime rules determine what constitutes overtime. For example, state law may declare anything over an 8-hour workday as time and a half and anything over 12 hours as double time.
Note Overtime Rule Definitions are defined by the state’s labor laws. Some states require different overtime rules to be applied to employees covered by child labor laws, so be sure to have the most current information.
Labor Management Setup Guide
39
Overtime Rule/Level Definition Tab Selected overtime rule Select an overtime rule (as defined on the Overtime Rule Definition tab) to associate with an overtime level to get an overtime definition. Then you can establish overtime rules. Overtime rules can be linked to the federal/state labor laws on the Labor Laws form.
Selected overtime level Select an overtime level (as defined on the Overtime Level Definition tab) to associate with an overtime rule to get an overtime definition. Then you can establish overtime rules.
Daily hours before overtime This column expands to display the number of hours an employee must work each day before overtime applies. Double-click on the plus sign to expand this column. Enter the number of hours an employee must work each day before overtime applies. These rules only apply to the selected overtime rule and overtime level.
Note Enter 0 if the overtime applies all day, such as on Sunday. Leave the field blank if overtime rules do not apply.
Hours before labor week overtime Enter the number of hours an employee must work during one labor week before overtime applies.
Number of days in a labor week before overtime Enter the number of days an employee must work during one labor week before overtime applies.
Consecutive day overtime This column expands to display the number of days and hours an employee must work during one labor week before consecutive day overtime applies. Double-click on the plus sign to expand the column.
Consecutive days to start labor week overtime Enter the number of consecutive days an employee must work during one labor week before overtime applies.

Labor Management Setup Guide
40
Hours in a labor week before consecutive overtime Enter the number of hours within the consecutive days an employee must work to receive overtime. For example, if an employee works 40 hours in 7 days, he or she receives overtime on the 7th day. But, if the employee only works 20 hours in 7 days, overtime will not apply.
Hours in a day before consecutive overtime Enter the number of hours in a day that an employee must work to receive overtime on the last consecutive day. For example, on the 7th consecutive day of work, an employee may not receive overtime until working 8 hours.
Note Overtime Levels/Rules are based on overtime laws defined by the state in which the business operates.

Labor Management Setup Guide
41
LABOR LAWS
Descriptions
Select MICROS Desktop | System Configuration | Labor | Rules/Laws | Labor Laws | Federal and State to open this form.
Tip Credit is a percentage ordollar amount (set by federalor state law) that may bededucted from the minimumwage of a tipped employee(i.e., $5.15 minimum wage -$2.77 tip credit = $2.38 rate ofpay for tipped employees).
Set up the labor laws that are required by the state. This will either be a Federal law, a State law, or a combination of both. The law that favors the employee should be defined.

Labor Management Setup Guide
42
Field Descriptions
Federal and State Tab Name Select the State or Province for which labor law information will be entered. Double-click in the column to produce a drop-down list of States and Territories (this list is defined in the Country Descriptor tab).
Minimum Wage Effective Date Enter the date when this minimum wage takes effect. Until this date becomes effective, the previous minimum wage amount will be used. The wage will take effect at 12:00 AM on the date specified. Any employee that is clocked in at 12:00 AM will continue that shift at the old wage rate. The new rate will take effect with their next clock-in. You can type the date directly in the field or use the Calendar button to select the date from the drop-down calendar.
Minimum wage Enter the minimum wage. Use the prevailing federal or state minimum wage (the law that favors the employee).
Maximum tip credit amount Maximum tip credit percentage Tip credit is either a dollar amount or percentage (set by federal or state law) that may be deducted from the minimum wage of a tipped employee (i.e., employees who receive tips).
Enter the dollar amount or percentage (in the appropriate field) of the tip credit that is allowed in this state. The law that favors the employee is honored.
For example, in Maryland, the allowed tip credit is 54% or $2.77. This means that an employer may pay a tipped employee $2.38 an hour (rather than the $5.15 minimum wage) as long as the employee receives enough tips during a payroll period to earn up to the minimum wage for each hour worked. If the employee’s combined earnings (i.e., wage – as adjusted by the tip credit, plus tips) average out to be below minimum wage, then the employer must make up the difference.

Labor Management Setup Guide
43
Note When the Minimum wage field is changed and saved, wages based upon the minimum wage are automatically updated. For example, if the minimum wage is changed from $5.15 to $5.25, all employees with regular or overtime pay that is less than $5.25 will be changed to the new minimum wage amount.
Overtime rule Select an Overtime Rule from the drop-down menu. Overtime rules define when and how much overtime pay an employee will receive. They are defined in System Configuration | Labor | Rules/Laws | Overtime Definitions | Overtime Rule/Level Definition. For example, an employee may receive time and a half for working over 40 hours in a week.

Labor Management Setup Guide
44
Child Labor Laws Tab
Description
Select MICROS Desktop | System Configuration | Labor | Rules/Laws | Labor Laws | Child Labor Laws to open this form.
Click on the blue plus signto add another agerequirement (i.e., 17-18) tomeet State child labor lawrequirements.

Labor Management Setup Guide
45
Field Descriptions
Minimum age Enter the minimum age for which child labor laws apply.
Note Multiple age ranges can be setup (e.g., 15-16, 17-18) to parallel the laws of the state or province.
Maximum age Enter the maximum age for which child labor laws apply.
Maximum consecutive days Enter the maximum number of consecutive days (if any) that an employee covered by child labor laws may work.
Note Scheduling shows a Business Rule Warning (BRW) when a minor is scheduled for more consecutive days than defined here.
Age certificate required Select this option if an age certificate is required for employment. If this option is selected, age certificate information must be entered in MICROS Desktop | Employee Maintenance | Employee Setup | Personal for minors in this age range.
Work permit required Select this option if a work permit is required for employment. If this option is selected, work permit information must be entered in MICROS Desktop | Employee Maintenance | Employee Setup | Personal for minors in this age range.
Sunday exclusion Select this option if Sunday exclusion applies. If this option is selected, Scheduling displays a Business Rule Warning (BRW) if a minor in this age range is scheduled for Sunday.
Child overtime rule Select the applicable child overtime rules from the drop-down menu. This selection specifies when and how much overtime pay a minor in this age range receives.

Labor Management Setup Guide
46
Work Restrictions Tab
School Day Restrictions
Earliest arrival time Select this option if restrictions apply to the arrival time on a school day and enter the earliest arrival time for employees covered by child labor laws.
Latest departure time Select this option if restrictions apply to the departure time on a school day and enter the latest departure time for employees covered by child labor laws.
Maximum hours per day Enter the maximum hours per day that an employee covered by child labor laws may work on a school day.
Maximum hours per week Enter the maximum hours in a school week that an employee covered by child labor laws may work.
Maximum days per week Enter the maximum number of days in a school week that an employee covered by child labor laws may work.
Note Scheduling will display a Business Rule Warning (BRW) for shifts scheduled on school days that exceed these restrictions.

Labor Management Setup Guide
47
Non-School Day Restrictions
Earliest arrival time Select this option if restrictions apply to the arrival time on a non-school day and enter the earliest arrival time for employees covered by child labor laws.
Latest departure time Select this option if restrictions apply to the departure time on a non-school day and enter the latest departure time for employees covered by child labor laws.
Maximum hours per day Enter the maximum hours on a non-school day that an employee covered by child labor laws may work.
Maximum hours per week Enter the maximum hours during a non-school week that an employee covered by child labor laws may work.
Maximum days per week Enter the maximum number of days during a non-school week that an employee covered by child labor laws may work.
Note Scheduling will display a Business Rule Warning (BRW) for shifts scheduled on non-school days that exceed these restrictions. All of this information can be obtained from the requirements established in the state’s labor laws.

Labor Management Setup Guide
48
SCHEDULING BREAK RULES
Description
Select MICROS Desktop | System Configuration | Labor | Rules/Laws | Scheduling Break Rules to open this form.
Set up break rules in accordance to the law and the company’s policy. The scheduling application uses this setup information in assigning breaks to employees while scheduling and costing.

Labor Management Setup Guide
49
Field Descriptions
Name Enter the name of the type of break described on this form (e.g., Paid Lunch Break, Required Break, Bathroom Break, etc.).
Break type Select an option that is associated with breaks, either paid or unpaid.
Break duration Enter the number of minutes that defines the length of the break.
Duration before break Enter the default amount of time (in minutes) before a break can begin (i.e., how many minutes an employee has to work before taking this break). This will be the default used for scheduling the break in the Scheduling application.
For example, a server may get a 15-minute break after every 4 hours (240 minutes), but a server who is a minor may get a 30-minute break every 4 hours.
Note It is important to set up the break information in Time and Attendance in LM setup or in POS Configurator (if you currently have the 3700 or 2800 System) to replicate the same break parameters as accurately as possible. When employees clock out, the prompt “Are you taking a break?” displays. Prompting is setup in Time and Attendance | Breaks.

Labor Management Setup Guide
50
TIME AND ATTENDANCE
Description
Select MICROS Desktop | System Configuration | Labor | Time and Attendance | Time and Attendance to open this form.

Labor Management Setup Guide
51
Field Descriptions
General Tab Name This is a read-only field that displays the establishment’s name as entered in MICROS Desktop | System Configurator | Labor | General | Labor Settings.
Labor week start day Select the day of the week when the labor week starts from the drop-down menu.
Payroll type Select the type of payroll period from the drop-down menu. If a bi-weekly or 4-week payroll type is selected, a date must be entered in the Pay period start date field.
Pay period start date Select the start date of the pay period from the drop-down calendar. This field is enabled only if the Payroll type is bi-weekly or 4-week.
Number of hours in a salaried labor week Enter the total number of hours in a labor week for salaried employees. This field is used to calculate the hourly pay for salaried employees based on the annual salary defined.
Number days time card detail Enter the number of days to store time card detail.
Number lines on time card Enter the maximum number of lines to print on a time card. This field is enabled only if Time and Attendance is used.
Note The 3700 System assumes that time cards print on a slip printer. Printing always begins on the first printable line – 1” (2.5 cm) from the top of the card. Enter the number of lines that should print on the time card (before the system prompts the employee to insert a new card). MICROS slip printers print 6 lines per inch. If the system does not use slip printers, leave this field blank.

Labor Management Setup Guide
52
Allocate labor hours Some restaurants schedule employee shifts that last beyond the end of the business day. The system can be programmed to record this time in two ways:
• Allocate labor hours to actual business date
This option counts hours accrued on a shift to the business date on which they actually occur. This option is intended for use in most restaurants, including 24-hour operations.
Select this option to allocate hours for a shift that spans business dates to the business date on which they actually occur.
• Allocate labor hours to clock-in business day
This option counts hours accrued on a shift to the business date on which the employee clocked in. This option is intended for restaurants whose accounting and operational practices require the ability to clock employees out for a time in the future.
Select this option to allocate hours for a shift that spans business dates to the business date on which the employee originally clocked in.
Declare cash tips only Select this option if employees are required to declare cash tips only. This information is used to calculate cash tips in Payroll Preprocessing and to generate data for the Employee TRAC Statement.
Exclude Daily from Weekly Overtime This option is used to prevent any daily overtime hours from being counted towards weekly overtime. For example, if daily overtime is in effect after 8 hours and weekly overtime is in effect after 40 hours, five 12-hour days in the same labor week will result in 40 regular hours and 20 overtime hours. With this option disabled, the employee would be paid 28 regular hours and 32 overtime hours.
Labor category names Enter a name for this labor category. Labor categories are used for reporting the number of hours worked and the associated labor costs.

Labor Management Setup Guide
53
Time Clock Schedule Tab Import payroll from schedule Select this option to enable the ability to import payroll information from the Weekly Assignments form in the Scheduling application.
This procedure overwrites any time punches that have been entered through POS operations or the Payroll application, either as single punches or as imported schedules. Each employee will be paid according to the schedule regardless of the hours actually worked. Each time the schedule is imported, all entries will be overwritten in the Payroll application in favor of the schedule that exists in the Scheduling application. There is no limit on the number of times that a schedule may be imported, but there is no way to undo changes once the import has taken place. A schedule may no longer be imported once the period has been closed.
Enable time clock schedule Select this option to enable the Time Clock Schedule feature. Time Clock Schedule is a security feature that allows only scheduled employee access to the 3700 System. Restricting clock in and clock out times and break periods can control labor costs more effectively.
Enable scheduled job override Select this option to display a list of assigned jobs that an employee may clock into. This option is used in conjunction with the Clock in to a non-scheduled job option in POS Configurator | Employee Classes | Clock In/Sign In.
When this option is selected and an employee clocks in, if the employee is assigned to multiple jobs, the Job Code Selection window displays with a list of all jobs assigned to the employee. An asterisk (*) displays next to the job that the employee is scheduled for.
Require salary employees to clock-in Select this option to require salaried employees to clock in and out of the system.
Include salaried employees in labor cost Select this option to include salaried employees in labor cost calculation.
Schedule week start day Select the day of the week that the schedule week begins from the drop-down menu. This selection determines the start day for the schedule week that is displayed in the Scheduling application and in schedule-related reports.
Number of days to store schedule Enter the number of days to store the schedules in the database.
Authorization required for early clock in Select this option if employees need management authorization to clock in early.
Authorization required for late clock in Select this option if employees need management authorization to clock in late.

Labor Management Setup Guide
54
Authorization required for early clock out Select this option if employees need management authorization to clock out early.
Authorization required for late clock out Select this option if employees need management authorization to clock out late.
Grace period – clock in early Enter the length (number of minutes) of the early clock-in grace period (if any).
Grace period – clock in late Enter the length (number of minutes) of the late clock-in grace period (if any).
Grace period – clock out early Enter the length (number of minutes) of the early clock-out grace period (if any).
Grace period – clock out late Enter the length (number of minutes) of the late clock-out grace period (if any).
Note The authorizations and grace period times are populated by POS Configurator in Employees | Time and Attendance (if you currently have the 3700 or 2800 System).
Breaks Tab Enforce scheduled breaks By law, employers are required to ensure that employees are given breaks at specified times during their shift. If these breaks are not taken, or are taken but not within the time that has been defined by law, a serious fine can be levied against the employer.
To help control this situation, when the Scheduling application is installed and the Time Clock Scheduler is enabled on the POS system, scheduled breaks can be automatically enforced by
enabling the Enforce scheduled breaks option on the Time and Attendance | Breaks form.
If the employee is scheduled for a break and is taking the break early or late, the time clock will automatically determine if a manager’s authorization is required. In these cases, established grace periods will apply. When the employee is returning from break and is outside the clock in grace period, the employee will need a manager override to clock back into the system.
If the employee is taking an unscheduled break, a manager can authorize him/her to take a break “on-the-fly” and choose which break rule should apply. When the employee clocks in from a break, established break authorization rules will be enforced.
Managers can use the Scheduled vs. Actual Time Card report to verify that breaks are being adhered to and what, if any, break violations are occurring.

Labor Management Setup Guide
55
Prompt for Break on clock out Select this option to prompt “ARE YOU TAKING A BREAK?” when an employee clocks out. To clock out for a break, press [Enter] or [Yes]. To clock out for the end of the shift, press [Clear] or [No]. Do not enable this option if prompts should not display when clocking out. In this scenario, if an employee clocks out, the system considers the employee clocked out from his or her shift.
Note Breaks tracked by this option are tracked as unpaid breaks, unless the option Prompt for
paid break on clock out is selected.
Prompt for paid break on clock out Select this option to prompt an employee to confirm that he or she is taking a paid break when clocking out. Do not enable this option if all breaks are tracked as unpaid break time.
Authorization required for Early in from paid break Select this option if employees need management authorization for clocking in early from a paid break.
Authorization required for Late in from paid break Select this option if employees need management authorization for clocking in late from a paid break.
Authorization required for Early in from unpaid break Select this option if employees need management authorization for clocking in early from an unpaid break.
Authorization required for Late in from unpaid break Select this option if employees need management authorization for clocking in late from an unpaid break.
Regular Break Durations Paid - minimum Enter the minimum length (in minutes) of a regular paid break.
Regular Break Durations Paid - maximum Enter the maximum length (in minutes) of a regular paid break.
Regular Break Durations Unpaid - minimum Enter the minimum length (in minutes) of a regular unpaid break.
Regular Break Durations Unpaid - maximum Enter the maximum length (in minutes) of a regular unpaid break.
Minor Break Durations Paid - minimum Enter the minimum length (in minutes) of a minor paid break.
Minor Break Durations Paid - maximum Enter the maximum length (in minutes) of a minor paid break.

Labor Management Setup Guide
56
Minor Break Durations Unpaid - minimum Enter the minimum length (in minutes) of a minor unpaid break.
Minor Break Durations Unpaid - maximum Enter the maximum length (in minutes) of a minor unpaid break.
Note The duration times are populated by POS Configurator in Employees | Time and Attendance (if you currently have the 3700 or 2800 System).
Staff Requirements Tab The Staff Requirements Generation (SRG) function provides managers two methods for generating labor needs for jobs — Standards and Template Sets. The Standards method allows you to define a matrix of standards for each day part or 15 minute interval that includes a forecast element, lead or lag time, and standard to requirement ratios. The Template Sets method allows you to create template sets that base employee requirements on historical information.
Prior to using either of these methods to generate staff requirements, forecasts must be created. Once the labor needs are generated, employees can be scheduled based on these requirements, allowing for more accurate scheduling and better control over labor costs.
In order to implement this functionality, parameters for the fields listed below must be defined.
Requirements time interval Click the drop-down arrow to select the default time interval for Staff Requirements Generation.
You can define whether to create requirements in 1/4 hour or day part segments. If 1/4 hour is
chosen, a requirement will be created for every 15 minutes of every day. If Day part is chosen, for each day part defined in MICROS Desktop | System Configuration | Forecasting | Day Parts (e.g., breakfast, lunch dinner), there will be one requirement created for each day part for each day.
Default template set Click the drop-down arrow to select the default template set for all jobs that use the template method for Staff Requirements Generation. For this field to be populated, there must be at least one template set up in MICROS Desktop | System Configuration | Labor | Staff Requirements | Template Setup.
Number of days to store generated requirements Enter the number of days to store generated staff requirements in the database before purging.
Auto schedule shift length (in hours) Enter the default shift length when using the Auto Schedule function to create weekly schedules.

Labor Management Setup Guide
57
Payroll Tab
Payroll Export Settings Payroll export Select the payroll export from the drop-down menu.
Custom payroll export application name Enter the payroll export application name.
Custom payroll export application parameters Enter the payroll export application parameters.
Deductions Post employee meal tenders to payroll deductions With this option enabled, when an employee meal is entered through the POS system, then posted through end of night procedures, the employee meal will post directly into Payroll Preprocessing | Deductions so that the balance of the meal can be taken from the employee's payroll check.
Employee meal descriptor Enter a name that will display in the Deduction column on the Deductions form in the Payroll Preprocessing application when an employee meal is posted from the POS system. This field may contain up to 32 alphanumeric characters, including spaces (e.g. Employee meal).

Labor Management Setup Guide
58
JOBS
Description
Select MICROS Desktop | System Configuration | Labor | Time & Attendance | Jobs to open this form.

Labor Management Setup Guide
59
Field Descriptions
Name Enter the names of the jobs (e.g., Salaried Manager, Server, Busser, and Retail Cashier) that are associated with the operation. A job is an accounting entity that enables the system to track the labor activity of a group of employees by their work category. Jobs are used for two purposes:
• They link hourly employees to a specific wage rate when they clock in.
• They group labor hours and costs into job categories on reports for labor cost analysis.
General Tab
Job category Select a job reporting category for this job from the drop-down menu. A job category provides a means for grouping several jobs for reporting purposes. For example, dishwashers, chefs, and cooks may be grouped in a job category called Kitchen Staff. Job categories are created on the Categories tab. Categories must be created before they will appear in the drop-down menu.
Overriding employee class Select an employee class from the drop-down menu whose privileges will override an employee’s regular class when working this job. The employee classes are established in MICROS Desktop | System Configurator | Security and Privileges | Employee Classes.
Revenue center Select a Revenue Center from the drop-down menu in which this job is effective. Revenue Centers are defined in MICROS Desktop | System Configuration | Revenue Centers | General | Transactions.
Labor category Select a labor category from the drop-down menu for reporting the hours worked at this job. Labor categories are defined in MICROS Desktop | System Configuration | Labor | Time and Attendance | Time and Attendance.
Clock-in privilege Select a clock-in privilege from the drop-down menu that an employee must have in order to clock in for this job. Clock-in privileges are assigned to employee classes in POS Configurator | Employee Classes (Privileges). Individual employees may have their own clock-in privilege if one is assigned in POS Configurator | Employees (Job Rates). The clock-in privilege is populated from POS Configurator (if you currently have the 3700 or 2800 System) in Employees | Jobs.
Declare direct tips on clock out Select this option if this job requires declaration of direct tips on clock out. Employees in this job will be prompted to declare their direct tips when clocking out.
Declare indirect tips on clock out Select this option if this job requires declaration of indirect tips on clock out. Employees in this job will be prompted to declare their indirect tips when clocking out.

Labor Management Setup Guide
60
Allow early or late clock out Select this option to allow employees working this job to clock out early or late even when their employee class is not privileged to do so.
Print tips declared on clock out Select this option to print a chit with the declared tips amount when an employee working this job clocks out. The chit prints the total amount of tips declared by the employee for that shift.
Tipped Select this option if an employee in this job receives direct or indirect tips. This option defines tipped jobs for calculating the tip credit.
Job Color Click the drop-down arrow to select a color that will identify this job category. The color assignments are reflected on the Weekly Assignments form when scheduling employees, and on the Daily Line Up Gantt Report. If no selection is made, the color defaults to black.
Minimum age Enter the minimum age requirement for this job (e.g., a bartender must be 21 to mix alcohol and a server must be 18 to serve alcohol).
Note
Jobs cannot be assigned to employees in Human Resources | Employee Setup that fall below the minimum age. A Business Rule Violation will be displayed stating that the employee is too young for this job.
Type Tab
Pay effective date Enter the date when this pay rate takes effect. Until this date becomes effective, the previous pay rate amount will be used. The wage will take effect at 12:00 AM on the date specified. Any employee that is clocked in at 12:00 AM will continue that shift at the old wage rate. The new rate will take effect with their next clock-in.
Hourly Select this option for a job that pays an hourly rate.
Salary Select this option for a salaried job (i.e., a job that does not pay an hourly rate).
Non-clock Select this option to enable non-clock pay for the selected job. By setting up this job type, an employee can be “paid” for a non-clocked “job” (e.g., vacation, bonus, retro pay, and shift
differential pay). Non-clock jobs are not included in overtime calculations.

Labor Management Setup Guide
61
Default regular rate Enter the default pay rate for this job. The default pay rate is the normal starting pay for this position at this location.
Minimum regular rate Enter the minimum regular pay rate for this job. The minimum pay rate is the lowest starting pay for this position at this location.
Maximum overtime rate Enter the maximum overtime pay rate for this job. The maximum overtime rate is the highest overtime pay for this position at this location.
Maximum regular rate Enter the maximum pay rate for this job. The maximum pay rate is the highest non-overtime pay for this position at this location.
Overtime level Select the name of an overtime level for the selected job from the drop-down menu. Overtime levels entered here are specific for the selected job. A Business Rule Warning (BRW) displays if the default overtime rate exceeds the maximum overtime rate. This warning will occur only when a wage multiplier is not used.
Default This field displays the default overtime rate for the job definition selected at the indicated overtime rate. A Business Rule Warning (BRW) displays if the default overtime rate exceeds the maximum overtime rate. This warning will occur only when a wage multiplier is not used.
Note
This field is overridden if the Override overtime rate is defined in Human Resources | Employee Setup tab.
Overtime rule (salary jobs) Select the overtime rule that applies to the selected salaried job.
Note
This option may be used for managers that clock in/out and receive overtime after a certain number of hours. For example, a separate overtime rule could be defined for managers who receive time and a half overtime after working 50 hours.
Require number of hours (non-clock jobs) Select this option if a quantity of hours must be entered when adding non-clock pay to an employee’s earnings in Payroll Preprocessing.
Include in labor calculation (non-clock jobs) Select this option if the cost of non-clock pay should be factored into labor costs for the location.

Labor Management Setup Guide
62
Note
Non-clock pay cannot be scheduled and will not be calculated into scheduled costs. Thus, when this option is selected and an employee receives non-clock pay, it creates a variance between scheduled costs and actual labor costs on reports.
Require amount entry (non-clock jobs) Select this option to require a monetary amount to be entered when adding non-clock pay to an employee’s earnings in Payroll Preprocessing.
Default rate to primary job (non-clock jobs) Select this option to make the non-clock wage rate the same as the hourly or salaried rate for the primary job.
Allow rate override (non-clock jobs) Select this option if the non-clock wage rate can be overridden.
Premium Pay Tab
Assigned definitions This box displays the premium pay definitions that are currently assigned to the selected job.
Unassigned definitions This box displays all the premium pay definitions that you can assign to the selected job.
Example
A new premium pay definition is assigned to the “Cook” position. Only employees that are currently clocked in need to clock out and back in to receive the premium pay associated with this position.
Note
Updates are not effective until the next employee with a job that premium pay is assigned to clocks in.

Labor Management Setup Guide
63
Categories Tab Job categories are used to categorize the different jobs in the restaurant. By using categories, managers can create schedules and report on certain areas of the restaurant. For example, servers, bartenders, and hosts might fall in the Front of House job category. A manager can then schedule the Front of House separate from the Kitchen.
By selecting a job category in the Scheduling application, only the jobs that fall into the selected category display in the job field. Managers can then schedule all employees in the selected job category or they can narrow the selection by selecting a job and schedule employees within the job.
To define a job category, click the Insert icon on the navigation bar, then enter the name of the job category in the highlighted Name field. Click the Save icon on the navigation bar to save the job category. To link jobs to job categories, go to LM Setup | Time and Attendance | Jobs | Definitions | General. Select the job Name. Select a job category from the drop-down list to link it to a job. Click the Save icon on the navigation bar to save the job category.

Labor Management Setup Guide
64
SKILL LEVELS
Description
Select MICROS Desktop | System Configuration | Labor | Time & Attendance | Time & Attendance | Skill Levels to open this form.
Set up skill levels that are associated with the employees. These levels assist with scheduling employees properly. Use your imagination to create levels that represent the growth in job skill. Be sure to use a naming scheme that everyone will understand.
Note
Skill levels are used by the Human Resources application to rate an employee’s proficiency in a particular job, and in the Scheduling Application to describe an employee’s proficiency when adding him or her to the schedule.

Labor Management Setup Guide
65
DEDUCTIONS
Description
Select MICROS Desktop | System Configuration | Labor | Time & Attendance | Deductions to open this form.
Set up a standard set of deductions that will be used for in the Payroll Preprocessing application.

Labor Management Setup Guide
66
Field Descriptions
Deduction Type Use the drop-down arrow to select Amount or Percentage as this deduction type.
Default Amount If the selected deduction type is Amount, enter the default amount in dollar format (e.g., $75.00). This amount can be changed later when assigning a deduction to an employee.
Default Percentage If the selected deduction type is Percentage, enter the default percentage (e.g., 15.00%). This percentage can be changed later when assigning a deduction to an employee.

Labor Management Setup Guide
67
FORECASTING
DAY PARTS
Description
Select MICROS Desktop | System Configuration | Forecasting | Day Parts to open this form.

Labor Management Setup Guide
68
Field Descriptions
Name Enter a name for the part of the day that will be associated with days and times (i.e., Breakfast, Lunch/Brunch, etc.). Day parts are a result of the division of restaurant hours into parts. They display in the Forecasting application to break up the day. For example, breakfast, lunch, dinner, and brunch may be defined as day parts, and in the Forecasting application.
Day Select a weekday from the drop-down menu to be included in the selected day part. For example, lunch may run Monday through Friday, while brunch only exists on Saturday and Sunday.
Start time Enter the time that the selected day part starts. For example, lunch starts at 12:00pm.
End time Enter the time that the selected day part ends. For example, lunch ends at 4:00pm.

Labor Management Setup Guide
69
HISTORICAL INFORMATION
Description
Select MICROS Desktop | System Configuration | Forecasting | Historical Information to open this form.

Labor Management Setup Guide
70
Field Description
Historical Totals Select the historical totals to use from the drop-down list. This must be defined for each record.
Import Properties Button Select this button to choose POS import parameters by which POS historical totals are linked to historical information in Forecasting Explorer. When this button is clicked, a list of the available parameters will display. When one is selected, the associated Parameters form will display where you must make the appropriate designations (e.g., revenue center, major group, order type, etc.).
Name Enter a descriptive name related to the type of historical information linked to this record (e.g., Restaurant Guest Count, Retail Sales, Table Turns, etc.)

Labor Management Setup Guide
71
SRG SETUP
SRG Setup | General Tab
Description
Select MICROS Desktop | System Configuration | Labor | Staff Requirements | Staff Requirements Setup to open this form.

Labor Management Setup Guide
72
Field Description
Work hours Select the work hours for which you are defining staff requirements. Work hours are defined under LM Setup | Rules/Laws.
Weekday Displays the day of the week in this work hour profile.
Start time Displays the time to begin scheduling employees.
End time Displays the day of the week in this work hour profile.
Requirement method Select the appropriate requirement method from the following:
• None—No requirement method is used. This is the default setting.
• Standards—This option allows you to define a matrix of standards for each day part or 15 minute interval that includes a forecast element, lead or lag time, and standard to requirement ratios.
• Template sets—This method allows you to create template sets that base employee requirements on historical information. Each template set consists of individual templates (jobs) for which you enter the number of required employees per day part for each weekday. A job can only be included in a template set once, but not all jobs have to be included.
Standards Tab Day part Displays the day part for which you are defining standards. Day parts are defined in LM Setup | Forecasting.
Forecast element Displays the forecast element to be used for the specified day part. Forecast elements are defined in Forecast Setup | Forecasting Explorer.
Lead Specify how many minutes of lead-time are needed to generate the proper number of requirements for the selected day part.
Lag Specify how many minutes of lag time are needed to generate the proper number of requirements for the selected day part.

Labor Management Setup Guide
73
Standard Enter the standard range for this record. The standard to requirement ratios allow you to specify at what point your requirements change. This range depends on the forecast element selected. Standards must be entered in whole numbers and in increasing values.
Requirement Enter the requirements for this standard. Requirements must be entered in whole numbers and in increasing values.

Labor Management Setup Guide
74
TEMPLATE SETS
Description
Select MICROS Desktop | System Configuration | Labor | Staff Requirements | Template Sets to open this form.
Field Description
Job Displays the job for which template parameters can be defined. This drop-down displays jobs that
are defined with a Requirement Method of Template sets in LM Setup | Staff Requirements | SRG Setup.
Labor Management Setup Guide
75
PREMIUM PAY
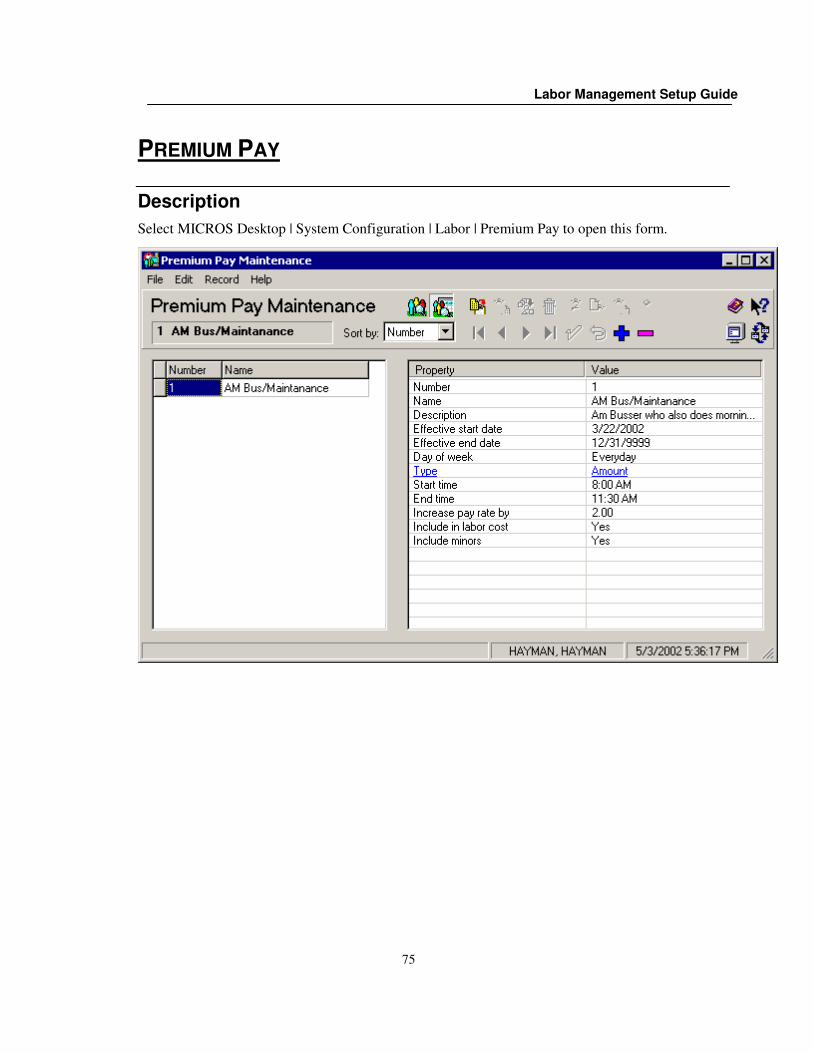
Description
Select MICROS Desktop | System Configuration | Labor | Premium Pay to open this form.

Labor Management Setup Guide
76
Field Description
Name Enter the name of the premium pay.
Property This column displays the properties that may be defined for a premium pay definition. To modify a premium pay definition, click a property or value to display the information in the Premium Pay wizard.
Value This column displays the property values for the premium pay definition. To modify a premium pay definition, click a property or value to display the information in the Premium Pay wizard.

Labor Management Setup Guide
77
Premium Pay Wizard Click on the Add button to open the Premium Pay Wizard.
Field Description
Number Displays the number that this record is associated with in the database.
Name Enter the name of the premium pay.
Description Enter a description for the premium pay. For example, enter the ‘Pay for working 10pm-6am’ description for the Night Differential premium pay.
Effective start date Select a starting date for the premium pay. The Effective start date field defaults to tomorrow’s date and may not be a date in the past.
Effective stop date Select an ending date for the premium pay. The Effective stop date defaults to 12/31/9999 and may not be before the Effective start date.

Labor Management Setup Guide
78
Effective days (Everyday, Day of week, Calendar day, Calendar day range) Specify the days within the effective start and stop dates that this premium pay will be in effect. A premium pay may be in effect everyday or for a specific day of the week, calendar day or range of calendar days.
Type Select the type of premium pay.
• Amount—A flat hourly rate amount or percentage of minimum wage, primary job, highest clocked in rate, or current clocked in rate may be awarded to the employee.
• Hours—The number of hours and a flat hourly rate amount or percentage of minimum wage, primary job, highest clocked in rate, or current clocked in rate may be awarded to the employee.
• Split Shift—State law may require that an employee be paid for an extra hour of work if the employee is scheduled to work two shifts in a day that are more than 1 hour apart. This extra hour is paid to the employee, but may not be included in overtime hours.
Start/End time Select the time of day for the premium pay. If you want a condition to span over midnight, you will need to define the condition twice: once to cover the time up until midnight, and again for the time past midnight. For example, the closing cook works from 7pm until 2am. You create two premium pay definitions: Closing Cook 1 with the start/end times 7pm to midnight, and Closing Cook 2 with the start/end times midnight to 2am. Both definitions are linked to the job ‘Cook’ in Time and Attendance | Jobs.
Increase Hourly Rate By Specify the amount for an employee’s hourly rate to be increased by for the premium pay. This may be a flat amount or a percentage of the minimum wage, primary job, highest clocked in rate, or current clocked in rate.
Include in labor cost Select this option to include the premium pay in labor cost calculations.
Include minors Select this option for the premium pay to be available for minors.

Labor Management Setup Guide
79
HUMAN RESOURCES
EMPLOYEE SETUP
Employee Setup | General Tab
Description
Select MICROS Desktop | Employee Maintenance | Employee Setup | General to open this form.
Update the employee information that is currently in the 3700 or 2800 POS System.

Labor Management Setup Guide
80
Field Descriptions
Prefix If the employee's name has a prefix (e.g., Mr., Mrs., Dr., Prof.), select it from the drop-down menu.
First name Enter the employee’s first name.
Middle Enter the employee’s middle name.
Last name This name will be auto-generated from what you entered in the Last Name record field.
Suffix If the employee’s name has a suffix (i.e., Jr., Ph.D., etc.), select it from the drop-down menu.
Check name Enter the employee’s name, as it will appear on guest checks. This field defaults to the employee’s first name, followed by the first letter of their last name (i.e., Margaret Baker will appear as Margaret B.)
Previous name Enter the employee’s previous name (e.g., maiden name) if one was used since being hired.
SSN/SIN Enter the employee’s Social Security Number (US), Social Insurance Number (Canada), or National Insurance Number (UK).
Picture This feature displays a digital picture of the employee.
Assign image Enter the path and filename to import an electronic image of the employee (e.g., a bitmap file containing the employee’s photograph).
Note
Only image files with the following extensions can be used: .bmp, .ico., .wmf, and .emf.
View image Click this button to view the image in a different window.
User defined fields These alphanumeric and numeric fields can be used for site-specific purposes (i.e., Uniforms Received, Received Employee Manual, etc.) These fields are defined in Labor Management | General | LM Parameters.

Labor Management Setup Guide
81
Employee Setup | Personal Tab
Description
Select MICROS Desktop | Employee Maintenance | Employee Setup | Personal to open this form.

Labor Management Setup Guide
82
Field Descriptions
Gender Select male or female.
Date of birth Enter the employee’s date of birth or click on the drop-down calendar to select the date of birth.
Ethnicity Select the employee’s preferred ethnicity from the drop-down list. This information is defined in Labor Management | General | User Defined Domain.
Veteran/Disabled Select this option if the employee is a veteran or disabled. If this option is selected and the employee is disabled, you will be required to complete the Registered disabled number field.
Registered disabled number Enter the employee’s registered disabled number (if applicable).
User defined fields These are alphanumeric and numeric fields that can be used for site-specific purposes (i.e., Uniforms Received, Received Employee Manual, etc.). These fields were set up in Labor Management | General | LM Parameters.
Work permit information Permit number Enter the employee’s work permit number (if required).
Expiration date Enter the expiration date of the employee’s work permit or click on the drop-down calendar to select a date.
Note
The permit number and expiration date are required if the work permit option is selected in Labor Management | Rules/Laws | Labor Laws | Child Labor Laws and if the employee falls within the specified age range.

Labor Management Setup Guide
83
Age certificate Permit number Enter the employee’s age certificate number (if required).
Expiration date Enter the expiration date of the employee’s age certificate or click on the drop-down calendar to select a date.
Note
The age certificate number and expiration date are required if the age certificate option is selected in Labor Management | Rules/Laws | Labor Laws | Child Labor Laws and the employee falls within the specified age range.
Exclude from EU directives Select this option to exclude this employee from EU Directives (applicable only in the European Union).

Labor Management Setup Guide
84
Employee Setup | Contact Information Tab
Description
Select MICROS Desktop | Employee Maintenance | Employee Setup | Contact Information to open this form.

Labor Management Setup Guide
85
Field Descriptions
Address Enter the employee’s address.
Country Select the country where the employee lives from the drop-down list.
Note
A country must be selected before a state/province.
City Enter the name of the city where the employee lives.
State/Province Select the state or province where the employee lives from the drop-down list.
Note
The country and state/province are defined in Labor Management | General | Country Descriptor.
Postal Code Enter the postal code of the employee’s residence.
County Enter the name of the county where the employee lives.
In city limits Select this option if the employee lives within the city limits of the city entered in the City Field.
Lives on property Select this option if the employee lives on the property.
School district Select the name of the school district in which the employee resides from the drop-down list. School districts are defined in Labor Management | General | School Districts.
Email address Enter the employee’s email address, if applicable.
Phone number Enter the employee’s home telephone number.
Unlisted Select this option if the employee's home telephone number is to be unlisted. When this option is enabled, the phone number will not be printed on the Employee Phone Listing Report (through HR), or the Phone List Report (through Report Explorer). All other applicable reports will include the phone number.

Labor Management Setup Guide
86
Extension Enter the extension of the employee’s home telephone number, if applicable.
Fax number Enter the employee’s fax number, if applicable.
Pager number Enter the employee’s pager number, if applicable.
Extension Enter the employee’s pager number suffix or extension, if applicable.
Mobile number Enter the employee’s mobile phone number, if applicable.
Emergency Contact Name Enter the name of a person to contact in case of an emergency involving the employee.
Address Enter the complete address of the employee’s emergency contact.
Phone Number Enter the telephone number of the employee’s emergency contact.
Relationship Enter a description of the employee’s relationship to the emergency contact (e.g., spouse, parent, next of kin, partner, etc.)

Labor Management Setup Guide
87
Employee Setup | I-9 Information Tab
Description
Select MICROS Desktop | Employee Maintenance | Employee Setup | I-9 Information to open this form.

Labor Management Setup Guide
88
Field Descriptions
INS status Select the employee’s Immigration and Naturalization Service (INS) status from the drop-down list (i.e., Alien, Citizen, or Permanent Resident).
Alien/Admission number If the employee is an alien or permanent resident, enter the employee’s alien/admission number.
Expiration date If an alien is authorized to work only until a specific date, enter the date or click on the drop-down calendar and select the date.
Select document type from one of the following List A Select this option to enter one document from List A.
List B and C Select this option to enter one document from List B and one document from List C.
Note
It is illegal for employers to specify the document(s) that can be accepted from an employee.
List A Document type Select one document type from the drop-down list. One document from List A establishes both identity and employment eligibility.
Document ID Enter the document number and issuing authority, if any.
Expiration date Enter the expiration date or click on the drop-down calendar and select a date.

Labor Management Setup Guide
89
List B and C Document type Select one document type for List B and one for List C from the drop-down lists. One document from List B and one from List C establishes identity and employment eligibility.
Document ID Enter the document number and issuing authority and/or other identifying feature.
Expiration date Enter the expiration date or click on the drop-down calendar and select a date.

Labor Management Setup Guide
90
Employee Setup | Exemptions Tab
Description
Select MICROS Desktop | Employee Maintenance | Employee Setup | Exemptions to open this form.

Labor Management Setup Guide
91
Field Descriptions
Federal Marital status Select the employee’s marital status. The marital status list is defined in Labor Management | General | User Defined Domain.
Exemptions Enter the number of exemptions. Negative numbers are not accepted.
Tax exempt Select this option if the employee is exempt from federal tax.
Additional withholdings Enter the dollar amount of any additional withholdings (e.g., $30.00).
Note
Refer to the employee’s completed W-4 Form (Employee’s Withholding Allowance Certificate) to fill in the federal additional withholding data.
Earned income credit If the employee qualifies for Earned Income Credit, select a type from the drop-down list (i.e., Single, Married Filing Jointly, Head of Household, etc.).
State Marital status Select the employee’s marital status. The marital status list is defined in Labor Management | General | User Defined Domain.
Exemptions Enter the number of exemptions. Negative numbers are not accepted.
Tax exempt Select this option if the employee is exempt from state tax.
Additional withholdings Enter the dollar amount of any additional withholdings (e.g., $40.00).
Note
Refer to the employee’s completed state Withholding Allowance Certificate to fill in this data.

Labor Management Setup Guide
92
Local Exemptions Enter the number of exemptions. Negative numbers are not accepted.
City Additional withholdings Enter the dollar amount of any additional withholdings for city tax (e.g., $60.00).
Tax exempt Select this option if the employee is exempt from city tax.
County Additional withholdings Enter the dollar amount of any additional withholdings for county tax (e.g., $75.00).
Tax exempt Select this option if the employee is exempt from county tax.

Labor Management Setup Guide
93
Employee Setup | Security Tab
Description
Select MICROS Desktop | Employee Maintenance | Employee Setup | Security to open this form.

Labor Management Setup Guide
94
Field Descriptions
Password ID Enter a password ID to access the POS system (workstations). Up to 10 digits are accepted.
Note
When adding an employee, the ID defaults to the last four digits of the employee’s SSN or SIN. If the LM Parameter is set to US, the system will automatically assign the last four digits of this number to that employee's ID.
PC application ID Enter a unique four-digit number to access the back office system.
Payroll ID Enter the employee’s payroll ID number.
Employee class Select an employee class from the drop-down list. Employee Classes are defined in POS Configurator | Employees | Employee Classes.
Back office employee class Select a back office employee class from the drop-down list. Back Office Classes are defined in Labor Management | General | Security Access.
HTML Enter the name of the HTML file that the desktop will default to for this employee.
User Defined Fields These are alphanumeric and numeric field captions that are defined in LM Setup | General | LM Parameters | User Defined Fields.

Labor Management Setup Guide
95
Employee Setup | Employee Status Tab
Description
Select MICROS Desktop | Employee Maintenance | Employee Setup | Employee Status to open this form.

Labor Management Setup Guide
96
Field Descriptions
Hire date Enter the employee’s hire date or click on the drop-down calendar and select a date.
Note
A future date can be entered, but the employee will not be able to sign in to the POS system until the specified hire date occurs.
Original hire date Enter the original hire date if it differs from the employee’s most recent hire date (e.g., the employee has resigned and returned).
Hire status Select the employee’s hire status. Transferred or borrowed status requires the store from which the employee transferred or is borrowed.
Transferred/Borrowed from store If the employee is transferred or borrowed from another store, identify the store (e.g., store number, location, etc.) from which the employee is transferring or being borrowed.
Status This field displays the employee’s employment status (e.g., Active, Inactive, or Terminated).
Job position Select Temporary or Permanent to describe the nature of the employee’s position.
Part-time Select this option if the employee is employed on a part-time basis. By default, this option is disabled.
POS status The Effective from and Effective to dates are read only fields that display the date range that an employee may access the POS system. For example, if an employee takes leave of absence and becomes inactive, the Effective to date will mirror the employee’s Inactive from date (i.e., the first day of leave). The employee will not be able to access the POS system until their status changes back to active.

Labor Management Setup Guide
97
Terminated Date Enter the employee’s date of termination or click on the drop-down calendar and select a date.
Status Select a termination status from the drop-down list (e.g., Transfer, Quit, Discharge, or Layoff).
Transferred to store If the employee transferred to another store, identify the store (e.g., store number, location, etc.).
Rehire Select the appropriate option if the employee is eligible or not eligible for rehire.
Termination notes… Click this button to open a notepad to enter text pertaining to the employee’s termination
Reasons (for terminations) Select a reason(s) for termination from the drop-down list. Reasons are defined in Labor Management | General | Reasons.
Inactive Inactive from Enter the date that the employee’s status changed to inactive or click on the drop-down calendar to select a date.
Inactive to Enter the date that the employee’s status will cease to be inactive or click on the drop-down calendar to select a date.
Reason (for inactive) Select the reason why the employee became inactive from the drop-down list. A Business Rule Warning (BRW) will appear in the inactive date field if the Inactive to date for the reason is exceeded. Reasons are defined in Labor Management | General | Reasons.
Return an employee from leave of absence This icon button appears in focus when an employee has an Inactive from/to date set. When an employee is ready to return from leave of absence, click this icon.

Labor Management Setup Guide
98
Employee Setup | POS Tab
Description
Select MICROS Desktop | Employee Maintenance | Employee Setup | POS to open this form.

Labor Management Setup Guide
99
Field Descriptions
Revenue center Select the employee’s Revenue Center from the drop-down list.
In training Select this option if the employee is in training. Training mode allows an employee in training to post sales without affecting real system totals.
Note
A separate set of training totals is maintained. Remote order printing is disabled (so that the kitchen does not prepare any training orders). The system does print guest checks and customer receipts for employees in training, but a special training header will print for security purposes.
Minor Select this option if the employee is a minor. This option is used by POS Operations to prompt for breaks for minors.
Late clock in grace Enter the length (in minutes) of this employee’s late clock-in grace period, if applicable.
LDS ID Enter this employee’s ID for accessing the Liquor Dispensing System (LDS), if any.
Cash drawer status Select the cash drawer(s) to which this employee has access. If a cash drawer is not selected, the system defaults to None.
Cashier Select the cashier to which this employee’s transaction totals will post. Cashier totals are assigned to individual employees so they can balance the flow of money in and out of a workstation cash drawer.
Language Select the language that the system will use when this employee is signed in.

Labor Management Setup Guide
100
Employee Setup | Notes Tab
Description
Select MICROS Desktop | Employee Maintenance | Employee Setup | Notes to open this form.
Field Descriptions
Notes Enter notes pertaining to the employee.

Labor Management Setup Guide
101
Employee Setup | Hourly Job Tab
Description
Select MICROS Desktop | Employee Maintenance | Employee Setup | Hourly Job to open this form.
Field Descriptions
Allow sub-minimum wage pay Select this option if the employee is to be paid at a rate below the minimum wage. When this option is selected for an employee, you must enter the rate in the ($) Override field.

Labor Management Setup Guide
102
Name Select the name of the employee’s hourly job from the drop-down list. Jobs are defined in Labor Management | Time and Attendance | Jobs. Jobs will be populated if you currently have the 3700 or 2800 System).
Note
A Business Rule Warning or Violation (BRW or BRV) displays if an employee is assigned to a job and he or she does not meet the minimum age requirement for the job.
Skill level Select a job skill level for each job from the drop-down list. The skill level rates how well the employee performs the specified job. Skill Levels are defined in Labor Management | Time and Attendance | Skill Levels.
Primary Select this box to indicate the employee’s primary job.
($) Default This field displays the default hourly pay rate for the defined job. The default pay rate is the regular starting pay rate for this position.
($) Override Enter the employee’s hourly pay rate for this job if it is different than the default pay rate. Leave this field blank if the employee earns the default pay rate for this job.
Rate effective date Enter the date that this pay rate is effective. This date cannot be set in the past. If this field is left blank, the rate is effective immediately. Otherwise, the rate becomes effective on the date specified.
Pay change reason Select a reason for the pay rate change. This field may be left blank.
($) Minimum This field displays the minimum regular pay rate. Minimum regular pay rate is the lowest starting pay for this position.
($) Maximum This field displays the maximum regular pay rate. Maximum regular pay rate is the highest non-overtime pay for this position.
Note
The default hourly rate, minimum regular pay rate and maximum regular pay rate are defined in System Configuration | Labor | Time and Attendance | Jobs | Definitions | Type.
Override clock privilege Select an override clock privilege. The higher the number, the greater the access.

Labor Management Setup Guide
103
Exempt from overtime Select this option if the employee is exempt from overtime.
Overtime level This column displays the overtime level(s) defined for the selected job type. Overtime levels are defined in System Configuration | Labor | Rules/Laws | Overtime Definition.
($) Default pay rate Displays the default overtime rate defined for the job in System Configuration | Labor | Time and Attendance | Jobs.
($) Override overtime rate If not using wage multipliers, enter the override overtime pay rate. If using wage multipliers, this displays the hourly overtime pay rate this employee earns based on the regular override entered.
($) Maximum overtime rate This field displays the maximum overtime pay rate allowed for a job, as defined in System Configuration | Labor | Time and Attendance | Jobs | Definition | Type.

Labor Management Setup Guide
104
Employee Setup | Salary Job Tab
Description
Select MICROS Desktop | Employee Maintenance | Employee Setup | Salary Job to open this form.

Labor Management Setup Guide
105
Field Descriptions
Salaried Select this option if the employee is compensated by salary.
Note
If this option is selected, all hourly jobs for the employee are set to inactive.
Salary start date This field displays the employee’s salary start date.
Salaried rates Select any salary rate option and enter the employee’s salary rate in its corresponding field and the system will automatically calculate the other salary rates.
Overtime level If the Require salaried employees to clock in option in LM Setup | Time and Attendance | Time Clock Schedule is selected, the Salary Job overtime grid is active, and an Overtime level may be selected. For example, a restaurant may want to pay salaried employees overtime after working 70 hours in a week. A special overtime rule may be set up for this and linked to the salary job.
Override overtime rate If the Require salaried employees to clock in option in LM Setup | Time and Attendance | Time Clock Schedule is selected, the Salary Job overtime grid is active, and an Override overtime rate may be selected.
Name Select the name of the employee’s hourly job from the drop-down list. Jobs are defined in Labor Management | Time and Attendance | Jobs. Jobs will be populated if you currently have the 3700 or 2800 System).
Note
A Business Rule Warning or Violation (BRW or BRV) displays if an employee is assigned to a job and he or she does not meet the minimum age requirement for the job.
Skill level Select a job skill level for each job from the drop-down list. The skill level rates how well the employee performs the specified job. Skill Levels are defined in Labor Management | Time and Attendance | Skill Levels.
Primary Select this box to indicate the employee’s primary job.
Override clock privilege Select an override clock privilege. The higher the number, the greater the access.
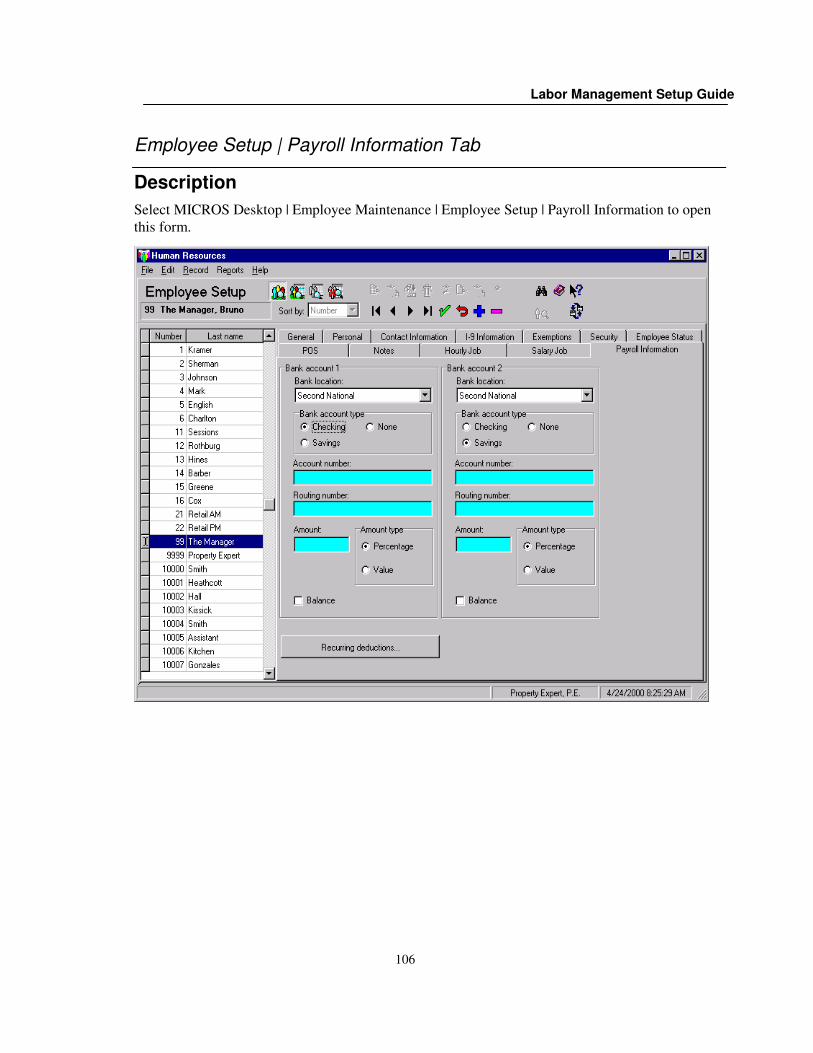
Labor Management Setup Guide
106
Employee Setup | Payroll Information Tab
Description
Select MICROS Desktop | Employee Maintenance | Employee Setup | Payroll Information to open this form.

Labor Management Setup Guide
107
FIELD DESCRIPTIONS
Bank Account 1 Bank location Select the employee’s bank from the drop-down list. Local banks are defined in Labor Management | General | Payroll Banks.
Bank account type Select the employee’s bank account type (i.e., savings or checking) from the drop-down list.
Account number Enter the employee’s direct deposit account number.
Routing number Enter the routing number for direct deposit for the employee’s bank account.
Amount Type Select the appropriate amount type from the following:
� Percentage—Select this option if a percentage of the employee's net pay is to be deposited to this account. If this option is selected, you must enter a percentage value in the Amount field (e.g., 75%). If an employee is using two bank accounts, the combined amounts may be less than 100%. The employee's paycheck will then reflect their balance due.
� Value—Select this option if a specific dollar amount of the employee's net pay is to be deposited to this account. If this option is selected, you must enter a dollar value in the Amount field (e.g., 485.00). If an employee is using two bank accounts, the combined dollar amounts may be less than their net pay amount. The employee's paycheck will then reflect their balance due.
Amount Based on the Amount Type selected, enter the percentage or dollar amount of the employee's net pay that is to be deposited to this account. Please note that you are solely responsible for the accuracy of this entry. The system does not validate the amount against the employee's salary.
Balance Select this option if the entire net balance of the employee's paycheck is to be deposited to this account. This option may be selected for only one account. Please note that this is not a calculated amount. This field merely serves as an indicator that the balance of the employee's net pay is to be deposited to this account.

Labor Management Setup Guide
108
Bank Account 2 Bank location Select the employee’s bank from the drop-down list. Local banks are defined in Labor Management | General | Payroll Banks.
Bank account type Select the employee’s bank account type (i.e., savings or checking) from the drop-down list.
Account number Enter the employee’s direct deposit account number.
Routing number Enter the routing number for direct deposit for the employee’s bank account.
Amount Type Select the appropriate amount type from the following:
� Percentage—Select this option if a percentage of the employee's net pay is to be deposited to this account. If this option is selected, you must enter a percentage value in the Amount field (e.g., 75%). If an employee is using two bank accounts, the combined amounts may be less than 100%. The employee's paycheck will then reflect their balance due.
� Value—Select this option if a specific dollar amount of the employee's net pay is to be deposited to this account. If this option is selected, you must enter a dollar value in the Amount field (e.g., 485.00). If an employee is using two bank accounts, the combined dollar amounts may be less than their net pay amount. The employee's paycheck will then reflect their balance due.
Amount Based on the Amount Type selected, enter the percentage or dollar amount of the employee's net pay that is to be deposited to this account. Please note that you are solely responsible for the accuracy of this entry. The system does not validate the amount against the employee's salary.
Balance Select this option if the entire net balance of the employee's paycheck is to be deposited to this account. This option may be selected for only one account. Please note that this is not a calculated amount. This field merely serves as an indicator that the balance of the employee's net pay is to be deposited to this account.
Recurring Deductions Button Select this button to load the Recurring Deductions setup form where you can specify any recurring deductions to be taken from an employee's paycheck.
Note
Direct Deposit information only needs to be entered if the operation offers direct deposit.

Labor Management Setup Guide
109
AVAILABILITY
Description
Select MICROS Desktop | Employee Maintenance | Availability to open this form.
Use the trash can todiscard time blocks.
This is the employees whoseavailability is displayed.
These are the minimums and maximums that theemployee can work on a weekly and daily basis.
When an employee is hired, the system considers that employee to always be available to work. This means that if the operation is open 24 hours a day, the employee is available to work any time.
Define an employee’s availability (if special arrangements are made when the employee is hired) to work during specific times or to be off on certain days of the week.

Labor Management Setup Guide
110
With each employee, his or her personal availability can be defined for up to four alternating weeks. The scheduling application will then cycle through availability starting at Week 1 to Week 2 etc., back to Week 1, and continue the same rotation until the employee’s availability is changed.
Note
Changing the number of weeks of rotation resets the employee’s availability.
This section of the form area can also be used to indicate when minors can and cannot work. This can provide a visual reminder when scheduling minors that they are not available to work during specific times of the day.
Field Description
Employee list All employees will appear in this drop-down list. Select an employee from this list to view his or her availability.
Rotation weeks An employee’s availability can differ for up to four weeks. This means an employee can be available on Sunday during Week 1, but not available on Sunday during Week 2, etc. As the application cycles through its natural rotation, and based on when the rotation was set up, each week’s availability will display while scheduling. The current week defaults as week 1.
Weekly Minimum/Maximum Enter the minimum and maximum number of hours that an employee is allowed to work during the week. The minimum and maximum hours default to the settings defined in Labor Management | Rules/Laws | Work Rules.
Daily (Sunday – Saturday) Minimum/Maximum Enter the minimum and maximum number of hours that an employee is allowed to work on the selected day. The minimum and maximum hours default to the settings defined in Labor Management | Rules/Laws | Work Rules.
Labor Management Setup Guide
111
Start This field defines the start time of the employee’s availability. This entry relates to the starting point where the turquoise blue line begins.
Stop This field defines the stop time of the employee’s availability. This entry relates to the ending point where the turquoise blue line ends.
Note
The start and stop times can be edited by using the arrow keys or by clicking on the line and moving it with the mouse.
Save When the employee’s availability is completed, click the Save button.

Labor Management Setup Guide
112
EXCEPTIONS
Description
Select MICROS Desktop | Employee Maintenance | Exceptions to open this form.
This form is used to indicate an exception to an employee’s regular availability. If an employee has a request for time off, the manager can enter the request on this form, or the employee can enter the request through the POS Employee Exception to Availability Request Wizard.
These changes in availability are temporary, and only affect the dates indicated.

Labor Management Setup Guide
113
Field Descriptions
Employees Select the employee from the drop-down list for whom information will be entered or edited, or begin typing the letters of the employee’s last name until the appropriate name displays.
Note
Remember to click the “Add Exception” button before entering any information.
Request date This date will automatically default to the day the exception is added. To change the date, click in this field and select a date from the calendar.
Start date Enter the start date of the exception or click and select the date from the calendar.
Start time Select a start time if the exception does not encompass the entire business day.
Stop date Enter the stop date of the exception or click and select a date from the calendar.
Stop time Select a stop time if the exception does not encompass the entire business day.
Type Select an exception type from the drop-down list.
Approval Select an approval decision from the drop-down list.
Approved by This is a read-only field. It defaults to the user who is logged in and making the approval.
Approval date Enter the date that the exception is decided upon or click and select the date from the calendar.
Reason Select the approval reason from the drop-down list.
Add exception Click this button to add a new exception.
Delete exception Click this button to delete the selected exception.

Labor Management Setup Guide
114
Save exception Click this button to save all changes made to the selected exception.
Cancel Click this button to cancel the current changes to the selected exception.
Close Click this button to close the Exceptions form.

Labor Management Setup Guide
115
EVALUATIONS/CERTIFICATIONS
Description
Select MICROS Desktop | Employee Maintenance | Evaluations to open this form.
Enter any certification and/or evaluation information for the employees. For example:
• After hiring an employee, there may be a required 30-day review with a test to advance the employee to the next level.
• Annual employee reviews may be based on the employee’s hire date.
• A cook may be required to have Health Department Certification training to work in the kitchen.
• Alcohol awareness training may be required annually for bartenders and servers.

Labor Management Setup Guide
116
Field Descriptions
Employees Select the employee from the drop-down list for whom information will be entered or edited, or begin typing the letters of the employee’s last name until the appropriate name displays.
Job name Select the job that is associated with the evaluation/certification from the drop-down list.
Skill level Select the skill level that is associated with the job assigned for this evaluation or certification from the drop-down list.
Date Select the date of this evaluation or certification or click and select from the calendar.
Type Select the type of evaluation or certification from the predefined drop-down list.
Score Enter the score of the evaluation, if applicable.
Passed Select this box to indicate that the employee passed the certification, if applicable.
Employee This field defaults to the user who is entering the evaluation or certification.
Comment Double click the ellipsis (the … button) inside the Comment field to display a memo box to enter comments regarding the evaluation or certification. Up to 250 characters are allowed in this field.
Certificate name Enter the name of the certificate earned by the employee, if applicable. Up to 8 characters are allowed in this field.
Due date Enter the evaluation or certification due date or click and select the date from the calendar.
Add evaluation Click this button to add a new evaluation or certification.
Delete exception Click this button to delete the selected evaluation or certification.

Labor Management Setup Guide
117
Save evaluation Click here to save a new or modified evaluation/certification.
Cancel Click this button to cancel the current changes to the selected evaluation or certification.
Close Click this button to close the Evaluations/Certifications form.

Labor Management Setup Guide
118
RECURRING DEDUCTIONS
Description
Select MICROS Desktop | Employee Maintenance | Recurring Deductions to open this form.
Enter any recurring deductions that are to be deducted from the selected employee's paycheck (e.g., life insurance).

Labor Management Setup Guide
119
Field Descriptions
Deduction Select the deduction that will be withheld from wages.
Amount Enter the amount that will be deducted from payroll.
Percentage Enter the percentage that will be deducted from payroll.
Deduction Type This column displays the deduction type of either amount or percentage. The deduction type is configured in the LM Setup | Time and Attendance | Deductions form.
Effective from Enter the date when this recurring deduction should begin to be withheld from wages.
Effective to Enter the date when this recurring deduction should stop being withheld from wages.
Add Deduction Click this button to add a new recurring deduction.
Delete Deduction Click this button to delete the selected recurring deduction.
Save Deduction Click this button to save a new or modified recurring deduction.

Labor Management Setup Guide
120
AVAILABILITY WIZARDS
Employee Request Wizard
Description
Select MICROS Desktop | Employee Maintenance | Availability Wizards | Add an Employee's Schedule Request to open this form.
This wizard allows the user to easily update an employee’s change in availability.
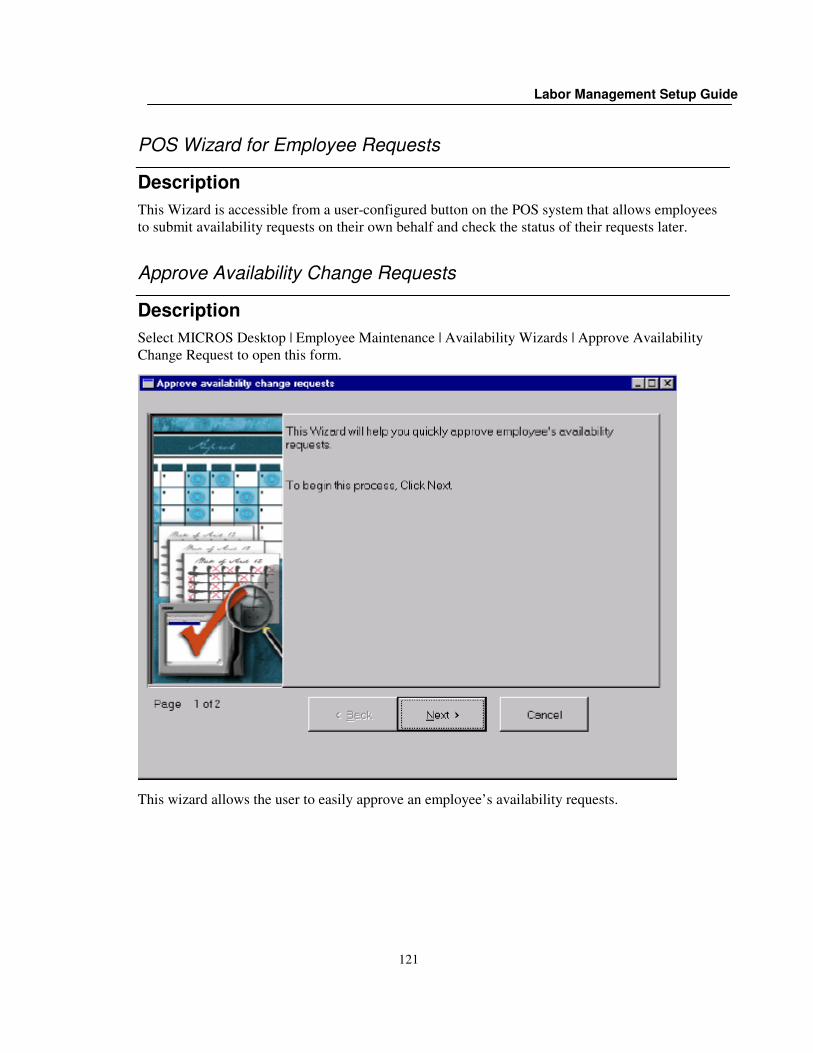
Labor Management Setup Guide
121
POS Wizard for Employee Requests
Description
This Wizard is accessible from a user-configured button on the POS system that allows employees to submit availability requests on their own behalf and check the status of their requests later.
Approve Availability Change Requests
Description
Select MICROS Desktop | Employee Maintenance | Availability Wizards | Approve Availability Change Request to open this form.
This wizard allows the user to easily approve an employee’s availability requests.

Labor Management Setup Guide
122
SCHEDULING
WEEKLY ASSIGNMENTS
Description
Select MICROS Desktop | Scheduling | Weekly Assignments to open this form.

Labor Management Setup Guide
123
Field Descriptions
Start week Select a date in the schedule week to be scheduled, or double-click and select a date from the drop-down calendar.
Job category Select the job category to view from the drop-down list. This selection determines the jobs that will display in the job field. Job categories are defined in Labor Management | Time and Attendance | Jobs | Categories.
Job Select a job from the drop-down list. Jobs are positions that are available within the job category. The job selected here will determine the employees that display in the schedule.
Labor hours This field displays the number of hours for the selected job that are scheduled for the labor week. Regular and overtime hours are calculated and displayed for the current schedule.
Labor cost This field displays the real dollar amount spent by the restaurant for hourly wages for the selected job. It includes regular and overtime costs.
Forecast sales This field displays the estimated or forecasted amount of sales for the selected job category. If no forecasting application is in place, the Forecasted Sales fields will display NO Forecast.
Labor cost % This field displays the percent of labor cost to forecasted sales for the selected job category. If no forecasting application is in place or if there is no forecast element linked in LM | General | Restaurant, the Labor Cost % field will display NO Forecast.
Min/Max This tab displays the minimum and maximum hours an employee can work each day and for the week, as defined in Human Resources | Availability. If these parameters are not met, Business Rule Warning (BRW) will display in the schedule.
Personal This tab displays information such as the employee’s phone number and birth date, as defined in Human Resources | Employee Setup.
Notes This tab displays additional information about the employee (such as schedule restrictions), as defined in Human Resources | Employee Setup | Notes.
Start time This field displays the start time of an employee’s shift. Shifts can be scheduled here by using the up/down arrow buttons. If shifts are scheduled in the grid, they automatically display here.

Labor Management Setup Guide
124
Stop time This field displays the stop time of an employee’s shift. Shifts can be scheduled here by using the up/down arrow buttons. If shifts are scheduled in the grid, they automatically display here.
Options
Show Options
• Show Not Available—Select this option to display when employees are not available for scheduling.
• Show Preferred—Select this option to display an employee’s preferred hours for scheduling.
• Show On Call—Select this option to display an employee’s on-call hours for scheduling.
Colors
• Not Available Color—Select the color to display the days/times an employee is not available.
• On Call Color—Select the color to display the days/times an employee is on-call.
• Preferred Color—Select the color to display the days/times an employee’s preferred hours.

Labor Management Setup Guide
125
Grid Sizing
• Tiny Rows—Select this option to hide the scheduled hours and costs for each employee. This allows more employees to display on the Weekly Assignments form.
• Simple Header—Select this option to hide the informational tabs (Min/Max, Personal, Notes), fly-over hints box, and labor hours/cost fields. This allows more employees to display on the Weekly Assignments form.
Zoom
• Level 1—Select this option to display each weekday for the selected schedule week.
• Level 2—Select this option to display a daily view broken into one-hour grids
• Level 3—Select this option to display a daily view broken into 15-minute grids.

Labor Management Setup Guide
126
Show Options
• Show Graph—The Show Graph option displays a graphical bar chart of the required vs. scheduled assignments for the currently selected start week, job category, and job type. A specific job must be selected in order for this option to be active. It will not be active if the
Job category field is set to All. The Show Graph functionality is linked to the Staff Requirements Generator (SRG) feature, which allows you to generate labor needs for each job based on forecasted information or pre-defined templates. Once the labor requirements are generated, you will be able to schedule employees based on these requirements, allowing for more accurate scheduling and more controlled labor costs. While in graph view, selecting the Display Values button will show the Sched/Req/Variance screen, which translates the graph information into actual numbers for scheduled vs. required employees per shift, along with the variance.
Colors
• Required Color—Select the color to use on the Staff Requirements grid for the number of employees required for the selected job.
• Background Color—Select the color of background for the Staff Requirements grid.
• Scheduled Color—Select the color to use on the Staff Requirements grid for the number of employees scheduled for the selected job.
• Use selected job color as the Scheduled Color—Select this option to use the color defined for the job (in LM Setup | Time and Attendance | Jobs) in the Staff Requirements grid for the number of employees scheduled for the selected job.

Labor Management Setup Guide
127
Show Options
• Show Time of Day Hint—Select this option to display the day and time as the cursor is moved around the Weekly Assignments grid. This hint helps you to select the desired day and time for a schedule segment to begin.
• Show Availability Hints—Select this option to display the hours of availability and the type (Preferred, Not Available, On-call) when the cursor is moved over the availability lines on the Weekly Assignment form.
• Show Assignment Hints—Select this option to display the Job, Start Time, and Stop Time when the cursor is moved over a schedule segment.
• Show Warning Hints—Select this option to display the Business Rule Violations for a schedule segment when the cursor is moved over the yellow Business Rules box in the upper left corner of a schedule segment.
Delay
• Delay Availability Hints—Select this option to delay showing the Availability hints.
• Delay Assignment and Warning Hints—Select this option to delay showing the Assignment hints.

Labor Management Setup Guide
128
Preview
• Show Preview Before Printing—Select this option to display the Employee Schedule by Employee report on the screen before printing.
Recalculate
• Auto-recalculate totals—Select this option to automatically recalculate totals as schedule
changes are made. Clear this option to recalculate totals only when using the Recalc Totals button.
Auto-scheduling
• Ask to copy from template or previous schedule—Select this option to be prompted to
use a saved template or schedule when using the Auto-Schedule button.

Labor Management Setup Guide
129
Recalc Totals Click this button to re-calculate the scheduled regular and overtime labor hours and cost for the selected job. This button will re-calculate the totals for each employee, for each day, and for the total schedule.
Print Report Click this button to print the Employee Schedule by Employee report. This report prints using the date, job category, and job that is currently selected from the Weekly Assignments form.
Auto-Schedule The Auto-Schedule button allows you to generate time clock segments that will fill all shift requirements created through Staff Requirements Generation. To activate this button, the grid must be filtered to one particular job that has SRG requirements. Clicking OK will populate the Weekly Assignments grid with the scheduled shifts. These shifts can then be edited for breaks, grace periods, or to change job types. It should be noted that any time segments that are in the grid will be deleted when Auto-Schedule is used. Availability of this button is controlled through the access level setting for the Scheduling - Use Automatic Scheduling option on the System Configuration | Security & Privileges | LM Access form.
Copy From Click this button to copy a template from the Schedule Templates form or to copy a saved schedule. The schedule or template is copied to the schedule week displayed.
Save as Template Click this button to save this schedule as a template. An entire schedule or specific jobs can be saved.
Note
Only one instance of a job can be saved to a template. For example, the server job from 5/1 and the server job from 5/15 cannot be saved to the same template. Also, a schedule can only be save as a template once the schedule has been saved. Trying to save a schedule as a template before the schedule has been saved will result in a confirmation message asking the user to save the schedule.
Save Click this button to save the changes to the Weekly Assignments form.
Close Click this button to close the schedule.
BRW (Business Rule Warning) or BRV (Business Rule Violation) Anytime there is a BRW or BRV on an allotted time, press F2 to receive more details. A yellow line in the middle of the allotted time will indicate the BRW. A red line in the middle of the allotted time will indicate the BRV. Schedules cannot be saved with BRV; however, they can be save with BRW if the user chooses to ignore these warnings.

Labor Management Setup Guide
130
Copy Schedule Click on the Copy from button to open this form.
Field Descriptions
Schedule Select the schedule to copy into the current schedule week.
Highlight the schedule tocopy and click OK.

Labor Management Setup Guide
131
Template Tab
Description
Select MICROS Desktop | Scheduling | Weekly Assignments | Copy From to open this form.
These are the jobsto use on theselected templatefor Mother’s Day.
Use these arrowbuttons to add anddelete items from bothsides of this tab.

Labor Management Setup Guide
132
Field Descriptions
Available templates This window displays all available templates in the system. Highlight the template or template set to copy to the schedule being creating and click on the right arrow.
Right Arrow This arrow copies the highlighted templates from the Available templates window to the Selected templates window.
Left Arrow This arrow removes the highlighted templates or template sets from the Selected templates window.
Selected templates This window displays the templates or template sets that were selected to copy to the schedule being created. Click the left arrow to remove the template.
OK Click this button to copy in the template to Weekly Assignments.
Cancel Click this button to close the window without copying in a template to Weekly Assignments.

Labor Management Setup Guide
133
SCHEDULE TEMPLATES
Description
Select MICROS Desktop | Scheduling | Schedule Templates to open this form.
This window displays the scheduletemplates and template sets. Click theplus sign next to the template set to viewthe templates within the template set.

Labor Management Setup Guide
134
Field Descriptions
Add New Template Set Click this icon to add a new template set.
Add New Template Click this icon to add a new template to a template set. Templates will be added to the currently selected template set.
Delete Click this icon to delete the selected template or template set.
Copy Click this icon to copy the selected template or template set.
Paste Click this icon to paste the copied template or template set.
Save Click this button to save the changes before exiting the form.
Close Click this button to close the window without saving the changes.

Labor Management Setup Guide
135
SCHEDULE PLACE HOLDER SETUP
Description
Select MICROS Desktop | Scheduling | Schedule Place Holder Setup to open this form.

Labor Management Setup Guide
136
Field Descriptions
Last Name Enter the place holder’s last name.
First Name Enter the place holder’s first name.
Job Select the job to be held on the schedule.
Default Rate This is the default pay rate for the selected job. It is the pay rate an employee will receive while working this job if there are no overrides.
Override Rate Enter the override pay rate for this job if the employee will receive a pay rate other than the default rate.
Overtime level This column displays the overtime levels defined in the system. An overtime level is used to define different overtime rates and are defined in LM Setup | Rules/Laws | Overtime Definition.

Labor Management Setup Guide
137
FORECAST SETUP
FORECASTING EXPLORER
Forecasting Explorer | Day Parts Tab
Description
Select MICROS Desktop | System Configuration | Forecasting | Forecasting Explorer | Day Parts to open this form.

Labor Management Setup Guide
138
Field Descriptions
Forecast Groups/Elements A Forecast Group organizes various forecast elements that may be used to generate a forecast. A Forecast Element is a label applied to a specific set of parameters used in generating forecasts for a forecast group.
Day Part Select the day part to associate with this forecast group. Once generated, the forecasts will be broken into day parts. This is for viewing purposes only. Day parts are defined in Labor Management | Forecasting | Day Parts or MICROS Desktop | System Configuration | Forecasting | Day Parts.
Weekdays This window displays the weekday, start time, and stop time for each day part.

Labor Management Setup Guide
139
Forecasting Explorer | General Tab
Description
Select MICROS Desktop | System Configuration | Forecasting | Forecasting Explorer | General to open this form.
Highlight the Forecast Element beingdefined to activate the General Taband Algorithm Tab.

Labor Management Setup Guide
140
Field Descriptions
Historical information Select the historical information type (e.g., Net Sales, Cover Counts, Table Turns) to be used to generate a forecast. Historical information must first be defined in LM Setup | Forecasting | Historical Information. An aggregate forecast (i.e., a combined forecast for Bar Sales and Restaurant Sales) may be generated by selecting more than one type of historical information type for an element. Special care must be taken to ensure that information types are logical (i.e., avoid combining cover counts and sales).
Period interval Forecasts are generated by day. Make sure that Day is selected from the drop-down list.
Number of periods Enter the number of periods you want in your forecast. The maximum number of periods is 12.
Row interval Forecasts can be generated and broken down into 15, 30, and 60-minute intervals. Select the interval for this forecast element from the drop-down list.
Number of days to store forecasts Enter the number of days to keep the generated forecasts in the system. The maximum number of days to keep is 9999.
Display precision Enter the number of places to the right of the decimal the forecast should be generated.

Labor Management Setup Guide
141
Forecasting Explorer | Algorithm Tab
Description
Select MICROS Desktop | System Configuration | Forecasting | Forecasting Explorer | Algorithm to open this form.

Labor Management Setup Guide
142
Field Descriptions
Algorithm type Select the algorithm type that the system will use to generate the forecast.
Weighted Moving Average This algorithm type takes the most recent periods (the number of recent periods is user defined) and averages them to provide a user defined weight percentage (e.g., 70%), and also takes the same period last year and gives it a user defined weight percentage (e.g., 30%). These percentages are then averaged together to create the forecast.
Moving Average This algorithm type averages the most recent periods (user defined) to create the forecast.
If one year’s worth of historical totals do not exist, the forecast will be generated using the Moving Average algorithm. The system will display the following warning message to inform you of this change when you attempt to generate a forecast in Forecasting | Generate Forecasts - “Previous year’s historicals not found. The following forecast was generated using the Moving Average algorithm <Element Name>.” These algorithms are available in the Forecast Setup module, where the user selects an algorithm and defines its parameters. Once the algorithm is defined for a particular forecast element, the forecast will be generated, in the Forecasting module, according to the parameters established in Forecast Setup.
Parameters Enter the parameters to define this algorithm.
Recent Periods to Average This field defines the number of recent periods (periods that have just passed) to average to create the forecast. Up to 15 periods can be averaged.
Recent Weight (%) This field defines the weight percentage to be applied to the most recent periods when generating the forecast. You may want recent sales to outweigh historical sales since recent sales represent current business trends.
Historical Weight (%) This field defines the weight percentage to be applied to historical sales (sales from the same week last year). You may want to put less weight on historical sales than recent sales, since historical sales less accurately portray the current trends at your location.
Example
The Recent weight % and the Historical weight % must equal 100%. To generate a forecast for scheduling based on sales, average three periods and place a 70% weight on the sales for the last three periods (recent weight), and 30% weight on sales for the same week last year (historical weight).

Labor Management Setup Guide
143
EVENT TYPES
Description
Select MICROS Desktop | System Configuration | Forecasting | Event Types to open this form.

Labor Management Setup Guide
144
Field Descriptions
Event Categories/Types Event categories organize event types. Event types are associated with event categories to track like events. For example, the event types, baseball and football, might fall into the Sports Category.
Delete Click this button to delete event types. All event types must be deleted from an event category before the category can be deleted.
Add Arrow Click this button to add the highlighted forecast group or element to an event category.
Remove Arrow Click this button to remove the highlighted forecast group or element from an event category.
Forecast Groups/Elements This window displays the established forecast groups and elements. Associating forecasts with events allows the user to adjust the forecast by multiplying or adding to meet the needs of the event.
Number of days to store events This field is displayed when an event category is highlighted. When defining an event category, you may use this field to specify when event historicals should be purged. It should be noted, however, that event historicals will be stored longer if all historicals are set to purge at a later time via the Number of days to store historicals field in MICROS Desktop | System Configuration | Forecasting | Historical Information.
Only calc events on the same day This field is displayed when a forecast group/element that has been linked to an event type is highlighted. The forecast group/element can be adjusted by either multiplying or adding so the forecast meets the needs of the event. The adjustment amount is defined on the Event Schedule. If
the Only calc events on the same day option is selected for a specific event type/category, only events that appear on the same day of the week will be used when auto-calculating the event adjustment.
Cancel Click this button to close the form without saving the changes.
Changes are automatically saved. There is no undo so care must be taken when making changes to the form.

Labor Management Setup Guide
145
EVENT SCHEDULE
Description
Select MICROS Desktop | System Configuration | Forecasting | Event Scheduler to open this form.

Labor Management Setup Guide
146
Field Descriptions
Period Date Select a date in the period to view in the event calendar.
Events The calendar displays a two-week period of time, beginning with the selected day in the Period Date field. Drag events into the calendar to schedule them.
Event Types This window displays the defined event types. Drag an event to the desired day(s) on the schedule to make the forecast available for that day(s).
Add Event Click this button to add the highlighted event to the selected day on the schedule.
Remove Event Click this button to remove the highlighted event from the selected day on the schedule.
Event Adjustments Click this button to adjust how the event will affect the forecast.
Use auto ca This option can be applied to calculate forecasts based on past instances of the event. Of course this option can only be used if a forecast exists where this event type was previously applied and historical information is available.
Omit from fcs This option can be set to specify that the week containing this event be ignored when generating future forecasts. In this case, the prior week’s historical totals will be used.
Close Click this button to close the form.
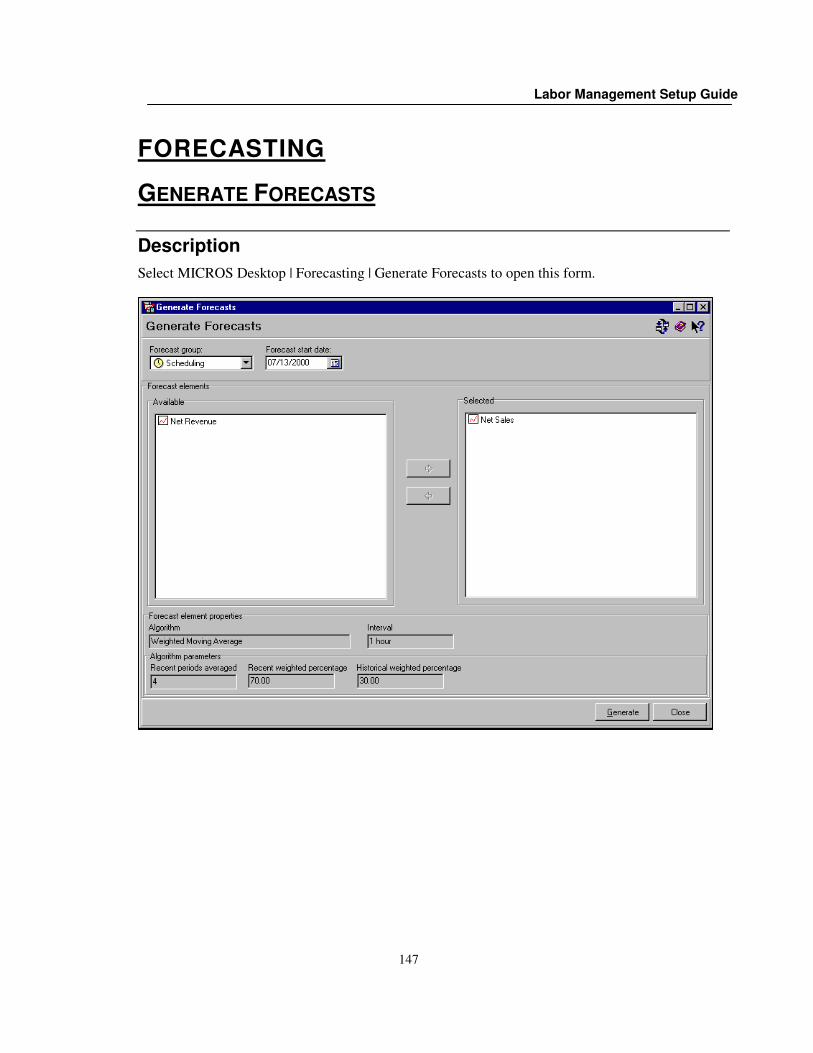
Labor Management Setup Guide
147
FORECASTING
GENERATE FORECASTS
Description
Select MICROS Desktop | Forecasting | Generate Forecasts to open this form.

Labor Management Setup Guide
148
Field Descriptions
Forecast group Select a forecast group from the drop-down list. Forecast groups organize various forecast elements that may be used to generate a forecast.
Forecast start date Enter the forecast start date. This is the date to generate the forecast.
Note
Forecasts cannot be generated for dates in the past. Forecasts for the forecast element selected to be used with Scheduling in LM Setup | General | Restaurant | Labor must begin on the schedule week start day. If an incorrect date is selected, a message will prompt and the date will be automatically corrected.
Available The Available window lists forecast elements within the selected forecast group. Select the element(s) to generate a forecast and click the right arrow button to move the elements to the Selected window.
Right Arrow This button copies the highlighted forecast elements from the Available window to the Selected window. To select more than one element at a time, press the [Ctrl] key on the keyboard while selecting the elements.
Left Arrow This button removes all highlighted elements from the Selected window to the Available window. To select more than one element at a time, press the [Ctrl] key on the keyboard while selecting the elements.
Selected The Selected window lists all of the elements to generate the forecast. To remove an element from this window, highlight the undesired elements and click the left arrow button to move them back to the Available window.
Algorithm This is the algorithm that was selected in Forecast Setup | Forecasting Explorer | General to generate the forecast.
Interval This is the interval that was selected in Forecast Setup | Forecasting Explorer | General to view the forecast. For example, if 30 was selected, the forecast will display 30-minute intervals.
Recent periods averaged This is the number of periods that was selected to average in Forecast Setup | Forecasting Explorer | General for the forecast.

Labor Management Setup Guide
149
Recent weighted percentage This is the weight percentage that was selected to be put on the most recent weeks in Forecast Setup | Forecasting Explorer | General to generate the forecast.
Historical weighted percentage This is the weight percentage that was selected to be put on the historical week in Forecast Setup | Forecasting Explorer | General to generate the forecast.
Generate Click this button to generate the selected forecast.

Labor Management Setup Guide
150
EDIT FORECASTS
Description
Select MICROS Desktop | Forecasting | Edit Forecasts to open this form. After pressing the Generate button, this form opens automatically to display the forecast.
Click this button tohide this view andshow only day partssubtotals.

Labor Management Setup Guide
151
Field Descriptions
Forecasts This window displays forecast groups and elements. Expand the forecast group by clicking the + sign. Select the forecast element and forecast to view or edit.
A pencil icon next to the forecast means the forecast can be edited.
A green check mark next to the forecast means the forecast has been approved.
A calculator icon next to the forecast indicates that the forecast has been generated (it is read-only).
Generated This forecast type displays the unedited forecast for the selected forecast element for the selected date.
Edited This forecast type displays the saved edited forecast for the selected forecast element for the selected date.
Event Adjust Click this button to display a list of all the events that are scheduled. An event that is listed can be applied to the forecast. This option is only available in edit mode.
Approve Select this box to approve the adjusted forecast. Once the forecast has been approved, changes cannot be made. Clear the box to continue editing the forecast. This option is only available in edit mode.
Show Audit Log Click this button to view the forecast date, action, employee who took the action, and the action date.
Show Applied Events Click this button to view all of the events that were applied to the forecast.
Forecast Information… Click this button to view the historical information the system used to generate the forecast.
Save Click this button to save the changes.

Labor Management Setup Guide
152
Revert Click this button to revert to the original generated forecast.
Note
Reverting to the original generated forecast deletes all edited versions of the forecast.
Close Click this button to close the window.
Show Day Parts Subtotals Click this button to show only the day part totals and grand totals (with no intervals).
Show Totals Click this button to hide the day part subtotals, but show only the intervals and grand totals.
Show Day Parts Subtotals and Totals Click this button to show the day part subtotals and intervals.

Labor Management Setup Guide
153
Edit Forecasts – Additional Form Information
Description
Select MICROS Desktop | Forecasting | Edit Forecasts to open this form.
Show Day Part Subtotals View
Click this button to viewthe day parts subtotals(the view currentlyshown).
This is a generatedforecast (read-only).
This is an approved forecast.
This is an edited forecast.

Labor Management Setup Guide
154
Edit Forecasts / Show Audit Log
Description
Select MICROS Desktop | Forecasting | Edit Forecasts | Show Audit Log to open this form.
Use Audit Log to view when forecasts have been approved or generated and by whom.
Field Descriptions
Forecast Date This field displays the forecast start date.
Action This field displays the forecasting action that was performed, either Generate, Approved, or Edited.
Employee This field displays who changed the forecast.
Action Date This field displays the date that the forecast was changed.
Close Click this button to close the Audit Log.

Labor Management Setup Guide
155
Edit Forecasts / Show Applied Events
Description
Select MICROS Desktop | Forecasting | Edit Forecasts | Show Applied Events to open this form.
Use View Event to view information about events that have been applied to this forecast.
Field Descriptions
Name This field displays the name of the event.
Date This field displays the date in the forecast at which the event was applied.
Adj… This field displays the amount by which the forecast was adjusted as a result of applying the event.
OK Click this button to close View Event.
Cancel Click this button to exit the View Event form.

Labor Management Setup Guide
156
Edit Forecasts / Forecast Information
Description
Select MICROS Desktop | Forecasting | Edit Forecasts | Forecast Information to open this form.
Use Forecast Information to view the information that was used for the selected forecast date and forecast type.

Labor Management Setup Guide
157
Field Descriptions
Algorithm This field displays the algorithm, either Moving Average or Weighted Moving Average, that was used for this forecast. This is the algorithm you chose in Forecast Setup | Forecasting Explorer | Algorithm to generate the forecast. This field is read-only.
Forecast start date This field displays the forecast start date of the selected forecast. This field is read-only.
Periods averaged This field displays the number of periods you chose to average in Forecast Setup | Forecasting Explorer | Algorithm for the forecast. It is read-only.
Recent Weighted percentage This field displays the recent weighted percentage, the percentage of weight you chose to put on the most recent weeks in Forecast Setup | Forecasting Explorer | Algorithm to generate the forecast. For example, you might have put more weight on recent sales to outweigh the historical sales since recent sales represent current business trends. It is read-only.
Historical Weighted percentage This field displays the percentage of weight you chose to put on the historical week in Forecast Setup | Forecasting Explorer | Algorithm to generate the forecast. It is read-only.
Historical Data This area displays the data used to generate the forecast. It is read-only.
OK Click this button to exit Forecast Information.

Labor Management Setup Guide
158
EDIT HISTORICAL INFORMATION
Description
Select MICROS Desktop | Forecasting | Edit Historical Information to open this form.

Labor Management Setup Guide
159
Field Descriptions
Edit date Enter the date of the historical information to edit.
Historical information This window displays the types of historical information that is in the system.
Show Audit Log Click this button to view the forecast date, action, employee who took the action, and the action date.
Day Parts Select the day part for which interval totals should be displayed.

Labor Management Setup Guide
160
PAYROLL PREPROCESSING
TIME CARDS
Description
Select MICROS Desktop | Payroll Processing | Time Cards to open this form.
Labor Management Setup Guide
161
Field Descriptions
Number This field displays the object number for the employee.
Name This column displays employees in the system. Select an employee to enter time card information. Employees are entered in the Human Resources module.
Note
This column will display terminated employees if they have time clock entries for the selected date.
Day This column displays the day of the week the employee is being clocked in. The day of the week displays after a record is saved or added.
Clock in date Select the date for which the employee is being clocked in. Double-click on the column to select a date from the drop-down calendar.
Clock in time Select the time for which the employee is being clocked in.
Note
An employee cannot be clocked in for a future date.
Clock in status Select this employee’s clock in status from the drop-down list.

Labor Management Setup Guide
162
Clock out date Select the date for which the employee is being clocked out. Double-click on the column to select a date from the drop-down calendar.
Clock out time Select the time for which the employee is being clocked out.
Note
Both the clock out date and time can be set in the future.
Clock out status Select this employee’s clock out status from the drop-down list.
Job Select the job this employee worked during this shift. Double-click in the column for a drop-down list.
RVC Select the Revenue Center where this employee worked. Double-click in the column for a drop-down list.
Hours/Pay This column expands to display the employee’s regular and overtime hours and pay, commission pay, and service charge pay. Double-click on the plus sign to expand this column.
Regular hours This column displays the total regular hours the employee worked for the shift.
($) Regular pay This column displays the total regular pay the employee should receive for the hours worked.
Overtime hours This column displays how many hours in the employee’s shift were overtime hours. Any amount of time over the amount defined in Labor Management | Rules/Laws | Overtime Definition is considered overtime.
($) Overtime pay This column displays the total pay the employee will receive for overtime work.
($) Commission pay This column displays the employee’s commission pay for this shift.
($) Service charge pay This column displays the employee’s service charge pay for this shift.
($) Gross sales This column expands to display the employee’s cash sales and charge sales for this shift. Double-click on the plus sign to expand this column.

Labor Management Setup Guide
163
($) Cash sales This column displays the employee’s cash sales (i.e., Gross Sales – Charge Sales = Cash Sales) for this shift.
($) Charge sales This column displays the employee’s charge sales for this shift.
($) Total tips This column expands to display the employee’s tips. Double-click on the plus sign to expand this column.
Note
Total tips will show direct tips, indirect tips, and charge tips if declared tips are cash only. Total tips will show direct tips and indirect tips if declared tips are not cash only.
($) Direct tips This column displays the amount of direct tips the employee declared for this shift.
($) Indirect tips This column displays the amount of indirect tips the employee received for this shift. Indirectly tipped employees receive tips from directly tipped employees.
($) Charge tips This column displays the amount of this employee’s tips that were charged.
Premium pay This column expands to display the premium pay hours, additional hours, and amount.
Prem pay hours This column displays the number of hours that are paid as premium pay.
Prem pay additional hours This column displays the number of additional hours that are paid to the employee. This amount is determined by the Hours and Split Shift Premium Pay types that are linked to the job.
Prem pay amount This column displays the premium pay amount that is paid to the employee. This amount is determined by the premium pay definition that is links to the job.
Reason Reasons are defined in Labor Management | General | Reasons. Any time a new record is entered, or an adjustment is made to an existing record, the Reasons field will be required.

Labor Management Setup Guide
164
Closed A check mark in this column indicates that the payroll period has been closed. If the column is blank, the payroll period is still open. Payroll periods are closed in Payroll Preprocessing | Payroll Job Summary.
Note
No adjustments can be made to the payroll period after it has been closed.
Tip summary This box displays tip summary information.
Hours/Pay summary This box displays the summary of regular and overtime hours the employee worked, and the regular and overtime pay the employee received.
Premium pay summary This box displays the summary of premium pay hours, premium pay additional hours, and the premium pay amount worked by the employee.

Labor Management Setup Guide
165
OTHER PAY
Description
Select MICROS Desktop | Payroll Processing | Other Pay to open this form.
Click this icon to go to thePayroll Job Summary tab.

Labor Management Setup Guide
166
Field Descriptions
Date Enter a date for which other pay information will be entered. Double-click in the column to select a date from the drop-down calendar.
Job Select the salary job this employee worked during this shift or the appropriate non-clock job. Double-click in the column to select a job from the drop-down list.
Pay type This field displays the employee’s pay type. This column cannot be edited.
Hours Enter the number of hours the employee worked in this job.
Note
This column is required only if the Require Number of Hours setting was selected in Labor Management | Time and Attendance | Jobs | Type Tab | Non-clock.
($) Rate Enter the rate for this job.
($) Amount Enter the amount for this job.
Note
This column is required only if the Require Amount Entry setting was selected in Labor Management | Time and Attendance | Jobs | Type Tab | Non-clock.
Description Enter an optional description for the pay information. Up to 40 characters are allowed.
Closed A check mark in this column indicates that the payroll period has been closed. If the column is blank, the payroll period is still open. Payroll periods are closed in Payroll Preprocessing | Payroll Job Summary. No adjustments can be made if the payroll period has been closed.

Labor Management Setup Guide
167
PAYROLL JOB SUMMARY
Description
Select MICROS Desktop | Payroll Processing | Payroll Summary to open this form.

Labor Management Setup Guide
168
Field Descriptions
Date Select a date to view the payroll summary or to close the payroll period.
Number This column displays the number of this employee record.
Name This column displays the employee’s name.
Description This column displays the name of the job, other pay, or deduction.
Deduction A checkmark in this column indicates the pay information is a deduction.
Total hours This column displays the total regular hours the employee worked for the designated job.
($) Total pay This column displays the total regular pay the employee received for the designated job.
Pay summary This column expands to display regular and overtime hours and pay (for all overtime levels), sales/tip information, commission pay, and service charge pay.
Overtime hours This column displays the overtime hours the employee worked for the designated job.
($) Overtime pay This column displays the overtime pay the employee received for the designated job.
($) Sales This column displays the total sales by this employee for the designated job.
($) Tips This column displays the employee’s total tips for the designated job.
($) Commissions This column displays the employee’s commission pay for the designated job.
($) Svc charges This column displays the employee’s service charge pay for the designated job.
Deduction amount This column displays the amount the employee received for the designated amount deduction.

Labor Management Setup Guide
169
Deduction percentage This column displays the percentage the employee received for the designated percentage deduction.
Premium pay This column expands to display premium pay hours, additional hours, and amount.
Prem pay hours This column displays the total number of hours that are paid as premium pay.
Prem pay additional hours This column displays the total number of additional hours that are paid to the employee. This amount is determined by the Hours and Split Shift Premium Pay types that are linked to the job.
Prem pay amount This column displays the total premium pay amount that is paid to the employee. This amount is determined by the premium pay definition that is linked to the job.
Closed A check mark in this column indicates that the payroll period has been closed. If the column is blank, the payroll period is still open. No adjustments can be made if the payroll period has been closed. Payroll periods ending after the current business date cannot be closed.
Run export Click this button to export payroll job summary data. This button is enabled only if:
• the period is closed and
• an external custom export program exists, or Payroll Preprocessing export program settings are defined.
Close period Click this button to close the payroll period.

Labor Management Setup Guide
170
REPORT EXPLORER
Description
Select MICROS Desktop | Reporting | Report Explorer to open this form.
Use the chart on the next page to define the Labor Management Reports to be configured for the site.

Labor Management Setup Guide
171
Place a checkmark in the columns to the right after you review each report attached to this Setup Guide to determine whether or not the report will be configured in Report Explorer. Reports that aren’t configured now can be added at a later date.
Labor Management Report Configure Do Not Configure
LM – Approaching Overtime
LM – Costed Employee Schedule
LM – Daily Labor Tracking
LM – Employee Availability
LM – Employee Earnings Summary
LM – Employee Evaluations/Certifications
LM – Employee I9 Renewals
LM – Employee Leave of Absence Report
LM – Employee Master Report
LM – Employee Master Report w/Pay Rates
LM – Employee Payroll Summary
LM – Employee Schedule
LM – Employee Schedule by Job
LM – Employee Schedule by Job w/Clock-in Times Only
LM – Employee Schedule w/Clock-in Times Only
LM – Employee Time Card and Job Summary
LM – Individual Employee Schedule (40-column)
LM – Employee TRAC Statement
LM – Employee Turnover
LM – Forecast Accuracy
LM – Forecast by Time Interval
LM – Job Earnings Summary
LM – Phone List
LM – Scheduled vs. Actual Time Card
LM – Staff Requirements vs Actual Schedule
LM – Staff Requirements vs Actual Schedule 15 Min Interval
LM – Tip Exception Report

Labor Management Setup Guide
172
EMPLOYEE INFORMATION SHEET
Employee Information Sheet (1 of 4)
Employee Information
Prefix ____ First______________________ Middle ____________ Last _________________ Suffix ___ Check Name Previous Last Name SSN/SIN Gender DOB / / Ethnicity Disability #
Work Permit/Age Certificate Information
Work Permit # Expiration Date Age Certificate # Expiration Date
Direct Deposit Information
Bank 1 Location Bank Account Type Account Number Routing Number
Direct Deposit Information
Bank 2 Location Bank Account Type Account Number Routing Number

Labor Management Setup Guide
173
Employee Contact Information
Address Country City State Postal Code County In City Limits Y / N School District Email Address Phone number __________________ Unlisted Y / N Ext. ________ Fax number ________________ Pager number Ext. Mobile number

Labor Management Setup Guide
174
Employee Information Sheet (2 of 4)
Emergency Contact Information
Name Address Phone Number Relationship
I-9 Information
INS Status Alien/Admission Number Expiration Date
List A Document Type Document ID Expiration Date
List B and C Document Type Document ID Expiration Date Document Type Document ID Expiration Date
Exemption Information
Federal Marital Status Exemptions Tax Exempt Y / N Additional Withholdings Earned Income Credit
State Marital Status Exemptions Tax Exempt Y / N Additional Withholdings Earned Income Credit
Local City Exemptions Additional Withholdings Tax Exempt Y / N
County Additional Withholdings Tax Exempt Y / N
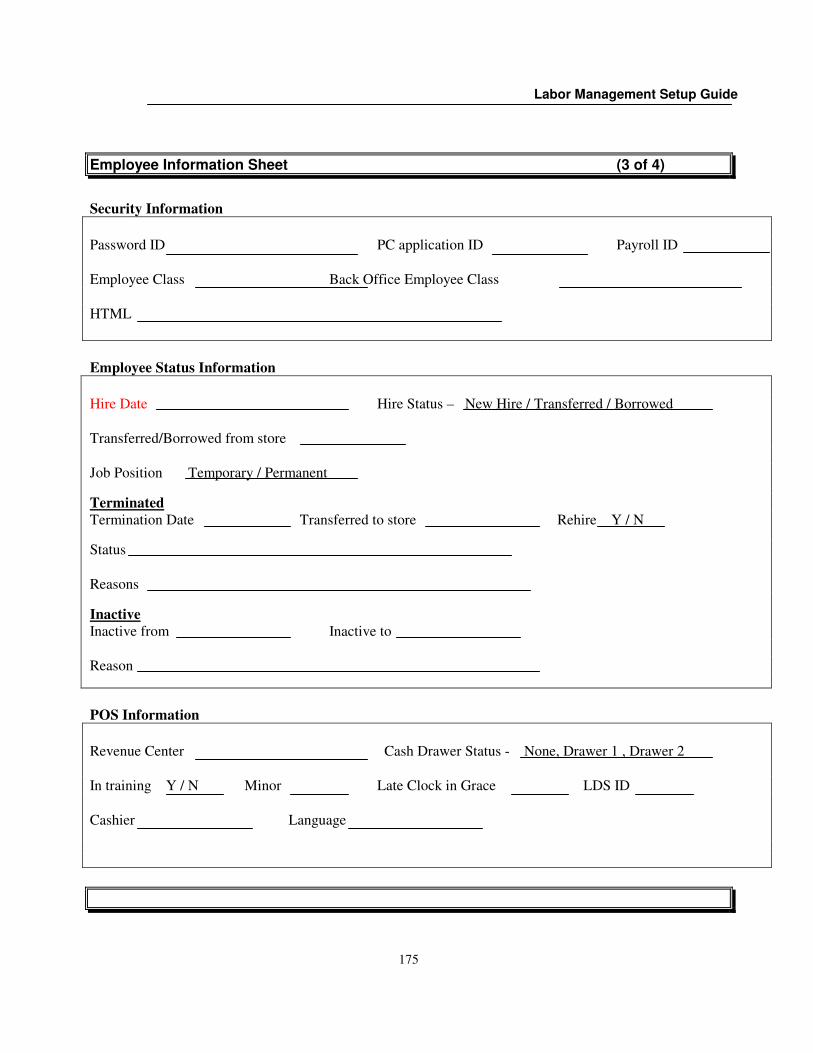
Labor Management Setup Guide
175
Employee Information Sheet (3 of 4)
Security Information
Password ID PC application ID Payroll ID Employee Class Back Office Employee Class HTML
Employee Status Information
Hire Date Hire Status – New Hire / Transferred / Borrowed Transferred/Borrowed from store Job Position Temporary / Permanent
Terminated Termination Date Transferred to store Rehire Y / N
Status Reasons
Inactive Inactive from Inactive to Reason
POS Information
Revenue Center Cash Drawer Status - None, Drawer 1 , Drawer 2 In training Y / N Minor Late Clock in Grace LDS ID Cashier Language

Labor Management Setup Guide
176
Employee Information Sheet (4 of 4)
Job Information
Jobs Assigned to Employee Skill Level Primary Job Salary Rate

Labor Management Setup Guide
177
PROGRESS CHECK LIST
Place a check mark in the columns to the right after reviewing each section of this Setup Guide, and gather information to complete the employee information sheets.
MICROS recommends that these sections should be completed in the order in which they are presented in this Setup Guide.
Topic
Reviewed Setup Guide
Completed Form
General Site Information
Labor Management Setup
Employee Change Tracking
Country Descriptor
LM Calendar
LM Parameters
Payroll Bank
School District
User Defined Domain
Reasons
Restaurant
Clear All Labor
LM Access
Security Access
Work Rules
Work Hours
Overtime Definition
Labor Laws
Break Rules
Scheduling
Time and Attendance
Jobs
Skill Levels
Deductions
Day Parts
Historical Information
SRG Setup
Template Sets
Premium Pay

Labor Management Setup Guide
178
Human Resources Setup
Employee Setup
Availability
Exceptions
Evaluations
Recurring Deductions
Wizards
Scheduling
Weekly Assignments
Schedule Templates
Schedule Place Holder Setup
Forecast Setup
Forecasting Explorer
Event Types
Event Schedule
Forecasting
Generate Forecasts
Edit Forecasts
Edit Historical Information
Payroll Preprocessing
Time Cards
Other Pay
Payroll Job Summary
Report Explorer
Questions or concerns? Contact the MICROS installer listed in the front of this Setup Guide.