lab manual - svec … · iv b.tech., i-semester, eee embedded systems lab (16bt70432) course...
TRANSCRIPT

SREE VIDYANIKETHAN ENGINEERING COLLEGE
(An autonomous institution affiliated to JNTUA, Anantapuramu)
SreeSainath Nagar, Tirupati – 517 102.
DEPARTMENT OF ELECTRICAL AND ELECTRONICS ENGINEERING
Lab Manual
EMBEDDED SYSTEMS LAB
(16BT70432)
(IV B. Tech., I-Semester, EEE)
Prepared by Dr. G. HARIKRISHNAN
Associate Professor Department of EEE

(An Autonomous institute affiliated of JNTUA, Anantapuramu)
Sree Sainath Nagar, Tirupati – 517 102
Department of Electrical and Electronics Engineering
Lab Manual EMBEDDED SYSTEMS
(16BT70432)
(IV B.Tech., I-Semester, EEE)

(An Autonomous institute affiliated of JNTUA, Anantapuramu)
Sree Sainath Nagar, Tirupati – 517 102
Department of Electrical & Electronics Engineering
List of Contents Embedded Systems Lab (16BT70432)
Title Page No.
Vision & Mission i
PEOs, POs & PSOs ii
Syllabus iv
CO-PO-PSO Mapping vi
Rubrics for Embedded Systems Lab vii
Day to Day Evaluation viii
Internal Marks Evaluation x
List of Equipment Needed xii
General Instructions xiii
Exp-1 Introduction to MSP430 launch pad and Programming Environment. (Study Experiment) 1
Exp-2 Read input from switch and Automatic control/flash LED (soft-ware delay). 5
Exp-3 Interrupts programming example using GPIO. 9
Exp-4 Configure watchdog timer in watchdog mode & interval mode. 11
Exp-5 Configure timer block for signal generation (with given frequency) 14
Exp-6 Read Temperature of MSP430 with the help of ADC. 16
Exp-7 Test various Power Down modes in MSP430. 18
Exp-8 PWM Generator 23
Exp-9 Use Comparator to compare the signal threshold level 25
Exp-10 Speed Control of DC Motor 26
Exp-11 Master slave communication between MSPs using SPI 30
Exp-12 Networking MSPs using Wi-Fi. 35

i
SREE VIDYANIKETHAN ENGINEERING COLLEGE (An Autonomous institute affiliated of JNTUA, Anantapuramu)
Sree Sainath Nagar, Tirupati – 517 102
Vision
To be one of the Nation’s premier Engineering Colleges by achieving the highest
order of excellence in Teaching and Research.
Mission
Through multidimensional excellence, we value intellectual curiosity, pursuit of
knowledge building and dissemination, academic freedom and integrity to enable
the students to realize their potential. We promote technical mastery of Progressive
Technologies, understanding their ramifications in the future society and nurture
the next generation of skilled professionals to compete in an increasingly complex
world, which requires practical and critical understanding of all aspects.
Department of Electrical & Electronics Engineering
Vision
To become the Nation’s premiere Centre of excellence in electrical engineering
through teaching, training, research and innovation to create competent
engineering professionals with values and ethics.
Mission
1 Department of Electrical Engineering strives to create human resources in
Electrical Engineering to contribute to the nation development and improve
the quality of life.
2 Imparting Knowledge through implementing modern curriculum, academic
flexibility and learner centric teaching methods in Electrical Engineering.
3 Inspiring students for aptitude to research and innovation by exposing them
to industry and societal needs to create solutions for contemporary problems.
4 Honing technical and soft skills for enhanced learning outcomes and
employability of students with diverse background through comprehensive
training methodologies.
5 Inculcate values and ethics among students for a holistic engineering
professional practice.

ii
SREE VIDYANIKETHAN ENGINEERING COLLEGE (An Autonomous institute affiliated of JNTUA, Anantapuramu)
Sree Sainath Nagar, Tirupati – 517 102
Department of Electrical & Electronics Engineering
PEOs, POs & PSOs Embedded Systems Lab (16BT70432)
Program Educational Objectives - B.Tech - EEE
1. Graduates will be enrolled in academic program in the disciplines of electrical
engineering or other disciplines.
2. Graduates will be employed as productive and valued engineers in reputed industries.
3. Graduates will assume increasingly responsible positions and use the technical skills and
analytical acumen to address professional values, ethics, leadership, and team skills for
execution of complex technological solutions.
Program Outcomes - B.Tech – EEE
1. Acquire knowledge of computing mathematics, sciences and concepts of electrical
engineering.
2. Ability to perform analysis of electrical power systems.
3. Design and develop electric machines power electronic converters, control systems and
schemes of electrical power transmission and protection.
4. Skills to solve problems in electric circuits, efficiency of electric machines and power
system stability.
5. Use of electrical engineering principles to modern electric generation, transmission and
distribution.
6. Create solutions of social context the impact of electrical engineering.
7. Practice electrical engineering in compliance with environmental standards.
8. Follow ethical code of conduct in professional activities.
9. Achieve personal excellence and ability to work in groups.
10. Develop effective communication in professional transactions.
11. Life skills for effective project management.
12. Appreciate the significance and applications of electrical engineering and to engage in
lifelong learning for knowledge and skill up gradation.

iii
Program Specific Outcomes
On successful completion of the program, engineering graduates will
1 Demonstrate knowledge of Electrical and Electronic circuits, Electrical Machines, Power
Systems, Control Systems, and Power Electronics for solving problems in electrical and
electronics engineering.
2 Analyze, design, test and maintain electrical systems to meet the specific needs of the
Industry and society.
3 Conduct investigations to address complex engineering problems in the areas of
Electrical Machines, Power Systems, Control Systems and Power Electronics.
4 Apply appropriate techniques, resources and modern tools to provide solutions for
problems related to electrical and electronics engineering.

iv
(An Autonomous institute affiliated of JNTUA, Anantapuramu)
Sree Sainath Nagar, Tirupati – 517 102
Department of Electrical & Electronics Engineering
Syllabus
IV B.Tech.,I-Semester, EEE
L T P C
16BT70432: EMBEDDED SYSTEMS LAB - - 3 2
DAY-TO-DAY
EVALUATION
INTERNAL
EVALUATION
END LAB
EXAMINATION TOTAL
30 MARKS 20 MARKS 50 MARKS 100 MARKS
PREREQUISITES: Course on Embedded systems.
COURSE DESCRIPTION:
IDE for Embedded System Design using MSP430; Interfacing Switch & LED; Timers-WDT,
Configuring, Programming; ADC-usage; Power down modes; DAC; PWM Generator; Networking
- SPI, Wi-Fi.
COURSE OUTCOMES: On successful completion of the course, students will be able to
CO1. Demonstrate knowledge in designing complex energy efficient embedded systems.
CO2. Analyze usage of various on-chip resources like GPIO, Timers, Interrupts, ADC, DAC, Comparator,
SPI.
CO3. Design embedded systems to suit market requirements.
CO4. Solve engineering problems by proposing potential solutions using industry choice advanced
Microcontrollers.
CO5. Apply appropriate techniques, resources, and CCSV6 based IDE for modeling embedded systems
with understanding of limitations.
CO6. Provide embedded system solutions for societal needs.
CO7. Work individually and in a group to develop embedded systems.
CO8. Communicate effectively in oral and written form in the field of embedded systems.
DETAILED SYLLABUS: Conduct any TEN experiments from the following:
1. Introduction to MSP430 launch pad and Programming Environment.
2. Read input from switch and Automatic control/flash LED (soft-ware delay).
3. Interrupts programming example using GPIO.
4. Configure watchdog timer in watchdog & interval mode.
5. Configure timer block for signal generation (with given frequency).
6. Read Temperature of MSP430 with the help of ADC.
7. Test various Power Down modes in MSP430.
8. PWM Generator.
9. Use Comparator to compare the signal threshold level.
10. Speed Control of DC Motor
11. Master slave communication between MSPs using SPI.
12. Networking MSPs using Wi-Fi.
TOOL REQUIREMENT:
Code Composer Studio Version 6, MSP430 based launch pads, Wi-Fi booster pack. REFERENCE BOOKS: 1. John H Davies, MSP430 Microcontrollers Basics, Newnes Pub-lishers, 1
st edition, 2008.
2. C P Ravikumar, MSP430 Microcontrollers in Embedded Sys-tem Projects, Elite Publishing House , 1
stedition, 2012.
v
(An Autonomous institute affiliated of JNTUA, Anantapuramu)
Sree Sainath Nagar, Tirupati – 517 102
Department of Electrical & Electronics Engineering
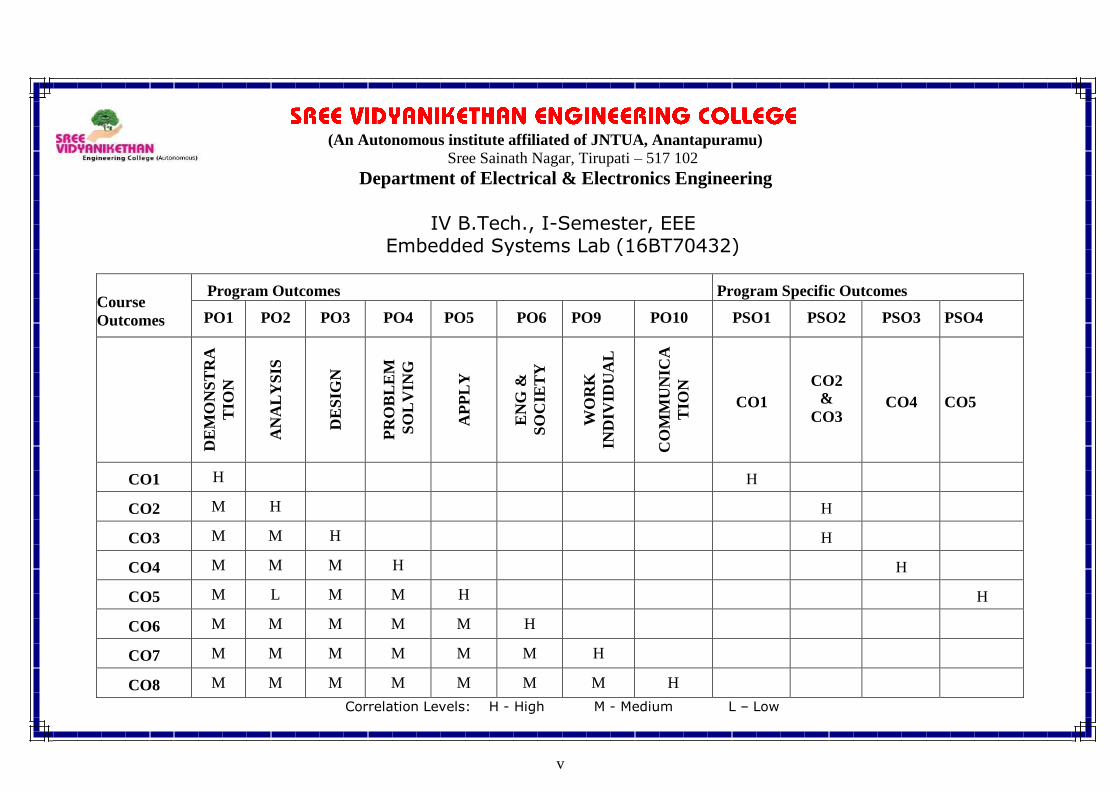
IV B.Tech., I-Semester, EEE Embedded Systems Lab (16BT70432)
Course
Outcomes
Program Outcomes Program Specific Outcomes
PO1 PO2 PO3 PO4 PO5 PO6 PO9 PO10 PSO1 PSO2 PSO3 PSO4
DE
MO
NS
TR
A
TIO
N
AN
AL
YS
IS
DE
SIG
N
PR
OB
LE
M
SO
LV
ING
AP
PL
Y
EN
G &
SO
CIE
TY
WO
RK
IND
IVID
UA
L
CO
MM
UN
ICA
TIO
N
CO1
CO2
&
CO3
CO4
CO5
CO1 H H
CO2 M H H
CO3 M M H H
CO4 M M M H H
CO5 M L M M H H
CO6 M M M M M H
CO7 M M M M M M H
CO8 M M M M M M M H
Correlation Levels: H - High M - Medium L – Low

(An Autonomous institute affiliated of JNTUA, Anantapuramu)
Sree Sainath Nagar, Tirupati – 517 102
Department of Electrical & Electronics Engineering
Rubrics Embedded Systems Lab (16BT70432)
S.
No
Course Outcome
Rubric 1 Rubric 2 Rubric 3 Score
X (Max 5M)
(1-2)M Average
(3-4) M Good
(5)M Very Good
1
CO1
PO1
DemonstDemonstrate knowledge in designing
complex energy efficient embedded
systems.
Unable to recall the
basic theoretical
knowledge of the experiment and
unable to follow the
practical procedure
Able to recall the
basic theoretical
knowledge of the experiment and
unable to follow the
practical procedure
Able to recall the
basic theoretical
knowledge of the experiment and able
to follow the
practical procedure.
2
CO2
PO2
Analyze usage of various on-chip resources
like GPIO, Timers, Interrupts, ADC, DAC,
Comparator, SPI.
Unable to analyse
Characteristics of
servomotor.
Able to explain the
operation of motors
Able to analyse and
apply,
Power electronics
circuits for real time
3
CO3
PO3
Design embedded systems to suit market requirements.
Unable not able to follow the
experimental
procedures and mathematical
calculations
Able to follow the
experimental procedures and
mathematical
calculations. But unable to
evaluate and interpret
properly.
Able to follow
experimental procedures and
mathematical
calculations. Also able to present and
interpret properly
and co-relate the practical with the
theory.
4
CO4
PO4
Solve engineering problems by proposing potential solutions using industry choice
advanced Microcontrollers.
Unable to interpret the experimental
results with the
programming and control strategy to
meet the required
specifications
able to interpret the experimental results
with the
programming and control strategy to
meet the required
specifications. Unable
to plan and design.
Able to plan and design and also to
interpret the
experimental results with the
programming and
control strategy to
meet the required
specifications.
5 CO5 PO5
Apply appropriate techniques, resources, and CCSV6 based IDE for modeling
embedded systems with understanding of
limitations.
Unable to select appropriate tool and
develop the program
for simulation
Able to select appropriate tool for
simulation but lags in
developing the model/program for
simulation.
Able to select appropriate tool and
develop the program
logic for simulation. Able to interpret the
results and correlate
them with practical.
6
CO6
PO6
Provide embedded system solutions for
societal needs.
Unable to handle as
an individual.
Occasionally works
as an individual
Able to work and
execute the problem
individually.
7
CO7
PO9
Work individually and in a group to
develop Embedded Systems.
Lab report is not
systematic
Lab report is
systematic at some
places to demonstrate
Report is fully
systematic and also
in specified format.
CO8
PO10 Communicate effectively in oral and
written form in the field of Embedded
Systems.
Unable to follow the
professional code of
ethics
able to follow the
professional code of
ethics and can unable
to define standard
code of ethics
able and apply the
professional code of
ethics.
8
6
Total Score (Max 30M) Y = X i
i1
9
Y Average Marks Obtained Z =
6 10 Marks Obtained = Z * 3
11 Assessment Average /Good / Very Good
vi

vii
(An Autonomous institute affiliated of JNTUA, Anantapuramu)
Sree Sainath Nagar, Tirupati – 517 102
Department of Electrical & Electronics Engineering
S.
No. Experiment Name
CO1 CO2 CO3 CO4 CO5 CO6 CO7 CO8
TOTAL Signatu
re of the
Faculty
DE
MO
NS
TR
AT
IO
N
AN
ALY
SIS
DE
SIG
N
PR
OB
LE
M
SO
LV
IN
G
AP
PLY
EN
G &
SO
CIE
TY
WO
RK
IN
DIV
ID
UA
L
CO
MM
UN
IC
AT
IO
N
3 M 3 M 6 M 3 M 3 M 3 M 3 M 6 M 30 M
1
Introduction to MSP430 launch pad and Programming Environment. (Study Experiment)
2 Read input from switch and Automatic control/flash LED (soft-ware delay).
3 Interrupts programming example using GPIO.
4 Configure watchdog timer in watchdog mode & interval mode.
5
Configure timer block for signal generation (with given frequency)
6
Read Temperature of MSP430 with the help of ADC.
7 Test various Power Down
modes in MSP430.
8 PWM Generator
9
Use Comparator to compare
the signal threshold level
10 Speed Control of DC Motor
11
Master slave
communication between
MSPs using SPI
12
Networking MSPs using
Wi-Fi.
Year and Semester: IV B.Tech. I Semester Roll No. :
Name of the Laboratory: Embedded Systems Lab Course Code: 16BT70432

viii
(An Autonomous institute affiliated of JNTUA, Anantapuramu)
Sree Sainath Nagar, Tirupati – 517 102
Department of Electrical & Electronics Engineering
IV B.Tech., I-Semester, EEE Embedded Systems Lab (16BT70432)
General Instructions
1. Shirts should be tucked in.
2. Perform only appropriate experiments and be sure that you understand the procedure
involved before you begin.
3. Supply to test table should be obtained only through the lab technician.
4. Energize the circuit only after getting approval from the faculty-in-charge.
5. Students who are not appropriately attired will not be allowed to perform experiments.
6. No horse-play before, during or after lab.
7. Be familiar with emergency procedures & know the location of emergency equipment.
First aid kit for minor injuries is with the lab technician.
8. Do not modify equipment settings unless instructed by lab handout or lab instructor.
9. Unauthorized experiments and working in the laboratory outside the class hours without
permission are strictly prohibited.
10. Keep bags in the designated areas.
11. If you feel unhealthy or dizzy while doing the experiment, stop immediately, sit down
and notify the instructor.

SVEC, EEE 1
Pag
e1
1. BLINK IN-BUILD LED1 & LED2
(1A) To Blink GREEN LED with GPIO
AIM: The main objective of this experiment is to blink the on-board, GREEN LED
(connected to P1.0) using GPIO.
APPARATUS:
1) Code Composer studio software
2)MSP430F5529 target Launch-pad
3) USB cable
4) Patch Chords
THEORY :
The MSP430F5529 has two LED’s connected to GREEN LED (P1.0) and RED LED
(P4.6) on the MSP430F5529 Launch-Pad for visual feedback. In this experiment, the
code programmed into the MSP430F5529 processor toggles the output on Port P1.0
at fixed time intervals computed within the code. A HIGH on P1.0 turns the LED
ON, while a LOW on P1.0 turns the LED OFF. Thus, the toggling output blinks the
GREEN LED connected to it.
PROGRAM:
#include<msp430.h>
intmain(void)
{
WDTCTL = WDTPW | WDTHOLD; // Stop watchdog timer
PM5CTL0 &= ~LOCKLPM5; // Disable the GPIO power-on default high-
impedance mode to activate previously configured port settings
P1DIR |= 0x01; // set the pin 1.0 direction to O/P
while(1)
{
volatile unsigned long i;
P1OUT ^=0x01; // blink LED
i = 50000;
doi--;
while(i != 0);
}
return 0;
}

SVEC, EEE 2
Pag
e2
PROCEDURE:
1. 1. Connect the MSP430F5529 LaunchPad to the PC using the USB cable supplied.
2. Build, program and debug the code into the LaunchPad using CCS to view
the status of the LED.
3. In the CCS debug perspective, select View --> Registers.
RESULT :
(1B) To Blink an RED LED with GPIO
AIM: The main objective of this experiment is to blink the onboard, RED LED
(connected to P4.6) using GPIO.
PROGRAM:
#include<msp430.h>
intmain(void)
{
WDTCTL = WDTPW | WDTHOLD; // Stop watchdog timer
PM5CTL0 &= ~LOCKLPM5; // Disable the GPIO power-on default high-
//impedance mode to activate previously configured port settings
P4DIR |= 0x40; // set the pin 4.6 direction to O/P
while(1)
{
volatileunsignedlongi;
P4OUT ^=0x40;// blink LED
i = 50000;
doi--;
while(i != 0);
}
return 0;
}
RESULT :

SVEC, EEE 3
Pag
e3
(1C) To Blink an RED LED & GREEN LED Together
AIM: The main objective of this experiment is to blink the onboard, RED LED
(connected to P4.6) and GREEN LED(connected to P1.0) together using GPIO.
PROGRAM:
#include<msp430.h>
intmain(void)
{
WDTCTL = WDTPW | WDTHOLD; // Stop watchdog timer
PM5CTL0 &= ~LOCKLPM5; // Disable the GPIO power-on default //
high-impedance mode to activate previously configured port settings
P1DIR |= 0x01; P4DIR |= 0x40;
P1OUT |= 0x01; P4OUT |= 0x40;
while(1)
{
volatileunsignedlongi;
P1OUT ^= 0x01;
P4OUT ^=0x40;
i = 50000;
doi--;
while(i != 0);
}
return 0;
}
RESULT :
(1D)To Blink an RED LED & GREEN LED Alternatively
AIM: The main objective of this experiment is to blink the onboard, RED LED
(connected to P4.6) and GREEN LED(connected to P1.0) alternatively using GPIO.
PROGRAM:
#include<msp430.h>
intmain(void)
{
WDTCTL = WDTPW | WDTHOLD; // Stop watchdog timer
PM5CTL0 &= ~LOCKLPM5; // Disable the GPIO power-on default //high-
//impedance mode to activate previously configured port settings

SVEC, EEE 4
Pag
e4
P1DIR |= 0x01;
P4DIR |= 0x40;
P1OUT |= 0x01;
P4OUT &= ~0x40;
while(1)
{
volatileunsignedlongi;
P1OUT ^= 0x01;
P4OUT ^=0x40;
i = 50000;
doi--;
while(i != 0);
}
return 0;
}
RESULT :

SVEC, EEE 5
Pag
e5
2. READ INPUT FROM SWITCH AND GLOW LED
(2A)To Blink an GREEN LED using Button
AIM: The main objective of this experiment is to blink the onboard, GREEN LED
(connected to P1.0) whenever button (connected to P.1.1) is pressed and OFF when
released using GPIO.
APPARATUS:
1) Code Composer studio software
2)MSP430F5529 target Launch-pad
3) USB cable
4) Patch Chords
THEORY :
The MSP430F5529 has two LED’s and two push BUTTONS connected to GREEN
LED (P1.0),S2(P1.1) and RED LED (P4.6),S1(P4.5) on the MSP430F5529
LaunchPad for visual feedback. In this experiment, the code programmed into the
MSP430F5529 processor to turn on GREEN LED when button is pressed & OFF
when button is released are computed within the code.
PROGRAM:
#include<msp430.h>
int main(void)
{
WDTCTL = WDTPW | WDTHOLD; // Stop watchdog timer
PM5CTL0 &= ~LOCKLPM5; // Disable the GPIO power-on default high-
impedance mode //to activate previously configured port settings
P1DIR |= 0x01;
P1REN |= 0x02;
while(1)
{
if(P1IN & BIT1)
{
P1OUT &= ~BIT0;
}
else
{
}
}

SVEC, EEE 6
Pag
e6
P1OUT |= BIT0;
return 0;
}
PROCEDURE:
1. Connect the MSP430F5529 LaunchPad to the PC using the USB cable supplied.
2. Build, program and debug the code into the LaunchPad using CCS to view
the status of the LED.
3. In the CCS debug perspective, select View --> Registers.
RESULT :
(2B) To Blink an GREEN LED using Button with Delay 1sec
AIM:The main objective of this experiment is to make the green LED stay
ON for around 1 second every time the button is pressed.
APPARATUS:
1) Code Composer studio software
2)MSP430F5529 target Launch-pad
3) USB cable
THEORY:
The MSP430F5529 has two LED’s and two push BUTTONS connected to GREEN
LED (P1.0),S2(P1.1) and RED LED (P4.6),S1(P4.5) on the MSP430F5529
LaunchPad for visual feedback. In this experiment, the code programmed into the
MSP430F5529 processor make the green LED stay ON for around 1 second every
time the button is pressed.
PROCEDURE:
1. Connect the MSP430F5529 LaunchPad to the PC using the USB cable supplied.
2. Build, program and debug the code into the LaunchPad using CCS to view the
status of the red LED.
3. In the CCS debug perspective, select View --> Registers.

SVEC, EEE 7
Pag
e7
PROGRAM:
#include<msp430.h>
int main(void) {
WDTCTL = WDTPW | WDTHOLD; // Stop watchdog timer
// Disable the GPIO power-on default //high-//impedance mode to activate previously
configured port settings
PM5CTL0 &= ~LOCKLPM5;
P1DIR |= 0x01;
P1REN |= 0x02;
while(1){ volatileunsignedlongi;
if(P1IN & BIT1){
P1OUT &= ~BIT0;
}else
{
}
P1OUT |= BIT0; i = 50000;
doi--;
while(i != 0);
}
return 0;
}
(2C) To Blink an GREEN LED & RED LED using Button
AIM: The main objective of this experiment is to turn the red LED ON when the button is pressed and the green LED ON when the button is released.
APPARATUS:
1) Code Composer studio software
2)MSP430F5529 target Launch-pad
3) USB cable
THEORY:
The MSP430F5529 has two LED’s and two push BUTTONS connected to GREEN
LED (P1.0),S2(P1.1) and RED LED (P4.6),S1(P4.5) on the MSP430F5529

SVEC, EEE 8
Pag
e8
LaunchPad for visual feedback. In this experiment, the code programmed into the
MSP430F5529 processor turn the red LED ON when the button is pressed and the
green LED ON when the button is released.
PROCEDURE:
1. Connect the MSP430F5529 LaunchPad to the PC using the USB cable supplied. 2. Build, program and debug the code into the LaunchPad using CCS to view
the status of the LED.
3. In the CCS debug perspective, select View
--> Registers PROGRAM:
RESULT:

SVEC, EEE 9
Pag
e9
3. INTERRUPTS PROGRAMMING EXAMPLE USING GPIO
AIM: The main objective of this experiment is to write a C program and associated GPIO ISR using interrupt programming technique.
APPARATUS:
1) Code Composer studio software
2)MSP430F5529 target Launch-pad
3) USB cable
THEORY:
The MSP430F5529 has two LED’s and two push BUTTONS connected to GREEN
LED (P1.0),S2(P1.1) and RED LED (P4.6),S1(P4.5) on the MSP430F5529
LaunchPad for visual feedback. In this experiment, the code programmed into the
MSP430F5529 processor toggle the GREEN LED whenever interrupt is generated.
MSP430FR59xx
----------------- /|\| XIN|-
| | | 32kHz
--|RST XOUT|-
| |
| P1.0 |--> LED | P1.1 |--->S2
PROCEDURE:
1. Connect the MSP430F5529 LaunchPad to the PC using the USB cable supplied.
2. Build, program and debug the code into the LaunchPad using CCS to view
the status of the LED.
3. In the CCS debug perspective, select View --> Registers
4. Press the S2 and observe the GREEN LED toggled.
PROGRAM:
#include<msp430.h> intmain(void)
{
WDTCTL = WDTPW + WDTHOLD; // Stop WDT PM5CTL0 &= ~LOCKLPM5;
P1DIR |= BIT0; // Set P1.0 to output direction
P1REN |= BIT1; // Enable P1.1 internal resistance
P1OUT |= BIT1; // Set P1.1 as pull up resistance

SVEC, EEE 10
Pag
e10
P1IES |= BIT1; // P1.1 High/Low Edge
P1IFG &= ~BIT1; // P1.1 IFG Cleared
P1IE |= BIT1; // P1.1 Interrupt Enabled
_bis_SR_register(LPM4_bits + GIE); // Enter LPM4 w/ interrupt
_no_operation();
return 0;
}
#pragma vector=PORT1_VECTOR
interruptvoidPort_1 (void)
{
P1OUT ^= BIT0; // Toggle P1.0
P1IFG &= ~BIT1; // P1.1 IFG Cleared
}
RESULT:

SVEC, EEE 11
Pag
e11
4. CONFIGURE WATCHDOG TIMER IN WATCHDOG MODE & INTERVAL
MODE
AIM: The main objective of this experiment is to configure watchdog timer module
in watchdog and Interval time mode and observe its output.
APPARATUS:
1) Code Composer studio software
2)MSP430F5529 target Launch-pad
3) USB cable
THEORY:
WDT_A Operation
The watchdog timer module can be configured as either a watchdog or interval timer
with the WDTCTL register. WDTCTL is a 16-bit password-protected read/write
register. Any read or write access must use word instructions and write accesses must
include the write password 05Ah in the upper byte. Any write to WDTCTL with any
value other than 05Ah in the upper byte is a password violation and triggers a PUC
system reset, regardless of timer mode. Any read of WDTCTL reads 069h in the
upper byte. Byte reads on WDTCTL high or low part result in the value of the low
byte. Writing byte wide to upper or lower parts of WDTCTL results in a PUC.
Watchdog Timer Counter (WDTCNT)
The WDTCNT is a 32-bit up counter that is not directly accessible by software. The
WDTCNT is controlled and its time intervals are selected through the Watchdog
Timer Control (WDTCTL) register. The WDTCNT can be sourced from SMCLK,
ACLK, VLOCLK, or X_CLK on some devices. The clock source is selected with the
WDTSSEL bits. The timer interval is selected with the WDTIS bits.
Watchdog Mode
After a PUC condition, the WDT module is configured in the watchdog mode with an
initial ~32-ms reset interval using the SMCLK. The user must setup, halt, or clear the
watchdog timer prior to the expiration of the initial reset interval or another PUC is
generated. When the watchdog timer is configured to operate in watchdog mode,
either writing to WDTCTL with an incorrect password, or expiration of the selected
time interval triggers a PUC. A PUC resets the watchdog timer to its default
condition.
Interval Timer Mode
Setting the WDTTMSEL bit to 1 selects the interval timer mode. This mode can be
used to provide periodic interrupts. In interval timer mode, the WDTIFG flag is set at
the expiration of the selected time interval. A PUC is not generated in interval timer
mode at expiration of the selected timer interval, and the WDTIFG enable bit WDTIE
remains unchanged.

SVEC, EEE 12
Pag
e12
When the WDTIE bit and the GIE bit are set, the WDTIFG flag requests an interrupt.
The WDTIFG interrupt flag is automatically reset when its interrupt request is
serviced, or it may be reset by software. The interrupt vector address in interval timer
mode is different from that in watchdog mode.
PROGRAM:
1. A WATCHDOG TIMER:INTERVAL TIMER MODE C PROGRAM:
{
WDTCTL = WDT_ADLY_250; // WDT 250ms, ACLK, interval timer
IE1 |= WDTIE; // Enable WDT
P1DIR |= 0x01; // Set P1.0 to __bis_SR_register(LPM3_bits + GIE); //
Enter LPM3
}
// Watchdog Timer interrupt service routine
#pragma vector=WDT_VECTOR
__interrupt voidwatchdog_timer(void)
{
P1OUT ^= 0x01; // Toggle P1.0 using exclusive-OR
}
2. WATCHDOG MODE: C PROGRAM
intmain(void)
{
WDTCTL = WDT_ARST_1000;
P1DIR |= 0x01;
P1OUT ^= 0x01;
__bis_SR_register(LPM3_bits);
}
3. WATCHDOG TIMER: WATCDOG MODE ALP PROGRAM

SVEC, EEE 13
Pag
e13
WDCNT: 0000 0001
RESET mov.w #0280h,SP ; Initialize stackpointer
SetupWDT mov.w #WDT_ARST_1000N,&WDTCTL ; Set Watchdog Timer
bis.b #WDTIE,&IE1
bis.b #001h,&P1DIR ; P1.0 output
xor.b #001h,&P1OUT ; Toggle P1.0
bis.w #LPM3,SR ;
Mainloop jmp $
RESULT

SVEC, EEE 14
Pag
e14
5.CONFIGURE TIMER BLOCK FOR SIGNAL GENERATION
AIM: The main objective of this experiment is to write a C program and
TIMER ISR using interrupt programming technique.
APPARATUS:
1) Code Composer studio software
2)MSP430F5529 target Launch-pad
3) USB cable
THEORY:
The MSP430F5529 has two LED’s and two push BUTTONS connected to GREEN
LED (P1.0),S2(P1.1) and RED LED (P4.6),S1(P4.5) on the MSP430F5529
Launch-Pad for visual feedback. In this experiment, the code programmed into the
MSP430F5529 processor Toggle P1.0 using software and TA_0 ISR. Timer0_A is
configured for continuous mode, thus the timer overflows when TAR counts to
CCR0. In this example, CCR0 is loaded with 50000.
// ACLK = n/a, MCLK = SMCLK = TACLK = default DCO = ~1MHz
MSP430FR59xx
-----------------
/|\| XIN|- | | | 32kHz
--|RST XOUT|- | |
PROCEDURE:
| P1.0 |--> LED
1. Connect the MSP430F5529 LaunchPad to the PC using the USB cable supplied.
2. Build, program and debug the code into the LaunchPad using CCS to view
the status of the LED.
3. In the CCS debug perspective, select View --> Registers
4. Observe the GREEN LED blinks whenever timer overflows.
PROGRAM:
#include<msp430.h> intmain(void)
{
WDTCTL = WDTPW | WDTHOLD; // Stop WDT
// Configure GPIO
P1DIR |= BIT0; P1OUT |= BIT0;

SVEC, EEE 15
Pag
e15
// Disable the GPIO power-on default high-impedance mode to activate
// previously configured port settings
PM5CTL0 &= ~LOCKLPM5;
TA0CCTL0 = CCIE; // TACCR0 interrupt enabled TA0CCR0 = 20000;
TA0CTL = TASSEL SMCLK | MC UP; // SMCLK, UP mode
bis_SR_register(LPM0_bits + GIE); // Enter LPM0 w/ interrupt
no_operation(); // For debugger
}
// Timer0_A0 interrupt service routine
#if defined( TI_COMPILER_VERSION ) || defined( IAR_SYSTEMS_ICC )
#pragma vector = TIMER0_A0_VECTOR
interruptvoidTimer0_A0_ISR (void)
#elif defined( GNUC )
void attribute ((interrupt(TIMER0_A0_VECTOR))) Timer0_A0_ISR (void)
#else
#error Compiler not supported!
#endif
{
P1OUT ^= BIT0;
}
RESULT:

SVEC, EEE 16
Pag
e16
6. READ TEMPERATURE OF MSP430 WITH THE HELP OF ADC
AIM: The main objective of this experiment is to measure temperature using
inbuilt ADC module.
APPARATUS:
1) Code Composer studio software
2)MSP430F5529 target Launch-pad
3) USB cable
THEORY:
To use the on-chip temperature sensor, select the analog input channel INCHx =
1010. Any other configuration is done as if an external channel were selected,
including reference selection and conversion-memory selection. The temperature
sensor is part of the reference. Therefore, for devices with the REF module, in
addition to the input channels selection INCHx = 1010, configuring
ADC12REFON = 1 (for REFMSTR = 0) or REFON = 1 (for REFMSTR = 1) is
required to enable the temperature sensor. For the MSP430F54xx (non-A) devices,
which do not include the REF module, selecting the temperature sensor by
configuring INCHx = 1010 automatically enables the reference generator required
for the temperature sensor. Any other configuration is done as if an external
channel were selected, including reference selection and conversion-memory
selection.

SVEC, EEE 17
Pag
e17
Figure shows a typical temperature sensor transfer function. The transfer function
that is shown is only an example; the device-specific data sheet contains the actual
parameters for a given device. When using the temperature sensor, the sample
period must be greater than 30 µs. The temperature sensor offset error can be large
and may need to be calibrated for most applications. Temperature calibration
values are available for use in the TLV descriptors (see the device-specific data
sheet for locations). Some MSP430 devices include calibration data that can be
used to compute temperature more accurately.
PROGRAM:
Read Temperature of MSP430 with the help of ADC
#include<msp430.h>
long temp;
long IntDegC;
intmain(void)
{
WDTCTL = WDTPW + WDTHOLD; // Stop WDT
ADC10CTL1 = INCH_10 + ADC10DIV_3; // Temp Sensor ADC10CLK/4
ADC10CTL0 = SREF_1 + ADC10SHT_3 + REFON + ADC10ON + ADC10IE;
while(1)
{
ADC10CTL0 |= ENC + ADC10SC; // Sampling and conversion start
__bis_SR_register(CPUOFF + GIE); // LPM0 with interrupts enabled
temp = ADC10MEM;
IntDegC = ((temp - 673) * 423) / 1024;
__no_operation(); // SET BREAKPOINT HERE
}
}
// ADC10 interrupt service routine
#pragma vector=ADC10_VECTOR
__interrupt voidADC10_ISR (void)
{
__bic_SR_register_on_exit(CPUOFF); // Clear CPUOFF bit from 0(SR)
}
RESULT:

SVEC, EEE 18
Pag
e18
7. TEST VARIOUS POWER DOWN MODE IN MSP430
AIM:The main objective of this experiment is to Configure the MSP-EXP430FR
Launchpad for Low Power Mode (LPM3) and measure current consumption both
in active and low power modes.
APPARATUS:
1) Code Composer studio software
2)MSP430F5529 target Launch-pad
3) USB cable
THEORY:
The RTC_B module is used to set the time, start RTC operation,and read the
time from the respective RTC registers. Software will set the original time to
11:59:30 am on Friday October 7, 2011. Then the RTC will be activated
through software, and an alarm will be created for the next minute (12:00:00
pm). The device will then enter LPM3.5 awaiting the event interrupt. Upon
being woken up by the event, the LED on the board will be set.we will use
MSP-EXP430FR5969 as hardware platform and measure active mode and
standby mode current.
ACLK = 32.768kHz, MCLK = SMCLK = DCO = ~1MHz
MSP430FR59xx
-----------------
/|\| XIN|-
| | | 32kHz
--|RST XOUT|-
| |
| P1.0 |--> LED
PROCEDURE:
1. Connect the MSP430F5529 LaunchPad to the PC using the USB cable supplied.
2. Build, program and debug the code into the LaunchPad using CCS to view the status of the LED.
3. In the CCS debug perspective, select View --> Others-->Energy Trace
Technology
4. Note down the power consumption in Active mode and Low power mode 3.5.

SVEC, EEE 19
Pag
e19
PROGRAM:
#include<msp430.h>
voidBoard_Init(void);
voidRTC_Init(void);
voidEnterLPM35(void);
voidWakeUpLPM35(void);
intmain(void)
{
WDTCTL = WDTPW | WDTHOLD; // Stop WDT
// Determine whether we are coming out of an LPMx.5 or a regular RESET.
if (SYSRSTIV == SYSRSTIV_LPM5WU)
{
}
else
{
}
// When woken up from LPM3.5, reinit
WakeUpLPM35(); // LPMx.5 wakeup specific init code
enable_interrupt(); // The RTC interrupt should trigger
while (1); // Forever loop after returning from RTC ISR.
// Init board & RTC, then enter LPM3.5
Board_Init(); // Regular init code for GPIO and CS
RTC_Init(); // Regular init code for RTC_B EnterLPM35();
}
voidBoard_Init(void)
{
// Port Configuration
P1OUT = 0x00;
P1DIR = 0xFF;
P2OUT = 0x00;
P2DIR = 0xFF;
P3OUT = 0x00;
P3DIR = 0xFF;

SVEC, EEE 20
Pag
e20
P4OUT = 0x00;
P4DIR = 0xFF;
PJOUT = 0x00;
PJSEL0 |= BIT4 | BIT5;
PJDIR = 0xFFFF;
PM5CTL0 &= ~LOCKLPM5;
CSCTL0_H = CSKEY >>8; // Unlock CS registers
CSCTL1 = DCOFSEL_0; // Set DCO to 1MHz
CSCTL2 = SELA LFXTCLK | SELS DCOCLK | SELM DCOCLK;
CSCTL3 = DIVA 1 | DIVS 1 | DIVM 1; // Set all dividers to 1
CSCTL4 &= ~LFXTOFF;
do
{
CSCTL5 &= ~LFXTOFFG; // Clear XT1 fault flag
SFRIFG1 &= ~OFIFG;
}while (SFRIFG1&OFIFG); // Test oscillator fault flag
CSCTL0_H = 0; // Lock CS registers
}
voidRTC_Init(void)
{
// Configure RTC_B
RTCCTL01 = RTCBCD | RTCHOLD | RTCTEV MIN | RTCTEVIE; // BCD mode, RTC
hold,
enable RTC // event interrupt for each minute
RTCYEAR = 0x2011;
RTCMON = 0x10; // Month = 0x10 = October
RTCDAY = 0x07; // Day = 0x07 = 7th
RTCDOW = 0x05; // Day of week = 0x05 = Friday
RTCHOUR = 0x11; // Hour = 0x11
RTCMIN = 0x59; // Minute = 0x59
RTCSEC = 0x30; // Seconds = 0x30
RTCCTL01 &= ~RTCHOLD; // Start RTC calendar mode
voidEnterLPM35(void)

SVEC, EEE 21
Pag
e21
{
PMMCTL0_H = PMMPW_H; // Open PMM Registers for write
PMMCTL0_L |= PMMREGOFF;
bis_SR_register(LPM4_bits | GIE);
}
voidWakeUpLPM35(void)
{
// Restore Port settings P1OUT = 0x00;
P1DIR = 0xFF;
P2OUT = 0x00;
P2DIR = 0xFF;
P3OUT = 0x00;
P3DIR = 0xFF;
P4OUT = 0x00;
P4DIR = 0xFF;
PJOUT = 0x00;
PJSEL0 |= BIT4 | BIT5;
PJDIR = 0xFFFF;
RTCCTL01 |= RTCBCD | RTCHOLD | RTCTEV MIN | RTCTEVIE;
RTCCTL01 &= ~RTCHOLD;
PM5CTL0 &= ~LOCKLPM5;
CSCTL0_H = CSKEY >>8; // Unlock CS registers
CSCTL1 = DCOFSEL_0; // Set DCO to 1MHz
CSCTL2 = SELA LFXTCLK | SELS DCOCLK | SELM DCOCLK;
// Set ACLK = XT1; MCLK = DCO
CSCTL3 = DIVA 1 | DIVS 1 | DIVM 1; // Set all dividers to 1
CSCTL4 &= ~LFXTOFF; // Enable LFXT1
do
{
CSCTL5 &= ~LFXTOFFG; // Clear XT1 fault flag
SFRIFG1 &= ~OFIFG;
}while (SFRIFG1&OFIFG); // Test oscillator fault flag
CSCTL0_H = 0; }

SVEC, EEE 22
Pag
e22
#if defined( TI_COMPILER_VERSION ) || defined( IAR_SYSTEMS_ICC )
#pragma vector=RTC_VECTOR
interruptvoidRTC_ISR(void)
#elif defined( GNUC )
void attribute ((interrupt(RTC_VECTOR))) RTC_ISR (void)
#else
#error Compiler not supported!
#endif
{
switch ( even_in_range(RTCIV, RTCIV_RTCOFIFG)){
case RTCIV_NONE: break;
case RTCIV_RTCRDYIFG: break;
case RTCIV_RTCTEVIFG:
P1OUT |= BIT0; // Turn on LED
break;
case RTCIV_RTCAIFG: break;
case RTCIV_RT0PSIFG: break;
case RTCIV_RT1PSIFG: break;
case RTCIV_RTCOFIFG: break;
}
}
RESULT:

SVEC, EEE 23
Pag
e23
8. PWM GENERATOR
AIM:The main objective of this experiment is to understand how to configure the
PWM module of the MSP-EXP430FR5969 Launchpad to control the brightness of LED using external input.
APPARATUS:
1) Code Composer studio software
2)MSP430F5529 target Launch-pad
3) USB cable
THEORY:
The MSP430F5529 has two LED’s and two push BUTTONS connected to GREEN
LED (P1.0),S2(P1.1) and RED LED (P4.6),S1(P4.5) on the MSP430F5529
LaunchPad for visual feedback. In this experiment, the code programmed into the
MSP430F5529 processor increase the brightness of LED when button is pressed
gradually and decrease the brightness of LED when another button is presses
gradually.Actually here we are increasing and decreasing the width of the pulse by
varying the values in CCR1 of the Timer.
MSP430FR59xx
----------------- /|\| XIN|- | | | 32kHz
--|RST XOUT|-
| |
LED<--| P4.6 P1.0 |--> LED
S1←| P4.5 P1.1 |-->S2
-------------------
PROCEDURE:
1. Connect the MSP430F5529 LaunchPad to the PC using the USB cable supplied.
2. Build, program and debug the code into the LaunchPad using CCS to view
the status of the LED.
3. In the CCS debug perspective, select View --> Registers
4. Observe the GREEN LED brightness increase whenever S1 is pressed and
decreases when S2 is pressed.
PROGRAM:
#include<msp430.h>
int j=0; intmain(void) {
WDTCTL = WDTPW | WDTHOLD; // Stop watchdog timer
PM5CTL0 &= ~LOCKLPM5; // Disable the GPIO power-on default high-impedance
//mode to activate previously configured port settings
P1DIR |= BIT0; // Set P1.0 to output direction

SVEC, EEE 24
Pag
e24
P1OUT &= ~BIT0; // Switch LED off
P1DIR &= ~BIT1; // Set P1.1 as input
P1OUT |= BIT1; // Configure P1.1 for Pull-Up
P1REN |= BIT1; // Enable Pull Up of P1.1
P4DIR &= ~BIT5; // Set P4.5 as input
P4OUT |= BIT5; // Configure P4.5 for Pull-Up
P4REN |= BIT5; // Enable Pull Up of P4.5
TA0CCTL1 = OUTMOD_7; // Reset/Set Mode
TA0CTL = TASSEL_2 + MC_1 +TACLR ; // SMCLK / Upmode
TA0CCR0 = 100-1; // PWM Frequency 10 kHz
TA0CCR1 = 50; // 50% Duty Cycle
P1SEL0 |= BIT0; // PWM output to LED P1.0
P1SEL1 &= ~BIT0;
while(1)
{
if(!(P1IN & BIT1))
{
if(TA0CCR1 <= 90)
{
TA0CCR0 = 0;
TA0CCR1 += 10;
TA0CCR0 = 100;
}
}
elseif(!(P4IN & BIT5))
{
if(TA0CCR1 >= 10)
{
TA0CCR0 = 0;
TA0CCR1 -= 10;
TA0CCR0 = 100;
}
}
for(j=100;j>0;j--)
{
delay_cycles(1000);
}
}
}
RESULT:

SVEC, EEE 25
Pag
e25
9. USE OF COMPARATOR TO COMPARE THE SIGNAL
THRESHOLD LEVEL
AIM: The main objective of this experiment is to understand how to configure
comparator to compare the signal threshold level using MSP-EXP430FR5969
Launchpad
APPARATUS:
1) Code Composer studio software
2)MSP430F5529 target Launch-pad
3) USB cable
THEORY:
PROGRAM:
#include <msp430.h>
int main (void)
{
WDTCTL = WDTPW + WDTHOLD; // Stop WDT
P1DIR |= 0x01; // P1.0 output
CACTL1 = CARSEL + CAREF0 + CAON; // 0.25 Vcc = -comp, on
CACTL2 = P2CA4; // P1.1/CA1 = +comp
while (1) // Test comparator_A output
{
if ((CAOUT & CACTL2))
P1OUT |= 0x01; // if CAOUT set, set P1.0
else P1OUT &= ~0x01; // else reset
}
}
RESULT

SVEC, EEE 26
Pag
e26
10. SPEED CONTROL OF DC MOTOR
AIM: The main objective of this experiment is to understand how to configure the
PWM module of the MSP-EXP430FR5969 Launchpad to control the brightness of
LED using external input.
APPARATUS:
1) Code Composer studio software
2)MSP430F5529 target Launch-pad
3) USB cable
4) Patch Chords
THEORY:
A potentiometer is connected to the pin P1.3(A3) and DC MOTOR is
connected to P1.2. Timer operates in UP MODE with Reset/set(output MODE
7) and set the PWM frequency in Capture/Compare register 1(CCR1). Software
sets ADC12SC to start sample and conversion
- ADC12SC automatically cleared at EOC. ADC12 internal oscillator times
sample (16x) and conversion. In Main loop MSP430 waits in LPM0 to save
power until ADC12 conversion complete, ADC12_ISR will force exit from
LPM0 in Mainloop on reti. Values of potentiometer is stored in ADC memory.
The Contents of ADC memory is assigned to Capture/Compare register 0
(CCR0) which sets the duty cycle of the generated pulse. The full, correct
handling of and ADC12 interrupt is shown as well.

SVEC, EEE 27
Pag
e27
ADC12CTL1, ADC12 Control Register 1
PROGRAM:
#include<msp430.h>
intmain(void)
{
WDTCTL = WDTPW | WDTHOLD; // Stop WDT
// GPIO Setup
P1OUT &= ~BIT2; // Clear MOTOR to start
P1DIR |= BIT2; // Set P1.2/MOTOR to output
P1SEL1 = BIT3; // Configure P1.3 for ADC
P1SEL0 = BIT3 | BIT2; // PWM output to MOTOR P1.2
// Disable the GPIO power-on default high-impedance mode to activate
// previously configured port settings
PM5CTL0 &= ~LOCKLPM5;
// Configure TimerA0
TA0CCTL1 = OUTMOD_7; // Reset/Set Mode
TA0CTL = TASSEL_2 + MC_1 +TACLR ; // SMCLK / Upmode
TA0CCR0 = 64-1; // PWM frequency
// Configure ADC12
ADC12CTL0 = ADC12SHT0_2 | ADC12ON; // Sampling time, S&H=16, ADC12
on
ADC12CTL1 = ADC12SHP; // Use sampling timer
ADC12CTL2 |= ADC12RES_2; // 12-bit conversion results
ADC12MCTL0 |= ADC12INCH_3; // A3 ADC input select; Vref=AVCC
ADC12IER0 |= ADC12IE0; // Enable ADC conv complete interrupt
while (1)
{
delay_cycles(5000);
ADC12CTL0 |= ADC12ENC | ADC12SC; // Start sampling/conversion

SVEC, EEE 28
Pag
e28
bis_SR_register(LPM0_bits | GIE); // LPM0, ADC12_ISR will force exit
no_operation(); // For debugger
}
}
#pragma vector = ADC12_VECTOR
interrupt voidADC12_ISR(void)
{
switch( even_in_range(ADC12IV, ADC12IV_ADC12RDYIFG))
{
case ADC12IV_NONE: break; // Vector 0: No interrupt
case ADC12IV_ADC12OVIFG: break; // Vector 2: ADC12MEMx Overflow
case ADC12IV_ADC12TOVIFG: break; // Vector 4: Conversion time overflow
case ADC12IV_ADC12HIIFG: break; // Vector 6: ADC12BHI case
ADC12IV_ADC12LOIFG: break; // Vector 8:
ADC12BLO case ADC12IV_ADC12INIFG: break; // Vector 10: ADC12BIN
case ADC12IV_ADC12IFG0:
TA0CCR1 = ADC12MEM0/64; // Vector 12: ADC12MEM0 Interrupt
bic_SR_register_on_exit(LPM0_bits); // Exit active CPU
break; // Clear CPUOFF bit from 0(SR)
case ADC12IV_ADC12IFG1: break; // Vector 14: ADC12MEM1
case ADC12IV_ADC12IFG2: break; // Vector 16: ADC12MEM2
case ADC12IV_ADC12IFG3: break; // Vector 18: ADC12MEM3
case ADC12IV_ADC12IFG4: break; // Vector 20: ADC12MEM4
case ADC12IV_ADC12IFG5: break; // Vector 22: ADC12MEM5
case ADC12IV_ADC12IFG6: break; // Vector 24: ADC12MEM6
case ADC12IV_ADC12IFG7: break; // Vector 26: ADC12MEM7
case ADC12IV_ADC12IFG8: break; // Vector 28: ADC12MEM8
case ADC12IV_ADC12IFG9: break; // Vector 30: ADC12MEM9
case ADC12IV_ADC12IFG10: break; // Vector 32: ADC12MEM10
case ADC12IV_ADC12IFG11: break; // Vector 34: ADC12MEM11
case ADC12IV_ADC12IFG12: break; // Vector 36: ADC12MEM12
case ADC12IV_ADC12IFG13: break; // Vector 38: ADC12MEM13
case ADC12IV_ADC12IFG14: break; // Vector 40: ADC12MEM14
case ADC12IV_ADC12IFG15: break; // Vector 42: ADC12MEM15
case ADC12IV_ADC12IFG16: break; // Vector 44: ADC12MEM16
case ADC12IV_ADC12IFG17: break; // Vector 46: ADC12MEM17
case ADC12IV_ADC12IFG18: break; // Vector 48: ADC12MEM18
case ADC12IV_ADC12IFG19: break; // Vector 50: ADC12MEM19
case ADC12IV_ADC12IFG20: break; // Vector 52: ADC12MEM20
case ADC12IV_ADC12IFG21: break; // Vector 54: ADC12MEM21
case ADC12IV_ADC12IFG22: break; // Vector 56: ADC12MEM22
case ADC12IV_ADC12IFG23: break; // Vector 58: ADC12MEM23
case ADC12IV_ADC12IFG24: break; // Vector 60: ADC12MEM24
case ADC12IV_ADC12IFG25: break; // Vector 62: ADC12MEM25

SVEC, EEE 29
Pag
e29
case ADC12IV_ADC12IFG26: break; // Vector 64: ADC12MEM26
case ADC12IV_ADC12IFG27: break; // Vector 66: ADC12MEM27
case ADC12IV_ADC12IFG28: break; // Vector 68: ADC12MEM28
case ADC12IV_ADC12IFG29: break; // Vector 70: ADC12MEM29
case ADC12IV_ADC12IFG30: break; // Vector 72: ADC12MEM30
case ADC12IV_ADC12IFG31: break; // Vector 74: ADC12MEM31
case ADC12IV_ADC12RDYIFG: break; // Vector 76: ADC12RDY
default: break;
}
}
RESULT :

SVEC, EEE 30
Pag
e30
11. MASTER SLAVE COMMUNICATION BETWEEN MSPs
USING SPI
AIM: The main objective of this experiment is to establish the SPI master-
slave communication using 3- wire mode in MSP430F5529 Launchpad. This
experiment will help understand the configuration of USCI_A0 SPI 3-Wire
Master Incremented Data in MSP430F5529.
APPARATUS REQUIRED:
● Code composer studio software.
● MSP430FR5529 target Launchpad.
● USB cable.
THEORY
Master:

SVEC, EEE 31
Pag
e31
The program code first disables the watch dog timer to prevent a processor
restart on expiry of the WDT count. The port pin P1.1 is set as slave reset and
port pin P1.0 is configured for the red LED. The port pins P3.3, P3.4 and P2.7
are configured for SPI communication. The USCI logic is held in reset state
and the 3-pin, 8- bit synchronous SPI master is enabled. The SMCLK is
selected as clock source and the USCI logic initiated. The USCI_RX interrupt
is enabled in low power mode and the slave is reset via out- put pin P1.1 and
allowed to initialize. The data values to be transmitted to the slave is also
initial- ized and transmitted via the transmit buffer UCA0TXBUF. On
receiving data from the slave, the USCI_RX interrupt occurs. If the data
received is same as the data transmitted, the red LED is turned on and the data
transmission is continued.
SLAVE
The program code first disables the watch dog timer to prevent a processor
restart on expiry of the WDT count. Since, the connec- tion is synchronous,
the slave receives the clock source from the master on port pin P2.7. If a clock
signal is detected from the master, the port pins P3.3, P3.4 and P2.7 are
configured for SPI communication and the USCI logic is held in reset state.
The 3-pin, 8-bit synchronous SPI master is then enabled. The USCI logic is
initiated and the USCI Rx interrupt is enabled in low power mode 4. When the
slave receives data from the master, the USCI Rx interrupt occurs. The
received data is copied into the transmit buffer UCA0TXBUF for echo
transmission to the master.
PROGRAM
C Program Code for Master and Slave
Master:
#include <msp430.h>
unsigned char MST_Data,SLV_Data; unsigned char temp;

SVEC, EEE 32
Pag
e32
int main(void)
{
volatile unsigned int i;
WDTCTL = WDTPW+WDTHOLD; // Stop watchdog
timer
P1OUT |= 0x02; // Set P1.0 for LED
P1DIR |= 0x03; // Set P1.1 for
slavereset
* P3SEL |= BIT3+BIT4; // P3.3,4 option select
P2SEL |= BIT7; // P2.7 option select
UCA0CTL1 |= UCSWRST; // **Put state machine in reset**
UCA0CTL0 |= UCMST+UCSYNC+UCCKPL+UCMSB; // 3-pin, 8-bit SPI synchronous
master
// Clock polarity high, MSB
UCA0CTL1 |= UCSSEL_2; // SMCLK
UCA0BR0 = 0x02; // /2
UCA0BR1 = 0;
UCA0MCTL = 0; // No modulation
UCA0CTL1 &= ~UCSWRST; // **Initialize USCI state machine**
UCA0IE |= UCRXIE; // Enable USCI_A0 RX interrupt
P1OUT &= ~0x02; // Now with SPI signals
initialized,
P1OUT |= 0x02; // reset slave
for(i=50;i>0;i--); // Wait for slave to
initialize
MST_Data = 0x01; // Initialize data values
SLV_Data = 0x00;
while (!(UCA0IFG&UCTXIFG)); // USCI_A0 TX buffer ready?
UCA0TXBUF = MST_Data; // Transmit first character
bis_SR_register(LPM0_bits + GIE); // CPU off, enable interrupts
}
#if defined( TI_COMPILER_VERSION ) || defined( IAR_SYSTEMS_ICC )
#pragma vector=USCI_A0_VECTOR
interrupt void USCI_A0_ISR(void)
#elif defined( GNUC )

SVEC, EEE 33
Pag
e33
void attribute ((interrupt(USCI_A0_VECTOR))) USCI_A0_ISR (void)
#else
#error Compiler not supported!
#endif
{
volatile unsigned int i;
switch( even_in_range(UCA0IV,4))
{
case 0: break; // Vector 0 - no interrupt
case 2: // Vector 2 - RXIFG
while (!(UCA0IFG&UCTXIFG)); // USCI_A0 TX buffer ready?
if (UCA0RXBUF==SLV_Data)// Test for correct character RX'd P1OUT |= 0x01; // If
correct, light LED
else
P1OUT &= ~0x01;// If incorrect, clear LED
MST_Data++; // Increment data SLV_Data++;
UCA0TXBUF = MST_Data; // Send next value
for(i = 20; i>0; i--); // Add time between transmissions to
// make sure slave can process
//information
break;
case 4: break; // Vector 4 - TXIFG default: break;
}
}
Slave:
#include <msp430.h>
int main(void)
{
WDTCTL = WDTPW+WDTHOLD; // Stop watchdog timer
while(!(P2IN&0x80)); // If clock sig from mstr stays low,
P3SEL |= BIT3+BIT4; // P3.3,4 option select
P2SEL |= BIT7; // P2.7
UCA0CTL1 |= UCSWRST; // **Put state machine in reset**
UCA0CTL0 |= UCSYNC+UCCKPL+UCMSB; // 3-pin, 8-bit SPI slave,
UCA0CTL1 &= ~UCSWRST; // **Initialize USCI state machine**

SVEC, EEE 34
Pag
e34
UCA0IE |= UCRXIE; // Enable USCI_A0 RX interrupt
bis_SR_register(LPM4_bits + GIE); // Enter LPM4, enable interrupts
}
#if defined( TI_COMPILER_VERSION ) || defined( IAR_SYSTEMS_ICC )
#pragma vector=USCI_A0_VECTOR
interrupt void USCI_A0_ISR(void)
#elif defined( GNUC )
void attribute
#else
((interrupt(USCI_A0_VECTOR))) USCI_A0_ISR (void)
#error Compiler not supported!
#endif
{
switch( even_in_range(UCA0IV,4))
{
case 0:break; // Vector 0 - no interrupt
case 2: // Vector 2 - RXIFG
while (!(UCA0IFG&UCTXIFG)); // USCI_A0 TX buffer ready? UCA0TXBUF =
UCA0RXBUF;
break;
case 4:break; // Vector 4 - TXIFG default: break;
}
}
RESULT

SVEC, EEE 35
Pag
e35
12. NETWORKING MSPs USING WI-FI
AIM: The main objective of this experiment is to configure CC3100 Booster
Pack as a Wireless Local Area Network (WLAN) Station to send Email over
SMTP. This experiment will help you understand the WLAN concepts and
CC3100 configuration to send Email over SMTP.
APPARATUS REQUIRED:
Code Composer Studio
CC3100 SDK
Tera Term Software (or any Serial Terminal Software)
MSP430 Launchpad
CC3100 Booster Pack
THEORY
A wireless local area network (WLAN) is a wireless computer network that
connects two or more devices without wires within a confined area, for
example: within a building. This stay connected without physical wiring
constraints and also access Internet. WiFi is based on IEEE 802.11 stan-
dards including IEEE 802.11a and IEEE802.11b.
All nodes that connect over a wireless network are referred to as stations
(STA). Wireless stations can be categorized into Wireless Access Points (AP)
or clients. Access Points (AP) work as the base station for a wireless network.
The Wireless clients could be any device such as computers, laptops, mobile
devices, smart phones, etc.
The Simplelink WIFI CC3100 device is the industry's first Wi-Fi Certified
chip used in the wireless networking solution that simplifies the
implementation of Internet connectivity. This device supports WPA2 personal
and enterprise security and WPS 2.0 and Embedded TCP/IP and TLS/SSL
stacks, HTTP server, and multiple Internet protocols. The functional block
diagram for the CC3100 is shown in Figure.

SVEC, EEE 36
Pag
e36
Steps for Creating and Debugging the Project
Install CC3100 SDK.
Open CCS and create a new workspace.
Choose the Import Project link on the TI Resource Explorer page.
Import "email_application" project from CC3100 SDK using the
following steps:
a.Choose the Import Project link on the TI Resource Explorer page.
b.Select the Browse button in the Import CCS Eclipse Projects
dialog.
c.Select the email_application within
4.Open sl_common.h(line 50 of main.c) and change SSID_NAME,
SEC_TYPE and PASSKEY as per the properties of your Access
Point(AP). SimpleLink device will connect to this AP when the
application is executed.
a.Expand the imported project
b.Click on includes.
c.Click on C:ti/CC3100SDK_1.1.0/cc3100sdk/examples/common
d.Open sl_common.h
#include "simplelink.h"
#include "sl_common.h" << Line 50
5.Replace with SSID of your Access Point.
#define SSID_NAME "XXXXXXXX" /* Security type of the
Access point */
6.Specify Security Type and Password as below if network is
protected with security.

SVEC, EEE 37
Pag
e37
#define SEC_TYPE SL_SEC_TYPE_WPA_WPA2 /*Security
type of the Access point */
7.If network is protected with security, replace passkey with your
network password.
#define PASSKEY "XXXXXXXXXX" /* Password in case of
secure AP */
8.If the Security is open, replace the definitions as below:
#define SEC_TYPE SL_SEC_TYPE_OPEN /*Security type of
the Access point*/
9.If the Network has no password
#define PASSKEY "" /* No password for open type */
10.Open config.h and change values for USER and PASS for
setting up the source email using the following steps:
a. Replace the username of your source email id
#define USER "<username>" Write the password of your email
id #define PASS "<password>"
11.Edit the same config.h file and change the values of
DESTINATION_EMAIL, EMAIL_SUB-
JECT and EMAIL_MESSAGE for setting up the email properties
using the following steps:
a.Replace your destination email id
#define DESTINATION_EMAIL "<destination_email>"
b.Write the subject of your mail
#define EMAIL_SUBJECT "<email_subject>"
c.Write your email message
#define EMAIL_MESSAGE "<email_body>"
12. Save, Debug and Run
Procedure
1. Connect MSP430F5529 Launchpad and CC3100 BoosterPack as
shown below in Figure.
2. Build, program and debug the code into the LaunchPad using CCS.
Observation
Open Tera Term Terminal Software on the PC where the MSP-EXP430
LaunchPad is connected. The serial port parameters to be set are 9600 baud
rate, 8 bits, No parity and 1 stop bit.The serial window outputs the debug
messages received from the MSP-EXP430 Hardwar.
RESULT