lab 9 - egl accessing mq (30 min) optional – …...ibm lab 9 – using mq page 1 lab 9 - egl...
TRANSCRIPT
IBM
Lab 9 – Using MQ Page 1
LAB 9 - EGL accessing MQ (30 min) Optional – Generate COBOL batch program Updated March 18, 2008 EGL supports access of MQSeries message queues on any of the target platforms. You can provide such access in either of the following ways:
• Use MQSeries-related EGL keywords like add and get next on an MQ record; in this case, EGL hides details of MQSeries so you can focus on the business problem your code is addressing
• Invoke EGL functions that call MQSeries commands directly, in which case some commands are available that are not supported by the EGL keywords
You can mix the two approaches in a given program. For most purposes, however, you use one or the other approach exclusively. Regardless of your approach, you can control various runtime conditions by customizing options records, which are global basic records that EGL runtime services passes on calls to MQSeries. When you declare an options record as a program variable, you can use an EGL-installed options record part as a “typedef”; or you can copy the installed part into your own EGL source file, customize the part, and use the customized part as a “typedef”. Your approach determines how EGL runtime framework makes the options records available to MQSeries:
• If you are working with the EGL add and get next statements, you identify the options records when you specify properties of an MQ record. If you do not identify a particular options record, EGL uses a default.
• If you are invoking the EGL functions that call MQSeries directly, you use options records as arguments when you invoke the functions. Defaults are not available in this case.
This Lab will take you through the steps to create the EGL Server program that accesses a simple local MQ queue named Q1. The EGL server program that you will code is very simple, due to time available and so we will do a simple operation PUT/GET to the queue.This is a very simple program but the idea is to just show how it can be implemented and the potential of using EGL. In a real world the server program the business logic could be extremely complex, but in our example, the Server has a very simple logic. The following tasks need to be performed to create the EGL server program:
1. Create a WDz project to work with MQ 2. Create the EGL parts 3. Debug/Run the EGL Server program
Each time you see this symbol it means that you have to “do” something on your computer – not merely read the document. Tips! 1) If you want to have the lab in HTML format displayed in your browser, you can find it at the location: C:\RBD_V7.1_POT\HTML Then you can CUT/PASTE the names and the code, using the Browser. 2) Most of the labs will be performed under VMWARE. So we will run 2 ‘Windows ’ in the same machine. This will cause some overhead and sometimes performance will not be as good as if the program would be running in the native windows… So, please be patient 3) If you lost the “VMWARE full screen” either type Ctrl + Alt + Enter or use the VMWARE
icon (on top).

IBM
Page 2 Discovering the Value of IBM Rational Business Developer version 7.1
Section 1 – Creating an EGL project to work with MQ
Starting MQ Series.
1.1 Click on the Windows Services icon located on the bottom of the desktop
1.2 Find the service IBM MQSeries, right-click and select Start:
It will take a while and you will have the MQ started as below.:
1.3 Close the Services Window ___Starting Rational Business Developer : 1.4 Select Start à Programs à IBM Software Development Platform à IBM Rational Business Developer à IBM Rational Business Developer 1.5 Type C:\Workspaces\RBD as workspace name and click OK Do not select the option Use this workspace as the default...
Caution!
Be sure that you are using the right workspace. This Lab uses the file C:\Workspaces\RBD as your work workspace.

IBM
Lab 9 – Using MQ Page 3
Rational Business Developer will start…. Remember that you are under VMWARE and it will give you some overhead. ___ To set up a new EGL Web project:
1.6 Open the New Project wizard: click File à New à Project… à type egl in place of type filter text Select EGL Project and click Next
1.7 Type LAB9_MQ as Project Name, select General Project (since we will not have Web pages or Web services here) and click Next.
1.8 Select Java (since we will generate Java) and be sure that Create a new build descriptor is selected, select Show Advanced Settings and click Next

IBM
Page 4 Discovering the Value of IBM Rational Business Developer version 7.1
1.9 Unselect Create an EGL service deployment descriptor and click Finish. This project will not need any Web or EGL services, so we don’t need the file *.egldd created.
1.10 Depending on which perspective you were, a dialog message will ask for a Perspective Switch.
Click Yes to move to the EGL perspective.
1.11 Using the Project Explorer view, expand the LAB9_MQ and EGLSource folders (left click on the + sign) and you will see something like the following:

IBM
Lab 9 – Using MQ Page 5
Section 2 – Creating the EGL parts Creating an MQ Record Data part 2.1 Right click on EGLSource (under LAB9_MQ) and select New à EGL Source File
Type pot.mq.records as package and MQRecord as EGL Source name and click Finish.
We will need to create two EGL Data parts that map to the MQ queue named Q1.
2.2 Expand pot.mq.records folder under EGLSource (left click on the + sign) and you will see something like shown below:
Use the Code Assist to create the record. 2.3 Using the editor opened, move the mouse at the end of line // Put EGL Source File Contents Here and press Enter 2.4 Type record press Ctrl + Space, scroll down and select record – fixed mq record and press enter (or double-click). %%REGI
2.5 Type MQRecord_Q1 as recordName, Q1 as messageQueueName and delete most of the other

IBM
Page 6 Discovering the Value of IBM Rational Business Developer version 7.1
parameters except for the last 2 ones.
2.6 Type message as itemName with size char (100)
2.7 Use Ctrl + S to Save it. You should have no errors. If you have errors, must correct it. Also you could copy/paste from C:\RBD_V7.1_POT\lab9\MQRecord.egl
2.8 Close the editor using Ctrl + Shift + F4. Creating the EGL Program Logic 2.9 Right -click on project LAB9_MQ and select New à EGL à Program
Type pot.mq.programs in the Package field
Type MQPROGRAM as EGL source file name. This will be also the program name.
Select Basic as EGL program type
Be sure that Create as called program is not selected.
2.10 Click the Finish button. The editor will be ready for you to type EGL code. You must type code shown below. You may use the
IBM
Lab 9 – Using MQ Page 7
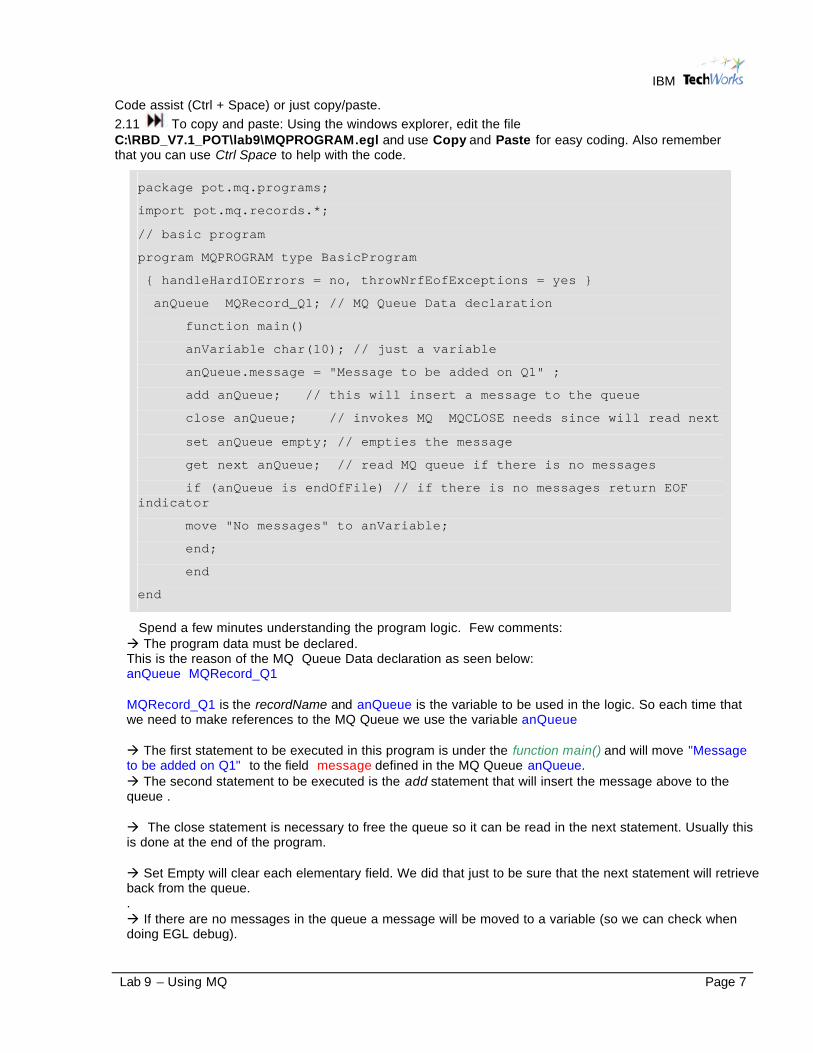
Code assist (Ctrl + Space) or just copy/paste. 2.11 To copy and paste: Using the windows explorer, edit the file C:\RBD_V7.1_POT\lab9\MQPROGRAM.egl and use Copy and Paste for easy coding. Also remember that you can use Ctrl Space to help with the code.
package pot.mq.programs;
import pot.mq.records.*;
// basic program
program MQPROGRAM type BasicProgram
{ handleHardIOErrors = no, throwNrfEofExceptions = yes }
anQueue MQRecord_Q1; // MQ Queue Data declaration
function main()
anVariable char(10); // just a variable
anQueue.message = "Message to be added on Q1" ;
add anQueue; // this will insert a message to the queue
close anQueue; // invokes MQ MQCLOSE needs since will read next
set anQueue empty; // empties the message
get next anQueue; // read MQ queue if there is no messages
if (anQueue is endOfFile) // if there is no messages return EOF indicator
move "No messages" to anVariable;
end;
end
end
Spend a few minutes understanding the program logic. Few comments: à The program data must be declared. This is the reason of the MQ Queue Data declaration as seen below: anQueue MQRecord_Q1 MQRecord_Q1 is the recordName and anQueue is the variable to be used in the logic. So each time that we need to make references to the MQ Queue we use the variable anQueue à The first statement to be executed in this program is under the function main() and will move "Message to be added on Q1" to the field message defined in the MQ Queue anQueue. à The second statement to be executed is the add statement that will insert the message above to the queue . à The close statement is necessary to free the queue so it can be read in the next statement. Usually this is done at the end of the program. à Set Empty will clear each elementary field. We did that just to be sure that the next statement will retrieve back from the queue. . à If there are no messages in the queue a message will be moved to a variable (so we can check when doing EGL debug).

IBM
Page 8 Discovering the Value of IBM Rational Business Developer version 7.1
2.12 Right click on the editor and select Format.
This will keep the EGL code better formatted.
2.13 Use Ctrl + Shift + F4 to save and close all editors. The program MQPROGRAM cannot have errors.

IBM
Lab 9 – Using MQ Page 9
Using the EGL the build descriptor, create a new Resource Association part A build descriptor part was automatically created when the EGL project was created. You need to modify it since you will create a special part named Resource Association.. The Resource association is needed when the EGL record accesses an external file, printer or MQ queue. The resource associations part does not apply for working records, SQL Records and DL/I data base. 2.13 Open the file LAB9_MQ .eglbld that is under the folder EGLSource (just double-click). 2.14 Using the Outline view, right-click on LAB9_MQ.eglbld and click on Add Part…
2.15 Select Resource Associations and click Next
2.16 Type LAB9_Resource as name and click Finish.

IBM
Page 10 Discovering the Value of IBM Rational Business Developer version 7.1
2.17 Click Add Association and type Q1 as File Name (this must match the QueueName that was specified in the MQ Record),
Move to the next line and using the System column be sure that is win (use the drop down and see the other options there like aix, zoscics, zosbatch, etc..) .
Change File Type from to mq (using drop down)
On the right side, for systemName type QM_demovm1:Q1 Since those are the MQ definitions on your windows. The Resource Associations is shown below:
2.18 Save the Resource associations with Ctrl + S
2.19 Close ONLY this LAB9_Resource, clicking on the white as seen below
We still want to change the Build options (if you close all by accident, just open it again) 2.20 Eliminate all entries related to database (dbms, sqlDB, sqlJDBC… and sqlValidation...). See bellow the results
2.21 Uncheck Show only specified options.

IBM
Lab 9 – Using MQ Page 11
2.22 Scroll down the options find Resource Associations and using the drop down select LAB9_Resource .
2.23 Click on Show only specified options.
(Note : you also could import this file from c:\RBD_V7.1_POT\lab9\LAB9_MQ.eglbld if don’t want to save time) 2.24 Save and Close the editor using Ctrl + Shift + F4 and click Yes to save the changes..
Section 3 – Debug/Run the EGL Server program At this point we are almost ready to debug the EGL created. EGL debugger lets you debug EGL code without requiring that you first generate output We need to add one MQ jar file in our project.
3.1 Right click on LAB9_MQ and click and select Properties
3.2 Click on Java Build Path in the left , select page Libraries and use the button Add External JARS… To add the class: com.ibm.mq.jar that is located at C:\Program Files\IBM\WebSphere MQ\Java\lib
3.3 Click Open to select the jar and OK to save the change.

IBM
Page 12 Discovering the Value of IBM Rational Business Developer version 7.1
To Debug the Server program: 3.4 Set a breakpoint in the first line of the program MQPROGRAM.egl
Select Window à Preferences… à Expand EGL à Debug and be sure that Stop at first line of a program is selected. This way when the EGL debug is action will always stop at the first line.
3.5 Using the Project Explorer view, Right-click on MQPROGRAM.egl and select Debug EGL Program
A Confirm Perspective Switch message will be displayed.., 3.6 Click Yes to Confirm Perspective Switch.
3.7 Using the view Variables in the upper corner, expand MQPROGRAM and anQueue (resize the view to see better. Note that the queue Q1 was found and its associated with the resourceAssociation

IBM
Lab 9 – Using MQ Page 13
3.8 Click on the icon (step into) to step through the code and observer the variables on the right. Note that the message is added to the queue, the queue is closed, the anQueue is cleaned and the get next read it again. As you see there are no errors. Below just after the queue is read again
As you know the EGL code can be debugged without generating code. 3.10 With the debug stopped, press enter after the move statement and type a new EGL sentence like move “No more messages” to anVariable; Note that you could use the code assist using Ctrl + Space.
3.11 Press Ctrl + S to save the code after typing this new EGL code. Note that the debug will return to the first executable line of the program. This is a new feature called hot swapping available on version 7.1. Java also has this capability.
IBM
Page 14 Discovering the Value of IBM Rational Business Developer version 7.1
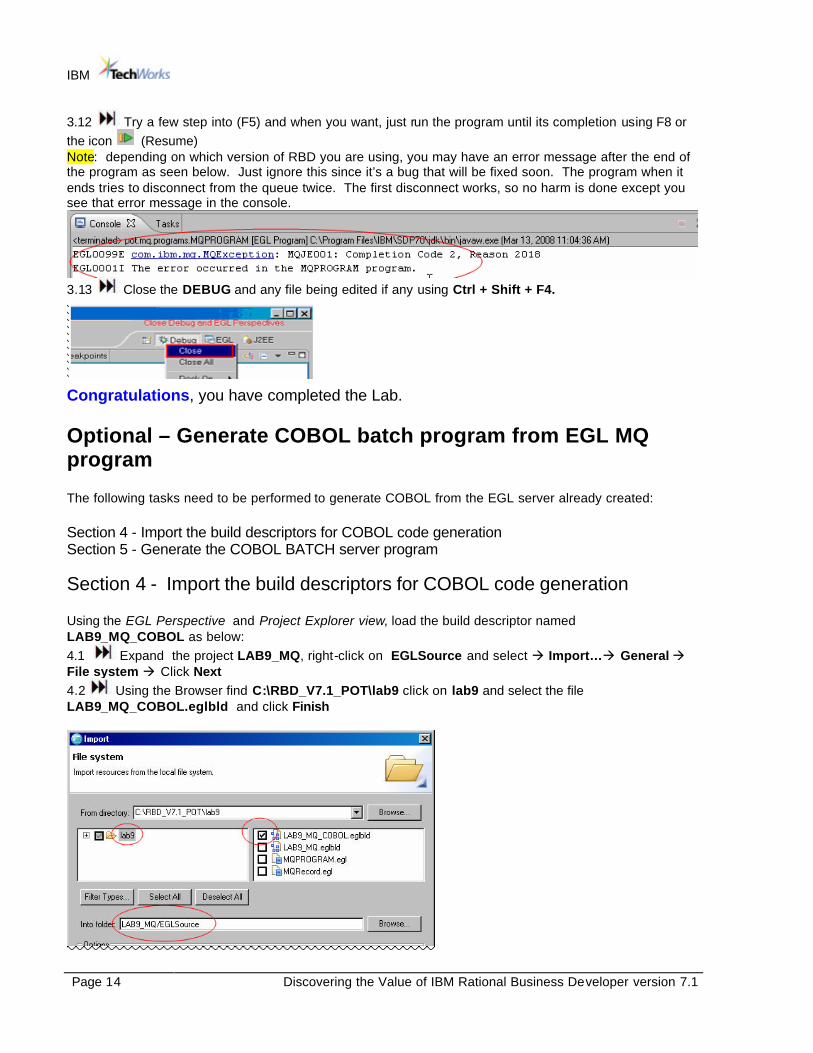
3.12 Try a few step into (F5) and when you want, just run the program until its completion using F8 or the icon (Resume) Note: depending on which version of RBD you are using, you may have an error message after the end of the program as seen below. Just ignore this since it’s a bug that will be fixed soon. The program when it ends tries to disconnect from the queue twice. The first disconnect works, so no harm is done except you see that error message in the console.
3.13 Close the DEBUG and any file being edited if any using Ctrl + Shift + F4.
Congratulations, you have completed the Lab. Optional – Generate COBOL batch program from EGL MQ program The following tasks need to be performed to generate COBOL from the EGL server already created:
Section 4 - Import the build descriptors for COBOL code generation Section 5 - Generate the COBOL BATCH server program
Section 4 - Import the build descriptors for COBOL code generation
Using the EGL Perspective and Project Explorer view, load the build descriptor named LAB9_MQ_COBOL as below: 4.1 Expand the project LAB9_MQ, right-click on EGLSource and select à Import…à General à File system à Click Next 4.2 Using the Browser find C:\RBD_V7.1_POT\lab9 click on lab9 and select the file LAB9_MQ_COBOL.eglbld and click Finish
IBM
Lab 9 – Using MQ Page 15
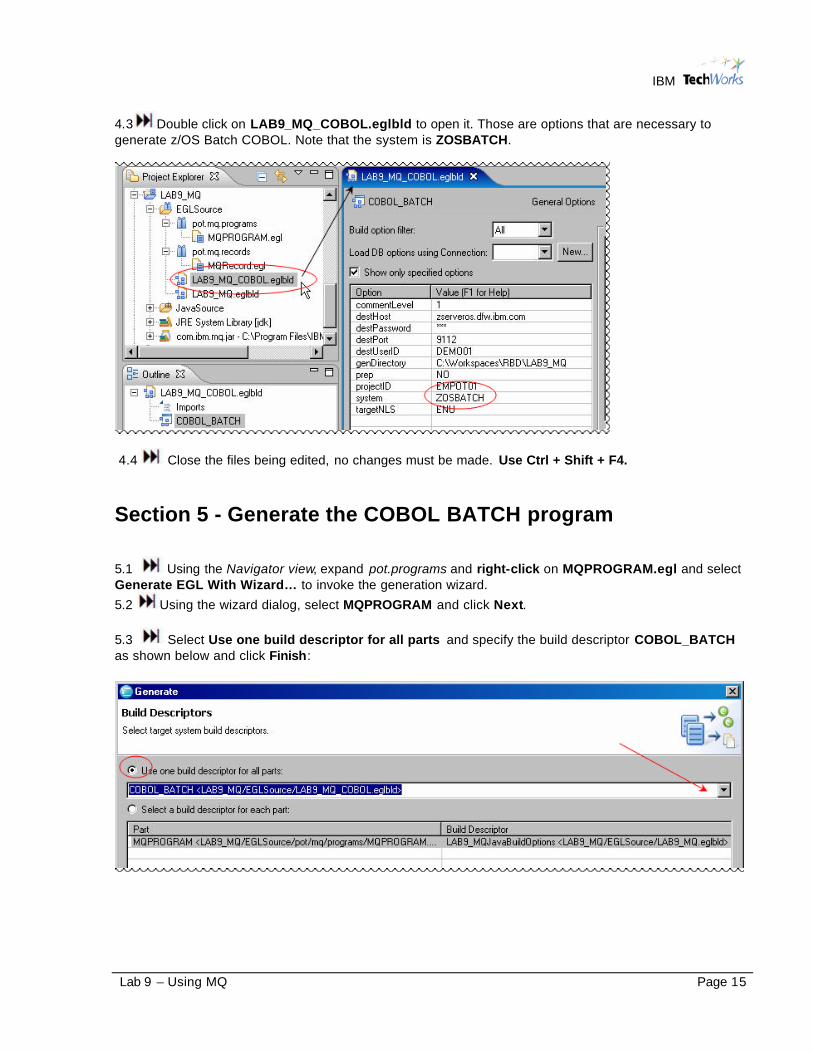
4.3 Double click on LAB9_MQ_COBOL.eglbld to open it. Those are options that are necessary to generate z/OS Batch COBOL. Note that the system is ZOSBATCH.
4.4 Close the files being edited, no changes must be made. Use Ctrl + Shift + F4.
Section 5 - Generate the COBOL BATCH program 5.1 Using the Navigator view, expand pot.programs and right-click on MQPROGRAM.egl and select Generate EGL With Wizard… to invoke the generation wizard.
5.2 Using the wizard dialog, select MQPROGRAM and click Next.
5.3 Select Use one build descriptor for all parts and specify the build descriptor COBOL_BATCH as shown below and click Finish:

IBM
Page 16 Discovering the Value of IBM Rational Business Developer version 7.1
5.4 The Generation takes place and since we specified prep=no as option in the build descriptor the generation process will not send the code to the z/OS.
Click on the view Generation Results in the lower right corner to check if generation is fine. You should have no errors.
5.5 The EGL server components are created in the directory C:\Workspaces\RBD\LAB9_MQ. To see the generated code we will need to refresh this project.
Using the EGL Perspective and Project Explorer view right-click on LAB9_MQ and select refresh (or press F5) 5.6 You should see the components below, where, *.cbl is the COBOL source, *.jcx is the JCL sample that can be used to execute the generated code, *,led is the link edit part for program and *.xml that is the build plan. Note that the name MQPROGRAM is truncated to 8 positions: MQPROGRA.
5.7 Edit each one of the files above and close it after a quick view of its contents. See below the generated COBOL code.

IBM
Lab 9 – Using MQ Page 17
5.8 Take a moment to review the generated Code using the Outline view. 5.9 Optionally, right click on MQPROGRAM.jcx and select Refactor à Rename and change the type from jcx to jcl Double click on the file to edit it. The editor will recognize this as a JCL keyword
2.10 Close all opened files using Ctrl + Shift + F4. Stoping MQ Series.
2.11 Click on the Windows Services icon located on the bottom of the desktop
2.12 Right click on IBM MQSeries and select Stop.

IBM
Page 18 Discovering the Value of IBM Rational Business Developer version 7.1
Solution
If you could not complete the lab don’t get frustrated. In case you missed one step or typed a wrong name you would have problems. In that case you can load the solution to your workspace
In any Perspective, import the Solution project using the options: File à Import à Other àProject
Interchange and using the solution located at C:\RBD_V7.1_POT\lab9\solution\LAB9_Solution.zip. Select LAB9_MQ and click Finish.
The LAB9_MQr program will be created. You can now debug going to the Section 3 above. Also there is the solution workspace (C:\Workspaces\RBD_Solution) in your VMWARE image. To start the workspace with the solution:
Open the folder
and double-click in the icon below
Go to Section 3 for Debug the EGL code.