lab 19: using certificates to encrypt...
TRANSCRIPT

ETHICAL HACKING LAB SERIES
Lab 19: Using Certificates to Encrypt Email
Certified Ethical Hacking Domain: Cryptography
Document Version: 2015-08-14
This work by the National Information Security and Geospatial Technologies Consortium (NISGTC), and except where otherwise noted, is licensed under the Creative Commons Attribution 3.0 Unported License.
Development was funded by the Department of Labor (DOL) Trade Adjustment Assistance Community College and Career Training (TAACCCT) Grant No. TC-22525-11-60-A-48; The National Information Security, Geospatial Technologies Consortium (NISGTC) is an entity of Collin College of Texas, Bellevue College of Washington, Bunker Hill Community College of Massachusetts, Del Mar College of Texas, Moraine Valley Community College of Illinois, Rio Salado College of Arizona, and Salt Lake Community College of Utah.
This workforce solution was funded by a grant awarded by the U.S. Department of Labor's Employment and Training Administration. The solution was created by the grantee and does not necessarily reflect the official position of the U.S. Department of Labor. The Department of Labor makes no guarantees, warranties or assurances of any kind, express or implied, with respect to such information, including any information on linked sites, and including, but not limited to accuracy of the information or its completeness, timeliness, usefulness, adequacy, continued availability or ownership.

Lab 19: Using Certificates to Encrypt Email
2
This work by the National Information Security and Geospatial Technologies Consortium (NISGTC), and except where otherwise noted, is licensed under the Creative Commons Attribution 3.0 Unported License.
Contents Introduction ........................................................................................................................ 3
Domain: Cryptography ....................................................................................................... 3
Pod Topology ...................................................................................................................... 4
Lab Settings ......................................................................................................................... 5
1 Plain Text Email Traffic - tcpdump .............................................................................. 6
1.1 Capturing Plain Text Email Traffic with tcpdump................................................. 6
1.2 Conclusion .......................................................................................................... 17
2 Plain Text Email Traffic - Wireshark .......................................................................... 18
2.1 Analyze Plain Text Email Traffic Using Wireshark ............................................. 18
2.2 Conclusion .......................................................................................................... 21
3 Encrypted Email Traffic - tcpdump ............................................................................ 22
3.1 Capturing Encrypted Email Traffic with tcpdump .............................................. 22
3.2 Conclusion .......................................................................................................... 29
4 Encrypted Text Email Traffic - Wireshark ................................................................. 30
4.1 Analyzing Encrypted Text Email Traffic Using Wireshark .................................. 30
4.2 Conclusion .......................................................................................................... 32
References ........................................................................................................................ 33
Lab 19: Using Certificates to Encrypt Email
3
This work by the National Information Security and Geospatial Technologies Consortium (NISGTC), and except where otherwise noted, is licensed under the Creative Commons Attribution 3.0 Unported License.
Introduction
In this lab, students will view unencrypted and encrypted email messages. This lab includes the following tasks:
1. Capturing Plain Text Email Traffic with tcpdump 2. Analyzing Plain Text Email Traffic 3. Capturing Encrypted Email Traffic with tcpdump 4. Analyzing Encrypted Email Traffic
Domain: Cryptography
If email is sent over a network without using encryption, then passwords and messages can be viewed by anyone who is able to capture the email messages while they are being transmitted. If encryption is used when email is sent, the message will be unreadable. Certificate Authority – Known as the root CA, or Certificate Authority, is the certificate server that is the authority for all certificates requested within a Public Key Infrastructure, or PKI. The Enterprise Editions of Windows Server can act as a CA. Symmetric Encryption – This is a form of encryption in which the same key is used to encrypt and decrypt data. Examples of Symmetrical Encryption algorithms include Advanced Encryption Standard (AES) algorithm and DES (Data Encryption Standard). Asymmetric Encryption – This is a form of encryption in which a different key is used to encrypt and decrypt data. Examples of Symmetrical Encryption algorithms include RSA, which stands for Rivest, Shamir, and Adleman, the 3 original authors. Public Key – The Public Key is used to encrypt messages. The user can send their Public Key to another user by digitally signing an email message. The user will then use the public key provided to them by the sender to encrypt messages sent to that sender. Private Key – The Private Key is not distributed to other users. It is kept private and used to decrypt email messages that were encrypted with the user’s public key.

Lab 19: Using Certificates to Encrypt Email
4
This work by the National Information Security and Geospatial Technologies Consortium (NISGTC), and except where otherwise noted, is licensed under the Creative Commons Attribution 3.0 Unported License.
Pod Topology
Figure 1: Lab Topology

Lab 19: Using Certificates to Encrypt Email
5
This work by the National Information Security and Geospatial Technologies Consortium (NISGTC), and except where otherwise noted, is licensed under the Creative Commons Attribution 3.0 Unported License.
Lab Settings
The information in the table below will be needed in order to complete the lab. The task sections below provide details on the use of this information.
Required Virtual Machines and Applications This lab requires the use of the Windows XP, Windows 7, Windows Server 2003 SQL, and Linux Sniffer machines.
Virtual Machine
IP Address
Account
(if needed)
Password
(if needed)
Windows 2003 SQL
192.168.1.100 sperkins
northcarolina
Windows XP Pro
192.168.1.175 Administrator Ethicalhackin&
Windows 7
216.5.1.200 student password
Linux Sniffer
NO IP
ADDRESS root toor

Lab 19: Using Certificates to Encrypt Email
6
This work by the National Information Security and Geospatial Technologies Consortium (NISGTC), and except where otherwise noted, is licensed under the Creative Commons Attribution 3.0 Unported License.
1 Plain Text Email Traffic - tcpdump
Part of a network administrator’s job can be to capture and analyze network traffic. This is done for a variety of reasons, including the identification of the cause of bottlenecks, determining who is responsible for certain download activity, or analyzing an intrusion. There are also some ethical issues to consider as a network administrator can view email messages and credentials. For this reason, email encryption is important. 1.1 Capturing Plain Text Email Traffic with tcpdump
The Linux distribution BackTrack is installed on the sniffer machine. BackTrack is a distribution used by security professionals for pentration testing and forensics. Log on to the sniffer
1. Log into the Linux Sniffer with the username of root with the password of toor.
For security purposes, the password will not be displayed.
2. Type the following command to initialize the GUI, Graphical User Environment:
root@bt:~# startx
Figure 2: Logging on to the Sniffer
3. Open a terminal on the Linux system by clicking on the picture to the right of
Firefox in the task bar, located at the bottom of the screen in BackTrack.
Figure 3: The Terminal Windows within BackTrack

Lab 19: Using Certificates to Encrypt Email
7
This work by the National Information Security and Geospatial Technologies Consortium (NISGTC), and except where otherwise noted, is licensed under the Creative Commons Attribution 3.0 Unported License.
After opening the terminal, you may want to consider adjusting the size of the font.
4. To increase the font size within the terminal, click Settings from the Terminal menu bar, select Font, then select Enlarge Font. Repeat this step if necessary.
Figure 4: Increase the Font Size of the Terminal Windows
One of the nice features about some versions of BackTrack is they are not automatically assigned IP addresses through the use of DHCP, or Dynamic Host Configuration Protocol. The idea is to come on the network quietly, without being detected.
5. Only the loopback address, 127.0.0.1, is displayed when you type: root@bt:~# ifconfig
Figure 5: No IP address, other than the Loopback Address of 127.0.0.1, are Displayed

Lab 19: Using Certificates to Encrypt Email
8
This work by the National Information Security and Geospatial Technologies Consortium (NISGTC), and except where otherwise noted, is licensed under the Creative Commons Attribution 3.0 Unported License.
6. Type the following command to view all available interfaces on the system: root@bt:~# ifconfig -a
Figure 6: All Available Interfaces on the System
A sniffer should be operating in promiscuous mode so it can see all network traffic. Two ways to ensure that a sniffer will capture all traffic on a network segment are:
Connect the Sniffer and other devices on the Network to a Hub
Connect the Sniffer to a switch’s SPAN (Switched Port Analyzer Network) port. In this lab, we will only be capturing traffic on the internal network (Network # 1 in the figure below), so only interface eth0 will be used to capture traffic. It will not be necessary to capture traffic on the external network (Network # 2) with the eth1 interface. Neither of the interfaces, eth0 or eth1, are assigned IP addresses on their respective networks. The reason the sniffer has two interfaces is that it is located on two networks.
The Windows Firewall also has 2 interfaces and is connected to both networks.

Lab 19: Using Certificates to Encrypt Email
9
This work by the National Information Security and Geospatial Technologies Consortium (NISGTC), and except where otherwise noted, is licensed under the Creative Commons Attribution 3.0 Unported License.
Figure 7: The Sniffer is Connected to Two Networks
7. To activate the first interface, type the following command:
root@bt:~# ifconfig eth0 up
Figure 8: Activating the First Interface

Lab 19: Using Certificates to Encrypt Email
10
This work by the National Information Security and Geospatial Technologies Consortium (NISGTC), and except where otherwise noted, is licensed under the Creative Commons Attribution 3.0 Unported License.
8. To verify the first interface, type the following command: root@bt:~# ifconfig eth0
Figure 9: The Interface is activated without an IP address
The Linux/UNIX utility tcpdump is commonly used by network administrators to capture network traffic on a sniffer. Many sniffer machines do not have GUI, or Graphical User Interfaces, so running GUI based tools like Wireshark or Network Miner is not possible. Another benefit to using tcpdump is it handles very large capture files with no problem.
9. Type the following command to view several available switches for tcpdump: root@bt:~# tcpdump --help
Figure 10: The Available Options for tcpdump
10. To run tcpdump on the network segment interface eth0 is connected to, type:
root@bt:~# tcpdump -i eth0
Wait until at least one packet is displayed before stopping the capture.
Figure 11: The output of tcpdump on the network segment interface eth0 is connected

Lab 19: Using Certificates to Encrypt Email
11
This work by the National Information Security and Geospatial Technologies Consortium (NISGTC), and except where otherwise noted, is licensed under the Creative Commons Attribution 3.0 Unported License.
After a packet or more is displayed, hit CTRL+C to stop the network capture. If the network 192.168.1.0/24 is displayed, eth0 is located on the first network. If the network 216.0.0.0/8 is displayed, eth0 is located on the second network. Also, notice that the default for tcpdump is to only capture the first 96 bytes.
11. To capture traffic on the 192.168.1.0/24 network and send it to a file, type: root@bt:~# tcpdump -i eth0 -nntttt -s 0 -w capnet1.pcap -C 100
Figure 12: tcpdump syntax
The following details the switches used with the tcpdump command:
Switch Purpose
-i eth0 Use Interface Zero
-nntttt Disable DNS Resolution, Date and Time Format
-s 0 Disables Default Packet Size of 96 bytes, full packet size
-w Write to a capture file, instead of displaying to the screen
-C Split the captures into files of this size
Figure 13: Detailed tcpdump Syntax Explained

Lab 19: Using Certificates to Encrypt Email
12
This work by the National Information Security and Geospatial Technologies Consortium (NISGTC), and except where otherwise noted, is licensed under the Creative Commons Attribution 3.0 Unported License.
12. Log on as Administrator to the Windows XP Pro with the password of Ethicalhackin&
Figure 14: Logging in as Administrator
13. Click on the Start button on XP and then select E-mail from the Start Menu.
Figure 15: Opening Outlook Express

Lab 19: Using Certificates to Encrypt Email
13
This work by the National Information Security and Geospatial Technologies Consortium (NISGTC), and except where otherwise noted, is licensed under the Creative Commons Attribution 3.0 Unported License.
14. Click Create Mail to create an email message. The New Message box will open.
Figure 16: Creating a New Email Message
15. Follow the steps below to successfully send the email to sperkins.
In the To box, type [email protected]
In the Subject type, Unencrypted Email
In the message area, type:
Unencrypted emails can be read
After completing the three above steps, click Send to send the email.
Figure 17: Sending the Email Message

Lab 19: Using Certificates to Encrypt Email
14
This work by the National Information Security and Geospatial Technologies Consortium (NISGTC), and except where otherwise noted, is licensed under the Creative Commons Attribution 3.0 Unported License.
16. Click the Send/Receive button to ensure that the email is sent.
Figure 18: Sending the Email Message
If you receive an error message, it would mean that the email address was typed incorrectly. The only way to fix this issue is to delete the message from the Outbox.
17. Log on to the Windows 2003 SQL Server. Use the PC menu in the NETLAB+
Remote PC Viewer to send a Ctrl-Alt-Del (version 2 viewer), or click the Send Ctrl-Alt-Del link in the bottom right corner of the viewer window (version 1 viewer). Log on to the 2003 server with the username of sperkins and the password of northcarolina.
Figure 19: Send Ctrl-Alt-Del to the Windows 2003 Server

Lab 19: Using Certificates to Encrypt Email
15
This work by the National Information Security and Geospatial Technologies Consortium (NISGTC), and except where otherwise noted, is licensed under the Creative Commons Attribution 3.0 Unported License.
18. Click on Start on 2003 and select Outlook Express from the Start Menu.
Figure 20: Opening Outlook Express
19. Click the Send/Receive button to receive rmiller’s email.
Figure 21: Sending the Email Message

Lab 19: Using Certificates to Encrypt Email
16
This work by the National Information Security and Geospatial Technologies Consortium (NISGTC), and except where otherwise noted, is licensed under the Creative Commons Attribution 3.0 Unported License.
20. The email from rmiller should appear in the Inbox with the subject and message. Click the Reply button to reply to the email message from sperkins.
Figure 22: Replying to the Email Message
21. In the message area, type Yes they can. Click Send to send the email message.
Figure 23: Sending the Reply

Lab 19: Using Certificates to Encrypt Email
17
This work by the National Information Security and Geospatial Technologies Consortium (NISGTC), and except where otherwise noted, is licensed under the Creative Commons Attribution 3.0 Unported License.
22. Click the Send/Receive button to send the reply to rmiller.
Figure 24: Sending the Email Message
23. On Windows XP Pro, Click the Send/Receive button to ensure that the reply is
received.
Figure 25: Clicking Send/Receive
1.2 Conclusion
The tcpdump command is built into the Linux and Unix operating systems. It can be used to capture network traffic. The benefits of using tcpdump include the fact that many sniffer machines do not have GUI, or Graphical User Interfaces, so running GUI based tools like Wireshark is not possible. Another benefit to using tcpdump is it handles very large capture files with no problem, and it allows you to filter for specific traffic. In the next task, you will be able to view plain text emails and passwords within the pcap file.

Lab 19: Using Certificates to Encrypt Email
18
This work by the National Information Security and Geospatial Technologies Consortium (NISGTC), and except where otherwise noted, is licensed under the Creative Commons Attribution 3.0 Unported License.
2 Plain Text Email Traffic - Wireshark
Wireshark is a GUI, or Graphical User Interface, tool that will allow you to capture and analyze network traffic. Wireshark runs on Windows, Linux, and on Mac OS X. Wireshark can be downloaded from the following link: http://www.wireshark.org/download.html. 2.1 Analyze Plain Text Email Traffic Using Wireshark
1. After sending the plain text emails between rmiller and sperkins, we can stop the
capture. Press CTRL+C to stop tcpdump from running and capturing network traffic. You should receive a message about the number of packets that were captured by tcpdump.
The number of packets captured will vary.
Figure 26: Opening the tcpdump capture with Wireshark
2. To view the capture file, type the following command at the Linux Sniffer
terminal: root@bt:~# wireshark capnet1.pcap
Figure 27: Opening the tcpdump capture with Wireshark
3. Check the Don’t show the message again box and click the OK button.
Figure 28: Opening the tcpdump capture with Wireshark

Lab 19: Using Certificates to Encrypt Email
19
This work by the National Information Security and Geospatial Technologies Consortium (NISGTC), and except where otherwise noted, is licensed under the Creative Commons Attribution 3.0 Unported License.
Email is often received by using the POP3, or Post Office Protocol version 3, protocol. By default, most POP traffic is transmitted in clear text. Many organizations still use POP.
4. Type pop in the Wireshark filter pane and click Apply to view the traffic.
Figure 29: POP Traffic within Wireshark
Email is often sent by using the SMTP, or Simple Mail Transfer Protocol. By default, most SMTP traffic is transmitted in clear text. Many organizations use SMTP, and many SMTP servers do not require authentication, which can make them a target of spammers.
5. Type smtp in the Wireshark filter pane and click Apply to view the traffic.
Figure 30: SMTP Traffic within Wireshark

Lab 19: Using Certificates to Encrypt Email
20
This work by the National Information Security and Geospatial Technologies Consortium (NISGTC), and except where otherwise noted, is licensed under the Creative Commons Attribution 3.0 Unported License.
6. Right-click on the packet that says MAIL FROM: and select Follow TCP stream.
Figure 31: Opening the tcpdump capture with Wireshark
Within the TCP stream, you will be able to view the unencrypted email within Wireshark. After viewing the plain text message SMTP stream, click the Close button.
Figure 32: The Plain Text Email Message is displayed within Wireshark

Lab 19: Using Certificates to Encrypt Email
21
This work by the National Information Security and Geospatial Technologies Consortium (NISGTC), and except where otherwise noted, is licensed under the Creative Commons Attribution 3.0 Unported License.
7. Close Wireshark by selecting File from the menu bar and selecting Quit.
Figure 33: Closing the Wireshark Program
2.2 Conclusion
Wireshark is a GUI, or Graphical User Interface, tool that will allow you to analyze as well as capture network traffic. Wireshark runs on Windows, Linux, and Mac OS X. The Wireshark filter pane can be used to filter for various types of traffic, including pop and smtp. In this exercise, we used Wireshark to display plain text usernames, passwords, and email messages. By default, SMTP and POP traffic are transmitted in clear text.
Lab 19: Using Certificates to Encrypt Email
22
This work by the National Information Security and Geospatial Technologies Consortium (NISGTC), and except where otherwise noted, is licensed under the Creative Commons Attribution 3.0 Unported License.
3 Encrypted Email Traffic - tcpdump
In this task, we will once again use the Linux tcpdump program on the sniffer. This time we should not be able to read the email message, which will be encrypted. 3.1 Capturing Encrypted Email Traffic with tcpdump
In this step, we will start the sniffer again using tcpdump with a different filename.
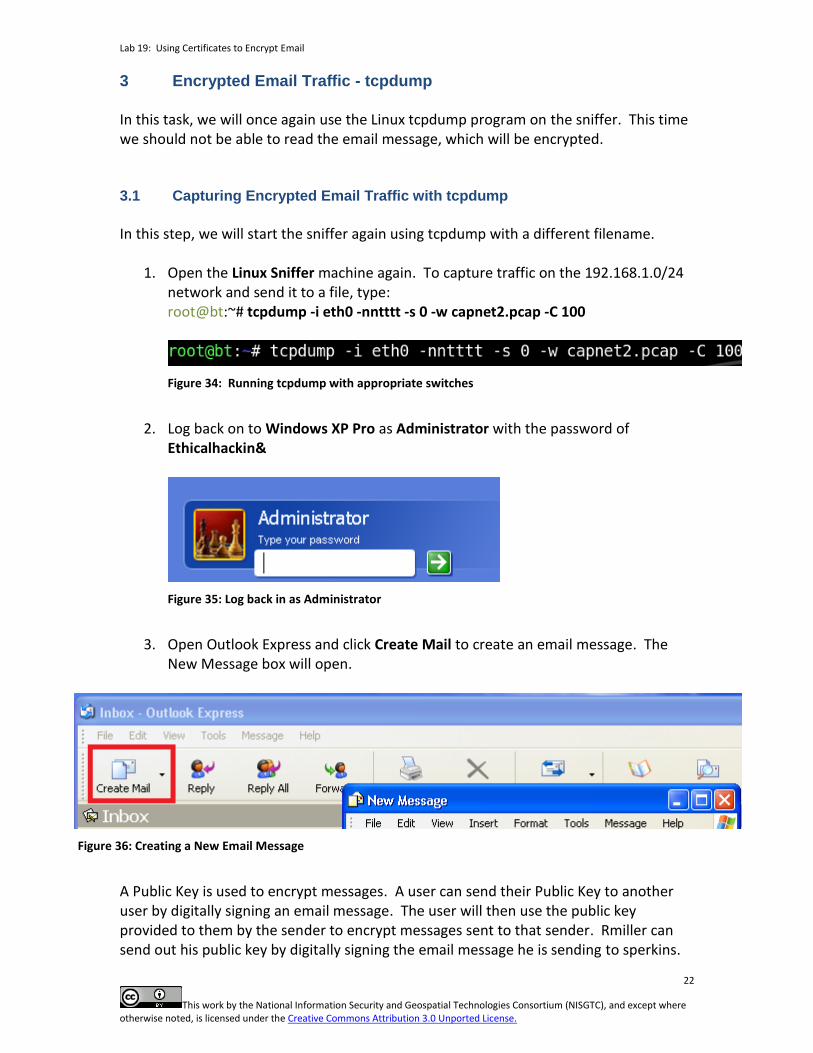
1. Open the Linux Sniffer machine again. To capture traffic on the 192.168.1.0/24 network and send it to a file, type:
root@bt:~# tcpdump -i eth0 -nntttt -s 0 -w capnet2.pcap -C 100
Figure 34: Running tcpdump with appropriate switches
2. Log back on to Windows XP Pro as Administrator with the password of
Ethicalhackin&
Figure 35: Log back in as Administrator
3. Open Outlook Express and click Create Mail to create an email message. The
New Message box will open.
Figure 36: Creating a New Email Message
A Public Key is used to encrypt messages. A user can send their Public Key to another user by digitally signing an email message. The user will then use the public key provided to them by the sender to encrypt messages sent to that sender. Rmiller can send out his public key by digitally signing the email message he is sending to sperkins.

Lab 19: Using Certificates to Encrypt Email
23
This work by the National Information Security and Geospatial Technologies Consortium (NISGTC), and except where otherwise noted, is licensed under the Creative Commons Attribution 3.0 Unported License.
4. Follow the steps below to successfully send the email to sperkins.
In the To box, type [email protected]
In the Subject type, Public Key
In the message area, type: Here is my digital signature
From the Tools menu, select Digitally Sign.
Figure 37: Digitally Signing the Email Message
5. Verify the email address is correct and click Send to send the email.
There should be a red ribbon to the right of the user’s email address.
Figure 38: Sending the Email Message

Lab 19: Using Certificates to Encrypt Email
24
This work by the National Information Security and Geospatial Technologies Consortium (NISGTC), and except where otherwise noted, is licensed under the Creative Commons Attribution 3.0 Unported License.
6. Click the Send/Receive button to ensure that the email is sent.
Figure 39: Ensuring that the Email is sent
If you receive an error message, it would mean that the email address was typed incorrectly. The only way to fix this issue is to delete the message from the Outbox.
7. Log on to the Windows 2003 SQL Server. Use the PC menu in the NETLAB+
Remote PC Viewer to send a Ctrl-Alt-Del (version 2 viewer), or click the Send Ctrl-Alt-Del link in the bottom right corner of the viewer window (version 1 viewer). Log back on to the 2003 server with as sperkins and the password of northcarolina.
Figure 40: Send Ctrl-Alt-Del to the Windows 2003 Server

Lab 19: Using Certificates to Encrypt Email
25
This work by the National Information Security and Geospatial Technologies Consortium (NISGTC), and except where otherwise noted, is licensed under the Creative Commons Attribution 3.0 Unported License.
8. On Windows 2003 SQL, click the Send/Receive button to receive sperkins’s email.
Figure 41: Sending the Email Message
9. The email from rmiller should appear. When you attempt to open the email, you
will receive a message about a digital signature. Check the box that says Don't show me this Help screen again and click the Continue button.
Figure 42: Message about Digital Signatures

Lab 19: Using Certificates to Encrypt Email
26
This work by the National Information Security and Geospatial Technologies Consortium (NISGTC), and except where otherwise noted, is licensed under the Creative Commons Attribution 3.0 Unported License.
10. Read the email message, which has been digitally signed and verified.
Figure 43: Message from rmiller including Digital Signature
11. In the contacts area in the left corner, right-click on rmiller and select Send Email
Figure 44: Sending the Reply
12. Follow the steps below to encrypt the email to rmiller.
In the Subject type, Encrypted Email
In the message area, type: You need to decrypt to read
From the Tools menu, select Encrypt.
You will see a blue lock appear to the right of rmiller’s name.
Click Send.

Lab 19: Using Certificates to Encrypt Email
27
This work by the National Information Security and Geospatial Technologies Consortium (NISGTC), and except where otherwise noted, is licensed under the Creative Commons Attribution 3.0 Unported License.
Figure 44: Sending the Encrypted Email Message
13. On Windows 2003 SQL, click the Send/Receive button to send the encrypted
email to rmiller.
Figure 45: Ensuring the Encrypted Email is Sent
14. On Windows XP Pro, Click the Send/Receive button to ensure the message is
received. Open the email and read the statement that the message has been encrypted by the sender. Check the Don’t show me this help screen again box and click Continue.

Lab 19: Using Certificates to Encrypt Email
28
This work by the National Information Security and Geospatial Technologies Consortium (NISGTC), and except where otherwise noted, is licensed under the Creative Commons Attribution 3.0 Unported License.
Figure 46: A message about the Encrypted Email
If you receive the Security Warning below, click the checkbox next to “Don’t ask me about this message again” and then click Open Message.
Figure 47: Security Warning
Now, you should be able to read the email in clear text.

Lab 19: Using Certificates to Encrypt Email
29
This work by the National Information Security and Geospatial Technologies Consortium (NISGTC), and except where otherwise noted, is licensed under the Creative Commons Attribution 3.0 Unported License.
Figure 48: The decrypted Email message
3.2 Conclusion
Since both SMTP and POP are transmitted in clear test by default, messages that are not encrypted could be read by an attacker with access to the internal network. To prevent this, we included a public key when digitally signing an email, which then allowed us to encrypt future messages sent to that user.

Lab 19: Using Certificates to Encrypt Email
30
This work by the National Information Security and Geospatial Technologies Consortium (NISGTC), and except where otherwise noted, is licensed under the Creative Commons Attribution 3.0 Unported License.
4 Encrypted Text Email Traffic - Wireshark
In this exercise, we will view the cipher text used to encrypt the email message sent from sperkins to rmiller. Sperkins used the rmiller’s public key to encrypt the email message. 4.1 Analyzing Encrypted Text Email Traffic Using Wireshark
1. After sending the cipher text emails between rmiller and sperkins, we can stop
the capture on the Linux Sniffer machine. Press CTRL+C to stop tcpdump from running and capturing network traffic. You should receive a message about the number of packets that were captured by tcpdump.
The number of packets captured can vary.
Figure 49: Stopping the tcpdump capture
2. To view the capture file, type the following command at the BackTrack terminal:
root@bt:~# wireshark capnet2.pcap
Figure 50: Opening the tcpdump capture with Wireshark
3. Type pop in the Wireshark filter pane and click Apply to view the traffic.
Figure 51: POP Traffic within Wireshark
Although the email message itself was encrypted, the authentication is still in plain text.

Lab 19: Using Certificates to Encrypt Email
31
This work by the National Information Security and Geospatial Technologies Consortium (NISGTC), and except where otherwise noted, is licensed under the Creative Commons Attribution 3.0 Unported License.
4. Type frame contains Encrypted in the Wireshark filter pane and click Apply.
The case must match what you used in the subject of the encrypted email.
Figure 52: SMTP Traffic within Wireshark
Even though the email message is encrypted, the subject is not. Keeping the subject in plain text will help email server software determine if an email message is spam.
5. Right-click on the packet and select Follow TCP stream. The email is encrypted.
Figure 53: The Encrypted Email Message
6. Click Close when done viewing Follow TCP Stream.

Lab 19: Using Certificates to Encrypt Email
32
This work by the National Information Security and Geospatial Technologies Consortium (NISGTC), and except where otherwise noted, is licensed under the Creative Commons Attribution 3.0 Unported License.
7. Close Wireshark by selecting File from the menu bar and selecting Quit.
Figure 54: Closing the Wireshark Program
4.2 Conclusion
By default, SMTP and POP traffic are transmitted in clear text. A PKI infrastructure can be used to encrypt email messages so they are not compromised when they are in transit.
Lab 19: Using Certificates to Encrypt Email
33
This work by the National Information Security and Geospatial Technologies Consortium (NISGTC), and except where otherwise noted, is licensed under the Creative Commons Attribution 3.0 Unported License.
References
1. Wireshark:
http://www.wireshark.org/
2. tcpdump: http://www.tcpdump.org/