l e sso n p l a n - science north | science education centre
TRANSCRIPT
Light Colour Mixing Grade 4 - Matter and Energy - Light
Lesson Plan Safety Notes
Careful when cutting holes in the cardboard ask if you need help! Do you not look directly into any source of light or its reflection.
Description In this lesson, students will learn about light while conducting three different experiments with materials found at home. Materials CD Spectrometer Cereal Box Variation
- Old CD (ask permission) - Flashlight - Cereal box - Scissors or knife *ask an
adult for help Paper Towel Roll Variation
- Old CD (ask permission) - Flashlight - Paper Towel Roll - Scissors or knife *ask an
adult for help - Tape - Black paper
Coloured Shadows - Red Marker - Blue Marker - Green Marker - 3 flashlights (can use
phone/device flashlights) - Clear Tape - White sheet of paper - Box (about the size of a
shoe box) *Optional - Dark room - Small figurine
Simple Water Rainbows Option One - Clear Glass bowl - Water - Small Mirror - White sheet of paper - Source of light
Option Two - Clear Drinking Glass - Water - White Paper - Tape - Source of Light
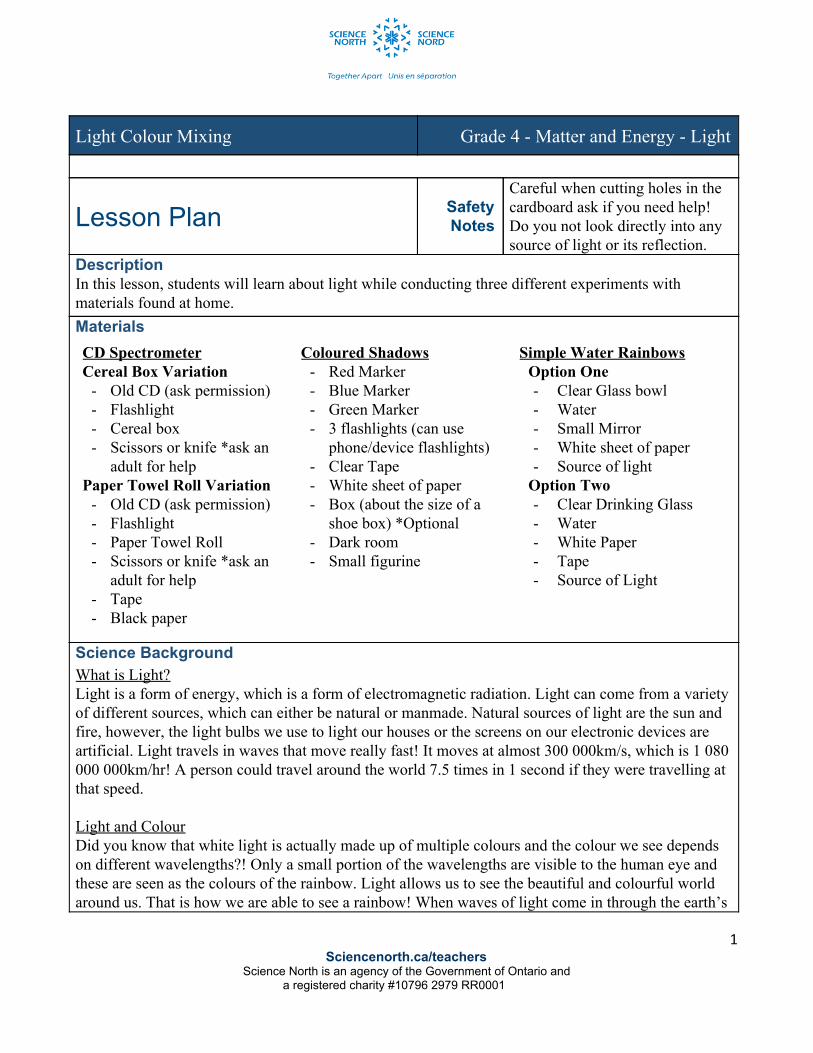
Science Background What is Light? Light is a form of energy, which is a form of electromagnetic radiation. Light can come from a variety of different sources, which can either be natural or manmade. Natural sources of light are the sun and fire, however, the light bulbs we use to light our houses or the screens on our electronic devices are artificial. Light travels in waves that move really fast! It moves at almost 300 000km/s, which is 1 080 000 000km/hr! A person could travel around the world 7.5 times in 1 second if they were travelling at that speed. Light and Colour Did you know that white light is actually made up of multiple colours and the colour we see depends on different wavelengths?! Only a small portion of the wavelengths are visible to the human eye and these are seen as the colours of the rainbow. Light allows us to see the beautiful and colourful world around us. That is how we are able to see a rainbow! When waves of light come in through the earth’s
1 Sciencenorth.ca/teachers
Science North is an agency of the Government of Ontario and a registered charity #10796 2979 RR0001
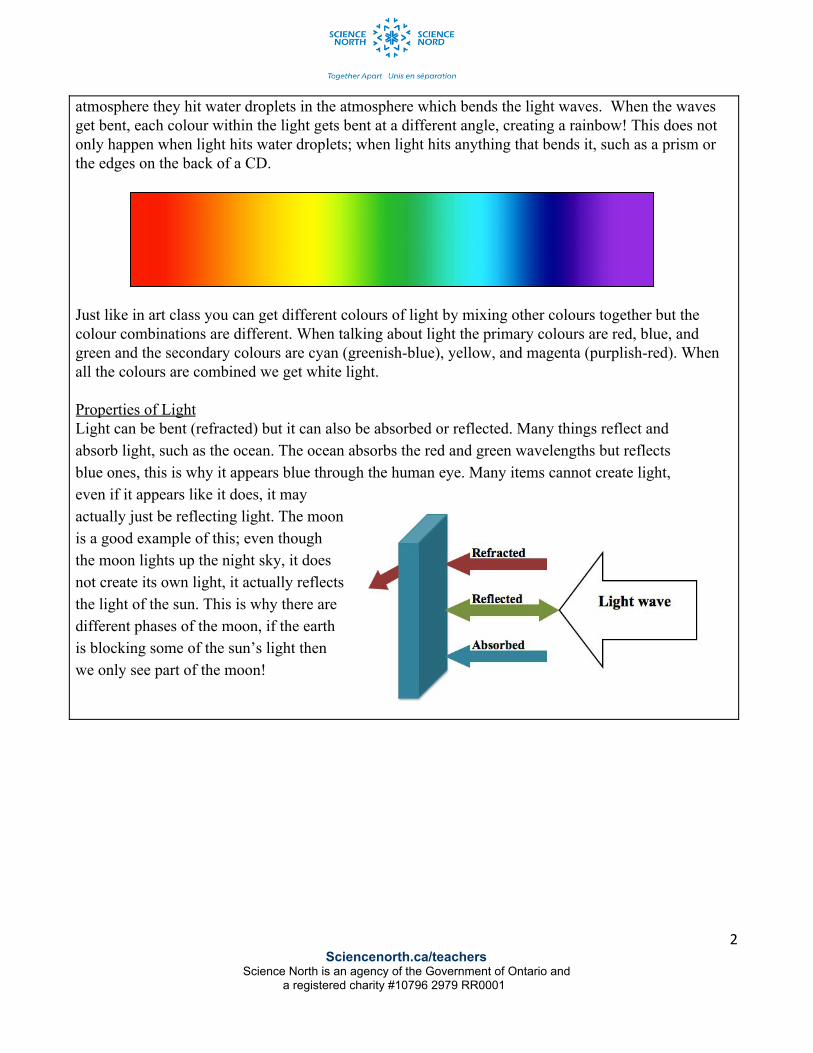
atmosphere they hit water droplets in the atmosphere which bends the light waves. When the waves get bent, each colour within the light gets bent at a different angle, creating a rainbow! This does not only happen when light hits water droplets; when light hits anything that bends it, such as a prism or the edges on the back of a CD. Just like in art class you can get different colours of light by mixing other colours together but the colour combinations are different. When talking about light the primary colours are red, blue, and green and the secondary colours are cyan (greenish-blue), yellow, and magenta (purplish-red). When all the colours are combined we get white light. Properties of Light Light can be bent (refracted) but it can also be absorbed or reflected. Many things reflect and absorb light, such as the ocean. The ocean absorbs the red and green wavelengths but reflects blue ones, this is why it appears blue through the human eye. Many items cannot create light, even if it appears like it does, it may actually just be reflecting light. The moon is a good example of this; even though the moon lights up the night sky, it does not create its own light, it actually reflects the light of the sun. This is why there are different phases of the moon, if the earth is blocking some of the sun’s light then we only see part of the moon!
2 Sciencenorth.ca/teachers
Science North is an agency of the Government of Ontario and a registered charity #10796 2979 RR0001
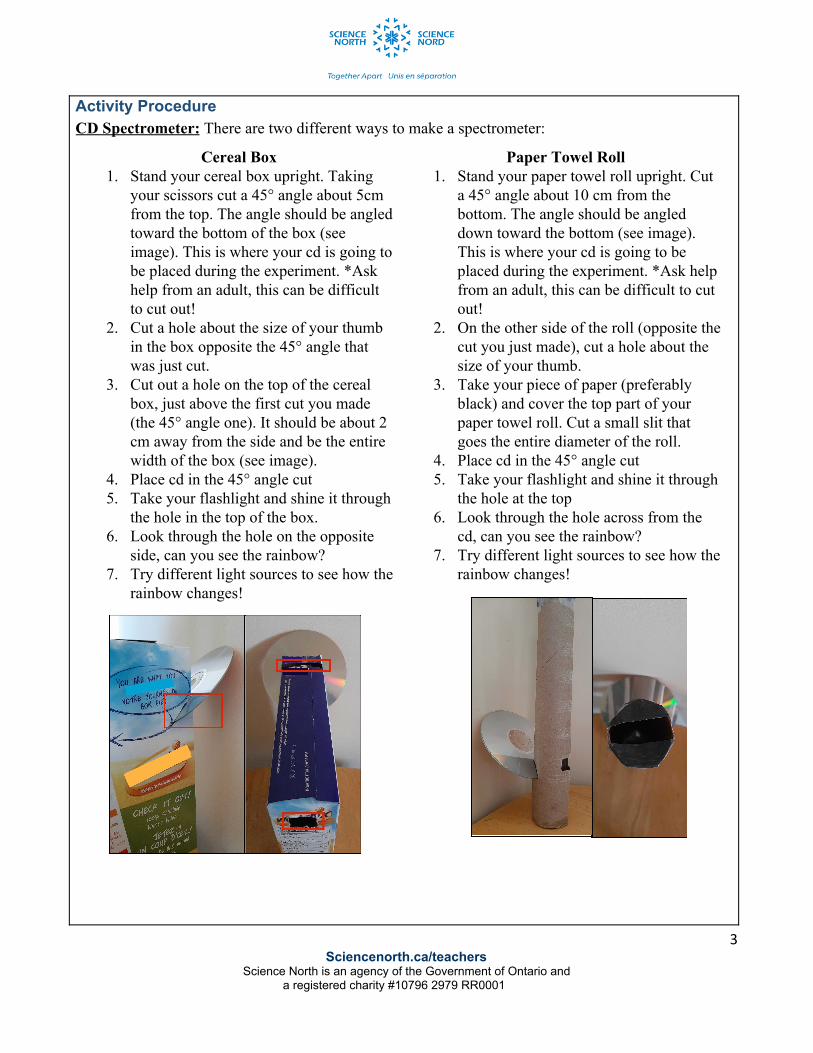
Activity Procedure CD Spectrometer: There are two different ways to make a spectrometer:
Cereal Box 1. Stand your cereal box upright. Taking
your scissors cut a 45° angle about 5cm from the top. The angle should be angled toward the bottom of the box (see image). This is where your cd is going to be placed during the experiment. *Ask help from an adult, this can be difficult to cut out!
2. Cut a hole about the size of your thumb in the box opposite the 45° angle that was just cut.
3. Cut out a hole on the top of the cereal box, just above the first cut you made (the 45° angle one). It should be about 2 cm away from the side and be the entire width of the box (see image).
4. Place cd in the 45° angle cut 5. Take your flashlight and shine it through
the hole in the top of the box. 6. Look through the hole on the opposite
side, can you see the rainbow? 7. Try different light sources to see how the
rainbow changes!
Paper Towel Roll 1. Stand your paper towel roll upright. Cut
a 45° angle about 10 cm from the bottom. The angle should be angled down toward the bottom (see image). This is where your cd is going to be placed during the experiment. *Ask help from an adult, this can be difficult to cut out!
2. On the other side of the roll (opposite the cut you just made), cut a hole about the size of your thumb.
3. Take your piece of paper (preferably black) and cover the top part of your paper towel roll. Cut a small slit that goes the entire diameter of the roll.
4. Place cd in the 45° angle cut 5. Take your flashlight and shine it through
the hole at the top 6. Look through the hole across from the
cd, can you see the rainbow? 7. Try different light sources to see how the
rainbow changes!
3 Sciencenorth.ca/teachers
Science North is an agency of the Government of Ontario and a registered charity #10796 2979 RR0001

Coloured Shadows: 1. Cover the lens of all 3 of your flashlights with clear tape. 2. Use a green marker to colour over the tape on one of the
flashlights. Test it out to make sure its light is now green. Repeat with the other two flashlights to make a blue flashlight and a red flashlight.
3. If you have a dark room, move there and set up the next part of the activity.
4. Take the white piece of paper and attach it to the bottom of your shoebox with tape or glue. You can cut it so that it fits perfectly if you want. If you do not have a box that size, try to prop up the white piece of paper so it is against a wall, still touching the floor or bottom surface.
5. Turn on your flashlights and set them up so that they are facing your white background (if using a box set them just inside the edge). Make sure green is in the middle; you want all of your flashlights to be pointing at the same spot so you will have to angle the two from the outside in.
6. Once you have all the flashlights lighting up the same spot, think about the colour you are seeing, then place your figurine a few centimetres away from the white background, in the spot where all the lights meet. What colours appear in the shadow of the figurine?
7. Try moving around the figurine, do the colours change. What happens if you add a second figurine?
4 Sciencenorth.ca/teachers
Science North is an agency of the Government of Ontario and a registered charity #10796 2979 RR0001

Simple Water Rainbows: There are two ways to conduct this experiment:
Option One 1. Fill a clear glass bowl halfway with
water 2. Place a mirror in the water, make sure
half of the mirror is in the water and half is out.
3. Place bowl in direct sunlight or point a bright light at the mirror (may need a second person to help)
4. Using white paper, find where the light is being reflected. Once you find it, you should be able to see a rainbow.
Option Two 1. Fill a clear glass
with water. 2. Place it in a very
sunny spot with a white surface (or a white piece of paper underneath it. Can you see the rainbow? *Alternative: If you cannot use direct sunlight, cut a small hole (about 1cmx4cm) in a piece of paper and tape it to the side of the glass. Make sure the glass is full and place it on a white surface. Using a flashlight, shine it right through the hole in the paper. Can you see the rainbow?
Debrief CD Spectrometer The bottom of a CD has small groves that act as a prisms separate light into its different colours. Sunlight shows all the colours of the rainbow! Light from other sources, such as different types of light bulbs will show different bands of colours. Test out the spectrometer on different LED lights or neo signs! Coloured Shadows Three coloured shadows should appear behind the figurine (yellow, cyan, and purple). This is because when the lights hit the figurine (or other object in the way), it blocks one of the colours, which means only two colours are mixing instead of three. For example, if the figurine is blocking the blue light, red and green mix together to create yellow. Simple Water Rainbow Just like an actual rainbow, the water in the glass cup is refracting (bending) the light. We know that the light waves refract differently when they hit a water droplet in the sky; the same
5 Sciencenorth.ca/teachers
Science North is an agency of the Government of Ontario and a registered charity #10796 2979 RR0001

thing is happening in this experiment, which is creating the rainbow! Although this rainbow is a lot smaller than the ones we see outside! Try to find other places in your house where there are rainbows hiding (Hint: try blowing bubbles). There are rainbows all around us all the time, we just need to bend the white light in order to see it! Without light energy the earth would not have become the beautiful world we have today since light is an essential part of life. Without light, everything would just be black. Thank you for participating in our at home science experiments for light! Have fun finding the hidden rainbows around your home!
6 Sciencenorth.ca/teachers
Science North is an agency of the Government of Ontario and a registered charity #10796 2979 RR0001