l 39 albatros - carf-models ltd. · read&this&manual&and&understood&it.&...
TRANSCRIPT

L 39 Albatros
Instruc(on*Manual*
F.W.*28/2/2014*Vers.1.0*

Thank&you&very&much&for&purchase&our&Skygate&L&39&Abatros&made&with&our&Total&Area&Vacuum&Sandwich&technology&(&TAVS&)&
Before&you&get&start&building&and&seBng&up&your&aircraC,&please&make&sure&you&have&read&this&manual&and&understood&it.&If&you&have&any&quesHon,&please&don’t&hesitate&to&contact&your&dealer,&your&&rep&or&CARF&Models&directly.&&
Email:&[email protected]&Telephone:&&Call&you&CARF&Sales&Rep&Q&he&will&be&there&for&you.&A&full&list&of&dealers&and&reps&can&be&found&on&the&CARF&website:&hRp://www.carfQmodels.com&
Liability*Exclusion*and*Damages*
You&have&&acquired&a&kit,&which&can&be&assembled&into&a&fully&working&R/C&model&when&fiRed&out&with&suitable&accessories,&as&described&in&the&instrucHon&manual&with&the&kit.&However,&as&manufacturers,&we&at&CARFQModels&are¬&in&a&posiHon&to&influence&the&way&you&build&and&operate&your&model,&and&we&have&no&control&over&the&methods&you&use&to&install,&operate&and&maintain&the&radio&control&system&components.&For&this&reason&we&are&obliged&to&deny&all&liability's&for&loss,&damage&or&cost&which&are&incurred&due&to&the&incompetent&or&incorrect&applicaHon&and&operaHon&of&our&products,&or&which&are&connected&with&such&operaHon&in&any&way.&
Unless&otherwise&prescribed&by&binding&law,&the&obligaHon&of&CARF&Models&company&to&pay&compensaHon&is&excluded,®ardless&of&the&legal&argument&employed.&This&applies&to&personal&injury,&death,&damage&to&buildings,&loss&of&turnover&and&business,&interrupHon&of&business&or&other&direct&and&indirect&consequent&damages.&In&all&circumstances&our&total&liability&is&limited&to&the&amount&which&you&actually&paid&for&this&model.&
BY*OPERATING*THIS*MODEL*YOU*ASSUME*FULL*RESPONISBILITY*FOR*YOU*ACTIONS.*
It&is&important&to&understand&that&CARF&Models&is&unable&to&monitor&whether&you&follow&the&instrucHons&contained&in&this&instrucHon&manual®arding&the&construcHon,&operaHng&and&maintenance&of&the&aircraC&,&nor&whether&you&install&and&use&the&radio&control&system&correctly&.For&this&reason&we&at&CARF&Models&are&unable&to&guarantee,&or&provide,&a&contractual&agreement&with&any&individual&or&company&that&the&model&you&have&made,&funcHons&correctly&and&safely.&You,&as&operator&of&the&model,&must&rely&upon&your&own&experHse&and&judgment&in&acquiring&and&operaHng&this&model.&&

APen(on*!*
This&jet&aircraC&is&a&high&end&product&and&can&create&an&enormous&risk&for&both&pilot&and&spectators&.&If¬&handled&with&care&&&used&according&to&the&instrucHons.&Make&sure&that&you&operate&your&L&39&according&to&the&laws&and®ulaHons&governing&model&flying&in&the&country&of&use.&The&engine,&landing&gear,&servo,&linkages&and&control&surfaces&have&to&be&aRached&properly.&Please&use&only&the&recommended&servos&and&accessories.&Make&sure&that&the&Centre&of&Gravity&is&located&in&the&recommended&place.&Use&the&nose&heavy&end&of&the&CG&range&for&your&first&flights.&A&tail&heavy&plane&can&be&an&enormous&danger&for&you&and&all&spectators.&Fix&any&weights&and&heavy&items&like&baReries&,&very&securely&into&the&plane.&Make&sure&that&the&plane&is&secured&properly&when&you&start&the&engine.&Have&a&helper&hold&your&plane&from&the&nose&before&you&start&the&engine.&Make&sure&all&spectators&are&far&behind,&or&far&in&front&of&the&aircraC&when&running&up&the&engine.&Make&sure&that&you&range&check&your&R/C&system&thoroughly&before&the&1st&flight.&It&is&absolutely&necessary&to&range&check&your&complete&R/C&installaHon&first&WITHOUT&the&engine&running.&Leave&the&transmiRer&antenna&retracted&or&incase&of&2.4ghz&depress&the&range&check&buRon&and&check&the&distance&you&can&walk&before&FAILSAVE&occurs.&Then&start&the&engine,&run&at&about&half&a&throRle&and&repeat&the&range&check.&Make&sure&that&there&is&no&range&reducHon&before&FAILSAVE&occurs.&If&the&range&with&engine&running&is&less&then&with&the&engine&off,&please&don’t&fly&at&that&Hme.&Check&that&the&wing&and&stab&retaining&bolts&are&Hght&and&that&all&linkages&are&secured.&Please&don’t&ignore&our&warnings,&or&those&provided&by&other&manufactures.&They&refer&to&things&and&processes&which,&if&ignored&could&result&in&permanent&damage&or&fatal&injury.&
Important/General*Notes*
Servo*Choice*We&strongly&advise&that&you&use&the&recommended&servos&and&equipment&listed&in&the&manual.&
Servo*Screws&Fix&the&all&the&servos&into&the&milled&plywood&&servo&&mounts&using&the&2.9x13mm&or&16mm&sheet&metal&screws&provided&in&the&Kit,¬&the&standard&screws&normally&supplied&with&the&servos&by&the&servo&manufacturer.&This&because&all&the&holes&in&our&milled&servo&mounts&are&2mm&diameter,&due&to&our&CNC&manufacturing&process&and&this&is&too&big&for&the&normal&screws.&
Building*Sequence*The&actual&building&sequence&is&your&choice&but&it&is&usually&most&efficient&to&start&as&suggested&in&this&manual,&which&has&been&created&by&building&several&airplanes&by&several&experienced&modelers.&

Adhesives*and*Solvents*Not&all&types&of&glue&are&suited&to&working&with&composite&parts&.&Please&don’t&use&inferior&&quality&glue&you&will&end&up&with&a&inferior&quality&plane&.that&is¬&strong&or&save.&Jet&models&require&good&gluing&techniques,&due&to&the&higher&flying&speeds,&and&hence&higher&loads&on&many&of&the&joints.&We&highly&recommend&that&you&use&a&slow&curing&&epoxy&such&a&24hr&resin&and&fill&it&with&coRon&flock&or&thixo&for&gluing&highly&&stressed&joints.&
We&take&great&care&during&producHon&at&the&factory&to&ensure&that&all&joints&are&properly&glued&but&of&course&it&is&wise&to&check&these&yourself&and®ular&any&might&just&have&been&missed.&When&sanding&areas&on&the&inside&of&the&composite&sandwich&parts&to&prepare&the&surface&for&gluing&something&onto&it,&do¬&sand&trough&the&layer&of&lightweight&glass&cloth&on&the&inside&foam&sandwich.&It&is&only&necessary&to&rough&up&the&surface,&with&120grit&and&wipe&of&any&dust&with&acetone&or&deQnatured&alcohol&before&gluing&to&make&a&perfect&joint.&Of&course&,you&should&always&prepare&both&parts&to&be&joined&before&gluing&for&the&highest&quality&joints.&Don’t&use&ACETON&for&cleaning&external.&Painted,&surfaces&as&you&will&damage&the&paint.&
TIP:*For*cleaning*small*spots*or*marks*off*the*painted*surface*you*can*use*liquid*cigarePe[lighter*fuel.*
Tip:*Use*only*high*quality*5*or*30*min*epoxy,*since*the*cheap*brands*of*this*kind*of*glue*are*not*moisture*resistant*like*a*proper*resin.**You*will*no(ce*this*as*older*bondings*change*their*color*and*get*more*and*more*so_*un(l*the*bond*eventually*fails.&
At&CARF&Models&we&try&our&best&to&offer&you&a&high&quality&kit,&with&outstanding&valueQforQmoney&and&as&complete&as&possible.&However,&if&you&think&that&some&addiHonal&or&different&hardware&should&be&included,&please&feel&free&to&let&us&know.&Email&us&:&[email protected].&We&know&that&even&good&things&can&be&made&beRer!&&

Accessories*
This&list&will&help&you&chose&the&main&addiHonal&items&needed&to&finish&your&L&39&Albatros&
1. Servos:&8&high&quality&Servos&all&the&main&control&surfaces&require&a&minimum&of&20&kg&torque&such&as&JR8711&&
2. Aluminum&servo&arms&&3. A&receiver&power&supply&such&as&a&Powerbox&EvoluHon&or&Cockpit&&4. Turbine&with&a&thrust&of&160&–&200&N&5. Scale&retract&Landing&Gear&6. Gear&door&pneumaHc&set&7. Speed&break&pneumaHc&set&8. Tank&Set&&&&&&&&&&&&&&&&&&&&&&&&&&&&&&&&&&&&&&&&&&&&&&&&&&&9. Trust&Tube&&&&&&&&&&&&&&&&&&&&&&&&&&&&&&&&&&&&&&&&&&&&&&&&10. Scale&Cockpit&&&&&&&&&&&&&&&&&&&&&&&&&&&&&&&&&&&&&&&&&&
Did&you&read&the&hints&and&warnings&above&and&the&instrucHon&carefully?&Did&you&understood&everything&in&this&manual&completely&?&
Then&and&only&then,&let’s&start&assembling&your&Skygate&CollecHon&L39&Albatros&&If¬,&please&read&it&again&before&you&conHnue&&
Item&No.&140500&Item&No.&140600&Item&No.&140650&Item&No.&140106&Item&No.&140700&Item&NO.&140400&

Hardware*List*


Milled*Parts*and*Hardware*included*in*the*kit*

*Stab*–*Elevator**
The&stab&comes&as&preassembled&as&possible&and&should&look&like&shown&on&the&Picture.&Note:&The&long&brass&tube&can&be&cut&In&the¢er&with&a&diamond&disk&if&you&enQ&counter&slight&allignment&issues&of&the&two&&elevator&halves.&&
You&have&to&add&&just&&4&carbon&roving's&which&you&put&around&the&4&supports.&Use&Hysol&or&30&min&epoxy&with&some&milled&fiber&or&coRon&flock.&&
Clean&the&brass&surface&and&&roughen&with&sand&paper&before&puBng&the&rovings&on.&&
Make&sure&the&elevators&move&smoothly&without&binding&aCer&the&resin&has&cured.&
For&the&assembly&the&stab&use&the&bag&No.&8&and&the&carbon&roving&which&is&included&in&bag&“Special&Parts”&.&You&also&need&the&carbon&linkages&which&are&already&assembled&by&the&factory.&

Tail*Area*–*Stab**
The&elevator&servos&are&mounted&in&the&rear&fuselage.&CARFQModels&recommends&these&servos&to&be&at&&least&of&20kg&torque&fiRed&with&1.25&inch&(30&mm)&aluminum&servo&arms&.&
The&installaHon&is&quite&easy,&make&sure&to&use&the&8&pcs.&Of&2.9x&13&sheet&metal&screws&included&in&the&hardware&bag.&
the&carbon&linkage&to&the&elevator&are&finshed&at&the&factory,&just&turn&the&ball&links&onto&the&threaded&studs.&
NOTE:&&In&some&earlier&kits&the&wood&construcHon&might&have&to&be&a&liRle&altered&to&allow&the&straight&allignment&of&the&rod&between&servo&horn&and&control&horn,&which&is&somewhat&dependent&on&the&type&of&servo&and&control&arm&used.&This&is¬&a&problem,&even&if&some&wood&braces&have&to&be&removed.&

To&aRach&the&carbon&linkage&to&the&servo&&use&the&plasHc&ball&link&and&the&allen&screw&&M3&x&16&and&the&stop&nut.&
To&aRach&the&carbon&linkage&to&the&elevator&&use&also&&the&plasHc&ball&link&and&&M3&stop&nut.&&

Fin*[*Rudder*
The&first&work&step&on&the&fin&is&to&adjust&the&length&of&the&linkage&like&as&you&see&on&the&picture.&
The&ruder&servo&is&installed&in&a&cutout&in&the&fin&rib.&
Please&use&also&a&double&aluminum&servo&horn&and&the&4&pcs&of&2.9x&13&sheet&metal&screws.&
The&torsion&rod&with&steering&plate&is&completely&assembled&and&ready&to&connect.&
For&the&sake&of&safety&consider&gluing&the&rod&into&the&rudder&aCer&final&assembly,&because&there&is&no&need&to&ever&take&it&apart&again.&&&
Just&use&2x&&M3&stop&nuts&to&secure&the&ball&links&and&make&sure&that&the&linkage&has&enough&clearance&in&the&slots&of&the&spar.&If&necessary,&reQshape&slightly&to&adjust&the&holes.&
For&the&assembly&of&fin&and&rudder&use&the&bag&&No.&7.&

To&cnnect&the&servo&to&the&linkages&use&the&M3&x&16&allen&bolt&and&the&M3&stop&nut.&
To&join&the&fin&to&the&fuselage&use&the&M3&x&20&allen&bolt.&Note&the&small&blue&tubing&in&the&photo,&it&is&a&4mm&Festo&pneumaHc&tubing&which&prevents&the&screw&from&falling&out&during&transport.&
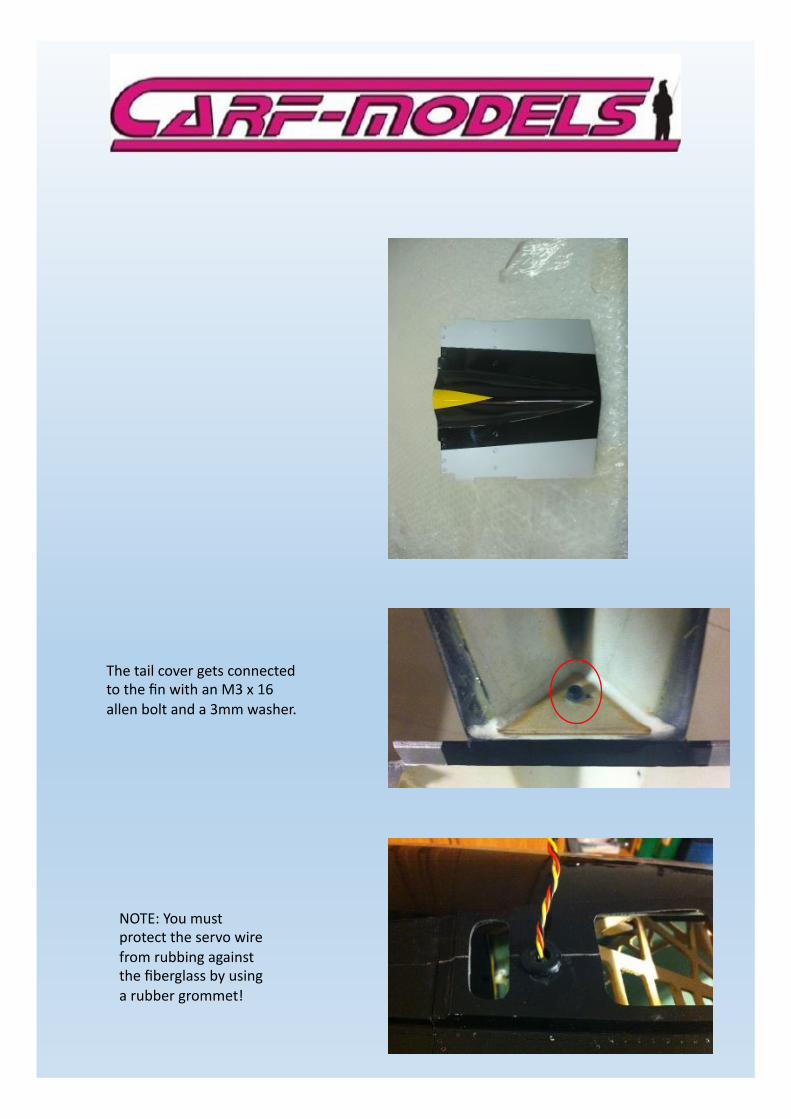
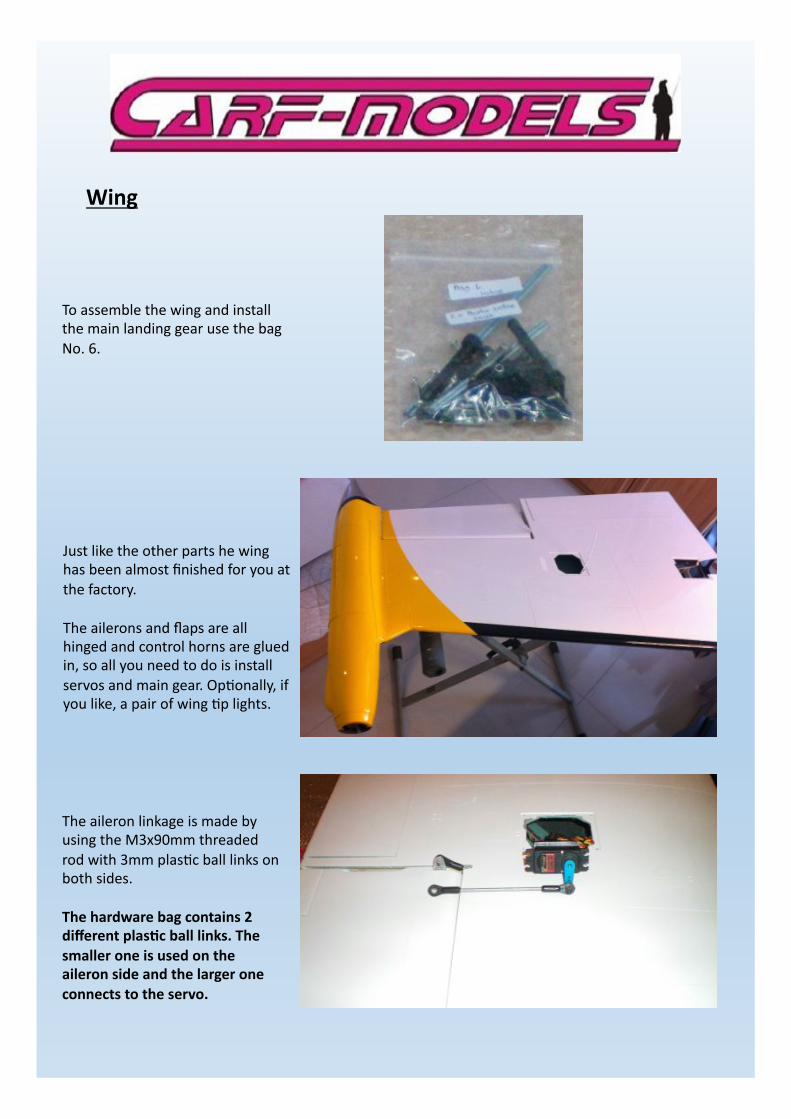
The&tail&cover&gets&connected&to&the&fin&with&an&M3&x&16&allen&bolt&and&a&3mm&washer.&
NOTE:&You&must&protect&the&servo&wire&from&rubbing&against&the&fiberglass&by&using&a&rubber&grommet!&
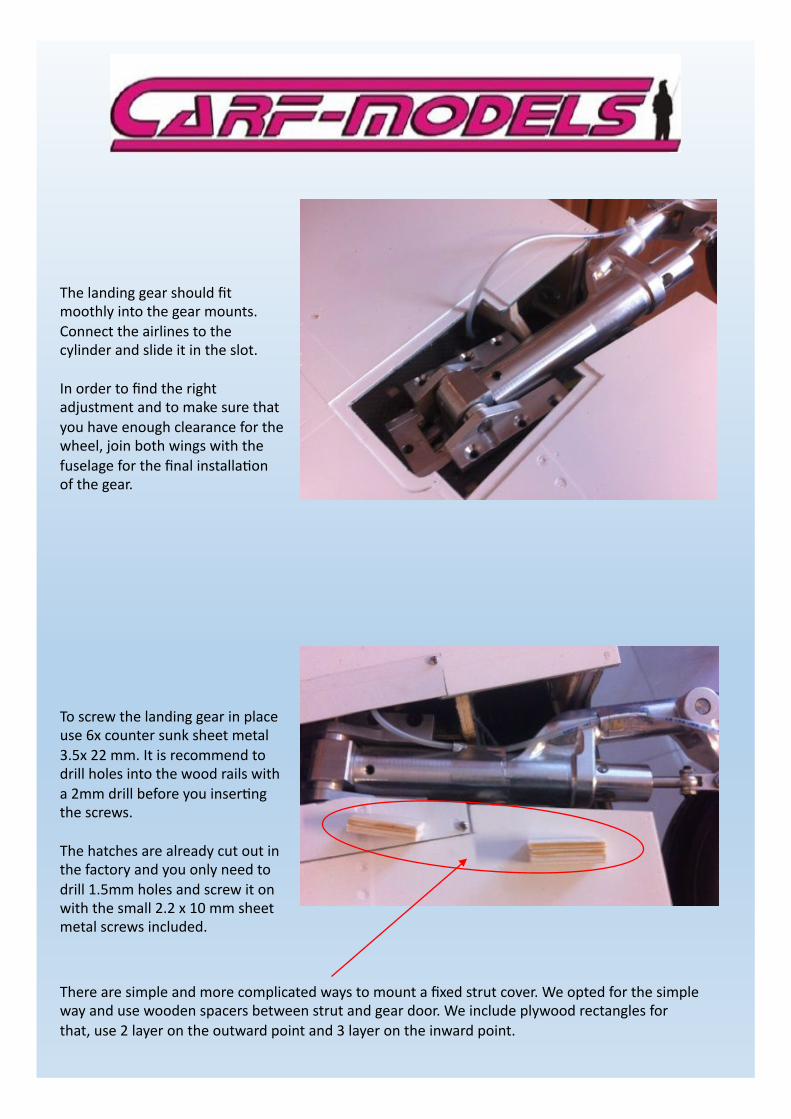
Wing**
Just&like&the&other&parts&he&wing&has&been&almost&finished&for&you&at&the&factory.&
The&ailerons&and&flaps&are&all&hinged&and&control&horns&are&glued&in,&so&all&you&need&to&do&is&install&servos&and&main&gear.&OpHonally,&if&you&like,&a&pair&of&wing&Hp&lights.&
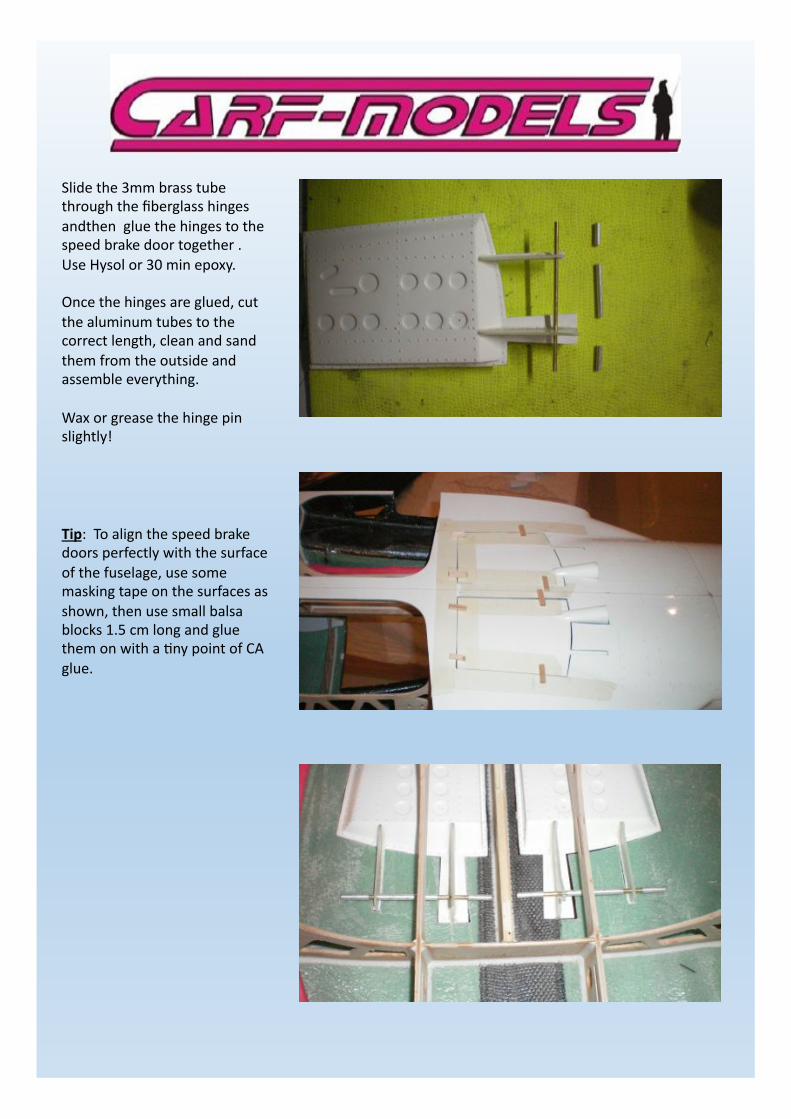
The&aileron&linkage&is&made&by&using&the&M3x90mm&threaded&rod&with&3mm&plasHc&ball&links&on&both&sides.&&
The*hardware*bag*contains*2*different*plas(c*ball*links.*The*smaller*one*is*used*on*the*aileron*side*and*the*larger*one*connects*to*the*servo.**
To&assemble&the&wing&and&install&the&main&landing&gear&use&the&bag&No.&6.&

Please&make&sure&your&servo&arm&is&mounted&so&that&the&servo¢ers&perpendicular&to&the&linkage,&which&connects&servo&and&control&horn&on&opposite&sides&(diagonally&across&the&wing&secHon).&That&way&you&almost&do¬&need&any&slot&in&the&wing&surface.&Then&mount&the&servo&with&the&2.9&x&13&mm&sheet&metal&screws&into&the&ply&rib.&
Our&producHon&process&does¬&allow&to&open&the&hole&all&the&way&before&the&mold&halves&are&joined,&so&go&ahead&and&increase&the&hole&size&as&needed.&It&is&important&that&the&linkage&is¬&touching&the&spar&or&binding&elsewhere.&

for&the&connecHon&between&linkage&and&horn&use&the&smaller&ball&link&with&a&m3x12mm&buRon&head&screw&and&stop&nut&&
important&on&the&one&end&of&&the&aileron&hinge&brass&tube&you&can&see&like&a&90°ree&bended&2&mm&steel&wire,&here&trough&you&have&to&secure&the&hinge&tube&with&counter&sunk&sheet&
metal&3.5x&22&mm&
now&you&can&close&the&servo&hatch&just&drill&1.5mm&holes&and&screw&it&with&4x&&1.9&x&10mm&sheet&metal&screws&

The&flap&horns&are&installed&for&you&at&the&factory.&You&only&need&to&install&the&servo&and&linkage.&The&length&of&the&servo&arm&should&be&1.5&in&(35&mm).&The&linkage&is&made&from&an&M3&x130&mm&threaded&rod.&
On&the&servo&side&use&the&M3&ball&link&with&M3&x&16&allen&bolt&and&stop&nut,&on&the&flap&side&use&the&M3&spring&steel&clevis.&(included&is&a&very&high&quality&hardware)&&
As&always,&use&only&the&incluced&2.9&x&13&mm&sheet&metal&screws&to&install&the&servo&into&the&wood&rib.&
The&landing&gear&should&fit&moothly&into&the&gear&mounts.&Connect&the&airlines&to&the&cylinder&and&slide&it&in&the&slot.&
In&order&to&find&the&right&adjustment&and&to&make&sure&that&you&have&enough&clearance&for&the&wheel,&join&both&wings&with&the&fuselage&for&the&final&installaHon&of&the&gear.&&
To&screw&the&landing&gear&in&place&use&6x&counter&sunk&sheet&metal&3.5x&22&mm.&It&is&recommend&to&drill&holes&into&the&wood&rails&with&a&2mm&drill&before&you&inserHng&the&screws.&
The&hatches&are&already&cut&out&in&the&factory&and&you&only&need&to&drill&1.5mm&holes&and&screw&it&on&with&the&small&2.2&x&10&mm&sheet&metal&screws&included.&
There&are&simple&and&more&complicated&ways&to&mount&a&fixed&strut&cover.&We&opted&for&the&simple&way&and&use&wooden&spacers&between&strut&and&gear&door.&We&include&plywood&rectangles&for&that,&use&2&layer&on&the&outward&point&and&3&layer&on&the&inward&point.&

Clean&and&roughen&the&strut&in&the&area&where&the&spacers&have&to&be&glued&on.&Use&Hysol&(Aeropoxy)&or&a&good&30&min&epoxy.&
Note:&Some&LQ39&have&white&painted&landing&gear&parts.&Paint&the&metal&parts,&including&the&wood&spacers,&so&that&it&looks&right,&or&paint&the&wood&spacers&silver,&if&the&struts&have&to&stay&metallic&color.&

This&is&now&the&Hme&to&install&landing&lights&if&you&decide&to&do&so.&&There&are&a&lot&of&aCer&market&lighHng&systems&available&and&we&do¬&want&to&recommend&one&over&the&other.&
You&might&be&required&to&create&small&mounHng&formers&depending&on&which&lights&you&use.&
The&clear&lenses&need&to&be&cut&and&trimmed&and&then&screwed&on&with&3pcs&2.2x13&mm&sheet&metal&screws.&&

The&flap&fairings&are&already&painted&in&the&factory.&Cut&and&sand&cut&them&carefully&to&fit&perfectly&on&the&wing.&If&the&fairings&are¬&sanded&to&fit&properly&you&will&always&see&a&gap,&since&the&plane&is&already&painted.&This&is&of&course¬&so&criHcal&if&you&are&building&an&all&silver&version&and&paint&the&plane&yourself.&
Tshe&mark&for&the&correct&posiHon&are&clearly&visible&on&the&wing&.&Mask&around&this&area,&sand&carefully&and&glue&the&fairing&on&with&a&SMALL&amount&of&30&min&resin.&
You&see&in&the&photo&how&to&apply&the&resin&inside&the&fairing.&Place&the&fairings&on&the&wing&at&the&correct&posiHon&and&fix&it&with&tape.&Make&sure&the&wing&lies&totally&flat&on&the&table.&ACer&few&minutes&the&resin&mix&will&run&&down&on&the&inside&and&the&glue&joint&will&be&perfect&if&you&previously&sanded&the&fairings&to&fit&the&wing&perfectly.&If&you&didn’t&do&this&properly,&you’re&going&to&end&in&a&big&mess,&so&make&sure&that&there&is&no&gap&between&fairing&and&wing&surface.&Check&this&by&dryQfiBng&several&Hmes.&
The&result&can&be&astonishingly&clean&and&perfect&if&done&right.&

This&is&how&the&resut&should&&look&like…&&

Nose*Cone***
To&finish&the&nose&cone&you&only&&have&to&glue&in&the&mounts&for&the&baRery&tray.&
The&M3&bolt,&washer&and&TQnut&you&will&find&&in&bag&No.&1,&the&Velcro&in&bag&“Special&parts”.&&
First&glue&the&verHcal&former&on&to&the&baRery&floor&and&push&the&M3&TQnut&in.&&
Then&slide&the&front&former&on&to&the&front&tab&of&the&baRery&floor,&add&some&30&min&epoxy&to&the&area&which&will&contact&the&inside&skin&of&the&nose&cone&and&place&the&tray&in&the&right&posiHon,&as&seen&on&the&photo.&ACer&the&30&min&resin&has&cured,&take&the&tray&out&and&fill&the&bond&with&some&more&resin.&&
Don’t&forget&to&sand&the&fiberglass&surface&before&glueing,&as&usual.&

Nose*Gear*Door*
To&install&the&gear&door&cut&2&pcs&of&2cm&of&2&mm&piano&wire&and&4&x&1cm&pcs&of&3&mm&Festo&tubing.&&
The&2mm&wire&you&will&find&in&bag&“Special&Parts”.&&
Glue&the&cylinder&mount&together&as&shown&on&the&photo.&
Use&the&2mm&steel&wire&as&hinge&wire&for&the&front&gear&door&and&secure&it&with&the&Festo&tubing&as&shown.&

For&the&connecHon&between&cylinder&and&fuselage&use&the&support&which&you&already&glued&together,&slide&the&cylinder&in&and&take&the&m3&x25mm&&allen&screw,&as&a&replacement&of&a&nut&(the&area&is&hard&to&reach&if&you&want&to&take&the&cylinder&out&later&for&maintenance)&use&a&piece&of&4&mm&festo&tube&which&to&pull&over&the&screw’s&end.&
On&gear&door&side&you&use&the&M3&aluminum&ball&link&with&the&M2&x&15mm&screw.&To&determine&the&right&posiHon&for&the&cylinder&support,&pull&on&the&ball&link&unHl&the&cylinder&blocks&at&its&end&of&travel.&Now&you&have&the&max.&stroke,&the&gear&door&should&be&90°ree&open.&&Determine&the&right&place&and&then&glue&the&wood&mount&on&the&surface.&Use&30&min&epoxy.&Work&with&the&fuselage&on&the&table&inverted.&&
The&collar&will&act&as&a&Stop&and&define&the&&“closed&posiHon”&of&the&&cylinder/gear&door.&
Note:&&The&cylinders&are&to&be&purchased&separately!&&
For&the&installaHon&of&the&gear&door&cylinder&use&bag&No.&2.&

Main*Gear*Doors*
Define&the&parts&required&to&install&the&main&gear&door&cylinders.&
See&the&mounts&for&the&cylinder,s&which&you&have&to&glue&in.&&
As&first&step&use&the&M4&x&20mm&allen&bolt&and&connect&the&cylinder&with&the&mount.s&To&secure&the&screw&you&can&&use&a&4&mm&tygon&tube.&&

the&gear&door&hinge&are&made&with&the&&4&x&20&mm&aluminum&tubes,&also&secured&swith&small&piece&of&4mm&tygon&which&you&just&pull&over&the&tubes&when&weverthing&is&mounted.&&
In&the&wood&structure&we&already&milled&the&slots&for&the&cylinder&mounts,&just&slide&the&assembled&cylinder&mount&parts&in.&
You&will&find&in&your&kit&one&aluminum&tube&(inside&3mm&dia.)&and&one&brass&tube&(outside&3mm&dia.).&The&brass&we&need&later&for&the&speed&brake.&Cut&from&the&aluminum&tube&4&pieces&x&20mm&long&and&keep&the&remaining&for&the&speed&brake.&&

On&gear&door&side&you&use&the&M3&aluminum&ball&link&with&the&M2&x&15mm&screw.&To&get&the&right&opening&angle&of&the&door,&pull&on&the&ball&link&unHl&the&cylinder&blocks.&The&gear&door&should&be&90°ree&open.&Then&glue&the&mount&into&the&former,&so&that&the&gear&door&open&posiHon&is&always&the&end&posiHon&of&the&cylinder.&With&the&wheel&collar&you&can&now&adjust&the&travel&to&close&the&door.&&

Speed*Brake*
This&is&what&you&need&to&find&in&the&kit&to&start&working.&
Note:&&The&cylinders&are&sold&separately.&&
if&you&decide&that&you’d&like&make&the&speed&brake&doors&funcHonal,&use&the&hardware&of&bag&No.&3.&

As&this&work&is&opHonal,&it&requires&a&liRle&more&work&and&skill.&
On&the&boRom&side&of&the&fuselage&you&can&see&clearly&the&marks&for&the&speed&brake&doors.&You&can&trust&these&lines,&they&are&really&accurate.&Cut&them&out&by&using&a&dremel&with&diamant&disk.&&
Sand&around&the&edges,&trial&fit&the&speed&brake&doors&and&make&sure&they&have&enough&clearance&around.&

As&hinges&use&the&milled&poly&ply&parts.&Mark&the&height&of&the&necessary&slots&on&the&speed&brake&doors&by&measuring&the&hinges.&
Mill&the&slots&sand&the&glue&area&well.&
Slide&the&3mm&brass&tube&through&the&fiberglass&hinges&andthen&&glue&the&hinges&to&the&speed&brake&door&together&.&Use&Hysol&or&30&min&epoxy.&&
Once&the&hinges&are&glued,&cut&the&aluminum&tubes&to&the&correct&length,&clean&and&sand&them&from&the&outside&and&assemble&everything.&
Wax&or&grease&the&hinge&pin&slightly!&
Tip:&&To&align&the&speed&brake&doors&perfectly&with&the&surface&of&the&fuselage,&use&some&masking&tape&on&the&surfaces&as&shown,&then&use&small&balsa&blocks&1.5&cm&long&and&glue&them&on&with&a&Hny&point&of&CA&glue.&&
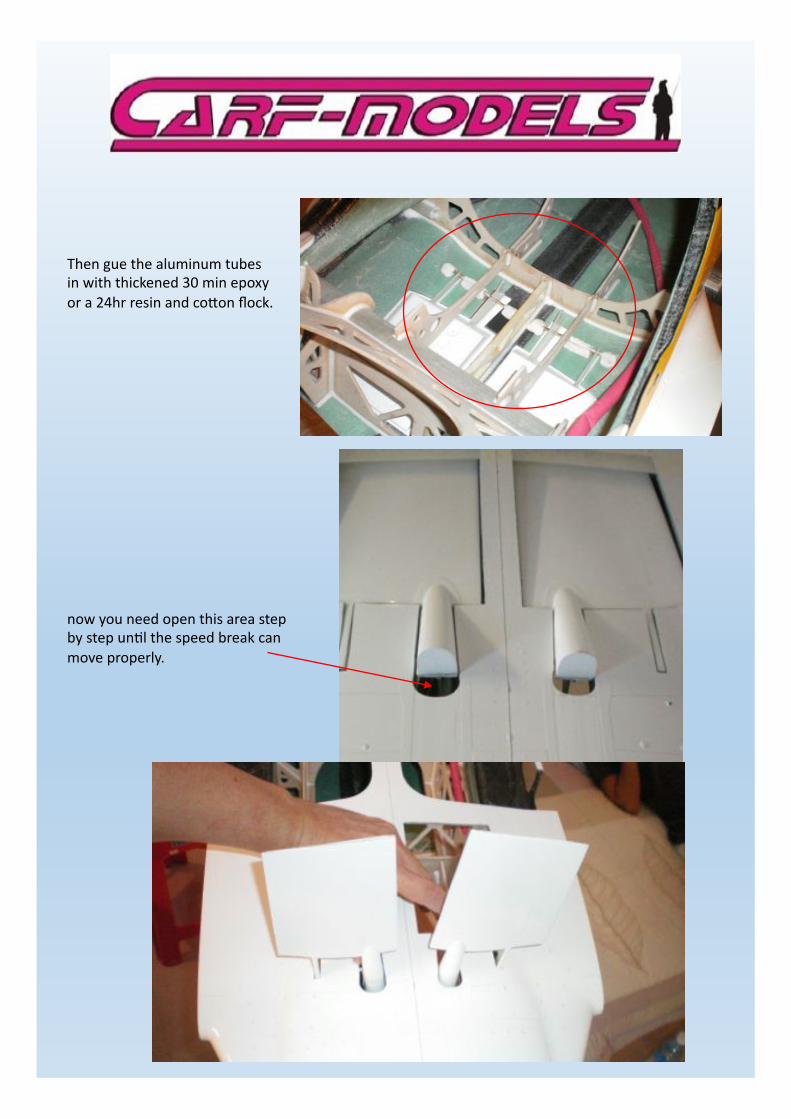
now&you&need&open&this&area&step&by&step&unHl&the&speed&break&can&move&properly.&&
Then&gue&the&aluminum&tubes&&in&with&thickened&30&min&epoxy&or&a&24hr&resin&and&coRon&flock.&&&

Cut&the&fairing&as&shown&on&the&photos,&make&sure&it&will&fit&well&to&the&fuselage&and¬&foul&the&movement&of&the&speed&brake&door.&Then&proceed&with&the&gluing&like&the&work&steps&taken&when&installing&the&flap&fairings&to&the&wing.&

The&final&work&leC&is&connecHng&the&cylinders&with&the&in&the&factory&preassembled&wood&mount.&Use&again&M4&x&20mm&allen&bolts&and&secure&with&a&piece&of&tygon&tube&
Connect&the&cylinders&to&the&doors&with&the&&M3&aluminum&ball&link,&the&M2&x&15mm&screw.&To&adjust&the&travel&adjust&the&ball&link&on&the&thread.&

Turbine*and*Trust*Tube**
Start&by&locaHng&the&4&3mm&milled&plywood&pieces.&&
The&two&lower&ones,&which&later&ontact&the&duct&surface,&need&to&be&rounded&as&you&see&here.&Trial&fit&unHl&they&sit&flat&on&the&duct&mount&surface.&
Roughen&the&gluing&area&and&glue&the&wood&parts&with&30&min&epoxy&on&the&carbon&ducHng.&Make&sure&they&sit&flush&and&are&alligned&to&each&other.&

ACer&the&resin&is&cured&the&duct&looks&like&&shown&on&the&photo.&&
The&duct&is&a&standard&part&used&on&other&CARF&airplanes&as&well.&This&it&needs&to&be&adapted&in&length.&The&LQ39’s&internal&wood&structure&and&the&Hght&space&from&the&intake&to&the&engine,&make&it&necessary&to&cut&the&ducHng&shorter,&the&esHmated&cut&point&is&on&the&4th&hole&in&the&wood&support.&
To&make&sure&the&cuBng&will&be&straight&use&tape&to&give&you&the&direcHon.&To&create&a&more&balanced&bypass&air&flow&around&the&engine,&you&can&even&cut&the¢er&area&further&back&in&a&circular&shape.&Use&a&Dremel&with&a&diamond&disk.&&&

The&trust&tube,&which&is&to&be&purchased&separately,&has&already&4&holes&drilled&in&the&front&edge&,you&just&have&to&slide&it&over&the&ducHng.&SomeHmes&you&will&have&to&sand&the&duct&area&a&liRle&down&because&there&are&&manufacturing&tolerances&during&spot&&welding&process.&
Slide&the&tube&approx.&10&mm&over&the&duct&and&drill&the&holes&through.&Then&use&M3&x&10&allen&screw&with&stop&nut.&The&screw&heads&need&to&be&from&the&inside!&
The&tail&fairing&and&thrust&tube&support&on&the&rear&end&might&need&to&be&cut&4Q8&mm&but&please&check&you&trust&tube&in&a&trial&assembly&first.&Sand&the&fiberglass&tail&fairing&if&necessary.&The&tube&needs&to&slide&easily&over.&If&the&fit&is&too&Hght,&it&will&be&difficult&to&take&the&rear&part&of&the&fuselage&off&and&back&on,&in&case&you&have&to&remove&it&for&transport&or&maintenance.&
Once&the&trust&tube&fits&well&on&to&the&fairing,&you&can&glue&the&fairing&with&30&min&epoxy&to&the&fuselage.&This&joint&is&permanent,&so&make&sure&that&you&have&fiRed&everything&perfectly&before&you&glue.&
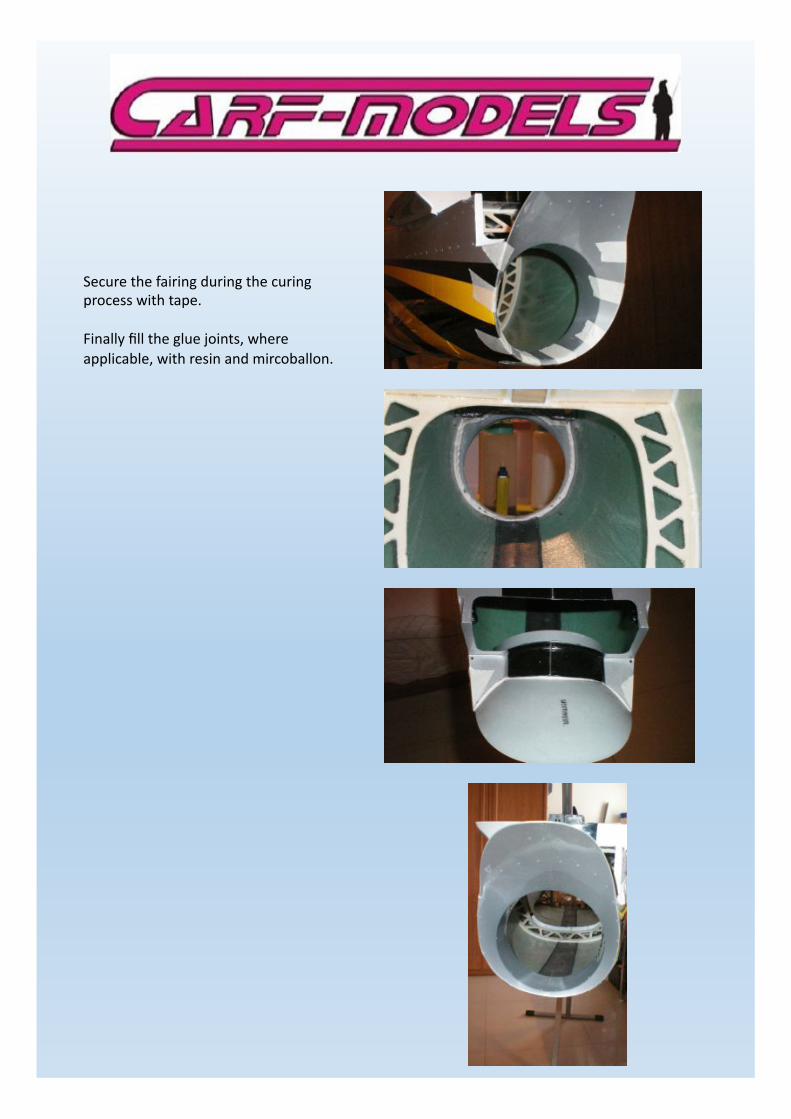
Secure&the&fairing&during&the&curing&&process&with&tape.&
Finally&fill&the&glue&joints,&where&&applicable,&with&resin&and&mircoballon.&
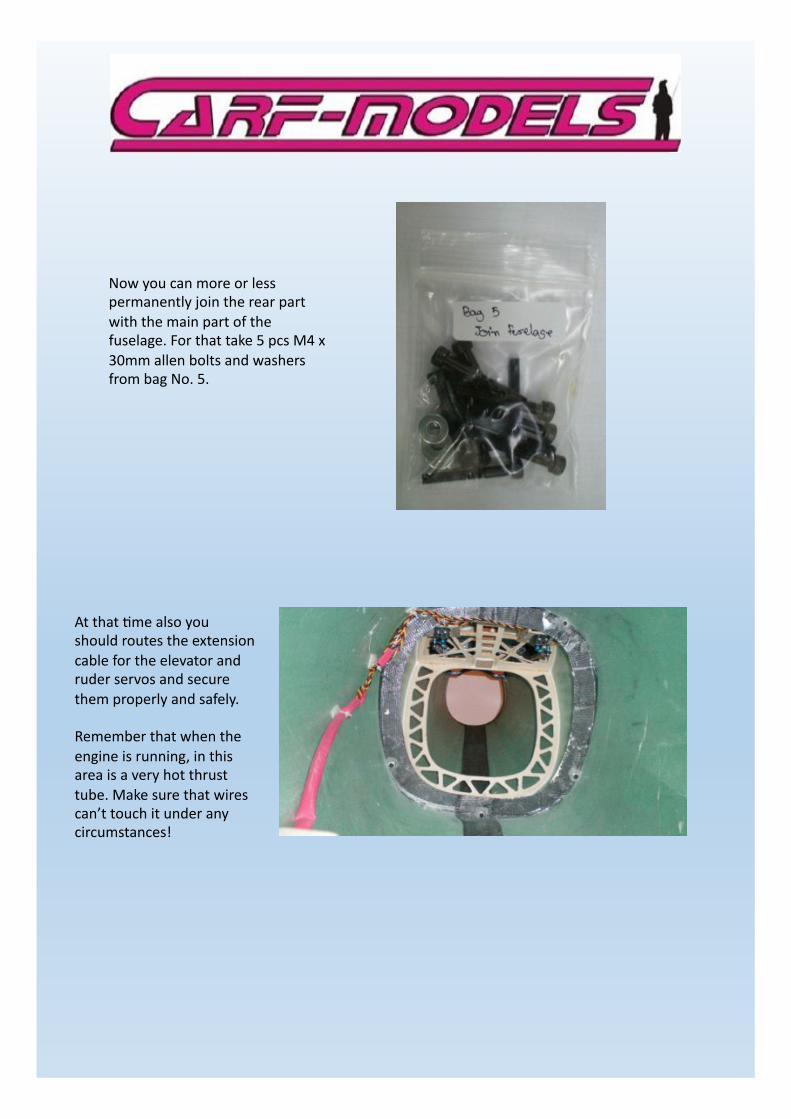
Now&you&can&more&or&less&permanently&join&the&rear&part&with&the&main&part&of&the&fuselage.&For&that&take&5&pcs&M4&x&30mm&allen&bolts&and&washers&from&bag&No.&5.&&
At&that&Hme&also&you&should&routes&the&extension&cable&for&the&elevator&and&ruder&servos&and&secure&them&properly&and&safely.&&
Remember&that&when&the&engine&is&running,&in&this&area&is&a&very&hot&thrust&tube.&Make&sure&that&wires&can’t&touch&it&under&any&circumstances!&&&
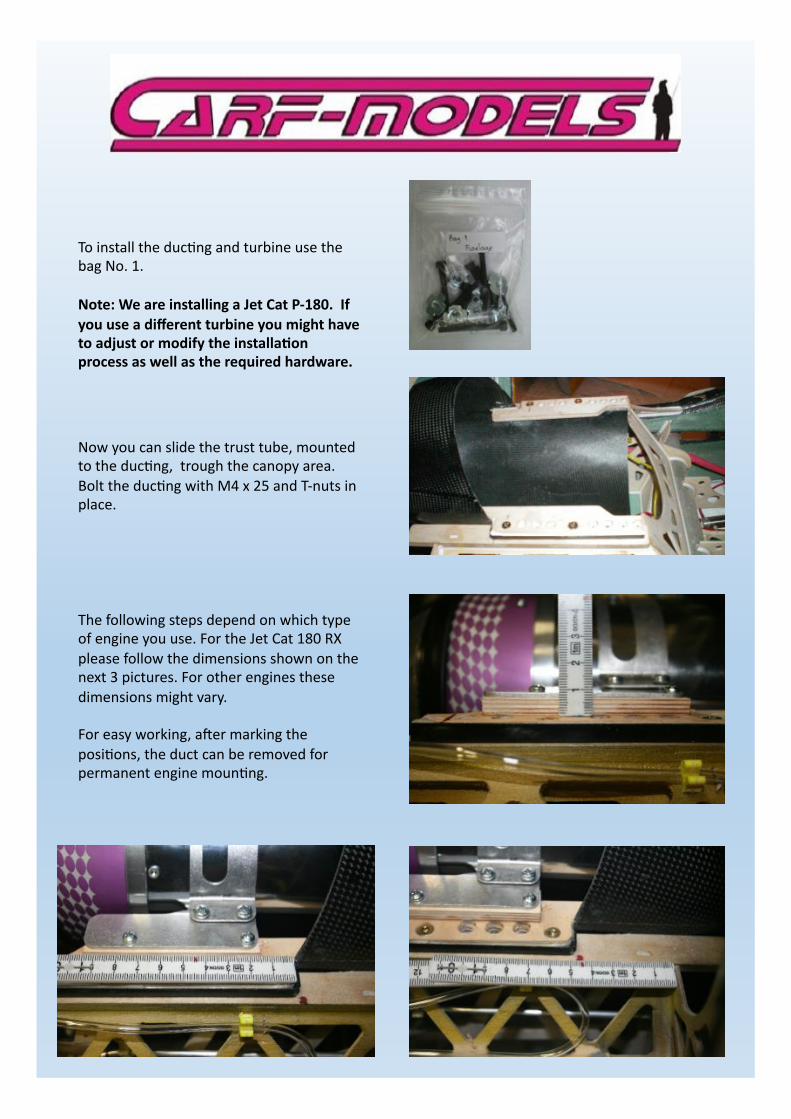
Now&you&can&slide&the&trust&tube,&mounted&to&the&ducHng,&&trough&the&canopy&area.&Bolt&the&ducHng&with&M4&x&25&and&TQnuts&in&place.&
The&following&steps&depend&on&which&type&of&engine&you&use.&For&the&Jet&Cat&180&RX&please&follow&the&dimensions&shown&on&the&next&3&pictures.&For&other&engines&these&dimensions&might&vary.&
For&easy&working,&aCer&marking&the&posiHons,&the&duct&can&be&removed&for&permanent&engine&mounHng.&
To&install&the&ducHng&and&turbine&use&the&bag&No.&1.&
Note:*We*are*installing*a*Jet*Cat*P[180.**If*you*use*a*different*turbine*you*might*have*to*adjust*or*modify*the*installa(on*process*as*well*as*the*required*hardware.*
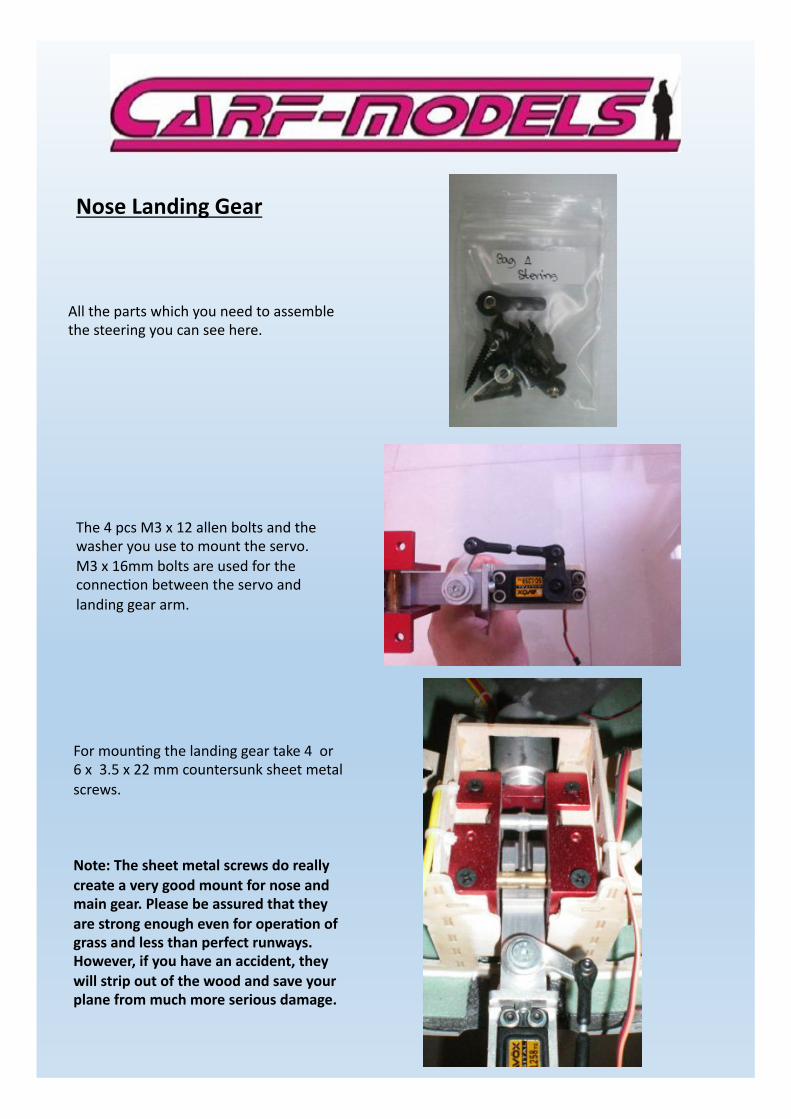
Nose*Landing*Gear***
All&the&parts&which&you&need&to&assemble&the&steering&you&can&see&here.&
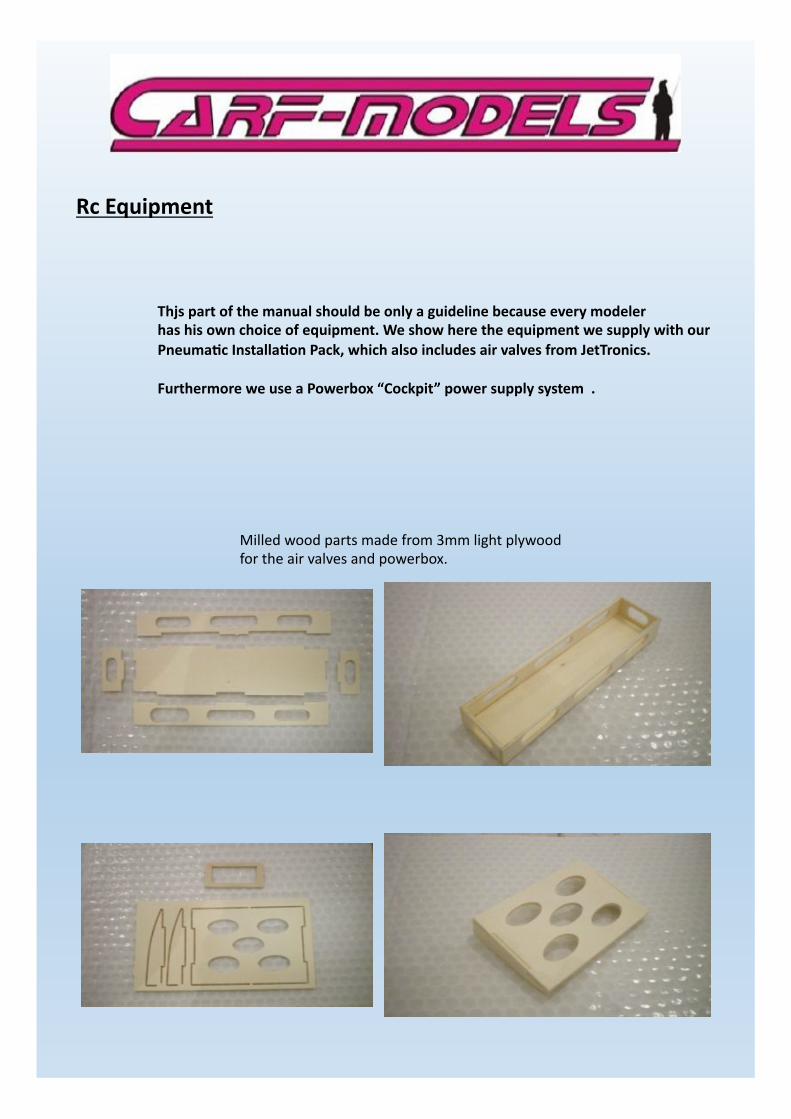
The&4&pcs&M3&x&12&allen&bolts&and&the&washer&you&use&to&mount&the&servo.&M3&x&16mm&bolts&are&used&for&the&connecHon&between&the&servo&and&landing&gear&arm.&&
For&mounHng&the&landing&gear&take&4&&or&&6&x&&3.5&x&22&mm&countersunk&sheet&metal&screws.&
Note:*The*sheet*metal*screws*do*really*create*a*very*good*mount*for*nose*and*main*gear.*Please*be*assured*that*they*are*strong*enough*even*for*opera(on*of*grass*and*less*than*perfect*runways.*However,*if*you*have*an*accident,*they*will*strip*out*of*the*wood*and*save*your*plane*from*much*more*serious*damage.*
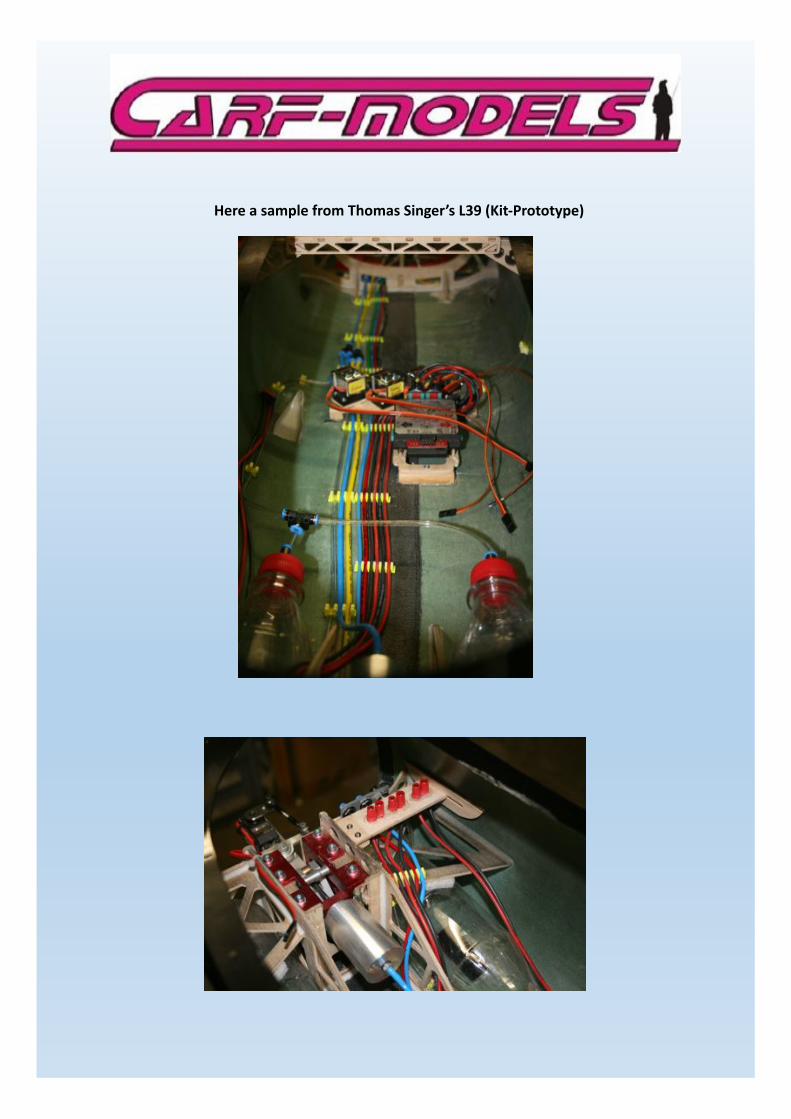
Rc*Equipment**
Milled&wood&parts&made&from&3mm&light&plywood&for&the&air&valves&and&powerbox.&
Thjs*part*of*the*manual*should*be*only*a*guideline*because*every*modeler*has*his*own*choice*of*equipment.*We*show*here*the*equipment*we*supply*with*our*Pneuma(c*Installa(on*Pack,*which*also*includes*air*valves*from*JetTronics.*
Furthermore*we*use*a*Powerbox*“Cockpit”*power*supply*system**.*

These*pictures*are*from*the*build*for*this*manual**
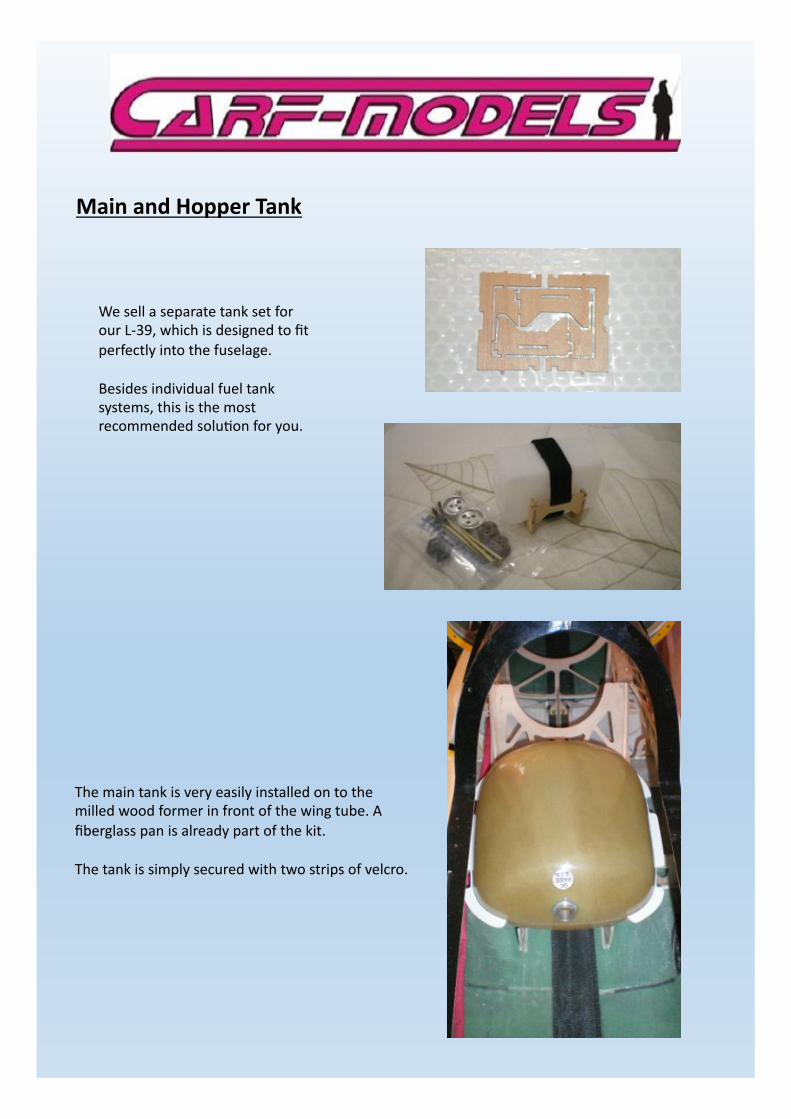
Here*a*sample*from*Thomas*Singer’s*L39*(Kit[Prototype)*
Main*and*Hopper*Tank**
We&sell&a&separate&tank&set&for&our&LQ39,&which&is&designed&to&fit&perfectly&into&the&fuselage.&&
Besides&individual&fuel&tank&systems,&this&is&the&most&recommended&soluHon&for&you.&&
The&main&tank&is&very&easily&installed&on&to&the&milled&wood&former&in&front&of&the&wing&tube.&A&fiberglass&pan&is&already&part&of&the&kit.&&
The&tank&is&simply&secured&with&two&strips&of&velcro.&

Hopper*tank*assembly*
If&you&purchased&the&CARF&tank&set&you’ve&got&everything&you&need&to&assemble&the&two&tanks.&
Use&a&very&short&6mm&festo&tube&for&the&clunk&line.&The&clunk&is&placed&in&the&cubic¢er&of&the&hopper,&it&is¬&designed&to&move&at&all.&&
For&the&breather&tube&(connecHon&to&the&main&fuel&tank)&use&a&piece&of&tygon&and&cut&&a&“V”&shape&to&the&end,&that&makes&sure&you&get&as&much&as&possible&air&out&during&refill&.&
The&wood&parts&of&the&hopper&tank&mount&are&self&explaining.&Glue&them&together&with&thick&CA&glue&and&mount&the&hopper&with&a&strip&of&Velcro.&

The&main&tank&can&&beassembled&with&our&supplied&hardware,&too.&&
OpHonally&you&can&use&your&own&metal&clunk&instead&of&our&felt&clunk.&We&generally&use&felt&clunks&because&they&guarantee&air&free&supply&from&the&main&tank&into&the&hopper&tank.&But&with&very&powerful&engines&some&worry&that&they&restrict&fuel&flow…&we&are&sure&that&there&is¬hing&to&worry&about.&
The&advantage&of&a&felt&clunk&is&that&you’ll&be&sure&there’s&a&leak&of&some&kind,&if&you&find&air&in&your&hopper&tank&aCer&a&flight.&
&Use&Tygon&fuel&tube&and&extend&the&breather&tube&like&you&did&on&the&hopper&tank.&make&sure&the&breather&tube&touches&the&inside&surface&of&the&tank&..*
NOTE:&The&supplied&felt&clunk&will&become&heavier&when&charged&with&fuel&and&will&easily&reach&all&areas&of&the&fuel&tank.&
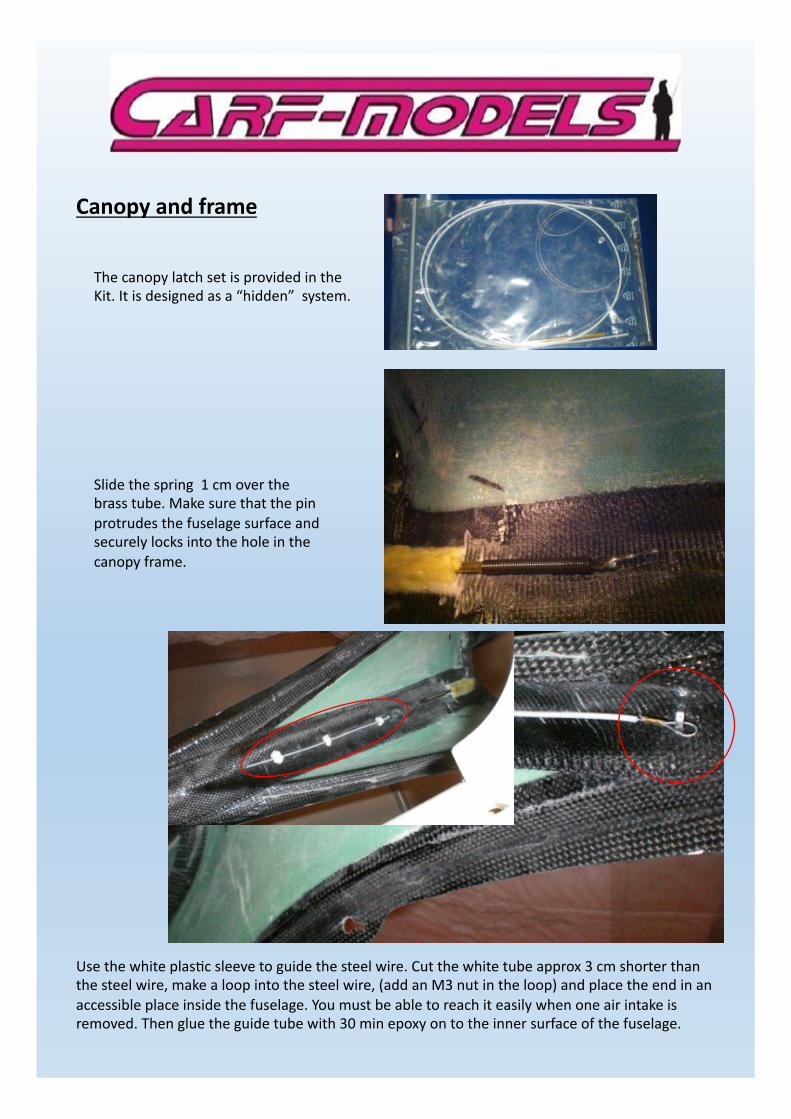
Canopy*and*frame**
The&canopy&latch&set&is&provided&in&the&Kit.&It&is&designed&as&a&“hidden”&&system.&
Slide&the&spring&&1&cm&over&the&brass&tube.&Make&sure&that&the&pin&protrudes&the&fuselage&surface&and&securely&locks&into&the&hole&in&the&canopy&frame.&
Use&the&white&plasHc&sleeve&to&guide&the&steel&wire.&Cut&the&white&tube&approx&3&cm&shorter&than&the&steel&wire,&make&a&loop&into&the&steel&wire,&(add&an&M3&nut&in&the&loop)&and&place&the&end&in&an&accessible&place&inside&the&fuselage.&You&must&be&able&to&reach&it&easily&when&one&air&intake&is&removed.&Then&glue&the&guide&tube&with&30&min&epoxy&on&to&the&inner&surface&of&the&fuselage.&

The&canopy&frame&has&all&work&done.&It&comes&completely&finished&with&all&locks,&tabs&and&slides.&It&fits&perfectly&on&the&fuselage.&You&just&have&to&cut&out&the&clear&canopy&and&glue&it&into&the&frame.&
The&easiest&will&be&if&you&split&the&canopy&in&3&pieces.&Start&with&the&front&part&and&work&towards&the&rear&because&you&have&always&access&through&the&next&opening,&and&the&rear&one&you&can&reach&through&the&air&intake&.&

Roughly&cut&the&front&and&rear&of&the&canopy&as&molded,&so&that&you&can&put&it&over&the&fuselage.&&
Fix&it&with&small&pieces&of&tape&and&mark&around&the&three&canopy&cutouts&.&Allow&&4&mm&excess&material&so&you&can&glue&it&later&from&the&inside&in&to&the&frame.&&
Cut&now&the&front&part&around&your&mark&.&Use&a&pair&of&short,&curved&scissors&or&a&diamond&disk&with&a&dremel.&Make&sure&the&room&is&warm,&or&warm&up&the&material&before&you&cut,&to&prevent&spliBng&or&cracking.&
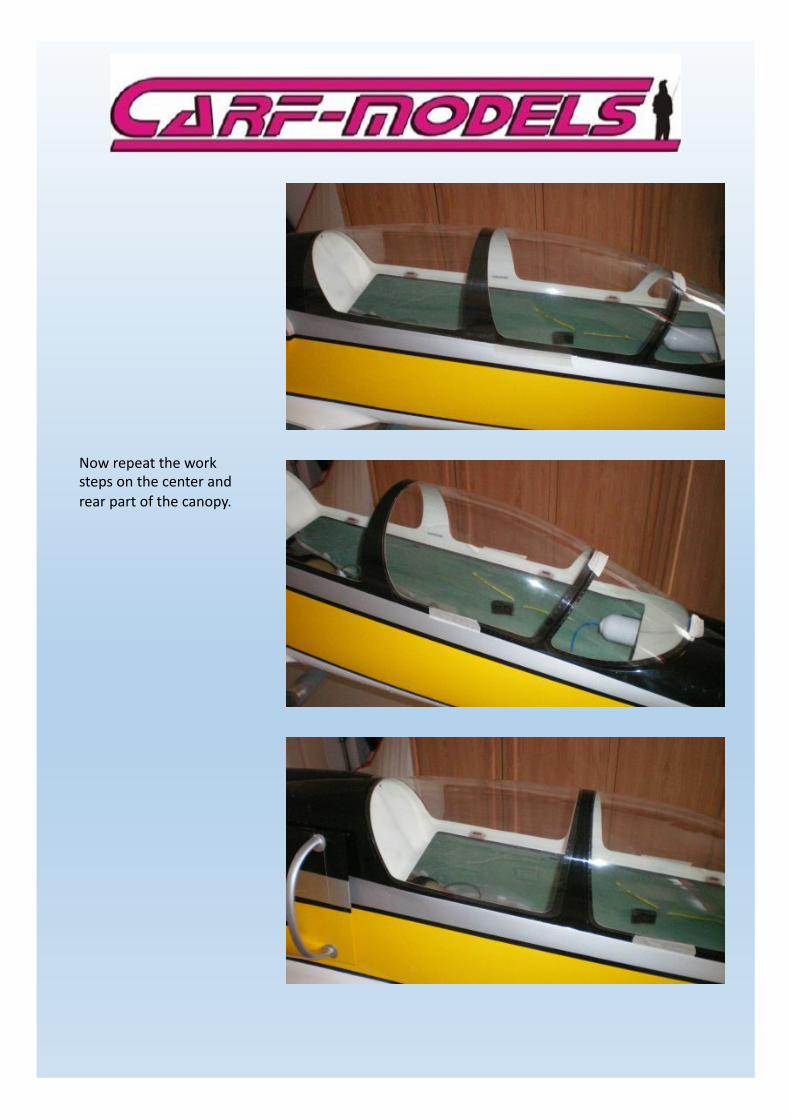
Now&repeat&the&work&steps&on&the¢er&and&rear&part&of&the&canopy.&&
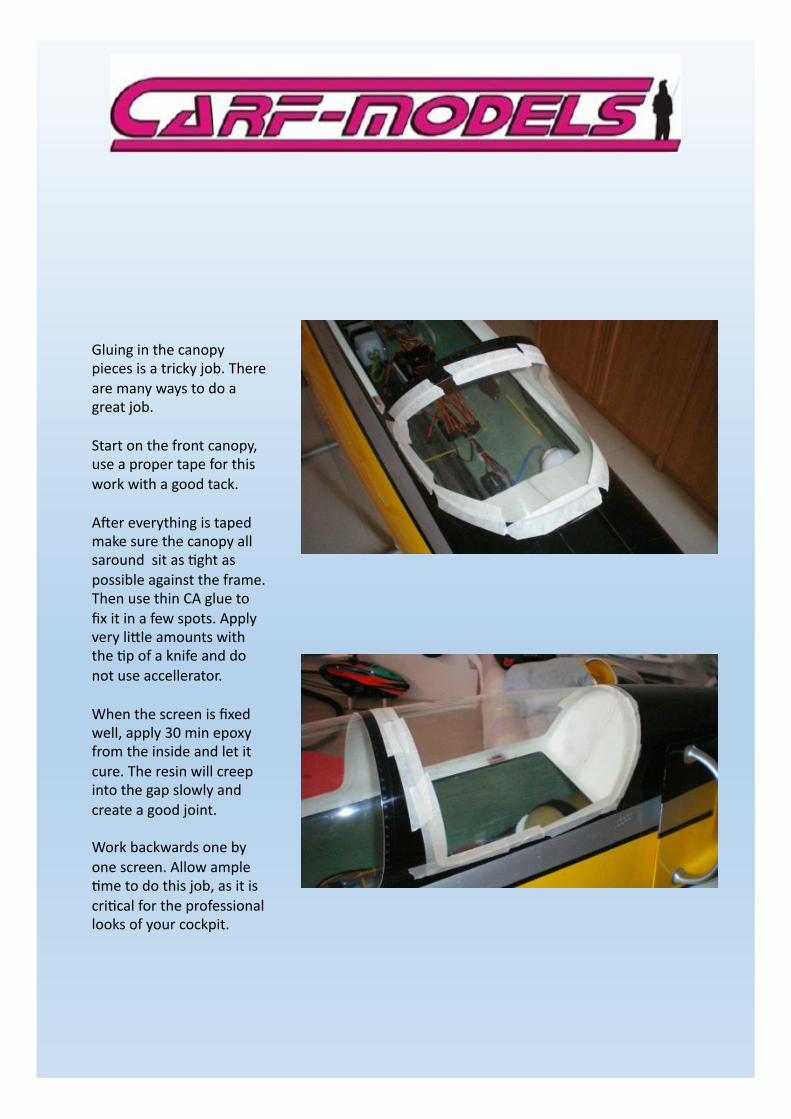
Gluing&in&the&canopy&pieces&is&a&tricky&job.&There&are&many&ways&to&do&a&great&job.&
Start&on&the&front&canopy,&use&a&proper&tape&for&this&work&with&a&good&tack.&&
ACer&everything&is&taped&make&sure&the&canopy&all&saround&&sit&as&Hght&as&possible&against&the&frame.&Then&use&thin&CA&glue&to&fix&it&in&a&few&spots.&Apply&very&liRle&amounts&with&the&Hp&of&a&knife&and&do¬&use&accellerator.&&
When&the&screen&is&fixed&well,&apply&30&min&epoxy&from&the&inside&and&let&it&cure.&The&resin&will&creep&into&the&gap&slowly&and&create&a&good&joint.&
Work&backwards&one&by&one&screen.&Allow&le&Hme&to&do&this&job,&as&it&is&criHcal&for&the&professional&looks&of&your&cockpit.&&

AlternaHvely&you&can&use&small&neodym&magnets&instead&of&the&tape.&&

Finally,&you&can&use&grey&or&&black&silicone&to&create&a&nice&filled&between&the&canopy&glass&and&frame.&Mask&the&glas,&cut&the&masking&tape¶llel&to&the&frame&with&a&very&sharp&knife,&in&a&distance&of&2Q3&mm.&Remove&the&tape&close&to&the&frame,&apply&the&silicone&with&a&very&thin&nozzle.&
Use&your&finger&and&form&a&nice&round&fillet.&Then&pull&the&tape&off,&make&sure&you&have&a&sharp&line&on&the&wind&screen&and&let&the&silicone&cure&overnight.&
Lastly,&next&day,&you&simply&can&rub&off&any&excess&silicone&from&the&fiberglass&canopy&frame.&&
We&provide&in&our&&kit&a&scale&frame&inlay.&It&will&be&very&difficult&to&get&it&inside&the&canopy&frame&in&one&piece.&So,&simply&cut&it&in&two&pieces&and&glue&it&in&as&shown&on&the&photo.&

Scale*Details*and*more*Pics***
All&those&naca&inlets&are&clearly&marked&on&the&surface&of&the&fuselage.&&Cut&them&out&carefully&and&glue&in&the&pre&painted&intakes&which&come&with&your&kit.&Cut&them&to&fit&and&glue&them&from&inside.&

Balancing**
The&final&weight&of&you&L39&Albatros&will&vary&depending&on&your&equipment/turbine&choice&&and&the&amount&of&scale&detail&you&might&choose&to&add.&We&guarantee&that&the&plane&can&be&build&below&20&kg&dry&weight&with&our&producHon&cockpit,&which&can&be&ordered&as&an&accessory.&
However,&if&you&are¬&careful,&you&can&easily&end&up&being&1Q2&kg&too&heavy.&Don’t&give&up&if&you&need&to&keep&the&weight&limit,&you&will&find&areas&where&you&can&save&weight,&if&you&end&up&a&bit&too&heavy.&
The¢er&of&gravity&is&quiet&easy&to&check&,&just&use&the&jig&which&we&provide&in&our&kit&&Check&it&with&full&hoper&tank&but&empty&main&tank&and&extended&landing&gear.&
We&have&listed&below&the&control&movements&recommended&to&fly&the&aircraC.&Different&&pilots&someHmes&prefer&a&different&feel&but&you&will&find&your&personal&seBng&using&these&deflecHons&&as&a&starHng&point.&
Aileron*********+*40mm**[*25mm***********30*[*40%*Expo******
Elevator*******+*32mm**[*26mm******************55*%*Expo*********For*Landing*+*43*mm**[*26mm*
Ruder***********+/[*75*mm************************25[30%*Expo**
Flap*************Take*Off**(step*1)**[*62mm************Landing*(step*2)***[*105mm*
No*Flap*to*Elevator*mix*necessary.*
All&measurements&are&related&to&the&root&trailing&edge&of&each&surface.&
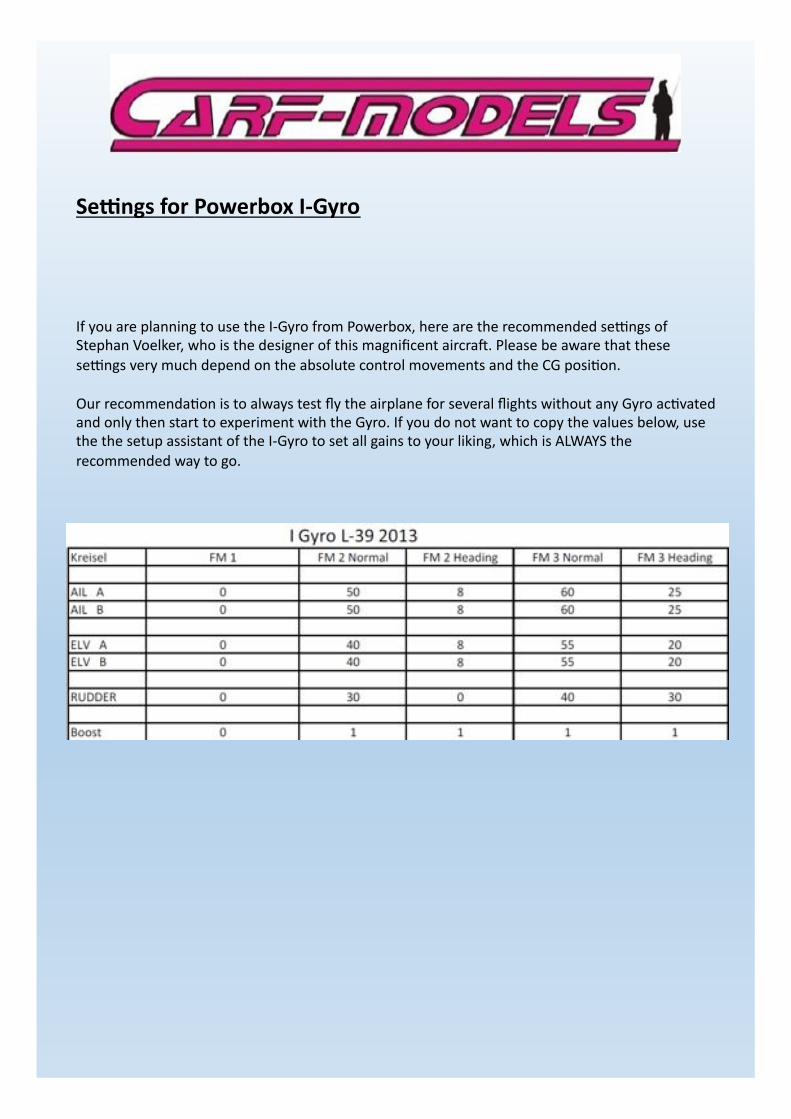
Senngs*for*Powerbox*I[Gyro*
If&you&are&planning&to&use&the&IQGyro&from&Powerbox,&here&are&the&recommended&seBngs&of&Stephan&Voelker,&who&is&the&designer&of&this&magnificent&aircraC.&Please&be&aware&that&these&seBngs&very&much&depend&on&the&absolute&control&movements&and&the&CG&posiHon.&&
Our&recommendaHon&is&to&always&test&fly&the&airplane&for&several&flights&without&any&Gyro&acHvated&and&only&then&start&to&experiment&with&the&Gyro.&If&you&do¬&want&to©&the&values&below,&use&the&the&setup&assistant&of&the&IQGyro&to&set&all&gains&to&your&liking,&which&is&ALWAYS&the&recommended&way&to&go.&