k_q-m200_e
DESCRIPTION
Minolta ManualTRANSCRIPT

Chapter 1 Preparations
Names of Parts
察 Mode select dial 拶 Power button 撮 Shutter button 擦 Lens 札 Selftimer LED 殺 Active AF sensor 薩 Viewfinder window 雑 Flash 皐 Flash adjustment sensor 鯖 Mode setup buttons 捌 Image quality mode button (QUALITY) 錆 Selftimer button 鮫 Flash mode button 皿 Photo mode button (MODE) 晒 Data display panel (LCD) 三 Power input terminal 傘 Serial port 参 Video port 山 Lens cover 惨 Battery cover 撒 Battery cover lock button 散 Tripod socket hole 惨 撒 散
山
察
拶
撮
擦
札
殺
薩
雑
皐
捌
錆
鮫
皿
鯖
晒
三
傘
参

○ * If foreign matter adheres to the active AF
sensor or the eye sensor, this may lead to malfunction of the sensor.
桟 Eye sensor 燦 Viewfinder LED 珊 Card access LED 産 Viewfinder eyepiece 算 LCD monitor 纂 LCD monitor power button (LCD POWER) 蚕 Menu button (MENU) 讃 Set/Zoom button (SET/ZOOM) 賛 Select button 酸 Card cover 餐 Strap eyelet 斬 Eject lock button 暫 Card eject button
蚕
讃
賛
酸
餐
斬
暫
桟
燦/珊
算
産
纂
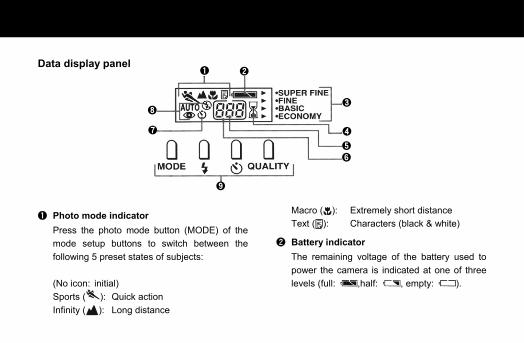
Data display panel
察 Photo mode indicator Press the photo mode button (MODE) of the mode setup buttons to switch between the following 5 preset states of subjects: (No icon: initial) Sports ( ): Quick action Infinity ( ): Long distance
Macro ( ): Extremely short distance Text ( ): Characters (black & white)
拶 Battery indicator The remaining voltage of the battery used to power the camera is indicated at one of three levels (full: ,half: , empty: ).
撮
擦
札
殺
雑
薩
皐
察 拶

撮 Image quality mode indicator Press the image quality mode button (OUALITY) of the mode setup buttons to switch the mode among the following 4 choices of image quality: FINE (Initial setting) SUPER FINE BASIC ECONOMY
擦 Sandglass indicator Flashes to indicate an ongoing access to the CompactFlash card (for writing shot images to the card or transferring them to a personal computer). Any other operation is disabled until the mark stops flashing.
札 Remaining frame count indicator Indicates the remaining number of frames that can be shot. "PC" appears when the camera is connected to a personal computer.
殺 Card status indicator Lights when a card is inserted and the eject lock button is locked. Goes off when the eject lock button is not locked or a card is not in position.
薩 Selftimer indicator Press the selftimer button ( ), a mode setup button, to use the selftimer mode. The selftimer indicator will appear on the data display panel.
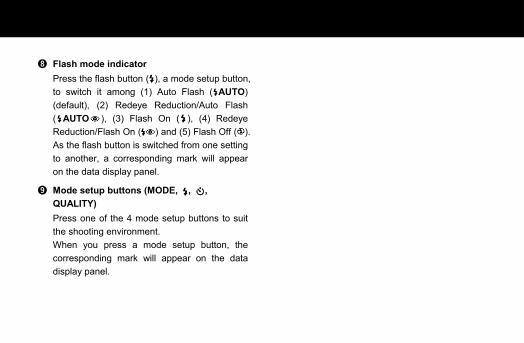
雑 Flash mode indicator Press the flash button ( ), a mode setup button, to switch it among (1) Auto Flash ( AUTO) (default), (2) Redeye Reduction/Auto Flash ( AUTO ), (3) Flash On ( ), (4) Redeye Reduction/Flash On ( ) and (5) Flash Off ( ). As the flash button is switched from one setting to another, a corresponding mark will appear on the data display panel.
皐 Mode setup buttons (MODE, , , QUALITY) Press one of the 4 mode setup buttons to suit the shooting environment. When you press a mode setup button, the corresponding mark will appear on the data display panel.
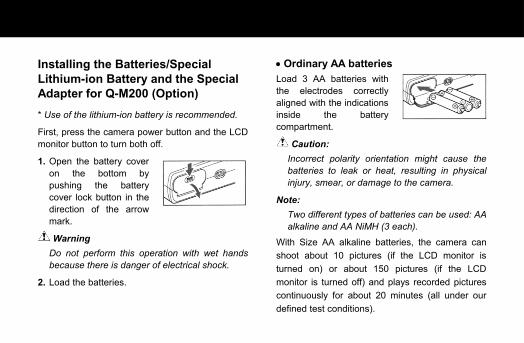
Installing the Batteries/Special Lithium-ion Battery and the Special Adapter for Q-M200 (Option) * Use of the lithium-ion battery is recommended.
First, press the camera power button and the LCD monitor button to turn both off.
1. Open the battery cover on the bottom by pushing the battery cover lock button in the direction of the arrow mark.
Warning Do not perform this operation with wet hands because there is danger of electrical shock.
2. Load the batteries.
• Ordinary AA batteries Load 3 AA batteries with the electrodes correctly aligned with the indications inside the battery compartment.
Caution: Incorrect polarity orientation might cause the batteries to leak or heat, resulting in physical injury, smear, or damage to the camera.
Note: Two different types of batteries can be used: AA alkaline and AA NiMH (3 each).
With Size AA alkaline batteries, the camera can shoot about 10 pictures (if the LCD monitor is turned on) or about 150 pictures (if the LCD monitor is turned off) and plays recorded pictures continuously for about 20 minutes (all under our defined test conditions).

• Lithium-ion battery (PX-LB1) Load the battery with the label facing upward and with the plus and minus electrodes positioned as shown in the diagram.
3. After making sure that the batteries are correctly loaded, close the battery cover positively until it clicks into position.
Note: Battery replacement is indicated when only the right half of the Battery indicator in the data display panel is displayed. Replace all three AA batteries at the same time. It is recommended that spare batteries be carried on trips.
• AC adapter (Option: PX-AC1/PX-AC2)
Connect the AC adapter to an AC power outlet. Next, connect the power cable of the AC adapter to the power input terminal of the camera.
Handling the AC Adapter • Be sure to read Safety Considerations and the
instructions supplied with the AC adapter. • Use an AC adapter of the specified type
(PX-AC1/PX-AC2). Use of a nonstandard AC adapter might cause the camera to fail or fire or to develop electrical shock hazards.

Inserting/Ejecting Compact Flash (CF) card CF card applications and handling ● CF cards can be used to store photographic
images and to transfer data to a personal computer (see Transferring Image Files to a Personal Computer). Refer to CompactFlash (CF) cards concerning handling.
Preparation ● Make sure that the lens cover is closed and that
the LCD monitor is turned off to prevent damaging the camera and CF card when the power is turned on.
Inserting the CF card Position the CF card with the Konica label facing the rear of the camera and insert the CF card fully by pushing in the direction indicated by the ▲ mark on the label.
Ejecting the CF card Hold the eject lock button downward and slide the card eject button to the left side.
(At Insertion/Ejection) * The card access LED lights while shot images are being written to the CF card. Never eject the CF card while the lamp is on. Writing would be interrupted, resulting in possible malfunctioning.

(At Insertion) * Inserting the CF card in the wrong direction would cause damage to the connector.
(At Ejection) * If the CF card won't eject easily when you press the eject lock button and slide the card eject button, push in the CF card once again and then slide the card eject button while pressing the eject lock button strongly.
* If you slide the card eject button with the CF card slot facing down, the card could pop out. Be careful not to let it drop.
* Turn the power off before inserting or ejecting a CF card. If you press the eject lock button while the card access LED is lighting, the access to the CF card would be interrupted, resulting in possible malfunctioning.

Installing the Strap
1. Pass the narrow short end of the strap through the strap eyelet on the right side of the camera. Use a sharp pointed ob-ject as an aid for passing the strap when this is difficult.
2. Pass the long end of the strap through the loop formed by the short end and pull the long end to tighten.
Warning: When carrying the camera with the strap at-tached to it, be careful not to let it wrap around your neck. Particularly avoid hanging the cam-era on to an infant or child's neck. The strap could wrap around their neck, choking them. * When carrying the camera by hanging it by the strap, be careful not to hit it against objects.
* There is possibility of dropping the camera while attaching the strap. This could result in damage or malfunction; therefore, place the camera in a stable position while installing the strap.

Setting the Date and Time
Set the date and time when using the camera for the first time after purchase. Setting is possible from January 1, 1970 to December 31, 2037. In this example, set the date and time from Janu-ary 1, 1999 (0:00) to September 3, 2000 (10:30). Note:
* The date and time settings are powered by the backup battery and are not lost when the cam-era batteries are replaced. The life of the backup battery is about 2 years.
1. Make sure that fully charged batteries are loaded or the AC adapter is connected.
2. Set the mode select dial
to SET UP and then press the power button. The LCD monitor will light and the setup screen will appear with “Format” selected. (*1)
Notes: * When the power button is pressed for the first time after purchase, step 4 of the date and time setting screen will appear.
* When the power is already turned on with Playback ( ) or Photo ( ), set the mode select dial to set up (SET UP) to cancel these 2 modes the LCD monitor will light automatically.

3. Press the select button ( ) once and select “Set Date & Time”. If any item other than “Set Date & Time” has al-ready been selected, either press the select button ( ) again to re-select or press the select button ( ) and return to the previous item. (*2)
4. Press the Set/Zoom button. “Year” is selected, so press the select buttons ( , ) to switch “Year”. To end after setting or changing only the year, press the Set/Zoom button (go to step 9).
5. Press the select button ( ) and select “Month”. Now press the select buttons ( , ) and select the “Month”.

6. Press the select button ( ) and select “Date”. Now press the select buttons ( , ) and select the “Date”.
7. Press the select button ( ) and select “Time”. Now press the select buttons ( , ) and select the hour and minute.
8. Press the Set/Zoom button to switch to the setting item check screen.

9. Press the select buttons ( , ) and select either “YES” or “NO”. Select “YES” and press the Set/Zoom button to save the settings and return to the screen in step 3. Select “NO” and press the Set/Zoom button to return to the setup screen in step 3 without saving the settings.
*1: If the menu button is pressed before selecting the settings in steps 4 through 8, the settings will become invalid and the setup screen in step 2 will return.
*2: In steps 4 through 8, the “Month” “Date” and “Time“ settings can be re-selected by pressing the select buttons ( , ).

Chapter 2 Basic Photography
Basic Photography
Holding the camera ● Hold the camera firmly in
both hands and press the elbows against the body for added stability.
● When taking vertical shots while using the flash, hold the camera so that the flash is at the top.
○ Be careful to avoid placing the fingers or strap, etc., in front of the flash or lens.
Viewfinder and LED For normal picture taking, position the subject within the viewfinder and focus on the circle located to the left of in the center of the viewfinder. When shooting at close range (about 40 cm) posi-tion the subject as indicated by the slanted lines in the diagram to the right and focus on the circle located to the right of in the center of the viewfinder. For details, see Macro (Close-up) Photography (10-30 cm).
View finder LED Card access LED
Range of close-range shooting and focus frame

The meaning of the viewfinder LED/Card access LED located on the left side of the viewfinder is shown in the table below. Use this as reference for all operations.
*1 When the camera is in the macro mode, the
parallax warning will appear when looking through the viewfinder with the LCD monitor set to off and eye start set to ON.

Shooting a picture Normally, photographs are taken with the subject at distances of 0.3 m or more. When the distance to the subject is 0.1 m to 0.3 m, please refer to Macro (Close-up) Photography.
1. Make sure the CF card has been inserted.
2. Set the mode select dial on the top of the camera to Photo ( ).
Notes: * When the power is already turned on with Play-back ( ) or set up (SET UP), set the mode select dial to Photo ( ) to cancel these two modes and open the lens cover automatically.
3. Press the power button. The lens cover will open automatically.
○ * Do not open the lens cover by hand.
4. Look through the view-finder and compose the scene. Use the autofocus frame in the center of the viewfinder to focus. Now lightly press the shutter button. The viewfinder LED will light green and exposure and focus will be locked. When the subject being focused on is not in the center of the viewfinder, follow the instructions in Focus lock Photography in the following section.
Lightly press the shutter button.
Viewfinder LED (green)
POWER

Reference: * See Release Lock.
Note: When looking through the viewfinder, the sound of starting the eye start will be heard. However, this is not malfunction. (When the eye start is set to ON.)
5. Gently press the shutter button farther. When the beep sounds, taking of the photograph has been completed. Then, writing of the image to the CF card will start. The sand-glass mark in the data display panel will start blinking, indicating the image photographed has been written to the CF card and the card access LED will light amber at the same time.
○ * Never eject the CF card while the card access
LED is lit. Note:
The number displayed in the card status indi-cator of the data display panel indicates the number of shooting images to be left. The number of images may vary depending on the CF card remaining space and the images selected by the QUALITY button. * Replace the batteries with new ones when the
battery indicator in the data display panel shows “half” ( ).
6. Press the power button. The lens barrier will close automatically.
Press the shutter button farther.
Battery indicator
POWER
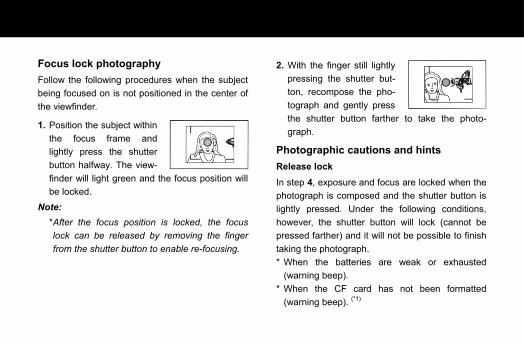
Focus lock photography Follow the following procedures when the subject being focused on is not positioned in the center of the viewfinder.
1. Position the subject within the focus frame and lightly press the shutter button halfway. The view-finder will light green and the focus position will be locked.
Note: * After the focus position is locked, the focus lock can be released by removing the finger from the shutter button to enable re-focusing.
2. With the finger still lightly
pressing the shutter but-ton, recompose the pho-tograph and gently press the shutter button farther to take the photo-graph.
Photographic cautions and hints Release lock In step 4, exposure and focus are locked when the photograph is composed and the shutter button is lightly pressed. Under the following conditions, however, the shutter button will lock (cannot be pressed farther) and it will not be possible to finish taking the photograph. * When the batteries are weak or exhausted
(warning beep). * When the CF card has not been formatted
(warning beep). (*1)

* When there is no available space remaining on the CF card (when “0” (remaining frame count) appears on the data display panel) (warning beep).
* While writing to the CF card is in progress (in-cluding compression).
* While the photographic mode ( ) setting is being changed.
* Before exposure and focus have been deter-mined.
* While an error message is displayed on the data display panel.
*1 Be sure to always format CF cards in the cam-era.
Camera-shake warning When camera-shake occurs while a photograph is being taken, the viewfinder LED will slowly blink red.
Eye start When eye start has been set to ON, operations up to when the shutter button is pressed halfway (not including focus) will be performed automatically when you hold the camera and look through the viewfinder.
Auto power-off function (Auto shut-Off) If the camera is not operated within a certain time after batteries are loaded, the camera power will be turned off automatically to conserve the batter-ies. (When the power is turned off, depending on the mode, the lens cover will close automatically or the LCD monitor will turn off.) The initial time setting for auto power-off is 3 min-utes, which you can change in the setup mode.

Remaining frame count The number of the remaining frames may not decrease depending on the subject photographed.
Note: * The auto power-off function operates even when the AC adapter is used.

Chapter 3 Advanced Photography
Using the Mode Setup Buttons
The 4 buttons (Photo mode, Flash mode, Selftimer and Image quality mode) on the top of the camera can be used to change the photographic settings. These settings can be checked using the icons displayed on the data display panel.
Photo Mode button (MODE) Subjects are classified into four categories: sports (rapidly moving subjects), infinity (distant subjects), macro (close-up subjects) and text (text, black & white) so that settings can be selected for the appropriate mode beforehand. The initial setting is “Standard”.
1. Set the mode select dial to Photo ( ).
Note: When the power is already turned on with Playback ( ) or set up (SET UP), set the
mode select dial to Photo ( ) to cancel these two modes and open the lens barrier automati-cally.
2. Press the power button. The lens cover will open automatically.
3. Press the Photo mode button (MODE) on the top of the camera and set the desired imag-ing mode. Each time this button is pressed, the icon on the data display panel will change accordingly in the following sequence: Standard (initial setting, no icon)→Sports [ ]→Infinity [ ] →Macro [ ]→Text [ ] →Standard . . .

Sports: Use to photograph rapidly moving subjects.
Infinity: Focus is fixed at infinity. Use to photograph scenery.
Macro: Used to focus at distances between 0.1 m and 0.3 m. Check the image on the LCD monitor before taking the photograph.
Text: Images are recorded in monochrome. Use to photograph text, etc.
4. Look through the viewfinder, compose the scene and lightly press the shutter button half-way. The viewfinder LED will light green, and both exposure and focus will be locked.
5. Press the shutter button fully. The beep will sound when the photograph has been taken.
Notes: * The selected mode will remain effective even when the power is turned off and then on again.
* The flash mode is turned off whenever the Photo mode (MODE) button is pressed and the above mode is selected. To use the flash, press the flash mode button.

Flash Mode Button It is possible to preset the flash for situations where it is anticipated that sometimes there may be insufficient light for normal photography. The flash range is 1.0 m-3.0 m. If the flash is used with subjects closer than this distance the photo-graph will be too light; if used beyond this range, the photograph will be too dark.
1. Set the mode select dial to Photo ( ). Note:
* When the power is already turned on with Playback ( ) or set up (SET UP), set the mode select dial to Photo ( ) to cancel these two modes and open the lens cover automati-cally.
2. Press the power button. The lens cover will open automatically.
3. Press the flash mode button ( ).
Each time this button is pressed, the data display panel will change as indicated below.
Auto Flash (initial Setting) [ AUTO] The camera senses the light conditions and deter-mines whether or not flash is necessary.
↓ Redeye Reduction/ Auto Flash [ AUTO ] The camera senses the light conditions and determines whether or not flash is necessary. Pre-flashes are fired before the main flash to re-duce the redeye effect.
↓

Flash On [ ] The flash fires for each photograph.
↓ Redeye Reduction/ Flash On [ ] Pre-flashes are always fired first to reduce the redeye effect, followed by the main flash to reduce the redeye effect.
↓ Flash Off [ ] The flash does not fire, regardless of the lighting conditions.
Notes: * Set for places where flash photography is for-bidden, night scenes, etc. In such cases, the shutter speed is slow and blurring can occur, so use a tripod.
* Blurring will occur with moving subjects.
4. Look through the viewfinder, compose the scene and lightly press the shutter button. The viewfinder LED will light green, and both exposure and focus will be locked.
5. Gently press the shutter button fully. The beep will sound when the photograph has been taken.
Notes: * The selected mode will remain in effect even when the power is turned off and then on again.
* The viewfinder LED lights red after a flash photograph is taken to indicate that the flash is charging. Wait until the viewfinder LED turns off before taking the next flash photograph.
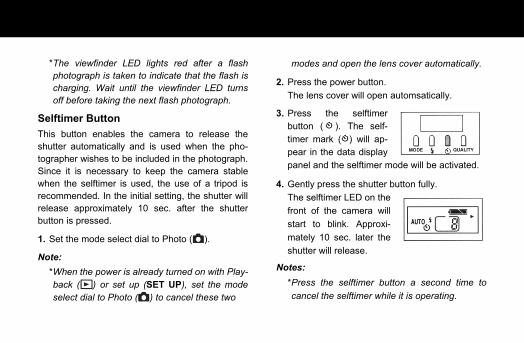
Selftimer Button This button enables the camera to release the shutter automatically and is used when the pho-tographer wishes to be included in the photograph. Since it is necessary to keep the camera stable when the selftimer is used, the use of a tripod is recommended. In the initial setting, the shutter will release approximately 10 sec. after the shutter button is pressed.
1. Set the mode select dial to Photo ( ).
Note: * When the power is already turned on with Play-back ( ) or set up (SET UP), set the mode select dial to Photo ( ) to cancel these two
modes and open the lens cover automatically.
2. Press the power button. The lens cover will open automsatically.
3. Press the selftimer button ( ). The self-timer mark ( ) will ap-pear in the data display panel and the selftimer mode will be activated.
4. Gently press the shutter button fully. The selftimer LED on the front of the camera will start to blink. Approxi-mately 10 sec. later the shutter will release.
Notes: * Press the selftimer button a second time to cancel the selftimer while it is operating.

* The selftimer is cancelled each time a photo-graph is taken; therefore, to continue using the selftimer, it is necessary to press the selftimer button again.
* The timer operating time can be set to either 10 sec. (initial setting) or 3 sec. in the setup mode.
Image Quality Mode (QUALITY) The image quality mode button is used to select any of four qualities of image data for photographs. The currently selected quality can be checked using the data display panel.
1. Set the mode select dial to Photo ( ). Note:
* When the power is already turned on with Play-back ( ) or set up (SET UP), set the mode select dial to Photo ( ) to cancel these two modes and open the lens cover automatically.
2. Press the power button. The lens cover will open automatically.
3. Press the image quality mode button. Each time the image qual-ity mode button is pressed, the data display will change as follows.
[FINE] (Initial setting) ② [SUPER FINE] ① [ECONOMY] ④ [BASIC] ③

4. Look through the viewfinder, compose the scene and lightly press the shutter button half-way. The viewfinder LED will light green, and expo-sure and focus will be locked.
5. Press the shutter button further. A beep will sound when the photograph has been taken.
Note: * The selected mode will remain in effect even when the power is turned off and then on again.
Image quality mode and number of shooting The numerical values in the table below show the number of images shot in the same quality mode. The number of images may vary when there are files other than images and when each photograph
is taken with a different quality or a photographic mode. The number of images may also vary depending on the type of subject photo-graphed.
Note: Image quality mode and image size

Image quality mode and displays When images photographed in the above modes are played back, the four modes will be displayed in the center of the LCD monitor as follows.
[SUPER FINE] → [SFI] [FINE] → [FIN] [BASIC] → [BSC] [ECONOMY] → [ECM]

Macro (Close-up) Photography
* Use of a dedicated lithium-ion battery (supplied) is recommended.
* With Size AA alkaline batteries, the camera can shoot about 10 pictures (if the LCD monitor is turned on) or about 150 pictures (if the LCD monitor is turned off) and plays recorded pictures continuously for about 20 minutes (all under our defined test conditions).
Macro (Close-up) photog-raphy means any photog-raphy performed within the distance range of 0.1 m-0.3 m from the lens.
1. Set the mode select dial to Photo ( ).
Note: * When the power is already turned on with Playback ( ) or set up (SET UP), set the mode select dial to Photo ( ) to cancel these two modes and open the lens cover automati-cally.
2. Press the power button. The lens cover will open automatically.
3. Set the Photo mode button of the mode setup buttons to Macro ( ).
Please refer to Photo Mode
Button (MODE) concerning the method used to set the Photo mode button.
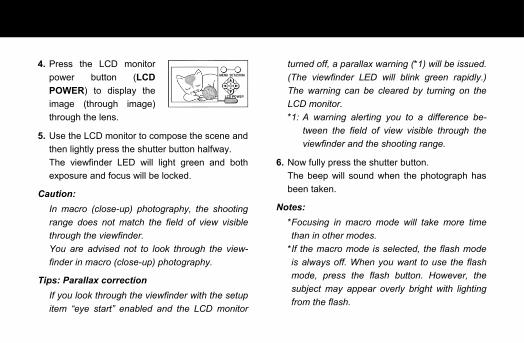
4. Press the LCD monitor power button (LCD POWER) to display the image (through image) through the lens.
5. Use the LCD monitor to compose the scene and then lightly press the shutter button halfway. The viewfinder LED will light green and both exposure and focus will be locked.
Caution: In macro (close-up) photography, the shooting range does not match the field of view visible through the viewfinder. You are advised not to look through the view-finder in macro (close-up) photography.
Tips: Parallax correction If you look through the viewfinder with the setup item “eye start” enabled and the LCD monitor
turned off, a parallax warning (*1) will be issued. (The viewfinder LED will blink green rapidly.) The warning can be cleared by turning on the LCD monitor. *1: A warning alerting you to a difference be-
tween the field of view visible through the viewfinder and the shooting range.
6. Now fully press the shutter button. The beep will sound when the photograph has been taken.
Notes: * Focusing in macro mode will take more time than in other modes.
* If the macro mode is selected, the flash mode is always off. When you want to use the flash mode, press the flash button. However, the subject may appear overly bright with lighting from the flash.

* You may experience difficulty focusing in the following instances. • In an excessively dark place where the sub-
ject becomes overly dark. • Objects with little or no contrast (such as
skies, white walls, and car hoods)

Using the Digital 2 × Zoom Function
* Use of a dedicated lithium-ion battery (supplied) is recommended.
* With Size AA alkaline batteries, the camera can shoot about 10 pictures (if the LCD monitor is turned on) or about 150 pictures (if the LCD monitor is turned off) and plays recorded pictures continuously for about 20 minutes (all under our defined test conditions).
The digital 2× zoom is used to enlarge the stan-dard image size two times (*1). Image quality may be adversely affected when this function is used. *1: Equivalent to 76 mm on a 35 mm camera.
1. Make sure the CF card is loaded.
2. Set the mode select dial on the top of the cam-era to Photo ( ).
Note: * When the power is already turned on with Playback ( ) or set up (SET UP), set the mode select dial to Photo ( ) to cancel these two modes and open the lens cover automati-cally.
3. Press the power button. The lens cover will open automatically.
4. Press the LCD monitor power button (LCD POWER). The image passing through the lens (called a “Through Image”) will appear.
Through image

5. Press the Set/Zoom button once. The image will be enlarged two times. Press the Set/Zoom button again to return the image to the stan-dard size. While zoom is set, the periphery of the monitor will be displayed in blue.
6. Look through the viewfinder, compose the scene and lightly press the shutter button half-way. The viewfinder LED will light green, and expo-sure and focus will be locked.
Caution * Setting zoom while 4-frame continuous shoot-ing mode is selected will cancel 4-frame con-tinuous shooting mode and return to normal photographic status.
7. Gently press the shutter button fully. When the beep sounds, taking of the photo-graph has been completed. Then, writing of the image to the CF card will start. The sandglass mark in the data display panel will start blinking, indicating the image photographed has been written to the CF card and the card access LED will light amber at the same time.
Note: The continuous shooting function and digital 2× zoom function cannot be used at the same time.
Set/Zoom button
Set/Zoom button
Set/Zoom button 1.0× → 2.0× → 1.0× → ...

Setting the Photographic Conditions (Entering the Menu Mode)
* Use of a dedicated lithium-ion battery (supplied) is recommended.
* With Size AA alkaline batteries, the camera can shoot about 10 pictures (if the LCD monitor is turned on) or about 150 pictures (if the LCD monitor is turned off) and plays recorded pictures continuously for about 20 minutes (all under our defined test conditions).
In addition to the mode select buttons on top of the camera, the LCD monitor on the back of the camera can also be used to set the photographic conditions.
Exposure compensation, single/continuous shoot-ing and LCD monitor brightness can be set from the LCD monitor.
1. Set the mode select dial to Photo ( ).
Note: * When the power is already turned on with Playback ( ) or set up (SET UP), set the mode select dial to Photo ( ) to cancel these two modes and open the lens cover automati-cally.
2. Press the power button. The lens cover will open automatically.
3. Press the LCD monitor power button (LCD POWER). The through image will appear on the LCD monitor.
4. Press the menu button once to enable menu selection (“Set Camera Exposure” setting screen).

Adjusting the Exposure (Set Camera Exposure Menu)
Using the 4-frame Continuous Shooting Mode
Adjusting the Brightness of the LCD Monitor
5. Press the select ( / ) buttons to change the
mode.
The Basic Keys ● To enter the menu mode (within the broken
lines) to change the mode. →Press the menu button.
● To exit the menu mode (within the broken lines) (return to the through image screen without saving the menu changes). →Press the menu button.
* The broken lines on the following pages corre-spond to the above explanations.
(LCD monitor off)
Menu button
LCD monitor button (LCD
POWER)
Through image

* When the menu button is pressed from the through image to activate the menu select mode (within the broken lines), the icon indi-cating the menu area will appear at the top of the monitor and the selected menu will be highlighted. In this Photo menu, “Set Camera Exposure” menu (left side) → “Continuous shooting” menu (center) →“Set Screen Con-trast” menu (right side) are highlighted in that sequence.

Adjusting the Exposure (Set Camera Exposure Menu)
Exposure adjustment is used to consciously brighten or darken images. When the LCD monitor is on, the exposure can be adjusted ±1.5EV in 0.3EV steps.
1. Set the mode select dial to Photo ( ).
Note: * When the power is already turned on with Playback ( ) or set up (SET UP), set the mode select dial to Photo ( ) to cancel these two modes and open the lens cover automati-cally.
2. Press the power button. The lens cover will open automatically.
3. Press the LCD monitor power button (LCD POWER). The through image will appear on the LCD monitor.
Caution: * Always turn on the LCD monitor before at-tempting to adjust the exposure.
Set/ Zoom button
Set/ Zoom button
Set Camera Exposure icon
Through image
Through image

4. Press the menu button once to enable mode selection (“Set Camera Exposure” setting screen). The “Set Camera Exposure” icon is highlighted in the upper left corner of the LCD monitor screen, with the through image appearing still.
5. Press the Set/Zoom button once. The exposure adjustment bar will appear at the bottom of the screen. Standard exposure is with the cursor in the center of the bar.
6. Press the select buttons ( , ) to adjust the exposure. * Press the button to set exposure to the minus side and darken the image. Use with colors with low intensity to enhance the effect.
* Press the button to set exposure to the plus side and brighten the image. Use to adjust the exposure with backlighting.
7. Press the Set/Zoom button to return to the through image. The through image will be displayed showing the effects of the exposure compensation.
To change the exposure again, press the menu button, press the Set/Zoom button and repeat steps 6 and 7.
Notes: * All exposure compensation values will return to the initial settings when the power is turned off and then on again.
* Any differences may be difficult to detect after exposure compensation when the subject is in a dark place. In such cases, take several photographs with different exposure compensation settings and select the most suitable image by displaying on a TV set or personal computer screen.

Using the 4-frame Continuous Shooting Mode (Continuous shoot-ing menu) * ECONOMY mode only.
In the 4-frame continuous shooting mode, 4 con-secutive photographs can be taken with 3 different intervals (L: Low, N: Normal, H: High) between them. When played back, all four photographs are displayed on the LCD monitor at the same time.
“Continuous shooting menu” icon
Set/ Zoom button
Set/ Zoom button
Standard mode
Through image
Set/Zoom button
Set/Zoom button
Through image
Set/Zoom button
Low-speed mode
Medium-speed mode
High-speed mode

Display during playback
1. Set the mode select dial to Photo ( ).
Note: * When the power is already turned on with Playback ( ) or set up (SET UP), set the mode select dial to Photo ( ) to cancel these two modes and open the lens cover automati-cally.
2. Press the power button. The lens cover will open automatically.
3. Press the LCD monitor power button (LCD POWER). The through image will appear on the LCD monitor.
Caution Always turn the LCD monitor on when selecting the 4-frame continuous shooting mode.
4. Press the menu button once to enable menu selection (“Set Camera Exposure” setting screen). The through image will become a still image.
5. Press the select buttons ( , ) and, change to the “Continuous shooting” menu. The 4-frame continuous shooting menu icon will be displayed highlighted in the upper center part of the LCD monitor.
6. Press the Set/Zoom button once. The 4-frame continuous shooting mode icon will appear in the center of the LCD monitor. Among the 4 modes (Standard →Low-speed→Medium-speed→High-speed); the currently se-lected mode will appear in highlighted. The standard mode (not the continuous shooting mode) will be displayed with the initial setting. The intervals are low-speed (L;2 frames/sec.),

medium-speed (N;3 frames/sec.) and high- speed (H;4 frames/sec.).
7. Press the select buttons ( , ) and change to the 4-frame continuous shooting mode.
8. Press the Set/Zoom button to return to the through image. The through image frame will be displayed in yellow, except in the standard mode.
To change the setting mode again, repeat steps 4 through 7.
Notes: * The 4-frame images will be saved in 640 (W) × 480 (H) pixels size. During playback, these images will appear as shown on the previous page.
* The 4-frame continuous shooting function and digital 2× zoom function cannot be used at the same time.
* If the 4-frame continuous shooting mode is set when zoom has been selected, the zoom set-ting will be canceled.
* The 4-frame continuous shooting mode re-mains valid until the LCD monitor is turned off. When turning the LCD monitor on, the setting returns to default (Standard photo mode).

Adjusting the Brightness of the LCD Monitor
The brightness of the LCD monitor can be ad-justed in accordance with the brightness of the surroundings.
1. Set the mode select dial to Photo ( ).
Note: * When the power is already turned on with Playback ( ) or set up (SET UP), set the mode select dial to Photo ( ) to cancel these two modes and open the lens cover automati-cally.
2. Press the power button. The lens cover will open automatically.
3. Press the LCD monitor power button (LCD POWER). The through image will appear on the LCD monitor.
Caution Always turn the LCD monitor on when adjusting the brightness of the LCD monitor.
“Brightness adjustment menu” icon
Set/ Zoom button
Through image
Through image
Set/ Zoom button
Set/ Zoom button
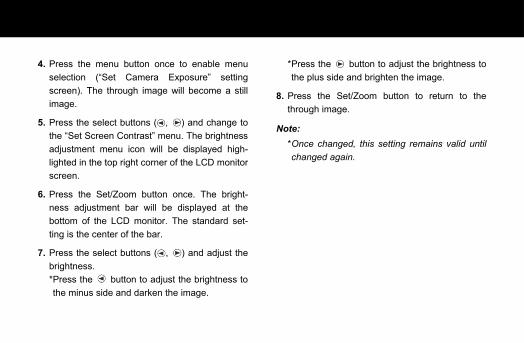
4. Press the menu button once to enable menu selection (“Set Camera Exposure” setting screen). The through image will become a still image.
5. Press the select buttons ( , ) and change to the “Set Screen Contrast” menu. The brightness adjustment menu icon will be displayed high-lighted in the top right corner of the LCD monitor screen.
6. Press the Set/Zoom button once. The bright-ness adjustment bar will be displayed at the bottom of the LCD monitor. The standard set-ting is the center of the bar.
7. Press the select buttons ( , ) and adjust the brightness. * Press the button to adjust the brightness to the minus side and darken the image.
* Press the button to adjust the brightness to the plus side and brighten the image.
8. Press the Set/Zoom button to return to the through image.
Note: * Once changed, this setting remains valid until changed again.

Chapter 4 Basic Playback
Setting to the Playback Mode The following explains display of photographed images on the LCD monitor, frame advance, viewing the monitor display and zoom playback.
1. 2.
3. 4.
5.
1. 察 Set the mode select button to playback ( ) and press the power button.
2. * The frame number of the displayed image (“No.25” in the example) is displayed in the lower right corner of the monitor screen.
The frame number is given in serial order to the images that can be played back with this camera. If the image is erased, etc., the frame number will be given again. The last frame photographed is displayed when the power button is turned on for the first time.
3. Image number Example: 100-0025
Directory File number number
The directory number and the file number recorded on the CF card are displayed. These numbers are unique registration numbers assigned to each individual image and are used for creating Auto-matic image print files (see Notes 1 and 2).
4. Switching photographic images 拶-1 Press the select buttons ( , ) to display
the images before and after the current im-age as thumbnails (the previous image is to the left, the next image to the right). The frame number is also displayed (only on the LCD monitor screen).
拶-2 If the select buttons ( , ) are not pressed for 2-3 sec., this screen will be displayed and the image number (the directory number and file number) will appear in the upper left cor-ner of the screen and the date photographed

will appear in the upper right corner of the screen.
撮-1 The image number and date photographed will disappear if the buttons are not pressed within 2-3 sec.
Playback with zoom 撮-2 Each time the Set/Zoom button is pressed,
the image will be enlarged consecutively in the sequence 2× → 4× → 1× → 2×...
擦 The display position can be changed with the select buttons ( , , , ).
● When there is no image file on the CF card and when the CF card is not loaded into the cam-era, the message “No Picture in camera” will appear on the screen when the power button is pressed (see Note 3).
5. Image quality Mode The image quality mode shows the type of quality in effect when the image was taken (see Note 4).
Note 1: This camera conforms to “Design rule for Camera File system” specifications and can playback basic image files. (Basic image files recorded with a non-Konica digital camera (conforming to the “Design rule for Camera File system” secifica-tions) can also be played if a CF card is used as a memory card.) It can also playback image files recorded with the Konica digital cameras Q-M100 and Q-M100V. In this case, the image num-bers will be displayed as DSC*****.

Note 2: The image number is usually displayed in yellow. The image number of basic image files recorded with the products of other companies is displayed in red. If the im-age numbers appeared, it means that some functions (such as erasure and ro-tation) are disabled.
Note 3: A maximum of 1,000 image files can be played back with this camera. If there are more than 1,000 image files on the CF card, playback may not be possible in some cases.
Note 4: SFI (‘SUPER FINE’). FIN (‘FINE’'), BSC ('BASIC') or ECM (‘ECONOMY’) will al-ways be displayed. In the case of image files recorded with the products of other companies, there will either be no display or THM (in the case of thumbnail substi-tute playback) may be displayed in some
cases; this “THM” usually is displayed in blue, however, thumbnail images that do not conform to “Design rule for Camera File system” specifications will be dis-played in red. When the image quality mode is not dis-played or the “THM” is displayed, it means that some functions (such as erasure and rotation) are disabled.
Note 5: * Use of a dedicated lithium ion battery (supplied) is recommended.
* With Size AA alkaline batteries, the camera plays recorded pictures con-tinuously for about 20 minutes (all un-der our defined test conditions).

Displaying Images on a TV Set
The video output cord provided can be used to display images on a TV set; however, images cannot be displayed on a TV set and the LCD monitor at the same time.
Preparations Make sure that the CF card containing the images is inserted into the camera and that a bat-tery/batteries is/are loaded or the AC adapter is connected.
1. Connect the supplied video output cord to the video output terminal of the camera and the video input terminal of the TV set.
Next, turn on the TV set power and switch the input to video.
2. Set the mode select dial to playback ( ) and then press the power button. The last image recorded will appear on the screen of the TV set. Use the select button to change images.
* The message “No Picture in camera” is dis-played if a CF card is not inserted or no im-age has been recorded.
3. Press the power button of the camera to turn off the camera power to interrupt TV playback.
To video output terminal
To video input terminal

Icon display on the TV screen ● The following function restrictions apply during
TV screen displays. * Dates photographed and image numbers are not displayed.
* Only 4 functions can be selected: erase, pro-tect setting, index playback and slide show playback. Select all other functions after returning to LCD monitor display.
○ Caution
* Do not connect or disconnect the cord to or from the video output terminal while making a setting. That setting would be disabled.
* Do not connect or disconnect the cord to or from the video output terminal while the card access LED is flashing. Damage to the CF card could result.
● As with the LCD monitor of the camera, 2× and 4× zoom playback is also possible on the TV screen.
● If the video output cord is disconnected during TV screen playback, playback on the TV screen will switch to the LCD monitor. In this case, the last frame recorded will be displayed, regard-less of the frame being displayed on the TV screen.
Protect data
Image quality mode
Frame number
Select by operating the select buttons.
Menu display (protect setting,erase,index playback)
Menu display (side show playback)

● Time may be required for switching the play-back on the TV screen or on the LCD monitor when the video output cord is connected or disconnected during index playback.

Chapter 5 Application Playback
The Playback Menus
There are eight playback mode menus, as shown below. Refer to the respective pages concerning the settings. The following explains
how to access the various menus.

1. Set the mode select dial to Playback ( ).
2. With the LCD monitor off, press the power button. * The playback image will appear. * The frame number of the image will appear in the lower right part of the monitor (No.25 in this example).
* 2-3 sec. later the image number (directory number, file number) will appear in the upper left corner of the monitor and the date and time photographed will appear in the upper right corner of the monitor and the image quality mode will appear in the bottom center (①). Approx. 2-3 sec. later the image registration number and the date and time photographed will disappear (②).
3. Press the menu button once from either ① or ②. The erase menu will be displayed.
4. Press the select buttons ( , ) to switch the menus consecutively. Press the menu button while switching to return to the standard playback screen (②).

Displaying Multi Images at the Same Time (Index Playback)
This function is used to display nine images at the same time on the LCD monitor, and also it is used to access the desired image rapidly. Press the select buttons ( , )from the menu display screen to select the index playback menu screen ( ).
1. Press the Set/Zoom button to display the index menu screen. * The image displayed before the Set/Zoom button is pressed is located in the upper left corner with a bold frame.
* Nine frames can be arranged in sequence for display.
Set/ Zoom button
Set/ Zoom button
Set/ Zoom button
Set/ Zoom button
Standard playback
Standard playback
Standard playback

2. Use the select buttons ( , , , ) to select an image to be displayed. * Press the menu button to cancel index screen selections.
3. Press the Set/Zoom button to return to the standard playback screen. * 2-3 sec. later the image number (directory number, file number) will appear in the upper left corner of the monitor and the date and time photographed will appear in the upper right corner of the monitor screen and the image quality mode will appear in the bottom center. Approx. 2-3 sec. later the image number and the date and time photographed will disappear.
Playing Back A Slide Show
This function is used to playback and check im-ages consecutively at a fixed interval. Press the select buttons ( , ) from the menu display screen to select the slide show menu screen ( ).

1. Press the Set/Zoom button. * The images will be displayed consecutively at intervals of approximately 3 sec. (the slide show will start).
* The frame numbers will be displayed consecu-tively in the lower right corner of the screen.
* The menu will again appear 2-3 sec. after all of the images have been displayed.
* Pressing the menu button during a slide show cancels the slide show and returns to the standard playback screen with the image pre-sent when the menu button was pressed, or the next image.
Set/Zoom button
Menu button
Standard playback
Standard playback
Menu button
Approx 3sec later
Approx 3sec later
Last screen
Standard playback
Menu button

Protect Setting for Important Images
Images can be protected to prevent them being deleted. Protected images are not deleted acci-dentally even if an attempt is made to delete all images. Press the select buttons ( , ) from the menu display screen to select the image protect menu screen ( ).
●To protect an image for the first time
1. Press the Set/Zoom button. * The protect icon ( ) will appear in the lower left corner of the screen.
●To remove protection
1. Press the Set/Zoom button.
* The protect icon ( ) will disappear from the lower left corner of the screen. * Images photographed with a digital camera
other than the Q-M200 cannot be protected or unprotected.
Set/Zoom button
Set/Zoom button

Adjusting the Brightness of the LCD Monitor
press the select buttons ( , ) from menu dis-play screen to select the brightness adjustment mode menu screen ( ).
1. Press the Set/Zoom button to display the brightness adjustment menu screen. * An adjustment bar appears at the bottom of the LCD monitor screen.
2. Press the select buttons ( , ) to adjust the brightness. * Press the select button ( ) to darken the monitor (negative direction) or press the select button ( ) to brighten the monitor (positive di-rection).
* To cancel the brightness adjustment on the brightness adjustment menu screen, press the menu button.
3. Press the Set/Zoom button to save the bright-ness setting.
Note: * Once changed, this setting remains valid until changed again.
Set/ Zoom button
Standard playback Set/ Zoom button
Set/ Zoom button
Standard playback

Chapter 6 Advanced Operations
Image Editing
Erasing images (1) Images can be erased singly or collectivelly. To use this erase function, press the select buttons ( , ) from the menu display screen to select the erase menu screen ( ).
● When the image to be erased is not pro-tected (Erasing an unprotected image)
1. Press the Set/Zoom button.
2. Press the select buttons ( , ) and select the number of frames to be erased (single frame or all frames).
Set/Zoom button
Set/Zoom button
Set/Zoom button
Set/Zoom button
Set/Zoom button
Set/Zoom button

3. Press the Set/Zoom button to execute. * When “This” is selected, a message will be displayed during erasure and then, when im-ages remain on the CF card, the standard playback screen will return. If no images other than those erased still re-main, the message “No Picture in camera” will be displayed.
* When “NO” is selected, the erase menu screen will return.
* When “ALL” is selected, the erase confirmation message will appear and then all of the era-sure will be executed. When “NO” is selected and the Set/Zoom but-ton is pressed, the original erase menu will re-turn. When “YES” is selected and press the Set/Zoom button, a message appears telling that all the frames are erased. Then, a pro-tected image (No. 20 in the example shown to
the left). (if there are multiple protected images, the last frame) is displayed. If all the frames erased are unprotected, the message “No Picture in camera” is displayed. If all the frames to be erased are protected, a message “All Pictures Protected” will appear and the screen will return to the standard playback screen.
* Images photographed with a digital camera other than the Q-M200 cannot be erased with “This” or “ALL” selected.

Erasing images (2) ● When the image to be erased is protected
(Erasing a protected image) Remove the protection before attempting to erase the image.
● Erasing all unprotected images
1. Press the Set/Zoom button. * “NO” is selected.
2. Press the select button ( ) once. * “ALL” is selected.
3. Again press the Set/Zoom button. * The erase all frames confirmation message will appear. “NO” is selected.
4. To cancel the erasure of all frames, just press the Set/Zoom button. * The original erase menu screen will return. * To delete all frames, press the select buttons ( , ) to select “YES” and then press the Set/Zoom button. The message “Erasing All Pictures...” will ap-pear. When the erasures have been completed, the images with protection will be displayed.
Set/Zoom button Set/Zoom button
Set/Zoom button
Set/Zoom button
Standard playback

If all of the images to be erased are protected, the message “All Pictures Protected” will ap-pear and the normal playback screen will re-turn.
* If the CF card includes images photographed with a digital camera other than the Q-M200 and the erasure of all frames is executed, im-ages photographed only with this camera will be erased.
* If all the images are photographed with a digital camera other than Q-M200, a message "All Pictures Protected" will appear and the screen will return to the standard playback screen.
Rotating images Images can be rotated either clockwise or counter-clockwise in 90-degree increments. This is not possible, however, with images recorded using products other than Q-M200. Also, some of the data in the image file is altered when an image is rotated. Because of this, when rotating an image, make sure that the image is not protected. Press the select buttons ( , ) from the menu display screen to select the rotation menu screen.

1. Press the Set/Zoom button. * The image rotation mode is activated. * The message “Not applicable to this image” will appear in the case of images recorded with the products other than Q-M200 and the standard playback screen will return 2-3 sec. later.
* If an attempt is made to rotate a protected im-age, the message “Protected” will appear and the standard playback screen will return 2-3 sec. later.
2. To cancel rotation, again press the Set/Zoom button. * The standard playback screen will return. To rotate an image counterclockwise, press the select button ( ); to rotate an image clockwise, press the select button ( ). Each time the select button is pressed, the image rotates at 90 degrees.
Set/ Zoom button
Set/ Zoom button
Set/ Zoom button
Standard playback
Standard playback
Standard playback
Standard playback
2 – 3 sec later.
2 – 3 sec later.
Protected image
Image recorded with the product of another company

3. After selecting the rotation, press the Set/Zoom button. * The rotated image will be played back.
* Once an image rotation is set, the setting information is stored and the image is dis-played rotated automatically next time.
Selecting images to be printed (Creating Automatic image print file)
Note: Images cannot be printed with this camera it-self.
This menu is used to specify the images and the number of stored images on the CF card that are to be printed automatically to a DPOF (*1) com-patible digital printer. This can be done in two different patterns: for individual images or for all of the images.
These specifications are automatically saved to the CF card as an Automatic image print file and include the order data.
Set/Zoom button
Set/Zoom button
Set/Zoom button
Set/Zoom button
Set/Zoom button
1 – 3 sec later.
1 – 2 sec later.
1 – 2 sec later.
Set/ Zoom button

If you wish to print images on your own printer using DPOF, check with the printer manufacturer to see if your printer is DPOF compatible or not.
Note: Images cannot be printed from the created Automatic image print file if your printer is not DPOF compatible.
Press the select buttons ( , ) from the menu display screen and select the print select menu screen ( ).
1. Press the Set/Zoom button. * This activates the menu in which images to be printed are selected.
2. Press the select buttons ( , ) and select either “This”, “NO” (cancel print selection) or “ALL”.
3. Press the Set/Zoom button. ① When “ALL” is selected: use the select but-
tons ( , ) to select the number of prints. Next, press the Set/Zoom button to close the processing screen and return to the standard playback screen (end setting).
② When “NO” is selected: and then press the Set/Zoom button, the screen returns to the menu screen.
③ When “This” is selected: use the select but-tons ( , ) to specify the number of prints. Next, press the Set/Zoom button to return to the standard playback screen.

Once these specifications have been completed, verify them on the Print List menu described in the following section. *1 DPOF: This is the abbreviation for Digital Print
Order Format. Notes:
* From 1 to 99 print copies can be specified as “Number”.
* If the number of images specified in steps 3 (① and ③) is too many a message “Too many images to order” will appear (Ⓐ). And one or two seconds later, the screen will return to the normal playback screen.
* Print selection cannot be done for an image (on which “THM” is displayed in the image quality mode), etc to be played back as a thumbnail. (See Note 4.)
* If the CF card on which images created with a personal computer or with a non-Konica digi-tal camera are stored does not have enough space available, the message “Memory card full” will be displayed when you press the Set/Zoom button (Ⓑ).
Displaying the print list
Note: Images cannot be printed with this camera it-self.
This menu is used to display a list of image num-bers (directory numbers and file numbers) and number of copies. Images for which prints are not necessary can be deleted from the print list (single frame or all frames).

Press the select buttons ( , ) from the menu display screen to select the print image list menu screen ( ).
1. Press the Set/Zoom button.
* The print list will be displayed (left: image num-bers (directory number) - (file number), right: number of copies).
* When a print list is too large to fit within the current display, press the select button ( ) the required number of times.
2. Press the select buttons ( , ) and select either delete from the print list (single frame or all frames) or accept. * When the image number (the directory number - file number) and number of prints “Quantity” has been selected, that one image will be de-leted. Press the Set/Zoom button. The print delete (delete from list) confirmation display will appear. Use the select buttons ( ,
) to select “YES” or “NO”.
Set/ Zoom button
Set/ Zoom button
Set/ Zoom button
Set/Zoom button
Set/Zoom button

If “YES” is selected and the Set/Zoom button is pressed, the print will be deleted from the print list and the print list screen will return. If “NO” is selected and the Set/Zoom button is pressed, deletion will be canceled and the print list screen will return.
* When “Cancel All” is selected, all of the print data in the list will be deleted. Press the Set/Zoom button.
* The Automatic image print file in the CF card can be updated to comply with the contents of the print list by selecting “OK” from the print list and pressing the Set/Zoom button.
Note: “Image number” and “frame number” are sepa-rate things.
Customizing the Camera
The setup mode is used to change the settings of the camera opera-tion items to make the camera easier to use. The CF card is also
formatted from the setup mode. The following explains how to switch the setup mode and the various settings.
Note: The items that are marked by an asterisk (*) are advanced setup items and are not normally re-quired to change. When an item is changed to a non-initial setting, the circle (●) that precedes it will turn to blue in the center (○).

1. Set the mode select dial to SET UP (SET UP).
2. With the LCD monitor off, turn on the power button. The setup screen will appear.
3. Press the select buttons ( , ) to select the necessary item.
4. The values of the various settings are changed with the Set/Zoom button.
CF card format Press the Set/Zoom button to dis-play the format screen. Setting the calendar and clock Press the Set/Zoom button to dis-play the settings screen.
LCD monitor off
Power on

* Depending on the printer specifica-tions, the settings may not have any effect on the prints in some cases.
* When photographs are taken with a shutter speed of from 2 sec. to 1/8 sec., the quality may deteriorate in some cases due to the characteris-tics of the video element; however, this company will not pay compensa-tion for any problems resulting from such deterioration.
Selecting NTSC or PAL Each time the Set/Zoom button is pressed, the setting alternates between NTSC (initial setting) and PAL. Turning the eye start function on and off Each time the Set/Zoom button is pressed, the setting alternates between ON and OFF (initial setting).
Turning the beep on and off Each time the Set/Zoom button is pressed, the setting alternates between ON (initial setting) and OFF.

Setting the date printing Each time the Set/Zoom button is pressed, the setting alternates between ON (initial setting) and OFF. When ON is set, the date is recorded in image data registered in the Automatic image print file for use by the date printing. This setting is effective only for the images recorded in the automatic image print file after this setting.
● Selecting the AE system (*) Each time the Set/Zoom button is pressed, the setting alternates between “Regular” (multi pho-tometry/initial setting) and “Spot” (center spot photometry).
● Selecting slow shutter speeds (2 sec. - 1/8 sec.) (*)
Each time the Set/Zoom button is pressed, the setting alternates between “Enable” and “Disable” (initial setting).
● Changing the selftimer time (*) Each time the Set/Zoom button is pressed, the setting alternates between “10 sec” (initial setting) and “3 sec”.

● Changing the auto shut off (auto power-off) time (*)
Each time the Set/Zoom button is pressed, the setting alternates in se-quence between “3 min” (initial setting), “10 min” and OFF.
● Changing the white balance set-ting (*)
Each time the Set/Zoom button is pressed, the setting alternates in se-quence between “Auto” (initial setting), “Daylight” “Incandescent”, and “Strobe”.
● Changing the sharpness setting (*)
Each time the Set/Zoom button is pressed, the setting alternates in se-quence between “Normal” (initial set-ting), “Soft” and “Hard”.
● Changing the Saturation setting (*) Each time the Set/Zoom button is pressed, the setting alternates in sequence between “Normal” (initial setting), “Low” and “High”.
● Changing the color setting (*) Each time the Set/Zoom button is pressed, the setting alternates between “Color” (initial setting) and “Black & White”.
When the Set/Zoom button is pressed, the values of set up items marked with ● are returned to the initial setting.

Formatting the CF card When a CF card is formatted, all protected, as well as unprotected, images stored on it will be lost.
1. Press the Set/Zoom button.
2. Press the select buttons ( , ) to select YES to format or NO to cancel formatting.
3. Press the Set/Zoom button. * When Yes is selected, formatting will be exe-cuted. During formatting, the message “For-matting the memory card... ” will be displayed.
* When formatting is completed, the setup screen will return.
* When NO is selected, formatting will be can-celed and the setup screen will return.
Set/ Zoom button
Set/Zoom button
Set/ Zoom button

Transferring Image Files to a Personal Computer
1. IBM PC/AT compatible • Microsoft Windows 95, Windows 98, Win-
dows NT 4.0 installed • RS-232C interface (D-SUB 9-pin connector) • Display with 32,000 or more colors and 640 ×
480 pixels or better. • 16 MB or more of available RAM (at least 32
MB of RAM recommended) • 60 MB or more of available hard disk space • CD-ROM drive
2. Macintosh • Power PC • Mac OS 7.6 or /8.0/8.1/8.5 • Display with 32,000 or more colors and 640 ×
480 pixels or better. • Printer port or modem port installed
• 16 MB or more of available RAM (at least 32 MB of RAM recommended)
• 60 MB or more of available hard disk space • CD-ROM drive
●Using the supplied interface cable * Check the environment of the device being con-nected (personal computer).
* Install the necessary software as per the instruc-tions in the Installation manual. Always read the ReadMe files included with the software.
* Use of an optional AC adapter for Q-M200 (Part No. PX-AC1/PX-AC2) is recommended to con-nect the Q-M200 to a personal computer.

Preparation * Turn off the personal computer power supply. * Turn off the camera power supply and make sure the CF card containing the images has been in-serted. Make sure that either batteries have been loaded or that the AC adapter for Q-M200 (option) has been connected to a power outlet.
1. Use the connecting (interface) cable to connect the camera and personal computer. Camera: Connect the mini-plug end of the ca-ble to the serial port jack of the camera (refer to the Installation manual). Personal computer: Personal computers can be equipped with various different types of ca-ble connection jacks. Check the Installation manual concerning the appropriate connector (or adapter) to use.
2. Set the mode select dial on the top of the cam-era to PC connection mode ( ), used for PC connection.
3. Press the camera power button. “PC” will ap-pear on the data display panel. When batteries are being used, the battery mark will blink 5 times when the power is turned on. For transferring image files using each software, refer to the section “How to use the software” of the Installation manual.
● Reading directly from the CF card to the personal computer
The Konica CompactFlash Card Adapter (option: CF1-AD1) can be used to read images directly on a personal computer as a PCMCIA Type II compatible ATA card.

1. Remove the CF card from the camera and load it into the Kon-ica CompactFlash Card Adapter.
* The specifications and appearance of the Kon-ica CompactFlash Card Adapter are subject to change without notice.
2. Insert the adapter into the PCMCIA Type II card slot of a personal computer that can read ATA cards.
* Refer to the instruction manual of the personal computer for details concerning the method used to insert the CF card adapter into the slot of the personal computer.
* Depending on the personal computer and CF card adapter operating environment, software installation, registration, setting, etc., may be necessary in some cases. For details, refer to the instruction manuals of the personal com-puter and OS being used.
3. Open an image using an application software that supports Exif (JPEG). The sub-directory ‘***KCAC*’ is located within the directory ‘DCIM’. The files within this sub-directory with the JPG extension are the image files recorded with this camera. (*is a number that is assigned by the camera automatically. The first three digits de-note the directory number.)
• When the card slot is compatible with CF card
CF card Konica CompactFlash Card Adapter

* Imagse files can be copied to other storage media, such as hard disks, or erased as needed. Consult the instruction manual for your OS. We are not responsible for damage or failure that may result from these opera-tions.
* Keep backup copies of any valuable data. * The protection setting configured with the
camera is a read-only file attribute setting. If this attribute is altered on a personal computer, the protection setting configured with the cam-era would be overridden.
* When a CF card is inserted in the camera, it may happen that not only images that have been modified or newly recorded may not be played by the camera but the camera malfunc-tions.
○ * Do not rename image files stored on the CF
card from the personal computer or write non-image data files to the CF card from the camera.

Chapter 7 Appendix
When Carrying the Camera with You on Overseas Trips
Using the Custom AC Adapter (Optional)
<Overseas> • Do not operate the AC adapter from supply
voltages outside the specified range of 100 to 240 VAC.
• The AC cable that comes with the PX-AC1 can be used only in districts where a supply voltage of 125 VAC or lower is available. In districts where a higher supply voltage is available, use a transformer to convert it to 100 to 125 VAC.
• An AC adapter supplied with the PX-AC2 can be used in the districts where a supply voltage of lower than 240 VAC.
• If you plan to take a trip to a country where a power receptacle of a different shape is used, consult your travel agent to identify an AC adapter of the type that matches the power re-ceptacle and make one available.
Warranty Card • This warranty card (see the last page in this
instruction manual.) is valid only within the country of purchase.
• We are not responsible for servicing your cam-era locally if it fails or malfunctions while you are away on an overseas trip, nor for indemnifying you for the expenditure incurred by you.

Using a Local TV Receiver to Play Recorded Images • This camera can be used with a TV receiver (or
monitor) operating on an NTSC or PAL basis, with a video input terminal.
• The included video output cable is required. • This camera is factory-set for NTSC.
When using it in a country where the PAL sys-tem is used, switch its video output to PAL.
• This camera cannot be used with a TV receiver (or monitor) operating on a SECAM basis.
Tips: • Major countries in which NTSC is used U.S.,
Korea, Canada, Taiwan, Cuba, Chile, Guam, Mexico
• Major countries in which the PAL system is used China, West European countries (except for France), New Zealand, Australia, Brazil, Singa-pore, Malaysia
• You cannot view images recorded with this camera in countries where the SECAM system is used, such as France and Russia.
* For information on other countries, consult your travel agent.

Maintaining and Keeping the Camera
Cleaning the camera Never use solvents such as benzine and thinner to clean this camera. • Before cleaning, first remove the batteries or
disconnect the plug of the AC adapter from the power outlet.
• The surface of the outer cover is made of metal but is specially processed and printed. Wiping with a solvent such as benzine and thinner could cause discoloration or peeling of the paint.
• When the camera becomes dirty, wipe with a soft, dry cloth. When heavily soiled, immerse a cloth in a weak solution of detergent (kitchen type), wring out the cloth thoroughly and then wipe the camera.
• Observe the cautions when wiping with a chemical cloth.
After using the camera When the camera is not to be used for an ex-tended period, either remove the batteries or dis-connect the plug of the AC adapter from the power outlet. • Leaving the batteries in the camera for an ex-
tended period can result in battery leakage and malfunction.
• When storing the camera, store both the cam-era and batteries in a constantly cool, dry place. Recommended temperature: 15 - 25 degrees C Recommended humidity: 40 - 60% RH

CF card
Handling • Do not bend the card or apply excessive force. • Do not store the card where the humidity is
high, where there is excessive dust and near sources of static electricity or magnetism.
• Do not allow dust, moisture or foreign matter to accumulate on the terminals of the CF card.
Image data
• The recorded images are stored digitally. Be-cause of this, recorded images can be deleted and recorded again.
• Use a personal computer to delete images recorded with other models or a personal com-puter.
• In some cases, the recorded data may be lost due to malfunction or repair due to the influence of static electricity or electrical shock to the CF
card resulting from mis-operation by the cus-tomer or a third party. This company assumes absolutely no responsi-bility for paying compensation for losses in-curred due to the loss of recorded data.
LCD monitor
• High-precision technology is used in the manu-facture of the LCD monitor. 99.98% or more of the pixels are effective but up to 0.02% of the pixels may be missing or may light constantly.
• When the LCD monitor is used in a cold place, the screen brightness will be slightly darker than normal but normal brightness will return as the temperature of the camera rises.
• Use a soft, dry cloth to wipe off fingerprints, soiling, etc.

Before Calling for Service
● If inspection in accordance with the chart below does not produce a solution, please consult your dealer.


Error messages ● When “Err” appears on the remaining number of
frames display on the Data display panel on the top of the camera and all of the Data display panel marks blink, an error has occurred. In such cases, follow the instructions given below.
1. Press the power button to turn the camera off.
Now press the power button again to turn the power back on. If the functions still do not work:
2. Disconnect the AC adapter, if used. 3. Remove all of the batteries. 4. Load new batteries.
If the error status continues after all of the above have been performed, please con-sult your local dealer.
Contact your local dealer first concerning re-pairs, handling and cleaning.

Main Specifications
● Main Specifications Type Recording medium Resolution*1
: Digital still camera : CompactFlashTM card : Super fine 1600 × 1200 pixels: approx. 11 frames at 8MB.
Fine 1600 × 1200 pixels: approx. 20 frames at 8MB. Basic 1152 × 872 pixels: approx. 40 frames at 8MB.
Economy 640 × 480 pixels: approx. 80 frames at 8MB. File format Camera file system Erase Lens
: JPEG (Exif ver. 2.1) : Conforms to “Design rule for Camera File system” : Single frame/All frames/Format : Hexanon F3.2, f=6.9 mm (equivalent to 38 mm on a 35 mm camera)
Focus Focus range
: Autofocus : 0.1 m to infinity (close-up mode: 0.1 m-0.3 m)
(normal photography: 0.3 m - infinity) Viewfinder CCD sensor
: Optical real-image viewfinder : 1/2-inch, total pixels 2,110,000, primary color CCD

Exposure control Aperture Light measurement Eye start Flash Flash range
: Programmed AE (4.7EV - 16.7EV) Shutter speeds: 1/8 sec. - 1/1000 sec.
: Two-step type (F3.2/F9) : Multi area light measurement, opposite light auto detect : Built-in type : Built-in automatic flash : approx. 1.0 m-3.0 m
Redeye reduction/Auto/On/Off mode selective White balance Photo modes
: Automatic white balance : Single frame/selftimer (10 sec., 3 sec.)/Macro/4-frame continuous shoot-
ing*2/Digital 2× Zoom*3/Sports/Infinity/Text*4 Auto date Automatic image print format
: Year/month/day/hour/minute : DPOF (Digital Print Order Format)
LED displays Beep Power source
: Selftimer LED, viewfinder LED (also used as card access LED) : Warning and shutter release : Exclusive lithium ion rechargeable battery, AA NiMH battery × 3, AA
alkaline battery × 3 or exclusive AC adapter (5V DC).

Operating temperature range
: 5-45 degrees C
Operating humidity range : 20% - 80% RH PC interface : RS-232C serial interface (max. 115.2kbps) LCD monitor : 1.8-inch TFT color LCD monitor Playback : Single frame/zoom playback (×1, ×2, ×4)/Index playback/Slide show
playback Video output : NTSC/PAL (usable only for playback, cannot be used together with the
LCD monitor) Accessories : CF card (8MB), Lithium-ion battery charger, Lithium-ion battery, Strap,
Video output cord, Q-M200 Instruction manual, Soft case, Installation manual, Interface cable (for IBM PC/AT compatible and Macintosh), CD-ROM.
Optional accessories : AC adapter, Lithium-ion battery charger Kit, Lithium-ion battery. Dimensions (W × H × D) : 121.8 × 71.6 × 41.8mm ; 4.8 × 2.8 × 1.6in. (excluding protruding parts) Weight : Approx. 270g (excluding the batteries and the CF card)
* All values are based on company test conditions (50% flash use ratio, continuous op-
eration, temperature; 23 degrees C). * Battery life will vary depending on the battery brand and grade. *1 The number of images may also vary depending on the type of subject photographed. *2 Economy mode only. *3 Equivalent to 76mm on a 35mm camera. *4 Black & white only, focusing 20cm to ∞.