knot arthoscopy
TRANSCRIPT

Introduction
One of the most important advances in the last twodecades has been the development of devices that allowsutures to be passed and retrieved within joints. Thesedevices have allowed arthroscopists to ‘sew’ withinjoints, and the need to tie knots arthroscopically hasnaturally followed.
Initially, knots used in open procedures such as thesquare knot were tried for arthroscopic applications. Itbecame clear that these knots were not well suited toarthroscopic applications as it was very difficult tomaintain tissue approximation tension when tying theseknots arthroscopically. The search therefore began forknots that better lent themselves to arthroscopictechniques. Slip knots were found to be easily tied andto provide good tissue approximation tension, but theytended to loosen easily. Attention then turned to attemptsto somehow ‘lock’ the slip knot so that it would notloosen so easily. Loutzenheiser et al1 showed that the mosteffective way to secure a sliding arthroscopic knot wasthrough a series of alternating post half-hitches appliedafter the sliding knot had been seated. The Duncan loopbacked with alternating post half-hitches was shown tobe the most secure arthroscopic knot of several tested inLoutzenheiser’s paper and consequently has come to beone of the most commonly used arthroscopic knots.Several variations on the theme of placing locking knotsbehind a slip knot have since been described in searchof a knot with the ideal qualities of ease of tying, tight-ness of tissue hold, and resistance to loosening.
Recently, attention has turned to ‘locking’ slip knots.‘Locking’ slip knots are passed as slip knots, then theconfiguration of the knot is purposely changed once theknot is seated in order to convert the knot to a non-sliding configuration. This prevents the knot fromloosening. Theoretically, this approach provides goodtissue loop tension and knot security (resistance toloosening) with a small knot that can be rapidly tied. Asdiscussed in greater detail below, locking slip knots dofulfill these objectives, but tying them can be difficult.
The development of arthroscopic implants has alsoinfluenced the evolution of arthroscopic knot tying. Forexample, as suture anchors have become more effectiveand easy to use, arthroscopists have been able to attemptmore complicated procedures. With the advent of morecomplicated arthroscopic procedures, the need for andrelevance on arthroscopic knot-tying skills has increased.Conversely, arthroscopic knot tying has also influencedthe design of arthroscopic instrumentation. As manufac-
turers have recognized that arthroscopic knot tying maynot be a skill that all arthroscopists can master, deviceshave been devised to eliminate the need for knot tying.These devices have to date fallen into two categories:knot substitute devices such as the Y-Knot (Innovasive,Malborough, MA, USA) and knot elimination devicessuch as ‘knotless suture anchors’ (Mitek, Norwood, MA,USA; Arthrex, Naples, FL, USA and others). Knot substi-tute devices eliminate the need to tie knots when thesurgeon places standard sutures, and knot eliminationdevices change the techniques of reconstruction suchthat no free suture ends need to be tied.2
Arthroscopic knot tying is indicated when there is aneed to secure a suture repair intra-articularly and thearthroscopist has the technical expertise to tie a securearthroscopic knot for fixation of that repair. Although knot-substitute devices or knotless suture anchors are available,it would be unwise to undertake a procedure known torequire securing of suture intra-articularly if the surgeondoes not have the technical expertise to tie knots arthro-scopically as a back-up. Knot-substitute devices or knotlessanchors are useful adjuncts to arthroscopic knot tying, notsubstitutes for the ability to tie arthroscopic knots.3
Surgical principles
Arthroscopic knot tying is significantly more complexthan open knot tying. Rather than simply memorizingknot configurations, a significant part of successfullytying knots arthroscopically is appropriate suturemanagement.4 It is critically important that the arthro-scopist understand the path of the sutures within thetissues being approximated, within the joint, and withinthe cannulas. This understanding is a prerequisite totying and passing knots without tangling the sutures witheach other, getting the sutures stuck in soft tissue, orbreaking the sutures while tying. Paradoxically, mostpublished information on arthroscopic knot tying focuseson the configuration of specific knots rather than theimportant issue of suture handling. Focusing on the finepoints of arthroscopic knot configuration is analogous todebating the most efficient way to pack bundles ofmoney into duffel bags and overlooking the issue of howyou’re going to get the bags into the bank vault.Certainly there is merit in finding the most effectivearthroscopic knots, but the literature largely overlooksthe issue that presents the greatest challenge to the vastmajority of arthroscopists—avoiding problems that canpreclude a knot of any configuration from being tied.
7 Arthroscopic knot-tying techniquesEric R McMillan and Richard B Caspari
McMillan ER, Caspari RB. Arthroscopic knot-tying techniques. In An Atlas of Shoulder Arthroscopy, Imhoff AB, Ticker JB, Fu FH (eds). London: Martin Dunitz, 2003. 81–95. © Martin Dunitz 2003.
ch07 21/5/03 9:33 am Page 81

Surgical technique
In order to facilitate a more practical understanding ofarthroscopic knot tying, we will consider the surgicaltechnique as four distinct processes: preparation forarthroscopic knot tying; selection of the right arthro-scopic knot; suture handling for arthroscopic knot tying;and configurations of specific arthroscopic knots.
Prior to developing the topic of arthroscopic knottying, some knot terms should be clarified. The two freeends of any given suture are referred to as ‘limbs’. Aknot is made up of a series of loops passed around the‘post’ limb. The limb that is not currently acting as thepost is by default the ‘non-post’. The post is not alwaysthe same limb and, in fact, it can be changed with everythrow if desired—it is simply the limb the loops arebeing thrown around.
Preparation for knot tying
The basic foundation of learning to tie knots arthro-scopically is practicing the techniques and knotsinvolved. Materials for practice are inexpensive andreadily available: a short segment of cord is really allthat is needed to get started. When the surgeon is readyto progress on to tying with suture, the appropriatesuture material, a knot pusher, and a cannula areneeded. Either a commercially available or a makeshiftknot-tying board is also required. The process of learn-ing can be greatly accelerated by attending a teachingcourse that includes specific instruction in arthroscopicknot tying. Learning in a controlled environment withcapable surgeons at hand to demonstrate the fine pointsis far more productive than on-the-job or at home trialand error learning. (Arthroscopic teaching courses areoffered regularly in the United States by the ArthroscopyAssociation of North America (www.aana.org).)
Prior to tying knots arthroscopically in the operatingroom setting, it is critical to ensure that the necessaryequipment and sutures are available. Being half way
through an arthroscopic procedure and realizing that youdon’t have the piece of equipment you need to throwthe knot is a very lonely feeling. Table 7.1 provides ageneral listing of the items needed.
What knot pusher is the best?
The answer is that it depends on what you’re doing. Ingeneral, knot pushers are used for three purposes: (1)to check for suture twisting prior to knot tying; (2) totie sliding knots; and (3) to tie non-sliding knots.
When checking for suture twisting prior to knot tying,a two-hole knot pusher is definitely the most reliableand easy to use.5 There is no way for a suture twist tohide in the cannula when a two-hole knot pusher isused, whereas twists can occasionally remain undetectedwith a single-hole pusher. Any twisting detected can alsobe easily corrected with a two-hole pusher by simplyrotating the pusher to untwist the suture under arthro-scopic visualization. Once the suture has been untwisted,the two-hole pusher is withdrawn from the cannulawithout further rotation and the suture limbs are laid tothe appropriate side of the cannula in their new,untwisted configuration. With regard to knot tying, two-hole pushers can be used to tie sliding knots but theincreased bulk of the two-hole pusher is unnecessaryand gives no advantage over the easier-to-use single-holepusher. Using a two-hole knot pusher to tie non-slidingknots has been described, but there is no way tomaintain tension on the tissue loop while subsequentthrows are placed. This generally results in a loose andless effective knot. As a result, use of two-hole knotpushers to pass knots has now largely been abandoned.
For tying sliding knots, a single-hole knot pusher isthe most commonly used and least complicated pusher.The single-hole design is relatively effective in checkingfor suture twists and allows easy passage of knotsthrough cannulas and application of tension to seatedknots. A modified one-hole knot pusher (Surgeon’s 6thFinger, Arthrex) can also be used to check for suturetwisting, pass knots through cannulas, and apply tensionto seated knots. However, the modified one-hole pusher
82 Eric R McMillan and Richard B Caspari
Table 7.1 Arthroscopic knot-tying equipment
Quantity Description Notes
1 or more Water-tight cannula(s) Transparent cannulas are helpful3,4 as are cannulas with differing inner diameters1 Suture retriever Suture graspers
Crochet hook1 or more Knot pusher(s) (see discussion in text)N/A Suture 27" for single or double-hole pusher
36" for modified one-hole pusher
McMillan ER, Caspari RB. Arthroscopic knot-tying techniques. In An Atlas of Shoulder Arthroscopy, Imhoff AB, Ticker JB, Fu FH (eds). London: Martin Dunitz, 2003. 81–95. © Martin Dunitz 2003.
ch07 21/5/03 9:33 am Page 82

is a bit bulkier than the standard one-hole pusher,requires use of a longer suture than the standard one-hole pusher, is associated with a per-use patient chargesince it is disposable, and requires a certain technicalexpertise for proper use that can slow the inexperienceduser. Proponents of the modified one-hole pusher citegreater ‘loop security’ than that obtained by a standardone-hole pusher by virtue of the pusher’s ability tomaintain tension in the initial knot loop while subse-quent throws are placed.6
As discussed below, non-sliding arthroscopic knots aretypically tied out of desperation rather than design. Ifone is forced to tie a non-sliding knot, the modified one-hole knot pusher is really the only good option since itis the only knot-tying device that can hold tension onthe initial knot loop while subsequent throws are placed.Use of any other style of knot pusher relies on thefriction of the suture against itself to hold the initialthrow tight while another knot is thrown to secure theinitial knot. This rarely results in a ‘non-sliding’ knot withsatisfactory tissue loop tension.
To summarize, a one-hole knot pusher is the mostcommonly available and easiest pusher to use, amodified one-hole knot pusher should be available incase of the unexpected need to tie a non-sliding knotdue to suture binding, and a two-hole knot pusher isthe most effective when checking for suture twisting(Table 7.2).
Selecting the right arthroscopic knot
The basic objectives of tying an arthroscopic knot areto: (1) provide good tissue loop tension to approximatethe desired tissues,3,6 and (2) to maintain this tension asthe tissues are loaded postoperatively.3 The ideal knot isone that accomplishes these two objectives with thesmallest bulk and greatest ease of tying.
Sliding versus non-sliding
Sliding knots inherently provide better tissue looptension, but also inherently loosen more easily than non-
sliding knots. As arthroscopic knot tying has evolved, ithas proven easier to devise techniques to keep a slidingknot from loosening than to get good tissue loop tensionfrom a non-sliding knot. Consequently, sliding knots arepreferred to non-sliding knots for all arthroscopic knottying.
Non-locking versus locking
Two fundamentally different approaches to the preven-tion of loosening have been developed for sliding knots:throwing additional loops on top of the sliding knot afterit is seated, and changing the sliding knot into a non-sliding knot after it is seated.
As demonstrated by Loutzenheiser et al,1 the additionof just a few simple suture throws on top of a slidingknot can be very effective in preventing loosening. Thisapproach is both easy to accomplish from a technicalstandpoint and very reproducible or predictable. Becauseof these benefits, the Duncan loop knot backed by alter-nating post half-hitches has become the workhorse ofarthroscopic knots. Securing other types of sliding knotswith additional suture throws has been described,7 andhas been shown to be effective as well.3
An alternative method of preventing sliding knots fromslipping is the locking sliding knot. A locking slidingknot is one whose configuration can be selectivelychanged by applying tension to the suture limbs in theappropriate sequence. Theoretically, this is accomplishedafter the knot has been seated and good tissue looptension has been achieved. The problem with thisapproach however, is that the knot can be inadvertentlylocked at any point in the tying process. Locking a knotin the cannula is one thing on a knot-tying board andquite another thing after working for 10 or 20 minutesin the operating room to get an anchor properly placed,pass the suture through the correct location in the correcttissue, and get the suture limbs back through the cannulawithout tangling. Locking knots are very attractive intheory but can be very unforgiving in practice.
For the average arthroscopist, the best knot to learnis probably the Duncan loop backed by alternating posthalf-hitches in light of the Duncan loop’s proven effec-tiveness, relative ease of tying, and predictability.
Arthroscopic knot-tying techniques 83
Table 7.2 A comparison of knot pusher types
Ease of Usefulness for Usefulness forStyle detecting twisting sliding knots non-sliding Cost
One-hole +/– + Don’t use One-time costModified one-hole +/– +/– + Per-use chargeTwo-hole + – Don’t use One-time cost
McMillan ER, Caspari RB. Arthroscopic knot-tying techniques. In An Atlas of Shoulder Arthroscopy, Imhoff AB, Ticker JB, Fu FH (eds). London: Martin Dunitz, 2003. 81–95. © Martin Dunitz 2003.
ch07 21/5/03 9:33 am Page 83

Suture handling for arthroscopicknot tying
Tips and tricks: general
A good basic starting point when tying knots arthro-scopically is to eliminate any distractions that may bepresent in the operating room.4,8 Of course, a good viewof the knot-tying field is also mandatory.3,4,8,9 One shouldalways check for twisting of the sutures prior to tying4,10
(Figure 7.1) as a knot tied on twisted sutures willinevitably untwist after tying, thereby loosening thetissue loop.
It is a mistake to tie a sliding knot with a suture thatdoes not slide freely.4,10 At best, a knot with poor tissueloop tension results. At worst, the suture stops slidingaltogether and the knot becomes firmly fixed abouthalfway down the cannula. If the knot does becomestuck in the cannula you usually have to just cut thesuture out and start over; such a knot can rarely becoaxed back up the cannula for untangling and retying.Which brings us to another important point—alwayshave a back-up plan in case your arthroscopic knot tyingis unsuccessful.4,9,10
Tips and tricks: the portals and cannulas
It is critical to ensure that both suture limbs being tiedexit the joint through the same passage, with no soft-tissue bridge between the limbs. Clearly, it is not poss-ible to seat a knot within the joint if a soft-tissue bridgeblocks the knot’s entry into the joint. Drawing the limbsto be tied through a cannula prior to tying ensures bydefault that there is no soft-tissue bridge.4 Use of acannula for tying also helps prevent interposition of straysoft tissue in the knot as it is seated. If the tip of thecannula is kept close to the area where the knot is tobe seated the risk of soft tissue becoming entangled inthe knot just prior to seating is minimized as well.5 Ineffect, the less soft tissue the knot passes by the lesslikely the soft tissue is to become entangled in the knot.
Another approach that is very helpful is to use a thirdportal when tying knots arthroscopically.4,9,10 Having athird portal allows the uninvolved sutures to be passedout of the joint clear of the tying process (Figure 7.2).This significantly reduces the likelihood of these othersutures becoming entangled within the knot. It is alsogenerally easier to retrieve sutures from a third portalthan from around the cannula in the tying portal, as isrecommended by some authors (Figures 7.3 and 7.4).11
As discussed previously, an important part of success-ful arthroscopic knot tying is having an understandingof the suture’s path within the tissues and cannulas.Having this understanding allows the surgeon to reactappropriately and quickly when figuring out which limbto pull to tighten a knot, which limb to pull to draw theknot into the joint, and so on. One technique that is
84 Eric R McMillan and Richard B Caspari
Figure 7.1Knot pusher advanced to knot, revealing twisting.
Figure 7.2Uninvolved sutures passing out of accessory cannula, clear ofthe knot-tying process.
Figure 7.3Suture being easily retrieved from accessory cannula.
McMillan ER, Caspari RB. Arthroscopic knot-tying techniques. In An Atlas of Shoulder Arthroscopy, Imhoff AB, Ticker JB, Fu FH (eds). London: Martin Dunitz, 2003. 81–95. © Martin Dunitz 2003.
ch07 21/5/03 9:33 am Page 84
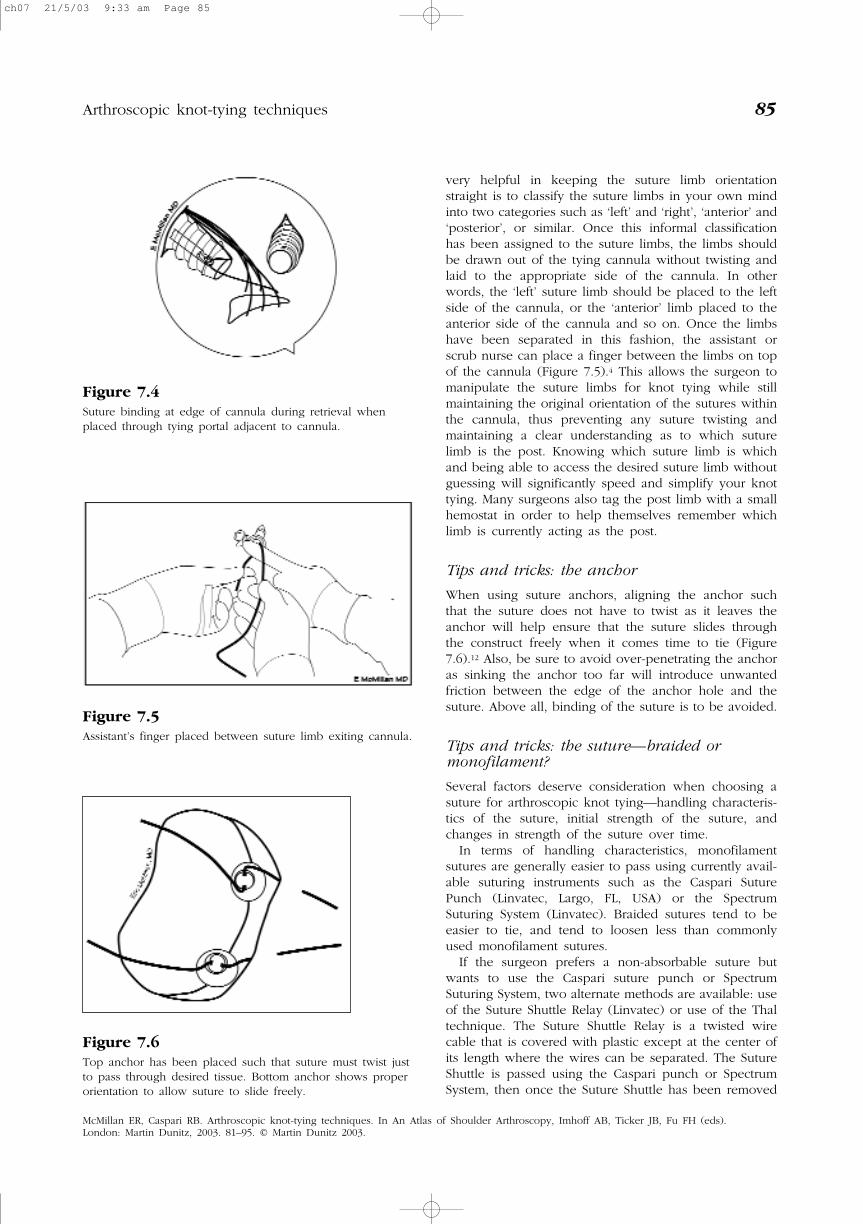
very helpful in keeping the suture limb orientationstraight is to classify the suture limbs in your own mindinto two categories such as ‘left’ and ‘right’, ‘anterior’ and‘posterior’, or similar. Once this informal classificationhas been assigned to the suture limbs, the limbs shouldbe drawn out of the tying cannula without twisting andlaid to the appropriate side of the cannula. In otherwords, the ‘left’ suture limb should be placed to the leftside of the cannula, or the ‘anterior’ limb placed to theanterior side of the cannula and so on. Once the limbshave been separated in this fashion, the assistant orscrub nurse can place a finger between the limbs on topof the cannula (Figure 7.5).4 This allows the surgeon tomanipulate the suture limbs for knot tying while stillmaintaining the original orientation of the sutures withinthe cannula, thus preventing any suture twisting andmaintaining a clear understanding as to which suturelimb is the post. Knowing which suture limb is whichand being able to access the desired suture limb withoutguessing will significantly speed and simplify your knottying. Many surgeons also tag the post limb with a smallhemostat in order to help themselves remember whichlimb is currently acting as the post.
Tips and tricks: the anchor
When using suture anchors, aligning the anchor suchthat the suture does not have to twist as it leaves theanchor will help ensure that the suture slides throughthe construct freely when it comes time to tie (Figure7.6).12 Also, be sure to avoid over-penetrating the anchoras sinking the anchor too far will introduce unwantedfriction between the edge of the anchor hole and thesuture. Above all, binding of the suture is to be avoided.
Tips and tricks: the suture—braided ormonofilament?
Several factors deserve consideration when choosing asuture for arthroscopic knot tying—handling characteris-tics of the suture, initial strength of the suture, andchanges in strength of the suture over time.
In terms of handling characteristics, monofilamentsutures are generally easier to pass using currently avail-able suturing instruments such as the Caspari SuturePunch (Linvatec, Largo, FL, USA) or the SpectrumSuturing System (Linvatec). Braided sutures tend to beeasier to tie, and tend to loosen less than commonlyused monofilament sutures.
If the surgeon prefers a non-absorbable suture butwants to use the Caspari suture punch or SpectrumSuturing System, two alternate methods are available: useof the Suture Shuttle Relay (Linvatec) or use of the Thaltechnique. The Suture Shuttle Relay is a twisted wirecable that is covered with plastic except at the center ofits length where the wires can be separated. The SutureShuttle is passed using the Caspari punch or SpectrumSystem, then once the Suture Shuttle has been removed
Arthroscopic knot-tying techniques 85
Figure 7.4Suture binding at edge of cannula during retrieval whenplaced through tying portal adjacent to cannula.
Figure 7.6Top anchor has been placed such that suture must twist justto pass through desired tissue. Bottom anchor shows properorientation to allow suture to slide freely.
Figure 7.5Assistant’s finger placed between suture limb exiting cannula.
McMillan ER, Caspari RB. Arthroscopic knot-tying techniques. In An Atlas of Shoulder Arthroscopy, Imhoff AB, Ticker JB, Fu FH (eds). London: Martin Dunitz, 2003. 81–95. © Martin Dunitz 2003.
ch07 21/5/03 9:33 am Page 85
from the suturing device a braided suture is placedbetween the wire strands in the center of the ShuttleRelay. The braided suture is drawn through the desiredtissue by pulling the Shuttle Relay in the appropriatedirection, thereby passing the braided suture retrogradethrough the tissues. A more gentle pull will limit thebraided suture from stripping the plastic coating.
The other technique for passing braided suture usingthe Caspari punch or the Spectrum Suturing System isthe Thal technique (R. Caspari, personal communica-tion). A 2-0 or 3-0 monofilament suture is folded in halfand the two free ends fed into the Caspari punch. Thetwo free ends feed roughly the same as a single largermonofilament in most cases. Once the doubled monofil-ament suture has been placed through the desired tissuesand retrieved from a cannula a braided suture is passedthrough the loop at the end of the doubled monofila-ment suture and drawn down into the joint and throughthe desired tissue by pulling on the free ends of thedoubled monofilament suture. Alternatively, a suturepunch specifically designed to accommodate braidedsuture (Arthrotek, Warsaw, IN, USA) can be used.
With regard to the strength of various sutures, non-dissolving braided sutures such as Ethibond (Ethicon,Mitek) tend to have higher failure strength than mono-filament dissolving sutures such as PDS II (Ethicon).
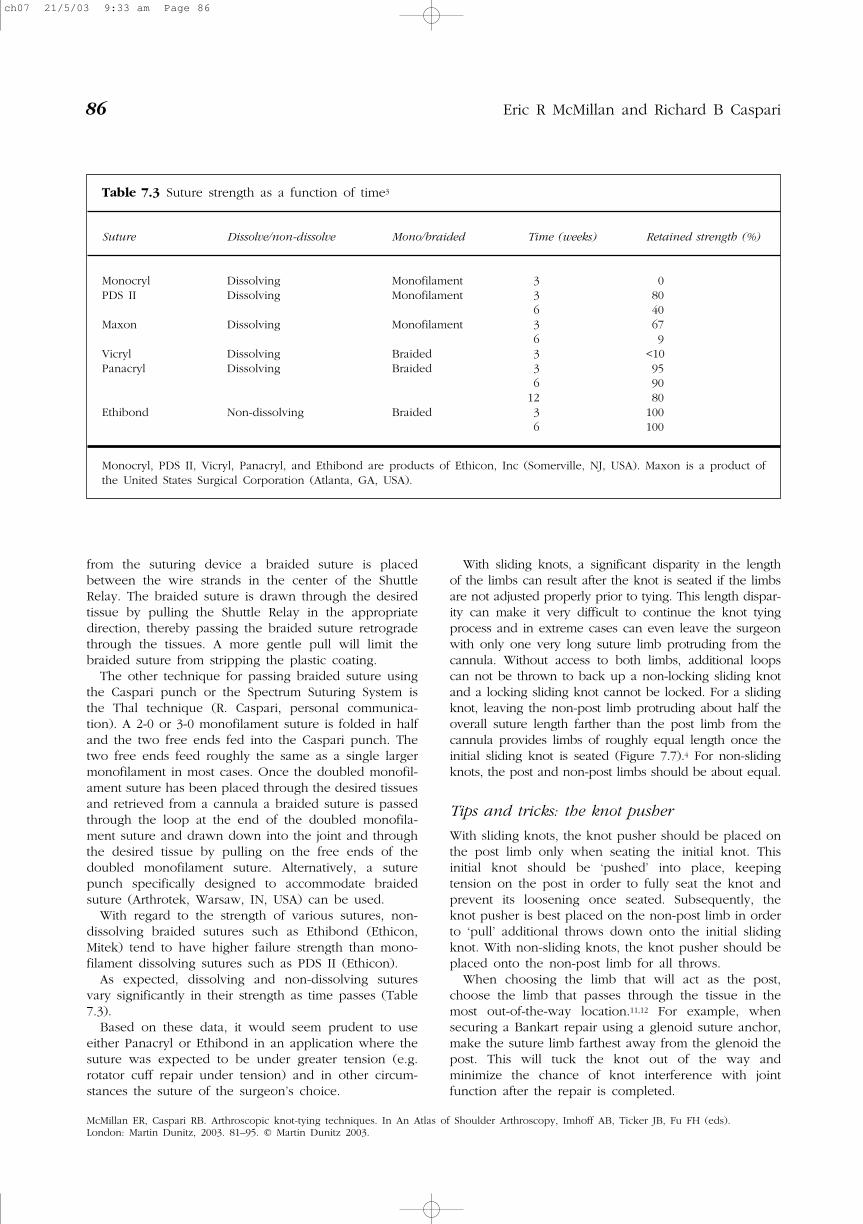
As expected, dissolving and non-dissolving suturesvary significantly in their strength as time passes (Table7.3).
Based on these data, it would seem prudent to useeither Panacryl or Ethibond in an application where thesuture was expected to be under greater tension (e.g.rotator cuff repair under tension) and in other circum-stances the suture of the surgeon’s choice.
With sliding knots, a significant disparity in the lengthof the limbs can result after the knot is seated if the limbsare not adjusted properly prior to tying. This length dispar-ity can make it very difficult to continue the knot tyingprocess and in extreme cases can even leave the surgeonwith only one very long suture limb protruding from thecannula. Without access to both limbs, additional loopscan not be thrown to back up a non-locking sliding knotand a locking sliding knot cannot be locked. For a slidingknot, leaving the non-post limb protruding about half theoverall suture length farther than the post limb from thecannula provides limbs of roughly equal length once theinitial sliding knot is seated (Figure 7.7).4 For non-slidingknots, the post and non-post limbs should be about equal.
Tips and tricks: the knot pusher
With sliding knots, the knot pusher should be placed onthe post limb only when seating the initial knot. Thisinitial knot should be ‘pushed’ into place, keepingtension on the post in order to fully seat the knot andprevent its loosening once seated. Subsequently, theknot pusher is best placed on the non-post limb in orderto ‘pull’ additional throws down onto the initial slidingknot. With non-sliding knots, the knot pusher should beplaced onto the non-post limb for all throws.
When choosing the limb that will act as the post,choose the limb that passes through the tissue in themost out-of-the-way location.11,12 For example, whensecuring a Bankart repair using a glenoid suture anchor,make the suture limb farthest away from the glenoid thepost. This will tuck the knot out of the way andminimize the chance of knot interference with jointfunction after the repair is completed.
86 Eric R McMillan and Richard B Caspari
Table 7.3 Suture strength as a function of time3
Suture Dissolve/non-dissolve Mono/braided Time (weeks) Retained strength (%)
Monocryl Dissolving Monofilament 3 0PDS II Dissolving Monofilament 3 80
6 40Maxon Dissolving Monofilament 3 67
6 9Vicryl Dissolving Braided 3 <10Panacryl Dissolving Braided 3 95
6 9012 80
Ethibond Non-dissolving Braided 3 1006 100
Monocryl, PDS II, Vicryl, Panacryl, and Ethibond are products of Ethicon, Inc (Somerville, NJ, USA). Maxon is a product ofthe United States Surgical Corporation (Atlanta, GA, USA).
McMillan ER, Caspari RB. Arthroscopic knot-tying techniques. In An Atlas of Shoulder Arthroscopy, Imhoff AB, Ticker JB, Fu FH (eds). London: Martin Dunitz, 2003. 81–95. © Martin Dunitz 2003.
ch07 21/5/03 9:33 am Page 86
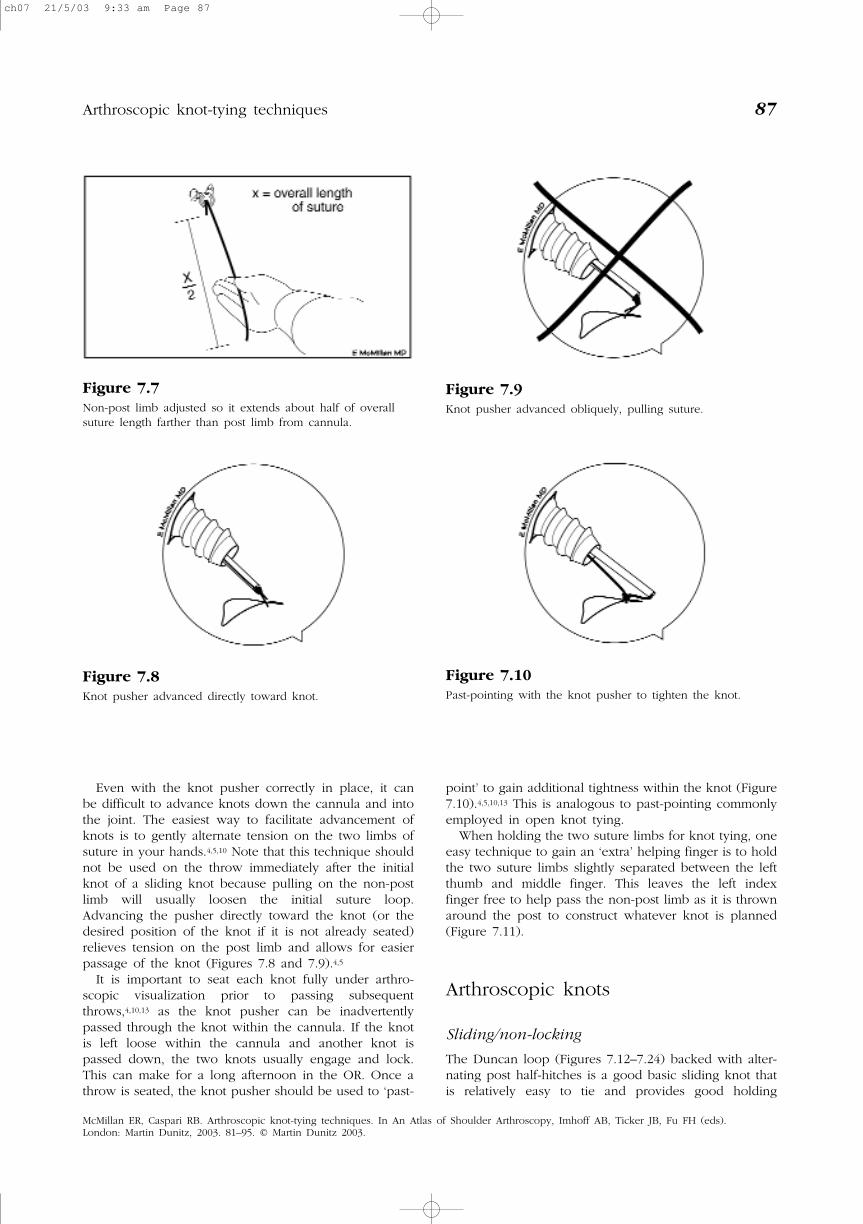
Even with the knot pusher correctly in place, it canbe difficult to advance knots down the cannula and intothe joint. The easiest way to facilitate advancement ofknots is to gently alternate tension on the two limbs ofsuture in your hands.4,5,10 Note that this technique shouldnot be used on the throw immediately after the initialknot of a sliding knot because pulling on the non-postlimb will usually loosen the initial suture loop.Advancing the pusher directly toward the knot (or thedesired position of the knot if it is not already seated)relieves tension on the post limb and allows for easierpassage of the knot (Figures 7.8 and 7.9).4,5
It is important to seat each knot fully under arthro-scopic visualization prior to passing subsequentthrows,4,10,13 as the knot pusher can be inadvertentlypassed through the knot within the cannula. If the knotis left loose within the cannula and another knot ispassed down, the two knots usually engage and lock.This can make for a long afternoon in the OR. Once athrow is seated, the knot pusher should be used to ‘past-
point’ to gain additional tightness within the knot (Figure7.10).4,5,10,13 This is analogous to past-pointing commonlyemployed in open knot tying.
When holding the two suture limbs for knot tying, oneeasy technique to gain an ‘extra’ helping finger is to holdthe two suture limbs slightly separated between the leftthumb and middle finger. This leaves the left indexfinger free to help pass the non-post limb as it is thrownaround the post to construct whatever knot is planned(Figure 7.11).
Arthroscopic knots
Sliding/non-locking
The Duncan loop (Figures 7.12–7.24) backed with alter-nating post half-hitches is a good basic sliding knot thatis relatively easy to tie and provides good holding
Arthroscopic knot-tying techniques 87
Figure 7.7Non-post limb adjusted so it extends about half of overallsuture length farther than post limb from cannula.
Figure 7.8Knot pusher advanced directly toward knot.
Figure 7.9Knot pusher advanced obliquely, pulling suture.
Figure 7.10Past-pointing with the knot pusher to tighten the knot.
McMillan ER, Caspari RB. Arthroscopic knot-tying techniques. In An Atlas of Shoulder Arthroscopy, Imhoff AB, Ticker JB, Fu FH (eds). London: Martin Dunitz, 2003. 81–95. © Martin Dunitz 2003.
ch07 21/5/03 9:33 am Page 87

88 Eric R McMillan and Richard B Caspari
Figure 7.11Suture being held between left thumb and middle finger,leaving the index finger free to help with knot tying.
Figure 7.12Adjust the suture limbs for a sliding knot and hold bothlimbs between the left thumb and middle finger.
Figure 7.13Throw an overhand loop over the tip of your thumb andsubsequently over the post.
Figure 7.14Throw three overhand loops on the post.
Figure 7.15Move the loop that was over your thumb tip down and passthe end of the non-post limb through the loop in adownward direction.
Figure 7.16Apply tension to both ends of the non-post limb to snug theknot.
McMillan ER, Caspari RB. Arthroscopic knot-tying techniques. In An Atlas of Shoulder Arthroscopy, Imhoff AB, Ticker JB, Fu FH (eds). London: Martin Dunitz, 2003. 81–95. © Martin Dunitz 2003.
ch07 21/5/03 9:33 am Page 88

strength.1 The only significant drawback to this knot isits relatively large size compared to other arthroscopicknots.
The Tennessee slider (Bunt-line hitch)7 (Figures7.25–7.29) is a knot that is easy to tie and has a compar-atively low bulk. The Tennessee slider also has goodholding strength.3
Sliding/locking
The tautline (or Midshipman’s) hitch (Figures 7.30–7.37)is one of the more forgiving of the locking sliding knots.
Arthroscopic knot-tying techniques 89
Figure 7.17Hold both limbs with the right thumb and index finger, andapply a pull to the knot with the left thumb and middlefinger to compact the knot. Use caution not to overtighten.
Figure 7.18Apply a push to the knot to further compact it. Seat theknot by applying tension to the post and/or pushing theknot into the joint with a knot pusher on the post limb.
Figure 7.19Throw an underhand loop on the post limb.
Figure 7.20Pull the underhand loop down onto the knot and past-pointto tighten. When using suture, the knot pusher should be onthe non-post limb.
Figure 7.21Switch posts and throw an overhand loop on the new post.
McMillan ER, Caspari RB. Arthroscopic knot-tying techniques. In An Atlas of Shoulder Arthroscopy, Imhoff AB, Ticker JB, Fu FH (eds). London: Martin Dunitz, 2003. 81–95. © Martin Dunitz 2003.
ch07 21/5/03 9:33 am Page 89

90 Eric R McMillan and Richard B Caspari
Figure 7.22Pull the overhand loop down onto the knot and past-pointto tighten.
Figure 7.23Switch posts again and throw an underhand loop on thenew post.
Figure 7.24Pull the underhand loop down onto the knot and past-pointto finish the knot.
Figure 7.25Adjust the suture limbs for a sliding knot and hold bothlimbs between the left thumb and middle finger. Throw anoverhand loop over both limbs.
Figure 7.26Throw an overhand loop on the post and pass the non-postsuture back through the knot, as shown.
Figure 7.27Apply tension to both ends of the non-post limb to snug the knot.Seat the knot by applying tension to the post and/or pushing theknot into the joint with a knot pusher on the post limb.
McMillan ER, Caspari RB. Arthroscopic knot-tying techniques. In An Atlas of Shoulder Arthroscopy, Imhoff AB, Ticker JB, Fu FH (eds). London: Martin Dunitz, 2003. 81–95. © Martin Dunitz 2003.
ch07 21/5/03 9:33 am Page 90

Arthroscopic knot-tying techniques 91
Figure 7.28Switch posts and throw an overhand loop on the new post.Pull the loop down and past-point to tighten.
Figure 7.29Switch posts and throw an underhand loop on the newpost. Pull the loop down and past-point to tighten.
Figure 7.30Adjust the suture limbs for a sliding knot and hold bothlimbs between the left thumb and middle finger. Throw anoverhand loop on the post.
Figure 7.31Throw another overhand loop on the post.
Figure 7.32Slide your left thumb and middle finger down so that theoriginal loops are held under slight tension.
Figure 7.33Throw an overhand loop on the post in this new position.
McMillan ER, Caspari RB. Arthroscopic knot-tying techniques. In An Atlas of Shoulder Arthroscopy, Imhoff AB, Ticker JB, Fu FH (eds). London: Martin Dunitz, 2003. 81–95. © Martin Dunitz 2003.
ch07 21/5/03 9:33 am Page 91

92 Eric R McMillan and Richard B Caspari
Figure 7.34Pull the loop down to snug the knot.
Figure 7.37Change the knot to a non-sliding configuration by pulling onthe non-post limb to finish the knot.
Figure 7.39Throw another underhand loop on the post. Pull the loopdown and past-point to tighten.
Figure 7.36Release the post limb and grasp the non-post limb with yourright thumb and index finger.
Figure 7.35Seat the knot by applying tension to the post and/or pushingthe knot into the joint with a knot pusher on the post limb.
Figure 7.38Adjust the limbs for a non-sliding knot and throw anunderhand loop on the post. Pull the loop down to formthe beginning of the knot and past-point to tighten.
McMillan ER, Caspari RB. Arthroscopic knot-tying techniques. In An Atlas of Shoulder Arthroscopy, Imhoff AB, Ticker JB, Fu FH (eds). London: Martin Dunitz, 2003. 81–95. © Martin Dunitz 2003.
ch07 21/5/03 9:33 am Page 92

It has a small bulk and good holding strength empiri-cally.
Non-sliding
The Revo knot (Figures 7.38–7.42) is a good choicewhen the need to tie a non-sliding knot arises. It isrelatively easy to tie and has been shown to be verysecure.3
Arthroscopic knot-tying techniques 93
Figure 7.40Throw an overhand loop on the post. Pull the loop downand past-point to tighten.
Figure 7.43The Duncan loop knot backedwith alternating post half-hitches—a non-locking slidingknot.
Figure 7.42Switch posts again and throw an underhand loop on the newpost. Pull the loop down and past-point to finish the knot.
Figure 7.41Switch posts and throw an underhand loop on the newpost. Pull the loop down and past-point to tighten.
Figure 7.44The Tennessee sliderknot7—a non-locking slidingknot.
McMillan ER, Caspari RB. Arthroscopic knot-tying techniques. In An Atlas of Shoulder Arthroscopy, Imhoff AB, Ticker JB, Fu FH (eds). London: Martin Dunitz, 2003. 81–95. © Martin Dunitz 2003.
ch07 21/5/03 9:33 am Page 93

Knot diagrams (Figures 7.43–7.49)
Diagrammatic representations of all of the knots shownabove as well as a few other common knots areincluded.
Conclusion
Arthroscopic knot tying is an exciting aspect ofarthroscopy that significantly expands the arthroscopist’s
capabilities. Although technically demanding, observa-tion of a few precautions and use of a few simpletechniques can bring arthroscopic knot tying within thegrasp of the interested arthroscopist.
References
1. Loutzenheiser TD, Harryman DT II, Yung SW et al. Optimizingarthroscopic knots. Arthroscopy 1995; 11:199–206.
2. Thal R. A knotless suture anchor: technique for use in arthro-scopic Bankart repair. Presented at the 18th Annual Meeting,
94 Eric R McMillan and Richard B Caspari
Figure 7.46The Revo knot7—anon-sliding knot.
Figure 7.48The Roeder knot11—anon-locking sliding knot.
Figure 7.47The Hangman’s loopknot backed withalternating post half-hitches—a non-lockingsliding knot.
Figure 7.49The Weston knot15—alocking sliding knot.
Figure 7.45The Tautline (orMidshipman’s14) Hitchknot—a locking slidingknot.
McMillan ER, Caspari RB. Arthroscopic knot-tying techniques. In An Atlas of Shoulder Arthroscopy, Imhoff AB, Ticker JB, Fu FH (eds). London: Martin Dunitz, 2003. 81–95. © Martin Dunitz 2003.
ch07 21/5/03 9:33 am Page 94

Arthroscopy Association of North America, Vancouver, BC,Canada, April, 1999.
3. Nottage WM. Suture, anchors, and knots. Presented at the 18thAnnual Meeting, Fall Course, Arthroscopy Association of NorthAmerica, Vancouver, BC, Canada, April, 1999.
4. McMillan ER. A simplified technique for suture handling duringarthroscopic knot tying. The ‘Masters Experience’ Knot TyingManual. Rosemont, IL: Arthroscopy Association of NorthAmerica, 1999.
5. Nottage WM. Arthroscopic knot tying. Presented at the 15th FallCourse, Arthroscopy Association of North America, Palm Desert,California, 1996.
6. Burkhart SS, Wirth MA, Simonick M et al. Loop security as adeterminant of tissue fixation security. Arthroscopy 1998;14:773–6.
7. Snyder SJ. Technique of arthroscopic rotator cuff repair usingimplantable 4mm Revo™ suture anchors, suture shuttle relaysand #2 non-absorbable mattress sutures. Presented at the 18thAnnual Meeting, Arthroscopy Association of North America,Vancouver, BC, Canada, April, 1999.
8. Abrams JS. Principles of arthroscopic stabilization. Presented atthe 16th Fall Course, Arthroscopy Association of North America,Nashville, Tennessee, 1997.
9. Tauro JC. Arthroscopic rotator cuff repair: analysis of techniqueand results at 2- and 3-year follow-up. Arthroscopy 1998; 14:45–51.
10. Fischer SP. Tying good knots arthroscopically. Presented at theSpecialty Day Meeting, Arthroscopy Association of NorthAmerica, San Francisco, California, 1997.
11. Nottage WM, Lieurance RK. Arthroscopic knot tying techniques.Arthroscopy 1999; 15:515–21.
12. De Beer JF. Arthroscopic Bankart repair: some aspects of sutureand knot management. Arthroscopy 1999; 15:660–2.
13. Sweeney HJ. Knot tying. Presented at the 17th Fall Course,Arthroscopy Association of North America, Palm Desert,California, November, 1998.
14. Ashley CW. Hitches to spar and rail (right-angle pull). In: TheAshley Book of Knots. New York: Doubleday, 1944;296.
15. Chan KC. Classification of sliding knots for use in arthroscopicsurgery. Presented at the 18th Annual Meeting, ArthroscopyAssociation of North America, Vancouver, BC, Canada, April, 1999.
Arthroscopic knot-tying techniques 95
McMillan ER, Caspari RB. Arthroscopic knot-tying techniques. In An Atlas of Shoulder Arthroscopy, Imhoff AB, Ticker JB, Fu FH (eds). London: Martin Dunitz, 2003. 81–95. © Martin Dunitz 2003.
ch07 21/5/03 9:33 am Page 95

ch07 21/5/03 9:33 am Page 96