kfs cash operations and accounts receivable - faqs cash operations and accounts receivable ... table...
TRANSCRIPT

KFS Cash Operations and Accounts Receivable A Procedural Guide for Kuali Financial Systems eDocs Office of the Bursar
2015

2
Table of Contents
eDoc / Process Page Cash Receipt (CR) 3
Advance Deposit (AD) 7 Credit Card Receipt (CCR) 9
Customer eDoc (CUS) 12 Create New Customer (CUS) 14
Customer Edit Adding Alternate Address (CUS)
18
Customer Invoice (INV) 21 Correction Button – Customer Invoice 26
Customer Invoice – Batch Upload 27 Customer Invoice – Batch Print 31
Customer Credit Memo (CM) 33 Cash Control (CTRL) 36
Payment Application (APP) 39 Customer Report/History 42
Notes/Tips 44 Questions? 46
Appendix 47

3
Cash Receipt (CR)
Used to record cash and checks for subsequent deposit into bank
accounts by Cash Operations.
The CR eDoc routes to Cash Operations staff for approval after the deposit has been brought/sent to the Cash Operations Office.
To create a Cash Receipt: Main Menu Tab Transactions Financial Processing Cash Receipt

4
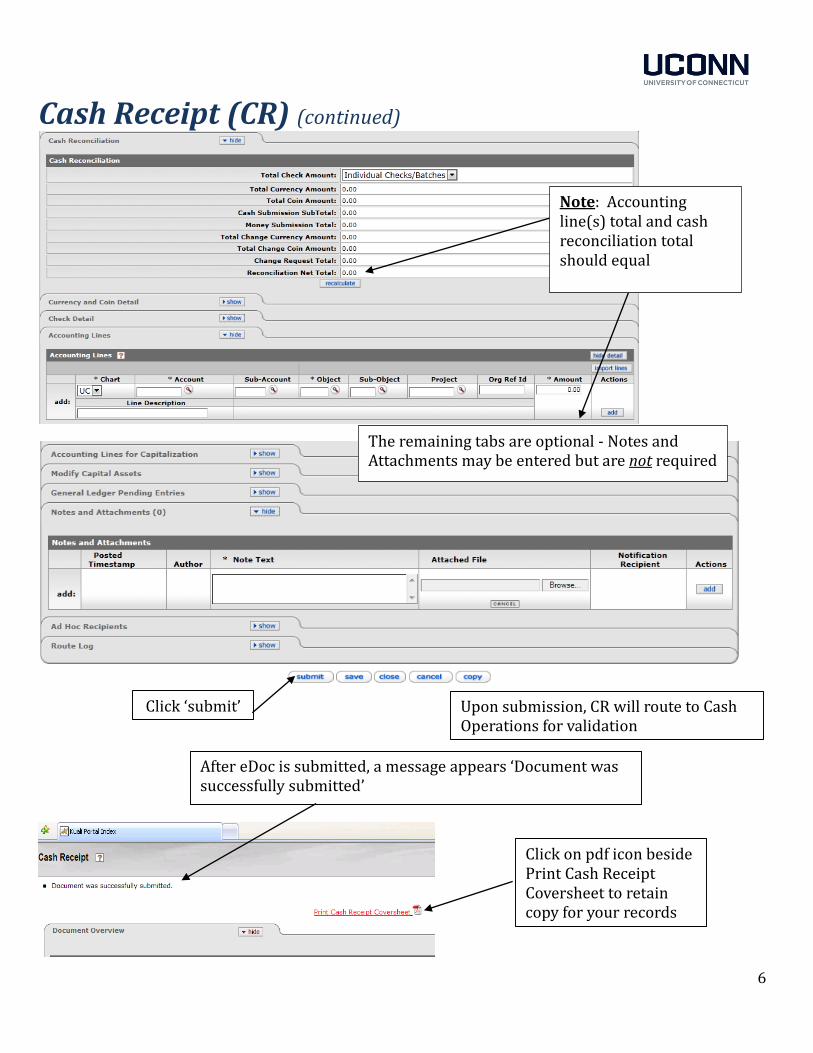
Cash Receipt (CR) (continued)
Use the drop down menu to choose between entering individual checks/batches or total only
Enter currency and coin count here
Enter Description

5
Cash Receipt (CR) (continued)
Enter individual check details (check #, date, description [name on check], amount) (if you did not choose total from drop down menu) and click ‘add’ button
Enter Accounting Lines: account number, object code, and amount. (If using expense object code, amount entered must be negative) and click ‘add’
Enter Line Description (not required, but appears on General Ledger)
Click ‘add’ button after each accounting line
Use ‘Individual Checks/Batches’ to list checks individually in the eDoc. For large number of checks, use ‘Total Only’ to enter total amount of checks in box, and attach Excel spreadsheet to Notes and Attachments tab. Excel file should include check #, date, and amount. If ‘Total Only’ is selected and spreadsheet is not attached, eDoc could be disapproved
6
Cash Receipt (CR) (continued)
Upon submission, CR will route to Cash Operations for validation
Click ‘submit’
After eDoc is submitted, a message appears ‘Document was successfully submitted’
Click on pdf icon beside Print Cash Receipt Coversheet to retain copy for your records
Note: Accounting line(s) total and cash reconciliation total should equal
The remaining tabs are optional - Notes and Attachments may be entered but are not required

7
Advance Deposit (AD) When departments receive wire or ACH payments, an Advance
Deposit (AD) eDoc is required to record receipt of the funds.
An AD is also used to report batches of RDS checks.
ADs enable distribution of the amount received directly to the appropriate accounts at the bank.
To Create an Advance Deposit Main Menu Tab Transactions Financial Processing Advance Deposit

8
Advance Deposit (AD) (continued)
Enter Description
Enter Date, Reference Number Enter Amount and click ‘add’
Enter Account Number, Object Code, Amount and click ‘add’ then ‘submit’
Enter Line Description (not required but appears on General Ledger)
RDS users must list location number in Organization Document Number field, for example “67000002”
Note: Accounting Line Total and Advance Deposit Total should equal

9
Credit Card Receipt (CCR) Used for departmental deposit of credit card receipts. Records income received via credit card payments. Negative accounting lines are acceptable.
Enter Description (date of transactions MM/DD/YY, Amount, last three digits of merchant number)
Enter Credit Card Type (click on Magnifying Glass for options)
To Create a Credit Card Receipt: Main Menu Tab Transactions Financial Processing Credit Card Receipt

10
Credit Card Receipt (CCR) (continued)
Click ‘search’ and system will show available options below
Once options are displayed, choose correct Credit Card Type Code, click ‘return value’
Enter Vendor Number (10 digit number assigned or click magnifying glass for lookup) Enter Date, Ref Nbr
(Reference Number) and Amount
Click ‘add’
Enter Account Number, Object Code, and Amount
Click ‘add’
Enter Line Description (not required but appears on General Ledger)
Click ‘submit’
Note: Accounting Line Total must equal the Credit Card Receipt

11
Credit Card Receipt (CCR) (continued)
After a document has been saved, the General Ledger Pending Entries tab will populate with debits and credits Note: Utilizing the General Ledger Pending Entries Tab is a beneficial tool to confirm entries prior to submission
Please attach supporting documentation for CCR’s in the Notes and Attachments section - supporting documentation can be a copy of the daily settlement or any other report run to confirm the daily credit card activity

12
Customer eDoc (CUS) Used to create new customers and edit existing customers. KFS auto-generates new customer account numbers. See
specifications below for further details. Stores customer biographical information (address, phone
number, customer type, tax ID, etc.) Allows multiple addresses for each customer.
*Note: Customer statements are strictly mailed to the primary address
Customer eDoc Specifications 1) The customer account number is based on user entry in customer
name field. The customer name must be entered as last name, first
name. A customer account number will be auto-generated and
consist of the first 3 letters of the last name and 4 to 5 numerical
digits, (i.e. Doe, John customer account number would be
DOE12345).
2) Customer accounts should not have special characters in the first 3
digits (i.e., C&S Distributors - enter customer name as ‘Distributors
C&S). Customers who have special characters in their account
number will affect reporting when running reports in Web FOCUS.
13
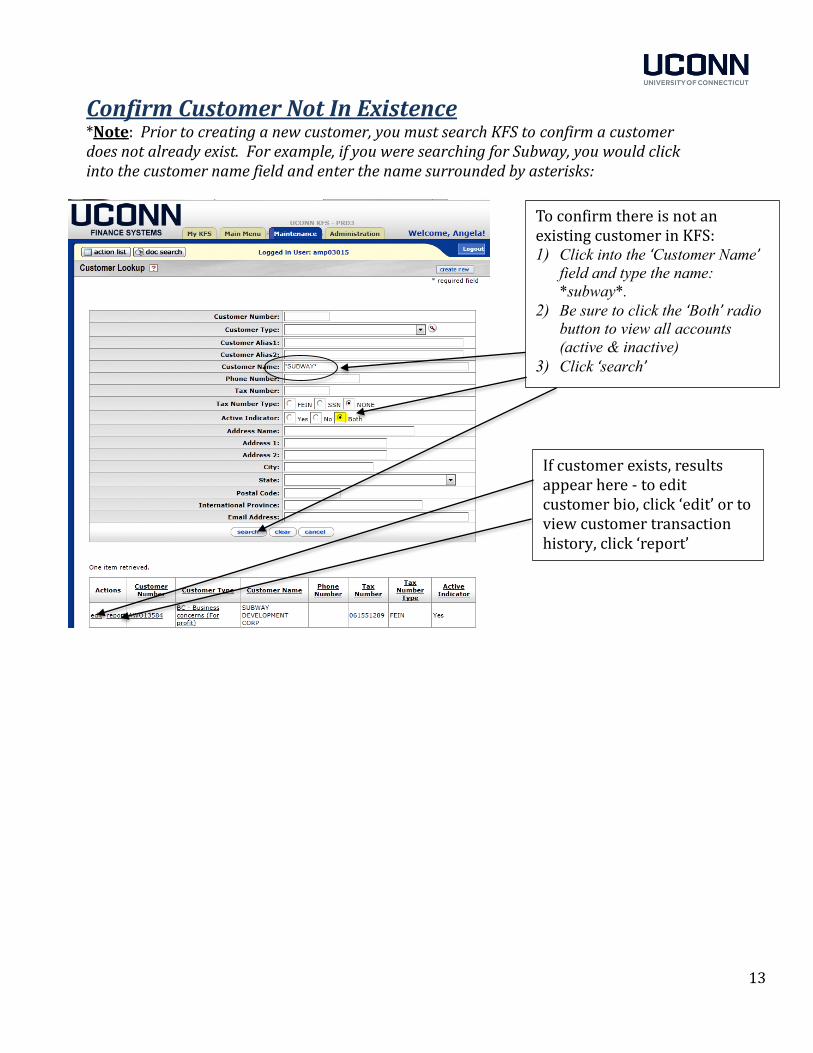
Confirm Customer Not In Existence *Note: Prior to creating a new customer, you must search KFS to confirm a customer does not already exist. For example, if you were searching for Subway, you would click into the customer name field and enter the name surrounded by asterisks:
To confirm there is not an existing customer in KFS: 1) Click into the ‘Customer Name’
field and type the name:
*subway*.
2) Be sure to click the ‘Both’ radio
button to view all accounts
(active & inactive)
3) Click ‘search’
If customer exists, results appear here - to edit customer bio, click ‘edit’ or to view customer transaction history, click ‘report’

14
Create New Customer (after confirming customer does not exist)
To Create a New Customer: Maintenance Tab Accounts Receivable Click Customer
While in the Customer Lookup screen:
1) Click ‘create new’ to create a new customer or
2) Click ‘search’ to edit an existing customer

15
Create New Customer (continued) Tabs: Document Overview & General Information
Enter Description of eDoc (wording should be consistent with like eDocs)
Required fields marked with asterisk (*)
eDoc # Initiator Netid
Collection Status defaults to ‘Current’
The ‘Address Name’ field is the name which prints on Customer Statement
*It is acceptable to enter first name, last name in this section
Enter Customer Name as last name, first name

16
Create New Customer (continued)
Tabs: Contact Information, Addresses, Notes & Attachments
Customer Contact Information
Customer Address Information
Options from the Customer Type Dropdown Menu:
The most common customer type is IO for Individual Other
IMPORTANT: Contact Information: Enter as much contact information as possible. The more information you enter, the better chances the AR Office/collection agency has at recovering funds if customer fails to pay
Complete the required address fields (*)
Click ‘add’
Email Address to be a required field in the near future
**Minimum recommendation:
include customer phone number or
email and contact name

17
Create New Customer (continued) Notes and Attachments
Tabs: Ad hoc Recipients
Ad Hoc Recipients
Once all tabs are completed and all customer information is entered, you may click ‘submit’ at bottom of eDoc and the customer eDoc will be routed to the AR Manager’s action list for approval. Every eDoc has a route log which will display Pending Action Requests (current approval), as well as any Future Action Requests (future approval(s) in the workflow).
Note: Departments will not be notified when the Customer has been approved. If you need the customer approved prior to the 24 hour turnaround rule, please contact the Accounts Receivable Office at 5995 to request an exception.
Click ‘add’
Notes and Attachments are useful tools to include in a customer account Anytime there is an update to a customer address or issue with an invoice/payment, a note should be entered in the customer account. If ever a credit memo is necessary, a note must be entered as to why the credit memo is required and emails or supporting documentation should be attached
Ad Hoc Recipients can also be useful, for example if you must inform your supervisor of an invoice you created or you want another KFS user to acknowledge an eDoc, etc. Simply enter the action requested, enter the person you are ad hoc-ing, and click the ‘add’ button.
Click ‘add’

18
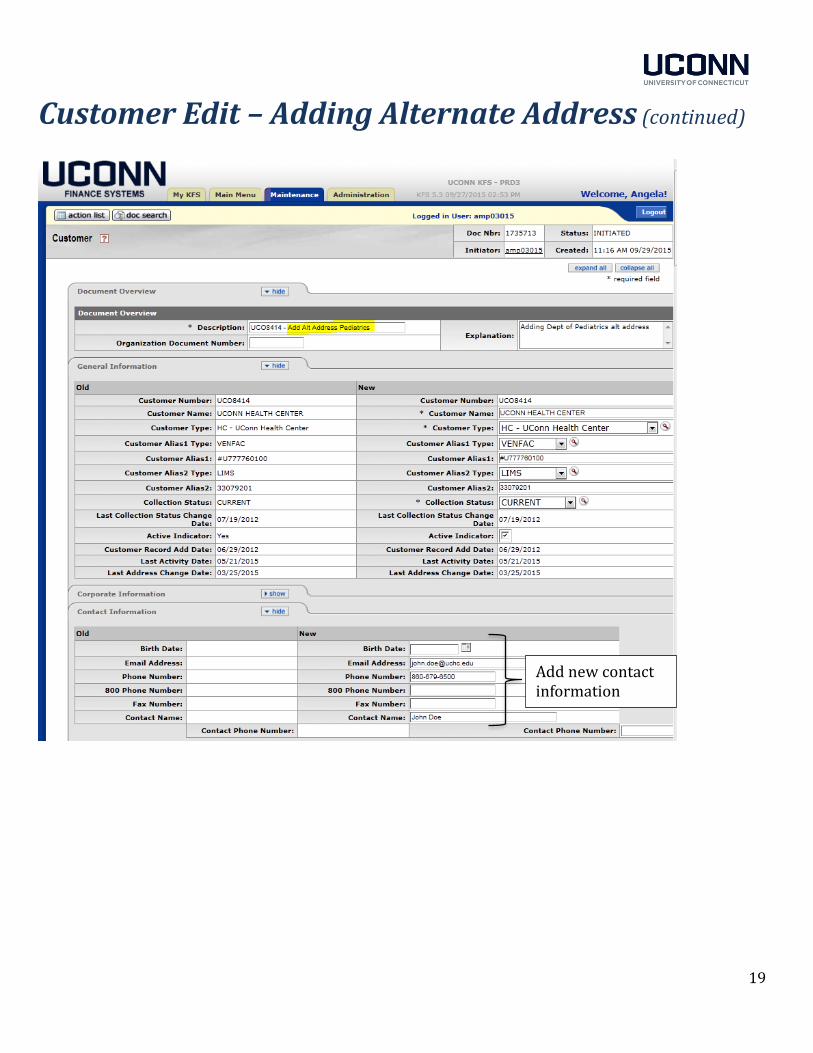
Customer Edit – Adding Alternate Address Alternate addresses are often necessary for larger customer accounts, for example the UConn Health Center. To add an alternate address, the customer account needs to be edited. Follow these steps to add an alternate address:
Result appears, click ‘edit’ at bottom left of screen.
To Create an Alternate Address: Maintenance Tab Accounts Receivable Customer
Click ‘edit’ when customer account appears
19
Customer Edit – Adding Alternate Address (continued)
Add new contact information

20
Customer Edit – Adding Alternate Address (continued)
1) Edit customer address and click ‘add’
2) At the bottom of the eDoc click ‘submit’
21
Customer Invoice (INV)
Prepare an invoice to bill for goods and/or services provided. Describe transaction – enter description in Document Overview
section which will be helpful at first glance. Entering basic text will not be beneficial when/if needed in future
Identify customer
Enter accounting lines
Option to save invoice eDoc to be completed at a later time. Submit eDoc for approval. See Accounts Receivable FAQs for billing other state agencies.
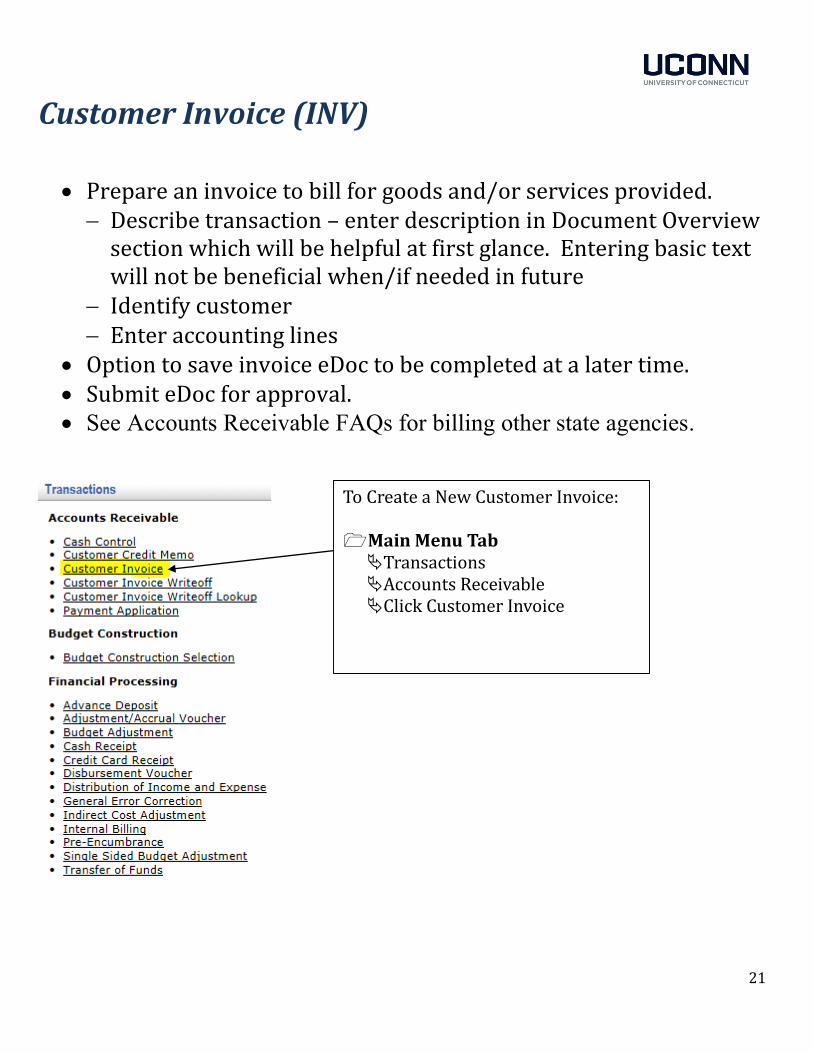
To Create a New Customer Invoice: Main Menu Tab Transactions Accounts Receivable Click Customer Invoice

22
Customer Invoice (continued)
Under Billing/Shipping Tab, enter ‘Bill To Address Identifier’ or click on the magnifying glass to search
Enter Description (appears on Customer Statement not on Invoice)
Enter Organization’s Invoice Number (optional)
Populates Billing Organization Code (based on Initiator)
Under General Tab, enter Customer Number or click magnifying glass to search by name
Due date defaults to 30 days
Enter Attention Line Text (whom you are sending invoice)
Enter optional fields, as needed
If no ‘Ship To Address’ is selected, goods are treated as picked up at Billing Organization’s location
A Ship To Address may be added in the Customer Edit function, and then selected here if the Shipping Address differs from the Billing Address
PO # is helpful and often required by Customer’s AP dept and payment will not be forwarded unless PO provided

23
Customer Invoice (continued)
Enter Invoice Item Quantity, Invoice Item Description, and Invoice Item Unit Price
Click ‘add’
Note: The Invoice Item Service Date currently does not appear on the
Invoice - the information entered in the Invoice Item Description is what
shows up on the General Ledger description
Enter Account Number and Object Code (revenue)
Any backup or notes regarding the invoice should be included in the Notes and Attachments section - emails or documents can be attached/added as well
Click ‘submit’
Click ‘add’

24
Customer Invoice eDoc: Refer to page 25 to see where each field appears on invoice
①
②
③
④
⑤ ⑥
⑦
⑧
⑨
⑩
⑪ ⑫ ⑬
⑭
⑮
⑯

25
Customer Invoice Example: Refer to page 24 to see how the eDoc fields flow to the invoice.
①
①
②
③
④
⑤
⑥ ⑦
⑧
⑨
⑩
⑪ ⑫ ⑬ ⑭ ⑮
⑯
⑯
④
③
⑧
26
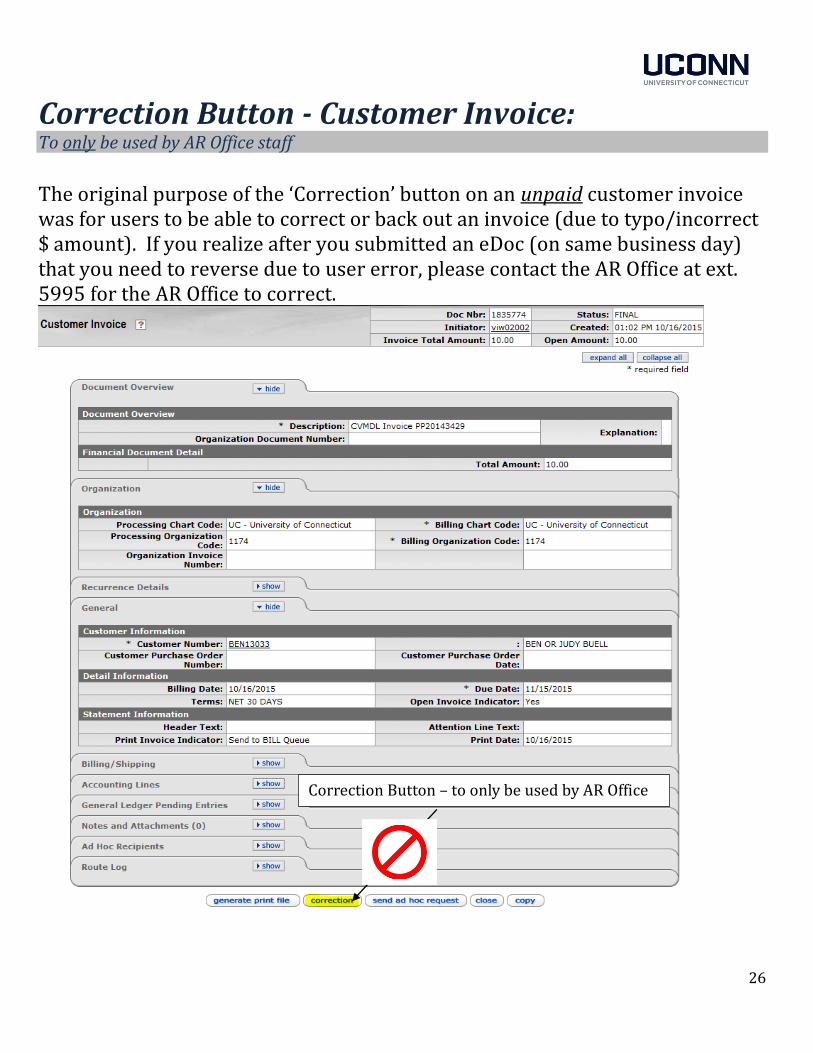
Correction Button - Customer Invoice:
To only be used by AR Office staff
The original purpose of the ‘Correction’ button on an unpaid customer invoice was for users to be able to correct or back out an invoice (due to typo/incorrect $ amount). If you realize after you submitted an eDoc (on same business day) that you need to reverse due to user error, please contact the AR Office at ext. 5995 for the AR Office to correct.
Correction Button – to only be used by AR Office

27
Customer Invoice – Batch Upload
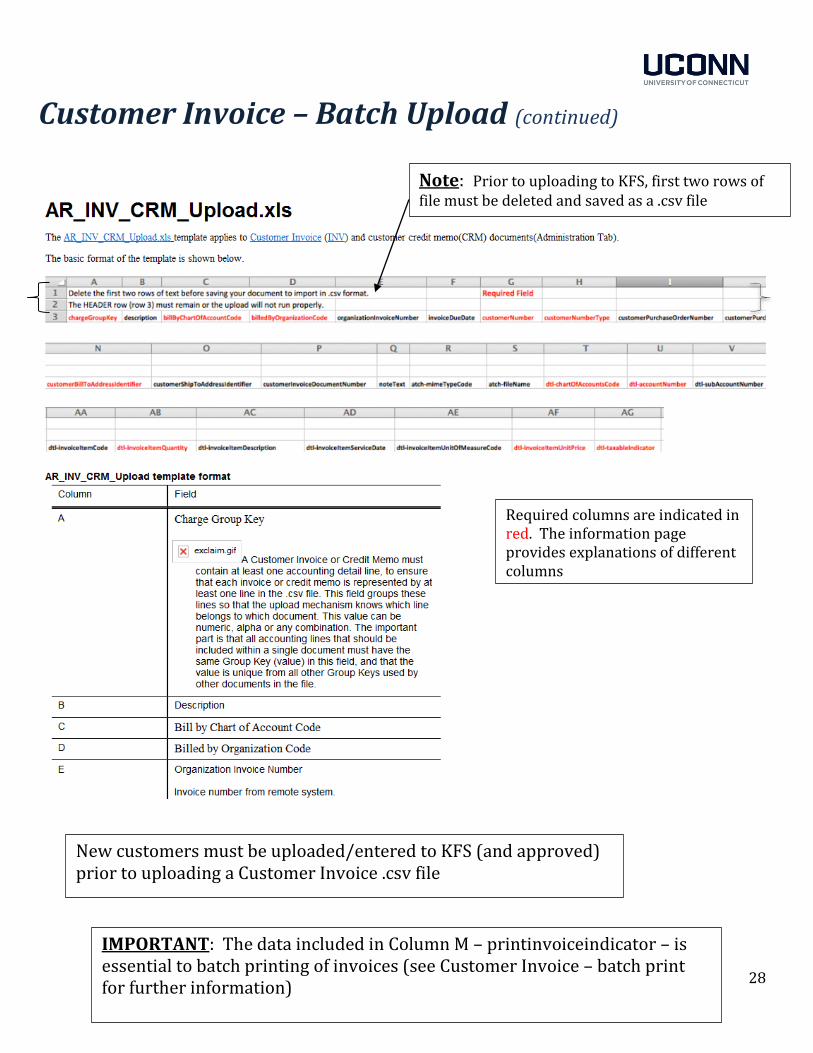
KFS allows for invoices to be uploaded and printed via batch by completing the AR_INV_CRM_Upload.xls template.
To access the template, open the Customer Invoice eDoc and scroll down to the Accounting Lines tab and click on red question mark icon as shown here:
On Accounting Lines tab, click red question mark icon to open list of Data Import Templates
Click to open Excel file template
28
Customer Invoice – Batch Upload (continued)
IMPORTANT: The data included in Column M – printinvoiceindicator – is essential to batch printing of invoices (see Customer Invoice – batch print for further information)
Required columns are indicated in red. The information page provides explanations of different columns
New customers must be uploaded/entered to KFS (and approved) prior to uploading a Customer Invoice .csv file
Note: Prior to uploading to KFS, first two rows of file must be deleted and saved as a .csv file
29
Customer Invoice – Batch Upload (continued)
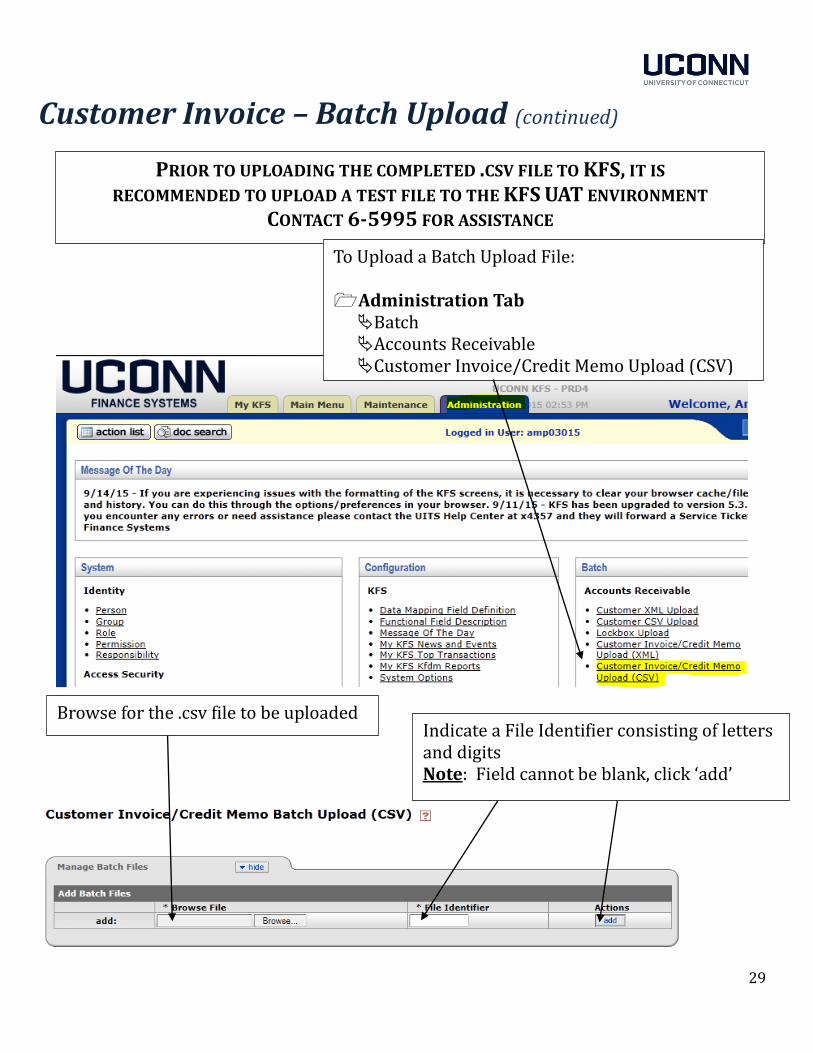
PRIOR TO UPLOADING THE COMPLETED .CSV FILE TO KFS, IT IS RECOMMENDED TO UPLOAD A TEST FILE TO THE KFS UAT ENVIRONMENT
CONTACT 6-5995 FOR ASSISTANCE
To Upload a Batch Upload File: Administration Tab Batch Accounts Receivable Customer Invoice/Credit Memo Upload (CSV)
Browse for the .csv file to be uploaded Indicate a File Identifier consisting of letters and digits Note: Field cannot be blank, click ‘add’

30
Customer Invoice – Batch Upload (continued)
KFS returns SUCCESS line for each invoice and invoice eDoc number
OR an unsuccessful upload is indicated
When batch upload fails, print error screen, and contact Angela at 6-5995 for assistance
KFS returns an ERROR line for each invoice and batch failure
After a successful upload in UAT, test batch print (instructions included on next page), then upload .csv file to KFS and batch print invoices
Successful upload indicated

31
Customer Invoice - Batch Print
To print customer invoices to a single pdf. NOTE: Pop-up blockers must be turned off or batch invoices will be lost
Customer invoice batches only print once. If batch is lost, each invoice must be
printed individually from invoice eDoc.
To Batch Print Customer Invoice: Main Menu Tab Reports Accounts Receivable Customer Invoice
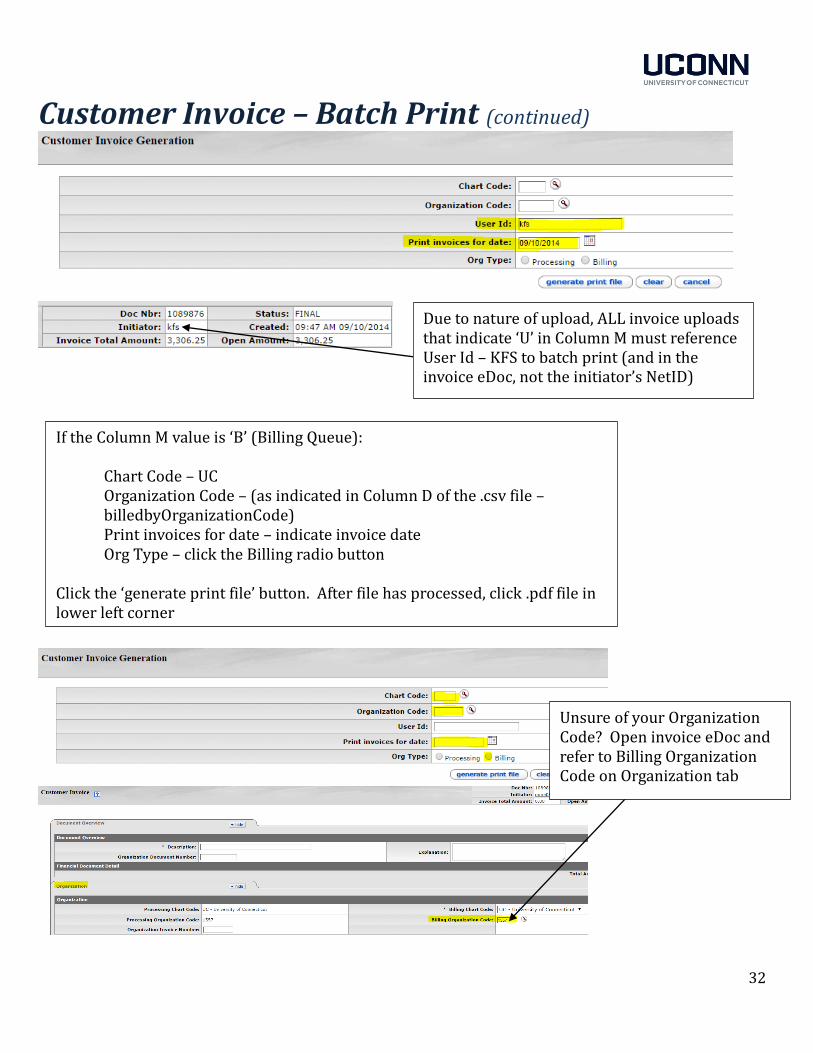
If invoices have been uploaded, Column M from the .csv file (printinvoiceindicator) is considered to print
If Column M value is U (User Queue) User ID – kfs Print invoices for date – indicate invoice date Click the ‘generate print file’ button. After file has processed, click .pdf file in lower left corner
32
Customer Invoice – Batch Print (continued)
Due to nature of upload, ALL invoice uploads that indicate ‘U’ in Column M must reference User Id – KFS to batch print (and in the invoice eDoc, not the initiator’s NetID)
Unsure of your Organization Code? Open invoice eDoc and refer to Billing Organization Code on Organization tab
If the Column M value is ‘B’ (Billing Queue): Chart Code – UC Organization Code – (as indicated in Column D of the .csv file – billedbyOrganizationCode) Print invoices for date – indicate invoice date Org Type – click the Billing radio button Click the ‘generate print file’ button. After file has processed, click .pdf file in lower left corner

33
Customer Credit Memo (CM)
To reduce charges (units or dollars) on an existing invoice. Credit Memos can only be entered against an invoice if the invoice has an
outstanding balance and the invoice must be in ‘Final’ status. Routes to Fiscal Officer of revenue account being credited on original
invoice for approval.
Click ‘continue’
Enter Original Invoice Number
To Create a Customer Credit Memo: Main Menu Tab Transactions Accounts Receivable Click Customer Credit Memo

34
Customer Credit Memo (CM) (continued)
IMPORTANT: Customer credit memos are created to cancel charges on customer accounts. When a customer credit memo is created, it is extremely important for departments to enter a note in the Notes and Attachments section of the Customer Credit Memo eDoc. If your department is audited, you must provide documentation as to why you credited the customer’s account. Be sure to enter a note describing the reason for the credit on the account/cancellation of the invoice. The more information (emails/correspondence) you provide, the better.
Enter Explanation
Click ‘recalculate’
Enter Description
Input Quantity (units) or Amount (dollars) to be credited
Do not enter both

35
Customer Credit Memo (CM) (continued)
Enter detail describing reason for credit memo
Attach emails/correspondence as backup in event your department is audited
Click ‘add’
Click ‘submit’

36
Cash Control (CTRL)
Facilitates the entry and tracking of payment information. Payment amount cannot be negative.
To Create a Cash Control: Main Menu Tab Transactions Accounts Receivable Cash Control
REMINDER:
Relieving an existing KFS receivable The Cash Control eDoc is the eDoc to be used to relieve an existing receivable. If an invoice was created on a customer account, the only way to clear the receivable from the account is to either: 1) Enter cash control and apply payment via
Payment Application or 2) Process Customer Credit Memo

37
Cash Control (CTRL) (continued)
Enter Customer # or use search icon to search and return value
Enter identifier associated with payment such as check number
Enter description (which will be reflected on reports and in general ledger)
Enter amount of payment received
Click ‘add’
Remaining tabs are optional
Click ‘submit’
Enter Description
Enter Explanation
Enter date payment received

38
Cash Control (CTRL) (continued)
Submission of Cash Control automatically generates Payment Application. Click on Payment Application eDoc number to open

39
Payment Application (APP)
Used when funds are already in AR Module, but have yet to be applied to a specific invoice.
Contains several unique tabs, in addition to standard financial transaction tabs:
Control Information Summary of Applied Funds Quick Apply to Invoice Apply to Invoice Detail Non-AR
Information brought over by Cash Control eDoc will be displayed
To Create a Payment Application: Main Menu Tab Transactions Accounts Receivable Payment Application

40
Payment Application (APP) (continued)
Summary of Applied Funds tab tracks amount(s) being applied - open amount decreases and applied amount increases as funds are applied
Quick Apply to Invoice tab allows you to quickly select multiple invoices and apply funds to each selected invoice in full
Check Quick Apply box next to each invoice you wish to apply payment to. Click ‘apply’
Non-AR tab allows for deposit of funds which are not related to payment of an invoice (to be used only by the AR Office)

41
Payment Application (APP) (continued)
Remaining tabs are optional
Click ‘submit’
42
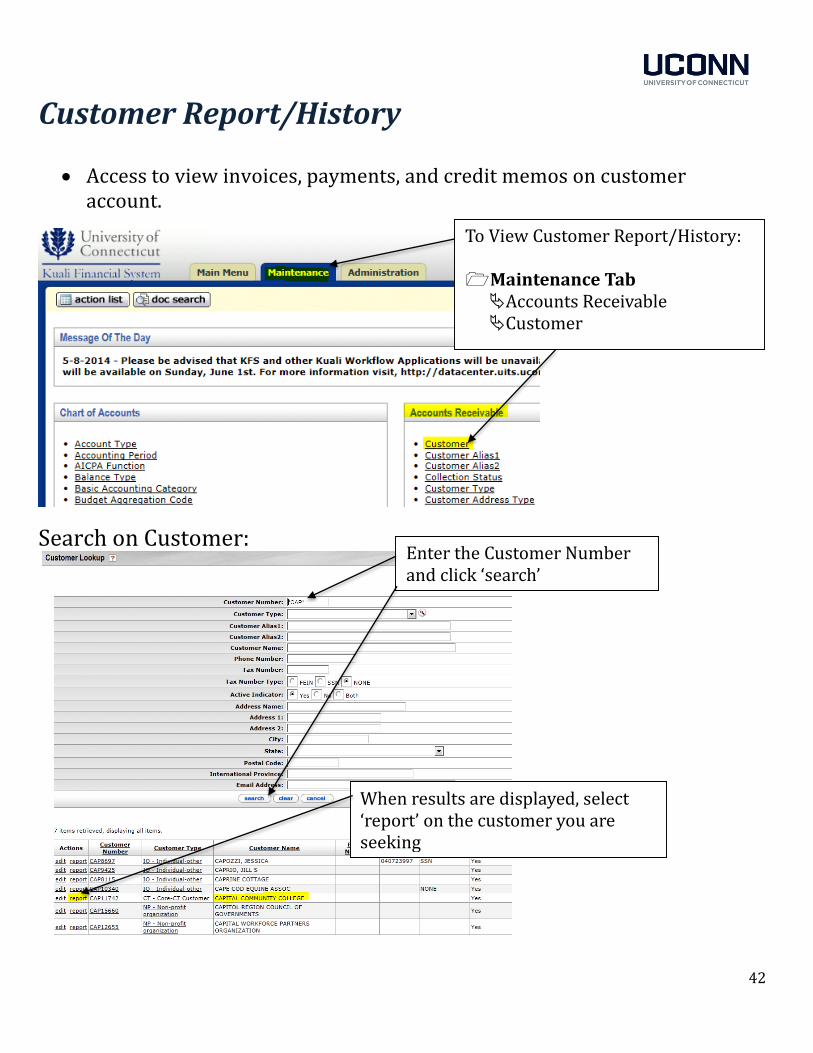
Customer Report/History
Access to view invoices, payments, and credit memos on customer account.
Search on Customer:
When results are displayed, select ‘report’ on the customer you are seeking
To View Customer Report/History: Maintenance Tab Accounts Receivable Customer
Enter the Customer Number and click ‘search’
43
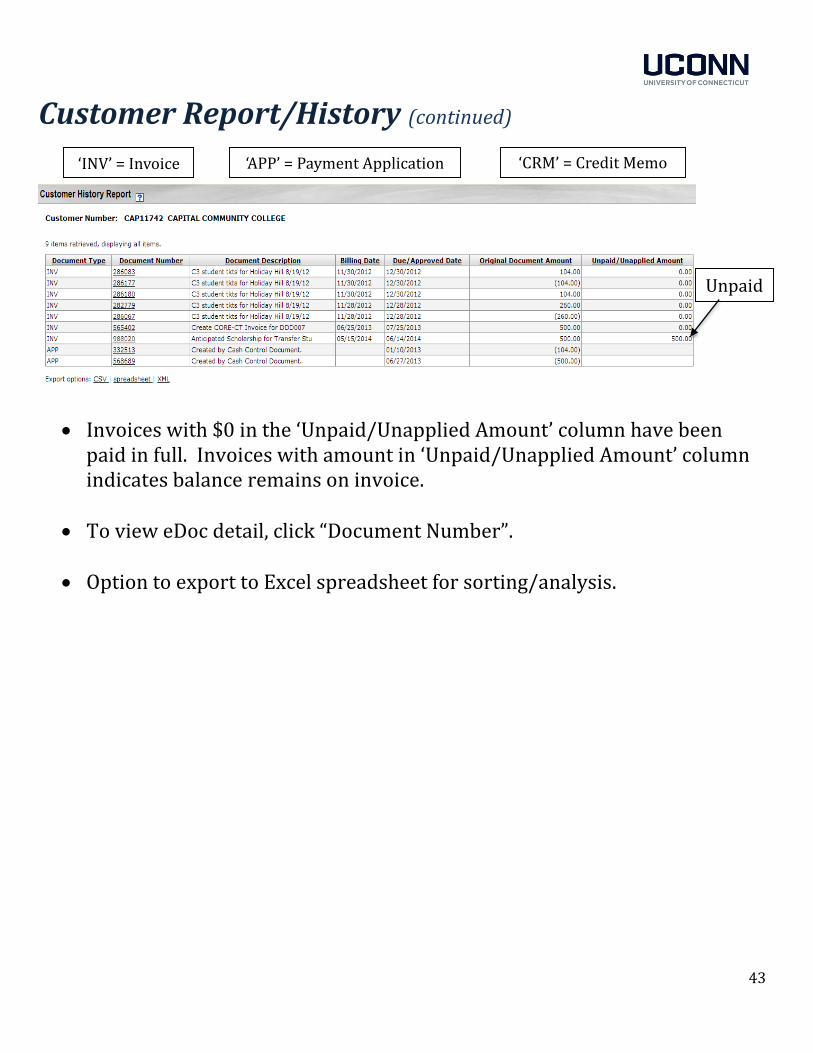
Customer Report/History (continued)
Invoices with $0 in the ‘Unpaid/Unapplied Amount’ column have been paid in full. Invoices with amount in ‘Unpaid/Unapplied Amount’ column indicates balance remains on invoice.
To view eDoc detail, click “Document Number”.
Option to export to Excel spreadsheet for sorting/analysis.
‘INV’ = Invoice ‘APP’ = Payment Application
Unpaid
‘CRM’ = Credit Memo
44
Notes/Tips: Miscellaneous information in regards to KFS invoices:
1) Invoice Generation - The responsibility falls on the university department to print and mail invoices to the Customer with the exception of other state agencies who require a Core-CT State Transfer Invoice. After submitting invoice, return to the bottom of the eDoc and click “reload”. The invoice will then go to “FINAL” status. At the bottom of the eDoc, click “generate print file”. This will bring up a .pdf file in another tab which can then be printed and mailed or sent to the customer via email. If the .pdf does not open, be sure to check for pop-up blockers and/or clear your cache.
2) Relief of Receivable - If department received payment directly and an invoice
has been created in KFS, the department must create a cash control to relieve
the receivable. Failure to do so by creating a cash receipt/credit card
receipt/advance deposit to be directly deposited into your respective KFS
departmental account will result in the customer receiving a statement
indicating payment continues to be due. In turn, your customer will contact
our office frustrated.
3) Quarterly Customer Statements – Quarterly customer statements are
generated and forwarded to the customer by the Accounts Receivable Office.
Customers who have outstanding invoices greater than 60 days, receive a
template past due letter requesting payment promptly. By the time the next
customer statements are run and if the balance is not paid, the customer
received another past due letter informing them they are in jeopardy of being
sent to an outside collection agency.
4) Internal Billing – The proper eDoc to be used when a University Department
needs to bill another University Department is the Internal Billing eDoc. To
access this eDoc follow this navigation: Main Menu Tab Transactions
Financial Processing and click ‘Internal Billing’.
45
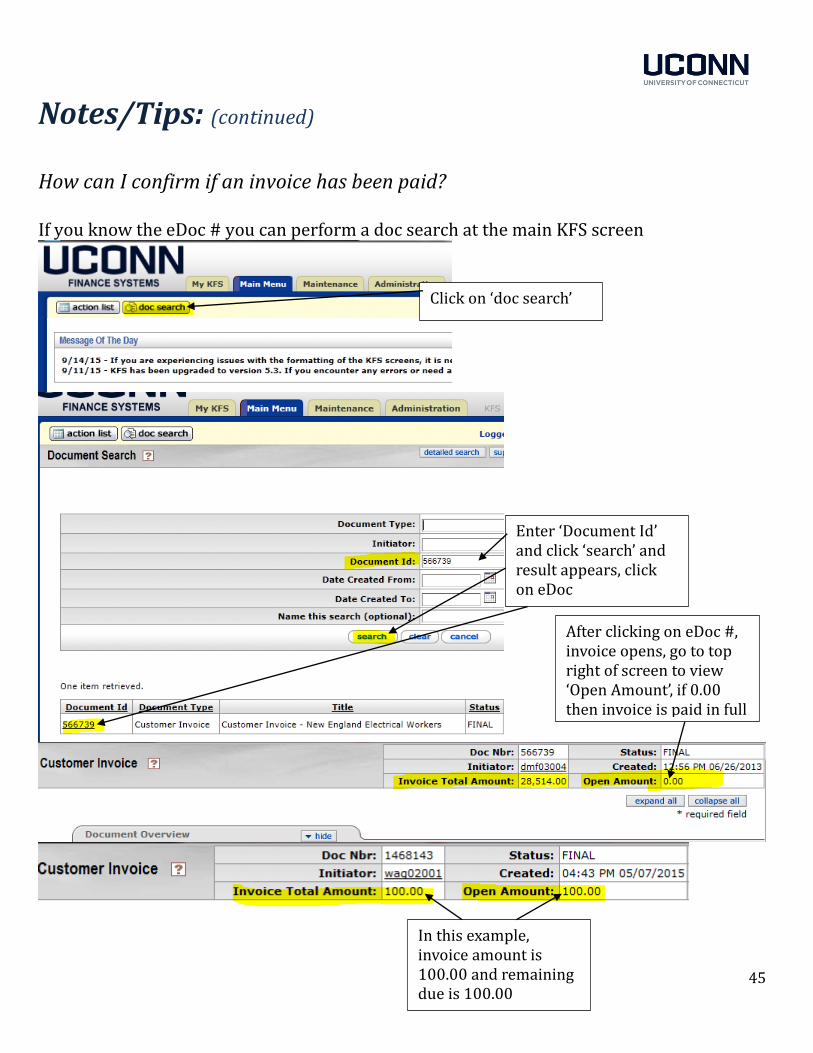
Notes/Tips: (continued) How can I confirm if an invoice has been paid? If you know the eDoc # you can perform a doc search at the main KFS screen
Click on ‘doc search’
Enter ‘Document Id’ and click ‘search’ and result appears, click on eDoc
After clicking on eDoc #, invoice opens, go to top right of screen to view ‘Open Amount’, if 0.00 then invoice is paid in full
In this example, invoice amount is 100.00 and remaining due is 100.00

46
Questions?
Topic Name Department Phone
CUS, INV, CM, CTRL, APP Carleen Wells Accounts Receivable 486-3335
CUS, INV, CM, CTRL, APP Angela Piela Accounts Receivable 486-5995
CR, CCR, AD, CTRL, APP Sherri Manis Cash Operations 486-6454
CR, CCR, AD Alyse Lofman Cash Operations 486-6826
CR, CCR, AD Jeanine Lavigne Cash Operations 486-6633
October 2015
Use help menu function from within eDocs by clicking on the question mark
47
Appendix
Accounts Receivable FAQs Am I required to invoice customers through KFS? What is the benefit to using the KFS AR Module for processing customer invoices? The university requires a receivable be created in KFS for any goods and/or services provided by the University. Department revenue accounts are funded at the time the invoice (and related receivable) is created. One of the customers I invoice is another state agency. Formerly I used form UC-608, how do I bill the other agency now?
1) Prepare a customer invoice – most state agencies have already been set up as KFS customers with a customer
type of CORE-CT. If you do not locate the customer account, contact the Accounts Receivable Office at
486.5995 to have the customer created.
2) Enter the contact name in the ‘Attention Line’ text field and include an email address for the recipient in the
‘Notes and Attachments’ tab.
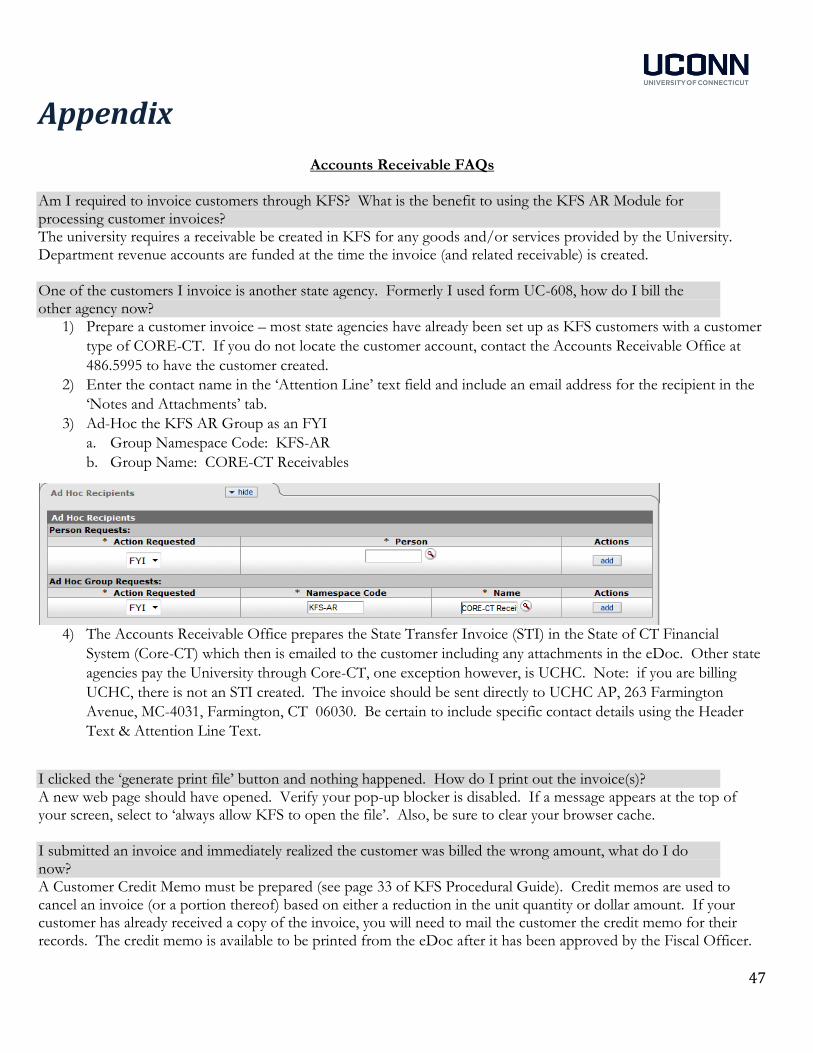
3) Ad-Hoc the KFS AR Group as an FYI
a. Group Namespace Code: KFS-AR
b. Group Name: CORE-CT Receivables
4) The Accounts Receivable Office prepares the State Transfer Invoice (STI) in the State of CT Financial
System (Core-CT) which then is emailed to the customer including any attachments in the eDoc. Other state
agencies pay the University through Core-CT, one exception however, is UCHC. Note: if you are billing
UCHC, there is not an STI created. The invoice should be sent directly to UCHC AP, 263 Farmington
Avenue, MC-4031, Farmington, CT 06030. Be certain to include specific contact details using the Header
Text & Attention Line Text.
I clicked the ‘generate print file’ button and nothing happened. How do I print out the invoice(s)? A new web page should have opened. Verify your pop-up blocker is disabled. If a message appears at the top of your screen, select to ‘always allow KFS to open the file’. Also, be sure to clear your browser cache. I submitted an invoice and immediately realized the customer was billed the wrong amount, what do I do now? A Customer Credit Memo must be prepared (see page 33 of KFS Procedural Guide). Credit memos are used to cancel an invoice (or a portion thereof) based on either a reduction in the unit quantity or dollar amount. If your customer has already received a copy of the invoice, you will need to mail the customer the credit memo for their records. The credit memo is available to be printed from the eDoc after it has been approved by the Fiscal Officer.

48
Appendix (continued) I have a large number of invoices to generate, will the invoices need to be input one at a time? No, KFS has an invoice upload feature which allows the user to upload batches of invoices. Contact the Accounts Receivable Office at 486-5995 to receive additional information. What KFS account and object code am I supposed to use when setting up the invoice/receivable? These fields refer to the intended income account(s). If you have questions as to what KFS account or object code to use, contact the Accounting Office. Customer Invoice (INV) Who is responsible for sending a KFS invoice to a customer? The department initiating the invoice is responsible for sending the invoice to the customer. Once the invoice is submitted in KFS, scroll to the bottom of the invoice and click ‘reload’. Once eDoc reloaded, scroll back to the bottom and click ‘generate print file.’ This produces a PDF which can be printed and mailed or saved and sent as an attachment via email.

Appendix (continued) University of Connecticut Cash and Accounts Receivable eDocs Kuali Financial Systems Quick Reference Guide
KFS eDoc Name
Abbreviated eDoc Name
Purpose of eDoc
Who Can Use?
Notes
Cash Receipt CR To record cash and checks received by departments for subsequent deposit into bank accounts by Bursar’s Office.
Cash Receipt Initiator
To be used for cash and/or checks received being brought to Cash Operations for deposit. If eDoc requires Ad Hoc approval, it must occur prior to delivery to Cash Operations.
Credit Card Receipt CCR To record the receipt of income via credit card payment.
All departments A separate CCR eDoc is necessary for each credit card type. Currently there are two types: American Express and Visa/MasterCard/Other. This document can be used with a negative amount for chargebacks. Timely submission required.
Advance Deposit AD To record deposits forwarded directly to the bank.
All departments To be used for receipt of wires or ACH payments, as well as RDS check batches.
Cash Control CTRL To record payments received for relief of an accounts receivable balance. This document assigns the payment to a particular customer.
Billing Orgs / Processing Orgs
To be used in conjunction with APP eDoc. If a cash payment is received, complete a CR, CTRL and APP. If a credit card payment is received, complete a CTRL and APP. If another type of payment is received (check, wire) then only CTRL and APP need to be completed. Note: APP is generated within the CTRL doc and should be completed (not saved) prior to submitting the CTRL.
Payment Application APP To apply funds received in a CTRL eDoc to a particular invoice for an identified customer.
Billing Orgs / Processing Orgs
A CTRL eDoc must be initiated prior to the APP. The APP can be accessed from the CTRL. If CTRL is used and the associated APP applies funds to unapplied, another APP eDoc would be needed to remove the amount from unapplied to a specific customer invoice.
Customer CUS To create a new customer to be invoiced or to edit an existing customer.
Billing Orgs Each customer may have up to two Alias IDs for cross referencing between different billing orgs.
Customer Invoice INV To create an invoice for a specific customer.
Billing Orgs Invoices should be created for any goods and/or services provided to non-student customers.
Customer Credit Memo
CRM To credit a customer invoice for a specific quantity or dollar amount.
Billing Orgs Credit memos are used to cancel an invoice (or portion thereof) based on either a reduction in the unit quantity or dollar amount.