keops installation and user guide - matisse · keops is a distributed system that requires the...
TRANSCRIPT

Keops User Guide 1st Edition April 2007

2 Keops User Guide

Keops User Guide Copyright © 2007 Matisse Software Inc. All Rights Reserved. Matisse Software Inc. 930 San Marcos Circle Mountain View, CA 94043 USA Printed in USA. This manual and the software described in it are copyrighted. Under the copyright laws, this manual or the software may not be copied, in whole or in part, without prior written consent of Matisse Software Inc. This manual and the software described in it are provided under the terms of a license between Matisse Software Inc. and the recipient, and their use is subject to the terms of that license. RESTRICTED RIGHTS LEGEND: Use, duplication, or disclosure by the government is subject to restrictions as set forth in subparagraph (c)(l)(ii) of the Rights in Technical Data and Computer Software clause at DFARS 252.227-7013 and FAR 52.227-19. The product described in this manual may be protected by one or more U.S. and international patents. TRADEMARKS: MATISSE and the MATISSE logo are registered trademarks of Matisse Software Inc. All other trademarks belong to their respective owners.
Keops User Guide 3

Content
INTRODUCTION............................................................................................................. 8
SCOPE .............................................................................................................................. 8 BEFORE YOU BEGIN.......................................................................................................... 8 USING KEOPS................................................................................................................... 8
GETTING STARTED.................................................................................................... 10 CONFIGURING KEOPS..................................................................................................... 10 LAUNCHING KEOPS........................................................................................................ 10
CONFIGURING KEOPS............................................................................................... 11 CONFIGURING THE DATABASE SERVER.......................................................................... 11 CONFIGURING A WORKSTATION .................................................................................... 11
Setting up the Database Server Connection ............................................................. 11 Defining an Administrator ........................................................................................ 11 Defining Users .......................................................................................................... 12 Setting up Lexicons ................................................................................................... 12 Configuring a Consultation Workstation.................................................................. 12 Configuring an Acquisition Workstation .................................................................. 12
MANAGING USERS...................................................................................................... 13 USER ACCOUNT TYPES .................................................................................................. 13 USER ROLES .................................................................................................................. 13 VIEWING USERS............................................................................................................. 13 ADDING A USER............................................................................................................. 13 UPDATING A USER ......................................................................................................... 14 DELETING A USER.......................................................................................................... 14
MANAGING MEDIA ACQUISITION INSTRUMENTS.......................................... 15 MEDIA DEVICE MODELS................................................................................................ 15
Canon EOS Digital Camera ..................................................................................... 15 FlashBus Spectrim Video Board............................................................................... 15 Sony 1394 Digital Video Camera ............................................................................. 15
VIEWING INSTRUMENT SETUPS...................................................................................... 15 SETTING UP AN INSTRUMENT ......................................................................................... 16 UPDATING AN INSTRUMENT SETUP ................................................................................ 16 DELETING AN INSTRUMENT SETUP ................................................................................ 16 CHECKING MEDIA CAPTURE.......................................................................................... 16
Digital Still Camera-based Instrument..................................................................... 17 Video Camera-based Instrument .............................................................................. 17
CREATING PREDEFINED VIDEO SETTINGS...................................................................... 17 UPDATING PREDEFINED VIDEO SETTINGS...................................................................... 19 DELETING PREDEFINED VIDEO SETTINGS ...................................................................... 19
4 Keops User Guide

MANAGING USER-DEFINED LEXICONS............................................................... 20
LEXICON-BASED PROPERTIES ........................................................................................ 20 SETTING UP A LEXICON.................................................................................................. 21
MANAGING STUDIES ................................................................................................. 22 VIEWING STUDIES.......................................................................................................... 22 CREATING A NEW STUDY ............................................................................................... 22 UPDATING A STUDY....................................................................................................... 22 DELETING A STUDY ....................................................................................................... 22
MANAGING OBSERVED ANIMALS ........................................................................ 24 VIEWING ANIMALS ........................................................................................................ 24 CREATING AN NEW ANIMAL........................................................................................... 24 UPDATING AN ANIMAL .................................................................................................. 24 DELETING AN ANIMAL................................................................................................... 24
MANAGING OBSERVATIONS................................................................................... 26 VIEWING OBSERVATIONS............................................................................................... 26 RECORDING AN OBSERVATION ...................................................................................... 26
Managing Animals .................................................................................................... 26 Managing Imaging Instruments................................................................................ 27 Choosing Pictures..................................................................................................... 28 Creating an Observation........................................................................................... 28 Deleting Captured Images ........................................................................................ 29
UPDATING AN OBSERVATION......................................................................................... 29 DELETING AN OBSERVATION ......................................................................................... 29 COMPARING OBSERVATIONS ......................................................................................... 29 VIEWING IMAGE DETAILS .............................................................................................. 30 EXPORTING AN IMAGE ................................................................................................... 30
QUERYING THE STUDIES DATABASE .................................................................. 31 BUILDING A QUERY ....................................................................................................... 31 EXPORTING A QUERY RESULT ....................................................................................... 31
MANAGING THE AUDIT RECORDS........................................................................ 33 RECORDED OPERATIONS................................................................................................ 33 VIEWING THE AUDIT LOG .............................................................................................. 33 EXPORTING THE AUDIT LOG .......................................................................................... 33
SESSION EVENT LOG................................................................................................. 35 VIEWING SESSION EVENTS ............................................................................................ 35 ACCESSING SESSION EVENTS HISTORY.......................................................................... 35
MANAGING THE DATABASE SERVER.................................................................. 36 CREATING THE KEOPS DATABASE ................................................................................. 36
Configuring the Database......................................................................................... 36
Keops User Guide 5

Starting the Database ............................................................................................... 36 Creating the Database User ..................................................................................... 36 Loading the Database Schema.................................................................................. 37
STOPPING THE DATABASE SERVER ................................................................................ 37 RESTARTING THE DATABASE SERVER............................................................................ 37 BACKING UP THE DATABASE ......................................................................................... 37 EXPORTING AND IMPORTING DATA................................................................................ 37
Exporting Data.......................................................................................................... 37 Importing Data.......................................................................................................... 38
MIGRATING STUDIES................................................................................................ 40 DATA MODEL ................................................................................................................ 40 FILE FORMAT................................................................................................................. 40 EXPORTING DATA.......................................................................................................... 41 LOADING DATA ............................................................................................................. 42
Re-initialize the Database......................................................................................... 42 Load Keops Database Schema.................................................................................. 42 Load Keops Migration Schema Extensions .............................................................. 42 Load CSV Files ......................................................................................................... 42
FREQUENTLY ASKED QUESTIONS........................................................................ 44 CONFIGURATION............................................................................................................ 44 USERS ............................................................................................................................ 44 ACQUISITION INSTRUMENTS .......................................................................................... 44 USER-DEFINED LEXICONS ............................................................................................. 44 STUDIES ......................................................................................................................... 45 AUDIT RECORDS ............................................................................................................ 45
6 Keops User Guide

Table of Figures
FIGURE 1: SUPPORTED VIDEO FEATURES........................................................................... 18 FIGURE 2: SONY 1394 CONTROL FEATURES ...................................................................... 18 FIGURE 2: PROPERTIES MANAGED BY A USER-DEFINED LEXICON ....................................... 20 FIGURE 3: EXAMPLE OF OBSERVATION SELECTIONS PER CATEGORY VALUE ..................... 21 FIGURE 4: PROPERTY TYPE FORMATS................................................................................ 31 FIGURE 5: AUDITED OPERATIONS ...................................................................................... 33 FIGURE 6: STUDY DATA MODEL ....................................................................................... 40
Keops User Guide 7

Introduction Keops provides a secure, efficient and easy to use solution to collect, analyze, process and store high-quality digital media of pre-clinical or clinical studies. Keops features a distributed system to manage digital assets of pre-clinical or clinical studies. The main features of Keops are comprised of: Connectivity to imaging instruments to capture digital media. Digital still
cameras, analog video camera and digital video cameras are currently supported.
Management of pre-clinical or clinical studies with several treatment groups.
Management of users and modifications in compliance with FDA regulations. All changes related to clinical study data are recorded and can be viewed in an audit log.
A comprehensive set of in-depth searching capabilities.
Scope This document is intended to help new users learn the configuration, administration and utilization of Keops features.
Before you begin Throughout this document, we presume that you already know how to manipulate the external imaging instruments connected to Keops. We also assume that Keops installation has been successfully completed.
Using Keops Keops User Interface is designed to allow users to quickly execute repetitive operations using only the workstation keyboard. The main dialog windows appear by pressing a keystroke combination on the keyboard. For example, pressing Ctrl+Shift+S on the keyboard displays the Add Study dialog window. Each capture form dialog window is designed to quickly complete the form by moving the cursor from one field to the next in the most convenient order for
8 Keops User Guide
the operator. Pressing Tab on the keyboard moves the cursor from fields to fields up to the OK button. Pressing Shift+Tab on the keyboard moves the cursor backwards. When a menu selection is activated, pressing the first letter of a selection on the keyboard selects it. The Up and Down arrows on the keyboard move selections respectively up and down. Pressing F4 displays all possible selections. When an image thumbnail list viewer is activated, use the arrows (Up, Down, Right and Left) on the keyboard to move from one image thumbnail to the next. When the list viewer enables multi-selection, use Shift+Arrow to select multiple image thumbnails. When a button is activated, pressing Enter on the keyboard validates the selection. When an image, a thumbnail or a row in a query result table is selected, right-click on the mouse to get access to a contextual menu.
Keops User Guide 9

Getting Started
Configuring Keops If you have just completed the installation, you must start from the Configuring Keops section of this document.
Launching Keops To launch Keops, select Keops in the Matisse Life Science folder in the Start All Programs menu on your machine. NOTE: You will be prompted for login and password to enter into the
application.
10 Keops User Guide
Configuring Keops Keops is a distributed system that requires the setup of a database server and of one or more workstations. CAUTION: You cannot configure a workstation unless the database
server is configured.
Configuring the Database Server The Creating the Keops Database section of this document guides you through the database configuration process. You need to refer to the Creating the Keops Database section and to complete the instructions presented in this section. Once you have successfully completed the database server setup, you can move on to configuring a workstation.
Configuring a Workstation
Setting up the Database Server Connection The very first time you launch Keops on a workstation, the Database Connection Setup dialog window appears so you can provide the necessary information to establish a connection to the database server. The Ping button helps you check the database connection prior to saving the database connection settings. NOTE: This operation is done only once per workstation since all users on
a workstation are sharing the database connection settings.
Defining an Administrator The very first user who logs into the application becomes an administrator. When you have successfully passed the Login dialog window, the Create a User dialog window is displayed and the administrator full name can be set. You are now logged in as an administrator ready to complete the setup. NOTE: From now on, this administrator is the only user able to login into
Keops until you have defined new users.
Keops User Guide 11

Defining Users Since you are now logged in as an administrator, you can manage application users. The Managing Users section of this document describes the management of users. You can add new users now or later.
Setting up Lexicons Since you are now logged in as an administrator, you can manage user-defined application lexicons. Section Managing User-defined Lexicons of this document describes the management of application lexicons. You can configure the lexicons now or later, but since Keops is not pre-configured with default selections, you need to define domain-related selections for each property prior to using Keops in production.
Configuring a Consultation Workstation Once you have completed the database connection setup, you need to connect as an administrator and check the data is accessible before quitting the application. This completes the consultation workstation configuration.
Configuring an Acquisition Workstation Once you have completed the database connection setup, you need to connect as an administrator to configure the acquisition instruments connected to this workstation. The Managing Media Acquisition Instruments section of this document guides you through configuring acquisition instruments.
12 Keops User Guide

Managing Users To manage the users, log in as an administrator and select the Users sub-tab under the Administration Tab.
User Account Types The application manages 2 types of user account: System User: a username registered into the application, which matches the Windows login name of the operator. No password is registered into Keops since the application checks against Windows credentials. Application User: a username and a password registered into Keops. The username does not need to match any Windows login name.
User Roles The application manages 2 types of role: Operator: The operator main role consists in managing studies. Specific tasks include creating studies, animals, capturing photos and establishing diagnostics associated to the captured photos. The operator can also initiate the change or removal of existing study information, but an approval by an administrator is required to complete the operation. Administrator: the administrator can create, update and delete System and Application users. He can also grant and revoke privileges to the users. He can also set and reset the password of any application users. The administrator can also configure the application. He manages instrument setups as well as application lexicons. The administrator is also responsible for approving changes or removals initiated by an operator.
Viewing Users The application users are listed in the Users sub-tab under the Administration Tab. Click on the Select a Username scrolling list to view the detailed information about an application user.
Adding a User To add a new user, click on the Create new user button in the toolbar. The Create a User dialog window appears. You can then enter a new username and
Keops User Guide 13

define the user’s full name, role and connection mode and enter a note. The username value must be unique. Optional fields include passwords and note. An entry in the audit log is added to record the operation. NOTE: When a new user is added to Keops, it becomes immediately
visible to all Keops workstations.
Updating a User To update a user, click on the Update selected user button in the toolbar. The Update a User dialog window appears so you can change the user full name, role and connection mode. An entry in the audit log is added to record the operation.
Deleting a User To delete a user, click on the Delete selected user button in the toolbar. The Delete a User dialog window appears allowing you to confirm your selection before proceeding with the removal of the user. An entry in the audit log is added to record the operation.
14 Keops User Guide
Managing Media Acquisition Instruments Acquisition Workstations are dedicated to the capture of digital media assets. These workstations are directly connected to the imaging instruments that capture digital media. To manage the instrument setups, log in as an administrator and select the Instruments sub-tab under the Administration Tab.
Media Device Models Keops supports connectivity to the following 3 types of imaging devices:
Canon EOS Digital Camera Keops supports the Canon EOS Digital SLRs with DIGIC II processors connected for example to a non-mydriatic digital fundus camera (e.g. a Canon EOS20D connected to a Canon CR66Dgi).
FlashBus Spectrim Video Board Keops supports the FlashBus Spectrim product family, a high-performance, PCI bus-mastering video frame grabber designed to capture composite, S-Video, or RGB video in real time. For example, the video board can be connected to an analog video indirect ophthalmoscope.
Sony 1394 Digital Video Camera Keops supports the Sony “FireWire” digital video cameras (Color models only) including the XCD-SX910CR/X710CR series. For example, a Sony 1394 digital video camera can be mounted on a digital video slit lamp. An acquisition workstation can be connected to at most 3 instruments. Only one instrument for each media device model can be connected to a workstation at a time.
Viewing Instrument Setups The connected instruments are listed in the Instruments sub-tab under the Administration Tab. Click on the Select an InstrumentID scrolling list to view the detailed information about an instrument.
Keops User Guide 15
Setting up an Instrument CAUTION: The external device drivers for the instrument must be
installed prior to complete the instrument connection setup. To setup a new instrument connection, click on the Setup new instrument button in the toolbar. The Setup a new Instrument dialog window appears. You can then select the media device model and enter a new instrument Id, serial number, location and note. The Instrument Id value must be unique. Optional fields include serial number, location and note. Additional options are provided in the Advanced Tab when you setup the connection to a Sony 1394 “FireWire” digital video camera. You can select a video format ranging for high image resolution (1280x960) to low image resolution (640x480). By default, the video format is set to the highest resolution. You can also configure a serial port for switch-based capture of digital images. An action on the external switch (i.e. a foot pedal or a joystick) will have the same effect as clicking on the Take a Picture button in the toolbar. By default, the switch-based capture is not enabled. An entry in the audit log is added to record the operation.
Updating an Instrument Setup To update an instrument setup, click on the Update selected instrument button in the toolbar. The Update Instrument dialog window appears allowing you to update the instrument serial number, location and notes. The properties defined in the Advanced Tab can also be updated. An entry in the audit log is added to record the operation.
Deleting an Instrument Setup To delete an instrument setup, click on the Delete selected instrument button in the toolbar. The Delete an Instrument dialog window appears so you can confirm your selection before proceeding with the removal of the instrument setup. An entry in the audit log is added to record the operation.
Checking Media Capture Once you have checked that the equipment is correctly plugged to the workstation and the equipment power is turned on, click on the Connect to selected instrument button from the toolbar, the status in the Live Feed section of the window is now indicating Connected. If not, you need to check the event session log for more information about the connection issue. If an external switch has been configured the status also indicates External switch active.
16 Keops User Guide

The instrument is now connected and some buttons in the toolbar are enabled. There are 2 scenarios depending on the media device type mounted on the instrument.
Digital Still Camera-based Instrument The instrument uses a Canon EOS Digital camera, which is now connected to Keops. The Disconnect button in the toolbar is now enabled while the Connect button is disabled. The Take a Picture button is also enabled. The Download images button may be enabled as well if there are images stored in the camera waiting to be downloaded. Images are stored in the camera when the camera is on and that pictures are taken while the instrument is not connected to Keops. Pictures can be taken by clicking on the Take a Picture button or by pressing the shutter button of the digital camera or an external switch plugged into the camera.
Video Camera-based Instrument The instrument uses a video camera, which is now connected to Keops. The Disconnect button in the toolbar is now enabled while the Connect button is disabled. The Start Video button is also enabled. Click on the Start Video button to capture the live video feed. When you see the live video feed in the Live Feed section of the window, you can take pictures by clicking on the Take a Picture button or by pressing the external switch if the status indicates that one switch is active. When the video is live, you can also define new video settings by clicking on the Create, Update or Delete video settings buttons in the toolbar.
Creating Predefined Video Settings CAUTION: Operations on video settings are available only for video-
based instruments and are only enabled when the video is live.
The objective of the predefined video settings is to speed up the image capture during the observations. For the same instrument, you can define a set of video settings well suited to each capture situation. Keops manages all video features supported by the imaging device. The table below summarizes the features supported by each video-based device.
Keops User Guide 17
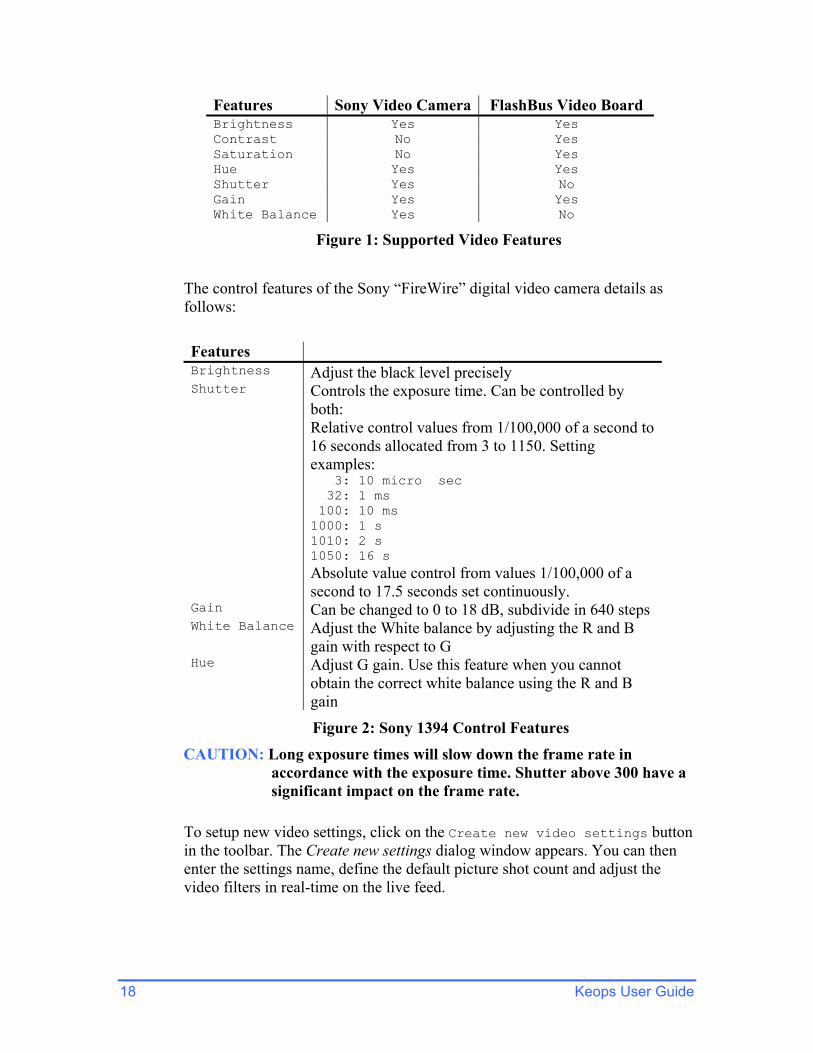
Features Sony Video Camera FlashBus Video Board Brightness Yes Yes Contrast No Yes Saturation No Yes Hue Yes Yes Shutter Yes No Gain Yes Yes White Balance Yes No
Figure 1: Supported Video Features The control features of the Sony “FireWire” digital video camera details as follows: Features Brightness Adjust the black level precisely Shutter Controls the exposure time. Can be controlled by
both: Relative control values from 1/100,000 of a second to 16 seconds allocated from 3 to 1150. Setting examples: 3: 10 micro sec 32: 1 ms 100: 10 ms 1000: 1 s 1010: 2 s 1050: 16 s Absolute value control from values 1/100,000 of a second to 17.5 seconds set continuously.
Gain Can be changed to 0 to 18 dB, subdivide in 640 steps White Balance Adjust the White balance by adjusting the R and B
gain with respect to G Hue Adjust G gain. Use this feature when you cannot
obtain the correct white balance using the R and B gain
Figure 2: Sony 1394 Control Features
CAUTION: Long exposure times will slow down the frame rate in accordance with the exposure time. Shutter above 300 have a significant impact on the frame rate.
To setup new video settings, click on the Create new video settings button in the toolbar. The Create new settings dialog window appears. You can then enter the settings name, define the default picture shot count and adjust the video filters in real-time on the live feed.
18 Keops User Guide
Updating Predefined Video Settings To update the video settings, click on the Update selected video settings button in the toolbar. The Update Settings dialog window appears allowing you to change the default picture shot count and to adjust the video filters in real time on the live feed.
Deleting Predefined Video Settings To delete the video settings, click on the Delete selected video settings button in the toolbar. The Delete Settings dialog window appears so you can confirm your selection before proceeding with the removal of the video settings.
Keops User Guide 19
Managing User-defined Lexicons Keops allows you to tailor property value selections to your domain of application. Keops is not pre-configured with default selections therefore you need to define domain-related selections for each property prior to using Keops in production.
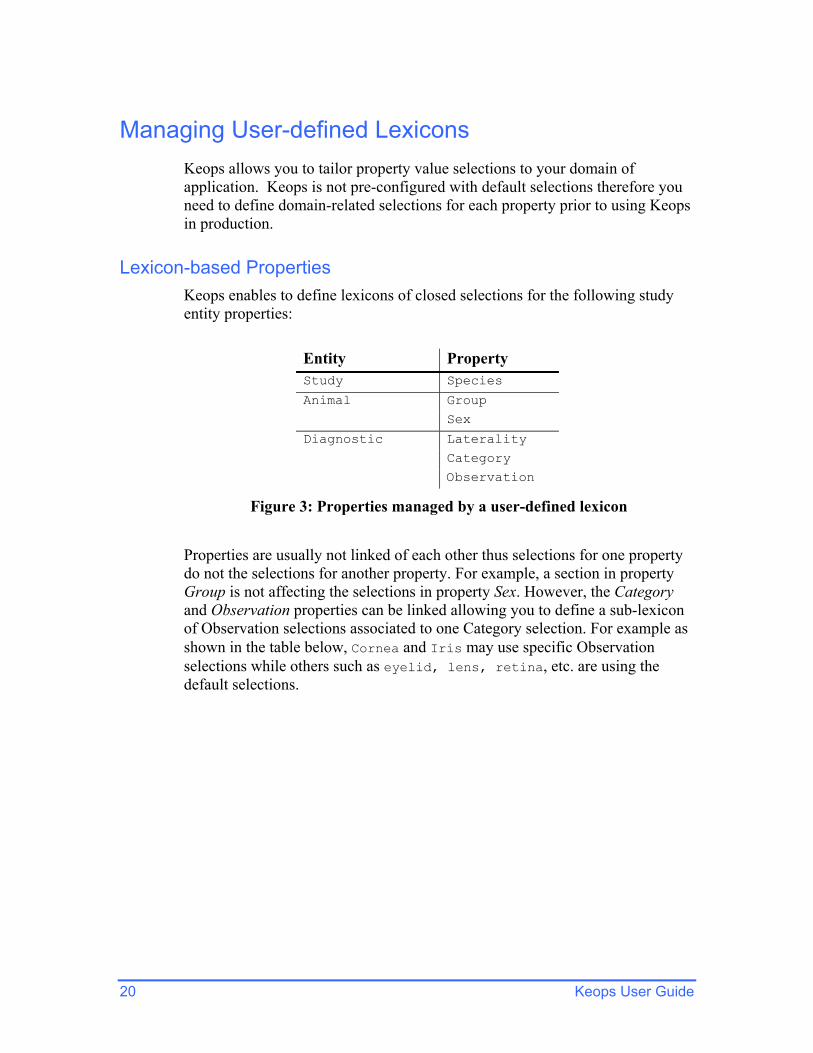
Lexicon-based Properties Keops enables to define lexicons of closed selections for the following study entity properties:
Entity Property Study Species
Animal Group Sex
Diagnostic Laterality Category Observation
Figure 3: Properties managed by a user-defined lexicon Properties are usually not linked of each other thus selections for one property do not the selections for another property. For example, a section in property Group is not affecting the selections in property Sex. However, the Category and Observation properties can be linked allowing you to define a sub-lexicon of Observation selections associated to one Category selection. For example as shown in the table below, Cornea and Iris may use specific Observation selections while others such as eyelid, lens, retina, etc. are using the default selections.
20 Keops User Guide

Category Observation Cornea focal opacity
pinpoints apocities ulcer
Iris vascularization œdème
All other selections focal opacity pinpoints apocities ulcer vascularization œdème anterior synechia
Figure 4: Example of Observation selections per Category value
Setting up a Lexicon To manage lexicons, log in as an administrator and select the Lexicons sub-tab under the Administration Tab. Select an Entity and a Property and then add new selections to a list. The list of selections is displayed in the order you have organized them. Each lexicon must hold at least one entry besides the selection for “no value”. NOTE: The “no value” selection is managed by the application therefore
there is no need to define such a selection in the lexicon. NOTE: The selections are text-based and the selected selections are
recorded as is, but comparison between 2 selections is not case sensitive.
CAUTION: Keops is not pre-configured with default selections therefore
you need to define selections for each property prior to using Keops in production.
CAUTION: An administrator can update property selections at any time,
since an operator can only choose from the selections pre-defined in the lexicon.
Keops User Guide 21

Managing Studies In Keops, a Study is defined by a set of observed animals for which a set of observations has been recorded. A picture shot is associated to each recorded observation. To manage studies, select the Studies Tab.
Viewing Studies The studies are listed in the Studies Tab. All recorded studies are listed in the Select a Study Number menu selection. Click on the Select a Study Number scrolling list to view the detailed information about a study. Then to navigate through the hierarchy of data, click on the Select an Animal ID scrolling list to switch from one animal to the next in the list. Then for a selected animal, the observations are listed in an image list viewer. Selecting an examination presents the observation details including photos and diagnostics.
Creating a new Study To create a new study, click on the Create new study button in the toolbar. The Create a Study dialog window appears. You can then enter a new study number, compound and select the species, a start date for the study and enter a note. The study number value must be unique. Optional fields include compound, species and note.
Updating a Study To update a study, click on the Update selected study button in the toolbar. The Update Study dialog window appears allowing you to update the study number, compound, species, start date and notes. Each property update requires the approval of an administrator. An entry in the audit log is added to record the change of each property.
Deleting a Study To delete a study, click on the Delete selected study button in the toolbar. The Delete a study dialog window appears so you can confirm your selection before proceeding with the removal of the study. Deleting a study requires the approval of an administrator.
22 Keops User Guide
An entry in the audit log is added to record the operation. CAUTION: When deleting a study all the depending entities are deleted as
well. This includes the animals, exams, diagnostics and images part of this study.
Keops User Guide 23

Managing Observed Animals In Keops, observed animals are uniquely referenced in a study. Each observed animal can carry a set of observations. To manage observed animals, select the Studies Tab.
Viewing Animals Observed animals, which are parts of studies are listed in the Studies Tab. Once you have selected a study from the Select a Study Number scrolling list, click on the Select an Animal ID scrolling list to switch from one animal to the next. Then for a selected animal, the observations are listed in an image list viewer. Selecting an examination presents the observation details including photo and diagnostics.
Creating an new Animal To create a new observed animal, click on the Create new animal button in the toolbar. The Create an Animal dialog window appears. You can then enter a new initial Id, select the sex and group and enter a study Id and a note. The animal initial Id value must be unique. Optional fields include sex, group, study Id and note.
Updating an Animal To update an observed animal, click on the Update selected animal button in the toolbar. The Update Animal dialog window appears allowing you to update the animal initial Id, sex, group, study Id and note. Each property update requires the approval of an administrator. An entry in the audit log is added to record the change of each property.
Deleting an Animal To delete an observed animal, click on the Delete selected animal button in the toolbar. The Delete an Animal dialog window appears so you can confirm your selection before proceeding with the removal of the animal. Deleting an observed animal requires the approval of an administrator. An entry in the audit log is added to record the operation.
24 Keops User Guide
CAUTION: When deleting an observed animal all the depending entities are deleted as well. This includes the exams, diagnostics and images part of this animal.
Keops User Guide 25
Managing Observations In Keops, observations are uniquely referenced in an observed animal. To manage observations, select the Studies Tab.
Viewing Observations Observations that are parts of Observed animals are listed in the Studies Tab. Once you have selected an observed animal from the Select an Animal ID scrolling list, you can view the observations, which are listed in an image list viewer. Selecting an observation presents the observation details including photos and diagnostics.
Recording an Observation An Observation recorded in Keops always contains a picture to support the operator diagnostic. The process for recording an animal observation implies that the operator takes meaningful pictures to document its findings. To record an observation, click on the Capture Media button in the toolbar. The Capture Media dialog window appears. The operator can then capture images of an animal under observation. From the Capture Media window, you can independently manage observed animals and imaging instruments.
Managing Animals
Observed animals, which are parts of studies are listed in the Animal Initial ID scrolling list. When the Capture Media window is opened, the selected animal is the one selected in the Study Tab. The operator can switch animals by clicking on the Animal Initial ID scrolling list. If the animal is not yet present in the list, click on the Create new animal button from the toolbar to create a new animal. In some cases, the operator may capture images of an animal that is not yet registered into the study and then decide after the picture shots examination that the animal needs to be added to the study. In this context, the operator needs to select the Unregistered value in the Animal Initial ID scrolling list or needs to click on the Observe an unregistered animal button from the toolbar.
26 Keops User Guide
If the Unregistered animal is selected, the operator will be prompted to create a new animal prior to recording an observation. And the remaining captured images will be associated to the newly created animal. CAUTION: Captured images associated to an Unregistered animal are
not shared with other workstations. These images are automatically deleted when the Keops session is ended.
Managing Imaging Instruments Imaging instruments connected to the acquisition workstation are listed in the Instrument scrolling list. When the Capture Media window is opened, the selected instrument is the first one in the Instrument scrolling list. The operator can switch instruments by clicking on the Instrument scrolling list. Next to the Instrument scrolling list is displayed the status of the instrument. Click on the Connect and Go live button from the toolbar, the instrument status is now indicating Connected or Live. If not, you need to check the event session log for more information about the connection issue. If an external switch has been configured, the status also indicates External switch active. The instrument is now connected and some buttons in the toolbar are enabled. There are 2 scenarios depending on the media device type mounted on the instrument. Digital Still Camera-based Instrument The instrument uses a Canon EOS Digital camera, which is now connected to Keops. The Take a Picture button in the toolbar is enabled. The Download images button may be enabled as well if there are images stored in the camera waiting to be downloaded. Images are stored in the camera when the camera is on and that pictures are taken while the instrument is not connected to Keops. Pictures can be taken by clicking on the Take a Picture button or by pressing the shutter button of the digital camera. Video Camera-based Instrument The instrument uses a video camera, which is now connected to Keops. The Take a Picture button in the toolbar is enabled. The Take a Picture and Save button is also enabled as well as the Adjust video settings button. When you see the live video feed in the Live Feed section of the window, you can take pictures by clicking on the button or by pressing the external switch if the status indicates that one switch is active.
Keops User Guide 27

When the video is live, the operator can switch the video settings by clicking on the Settings scrolling list. Video settings can be adjusted in real-time by clicking on the Adjust video settings button in the toolbar. NOTE: We recommend that an administrator check the instrument
connectivity and settings prior to start the observations recording session.
Choosing Pictures When multiple images of the same observation have been taken, the operator may need to review the images in detail and compare them before deciding for the more relevant picture shots. To review and compare images, click on the Select Media button in the toolbar. The Select Media dialog window appears so the operator can review and compare images side by side. To help the operator with the comparison, selected images can be displayed in single, dual or quad mode.
Creating an Observation Saving a captured image displays the Add an Exam dialog window allowing the user to associate a diagnostic to this image. To create a new observation, click on the Save selected image button in the toolbar of the Capture Media or Select Media windows or right-click on a thumbnail image or a full-size image when the multi-image mode is selected. The Add an Exam dialog window appears. You can then enter a diagnostic, note and change the examination date. Optional fields include diagnostic and note. You can also create multiple observations that share the same diagnostic and related information in a single operation. In order to do so, select multiple capture images and click on the Save selected image button in the toolbar of the Capture Media or Select Media windows. The Add an Exam dialog window appears. You can then enter a diagnostic, note and change the examination date associated to the first selected image. Then an observation with the exact same diagnostic will be created for each of the remaining selected images. The Take a Picture and Save button combines the acquisition of an image and the creation of an observation in a single operation.
28 Keops User Guide

Deleting Captured Images Captured images are associated with the observed animal until they are explicitly deleted. To delete captured images, select one or more images in the captured image list viewer and click on the Delete selected image button in the toolbar of the Capture Media or Select Media windows. The Delete an Image dialog window appears so you can confirm your selection before proceeding with the removal of the images. NOTE: To disable confirmation on delete, uncheck Always show this
message in the Delete an Image dialog window.
Updating an Observation To update an observation, click on the Update selected exam button in the toolbar. The Update Exam dialog window appears allowing you to update the examination date, diagnostic and note. Each property update requires the approval of an administrator. An entry in the audit log is added to record the change of each property.
Deleting an Observation To delete an observation, click on the Delete selected exam button in the toolbar. The Delete an Exam dialog window appears so you can confirm your selection before proceeding with the removal of the observation. Deleting an observation requires the approval of an administrator. An entry in the audit log is added to record the operation. CAUTION: When deleting an observation all the depending entities are
deleted as well. This includes the diagnostics and images part of this observation.
Comparing Observations When multiple observations have been recorded, the operator may need to review the images in detail and to compare them side-by-side. To review and compare images, click on the Open multi-image viewer button in the toolbar. The Examination Viewer dialog window appears so the operator can review and compare images side by side. To help the operator with the comparison, selected images can be displayed in single, dual or quad mode.
Keops User Guide 29
Viewing Image Details To view an image in details, click on the Show selected image button in the toolbar. The Show an Image dialog window appears allowing you to zoom in and zoom out the image.
Exporting an Image The images can be saved into a JPEG format file. Each exported image is watermarked with specific study related information. The image tag is formatted as follows: “Study Id/Animal Id/Animal Study Id/Exam Date/Day of Study/Laterality”
To save an image, click on the Save selected image to file button in the toolbar.
30 Keops User Guide
Querying the Studies Database Keops provides a comprehensive set of in-depth searching capabilities to retrieve observations matching multi-criteria filters. The query builder is accessed by selecting the Search Tab.
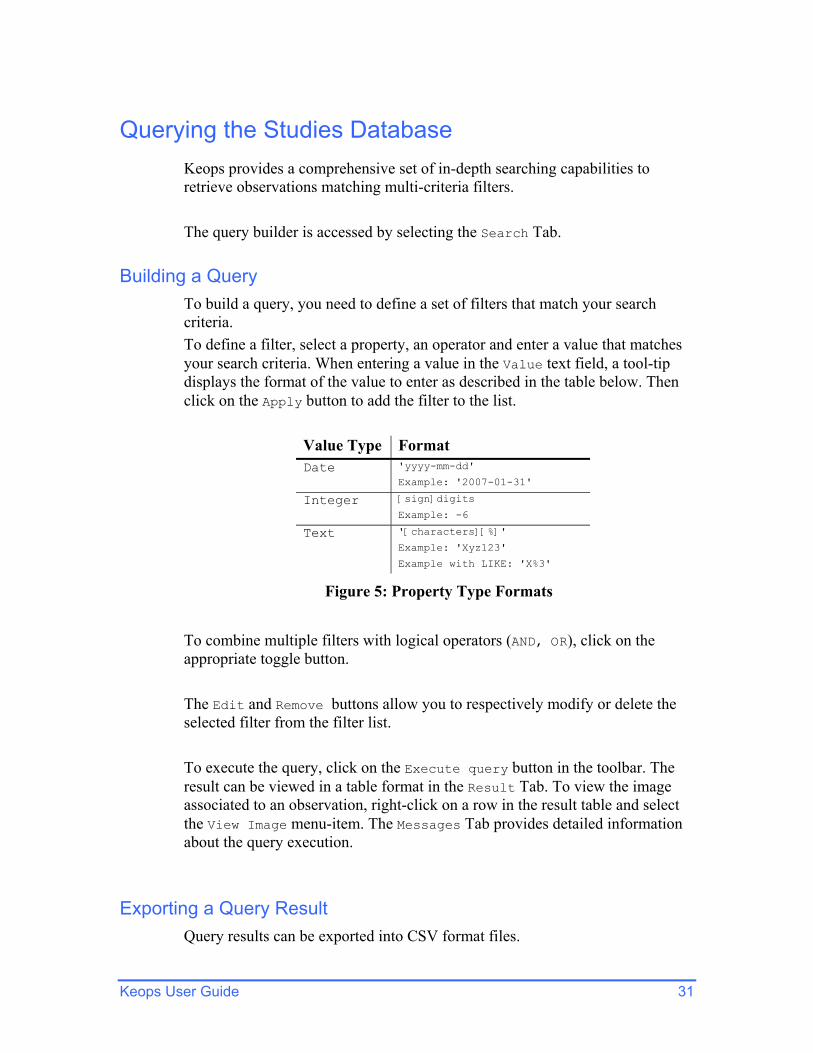
Building a Query To build a query, you need to define a set of filters that match your search criteria. To define a filter, select a property, an operator and enter a value that matches your search criteria. When entering a value in the Value text field, a tool-tip displays the format of the value to enter as described in the table below. Then click on the Apply button to add the filter to the list.
Value Type Format Date 'yyyy-mm-dd'
Example: '2007-01-31'
Integer [sign]digits
Example: -6
Text '[characters][%]'
Example: 'Xyz123'
Example with LIKE: 'X%3'
Figure 5: Property Type Formats To combine multiple filters with logical operators (AND, OR), click on the appropriate toggle button. The Edit and Remove buttons allow you to respectively modify or delete the selected filter from the filter list. To execute the query, click on the Execute query button in the toolbar. The result can be viewed in a table format in the Result Tab. To view the image associated to an observation, right-click on a row in the result table and select the View Image menu-item. The Messages Tab provides detailed information about the query execution.
Exporting a Query Result Query results can be exported into CSV format files.
Keops User Guide 31
To export the query result of the last query execution, click on the Save result button in the toolbar.
32 Keops User Guide
Managing the Audit Records Keops manages modifications in compliance with FDA regulations. All changes related to study data are recorded and can be viewed in an audit log.
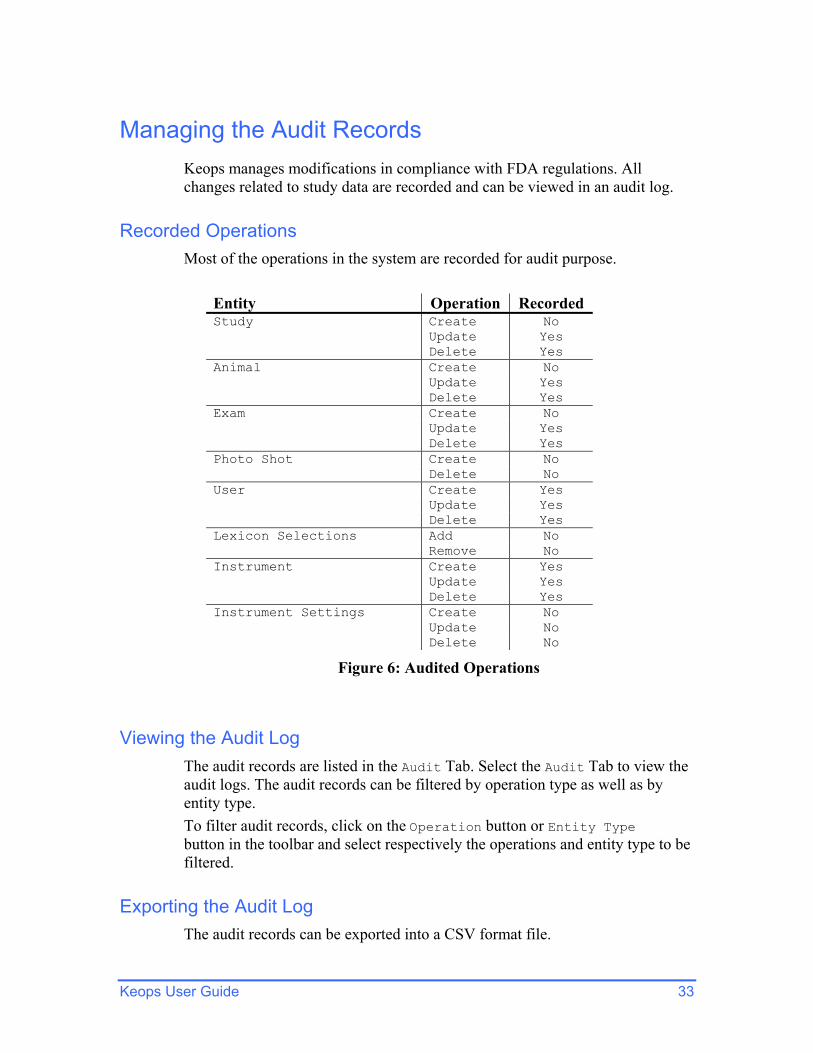
Recorded Operations Most of the operations in the system are recorded for audit purpose.
Entity Operation Recorded Study Create No Update Yes Delete Yes Animal Create No Update Yes Delete Yes Exam Create No Update Yes Delete Yes Photo Shot Create No Delete No User Create Yes Update Yes Delete Yes Lexicon Selections Add No Remove No Instrument Create Yes Update Yes Delete Yes Instrument Settings Create No Update No Delete No
Figure 6: Audited Operations
Viewing the Audit Log The audit records are listed in the Audit Tab. Select the Audit Tab to view the audit logs. The audit records can be filtered by operation type as well as by entity type. To filter audit records, click on the Operation button or Entity Type button in the toolbar and select respectively the operations and entity type to be filtered.
Exporting the Audit Log The audit records can be exported into a CSV format file.
Keops User Guide 33

To export the audit records, click on the Save audit records button in the toolbar.
34 Keops User Guide

Session Event Log Keops records each operation executed by a Keops user during a session in an event log file. Instrument connection related events are also recorded into the log file. The application session events are listed in the Log sub-tab under the Administration Tab.
Viewing Session Events To view the session event records, log in as an administrator and select the Log sub-tab under the Administration Tab.
Accessing Session Events History The [INSTALLDIR]\logs directory contains a history of the last 5 sessions of each connected user.
Keops User Guide 35
Managing the Database Server This section gives a brief overview of the operations the administrator needs to know in order to get the Keops database server up and running. To administer the database server, please read the Matisse Server Administration Guide. You can find this and other Matisse documentation on the Matisse Software web site http://www.matisse.com/developers/documentation/
Creating the Keops Database Launch Matisse Enterprise Manager and create a new database named ‘keops’.
Configuring the Database To perform these tasks with the Enterprise Manager, right click on the node that represents your host machine, and select New Database. Once you have entered the database name (keops), complete the following instructions: 1.
2.
3.
Select the Data Files tab to increase the initial datafiles size to 200 Mbytes,
Select the Advanced tab to enable the database access control,
In the Advanced tab increase the server cache size to 196 Mbytes.
Starting the Database After your database is configured, you can start it with a right-click on the database node then select Start. The first start will take more time as it initializes the datafiles.
Creating the Database User You need to create the database user that Keops application is using to access the database. Before adding a database user, you must verify that the database is online. To add a database user from the Enterprise Manager, click on the database node (keops) and then by clicking on the Users node under Security. Right click in the Users table and select Add User. Create a user with login name set to keopsappli, privileges set to Data Read Write and connection mode set to Database Authentication and enter the password of your choice.
36 Keops User Guide
Loading the Database Schema The last operation consists in loading the database schema from the KeopsApplicationSchema.odl script file. A copy of KeopsApplicationSchema.odl is located in [INSTALLDIR]\schema Before loading the database schema, you must verify that the database is online. To loading a database schema from the Enterprise Manager, right click on the database node (keops) and then select Schema..Import ODL Schema.
Stopping the Database Server Before stopping a database, you must verify that there are no users connected on it. After the database has been stopped, it becomes off-line. Users are no longer able to access the data. When the database is off-line, the root or owner account can modify the database configuration file. To stop a database from the Enterprise Manager, right click on the database node (keops) and then select Stop.
Restarting the Database Server To restart a database from the Enterprise Manager, right click on the database node (keops) and then select Start. NOTE: You can set the AUTORESTART database configuration parameter to
1 to get the database server automatically restarted after a reboot of the machine.
Backing up the Database Matisse Database Backup tool allows users to perform full and incremental parallel backups of databases while the system in online. There is no need to block updates during a backup, as the Matisse server keeps a snapshot of the database at the time of the beginning of the backup operation. To backup a database from the Enterprise Manager, right click on the database node (keops) and then select Tasks..Backup Database.
Exporting and Importing Data Keops provides scripts to export and import data in CSV files.
Exporting Data
To export data, run the export script located in [INSTALLDIR]\data.
Keops User Guide 37

Prior to running the script, you need to update the destination directory for the export of the photo shots. Edit the PhotoShotExport.opt file located in [INSTALLDIR]\data and update the destination directory of the columnToFile property to match your installation. The default location is C:\Program Files\MatisseLS\Keops\data\photos. <columnToFile Directory="C:\Program Files\MatisseLS\Keops\data\photos"
FilenameFormat="{MediaName}">Photo</columnToFile>
Before exporting data, you must verify that the database is online. Then open a Windows command and run MlsKeopsExport script with the database name as a parameter. C:\> cd [INSTALLDIR]\data
C:\> MlsKeopsExport keops
Exporting Study data into Study.csv
Exporting Animal data into Animal.csv
Exporting Exam data into Exam.csv
Exporting Diagnostic data into Diagnostic.csv
Exporting PhotoShot data into PhotoShot.csv
Exporting UserAccount data into UserAccount.csv
Exporting AuditRecord data into AuditRecord.csv
Exporting Instrument data into Instrument.csv
Exporting MediaDevice data into MediaDevice.csv
Exporting InstrumentSettings data into InstrumentSettings.csv
Exporting VideoFeatureInfo data into VideoFeatureInfo.csv
Exporting UserDefinedMenuChoices data into UserDefinedMenuChoices.csv
Exporting data completed
See ExportData.log for details
C:\>
The CSV files are created into the CSV directory and the images files into the photos directory. A log file named ExportData.log is produced. This file provides details about the exported data.
Importing Data
To import data, run the import script located in [INSTALLDIR]\data. Before importing data, you must re-initialize the database since the database must be empty. The import script automatically loads the database schema as well as the import schema extensions. The script assumes the CSV files exist
38 Keops User Guide
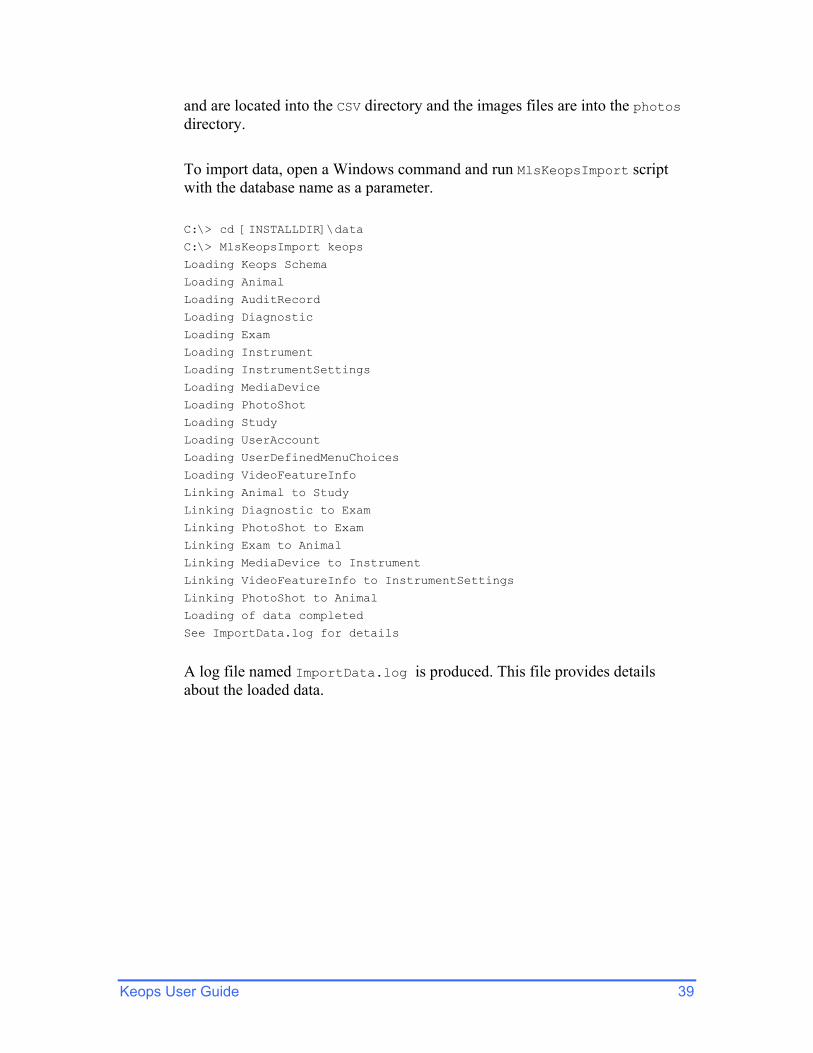
and are located into the CSV directory and the images files are into the photos directory.
To import data, open a Windows command and run MlsKeopsImport script with the database name as a parameter. C:\> cd [INSTALLDIR]\data
C:\> MlsKeopsImport keops
Loading Keops Schema
Loading Animal
Loading AuditRecord
Loading Diagnostic
Loading Exam
Loading Instrument
Loading InstrumentSettings
Loading MediaDevice
Loading PhotoShot
Loading Study
Loading UserAccount
Loading UserDefinedMenuChoices
Loading VideoFeatureInfo
Linking Animal to Study
Linking Diagnostic to Exam
Linking PhotoShot to Exam
Linking Exam to Animal
Linking MediaDevice to Instrument
Linking VideoFeatureInfo to InstrumentSettings
Linking PhotoShot to Animal
Loading of data completed
See ImportData.log for details
A log file named ImportData.log is produced. This file provides details about the loaded data.
Keops User Guide 39
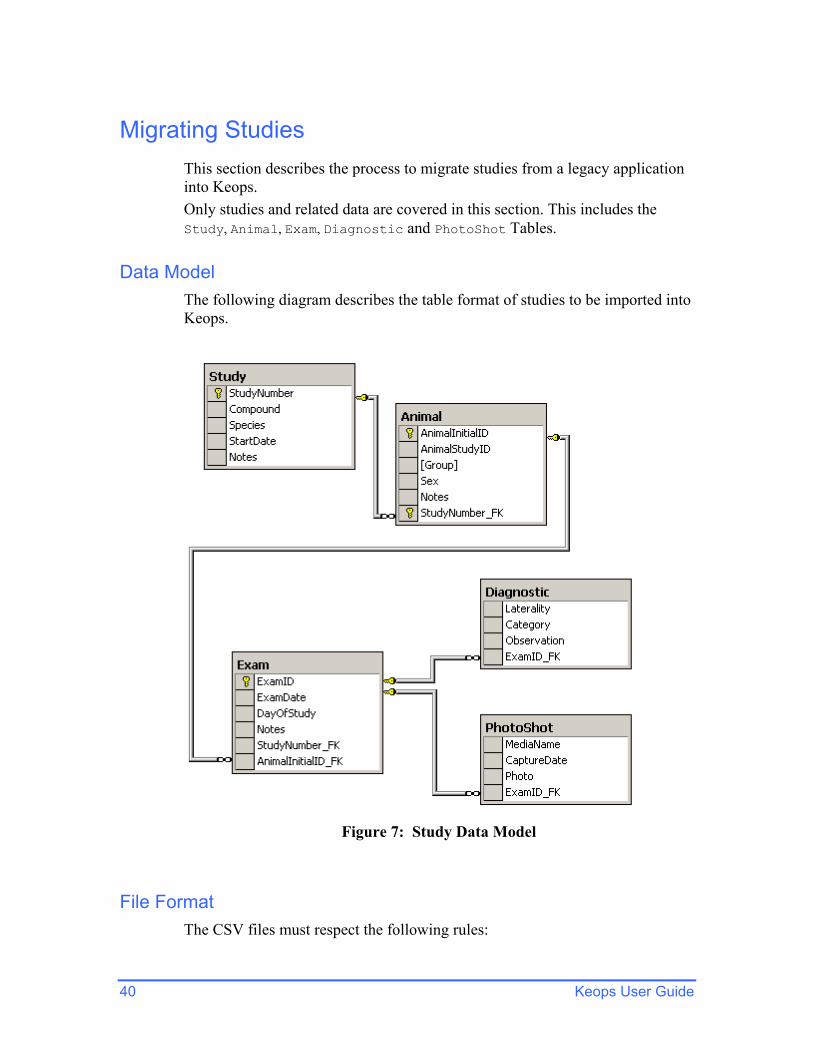
Migrating Studies This section describes the process to migrate studies from a legacy application into Keops. Only studies and related data are covered in this section. This includes the Study, Animal, Exam, Diagnostic and PhotoShot Tables.
Data Model The following diagram describes the table format of studies to be imported into Keops.
Figure 7: Study Data Model
File Format The CSV files must respect the following rules:
40 Keops User Guide
The first row contains the column names Field separator is a comma (,) Text field delimiter is double-quotes (") Date Format is YYYY-MM-DD (4 digits for year, 2 digits for month, and 2
digits for day). For example January 1st, 2007 is represented as 2007-01-01 Timestamp format is YYYY-MM-DD HH:MM:SS (4 digits for year, 2 digits for
month, 2 digits for day, 2 digits for hours, 2 digits for minutes, 2 digits for seconds)
The file format for the Study table export reads as follows: "StudyNumber","Compound","Species","StartDate","Notes" "04200D","PD-325000","Rat",2007-01-06,"this is a comment"
The file format for the Animal table export reads as follows: "AnimalInitialID","AnimalStudyID","Group","Sex","Notes","StudyNumber_FK" "508","508-A","5","Male","this is a comment","04200D"
The file format for the Exam table export reads as follows: "ExamID","ExamDate","DayOfStudy","Notes","StudyNumber_FK","AnimalInitialID_FK" "1.JPG",2007-01-06,1,"this is a comment","04200D","508"
The file format for the Diagnostic table export reads as follows: "ExamID_FK","Laterality","Category","Observation" "1.JPG","Left Eye","Retina","Abnormal Vessels Nos"
The file format for the PhotoShot table export reads as follows: "MediaName","CaptureDate","Photo","ExamID_FK" "1.JPG",2002-09-16 14:21:40,1.JPG,"1.JPG"
The CaptureDate values are timestamps. The Photo values represent the file name associated with the image.
Exporting Data We assume that you are able to export from your legacy database the study data mapping the Study data model and format described above. The export needs to produce the following CSV files: 1. Study.csv 2. Animal.csv
Keops User Guide 41

3. Exam.csv 4. Diagnostic.csv 5. PhotoShot.csv In addition to the CSV files, the image files associated to the photo shots need to be produced.
Loading Data Once you have completed the data export, copy the CSV files into Keops migration directory and copy the images files into Keops migration\photos. To load the study data, complete the followings steps:
Re-initialize the Database To initialize a database from the Enterprise Manager, right click on the database node (keops) and then select Re-initialize.
Load Keops Database Schema
You need to load the database schema ( KeopsApplicationSchema.odl ) from the Enterprise Manager. A copy of KeopsApplicationSchema.odl is located in [INSTALLDIR]\schema
Load Keops Migration Schema Extensions You need to load the migration database schema updates ( KeopsMigrationUpdates.sql ) from the Enterprise Manager. A copy of KeopsMigrationUpdates.sql is located in [INSTALLDIR]\schema. To load a database schema from the Enterprise Manager, right click on the database node (keops) and then select Schema..Import DDL Schema.
Load CSV Files The last step consists in running the migration script located in [INSTALLDIR]\migration. Open a Windows command and run MlsKeopsMigrate script with the database name as a parameter. C:\> cd [INSTALLDIR]\migration C:\> MlsKeopsMigrate keops Loading Study Loading Animal Loading Exam Loading Diagnostic
42 Keops User Guide

Loading PhotoShot Linking Diagnostic to Exam Linking PhotoShot to Exam Linking Exam to Animal Linking Animal to Study Migration completed See MigrateData.log for details C:\> A log file named MigrateData.log is produced. This file provides details about the loaded data.
Keops User Guide 43

Frequently Asked Questions This section provides quick answers to users “How do I…” questions. The FAQs are organized by category.
Configuration How do I configure a workstation to access multiple database servers? This is not an option of the current release. However keopsApp.cfg file located in Keops config directory contains the database server information. You can edit this file and update the database information.
Users How do I know my user account role when logged into Keops? The user’s role is displayed in the 4th field of the status bar at the bottom of the main window. How do I create a Keops login without password? All Keops users must have password. How do I change my Keops login password? For System users for which the username matches the Windows login name, there is no password is registered into Keops. For Application users, if you are an administrator you can change anyone password. If you are an operator, you need an administrator to log in and edit your username. You will then be able to change your password.
Acquisition Instruments How do I know that I can capture an image using a foot pedal? When an instrument is connected, its status indicates External switch active if an external switch has been configured.
User-Defined Lexicons How do I remove the last selection in the list? Each lexicon of closed selections must have at least one selection. How do I enter a value that is not in the pre-defined selection list? There is no other way around adding the value to the lexicon first.
44 Keops User Guide

Keops User Guide 45
Studies How do I compare side-by-side observations from 2 different animals? This is not an option of the current release. How do I print an observation including image and diagnostic? There is no print function the current release. However you can export an observation image which is tagged with a watermark detailing the observation origin. You can also export the result of a search into an Excel type file.
Audit Records How do I remove a record from the audit log? You cannot remove any audit record for the audit log. How do I reset the audit log? The audit log cannot be reset or cleared of any record.