kd-bbtx / kd-bbrx - welcome to digital connection filekd-bbtx / kd-bbrx o perating instructions....
TRANSCRIPT
Key Digital® Exclusive
Video/Audio HDMI®/DVI Smart Baluns™ with RS-232/IR Connection over CAT5/5e/6
Key Digital® Exclusive Technologies
KD-BBTX / KD-BBRX
Operating Instructions
Page 2
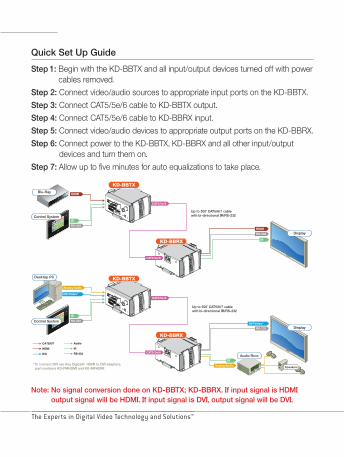
Quick Set Up Guide
Step 1: Begin with the KD-BBTX and all input/output devices turned off with power cables removed.
Step 2: Connect video/audio sources to appropriate input ports on the KD-BBTX.
Step 3: Connect CAT5/5e/6 cable to KD-BBTX output.
Step 4: Connect CAT5/5e/6 cable to KD-BBRX input.
Step 5: Connect video/audio devices to appropriate output ports on the KD-BBRX.
Step 6: Connect power to the KD-BBTX, KD-BBRX and all other input/output devices and turn them on.
Step 7: Allow up to five minutes for auto equalizations to take place.
Note: No signal conversion done on KD-BBTX; KD-BBRX. If input signal is HDMI output signal will be HDMI. If input signal is DVI, output signal will be DVI.
DVI
HDMI
AudioCAT5/6/7
IR
RS-232
Up to 300’ CAT5/6/7 cablewith bi-directional IR/RS-232
Up to 300’ CAT5/6/7 cablewith bi-directional IR/RS-232
Speakers
KD-BBRX
KD-BBTX
KD-BBRX
KD-BBTX
CAT5/5e/6
CAT5/5e/6
CAT5/5e/6
CAT5/5e/6
RS-232
RS-232
IR
IR
Analog Audio
IR
HDMI
HDMI
Analog Audio
RS-232
RS-232
IR
DVI Video*
DVI Video*
*To connect DVI use Key Digital® HDMI to DVI adapters, part numbers KD-FMHDMI and KD-MFHDMI
Display
Blu-Ray
Control System
Display
Audio Rcvr.
Control System
Desktop PC
Page 1
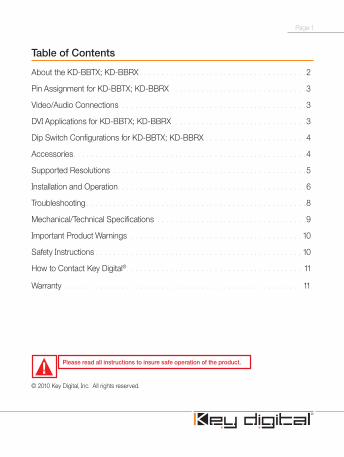
Table of Contents
About the KD-BBTX; KD-BBRX . . . . . . . . . . . . . . . . . . . . . . . . . . . . . . . . . . . . . .2
Pin Assignment for KD-BBTX; KD-BBRX . . . . . . . . . . . . . . . . . . . . . . . . . . . . . .3
Video/Audio Connections . . . . . . . . . . . . . . . . . . . . . . . . . . . . . . . . . . . . . . . . . .3
DVI Applications for KD-BBTX; KD-BBRX . . . . . . . . . . . . . . . . . . . . . . . . . . . . . .3
Dip Switch Configurations for KD-BBTX; KD-BBRX . . . . . . . . . . . . . . . . . . . . . . .4
Accessories. . . . . . . . . . . . . . . . . . . . . . . . . . . . . . . . . . . . . . . . . . . . . . . . . . . . .4
Supported Resolutions . . . . . . . . . . . . . . . . . . . . . . . . . . . . . . . . . . . . . . . . . . . .5
Installation and Operation. . . . . . . . . . . . . . . . . . . . . . . . . . . . . . . . . . . . . . . . . . .6
Troubleshooting . . . . . . . . . . . . . . . . . . . . . . . . . . . . . . . . . . . . . . . . . . . . . . . . . .8
Mechanical/Technical Specifications . . . . . . . . . . . . . . . . . . . . . . . . . . . . . . . . . .9
Important Product Warnings . . . . . . . . . . . . . . . . . . . . . . . . . . . . . . . . . . . . . . . 10
Safety Instructions . . . . . . . . . . . . . . . . . . . . . . . . . . . . . . . . . . . . . . . . . . . . . . . 10
How to Contact Key Digital®. . . . . . . . . . . . . . . . . . . . . . . . . . . . . . . . . . . . . . . . 11
Warranty . . . . . . . . . . . . . . . . . . . . . . . . . . . . . . . . . . . . . . . . . . . . . . . . . . . . . . 11
© 2010 Key Digital, Inc. All rights reserved.
Please read all instructions to insure safe operation of the product.

Page 2
About the KD-BBTX; KD-BBRX
½ Transmits (KD-BBTX) and Receives (KD-BBRX) 1080p/60 HDMI/DVI signals up to 150 feet and 1080p/24, 1080i, 720p, 480p, 480i HDMI/DVI signals up to 300 feet over CAT5/5e/6 cable.
½ Transmits and Receives RS-232 and IR control signals up to 300 feet over CAT5/5e/6 cable utilizing Key Digital’s exclusive Adaptive Smart Data Link™ technology.
½ Transmits (KD-BBTX) and Receives (KD-BBRX) Left/Right analog or PCM digital audio up to 300 feet over standard CAT5/5e/6 cable†
½ Automatically performs measurement of CAT5/5e/6 link frequency response and performs adaptive video response equalization for maximum video quality performance utilizing Key Digital’s exclusive Auto Video Equalizer™ technology.
½ Can handle all major video and audio formats such as analog stereo (balanced/unbalanced) and digital S/PDIF.
½ Shielded RJ45 for best picture quality with UTP or STP cable. ½ Compliant with CAT5, CAT5e, CAT6 and CAT7 cables.
Note: Maximum distance specifications may vary based on UTP cable and crimping connection quality. For optimum performance at maximum distances, please use STP cabling with properly soldered shielded RJ45 connectors.† HDMI HDCP handshake information (DDC) and external audio cannot be supported simultaneously.
DVI
HDMI
AudioCAT5/6/7
IR
RS-232
Up to 300’ CAT5/6/7 cablewith bi-directional IR/RS-232
Up to 300’ CAT5/6/7 cablewith bi-directional IR/RS-232
Speakers
KD-BBRX
KD-BBTX
KD-BBRX
KD-BBTX
CAT5/5e/6
CAT5/5e/6
CAT5/5e/6
CAT5/5e/6
RS-232
RS-232
IR
IR
Analog Audio
IR
HDMI
HDMI
Analog Audio
RS-232
RS-232
IR
DVI Video*
DVI Video*
*To connect DVI use Key Digital® HDMI to DVI adapters, part numbers KD-FMHDMI and KD-MFHDMI
Display
Blu-Ray
Control System
Display
Audio Rcvr.
Control System
Desktop PC

Page 3
Pin Assignment for KD-BBTX; KD-BBRX
PIN # 1 2 3 4 5 6 7 8
Description TMDS 0-
TMDS 0+
TMDS C+
TMDS 1-
TMDS 1+
TMDS C-
TMDS 2-
TMDS 2+
Video/Audio Connections
Input (KD-BBTX) / Output (KD-BBRX) ½ Video
» HDMI / DVI via (1) HDMI Connector ½ Audio†
» Analog: L+, L-, R+, R- via (1) Terminal Block 6c style connector, included. Balanced/unbalanced compatible
» Digital: PCM via (1) RCA style connector ½ Data Connection
» RS-232 + IR via (1) Terminal Block 5c style connector, included
Input (KD-BBRX) / Output (KD-BBTX) ½ Single CAT5/5e/6
DVI Applications for KD-BBTX; KD-BBRX
KD-BBTX; KD-BBRX can also be used to extend DVI video cable runs. For these applications, use DVI to HDMI (Key Digital model number KD-MFHDMI or KD-FMHDMI) adapters.
DVI
HDMI
AudioCAT5/6/7
IR
RS-232
Up to 300’ CAT5/6/7 cablewith bi-directional IR/RS-232
Up to 300’ CAT5/6/7 cablewith bi-directional IR/RS-232
Speakers
KD-BBRX
KD-BBTX
KD-BBRX
KD-BBTX
CAT5/5e/6
CAT5/5e/6
CAT5/5e/6
CAT5/5e/6
RS-232
RS-232
IR
IR
Analog Audio
IR
HDMI
HDMI
Analog Audio
RS-232
RS-232
IR
DVI Video*
DVI Video*
*To connect DVI use Key Digital® HDMI to DVI adapters, part numbers KD-FMHDMI and KD-MFHDMI
Display
Blu-Ray
Control System
Display
Audio Rcvr.
Control System
Desktop PC

Page 4
Dip Switch Configurations for KD-BBTX
1. L/R or PCM Switch » Used to select either L/R Analog or PCM Digital
audio.2. Audio or DDC Switch
» Used to select either external audio (L/R Analog or PCM Digital) or HDMI handshake information (Ie. HDCP, EDID).
» Note: HDMI HDCP handshake information (DDC) and external audio cannot be supported simultaneously. Therefore, selecting DDC will nullify any selection of dip switch # 1
3. Low or High Switch » No current functionality
Fine Equalizer KD-BBRX
1. Fine Equalizer Adjustment Knob » Used to fine tune equalization settings based on
CAT5/5e/6 cabling used
Accessories
½ External 5 Volt 1 Amp switching power supply (for 110V-240V applications) ½ Operating Instructions
You MUST use the Power Supply provided with your unit or you VOID the Key Digital® Warranty and risk damage to your unit and associated equipment.

Page 5
Supported Resolutions
Common Video Resolutions
Resolution Common Name Distance
720 x 480 (split into two fields) 480i 300’
720 x 480 480p 300’
1280 x 720 720p 300’
1980 x 1080 (split into two fields) 1080i 300’
1920 x 1080 1080p / 24 300’
1920x 1080 1080p / 60 150’
Common Computer Resolutions
Resolution Common Name Distance
800 x 600 SVGA 300’
1024 x 768 XGA 300’
1280 x 768 WXGA 300’
1280 x 1024 SXGA 300’
1366 x 768 WXGA 300’
1440 x 1080 SXGA+ 180’
1600 x 1200 UXGA 150’
1920 x 1200 WUXGA 150’

Page 6
Installation and Operation
The KD-BBTX; KD-BBRX must receive power from the supplied power adapter. We recommend the use of STP CAT5/5e/6 cabling for best performance.
Before permanently securing the unit or final installation of cabling behind walls or ceilings, test for proper operation of the unit and the cables in your system.
1. Find a safe and convenient location for the KD-BBTX; KD-BBRX unit » a. The KD-BBTX; KDBBRX is shipped with a convenient mounting clip as an
installation option. Once you have verified operation of the unit with your cables, secure the mounting clip to a convenient location. Carefully insert the KD-BBTX; KD-BBRX into the mounting clip provided.
2. Connections » a. Plug in desired Video source into HDMI style
connector port of the KD-BBTX; KD-BBRX. » b. Plug in desired Audio source*:
» i. Audio over HDMI or » ii. PCM into RCA style connector or » iii. Analog L/R Audio into Terminal Block 6c style connector
3. Connecting Unbalanced Analog L/R Audio* » a. On Terminal Block 6c Style Connector, depress orange buttons with small
screwdriver and insert as follows: » i. L Signal = Pin 3 » ii. L Ground = Pin 2 » iii. R Signal = Pin 6 » iv. R Ground = Pin 5
* HDMI HDCP handshake information (DDC) and external audio cannot be supported simultaneously.
Page 7
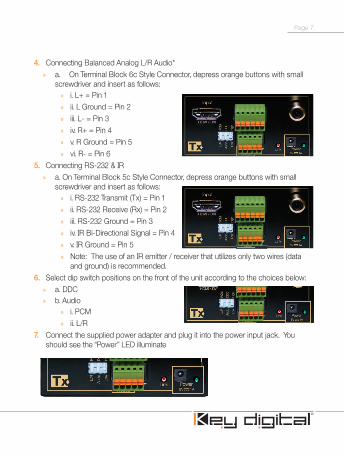
4. Connecting Balanced Analog L/R Audio* » a. On Terminal Block 6c Style Connector, depress orange buttons with small
screwdriver and insert as follows: » i. L+ = Pin 1 » ii. L Ground = Pin 2 » iii. L- = Pin 3 » iv. R+ = Pin 4 » v. R Ground = Pin 5 » vi. R- = Pin 6
5. Connecting RS-232 & IR » a. On Terminal Block 5c Style Connector, depress orange buttons with small
screwdriver and insert as follows: » i. RS-232 Transmit (Tx) = Pin 1 » ii. RS-232 Receive (Rx) = Pin 2 » iii. RS-232 Ground = Pin 3 » iv. IR Bi-Directional Signal = Pin 4 » v. IR Ground = Pin 5 » Note: The use of an IR emitter / receiver that utilizes only two wires (data
and ground) is recommended.6. Select dip switch positions on the front of the unit according to the choices below:
» a. DDC » b. Audio
» i. PCM » ii. L/R
7. Connect the supplied power adapter and plug it into the power input jack. You should see the “Power” LED illuminate

Page 8
Troubleshooting
Most issues with the KD-BBTX; KD-BBRX setup will involve resolution and distance performance. If you experience problems (no image, video artifacts, picture dropout, noise) here are a few things to try:1. Allow auto-equalization to take place after initial setup. Auto-equalization may take
up to five minutes.2. HDMI® HDCP handshake information (DDC) and external audio cannot be
supported simultaneously. KD-BBTX; KD-BBRX supports either HDMI with HDCP or HDMI/DVI without HDCP in addition to external audio (L/R or PCM). IR and RS-232 control signals are supported in either scenario.
3. Use the shortest possible HDMI/DVI and CAT5/5e/6 cables between devices.4. Lower the output resolution of the image source.5. Use Key Digital HDMI cables.6. Verify that the “Link” light is active on KD-BBTX; KD-BBRX. “Link” light will not
illuminate or possibly flicker if the CAT5/5e/6 cabling is not transmitting/receiving all necessary data.
7. Re-terminate CAT5/5e/6 cabling in accordance with TIA/EIA-568-A or TIA/EIA-568-B pin-pair assignments (see diagram below).
TIA/EIA-568-A
PIN # 1 2 3 4 5 6 7 8
Description White Green
Green White Orange
Blue White Blue
Orange White Brown
Brown
TIA/EIA-568-B
PIN # 1 2 3 4 5 6 7 8
Description White Orange
Orange White Green
Blue White Blue
Green White Brown
Brown

Page 9
Technical Specifications
» Inputs/Outputs:� 1 HDMI connector, 1 stereo analog balanced or unbalanced audio 1VRMS/10KΩ on a Phoenix connector; 1 digital S/PDIF audio 0.5Vpp/75Ω on an RCA connector, RS-232 Tx, Rx line and ground on Phoenix connector; wired IR bi-directional on Phoenix connector; 1 CAT5 Input on a shielded RJ-45 connector (for video/audio/data)
» Bandwidth:� TMDS bandwidth 10.2 Gb/s » EQ Adjustments:� Precise Auto Adjust, Distance Measurement » HDMI® and HDCP Licensing:� Fully licensed and compatible with all HDMI and HDCP techologies
» Link and Range:� 1080i/60, 720p, 1080p/24 UTP up to 250 ft. CAT6 UTP up to 280 ft.
» Deep Color Support:� Supports Digital Video Formats in Deep Color Mode at up to 12 bits/color
» Additional Non-HDMI Audio:� Left and Right Balanced or unbalanced on Phoenix connector or Coaxial Digital Audio S/PDIF on RCA connector
» DDC Signal (Data):� Input DDC Signal: 5 Volts p-p (TTL) » HDMI Video/Audio Signal:� Input Video Signal: 1.2 Volts p-p » HDMI Connector:� Type A, 19 Pin Female » RJ45 Connector:� Shielded Link Connector RJ45 » DDC Communication:� EDID and HDCP Transparency from Display to Source » Additional Non-HDMI Wired RS-232:� RS-232 Tx and Rx Line active and bi-directional up to 115,200 baud rate
» Additional Non-HDMI Wired IR:� IR line, active and bi-directional 0-5V TTL or -10 – 10V
» Power:� External UL Certified Power Supply – 5V DC / 2A, 110-240 VAC, 50-60 Hz
RoHSCOMPLIANT
WEEECOMPLIANT
RoHS WEEE
RoHSCOMPLIANT
WEEECOMPLIANT
RoHS WEEE

Page 10
1. Read and follow all instructions.2. Heed all warnings.3. Do not use this device near water.4. Clean only with dry cloth.5. Install in accordance with the manufacturer’s instructions.6. Do not install near any heat sources such as radiators, heat registers, stoves, or
other apparatus (including amplifiers) that produce heat.7. Only use attachments/accessories specified by the manufacturer.8. Refer all servicing to qualified service personnel. Servicing is required when the
device has been damaged in any way including: » Damage to the power supply or power plug » Exposure to rain or moisture
1. Connect all cables before providing power to the unit.2. Test for proper operation before securing unit behind walls or in hard to access
spaces.3. If installing the unit into wall or mounting bracket into sheet-rock, provide proper
screw support with bolts or sheet-rock anchors.
Important Product Warnings:
Safety Instructions.Please be sure to follow these instructions for safe operation of your unit.
You MUST use the Power Supply provided with your unit or you VOID the Key Digital® Warranty and risk damage to your unit and associated equipment.

Page 11
How to Contact Key Digital®
System Design Group (SDG)
For system design questions please contact us at: ½ Phone: 914-667-9700 ½ E-mail: [email protected]
Key Digital Trainings
For questions about Key Digital Trainings please contact us at: ½ Phone: 914-667-9700 ½ E-mail: [email protected]
Customer Support
For customer support questions please contact us at: ½ Phone: 914-667-9700 ½ E-mail: [email protected]
Technical Support
For technical questions about using Key Digital® products, please contact us at: ½ Phone: 914-667-9700 ½ E-mail: [email protected]
Repairs and Warranty Service
Should your product require warranty service or repair, please obtain a Key Digital® Return Material Authorization (RMA) number by contacting us at: ½ Phone: 914-667-9700 ½ E-mail: [email protected]
Warranty
All Key Digital® products are built to high manufacturing standards and should provide years of trouble-free operation. They are backed by a limited two-year parts and labor warranty.

Page 12
* HDMI, the HDMI Logo, and High-Definition Multimedia Interface are trademarks or registered trademarks of HDMI Licensing LLC in the United States and other countries.

Page 13

521 East 3rd Street, Mount Vernon, NY 10553
Phone :: 914.667.9700 Fax :: 914.668.8666
Web :: www.keydigital.com Rev 0 – Nov. 2009
Key Digital®, led by digital video pioneer Mike Tsinberg,
develops and manufactures high quality, cutting-edge
technology solutions for virtually all applications where
high quality video imaging is important. Key Digital®
is at the forefront of the video industry for Home
Theater Retailers, Custom Installers, System Integrators,
Broadcasters, Manufacturers, and Consumers. We
provide total video system solutions because we know
and help drive the technology, the industry, the business,
and all the latest up-and-coming standards. But most
of all, we know exactly what you need for your unique
application - the right solution.