kci express reference guide consignment...enter account information. b. ... the number of...
TRANSCRIPT

KCI Express®
Reference Guide

Contact Information KCI EXPRESS® Version 2 Website address: www.kciexpress.com/kciexpress For additional information or assistance with KCI Express®,
Please call: 1-800-275-4524 Ext. 65080 or email: [email protected] Please note members of the KCI Express Support Team are available Business Days (Monday – Friday, except National Holidays) from 7:00 AM – 6:00 PM CST. Please call the National Contact Center 1-800-275-4524 after hours.

KCI Express® Reference Guide Homecare site – Home Consignments
Logging in for the First TimeLogging in – Every DayEntering a New Consignment OrderViewing Order StatusViewing Available Consignment InventoryPlacing the Consignment Unit on the PatientOrdering VAC DisposablesSubmitting a Monthly Wound Progress ReportService Calls for Improperly Functioning UnitsDischarging Patients and Returning Units/Disposables
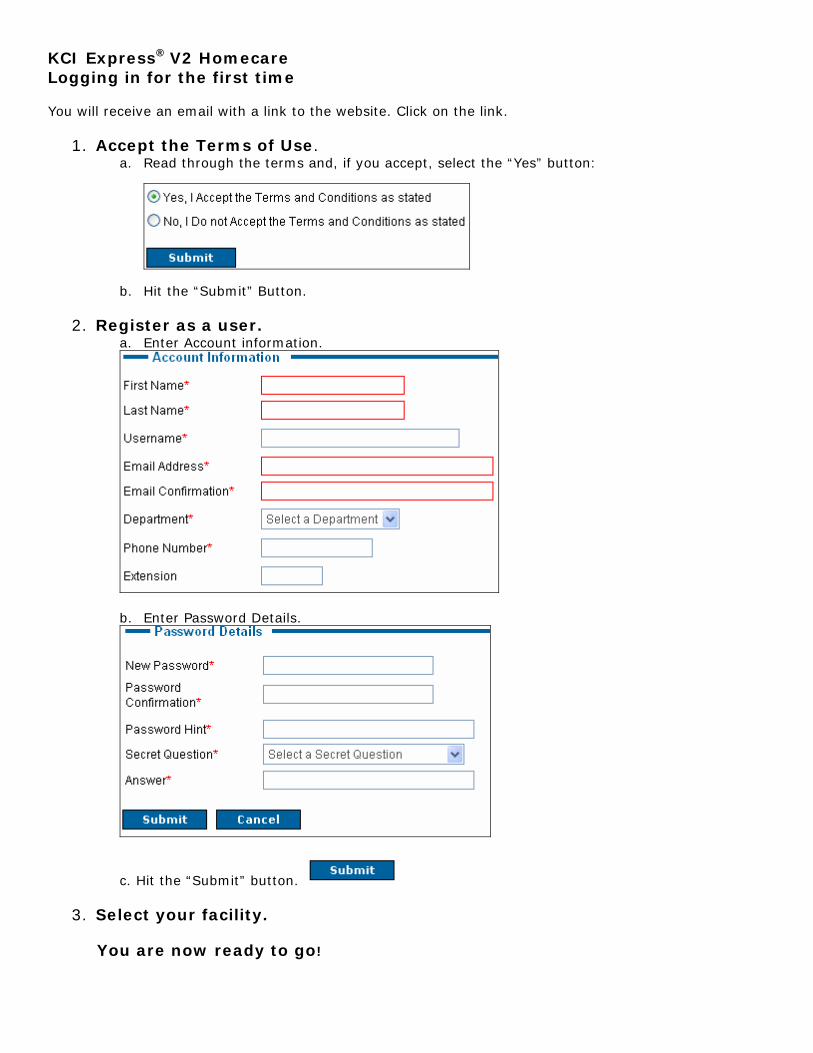
KCI Express® V2 HomecareLogging in for the first time You will receive an email with a link to the website. Click on the link.
1. Accept the Terms of Use. a. Read through the terms and, if you accept, select the “Yes” button:
b. Hit the “Submit” Button.
2. Register as a user. a. Enter Account information.
b. Enter Password Details.
c. Hit the “Submit” button.
3. Select your facility. You are now ready to go!

KCI Express® V2 Homecare HomeCare Consignment Logging In – Every Day
1. Log into the website – https://www.kciexpress.com/kciexpress/ a. Enter your User Name and password:
b. Hit the “Login” button.
2. Select the account you will be placing the order from.
a. Select the site location from which you will be placing the order.
b. Click on the correct site address.

KCI Express® V2 Homecare Entering a New Consignment Order
1. Hit the “Rental Order” button on the Site Functions menu on the left side of the screen.
2. Select the location where the product will be used. “Private Residence" is the usual selection.
a. Hit “Continue”
3. Enter Patient information (Step 1) and any other optional information available.
a. Enter Patient’s name, phone number, and date of birth. If this is a transition order, the patient's name will be pre-entered.
b. Enter Permanent Address. This is the patient's legal address – the address listed on any insurance or claims documentation.
c. Enter a Current Address, if the patient will not be using the unit at home. If the permanent address is where the patient is staying, select “Same as Permanent Address.” If the patient is staying somewhere besides their permanent address while getting treatment (for example, a relative’s house or a vacation home) enter this address here.
d. Enter all other optional information available and Hit “Continue”.

4. Enter Insurance and Select Product. (Step 2) a. Select or enter Insurance payer information. Hit the ‘View Payers’ button to select from a list of insurance companies frequently used.
b. Select “Yes” to the consignment unit question. The number of consignment units listed as available may include units that are already committed to orders in progress.
5. Order Additional Supplies. (Step 2) a. Hit the Blue Arrows (or triangles) to expand the selection. b. Add the additional supplies that should be delivered to the patient's home. The items included with the unit are already indicated. Add to the order the supplies (or the quantities) to be shipped to the patient’s home for the initial 30-day period
i. Order Canisters. Usual Maximum**: 10. ii. Order Dressings. Usual Maximum**: 15 per wound. iii. Order Other Items. Y-connectors, drapes, etc.
**More supplies may be ordered, but a Justification Form may be required.
c. Hit the “Add To Cart” button.
d. Enter all other optional information available and hit “Continue.”

6. Enter Clinical Information. (Step 3). a. Enter Clinical Care Contact of Organization Providing Clinical Care information. b. Enter V.A.C. Patient and Wound Information.
i. The question on previous wound treatment is required to answer. If you selected the patient from your patient list, the answer will automatically be set to yes.
c. Enter V.A.C. Wound Information.
d. Enter all other optional information available and hit “Continue.”
7. Enter Physician Information (Step 4) and other information available*. a. Hit the “View Physicians” button to select from a list of physicians frequently used.
b. Enter the Physician's Phone Number.
c. Enter all other optional information available and hit “Continue.”
13. Enter Delivery Preferences. (Step 5). a. Select the date and time the patient will be placed on the product using the calendar.
b. Enter Delivery Address for the additional supplies. You can use the drop-down list to select from the addresses you entered earlier. The “My Facility” option for should not be used for consignment orders.
14. Enter Requestor Information. Check "Requestor same as submitter" if you are the requestor for the order.
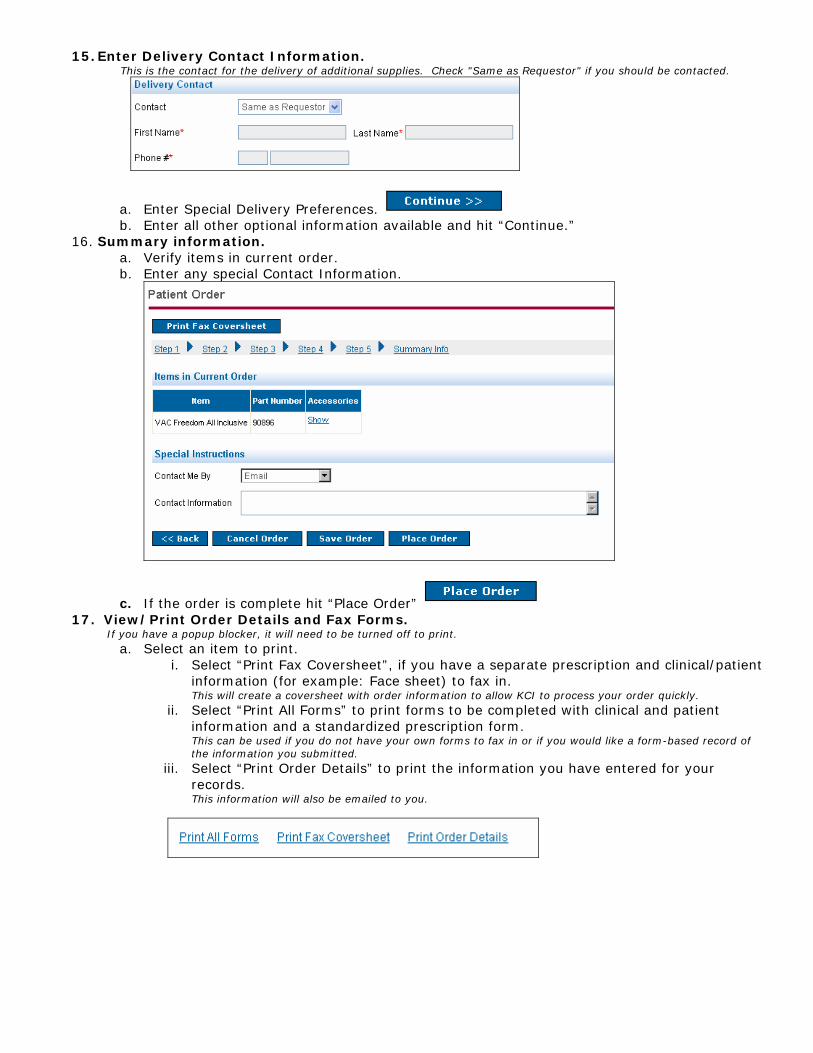
15. Enter Delivery Contact Information. This is the contact for the delivery of additional supplies. Check "Same as Requestor" if you should be contacted.
a. Enter Special Delivery Preferences. b. Enter all other optional information available and hit “Continue.”
16. Summary information. a. Verify items in current order. b. Enter any special Contact Information.
c. If the order is complete hit “Place Order” 17. View/Print Order Details and Fax Forms.
If you have a popup blocker, it will need to be turned off to print. a. Select an item to print.
i. Select “Print Fax Coversheet”, if you have a separate prescription and clinical/patient information (for example: Face sheet) to fax in. This will create a coversheet with order information to allow KCI to process your order quickly.
ii. Select “Print All Forms” to print forms to be completed with clinical and patient information and a standardized prescription form. This can be used if you do not have your own forms to fax in or if you would like a form-based record of the information you submitted.
iii. Select “Print Order Details” to print the information you have entered for your records. This information will also be emailed to you.
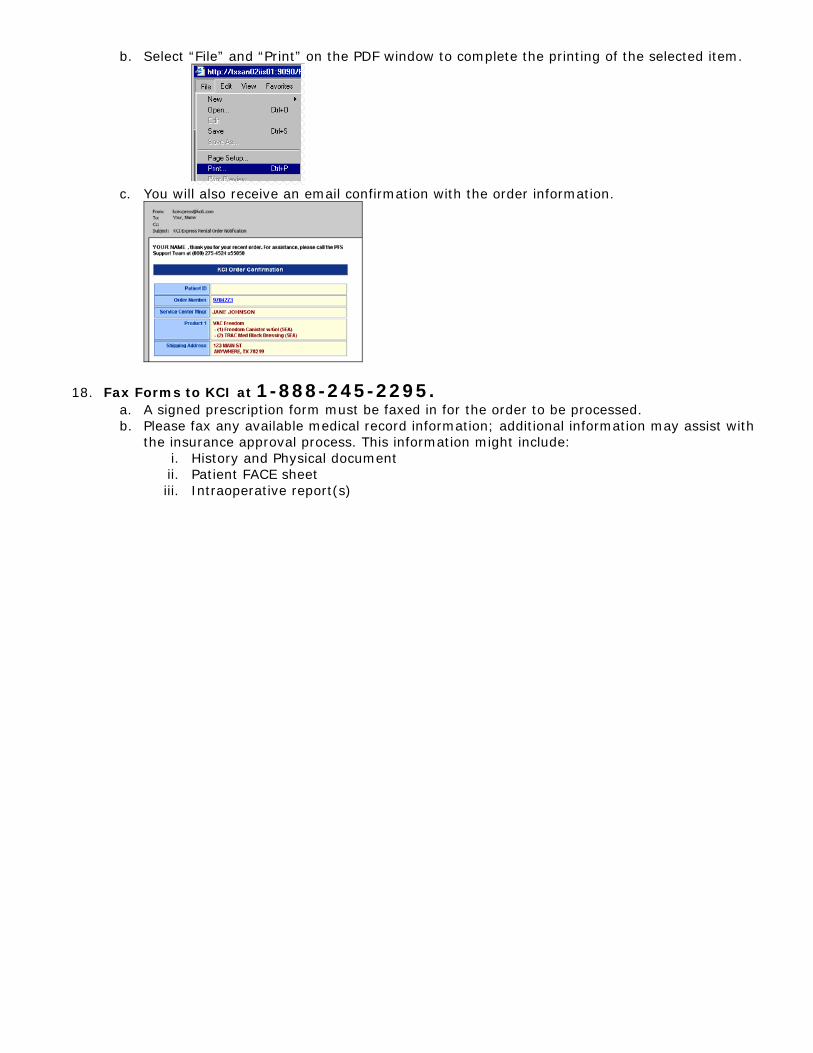
b. Select “File” and “Print” on the PDF window to complete the printing of the selected item.
c. You will also receive an email confirmation with the order information.
18. Fax Forms to KCI at 1-888-245-2295. a. A signed prescription form must be faxed in for the order to be processed. b. Please fax any available medical record information; additional information may assist with
the insurance approval process. This information might include: i. History and Physical document ii. Patient FACE sheet iii. Intraoperative report(s)

KCI Express® V2 Viewing Order Status
1. The status of orders entered will be displayed on the Patient Listing.
2. The “current View” filter will limit the patients displayed on the Patient listing as indicated.
3. The definition of the order statuses can be seen by selecting the “Information” icon at the
top of the column. a. Select the “i”.
b. View the definitions.
4. A “Gas Gauge” graph is displayed on the Patient Actions screen that pops up when you select
a patient. a. Select Patient.
b. View gauge.

5. There is more order status information available on the Order details screen. a. Select “Order Details” from the Patient Actions Menu
b. View the Order Details.

KCI Express® V2 Viewing Available Consignment Inventory
1. Select “Inventory Listing” on the Site Functions menu on the left side of the screen.
2. View the products that are listed as in storage at your facility for home placement.

KCI Express® V2 Placing on the Patient
1. KCI will review the information after you submit an order through KCI Express and fax a completed prescription.
2. You will receive a notification email when the order has been processed.
3. Print the Proof of Delivery/Assignment of Benefits Document and confirm the placement.
a. Find the patient's name on the "Patient Listing" and select it. b. Select "Confirm Patient Placement" from the Patient Actions list.
c. Select the correct VAC serial number from the drop-down list.

d. Enter the placement date and time.
e. Click "Print Docs & Confirm Placement”.
f. Click on “OK” to generate Adobe PDF document and confirm the order.
Note: The additional supplies for the patient will be shipped when the placement is confirmed.
g. Select “File”, “Print” on the PDF document to print the document.
If the document does not generate, you may need to have Adobe Reader installed on your computer. Please contact your IT department.

4. Review the Proof of Delivery/Assignment of Benefits Document. This document contains the proof of delivery, assignment of benefits, and privacy information and needs to be signed by the patient.
a. Ensure the serial number placed on the patient is listed correctly.
b. Verify that the dressings and canisters provided to the patient are listed correctly.
5. Obtain the patient’s signature and date on this document. Please provide a copy of this paperwork to the patient for their records. A second copy of this paperwork will be generated for your convenience.
6. Fax to 1-888-245-2295 after it is signed.

KCI Express® V2 Homecare Ordering VAC® Disposables (Including Supply Justification Form, if applicable)
1. Hit the “Sales Order” button on the Site Functions menu on the left hand side of the screen.
2. Hit the “select” button for the patients needing the supplies.
2. Select items to order for the patient.
a. To place the same order, hit the “Place Same Order” button and proceed to step 3. b. To place a different order, hit the “Place Different Order” button. i. Select the items and quantity to add to your order.
ii. Confirm that items are correct and hit “Continue.”

3. Review the accessory order summary. If everything is correct, hit “Continue.” If the order is incorrect, hit “Change Items” to go back to the accessory selection page.
4. Complete Supply Justification Form, if needed. a. If the supplies ordered exceed the amount allowed to by the patient’s insurance, you will
receive a Supply Justification Form (SJF) Warning.
b. Hit “Continue with Order” to fill out the SJF later. Please note this may delay the order.
c. Hit “Complete SJF” to fill out the SJF. i. Enter the required information on the Supply Justification Form.
ii. Hit “Finish” when complete.

5. Confirm Shipping Address
a. Confirm the information is correct and hit “Continue.”
6. Order Entry Verification.
a. Confirm the information is correct and hit “Place Order.”
7. Receive Sales Order Confirmation.
a. Receive confirmation and hit “Print” if necessary.

KCI Express® V2 Homecare Submitting a Monthly Wound Progress Report (MWP)
1. Hit the “Documents Due” button on the Site Functions menu on the left hand side of the screen.
2. Hit the “Complete Form” link next to the patient’s name.
3. Enter the number of V.A.C.® treated wounds. a. Enter the number and Hit “Next - - >” to continue.
4. Complete the required Wound Information fields. a. Indicate if the patient is still using the unit by selecting “Yes” or “No”.
i. If you select “Yes”:
1. Enter the location and measurements of the wound(s).
If you enter more than one wound, there will be a tab to complete for each wound.
2. Hit “Next - - >” to continue.
ii. If you select “No” :

1. Enter information about the outcome of therapy.
2. Hit “Finish” to complete your submission (go to step 5c). 5. Complete the required Information fields for Step 2.
a. Select “Yes” or “No” for each question and complete any additional information.
b. Hit “Next - - >” to continue.
6. Enter required Clinical information fields for Step 3 and complete submission. a. Enter the required information in each field, using the calendar icon to enter the date.
b. Hit “Finish” to complete your submission. c. If you want to print the MWP, hit “View printer-friendly version”.

d. Hit the “Return to Patient Listing” button. e. Your submission is now complete.

KCI Express® V2 Homecare Consignment Service Calls for Improperly Functioning Units
1. Contact KCI at 800-275-4524 to report improperly functioning units. You will be asked for information about the patient using the product. The patient can also contact KCI directly if they are at home and require service. This is a 24 hour a day service.
2. You will be connected to our Technical Product support team.
a. The support team will provide technical assistance and contact the local service center if repair or replacement is needed.
b. If troubleshooting measures cannot return the unit to a properly functioning status and the patient is at your facility with the unit, it can be replaced with a unit from your consignment inventory.
3. To replace with a unit from your inventory, use the exchange process.
a. Login to KCI Express® b. Find the patient's name on the "Patient Listing" and select them.
c. Select "Exchange Patient's VAC Unit" from the Patient Actions list.
d. Select the Serial Number the patient will now be using (the NEW serial number).
e. Enter the Date and time that the unit was replaced.

4. Hit the Print Document button.
a. Hit “File”, then “Print” on the PDF document to print the document.
b. Confirm that the information on the document is correct 5. Obtain the patient’s signature and date at the bottom of the document.
6. Fax to 1-888-245-2295 after it is signed. 7. Select “Confirm Placement” to complete the order.

KCI Express® Homecare Consignment Discharging Patients and Returned Units/Disposables
1. If the patient has discharged from the product, please contact KCI at 800-275-4524 to discontinue the product and arrange for pickup.
2. KCI will contact the patient to arrange for pickup at the patient’s home.
3. If a unit and disposables are returned to your facility, a. Contact KCI for the discharge as above. b. Inform the agent that the unit and disposables can be picked up at your facility.
i. Please note that only disposables in unopened boxes may be returned. c. Place the KCI VAC unit and all returned disposables into a KCI packing box.
i. Write the patient’s first and last name on the outside of the box and indicate “returned unit.”