jztek surveillance systems jztek dvr...
TRANSCRIPT

JZTEK SURVEILLANCE SYSTEMS
www.jztekcctv.com [email protected]
JZTEK DVR Operation Manual
Windows10 version
Dear Valued Client, Thank you for your trust about JZTEK! If you’re satisfied with this JZTEK product, we would sincerely appreciate providing your positive review and feedback on the Amazon JZTEK product page. If you have any questions about the DVR installation and its functions, please contact us for assistance at [email protected]. As time difference, we’ll reply you within 24hours! Thank you once again for your trust and business. Best regards. JZTEK
Preparations & Suggestions: 1. Power up DVR, and connect dvr to a monitor via VAG/HDMI Cable. Some monitor, like
SAMSUNG, HDMI is different, when you use HDMI Cable, it might shows “Not Compatiable”, please connect with a VGA cable and try again.
2. DVR is not wireless, you need use a wired ethernet cable to connect DVR to a router. 3. DVR without HDD Pre-installed, please buy and install one HDD for recording and
playback. HDD MUST be Surveillance HDD, NOT for Desktop or Laptop! 4. Contact us for a super password if your DVR is locked or shows “System Maintaining,
contact installer plz”! 5. CVI Camera is special signal, please better use CVI Camera alone.
1. Login Cloud Server
1.1 PC Access Enter http://xmeye.net into the internet explorer and you will see the page below (See P-1).In the Login and Preview box select “By Device” option: CMS Interface is shown below:

JZTEK SURVEILLANCE SYSTEMS
www.jztekcctv.com [email protected]
Note: Please make sure your Active X Browser is enabled to install Active X. You can also visit www.jztekcctv.com/downloads to download CMS online to avoid troubles.You can also find “CMS User’s manual” and “How to add device in CMS” there also.
1.2 Mobile Access
Please get the XMeye App in Play store or App store, and install it in your smart phone.

JZTEK SURVEILLANCE SYSTEMS
www.jztekcctv.com [email protected]
Now you are ready to: 1. Register an account for the APP. (If you don't want to register, just tap “local login”.)


JZTEK SURVEILLANCE SYSTEMS
www.jztekcctv.com [email protected]
2. Click “ + “ button at the top right to add device.
Note: You can find DVR serial number, input the number or scan the QR code directly with mobile APP. <main menu>--<advanced>--<version>.


JZTEK SURVEILLANCE SYSTEMS
www.jztekcctv.com [email protected]
After you can check video in XMEYE APP, and you can also see the playback in this APP (make sure HDD installed first), see below picture:

JZTEK SURVEILLANCE SYSTEMS
www.jztekcctv.com [email protected]
2. Appearance and Interface
2.1 Rear Panel (8CH as example)
1 Video input 2 Audio out 3 HDMI output 4 VGA output
5 Audio input 6 USB interface 7 RS485 interface 8 DC 12V input
9 Network interface
3. Hard Drive Installation
Open top cover and unfasten the screws of dvr, hook the power and data cable of HDD as below, and screw the HDD (either a 2.5 or 3.5 inch is ok; the maximum memory is 3TB, better change the power adapter to a 12V 3A at the minimum) .

JZTEK SURVEILLANCE SYSTEMS
www.jztekcctv.com [email protected]
Note: 1. HDD MUST be Surveillance hard drive, not desktop or laptop hard drive. Seagate and
WD recommend! 2. For first time use, you need format storage. Please go to <main
menu>--<advanced>--<storage>--format storage. 3. HDD informations should be correct, like type should be “Read/write”, status shows
“normal”, then means the HDD installed ok and is detected by DVR. See below pictures:

JZTEK SURVEILLANCE SYSTEMS
www.jztekcctv.com [email protected]
Note: Type should show “read/write”, Status show “Normal”, then means HDD is working fine.
4. Boot up/Shut down/User Login/Shortcut Menu
4.1 Boot up Connect the power and when the indicator comes on, DVR will boot up. Connect dvr to a monitor or TV, and an ethernet cable via dvr RJ45 port. Note: Please use the factory furnished power adapter to avoid any abnormal situation or damage to the device. 4.2 Shut Down
To shut down the device, there is the soft and hard shut down methods: <Soft-off>: shortcut menu--<logout>-<shutdown>, or Please refer to 4.4 Desktop Shortcut Menu. <Hard-off>: directly unplug the power on the rear of the panel. Note: 1. Power recovery: when the DVR is shut down abnormally, all recording data is saved automatically and is restored to the previous status once the DVR is rebooted.

JZTEK SURVEILLANCE SYSTEMS
www.jztekcctv.com [email protected]
2. When replacing the HDD, please shut down the power first to prevent circuit damage. 4.3 System Login When DVR boots up, video comes, please right click on the monitor or TV, default user is “admin”, no password, just click “ok”.
Note: If you assign new user and password, but the account is locked due to wrong password, please contact us for a super password. 4.4 Shortcut Menu In preview mode, you can right click the mouse on monitor or TV to get a desktop shortcut menu as shown in the pictures below:

JZTEK SURVEILLANCE SYSTEMS
www.jztekcctv.com [email protected]
This shortcut includes: Main Menu, Guide, Record Mode, PlayBack, PTZ Control, Coaxial Control, TVI&AHD, High Speed PTZ, Alarm Output, Color Setting, Output Adjust, Logout, and view mode shift. In the following sections, we’ll introduce you some key points. 4.4.1 Main menu Main menu interface is shown as below (for each detailed function blocks, please refer to section 5. Main Menu):

JZTEK SURVEILLANCE SYSTEMS
www.jztekcctv.com [email protected]
4.4.2 Guide Here is how to get a quick connection to the DVR:

JZTEK SURVEILLANCE SYSTEMS
www.jztekcctv.com [email protected]
Click ”next”, you can set language and time zone as below:
Click “Retry”, you can test DVR network settings.

JZTEK SURVEILLANCE SYSTEMS
www.jztekcctv.com [email protected]
Then it comes mobile APP QR code and SN.
4.4.3 Record mode Assign each channel recording mode you need, it will affect record config settings, refer to 5.2 Record Config.
4.4.4 XVI Control Set each camera parameters via here, brightness or others.

JZTEK SURVEILLANCE SYSTEMS
www.jztekcctv.com [email protected]
4.4.5 XVI&AHD Here you can assign which channel to connect AHD TVI or CVI camera (see following Picture). Note: CVI camera signal is special, better connect this kind of cameras alone.

JZTEK SURVEILLANCE SYSTEMS
www.jztekcctv.com [email protected]
4.4.5 Playback You can access playback quickly here.
5. Main Menu In the Main Menu, there are six blocks and each block will be briefly explained.

JZTEK SURVEILLANCE SYSTEMS
www.jztekcctv.com [email protected]
5.1 Playback Note: Install a HDD in DVR. Recommend Seagate and WD surveillance hard drive.
1 Time & Date Selection
2 Channel Selection
3 Search Records
4 Play Back Buttons
5 Time line File Records
5.2 Record Conf.

JZTEK SURVEILLANCE SYSTEMS
www.jztekcctv.com [email protected]
Channel:Choose the corresponding channel number. You can select “All”. Redundancy: Choose the redundancy function to double backup the file. Length: Set the time length of each video file between 1min to 120min. 60minutes is the default value. Mode: Set video state: select either schedule, manual or stop. Refer to 4.4.3 Record mode. “Schedule”: record according to the set video type (common, detection) and time. Video file type is “R”. “Manual”: Manually set recording. Video file type is “H”. “Stop”: Selected channel will not record. Period: Set the time section of common recording; the recording will start only in this time period. Record Type: Set recording type: regular, detection or alarm. Regular: record according to the set time section. Detect: within the set time section, trigger the motion detect. The video file type is “M”. Alarm: other alarm recording.The video file type is “A”. 5.3 Network

JZTEK SURVEILLANCE SYSTEMS
www.jztekcctv.com [email protected]
DHCP Enable: obtain IP address automatically to avoid IP Conflict with other device. Transfer Policy: adaptive, quality preferred and fluency preferred. Adaptive and fluency preferred are valid only when you choose related coding mode (refer to section 5.3.2 Encode). 5.4 Date Time You can set date and time here.

JZTEK SURVEILLANCE SYSTEMS
www.jztekcctv.com [email protected]
5.5 XVI Setting Only introduce XVI control and image enhance.
5.5.1XVI Control Set each channel camera brightness and other parameters here.

JZTEK SURVEILLANCE SYSTEMS
www.jztekcctv.com [email protected]
5.5.2 Image Enhance This is only effective on our own AHD cameras. By clicking here, camera video will adjust to the best resolution on our DVR.
6 System
6.1 General

JZTEK SURVEILLANCE SYSTEMS
www.jztekcctv.com [email protected]
Machine Name: You can assign a name to this device. Language: Set language you need. Video Standard: Change video standard here, PAL or NTSC. Storage Full: Choose “Stop record” or “Overwrite”, suggest Overwrite, it’ll cover old files. Period: Click “set” to set which time for motion detection. Auto Logout: Suggest 0, if you set, it will automatically logout when you don’t operate. 6.2 Encode

JZTEK SURVEILLANCE SYSTEMS
www.jztekcctv.com [email protected]
Channel: Select which channel you want set encode. Resolution: It will change according to the camera you hook up. Bit Rate Type: Suggest VBR, it will adjust resolution according to network speed. Quality: Set according to your network speed. Video/Audio: If you need record video with voice, please select Audio. And connect a pickup with DVR audio in. 6.3 Backup You can back up the video files to external storage.

JZTEK SURVEILLANCE SYSTEMS
www.jztekcctv.com [email protected]
Note: Backup format: H.264 or AVI. You can use specific player to play the videos. 6.4 Display You can set monitor or TV resolution here of each channel.

JZTEK SURVEILLANCE SYSTEMS
www.jztekcctv.com [email protected]
6.5 Account
Modify User: Modify the existing user attribute(s). Modify Group: Modify the existing team attribute(s). Modify Pwd: Modify the user password. You can set a 1-6 bit password. The blank ahead or behind the character string is invalid. Add User: Add a user and set the user’s authority or group it belongs to. See below example:

JZTEK SURVEILLANCE SYSTEMS
www.jztekcctv.com [email protected]
“GROUP”- You can set this new user to which group, then assign authority to this new user. Add Group: Add user group. You only need to edit group authority, then all users in this group will have same authority.
Safety question: You can set a question, if you forget your password, you can find it back by answering question. 6.6 RS232 RS-232 is a standard for serial communication transmission of data used to connect PTZ transmission with the DVR.

JZTEK SURVEILLANCE SYSTEMS
www.jztekcctv.com [email protected]
6.7 PTZ Control This function is for adding PTZ Cameras.You need input PTZ Camera parameters here.
Channel: Choose the dome camera input channel. Control Method: Select either Coaxial, RS485 or all. Protocol: Input PTZ camera protocol. Address: Set Default: 1 as the corresponding dome address. Note: Please confirm the parameters with your PTZ camera supplier. 6.8 Digital Under pure analog/ AHD mode, it will show like below:

JZTEK SURVEILLANCE SYSTEMS
www.jztekcctv.com [email protected]
Click the appropriate box(s) base on your cameras, default is AHD; click “OK”and then the DVR will reboot. Note: To add an ONVIF IP Camera take the following steps: a. make sure the ONVIF IP camera address and DVR address are within same network. b. you need to change channeltype to Local+IP or pure IP mode. When DVR boot up, digital will show like this:

JZTEK SURVEILLANCE SYSTEMS
www.jztekcctv.com [email protected]
c. click “Digital channels”:
Channel: Select the channel of the ONVIF IPC camera you want to install. Enable: Select “Enable” to allow viewing. Time Sync: Select which time you want the ONVIF IP camera show. Decode Order: Select according to your needs. Connection Mode: If you choose multi-link, all camera will show in same channel, and you can set polling time for each camera also.

JZTEK SURVEILLANCE SYSTEMS
www.jztekcctv.com [email protected]
Click “Add”, below interface will show:
Search: Click on search, all devices within the same LAN will show. (such as IPC, DVR, and NVR). Select the IP Camera you want to add. Configur.name: you can set a name for this ONVIF IP camera. Protocol: ONVIF. IP Channel: Select which channel to show it. User name and password: Input ONVIF IP camera user name and password.
7 Alarm

JZTEK SURVEILLANCE SYSTEMS
www.jztekcctv.com [email protected]
7.1 Motion Detect
Channel: Select which channel you want trigger motion detection. Enable: Select it to active Motion Detection.

JZTEK SURVEILLANCE SYSTEMS
www.jztekcctv.com [email protected]
Sensitivity: Set according to your needs. Region: Click “set”, to choose which region you need to trigger motion detection. Period: Click “set” to set which time for motion detection. MD interval: Suggest is 10 seconds. Record Channel: Set channels you want. Show Message: Select it to show an alarm message when motion is detected. Buzzer: Selected it to get buzz when motion is detected. Send email: Select it to get email notification when motion is detected. Mobile reported: Select it to get a text message on your mobile when motion detected. How to add an email & enable “mobile reported” function: 1. go to <main menu>--<network>--netservice
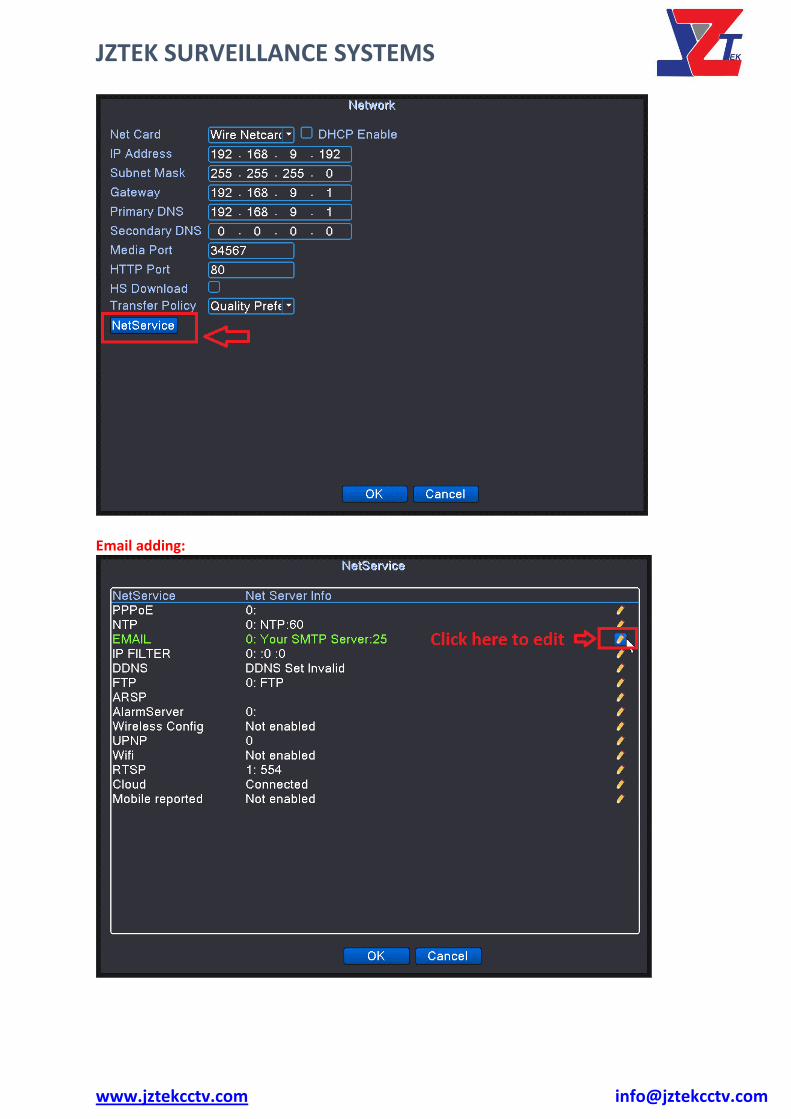

JZTEK SURVEILLANCE SYSTEMS
www.jztekcctv.com [email protected]
Enable: Tick enable to active email. Need SSL: Tick SSL here. User Name and Sender: Fill in same email address. Password: Fill in password of the email address input in User name and Sender. Receiver: Fill in an email address you want to receive motion detection notifcations. Mail Testing: Click test email settings (you should receive an email if properly configured). Note: Email might need additional settings, take Gmail as an example:

JZTEK SURVEILLANCE SYSTEMS
www.jztekcctv.com [email protected]
Mobile reported: click “pencil” icon to enable it.
Then you can find the device you need get mobile text message on your mobile app “xmeye”, follow the pictures below to open alarm.

JZTEK SURVEILLANCE SYSTEMS
www.jztekcctv.com [email protected]
7.2 Video Blind Normally no one will set video blind, if you need, you can input informaitons and take motion detection as an example, quite similar.
7.3 Video Loss Alarm when selected channel disconected to DVR or some other reasons caused video loss.

JZTEK SURVEILLANCE SYSTEMS
www.jztekcctv.com [email protected]
7.4 Abnormality Alarm when DVR has no storage, or storage device error, etc. You can set notify you by buzzer or show messages.
8 Advanced
8.1 HDD Info For the first time use, you need formate storage first.

JZTEK SURVEILLANCE SYSTEMS
www.jztekcctv.com [email protected]
Read/write: DVR can write or read data. Read-only disk: DVR can read data but can’t write data. Redundant: Backup the video files in the read/write disk. Format Storage: Erase all recording in HDD. Recover: Recover the bad sector or Unformatted Drives. Partition: Makes Hard Drive into different sections Note: Storage type need show “read/write”, status need show “normal”, then means HDD is working fine.
8.2 Output Adjust Adjust DVR output parameters in monitor or TV.

JZTEK SURVEILLANCE SYSTEMS
www.jztekcctv.com [email protected]
8.3 Output Adjust Set DVR auto reboot or delete itself.
8.3 Restore Set DVR to factory default. All your settings will be erased!

JZTEK SURVEILLANCE SYSTEMS
www.jztekcctv.com [email protected]
8.4 Upgrade Here you can update newest firmware, details you can refer to www.jztekcctv.com/downloads.
8.5 Import&Export Import&export files inside DVR or outside.

JZTEK SURVEILLANCE SYSTEMS
www.jztekcctv.com [email protected]
8.6 Log DVR footages will be showed here.
8.7 BPS Each channel record capacity per hour.

JZTEK SURVEILLANCE SYSTEMS
www.jztekcctv.com [email protected]
8.8 Version DVR informations will be showed here, you can also scan QR-Code to get access directly in mobile APP.
Device Info—click device info to check more details of this DVR.

JZTEK SURVEILLANCE SYSTEMS
www.jztekcctv.com [email protected]
Maintain—This is for engineer use, ordinary users please do not click!!