just get it written: deploying applications to weblogic server … · just get it written:...
TRANSCRIPT
Just Get It Written: Deploying Applications to WebLogic Server Using JDeveloper and WLS Console ‐ Hands‐on Practice
© 2014 Peter Koletzke 1 6/25/2014
This hands‐on practice describes the steps for deploying an existing Java EE application written with Oracle ADF technologies. Although the practice refers to specific features and files in a sample application (available from the instructor), you can alternatively use an application of your own and adjust the steps appropriately.
For the purposes of this hands‐on practice you will configure a standalone domain for the WebLogic software that is part of the JDeveloper installation. Although the process followed in this hands‐on practice uses development mode of WebLogic, it very closely emulates the process used for deployment to a full application server environment. Although in many organizations it is not the responsibility of the developer to finally deploy applications into production, testing the deployment is nevertheless an essential step in the testing of the application before you hand it over to those who will perform the deployment.
This practice follows these phases:
I. Set up a standalone WebLogic server for testing A. Create a domain using the Quick Start Configuration Wizard B. Update the domain with the Configuration Wizard C. Start the domain server D. Run the WebLogic Server Administration Console
II. Configure application‐specific settings A. Explore the deployment profiles (optional) B. Define database connection information C. Adjust deployment profile properties
III. Deploy the application A. Deploy the application from JDeveloper B. Explore the EAR file (optional) C. Deploy and install the application from an EAR file
Notes
This practice was developed with JDeveloper, version 12.1.2.0. If you use a later release, you may need to adjust steps to changes introduced with that later release.
These instructions use typographical conventions followed in the United States where ending punctuation (periods and commas) is placed inside quotation marks. Unless otherwise stated, these punctuation marks are not part of the value to be typed into a field.
As you work through the pages containing deployment settings, you will see many optional values that are not set or discussed in this hands‐on practice. The deployment process is flexible enough to allow many variations that might be needed for certain environments. The Help button in each page can lead you to explanations of the settings on that page should you find the need for more information. In addition, Oracle documentation provides information and instructions about all options:
o WebLogic Server: http://docs.oracle.com/middleware/1212/wls/ o ADF deployment: http://docs.oracle.com/middleware/1212/adf/ADFAG/deploy.htm
I. Set up a Standalone WebLogic Server for Testing
Within your JDeveloper installation, you already have all of the pieces required to set up a standalone WebLogic server for testing. When you run an application from within JDeveloper, the IDE takes various shortcuts to speed up the runtime and so does not exactly emulate the final deployment environment with the application server. Therefore, this additional step to deploy to a standalone server is a valuable one because, if you’ve tested an EAR file by deploying it to a standalone server, the hand‐off process for the final production environment will be smoother.

Just Get It Written: Deploying Applications to WebLogic Server Using JDeveloper and WLS Console ‐ Hands‐on Practice
© 2014 Peter Koletzke 2 6/25/2014
Objective Instructions
A. Create a domain using the Quick Start Configuration Wizard
Note: The WLS 12c Configuration Wizard usually requires a new domain configured to run ADF to be connected to a database so it can store server distribution information. For development purposes, this requirement is not important, so the following steps work around this requirement by first creating the domain with the Quick Start Configuration Wizard, and next running the Configuration Wizard to update the domain. The normal database requirement is fulfilled by an embedded Java database in this situation
Duncan Mills describes these steps and more information about the database requirement (and why this workaround would not be supported in a production environment) in his blog post: https://blogs.oracle.com/groundside/entry/setting_up_a_standalone_weblogic.
1. Open a command shell (command‐line) window and change directories (CD) to the folder into which you installed Oracle Fusion Middleware 12c. These examples use “<MW_HOME>” to represent the directory into which you installed JDeveloper (for example, C:\Oracle\Middleware_1212). Be sure to substitute the actual path when you read “<MW_HOME>.” Additional Information: In Windows, you can open a command‐line window by selecting Start | Run, entering “CMD,” and clicking OK.
2. Change to the <FMW_HOME>\wlserver\common\bin directory and set the QS_CONFIG environment variable as follows (this example is for Windows; adjust it if you use a flavor of Unix):
SET QS_TEMPLATES=<MW_HOME>/wlserver/common/templates/wls/wls_jrf.jar
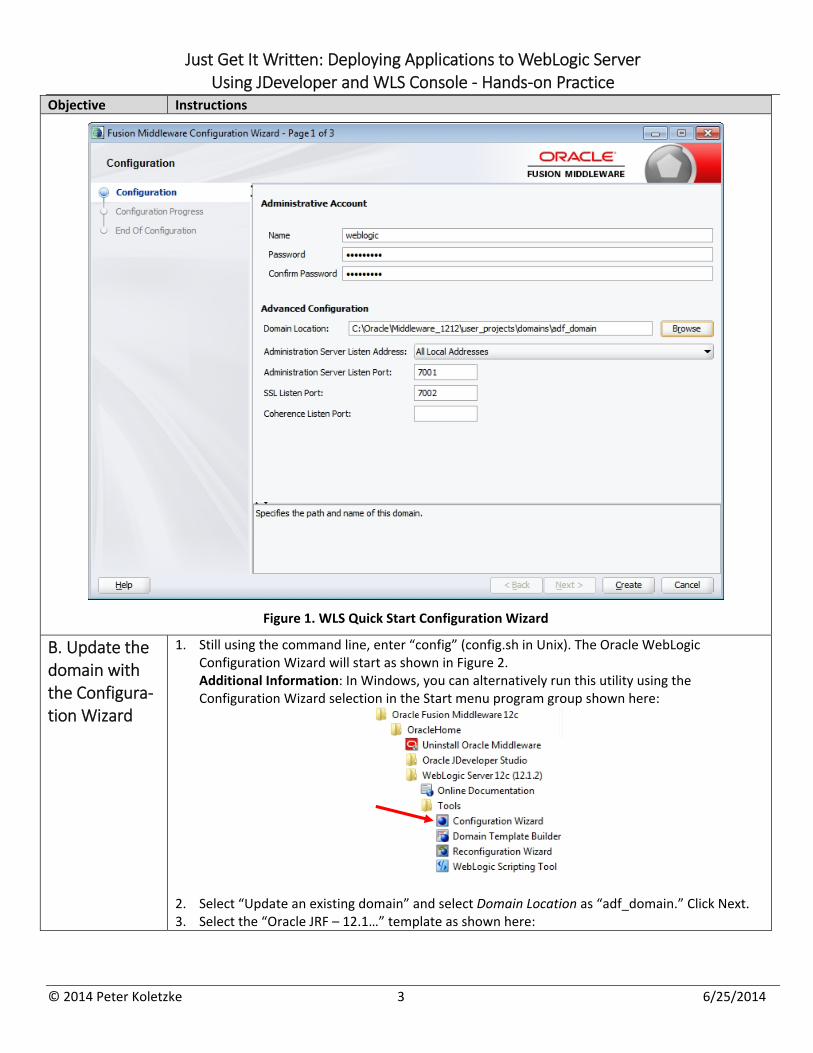
3. At the command line, enter “qs_config” (qs_config.sh in Unix). The Quick Start configuration window will be displayed as in Figure 1 (without the fields filled in).
4. Enter Password and Confirm Password (for example, “weblogic1”). [eight characters minimum, one non‐alphabetic character]
5. Change the domain name at the end of the Domain Location value to “adf_domain” as shown in Figure 1.
6. Click Create. The progress bar will fill, and the steps completed will be listed as follows:
7. Click Next. Do not select the checkbox to start the new domain. Click Finish.
Just Get It Written: Deploying Applications to WebLogic Server Using JDeveloper and WLS Console ‐ Hands‐on Practice
© 2014 Peter Koletzke 3 6/25/2014
Objective Instructions
Figure 1. WLS Quick Start Configuration Wizard
B. Update the domain with the Configura‐tion Wizard
1. Still using the command line, enter “config” (config.sh in Unix). The Oracle WebLogic Configuration Wizard will start as shown in Figure 2. Additional Information: In Windows, you can alternatively run this utility using the Configuration Wizard selection in the Start menu program group shown here:
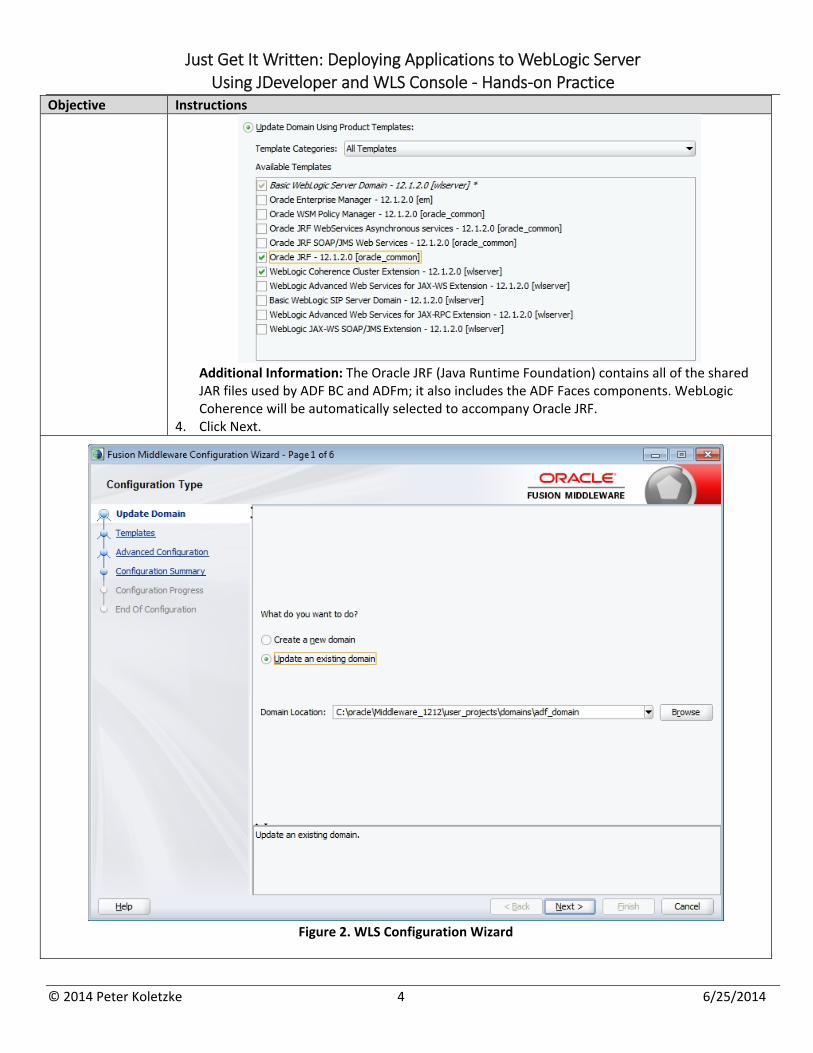
2. Select “Update an existing domain” and select Domain Location as “adf_domain.” Click Next. 3. Select the “Oracle JRF – 12.1…” template as shown here:
Just Get It Written: Deploying Applications to WebLogic Server Using JDeveloper and WLS Console ‐ Hands‐on Practice
© 2014 Peter Koletzke 4 6/25/2014
Objective Instructions
Additional Information: The Oracle JRF (Java Runtime Foundation) contains all of the shared JAR files used by ADF BC and ADFm; it also includes the ADF Faces components. WebLogic Coherence will be automatically selected to accompany Oracle JRF.
4. Click Next.
Figure 2. WLS Configuration Wizard
Just Get It Written: Deploying Applications to WebLogic Server Using JDeveloper and WLS Console ‐ Hands‐on Practice
© 2014 Peter Koletzke 5 6/25/2014
Objective Instructions
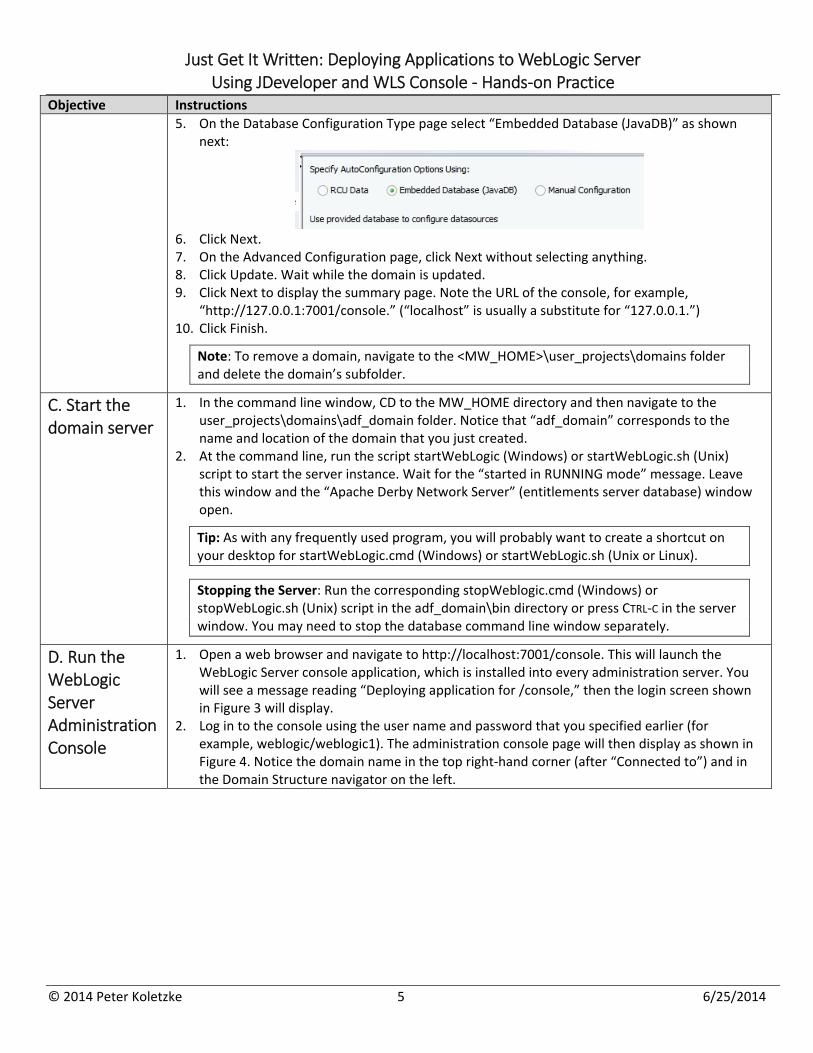
5. On the Database Configuration Type page select “Embedded Database (JavaDB)” as shown next:
6. Click Next. 7. On the Advanced Configuration page, click Next without selecting anything. 8. Click Update. Wait while the domain is updated. 9. Click Next to display the summary page. Note the URL of the console, for example,
“http://127.0.0.1:7001/console.” (“localhost” is usually a substitute for “127.0.0.1.”) 10. Click Finish.
Note: To remove a domain, navigate to the <MW_HOME>\user_projects\domains folder and delete the domain’s subfolder.
C. Start the domain server
1. In the command line window, CD to the MW_HOME directory and then navigate to the user_projects\domains\adf_domain folder. Notice that “adf_domain” corresponds to the name and location of the domain that you just created.
2. At the command line, run the script startWebLogic (Windows) or startWebLogic.sh (Unix) script to start the server instance. Wait for the “started in RUNNING mode” message. Leave this window and the “Apache Derby Network Server” (entitlements server database) window open.
Tip: As with any frequently used program, you will probably want to create a shortcut on your desktop for startWebLogic.cmd (Windows) or startWebLogic.sh (Unix or Linux).
Stopping the Server: Run the corresponding stopWeblogic.cmd (Windows) or stopWebLogic.sh (Unix) script in the adf_domain\bin directory or press CTRL‐C in the server window. You may need to stop the database command line window separately.
D. Run the WebLogic Server Administration Console
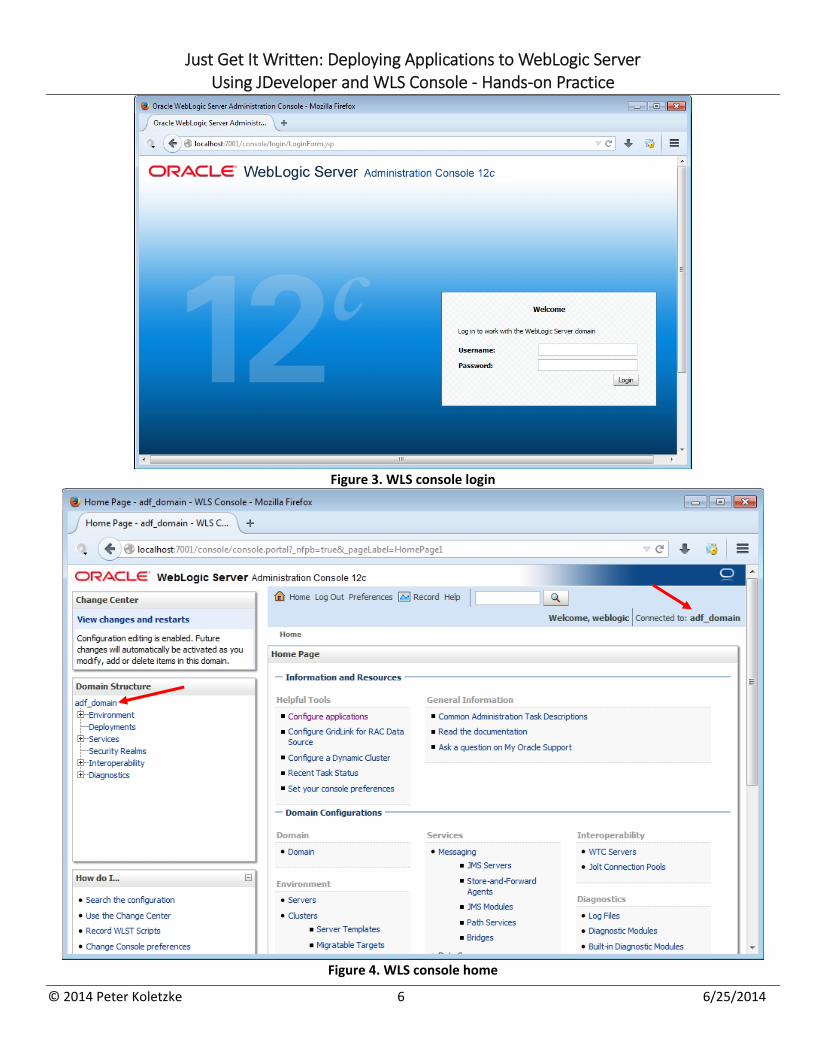
1. Open a web browser and navigate to http://localhost:7001/console. This will launch the WebLogic Server console application, which is installed into every administration server. You will see a message reading “Deploying application for /console,” then the login screen shown in Figure 3 will display.
2. Log in to the console using the user name and password that you specified earlier (for example, weblogic/weblogic1). The administration console page will then display as shown in Figure 4. Notice the domain name in the top right‐hand corner (after “Connected to”) and in the Domain Structure navigator on the left.
Just Get It Written: Deploying Applications to WebLogic Server Using JDeveloper and WLS Console ‐ Hands‐on Practice
© 2014 Peter Koletzke 6 6/25/2014
Figure 3. WLS console login
Figure 4. WLS console home
Just Get It Written: Deploying Applications to WebLogic Server Using JDeveloper and WLS Console ‐ Hands‐on Practice
© 2014 Peter Koletzke 7 6/25/2014
What Did You Just Do? The configuration wizards that you ran in this phase create a set of configuration files and scripts, which will start a WebLogic Server instance. This server is configured to use the default port: 7001, which is different from the port that is used when running within JDeveloper (port 7101), so you can safely use both the internal server and this new external testing server at the same time. The domain that you have created is set up with all of the libraries required to run an ADF application.
In this phase, you also started the domain server and ran the WLS console, the tool you will use for the rest of the configuration tasks.
Note: You can use the WLS console to administer the Integrated WebLogic Server domain that is installed with JDeveloper as well; this server starts when you run an application in JDeveloper. You can also start it independently using the Run | Start Server Instance (IntegratedWebLogicServer) in the main menu. Then you can connect to the console with the same URL as before but using the 7101 port. Alternatively, you can start this console from the Application Servers window (Windows | Application Servers), which contains a right‐click menu option on the server’s node for “Launch Administrative Console. The username/password for this login is weblogic/weblogic1.
II. Configure Application‐Specific Settings
Before starting this phase, acquire the sample application files (HRDeploy.zip) from the instructor. Alternatively, if you are interested in building the application from scratch, follow the steps in Appendix A and then return to this section.
Objective Instructions
A. Explore the deployment profiles (optional)
Applications created with the ADF Fusion Web Application template are set up by default with the following deployment profiles:
Model project: ADF Library JAR File (one or two of these)
ViewController project: WAR File
Application: EAR File When you deploy the application to an EAR file, the EAR file includes the ViewController WAR file. Within the WAR file are the files from both the ViewController project and the Model project (because the ViewController files are dependent on the Model project files). The ADF Library JAR File deployment profile is not used, but it is available should you need to publish the Model project as a JAR.
In this section you will open the EAR and WAR deployment profiles to get a brief tour of their contents. Although understanding the contents of the deployment profiles may help in work after this practice, the default options set up by the ADF Fusion Web Application template will work as is, so you could choose to skip to section B if hands‐on practice time is a concern.
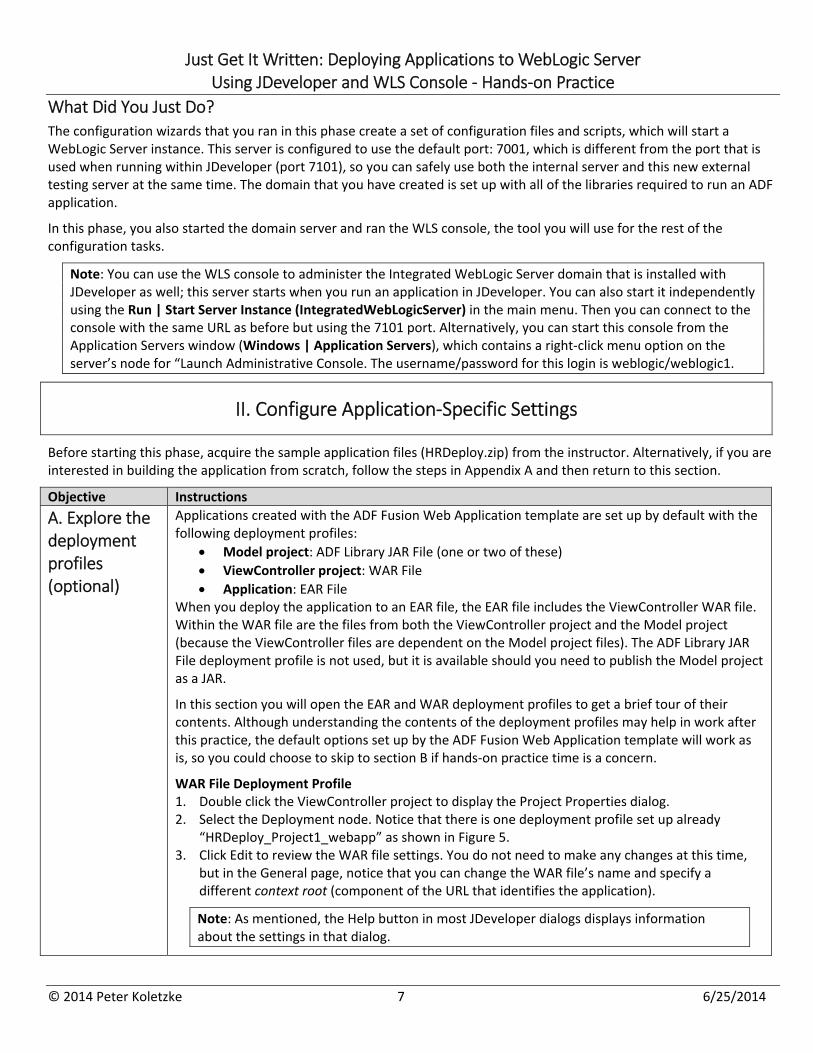
WAR File Deployment Profile 1. Double click the ViewController project to display the Project Properties dialog. 2. Select the Deployment node. Notice that there is one deployment profile set up already
“HRDeploy_Project1_webapp” as shown in Figure 5. 3. Click Edit to review the WAR file settings. You do not need to make any changes at this time,
but in the General page, notice that you can change the WAR file’s name and specify a different context root (component of the URL that identifies the application).
Note: As mentioned, the Help button in most JDeveloper dialogs displays information about the settings in that dialog.
Just Get It Written: Deploying Applications to WebLogic Server Using JDeveloper and WLS Console ‐ Hands‐on Practice
© 2014 Peter Koletzke 8 6/25/2014
Objective Instructions
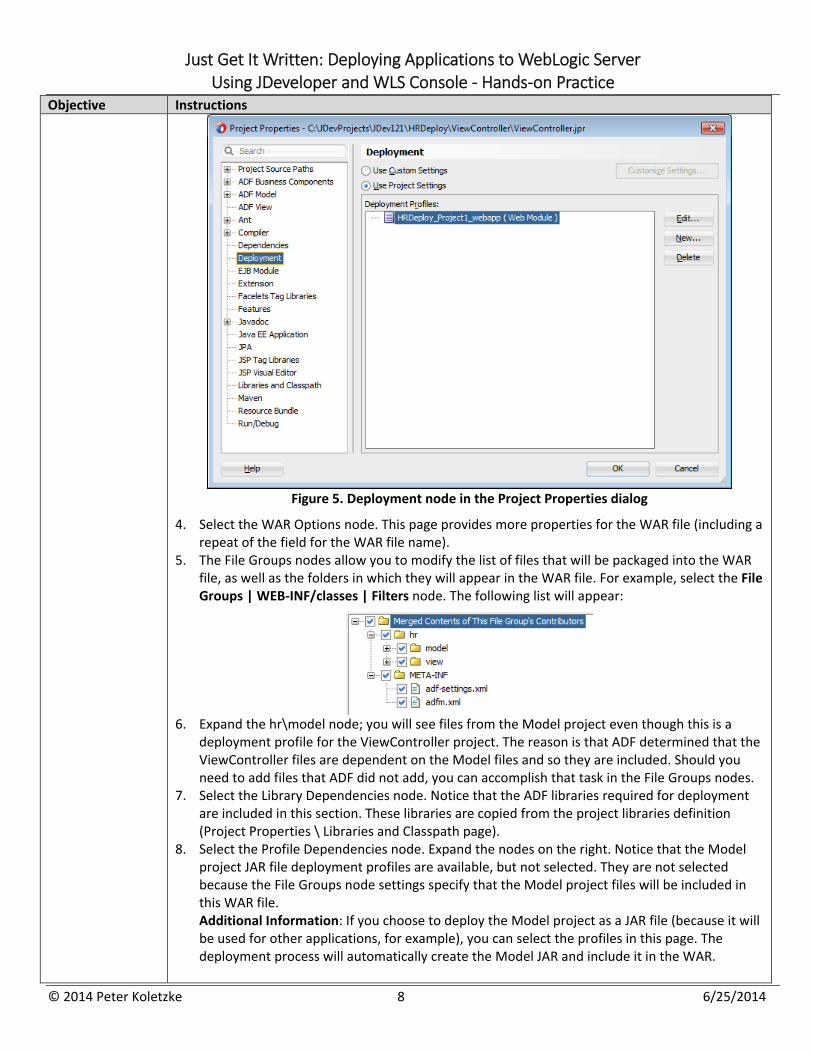
Figure 5. Deployment node in the Project Properties dialog
4. Select the WAR Options node. This page provides more properties for the WAR file (including a repeat of the field for the WAR file name).
5. The File Groups nodes allow you to modify the list of files that will be packaged into the WAR file, as well as the folders in which they will appear in the WAR file. For example, select the File Groups | WEB‐INF/classes | Filters node. The following list will appear:
6. Expand the hr\model node; you will see files from the Model project even though this is a
deployment profile for the ViewController project. The reason is that ADF determined that the ViewController files are dependent on the Model files and so they are included. Should you need to add files that ADF did not add, you can accomplish that task in the File Groups nodes.
7. Select the Library Dependencies node. Notice that the ADF libraries required for deployment are included in this section. These libraries are copied from the project libraries definition (Project Properties \ Libraries and Classpath page).
8. Select the Profile Dependencies node. Expand the nodes on the right. Notice that the Model project JAR file deployment profiles are available, but not selected. They are not selected because the File Groups node settings specify that the Model project files will be included in this WAR file. Additional Information: If you choose to deploy the Model project as a JAR file (because it will be used for other applications, for example), you can select the profiles in this page. The deployment process will automatically create the Model JAR and include it in the WAR.
Just Get It Written: Deploying Applications to WebLogic Server Using JDeveloper and WLS Console ‐ Hands‐on Practice
© 2014 Peter Koletzke 9 6/25/2014
Objective Instructions
9. Select the Platform node. On this page, you can define a specific server product into which this WAR file will be deployed. If you select a product in this pulldown, the WAR file will contain settings specific to that server platform.
10. Important: click Cancel (not OK) so anything you may have changed will not be saved.
Note: Deployment profile settings are saved in the project file (for example, ViewController.jpr) for the WAR profile, and application file (for example, HRDeploy.jws) for the EAR profile.
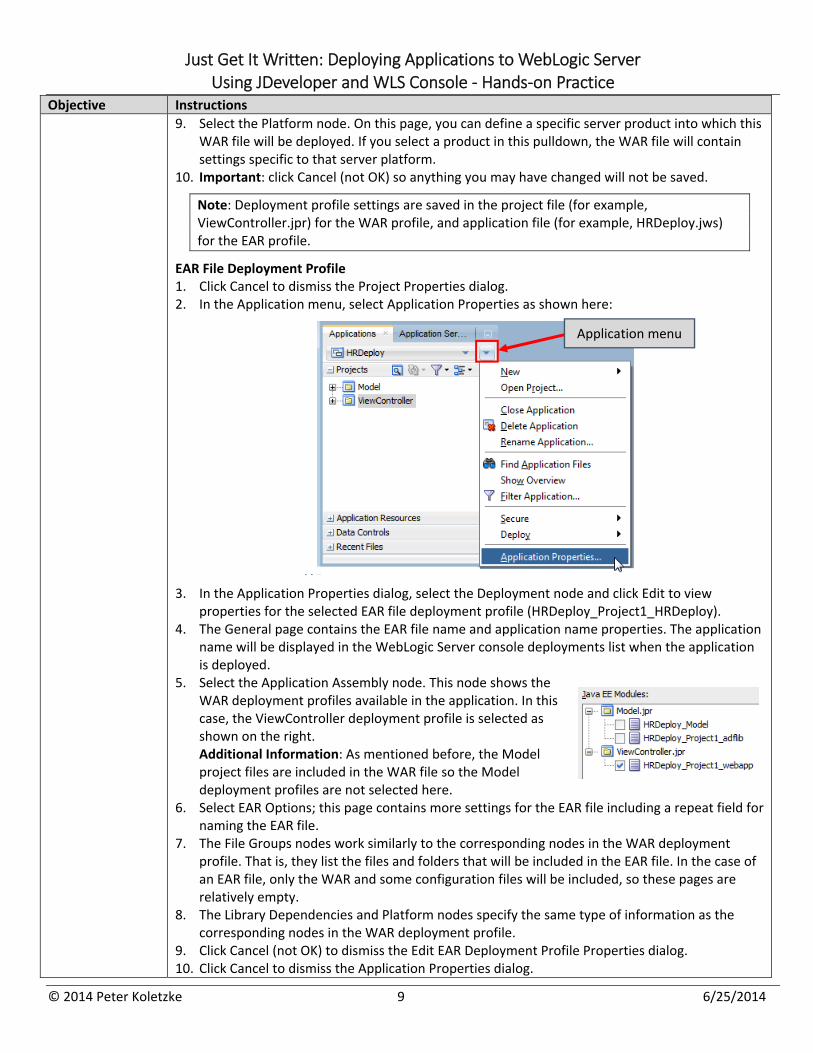
EAR File Deployment Profile 1. Click Cancel to dismiss the Project Properties dialog. 2. In the Application menu, select Application Properties as shown here:
3. In the Application Properties dialog, select the Deployment node and click Edit to view properties for the selected EAR file deployment profile (HRDeploy_Project1_HRDeploy).
4. The General page contains the EAR file name and application name properties. The application name will be displayed in the WebLogic Server console deployments list when the application is deployed.
5. Select the Application Assembly node. This node shows the WAR deployment profiles available in the application. In this case, the ViewController deployment profile is selected as shown on the right. Additional Information: As mentioned before, the Model project files are included in the WAR file so the Model deployment profiles are not selected here.
6. Select EAR Options; this page contains more settings for the EAR file including a repeat field for naming the EAR file.
7. The File Groups nodes work similarly to the corresponding nodes in the WAR deployment profile. That is, they list the files and folders that will be included in the EAR file. In the case of an EAR file, only the WAR and some configuration files will be included, so these pages are relatively empty.
8. The Library Dependencies and Platform nodes specify the same type of information as the corresponding nodes in the WAR deployment profile.
9. Click Cancel (not OK) to dismiss the Edit EAR Deployment Profile Properties dialog. 10. Click Cancel to dismiss the Application Properties dialog.
Application menu
Just Get It Written: Deploying Applications to WebLogic Server Using JDeveloper and WLS Console ‐ Hands‐on Practice
© 2014 Peter Koletzke 10 6/25/2014
Objective Instructions
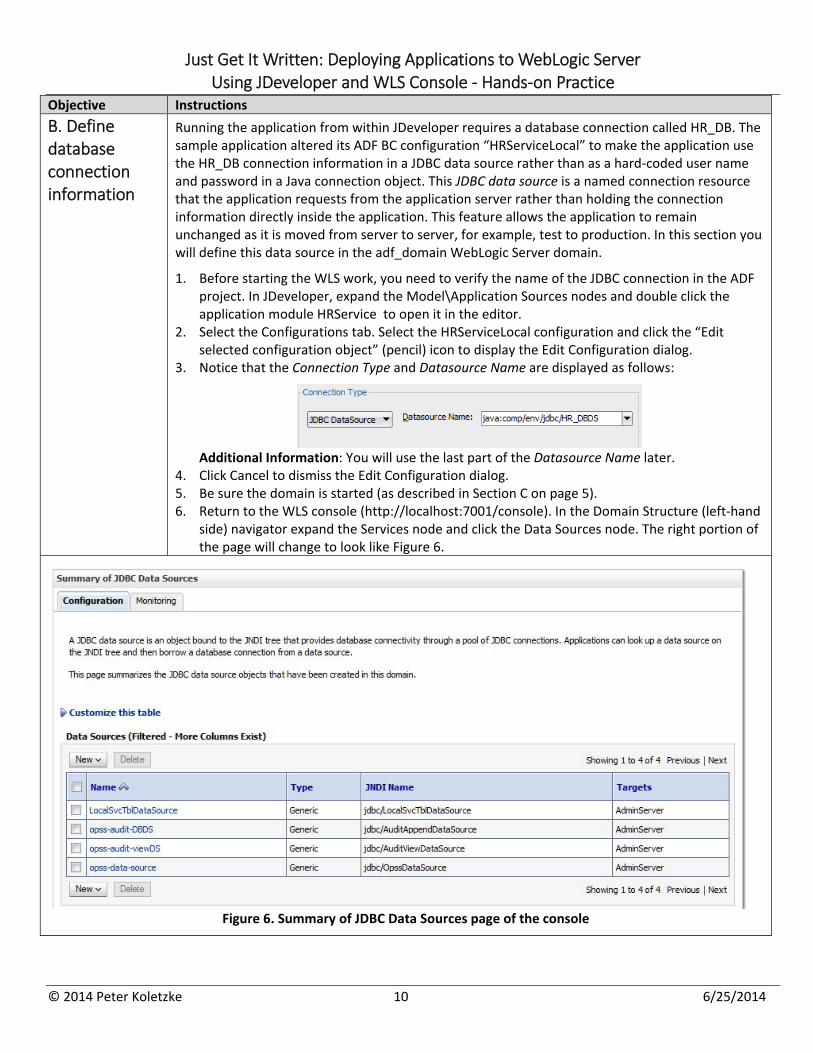
B. Define database connection information
Running the application from within JDeveloper requires a database connection called HR_DB. The sample application altered its ADF BC configuration “HRServiceLocal” to make the application use the HR_DB connection information in a JDBC data source rather than as a hard‐coded user name and password in a Java connection object. This JDBC data source is a named connection resource that the application requests from the application server rather than holding the connection information directly inside the application. This feature allows the application to remain unchanged as it is moved from server to server, for example, test to production. In this section you will define this data source in the adf_domain WebLogic Server domain.
1. Before starting the WLS work, you need to verify the name of the JDBC connection in the ADF project. In JDeveloper, expand the Model\Application Sources nodes and double click the application module HRService to open it in the editor.
2. Select the Configurations tab. Select the HRServiceLocal configuration and click the “Edit selected configuration object” (pencil) icon to display the Edit Configuration dialog.
3. Notice that the Connection Type and Datasource Name are displayed as follows:
Additional Information: You will use the last part of the Datasource Name later.
4. Click Cancel to dismiss the Edit Configuration dialog. 5. Be sure the domain is started (as described in Section C on page 5). 6. Return to the WLS console (http://localhost:7001/console). In the Domain Structure (left‐hand
side) navigator expand the Services node and click the Data Sources node. The right portion of the page will change to look like Figure 6.
Figure 6. Summary of JDBC Data Sources page of the console
Just Get It Written: Deploying Applications to WebLogic Server Using JDeveloper and WLS Console ‐ Hands‐on Practice
© 2014 Peter Koletzke 11 6/25/2014
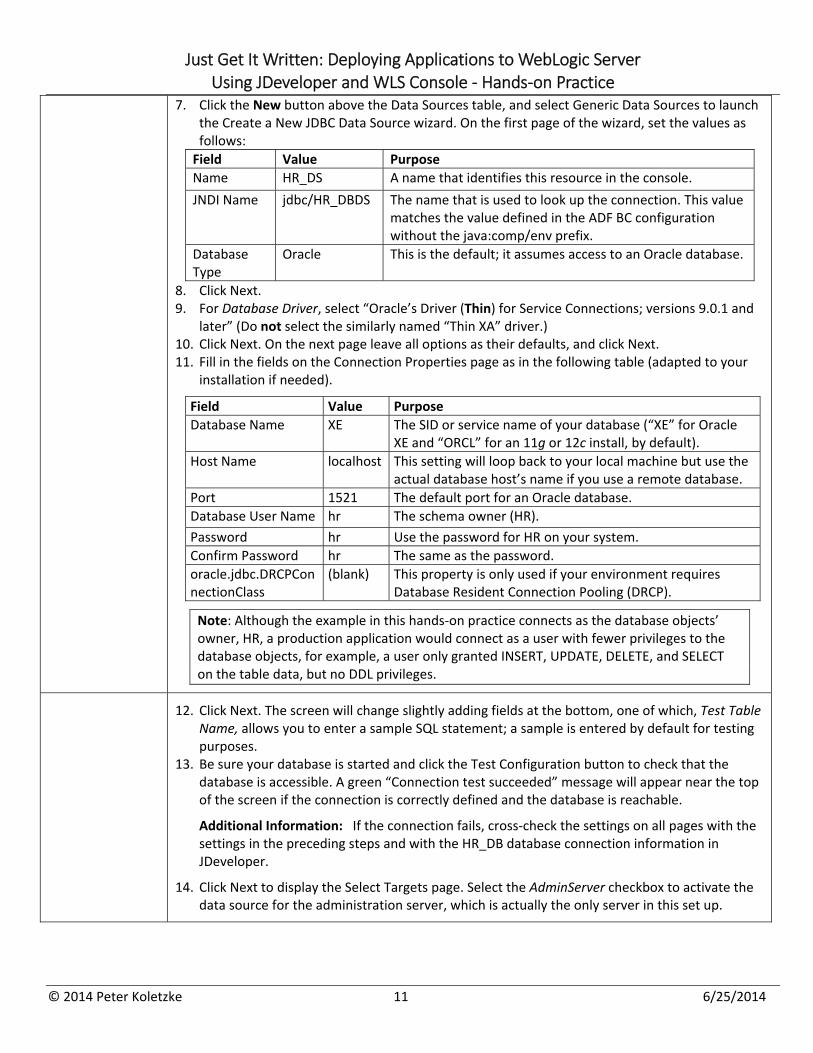
7. Click the New button above the Data Sources table, and select Generic Data Sources to launch the Create a New JDBC Data Source wizard. On the first page of the wizard, set the values as follows:
Field Value Purpose
Name HR_DS A name that identifies this resource in the console.
JNDI Name jdbc/HR_DBDS The name that is used to look up the connection. This value matches the value defined in the ADF BC configuration without the java:comp/env prefix.
Database Type
Oracle This is the default; it assumes access to an Oracle database.
8. Click Next. 9. For Database Driver, select “Oracle’s Driver (Thin) for Service Connections; versions 9.0.1 and
later” (Do not select the similarly named “Thin XA” driver.) 10. Click Next. On the next page leave all options as their defaults, and click Next. 11. Fill in the fields on the Connection Properties page as in the following table (adapted to your
installation if needed).
Field Value Purpose
Database Name XE The SID or service name of your database (“XE” for Oracle XE and “ORCL” for an 11g or 12c install, by default).
Host Name localhost This setting will loop back to your local machine but use the actual database host’s name if you use a remote database.
Port 1521 The default port for an Oracle database.
Database User Name hr The schema owner (HR).
Password hr Use the password for HR on your system.
Confirm Password hr The same as the password.
oracle.jdbc.DRCPConnectionClass
(blank) This property is only used if your environment requires Database Resident Connection Pooling (DRCP).
Note: Although the example in this hands‐on practice connects as the database objects’ owner, HR, a production application would connect as a user with fewer privileges to the database objects, for example, a user only granted INSERT, UPDATE, DELETE, and SELECT on the table data, but no DDL privileges.
12. Click Next. The screen will change slightly adding fields at the bottom, one of which, Test Table Name, allows you to enter a sample SQL statement; a sample is entered by default for testing purposes.
13. Be sure your database is started and click the Test Configuration button to check that the database is accessible. A green “Connection test succeeded” message will appear near the top of the screen if the connection is correctly defined and the database is reachable.
Additional Information: If the connection fails, cross‐check the settings on all pages with the settings in the preceding steps and with the HR_DB database connection information in JDeveloper.
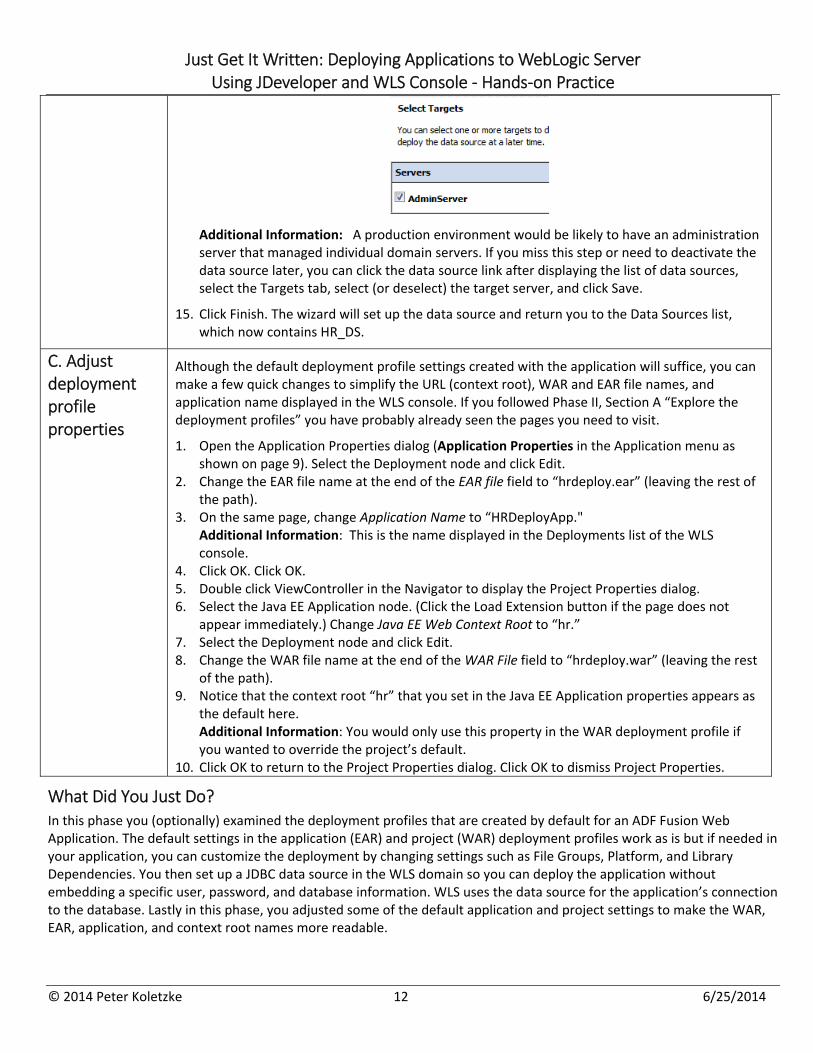
14. Click Next to display the Select Targets page. Select the AdminServer checkbox to activate the data source for the administration server, which is actually the only server in this set up.
Just Get It Written: Deploying Applications to WebLogic Server Using JDeveloper and WLS Console ‐ Hands‐on Practice
© 2014 Peter Koletzke 12 6/25/2014
Additional Information: A production environment would be likely to have an administration server that managed individual domain servers. If you miss this step or need to deactivate the data source later, you can click the data source link after displaying the list of data sources, select the Targets tab, select (or deselect) the target server, and click Save.
15. Click Finish. The wizard will set up the data source and return you to the Data Sources list, which now contains HR_DS.
C. Adjust deployment profile properties
Although the default deployment profile settings created with the application will suffice, you can make a few quick changes to simplify the URL (context root), WAR and EAR file names, and application name displayed in the WLS console. If you followed Phase II, Section A “Explore the deployment profiles” you have probably already seen the pages you need to visit.
1. Open the Application Properties dialog (Application Properties in the Application menu as shown on page 9). Select the Deployment node and click Edit.
2. Change the EAR file name at the end of the EAR file field to “hrdeploy.ear” (leaving the rest of the path).
3. On the same page, change Application Name to “HRDeployApp." Additional Information: This is the name displayed in the Deployments list of the WLS console.
4. Click OK. Click OK. 5. Double click ViewController in the Navigator to display the Project Properties dialog. 6. Select the Java EE Application node. (Click the Load Extension button if the page does not
appear immediately.) Change Java EE Web Context Root to “hr.” 7. Select the Deployment node and click Edit. 8. Change the WAR file name at the end of the WAR File field to “hrdeploy.war” (leaving the rest
of the path). 9. Notice that the context root “hr” that you set in the Java EE Application properties appears as
the default here. Additional Information: You would only use this property in the WAR deployment profile if you wanted to override the project’s default.
10. Click OK to return to the Project Properties dialog. Click OK to dismiss Project Properties.
What Did You Just Do? In this phase you (optionally) examined the deployment profiles that are created by default for an ADF Fusion Web Application. The default settings in the application (EAR) and project (WAR) deployment profiles work as is but if needed in your application, you can customize the deployment by changing settings such as File Groups, Platform, and Library Dependencies. You then set up a JDBC data source in the WLS domain so you can deploy the application without embedding a specific user, password, and database information. WLS uses the data source for the application’s connection to the database. Lastly in this phase, you adjusted some of the default application and project settings to make the WAR, EAR, application, and context root names more readable.
Just Get It Written: Deploying Applications to WebLogic Server Using JDeveloper and WLS Console ‐ Hands‐on Practice
© 2014 Peter Koletzke 13 6/25/2014
III. Deploy the Application
Now that the server is set up and the application properties are adjusted, you can deploy the application. This phase will explain two alternative forms of deployment: deployment directly from JDeveloper, which you would use to test the deployment on a local WebLogic Server instance, and deployment using an EAR file, which is the technique that you or an administrator would usually use to roll out an application into a full application server environment.
Objective Instructions
A. Deploy the application from JDeveloper
JDeveloper makes the process of deploying to a local or a remote WebLogic server, a relatively easy, point‐and‐click task.
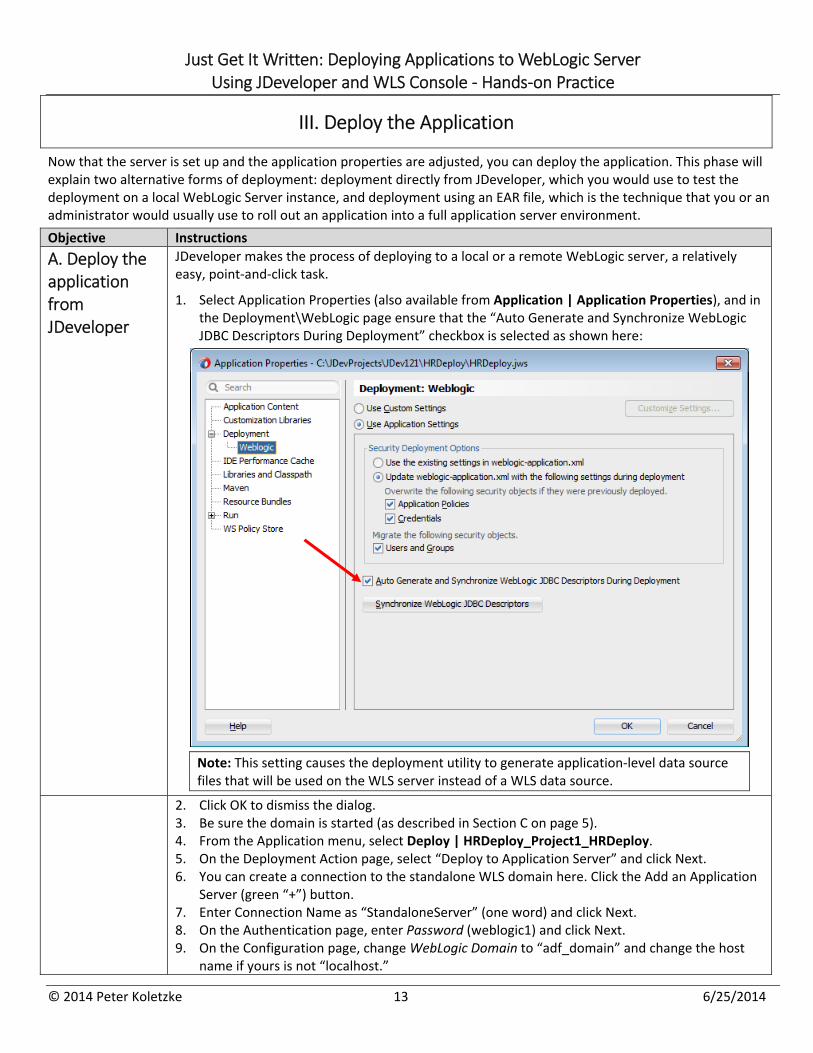
1. Select Application Properties (also available from Application | Application Properties), and in the Deployment\WebLogic page ensure that the “Auto Generate and Synchronize WebLogic JDBC Descriptors During Deployment” checkbox is selected as shown here:
Note: This setting causes the deployment utility to generate application‐level data source files that will be used on the WLS server instead of a WLS data source.
2. Click OK to dismiss the dialog. 3. Be sure the domain is started (as described in Section C on page 5). 4. From the Application menu, select Deploy | HRDeploy_Project1_HRDeploy. 5. On the Deployment Action page, select “Deploy to Application Server” and click Next. 6. You can create a connection to the standalone WLS domain here. Click the Add an Application
Server (green “+”) button. 7. Enter Connection Name as “StandaloneServer” (one word) and click Next. 8. On the Authentication page, enter Password (weblogic1) and click Next. 9. On the Configuration page, change WebLogic Domain to “adf_domain” and change the host
name if yours is not “localhost.”

Just Get It Written: Deploying Applications to WebLogic Server Using JDeveloper and WLS Console ‐ Hands‐on Practice
© 2014 Peter Koletzke 14 6/25/2014
Objective Instructions
10. Click Next for the Test page and click Test Connection. All tests should be successful. If not, check your settings on the other pages and retest.
11. Click Finish when you have full success. Additional Information: In the future, you will be able to select this connection from the Deploy menu option without having to step through this connection wizard.
12. In the Deploy dialog, Standalone Server should be selected. Click Next. 13. On the WebLogic Server page, click Next without making changes. 14. On the Shared Libraries page, click Next without making changes. 15. Click Finish. The deployment will proceed, and you will see status messages appear in the Log
window (Deployment tab). Additional Information: If more than one server is defined for the domain, an additional popup dialog allows you to select the target server.
16. When the process is complete, the Log window will display “Deployment finished.” 17. Open the Application Server window (Window | Application Servers). Expand the Application
Servers\StandaloneServer\Deployments node to view all deployed applications as shown on the right with the application’s deployment highlighted. Additional Information: The right‐click menu on a deployed application node allows you to undeploy the application.
18. The Log window shows the URL to be used for the application (your IP address may be displayed even if you are deploying on localhost).
19. Test the deployed application by opening a browser window and entering the URL http://localhost:7001/hr/faces/emp.jsf into the browser location field. Additional Information: The employee table page will appear. You can click column header buttons to confirm the sorting function works, but data appearing on the page is enough to prove that the deployment and its database connection works.
20. Close the browser.
B. Explore the EAR File (optional)
An EAR file is the standard deployment unit for Java EE applications; it contains all application files that need to be installed on the server but does not include the connection information and security setup, which are held in the server.
The EAR file generated by this process was created, copied to the server, and deployed automatically by the JDeveloper deployment process. However, the file is still available for browsing; you can examine its contents using the following steps:
1. In JDeveloper, look in the Deployment Log window for a message about the EAR file: “Wrote Enterprise Application Module to…” Notice the file system location for the EAR file.
2. Also notice that the file name in the Log window is a link. Click that link to open the EAR file in the editor (archive viewer).
3. The list of files in the EAR file consists mostly of configuration files and the WAR file, hrdeploy.war.
2. Double click the WAR file in the EAR file (or click its link in the log window) to examine the WAR file contents. You will see familiar files as you browse this list, for example, Model project files like Employees.xml that are required for the application; library JAR files, and ViewController files (the emp.jsf file).
3. You can open any of these files in an editor or viewer window by double clicking the file name. Close the Archive Viewer tabs when you are finished browsing.
Just Get It Written: Deploying Applications to WebLogic Server Using JDeveloper and WLS Console ‐ Hands‐on Practice
© 2014 Peter Koletzke 15 6/25/2014
Objective Instructions
C. Deploy and install the application from an EAR file
Although the approach of deploying the application directly from JDeveloper will work successfully for both local and remote application servers, many organizations would prefer that their developers not directly update production servers. In these environments the developer will need to create an EAR file of the application to hand over to the administrator for deployment.
Most Java EE application servers understand how to automatically install an EAR file. The process of deployment directly from JDeveloper explained in section A is really just automating the process of packaging the EAR file, copying it to the target server machine, and triggering the installation. However, since most administrators will use manual deployment steps, we will run through that technique in this section. Although you’ve already created the EAR file as part of the JDeveloper deployment steps before, the file is slightly different when deployed through the WLS console, so the following steps create the EAR file again. If you are in charge of deployment to the production application server, you can use these steps to practice the production deployment on a standalone local server.
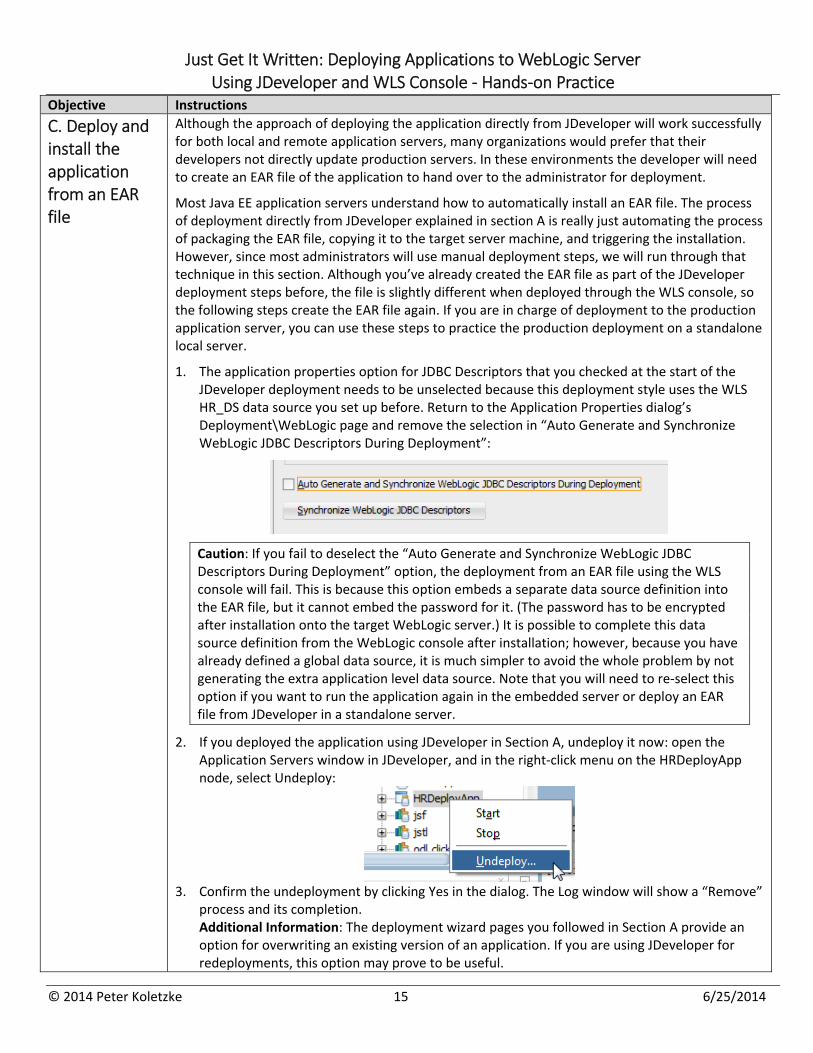
1. The application properties option for JDBC Descriptors that you checked at the start of the JDeveloper deployment needs to be unselected because this deployment style uses the WLS HR_DS data source you set up before. Return to the Application Properties dialog’s Deployment\WebLogic page and remove the selection in “Auto Generate and Synchronize WebLogic JDBC Descriptors During Deployment”:
Caution: If you fail to deselect the “Auto Generate and Synchronize WebLogic JDBC Descriptors During Deployment” option, the deployment from an EAR file using the WLS console will fail. This is because this option embeds a separate data source definition into the EAR file, but it cannot embed the password for it. (The password has to be encrypted after installation onto the target WebLogic server.) It is possible to complete this data source definition from the WebLogic console after installation; however, because you have already defined a global data source, it is much simpler to avoid the whole problem by not generating the extra application level data source. Note that you will need to re‐select this option if you want to run the application again in the embedded server or deploy an EAR file from JDeveloper in a standalone server.
2. If you deployed the application using JDeveloper in Section A, undeploy it now: open the Application Servers window in JDeveloper, and in the right‐click menu on the HRDeployApp node, select Undeploy:
3. Confirm the undeployment by clicking Yes in the dialog. The Log window will show a “Remove”
process and its completion. Additional Information: The deployment wizard pages you followed in Section A provide an option for overwriting an existing version of an application. If you are using JDeveloper for redeployments, this option may prove to be useful.
Just Get It Written: Deploying Applications to WebLogic Server Using JDeveloper and WLS Console ‐ Hands‐on Practice
© 2014 Peter Koletzke 16 6/25/2014
Objective Instructions
4. Now you can start the WLS console deployment. In the JDeveloper Application menu, select Deploy | HRDeploy_Project1_HRDeploy. Additional Information: If you deployed before, the option to repeat that deployment will have been added to this menu. You do not want to use that additional option at this time.
5. In the Deployment Action page, select “Deploy to EAR,” and click Next. 6. Click Finish. The Log window will display the progress of the deployment and show the links to
the WAR and EAR files. Wait for the “Deployment finished” message. Additional Information: You could then pass this EAR file to the application server administrator, who would deploy the application to the server, but the following steps demonstrate the process of deployment using the WebLogic console in your standalone WebLogic server.
7. Log in to the WebLogic console (http://localhost:7001/console) using the user name/password you set up (weblogic/weblogic1). From the Domain Structure tree on the left‐hand side of the screen, click Deployments. Additional Information: The 30 or so deployments you see here are part of the WLS domain services, so you would not want to undeploy them.
8. Click the Install button in the Deployments table. This will launch the Install Application Assistant, the first screen of which will allow you to navigate to and select the EAR file for the application from your local disk (in the ..\HRDeploy\deploy folder).
Tip: Instead of navigating to the file, you can copy and paste the location from the JDeveloper Log window (after the “Wrote Enterprise Application Module to” message).
9. Once the file name is entered in the Path field, click Next. 10. On the “Choose targeting style” page, leave the default option of “Install this deployment as
an application” selected and click Next. 11. On the “Optional Settings” page, leave all of the options as default and click Finish. The
“Summary of Deployments” page will display. 12. Scroll to the page containing hrdeploy to confirm that the State is “Active” and Health is “OK.”
Note: If you receive red error messages referring to the connection, check that you removed the checkmark on the JDBC descriptors property as described in step 1. Click the Activate Changes button on the left and Remove the application if it shows in the list.
13. Open a new browser session and connect to the application as before (http://localhost:7001/tuhra2/faces/employeeSearch). Test the application.
14. Close the browser and stop the server using the stopWeblogic script or by pressing ctrl‐c and closing the server’s command‐line window.
What Did You Just Do?
In the final phase of this practice, you deployed the application into a standalone instance of WebLogic Server. In the process you used both automated deployment from JDeveloper as well as the more manual process using the console to deploy an EAR file. As mentioned, you would only need to deploy an application once, but this phase showed both methods to give you experience with the processes. You also (optionally) examined the EAR and WAR files that were created in this process.
Just Get It Written: Deploying Applications to WebLogic Server Using JDeveloper and WLS Console ‐ Hands‐on Practice
© 2014 Peter Koletzke 17 6/25/2014
Appendix A. Build the Sample Application
The abbreviated steps that follow create a mostly‐default application that you can use for the deployment practice. The application connects to a database and queries data so you can prove that the deployed application is data‐competent.
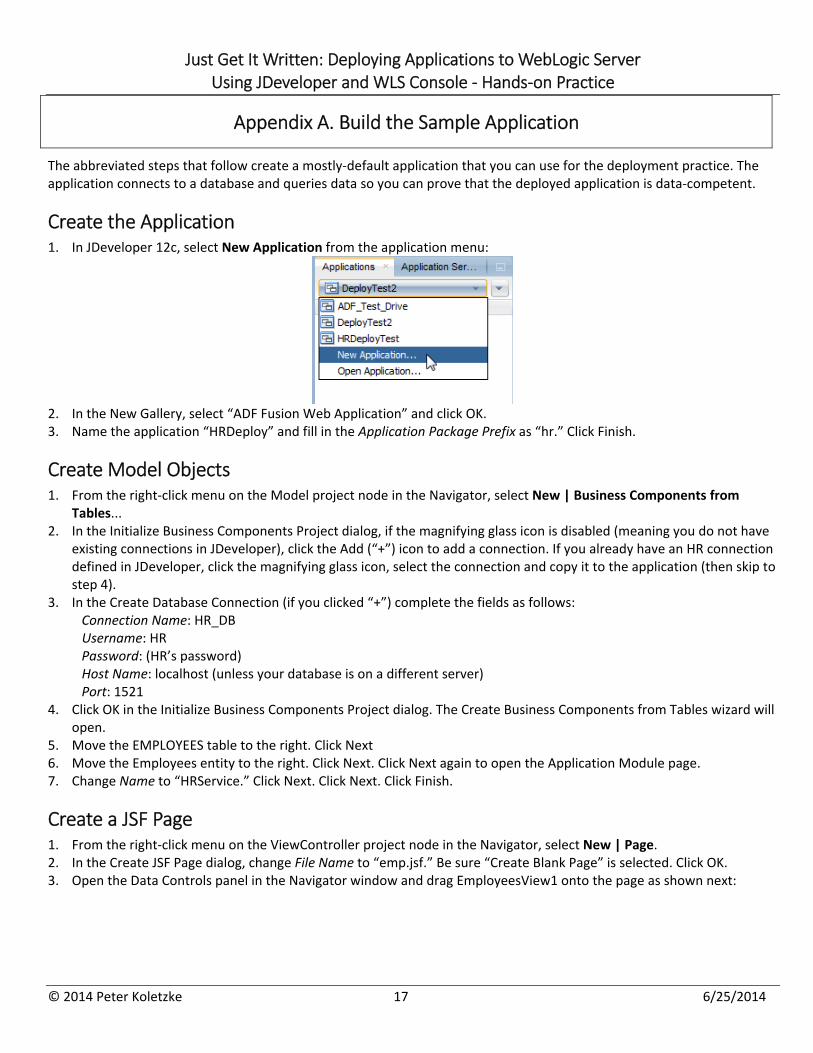
Create the Application 1. In JDeveloper 12c, select New Application from the application menu:
2. In the New Gallery, select “ADF Fusion Web Application” and click OK. 3. Name the application “HRDeploy” and fill in the Application Package Prefix as “hr.” Click Finish.
Create Model Objects 1. From the right‐click menu on the Model project node in the Navigator, select New | Business Components from
Tables... 2. In the Initialize Business Components Project dialog, if the magnifying glass icon is disabled (meaning you do not have
existing connections in JDeveloper), click the Add (“+”) icon to add a connection. If you already have an HR connection defined in JDeveloper, click the magnifying glass icon, select the connection and copy it to the application (then skip to step 4).
3. In the Create Database Connection (if you clicked “+”) complete the fields as follows: Connection Name: HR_DB Username: HR Password: (HR’s password) Host Name: localhost (unless your database is on a different server) Port: 1521
4. Click OK in the Initialize Business Components Project dialog. The Create Business Components from Tables wizard will open.
5. Move the EMPLOYEES table to the right. Click Next 6. Move the Employees entity to the right. Click Next. Click Next again to open the Application Module page. 7. Change Name to “HRService.” Click Next. Click Next. Click Finish.
Create a JSF Page 1. From the right‐click menu on the ViewController project node in the Navigator, select New | Page. 2. In the Create JSF Page dialog, change File Name to “emp.jsf.” Be sure “Create Blank Page” is selected. Click OK. 3. Open the Data Controls panel in the Navigator window and drag EmployeesView1 onto the page as shown next:

Just Get It Written: Deploying Applications to WebLogic Server Using JDeveloper and WLS Console ‐ Hands‐on Practice
© 2014 Peter Koletzke 18 6/25/2014
4. In the drop menu, select ADF List/View | ADF Table. The Create Table dialog will open. 5. Select all attributes except for EmployeeId, FirstName, LastName, Email, and HireDate and delete the selected
attributes by clicking the “X” icon. 6. Select Enable Sorting; the dialog should appear as follows:
7. Click OK. 8. Test the application by running emp.jsf (from the right click menu in emp.jsf). 9. Close the browser and stop the application and Integrated WebLogic Server (red button).