july, 1999 volume 4, number 2 - texas asltexas-asl.com/banzai/banzai4_2.pdf · the newsletter of...
TRANSCRIPT

The Newsletter of the Austin ASL Club
July, 1999 Volume 4, Number 2
This newsletter is FREE! Don't let anyone charge you for it.
Banzai!!
July, 1999 This newsletter is FREE! Don't let anyone charge you for it.
The Newsletter of the Austin ASL Club
July, 1999 Volume 4, Number 2
In this IssueEditor's Corner ................................................................2Tactical Analysis: DASL 7 - With Flame and Shell..........2After Action Report: DASL 7 - With Flame and Shell......7Player Profile: Jeff Toreki ...............................................8Favorite Scenarios: Chas Smith .......................................9The Return of the Weekender ..........................................9Club Notes ....................................................................10Club Ladder ..................................................................10This Happened to Me ....................................................11Next Issue .....................................................................12
Editor's CornerMatt Shostak
A lot has happened in our club since the last newsletter. We heldour 7th Annual Austin ASL Team Tournament with 18 guyscompeting over the weekend. Mike Seningen deserves manythanks from the entire club for running this event and doing agreat job with it. In an exciting new development, we have alsorecently made contact with a group of players in Houston. Acouple of months ago Mike Seningen and I responded to arequest from Walter Eardley about how to run a club event.Walter told us afterwards that they had 10 guys show up for theirfirst meeting! About that time two Houston players, Bret Smithand Jeff Toney, scouted us by showing up for one of our regularclub meetings and knocking heads with us. Then two weeksbefore our tourney, Bret Smith had an informal gathering at hisplace in Houston, and four of us made the drive to meet more ofthe Houston guys. It was a lot of fun. Four of them then madethe trek to Austin for our tourney in late June. It appears that wemay be starting a new chapter in our club’s history, as wetransition from Central Texas ASL to simply Texas ASL. ThoseHouston guys that we have met have joined our ladder, and seemwilling and even eager to do joint ASL gatherings every once in awhile. I think this is a great thing and will allow us all to makesome new friends, not to mention make us all better players.Although Dallas seems much more remote to us than Houstondoes, we could potentially do the same sort of thing there as well.Glen Gray and Russell Mueller, our intrepid ASL warriors frombig D, have supported our club, and particularly our tournament,since the very beginning 7 years ago. It was great to see them atour tourney yet again. Not to be outdone, San Antonio seems tobe gaining momentum as an ASL hotbed as well. In the last fewmonths several players from that area have made it to our Austinclub meetings to challenge us. I encourage all of us to takeadvantage of our opportunities for interaction, not only withinAustin itself but also with Houston, San Antonio, and Dallas. Atthe same time, I would ask that we not forget the many players inAustin either. We have many members who are lurkers – theyare on our club roster but don’t play very much. Don’t be afraidto call someone new for a match. And remember - we all get outof ASL what we put into it.
Tactical AnalysisDASL 7 - With Flame and Shell
Matt Shostak
A few issues ago I reviewed the deluxe scenario Preparing the Way.Writing that article made me realize how much I enjoyed those EasternFront slugfests on deluxe boards. So, I thought, why not continue where Ileft off and write about another excellent deluxe scenario from thegripping Streets of Fire module? Like most of the scenarios from thatmodule, one of the main attractions is playing on those incredible deluxeboards. It’s not just that the deluxe boards are nice to look at. Theycertainly are, but more importantly, they allow the elbowroom for thosehigh-density, heavy-hitting, toe-to-toe, brutal urban cauldrons that we allenjoy so much. With Flame and Shell is just such a scenario. Both sideshave excellent orders of battle (OBs). The Germans boast threeflamethrowing tanks and three assault guns to support their infantryattack, while the Russian defenders are bolstered by three antitank gunsand three formidable artillery pieces being used here in a direct fire role.The setting, Kursk, is an ever-popular one among many gamers. Thescenario has such a cool name too.
Russian Strengths: Close Combat, Guns, SniperRussian Weaknesses: Leadership
Over half of the Russian force is elite, and those elite squads areconsidered assault engineers for CCV purposes, so they have a decentchance of killing German tanks in Close Combat. They have six guns, allof which are capable of destroying the German armor frontally, althoughit’s not a sure thing, and the 45LLs will need a little help from the dice.Still, they all have pretty good rate of fire, and one might hope thateventually a gun will be rewarded with a kill if it is able to take asuccession of shots. The kill numbers of the 45LLs and the 76Ls are,respectively, 11 and 13. That number can be increased by one at veryshort ranges (0-2 hexes for the 45LLs and 0-1 hexes for the 76Ls). Bothguns have APCR 5, and if they are fortunate enough to have someavailable, their base kill numbers become 13 for the 45LLs and 14 for the76Ls. Close range will again result in an increase of those kill numbers(+3 at 0-1, +2 at 2, and +1 at 3-6). Since most shots will probably occurat ranges of 6 hexes and under, the Russian player can count on gettingthis bonus most of the time. Because the frontal armor of all the Germantanks is 8, achieving kills against them, while not impossible, is not agiven either. Still, one can expect the German player to be somewhatcautious of losing his tanks to these guns. The guns can be used veryeffectively against infantry as well. With its high rate of fire, a 45LL canwhittle down a stack of Wehrmacht aggressors pretty quickly when thedice are falling the right way (the wrong way if you’re the Germanplayer). Naturally the 76L guns command a lot of respect as anti-infantryweapons also, since they will attack on the 12 column, and their rate offire is a very respectable 2. If the going gets rough, the 76Ls can evenfire smoke (s8). The Russian SAN of 6 is very high indeed, and ought tocause the German player to think twice about, and even turn down many,low-odds shots. It is vitally important for the Russian player to watchevery roll with an eagle eye on the lookout for possible sniper activation.Each one missed is a missed opportunity to kill a German leader or breaka squad, and that can add up over the course of a long game. As always,it shows class for each player to call out each sniper activation as theyhappen. A sniper is part of the game, and is supposed to occur. ASL isnot a contest about remembering every dice roll, and taking advantage ofa guy who misses his SAN. As usual, the paucity of Russian leaders willcause problems for the Russian player. With only 4 leaders (with only -2total modifiers) to lead 25 squads, there never seem to be enough of themto go around. If the 9-1 and 8-1 are busy directing fire, then only twoleaders are left to anchor rally havens for broken squads.

The Newsletter of the Austin ASL Club July, 1999 Volume 4, Number 2
July, 1999 Page 3 of 12
German Strengths: Flamethrowing tanks, assault guns, Smoke, Leadership
German Weaknesses: Close terrain for AFVs, Numbers
The Germans bring a very impressive force to the battlefield this timearound, highlighted by three flamethrowing tanks. These are verypowerful weapons indeed, and can quickly turn a Russian strongpoint intoashes if given the chance. The flammpanzers make it easy to overlookthe other AFVs, but the three StuH 42 assault guns are nothing to sneezeat either. Any Russians unlucky enough to catch one of their shells willbe treated to an attack on the 20 column. Together the flammpanzers andassault guns provide the flame and shell from the scenario title. TheGermans have plenty of smoke making capability. All their AFVs havesmoke dispensers, the assault guns have s9, and all their infantry squadshave smoke exponents, over half of which are a 2 or higher. Thus theyshould be able to cover their advance adequately. The Germans enjoy aleader for every 3.25 squads, and have combined leadership modifiers of-5, including a 9-2. Therefore they should be able to rally their brokentroops quickly, and of course, accurately direct several firegroups.Working against the Germans, however, is the closeness of the terrain.The city is not exactly tank country, and the German player is likely tofind that overly bold vehicles do not survive very long around here.Moreover, the Russians have plenty of men in uniform, as usual. It willbe difficult to overwhelm them, because these deluxe boards representsuch a small area that it is not easy to concentrate most of one’s forcesagainst a certain point. It’s a very narrow front.
Firepower Comparison
Scenario analyst extraordinaire Mark Nixon has a formula for comparingfirepower that he likes to apply when discussing a particular game (seeThe General, Vol. 28 No. 2, p.18). His system accounts for rate of fire,but does not include one-shot weapons such as demo charges, nor does itfactor in such things as MOL, SAN, etc. It is a rough sketch of rawfirepower available, and he claims that in a well-balanced scenario theattacker should have about 62% of the available firepower. Deviationfrom that number should be compensated for by other elements of thescenario that don’t fit into the calculation, such as smoke making ability.Using his formula (the actual computation is left as an exercise for thereader), we find that the Germans have 61.2% of the firepower here,which is pretty much right on the money for “Nixonian balance.” That’sencouraging, but don’t read too much into it. It’s just another bit of datathat I thought I’d mention for your benefit in considering the merits ofthis encounter.
Victory Conditions
Before going right into the setup and attack, let’s pause to consider thevictory conditions. The Germans need to earn 50 points to win. Theycan earn points by exiting units off the far end and by killing or capturingRussian units. The Germans essentially lose points, however, forcasualties that they suffer. What does this imply for this scenario? Toexit, the attackers need only go 19 hexes forward, and they have 10 turnsto do it. They’ve got plenty of time. Each AFV exited is worth 6 points,so if the entire at-start German OB succeeded in exiting, it would net 101points. The Russian at-start OB totals 80 points. So if the German playermanages to destroy half of the Russian forces (40 points) and exits twoassault guns (12 points), he’ll have 52 total and a win. However, it’s hardto imagine doing this without losing something in the process. A meresquad and a half killed would bring the German back under his victorymargin, so you can get an idea how each German loss in a sense hurtshim twice: he obviously can’t exit it, and the points also count againsthim. Okay, now that that’s clear, let’s move on to the nitty-gritty.
Defender Setup
Our look at the victory conditions suggests that the defense will want toachieve a balance between staying alive, and hence depriving theGermans of victory points, and inflicting harm, which “ups the ante” andforces the Germans to gain even more points to make up for those lost.Therefore it seems that a bit of skulking and a bit of “in your face”firepower is called for. Just what measure of each is necessary to win is atough call, and is why the game is so great. Each player probably has a
different opinion and style. Here I’ll present one possible setup, alongwith a discussion of what one might try to do with it. I have no delusionsabout this being the best setup and game plan possible. I’m just puttingtogether one possibility for your consideration.
First, some general points. It is easy for the Germans to set up massivestacks directed by good leaders to shred any Russians that showthemselves. So we will try to keep as many units out of potential Germanline of sight on turn 1 as possible. Those units that are put on the frontline will be given concealment to give them a chance against the initialassault. The idea is that I don’t want the German to be able to hit mymain line of resistance (MLR) right away. It’s better if he has to getthrough a picket line first. That way, when he does reach the MLR hewill be less organized, perhaps even a bit disorganized, and therefore lessable to have just the right units in just the right places when he wantsthem. Note that there are 13 support weapons and 13 elite Russiansquads. I see no good reason to give a support weapon to a first linesquad when elite guys are available to do the job. In general, I’d ratherhave the important stuff manned by troops with better morale.
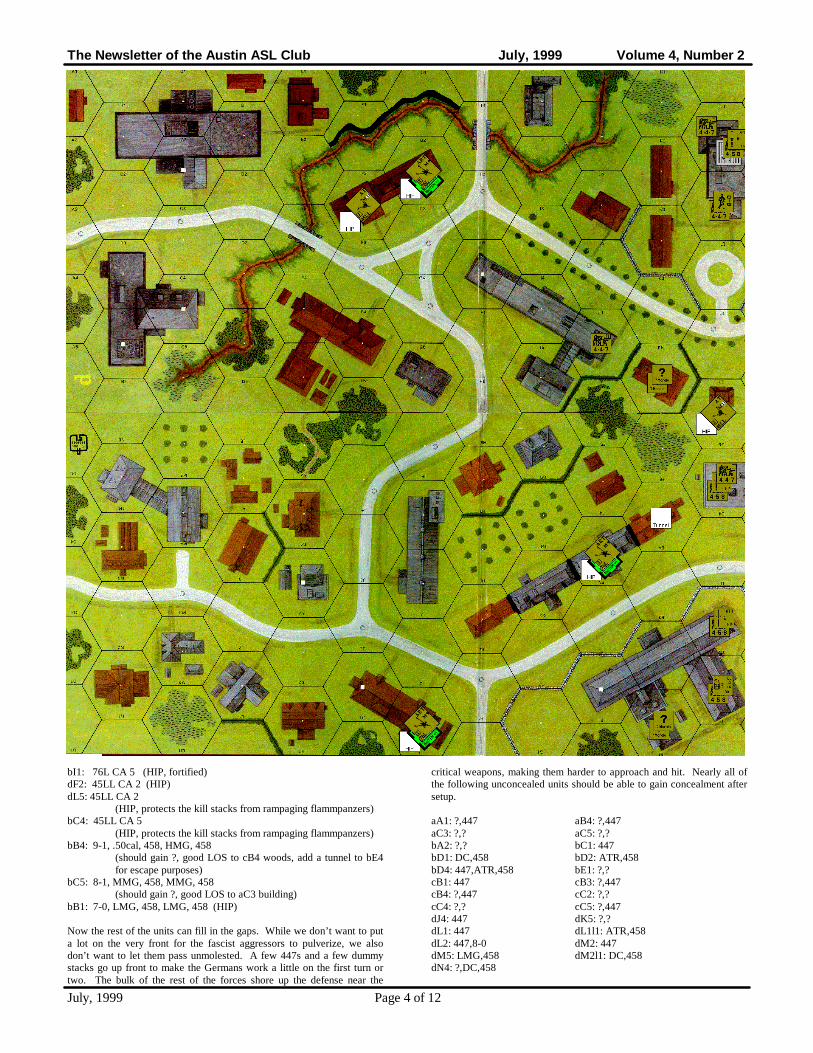
When setting up, I find it easier to place the key pieces first and thenbuild the supporting units around them. This approach may not work foryou, but it allows me to see things in a more organized way. Usually it’snot too hard to determine what the key pieces are. In this scenario I thinkthe key pieces for the Russians are the leaders, the guns, and the heavyand medium machineguns. To a lesser extent are the DCs and ATRs.Not so much a key piece but an important capability is the HIP units.Once those are in position, I can go ahead and fill in the rest of thedefense with the supporting units, which here will usually be rifle squads.Three locations stand out to me as excellent places for the 76Ls. Notethat an SSR allows these guns to be set up in a building if the location isfortified. Normally they could not set up in a building (B23.423). HexesdG2, bF3, and bI1 all command good views with open ground in front ofthem. Hex dG2 is especially hard to flank because of the cliff-gully.Although bF3 has a building right in front of it, it can see a good longway down the road toward the German setup area. Hexes bB4 and bC5cannot be seen from the German jump-off points, and moreover they arecentrally located and cover some important ground. Thus they are idealfor our big machinegun groups and leaders. They are, however, relativelyclose to the front line and in danger of being hit early in the game. Thosemachineguns are too heavy to rout with, so if the squads break they willlikely be left behind to the Germans. It therefore seems prudent toconsider how these units will eventually use the terrain to fall toward therear.
Several different philosophies could be used for the HIP units, dependingon your style. Some players might prefer a “kill stack” of bigmachineguns directed by a good leader to maximize casualties. Theadvantages are that it keeps them away from fire for a while and canreally intimidate an opponent if the trap works well. The disadvantage isthat it may be some while before the trap is sprung, and during that timethose excellent weapons are not being used. Moreover, if too far forwardthe units might not be able to save themselves once they have sprung thetrap and angry landsers seek to seal off their escape. Other players mightprefer tank traps of 458s with DCs and/or ATRs in devious places, hopingto get a side or rear shot at a passing tank. With this narrow front,however, it may be very difficult to arrange a flank or rear shot. Stillothers like HIP units to act as a delaying force. They don’t have to bevery powerful, they just have to occupy space so that they can “bump”German infantry and thus stop their movement short, and they also canhurt the enemy even without large amounts of firepower if they can get anegative modifier shot. Whichever idea you choose, it is best if it fits inwith your overall scheme of defense. Since here we are constructing alimited fallback defense, we’ll opt for a compromise of the aboveconcepts. We’ll put two squads with LMGs and a 7-0 in bB1. This stackhas enough firepower to seriously harm any Germans unlucky enough toget caught by them, and they also don’t have any heavy weapons to dragso they can more easily escape to the rear later on. The leader is there toprevent cowering and to give them extra movement to escape.
The 45LLs will go in positions that support the MLR. Thus our criticalunits are set up like so:
dG2: 76L CA 2 (HIP, fortified)bF3: 76L CA 5 (HIP, fortified)
The Newsletter of the Austin ASL Club July, 1999 Volume 4, Number 2
July, 1999 Page 4 of 12
bI1: 76L CA 5 (HIP, fortified)dF2: 45LL CA 2 (HIP)dL5: 45LL CA 2
(HIP, protects the kill stacks from rampaging flammpanzers)bC4: 45LL CA 5
(HIP, protects the kill stacks from rampaging flammpanzers)bB4: 9-1, .50cal, 458, HMG, 458
(should gain ?, good LOS to cB4 woods, add a tunnel to bE4for escape purposes)
bC5: 8-1, MMG, 458, MMG, 458(should gain ?, good LOS to aC3 building)
bB1: 7-0, LMG, 458, LMG, 458 (HIP)
Now the rest of the units can fill in the gaps. While we don’t want to puta lot on the very front for the fascist aggressors to pulverize, we alsodon’t want to let them pass unmolested. A few 447s and a few dummystacks go up front to make the Germans work a little on the first turn ortwo. The bulk of the rest of the forces shore up the defense near the
critical weapons, making them harder to approach and hit. Nearly all ofthe following unconcealed units should be able to gain concealment aftersetup.
aA1: ?,447 aB4: ?,447aC3: ?,? aC5: ?,?bA2: ?,? bC1: 447bD1: DC,458 bD2: ATR,458bD4: 447,ATR,458 bE1: ?,?cB1: 447 cB3: ?,447cB4: ?,447 cC2: ?,?cC4: ?,? cC5: ?,447dJ4: 447 dK5: ?,?dL1: 447 dL1l1: ATR,458dL2: 447,8-0 dM2: 447dM5: LMG,458 dM2l1: DC,458dN4: ?,DC,458

The Newsletter of the Austin ASL Club July, 1999 Volume 4, Number 2
July, 1999 Page 5 of 12
The general idea is to avoid enemy contact (skulking), while shootingonly at worthwhile targets for the first turn or two, all the while fallingback to the MLR which is roughly speaking just in front of the guns.There the defense will stiffen and fight back, hoping to cause as manyGerman casualties as possible, thus giving them a higher and highervictory point hill to climb. A couple of things are worth noting. Sinceprisoners count as double CVP, it is a good idea not to let any units getcaptured. This is especially true of the guns, since they are so immobile.I wouldn’t worry too much about intensive firing the guns if it appearedthat they would soon be captured. In fact, it may prove necessary to spikeyour own guns at some point to avoid having them fall into the enemy’shands. After fighting at the MLR for a while, it will probably benecessary to fall back again. After all, the Germans are expected to exitsome units. The rest of the game should see some combination of fallingback, delaying and skulking, yet standing up and fighting on occasion.Being opportunistic in causing enemy casualties should pay off. Forexample, the ATRs could be used to shoot at the rear of theflammpanzers. Sure, your opponent will not want to give you a rear shot,
but he may not have a choice when the vehicle is under Recall. That’syour opportunity for a kill and some CVP, which is better than simplyletting the tank escape.
Attacker Considerations
Before working on a setup and the first German turn, it is probablyworthwhile to go over the basic game plan. In this action the Germanshave plenty of time to accomplish their task. Unlike in Preparing theWay, here the attackers can win by destroying the enemy as well as byexiting units, so you can be somewhat flexible in your approach. Thisseems like a classic combined arms situation. Each combat arm supportsthe other. The tanks are the best weapon for dealing with Russianmachinegun strongpoints. Indeed, the flammpanzers can make theirdestruction seem trivial at times. However, the armor is vulnerable toinfantry assault in this urban setting, and moreover there are plenty of

The Newsletter of the Austin ASL Club July, 1999 Volume 4, Number 2
July, 1999 Page 6 of 12
antitank guns out there capable of killing them. It is the infantry’s job tohelp clear these guns out for the tanks. The vehicles can also support theinfantry assault with lots of smoke. Since every lost German unitincreases their needed victory points, it is essential to minimizecasualties.
Losing AFVs is especially costly at 6 points apiece. Ideally, I think theGerman player would like to employ powerful firegroups against theRussian infantry, but to avoid exposure of these important firegroups tothe Russian kill stacks, because you never know who will get the drop onwhom in those faceoffs. Rather, it is better to let the tanks handle theRussian kill stacks. Meanwhile, the rest of the German infantry canprobe to find and destroy the enemy guns. It all sounds so easysometimes, but in reality risks will have to be taken. Bringing up a tankto deal with a machinegun nest might very well expose it to a hiddenantitank gun, or an assault engineer with a DC hoping to kill it in streetfighting. If the game were easy, it wouldn’t be as much fun, would it?There really aren’t a heck of a lot of places to set up, what with only 3hexrows available. Given the above Russian setup, let’s put together aGerman plan to deal with it. Again, I have no delusions of grandeurabout the quality of this attack plan. It is merely a guideline fordiscussion.
aE2: 8-0, 3x467aE3: 8-0, 3x467aF2: flammpanzer CA->6aF3: 9-1, LMG, 468, 2xMMG, 2x468aG2: DC, 248aE5: StuH42 CA->5, 247aF5: flammpanzer CA->5, DC, 248
cE1: StuH42 CA->5, 8-1, 2xLMG, 2x838, 467cE2: StuH42 CA->5, 9-2, 2xHMG, 2x468, MMG, 468cF1: DC, 248cE4: 8-1, 2xLMG, 2x838, 467cE5: flammpanzer CA->5, 2x467, 247cF5: 8-0, DC, 248, LMG, 468, 468cG4: 7-0, 467
Here again you see my philosophy of giving the support weapons to theunits with the highest morale. I also deploy the maximum number ofsquads at start, using the 248s for the DCs. I’d rather use them because Idon’t want to break down any of those powerful 838s if I don’t have to.The tanks are all hiding somewhat in buildings and woods. Althoughthey are not completely hidden, I am not too worried about Russian gunshitting them in their setup locations. For one thing, the buildings givethem extra TEM, and for another it would be quite a bold setup indeed forthe Russian to have his guns so far forward that they could hit these tanks.The risk to him probably isn’t worth the reward. There are 9.5 squads forthe east flank, 7.5 squads in the middle, and 9 on the west flank. Therereally isn’t room here to mass most of my strength against one side, soit’ll be fairly evenly distributed. The general idea is to start out the attackvery deliberately, probing for weaknesses. When they are found theyshould be exploited, and it shouldn’t be too terribly hard to shift the axisof attack somewhat since the distances are so deceptively short on thesedeluxe boards.
Each of the 8-1 leaders has a 467 stacked with him that he can attempt todeploy in the first rally phase to obtain extra scout half squads. Whetheryou do this or not depends on your play style, but in this case it couldwork well to have scouting half squads “bumping” Russian concealmentwhile backed up by massive firegroups directed by skilled leaders. TheStuH 42s are in position to put Smoke in a variety of places, including thefront line just a couple of hexes in front of them. I’m not sure whetherthis is really worthwhile at this time, as it may be better to save thatSmoke capability for the Russian guns when they are revealed, or theRussian machinegun nests. The big kill stacks led by the 9-2 and 9-1could either fire at likely concealed targets in the first Prep Fire, orOpportunity Fire instead, hoping to use their full firepower againstRussians that lose their concealment for whatever reason on the first turn.The latter approach may be better, since we suspect that many of the unitson the front line are dummy stacks. Scouting half squads could run rightthrough building aC5-aB4 for example, revealing targets for the 9-1. Thisbuilding could be a very hot place since all the Russian big machinegunscan hit it. Half squads could also run through the lumberyard on board c,
exposing targets for Mister 9-2 and his orchestra. The first line squads inaE2 and aE3 are poised to take control of the aD2 building. Theflammpanzers are ready to exploit on each flank if the opportunitypresents itself, using bypass to get at those pesky Russians. A thirdflammpanzer is on standby to move in and roast the Bolshy machinegunnests in the center once the area is declared tank-safe, or the need justbecomes too great. One of the StuH42s could easily move to aD5 inorder to start taking the big Russkie stacks under direct fire. Althoughthis may expose a tank to some AT fire, it may still be worth it.
In general, there shouldn’t be any need to be impatient. The philosophyof taking what’s available while avoiding taking casualties as much aspossible could pay off. As Russian units are forced to reveal themselves,they should be cut up and destroyed by the German kill stacks. It isprobably a good idea to always try to keep a concealed German unit ortwo in each area of attack. This will help protect against ambush whilealso threatening ambush on the Russians. Moreover it will keep himguessing somewhat about your units. Do not be too impatient with theDCs. Keeping concealed DC units just behind the advance can be veryworthwhile. When you really want to force your enemy to fire, there’snothing like a DC team coming straight at him to catch his attention.Often I move these teams up with no real intention of placing the DC, justto see if my opponent will fire at them and thereby open up some otheravenue for some units that I really want to get to a particular spot.
As long as the German infantry stays in good terrain, they should be okayfor the most part. If they break there will almost always be a leader notvery far to the rear to rally them and get them back into the fight quickly.The same cannot be said for the Russians. The flammpanzers should beused wisely. Because their main armaments are X11 weapons, you canonly realistically expect about a half dozen shots from them before theyare recalled. You want to make their shots count, not waste them on abroken half squad. On the other hand, they really must be used at somepoint. They are simply the most effective weapons the Germans have.Consider that during its Movement Phase one of these monsters can stopand fire at an adjacent enemy on the 30 column, ignoring TEM. That’sdevastating. There’s a really good chance of achieving a KIA outright.The Russian kill stacks should be considered the best target for theseflames, although they will likely be well protected by antitank assets, sobe careful. As the game goes on, however, be on the lookout forimportant Russian units that become exposed without proper antitanksupport. These units can then be summarily burned out.
There isn’t much you can do about the Russian sniper, but there are acouple of things you can try. First, you can put your own sniper betweenthe enemy’s and your 9-2, in lower TEM than your leader. This willmake it somewhat more likely that your sniper will absorb a hit or twofirst. Second, you could detail a 247 to sniper duty, where he doesessentially the same thing. As the game wears on, you can move your 9-2away from the enemy sniper and put less valuable units in its way. Ingeneral, stacking leaders with squads should increase their chance ofsurviving a sniper attack due to the random selection process. If you get achance to knock the enemy SAN down by a point, you may want toseriously consider taking it.
Conclusion
This scenario is relatively straightforward and brutal. Each side is simplytrying to destroy the enemy while preserving its own strength, with anadded goal for the attacker of penetrating enemy lines. Both sides haveplenty of options, and the general mayhem that ensues ought to satisfymost ASL fanatics. The ROAR web-based record lists the balance of thisscenario as 15-9 in favor of the Germans as of this writing, suggestingthat they might have a slight edge. Perhaps that is due to the tremendouspower of the flamethrowing tanks. Still I’d play either side. I hope thisdiscussion has gotten you interested in this great scenario. I’d love toread your "After Action Reports" in Banzai!! if you play it.

The Newsletter of the Austin ASL Club July, 1999 Volume 4, Number 2
July, 1999 Page 7 of 12
After Action ReportDASL 7 - With Flame and ShellSam Tyson
Germans: Sam Tyson Russians: Steve Withers
I was sent a copy of Matt Shostak's analysis of this scenario, and it reallysounded like it would be a blast to play. Steve Withers and I havedeveloped a regular gaming session using VASL, and I suggested that weplay this scenario. He readily agreed after looking at the scenario card,and so we decided to play it. We diced for sides, and I came out with theGermans. This is a detailed report, including most of the highlights fromeach turn.
Russian Setup: Steve set up the Russian defense in two main areas. Themain line of resistance (MLR) appeared to be across the forward edge ofthe two full boards, about 6 hexes away from my setup area. Elevendifferent locations contained Russians in this forward group, and theywere all at level 0. The rear guard was close to the Exit edge, and againspread across both boards. It looked like it was going to be a slugfestearly in the game, with the German infantry trying to disperse thedefensive front and expose the six guns that were using HIP.
German Setup: The Germans have a narrow setup area, so the optionswere somewhat limited. I split my forces up into three groups, all roughlyequal in size and strength. I set up the top group behind the aC2 building,planning for initial concealment and cover for the movement phase. Themiddle group was set up in the aE5 and cE1 buildings, ready to pushdown the middle of the boards. The lower group was set up behind thelumberyard, ready to use the buildings and woods as cover.
German Turn 1: I placed smoke in the bB4 hex with a StuH, and probedthe board a and c hexes for hidden Russian troops. My infantry was ableto advance to hexrow B on board c, and occupy all the building hexes onboard a. One HS was sent all the way to aA4 woods, and did notencounter any enemy units up to that point. The biggest event of thisplayer turn was a 76L in dM2 taking out a Flammpanzer in aC1 as it triedto move up and support the right flank. We used the wrong TK number,but did not realize until later in the game, and it was too late to reverse theerror. The other significant action saw a second 76L malfunction on itsfirst shot. I also broke two Russian 4-4-7 squads, one with an ATR, whichwere behind the wall in dM3. I was down 6 CVP after my first turn, butmy troops were well positioned across the playing area for a strongadvance.
Russian Turn 1: Steve skulked as much as he could, and left me withfew shots. It was my turn to malf a gun, which I promptly did on a StuH.Steve advanced back into most of his original positions, and forward in acouple of other places.
German Turn 2: At this point things began to get intense, as the forcesstarted to bump into each other. I aggressively used scouting half-squadsto bump concealment in a few places, and suffered a few bruises in theprocess. But I needed to know what I was up against, and knew it wouldbe worth it in the long run. Besides, ample German leadership wasavailable to rally the units that were broken. Steve unveiled his HIP unitsin a big trap in bC2, consisting of a 4-5-8/HMG, 4-5-8/LMG, and a 8-1leader. They fired on a stack of Germans that had made their way to bB2,ADJACENT to his cleverly placed trap. Two broken half-squads and abroken leader had to retreat, but at least I had discovered all of hispotential HIP units. Steve reveals his last 76L in the DF phase, and triedto finish off the remaining units in bB2, but to no avail. Advancing firebroke the previously HIP units and wounded the 8-1 leader, and they allscurried back to bE2. Almost all of my forces were at or over the linebetween the boards, so the advance was moving along well after 2 turns.All three 76Ls were revealed, with only 1 AFV as a casualty.
Russian Turn 2: Steve again skulked, so not much happened this turn.His 76Ls had no effect on my infantry, and I did not get any decent shotsin the DF phase.
German Turn 3: A big turn for me. Lots of infantry smoke, goodmovement, ineffective defensive fire, and strong advancing fire all playeda part in a very successful German turn. One 76L crew and accompanyingsquad were broken and forced to rout upstairs in a building, where theyquickly became prisoners. The Russians in the center of the map retreatedunder the pressure of the German advance, and the other 76Lmalfunctioned, then became locked up in melee. Steve did take out asecond vehicle that had gotten ahead of the infantry. I had tried to cut therout path of a unit, and paid the price. The tank was hull down andbeyond an orchard, but Steve made the rolls count when he needed themand got a turret hit followed by a kill. I also lost a HS this turn, but Stevelost six HS units and a 8-0 leader. All 3 Russian 76L guns had been takencare of, but not without some cost.
Russian Turn 3: See Russian turns 1 and 2. Steve again skulked andretreated, and the German FP punished a few units left as targets.
German Turn 4: This was the highlight turn of the game for Steve. TheGerman onrush continued, but two big events had to give Steve somesmall satisfaction for a change. I again got careless with a StuH, and triedto use the sD in front of my troops. I moved it and stopped next to ahidden 45LL, which promptly flamed my overaggressive vehicle. Thefirst 45LL also had its moment in the spotlight, with a ROF spree fromhell. First it pinned two units, then immobilized a Flammpanzer in dN3,changed its CA, and finally toasted a stack of adjacent units, leaving twobroken half-squads remaining from a stack of three full squads. Butadvancing fire cast a shadow over these two strongpoints, and the gunswere both abandoned by the end of the turn. So after 3.5 turns, 5 of the 6Russian guns were out of action, but I was down two only two mobilevehicles, and only one had a functioning MA. I had captured two crewsand two half-squads so far, and wiped out everything in my path up to thedJ/bE hexrow. Approximate VP count at this point was 33 for theGermans to 20 for the Russians, with three AT guns waiting to becaptured for another 12 CVP.
Russian Turn 4: At this point I had broken through the main line ofresistance. Steve moved most of his units back to set up a seconddefensive line, to make it hard for me to achieve any Exit VP.
German Turn 5: Now cautious of the final AT gun, I pushed forwardonly using infantry. I managed to cut off and capture four more units, andestablished a front across both boards just behind the road that runs acrossthe map, all without incurring any more casualties on my side.
Russian Turn 5: Steve and I exchanged shots across the road, but I hadthe manpower to risk a few breaks here and there. Every time Stevedropped concealment to shoot he was doing me a favor. There were fiveturns left to go at this point, so I was happy to trade shots and chip awayat the Russian troops.
German Turn 6: The highlight for this turn came from a well-placedDC. Steve had a stack in the woods in bJ0, consisting of two concealedsquads and a wounded leader. A HS moved into I1 and placed the DCinto J0. Steve tried to break or pin the HS, but could not get it done.When the DC went off, the 3mc it generated left all of his units broken,and they all surrendered in the rout phase to the units in I1 and J1 for a 10VP gain. Prep-fire had killed another squad in M2 on a 1 KIA. I pushedforward with my troops, getting some units across the road for the finalassault.
Russian Turn 6: Steve anchored his defense around the .50 cal, and triedto hang on. Two squads held the flank in bL0, and a few units held toughon the north edge in the B1 building.
German Turn 7: Again, I was happy to trade shots, and gain ground inthe advance phase. I stayed away from the .50 cal, since I did not need torisk the exposure. Not much happened this turn, but the end was near.After 6.5 turns, the VP count stood at 70 to 22.
Russian Turn 7: The Russians again skulked and repositioned, trying tosurvive long enough to earn a few more CVP.
German Turn 8: I gambled a bit here, moving a large stack, andsuccessfully got Steve to reveal his last 45LL gun. He got a CH on mystack, and broke the leader and two squads, but I learned where his gun

The Newsletter of the Austin ASL Club July, 1999 Volume 4, Number 2
July, 1999 Page 8 of 12
was located. That allowed me to drive my last StuH off the board,narrowly avoiding a street-fighting nightmare as Steve boxed a PAATCattempt for a squad guarding the road on board b.
Russian Turn 8: The Russians initiated a small counterattack, in anattempt to at least go down fighting. Steve placed a couple of DCs andbroke a few of my units, but did not have enough manpower to do muchdamage elsewhere. Steve conceded at this point, and the game was over.
Aftermath: The German firepower was dominant from early on in thescenario. Steve had a strong forward line of resistance, but when itcrumbled, the Russians had trouble trying to avoid taking additionalcasualties. Any units that were bold enough to attack the Germans usuallywere dealt a bigger return blow in return. The Germans were able to pushthe Russians back, and had little difficulty in achieving victory. The dicewere not kind to Steve either, as he counted 16 boxcars against only 5snake-eyes among the Russian dice results.
Player Profile: Jeff TorekiAs a result ofgrowing up in afamily that hadmembers serving inthe military, particularly mygrandfather, I’ve always had aninterest in the history of thingsmilitary and technology related.I’ve also always had a fascinationfor games of skill of all kinds,including sports, pool, and strategyboard/computer games. So
naturally, I was interested when I saw my first wargame. I saw PanzerLeader (PL) in a mall game store when I was about 11 and absolutely hadto have it, but had to wait a couple of months until I had saved enoughmoney (sixteen bucks was a lot of money for an 11 year old at that time!!)and could convince my mom to go back to that particular mall. When Ifinally got it I was not disappointed, as I read and reread the rules and thescenarios. Unfortunately, I could not find an opponent, so I played all thescenarios solitaire. I tried to get my best friend to play, but he did nothave the patience or the interest in the history. I also tried to get mygrandfather to play, but I don’t think he understood that it was just a gamethat one could use as a tool to learn a bit of history. I remember himsaying something like “We beat those G#$%&*@ Krauts once, why thehell do we need to do it again?” [NOTE – no offense intended here, hewas a pilot in the RAF and hard feelings sometimes understandablylinger. I was just trying make clear how frustrating it is when your usualgame opponent/grandfather yells at you for suggesting something toplay.] Needless to say, I didn’t make any more attempts to get him toplay PL. We just stuck to Draughts, chess, and cribbage. Once I hadsolitaired-out on PL, I moved on to other wargames during Middle andHigh School. Some of these included Panzerblitz, B-17, Ambush and itsadd-ons, Bismarck, and a few non-AH wargames. I noticed an ad forASL (Beyond Valor, actually) in 1985 in an issue of The General and waskeenly interested, but alas, I gave up hope after reading details of thegame – it just looked too hard to learn on one’s own and too difficult tosolitaire. When I went to college in 1987, I met a guy named MarkSanchez at the UT Gaming society meeting. He and another fellow wereplaying a game of Squad Leader (Block Busting in Bobruisk, I believe itwas.) I started watching and was hooked immediately. I found a copy ofSL at a Michael’s store, and we managed to play a couple of SL scenariosbefore I got caught up in school and we lost touch. So for a few moreyears I had no opponents, but I managed to solitaire most of the SL and afew of the Cross of Iron scenarios. In about 1989, I managed to convincea good friend who is a WWII history buff to play a few games of SL withthe intention of moving on to ASL, but he did not have the patience forThe Game. During this time, I acquired the ASLRB, BV, RB, and Yankswith intentions of actually using them. After my friend lost interest, I stillcould not find opponents and my ASL stuff languished unused in a closet.I had given up hope on ever finding opponents for board wargames andmoved to solitaire specific and computer games and other hobbies such asmodel railroading. Since I had gotten into model railroading, I visited
King’s Hobby on a frequent basis for supplies and would occasionallyperuse the wargames, wistfully wishing I knew someone else who wasinterested.
In 1996, I happened to notice an early edition of Banzai!! next to the ASLstuff at King’s. What was this?!? You mean there are actually people inthis town who play this game?!? People, as in more than one, as in aclub??? I was blown away and my life hasn’t been the same since. Icalled Matt Shostak soon after seeing this and promptly scheduled a gamewith him. He proceeded to kick my ass soundly, but I’d never had morefun losing a game. For the next year or so, getting my ass kicked byeveryone was the accepted norm, but I was having a blast and I waslearning from some of the top players.
Some advice for the newbies out there: I'm still new enough to this gameto remember this, but patience is most certainly a virtue, if not arequirement for ASL. I think I got creamed in my first ten or soscenarios. It can certainly be frustrating when you feel like you're nevergoing to win a game. However, one has to understand that there is arather large learning curve to this game and you cannot expect to beatexperienced players early in your career. In my opinion, it takes playingapproximately 25 scenarios to just master the basic rules of the systemand get a feel for how things work out in the framework of a scenario.From that point, you can begin to fine tune things like playing style andstrategies. For the first 25 games, I suggest playing a wide variety ofopponents to get some exposure to various playing styles. Playingexperienced guys can certainly teach you a lot, but playing otherbeginners can give you some end-game experience and maybe a win ortwo to keep your confidence up.
Thanks to the experience of playing the guys in the central Texas area andattending a few tournaments, I now feel confident going into a scenariothat I’ll at least be able to make the outcome somewhat close against mostplayers. I highly recommend attending a tournament if you haven’tbefore. I’ve now been to three in Austin and two out of towntournaments, and they were all a blast. Tourneys are a great way to getsome intensive gaming in and also meet lots of people with the sameobsess… – umm, hobby, as yourself. Some of the highlights of my ASLexperience are winning the team trophy at the Austin tourney in 1997with David Hailey, winning the States Trophy at the ’98 WWF with MattShostak and Mike Seningen, and winning team (with Andy Milder) and10-3 awards at this year’s Austin Tourney.
While these things are certainly fun and nice to display on your shelf, themain attraction of this game to me is FUN. I have never had as much fun,win or lose, playing any other boardgame. There are just so many coolthings that can happen during the course of a scenario, and the game is sowell designed that it’s even exciting if you’re getting your ass kicked. Nomatter what, the dice always seem to swing back and forth, so usually ifyou’re doing well early on, you can count on things turning against you,and vice-versa. I’m not really sure what kind of style of play I have, ifany, but I like to socialize and talk about the events that are unfolding onthe cardboard battlefield. I guess I try to adapt my style of play to matchmy opponents’. That’s not tosay that I leave the initiativewith them, but that I try tofigure out their playing stylesand be flexible in adaptingmine to best counter theirs. Iguess most people would say Ihave a conservative style, butoccasionally I try to do thingsto keep people on their toes. Ithink I especially keep peopleon their toes when they play atmy house – I’ve got aDalmatian named Deacon (A.K.A. The Hound of the Spaskervilles) thatrequires attention from all my opponents. I think he may even have morefun than I do when I play ASL, especially when Sam Tyson and KirkWoller come over because he knows they’ll play ball with him. I’ve triedto teach him the finer points of ASL, but he’s still stuck on that whole"bypass movement/VBM freeze" reality thing, so we usually just stick tofetch. People say I have home dog advantage, but I’ve never noticed astatistically significant difference in my home and away records.

The Newsletter of the Austin ASL Club July, 1999 Volume 4, Number 2
July, 1999 Page 9 of 12
I’ll talk about a few of my favorite scenarios in the next issue of Banzai!!,so I won’t go into detail here, but I will talk here about my favorite kindsof scenarios. For one thing, there are only a couple of scenarios I’veplayed that were not fun to play due to lameness of the scenario itself.Most all of the scenarios I’ve played so far (about 53 ladder games todate) have been fun to play, even if they were three legged doggiesbalance wise. Of the stuff that I’ve played so far, I’d have to say I enjoythe combined arms stuff the best. A good mix of infantry and armorusually gives enough options to make a scenario interesting and give itreplay value. I enjoy playing scenarios from all theatres of the war and Ilike to try my hand at different nationalities also, but I’d have to say myfavorite scenarios are usually Russian/German slugfests. The sheer scopeand intensity of the Russian Front has always intrigued me, so I tend to bedrawn to those scenarios more than others. However, I’m just nowgetting into the PTO in a big way, having played four scenarios in thepast few months, so I’m gravitating toward those scenarios now. I’venever played a Campaign Game other than the first day of the DTWmodule, so that’s another facet of ASL I’m looking forward to exploringin the near future.
I’d like to extend thanks to Matt Shostak for all his hard work creating theclub and the newsletter, for without it I might still not be aware of ASL inAustin. I also think I’m lucky to have a girlfriend, Tracey, that is veryaccepting (even if not understanding why we do it) and encouraging ofmy hobbies. I think the future of ASL is bright in Texas, as we have astrong and growing group of players. Here’s to many more years ofrolling the bones and pushing the pieces!!
Favorite Scenarios: Chas SmithIt was very difficult to narrow the list of scenarios I like tomy top 10. I am listing ten scenarios that I have reallyenjoyed. I usually prefer combined arms scenarios with a lotof meat giving both sides numerous options. Note that Ihave discounted the possibility of including any scenarios Ihave designed. There are definitely a lot of good scenarios that I was notable get on this list.
The Citadel: This scenario offers a lot to do for both sides. There isn’t alot of armor, but both sides have a large force with numerous options.Technically both sides are attacking, and this one probably will not playthe same way twice.
With Flame and Shell: First, I like meaty deluxe scenarios. Thisscenario offers flame-spewing tanks, armor for both sides, and lots ofinfantry duking it out over a tight area. There is immediate action andmuch carnage in this one.
Preparing the Way: This is another tremendous deluxe scenario. It ishard to turn down commanding six Panthers, good infantry, and OBA.The Russians have a tough task in stopping the Germans, but possess theassets and numbers to win by attrition.
Acts of Defiance: I have already played this scenario twice getting bothviews. It is very fun and balanced. I like the challenges for both sides ofdefending and trying to cross the bridges. Both sides also have a nice mixof infantry and armor. Success or failure of the Russian OBA and thefight to get across the bridge are huge factors influencing the outcome.
No Farther: This is an excellent scenario, and possibly my favorite. Ihave played this one twice getting both views. I am really surprised ithas seen little play and hasn’t received much hype. Both sides have FTs,armor, heavy firepower, and HIP units. Best of all, they are duking it outin Stalingrad, and the fighting is bloody. I also think it is very balanced.It has a lot of replay because of the HIP units and minefields.
Sochazcew: This is the best scenario Dispatches from the Bunker hasproduced. Vic and company did a fine job with this one. The Germanshave an awesome and powerful combined arms force. The Poles havesome good stuff too, and have the assets to channel the Germans and set
up ambushes. It can also turn into a bloody city fight with buildingsrubbled by high caliber HE.
Baraque de Fraiture: I was lucky that Todd Hively convinced me toplay this one, although it took a while. This scenario has just abouteverything except air. The flexibility in setup and numerousreinforcements makes for a lot of options and replay value. Both sideshave good killer units which makes it very fun. I also think the entirescenario pack is good, but this scenario was worth the price.
Its About Time: Todd also convinced me to play this one. I liked it justas much as BdF. The Germans have some tough challenges withrelatively low quality infantry and vulnerable armor. The Brits' keyweapon is the Churchill in this one. It is invulnerable to almost all fireand provides the smoke necessary for the infantry. The Brits have a longway to go and a lot to do to win this one though. The scenario came rightdown to the wire with close combat in the building complex on the hill.
The Commissar’s House: I consider this a classic. When I first boughtBV, I really didn’t have much ftf, and I learned the basics playing thisone solitaire a few times. The German infantry force is a dream.Engineers with high firepower and morale, very well-equipped with FTsand DCs. The regular German infantry is also very good, and based onsetup could be well-led and armed with MGs. Overall the Germanleadership is awesome. The Russians don’t have the firepower or moraleto stand toe to toe with the engineers. They have HIP, booby traps, andnumbers to slowly wear down the attackers and hang on to win this.More than likely the Chemist’s Shop will fall very early, but you can betsome CC in the Commissar’s House will determine the winner.
He Who Hesitates: This scenario probably hasn’t seen much playespecially since it is in the desert and an all armor AT gun action. This isdefinitely a great desert battle though. The Brits must make some toughsetup choices. Do they set up the Lee tanks to use the bow 75, or setuphull down and lose the 75? The Brits also get reinforcements that comeon mid game that can turn this into a wild affair. The test for theGermans is where to set up firing lines and maximize their units. Theymust also decide what if any forces are going to be tasked with blockingthe Brit reserves. The game will have wild swings, and just when youthink you are getting whooped, you suddenly have the advantage. I havealso played this one from both sides, and would gladly play it again. Mybest memory is when my Lee took a 75 shot that just got between somesmoke and dust and pulverized Jeff Toreki’s 88 towing half-track.
If you have not tried any of these scenarios you have missed out. I highlyrecommend them, as you will have a lot of fun. I would very willinglyplay any of them again as either side.
The Return of the Weakender(I'm out there on the weak end)Greg Swantek
I'm gone from the hobby a few short months and Avalon Hill is forcedonto the auction block . . . Coincidence? Ponder this: Aren't the goodfolks at Hasbro concerned mainly with sizing their products so as not toasphyxiate infants? The Wall Street implications of this are nothing shortof world-shattering. The sidewalks below the penthouse offices of thebig-money Wargames Futures speculators are littered with their impactedcorpses. The Japanese, sensing the possible loss of the only WWII-eratactical board gaming system that honors appropriately their warriortradition, are reluctant to fund any foreign ventures until this cultural slapin the face is rectified. Asia panics; the rest is history. What does all thishave to do with me? Not a damn thing. But I did get back on the activelist of the Austin ASL club. No longer could I stomach the distant scornof my former peers; henceforth they must scorn me to my face. I took onSam "Of Course I Have Chilled Steins" Tyson, a Philadelphia Flyers fan(I was suckered in by that old Flyers'-fan line: "Sure, I"11 brush my teeththis week"). Sam lives out near the edge of civilization, more commonlyknown as Leander. This would be horribly inconvenient except for thefact that I live about a mile nearer the edge than he (it was the only place

The Newsletter of the Austin ASL Club July, 1999 Volume 4, Number 2
July, 1999 Page 10 of 12
on which I could find a bank injudicious enough to float me a mortgage).The scenario was "Ranger Stronghold," and we managed to knock it outin a couple of evenings. I played the Germans; my task was to eliminatecompletely the offensive (no pun possible) American presence. This Imanaged to do in fine style, as surely you will agree once you read thisaccount. Furthermore, the mere fact that you are reading this tells me thatyou probably are on the toilet at this very moment and likely not goinganywhere for a while. So here goes (no pun- please).
On the first turn I decided to attack with my tanks, and through brilliantplay (blind luck) I managed to put the Americans in a hole early.Actually, it was several holes, but I digress. I did not have an easy time ofit, however, as I had to persevere through much hardship (I rolled rate somany times my wrists cramped) and endure several bitter setbacks (I hadto set back from the bitters I was drinking and remark upon my favorabledice). Sam was a good sport about it though, and he did keep his promiseabout the teeth brushing. With this favorable reintroduction to thewonderful world of ASL, I was looking forward to a bright gamingfuture. What I got was a miserable drive across two counties in thepissing rain only to be railroaded into play-testing a vehicle-rich scenarioagainst another beginner, and between us we managed to completeexactly three-quarters of a game turn. Perhaps I doth whine too much; myopponent, Carl, drove in from Fredericksburg and had a much betterattitude than I. Perhaps I should look upon it as a learning experience, andbe grateful for the opportunity to interact with others in the hobby.Perhaps monkeys will fly out of my butt. The most perplexing thing,though, is why Chas would design a scenario the historical outcome ofwhich resulted in such an utter defeat to his beloved Germans. I believehe is suffering from a wargamer's version of the painful jealousy of ajilted lover, known to psychiatric professionals as "Krautlash." The onlycure is to helm the Germans in the ahistorical but nonetheless amusingscenario "To The Glue Factory- Jagdtigers vs. the Polish Cavalry." Ourprayers are with you, Chas.
In keeping with the format of our newsletter, I offer this player profile ofThe Weakender: One could say that I've been wargaming all my life. As achild with an older sibling, I was forced to develop my defensive abilityat an early age. Luckily, I had a younger sibling on which to develop myoffensive capabilities. As I grew to be a normal young lad, I soon becameobsessed with BB guns and building then blowing up models. Thisprogressed, quite naturally, to an obsession with real guns, real vehicles,and real explosions. It didn't take long to realize that wargaming was acheaper (and safer) way to indulge my passion for military history.Unfortunately, I am afflicted by a fascination for odd conflicts in remoteplaces. I have nearly uncontrollable urges to design a grand tactical gameof the entire Crimean campaign of 1854-5; I actually believe that there isa market for a strategic computer simulation of the French and IndianWar. So why WWII? Four words: SS heavy tank battalion. The first"wargame" I purchased was SPI's Agincourt. It looked like a good way tospank a lot of French; but I was young and not yet had learned of theglories of the western European springtime, circa 1940. My favorite non-wargame: Hockey. My favorite wargame: Hockey. My favorite computergame: Pong. Thing I like most about ASL: It develops my tweezer skills.Thing I like least about ASL: Getting waxed (figuratively, you perverts)by Matt. Nationality most suited to my playing style: SS Auxiliaries(brutalizing helpless populations). Now for the merciful yet revelatoryconclusion to this installment from the Weakender; the real reason ouresteemed Mr. Shostak has passed the editorial torch has been to avoid themental anguish he would suffer were he to be proven wrong, as surely hewould, in continuing to argue his erroneous position vis-à-vis TheWeakender on the raging "appurtenance-appertenance" controversy. Thatis all.
Club NotesClub Meeting Recaps
Two weeks prior to our tournament Bret Smith hosted a club meeting athis place in Houston. It was a good chance to prepare for the upcomingtourney and meet some of the Houston guys. Mike Seningen, Jeff Toreki,Eric Gerstenberg, and Matt Shostak all made the trip to do cardboardbattle with the Houstonites. Representing Houston were Bret Smith of
course, Doyle Motes, Tom Gillis, Jay Harms, Andy Blozinski, and RJMate. Doyle and Matt locked horns in a game of Swamp Cats from thenew Action Pack #2, with Matt’s Germans prevailing. Mike Seningenused his Pershing tank to great effect to defeat Jay Harms in Ace in theHole, also from Action Pack #2. Two games of Cream of the Crop hadopposite results. Toreki was able to captain the Russians to a win overhis arch-rival Gerstenberg, while Seningen’s Germans toppled Smith’sRussians, despite apparently showing up to the battle with no ammo forthe StuGs. Tom Gillis and RJ Mate journeyed to the Spanish Civil Warfor Italian Brothers, with RJ grabbing the honors. RJ also lost a tightgame of The Puma Prowls to Toreki. Blozinski’s Russians stoppedSmith’s Germans cold in Urban Guerrillas, and Seningen’s Russiansoverwhelmed Shostak’s Germans in a playtest for Chas Smith’s nextproject.
Several other smaller gatherings took place since the last newsletter, andthe results of those matchups can be found in the ladder standings sectionof this newsletter.
Biweekly Lunch Gathering!
Don’t forget to join us every other Friday at 1300 hours down at Pok-E-Jo's on Fifth Street. Jeff Toreki sends out email reminders, or you can callMatt for information on the next get-together.
Club LadderOur Humble Club Ladder (through Jun. 28,1999)
Player Points Record (Inactive players not listed)---------------------- --------- ----------Chas Smith 1640 56-13Mike Seningen 1620 53-18Matt Shostak 1605 75-22Jeff Toreki 1564 36-19Tom Lavan 1170 6-3Bob Purnell 1102 16-11Jay Harms 1093 4-2Andy Milder 1076 18-31David Hailey 1061 21-23Doyle Motes 1055 3-2Steve Desrosiers 1042 2-1Sam Tyson 1038 6-13Jeff Toney 1023 1-1Eric Gerstenberg 1021 29-45Greg Swantek 1018 7-8Kirk Woller 1005 34-52Walter Eardley 1001 2-3Ed Mott 994 1-5Mike Sosa 992 0-1Carl Kusch 987 8-15Steve Eckhart 972 2-4Neal Ague 971 1-2Duane Blocker 967 0-1James Rex 961 0-1Matt Scheffrahn 959 0-2Russell Mueller 946 0-3Glen Gray 943 1-3Matt Schwoebel 927 4-7Jack O'Quin 920 9-19Brian Roundhill 916 0-4Aaron Schwoebel 909 5-15Bret Smith 897 1-6Dave Morgenthaler 889 0-4Jim Knatcher 849 0-8Mike Austin 791 1-10

The Newsletter of the Austin ASL Club July, 1999 Volume 4, Number 2
July, 1999 Page 11 of 12
Recent Results(Send ladder reports to Matt Shostak at [email protected])================================================================Toreki (Brit) def Tyson (Germ) in Royal MarinesK Woller (Russ) def Milder (Germ) in Guryev's HeadquartersSmith (Germ) def Mott (Amer) in CanicattiShostak (Chin) def Gerstenberg (Jap) in Slow and SteadyToreki (Russ) def K Woller (Germ) in Urban GuerillasGerstenberg (Amer) def Kusch (Germ) in The T-PatchersToney (Pol) def B Smith (Germ) in Bloody HarvestSeningen (Amer) def Purnell (Jap) in Mayhem in ManilaMilder (Brit) def B Smith (Germ) in Going to ChurchSeningen (Germ) def Toney (Russ) in DesantnikiO'Quin (Russ) def Roundhill (Germ) in Urban GuerillasKusch (Germ) def Toreki (Amer) in Tabacchificchio FioccheSeningen (Germ) def Roundhill (Russ) in Urban GuerillasLavan (Germ) def Hailey (Brit) in Ring of FireC Smith (Amer) def Mott (Germ) in From Bad to WuerselenToreki (Germ) def K Woller (Russ) in The CitadelToreki (Germ) def Kusch (Amer) in Tabacchificchio FioccheKusch (Germ) def O'Quin (Amer) in Scouts OutToreki (Amer) def Gerstenberg (Germ) in Rocket's Red GlareEckhart (Brit) def Rex (Germ) in Turning the TablesPurnell (Amer) def K. Woller (Ital) in AP16, Danger Forward.Purnell (Amer) def K. Woller (Germ) in KE14, Another Day,
Another Field.K Woller (Russ) def Gerstenberg (Germ) in Urban GuerillasToreki (Russ) def Gerstenberg (Germ) in Cream of the CropSeningen (Germ) def B Smith (Russ) in Cream of the CropSeningen (Amer) def Harms (Germ) in Ace in the HoleA Schwoebel (Russ) def M Schwoebel (Germ) in RB CGIIToreki (Germ) def Eckhart (Russ) in Storm of SteelK Woller (Germ) def Purnell (Part) in Sylvan DeathHailey (Germ) def Gray (Brit) in A Desperate AffairHarms (Germ) def Motes (Amer) in InhumaineShostak (Russ) def Eardley (Germ) in Cream of the CropGray (Germ) def Harms (Poles) in An Uncommon OccurrenceTyson (Germ) def Milder (Russ) in Cream of the CropToreki (Germ) def Mueller (Amer) in The T-PatchersSeningen (Russ) def Gerstenberg (Germ) in Slaughter at KrutikB Smith (Amer) def Roundhill (Germ) in A Breezeless DayMotes (Russ) def Hailey (Germ) in Swamp CatsMotes (Ital) def Eardley (Brit) in A High Price to PayHarms (Brit) def M Schwoebel (Ital) in A High Price to PayMilder (Ital) def Hailey (Russ) in Bridge to NowhereSeningen (Germ) def Mueller (Russ) in Before the StormShostak (Germ) def B Smith (Pol) in Round OneEardley (Brit) def Gray (Germ) in Franzen's RoadblockTyson (Amer) def Gerstenberg (Germ) in Patton's PrayersA Schwoebel (Germ) def Kusch (Amer) in Patton's PrayersM Schwoebel (Fren) def Kusch (Germ) in Strangers in a Strange LandHarms (Germ) def A Schwoebel (Fren) in Strangers in a Strange LandMilder (Germ) def Gray (Amer) in Ace in the HoleMotes (Fren) def Tyson (Germ) Strangers in a Strange LandHarms (Germ) def Motes (Amer) in The Attempt to Relieve PeiperHailey (Brit) def Gerstenberg (Germ) in Bring up the BoysSeningen (Brit) def Shostak (Jap) in Broken BambooToreki (Germ) def O'Quin (Russ) in Hill 253.5Tyson (Germ) def Hailey (Amer) in Probing the VillasKusch (Amer) def B Smith (Germ) in Lash OutEardley (Jap) def Mueller (Amer) in The JungleersSeningen (Russ) def O'Quin (Germ) in The Puma ProwlsKusch (Germ) def Eardley (Russ) in Udarnik BridgeheadToreki (Germ) def Tyson (Amer) in Black Jack is BackShostak (Both) def Milder (Both) in Over Open SightsHailey (Jap) def B Smith (Amer) in Ninety Minute WarMilder (Germ) def O'Quin (Russ) in The Puma ProwlsToreki (Rep) def Seningen (Nat) in Los Ejercitos Nuevos
This Happened to MeJeff Toreki
The Austin Tourney was a ton of fun this year, as tourneys always are.Kudos to TD Mike Seningen for all the hard work, and to his companyfor hosting the tourney. It was a great location and hopefully we'll all beallowed back next year. We had a good turnout with lots of guys fromAustin, Houston, and Dallas showing up to do cardboard battle.
Sam Tyson and I started early with an unofficial warmup game Fridaymorning by playtesting a Norwegian vs. German Scenario that ChasSmith is developing. My Germans were able to overcome Sam'sNorwegians and we then packed up and headed to the tourney site.
Officially started the Tourney Friday night with The T-Patchers againstRussell Mueller (who won the tourney a few years ago) from Dallas andit was a pretty cool scenario with Russell's Texans attacking my Germansin good defensive terrain on board 41. It started ugly for me as Russell'skiller stack with .50cal and a Sherman took out my concealed overwatchposition with my HMG. I never could make use of my HMG the wholegame, that thing was like a hot potato as every squad that tried to pick itup and put it to use was hammered (including a fanatic 468 - damn!).My other infantry fared much better and was able to slow most of hisguys down. The StuGs did a good job as well KO'ing three of the Amitanks. After the 3rd Sherman was knocked out, Russell conceded as hewas only four CVP from reaching the cap and I still had a lot of guys inthe way of the victory area. Coolest event: Russell got a 1MC on one ofmy 467s, I roll snakes for HOB, subsequent roll of a 12 to Disrupt. SinceI had a leader adjacent that was going to advance in and try to rally him inthe next turn, Russell decided to shoot at him again to reduce him. 2check this time, I think, snakes for Heat again, this time he battle hardensand generates a Hero to boot! Bizarro. Fun little scenario, I highlyrecommend it if you haven't played it - it's got really good replaypotential as there are numerous options for both sides. Got to sleep reallate (4am) as we had sat around watching the other games and talking.
Saturday I played Jack O'Quin all day and part of the night in Hill 253.9or something like that I think. While it turned out to be much bigger thanwe had first thought it would be, it was a total blast of a scenario to play.Smashmouth ASL at its finest, with Russians and Germans playing 'Kingof the Hill' in a Kursk setting. Both sides have the proverbial kitchen sinkto hurl at each other in this one. The Russkies get tons of mines and wire,HIP guns, and reinforcing armor and infantry. The Germans get somegreat troops with TWO -2 leaders, 2 Panthers, and an Elephant. Bothsides get air support, OBA, FTs, and DCs. This was a brutal struggle asmy Germans got hung up on Jack's Russian fortifications and AT guns inthe early going. It was not looking too good for a while, as I had oneimmobilized Panther, an Elephant bogged on wire for about 3 turns, and aPanther stuck in an AT minefield for about 3 turns also. Jack'sreinforcements were coming on, so I had to get the Panther in the minesup on the hill to fight the KVs. I drove a HT into the minefield thePanther was sitting in to try to hopefully learn something about thestrength of the minefield (he'd rolled a 5 or 6 when the Panther hadentered it) and he rolled a one to immob. the HT. Knowing nothing new,I decided I had to risk moving the Panther out if I was going to be able tooppose his armor. I started successfully and moved out - Jack rolled a 2on the minefield roll and my heart was about to pound out of my chestuntil he said it was my lucky day and the strength was only a 1. Phew!!! Ithink that was the closest I've come to actual heart failure while playingthis damn game, and there have been many close games in the past. ThisPanther and the German OBA carried the day as their one-two punchprevented the Russian tank and infantry reinforcements from successfullyregaining the 2nd level hill. Coolest (of many) event from this one: MyStukas were able to shoot down a Russian FB in a swirling dogfight thatlasted several CC Phases. Awesome scenario - I'd play it again any dayand Jack is one of the nicest opponents I've ever played.
Sunday morning, I was really tired and burnt-out, but by the time I hadshowered and eaten some breakfast, I was feeling somewhat better, so Idecided I'd play a short scenario. I got matched up with Sam Tyson, thistime "officially", for a game from the SSII Pack called Blackjack is Back.

The Newsletter of the Austin ASL Club July, 1999 Volume 4, Number 2
July, 1999 Page 12 of 12
BTW, we found the errata for it and the boards that are depicted in thepictures are the ones to use. We didn't get very far into the game whenmy tanks went on a rampage and KO'd four of Sam's five AmericanAFVs, so he conceded as he only had one Sherman with a short 75 left tooppose my StuG and two Panthers. His infantry had done really well upto that point, but the Panthers would probably have made it really difficultfor them to continue. Cool event: A Panther took out a 76L Sherman inBFF, got rate, moved to a new position, and took out the other 76LSherman with the next shot. First time I think I've ever gotten ROF inBFF-and KO'd two tanks as well. As we didn't get very far, I'd still liketo try this one again sometime, I think it has good potential.
Well, at that point Mike Seningen said I would have to play him for thechampionship, since he and I were undefeated and there was still time toplay. I was really shagged out and asked him (not too jokingly) if he'djust like to dice for it. I was not up for another game, especially againstMike, cause I knew he'd kick my ass, but everyone else convinced me toplay and not wuss out. Matt helped us choose a short scenario calledEjercitos Nuevos, I think. It was definitely different, as it was a SpanishCivil War scenario with Nationalist partisan troops against Republican(Italian Black Shirt) troops fighting for a hill with no cover other thanFoxholes (all woods were brush by SSR.) Same concept as Hill 253.5,but this time the troops were fighting with pillows instead ofsledgehammers. I diced him pretty badly early in the game, but he did agreat job to come back really strong and rush the hell out of the hill. Itended up being pretty close at the end, but somehow I held on and pulledoff the win. Cool Event: One Partisan squid took out a Berserk and a GONationalist squad in a HTH melee that lasted about two turns-neither oneof us could roll for crap for the first few CC phases of this one.
Wow, I had no thoughts of even competing for the championship at thebeginning of the weekend, but somehow I did it. And to top that off,Andy Milder and I won the team championship as well, as he had justwon a game while my game with Mike was going on. Way to go, Andy!We both had to win our last games for us to win the team trophy, so itwas pretty satisfying when we both did. I'm still in shock!!
See ya next year...
Jeff
Next Issue• Tactical Analysis and After Action Report for …• A player profile of Eric Gerstenberg• Jeff Toreki's favorite scenarios• Finale of the Schwoebel RB Campaign• Club Meeting Recaps• Club LadderAnd much more!
The Banzai!! StaffEditor in Chief andKeeper of the Ladder
Matt Shostak(512) [email protected]
Managing Editor Sam Tyson(512) [email protected]
Contributing Authors Mike SeningenChas SmithGreg SwantekJeff Toreki
Publishing Schedule Whenever we feel like it!Club Information Matt Shostak or
Mike Seningen(512) [email protected]
Club Web Site www.kdi.com/~samtysonCopyright © 1999 by the Austin ASL ClubAll Rights Reserved.
You may reproduce this newsletter (in entirety only) forfree distribution. Permission to reproduce individualarticles must be obtained from the authors.
ASL and all of its components, including module names,are copyrighted and trademarked by Hasbro.
Thanks to Rodney Kinney for VASL, Carl Fung for hisVASL counter images, and Bruce Mansfield for his VASLmap images. We use a combination of Carl's counterimages and Bruce's map images for scenario layouts withtheir permission of use for that purpose.