jual gps garmin map 585 rumahgps.com
TRANSCRIPT

GPSMAP® 580/585Chartplotter/Combo Fishfinder
Owner’s Manual

© 2011 Garmin Ltd. or its subsidiariesGarmin International, Inc. 1200 East 151st Street, Olathe, Kansas 66062, USA Tel. (913) 397.8200 or (800) 800.1020 Fax (913) 397.8282
Garmin (Europe) Ltd. Liberty House Hounsdown Business Park, Southampton, Hampshire, SO40 9LR UKTel. +44 (0) 870.8501241 (outside the UK) 0808 2380000 (within the UK) Fax +44 (0) 870.8501251
Garmin Corporation No. 68, Jangshu 2nd Road, Sijhih, Taipei County, Taiwan Tel. 886/2.2642.9199 Fax 886/2.2642.9099
All rights reserved. Except as expressly provided herein, no part of this manual may be reproduced, copied, transmitted, disseminated, downloaded or stored in any storage medium, for any purpose without the express prior written consent of Garmin. Garmin hereby grants permission to download a single copy of this manual onto a hard drive or other electronic storage medium to be viewed and to print one copy of this manual or of any revision hereto, provided that such electronic or printed copy of this manual must contain the complete text of this copyright notice and provided further that any unauthorized commercial distribution of this manual or any revision hereto is strictly prohibited.Information in this document is subject to change without notice. Garmin reserves the right to change or improve its products and to make changes in the content without obligation to notify any person or organization of such changes or improvements. Visit the Garmin Web site (www.garmin.com) for current updates and supplemental information concerning the use and operation of this and other Garmin products.Garmin® is a trademark of Garmin Ltd. or its subsidiaries, registered in the USA and other countries. GPSMAP®, AutoLocate®, BlueChart®, BlueChart® g2, TracBack®, BlueChart®, MapSource®, and Ultrascroll™ are trademarks of Garmin Ltd. or its subsidiaries. These trademarks may not be used without the express permission of Garmin. XM WX Weather and XM Radio are trademarks of XM Satellite Radio, Inc.
January 2011 Part Number 190-01202-00 Rev. B Printed in Taiwan
IntroductIonThank you for choosing the Garmin® GPSMAP® 580, which uses the proven performance of Garmin GPS and full-featured mapping, to create an unsurpassed marine navigation chartplotter.
Garmin GPSMAP 580 is a full-function chartplotter, while the GPSMAP 585 contains all the features of the GPSMAP 580 and adds fish finding capabilities.You must purchase a compatible transducer in order to use the fish finder on the GPSMAP 585.
Refer to http://www8.garmin.com/buzz/marine/m/pdf/Transducers.pdf For more information about compatible transducers.
About This ManualTo get the most out of your new navigation system, read this manual and learn the operating procedures for your unit. This manual is organized into the following sections:
The Introduction contains the Table of Contents, Care Information, and Warnings.
The Getting Started section provides an overview of the unit, how to turn the unit on, and how to simulate navigation.
The Operation Mode section provides you with information about navigating with the GPSMAP 580/585 in Operation Mode.
The Operation Mode pages section reviews the main pages in Operation Mode.
The Main menu section describes features found on the Main menu, and information on how to change settings.
The Setting Up and Using Sonar section provides instructions on using with your GPSMAP 580/585 .
The Appendix contains specifications, optional accessories, maintenance information, and other product information.
Declaration of Conformity Hereby, Garmin International, Inc. declares that this device is in compliance with the essential requirements and other relevant provisions of Directive 1999/5/EC. The Declaration of Conformity may be obtained at www.garmin.com/compliance.
Product RegistrationHelp us better support you by completing our online registration today. Go to http://my.garmin.com. Keep the original sales receipt, or a photocopy, in a safe place.
GPSMAP 580/585 Owner’s Manual i
Introduction

Contact GarminContact Garmin Product Support if you have any questions while using your unit. In the USA, go to www.garmin.com/support, or contact Garmin USA by phone at (913) 397.8200 or (800) 800.1020.
In the UK, contact Garmin (Europe) Ltd. by phone at 0808 2380000.
In Europe, go to www.garmin.com/support and click Contact Support for in-country support information, or contact Garmin (Europe) Ltd. by phone at +44 (0) 870.8501241.
In China, contact Garmin (China) Ltd. by phone at 400-819-1899.
CAUTION: Resetting your GPSMAP 580/585If your GPSMAP 580/585 stops functioning, retest your GPSMAP 580/585 by pressing and holding the Power button.
ii GPSMAP 580/585 Owner’s Manual
Introduction

Table of ContentsIntroduction ...........................................................................i
Caring for the GPSMAP 580/585 ........................................... ivWarnings .................................................................................. vImportant Information ............................................................. v
Getting Started .....................................................................2Unit Overview .......................................................................... 2Turning Your GPSMAP 580/585 On or Off ............................. 3Adjusting the Backlight .......................................................... 3Acquiring GPS Satellite Signals ............................................ 4Using the GPSMAP 580/585 ................................................... 8Using Simulator Mode .......................................................... 11
Operation Mode .................................................................12Main Pages ............................................................................. 12Navigating to a Destination .................................................. 12Finding an Item ...................................................................... 15Creating and Using Routes .................................................. 17Creating and Using Waypoints ............................................ 21Creating a Route as a Marking line ...................................... 31Managing Your Tracks .......................................................... 32
Operation Mode Pages......................................................36Compass Page ....................................................................... 42Navigation Page .................................................................... 45Active Route Page ................................................................. 47Position Data Page ................................................................ 48
Main Menu ..........................................................................49Main Menu Tabs ..................................................................... 49
GPS Tab .................................................................................. 50Route Tab ............................................................................... 50Points Tab .............................................................................. 51Track Tab ................................................................................ 51DSC Tab .................................................................................. 52Sonar Tab ............................................................................... 56Alarms Tab ............................................................................. 56Calendar Tab .......................................................................... 58Celestial Tab........................................................................... 59Message Tab .......................................................................... 63Display Tab............................................................................. 64Sound Tab .............................................................................. 65Setup Tab ............................................................................... 65
Setting Up and Using Sonar .............................................69Showing Sonar on the Map Page ......................................... 69Using the Sonar Page ........................................................... 70Setting Up Sonar ................................................................... 74
Appendix ............................................................................78Specifications ........................................................................ 78Optional Accessories ............................................................ 79Install the Wiring Harness .................................................... 80Satellite Information .............................................................. 83Digital Selective Calling ........................................................ 84Messages ............................................................................... 86Data Field Options ................................................................. 88Software License Agreement ............................................... 90Limited Warranty ................................................................... 90Declaration of Conformity (DoC) ......................................... 92
GPSMAP 580/585 Owner’s Manual iii
Table of Contents

WARNING: See the Important Safety and Product Information guide in the product box for product warnings and other important information.
Caring for the GPSMAP 580/585The case is constructed of high-quality materials and does not require user maintenance, except cleaning.
Cleaning the CaseClean the outer casing of the unit (except for the screen) using a cloth dampened with a mild detergent solution and then wipe dry. Avoid chemical cleaners and solvents that may damage plastic components.
Cleaning the ScreenThe unit’s lens is coated with a special anti-reflective coating that is sensitive to skin oils, waxes and abrasive cleaners. Cleaners containing ammonia, alcohol, abrasives, or anti-grease detergents will harm the anti-reflective coating. It is important to clean the lens using an eyeglass lens cleaner (that is specified as safe for anti-reflective coatings) and a clean, lint-free cloth.
Water ImmersionThe unit is waterproof to IEC Standard 60529 IPX7. It can withstand immersion in 1 meter of water for 30 minutes. Prolonged submersion can cause damage to the unit. After submersion, be certain to wipe and air dry the unit before reuse.
StorageDo not store the GPSMAP 580/585 where prolonged exposure to temperature extremes might occur (such as in the trunk of a car) as permanent damage could result.
iv GPSMAP 580/585 Owner’s Manual
Caring for the GPSMAP 580/585

Navigation and Installation Warnings Failure to avoid the following potentially hazardous situations could
result in an accident or collision resulting in death or serious injury. When navigating, carefully compare information displayed on
the unit to all available navigation sources, including information from visual sightings, and maps. For safety, always resolve any discrepancies or questions before continuing navigation.
Use the electronic chart in the unit only to facilitate, not to replace, the use of authorized government charts. Official government charts
and notices to mariners contain all information needed to navigate safely.
Use this unit only as a navigational aid. Do not attempt to use the unit for any purpose requiring precise measurement of direction, distance, location, or topography.
Warnings
WARNING: This product, its packaging, and its components contain chemicals known to the State of California to cause cancer, birth defects, or reproductive harm. This Notice is provided in accordance with California’s Proposition 65. See www.garmin.com/prop65 for more information.
Hg - LAMPS INSIDE THIS PRODUCT CONTAIN MERCURY AND MUST BE RECYCLED OR DISPOSED OF ACCORDING TO LOCAL, STATE, OR FEDERAL LAWS.
For more information go to: http://www8.garmin.com/aboutGarmin/environment/disposal.html
Important InformationMAP DATA INFORMATION: One of the goals of Garmin is to provide customers with the most complete and accurate cartography that is available to us at a reasonable cost. We use a combination of governmental and private data sources, which we identify in product literature and copyright messages displayed to the consumer. Virtually all data sources contain some inaccurate or incomplete data. In some countries, complete and accurate map information is either not available or is prohibitively expensive.
See the Important Safety and Product Information guide in the product box for product warnings and other important information.
GPSMAP 580/585 Owner’s Manual v
Warnings
GettInG Started
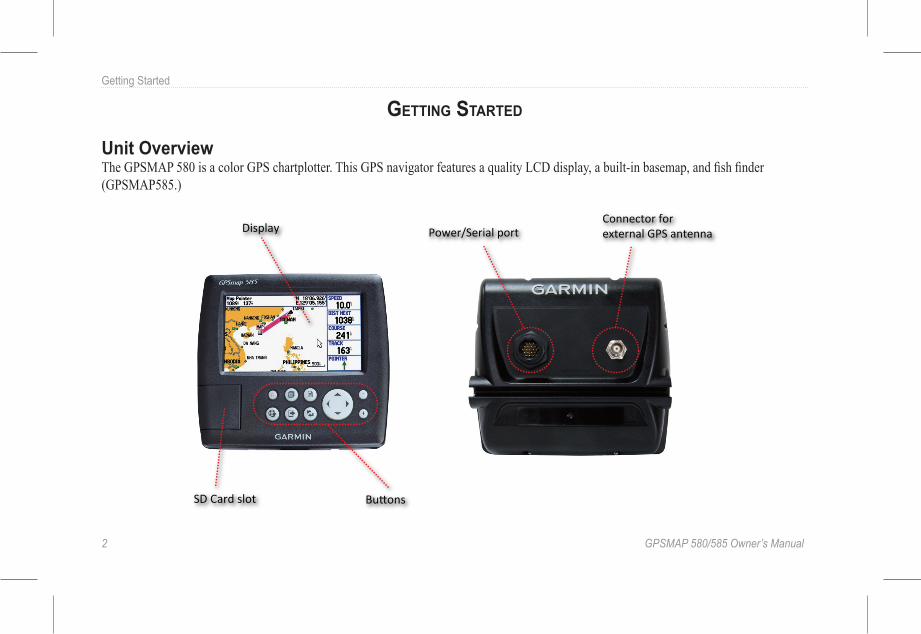
Unit OverviewThe GPSMAP 580 is a color GPS chartplotter. This GPS navigator features a quality LCD display, a built-in basemap, and fish finder (GPSMAP585.)
Display
ButtonsSD Card slot
Power/Serial portConnector for external GPS antenna
2 GPSMAP 580/585 Owner’s Manual
Getting Started

Turning Your GPSMAP 580/585 On or OffThe GPSMAP 580/585 has a built-in, high-sensitivity GPS module. You can use the unit without external GPS antenna; however, you may receive a weak GPS signal when navigating in areas where an external antenna is required.
To turn the GPSMAP 580/585 on and off:1. Press and hold the Power key. When the unit turns on, a
tone sounds and the Warning page appears.
Warning page
2. Read the warning, and then press Enter to continue.3. To turn off the GPSMAP 580/585, press and hold the Power
key.
Adjusting the Backlight
1. Press and quickly release the Power key.2. Press up the Rocker up or down on the Rocker to adjust the
brightness.
Backlight adjustment slider
GPSMAP 580/585 Owner’s Manual 3
Getting Started

The first time you turn on your GPSMAP 580/585, the GPS receiver must collect satellite data and establish the current location.
Acquiring GPS Satellite SignalsAfter you turn on the GPSMAP 580/585, the unit automatically begins searching for satellites. The GPS page appears while the unit is gathering satellite signals and acquiring a fix.
Viewing GPS StatusThe GPS tab provides a visual reference of satellite acquisition, receiver status, and accuracy. The sky view and signal strength bars show the satellites visible to the receiver and if they are being tracked.
The number below each bar represents the particular satellite being received. WAAS satellites are indicated by numbers 33 and above.Numbers above 33 indicate WAAS satellites.
The sky view shows a bird’s eye view of the position of each satellite relative to the last known position of the receiver. The outer circle represents the horizon (north up), the inner circle represents 45º above the horizon, and the cEnter point represents a position directly overhead. You can also set the sky view to a Track Up configuration which causes the top of the sky view to display along your current track heading. Press Menu to change the configuration of the sky view.
GPS Status
Receiver status field
Sky view
Signal strength bars
4 GPSMAP 580/585 Owner’s Manual
Getting Started

The progress of satellite acquisition is shown in three stages:
• No signal strength bars—the receiver is searching for satellites.
• White signal strength bars—the receiver has found the satellite and is collecting data.
• Green signal strength bars—the receiver has collected the necessary data for this satellite.
Receiver StatusThe receiver status field displays one of the following conditions:
• Searching the Sky—the receiver is searching for satellites.• AutoLocate—the receiver is searching for any satellite for
which an almanac was collected.• Acquiring Satellites—the receiver is searching for, and
collecting data from, satellites visible at the last known or initialized location, but has not acquired a fix.
• 2D GPS Location—At least three satellites are acquired and a two-dimensional position fix is calculated. “2D Differential” appears if you are receiving DGPS corrections in 2D mode, and a “D” appears on the strength bar of satellites being corrected.
• 3D GPS Location—At least four satellites are acquired and a three-dimensional fix was calculated. “3D Differential” appears if you are receiving DGPS corrections in 3D mode, and a “D” appears on the strength bar of satellites being corrected.
• Lost Satellite Reception—the receiver is no longer tracking enough satellites for a 2D or 3D fix.
• Receiver Not Usable—the receiver is unusable, possibly due to interference or abnormal satellite conditions. Restart the unit to reset the receiver.
• Simulating GPS—the receiver is in Simulator Mode.• GPS Off—the GPS receiver is turned off.
GPSMAP 580/585 Owner’s Manual 5
Getting Started

GPS OptionsPress Menu twice to open the Main menu. Use the Rocker to highlight the GPS tab. Press Menu to open the options Menu.
GPS Tab Options menu
Start/Stop Simulator—starts and stops Simulator mode.
Enable/Disable WAAS—enables or disables WAAS capability. See the “Appendix” for more information about WAAS.
Track Up Skyview/North Up Skyview—orients the sky view display to North Up or Track Up. New Location—allows you to reset your location for simulation.
GPS Tips• While the receiver is gathering information, your location
on the map might appear different from where you actually are located. As soon as the receiver gathers enough satellite information, your proper location appears on the map.
• Any time you have traveled more than 500mile (800km) with the GPS receiver turned off, the receiver might take longer than normal to find your location.
• The GPS receiver can lose satellite signals due to interference from items such as buildings, tunnels, and trees.
• To learn about GPS, visit www.garmin.com/aboutGPS/.
6 GPSMAP 580/585 Owner’s Manual
Getting Started

Zoom IN and Zoom OUT Keys• Press to adjust map zoom range.
PAGE Key• Press to cycle through the pages.
Quit Key• Press to cancel an unintended
function.
MARK/Enter Key• Press to select a highlighted
option.• Press and hold to mark your
current location as a waypoint.
NAV/MOB Key• Press to display the Navigate
Menu.• Press and hold to navigate to a man
overboard (MOB) location.
Menu Key• Press to display the options Menu
for the current page.• Press twice to open the Main
menu.
POWER Key• Press and hold to turn the unit on
or off.• Press and release to adjust the
backlighting.
Rocker• Press up, down, left, or right to
highlight options and to Enter data, or to pan the arrow on the Map Page.
GPSMAP 580/585 Owner’s Manual 7
Getting Started

Using the GPSMAP 580/585 The advanced keypad system on the GPSMAP 580/585 is designed to allow you to select options and enter data quickly and conveniently. As you progress through this owner’s manual, you are directed to press a specific key or highlight a field on the screen. When you are directed to press a key, you should press and quickly release the key. If the key needs to be held down for a period of time to start a secondary function, the instructions tell you to do so. When a field is selected on the screen, it is highlighted in yellow.
The following terms are used throughout this manual:
• Highlight—move the highlighted area on the screen up, down, left, or right with the Rocker to select individual fields. Moving the highlight to a given location allows you to make a selection, begin data entry, or scroll through a list.
• Field—the location on a page where data or an option can be shown and entered. Highlight a field using the Rocker to begin entering data or selecting options.
• On-screenbutton—use the Rocker to highlight a button, and press Enter to select the button.
• Scroll bar—when viewing a list of items too long to appear on the screen, a scroll bar appears along the right side of the list. To scroll through a list, press up or down on the Rocker.
• Default—the factory setting saved in the unit’s memory. You can change the settings, but you can also revert to the factory (default) settings when you select Restore Defaults.
Highlighted field
Field
On-screen buttons
CartographyYour unit supports Secure Digital (SD) cards.You can insert an optional BlueChart® g2 SD card to view detailed map features. You can insert blank SD cards to transfer data such as waypoints, routes, and tracks to another compatible Garmin unit or a PC.
To insert the SD card, press it in until it clicks. You can also choose Garmin Homeport software (marine trip-planning software) that lets you plan and organize routes from the convenience of your computer.
8 GPSMAP 580/585 Owner’s Manual
Getting Started

Selecting Options and Entering DataSelect options and enter data by using the Rocker and Enter key.
To select and activate an option:1. From any page, press Menu. An options menu shows a list of
optional features specific to that page.
Selecting an option from an options Menu
2. Use the Rocker to move the highlight up, down, right, or left on the menu to the option you want to select.
3. Press Enter to select the feature. Another window with more options might appear. If so, select an option, and press Enter again.
To exit a menu or return to the previous setting: Press Quit. The Quit key moves backward through your
steps. Press Quit repeatedly to return to the starting page.
To select an on-screen button: On a page with on-screen buttons, use the Rocker to
highlight an on-screen button, and press Enter.
On-screen button
To mark your current location as a waypoint, press and hold Enter/Mark until the New Waypoint Page opens.
To enter data in a data field:1. Use the Rocker to highlight the data field you want, and
press Enter to select the field.2. Press up or down on the Rocker to select characters.
GPSMAP 580/585 Owner’s Manual 9
Getting Started

Entering data
TIP: To clear the entire data field, highlight the left-most character field and press left on the Rocker again.
Not all fields are programmable. When you are on a page with fields that are not selectable, the highlight skips over them.
Using the Main MenuUse the Main menu on your GPSMAP 580/585 to access various functional tabs --- Waypoint, Route, Tracks, Sonar, Setup, etc. Press the Menu key twice from any page to open the Main menu.
Main menu
To select a tab from the Main Menu:1. From any page, press Menu twice to open the Main menu.2. Press up or down on the Rocker to highlight a tab. The
information for the highlighted tab automatically appears on the right. To highlight a sub tab, press left or right on the Rocker, and then press up or down to select individual fields.
By default, the Main menu tabs are shown as icons along the left side of the screen. You can change the Main menu to show tabs in a text-only format.
To view the Main Menu icons in text-only format:1. Highlight the Display tab, and press Enter.2. Select the Main menu field, and press Enter.3. Highlight Text Only, and press Enter.
10 GPSMAP 580/585 Owner’s Manual
Getting Started

Restoring Default StettingsYou can restore factory defaults for Track, Alarms, Display, Sound, and Setup on the Main menu. For more information about the Main menu, see the “Main menu” section.
To restore default settings:1. Press Menu twice to open the Main menu. 2. Use the Rocker to highlight Setup tab, and then press Menu
to open the options menu.
Setup Tab Options menu
3. Highlight Restore Default, and press Enter.
Using Simulator ModeSimulator mode turns the GPS receiver off for use indoors or for practice. The unit does not track satellites in simulator mode. All waypoints and routes created in Simulator mode are retained for future use.
WARNING: Do not try to navigate using simulator mode because the GPS receiver is turned off. Any satellite signal strength bars shown are simulations and do not represent the strength of actual satellite signals.
To turn on Simulator Mode:1. From the Main menu, highlight the GPS tab.2. Press Menu to open the GPS tab options menu. 3. Highlight Start Simulator, and press Enter.
GPS tab
Starting Simulator Mode from the GPS tab
GPSMAP 580/585 Owner’s Manual 11
Getting Started
operatIon Mode
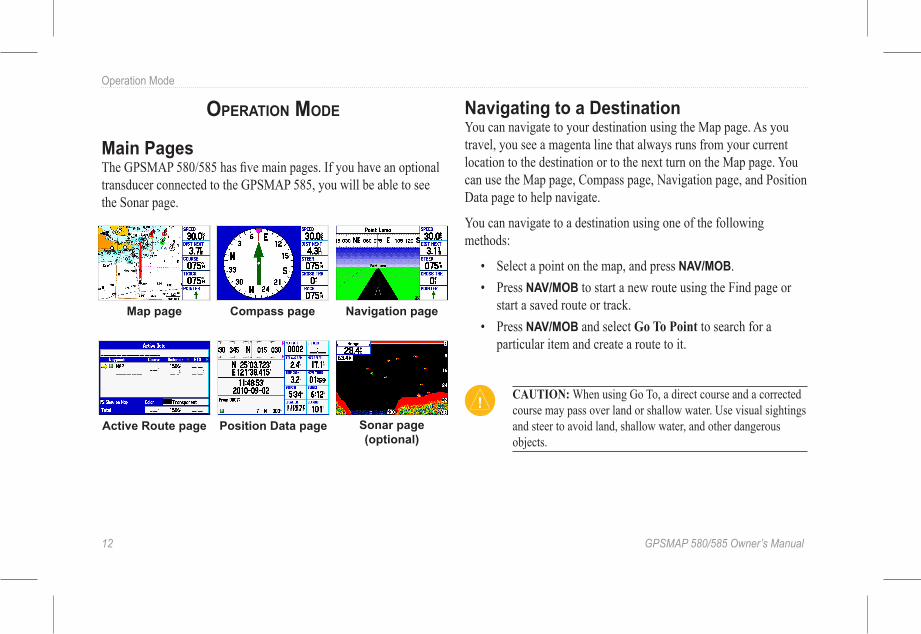
Main PagesThe GPSMAP 580/585 has five main pages. If you have an optional transducer connected to the GPSMAP 585, you will be able to see the Sonar page.
Map page Compass page Navigation page
Position Data page Active Route page Sonar page (optional)
Navigating to a DestinationYou can navigate to your destination using the Map page. As you travel, you see a magenta line that always runs from your current location to the destination or to the next turn on the Map page. You can use the Map page, Compass page, Navigation page, and Position Data page to help navigate.
You can navigate to a destination using one of the following methods:
• Select a point on the map, and press NAV/MOB.• Press NAV/MOB to start a new route using the Find page or
start a saved route or track. • Press NAV/MOB and select Go To Point to search for a
particular item and create a route to it.
CAUTION: When using Go To, a direct course and a corrected course may pass over land or shallow water. Use visual sightings and steer to avoid land, shallow water, and other dangerous objects.
12 GPSMAP 580/585 Owner’s Manual
Operation Mode

Navigate Options Menu CAUTION: When using Go To, a direct course and a corrected
course may pass over land or shallow water. Use visual sightings and steer to avoid land, shallow water, and other dangerous objects.
Press NAV/MOB to open the Navigate options menu.
Navigate menu in Operation mode
Go To Point—allows you to select a waypoint or point of interest from the Find page.
Navigate Route—allows you to select a route to navigate.
Navigate Track (TracBack)—allows you to select a saved track to navigate.
To navigate a point on the map:1. On the Map page, highlight a point to navigate to, and press
NAV/MOB.2. Highlight Go To <point name>, and press Enter.
Navigate menu
3. Navigate to your destination.
To stop navigation:1. While navigating to a point, press NAV/MOB.2. Highlight Stop Navigation, and press Enter.3. Highlight Resume Navigation, and press Enter to resume
navigation.
GPSMAP 580/585 Owner’s Manual 13
Operation Mode

To search for an item and route to it:1. Press NAV/MOB and select Go To Point to open the Find
page. 2. Highlight a category, and press Enter. 3. Press Enter, and then press the Rocker up or down to enter
letters contained in the item name. 4. Press Enter when finished.
5. Highlight the item from the list, and press Enter. 6. Press Enter when the Go To button is highlighted.
Man OverboardUse the MOB function to simultaneously mark your current location and create a direct route back to that location.
To navigate to a MOB location:1. Press NAV/MOB twice.
2. Press Enter to confirm and begin navigating to the MOB location.
When a MOB is activated, a MOB waypoint with an international MOB symbol is created, and the unit begins actively navigating to that point. Use any of the Navigation pages to guide you back to the MOB point. The MOB waypoint is stored in the waypoint list and can be deleted like any other waypoint.
14 GPSMAP 580/585 Owner’s Manual
Operation Mode

Finding an ItemUse the Find page to search for Waypoints, Tidal Information, or any recently found items. To open the Find page, press the NAV/MOB Key and then press Go To Point.
The Find page is comprised of several default categories: Waypoints, Tide Stations. Additional categories such as Marine Navaids or Restricted Areas will appear depending on the optional BlueChart® g2 data card in the unit.
Find pageShown without additional BlueChart® g2 or
MapSource maps installed
Viewing Recently Found ItemsThe Recently Found page shows a list of the items you have recently searched for or navigated to.
To view recently found items:1. Press NAV/MOB and select Go To Point. 2. Highlight Recently Found, and press Enter to open the list
of recently found items.3. Press Menu to display the options menu.4. Select Show Find History to view the list of items you have
searched for recently. OR Select Show Go To History to view the list of items for which you have recently navigated to.
GPSMAP 580/585 Owner’s Manual 15
Operation Mode

Viewing the Information PageEach item on the map, and each item listed in the results list, contains an information page.
To view details about an item:1. Highlight a point on the map or in the search results list, and
press Enter. An information page appears with details about the item in a
tabbed format. Depending on the type of item selected, and if you are using optional BlueChart® g2 data cards, additional information is available.
Map Feature Information page
2. Press Quit to exit the information page.
Viewing Find Page Options1. Press NAV/MOB.2. Select Go To a Point.3. Press Menu.• EnableAuto Arrange—automatically arranges the Find
Page. When selected, Disable Auto Arrange and Restore Default options are available.
• NearOther—selects a new location from which to compile the Find items lists. Using the Rocker, move the map arrow to the location you want, and press Enter.
• MapInformation—shows information about the detailed map data stored on the data card and allows you to select which maps appear on the Map page.
Additional selections are included in the options menu when you are navigating:
• NearNext—compiles the Find items lists based on the next turn in the route.
• NearDestination—compiles the Find items lists based on the route destination.
• Near Current Route—compiles the Find items lists based on the active route.
16 GPSMAP 580/585 Owner’s Manual
Operation Mode

Creating and Using RoutesThe GPSMAP 580/585 allows you to create and store up to 150 routes.
Creating a New RouteUse the Route tab to create a route by selecting waypoints from the Find page, or by selecting waypoints or map items from the Map page.
To create a route using the Find Page:1. On the Main menu, highlight the Route tab.
Route Tab with the Route List
2. Press Menu to open the Route options menu. 3. Highlight New Route, and press Enter.4. Press Enter to find items to add to the route.
5. Highlight OK, and press Enter to add a point to the route.6. Repeat steps 4 and 5 to add additional points to the route.
To create a route using the map:1. On the Main menu, highlight the Route tab.2. Press Menu to open the Route options menu.3. Highlight New Route, and press Enter.
Creating a new route on Route Review Page
4. Highlight Edit on Map, and press Enter.5. Highlight a location on the map, and press Enter.6. Repeat step 5 to add additional points to the route.
NOTE: If you select an area of the map that is not a feature or a waypoint, a new waypoint is created for that location. Press Enter on the New Waypoint Page to save the location as a waypoint and continue adding points to your route.
GPSMAP 580/585 Owner’s Manual 17
Operation Mode

Navigating a Saved RouteUse the Navigate Route option to select and navigate a saved route.
To navigate a saved route:1. Press NAV/MOB.2. Highlight Navigate Route, and press Enter.3. Highlight a previously saved route, and press Enter.
Select the route you want to take.
Editing a RouteAfter you create a route, use the Route Review page to edit, change the name, and review route points of a selected route.
To change the name of the route:1. On the Main menu, highlight the Route tab.2. Highlight the name of the route, and press Enter.3. With the Route Review page open, highlight the route name
field at the top of the page, and press Enter.
Route Review page
4. Use the Rocker to enter the route name, and press Enter.
18 GPSMAP 580/585 Owner’s Manual
Operation Mode

To review individual route points:1. On the Main menu, highlight the Route tab.2. Highlight the name of the route, and press Enter.3. Highlight a point, and press Enter. 4. Choose Next, Show Map, or Save, and press Enter.
If the route point is a user waypoint, you can edit any of the waypoint properties on the Waypoint Page (see the “Creating and Using Waypoints” section beginning on page 21 for details).
When you return to the Route Review page, the next point in the route is automatically highlighted. You can review each point on the route by pressing Enter.
To add points to the route:1. On the Main menu, highlight the Route tab. 2. Highlight a route, and press Enter. 3. Highlight the spot in the route where you want to add the new
point. (The new point is added before the highlighted route point).
4. Press Menu. 5. Highlight Insert Waypoint, and press Enter.
Route Review page
6. Highlight OK, and press Enter to add the new point to the route.
GPSMAP 580/585 Owner’s Manual 19
Operation Mode

To edit the route on the map:1. On the Main menu, highlight the Route tab. 2. Select a route, and press Enter. 3. Press Menu to open the Route Review page options menu. 4. Highlight Edit on Map, and press Enter. 5. Select a location on the route (the route turns red when the
arrow is over the route), and press Enter. 6. Use the Rocker to drag the route to the new point location,
and press Enter.
Editing the route on the map
7. Repeat steps 4 through 5 to add any remaining points to the route.
To plan your route:1. Open the Route Review page options menu.2. Highlight Plan Route, and press Enter.
Entering Speed and Fuel Flow for trip planning
3. To enter data for Speed, use Rocker to highlight the data field.
4. Press Enter and use UP/DOWN to key in the number.
NOTE: Fuel flow rates are measured in units per hour. System setting changes for units of measure (statute, nautical, or metric) do not affect the fuel flow measure. You should enter fuel flow rates based on information for your vehicle (such as the operator’s manual or performance specifications), and make note of the units of measure (gallons or liters).
20 GPSMAP 580/585 Owner’s Manual
Operation Mode
Transitioning to the Next Waypoint1. On the Main menu, highlight the Route tab. 2. Press Menu to open the Route Review page options menu. 3. Highlight Set Up Routes and press Enter to set the route leg
transition (or waypoint transition). 4. Select distance to enter a radius so that when you are within
the entered distance, the GPSMAP 580/585 leads you to the next point on your route. When you select Manual, you can transition to the next waypoint anytime while navigating a route.
While you are navigating the route, open the Active Route Page, and press Menu. Highlight next Route Waypoint, and press Enter to have the GPSMAP 580/585 start routing you to the next point in your route.
Creating and Using WaypointsWaypoints are locations or landmarks you record and save to your GPS. You can add waypoints to routes, and even navigate directly to the selected waypoint.
The GPSMAP 580/585 stores up to 6,000 alphanumeric waypoints with user-defined icons, comments, elevation, depth, and temperature available for each waypoint. Waypoints can be created using three basic methods:
• Enter/Mark—allows you to quickly mark your present location.
• Graphically—allows you to define a new waypoint location from the map using the Rocker.
• Text Entry—allows you to manually enter the location coordinates for a new waypoint.
GPSMAP 580/585 Owner’s Manual 21
Operation Mode
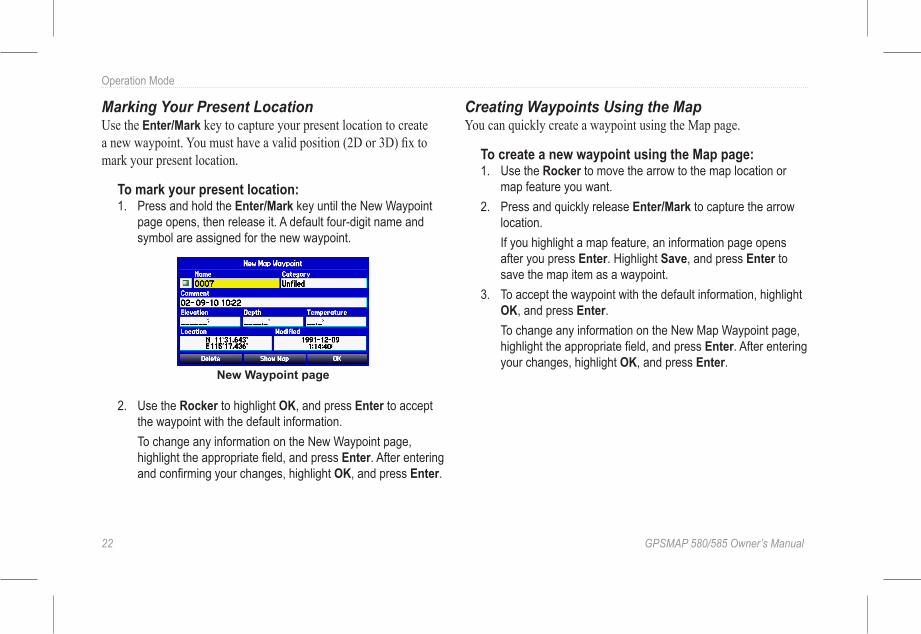
Marking Your Present LocationUse the Enter/Mark key to capture your present location to create a new waypoint. You must have a valid position (2D or 3D) fix to mark your present location.
To mark your present location:1. Press and hold the Enter/Mark key until the New Waypoint
page opens, then release it. A default four-digit name and symbol are assigned for the new waypoint.
New Waypoint page
2. Use the Rocker to highlight OK, and press Enter to accept the waypoint with the default information.
To change any information on the New Waypoint page, highlight the appropriate field, and press Enter. After entering and confirming your changes, highlight OK, and press Enter.
Creating Waypoints Using the MapYou can quickly create a waypoint using the Map page.
To create a new waypoint using the Map page:1. Use the Rocker to move the arrow to the map location or
map feature you want. 2. Press and quickly release Enter/Mark to capture the arrow
location. If you highlight a map feature, an information page opens
after you press Enter. Highlight Save, and press Enter to save the map item as a waypoint.
3. To accept the waypoint with the default information, highlight OK, and press Enter.
To change any information on the New Map Waypoint page, highlight the appropriate field, and press Enter. After entering your changes, highlight OK, and press Enter.
22 GPSMAP 580/585 Owner’s Manual
Operation Mode
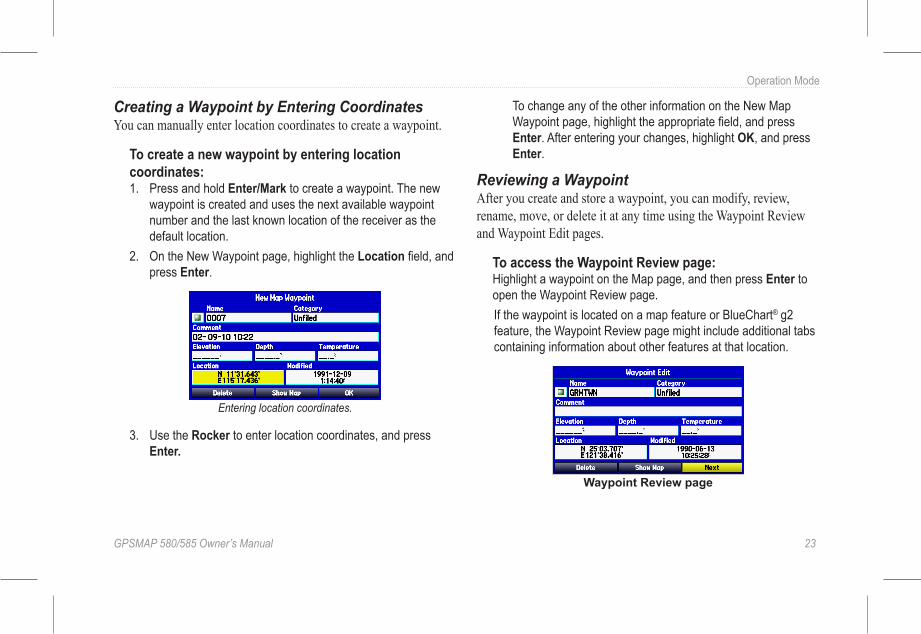
Creating a Waypoint by Entering CoordinatesYou can manually enter location coordinates to create a waypoint.
To create a new waypoint by entering location coordinates:1. Press and hold Enter/Mark to create a waypoint. The new
waypoint is created and uses the next available waypoint number and the last known location of the receiver as the default location.
2. On the New Waypoint page, highlight the Location field, and press Enter.
Entering location coordinates.
3. Use the Rocker to enter location coordinates, and press Enter.
To change any of the other information on the New Map Waypoint page, highlight the appropriate field, and press Enter. After entering your changes, highlight OK, and press Enter.
Reviewing a WaypointAfter you create and store a waypoint, you can modify, review, rename, move, or delete it at any time using the Waypoint Review and Waypoint Edit pages.
To access the Waypoint Review page:Highlight a waypoint on the Map page, and then press Enter to open the Waypoint Review page.If the waypoint is located on a map feature or BlueChart® g2 feature, the Waypoint Review page might include additional tabs containing information about other features at that location.
Waypoint Review page
GPSMAP 580/585 Owner’s Manual 23
Operation Mode
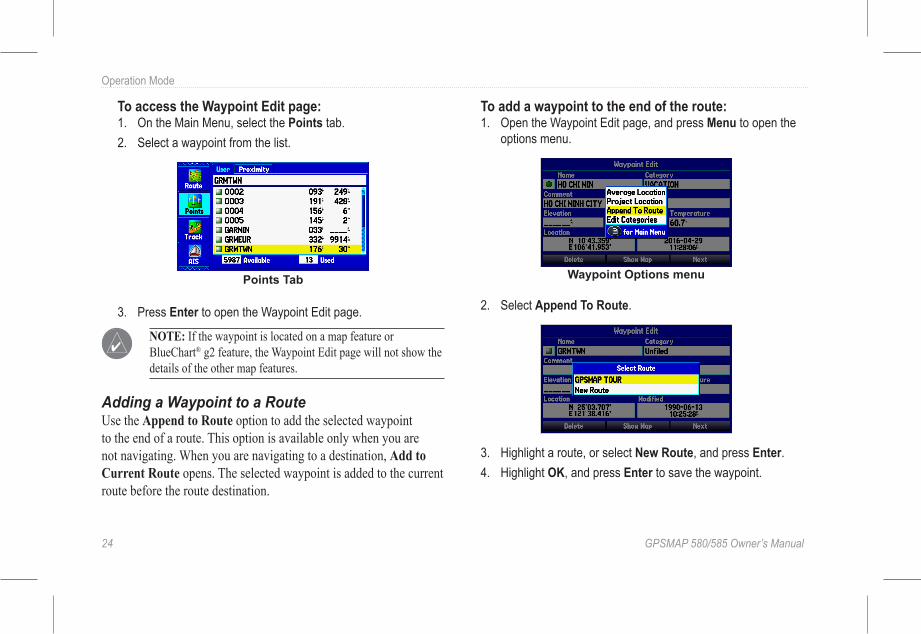
To access the Waypoint Edit page:1. On the Main Menu, select the Points tab.2. Select a waypoint from the list.
Points Tab
3. Press Enter to open the Waypoint Edit page.
NOTE: If the waypoint is located on a map feature or BlueChart® g2 feature, the Waypoint Edit page will not show the details of the other map features.
Adding a Waypoint to a RouteUse the Append to Route option to add the selected waypoint to the end of a route. This option is available only when you are not navigating. When you are navigating to a destination, Add to Current Route opens. The selected waypoint is added to the current route before the route destination.
To add a waypoint to the end of the route:1. Open the Waypoint Edit page, and press Menu to open the
options menu.
Waypoint Options menu
2. Select Append To Route.
3. Highlight a route, or select New Route, and press Enter.4. Highlight OK, and press Enter to save the waypoint.
24 GPSMAP 580/585 Owner’s Manual
Operation Mode

Averaging the Waypoint’s LocationAverage Location makes the unit take several sample location measurements for the waypoint and recalculate for a more accurate location reading.
NOTE: You must have a GPS satellite fix before you can average a waypoint’s location.
To calculate the average location:1. Open the Waypoint page, and press Menu.2. Select Average Location, and press Enter. The fields
change as the unit calculates the average location of the waypoint.
Average Location page
3. Press Enter to save the location.
Projecting a WaypointYou can also create a new waypoint by projecting the distance and bearing from a specific location to a new location.
To create a new waypoint by projecting its location:1. On the Main menu, highlight the Points tab and select the
point which you want to porject from, then press Enter.2. Press Menu. 3. Highlight Project Location, and press Enter.
Project Location menuEnter the distance, bearing, and location.
4. To change the location from which you are projecting the new waypoint, highlight the From field, and press Enter.
5. Select the point from which you can project your new waypoint.
GPSMAP 580/585 Owner’s Manual 25
Operation Mode

6. To adjust the distance that the new waypoint is projected beyond the original waypoint, highlight the Distance field, and press Enter. enter the projection distance, and press Enter.
7. To adjust the bearing that the new waypoint is projected from the original waypoint, highlight the Bearing field, and press Enter. Enter the bearing, and press Enter.
8. When you have adjusted all elements of the projected location, highlight Save, and press Enter.
9. Make any other changes to the new waypoint data (such as the name or symbol); highlight OK, and press Enter.
Editing a WaypointYou can edit waypoints using the Points tab on the Main menu. The User sub tab, on the Points tab, shows a master list of all waypoints stored in memory. From the User list, you can review, edit, rename, or delete individual waypoints or delete all user waypoints.
User sub tab
To navigate to a waypoint from the Points tab:1. On the Main menu, select the Points tab, and then highlight
the User sub tab.2. Highlight the waypoint you want to navigate to. 3. Press NAV/MOB to open the Navigate menu. 4. Highlight Go To <Point Name>, and press Enter.
To edit a waypoint:1. Open the Waypoint Review or Waypoint Edit page.2. Highlight the waypoint name, symbol, or field you want to
change, and press Enter.3. Use the Rocker to select a symbol or enter data, and press
Enter.
26 GPSMAP 580/585 Owner’s Manual
Operation Mode
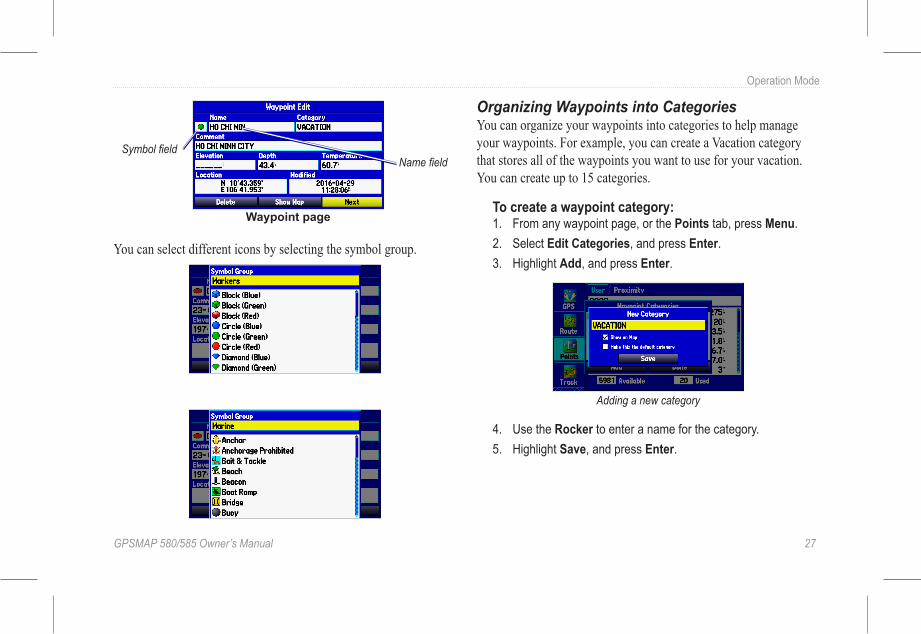
Waypoint page
Name fieldSymbol field
You can select different icons by selecting the symbol group.
Organizing Waypoints into CategoriesYou can organize your waypoints into categories to help manage your waypoints. For example, you can create a Vacation category that stores all of the waypoints you want to use for your vacation. You can create up to 15 categories.
To create a waypoint category:1. From any waypoint page, or the Points tab, press Menu.2. Select Edit Categories, and press Enter. 3. Highlight Add, and press Enter.
Adding a new category
4. Use the Rocker to enter a name for the category. 5. Highlight Save, and press Enter.
GPSMAP 580/585 Owner’s Manual 27
Operation Mode

To assign a category to a waypoint:1. Open the Waypoint Edit page. 2. Select the Category field, and press Enter.3. Select the category for which you want to assign the
waypoint, and press Enter.
Waypoint page
To delete a category:1. Within the Waypoint Categories page, highlight the category
you want to delete, and press Menu.2. Select Delete Category, and press Enter.
Waypoint Categories Options menu
3. Press Enter.
Deleting WaypointsYou can delete waypoints from the waypoint list on the Points tab or from the Waypoint page. To delete a waypoint from the Waypoint page, use the Rocker to highlight the on-screen Delete button, and press Enter.
NOTE: When you delete a waypoint from the list, it cannot be recovered from the unit. Garmin suggests backing up important waypoints to a computer using Garmin Home Port software.
To delete a waypoint from the User Points tab:1. From the Points tab, highlight the waypoint you want to
delete. 2. Press Menu.3. Highlight Delete Waypoint, and press Enter. A confirmation
message appears.28 GPSMAP 580/585 Owner’s Manual
Operation Mode

4. Press Enter.
To delete waypoints by symbol or category:1. On the User sub tab, highlight the waypoint to delete, and
press Menu.2. Highlight Delete by Symbol or Delete by Category, and
press Enter.3. Highlight the symbol or category you want to delete, and
press Enter. 4. Highlight OK, and press Enter.
To delete waypoints by distance:1. On the User sub tab, highlight the waypoint to delete, and
press Menu.2. Highlight Delete By Distance, and press Enter.3. Select Less Than or More Than, and enter the distance. 4. Select a waypoint or point of interest as the From location. 5. Highlight the From field and press Enter. 6. Select a location on the Find page, and press Enter.7. Highlight OK, and press Enter.8. Highlight Delete, and press Enter to delete all waypoints
within the set location.
GPSMAP 580/585 Owner’s Manual 29
Operation Mode
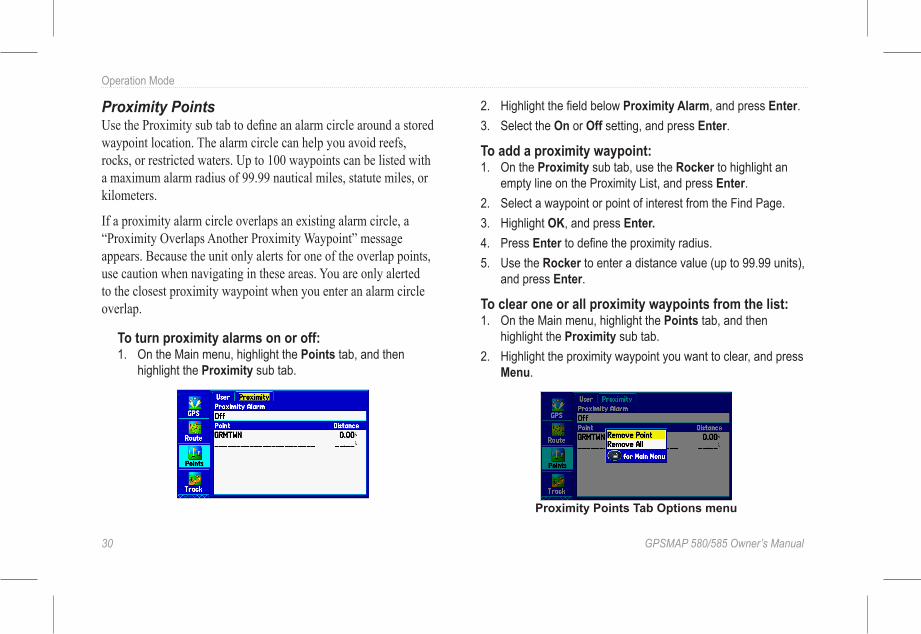
Proximity PointsUse the Proximity sub tab to define an alarm circle around a stored waypoint location. The alarm circle can help you avoid reefs, rocks, or restricted waters. Up to 100 waypoints can be listed with a maximum alarm radius of 99.99 nautical miles, statute miles, or kilometers.
If a proximity alarm circle overlaps an existing alarm circle, a “Proximity Overlaps Another Proximity Waypoint” message appears. Because the unit only alerts for one of the overlap points, use caution when navigating in these areas. You are only alerted to the closest proximity waypoint when you enter an alarm circle overlap.
To turn proximity alarms on or off:1. On the Main menu, highlight the Points tab, and then
highlight the Proximity sub tab.
2. Highlight the field below Proximity Alarm, and press Enter.3. Select the On or Off setting, and press Enter.
To add a proximity waypoint:1. On the Proximity sub tab, use the Rocker to highlight an
empty line on the Proximity List, and press Enter.2. Select a waypoint or point of interest from the Find Page. 3. Highlight OK, and press Enter.4. Press Enter to define the proximity radius.5. Use the Rocker to enter a distance value (up to 99.99 units),
and press Enter.
To clear one or all proximity waypoints from the list:1. On the Main menu, highlight the Points tab, and then
highlight the Proximity sub tab.2. Highlight the proximity waypoint you want to clear, and press
Menu.
Proximity Points Tab Options menu
30 GPSMAP 580/585 Owner’s Manual
Operation Mode

3. To clear a single alarm, highlight Remove Point, and press Enter. To clear all proximity waypoints, select Remove All, and press Enter.
4. Highlight OK, and press Enter.
Creating a Route as a Marking lineIn some instances, you may want to display a line need on the map to display a dangerous border or area.
To begin making a marking line on the map:1. On the Route tab, select the route to act as a marking line to
display on the map.2. Select Show on Map.3. Select a color.
To hide a marking line on the map:1. To hide the marking line, deselect the Show on Map
checkbox on the Route edit page. NOTE: The maximum number of routes (marking line) that can
be displayed is 150 lines.
GPSMAP 580/585 Owner’s Manual 31
Operation Mode

Managing Your TracksThe GPSMAP 580/585 draws an electronic breadcrumb trail or track log on the Map Page as you travel. The track log contains points along its path, and includes both time and location for each point.
The track log starts recording as soon as the GPSMAP 580/585 obtains a location fix. For best results, clear the track log before you start traveling as new track points overwrite the oldest track points.
The percentage of memory used by the current track log appears at the top of the Active tab. After the track log is cleared, it shows zero percent. When the track log reaches 100%, the most recent track points overwrite the oldest track points (if Wrap is selected for Record Mode). To avoid losing track points, save the track log when it approaches the 99% mark.
Setting Up and Saving Your TracksYou must save the track log before you can use the Navigate Track feature. The Save feature allows you to store up to 50 track logs.
To access the Track tab:1. Press Menu twice to open the Main menu. 2. Highlight the Track tab.
Track tab
Record Mode—Wrap records over the oldest tracks when the track log reaches 100%. Fill records a track log until the track log is full (100%). When Off is selected, the unit does not record tracks.
Interval—Distance records track points after a specified distance is traveled. Time creates track points after a specified time has elapsed. Resolution records track points based higher the resolution entered, the more points the unit creates to make the track.
Color—allows you to select a color for the track when it appears on the map.
Value—allows you to record a track according to the Interval and Value. enter a specific distance, time, or resolution.
32 GPSMAP 580/585 Owner’s Manual
Operation Mode

To clear the track log:1. On the Main menu, highlight the Track tab and then highlight
the Active sub tab.2. Highlight the Clear button, and press Enter.
Clearing the track log
3. Highlight OK, and press Enter.
To save the entire track log:1. On the Main menu, highlight the Track tab and then highlight
the Active sub tab.2. Select Save, and press Enter. A message appears asking if
you want to save the entire track. 3. Highlight Yes, and press Enter.
To save a portion of the track log:1. On the Main menu, highlight the Track tab and then highlight
the Active sub tab.2. Select Save, and press Enter.3. Highlight No, and press Enter. 4. Select a beginning point, and press Enter.
Saving a portion of the track log
5. Select an ending point, and press Enter. The Track Review page opens automatically.
6. Highlight OK, and press Enter to save the track.
GPSMAP 580/585 Owner’s Manual 33
Operation Mode

Saved TracksThe Saved sub tab lists all of the saved tracks in your unit. Press Menu to open the Saved tab options menu.
Saved sub tab
Review on Map—allows you to show the highlighted track on the Map page.
TracBack—allows you to navigate the track. You can navigate the track as it is saved, or you can navigate the track in reverse.
Delete Track—allows you to erase the highlighted track from the unit’s memory.
Delete All—allows you to erase all tracks from the unit’s memory.
To edit a track:1. On the Main menu, highlight the Track tab and then select
the Saved tab.2. Select a track to edit, and press Enter.
Track Review page
3. Highlight the Name field, and press Enter. 4. Use the Rocker to change the name, and press Enter. 5. Select a different display color to show the track on the map.6. Highlight the box next to Show on Map, and press Enter to
show the track on the map.7. To view the track on the map, highlight Map, and press
Enter. 8. Highlight OK, and press Enter to save your changes.
34 GPSMAP 580/585 Owner’s Manual
Operation Mode
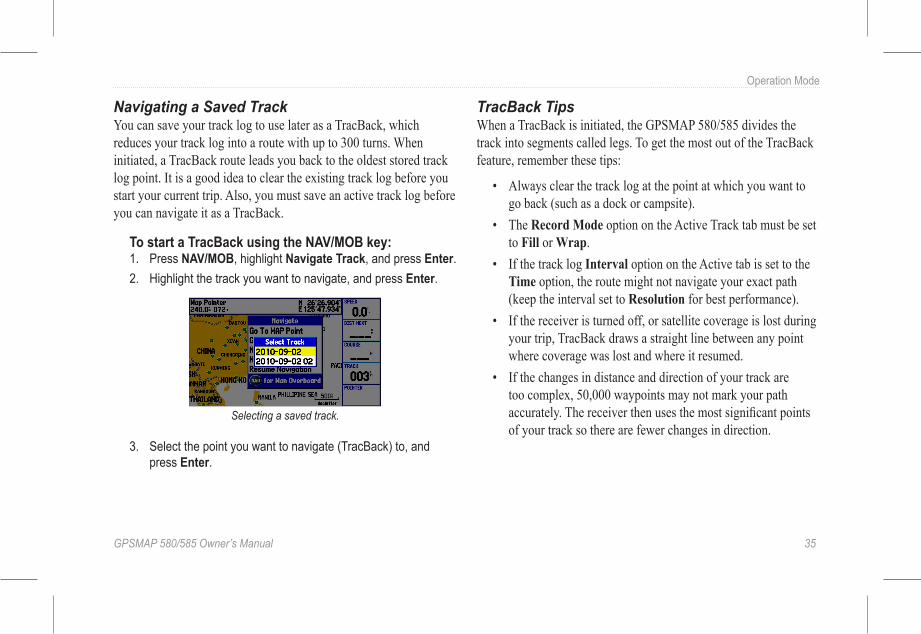
Navigating a Saved TrackYou can save your track log to use later as a TracBack, which reduces your track log into a route with up to 300 turns. When initiated, a TracBack route leads you back to the oldest stored track log point. It is a good idea to clear the existing track log before you start your current trip. Also, you must save an active track log before you can navigate it as a TracBack.
To start a TracBack using the NAV/MOB key:1. Press NAV/MOB, highlight Navigate Track, and press Enter.2. Highlight the track you want to navigate, and press Enter.
Selecting a saved track.
3. Select the point you want to navigate (TracBack) to, and press Enter.
TracBack TipsWhen a TracBack is initiated, the GPSMAP 580/585 divides the track into segments called legs. To get the most out of the TracBack feature, remember these tips:
• Always clear the track log at the point at which you want to go back (such as a dock or campsite).
• The Record Mode option on the Active Track tab must be set to Fill or Wrap.
• If the track log Interval option on the Active tab is set to the Time option, the route might not navigate your exact path (keep the interval set to Resolution for best performance).
• If the receiver is turned off, or satellite coverage is lost during your trip, TracBack draws a straight line between any point where coverage was lost and where it resumed.
• If the changes in distance and direction of your track are too complex, 50,000 waypoints may not mark your path accurately. The receiver then uses the most significant points of your track so there are fewer changes in direction.
GPSMAP 580/585 Owner’s Manual 35
Operation Mode

operatIon Mode paGeSFive pages are available in Operation Mode—Map, Compass, Navigation, Active Route, and Position Data.
Map PageWhen you turn on the GPSMAP 580/585 , the Map page appears after the unit acquires a satellite signal. The position marker shows your current location on the map.
The Map page shows map information (digital cartography). Use the dedicated zoom keys (IN and OUT) to adjust the Map page scale.
Two map operating modes, position mode and pan mode, determine what cartography is shown on the map. Position mode pans the map to keep your present location in the display area. The position marker
shows your travel on the Map page. The GPSMAP 580/585 always turns on in position mode, with the last known location centered on the map. When you press the Rocker, the GPSMAP 580/585 enters pan mode, which moves the map to keep the white arrow (map pointer) within the display area.
In Operation mode, four user-selectable data fields appear on the right side of the screen that can be configured to show any one of the possible data options. You can also add additional data fields to the page or select a full screen map without data fields.
Map page
Data fields
Map zoom range
Current location
36 GPSMAP 580/585 Owner’s Manual
Operation Mode Pages

Changing the Page Layout and Data FieldsYou can adjust how the following pages appear: Map, Compass, Navigation, Position Data, Trip Computer, and optional Sonar Pages. You can also adjust the data fields on each page.
To set up the page layout:1. Press Menu to open the options menu. 2. Highlight Set Up Page Layout, and press Enter.
Selecting the page layout.
3. Select a page layout option, and press Enter.
To change a data field:1. Press Menu to open the options menu. 2. Highlight Change Data Fields, and press Enter.3. Highlight the data field to change, and press Enter. 4. Highlight the type of data you want to show, and press Enter.
Changing a data field.
GPSMAP 580/585 Owner’s Manual 37
Operation Mode Pages

Setting Up the Map PageUse the Set Up Map option to adjust how items appear on the Map page.
To change a map setup option:1. On the Map page, press Menu to open the options menu. 2. Highlight Set Up Map, and press Enter.
Setting up the Map page.
3. Press left or right on the Rocker to highlight a tab; press up or down on the Rocker to highlight the field you want to change, and press Enter.
4. Highlight a setting, and press Enter.
Viewing Additional Map DataUse the Map information page to view the data loaded on your GPSMAP 580/585 unit and data card.
To review/change map information:1. On the Map page, press Menu. 2. Highlight Map Information, and press Enter.3. To change the setting for a map family, highlight the box next
to the map family name and press Enter to select (check mark) or deselect (no check mark) the Show setting.
4. To view the list of maps within a map family, highlight the name of the map family, and press Enter.
38 GPSMAP 580/585 Owner’s Manual
Operation Mode Pages

Map OrientationThere are three map orientation options: North Up - orients the map like a paper map. Track Up - orients the map in the direction of travel. Course Up - orients the map so the direction of navigation is always up.
When using Track Up or Course Up, the North arrow indicates the orientation.
Changing the Map Orientation1. Press Menu to open the Map page.2. Press Menu and select Set Up Map.3. Press Enter
Zooming In and Out of the MapThe map display has 28 available map zoom ranges ranging from 20 ft to 800 nm (20 ft to 800 mi or 5 m to 1200 km). The map zoom range is controlled by the IN and OUT keys, with the current scale shown at the bottom right of the data window.
NOTE: The scale value represents the distance from one end of the scale bar ( ) to the other.
To select a map zoom range (zoom in and out): Press the OUT key to zoom out, press the IN key to zoom in.
Panning the MapUse the panning arrow to pan the map to view other map areas. As you pan past the edge of the current map display, the screen moves to provide continuous map coverage. The position icon stays in your present location and might not be visible on the screen when you pan the map.
To pan the map: Press up, down, right, or left on the Rocker. The panning arrow moves the map so you can view different parts of the map.
Map feature highlighted
As you move the arrow, the distance and bearing from your present location to the arrow appears in the data window, along with the coordinates of the arrow. When the arrow is stationary, the arrow stays centered on the screen.
You can also use the arrow to select on-screen map items, which GPSMAP 580/585 Owner’s Manual 39
Operation Mode Pages

allows you to review a selected item directly from the map.
To view details about an on-screen point:1. Use the Rocker to move the arrow to a waypoint or map
item. If several items are grouped closely together, zoom in closer for a better view.
When a waypoint or map item is selected, it is highlighted on- screen with the name and location shown at the top of the screen, along with the distance and bearing from your current location.
2. Press Enter to view more information about the point. The information and on-screen buttons shown vary depending on the type of item selected. In some cases, additional information tabs appear at the top of the information page or Waypoint page.
3. Use the Rocker to highlight the extra tabs and view the information.
4. Select an on-screen button, and press Enter.
Map Feature Information page
Clearing Unwanted Details from the MapYou can remove items from the Map page (declutter the display) to remove unwanted items.
To declutter the Map page: 1. On the Map page, press Menu to open the options menu. 2. Highlight Declutter, and press Enter.3. Press Enter.
40 GPSMAP 580/585 Owner’s Manual
Operation Mode Pages
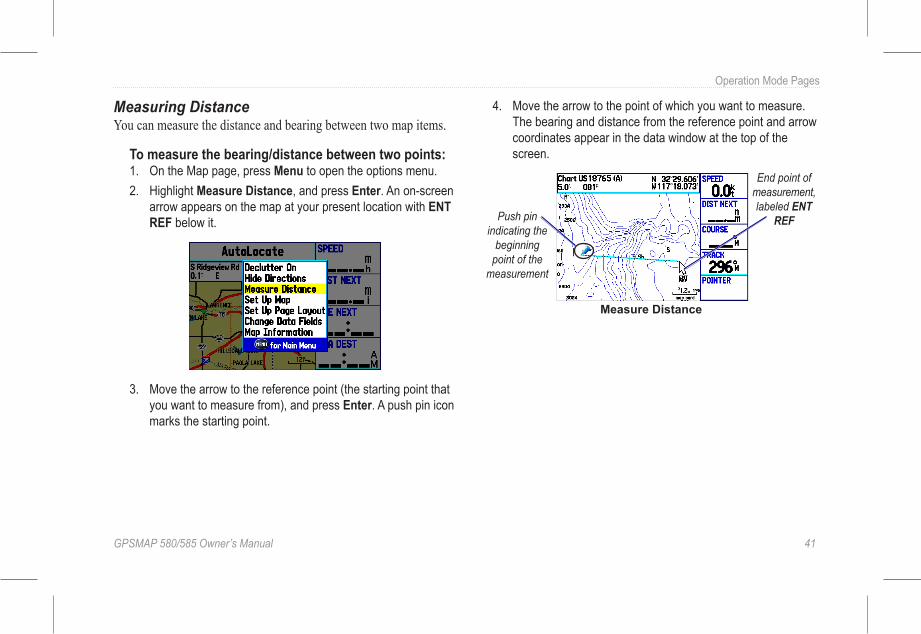
Measuring DistanceYou can measure the distance and bearing between two map items.
To measure the bearing/distance between two points:1. On the Map page, press Menu to open the options menu. 2. Highlight Measure Distance, and press Enter. An on-screen
arrow appears on the map at your present location with ENT REF below it.
3. Move the arrow to the reference point (the starting point that you want to measure from), and press Enter. A push pin icon marks the starting point.
4. Move the arrow to the point of which you want to measure. The bearing and distance from the reference point and arrow coordinates appear in the data window at the top of the screen.
Measure Distance
End point of measurement, labeled ENT
REFPush pin indicating the
beginning point of the
measurement
GPSMAP 580/585 Owner’s Manual 41
Operation Mode Pages

Compass PageDuring active navigation, the Compass page guides you to your destination with a graphic compass and a bearing pointer. When the pointer is pointing straight up, you are heading directly to your destination.
Compass Page in Operation mode
Rotating compass ring
Course to steer indicator
Compass arrow Data fields
The middle of the page features a rotating compass ring that shows your course over ground (track) while you are moving. Your present course over ground is indicated at the top of the compass ring. The direction of the destination (bearing) relative to the course over ground is indicated by an arrow in the middle of the compass ring and a course to steer “bug” on the outside of the compass ring. The course to steer represents the direction to steer to get back to the course line.
If the arrow points up, you are going directly to the waypoint. If the arrow points any direction other than up, turn toward the arrow until it points up, and then continue in that direction.
NOTE: You must be moving for the compass to accurately update and show your heading.
Turning On the Compass PageTo show the Compass page:1. On the Main menu, highlight Display.2. Highlight the Compass Page field, and press Enter. 3. Select On, and press Enter.
Turning on the Compass page
42 GPSMAP 580/585 Owner’s Manual
Operation Mode Pages

Compass Page OptionsUse the options menu on the Compass page to customize the Compass page.
1. Press Page until the Compass page appears.2. Press Menu to open the Compass page options menu.
Set Up Page Layout—allows you to select the page layout.
Show Course Pointer/Show Compass—allows you to toggle between showing the Course Pointer, which shows how far off you are from your course and how to get back on course, or shows the compass arrow. The Course Pointer is also referred to as a CDI or Course Deviation Indictor.
Show (Hide) Bug Indicator—shows the course to steer bug indicator (the purple tick mark on the compass ring).
Change Data Fields—allows you to change on-screen data fields.
Using the Marine TimerThe Marine Timer, specifically designed for sail boat racing, allows you to easily count up or down by specified time increments. As is common in sail boat racing, there is often a 5-minute warning countdown, followed by a 4-minute preparation countdown, and finally a 1-minute final countdown.
You can use your GPSMAP 580/585 to perform each of these different countdowns.
To open the Marine Timer:1. On the Compass page, press Menu.2. Highlight Set Up Page Layout, and press Enter. 3. Highlight 2 Columns With Timer, and press Enter. The
Marine Timer appears in the lower right corner.
GPSMAP 580/585 Owner’s Manual 43
Operation Mode Pages

To use the Marine Timer:1. Press the Rocker up or down to select the time you want to
count. 5-minutes is the default. 2. Press Enter to start the timer. Use the Rocker during the
timing to quickly select a different length of time. 3. Press Enter to stop timing.
Marine Timer on the Compass page
As discussed previously, the timer is set to count down 5-minutes. If you want to change the length of time and the behavior of the timer, highlight the Setup tab on the Main menu, and then select the Timers sub tab.
NOTE: You can set the timer countdown for up to 60 minutes.
To set the Marine Timer:1. On the Main menu, highlight the Setup tab, and then select
the Timers sub tab.2. Highlight Stop to change the timer.
3. To enter a new time, highlight the time field, press Enter, and then use the Rocker.
44 GPSMAP 580/585 Owner’s Manual
Operation Mode Pages

Navigation Page
Navigation page
When you are navigating, the Navigation page provides digital and graphic steering guidance to the destination. The right side of the Navigation page features user-selectable data fields showing useful navigation information. A compass ribbon appears at the top of the page to show your current heading, represented by the violet bar. The red vertical bar represents the bearing to your course. To stay on course, steer toward the red vertical indicator (or arrows) until it lines up with the violet bar in the middle. The bottom of the screen provides visual guidance to the waypoint. The line down the center of the Navigation represents your preferred track line.
To hide or show the Navigation page:1. On the Main menu, highlight the Display tab.2. Highlight the Navigation Page field, and press Enter.3. Select Off to hide or On to show, and press Enter.
Using the Navigation PageAs you head toward your destination, the Navigation perspective moves to indicate your progress to the waypoint and the direction you should steer to stay on course. If you are navigating a route, the Navigation page shows each route waypoint connected in sequence by a black “road” with a white line down the middle. Nearby waypoints that are not on the active route can also be shown.
To change the Navigation perspective scale: On the Navigation page, press IN to zoom in; press OUT to
zoom out.
GPSMAP 580/585 Owner’s Manual 45
Operation Mode Pages

Navigation Page OptionsUse the Navigation page options menu to define the data fields and to select which waypoints and tracks appear on the screen.
To show and select the Navigation Page Options:1. Press PAGE until the Navigation page appears. 2. Press Menu. 3. Highlight an option, and press Enter.
Navigation page Options menu
The following options are available from the Navigation page options menu:
Set Up Page Layout—allows you to select the page layout.
Change Data Fields—allows you to change on-screen data fields.
Set Up Navigation—shows an options menu with two sub tabs: Line and Waypoint. Each tab has on/off settings for options, including enabling the line for the Active Leg and Track Log.
Set Up Navigation
46 GPSMAP 580/585 Owner’s Manual
Operation Mode Pages
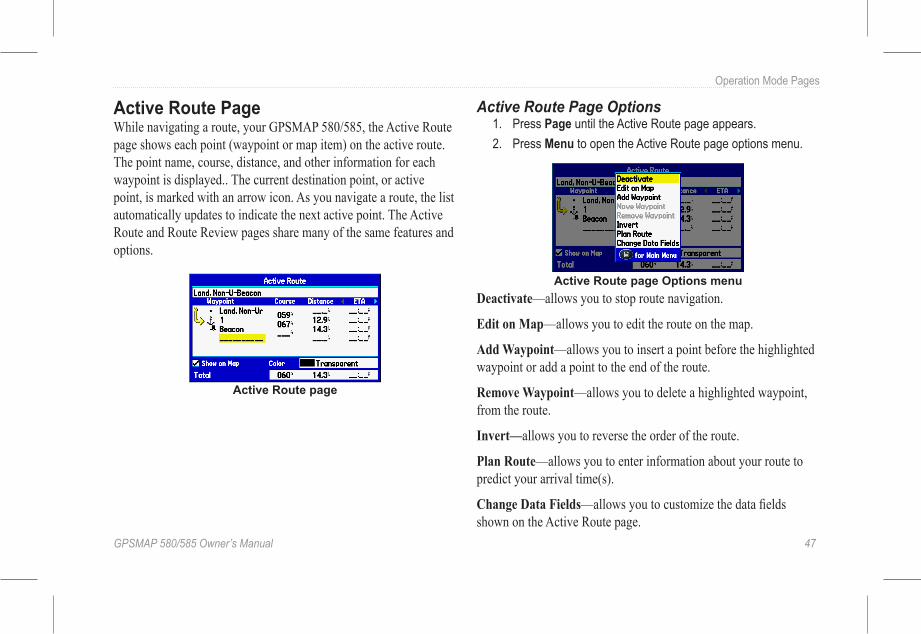
Active Route PageWhile navigating a route, your GPSMAP 580/585, the Active Route page shows each point (waypoint or map item) on the active route. The point name, course, distance, and other information for each waypoint is displayed.. The current destination point, or active point, is marked with an arrow icon. As you navigate a route, the list automatically updates to indicate the next active point. The Active Route and Route Review pages share many of the same features and options.
Active Route page
Active Route Page Options1. Press Page until the Active Route page appears.2. Press Menu to open the Active Route page options menu.
Active Route page Options menuDeactivate—allows you to stop route navigation.
Edit on Map—allows you to edit the route on the map.
Add Waypoint—allows you to insert a point before the highlighted waypoint or add a point to the end of the route.
Remove Waypoint—allows you to delete a highlighted waypoint, from the route.
Invert—allows you to reverse the order of the route.
Plan Route—allows you to enter information about your route to predict your arrival time(s).
Change Data Fields—allows you to customize the data fields shown on the Active Route page.
GPSMAP 580/585 Owner’s Manual 47
Operation Mode Pages

Position Data PageThe Position Data page shows important navigation data while navigating a route in Operation mode. By default, the Position Data page shows a compass ribbon, your current latitude and longitude, date and time, your location in relation to a prominent nearby landmark (such as a waypoint or city), and eight user-selectable data fields. The compass ribbon appears at the top of the page to show your current heading with a red, vertical bar. To stay on course, steer toward the violet bar (or arrows) until it is aligned with the red bar.
Position Data page
Position Data Page Options1. Press Page until the Position Data page appears.2. Press Menu to open the Position Data page options menu.
Change Nearest Type—allows you to specify the type of item used as the nearest item (shown in the lower-left data field). The choices change based on the current usage mode.
Reset Trip—allows you to clear trip information, except the maximum speed and the odometer.
Reset Max Speed—allows you to clear the maximum speed.
Reset Odometer—allows you to clear the running total of the distance traveled since the odometer was last reset.
Reset All—allows you to clear all trip information, including the maximum speed and odometer.
48 GPSMAP 580/585 Owner’s Manual
Operation Mode Pages

MaIn MenuThe Main menu provides access to various waypoint, system, navigation and interface management, and setup menus.
Main menu
To select a tab from the Main menu:1. From any page, press Menu twice to open the Main menu.2. Highlight the appropriate tab. The information for the
highlighted tab automatically appears on the right. To highlight a sub tab, press left or right on the Rocker, and then press up or down to select individual fields.
Main Menu Tabs• GPS—allows you to view satellite information.• Route—allows you to create and navigate routes.• Points—allows you to view stored waypoints.• Track—allows you to record and save tracks.• DSC—allows you to set up digital select (DSC) calling
features.• Sonar—allows you to configure sonar options.• Alarms—allows you to define alarm settings.• Calendar—allows you to view sun/moon and hunting/fishing
information for a specific day.• Celestial—allows you to view tide, hunting & fishing, and
sun & moon information.• Message—allows you to view system generated messages.• Display—allows you to adjust the backlight and page display.• Sound—allows you to customize GPSMAP 580/585 sounds.• Setup—allows you to adjust system settings.
GPSMAP 580/585 Owner’s Manual 49
Main Menu

GPS TabThe GPS tab provides a visual reference of satellite acquisition, receiver status, and accuracy. The sky view and signal strength bars indicates satellites that are visible to the receiver and whether they are being tracked.
Main menu—GPS tab
Route TabThe Route tab shows all the routes currently stored in memory, along with a descriptive name for each route.
Use the Route tab to create and store up to 150 reversible routes, with up to 250 points each. See the “Creating and Using Routes” section beginning on page 17 for more information about routes.
Main menu—Route tab
50 GPSMAP 580/585 Owner’s Manual
Main Menu

Points TabThe Points tab contains two sub tabs, User and Proximity, which allow you to manage a large number of waypoints quickly and efficiently. For more information about waypoints, see the “Creating and Using Waypoints” section beginning on page 21.
Main menu—Points tab
User Sub TabThe User sub tab shows a master list of all waypoints currently stored in memory. The total number of stored and available waypoints appear at the bottom of the User sub tab.
Proximity Sub TabUse the Proximity sub tab to define an alarm circle around a stored waypoint location.
Track TabUse the Track tab to specify whether or not to record a track log, define how it is recorded, or save the track log data for future use. The Track tab is divided into two sub tabs: Active and Saved. For more information about tracks, see the “Managing Your Tracks” section beginning on page 32.
Main menu—Track tab
Active Sub TabThe Active sub tab is for the active log (the log currently being recorded). It shows the amount of track memory used and current settings.
Saved Sub TabThe Saved sub tab shows a list of all saved tracks in your GPSMAP 580/585.
GPSMAP 580/585 Owner’s Manual 51
Main Menu

DSC TabUse the DSC tab (Operation mode only) to control and set up the Digital Selective Calling (DSC) features. DSC uses marine VHF radio, and GPS, to transmit and receive location information. DSC is used by mariners for distress calls and position reporting.
For more information about DSC and Maritime Mobile Service Identity (MMSI) numbers, see pages in the “Appendix”.
DSC page
Understanding Distress CallsWith your GPSMAP 580/585 properly connected to a VHF radio with DSC output, you can receive any DSC distress call within range. An alert message appears and a tone sounds when a distress call is received. The alarm only sounds on a distress call; position reports do not sound the alarm. Distress calls are broadcast to all DSC users in radio range and appear with a blue and white checkered icon on the DSC Call List and Log tabs.
You can enter the name of a caller, if it is known. The name of the caller replaces the MMSI number as a reference after it is entered.
Understanding Position ReportsThe Position Report operates similarly to the distress call. This type of contact is like a phone call; no emergency alarms are set off. Position reports are not broadcast to all DSC users and appear with a gold boat icon.
Receiving DSC CallsEach time you receive a distress call or position report, a review page opens—either a DSC Position Report page or a Distress Call page. Both pages contain identical fields to the DSC Entry Review page.
52 GPSMAP 580/585 Owner’s Manual
Main Menu

Each entry in the Call List and Log has a corresponding DSC Entry Review page. This page operates similarly to the Distress page and Position Report page. From the DSC Entry Review page, you can Delete the entry, Save it as a waypoint, or show the location on the map.
To review a call or log entry:1. Open the Call List or Log from the DSC tab.2. Highlight the call you want to review.3. Press Enter to open the DSC Entry Review Page.
DSC Entry Review page
DSC Call ListThe Call List sub tab shows the 50 most recent calls, even if the unit is left unattended. The Call List only shows the most recent call from a vessel. If a second call is received, it replaces the first call in the Call List. Press Menu to sort the list and delete entries.
DSC Call List
DSC LogWhen DSC calls are received, they are automatically stored in the Log, with the most recent call at the top. The unit can store up to 100 calls; after 100 calls are received, the oldest log file is removed when a new call is received.
GPSMAP 580/585 Owner’s Manual 53
Main Menu

DSC Log
Receiving a Position Report or Distress CallAfter you receive a Position Report or a Distress Call, you can quickly navigate to the location.
1. Highlight a call from the Call List or Log. 2. Press Direct To. The top selection in the Navigate menu is
highlighted. 3. Press Enter to go to the location.
DSC DirectoryThe DSC Directory is like a phone book and can hold up to 50 entries.
DSC Directory List
DSC directory entries. Press Enter to open
the Entry Review page.
Blank entry. Press Enter to add a DSC directory entry.
To add a new directory entry:1. On the Main menu, open the DSC Directory.2. Highlight the first blank space in the directory list, and press
Enter. OR Press Menu, highlight New Item, and press Enter.
3. Enter the MMSI number, the name, and any comments. 4. When finished, highlight OK, and press Enter.
New Directory Item page
54 GPSMAP 580/585 Owner’s Manual
Main Menu
After creating a New Directory Item, the name created is attached to that particular MMSI number. If you return to the Log, the new name appears under the corresponding MMSI number.
Another way to input a name is from the Entry Review page or the DSC Distress Call or DSC Position Report pages. The name and MMSI are sent to other Garmin GPS units. Only the MMSI numbers are sent to other non-Garmin DSC users.
Making a Distress CallTo make a distress call, press the Mayday button on your VHF radio. If you have DSC support, the call transmits on an emergency channel with the MMSI number attached to the call. Any DSC-equipped mariner (on sea or land) within range can receive the call.
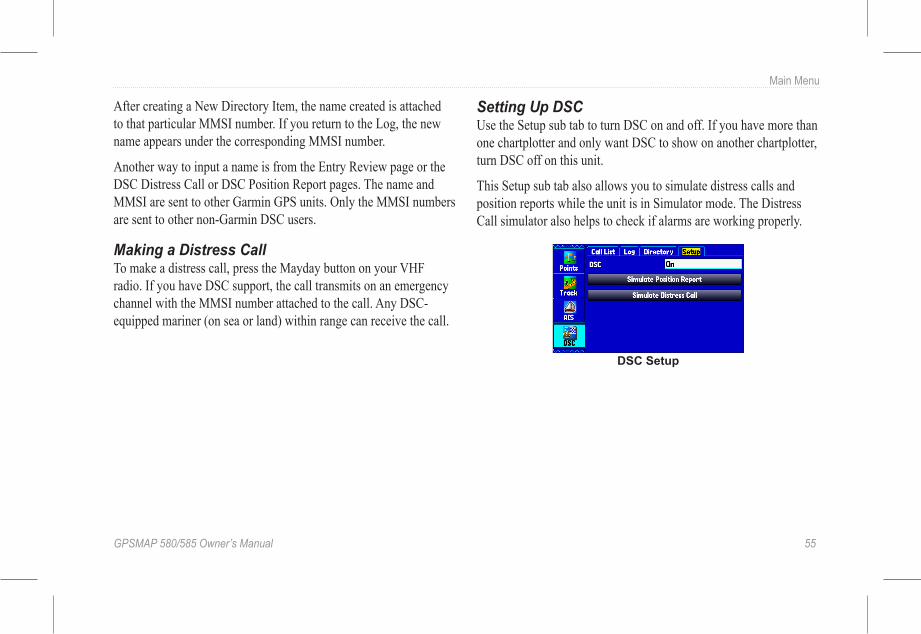
Setting Up DSCUse the Setup sub tab to turn DSC on and off. If you have more than one chartplotter and only want DSC to show on another chartplotter, turn DSC off on this unit.
This Setup sub tab also allows you to simulate distress calls and position reports while the unit is in Simulator mode. The Distress Call simulator also helps to check if alarms are working properly.
DSC Setup
GPSMAP 580/585 Owner’s Manual 55
Main Menu

Sonar TabUse the Sonar tab to set up and configure sonar. See the “Setting Up and Using Sonar” section.
NOTE: You must have a transducer connected to your GPSMAP 580/585 to use sonar.
Main Menu—Sonar tab
Alarms TabUse the Alarms tab to define alarm settings. When an alarm goes off, the alarm message appears on the GPSMAP 580/585 and the unit emits five (5) beeps.
Main Menu—Alarms tab
To set an alarm:1. On the Main menu, highlight the Alarms tab.2. Select the alarm to set, and press Enter. 3. Change the setting to On, and press Enter. If necessary,
highlight the next field to the right, and press Enter. Enter the settings you want.
4. Press Enter.
56 GPSMAP 580/585 Owner’s Manual
Main Menu

To set a persistent alarm:1. On the Main menu, highlight the Alarms tab.2. Highlight the box next to the persistent alarm you want to
enable.
3. Press Enter to place a check mark in the Persist box.
Navigation (Nav) Alarms The Nav sub tab contains the following alarms:
Next Turn—allows you to set an alarm to indicate the next turn in a route. Select Dist to specify a distance before you reach the next turn to sound the alarm. Select Time to specify a time before the turn for the alarm to go off. Select Auto for the unit to provide a Next Turn alarm at its discretion.
Arrival—allows you to set an alarm to sound when you are a specified distance or time away from a destination waypoint. Select Auto for the unit to provide an Arrival alarm at its discretion.
Off Course—allows you to set an alarm to sound when off course. Select On, then enter a distance.
Anchor Drag—allows you to set an alarm to sound when you exceed a specified drift distance. Select On, and then enter a distance.
System AlarmsClock—sets an alarm based on the unit clock. Select On, and then enter a specific time for when you want the alarm to sound. The GPSMAP 580/585 must be on for the clock alarm to work.
DGPS—allows you to set an alarm to sound when the GPSMAP 580/585 loses a differential fix.
Accuracy—allows you to set an alarm to sound when GPS accuracy falls outside of the user-set value. Select On, and then Enter a specific distance.
GPSMAP 580/585 Owner’s Manual 57
Main Menu

Sonar Alarms CAUTION: The Safe Depth and Safe Height settings influence
how the chartplotter calculates an Auto Guidance line. If an area has an unknown water depth or an unknown obstacle height, the Auto Guidance line is not calculated in that area. If an area at the beginning or the end of an Auto Guidance line is shallower than the safe water depth or lower than the safe obstacle height, the Auto Guidance line is not calculated in that area. On the chart, the course through those areas appears as a gray line. When your boat enters one of those areas, a message appears.
Shallow Water/Deep Water—allows you to set an alarm to sound when you enter an area of water that is too shallow or deep. Select On, and then specify a depth. You must be receiving sonar NMEA data for this function to work.Water Temp—allows you to set an alarm to indicate if the water temperature has exceeded or dropped below a specific temperature, or fallen outside/inside a specific temperature range. Select Above or Below, and then enter a specific temperature, or select Inside or Outside and enter a range of temperatures. You must be receiving sonar NMEA data for this function to work.Drift—allows you to set an alarm to sound when you exceed a specified drift distance. Select On, and then enter a specific distance. Fish—allows you to set an alarm to sound when fish are detected with sonar.
Calendar TabUse the Calendar tab to plan trips, as well as view sun and moon, and hunting and fishing information for the day.
Calendar Tab in Day View
Highlight an arrow, and press Enter to change the date in view.
Sunrise and sunset times
for the current location and
date.
List of points and routes
added to this date.
Calendar OptionsThe options menu is available in all three calendar views. Press Menu on any of the calendar views to open the options menu. To view the Sun & Moon or Hunt & Fish sub tab, highlight View Sun and Moon or View Hunt and Fish, and press Enter.
58 GPSMAP 580/585 Owner’s Manual
Main Menu

To add a route (or point) to the calendar:1. On the Main menu, highlight the Calendar tab.2. Press Menu to open the options menu. Highlight Add Route
(or Add Point), and press Enter.3. From the pop-up route list (or the Find page if Add Point was
selected), select the route you want to add to the calendar, and press Enter.
Day View Sub TabThe Day View sub tab shows sunrise and sunset times for your current date and location. Points and routes for the day appear in a list.
Week View Sub TabThe Week View sub tab provides the same elements as Day View, but the entire week is visible. Days with added points or routes are shown highlighted in green. Icons for the points and routes assigned to the date are shown along the bottom of the screen.
Month View Sub TabThe Month View sub tab provides the same elements as Day View, but the entire month is visible. Days with added points or routes are shown highlighted in green. Icons for the points and routes assigned to the date are shown along the bottom of the screen.
Celestial TabThe Celestial tab shows tide information, sun and moon information, and hunting and fishing information. You can view this data for your current location, a location from the map, or a waypoint location. Also, you can select a different date and time, or use the current data.
Main menu—Celestial tab
To access the Celestial tab:1. On the Main menu, highlight the Celestial tab.2. Use the Rocker to view the sub tab you want, such as
Sun & Moon.
GPSMAP 580/585 Owner’s Manual 59
Main Menu

Tide Sub TabThe Tide sub tab contains a graphical chart that shows tide station information in a 24-hour span starting at midnight station time. You can choose from different dates and more than 3,000 tide stations.
Height of tide
Smallest and largest tides for the AM
hours
Select the tide station for which you want to view the information.
Enter the date for which you want to view the tide information.
Tide sub tab
Time
Smallest and largest tides for the PM
hours
The top of the page shows the tide station and date referenced. The chart shows a 24-hour block of time, with the time progressing from left to right. The solid vertical lines represent 4-hour increments; the dotted vertical lines represent 1-hour increments.
The tide curve appears as a shaded area; higher tides are taller and lower tides are shorter. The bottom of the page indicates the times with the highest and lowest tides.
To view a tide chart for a different tide station:1. From the Tide sub tab, highlight the At field, and press
Enter. 2. Press Menu, and select Near Current Location, Near
Current Route, Near Other (select another location using the map), or Near Destination. The list updates with your search requirements.
3. Select a tide station from the list, and press Enter. 4. Highlight OK, and press Enter.
To view the tide chart for another date: 1. From the Tide sub tab with a chart open, highlight the On
field, and press Enter. 2. Enter the date with the Rocker, and press Enter. You can
also use the zoom IN and OUT keys to view information for another date. Press and hold IN or OUT to scroll quickly through dates.
3. Press Enter. To use the current date again, highlight the On (Date) field. Press Menu, highlight Use Current Date, and press Enter.
60 GPSMAP 580/585 Owner’s Manual
Main Menu

To view a chart’s details for another time during the day (other than current time):1. From the Tide sub tab with the chart you want to view, press
Menu, and then select Move Cursor.2. Press the Rocker right or left to view the chart at another
time.3. To return to the current time, press Menu, and select Stop
Moving Cursor.
To automatically start cursor mode to scroll the chart:1. Highlight the On (Date) field. Then press down to start the
pointer (pan) mode. 2. Scroll the chart right to view the next day or left to view the
previous day.
Sun & Moon Sub TabThe Sun & Moon sub tab provides you with sunrise/sunset and moon rise/set times. A graphic of the moon phase also appears. You can view Sun & Moon information for any date or location. You can also use the play, fast forward, and stop buttons to view an animation of the Sun & Moon sub tab.
To view sun and moon information for a different date:1. Highlight the Date field, and press Enter.2. Use the Rocker to change the digits of the date to the date
you want. You can also use the zoom IN and OUT keys to view information for another date. Press and hold IN or OUT to scroll quickly through dates.
3. Press Enter when finished. The unit shows the sun and moon information for the selected date.
Sun & Moon sub tab
Moon phase
Animation controls for the
sky view
Select the date and location
Location of the sun and moon in the sky view
GPSMAP 580/585 Owner’s Manual 61
Main Menu

To view sun and moon information for a different location:1. Highlight the From field, and press Enter.2. Highlight Use Find Page, and press Enter. 3. Select a waypoint or point of interest, and press Enter. 4. On the waypoint information page, press Enter. The unit
shows the sun and moon information for the location you selected.
Hunt & Fish Sub TabThe Hunt & Fish sub tab provides you with predictions of the best times to hunt and fish in a selected location on a specific date.
To show the Hunt & Fish information:1. On the Main menu, highlight the Celestial tab. 2. Select the Hunt & Fish sub tab.
Hunt & Fish sub tab
To view hunt and fish information for a different date:1. Highlight the Date field, and press Enter.2. Use the Rocker to change the digits of the date. You can
also use the zoom IN and OUT keys to view information for another date. Press and hold IN or OUT to scroll quickly through dates.
3. Press Enter when finished.
62 GPSMAP 580/585 Owner’s Manual
Main Menu

To view hunt and fish information for a different location:1. Highlight the From field, and press Enter.2. Highlight Use Find Page, and press Enter. 3. Select a point, and press Enter. 4. On the information page, press Enter.
To use the current location:1. Highlight the From field, and press Enter.2. Highlight Current Location, and press Enter.
Message TabThe Message tab shows a list of messages generated by the GPSMAP 580/585 . Use the Rocker to scroll through the list of messages on the Log sub tab. Use the Log Filter sub tab to show only the message types that you want to view.
Main menu—Message tab
To view messages:1. On the Main menu, highlight the Message tab.2. Highlight a message.3. Press Enter to view detailed information about the message.
GPSMAP 580/585 Owner’s Manual 63
Main Menu

To show or hide messages using the log filter:1. On the Main menu, highlight the Message tab.2. Highlight the Log Filter sub tab. All messages appear by
default.
Message Log Filter tab
3. Highlight the message type you want to hide, and press Enter. The message name appears in the Hide window.
4. Highlight the message, and press Enter to show it again.
Display TabUse the Display tab to set display features, such as pages to show in the main page sequence and how long the backlight stays on.
Main menu—Display tabMain Menu—allows you to indicate whether the Main menu tabs contain text and icons (default) or text tabs only.
Color mode—allows you to set the display to Day, Night, or Auto color mode. Select Auto to automatically switch from day to night at sunset and change back at sunrise.
Twilight Adjustment—allows the unit to adjust the backlight for optimum viewing during twilight times.
Navigation Page—allows you to indicate whether the navigation page appears in the main page sequence.
Compass Page—allows you to indicate whether the Compass page appears in the main page sequence.
Backlight Intensity—allows you to turn the backlight up or down. 64 GPSMAP 580/585 Owner’s Manual
Main Menu

Sound TabUse the Sound tab to customize the sounds made by your GPSMAP 580/585.
Main menu—Sound tab
Beeper—allows you to set the beeper to chime during keypresses and alarms (Key and Alarm) or on Alarms Only.
Attention Tone—allows you to turn on and off the attention tone that sounds before the vocal prompts.
Setup TabTo customize how your GPSMAP 580/585 looks, use the System tab to adjust certain system settings.
System Sub TabUse the System sub tab to control settings for system mode, speed filter, language, and external power.
To access the System sub tab:1. Select the Setup tab on the Main menu. 2. Select the System sub tab.
Main menu—System Setup tab
System Mode—allows you to set the unit to operate in Normal mode or Simulator mode (for practice ONLY).
Speed Filter—allows the unit to average speed readings. Choose from Off, Auto (automatically controls filtering), or On (allows you to enter a value in seconds).
Text Language—allows you to set the on-screen language for the unit.
WAAS—allows you to enable or disable WAAS.
GPSMAP 580/585 Owner’s Manual 65
Main Menu

Timers Sub TabUse the Timers sub tab to set timers and view information about how long the unit has been on.
To access the Timers sub tab:1. On the Main menu, highlight the Setup tab.2. Select the Timers sub tab.
Timers sub tab
User—allows you to set the timer to Count Up or Count Down. You can also Reset the timer and turn it Off. Enter a time to use when counting up or down.
Marine—appears on the Compass Page in Operation mode.
Since Midnight—allows you to show the time the unit was turned on since midnight. To reset, select All Unit Defaults on the System sub tab.
Time Sub TabUse the Time sub tab to set the time format and zone, and set the unit to conform to Daylight Saving Time. The current time and date appear in the Current Time and Date field.
To access the Time sub tab:1. On the Main menu, highlight the Setup tab.2. Select the Time sub tab.
Time sub tab
Time Zone—allows you to choose the time zone for your city so the GPSMAP 580/585 shows the correct local time. Select Other to enter a UTC Offset.
If the wrong date appears, press Menu, highlight Set Date, and press Enter. You are prompted to enter the current year. The GPSMAP 580/585 uses this information when gathering satellite data to show the correct date.
66 GPSMAP 580/585 Owner’s Manual
Main Menu

Units Sub TabUse the Units sub tab to customize measurement units.
To access the Units sub tab:1. On the Main menu, highlight the Setup tab.2. Select the Units sub tab.
Distance and Speed—allows you to select the unit of measure to show your speed and distance traveled.
Direction Display—allows you to select the unit of measure to show your direction.
Temperature—allows you to select the unit of measure to show the temperature.
Elevation—allows you to select the unit of measure to show your altitude.
Depth—allows you to select the unit of measure to show the depth.
Vertical Speed—allows you to select the unit of measure to show the vertical speed.
Location Sub TabUse the Location sub tab to change location setting information.
To access the Location sub tab:1. On the Main menu, highlight the Setup tab.2. Select the Location sub tab.
See the “Appendix” for more information about location formats and map datums.
Changing the Location FormatWhen you change the Location Format, you change the coordinate system in which a given location reading appears. The default format is latitude and longitude in degrees, minutes, and thousandths of a minute (hddd°mm.mmm). Only change the location format if you are using a map or chart that specifies a different location format or you want to use a format you are familiar with.
Selecting a Different Map DatumDatums are used to describe geographic positions for surveying, mapping, and navigation and are not actual maps built in the unit. Only change the datum if you are using a map or chart that specifies a different datum.
The default setting is WGS 84. The unit automatically selects the best datum depending on your chosen location format.
GPSMAP 580/585 Owner’s Manual 67
Main Menu

WARNING: Selecting the wrong map datum can result in substantial position errors. When in doubt, use the default WGS 84 datum for best overall performance.
Selecting a Different Heading ReferenceYou can select from Auto Mag Var, True, Grid, and User Mag Var. Auto Mag Var provides magnetic north heading references that are automatically determined from your current location. True provides headings based on a true north reference. Grid provides headings based on a grid north reference (and is used in conjunction with the grid position formats). User Mag Var allows you to specify the magnetic variation at your current location and provides magnetic north heading references based on the variation you enter. Enter the magnetic variation of your current location in the Magnetic Variation field if you selected User Mag Var for the heading.
WARNING: If User Mag Var is selected, the unit does not automatically calculate and update the magnetic variation at your present location. You must update the magnetic variation as your location changes. Failure to update this setting can result in substantial differences between the information shown on your unit and external references, such as a magnetic compass.
Com 1 and Com 2 Sub TabsUse the Com 1and Com 2 sub tabs to change the data format and control the input/output format used when connecting your unit to external devices.
To access the Com 1 and Com 2 sub tabs:1. On the Main menu, highlight the Setup tab.2. Select the Com 1or Com 2 sub tab.
Com 1 sub tab
Serial Data Format—allows you to set the data format to one of the following:
• Garmin Data Transfer—provides the proprietary format used to exchange data with a computer or another Garmin GPSMAP 580/585 .
• NMEA In/NMEA Out—supports the input/output of standard NMEA 0183 version 3.01 data and sonar NMEA input support for the DBT, DSE, DPT, MTW, and VHW
68 GPSMAP 580/585 Owner’s Manual
Main Menu

sentences. • High Speed NMEAIn/NMEA Out —supports the input/
output of high baud rate NMEA devices like AIS. • None—provides no interfacing capabilities.
Advanced NMEA Output SetupIf you are going to interface the GPSMAP 580/585 with another piece of equipment (such as a radar or autopilot), the unit must to be set to output NMEA data. The NMEA data transmission can be customized to keep the output rate at two seconds. If too many NMEA sentences are started, the unit may take longer than two seconds to update.
You can also set the Output Rate to Fast which outputs a minimum number of NMEA sentences at 1-second intervals.
To access the Advanced NMEA Output Setup: 1. On the Main menu, highlight the Setup tab.2. Select the COM 1 or COM 2 sub tab.3. Highlight the Serial Data Format field, and press Enter. 4. Select NMEAIn/NMEA Out, and press Enter. 5. Press Menu.6. Select Advanced NMEA Setup, and press Enter.
SettInG up and uSInG SonarThis section covers the sonar options that become available when an optional transducer is connected to the GPSMAP 585.
When you turn on your GPSMAP 585, the sounder module automatically turns on.
NOTE: You MUST have a transducer installed and connected to your GPSMAP585to use the sonar features.
The Sonar page is added to the end of the page sequence when you are in Operation mode. Press Page until the Sonar page appears.
Showing Sonar on the Map PageYou can change the layout of the Map page to show a split screen to show the sonar on the Map page. You must be in Operation mode to use sonar.
To show the Sonar page on the Map page:1. Press and hold PAGE. 2. Highlight Marine, and press Enter.3. Press Page or Quit.4. Press Menu. 5. Highlight Set Up Page Layout, and press Enter. 6. Highlight Map With Sonar, and press Enter.
GPSMAP 580/585 Owner’s Manual 69
Setting Up and Using Sonar

Map page with Split Screen
To resize the Map page sonar split screen:1. After showing the Sonar and Map pages together in the split
screen as described in the previous steps, press Menu. 2. Highlight Size Split, and press Enter.3. Use the Rocker to move the sizing-arrow right or left.4. Press Enter.5. Press Quit to stop resizing the screen.You can also press
Menu, highlight Stop Resizing, and press Enter to stop resizing the screen and retain the previous split setting.
Using the Sonar PageGPSMAP 585 has an built-in sonar module which allows you to simply plug in the optional transducer to make GPSMAP 585 a powerful fishfinder/flasher. “Sonar Turned Off Please Check the Transducer Connection” message appears on the Sonar page if the transducer is not properly attached..
The middle of the page contains a right-to-left scrolling sonar image of the water beneath your boat. Items appear as they pass under the transducer. The adjustable scale displays the depth of the water. The information in the upper-left corner allows you to adjust the scale and displays the water temperature.
Sonar page
70 GPSMAP 580/585 Owner’s Manual
Setting Up and Using Sonar

The sonar returns show as red (strongest), then orange (strong), yellow (medium), green (weaker), and blue (weakest). The Fish Symbols option allows you to view the actual sonar data, a fish symbol, or a combination of both. When the unit is set to Dual, the appearance of the fish symbols changes. Returns from the center of the beam (200 kHz) display solid (or narrow arches), and returns from the edges of the beam (50 kHz) display hollow (or wide arches).
The sonar display can also be set to show a split screen view of a zoomed portion of the sonar, bottom lock (display scaled from the bottom up), or a combination of these options. For example, you can choose to show dual frequency at a 2X zoom (Dual 2X) on one half and normal range dual frequency (Dual) on the other half. The current display mode appears at the bottom of each sonar display.
Adjusting the Sonar PageUse the Adjustment menu to access the settings and features most commonly used on the Sonar page. Ten main adjustment options are available: Range, Zoom, View, Gain, Target Level, Whiteline, Frequency, Depth Line, Noise Reject, and Scroll. The selected option appears in the upper-left corner.
To select an adjustment option:Use one of the following methods to select an adjustment option:• Press the Rocker right or left to scroll through the adjustment
options. When the adjustment option you want appears, press Enter.
• Press Menu, highlight Adjustments, and press Enter. Use the Rocker to highlight the adjustment, and press Enter.
After you select an adjustment option, press the Rocker up or down to change the setting.
You can also press Menu and highlight a shortcut setting to quickly change to commonly used settings and values.
Press Enter to accept the new setting (or press Quit to cancel) and return to the Sonar Page.
GPSMAP 580/585 Owner’s Manual 71
Setting Up and Using Sonar

Sonar Adjustment Options
Scroll—allows you to adjust the rate that the sonar display scrolls from right to left. If you are sitting still, or the sonar display is moving too fast, slow the scroll rate or pause the scrolling.
Range—allows you to set the display depth range used for viewing. The unit can be set to automatically track the bottom or set to a user-specified depth range.
Zoom—allows you to select a display zoom scale or split the display. When a scale other than No Zoom is selected, the Adjustment menu shows a new selection labeled View or Span. The Zoom function is divided into six levels:
• 2X Split—shows two reduced-size sonar pictures at the same time. The right half of the screen shows the complete sonar image at its original scale. The left half shows a portion of the original image at 1/2 depth scale.
• 2X Zoom—shows the full screen image at 2X zoom.
• 4X Split—shows two reduced images, the right half of the screen shows at the original depth scale. The left half of the screen shows 1/4 the original depth scale.
• 4X Zoom—shows the full screen image at 4X zoom.• Btm (Bottom) Split—shows two reduced-size images. The
right half of the screen shows the original depth scale. The left side of the screen shows sonar returns. All target depths read as a distance from the bottom.
• Btm (Bottom) Lock—shows full screen sonar returns from the bottom up. TIP: Quickly zoom in and out of the Sonar display by pressing
the IN and OUT keys. Turn off the zoom function by pressing the OUT key until the No Zoom setting appears.
View/Span—allows you to change the viewing range of a zoomed display. If the display is 2X or 4X split, only the zoomed portion on the left side of the screen is affected by the change. If the display is Bottom Split or Bottom Lock, Span adjusts how far off the bottom the unit shows data. This option is available when a Zoom scale other than No Zoom is selected.
Gain—allows you to control the sensitivity of the unit receiver To see more detail, increase the receiver sensitivity by selecting a higher gain.
72 GPSMAP 580/585 Owner’s Manual
Setting Up and Using Sonar

Target Level—allows you to adjust colors used to show sonar information. A Color Bar appears on the right side of the screen as you adjust this setting. A higher percentage results in more strong-signaled colors shown on the sonar display. A lower percentage results in more weaker-signaled colors shown on the sonar display. This setting does not increase or decrease the unit Gain.
Whiteline—allows you to control how the unit shows information about the bottom type (hard or soft). With Whiteline Off, the bottom return shows as red. Set Whiteline at Normal or 1–100% to determine bottom hardness.
Frequency—allows you to choose a transducer frequency. Frequency refers to the “pitch” of the sound that the transducer sends and receives.
Depth Line—allows you to add a horizontal depth line across the display which is used to measure the depth of underwater objects. The depth of the line appears in a box on the right side of the line. Press up or down on the Rocker to move the line on the sonar display.
Noise Reject—allows you to filter unwanted noise from the sonar display. Noise Reject can be turned Off, set to Normal (automatically adjusts for optimum viewing), or to a fixed 1–100% setting. When setting the Noise Reject, remember that a higher noise rejection setting is less likely to show fish or structures.
Resizing the Split ScreenYou can adjust the way the split screen appears. This option is only available when a zoom scale other than No Zoom is selected.
To resize the Sonar page split screen:1. From the Sonar page split screen, press Menu. 2. Highlight Size Split, and press Enter. 3. Use the Rocker to move the sizing arrow left or right until the
vertical width line shows, and then press Enter.
GPSMAP 580/585 Owner’s Manual 73
Setting Up and Using Sonar

Using the Pointer on the Sonar PageYou can show the pointer (arrow) to reference sonar items and mark underwater waypoints. When using this feature, the Sonar page pauses and depth continues to update. After pausing, there may be a momentary lapse in information from where sonar information stops and when it starts again.
To mark an underwater waypoint:1. On the Sonar page, press Menu, highlight Show Pointer,
and press Enter.2. Use the Rocker to move the pointer to the location you want
to mark, and press Enter. 3. To change the name, symbol or depth, highlight the
appropriate field, and press Enter. Make your changes, and press Enter.
4. When you are done making changes, highlight OK, and press Enter.
Setting Up SonarUse the Sonar tab on the Main menu to set up the Sonar Page.
To access the Sonar Tab: Highlight the Sonar tab on the Main menu.
Main menu—Sonar tab
Fish Symbols—allows you to select how the Sonar page shows underwater targets and background information. Select Off to show all of the available information about the underwater environment. Select a fish symbol to show only the information related to that symbol.Water Type—allows you to select the proper water type in which you are boating.
Because sound waves travel through fresh and salt water at different rates, it is necessary to select the Water Type to ensure accurate readings on the unit.
74 GPSMAP 580/585 Owner’s Manual
Setting Up and Using Sonar

Depth Number—allows you to select the efficiency of the digital depth update rate. Fast Update updates quicker and is recommended for low-noise water deeper than 50 feet. Auto is best for shallow water or high-noise areas, has a slower screen update, and is best used if you travel a wide variety of depths.If the unit is unable to track the bottom for any reason, the digits in the depth window flash on and off to alert you that the unit is not tracking the bottom.
Map Split Sonar Detail—allows you to select how much detail appears on the Map page with the sonar shown. Full Range shows data using the Range setting of the Sonar page, regardless of Zoom or Bottom Lock. Maximum Detail shows any Zoom or Bottom Lock data from the Sonar page.
Keel Offset—allows you to enter the surface reading for the depth of a keel. This makes it possible to measure depth from the bottom of your keel rather than from the location of the transducer. Enter a positive number to offset for a keel. It is also possible to enter a negative number to compensate for a large vessel which draws several feet of water. The Keel Offset is reflected in the depth reading.
Calibrating Water SpeedIf you select Temp, Spd for the Transducer option on the Setup sub tab, you must calibrate the water speed on your unit. The calibration should take place in water with little or no current.
If available, the unit automatically uses the GPS ground speed, for comparison when calibrating. GPS ground speed is not available, use either your boat speedometer reading (not always accurate) or a stopwatch to determine your speed over a certain distance. To find out your speed, divide the distance by the time.
To calibrate water speed:1. On the Setup sub tab, highlight the Calibrate Water Speed
button, and press Enter.2. Bring the boat to cruising speed. Both the top ground and
uncalibrated water speeds are shown at the bottom of the calibration window.
3. Note your top speed, then stop the boat, and press Enter.
NOTE: To calibrate water speed, you must have a transducer with a built-in speed sensor or a separate compatible speed sensor.
GPSMAP 580/585 Owner’s Manual 75
Setting Up and Using Sonar

Calibrating the Water Speed
4. By default, the top ground speed is automatically shown. If a ground speed is not available, the top uncalibrated water speed is used instead. If the new speed is correct, highlight OK, and press Enter.
If you want to manually enter a calibration, press Enter while the speed is highlighted, enter a new speed, and press Enter again.
If the boat is not moving fast enough or the speed sensor is not outputting a speed, “Boat Is Not Moving Fast Enough To Calibrate” appears at the bottom of the screen. Check that the speed sensor wheel is moving or safely increase boat speed. If there is a problem with the speed sensor or if a speed senor is not installed, “Water Speed Sensor Is Not Working” appears at the bottom of the screen. Check connections of speed sensor cables.
Setting Up the Sonar DisplayYou can set up how the sonar information appears on-screen using the Display sub tab.
To access the Display sub tab:1. On the Main menu, highlight the Sonar tab.2. Highlight the Display sub tab.
Display sub tab
Scale—allows you to select how and where you want the depth scale to appear.
Color Bar—allows you to show a gradient scale of the current Target Level setting on the Sonar Setup tab.
76 GPSMAP 580/585 Owner’s Manual
Setting Up and Using Sonar
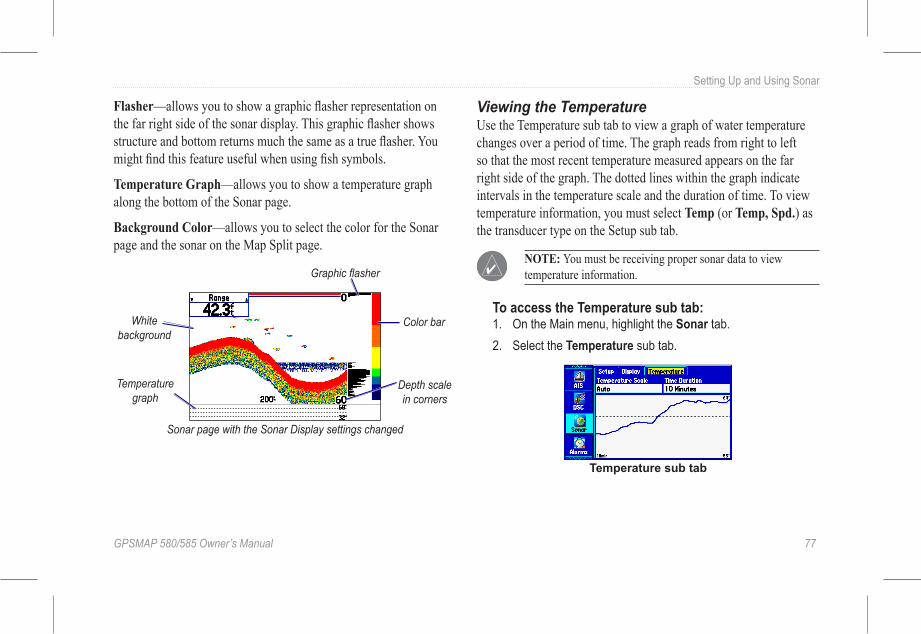
Flasher—allows you to show a graphic flasher representation on the far right side of the sonar display. This graphic flasher shows structure and bottom returns much the same as a true flasher. You might find this feature useful when using fish symbols.
Temperature Graph—allows you to show a temperature graph along the bottom of the Sonar page.
Background Color—allows you to select the color for the Sonar page and the sonar on the Map Split page.
Sonar page with the Sonar Display settings changed
Color bar
Graphic flasher
Depth scale in corners
Temperature graph
White background
Viewing the TemperatureUse the Temperature sub tab to view a graph of water temperature changes over a period of time. The graph reads from right to left so that the most recent temperature measured appears on the far right side of the graph. The dotted lines within the graph indicate intervals in the temperature scale and the duration of time. To view temperature information, you must select Temp (or Temp, Spd.) as the transducer type on the Setup sub tab.
NOTE: You must be receiving proper sonar data to view temperature information.
To access the Temperature sub tab:1. On the Main menu, highlight the Sonar tab.2. Select the Temperature sub tab.
Temperature sub tab
GPSMAP 580/585 Owner’s Manual 77
Setting Up and Using Sonar

Changing the Temperature DisplayThe graph adjusts and shows the temperature changes according to the Temperature Scale and Time Duration settings.
Temperature Scale—allows you to select a degree span from the list. Select Auto to automatically determine the best range, or select a span of 2, 4, 6, 8, or 10 degrees.
Time Duration—allows you to set how fast or slow the temperature log scrolls; a shorter time duration means a faster temperature log scroll. Select a duration from 1 minute to 2.5 hours.
Resetting the Temperature GraphTo reset the scale range for the temperature graph, press Menu, highlight Reset Auto Scale, and press Enter. You can reset the scale only when you select Auto for the Temperature Scale.
To restore the temperature graph to defaults, press Menu, highlight Restore Default, and press Enter.
appendIx
SpecificationsPhysical SpecificationsSize: 5.9” × 6.4” × 2.9” (15.0 × 16.3 × 7.4 cm) Weight: 13.6 oz (0.39 kg)Display: 5" WQVGA display with backlighting (480 ×
272 pixels)Case: Fully gasketed, high-impact plastic alloy,
waterproof to IEC 60529 IPX7 Temp. Range: 5°F to 140°F (-15°C to 60°C)
PowerSource: 10–36 VDC Fuse: AGC /3AG - 3.0 Amp
Map & MemoryBasemap: Worldwide basemapMap compatability: Garmin g2® Bluechart (optional)Waypoint: up to 6000 pointsRoute: 150 ; 250 pts/routeActive track: 50,000 points
78 GPSMAP 580/585 Owner’s Manual
Appendix
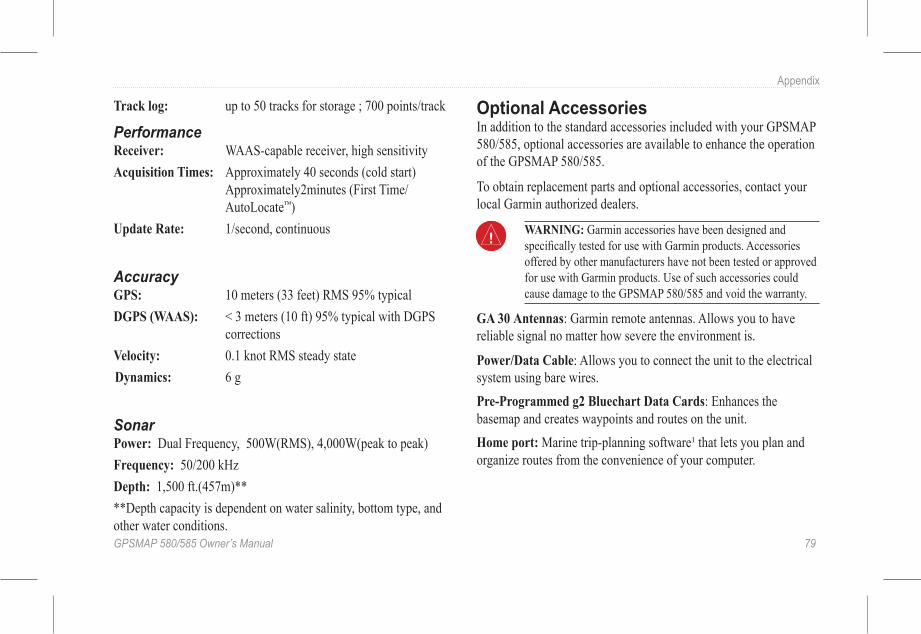
Track log: up to 50 tracks for storage ; 700 points/track
PerformanceReceiver: WAAS-capable receiver, high sensitivityAcquisition Times: Approximately 40 seconds (cold start)
Approximately2minutes (First Time/AutoLocate™)
Update Rate: 1/second, continuous
AccuracyGPS: 10 meters (33 feet) RMS 95% typicalDGPS (WAAS): < 3 meters (10 ft) 95% typical with DGPS
correctionsVelocity: 0.1 knot RMS steady state Dynamics: 6 g
SonarPower: Dual Frequency, 500W(RMS), 4,000W(peak to peak)Frequency: 50/200 kHzDepth: 1,500 ft.(457m)****Depth capacity is dependent on water salinity, bottom type, and other water conditions.
Optional AccessoriesIn addition to the standard accessories included with your GPSMAP 580/585, optional accessories are available to enhance the operation of the GPSMAP 580/585.
To obtain replacement parts and optional accessories, contact your local Garmin authorized dealers.
WARNING: Garmin accessories have been designed and specifically tested for use with Garmin products. Accessories offered by other manufacturers have not been tested or approved for use with Garmin products. Use of such accessories could cause damage to the GPSMAP 580/585 and void the warranty.
GA 30 Antennas: Garmin remote antennas. Allows you to have reliable signal no matter how severe the environment is.
Power/Data Cable: Allows you to connect the unit to the electrical system using bare wires.Pre-Programmed g2 Bluechart Data Cards: Enhances the basemap and creates waypoints and routes on the unit. Home port: Marine trip-planning software¹ that lets you plan and organize routes from the convenience of your computer.
GPSMAP 580/585 Owner’s Manual 79
Appendix

Install the Wiring HarnessThe unit comes with a wiring harness which connects the unit to power and the transducer with one easy-to-remove connection, and provides interface capabilities for connecting external devices.
The color code in the diagram (see page 81/82) indicates the appropriate harness connections. The replacement fuse is a AGC/3AG - 3-Amp fuse. If it is necessary to extend the power wires, use 22 AWG wire.
CAUTION: DO NOT cut the transducer cable, because this voids your warranty.
Wire the unit directly to an unused holder on your current fuse block. If you are using the fuse block on the boat, remove the in-line fuse holder supplied with the unit.
CAUTION: The maximum unit input voltage is 36 Volts DC. Do not exceed this voltage, because this can damage the unit and void the warranty.
NOTE: During a typical installation, use only the red and black wires. The other wires do not have to be connected for normal operation of the unit. For information on connecting to a NMEA device.
To install the wiring harness:1. Use a test light or voltmeter to determine the polarity of the
voltage source.2. Connect the red (+ or positive) wire to the positive voltage
terminal. (If you use the fuse block on the boat, route the positive connection through the fuse, as shown on the diagram.)
3. Connect the black (- or ground) wire to the negative voltage terminal.
4. Install or check the 3-Amp fuse (on the fuse block on the boat or in the in-line holder).
5. Align the notches on the cable plug and on the back of the unit. Insert the cable into the connector, and turn the lock ring counter-clockwise until it stops.
—
+
To 10-36 Volt boat supply2A3A
-
+Boat ground
3-Amp fuse
To unitFuse block
80 GPSMAP 580/585 Owner’s Manual
Appendix

DC PowerSource
NMEA Device 1(Single ended)
NMEA Device 2(Single ended)
RXD+
GND
TXD+
TXD+
RXD+
GND
(RED) + Power (10 - 36 Vdc)
(BLACK) Ground (Power and NMEA 0183)
(ORANGE) Accessory On
(BLUE) NMEA 0183 Port 1 Tx (Out)
(BROWN) NMEA 0183 Port 1 Rx (In)
(GREY) NMEA 0183 Port 2 TX+ (Out+)
(GREEN) NMEA 0183 Port 2 RX- (In-)
(WHITE) NMEA 0183 Port 2 RX+ (In+)
(YELLOW) Alarm Low
(VIOLET) NMEA 0183 Port 2 TX- (Out-) Alarm Relay
100ma maxcoil current
To Transducer(If applicable)
GPSMAP 580/585 Series Wiring Harness
PIN 8 - Black (Ground)
PIN 13 - Red (DC Positive)
PIN 7 - Yellow (Alarm)
PIN 12 - White (P2 NEMA In+)
PIN 16 - Green (P2 NEMA In-)
PIN 18 - Blue (P1 NEMA Out)
GPSMAP 580/585 Series Pin Assignment
GPSMAP 580/585 Owner’s Manual 81
Appendix
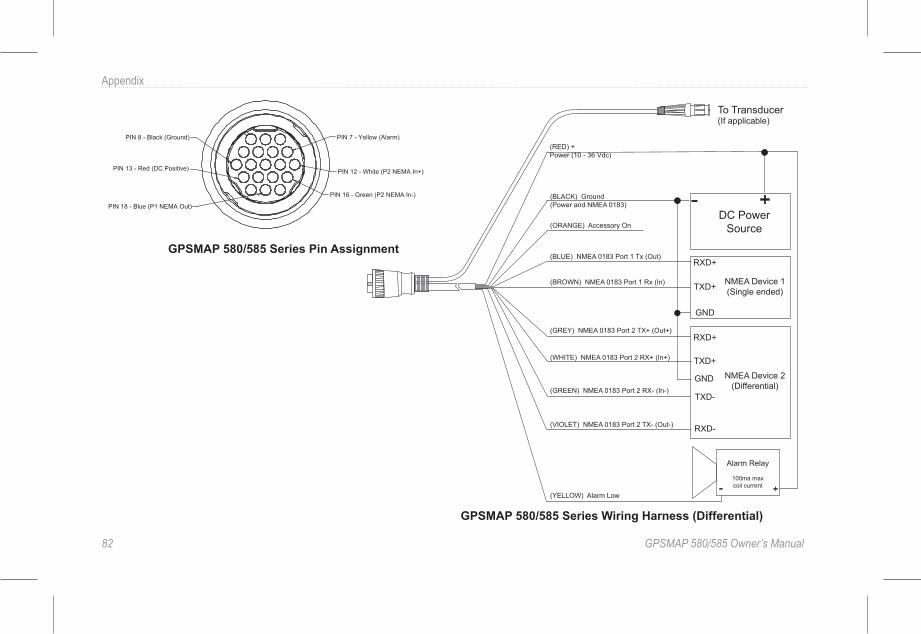
DC PowerSource
NMEA Device 1(Single ended)
NMEA Device 2(Differential)
RXD+
GND
TXD+
TXD+
TXD-
RXD+
RXD-
GND
(RED) + Power (10 - 36 Vdc)
(BLACK) Ground (Power and NMEA 0183)
(ORANGE) Accessory On
(BLUE) NMEA 0183 Port 1 Tx (Out)
(BROWN) NMEA 0183 Port 1 Rx (In)
(GREY) NMEA 0183 Port 2 TX+ (Out+)
(GREEN) NMEA 0183 Port 2 RX- (In-)
(WHITE) NMEA 0183 Port 2 RX+ (In+)
(YELLOW) Alarm Low
(VIOLET) NMEA 0183 Port 2 TX- (Out-)
Alarm Relay
100ma maxcoil current
To Transducer(If applicable)
GPSMAP 580/585 Series Wiring Harness (Differential)
PIN 8 - Black (Ground)
PIN 13 - Red (DC Positive)
PIN 7 - Yellow (Alarm)
PIN 12 - White (P2 NEMA In+)
PIN 16 - Green (P2 NEMA In-)
PIN 18 - Blue (P1 NEMA Out)
GPSMAP 580/585 Series Pin Assignment
82 GPSMAP 580/585 Owner’s Manual
Appendix

Satellite Information
Satellite Sky View
45°
90°
Outer ring - the horizon
Inner ring- 45° above the horizon
Center dot - 90° above the horizon
Satellite LocationThe location of each available satellite is shown over two location rings on the Satellite Information Page. The outer ring represents the horizon, the inner ring represents 45° above the horizon, and the center represents directly overhead. When the unit is using a satellite for navigation, the satellite number is highlighted on the location rings. The unit can show satellite location with either North or your current heading at the top of the screen.
Satellite Strength Indicator BarsThe Satellite Strength Indicator Bars show the strength of the signal being received and the status of the signal. The bars are either shaded or filled. A hollow gray bar means the unit is in the process of storing orbital data it is receiving from the satellite signal. When the bar turns solid green, the unit is using the satellite signal for navigation. A “D” in or above the bar means
differential corrections (WAAS) are being applied to that satellite.
Differential FieldDifferential receiver status is indicated in the lower-left field of the GPS tab and shows one of the following conditions:
• None—no optional beacon receiver is attached or enabled in the Interface sub tab on the Main menu—Setup tab or WAAS is disabled.
• Searching for WAAS—WAAS is enabled and the receiver is searching for WAAS signal.
• Using WAAS—WAAS capability is enabled and the unit is receiving WAAS corrections.
What is WAAS?The Wide Area Augmentation System (WAAS) is an FAA-funded project to improve the overall integrity of the GPS signal and increase position accuracy for users in North America.
The system is made up of satellites and approximately 25 ground reference stations positioned across the United States that monitor GPS satellite data. Two master stations, located on either coast, collect data from the reference stations and create a GPS data correction message. According to the FAA’s Web site, testing in September 2002 of WAAS confirmed an accuracy performance of 1–2 meters horizontal and 2–3 meters vertical throughout the
GPSMAP 580/585 Owner’s Manual 83
Appendix
majority of the continental United States and portions of Alaska.
WAAS is just one service provider that adheres to the Minimum Operational Performance Standard (MOPS) for global Satellite Based Augmentation Systems (SBAS).
All SBAS systems use the same receiver frequency; therefore, any operational SBAS system may be capable of providing your GPS unit with increased accuracy at any location in the world.
Currently, enabling WAAS on your Garmin GPSMAP 580/585 in regions not supported by ground stations may not improve accuracy, even when receiving signals from an SBAS satellite.
To enable WAAS, go to GPS tab and press Menu selecting “Enable WAAS”.
Digital Selective CallingDigital Selective Calling (DSC). DSC uses marine VHF radio GPS technology to transmit and receive location information. DSC is used by mariners to assist them in two major areas: Distress Calls and Position Reporting.
A non-emergency DSC Position Report allows mariners to exchange and show their position. When you receive a DSC position, you can create a waypoint or to show the received position on an electronic map.
An emergency DSC Distress Call allows a vessel to transmit a substantial amount of information in a single transmission, or “call,” without the need for voice communication. When nearby mariners or rescue teams receive the DSC signal, an alarm sounds, and they immediately receive the position of the caller.
The mariner or rescue team can navigate (Go To) the caller’s position or forward the call to the Coast Guard. When the Coast Guard receives the call, they can immediately access the caller’s information (such as who they are and the type of vessel) in their database while they are in transit to the caller’s location.
84 GPSMAP 580/585 Owner’s Manual
Appendix

In order to use DSC, you must first register your VHF radio with the FCC and receive a Maritime Mobile Service Identity (MMSI) number.
What is a Maritime Mobile Service Identity (MMSI) Number?The 9-digit MMSI number is similar to a phone number when used in a position report, and is a unique identifier to the Coast Guard when used in an emergency distress call. Garmin does not supply this number!
How Are MMSI Assignments Obtained?If you are outside the United States, you can obtain an MMSI assignment from their telecommunications authority or ship registry, often by obtaining or amending their ship station license.
How Can Garmin Help You with DSC?To receive distress calls or position reports, you must have a DSC-equipped chartplotter as well as a VHF radio with DSC support. During normal, non-emergency position report communication, Channel 70 (156.525 MHz) has been set aside as the VHF/DSC digital call channel.
For a distress call, press the Mayday button on the VHF radio. The call transmits on an emergency channel with the MMSI number
attached to the call, if the receiver has DSC support. Any DSC-equipped mariner (on sea or land) within range can receive the call.
When the GPSMAP 580/585 is connected to a VHF with DSC support, the GPS unit shows a call list, log, and a directory. Basic wiring is required for the Garmin unit and VHF radio to send and receive NMEA data from each other.
GPSMAP 580/585 Owner’s Manual 85
Appendix

MessagesAccuracy Alarm—the GPS accuracy has fallen outside of user-set value.Alarm Clock—the alarm clock has sounded.Antenna Shorted to Ground—the external GPS antenna has an electrical connection problem. Contact Garmin Product Support.Approaching Turn—you are nearing a turn in a route.Arriving at Destination—you are nearing your destination.Basemap Failed Unit Needs Repair—there is an internal problem with your unit. Contact Garmin Product Support to have the unit serviced.Boat Is Not Moving Fast Enough to Calibrate—the boat is not moving fast enough for the speed wheel to provide a valid speed.Can’t Unlock Maps—no applicable unlock code for one or more maps was found. All MapSource maps are not accessible.Dangerous Target— AIS indicates vessels which will approach to your boat in 1 kilometers or within 3 minutes.Database Error—internal problem with the unit. Contact your dealer or Garmin Product Support to have the unit repaired.Deep Water—the water is deeper than the amount set in the Deep Water Alarm.Detail Maps Don’t Support Routing—maps that are loaded on the data card do not support automatic route calculation.Distress Call—a DSC distress call was received. Take appropriate action.Dragging Anchor—the distance set in the Anchor Drag Alarm was
exceeded.Drift Alarm—the water depth has changed by the amount entered in the Drift Alarm setup.Fish Alarm—a suspended target was detected. The unit shows an icon and beeps (if enabled). This alarm does not show a message banner.Lost Heading Sensor— refers to a lost connection between heading sensor and the system. Lost Satellite Reception—the unit is unable to receive satellite signals.Memory Full—unit memory is full, no further data can be saved.Memory (RAM) Failed Unit Needs Repair—there is an internal problem with your unit. Contact Garmin Product Support to have the unit serviced.Memory (ROM) Failed Unit Needs Repair—there is an internal problem with your unit. Contact Garmin Product Support to have the unit serviced.Near Proximity Point—you have reached the distance set for a proximity waypoint.NMEA Depth is Below Transducer—no keel offset value has been received from the external sonar device.No Diff GPS Location— the unit is not receiving DGPS data.No DGPS Position—no differential connection data is available, or not enough data is available to calculate a DGPS position.No Tide Stations for that Area—no tide stations within 100 miles of the area.None Found—no data matched the search criteria.
86 GPSMAP 580/585 Owner’s Manual
Appendix

Off Course—you are off course by the distance set in the Off Course Alarm.Proximity Memory Full—no additional proximity waypoints can be saved.Proximity Radius Overlaps—the radius of two proximity waypoints overlap.Route Already Exists—you have entered a route name that already exists.Route Calculation Error—no route can be calculated.Route Memory Full—no additional routes can be saved.Route Truncated—uploaded route from another device has more than 300 waypoints.Route Waypoint Memory Full—no additional route waypoints can be saved.Shallow Water—the water is shallower than the amount set in the Shallow Water Alarm.Sonar Failed Unit Needs Repair—there is an internal problem with the unit. Contact Garmin Product Support to have the unit serviced.Sunrise, Switching to Day Mode—the unit is switching to Day Mode.Sunset, Switching to Night Mode—the unit is switching to Night Mode.Track Already Exists—a saved track with the same name already exists.Track Log Full—the track log is full and track recording was turned off. To record more track points, you need to clear the track log and turn track recording on. Track Memory Full—no more track data can be stored. Delete the old track data to store the new data.Track Truncated—a complete uploaded track does not fit in memory. The oldest track log points have been deleted.
Transducer Disconnected, Sonar Turned Off—the unit has no transducer attached, has a bad cable/transducer, or has a disconnected transducer cable.Transfer Complete—data transfer is complete. User Timer Expired—the Timer Alarm value has counted down to zero.Water Speed Sensor is Not Working—the speed sensor is not detected. Check the connections.Water Temperature Alarm—sonar has reported a temperature above, below, inside, or outside the specified value(s).Waypoint Already Exists—a waypoint with the same name already exists.Waypoint Memory Full—the unit has stored the maximum number of waypoints.
GPSMAP 580/585 Owner’s Manual 87
Appendix

Data Field OptionsThe following list provides a brief description of each data field option. Some of these options are supported only by devices interfaced to your GPSMAP 580/585 .Accuracy—the current accuracy of your GPS determined location.Bearing—the compass direction from your current location to a destination.Course—the preferred path of travel from your starting location to a destination.Course to Steer—the recommended direction to steer in order to reduce cross-track error and return to the course line. Shown as Steer.Cross Track—the distance you are off a preferred course in either direction, left or right.Depth (Marine Only)—the depth of water from the sonar NMEA input.Dest Wpt—see Waypoint (Destination).Destination Position— It shows the latitude/longitude data of your destinationDistance (Destination)—the entire distance of a route, from beginning to end.Distance (Next)—the distance to the next point on a route.ETA (Destination)—Estimated Time of Arrival. The estimated time you will reach your destination.ETA (Next)—Estimated Time of Arrival. The estimated time you will reach the next point on your route.ETE (Destination)—Estimated Time Enroute. The estimated time required to reach your destination.
ETE (Next)—Estimated Time Enroute. The estimated time required to reach the next point on your route.Elevation—the altitude (height) above or below mean sea level (MSL).GPS Status—the current status of the GPS receiver, such as “3D GPS.”Location (Lat/Lon)—your current location as latitude/longitude coordinates. Location (Selected)—your current location described in the selected units of measure (other than lat/lon). Max Speed—the maximum speed the vehicle has moved since last reset.Mov Avg Spd—see Trip Avg. Speed (Moving).Move Timer—see Trip Timer (Moving).Next Course—the course your route will take after you reach the next waypoint.Next Turn—the direction of the next turn on an active route.Next Wpt—see Waypoint (Next).Odometer—the total distance traveled since the odometer was reset. Pointer—the arrow indicating the direction to travel to the next point on a route.Speed—your current vehicle speed can be measured in miles per hour, kilometers per hour, or knots.Steer—see Course to Steer.Sunrise—the time at which the sun rises on the current day.Sunset—the time at which the sun sets on the current day.
88 GPSMAP 580/585 Owner’s Manual
Appendix

Time—the current time and date. It can be shown in 12-hour or 24-hour format in local time or universal (UTC) time.Track—the direction of movement relative to a ground position. Also referred to as ground track.Trip Avg. Speed (Moving)—the average speed while moving since the last reset of the trip computer. Appears as Mov Avg Spd.Trip Avg. Speed (Total)—the total average speed traveled since the last reset of the trip computer. Appears as Ttl Avg Spd.Trip Odometer—the total distance traveled since the trip computer was reset. Trip Timer (Moving)—the length of time your vehicle has been in motion, since the trip computer was reset. Appears as Move Timer.Trip Timer (Total)—the total time the unit has been tracking since the trip computer was reset. Ttl Avg Spd—see Trip Avg. Speed (Total).Turn—the distance between Bearing (BRG) and Track (TRG). L indicates you should turn left. R indicates you should turn right. The degrees indicates the difference angle and the number of degrees you should turn.User Timer—the timer you set on the Main menu. Velocity Made Good—the rate of closure on a destination based on your current speed and course of travel. Appears as VMG.Vertical Speed—the rate of climb or descent.Voltage—the direct current voltage level of an external power source.Water Speed (Marine Only)—the data acquired from measurement devices interfaced to the unit is used to calculate your current speed over water.
Water Temperature (Marine Only)—the temperature of water at a measured depth using measurement devices interfaced to the unit.Waypoint (Destination)—the last point on a route, your destination. Appears as Dest Wpt.Waypoint (Next)—the next waypoint in your route. Appears as Next Wpt.
GPSMAP 580/585 Owner’s Manual 89
Appendix

Software License AgreementBY USING THE GPSMAP 580/585, YOU AGREE TO BE BOUND BY THE TERMS AND CONDITIONS OF THE FOLLOWING SOFTWARE LICENSE AGREEMENT. PLEASE READ THIS AGREEMENT CAREFULLY.Garmin Ltd. and its subsidiaries (“Garmin”) grant you a limited license to use the software embedded in this device (the “Software”) in binary executable form in the normal operation of the product. Title, ownership rights, and intellectual property rights in and to the Software remain in Garmin and/or its third-party providers.You acknowledge that the Software is the property of Garmin and/or its third-party providers and is protected under the United States of America copyright laws and international copyright treaties. You further acknowledge that the structure, organization, and code of the Software, for which source code is not provided, are valuable trade secrets of Garmin and/or its third-party providers and that the Software in source code form remains a valuable trade secret of Garmin and/or its third-party providers. You agree not to decompile, disassemble, modify, reverse assemble, reverse engineer, or reduce to human readable form the Software or any part thereof or create any derivative works based on the Software. You agree not to export or re-export the Software to any country in violation of the export control laws of the United States of America or the export control laws of any other applicable country.
Limited WarrantyThis Garmin product is warranted to be free from defects in materials or workmanship for one year from the date of purchase. Within this period, Garmin will, at its sole option, repair or replace any components that fail in normal use. Such repairs or replacement will be made at no charge to the customer for parts or labor, provided that the customer shall be responsible for any transportation cost. This warranty does not apply to: (i) cosmetic damage, such as scratches, nicks and dents; (ii) consumable parts, such as batteries, unless product damage has occurred due to a defect in materials or workmanship; (iii) damage caused by accident, abuse, misuse, water, flood, fire, or other acts of nature or external causes; (iv) damage caused by service performed by anyone who is not an authorized service provider of Garmin; or (v) damage to a product that has been modified or altered without the written permission of Garmin. In addition, Garmin reserves the right to refuse warranty claims against products or services that are obtained and/or used in contravention of the laws of any country.
This product is intended to be used only as a travel aid and must not be used for any purpose requiring precise measurement of direction, distance, location or topography. Garmin makes no warranty as to the accuracy or completeness of map data in this product.
THE WARRANTIES AND REMEDIES CONTAINED HEREIN ARE EXCLUSIVE AND IN LIEU OF ALL OTHER WARRANTIES EXPRESS, IMPLIED, OR STATUTORY, INCLUDING ANY LIABILITY ARISING UNDER ANY WARRANTY OF MERCHANTABILITY OR FITNESS FOR A PARTICULAR PURPOSE, STATUTORY OR OTHERWISE. THIS WARRANTY GIVES YOU SPECIFIC LEGAL RIGHTS, WHICH MAY VARY FROM STATE TO STATE.
90 GPSMAP 580/585 Owner’s Manual
Appendix

IN NO EVENT SHALL GARMIN BE LIABLE FOR ANY INCIDENTAL, SPECIAL, INDIRECT OR CONSEQUENTIAL DAMAGES, INCLUDING, WITHOUT LIMITATION, DAMAGES FOR ANY TRAFFIC FINES OR CITATIONS, WHETHER RESULTING FROM THE USE, MISUSE OR INABILITY TO USE THE PRODUCT OR FROM DEFECTS IN THE PRODUCT. SOME STATES DO NOT ALLOW THE EXCLUSION OF INCIDENTAL OR CONSEQUENTIAL DAMAGES, SO THE ABOVE LIMITATIONS MAY NOT APPLY TO YOU.
Garmin retains the exclusive right to repair or replace (with a new or newly-overhauled replacement product) the device or software or offer a full refund of the purchase price at its sole discretion. SUCH REMEDY SHALL BE YOUR SOLE AND EXCLUSIVE REMEDY FOR ANY BREACH OF WARRANTY.
To obtain warranty service, contact your local Garmin authorized dealer or call Garmin Product Support for shipping instructions and an RMA tracking number. Securely pack the device and a copy of the original sales receipt, which is required as the proof of purchase for warranty repairs. Write the tracking number clearly on the outside of the package. Send the device, freight charges prepaid, to any Garmin warranty service station.
Online Auction Purchases: Products purchased through online auctions are not eligible for warranty coverage. Online auction confirmations are not accepted for warranty verification. To obtain warranty service, an original or copy of the sales receipt from the original retailer is required. Garmin will not replace missing components from any package purchased through an online auction.
International Purchases: A separate warranty may be provided by international distributors for devices purchased outside the United States depending on the country. If applicable, this warranty is provided by the local in-country distributor and this distributor provides local service for your device. Distributor warranties are only valid in the area of intended distribution. Devices purchased in the United States or Canada must be returned to the Garmin service center in the United Kingdom, the United States, Canada, or Taiwan for service.
Garmin International, Inc. 1200 East 151st Street, Olathe, Kansas 66062, USA Tel. (913) 397-8200 or (800) 800-1020
Garmin (Asia) Corporation No. 68, Jangshu 2nd Road, Sijhih, Taipei County, TaiwanTel. 886/2.2642.9199 Fax 886/2.2642.9099
Garmin (Europe) Ltd. Liberty House, Hounsdown Business Park, Southampton, Hampshire, SO40 9LR UK Tel. +44 (0) 870.8501241 (outside the UK) 0808.2380000 (within the UK) Fax +44 (0) 870.8501251
Garmin China Co., Ltd. Suite 0805 , Air China Plaza, No. 36 Xiaoyun Road, Chaoyang District, Beijing 100027, China Tel. +86-10-8447-5550 Fax +86-10-8447-5030
GPSMAP 580/585 Owner’s Manual 91
Appendix

Declaration of Conformity (DoC)Hereby, Garmin, declares that this GPSMAP 580/585 is in compliance with the essential requirements and other relevant provisions of Directive 1999/5/EC.
To view the full Declaration of Conformity, see the Garmin Web site for your Garmin product: www.garmin.com.
92 GPSMAP 580/585 Owner’s Manual
Appendix

GPSMAP® 580/585海图仪 /多功能 GPS 鱼探机
用户手册
介绍感谢您选择Garmin GPSMAP 580,本系列产品秉承Garmin GPS一贯出色的性能和属性丰富的绘图引擎,为您打造出无比卓越的航海导航仪。
Garmin GPSMAP 580是全功能的航海导航仪,而GPSMAP 585则整合了探测鱼群的功能。在购买GPSMAP 585时,用户应选择适当的鱼探仪。如果您对于选择鱼探仪有任何问题,欢迎与您的Garmin经销商联系。
为了充分利用新导航系统,请阅读本手册,并学习设备的操作程序。本手册组织为下列章节:
入门指南一节概述设备,说明如何打开设备及各简介各使用接口。
各章节说明乃按照主菜单左侧页面的顺序为用户做操作设定上的介绍。
附录包含技术规格、可选附件、维护信息和其他产品信息。
北京佳明航电科技有限公司(Garmin中国分公司) 北京市朝阳区酒仙桥中路10号星科大厦A座2层电话:400-819-1899网站:www.garmin.com.cn
94 GPSMAP 580/585 用户手册

目录表
介绍 ...........................................................94入门指南 ...................................................96
0.0 设备概述 ...........................................................960.1 产品概观 ...........................................................960.2 按键说明 ...........................................................970.3 调节背光 ...........................................................980.4 各主要页面说明 ...............................................980.5 主菜单及其子页面说明 ...................................99
第一章 GPS页面 ......................................99第二章 航线页面 ......................................101第三章 航点页面 ......................................102第四章 航迹页面 ......................................103第五章 AIS页面 ........................................104第六章 DSC 页面 .....................................105第七章 声纳页面 ......................................106第八章 报警页面 ......................................108第九章 日历页面 ......................................109第十章 天文页面 ......................................109
第十一章 信息页面 ..................................110第十二章 显示页面 ..................................111第十三章 声音页面 ..................................111第十四章 用户数据页面 ..........................112第十五章 设置页面 ..................................112附录 ...........................................................115
技术规格 .................................................................115
GPSMAP 580/585 用户手册 95

入门指南
0.0 设备概述
GPSMAP 580是专为亚洲地区设计的彩色导航产品,而GPSMAP 585则内建声纳模块,可用来探测鱼群。本系列导航产品配有在强烈日光下清晰易读的高质量液晶显示屏,内置标准的世界地图,为您提供最好的导航与鱼群探测的解决方案。
0.1 产品概观背光照明WQVGA显示屏
便于夜间操作的背光键盘SD卡插槽
电源/数据传输接口 外接天线接口
(各按键功能请参考下页说明)96 GPSMAP 580/585 用户手册

0.2 按键说明
翻页键电源键 菜单键
导航/MOB键 退出键 标记/输入键
方向键
缩放键
电源键─在关机状态时,短按此键可打开设备。在开机状态时,短按此键可调整背光亮度,长按此键则可关闭设备。
翻页键─在任何页面下按下此键,则可跳到主页面,连续按此键则可依序切换各主页面(各主页面说明请参考0.4节之说明)。菜单键─在任何页面下按下此键则会跳出一个选项菜单,
该选项菜单会显示当前页面可做的进一步设定。而在任何页面下连续按此键两次则会跳到主菜单页面。
方向键─按上、下、左、右键可突出显示选项并输入数据,或在地图页面上用于移动箭头。
缩放键─按下此键可以调整地图缩放范围。
标记/输入键─用于确认用户所选择的项目。在地图页面时,则可用来将光标所指示位置创建为新航点。
退出键─用于反向顺序循环切换主页面,或退出当前页面并取消当前操作。
导航/MOB键─在任何情况下按下此键,会跳出导航菜单让使用者做导航相关的设定。而在任何页面下持续按住此键或者连续两次按下此键则会跳出一窗口,询问是否要记录”目前所在位置”为紧急航点(MOB)。
GPSMAP 580/585 用户手册 97

0.3 调节背光
依照环境光源调节背光,以便更好地观察屏幕。
调节背光亮度的方法:1. 在开机的状态下,单击电源键。
2. 利用方向键向上提高亮度或向下降低亮度。
3. 按标记/输入键或退出键可离开“背光调节”窗口。
0.4 各主要页面说明
GPSMAP 580有五个主要页面:地图、罗盘、导航、当前航迹和位置数据。若购买GPSMAP 585并连接上鱼探仪配件后,则可看到声纳页面。可按翻页键或退出键在各页面之间随意切换。
地图页面 罗盘页面 导航页面
位置数据页面 当前航线页面 声纳页面 (仅GPSMAP 585)
操作小提示: 在查看各页面时,可按下菜单键查看进一步的设定,如可更改页面中的数据区、页面布局、编辑地图、添加航点等。
98 GPSMAP 580/585 用户手册
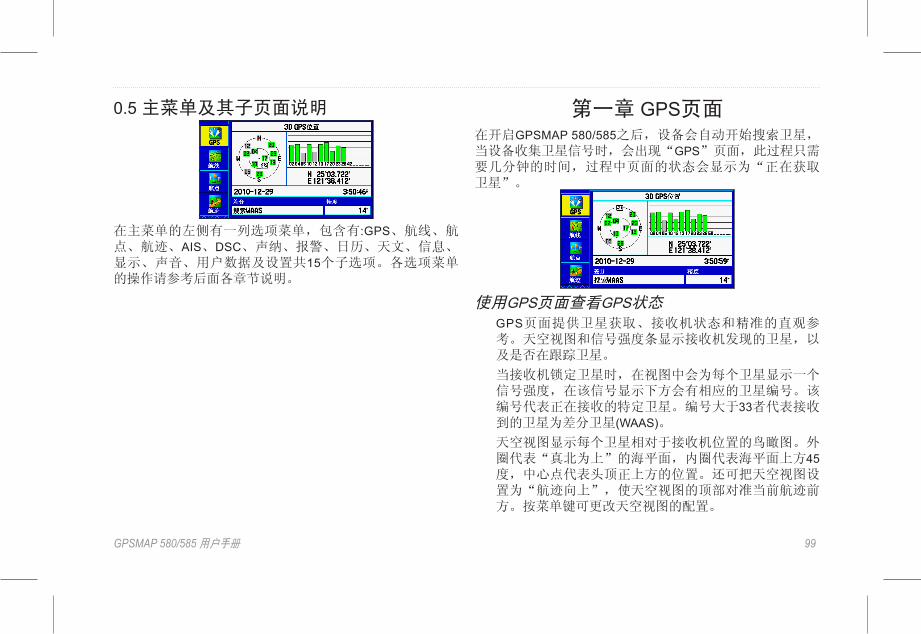
0.5 主菜单及其子页面说明
在主菜单的左侧有一列选项菜单,包含有:GPS、航线、航点、航迹、AIS、DSC、声纳、报警、日历、天文、信息、显示、声音、用户数据及设置共15个子选项。各选项菜单的操作请参考后面各章节说明。
第一章 GPS页面在开启GPSMAP 580/585之后,设备会自动开始搜索卫星,当设备收集卫星信号时,会出现“GPS”页面,此过程只需要几分钟的时间,过程中页面的状态会显示为“正在获取卫星”。
使用GPS页面查看GPS状态 GPS页面提供卫星获取、接收机状态和精准的直观参
考。天空视图和信号强度条显示接收机发现的卫星,以及是否在跟踪卫星。
当接收机锁定卫星时,在视图中会为每个卫星显示一个信号强度,在该信号显示下方会有相应的卫星编号。该编号代表正在接收的特定卫星。编号大于33者代表接收到的卫星为差分卫星(WAAS)。
天空视图显示每个卫星相对于接收机位置的鸟瞰图。外圈代表“真北为上”的海平面,内圈代表海平面上方45度,中心点代表头顶正上方的位置。还可把天空视图设置为“航迹向上”,使天空视图的顶部对准当前航迹前方。按菜单键可更改天空视图的配置。
GPSMAP 580/585 用户手册 99

GPS 状态
接收机状态
栏
天空视图
信号强度条
获取卫星讯号的三个阶段显示:
• 无信号强度条─接收机正在获取卫星。
• 白色信号强度条─接收机已发现卫星,正在收集数据。
• 绿色信号强度条─接收机已从卫星收集到必要的数据。
当GPSMAP 580/585获取到所需的数据时,状态区会显示接收机的状态。然后,设备会更新位置、日期和时间。
接收机状态接收机状态会显示下列状况:
• 正在搜索天空─接收机正在搜索卫星。
• 自动定位─接收机正在搜索每一个可用的GPS卫星来进行定位。
• 正在获取卫星─接收机正在从可见的GPS卫星中获取数据。
• 2D GPS位置─至少获取到三个卫星,并确定二维位置。此时若接收到DGPS差分信号,会显示为“2D差分定位”,同时卫星强度条中会出现一个字符“D”。
• 3D GPS位置─至少获取到四个位置,并确定三维位置。此时若接收到DGPS差分信号,会显示为“3D差分定位”,同时卫星强度条中会出现一个字符“D”。
• 卫星接收失败─接收机无法跟踪到足够的卫星以获得二维或三维位置。
• 接收机无法工作─接收机无法工作,这可能是由于干扰或卫星状况异常。关闭设备,然后重新打开,进行复位。
• 模擬GPS─接收机处于模拟模式。
• GPS关闭─GPS接收机被关闭。
GPS页面在GPS页面下,按下菜单键打开选项菜单可发现四个设定选项:【开始/停止模拟】、【启用/取消WAAS】、【北/航迹向上俯视图】、【新位置】。
开始/停止模拟─开始开始/停止模拟模式,在学习如何使用设备时,这很有用。
启用/取消WAAS─启用/取消WAAS功能。
北/航迹向上俯视图─把GPS页面上的天空视图显示定向为
100 GPSMAP 580/585 用户手册

北向上或航迹向上。
新位置─允许复位当前位置,以进行模拟。当处于模拟模式时启用此功能。
GPS提示• 当GPS接收基础于关闭状态时,如果您的行程超过800公里,再打开接收机时,接收机进行初始化和查找您的位置所用的时间可能比正常情况要长。
• 由于建筑、隧道、密集树木等干扰,GPS接收机可能丢失卫星讯号。建议监视GPS状态。
• 若希望了解GPS,请访问www.garmin.com/aboutGPS/。
第二章 航线页面在此页面下,可编辑窗体中已建立的航线,或新增航线。
航线页面在航线页面下,按下菜单键打开选项菜单有六个选项:【当前航线】、【创建新航线】、【复制航线】、【删除航线】、【全部清除】、【设置航线】。
其中【当前航线】显示当前航线的内容(航点、航向、距离等),用户可逐一更改各数据区内的数据,而【创建新航线】则利用用户自建的航点,建立新航线。
航线页面选项菜单
GPSMAP 580/585 用户手册 101

编辑航线利用方向键选择要进行编辑的航线后,按下标记/输入键即可开始编辑该航线的内容。
新增航线利用方向键选择表中虚线后,按下标记/输入键即可利用用户自建的航点,建立新航线。
第三章 航点页面在此页面下,可编辑窗体中已建立的航点,或新增航点。按下菜单键打开选项菜单可发现七个设定选项:【创建航路点】、【删除航路点】、【按类别删除】、【按符号删除】、【按距离删除】、【全部清除】、【编辑类别】。
用户子页面利用方向键选择要进行编辑的航点后,按下标记/输入键即可开始编辑该航点的内容。其中包含符号、名称、类别、注释、高度、水深、温度、位置(经纬度)。
102 GPSMAP 580/585 用户手册

报警点子页面在报警页面中,使用者可以针对某些特定航点建立警报,当船只与该航点的距离小于用户的设定值时则系统会发出警示音。
第四章 航迹页面在您移动时,GPSMAP 580/585会同时在“地图”页面上绘制/记录一条电子的“面包屑”,即为航迹。所记录下来的航迹包含所经过路径的时间与位置。
为了达到最佳效果,建议在开始每次行程前,先清空航迹日志。因为当航迹储存空间已满时,新航迹可能会覆盖较早的航迹或是停止记录(此部分设定后面内文会详叙)。
当前航迹子页面
利用方向键选择要进行编辑的内容后,按下标记/输入键即可开始编辑。内容包含记录模式、颜色、间隔、值。
• 记录模式─关闭: 设备不记录航迹。计满停止:记录航迹日志直到内存满为止。覆盖:当航迹存储空间已满时,则会覆盖最久的航迹记录。
• 颜色─选择航迹显示在地图上的颜色。
• 间隔─距离:在行程超过“值”字段中的距离时,即记录航迹点。时间:在经过“值”字段中的时间之后,即记录航迹点。分辨率: 基于分辨率记录航点,“值”字段
GPSMAP 580/585 用户手册 103

中输入的分辨率越高,设备就会产生越多的点来记录航迹。
• 值:对照间隔所选的项目,输入相对应要求的距离、时间或分辨率。
已存航迹子页面此页面可查看、编辑每个记录的航迹,亦可选择“航迹返航”依照所选择的航迹沿原航线返回。本系统最多可同时保存50条航迹。
第五章 AIS页面此页面用于查看其他船只的信息,若要使用此功能,设备必须连接外部AIS(自动识别系统)设备。
列表子页面
查看设备正在监控的所有船只的信息。AIS列表显示MMSI及船只的名称,并按照距离范围排序(距离本船最近的船只列于顶部)。
设置子页面开启或关闭AIS显示功能。
104 GPSMAP 580/585 用户手册

第六章 DSC 页面DSC功能需结合船用无线电和GPS收发位置信号使用,船员使用DSC可发出求救呼叫和提供位置报告。当您的GPSMAP 580/585与配有DSC输出的无线电正确的连接时,您可以在有效范围内接收任何DSC求救呼叫。
呼叫列表子页面显示最近收到的50次呼叫。DSC呼叫列表可显示某个船只最近发出的呼叫,若同一艘船只发出一个以上的呼叫,则系统上仅会保留最后一次的呼叫记录于列表上。
记录子页面 当接收到DSC呼叫时,会把呼叫自动存储到记录中,最近的呼叫置于记录顶部。本设备可存储多达100条呼叫记录;在接收到100条呼叫之后,当继续接收到新呼叫时,最久的记录将会被覆盖。
目录子页面在此页面下,可以将熟识呼叫者的名称及MMSI储存于系统中。在输入呼叫者的名称之后,日后收到对方的呼叫时,系统上会显示做为参考。
设置子页面开启或关闭DSC,亦可模拟位置报告及遇险呼叫。
GPSMAP 580/585 用户手册 105

第七章 声纳页面GPSMAP 585内建声纳模块,连接适当的鱼探仪后可利用声纳讯号来侦测周围海面下的鱼群及海底深度。
声纳画面说明按翻页键或退出键切换页面至声纳页面。
屏幕左上角所显示的为功能列,利用方向键向右或向左切换至菜单,利用方向键向上或向下调整该功能的选项。
相关功能说明如下:【范围】:可调整屏幕上显示声纳讯号范围,一般情况下建议使用自动。
【缩放】:放大显示声纳讯号。
【增益】:可调整声纳讯号强度,一般情况下建议使用自动。
【目标强度】:设定当回波强度大于某个值将其标示成红色,画面颜色的分布会做改变。
【白色线】:设定当回波强度大于某个值时将其标示成白色,主要目的在于捕捉“底栖鱼”时,因海底回波较强,
将会成为白色。因此可以清楚侦测出鱼群的位置。
【频率】:可选择显示200K或50K频率画面于屏幕上,或同时分屏显示(双频)。【深度线】:向上或向下移动此深度线,可用来做一指标线(例如:要关注某特定深度的鱼群时。
【噪音抑制】:调整噪声辨测值,滤除不想看的预期回波(杂波)。【卷动】:设定画面更新的速率,可调整为快速、中等及暂停。
设置子页面
【鱼群显示方式】:选择鱼群标志类型与及相关信息。
【水类】:由于声波在淡水和海水中的传播速度不同,选择正确的水类以确保设备读数的正确性。
【深度值】:选择显示深度值的更新速率。对于深度超过50英呎的低噪声水区,建议采用“快速更新”,而浅水区或高噪声区域则建议使用“自动”。若设备无法探测到海底时,深度窗口中的数字会闪烁,警告您设备探测不到海底。
106 GPSMAP 580/585 用户手册
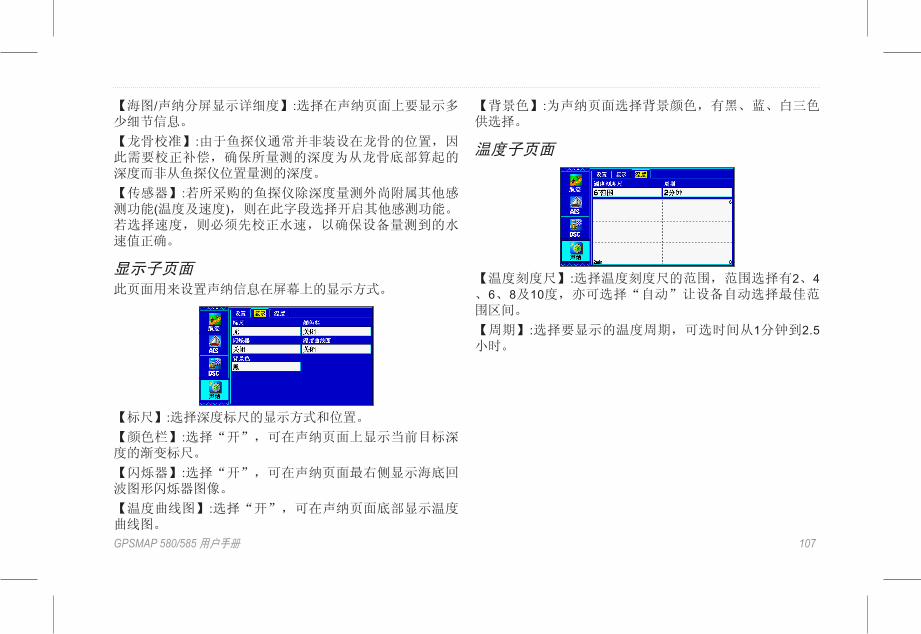
【海图/声纳分屏显示详细度】:选择在声纳页面上要显示多少细节信息。
【龙骨校准】:由于鱼探仪通常并非装设在龙骨的位置,因此需要校正补偿,确保所量测的深度为从龙骨底部算起的深度而非从鱼探仪位置量测的深度。
【传感器】:若所采购的鱼探仪除深度量测外尚附属其他感测功能(温度及速度),则在此字段选择开启其他感测功能。若选择速度,则必须先校正水速,以确保设备量测到的水速值正确。
显示子页面此页面用来设置声纳信息在屏幕上的显示方式。
【标尺】:选择深度标尺的显示方式和位置。
【颜色栏】:选择“开”,可在声纳页面上显示当前目标深度的渐变标尺。
【闪烁器】:选择“开”,可在声纳页面最右侧显示海底回波图形闪烁器图像。
【温度曲线图】:选择“开”,可在声纳页面底部显示温度曲线图。
【背景色】:为声纳页面选择背景颜色,有黑、蓝、白三色供选择。
温度子页面
【温度刻度尺】:选择温度刻度尺的范围,范围选择有2、4、6、8及10度,亦可选择“自动”让设备自动选择最佳范围区间。
【周期】:选择要显示的温度周期,可选时间从1分钟到2.5小时。
GPSMAP 580/585 用户手册 107
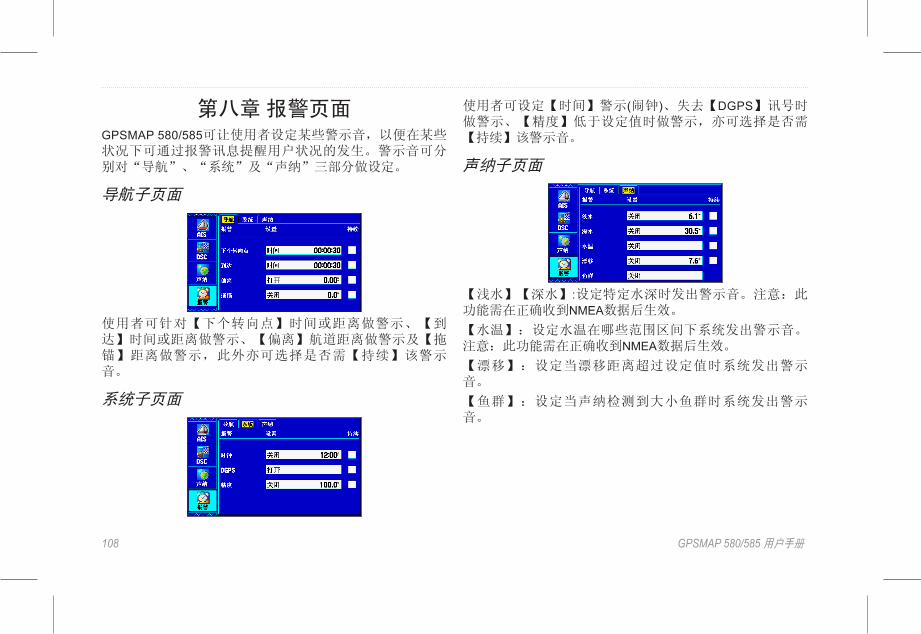
第八章 报警页面GPSMAP 580/585可让使用者设定某些警示音,以便在某些状况下可通过报警讯息提醒用户状况的发生。警示音可分别对“导航”、“系统”及“声纳”三部分做设定。
导航子页面
使用者可针对【下个转向点】时间或距离做警示、【到达】时间或距离做警示、【偏离】航道距离做警示及【拖锚】距离做警示,此外亦可选择是否需【持续】该警示音。
系统子页面
使用者可设定【时间】警示(闹钟)、失去【DGPS】讯号时做警示、【精度】低于设定值时做警示,亦可选择是否需【持续】该警示音。
声纳子页面
【浅水】【深水】:设定特定水深时发出警示音。注意:此功能需在正确收到NMEA数据后生效。
【水温】:设定水温在哪些范围区间下系统发出警示音。注意:此功能需在正确收到NMEA数据后生效。
【漂移】:设定当漂移距离超过设定值时系统发出警示音。
【鱼群】:设定当声纳检测到大小鱼群时系统发出警示音。
108 GPSMAP 580/585 用户手册

第九章 日历页面使用日历页面可查看各日添加航点、航线、日月及渔猎信息,并以日、周、月视图方式显示,并附有农历信息子页面。
第十章 天文页面此页面显示潮汐、日月及渔猎信息。
潮汐子页面此页面可以搜寻潮汐预测站,根据该测试站提供的信息查看每天24小时内潮汐高度以及上午和下午最大、最小潮的信息。
潮汐高度
上午的最小
和最大潮
选择查看潮汐信息的目标站输入查看潮汐信息的目标日期
潮汐子选项卡
时间
下午的最小
和最大潮
搜寻潮汐预测站的方式为:利用方向键选择【在】字段,按下标记/输入键进入。进入后按下菜单键打开选项菜单可发现四个设定搜寻条件:靠近当前位置、靠近其它位置、靠近下个转向点及靠近目的地,选取搜寻条件后按下标记/输入键开始搜寻。
GPSMAP 580/585 用户手册 109

日&月子页面此页面为您提供任何日期及地点的日出/日落及月出/月落时间。此外还可显示月相的画面并可用播放、快进和停止按钮观看动画。
狩猎&捕鱼子页面此页面为您提供在特定日期及地点进行渔猎的最佳时间预报。
第十一章 信息页面信息页面中记录子页面显示由GPSMAP 580/585产生的信息列表。而在筛选记录子页面里,则可使用方向键设定要显示或隐藏的信号类型。
110 GPSMAP 580/585 用户手册

第十二章 显示页面此页面可设置显示特性,包含日夜间模式、主菜单的显示方式、依照白天及夜晚时间做微光调整(白天时会使背光强度限制最暗程度为90%,而夜晚时会使被强度限制最亮程度为60%)、是否在主页面上显示导航和罗盘页面及调整背光强度。
第十三章 声音页面此页面可设置开关提示音,并可设定何时需发出蜂鸣音。
GPSMAP 580/585 用户手册 111

第十四章 用户数据页面此页面可将机台信息储存至SD卡上或是将SD卡中的信息导入设备中。
第十五章 设置页面此页面用于调整设备设定,其中包含系统、计时器、时间、单位、位置、COM1和COM2。
系统子页面使用系统子页面可控制系统模式、速度滤波、语言及WAAS。
【系统模式】:设定系统为正常或模拟模式(用于练习操作时使用)。【速度滤波】:设定设备对于速度读数读处理方式。可选择关闭、自动(自动控制过滤)或打开(以秒为单位输入值)。【文字语言】:选择显示于设备屏幕上的语言。
【WASS】:启用或取消WASS。
112 GPSMAP 580/585 用户手册

计时器子页面使用计时器页面,可查看记录工作时间。
【用户】:设定正计时或倒计时,还可重置计时器或将其关闭。
【海用】:设定计时器是否显示于罗盘页面上。
【从午夜】:显示从午夜开启设备使用以来的时间。
时间子页面使用时间子页面可设置时间格式及时区,并可开启夏时制(日光节约时间)。
【时间格式】:设置时间格式为12小时或24小时。
【时区】:选择所在地的时区,使设备显示正确的当地时
间。若时区列表中没有当前所在地区,可以选择“其他”来手动设置时差。
单位子页面使用单位子页面来设定测量及显示单位。
【距离和速度】:选择行程距离和速度的单位。
【方向显示】:选择方向的单位。其中军用设置采用密耳为单位,17.78密耳为一度。
【温度】:选择温度的单位。
【高度】:选择高度的单位。
【水深】: 选择水深的单位。
【垂直速度】:选择垂直速度的单位。
GPSMAP 580/585 用户手册 113

位置子页面使用位置子页面可更改位置显示信息。
【位置格式】:更改坐标的显示格式。预设的格式为度、分的经纬度格式(hdddºmm.mmm’)。【地图数据】:地球形状并非正球形,而是两极略扁的“旋转椭圆体”。此外,由于大地水平面并不规则,适合某一地区的“参考椭圆体”并不一定适合其他地区。因此,选择当地海图所使用的“参考椭圆体”,以获得最佳的GPS系统定位 (若不确定,应使用系统默认的WGS 84参考椭圆体) 。
【航向】:可选择自动磁偏差、真北、坐标格式和用户磁偏角作为航向基准。自动磁偏角将根据您当前位置自动确定磁北航向基准。真北基于正北为基准来提供行进航向。坐标格式与网格位置结合基于网格北为基准提供行进航向。用户磁偏角坐标则是允许您指定当前位置的磁偏角,并根据该值作为磁北航向基准。
【磁偏差】:输入当前位置的磁偏角。
警告:若选择用户磁偏角,则设备不会自动计算和更新您当前位置的磁偏角。在您的位置发生变化时,您必须自己更新磁偏角。不更新此设置可能导致设备显示信息与外部参照物(例如磁罗盘)之间出现显著差异。
COM 1&2子页面GPSMAP 580/585支持两个COM传输接口,此子页面可选择两传输接口与相连的外部设备通信的数据格式。
【串行数据格式】:• GARMIN数据传输─提供用于与计算机或另一部GARMIN
GPSMAP 580/585交换数据的专用格式。
• NMEA标准输入/输出─支持标准NMEA0183 3.01版数据输入/输出和DBT、DSE、DPT、MTW及VHW语句的声纳NMEA输入/输出。
• NMEA高速输入/输出─支持高速NMEA设备。
• 没有─当无外接任何设备时,选取此选项。
114 GPSMAP 580/585 用户手册

附录
技术规格
物理规格尺寸:15.0x16.3x7.4厘米
重量:390克显示:5” WQVGA显示屏,带背光(480x272像素)外壳:全衬层、高强度塑料-合金复合材料,防水性能达到 IEC 60529 IPX7 级温度范围:-15°C 到 60°C
供电电源:10–36 VDC熔断器:AGC /3AG - 3.0 安
地图和存储器基本地图:全球基本地图
地图兼容性: Garmin g2 ® Bluechart(可选)
航点:6000 点航线:150条;250 点当前航迹:50000 点
航迹日志:存储 50 条航迹;700 点/航迹
性能接收机:支持WAAS的接收机,高灵敏度
获取时间:约40秒(冷启动)
约2分钟(第一次/AutoLocate™)
更新速率: 1次/秒,连续
精度GPS:10 米(33 英尺),RMS 95% 典型值
DGPS (WAAS): <3米(10英尺)95%典型值
速度:0.1节RMS 稳态
动态性能:6g
声纳供电:双频率,500瓦(RMS),4000瓦(峰峰值)
频率:50/200 kHz深度:1500英尺(457米)**** 最大深度取决于海水盐度、海底类型和其它水体条件。
GPSMAP 580/585 用户手册 115

可选附件除了GPSMAP 580/585随带的标准附件,还有可选附件可加强GPSMAP 580/585的操作。若希望获得备件和可选附件,请与您当地的Garmin授权经销商联系。
GA30天线:Garmin外接天线。无论环境如何恶劣,都使您获得可靠的信号。
电源线/数据线:允许您使用裸线把设备连接到电气系统。
G2 bluechart海图数据卡:世界各区域的海图。
Home port:航海规划软件,使您能够方便地从电脑规划和编制航线。
安装线束本设备随带有一条把设备与电源和鱼探器连接的线束,并提供连接外部设备的接口能力。图中的色码指示相应的线束连接。保险丝为AGC/3AG-3A。如果需要加长电源线,可使用22 AWG线。不得截断鱼探器电缆,否则将使质保失效。应把设备直接连接到您的当前保险接线盒的未用保险座上。如果使用船的保险接线盒,应卸下与设备随带的直连保险座。
安装线束的方法:
1. 使用电笔或电压表确定电源的极性。
2. 把红线(+或正)连接到正电压端子。(如果使用船的保险接线盒,应使正极连接通过保险丝,如图所示。)
3. 把黑线(-或负)连接到负电压端子。
4. 安装或检查3安保险丝(在船的保险接线盒上或在直连保险座上)。
5. 把电缆插头的凹口对准设备后部的凹口。把电缆插入连接器中,沿逆时针方向转动锁环,直到无法再转动。
—
+
到10-36V 船电源2A3A
-
+
船的地线
3安保险丝
到设备
保险丝座
116 GPSMAP 580/585 用户手册

產品有害物質或元素自我宣告
GPSMAP 580
GPSMAP 580
GPSMAP 580GPSMAP 580
GPSMAP 585
GPSMAP 585
GPSMAP 585GPSMAP 585
GPSMAP 580/585 Owner’s Manual 117

Part Number 190-01202-00 Rev. B
© 2011 Garmin Ltd. or its subsidiaries
Garmin International, Inc.1200 East 151st Street, Olathe, Kansas 66062, USA
Garmin (Europe) Ltd.Liberty House, Hounsdown Business Park,Southampton, Hampshire, SO40 9LR, UK
Garmin CorporationNo. 68, Jangshu 2nd Road, Sijhih, Taipei County, Taiwan
北京佳明航电科技有限公司北京市朝阳区酒仙桥中路10号星科大厦A座2层
Garmin 中国网站 www.garmin.com.cn