j.p. morgan access us ach transactions what's different
TRANSCRIPT
This guide is confidential and proprietary to J.P. Morgan and is provided for your general information only. It is subject to change without notice and is not intended to be legally binding. All services described in this guide are subject to applicable laws and regulations and service terms. Not all products and services are available in all locations. Eligibility for particular products and services will be determined by JPMorgan Chase Bank, N.A. or its affiliates. J.P. Morgan makes no representation as to the legal, regulatory or tax implications of the matters referred to in this guide. J.P.Morgan is a marketing name for the Wholesale Payments businesses of JPMorgan Chase Bank, N.A., member FDIC, and its affiliates worldwide. © 2020 JP Morgan Chase & Co. All rights reserved
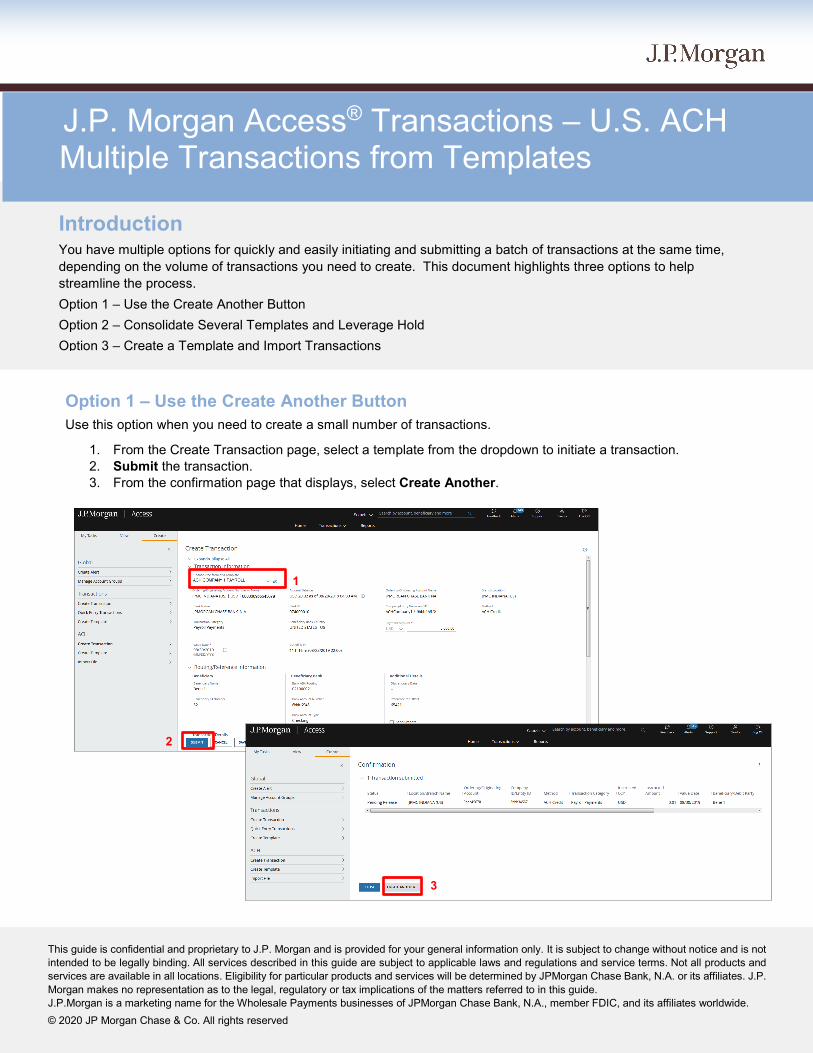
Option 1 – Use the Create Another Button Use this option when you need to create a small number of transactions.
1. From the Create Transaction page, select a template from the dropdown to initiate a transaction. 2. Submit the transaction. 3. From the confirmation page that displays, select Create Another.
J.P. Morgan Access® Transactions – U.S. ACH Multiple Transactions from Templates
Introduction You have multiple options for quickly and easily initiating and submitting a batch of transactions at the same time, depending on the volume of transactions you need to create. This document highlights three options to help streamline the process. Option 1 – Use the Create Another Button Option 2 – Consolidate Several Templates and Leverage Hold Option 3 – Create a Template and Import Transactions
1
3
2

2
4. From the Create Transaction page that displays, tab twice to navigate to the Choose free form or a
template field, and then begin entering another template name to select the desired template. 5. Update the amount or other fields, as needed, and submit the transaction.
Note: Repeat steps 4 and 5 if you want to continue to make payments from other templates.
Option 2 – Consolidate Templates and Leverage Hold Feature Use this option to consolidate several templates for the same Transaction Category to easily and quickly pay a number of beneficiaries at the same time.
1. In the Templates view, open the Filters panel using the filter icon and select the desired Transaction Category to filter templates by Transaction Category. Select Apply Filter.
2. Select the desired templates. 3. Select More>>Export to CSV, and then save the file to the desired location when prompted. 4. Select Manage Maps.
Filter icon 1
2
3
4
4
5

3
By
5. Select Create New.
6. Enter or select values for Map Properties, File Properties, Data Format Details, and Data Formatting Codes fields as follows:
a. Enter a Map Name b. Method (ACH Credit or ACH Debit) – Select a
value to match records you will import c. Transaction Category – Select a value to match
records you will import d. Allow Map For = Templates Only e. Map Type = Delimited f. Data Starts on Row = 2
g. Addenda Type = Free Form Addenda or NTE Addenda (Note: RMR and RMT Addenda will not properly import when using Export to CSV.)
h. Decimal Separator = Period i. Checking = Checking j. Savings = Savings k. Yes/True = Yes l. No/False = No
Note: Use default values that display for the remaining fields: Update Entries By, Match Failure, End of Line Marker, Text Separator, Field Separator, and Decimal Position.
5
d e
l
6
a b c
i
h
gf
j k

4
7. Enter or select values for the Mapping Criteria section as follows: a. Select all Import criteria b. Select all Match criteria c. Enter the following values for Imported Field Positions, depending on the Method selected:
J.P. Morgan Access Fields
Imported Field Positions when
Method selected is: ACH
Credit ACH Debit
Addenda 57 57
Amount 30 41
Beneficiary or Debit Party Bank ABA 262 165
Beneficiary or Debit Party Bank Account Number 215 166
Beneficiary or Debit Party Bank Account Type 135 155
Beneficiary or Debit Party ID Number 136 137
Beneficiary or Debit Party Name 145 157
Discretionary Data 582 582
Hold Payment 563 563
Send Prenote 190 190
Note: Reference for Offset is not a field available for Import
8. Select Submit.
9. Do one of the following:
a. Create a new template with a single beneficiary via the Create tab, and then select the newly created template from the Templates list, or
b. From the Templates list, select one of the existing templates previously exported in step 3 above.
Notes:
• The Method and Transaction Category for the template must match the records in the file that will be imported.
• Select Allow Edits to Amount. • Select Allow Edits to Addenda if you intend import and edit addenda.
8
7a 7b 7c

5
10. Select More >> Import Beneficiary Details.
11. From the Import File page that displays:
a. Select the map you created in steps 6 to 8 above. b. Select the file exported in step 2 above. c. Select Import.
Note:
• While the file is processing, it may display in the Templates list with a status of File Processing… Click Refresh. Click Refresh ( ) to update the list.
• When the file is successfully import, the template is ready for approval and activation, which may require additional users depending on how your company assigns user entitlements.
9
10
a
b
c

6
12. Once a template has been successfully imported and activated, you can create transactions from the template. To start, select the template from the Templates list, and then select Create Transaction to display the Create Transaction page.
a. Update payment amounts, as needed. b. Use the Hold feature to place a hold on any beneficiaries/debit parties you don’t wish to pay at this time.
(Select Hold All to place holds on all beneficiaries/debit parties on the page. c. Update other information for a selected beneficiary/debit party, such as addenda, from the detail page by
clicking Modify to display the page.
a b
c

7
Option 3 – Create a Templates and Import Transactions Use this option when you have a high volume of beneficiaries/debit parties to pay. This option may also be preferable if you can create a source file using a separate application. The format of your file and transaction content will determine the mapping criteria values needed for the Imported Field Positions. For illustrative purposes, the following example follows the file format and field positions if you consolidated templates and exported to CSV (see Option 2 above).
1. Access the Create Import Map page from the Templates list by selecting Manage Maps>>Create New (refer to Option 2 – steps 4 and 5).
2. Enter or select values for Map Properties, File Properties, Data Format Details, Data Formatting Codes fields and the Mapping Criteria section by following Option 2 – steps 6 to 8, except: Select Transactions and Templates for the Allow Map For field.

8
3. You can now create transactions from a template using the map created in the previous step and your source file,
as follows: a. Create a new template with a single beneficiary via the Create tab, and then select the template from the
Templates list, b. Select More>>Create Transaction via Import.
c. Select the Map Name for the map created in step 2 above. d. Use Browse to locate and select your sour file. e. Select Import, and you will be returned to the Templates list.
a
b
c d
e

9
4. When the import completes, the transactions will display in the Transactions List. You can than select and view the
transactions.
Note: If the import has completed with errors, the file will display in the Templates list with a status of Needs Repair. • To determine which records need to be repaired, select the template used for import, and then select
More>>Import Summary Report. • To make necessary changes to repair the transaction, select the transaction, and then select Modify. Select
Submit once you have completed edits.